

Page 1
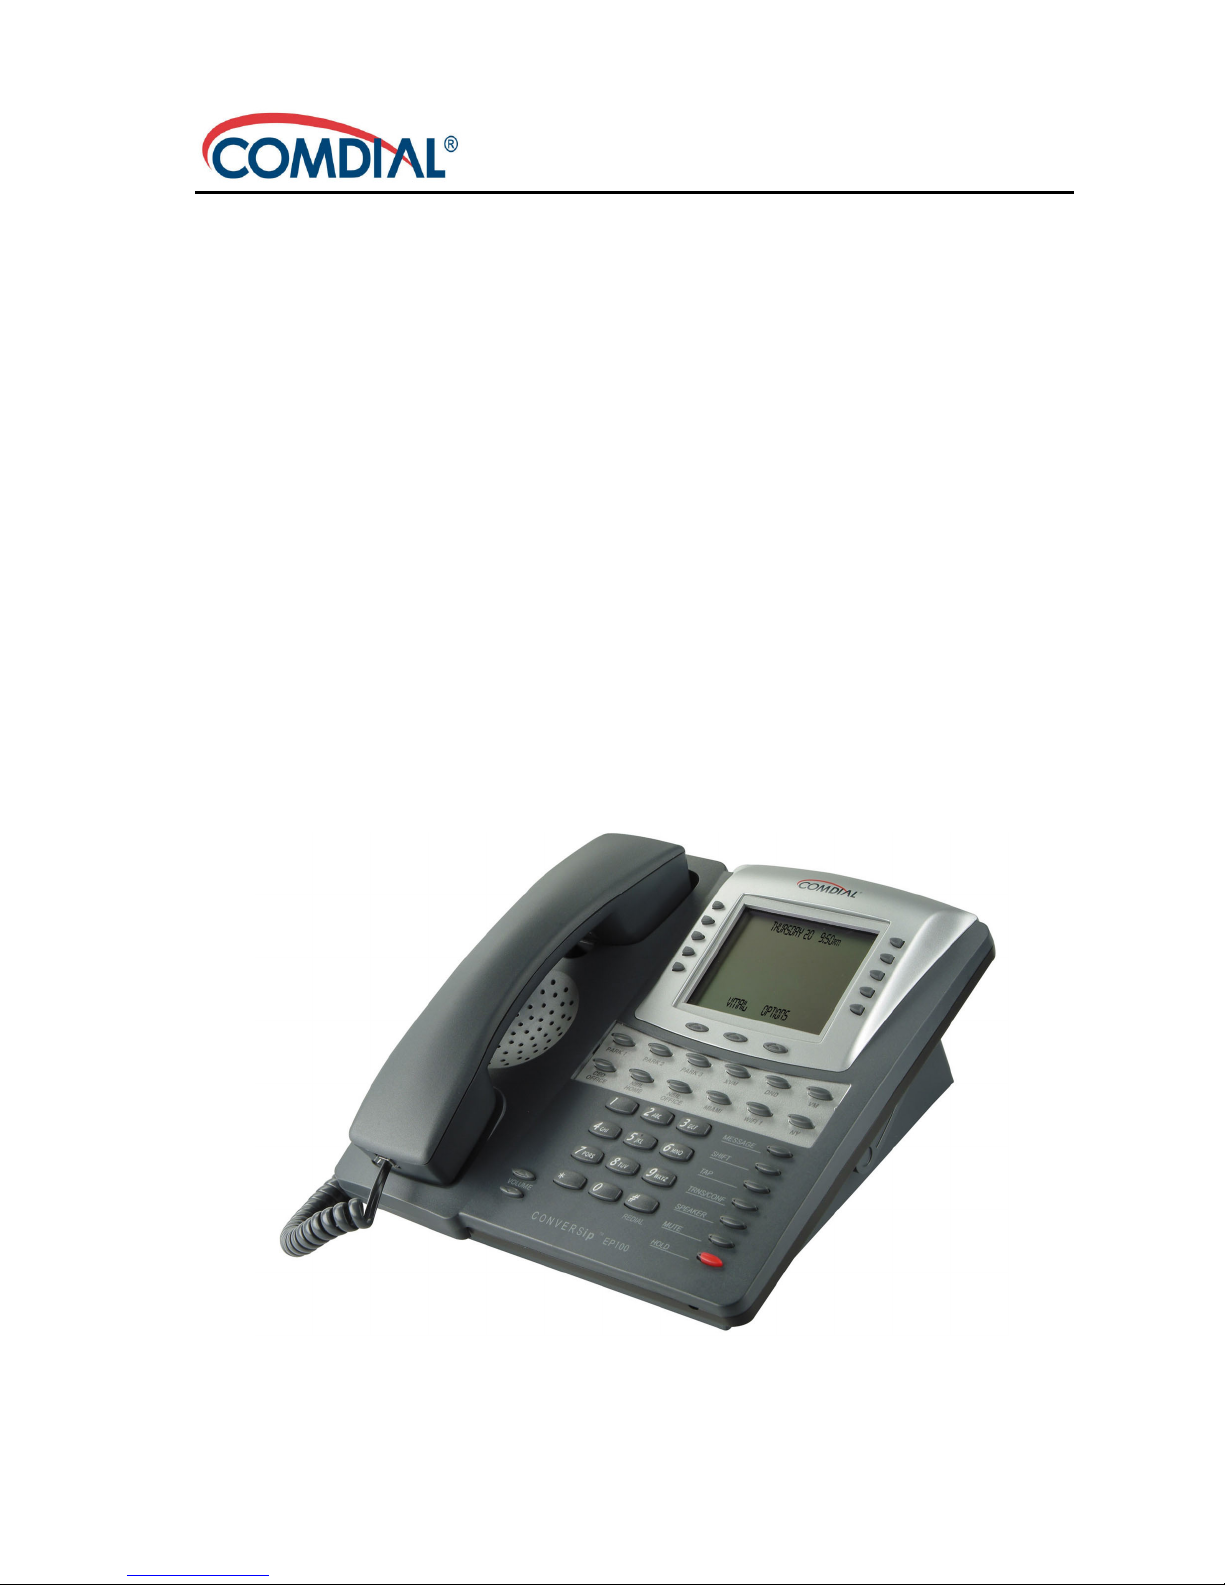
CONVERSip EP100G-L12 / EP100G-I12
Endpoint
User Guide
Page 2

ii
CONVERSip EP100G-L12 / EP100G-I12
Endpoint
User Guide
This manual supports the EP100G-L12 and EP100G-I12 models on
MP5000 and FXII systems.
CONVERSip, MP5000, FXII, EP100G-I12, and EP100G-L12 are trademarks of Comdial Corporation. All other product names are trademarks
of their respective owners.
February, 2005
GCA70-412 Feb ‘05
Copyright © 2005 Comdial Corporation
All rights reserved. Unauthorized use of this
document is prohibited.
Comdial Corporation
106 Cattlemen Road, Sarasota, FL 34232
(941) 554-5000 or (800) 266-3425
-Notice-
Comdial reserves the right to make any
changes and improvements in the product
described in this document at any time and
without prior notice.
Page 3

Feb ‘05 Comdial iii
EP100G-L12 / EP100G-I12 User
This equipment has been tested and found to comply with the limits for a
Class B digital device, pursuant to Part 15 of the FCC Rules. These limits
are designed to provide reasonable protection against harmful interference in a residential installation. This equipment generates, uses and can
radiate radio frequency energy and, if not installed in accordance with the
instructions, may cause harmful interference to radio communications.
However, there is no guarantee that interference will not occur in a particular installation. If this equipment does cause interference to radio or
television reception, which can be determined by turning the equipment
off and on, the user is encouraged to try to correct the interference by one
or more of the following measures:
• Reorient or relocate the receiving antenna
• Increase the separation between the equipment and receiver
• Connect the equipment into an outlet on a circuit different from that
to which the receiver is connected
• Consult the dealer or an experienced radio/TV technician for help
Page 4

iv Comdial Feb ‘05
Introduction
This Page Intentionally Left Blank
Page 5

Feb ‘05 Comdial v
EP100G-L12 / EP100G-I12 User
Revision History
Ver sion Ch anges Da te
01 Initial Release 2/24/05
Page 6

vi Comdial Feb ‘05
Introduction
This Page Intentionally Left Blank
Page 7

Feb ‘05 Comdial vii
EP100G-L12 / EP100G-I12 User
Introduction
This manual describes how to use the CONVERSip EP100 endpoint,
models EP100G-L12 and EP100G-I12.
This manual is intended to provide:
• basic knowledge of the functions and features of the EP100G-L12/
I12 LCD user interface.
• step-by-step procedures for processing calls and controlling
individual extension settings.
Audience Description
This manual is intended for persons who use CONVERSip EP100G-L12/
I12 endpoints on a day-to-day basis.
You should:
• read this manual in normal reading sequence before first using the
EP100G-L12/I12 User Interface.
• refer to this manual as necessary while modifying your endpoint
settings.
Related Publications
This manual refers you to related publications, when appropriate, for
additional information.
Conventions Used in this Manual
Many of the procedures require you to enter settings or to choose from a
list of variables. To signify when you are to act upon an item, parameter,
button, etc. we italicize the name of the item being acted upon. For
example, the following sentences instruct you to press a specific key on
your keyboard.
• Press Enter.
• Press Esc.
Page 8

viii Comdial Feb ‘05
Introduction
• Press Page Up or Page Down.
• Press and hold the Shift and Ctrl keys simultaneously.
In contrast, the following sentence instructs you to type in a required
response; notice the word “Enter” when used in this way is not italicized
because you are not pushing a specific key name.
• Enter the value you want to use for this feature.
Similarly, when you select a button or LCD menu option, we italicize the
name of the button/menu item because you are required to take the action
of choosing it, even though the item may not appear in italics on the endpoint or display.
• Use the arrow keys to highlight Programming and press Enter.
At other times in the manual, we discuss prompts that the system displays
to you. In these cases, we enclose the exact wording of the prompt in
quotation marks to signify that the system is, in essence, speaking to you.
• The system prompts, “Enter your password now.”
If the system is actually playing a recording aloud, we enclose the exact
wording of the prompt in quotation marks and italics to signify that the
system is in actually speaking to you.
• The system says, “You have no more new messages.”
Italics and quotes are also of course used in their normal contexts, that is,
for emphasis and to identify what words are spoken.
• This is called a hot transfer, that is, the system transfers the call
without ringing the extension.
There are times when this manual instructs you to enter a number from
within a range of numbers. In this instance, we use the “~ “ character to
indicate the range. For example, 05-01-1~3-001~100 tells you to enter:
• 05
• 01
• a 1, 2, or 3,
• a three-digit number that falls in the 001 to 100 range.
Page 9

Feb ‘05 Comdial ix
EP100G-L12 / EP100G-I12 User
TABLE OF CONTENTS
INTRODUCTION ...............................................................VII
Audience Description ............................................................ vii
Related Publications .............................................................. vii
Conventions Used in this Manual .......................................... vii
1. OVERVIEW.......................................................................15
1.1 Speakerphone Buttons ......................................................17
1.2 Speakerphone Display Lights ...........................................19
1.3 Using the Large Screen Display .......................................21
1.4 Setting Up Your Speakerphone.........................................22
1.4.1 Positioning Your Speakerphone ...............................22
1.4.2 Using Your Speakerphone ........................................23
1.4.3 Setting Display Contrast ...........................................24
1.4.4 Setting a Personal Ring Tone ....................................25
1.4.5 Setting Volume Levels ..............................................25
1.5 Answering and Making Calls ...........................................26
2. ANSWERING CALLS .....................................................29
2.1 Answering Outside Calls ..................................................29
2.2 Answering Intercom (Internal) Calls ................................31
2.3 Night-Transferred Calls - Line Access From Any
Station ..............................................................................32
Page 10

Contents
x Comdial Feb ‘05
2.4 Holding Calls ....................................................................33
2.4.1 Handling Hold Recalls..............................................33
2.4.2 Using Directed Call Hold .........................................34
2.4.3 Selecting Specific Held Calls ...................................35
2.5 Call Pickup........................................................................35
2.5.1 Group Call Pickup ....................................................36
2.5.2 Directed Call Pickup.................................................36
2.5.3 Monitored Station Pickup .........................................37
2.6 Receiving Subdued Off-Hook Voice Announcements
(SOHVA)..........................................................................38
2.6.1 Handling an Incoming SOHVA ................................38
2.6.2 Voice Announce Blocking ........................................39
3. MAKING CALLS .............................................................41
3.1 Making Outside Calls .......................................................41
3.2 Making Intercom Calls .....................................................41
3.2.1 Tone First ..................................................................42
3.2.2 Voice First .................................................................42
3.3 Automatic Dialing ............................................................43
3.4 Redialing...........................................................................44
3.4.1 Redial - Last-Dialed Number....................................44
3.4.2 Redial Programming (Storing Numbers) ..................44
3.5 Camping On - Busy Station, Automatic Callback............45
Page 11

Feb ‘05 Comdial xi
EP100G-L12 / EP100G-I12 User
3.6 Advanced Camping On Options.......................................47
3.6.1 Camping On - Idle Station, Automatic Callback......47
3.6.2 Camping On - Busy Station, Wait For An
Answer (Call Waiting)..............................................48
3.7 Sending Subdued Off-Hook Voice Announcements
(SOHVA)..........................................................................49
4. ADVANCED CALL HANDLING ..................................51
4.1 Waiting For a Line (Queuing)...........................................51
4.2 Conferencing.....................................................................51
4.3 Call Forwarding .............................................................54
4.3.1 Forwarding a Call .....................................................54
4.3.2 Diverting All Incoming Calls To Another Station ....56
4.4 Call Forward Outside System (CFOS) .............................57
4.5 Parking Calls.....................................................................59
4.5.1 Parking a Call............................................................59
4.5.2 Handling Park Recalls ..............................................60
4.6 Transferring Calls .............................................................61
4.6.1 Screened Transfers....................................................63
4.6.2 Unscreened Transfers................................................64
4.6.3 Hot Transfer..............................................................65
4.6.4 Quick Transfer ..........................................................65
5. NONVERBAL MESSAGING .........................................67
5.1 LCD Message Delivery ....................................................67
5.2 Message Waiting Light and Messaging ............................70
5.3 Response Message Delivery.............................................71
Page 12

Contents
xii Comdial Feb ‘05
6. PROGRAMMING ............................................................73
6.1 DSS Numbers ...................................................................73
6.2 Speed Dial Numbers.........................................................74
6.3 Feature Access Codes .......................................................76
6.3.1 LCD Feature Buttons ................................................78
6.4 Reminder Alert .................................................................81
6.5 Response Message Button ................................................83
7. OTHER ADVANCED FEATURES ................................85
7.1 Background Music............................................................85
7.2 Line Groups ......................................................................86
7.3 Do Not Disturb Condition ................................................86
7.4 Automatic Redial..............................................................87
7.5 Tracker Paging System.....................................................89
7.6 Auxiliary/Headset Jack.....................................................91
7.7 Account Codes.................................................................94
7.8 Dial By Name ...................................................................95
7.9 Volume Control.................................................................95
7.9.1 Setting Ringer Volume Level....................................96
7.9.2 Setting Speaker Volume Level..................................96
7.9.3 Setting Handset Volume Level..................................96
7.9.4 Setting Headset Volume Level..................................97
7.9.5 Setting Group Listening Volume Level ....................97
7.9.6 Setting Background Music Volume Level ................97
7.9.7 Muting Your Endpoint ..............................................98
Page 13

Feb ‘05 Comdial xiii
EP100G-L12 / EP100G-I12 User
7.10 Changing the Default Volume Control ............................98
7.11 Programmed Button Display ...........................................99
7.11.1 Button Functions Display (Button Query)..............99
7.11.2 Status Of Busy Lines and Stations (Busy
DSS/BLF Button Inquiry) ........................................99
7.12 Automatic Set Relocation (EP100G-L12 only).............100
7.13 Paging ............................................................................100
7.14 Viewing The Call Log ...................................................101
APPENDIX A FEATURE ACCESS CODES ...................103
APPENDIX B DISPLAY ABBREVIATIONS .................107
APPENDIX C SPEAKERPHONE
CHARACTERISTICS....................................................113
C.1 Full-Duplex Speakerphone Characteristics ....................113
C.2 Speakerphone User Guidelines.......................................114
APPENDIX D FEATURE NETWORKING
SUPPORT ........................................................................117
APPENDIX E GLOSSARY ................................................127
INDEX ..................................................................................137
Page 14

Contents
xiv Comdial Feb ‘05
This Page Intentionally Left Blank
Page 15
EP100G-L12 / EP100G-I12 User
Feb ‘05 Comdial 15
1. OVERVIEW
Congratulations and thank you for using a Comdial endpoint! Your
EP100G-L12/EP100G-I12 Speakerphone is supported by a communication system with hundreds of built-in, standard features. This
manual serves as a helpful guide for using these various functions.
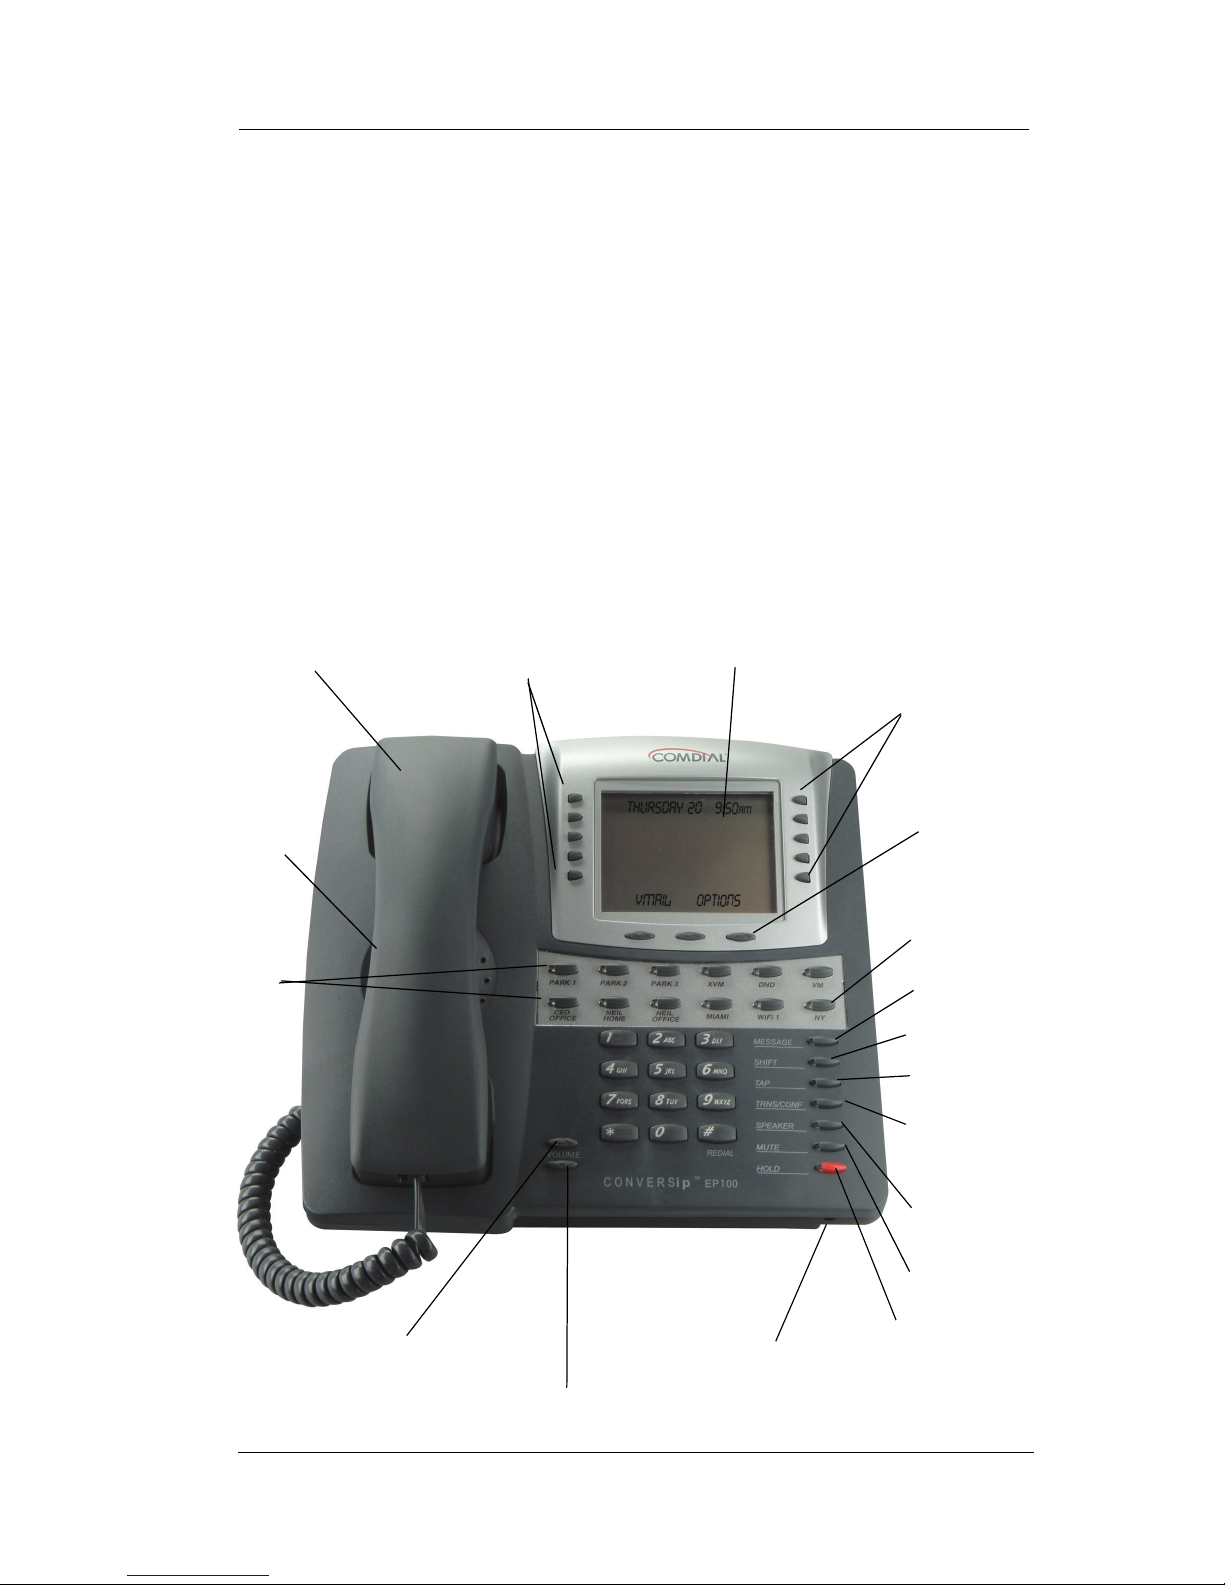
Note: The following illustration shows the default locations of the
buttons. Your system installer may have programmed these buttons
differently to suit your system. See your System Administrator if you
have any questions
interactive
buttons 1-5
interactive
buttons 6-10
LCD
handset
speaker
volume up
microphone opening
hold
mute
speaker
volume down
transfer/
conference
TAP
shift
message
INTERCOM
interactive
buttons 11-13
DSS/BLF
buttons
Page 16

Overview
16 Comdial Feb ‘05
Note: The EP100G-L12 and the EP100G-I12 are identical in
appearance. To differentiate which model you have, turn the endpoint
over to read the model number on the bottom of the endpoint (not the
bottom of the pedestal).
Your EP100G-L12/EP100G-I12 provides many versatile features for
your use.
Alphanumeric
Display (Liquid
Crystal Display
LCD)
• Displays time, day, date, and active call
information.
• Keeps you apprized of the status of your
endpoint.
• Provides programming prompts.
Auxiliary Jack Provides an interface for a headset (both
models), a tape recorder (EP100G-I12 only),
an external ringer (EP100G-I12 only), or an
external pager (EP100G-I12 only).
Message-Waiting
Light
Indicates that a message awaits pick up.
Microphone
Opening
Allows hands-free operation of EP100G-L12/
EP100G-I12 (speak clearly toward
microphone opening).
Speaker • Sounds distant party’s voice.
• Sounds ringing and call-in-progress tones.
Page 17

EP100G-L12 / EP100G-I12 User
Feb ‘05 Comdial 17
1.1 Speakerphone Buttons
Hold Button
(HOLD)
• Places a line or intercom call on hold.
• Stores pauses in number sequences during
programming.
• If available, scrolls through LCD response
messages.
• If multiple held calls feature is available,
scans or scrolls through calls placed on
hold (when hold light is flashing).
Interactive Buttons
(located below
alphanumeric
display)
• Provide quick and easy access to system
features.
• Provide straightforward button
programming without dialing codes (the
interactive buttons themselves, however,
are not programmable).
Intercom Button
(INTERCOM)
• Selects an intercom line.
• Allows you to initiate many of the
endpoint’s features.
Mute Button
(MUTE)
• Keeps the person on the line from hearing
your conversation.
• Allows reply to a Subdued Off-Hook Voice
Announcement (SOHVA).
Direct Station Select/
Busy Lamp Field
(DSS/BLF)
Programmable
Buttons
• Allow you to store numbers for automatic
dialing functions.
• Allow you to store extension numbers for
Direct Station Selection (DSS).
• May be programmed as a feature button.
• May be designated a line button by your
system installer.
Page 18

Overview
18 Comdial Feb ‘05
Shift Button
(SHIFT)
Allows you to enter a second tier for storing
and/or automatically dialing speed dial
numbers. (That is, you can store two speed
dial numbers at every programmable button
location one in the regular tier and one in the
second tier). You activate the shift function
by pressing this button and turning the shift
light on before storing or automatically
dialing a speed dial number from the second
tier.
Speaker Button
(SPEAKER)
• Turns your speaker on or off.
• Disconnects a call when you are on a hands
free call.
• Ends or cancels programming.
Tap Button (TAP) • Recalls dial tone or generates a hookflash.
• Retrieves held calls or last call placed on
hold.
• Places flash while programming speed dial
number.
Transfer/Conference
Button (TRNS/
CONF)
• Transfers calls.
• Sets up conference calls.
Volume Control
(VOLUME UP or
VOLUME DOWN)
Regulates the volume of the ringer, speaker,
handset, headset, background music, and
group listening mode.
Page 19

EP100G-L12 / EP100G-I12 User
Feb ‘05 Comdial 19
1.2 Speakerphone Display Lights
The lights (LEDs) on your EP100G-L12/EP100G-I12 indicate the
status of lines, features, and intercoms.
Busy Lamp Field
(BLF) lights (next to
DSS/BLF
programmable
button)
• Steady red = station is in use.
• Flashing red = station is receiving a call.
• Winking/Fluttering red = message-waiting
light set for you by station associated with
that DSS/BLF button.
Next to a line button • Steady green = this is your line, either on-
hook (in a hands free mode) or off-hook,
when the line is active.
• Steady red = another station is using this
line.
• Flashing red = a call is coming in on this
line.
• Flashing orange = this line is answered
when you lift the handset.
• Winking green = your line is on hold.
• Winking red = the call has been placed on
hold by another station.
• Fluttering orange or green = your line has
recalled from hold.
• Fluttering red = the line put on hold by
another station has recalled.
Note: You can find the programmable buttons
that the installer designates as line buttons in
the same location as the DSS/BLF buttons.
Ensure that these buttons are labeled
correctly to indicate their unique features.
Page 20

Overview
20 Comdial Feb ‘05
Next to a fixed
feature or
programmable
feature button
• Steady red = the feature is on.
• Steady off = the feature is off.
Note: You can find the programmable buttons
that the installer designates as feature buttons
in the same location as the DSS/BLF buttons.
Ensure that these buttons are labeled
correctly to indicate their unique features.
MUTE Button On steady = called party cannot hear your
conversation.
INTERCOM Button • Steady green or red = you are using your
intercom.
• Fluttering red = an LCD message is set on
your endpoint for others to receive when
calling.
• Flashing orange = someone is calling your
extension or a call is being transferred to
you.
HOLD Button Winking green = a line is on hold at your
station (DXP, DXP Plus, FXS and FXT only).
MESSAGEWAITING Button
Winking red = message awaits pick up.
SPEAKER Button • On steady (with the endpoint on hook and
busy) = speakerphone mode
• On steady (with endpoint on hook and idle)
= background music is turned on.
Page 21
EP100G-L12 / EP100G-I12 User
Feb ‘05 Comdial 21
1.3 Using the Large Screen Display
Your EP100G-L12/EP100G-I12 has a large screen display consisting
of six lines of 24 possible character positions per line. This provides
you with much more system information than can be presented on
two-line displays. This large display allows you many programming
options as well as quick and easy selection of the many features
available on your EP100G-L12/EP100G-I12. Your Speakerphone
has 13 interactive buttons for selecting or programming features.
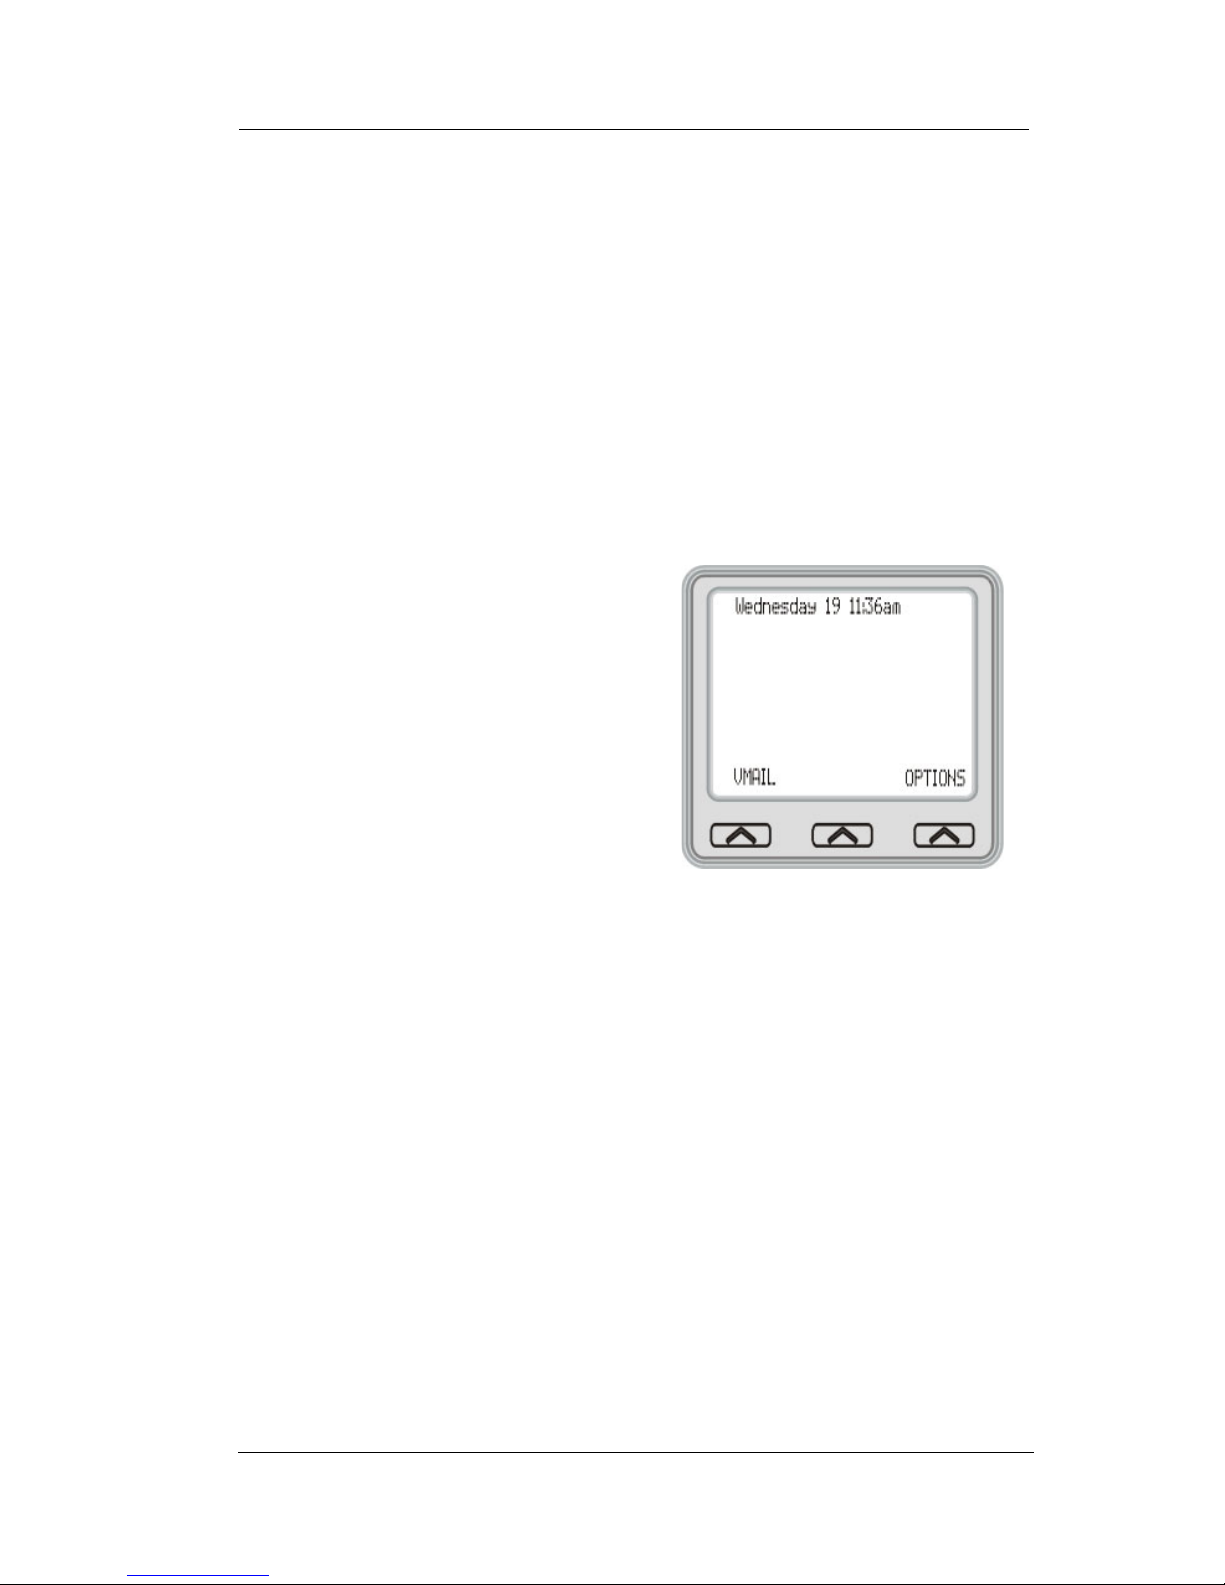
When your speakerphone is idle,
the first line in your display shows
the day, date and time while the
sixth line displays the word
OPTIONS. If your system is using
the voice mail option, this is also
indicated in the sixth line by the
word VMAIL. If your voice mail
has four messages for you, for
example, the VMAIL display is
replaced by 4MSG.
Lines two through four are used on
the idle display to indicate features that may be active (flashing),
enabled or set.
Page 22

Overview
22 Comdial Feb ‘05
1.4 Setting Up Your Speakerphone
When your new EP100G-L12 or EP100G-I12 arrives, the system
installer unpacks it and connects the line to a system jack. You may
need to make a few initial adjustments so you can quickly begin
making and answering calls with some of the most basic features.
1.4.1 POSITIONING YOUR SPEAKERPHONE
You should adjust the position of the EP100G-L12/EP100G-I12 on
your desk or table to suit your individual needs, and maximize the
performance of the sound activated features. When using your
EP100G-L12/EP100G-I12, the microphone and loudspeaker are
farther from you than when you use a handset. Some positioning tips
to consider include:
• For the microphone to best detect your voice, speak within three
feet of it and face the EP100G-L12/EP100G-I12.
• Background noise may prevent the sound-activated switches
from operating properly. Avoid placing the EP100G-L12/
EP100G-I12 where it will detect sounds from keyboards,
printers, paging systems, or other equipment.
• Place the endpoint on a hard surface and away from table edges.
Do not place the endpoint in corners or enclosures. Do not let
obstructions come between you and the microphone.
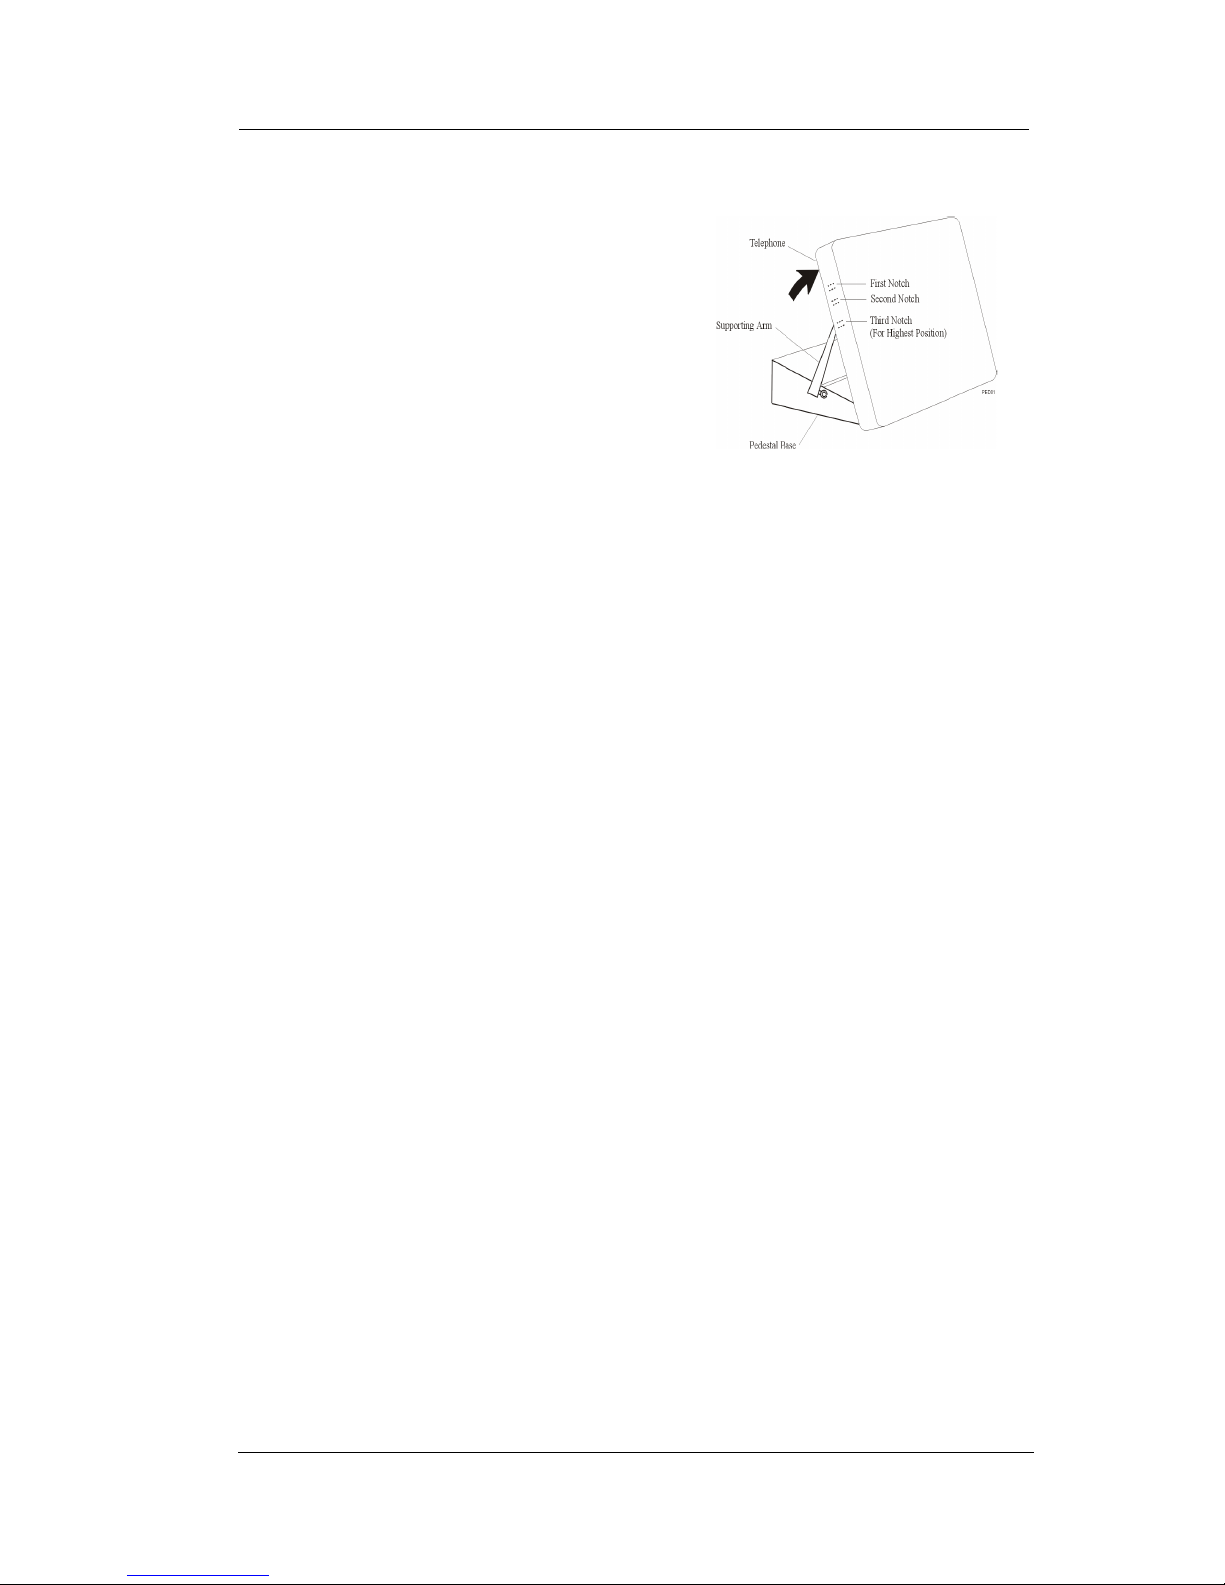
• Your endpoint has an adjustable pedestal to allow you to select
the most comfortable viewing angle. When you receive the
endpoint, the pedestal is in its lowest position flush against the
pedestal.
Page 23
EP100G-L12 / EP100G-I12 User
Feb ‘05 Comdial 23
To adjust the pedestal, perform the following steps.
1. Grasp the rear of the pedestal
base firmly with one hand and
lift the rear portion of the endpoint upward with your other
hand.
2. Lift the endpoint upward with
one hand and raise the endpoint
supporting arms upward with
your other hand. (Notice there are three sets of notches under
the endpoint corresponding to the three positions available.)
3. When the endpoint is at the desired height, select the closest
pair of notches and insert the supporting arms in the notches.
Press down slightly on the endpoint until you feel the supporting arms snap into place.
Also remember, as with any piece of electronic equipment, your endpoint may be damaged by contact with liquids. Please try to place the
endpoint in an area that is free from the danger of spills.
1.4.2 USING YOUR SPEAKERPHONE
To manually place a call using your EP100G-L12/EP100G-I12,
perform the following steps.
1. Press the INTERCOM or line button.
2. Dial the number.
3. When the party answers, speak toward the endpoint.
To automatically dial a number using your EP100G-L12/EP100GI12, press the preprogrammed speed dial or DSS/BLF button. Speak
toward the endpoint when your party answers.
To answer a call with your EP100G-L12/EP100G-I12, perform the
following steps.
1. Press the INTERCOM or line button with the flashing red or
orange light.
Page 24
Overview
24 Comdial Feb ‘05
2. Speak toward the endpoint to answer the call.
3. Press SPEAKER to end the call.
Note: For more tips and information on EP100G-L12/EP100G-I12
use, see Section C, Speakerphone Characteristics.
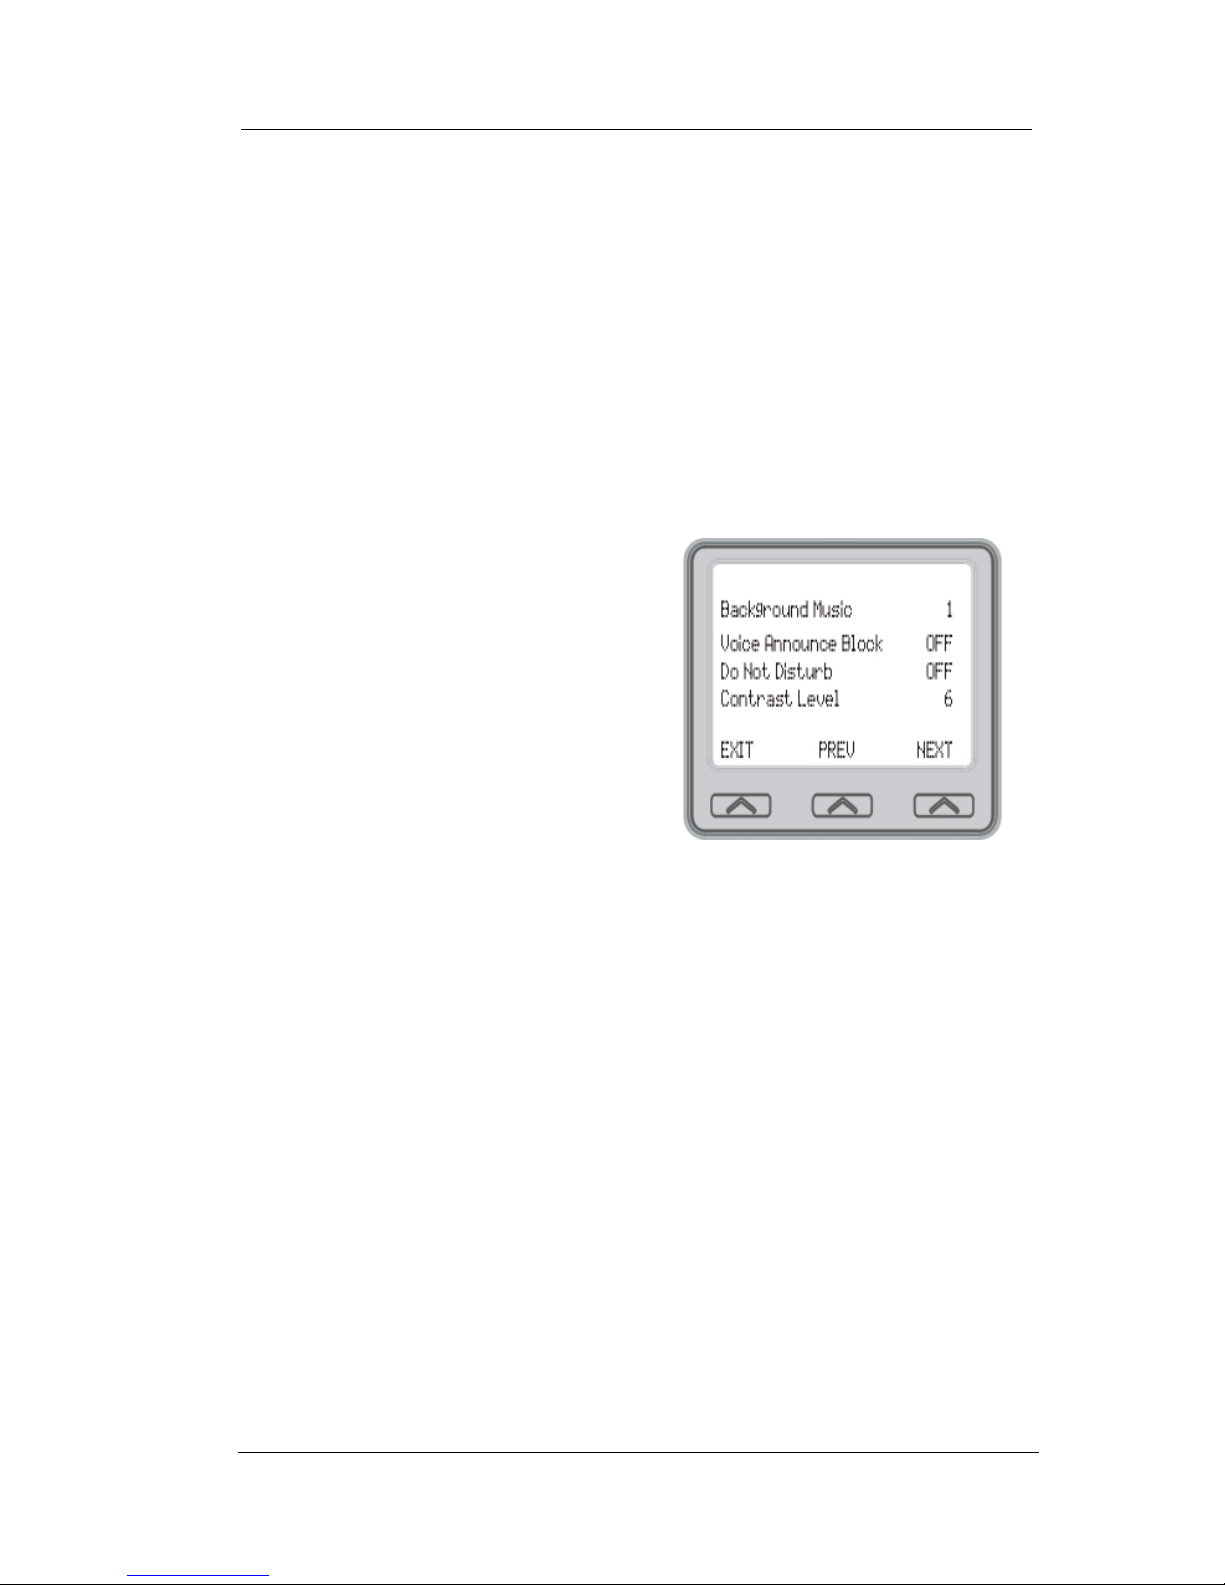
1.4.3 SETTING DISPLAY CONTRAST
You can darken or lighten the contrast of the display for best viewing.
To adjust the display contrast,
perform the following steps.
1. Select OPTIONS.
2. Select Programming.
3. Select Contrast Level.
4. Select the Contrast Level
interactive button (to the
right of the LCD, on the
same row as the words Contract Level) once for each
change of darkness you
desire. Each press of the button makes the display darker until
you go past level eight and return to level one.
5. Select EXIT to end.
Page 25
EP100G-L12 / EP100G-I12 User
Feb ‘05 Comdial 25
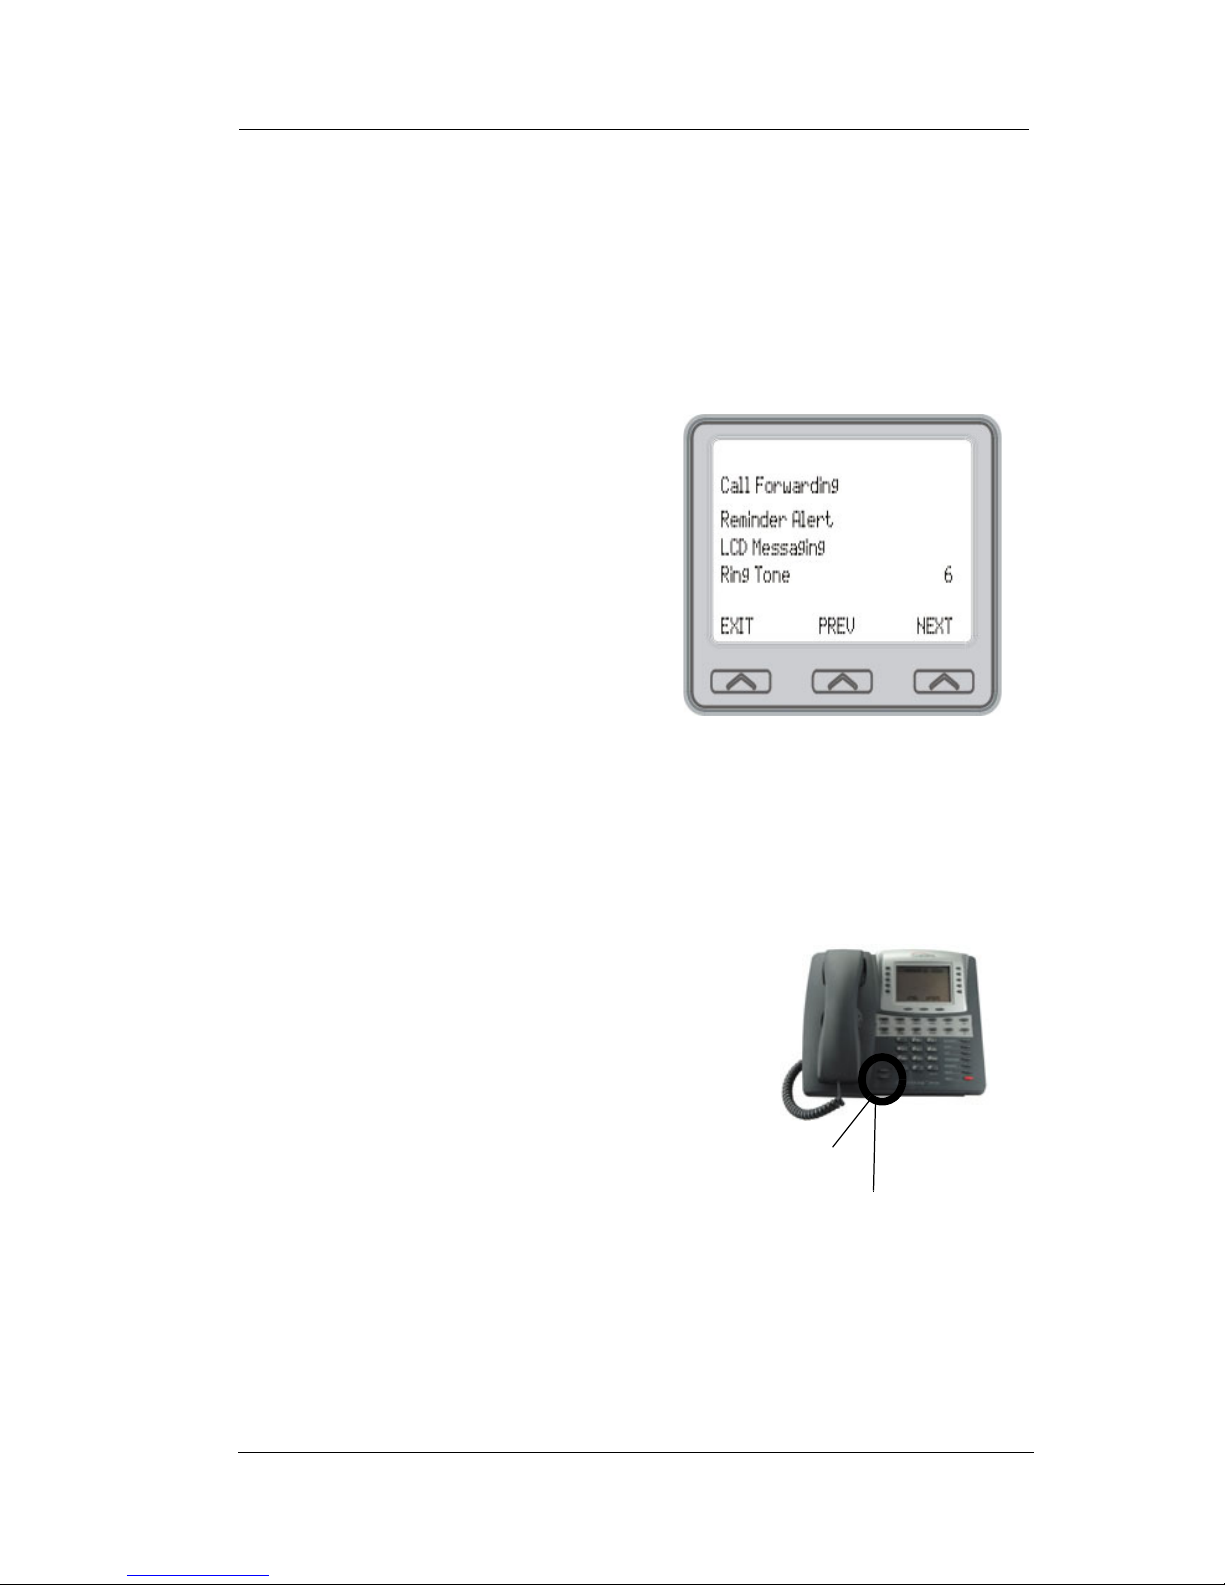
1.4.4 SETTING A PERSONAL RING TONE
You can choose one of eight different ring tones for your endpoint.
When several endpoints are located close together, you may want to
choose a different personal ring tone.
To select one of the ring tones,
perform the following steps.
1. Select OPTIONS.
2. Select Programming.
3. Select NEXT.
4. Select Ring Tone interactive
button (to the right of the
LCD) to scroll through the
eight ring tones.
5. Select EXIT to end.
The next time your endpoint rings,
your EP100G-L12/EP100G-I12 uses the new ring tone.
1.4.5 SETTING VOLUME LEVELS
The volume control on your endpoint
is a multipurpose control you can use
to set the volume (loudness) of the
ringer, the speaker, and the handset.
There are four ringer loudness levels
(plus an off position).
To set the ringer loudness level,
perform the following steps.
1. While your endpoint is on-hook
and idle, press the VOLUME UP or VOLUME DOWN button
once for each change in loudness you desire. The ringer
sounds once for each change as an example of the current setting.
2. Select SAVE to end.
volume up
volume down
Page 26

Overview
26 Comdial Feb ‘05
Note: If you set the ringer to the OFF position, your endpoint sounds
a short ring burst once for each call you receive at your station.
To set the speaker and handset
loudness levels, perform the following steps.
1. Press the INTERCOM but-
ton.
2. Press the VOLUME UP or
VOLUME DOWN button
once for each change in
speaker volume that you
desire.
3. Select SAVE.
4. Lift the handset.
5. Press the VOLUME UP or VOLUME DOWN button once for
each change in handset volume that you desire.
6. Select SAVE.
Note: When a call ends, the system resets the speaker and handset
volume of all future calls to the programmed setting. For instructions
in setting your EP100G-L12/EP100G-I12’s default volume, see Section 7.9, Volume Control.
1.5 Answering and Making Calls
Your EP100G-L12/EP100G-I12 is now properly configured to
answer and make calls to both endpoints within your system
(intercom calls) and outside lines. Remember that when dialing an
outside number, you must first select a line to connect your system to
the local exchange.
When you hear outside ringing (long bursts), press the flashing line
button and speak toward the endpoint (or lift the handset if you desire
privacy).
Page 27

EP100G-L12 / EP100G-I12 User
Feb ‘05 Comdial 27
When you hear intercom ringing (two short bursts), press
INTERCOM and speak toward the endpoint (or lift the handset if you
desire privacy).
To dial an outside number manually, perform the following steps.
1. Press INTERCOM.
2. Dial 9 or press another line button to select a line (see Section
7.2, Line Groups).
3. Listen for dial tone.
4. Dial the number.
5. Lift the handset if you desire privacy
To dial an intercom number manually, perform the following steps.
1. Press INTERCOM.
2. Dial the extension number (called endpoint rings or tone is
heard).
3. Speak toward endpoint (or lift the handset if you desire pri-
vacy).
Page 28

Overview
28 Comdial Feb ‘05
This Page Intentionally Left Blank
Page 29

EP100G-L12 / EP100G-I12 User
Feb ‘05 Comdial 29
2. ANSWERING CALLS
2.1 Answering Outside Calls
When an outside call rings at your station, the LCD screen displays
the system line number of the incoming call (e.g., L123) and any
caller ID information that your ringing line is programmed to receive.
In addition to simply lifting the handset, your other options for
answering the call are displayed above the interactive buttons.
When you hear outside ringing
(two long bursts) and observe an
orange
flashing light, perform the
following steps.
1. For speakerphone, press the
flashing line button or select
Answer and speak toward the
endpoint.
2. For privacy, lift the handset.
3. Select Do Not Disturb if you
do not wish to answer the
call at this time. (Selecting Do Not Disturb stops your endpoint from ringing but continues to send a ringing tone to the
caller.) The associated BLF continues to flash until the caller
disconnects.
When you hear outside ringing (two long bursts) and observe a red
flashing light, perform the following steps.
1. Press the flashing line button or select Answer.
2. Speak toward the endpoint or lift the handset if you want pri-
vacy.
3. Select Do Not Disturb if you do not wish to answer the call at
this time. Note: For more information on setting Do Not Dis-
turb at your station, see Section 7.3, Do Not Disturb Condition.
Outside Call on Line 339
Page 30
Answering Calls
30 Comdial Feb ‘05
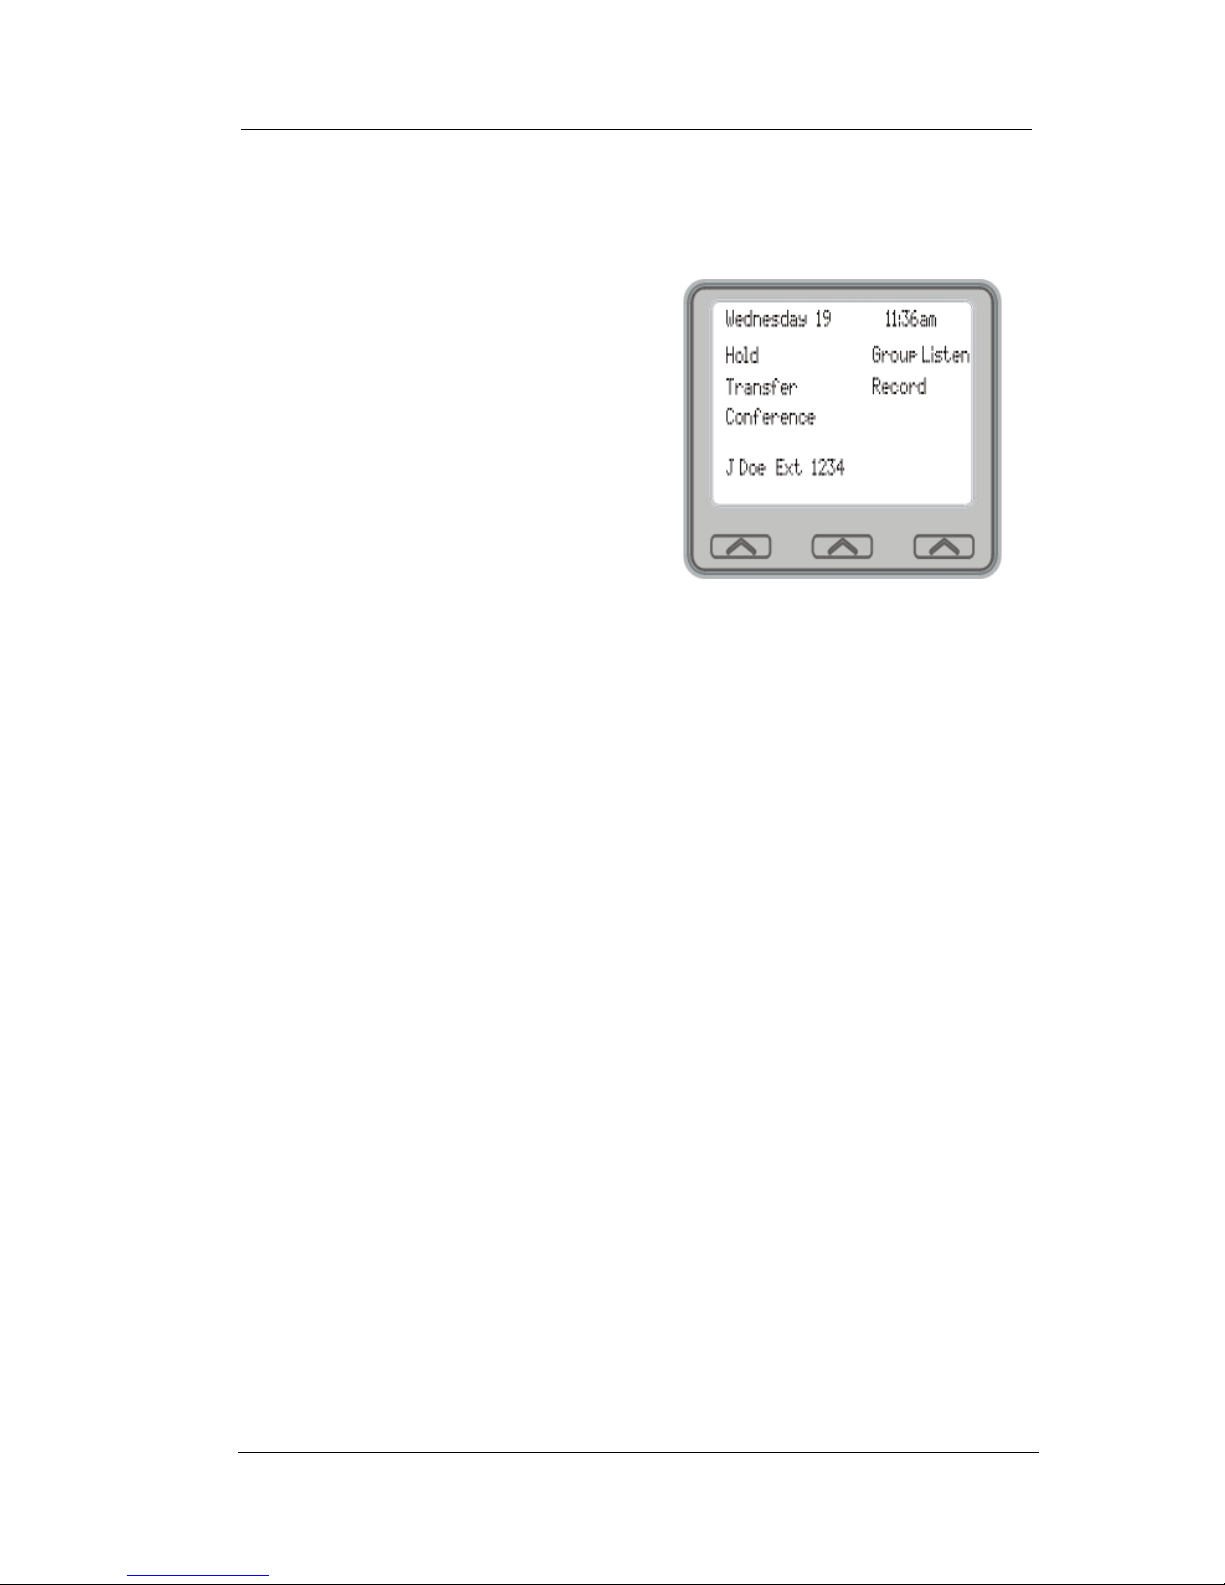
After you have answered an outside call at your station, your LCD
displays Hold, Transfer, Conference, Group Listen, and Record.
• Select Hold to place the call
on hold at your station, or
• Select Transfer to initiate a
transfer to another station,
then dial the station number,
announce the call or hang up
to complete the transfer, or
• Select Conference to initiate a
conference call.
• Select Group Listen to
activate the speaker while
using the handset or headset,
so a group can listen to the conversation but not interact with
the calling party.
• Select Record to record the call (if VMAIL is installed).
Selecting Hold, Transfer, or
Conference
Page 31

EP100G-L12 / EP100G-I12 User
Feb ‘05 Comdial 31
2.2 Answering Intercom (Internal) Calls
An intercom call is one that is made from one system endpoint to
another. Your station receives intercom calls in one of two ways
depending upon system programming.
• In a voice-first setting, a short tone is followed by the caller’s
voice heard on the speaker.
• With a tone-first setting, the endpoint rings in a distinctive
pattern and you must take action to answer the call.
As with an outside call, your LCD screen displays the line number of
the incoming call (e.g.,
L123
) and any caller ID information that the
ringing line is programmed to receive.
When you hear an intercom tone followed by the caller’s voice, speak
toward the endpoint to answer, or lift the handset if you want privacy.
When you hear intercom ringing
(two short bursts), perform the following steps.
1. Press Intercom or select
Answer.
2. Speak toward the endpoint or
lift the handset if you want
privacy.
3. Select Do Not Disturb if you
do not wish to answer the
call at this time. Note: For more information on setting Do
Not Disturb at your station, see Section 7.3, Do Not Disturb
Condition.
Page 32

Answering Calls
32 Comdial Feb ‘05
2.3 Night-Transferred Calls - Line
Access From Any Station
The system attendant can transfer incoming calls to a particular
station or stations for off-hour ringing.
If your endpoint rings, press line button with flashing light and lift the
handset to talk.
When you hear loud ringing anywhere in the system, perform the following steps.
1. Lift the handset.
2. Press Intercom.
3. Choose a ringing zone. Dial 65 through 68 to select ringing
zone (1-4), or dial 69 to answer for any zone.
Page 33

EP100G-L12 / EP100G-I12 User
Feb ‘05 Comdial 33
2.4 Holding Calls
You can place a call on hold and retrieve it later. With a regular hold,
you can pick up the held call at your endpoint or another user can pick
the call up at an endpoint sharing the held call line appearance.
To place a call on hold, press the
HOLD station button, or select the
Hold interactive button.
To retrieve a held call, press the
line button of the held call (with
winking green light), press Inter-
com for an intercom held call, or
press TAP. Then speak toward the
endpoint or lift the handset if you
want privacy. Note: Unless you
use your HOLD button to scroll through the calls on hold, TAP
always retrieves the last number placed on hold, regardless of
whether you have line appearance for the line on which the call is
holding.
With an exclusive hold condition, you must pick up the held call at
your endpoint; no other endpoint has access to the call.
To place a call on exclusive hold, press HOLD twice.
To retrieve exclusive hold, press the line button of held call (with
winking green light), or press TAP. Then speak toward the endpoint
or lift the handset if you want privacy.
2.4.1 HANDLING HOLD RECALLS
After a call has been on hold for the period of time (set by the installer
of your system), the system:
• sounds four quick hold recall tone bursts at your endpoint,
• the flash rate of the line button becomes faster, and
• the light turns to orange.
Page 34

Answering Calls
34 Comdial Feb ‘05
If the call is on exclusive hold, it reverts to manual hold after the hold
recall period.
If a held line is recalling, select
Hold to place the call on hold at
your station and restart the hold
timer. To retrieve the call instead,
lift the handset, press the line
button (with flashing orange light)
or select Answer to retrieve the
call.
2.4.2 USING DIRECTED
CALL HOLD
The installer can add a directed station hold feature to your endpoint.
With this feature, you can place a call on hold at another station. You
can also pick up the held call that has been waiting the longest length
of time at another endpoint.
To place a call on directed station hold, perform the following steps.
1. Answer the call.
2. Press INTERCOM or TRNS/CONF if it is an intercom call.
3. Dial *90.
4. Dial the extension number of station you want to receive the
held call.
5. Hang up.
To retrieve a held call at another station, perform the following steps.
1. Press INTERCOM.
2. Dial *90.
3. Dial the extension number of the station where the call is currently on hold.
4. Press TAP to answer the call.
A Recalling Held Line
Page 35

EP100G-L12 / EP100G-I12 User
Feb ‘05 Comdial 35
2.4.3 SELECTING SPECIFIC HELD CALLS
Often, you may have more than
one call on hold at your station.
You know you can retrieve the last
call placed on hold simply by
pressing TAP; however, if you do
not have line appearance for a line
on which another call is holding,
the system provides a way for you
to access that call before servicing
the last call you placed on hold.
To scan your held calls and retrieve
a specific one, repeatedly press
HOLD to scan the held call list. Then press TAP to retrieve a call.
2.5 Call Pickup
The EP100G-L12/EP100G-I12 offers three distinct methods to
answer incoming calls that are ringing at other stations:
• group call pickup,
• directed call pickup, and
• monitored station pickup.
Scan Calls on Hold
Page 36

Answering Calls
36 Comdial Feb ‘05
2.5.1 GROUP CALL PICKUP
The installer often arranges several endpoints together in a user
group. If your endpoint is so arranged, you can answer calls that are
ringing at other stations within your particular group.
To answer a call that is ringing within your group, press INTERCOM
and dial #4. Then speak toward the endpoint or lift the handset if you
want privacy.
2.5.2 DIRECTED CALL PICKUP
You can answer a call that is ringing at any endpoint in the system if
you know the ringing endpoint’s extension number. To do so,
perform the following steps.
1. Press INTERCOM.
2. Dial *4.
3. Dial the extension number of the ringing endpoint.
Page 37

EP100G-L12 / EP100G-I12 User
Feb ‘05 Comdial 37
4. Speak toward the endpoint or lift the handset if you want
prvacy.
2.5.3 MONITORED STATION PICKUP
Your endpoint may have the personal intercom number of another
endpoint appearing at a programmable button location. You can use
the light associated with this button to monitor the status of that endpoint, and you can press the button to make a call to that endpoint if
you wish. The associated light is known as the Busy Lamp Field
(BLF) light, and the button is known as the Direct Station Select
(DSS) button. If the installer arranged for your endpoint to have the
station monitoring feature, the BLF light shows activity status at the
monitored endpoint.
To monitor another endpoint, observe the BLF light indications next
to the DSS/BLF button.
• Off = Station is idle.
• Flashing (if enabled) = Station has an incoming call.
• On = Station is busy.
Note: If you do not have the station monitoring feature, the BLF light
shows: Off = idle, On = busy.
To call an idle monitored station or to answer one that is ringing, note
the BLF light condition. Then press the assigned DSS/BLF button.
Speak toward the endpoint, or lift the handset if you want privacy.
Note: If you place this call on hold or if you transfer it to another
endpoint, the BLF light flashes a hold signal. You can retrieve the
call by pressing TAP.
Page 38

Answering Calls
38 Comdial Feb ‘05
2.6 Receiving Subdued Off-Hook
Voice Announcements (SOHVA)
2.6.1 HANDLING AN INCOMING SOHVA
This feature allows an intercom caller to break into your call by
making an announcement through your handset receiver. The distant
party that you are currently talking to cannot hear the announcement
made by the SOHVA caller. You can respond to the SOHVA caller
either verbally, or non-verbally using Response Messaging.
To respond to a SOHVA verbally,
perform the following steps.
1. Select and hold REPLY.
2. Speak into the handset. The
distant party cannot hear
your response.
3. Press REPLY after response
is complete to return to distant party.
To respond to a SOHVA non verbally using Response Messaging, perform the following steps.
1. Select Message.
2. Select one of the messages
appearing in your LCD by
selecting the corresponding
interactive button. The message then appears in the display of the endpoint making
the SOHVA.
3. Continue your current call
with distant party. (The system automatically disconnects the SOHVA caller from your
endpoint).
Page 39

EP100G-L12 / EP100G-I12 User
Feb ‘05 Comdial 39
To respond to a SOHVA by blocking, select BLOCK when you hear
SOHVA tone. The system then disconnects the SOHVA call. See
Section 2.6.2, Voice Announce Blocking for more information.
Note: A station that is currently active in speakerphone mode or has
Voice Announce Block set CANNOT receive a SOHVA.
2.6.2 VOICE ANNOUNCE BLOCKING
If your system installer makes this feature available, you can prevent
voice announcements from sounding over your endpoint speaker if
you wish. This feature also blocks Subdued Off-Hook Voice
Announcements (SOHVA) and therefore refuses any attempted
SOHVAs.
To block (unblock) all voiceannounced calls, perform the following steps.
1. Select OPTIONS.
2. Select Programming.
3. Select Voice Announce
Block.
4. Select ON to block voice
announcements, or OFF to
unblock them.
Page 40

Answering Calls
40 Comdial Feb ‘05
5. Select EXIT to end. Caller ID (Automatic Number Identification)
When installed by system programming, the Caller ID feature allows
you to view incoming call numbers before you answer them.
Incoming call numbers flash in the left half of the LCD. If the name
of the calling party is available it displays in the second half on the
right side of the LCD. If you answer the call, the number appears
steady in the left half of the LCD.
The system also stores numbers that ring on your line but receive no
answer. The system indicates that it has stored ring-no answer
numbers by flashing the programmed Caller-ID (CID) light on your
endpoint. If you press the CID button you can view the stored
numbers one at a time. If you press the programmed SAVED
NUMBER REDIAL button, the system dials the displayed number. If
the call has been returned by someone else, select the T key to reveal
who returned the call. Everyone sharing your line can scroll through
the stored numbers and choose which calls to return.
To scroll through ring-no answer numbers stored on your system
(when the CID light is flashing), perform the following steps.
1. Select the CID button on your endpoint. Your LCD displays
the calling number, date, and time the call came in. The most
recent call appears first in the list.
2. Select the CID button each time you wish to display the next
most recent ring-no answer call to your line.
3. To dial one of the numbers in the redial queue, select the
SAVED NUMBER REDIAL button. The system automatically
dials the number.
Depending on your system programming, when a call is returned it
might remain in the ring-no answer queue, or the system might delete
it from the ring-no answer queue. Your system administrator can tell
you how the feature is programmed. If the system is programmed to
leave a returned number in the redial queue, the display shows an S
next to numbers that have been returned.
To determine who viewed the number and returned the call, dial *.
Page 41

EP100G-L12 / EP100G-I12 User
Feb ‘05 Comdial 41
3. MAKING CALLS
3.1 Making Outside Calls
You can manually dial a number over any endpoint line you select.
Or, if the installer assigned a prime line or the idle line preference
feature to your LCD speakerphone, the system automatically selects a
line for use when you lift the handset or press the speaker button.
To dial an outside number manually, perform the following steps.
1. Press INTERCOM and dial 9
or select a line button.
2. Listen for dial tone.
3. Dial the number.
4. Lift the handset if you want
privacy.
If your station has an assigned
prime line, you do not have to
select a line before dialing outside
your system.
To dial an outside number using
your prime line, press SPEAKER or the handset if you want privacy.
The system automatically selects an outside line. Then listen for the
dial tone (LCD displays the dial number) and dial the number.
3.2 Making Intercom Calls
There are two methods for making an intercom call:
• tone-first—the called endpoint rings.
• voice-first—your voice sounds out at the called endpoint.
Your installer can set the system to deliver either tone-first or voicefirst calling.
Outside Dialing Display
Page 42

Making Calls
42 Comdial Feb ‘05
3.2.1 TONE FIRST
The following instructions assume a tone-first setting. You can
change a call to voice announce signaling for that call simply by
pressing the INTERCOM button again after dialing the extension
number or by pressing the DSS/BLF button again.
To manually cause the other endpoint to ring (tone calling), press
INTERCOM or select Dial by
Name. Then dial the extension
number (the called endpoint rings).
To tone call automatically, press
the DSS/BLF button (the called
endpoint rings).
3.2.2 VOICE FIRST
The following instructions assume a voice-first default setting. Any
user can change a call to a tone signaling for that call simply by
pressing the INTERCOM button again after dialing the extension
number or by pressing the DSS/BLF button again.
To voice announce manually, press
INTERCOM, dial the extension
number, and make your
announcement.
To voice announce automatically,
press the DSS/BLF button, and
make your announcement.
Page 43

EP100G-L12 / EP100G-I12 User
Feb ‘05 Comdial 43
3.3 Automatic Dialing
This feature provides one- or two-button speed dialing using programmable buttons at which you have previously stored numbers.
Two levels of number storage are available at each storage location,
and you can use one or both levels as needed. Also, since you usually
store a line choice as part of a speed dial number, line selection is
automatic with speed dialing.
There are two types of speed dial numbers:
• numbers that you store for your own use (personal speed dial
numbers), and
• numbers that the system attendant stores for everyone’s use
(system speed dial numbers).
To use a programmed speed dial, press the programmed speed dial
button, or press SHIFT and programmed speed dial button.
To use a personal speed dial number, while on hook, dial the speed
dial number on the dial pad (0 to 9).
To speed dial a system speed dial number, while on hook dial * and
system speed dial number.
DSS/BLF Buttons:
Press button of desired
endpoint to dial directly.
Keypad:
Dial desired number for personal speed dial
OR
Dial * and number for system speed dial.
Speed Dial Options
Page 44

Making Calls
44 Comdial Feb ‘05
Note: If you are already on a line, you must press SHIFT before dialing the personal or system speed dial numbers that are stored at the
dial pad. Also, if a speed dials a preselected line that is in use, the
speed dial does not engage.
Note: On some systems, due to programming action, the available
system speed dial codes are *100 -*299 and *100 -*599.
3.4 Redialing
For instruction on using your system’s Automatic Redial feature, see
Section 7.4, Automatic Redial.
3.4.1 REDIAL - LAST-DIALED NUMBER
To redial the last-dialed number, perform the following steps.
1. Press SPEAKER or hang up the handset to disconnect the cur-
rent ringing or busy tone.
2. Dial #.
3. Listen for a ringing or busy tone over the endpoint speaker.
3.4.2 REDIAL PROGRAMMING (STORING NUMBERS)
To permanently store a number you
have just dialed, choose one of
these methods:
• While the number is still
ringing, select MORE, then
select Save, or,
• Press an unused
programmable button
location.
Page 45

EP100G-L12 / EP100G-I12 User
Feb ‘05 Comdial 45
To store a number while you are on a call (if available), perform the
following steps.
1. Press the programmed SAVE NUMBER REDIAL button twice
(the display prompts you to dial a number).
2. Dial the number that you wish to save (the system immediately
saves the number for later redial; it does not dial it over the line
you are on now).
To redial the saved number, perform the following steps.
1. Press a line button to select a line.
2. Press the programmed SAVE NUMBER REDIAL button (the
system automatically dials the number that you saved earlier).
3.5 Camping On - Busy Station,
Automatic Callback
If you call another station and receive a busy signal or a Do Not
Disturb tone, you can press a button that causes the system to ring
your endpoint when the station is available. This is called camping
on at a station. Please note that you can camp on to only one station
at a time.
To camp on at any busy station,
select CAMP On. Your endpoint
immediately hangs up. When the
station becomes available, your
endpoint rings with five short tone
bursts.
When you hear five short tone
bursts, press INTERCOM or select
Answer. The other endpoint then
starts ringing.
Note: If you do not press INTERCOM after the ring back tones sound within the time limit set by the
installer, the system cancels the call back.
Page 46

Making Calls
46 Comdial Feb ‘05
To cancel the call back before your
endpoint sounds the tone bursts,
press INTERCOM and dial #6 or
select CLEAR.
To camp on at a station with a Do
Not Disturb condition set, select
Camp-On. A call back occurs
when the called station is no longer
set in the Do Not Disturb mode.
Page 47

EP100G-L12 / EP100G-I12 User
Feb ‘05 Comdial 47
3.6 Advanced Camping On Options
3.6.1 CAMPING ON - IDLE STATION, AUTOMATIC
CALLBACK
If you call another station and hear ringing but receive no answer, you
can camp onto the idle station. In this case, the system rings your
endpoint when any activity is initiated at that station.
Page 48

Making Calls
48 Comdial Feb ‘05
To camp on at a station for which
you hear ringing but receive no
answer, select Call Back. Call
Back then occurs after any activity
is initiated at dialed station.
To cancel the camp-on condition,
press INTERCOM and dial #6 or
select CLEAR.
3.6.2 CAMPING ON - BUSY STATION, WAIT FOR AN
ANSWER (CALL WAITING)
If the endpoint you have called is busy, you can send a call-waiting
tone to the endpoint and wait on the line for an answer (you must be
using the handset for this feature to work).
To activate call waiting when you
hear a busy signal, perform the following steps.
1. Dial *6 (called party hears
tone).
2. Wait on the line for a reply.
The called party can place
the current call on hold or
disconnect from the call to
answer your call-waiting
tone. Or, the called party
can choose to ignore your call-waiting tone and continue current conversation.
To cancel call waiting, press INTERCOM and dial #6. Then hang up
or press SPEAKER to end the call.
Page 49

EP100G-L12 / EP100G-I12 User
Feb ‘05 Comdial 49
To answer a call-waiting tone if you receive one while on a call,
perform the following steps.
1. Hear the short tone burst in your receiver.
2. Place the current call on hold, or complete the call and hang up
(waiting call then rings at your endpoint).
3. Lift the handset to answer the call.
3.7 Sending Subdued Off-Hook Voice
Announcements (SOHVA)
You can make a private voice announcement to another station that is
off-hook and busy on a call if the installer has arranged the system to
provide this feature.
Make a SOHVA announcement
using the SOHVA button as
follows:
1. Make an intercom call and
hear the busy tone. If the
called station is on an outside
line, ring-back tone is heard,
but SOHVA is still available.
2. Select SOHVA and hear sev-
eral quick tone bursts.
3. Make your announcement.
4. Wait on the line for a reply (either verbal or an LCD reply). If
your station returns to idle, the called party has blocked your
SOHVA.
Note: If the called station is currently in speakerphone mode, or if
the SOHVA privileges have been denied by system programming,
interactive button selection for SOHVA is not available.
Page 50

Making Calls
50 Comdial Feb ‘05
This Page Intentionally Left Blank
Page 51

EP100G-L12 / EP100G-I12 User
Feb ‘05 Comdial 51
4. ADVANCED CALL HANDLING
4.1 Waiting For a Line (Queuing)
If all the lines in a line group are busy, you can place your endpoint in
a queue to await an idle line.
To queue for a line group, perform the following steps.
1. Press INTERCOM.
2. Dial the line group access code (see Line Group Access code
table on page 78 for your systems codes).
3. When you hear the busy tone, dial *6.
If you have line appearance for a particular line and wish to queue for
it, perform the following steps.
1. Observe the busy status light (LED).
2. Press INTERCOM.
3. Dial *6.
4. Press the line button. When line group is free, your endpoint
sounds several short tone bursts. When you hear this, lift the
handset, hear the dial tone, and place the call.
To cancel line queuing or line group queuing, press INTERCOM and
dial #6.
4.2 Conferencing
When your endpoint is joined together with several other endpoints
on the same call, the effect is called conferencing. You can make
conference calls that involve up to five parties, including you as the
originating party, in any combination of outside lines and intercom
parties.
Page 52

Advanced Call Handling
52 Comdial Feb ‘05
Note: When setting up a conference call with outside lines and
internal endpoints, you must call the outside lines first.
To set up a conference call that includes any combination of outside
lines and intercom parties, perform the following steps.
1. Make the first call.
2. Select Conference. The cur-
rent call is placed on hold
automatically.
3. Select the next line and make
another call.
4. Select Conference to estab-
lish a conference.
5. Press the TRNS/CONF but-
ton to add more parties.
To continue a conversation on the
remaining line after other outside
lines have dropped out of conference, press HOLD. Then press the
line button of the remaining party.
Establishing a Conference
Page 53

EP100G-L12 / EP100G-I12 User
Feb ‘05 Comdial 53
To retrieve a line from hold and
bring that party back into the conference, perform the following
steps.
1. Press TRNS/CONF.
2. Press a line button.
3. Press TRNS/CONF.
If you are involved in a conference
call with two outside lines, you can
drop out of this established conference call and leave the outside lines
in the conference with each other. This is known as an unsupervised
conference call.
To drop out of a conference call you initiated involving outside lines
(creating an unsupervised conference), dial #. The lines remain
lighted and in use until one or both outside parties disconnect; when
only one party drops out of an unsupervised conference, the other
party remains on hold until they hang up or until the line is answered.
To rejoin an unsupervised conference between two outside lines,
press TAP.
To drop a party out of a conference call, select Drop Party. Then
select the party you wish to drop by pressing the interactive button
beside the appropriate line.
Page 54

Advanced Call Handling
54 Comdial Feb ‘05
4.3 Call Forwarding
4.3.1 FORWARDING A CALL
You can forward the calls that normally ring at your endpoint to
another endpoint. To remind you that your calls are being forwarded,
your endpoint sounds a short ring burst each time the system forwards
a call.
You can forward calls that ring at your endpoint but receive no
answer; this feature is valuable if you are frequently away from your
desk for short periods of time and find it inconvenient to permanently
forward your calls every time you leave.
To forward your calls, perform the following steps.
Call Forwarding Options
Page 55

EP100G-L12 / EP100G-I12 User
Feb ‘05 Comdial 55
1. Select OPTIONS.
2. Select Programming.
3. Select NEXT.
4. Select Call Forwarding.
5. Choose one of the following
call forwarding options:
• Select Forward All to
forward all calls
• Select Forward Personal to
forward prime line and
intercom calls.
• Select Forward RNA All to
forward all calls that ring
at your station but receive
no answer after a
programmed number of
rings.
• Select Forward RNA
Personal to forward your
prime line and intercom
calls that ring at your
station but receive no
answer after a programmed number of rings.
• Select CFOS to forward your calls to outside the system.
6. Dial the extension number or press the DSS/BLF button of endpoint you want to receive your forwarded calls.
7. Select EXIT to end.
Selecting Call Forwarding
Call Forwarding Options List
Page 56

Advanced Call Handling
56 Comdial Feb ‘05
To cancel call forwarding, select
CLEAR.
4.3.2 DIVERTING ALL INCOMING CALLS TO
ANOTHER STATION
Call diverting permits you to send an incoming call to another station
that you have previously designated. You can divert an incoming call
to the designated station whether you are busy or idle.
To identify the station to receive diverted calls, perform the following
steps.
1. Press INTERCOM.
2. Dial *55.
3. Dial the extension number of station you want to receive
diverted call.
To divert calls to the designated
station, perform the following
steps.
1. Hear ringing and/or see the
flashing line status light.
2. Select Divert (the system
immediately forwards the
ringing call to station you
designated).
Page 57

EP100G-L12 / EP100G-I12 User
Feb ‘05 Comdial 57
4.4 Call Forward Outside System
(CFOS)
If enabled by your installer, the Call Forward Outside System (CFOS)
feature allows you to forward incoming or transferred line calls to
telephone numbers outside the system
To activate CFOS with your LCD speakerphone, perform the following steps.
1. Select OPTIONS.
2. Select Programming.
3. Select NEXT.
4. Select Call Forwarding.
5. Select CFOS.
6. Select NEXT.
7. Choose a type of CFOS by
selecting the top right-hand
interactive button to scroll
through the list of call types.
• Select Line for prime line
calls.Select Line Group for and
dial access code for outside
calls.
• Select Prime/Last Line for the
last line used for prime calls.
• Select ARS for calls utilizing the least costly line group
available to route a call.
• Select ARS (programmed number) for selecting a
programmed button for ARS calls.
Selecting CFOS
Choose CFOS Type
Page 58

Advanced Call Handling
58 Comdial Feb ‘05
8. Follow the instructions on the
LCD display and then select
DONE, or do nothing and let the
previously selected destination
remain in effect.
9. Select EXIT.
To deactivate CFOS, select CLEAR.
To join an active CFOS call from the
CFOS-enabled station, note the
flashing HOLD light indicating an
active CFOS call, and press TAP. Join
the CFOS-forwarded party and the
CFOS destination in a conference call.
Selecting Line
Deactivate CFOS
CAUTION
Comdial has taken reasonable steps in the
design of all product features, including
CFOS, which protect against unauthorized or fraudulent access
to, or use of, a system, or which protect against unauthorized,
fraudulent or unaccounted-for access to, or use of, long distance
lines. However, no system is entirely invulnerable or immune
from unauthorized or fraudulent access or use, or unaccounted-
for access or use, and therefore Comdial disclaims any and all
liability, and makes no warranty, express or implied, relating to
unauthorized or fraudulent access or use, or unaccounted-for
access or use.
Page 59

EP100G-L12 / EP100G-I12 User
Feb ‘05 Comdial 59
4.5 Parking Calls
4.5.1 PARKING A CALL
You can place an intercom or outside call on hold in the system so
that it can be answered from any station, even though it may not have
a line appearance for the call. You accomplish this by placing the call
in one of many park orbits, where the call remains until it is
answered.
To park a call in orbit, perform the following steps.
1. While on the call, press INTERCOM and dial *, or press TRNS/
CONF if it is an intercom call.
2. Dial code for park orbit (910 to 999 for orbit 1099).
Parking Calls
Page 60

Advanced Call Handling
60 Comdial Feb ‘05
3. Remember the code for later use or make it known to those
who need to know it in order to retrieve the call.
To park a call using a programmed PARK button, while on the call,
press PARK. The system then places the call in a preselected park
orbit and lights the PARK light.
To retrieve a call that was placed on hold in the system (parked),
perform the following steps.
1. Press INTERCOM.
2. Dial #.
3. Dial the code for the orbit (910 to 999 for orbit 1099), or press
the programmed PARK button.
4.5.2 HANDLING PARK RECALLS
When a parked call times out of the system, it returns to your endpoint in the form of a park recall (you hear four short tone bursts at
12-second intervals).
To answer a park recall, select Answer. The system then connects the
call to your station.
To place a park recall on hold at your
station, select Hold. After the call
remains on hold for a period of time,
the system rings the call back to your
endpoint as a hold recall.
To re-park a park recall and restart the
park timer, answer/retrieve call. Then
select Park (the system places the call
back in its original park orbit where it
remains until it is answered or recalls
again).
A Park Recall
Page 61

EP100G-L12 / EP100G-I12 User
Feb ‘05 Comdial 61
4.6 Transferring Calls
There are 5 different transfer options available:
• screened transfer—you announce the call prior to transfer,
• unscreened transfer—you transfer without a call announce,
• hot transfer—call announce prior to transfer, receiving party
does not have to pick up handset (for hands-free users),
• quick transfer (with call announce)—automatic transfer and call
announce without pressing TRNS/CONF, and
• quick transfer (without call announce)—automatic transfer, no
call announce, without pressing TRNS/CONF.
The following table summarizes each option and the situation for
which it is best suited.
Call Transferring Summary
Transfer
Option
Best Suited
For
Sender’s Actions
After Answering
Original Call
Delivery Method
of Transferred
Call
Screened
Transfer
Normal transfers that
require introduction.
1. Press TRNS/CONF
2. Dial Extension
3. Announce Call
4. Disconnect
Normal intercom
ringing (two short
bursts) and the
introduction of the
call; if answered in
speakerphone
mode, ringing also
follows the transfer.
Unscreened
Transfer
Expected
transfers that
need no introduction.
1. Press TRNS/CONF
2. Dial Extension
3. Disconnect
Normal intercom
ringing (two short
bursts).
Page 62

Advanced Call Handling
62 Comdial Feb ‘05
Hot Transfer Personnel who
must receive
speakerphone
calls in a
hands-free
mode.
1. Press TRNS/CONF
2. Dial Extension
3. Announce Call
4. Press TRNS/CONF
5. Disconnect
Transfer introduction followed
directly
Quick Transfer (with
intro)
Normal transfers from
attendants and
operators who
handle a large
number of
incoming calls
which require
transfer.
1. Dial Extension
2. Announce Call
3. Disconnect
Intercom ringing
(two short bursts)
and the introduction of the call; if
answered in speakerphone mode,
ringing also
follows the
transfer.
Quick Transfer (without
intro)
Expected
transfers from
attendants and
operators who
handle a large
number of
incoming calls
which require
transfer.
1. Dial Extension
2. Disconnect
Normal intercom
ringing (two short
bursts)
Call Transferring Summary (Continued)
Transfer
Option
Best Suited
For
Sender’s Actions
After Answering
Original Call
Delivery Method
of Transferred
Call
Page 63

EP100G-L12 / EP100G-I12 User
Feb ‘05 Comdial 63
4.6.1 SCREENED TRANSFERS
You can answer a call at your endpoint and transfer it to another
station. If you first identify the caller to the party receiving the
transfer (giving that user the opportunity to prepare for the call), you
have made a screened transfer.
To screen and transfer a call to another
endpoint in the system, perform the
following steps.
1. Answer the call.
2. Press the TRNS/CONF button or
select Transfer (call is automati-
cally placed on hold).
3. Dial the extension number of the
endpoint you want to receive the
transfer, or press a DSS/BLF
button for that extension.
4. Announce the call when intercom party answers.
5. Press SPEAKER to disconnect (if in speakerphone mode), or
hang up.
The intercom party then has the call (if they answered the screened
transfer with the handset). If you announce the transfer over the
speaker, the intercom party’s telephone rings with the transferred call
after you hang up.
If the intercom party is busy, take one
of the following steps (if made
available at your endpoint by installer
programming).
• Select Reconnect to reconnect the
call to your station.
• Select Message to leave a
message-waiting indication at the
called station.
Page 64

Advanced Call Handling
64 Comdial Feb ‘05
• Select Callback to camp-on at the called station.
• Select Voicemail to connect the caller to the busy party’s
Voicemail.
If the intercom party does not answer their endpoint when ringing,
take one of the following steps.
1. Select RECONNECT to reconnect the call to your station.
2. Select MESSAGE to leave a message-waiting indication at the
station.
3. Select CALLBACK to leave a message-waiting indication at the
station.
4.6.2 UNSCREENED TRANSFERS
You can answer a call at your LCD speakerphone and transfer it to
another telephone. If you transfer the call without first announcing it,
you have made an unscreened transfer.
To transfer an unscreened call to another system endpoint, perform
the following steps.
1. Answer the call.
2. Press TRNS/CONF or select Transfer (call is automatically
placed on hold).
3. Dial the extension number of the endpoint you want to receive
the transfer, or press a DSS/BLF button for that extension.
4. Press SPEAKER to disconnect (if in speakerphone mode), or
hang up. The transfer then rings at the called endpoint.
Note: Unscreened transfers ring at busy endpoints and wait to be
answered.
Page 65

EP100G-L12 / EP100G-I12 User
Feb ‘05 Comdial 65
If an unscreened transfer call is not
answered and recalls to your endpoint,
you can take one of the following
steps:
• Press the HOLD button or select
HOLD to place the call on hold at
your endpoint.
• Select ANS to return to the call.
• Select SEND to retry the transfer.
4.6.3 HOT TRANSFER
A hot transfer is a type of screened transfer. This feature is useful for
transferring calls to people who need to work in a hands-free mode.
Once you announce the call and the system completes the transfer, the
party receiving the transfer can simply begin speaking toward their
speakerphone to answer the call.
To make a hot transfer to another endpoint in the system, perform the
following steps.
1. Answer the call.
2. Press TRNS/CONF or select Transfer (the system automatically
places the call on hold).
3. Dial the extension number of the endpoint you want to receive
the transfer, or press a DSS/BLF button for that extension.
4. Announce the call.
5. Press TRNS/CONF or select Transfer.
6. Press SPEAKER to disconnect (if in speakerphone mode) or
hang up. The person receiving the transfer then has the call.
4.6.4 QUICK TRANSFER
When the installer programs the quick transfer method on your endpoint, you can deliver an automatic transfer of an incoming line call
without pressing the TRNS/CONF button.
Page 66

Advanced Call Handling
66 Comdial Feb ‘05
To do a quick screened transfer, perform the following steps.
1. Answer the call.
2. Dial the intercom number for transfer location.
3. When party at transfer location answers, announce the call.
4. Hang up, select RELEASE, or press the SPEAKER button.
To do a quick unscreened transfer, perform the following steps.
1. Answer the call.
2. Dial the intercom number for transfer location.
3. Hang up, select RELEASE, or press the SPEAKER button.
Page 67

EP100G-L12 / EP100G-I12 User
Feb ‘05 Comdial 67
5. NONVERBAL MESSAGING
5.1 LCD Message Delivery
You can set system-supplied messages at your station to be received
and displayed by a calling LCD speakerphone.
To turn on a message from your endpoint, perform the following steps
1. Select OPTIONS.
2. Select Programming.
3. Select NEXT.
4. Select LCD MESSAGING.
5. Select the message you would
like to appear in a calling party’s
LCD by selecting the corresponding interactive button. In
addition to the five options
shown below, there are 25 more
options available to be programmed.
• Select Back at and enter the time you will be back to display
this information on the LCD display.
For example: dial #00 01 29 0405 for the time 01:45.
• Select Call to and enter the extension number to call to
display Call and the extension number on the LCD display.
For example: Dial #0907081502
0000 for the number 978-2200.
• Select out to lunch to display this on the LCD display.
• Select Take a message to display this on the LCD display.
• SELECT I will call back to display this on the LCD display.
6. Select EXIT.
Page 68

Nonverbal Messaging
68 Comdial Feb ‘05
To turn off the message and your intercom light, select CLEAR.
Dialing Code Table
Character Dialing Code Character Dialing C ode
101
808
202
909
303
000
404
space 12
505
-15
606
:29
707
Page 69

EP100G-L12 / EP100G-I12 User
Feb ‘05 Comdial 69
LCD Message List
Dial Code Message
01 Back at (default message 1)
02 Call (default message 2)
03 Ask them to hold (default message 3)
04 Take a message (default message 4)
05 I will call back (default message 5)
06
07
08
09
10
11
12
13
14
15
16
17
18
19
20
21
22
23
24
25
26
27
28
29
30
Page 70

Nonverbal Messaging
70 Comdial Feb ‘05
5.2 Message Waiting Light and
Messaging
If the system installer programs your EP100G-L12/EP100G-I12 to
allow message-wait originate, you can turn on the message-waiting
light of any other endpoint.
To turn on the message-waiting light (and a broken dial tone, if
installer programmed) at another station that is idle or busy, perform
the following steps.
1. Press INTERCOM.
2. Dial *3.
3. Dial the extension number or press a DSS/BLF button of the
station you want to alert. The message-waiting light of called
station then flashes.
You can also turn on the message-waiting light and broken dial tone
at another station when that station is busy.
1. Hear the busy tone and remain
on the line.
2. Select MESSAGE.
3. Hang up.
To turn off the message waiting light at
a busy or idle station, perform the following steps.
1. Press INTERCOM.
2. Dial #3.
3. Dial the extension number or
press a DSS/BLF button of station that was alerted. The message-waiting light of called station then turns off.
To turn off the message-waiting light during message-delivering conversation, press INTERCOM once if off-hook, or twice if on-hook.
Page 71

EP100G-L12 / EP100G-I12 User
Feb ‘05 Comdial 71
To receive a message at an alerted station, perform the following
steps.
1. Observe the flashing message
waiting light and the LCD message indicating who called for
you.
2. Select CALL to dial the messaging station automatically.
3. Select CLEAR to clear the message from your station.
5.3 Response Message Delivery
By programming one or more RESPONSE MESSAGE buttons on
your LCD speakerphone, you can respond with a variety of messages
to many calling situations. A scrolling RESPONSE MESSAGE
button allows you to select from several different messages which
have been programmed by the system attendant. A fixed RESPONSE
MESSAGE button sends the same message you previously selected
each time you press it. (See Section 6.5, Response Message Button
for instructions on programming a dedicated RESPONSE MESSAGE
button.)
To send an LCD message when you call and receive busy signal or no
answer, perform the following steps.
1. While still on the call, press the appropriate RESPONSE MES-
SAGE button to send a preselected message to the other endpoint,
2. If a scrolling Response Messaging was programmed, continue
to press the RESPONSE MESSAGE button and dial # when
your display shows the message you wish to send.
Receiving a Message
Page 72

Nonverbal Messaging
72 Comdial Feb ‘05
To send an LCD message to a caller who has initiated a SOHVA or
intercom call from another LCD endpoint, perform the following
steps.
1. Hear the SOHVA tone or voice announcement in your handset
or headset.
2. Press the appropriate fixed RESPONSE MESSAGE button to
send a preselected message to the calling endpoint.
3. If a scrolling Response Messaging was programmed, continue
to press the RESPONSE MESSAGE button and dial # when
your display shows the message you wish to send.
Page 73

EP100G-L12 / EP100G-I12 User
Feb ‘05 Comdial 73
6. PROGRAMMING
6.1 DSS Numbers
Storing another station extension number at a DSS/BLF programmable location allows you to monitor that station, dial with the press
of one button, or pick up or hold calls at that station quickly and conveniently.
Note: Storing DSS numbers at button locations overwrites any
previously-stored numbers.
To store an intercom number as a DSS number, perform the following
steps.
1. Select OPTIONS.
2. Select Programming.
3. Select NEXT until the DSS
option appears.
4. Select DSS/BLF.
5. Press a programmable button
to choose DSS/BLF button
location.
6. Dial the extension number.
7. Repeat the previous steps, or
select EXIT.
8. Press SPEAKER to end.
Page 74

Programming
74 Comdial Feb ‘05
6.2 Speed Dial Numbers
Speed dialing is a feature that lets you store and dial frequently called
numbers using one or two buttons. You can store numbers for speed
dialing at any programmable button that is not now assigned as a line
button or other feature by the system administrator or installer. You
can also store speed dial numbers at the keypad numbers. .
DSS/BLF Buttons:
Press button of desired
endpoint to dial directly.
Keypad:
Dial desired number for personal speed dial
OR
Dial * and number for system speed dial.
Speed Dial Options
CAUTION
The Federal Communications Commission
(FCC) requires that when programming
emergency numbers and/or making test calls to emergency
numbers:
1. Remain on the line and briefly explain to the dispatcher the
reason for the call.
2. Perform such activities in the off-peak hours, such as early
morning or late evening.
Page 75

EP100G-L12 / EP100G-I12 User
Feb ‘05 Comdial 75
To store an outside number as a speed
dial number, perform the following
steps.
1. Select OPTIONS.
2. Select Programming.
3. Select NEXT until the Speeddial
option appears.
4. Select Speeddial to choose speed
dial programming.
5. Press a programmable button or
dial pad button (09) to choose storage location (remember, to
access second level storage at a programmable button, press
SHIFT first).
6. Select EDIT.
7. Make your speed dial route
selection choice from the list on
the LCD by pressing the appropriate button.
• Press a line button to select an
outside line,
• Dial 00 to select prime line or
last line used.
• Dial 01 to 16 to select line
group.
• Press INTERCOM button or
dial 8 to select intercom.
Note: You may need a pause between numbers to compensate
for differences in response time between your system and the
host system (ask your system administrator about this). To
store a pause, press HOLD, then continue dialing. If your system is behind a host system that needs a hook flash to access a
feature, press TAP to store a hook flash, then continue dialing.
Selecting Line or Intercom
Page 76

Programming
76 Comdial Feb ‘05
8. Dial a number (up to 16 digits
long, including * and # if
needed).
9. Select DONE to store the number.
10. Repeat the previous steps until
all numbers are stored, or select
EXIT.
11. Press SPEAKER to end.
6.3 Feature Access Codes
In addition to the system features which may be programmed using
the interactive buttons, several other features may be programmed by
using their access codes. The feature codes are programmed like
speed dial numbers and can occupy the same programmable buttons
on your endpoint. Access codes are listed in Section A, Feature
Access Codes.
To store a system feature access code, perform the following steps.
1. Select OPTIONS.
2. Select Programming.
3. Select NEXT until the Feature Button option appears.
4. Select Feature Button.
5. Select the programmable button
where you want to store the feature. (Remember, if there is
anything else programmed at
this button, the new programming overwrites it). For help in
Dialing a Speed Number
Page 77

EP100G-L12 / EP100G-I12 User
Feb ‘05 Comdial 77
selecting a button, select Show Empty Locations to display
unused feature buttons (green lights). To display all feature
buttons (used and unused, (red lights), select Show All Loca-
tions.
6. The speakerphone now displays
a list of features which you can
scroll through by selecting
NEXT.
7. Select the feature you want to
assign to the programmable button.
8. Repeat the previous steps until
all numbers are stored.
9. Select EXIT.
10. Press SPEAKER to end.
To clear a feature button assignment, repeat the previous procedure,
but select EXIT once you have selected the feature button.
As you program numbers, fill in the identification strips on your endpoint as well as in the following tables.
Speed Dial Numbers, Features, or DSS/BLF Locations
(Programmable Buttons)
1 13
2
14
3
15
4
16
5
17
6
18
7
19
8
20
9
21
10
22
Page 78

Programming
78 Comdial Feb ‘05
6.3.1 LCD FEATURE BUTTONS
You can create feature access buttons to make operation easier. To do
this, use the interactive buttons to select the feature you want to store,
and then store it on a programmable button (see Section 6.3, Feature
Access Codes).
• Account Code (Account Code) allows you to enter an account
code for call record purposes.
• Auto Redial (Auto Redial) allows you to redial the last dialed
number.
• Authorization Entry Code (Authorization Entry) allows you
the mobility to use your class of service features, prime line
assignments, and exception numbers on any telephone in the
system.
• Auxiliary Pager (APAGE) selects external pager operation
through the auxiliary jack (EP100G-L12 only).
• Auxiliary Recorder (ARECD) selects tape recorder operation
through the auxiliary jack (EP100G-L12 only).
11 23
12
24
Personal Speed Dial Numbers
(Keypad Buttons)
1 6
2
7
3
8
4
9
5
0
Speed Dial Numbers, Features, or DSS/BLF Locations
(Programmable Buttons)
Page 79

EP100G-L12 / EP100G-I12 User
Feb ‘05 Comdial 79
• Auxiliary Ringer (ARING) selects auxiliary ringer operation
through the auxiliary jack (EP100G-L12 only).
• Background Music (MUSIC) allows you to enable or disable
background music; also allows you to choose from two
preprogrammed music sources.
• Call Forward All (Call Forward All) allows you to forward all
of your calls to another endpoint.
• Call Forward Outside System (CFOS) allows you to forward
incoming or transferred calls to telephone numbers outside the
system.
• Call Forward Personal (Call Forward Personal) allows you to
forward all of your prime line calls to another endpoint.
• Call Forward Ring No Answer All (Call Forward RNA All)
allows you to forward all calls that ring at your station but
receive no answer after a preprogrammed number of rings.
• Call Forward Ring No Answer Personal (Call Forward RNA
Personal) allows you to forward all prime line calls that ring at
your station but receive no answer after a preprogrammed
number of rings.
• Camp-On With Automatic Call Back (CAMP) allows you to
camp on to a station. The system calls you back as soon as the
called station becomes idle or occupied.
• Camp-On (Call Waiting) (CAMP) when calling a busy station,
this feature allows you to send a call waiting tone to the station
and to wait on-line for a reply.
• Clear Feature (CLEAR) clears a currently active or engaged
feature.
• Do Not Disturb (DND) prevents other endpoints from ringing
your endpoint.
• Executive Override (Executive Override) allows overriding a
call or a Do Not Disturb condition at another endpoint.
Page 80

Programming
80 Comdial Feb ‘05
• Group Listen (Group Listen) allows others to hear a
conversation over the endpoint speaker while you use the
handset or headset; the distant party can hear only the
conversation transmitted through the handset or headset
microphone.
• Headset (Headset) allows you to use the Headset.
• Meet Me (Meet-Me) provides the capability for you to page
with the instruction to meet you on line.
• Message Wait (Message Wait) allows you to be notified that
there is a message waiting.
• Page Zone (Page Zone) provides one-button access to paging.
• Park Orbit (Park Orbit) parks calls in preselected park orbit.
• Pick-Up Direct (Pickup Direct) allows you to pick up a call
ringing elsewhere in your system.
• Pick-Up Group (Pickup Group) allows you to pick up a call
ringing in your group.
• Privacy Release (Privacy Release) allows other endpoints
which share a line appearance for current call to join.
• Response Messaging (Response Messaging) allows you to
send an LCD message to a caller who has initiated a SOHVA or
intercom call from another LCD endpoint.
• Saved Number Redial (Saved Number Redial) redials the last
number saved
• Service Observe (Service Observe) allows you to monitor a
conversation or activity at another endpoint in an undetected
manner.
• Tracker Paging System (Tracker Access) allows you to enter
tracker pager numbers, pickup a tracker page, and either enable
and/or disable a pager number.
• Voice-Announce Block (Voice Announce Block) blocks voice
announcements.
Page 81

EP100G-L12 / EP100G-I12 User
Feb ‘05 Comdial 81
• Volum e Sav e (Volume Save) allows the preset volume level to
be saved.
Programming of the feature access buttons may require several selections involving many LCD screens. If an abbreviation used is not
familiar to you, refer to Section B, Display Abbreviations.
To create a feature access button, perform the following steps.
1. Select OPTIONS.
2. Select Programming.
3. Select NEXT until the Feature
Button option appears.
4. Select Feature Button.
5. Select the Feature Level interac-
tive button to toggle between 1
and 2.
6. Select one of the three options.
• Show Empty Locations - green
lights
• Show All Locations - red lights
• Feature Level
7. Select the button you want to assign as a feature button.
8. Select the feature you want to assign to by selecting the corresponding interactive button. Select NEXT to scroll through the
list of available features.
9. Repeat steps 1 through 7 for other features.
10. Select EXIT to end programming.
To clear a feature button assignment, repeat the previous procedure,
but select CLEAR before selecting the storage location button.
6.4 Reminder Alert
You can set up to two reminder alerts to sound at your LCD so that
you remember important regular events or occasional events.
Page 82

Programming
82 Comdial Feb ‘05
To set a reminder alert at your endpoint, perform the following steps.
1. Select OPTIONS.
2. Select Programming.
3. Select NEXT until the Reminder
Alert option appears.
4. Select Reminder Alert.
5. Select Reminder Alert 1 or
Reminder Alert 2 to select an
available alert designation; if
you have already programmed
an alert for 1, select 2 to set a
second alert condition.
6. Dial the reminder time using the numbers on the dial pad
(remember to add a zero [0] before single digit times: 01 for
one o’clock, 02 for 2 o’clock, etc.)
7. Toggle the interactive button
between AM or PM.
8. Select the Reminder Alert interactive button to select ON.
9. Select EXIT.
When an alert sounds at the set time,
you hear four short tone bursts, which
continue until you act upon them. If
you are not at your station to hear the
alert when it sounds, your endpoint’s
ring tone changes to the alert tone for every incoming call until you
respond to the alert.
Page 83

EP100G-L12 / EP100G-I12 User
Feb ‘05 Comdial 83
To respond to an alert after it sounds,
choose one of the following.
• Select CLEAR to turn off the alert.
• Select SET to reset the alert for
the same time the following day.
6.5 Response Message Button
You may program a RESPONSE MESSAGE button, which allows you
to send an LCD message to a caller who has initiated a SOHVA or
intercom call from another EP100G-L12, or to send an LCD message
to another EP100G-L12/EP100G-I12 that you call and receive a busy
signal or no answer.
To store a fixed RESPONSE MESSAGE button (delivers the same
message each time it is pressed), perform the following steps.
1. Select OPTIONS.
2. Select Programming.
3. Select NEXT until the Feature Button option appears.
4. Select Feature Button.
5. Select the programmable button you wish to use as a response
message button.
6. Select NEXT until the Response Message option appears.
7. Select Response Message.
8. Select from the list of displayed messages. Select NEXT to
scroll through the list of messages. If you use the Back at or
Call options add to them as follows:
• For the Back at message, dial the code for the time numbers
and colon from dialing codes table.
Page 84

Programming
84 Comdial Feb ‘05
For example, dial #0001290405 for time 01:45.
• For the Call message, dial the code for endpoint number
where you can be reached.
For example, dial #090708150202
0000 for number 978-2200).
9. Repeat steps 5 through 8 for other features, or select EXIT to
end programming.
Page 85

EP100G-L12 / EP100G-I12 User
Feb ‘05 Comdial 85
7. OTHER ADVANCED FEATURES
7.1 Background Music
If the telephone system supplies background music, you can turn it on
at your LCD speakerphone while on-hook and idle. The system
automatically turns background music off during calls and voice
announcements.
To turn the music on, perform the following steps.
1. Select OPTIONS.
2. Select Programming.
3. Select Background Music.
4. Select the Background Music
interactive button and toggle
between 1 or 2.
5. Select EXIT.
6. Adjust the music volume with
the volume buttons.
To turn the music off, perform the following steps.
1. Select OPTIONS.
2. Select Programming.
3. Select Background Music.
4. Select the Background Music interactive button and select
OFF.
5. Select EXIT.
Page 86

Other Advanced Features
86 Comdial Feb ‘05
7.2 Line Groups
Some systems have telephone lines arranged into line groups which
may be accessed for outside calling instead of selecting an individual
line button.
If your system has line groups, access them as follows.
1. Press INTERCOM.
2. Dial the desired line group access code.
*If your system administrator has reassigned your line group
access codes, write them here for future reference.
3. Listen for an outside dial tone.
4. Dial the desired number.
5. Lift the handset to talk.
7.3 Do Not Disturb Condition
This feature keeps calls from ringing at your LCD speakerphone and
makes your station appear to be busy to intercom calls. As a
reminder, a station that is set in Do Not Disturb mode displays this
information on the LCD.
Line Group Access Codes
Line Group Default Code Active Code *
19
2 through 11 80 through 89
12 through
16
60 through 64
Page 87

EP100G-L12 / EP100G-I12 User
Feb ‘05 Comdial 87
To enable DND, proceed as follows.
1. Select OPTIONS.
2. Select Programming.
3. Select Do Not Disturb.
4. Select Do Not Disturb interact
button to toggle between ON and
OFF.
5. Select EXIT.
To disable the DND condition,
REPEAT the previous procedure, but select OFF instead of ON at
step 4.
To set a Do Not Disturb condition at
your endpoint when a call rings at your
station, perform the following steps.
1. Hear ringing and notice the
incoming call information in display.
2. Select OPTIONS.
3. Select Programming.
4. Select Do Not Disturb.
5. Select the Do Not Disturb interact button. Ringing stops, the caller hears the do not disturb
tone, and your endpoint remains in DND until you disable the
feature.
6. Select EXIT.
7.4 Automatic Redial
If your station has the multiple automatic redial feature enabled, you
can place up to ten numbers in your endpoint’s redial queue.
Note: The AUTOMATIC REDIAL button must be programmed by
your system installer or system administrator. Individual users cannot program this feature.
Page 88

Other Advanced Features
88 Comdial Feb ‘05
To use the automatic redial feature to
redial a busy or unanswered number,
perform the following steps.
1. While on the call, select Auto
Redial or press the AUTOMATIC
REDIAL button programmed by
your installer.
2. The system repeatedly dials the
number until you cancel the feature or the system has dialed the
number a preprogrammed number of times (determined by your
system installer).
The AUTOMATIC REDIAL light flashes between redials and
turns on steady during redialing.
3. If your installer has enabled answer supervision on your line,
the system automatically cancels automatic redialing and turns
the AUTOMATIC REDIAL light off.
If answer supervision is NOT enabled, select Auto Redial or
the programmed AUTOMATIC REDIAL button while on the
call to cancel automatic redialing,
4. If your system installer has enabled the redial multiple numbers
feature, you can have up to ten numbers in your redial queue.
To add numbers to your redial queue, repeat step 1.
To scroll through numbers in your redial queue if your endpoint is
currently idle, perform the following steps.
1. Select Auto Redial or the programmed AUTOMATIC REDIAL
button. The display shows the last number dialed.
2. Choose one of the following:
• Select REMOVE to remove the number from the redial queue.
• Select NEXT to scroll to the next number in the queue.
• Select EXIT to exit from the redial queue.
Initiating Auto Redial
Page 89

EP100G-L12 / EP100G-I12 User
Feb ‘05 Comdial 89
To interrupt the redialing procedure so that you can scroll through
numbers in your redial queue, perform the following steps.
1. While your endpoint is in the process of dialing a number,
select Auto Redial or the programmed AUTOMATIC REDIAL
button twice. This treats the number as answered, cancels automatic redialing for that number, and puts the number back in the
automatic redial queue. The display shows the last number
dialed.
2. Choose from one of the following.
• Select REMOVE to remove the number from the redial queue.
• Select NEXT to scroll to the next number in the queue.
• Select EXIT to exit from the redial queue.
To cancel the automatic redial feature, choose one of the following.
• Perform any user activity at the station (go on-hook, select the
speaker button, etc.),
• Dial #72 to delete all numbers from the redial queue,
• Select Auto Redial or the programmed AUTOMATIC REDIAL
button while the number you wish to remove from the redial
queue is ringing.
7.5 Tracker Paging System
When installed with your system, the Tracker Paging System option
allows you to send call back and parked call messages to Tracker
pagers assigned to station extension numbers. Along with the parked
call message, the system parks the call in orbit for retrieval by the
paged party. The type of message that the system delivers (either
alphanumeric or numeric-only) is dependent upon the Tracker pager
model in use at the station. When outside callers call into a system
that has both a Tracker Paging option and a voice mail option
installed, the system gives these callers the option of either leaving a
message or tracking the person that they are calling.
Page 90

Other Advanced Features
90 Comdial Feb ‘05
To track a called party after receiving a ring no answer, perform the
following steps.
1. Make an intercom call to someone and receive no answer.
2. Select TRACK.
3. Hear the confirmation beep (tracker page accepted) or hear a
busy tone (tracker page not accepted).
4. Press SPEAKER to end.
To track a called party without first
calling them, perform the following
steps.
1. Press INTERCOM and dial *8.
2. Dial the extension number or
select the LIST NAMES interactive button. The LCD display
shows several letters beside each
interactive button. Select the
interactive button next to the letter of the person’s name whom you wish to call. The LCD display shows the first existing name to match to the letters you
selected, or shows a No Name Match message if the system
cannot find a match.
Note: All the names starting with the letters you selected
appear, but they are not in alphabetical order.
3. Select NEXT to display the subsequent names in the index until
you reach the name you need.
4. Hear the confirmation beep (tracker page accepted) or hear a
busy tone (tracker page not accepted).
5. Press SPEAKER to end.
To use Tracker to transfer a call to a park orbit for retrieval and
transmit the calls park orbit code and caller ID information (if
available), perform the following steps.
1. Answer the call and select Transfer.
2. Dial the extension number.
Page 91

EP100G-L12 / EP100G-I12 User
Feb ‘05 Comdial 91
3. If the called station does not answer or is busy, select TRACK.
4. Hear a confirmation beep (tracker page accepted) or hear busy
a tone (tracker page not accepted).
5. Press the SPEAKER button to end.
Note: Tracker parked calls recall to your station after a preprogrammed time-out. You can either place the call into
another Tracker page orbit or retrieve the call.
To retrieve a call that you parked using the Tracker option, perform
the following steps.
1. Press HOLD button to scroll your held calls (display shows
PA G E and extension number of each parked call).
2. Press TAP to retrieve the displayed parked call.
If you receive a parked call message on your Tracker pager, perform
the following steps.
1. Go to any system station.
2. Press INTERCOM.
3. Dial the Tracker pager orbit code (#800 to #899).
4. Retrieve the call.
To enable or disable a Tracker pager at your station, perform the following steps.
1. Press INTERCOM.
2. Dial #07 to enable, or dial #06 to disable.
3. Press SPEAKER to end.
7.6 Auxiliary/Headset Jack
The EP100G-L12 speakerphone is equipped with an auxiliary jack
that provides an interface for a headset, a tape recorder, an external
ringer, or an external pager. You must program one of its programmable buttons to serve as an enable/disable button for each auxiliary
device you plan to connect. The system activates only the device that
it identifies in the display, and activates only one device at any time.
Page 92

Other Advanced Features
92 Comdial Feb ‘05
The EP100G-I12 speakerphone is equipped with an auxiliary jack
that provides an interface for a headset only. You must program one
of its programmable buttons to serve as an enable/disable button for
the headset.
The following modes are programmable with the auxiliary jack.
Note: The recorder, external ringer, or pager requires external
power.
• The headset mode allows you to operate your endpoint with a
headset instead of as a speakerphone, available with both the
L12 and I12 models. Note: This is the only auxiliary option
available on the EP100G-I12.
• The recorder mode allows you to send your voice and that of the
distant party to a tape recorder, available with the EP100G-L12
only.
• The ringer mode allows an external speaker to sound the ringing
of your endpoint, available with the EP100G-L12 only.
• The pager mode allows an external paging device to sound all
voice announcements (all-call, zone paging, voice announced
intercom calls) sent to your endpoint. This is available with the
EP100G-L12 only.
Program the enable/disable buttons (at any blank programmable
button location) as follows.
1. Select OPTIONS.
2. Select Programming.
3. Select NEXT until the Feature Button option appears.
4. Select Feature Button.
Auxiliary Jack Location
Page 93

EP100G-L12 / EP100G-I12 User
Feb ‘05 Comdial 93
5. Press a blank programmable button location to serve as enable/
disable button for the feature you
have selected.
6. Select NEXT until the auxiliary
feature you want to program
appears.
• APAGE to choose a pager
(EP100G-L12 only).
• ARECD to choose a recorder
(EP100G-L12 only).
• ARING to choose an external ringer (EP100G-L12 only).
• Headset to choose a headset.
7. Return to previous steps to add another device, or select
SPEAKER to quit.
To enable an inactive auxiliary mode, select its enable/disable button.
The system turns on the light associated with button and displays the
feature on the LCD.
To disable an active auxiliary mode, select its enable/disable button.
The system turns off the light associated with button and removes the
feature from the LCD.
CAUTION
With the exception of a headset
microphone, do not connect the audio
output of any external device to the auxiliary jack. Also, do not
connect the tip and ring leads of a telephone line to the auxiliary
jack. Do not connect any devices to the auxiliary jack other
than those listed in this section as applicable to your model.
Page 94

Other Advanced Features
94 Comdial Feb ‘05
7.7 Account Codes
If the installer has arranged your system for account code entry, your
display may prompt you to enter an account code after answering a
call.
To enter an account code on an
incoming call, perform the following
steps.
1. If available, press your programmed ACCOUNT CODE button (the system does not interrupt
the call in progress).
2. If this feature is not available,
press INTERCOM and dial *04
(the system automatically places
the call on hold).
3. Dial the account code. Your endpoint automatically returns to
the call after you have dialed the complete account code.
If the installer has arranged your system for account code entry, your
display may prompt you to enter an account code before dialing.
Depending upon how the installer has programmed your system,
these account codes may be forced (mandatory) for dialing outside
numbers.
To enter account code on an outgoing call, perform the following
steps.
1. Dial 9 or other line button (the display prompts for the Account
Code if programmed to do so).
2. Press INTERCOM (the system automatically places the call on
hold).
3. Dial *04 and the account code, or press the programmed
ACCOUNT CODE button.
4. Listen for dial tone and dial number you are calling.
Page 95

EP100G-L12 / EP100G-I12 User
Feb ‘05 Comdial 95
7.8 Dial By Name
The Dial By Name feature provides an index of names for you to
search through. When you select a name in the index, the system
automatically dials that person’s extension number.
To use Dial By Name, perform the following steps.
1. Select OPTIONS to enter the dial
by name menu.
2. Select Internal Dial by Name
interactive button for intercom
calling, or select External Dial
by Name for speed dial calling.
3. Select ALL to view all entries or
select an interactive button corresponding to the letters in the name you want to locate (for
example, dial ABC for Comdial). There is no limit to the number of digits you can dial.
4. The display shows the first exist-
ing name match to the dialed
digits or shows NO MATCH if
the system can not find a match.
5. Select NEXT to display the sub-
sequent names in the index until
you reach the name you need.
6. Select interactive button corre-
sponding to the name you want
to call.
7.9 Volume Control
The volume control on your endpoint is a multipurpose control you
can use to set the volume (loudness) of the ringer, the speaker, the
handset, the headset, background music, and the group listening
Page 96

Other Advanced Features
96 Comdial Feb ‘05
mode.
Note: When the call ends, the system resets the loudness of all future
calls to the programmed (default) setting. For instructions in setting
your endpoint’s default volume, see Section 7.10, Changing the
Default Volume Control.
7.9.1 SETTING RINGER VOLUME LEVEL
There are four ringer loudness levels
(plus an off position). To set these
levels, while your endpoint is on-hook
and idle, press the VOLUME UP or
VOLUME DOWN button once for each
change in loudness you desire. The
ringer sounds once for each change as
an example of the current setting.
Note: If you set the ringer to the OFF
position, your endpoint sounds a short ring burst once for each call
you receive at your station while the ringer is off.
7.9.2 SETTING SPEAKER VOLUME LEVEL
There are eight speaker loudness levels. To set these levels for the
current call while on a call and in speakerphone mode, press the
VOLUME UP or VOLUME DOWN button once for each change in
loudness that you desire.
7.9.3 SETTING HANDSET VOLUME LEVEL
There are at least eight handset loudness levels that you can set for the
current call. While on a call and in handset mode, press the VOLUME
UP or VOLUME DOWN button once for each change in loudness that
you desire.
volume up
volume down
Page 97

EP100G-L12 / EP100G-I12 User
Feb ‘05 Comdial 97
7.9.4 SETTING HEADSET VOLUME LEVEL
There are eight headset loudness levels that you can set for the current
call. While on a call and in headset mode, press the VOLUME UP or
VOLUME DOWN button once for each change in loudness that you
desire.
7.9.5 SETTING GROUP LISTENING VOLUME LEVEL
There are eight group listening loudness levels. To set the level for
the current call, while on a call and in the group listening mode, press
VOLUME UP or VOLUME DOWN button once for each change in
loudness you desire.
7.9.6 SETTING BACKGROUND MUSIC VOLUME
LEVEL
There are eight background music loudness levels. To set the level,
while background music is on at your station, press the VOLUME UP
or VOLUME DOWN button once for each change in loudness you
desire. This level remains set for background music until you change
it again, even if you turn off the feature and then reactivate it.
Page 98

Other Advanced Features
98 Comdial Feb ‘05
7.9.7 MUTING YOUR ENDPOINT
By using the MUTE button, you can block transmission of your voice
to the distant party. You can do this whether you are using the
handset or the speaker.
To mute your endpoint, press MUTE. The system turns the mute
function and light on. You can still hear the distant party, but they
cannot hear you.
To speak to the distant party, press MUTE again. The system turns
the mute function and light off.
7.10 Changing the Default Volume
Control
You can set a permanent loudness level for any volume control
setting. The level remains at this volume (referred to as the default
setting) until you change the setting.
To set a permanent speaker, headset, handset, or group listening
loudness for all future calls,
1. Press INTERCOM.
2. Activate the speaker, headset, handset, or group listen mode to
be affected.
3. While in that mode, press VOLUME Up or VOLUME Down
button to adjust loudness.
4. Dial **7 or press programmed SAVE button to hold the loud-
ness at the last setting for all future calls (until you change the
default again).
5. Repeat this procedure in each mode until you have set all
default volume levels.
Page 99

EP100G-L12 / EP100G-I12 User
Feb ‘05 Comdial 99
7.11 Programmed Button Display
7.11.1 BUTTON FUNCTIONS DISPLAY (BUTTON
QUERY)
You can cause the display to identify the function of each button on
your endpoint.
To button query your endpoint, perform
the following steps.
1. Select OPTIONS.
2. Select Programming.
3. Select NEXT until the Button
Query option appears.
4. Select Button Query.
5. Press the button in question. The
system displays the information
and holds for few seconds before the endpoint returns to idle.
7.11.2 STATUS OF BUSY LINES AND STATIONS
(BUSY DSS/BLF BUTTON INQUIRY)
You can use this feature to identify the station that is busy on a line or
the line on which a station is busy.
To identify the station that occupies a busy line, press the DSS/BLF
button for busy line. The system displays the intercom number of
station that is busy on line.
To identify the line that a busy station occupies, press a DSS/BLF
button for the busy station. The system displays the busy station’s
line number.
Page 100

Other Advanced Features
100 Comdial Feb ‘05
7.12 Automatic Set Relocation
(EP100G-L12 only)
If your installer has equipped your EP100G-L12 with automatic set
relocation, when you move your endpoint to a new location, the
system gives you a choice (through a display prompt) as to whether
you want to keep your previous programming or use the programming in the new location.
To maintain the extension number and programming features from
the old location, perform the following steps.
1. Connect the endpoint line cord to the new jack.
2. Observe the flashing HOLD light and press HOLD while the
light is still flashing. Your endpoint immediately assumes the
features from the previous location.
Note: If you do not select a button after installing the endpoint, the system automatically defaults to the programming
from the previous location.
To assume the extension number and programming features from the
new location, perform the following steps.
1. Connect the endpoint line cord to the new jack.
2. Observe the flashing HOLD light and dial # while the light is
still flashing. Your endpoint immediately assumes the features
from the previous location.
7.13 Paging
Your system provides an all-call or a zone page feature that you
access by dialing special codes. This arrangement sounds your voice
announcement through the endpoint speakers or through an external
paging unit.
To send a paging announcement, perform the following steps.
1. Lift the handset.
 Loading...