

Page 1
Digital Telephone System
’
Attendant’s Supplement
COMDWL
Made rigb in the USA
Page 2
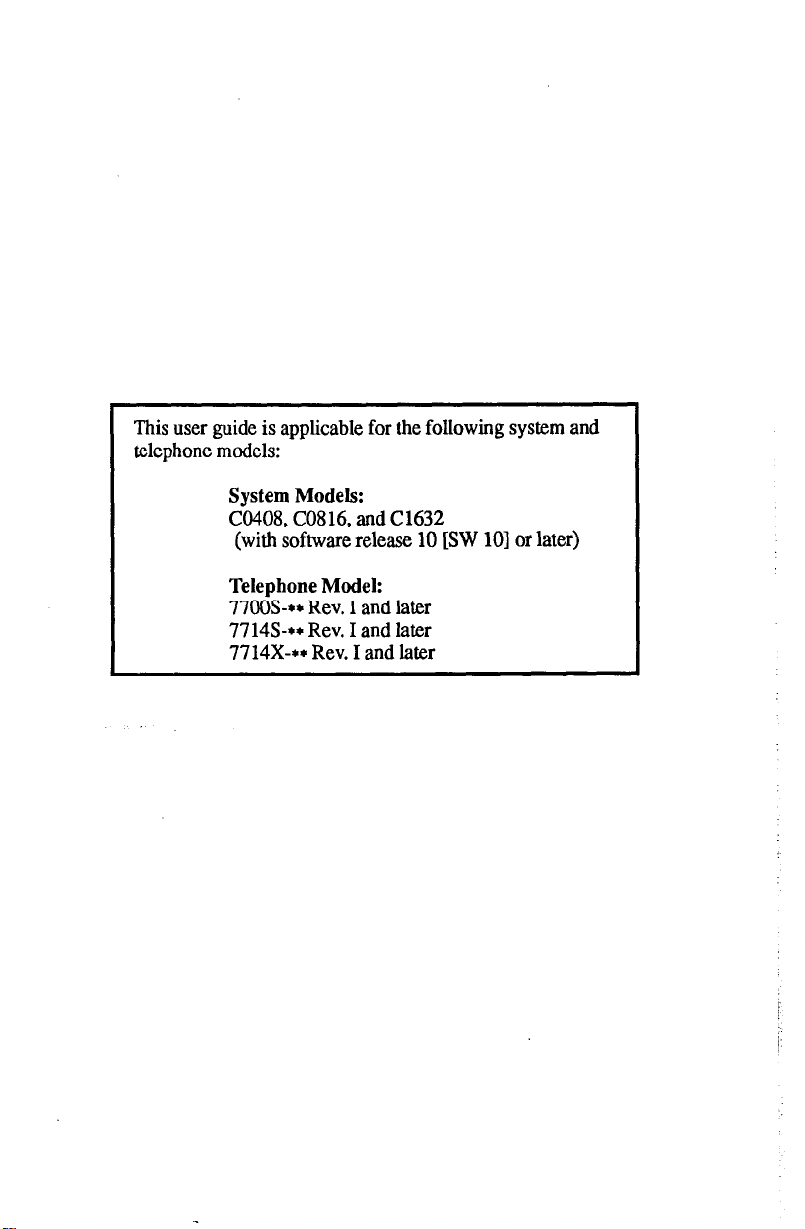
This user guide is applicable for the following system and
telephone models:
System Models:
CO408, C0816, and Cl632
(with software release 10 [SW 101 or later)
Telephone Model:
77OOS-+* Rev. I and later
77143~++ Rev. I and later
7714X-++ Rev. I and later
Page 3
Table Of Contents
LCD Display Abbreviations
Using This Supplement
Programming The Attendant Features
Creating The LCD Response Messages
Direct Inward Station Dialing
Naming The System Telephones
SettingTheMusicOnHoldFeature
.........................
..............................
................ .2
..............
...................... .6
.................... .7
................
Setting The Night Transfer Of Ringing Mode
Setting The System Clock
........................
Station Message Detail Accounting (SMDA) Printout
Storing The System Speed Dial Numbers
System Alarm Reporting
.........................
...........
Transferring Calls To The Voice Mail System
Transferring Recalls To A Secondary
AttendantTelephone........................... 4
Understanding The LCD Displays
...................
Glossary Of Terms .................................
Index ............................................
iV
1
.2
.lO
........
.12
.14
.. .15
.16
.20
........ .22
.25
33
36
. . .
111
Page 4
LW visplay Abbreviations
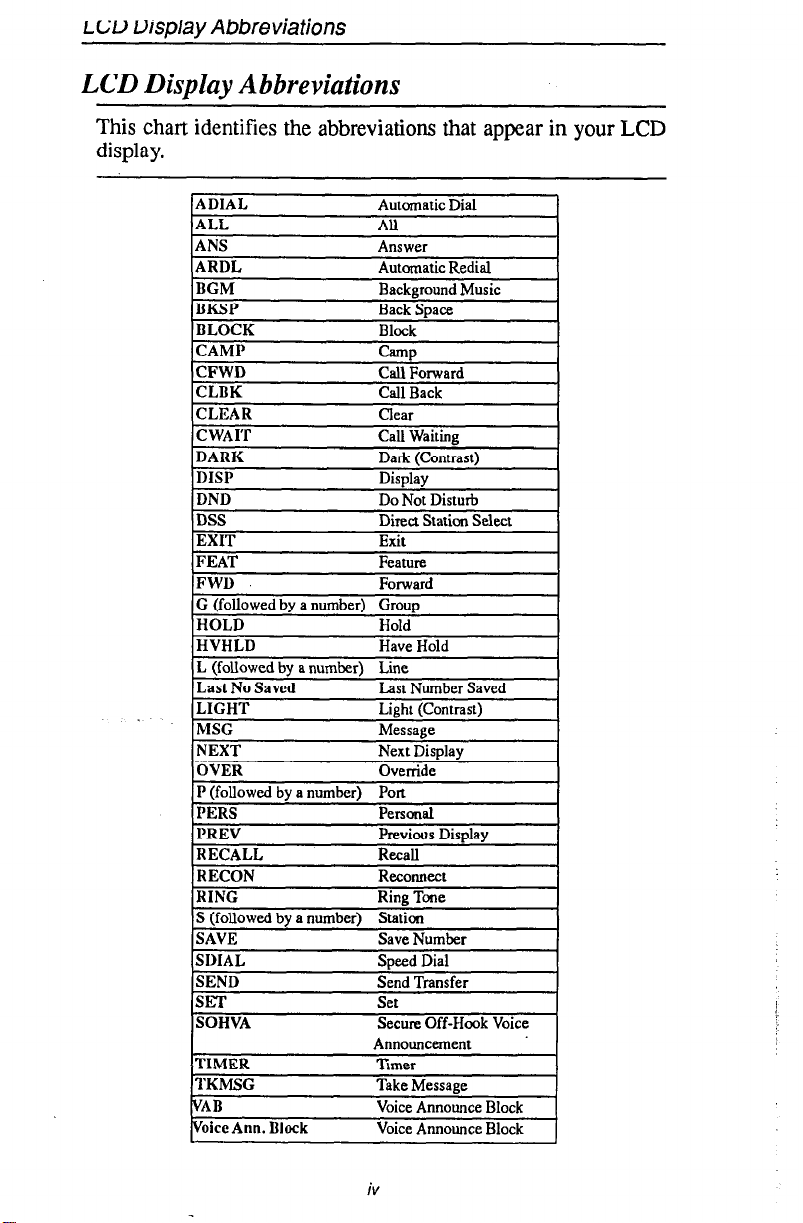
LCD Display Abbreviations
This cha
ll
display.
-
I identifies the abbreviations that appear in your LCD
ADIAL Automatic Dial
ALL
ANS Answer
ARDL Automatic Redial
BGM Background Music
BKSP Back Space
BLOCK Block
CAMP
CFWD Call Forward
CLBK Call Back
CLEAR
DSS
EXIT
FEAT
FWD
G (followed by a number) Group
HOLD Hold
All
Camp
clear
Direct Station Select
Exit
Feature
Forward
. .
MSG
NEXT Next Display
OVER Override
P (followed by a number) Port
PERS
PREV Previous Display
RECALL Recall
RECON Reconnect
RING
S (followed by a number)
SAVE Save Number
SDIAL
SEND Send Transfer
SET
SOHVA
TIMER
TKMSG
VAB
Voice Ann. Block
Message
Personal
Ring Tone
Staticn
Speed Dial
Set
Secure Off-Hook Voice
Announcement
Timer
Take Message
Voice Announce Block
Voice Announce Block
1
iV
Page 5
Using This Supplement
To help you use your attendant’s telephone to its fullest capacity, this
supplement to the-DigiTech system user’s guide describes the
attendant’s telephone and tells you how to use it.
You can program special features on your telephone that are unique to
attendant station operation. The instructions for programming these features are included in the section titled
l Programming The Attendant Features
For your convenience, a display summary, a glossary of terms and an
index are included in the back of this supplement.
The operation sections of the accompanying user’s guide define oftenused features and provide instructions for their use. Please refer to the
following sections of the user’s guide (publication GCA 70-220 or
GCA 70-221, provided separately) for more information about your
telephone’s basic functions:
l
Knowing Your Telephone
b
Understanding What The Lights Mean
0
Using Your Telephone To Answer Calls
.
Using Your Telephone To Make Calls
b
Using Your Telephone To Place Calls On Hold
.
Using Your Telephone To Transfer Calls
.
Using Your Telephone For Conference Calls
.
Using The Other Telephone Features
l
Sending And Receiving Non-Verbal Messages
0
Using The Auxiliary Jack
.
Programming Your Telephone
l
Using Your Quick Reference Guide
b
Troubleshooting Your Telephone
Page 6

Creating The LCD Response Messages
When you are busy or are away from your desk, you can set a message
at your telephone that will be received by any LCD speakerphone
within your system. Your system provides two default messages:
“Back at . . .‘I and “Call . . .”
messages, or you can create up to ten messages if you choose not to use
the two default messages.
In addition, you can add eight customized
Note:
If
you intend to create a response message to a voice announce,
remember that this is also a message, and that it uses one of
your message locations.
To store the LCD messages, proceed as follows:
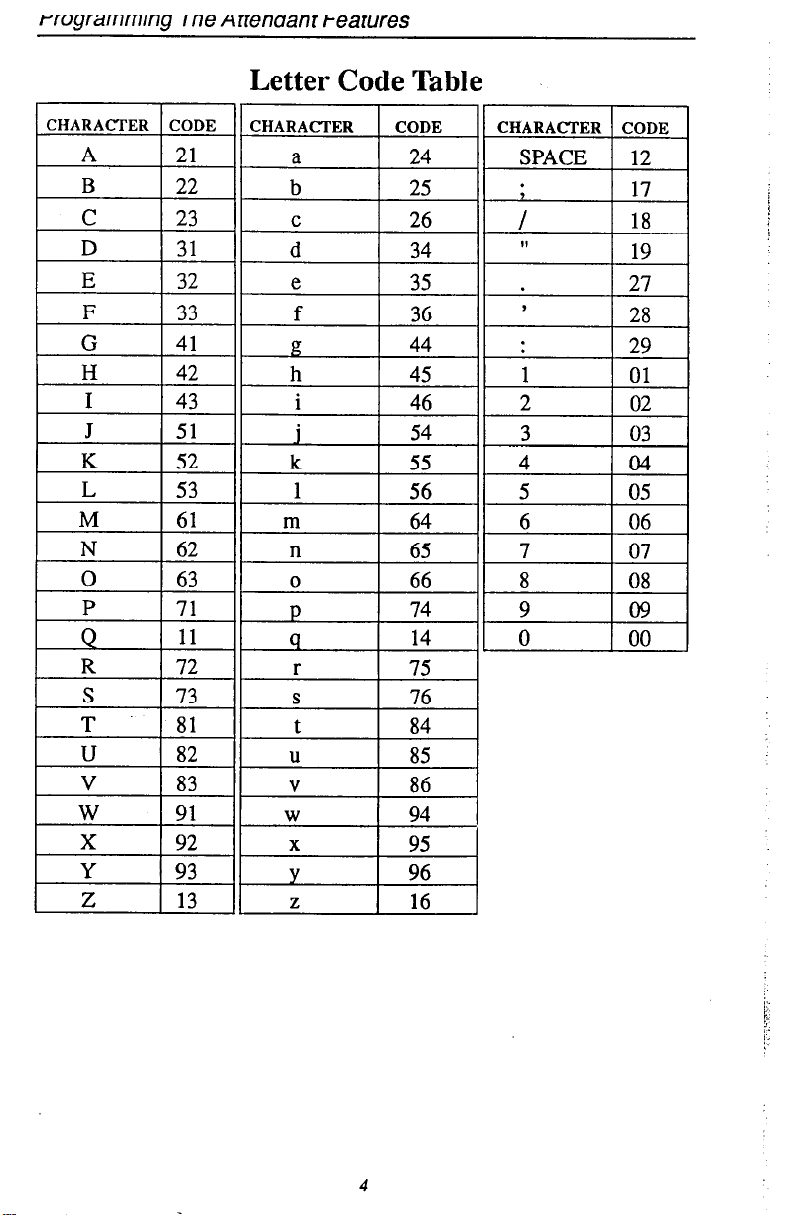
write your messages on the chart on page 5 (each message can
have up to 16 characters),
use the letter code table (on page 4) to assign a number to each let-
ter,
write these numbers on the chart line beside the message letters,
press ITCM,
dial+##O 5,
dial a message location number (l-O),
dial # to clear current message,
compose your messages by dialing the two-digit codes that relate
to the letters,
dial +# to save message,
dial next location number, #to clear it, two-digit codes for the
message, and +# to save,
repeat previous step until all messages are stored,
press SPKR to end.
Example: Create a message that will read as “TAKE MESSAGE” and
program it into message location number 3.
- press ITCM, dial + # 0 5,
- dial 3 #,
- dial +1,11,22,22 12
61, 32,73, 73;21,41 32
space M E S S A G’E
- dial #, and press SPKR to end.
2
Page 7
rrvgrarrrrnmg I rie fmzrmmr rearures
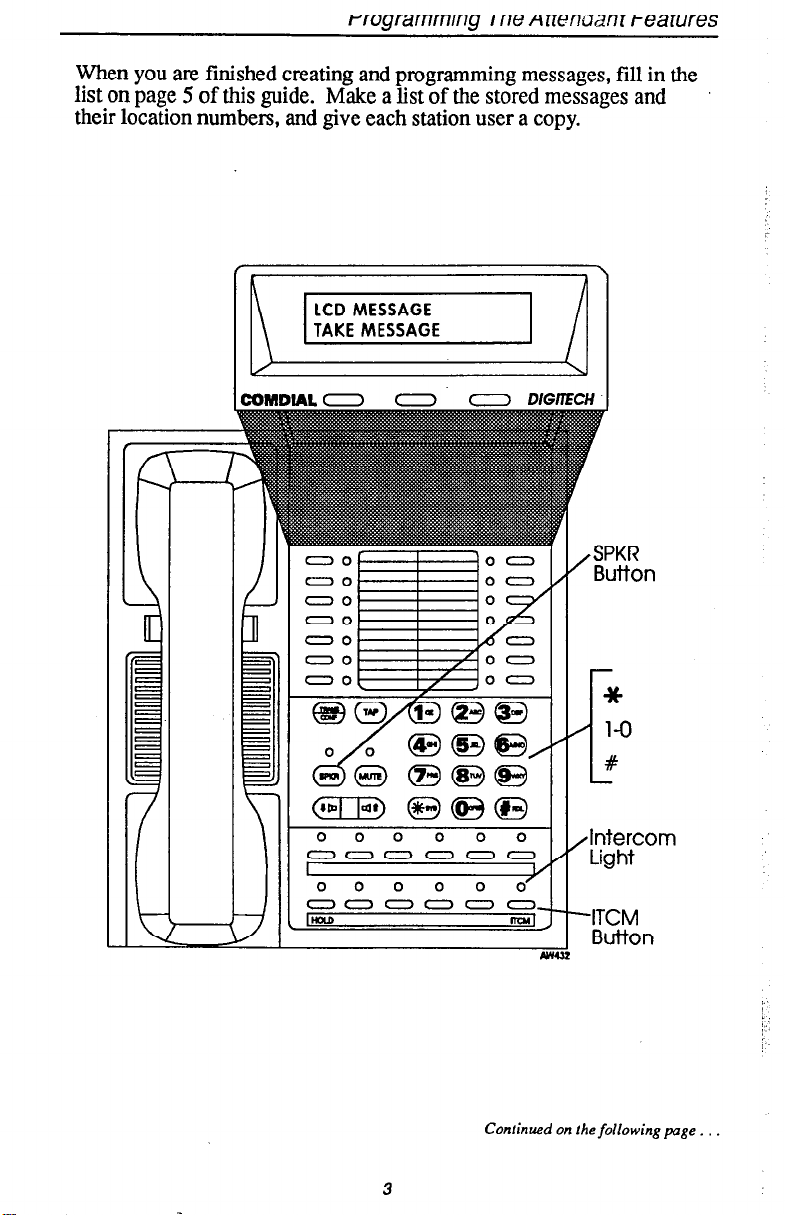
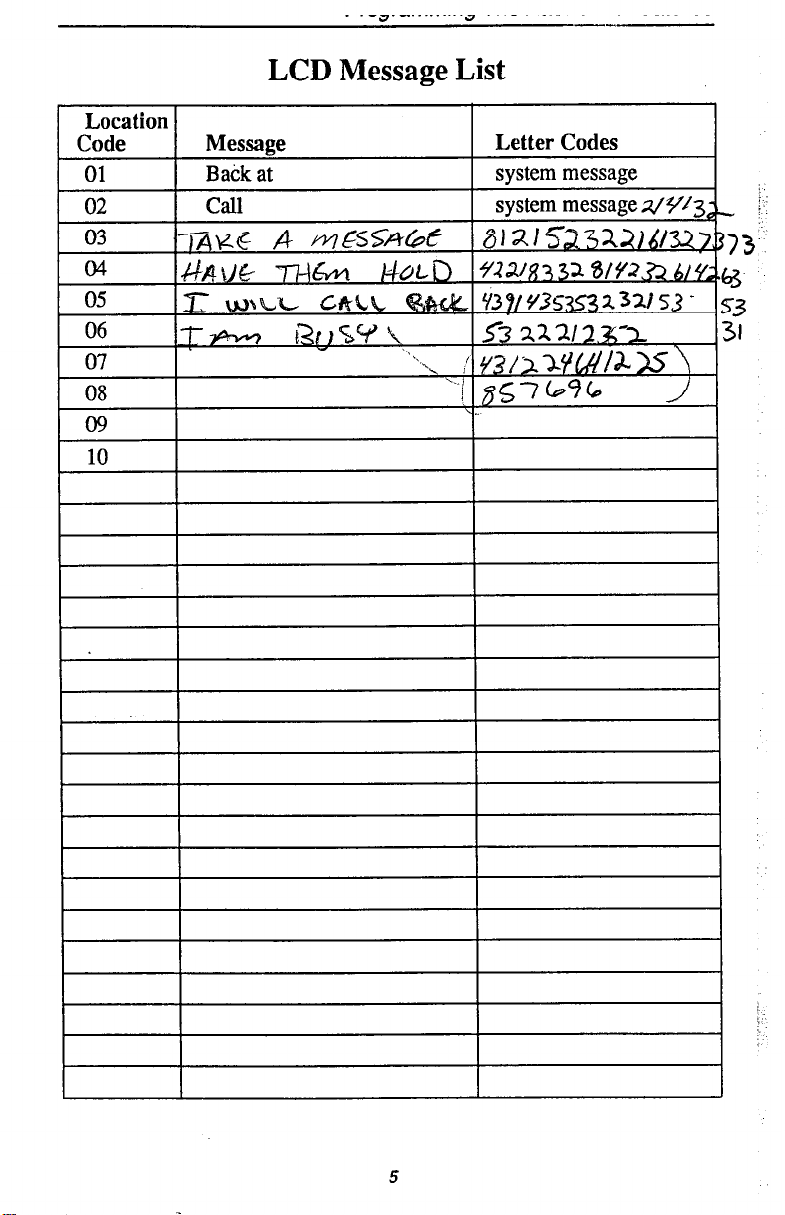
When you are finished creating and programming messages, fill in the
list on page 5 of this guide. Make a list of the stored messages and
their location numbers, and give each station user a copy.
00 00
00 00
00
00 0
@---pg @@@
0 0 0 0 0 0
000000
I
000000
000000
Im
0
Continued on the following page .
muI
,SPKR
Button
Antercom
Light
Y
-ITCM
Button
3
Page 8
rrvyrarrmmy
I ne menaanl tearures
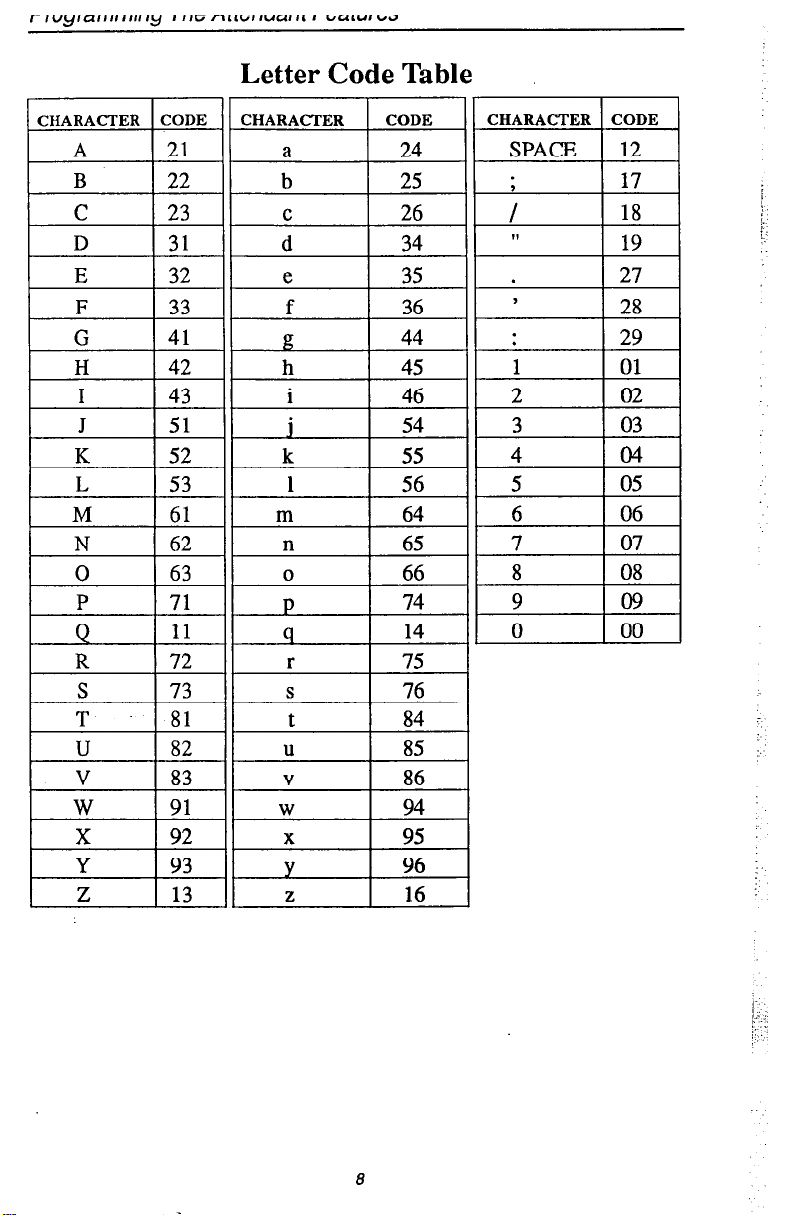
Letter Code Table
4
Page 9
LCD Message List
5
Page 10

rrvyra 111,111, ,y IIICirl~1GIIUCIIII rGcJ,“IGa
Direct Inward Station Dialing
The direct inward station dialing (DISD) feature allows an external
party to call an intercom station directly without assistance from the attendant if the call is made over a line programmed for that purpose. As
the system attendant, you may instruct callers to make DISD calls when
necessary.
For example, if a caller regularly dials a number that rings at the
attendant’s station for service, you may give the caller the DISD line
number and the extension number associated with the station he is
trying to reach. Future calls from the caller to a specific party will not
have to be serviced at the attendant’s station, although a ring-no answer
or busy condition at the called party’s station will result in the system’s
handling the call in another manner (described below).
When a caller makes a DISD call from an outside line, he or she will in-
itially hear ringing. The system will answer the call with a DISD con-
tinuous dial tone; the caller can then dial an extension number.
-
If
called station is
idle, a tone is sounded and called station rings.
- If the
call is answered by another station user, the
caller can ask for
transfer to desired station.
- If
ringing stops
and dial tone sounds again, the caller can dial another
extension number.
-
If
called station has callforward
-
If
calied’station is busy,
station. If
camp-on is not answered
call is placed on hold and camped-on at busy
feature set, forward station rings.
within a transfer recall timeout
period, busy tone is given, followed by a DISD dial tone.
Note: The system will return the caller to DISD dial tone two additional times
and then drop the line.
-
If
called station is busy but ispartof a huntgroup,
DISD call is routed
to idle station in hunt group, if available; otherwise, the call is campedon at dialed station. Hunt group is not followed when caller hears
ringing but receives no answer.
-
If
an invalid extension number
before DISD dial tone is returned (caller can redial). If
dialing is made,
Note: The system will return the caller to DISD dial tonetwo additional times
and then drop the line.
-
If
extension number dialing is not completed within the programmed
dial time limit,
caller can dial +K for new DISD dial tone.
call is routed to DISD assist station if available;
is
dialed,
an error tone is sounded
mistake in
otherwise, the line is dropped.
6
Page 11
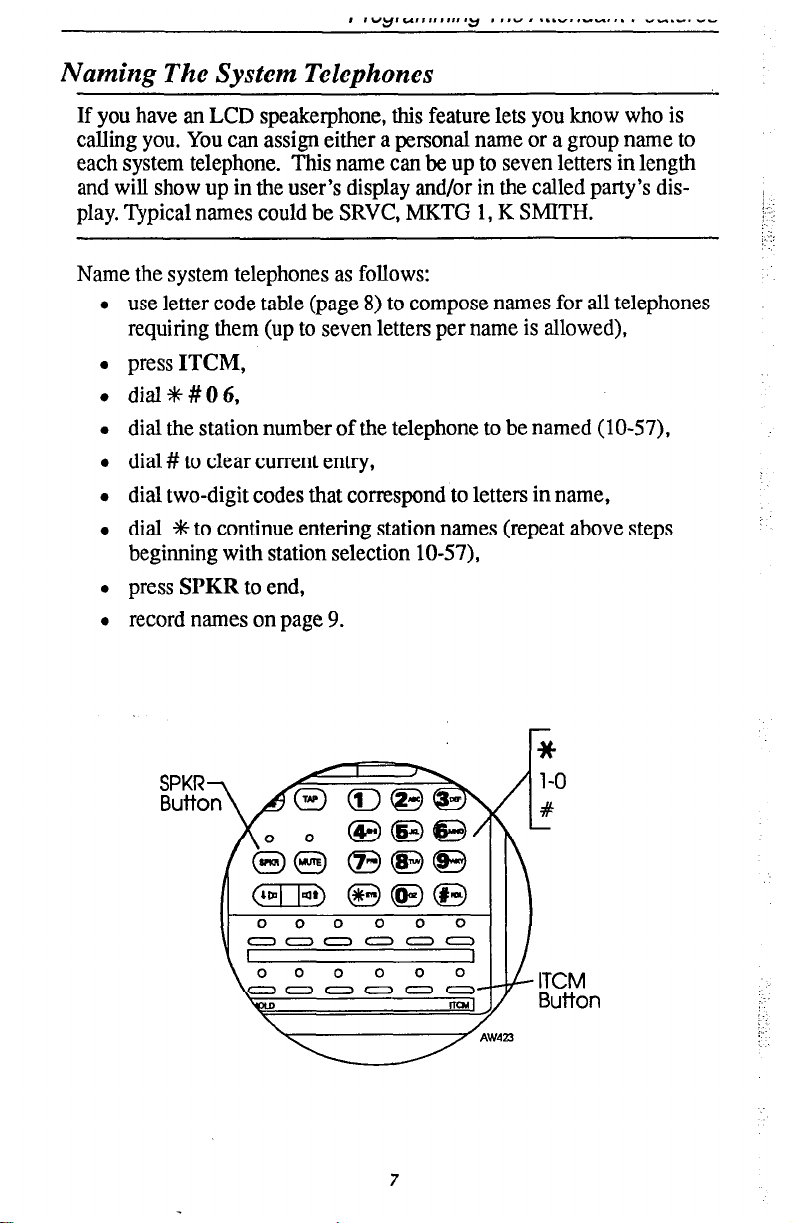
Naming The System Telephones
If you have an LCD speakerphone, this feature lets you know who is
calling you. You can assign either a personal name or a group name to
each system telephone. This name can be up to seven letters in length
and will show up in the user’s display and/or in the called party’s display. Typical names could be SRVC, MKTG 1, K SMITH.
Name the system telephones as follows:
l use letter code table (page 8) to compose names for all telephones
requiring them (up to seven letters per name is allowed),
l press ITCM,
l dial%#OO,
l dial the station number of the telephone to be named (lo-57),
l dial # to clear current entry,
l dial two-digit codes that correspond to letters in name,
l dial +l+ to continue entering station names (repeat above steps
beginning with station selection lo-57),
l press SPKR to end,
l record names on page 9.
7
Page 12
E 132 1
I
H 1 42
L 53
M 61
N 62
0 63
P 71
Q
R 72
S 73
Letter Code Table
11
8
Page 13
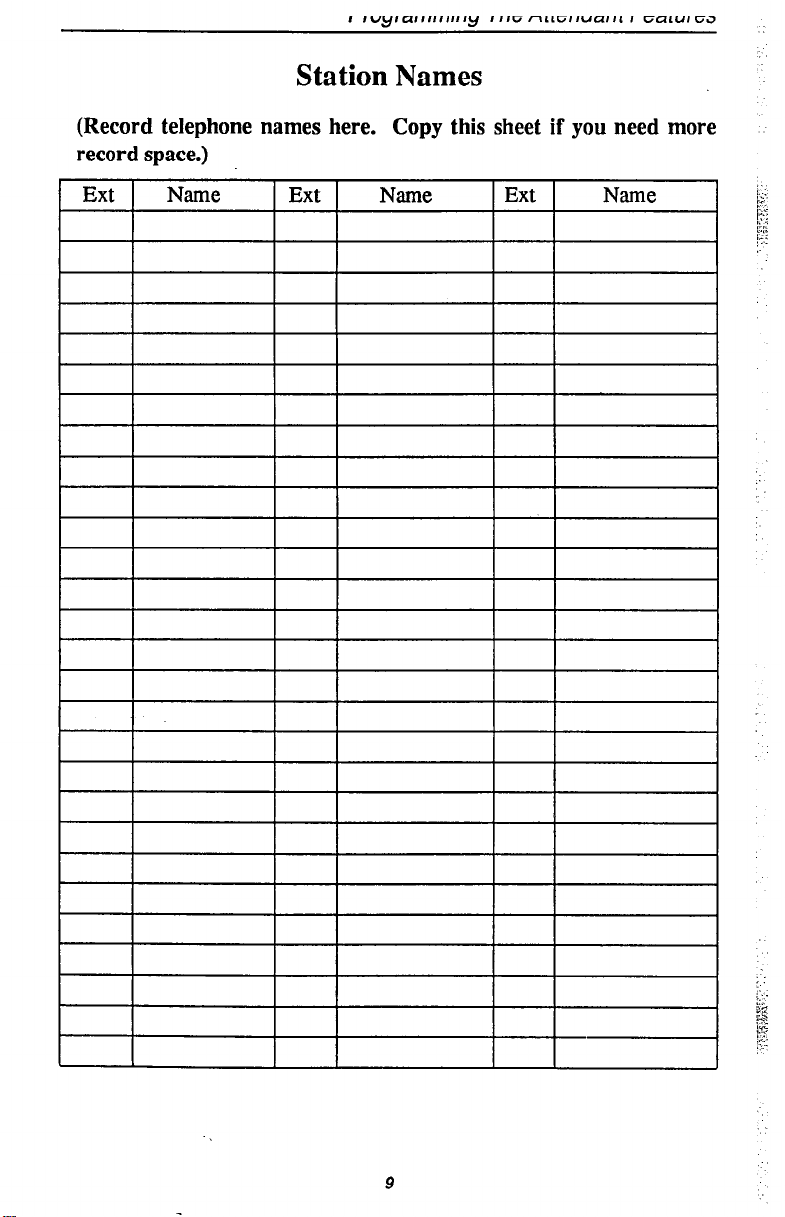
Station Names
(Record telephone names here. Copy this sheet if you need more
record space.)
9
Page 14
rrvyrdrrrrrrrrry I IICZ rl,LlG,I”clll‘ rGa‘“,Ga
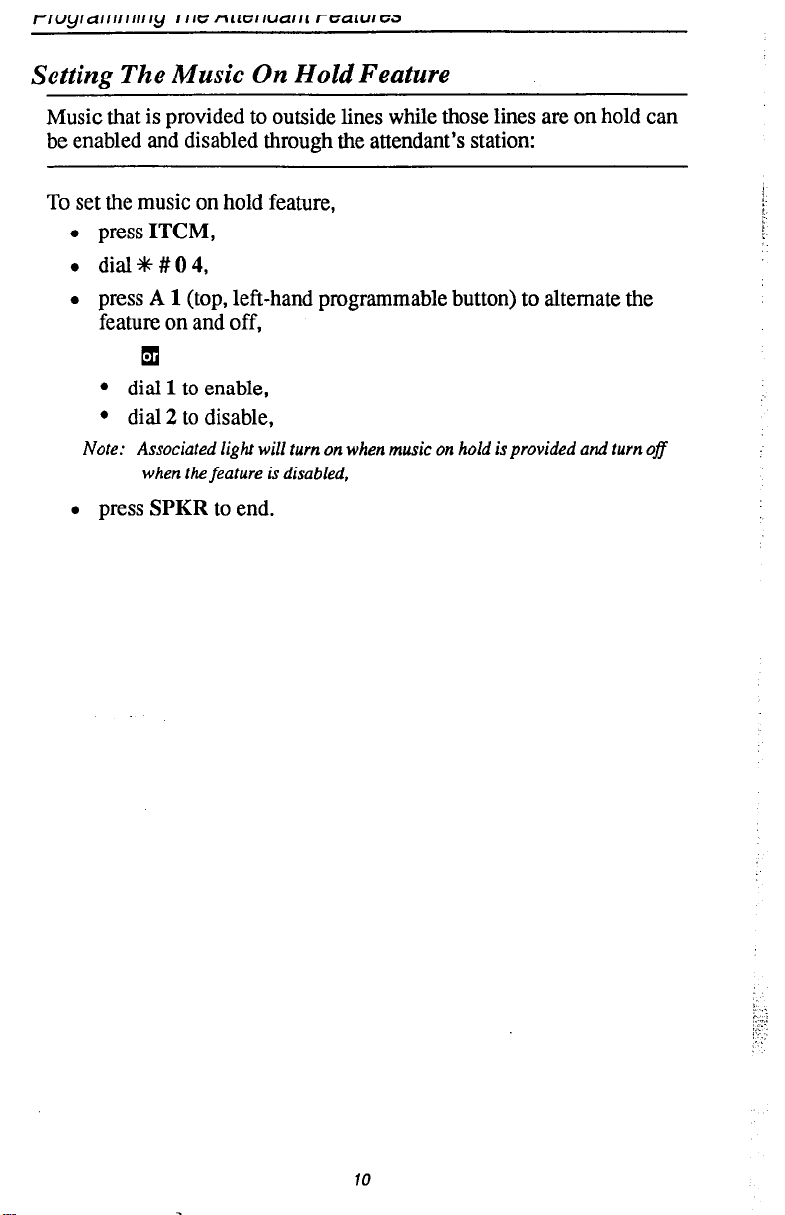
Setting The Music On Hold Feature
Music that is provided to outside lines while those lines are on hold can
be enabled and disabled through the attendant’s station:
TC 3 set the music on hold feature,
l press
l dial+%#OO,
l press
ITCM,
A 1
(top, left-hand programmable button) to alternate the
feature on and off,
q
l dial
l dial 2 to disable,
Note:
1
to enable,
Associated light will turn on when
when the feature is disabled,
music
on hold is provided and turn off
l press
SPKR
to end.
10
Page 15

rrvyrarrrrr~~r~y I IIG ~~uziiucuit rci’diuiea
-Al
*
#
/
1-O
c
000000
0-o--r
I
000000
0000-0~
tm
11
1
IlO
- SPKR
Button
/ ITCM
Button
Page 16

rrogrammlng I ne Hrrenaanr Pearures
Setting The Night Transfer
The
day (or normal) ringing assignments of incoming lines can be trans-
Of
Ringing Mode
ferred to a particular station or stations for off-hour or special purpose
answering (such line/station ringing assignments are made through
class of service programming). Additionally, stations can be arranged
through class of service programming to answer any ringing outside
line. The ability to answer a line from any station is also enabled
through the night transfer of ringing mode.
To set the night transfer mode,
l press
l dial+#OO,
l press
ITCM,
Al
(top, left-hand programmable button) to alternate the fea-
ture between on and off,
q
l dial
l dial 2 to disable,
Note: Associated light will turn on when night tran&er is active and will turn off
l press
Because Night Transfer is a commonly used feature, you may wish to
program a button to serve as the Night Transfer button.
1
to enable,
when the feature is disabled.
SPKR
to end.
To do this,
l press
l dialS+l,
l press one of the programmable buttons,
l press
l dial+k#OO,
l press
ITCM,
ITCM,
SPKR
to end.
To set the Night Transfer Of Ringing mode, simply press the Night
Transfer button you’ve programmed. To return ringing to the
attendant’s station, press the Night Transfer button again.
12
Page 17

..
:
I
/
/
mcmcn
00
00
00
00
00
00
00
-Al
*
#
1-o
4
- SPKR
Button
/ ITCM
Button
73
j ._
: :
:
Page 18

Setting The System Clock
The system clock can be programmed to maintain current date and time
information. This information is provided to the LCD speakerphone
for display.
To set the system clock from the attendant’s station,
l press ITCM,
l dial*#Ol,
l dial two digits (00-99) for year,
l dial two digits (01-12) for month,
l dial two digits (01-31) for day,
l dial two digits (00-23) for hour,
l dial two digits (00-59) for minutes,
l press SPKR to end.
r *
14
Page 19

Station Message Detail Accounting (SMDA) Printout
If your system is connected to a printer, you can command the system
to print several different types of reports and to delete all stored SMDA
records.
To print an SMDA report,
l press
l dial*#OO,
l choose report to be printed:
ITCM,
- dial 1 # for station report
- dial 2 # for line report
- dial 3 # for SMDA department report
- dial 4 # for account code report
- dial 5 # for automatic reports
- dial 6 #to print all records.
- dial 7 #to delete SMDA records
- dial 0 # for Departmental Call Distribution (DCD) report
- dial 8 to obtain the number of free records remaining in the
system (appears in LCD display)
; :
j..’
.:
- dial 9 to abort printing
l press
SPKR
to end.
Page 20

Storing The System Speed Dial Numbers
You can store up to 99 system speed dial numbers at your attendant
telephone that every system user can access from his or her telephone.
Typically, these are numbers that are frequently called by many different users and emergency numbers that you want readily available to
everyone. Distribute a list of these stored numbers to the system users
for their reference.
To program system speed dial numbers from the attendant’s station,
l press
l dial%# 02.
l dial
l dial # to clear current entry,
ITCM,
01
- 99 to choose storage location,
a choose line that is to be used:
- dial 90 for no line assignment (system will choose last line used
at calling station or prime line if one is assigned to calling
station),
q
- press buttons
Al - Al4
for lines 1-14 or dial
01 - 14,
q
- press buttons
Bl, B2
for lines 15, 16 or dial
15,16,
q
-
-,,s;FOLD
then press buttons
Al - A8
for lines 17 - 24 or dial
- 9
q
- dial 91- 94 for line groups 1 - 4,
q
-
press
ITCM
l dial the number to be stored (32 digits maximum),
-
press
HOLD
for intercom line,
to store pause (if required),
-
press
TAP
to store flash (if required),
l press
l repeat above steps (beginning with choice of storage location) to
TRANS/CONF
to save number,
store next number,
l press
SPKR
to end.
76
Page 21

-Al-A14
-TAP :
Button
*
#
/
1-O
E
B2Bl-
HOLD Bull-ON
‘c
\,L
Il\O\O 0 0 0 0
L
~000000,
000000’
\ lm
17
ml,
I
AW41’
- SPKR
Button
/ ITCM
Button
Page 22

Programming The Attendant Features
System Speed Dial Numbers
(Record system speed dial here. Copy this sheet if you need more
record space.)
18
Page 23

System Speed Dial Numbers
(Record system speed dial here. Copy this sheet if you need more
record space.)
Page 24

rruyra~rrrrrmy I ne nrrenaanr r-earures
System Alarm Reporting
Occasionally, the DXP system will fail to communicate with a particular station; it could be that the station has been disconnected from
its station port or that the system data printer is off line. When the system experiences these disruptions, an alarm signal will display at the
attendant’s station or any LCD speakerphone when provided for by
class of service programming. In order to review the system alarms,
the attendant can command the system to present alarm codes on the
station display.
When this feature is provided, a flashing +R appears on the first line of
your telephone’s LCD to indicate that new alarms are present. It is a
good idea to write down which alarms are displayed so that you may
report the nature of the alarms to your system installer.
To display alarm codes,
o press andhold +K f 5 or seconds. The following status reports will
be displayed:
- Station disconnected from station port for more than five
minutes. Month, day, station port number, and station extension number are shown.
Display shows:
“MolDa Pxx xx.xx A”
- Communications difficulty between a station and the common
equipment. The number of parity errors, up to 256, and the affected station port are shown.
Display shows:
” xxx PARITY Pn ”
- Data printer off-line,
Display shows:
“PRINTER OFF LINE”
You may press 0 to cancel the alarm report displays.
After the information has been shown on the display, the +K disappears
until another alarm occurs.
20
Page 25

rrogrammlng 1 ne Attenaan t t-eatures
,SPKR
00
00
00
00
00
00
Button
/*
21
00
Page 26

Transferring Calls To The Voice Mail System
As the attendant, you will not always have time to hand-write messages
for all of the people in your group. Transferring some calls to a voice
mail system provides an easy, efficient way for callers to record lengthy
messages to be retrieved by individual station users later.
You can program your attendant’s telephone so that you will be able to
transfer calls to voice mail by pressing a single button (known as the
Transfer To Voice Mail autodial button).
To program a Transfer To Voice Mail autodial buttoh at your
telephone,
l press ITCM,
l dial*%l,
l press programmable button for Transfer To Voice Mail autodial
button location,
l dia16,
l dial extension number of the voice mail station port,
o press SBKR to end. (Label button location.)
To transfer calls to the voice mail system,
l while on a call, press preprogrammed Transfer To Voice Mail
autodial button,
l dial extension number of party to receive voice mail message.
The system will automatically dial into voice mail and direct the
message to the appropriate voice mail location for later retrieval.
22
Page 27

SPKR-
Button
V u
EOMOULO 0 0 DImEad
00 00
00 00
00 00
-
1-o
#
*
-ITCM
Button
Programmable’
Buttons
23
Page 28

rrogrammrng I ne Attendant Features
Transferring Recalls To A Secondary Attendant
Telephone
The system installer can arrange for another telephone (station 12) to
serve as a secondary attendant location. When this feature is enabled
through programming, incoming calls ring at the regular (or prime)
attendant’s station, but recalls from unanswered transfers or timed hold
recalls will ring at both attendant stations simultaneously. Neither the
prime attendant nor the alternate attendant can program the feature
directly; only the installer, through class of service programming, can
enable or disable the alternate attendant.
24
Page 29

unaersranamg 1 ne L L;u uispiays
Display Type
Assist
Automatic Callback
Automatic Redial
-1 tive.
Call Costing
When Displayed
This preprogrammed message ap.
pears in the display to which it is
sent. Either a name or a station
number can be entered.
Display shows that feature is ac-
Call Forward
Call Messaging
Display shows extension number
of telephone to which call is for-
.
Display prompts for message.
Entering a keypad digit (O-9)
causes a message to be displayed.
25
Page 30

Display Type
Call Timer
1-1
Calling Station
Conference Calls
m
When Displayed
Begins during dialing and disap-
pears after hang-up.
To recall display for last com-
pleted call, press HOLD key.
The display shows extension
number or name of calling
.
When conferencing with lines,
this shows up in display.
When conferencing with other
Dia1e.d Numbers
The display wiU show all dialed
numbers or names along with any
Station:
c
Line. . -1 iz!~~~~~~x~~:
Then, after approximately 1
v,:,,/ pear in;he bot&)m line.
minute the call time will ap-
26
Page 31

Display Type When Displayed
Display Contrast Adjustment
Display after holding down Mute
v
~$d%&i;; y
Do Not Disturb
Display shows “Do Not Disturb”
-1
when feature is active.
Hold Recall
When a timed hold recall occurs,
display shows the recalling line.
Last Number Redial
When last number dialed is
display shows dialed
ds.
Line Queuing
Line Selection
When line is selected for calling
when ringing line is answered.
Lines can be programmed to display numbers or names, i.e. WATS
27
OI
Page 32

Display Type
When Displayed
Mute
Display shows when feature is ac-
Music on Hold
After you press ITCM * # 0 4;
Line 2 will display MOH DISABLED if music on hold feature
is off.
After you press 2 to disable (press
1 to enable feature; press Al to al-
ternate feature on and off).
Night ‘Ikansfer of Ringing
After you press Al or 1 to enable
(press 2 to disable feature; press
Al to alternate feature on and off).
Display for zone paging (paging
28
Page 33

Display Type When Displayed
Programming for Autodialing and Station
Speed Dialing
After you press
-1
-1
-1 in display.
appears in the display.
After you enter location, this ap-
pears in display.
After you enter line, this appears
Display after you dial the number.
ITCM f t 1, this
-1
Programming System Speed Dialing
After you press
this appears in the display.
After you enter location, this ap-
-1
-1
-1 number,
pears in display.
After you enter # to clear, this ap-
pears in display.
Display after you enter the line
ITCM +k # 0 2,
piEq
Saved Number Redial
Display after you dial the number.
When a number is saved, display
shows that feature is active. When
saved number is dialed, display
shows selected line, then shows
dialed number.
29
Page 34

Display Type
When Displayed
Service Observing
When using service observing, the
names or extension numbers of
two stations show up in display.
Station Message Detail Accounting (SMDA)
Printout
Station Identification
After you press
this appears in the display. The following report names will appear
in Line 2 as you enter the number
corresponding to each one:
1 = station report
2 = line report
3 = SMDA department report
4 = account code report
5 = automatic reports
6 = print ah reports
7 = delete SMDA reports
8 = number of free records
remaining in system
9 = abort printing
0 = Departmental Call Distribution
Report (DCD)
Pressing SPKR when your station
is idle causes your extension num-
ber, port number and station name
to show up in the display.
X = extension number
Y = port number
2 = station name
ITCM +k # 0
7,
30
Page 35

Display Type When Displayed
Station Name Programming
After you press ITCM +N # 0 6.
After you dial number of station to
be named (if station is already
named, a name will appear in Line
2; the name will be removed if
you press *).
As you press two-digit number
codes corresponding to letters in
the station name, the letters will
appear in Line 2 of the display.
X = statjon name.
System Alarm Reporting
After you press and hold +# for
five seconds, the display will
remain unchanged if there are no
system alarms to report.
After you press and hold f for
five seconds, one of the following
will appear:
When there has been a station dis-
When there has been communica-
tions difficulty between a station
and the common equipment.
When the printer has been taken
31
Page 36

Display Type
When Displayed
System Clock And Calendar
Always displayed as top line of
71 display.
NOTE: Date and time are set by
attendant as part
programming.
of system
Setting the System Clock and Calendar
After you press
this appears in the display.
After you enter two-digit codes
for year, month, day, hour, and
minutes, this appears in display.
YY = year hh = hour
MM = month mm = minutes
DD = day
After you enter the clock and
calendar information, Line 2 will
go
blank. Press
ITCM +# # 0 1,
SPKR
to save.
Transfer Recall
When a timed transfer recall oc-
32
Page 37

Glossary
A
All-call paging: Paging through the intercoms of all stations in
the system.
Assist button:
send a message requesting assistance to the LCD of another
telephone.
Automatic callback: System will ring a calling telephone when
a busy called telephone becomes idle.
Automatic dialing (or Autodialing): Using programmable buttons to store numbers for one- or two-button dialing.
Automatic redialing: Turning on a program that automatically
redials the last number dialed once a minute for 10 minutes.
C
Call forward: Designating another telephone to receive inter-
com calls normally directed to the user’s telephone.
Call park: Placing an active call at a particular telephone in sys-
tem hold (park orbit) and retrieving it by any telephone.
Call pickup: Answering a call at one telephone when it is ringing at another telephone.
Call transfer: Transferring a call from one station to another.
The transfer can be screened, i.e., you find out who is calling and
announce them to the party being called; or unscreened, i.e., you
transfer the call without identifying the calling party to the called
Pam.
Central message desk: A station that has been assigned to control message waiting lights and deliver messages to other stations
in the system.
Class of Service programming: Customized programming of
your system by the installer that establishes the basic operating
parameters of the system and individual stations.
D
A button that you can program that will let you
Departmental station operation: The operation of stations that
are organized into departments.
Direct Inward Station Dialing (DISD): This feature allows an
outside party to call an intercom station directly without an
attendant’s assistance.
Direct Station Selection/Busy Lamp Field (DSS/BLF): Using
one button to place intercom calls; the button is sometimes
referred to as a DSS button. Busy lamp field or BLF is a term for
a
light
that identifies current call status of DSS station.
33
Page 38

Do not disturb: A mode that disables incoming call ringing and
intercom calling.
Dual Tone Multiple Frequency (DTMF): The tones made by
your telephone when you dial.
Dynamic line button: System temporarily assigns a normally
unassigned line to an idle line button for certain call handling
operations.
E
Exclusive hold: Only the telephone placing the call on hold can
retrieve it.
Executive override: Breaking into a conversation at a busy
called telephone. This intrusion is announced by several quick
tone bursts over the conversation.
H
Handsfree answer inhibit: A telephone can be set to block
voice calls sent to it over the speaker.
Hookflash: Action that occurs when the TAP button is pressed.
Needed for activating host system features.
Hookswitch: The switch on a telephone which, when depressed
manually or by the handset, disconnects a call.
K
Keypad: Buttons 0 through 9, + and # used for dialing.
L
Last number redialing: Automatically dialing the last number
dialed.
M
Messaging: Turning on a telephone lamp to let the user know
that a message awaits pickup and leaving a message on the display of a telephone that gives information on your status.
Mute: A fixed feature button that keeps a distant party from
hearing your conversation. This button also lets you adjust the
telephone display contrast from light to dark.
N
Night transfer: Transferring incoming calls to a particular sta-
tion(s) for off-hour answering.
P
Personal ringing tones: A telephone can be arranged to ring in
one of six distinctive tones.
34
Page 39

Prime line: A line designated to a particular telephone and auto-
matically selected when the handset is lifted.
Programmable buttons: Each telephone or station has buttons
that can be user-programmed for autodialing numbers or feature
codes, or other special purpose dialing requirements.
Pulse/Tone switching: Changing from pulse/rotary dial signals
to tone/DTMP signals.
R
Response messaging: Responding non-verbally to a calling station by pressing a programmed button that sends a message to
the calling station’s display.
Ringing line preference: An automatic connection to any out-
side line ringing at the station when the station handset is taken
off-hook.
S
Saved number redialing: Saving a last manually dialed number
for later autodialing.
Secure off-hook voice announce: A private announcement that
can be made to a busy party which they hear through the receiver
of their handset.
Speed dialing: Autodialing using the keypad buttons. Speed
dialing can be station calls (personal and accessed by only one
specific user) or system calls (numbers used and accessed by
anyone in the system).
System alarm reporting: Allows you to view (through an LCD
telephone display) the various system alarms and the stations
with which those alarms are associated.
T
TAP: Depending on your system’s programming, this button
gives you a fresh dial tone or activates a hookflash.
Tone call: A ringing intercom call.
TransKonfi A fixed feature button that allows you to transfer
outside calls and set up conference calls.
v
Voice call: A verbal intercom call.
Voice announce blocking: A telephone can be set to block
voice calls sent to it over the speaker.
Z
Zone paging: Paging through the intercoms of some stations or
departments in the system.
35
Page 40

Abbreviations, LCD Display
..........................
AlarmReporting ..............................
Attendant Features, Progr anuningThe
Clot k. system
Direct Inward Station Dialing
Glossary
LCD Display Abbreviations
................................. .14
......................... 6
....................................
..........................
.................... .2
iv
..2 0
.33
iv
LCD Dispalys, Understanding The ...................... .25
LCDMessages, Creating
MusicOnHoldFeature,SettingThe
............................ 2
..................... .lO
Naming The System Telephones ........................ 7
Night Transfer Of Ringing Mode, Setting The
progranuning The Attendant Features
Secondary Attendant Telephone, Transferring Recalls To A
SMDAPrintout
Station Names
................................ .15
.................................. 7
Station Message Detail Accounting (SMDA) F’rintout
SystemSpeedDialNumbers,St&ngThe
System Telephones, Naming
System Clot k. Setting The
System Alarm Reporting
Transferring Calls To Voice Mail
.......................... 7
..........................
...........................
....................... .22
Transferring Recalls To A Secondary Attendant Telephone
Using This Supplement
Voice Mail, Transferring Calls To
............................. 1
...................... .22
................ .12
..................... 2
......... .24
............ .15
.................. .16
.14
.20
.........
.24
36
Page 41

Notes
Page 42

Page 43

Notes
Page 44

This manual has been developed by Ccmdial Corporation (the “Company”) and is intended for the
use of its customers and service personnel. The information in this manual is subject to change without
notice. While every effort has been made to eliminate errors, the Company disclaims liability for any
difficulties arising from the interpretation of the information contained herein. The information
contained herein does not purport to cover all details or variations in equipment nor to provide for
every possible contingency to be met in connection with installation. operation, or maintenance.
Should further information be desired, or should particular problems arise which are not covered
sufficiently for the purchaser’s purposes, contact Comdii. Customer Service Department, Charlottesville, Virginia 22906.
COMDIAL
Charlottesville, VA 22906-7266
Printed in U.S.A.
GCA 70-228.01 Q
l/92
 Loading...