

Page 1
DXP
Digital Communications System
System User’s Guide
For DigiTech Telephones
(Attendant Supplement)
CCOMDIAL
Page 2
This user’s guide is applicable for the
following telephone models:
77OOS-** Rev A through H
7714S-** Rev A through H
7714X-** Rev A through H
Page 3

Table Of Contents
Using This Supplement
.............................
1
Programming The Attendant Features
................ 2
Creating The LCD Messages
....................... 2
Line Disable Programming
........................ 6
Naming The System Telephones
.................... 8
Naming The Telephone Lines
.....................
12
SettingTbeNigbtTransferOfRingingMode..
.......
16
Setting The System Clock
........................ 17
Storing The System Speed Dial Numbers
............ 18
Transferring The Attendant Functions
To The Alternate Attendant Telephone
............
21
Using Special Attendant Buttons
.................... 22
Special Attendant Button Operations
...............
22
Understanding The LCD Displays
................... 26
Glossary Of Terms
................................
29
. . .
III
Page 4
Using This Supplement
Using This Supplement
To help you use your attendant’s telephone to its fullest capacity, this’
supplement to the system user’s guide describes the attendant’s
telephone and tells you how to use it.
You can program special features on your telephone that arc unique to
attendant station operation. The instructions for programming these features and special attendant buttons are included in the sections titled
l
Programming The Attendant Features
l
Using The Special Attendant Buttons
For your convenience, a display summary and a glossary of terms are
included in the back of this supplement.
The operation sections of the accompanying user’s guide define often-
used features and provide instructions for their use. Please refer to the
following sections of the user’s guide for more information about your
telephone’s basic functions:
l
Knowing Your Telephone
l
Understanding What The Lights Mean
l
Using Your Telephone To Answer Calls
l
Using Your Telephone To Make Calls
l
Using Your Telephone To Place Calls On Hold
l
Using Your Telephone To Transfer Calls To Another Telephone
@ Using Your Telephone For Conferencing Telephones Together
l
Using The Other Telephone Features
l
Sending And Receiving Non-Verbal Messages
l
Programming Your Telephone
l
Understanding the LCD Displays
l
Using Your Quick Reference Guide
Page 5

Programming The Attsndan t Features
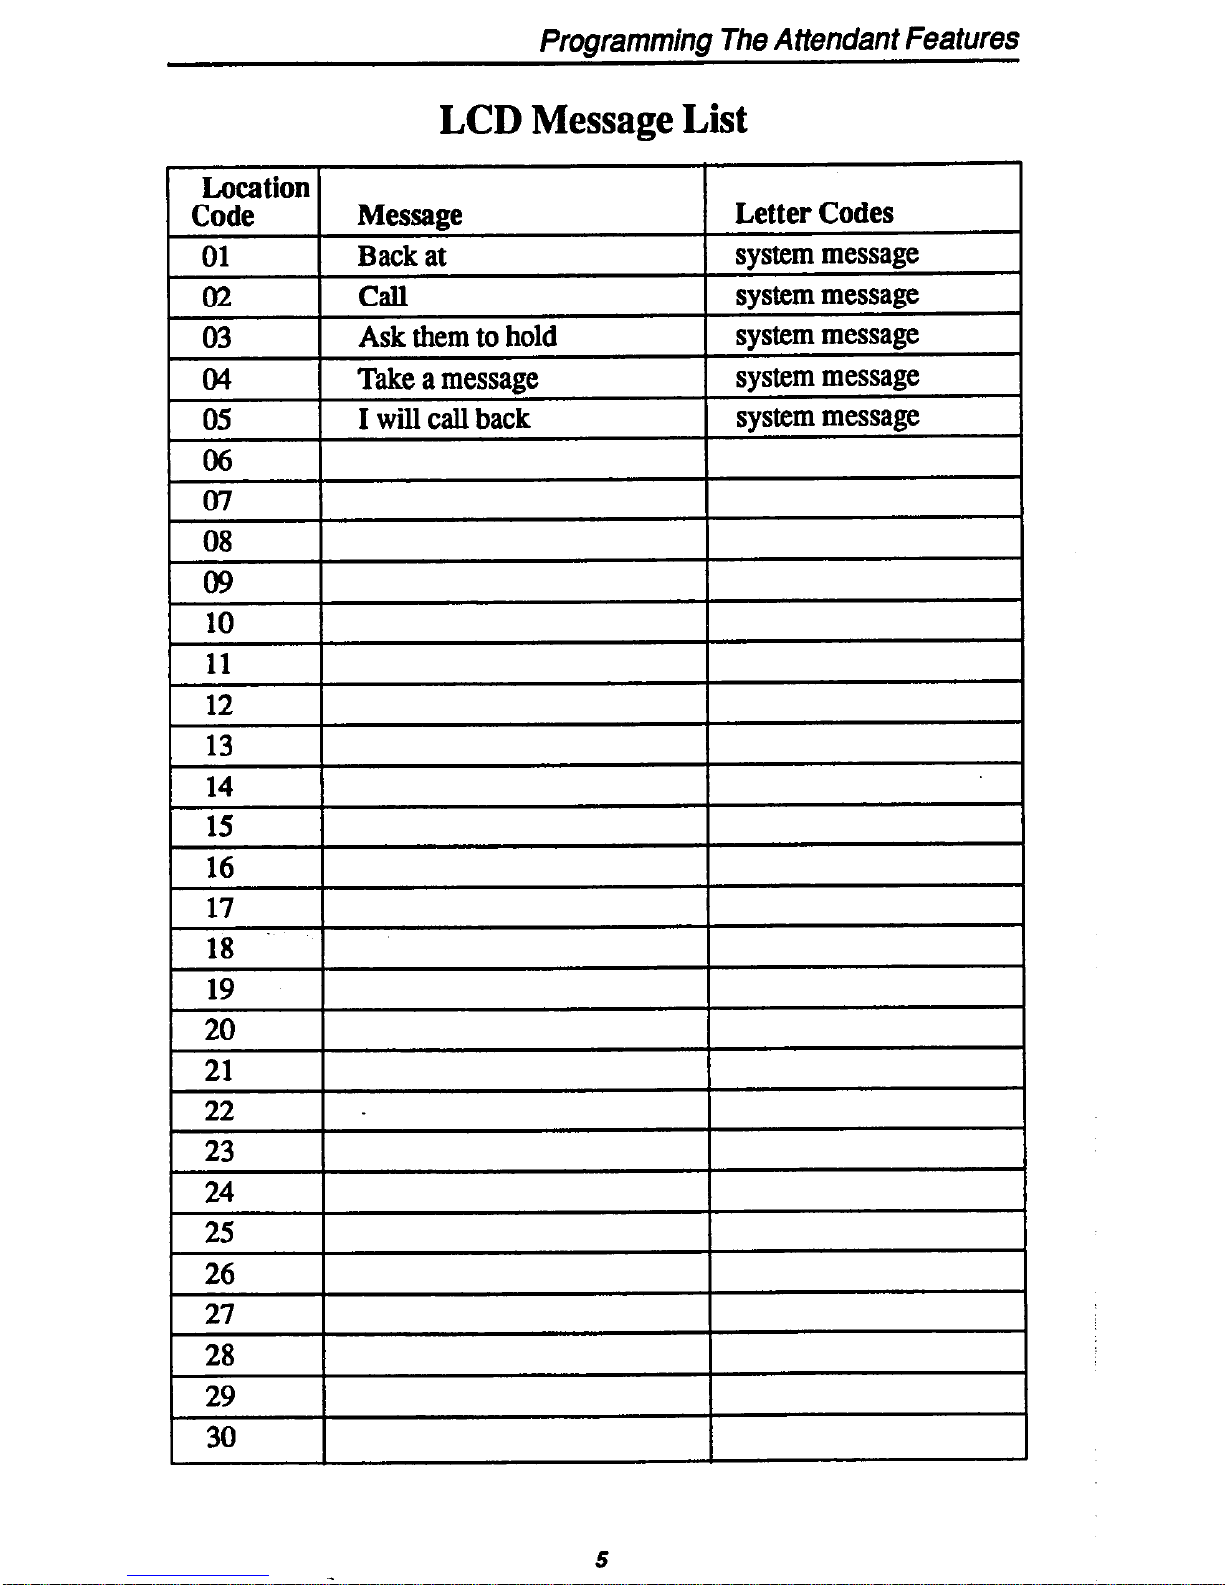
Creating The LCD Messages
System users send and receive non-verbal messages for display on
LCD speakerphones. Users send these messages so that callers will
know their status when they call and get no answer. Or they use a mes-
sage to respond to a secure off-hook voice announcement, LCD messages are either those that the DXP system provides or those that you
create. The system provides five messages; you can add an additional
25 customized messages. This makes a total of 30 messages available
for use. You can store customized messages in place of the default messages if you wish, thus increasing the number of custom messages avail-
able. Distribute a list of these LCD messages to the system users for
their reference.
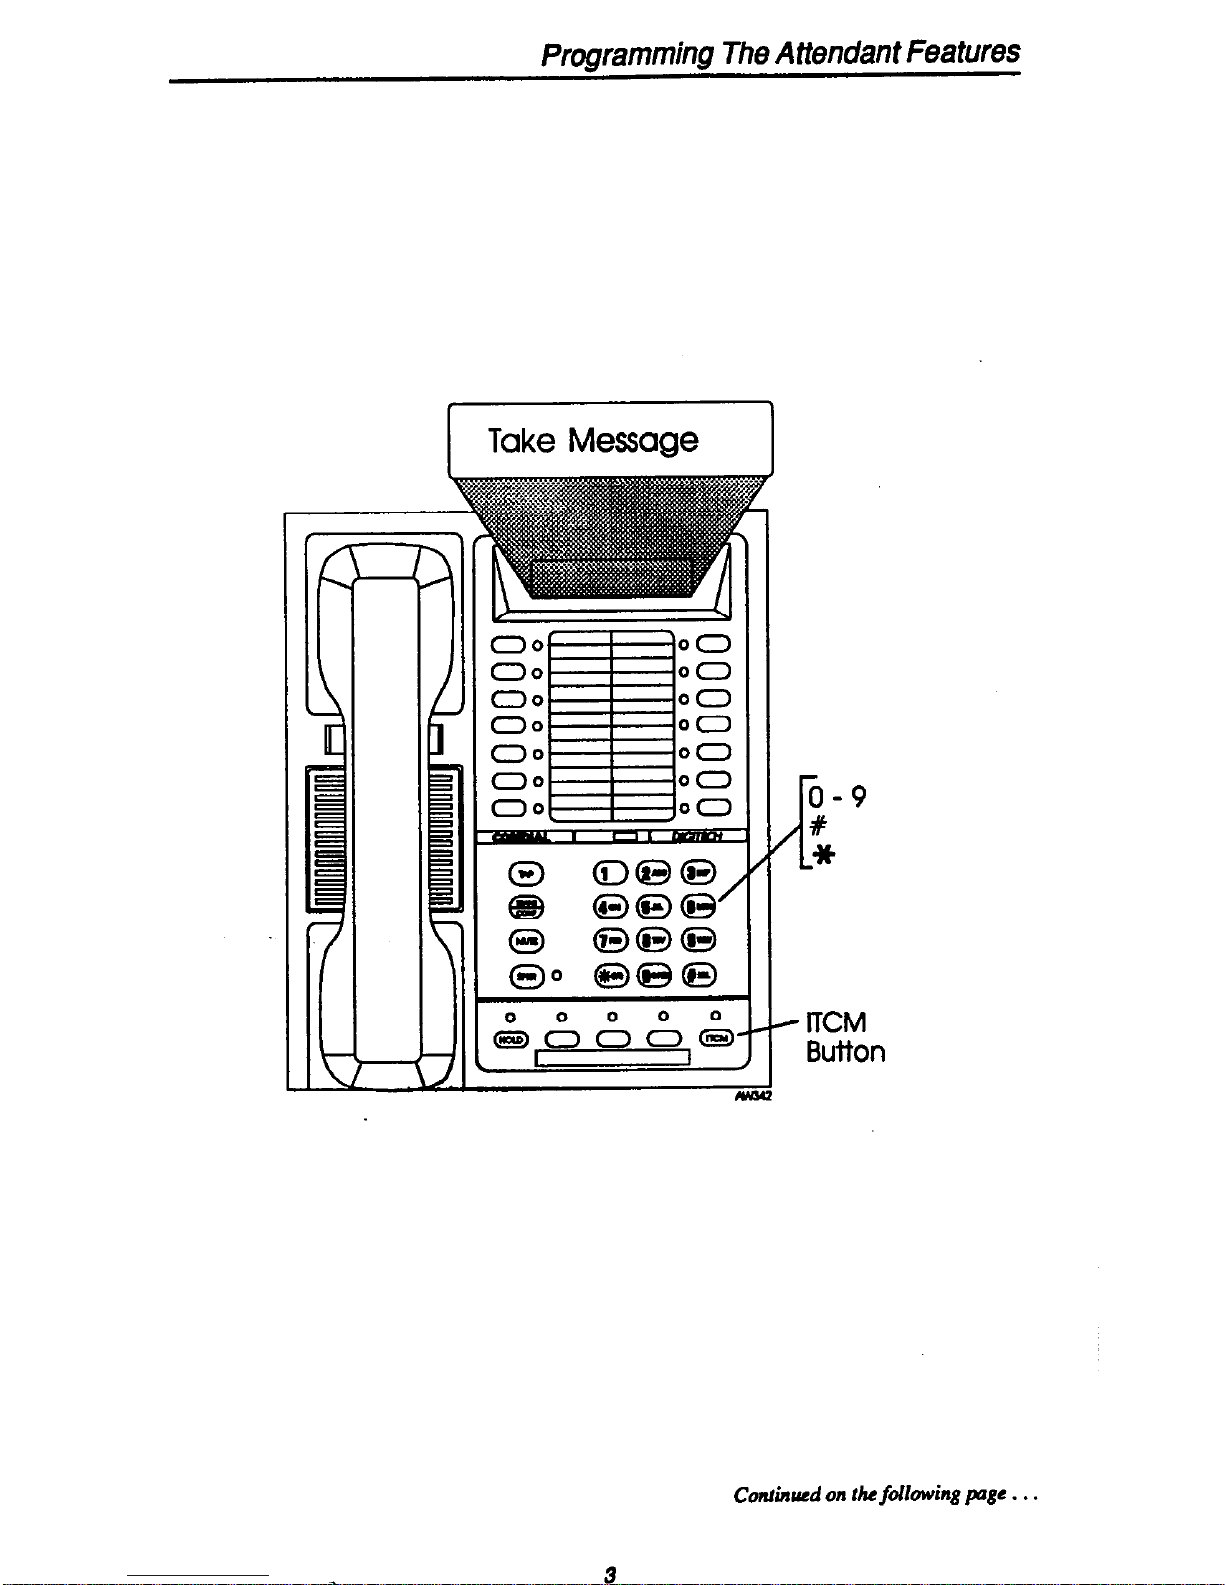
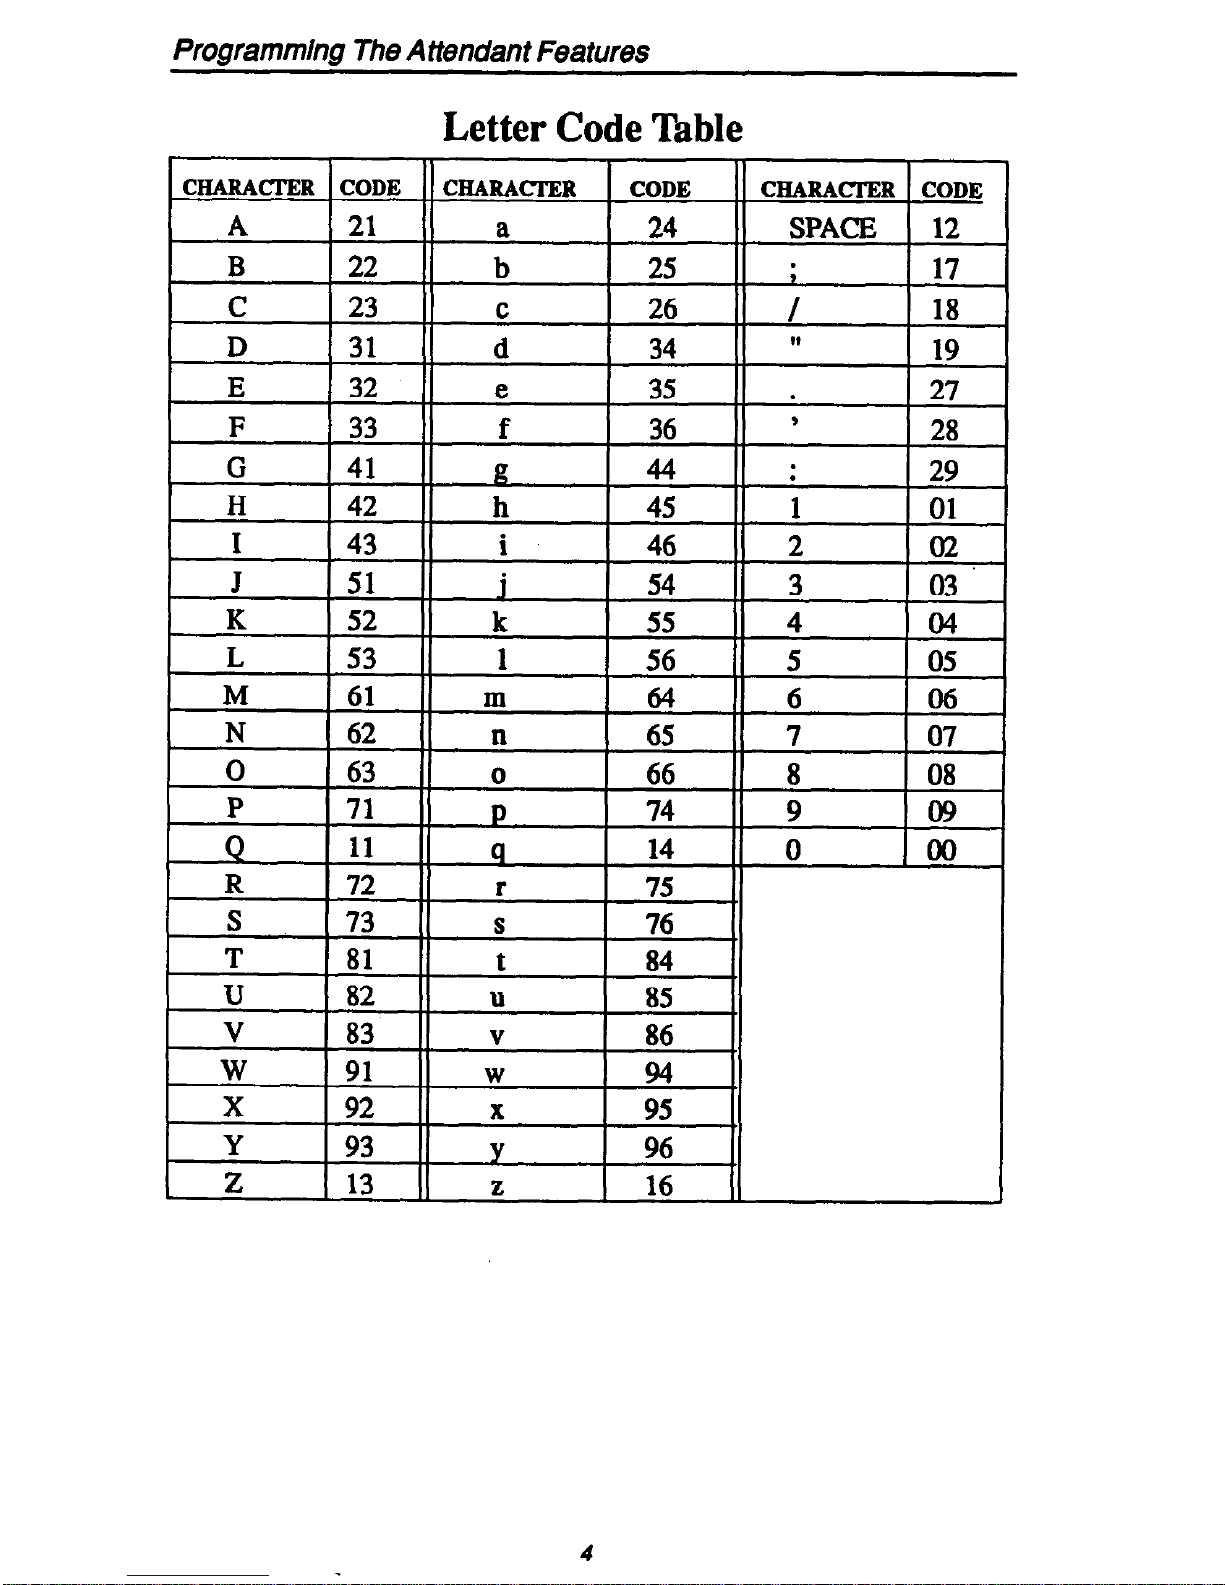
To stem the LCD messages, proceed as follows:
write your messages on the chart on page 7 1 (each message can
have up to 16 characters),
use the letter code table (on page 70) to assign a number to each
letter,
write these numbers on the chart line beside the message letters.
press ITCM,
dial4#0*12,
dial a message location number (01 - 30).
dial # to clear current message,
compose your messages by dialing the two-digit codes that relate
to the letters,
dial # to save message,
dial next location number, # to clear it, two-digit codes for the
message, and +# to save,
repeat previous step until all messages arc stored,
press SPKR to end.
Example: Create a message that will mad as “TAKE MESSAGE” and
program it into message location number 3.
- press ITCM, dial f # 0 +# 12,
- dialO3#,
- dial 81,21,52,32 12 61,32,73,73,21,41,32
TAKE
space
ME S SAGE
- dial t, and press SPKR to end.
2
Page 6
Programming The Attendant Features
Take Message
I
r
Y
u
- ITCM
Button
Conhued on
the fdlowing page . . .
3
Page 7
Programming The Attendant Features
Letter Code Table
Page 8
Programming The Attendant Features
LCD Message List
Page 9
Programming The Attendant Features
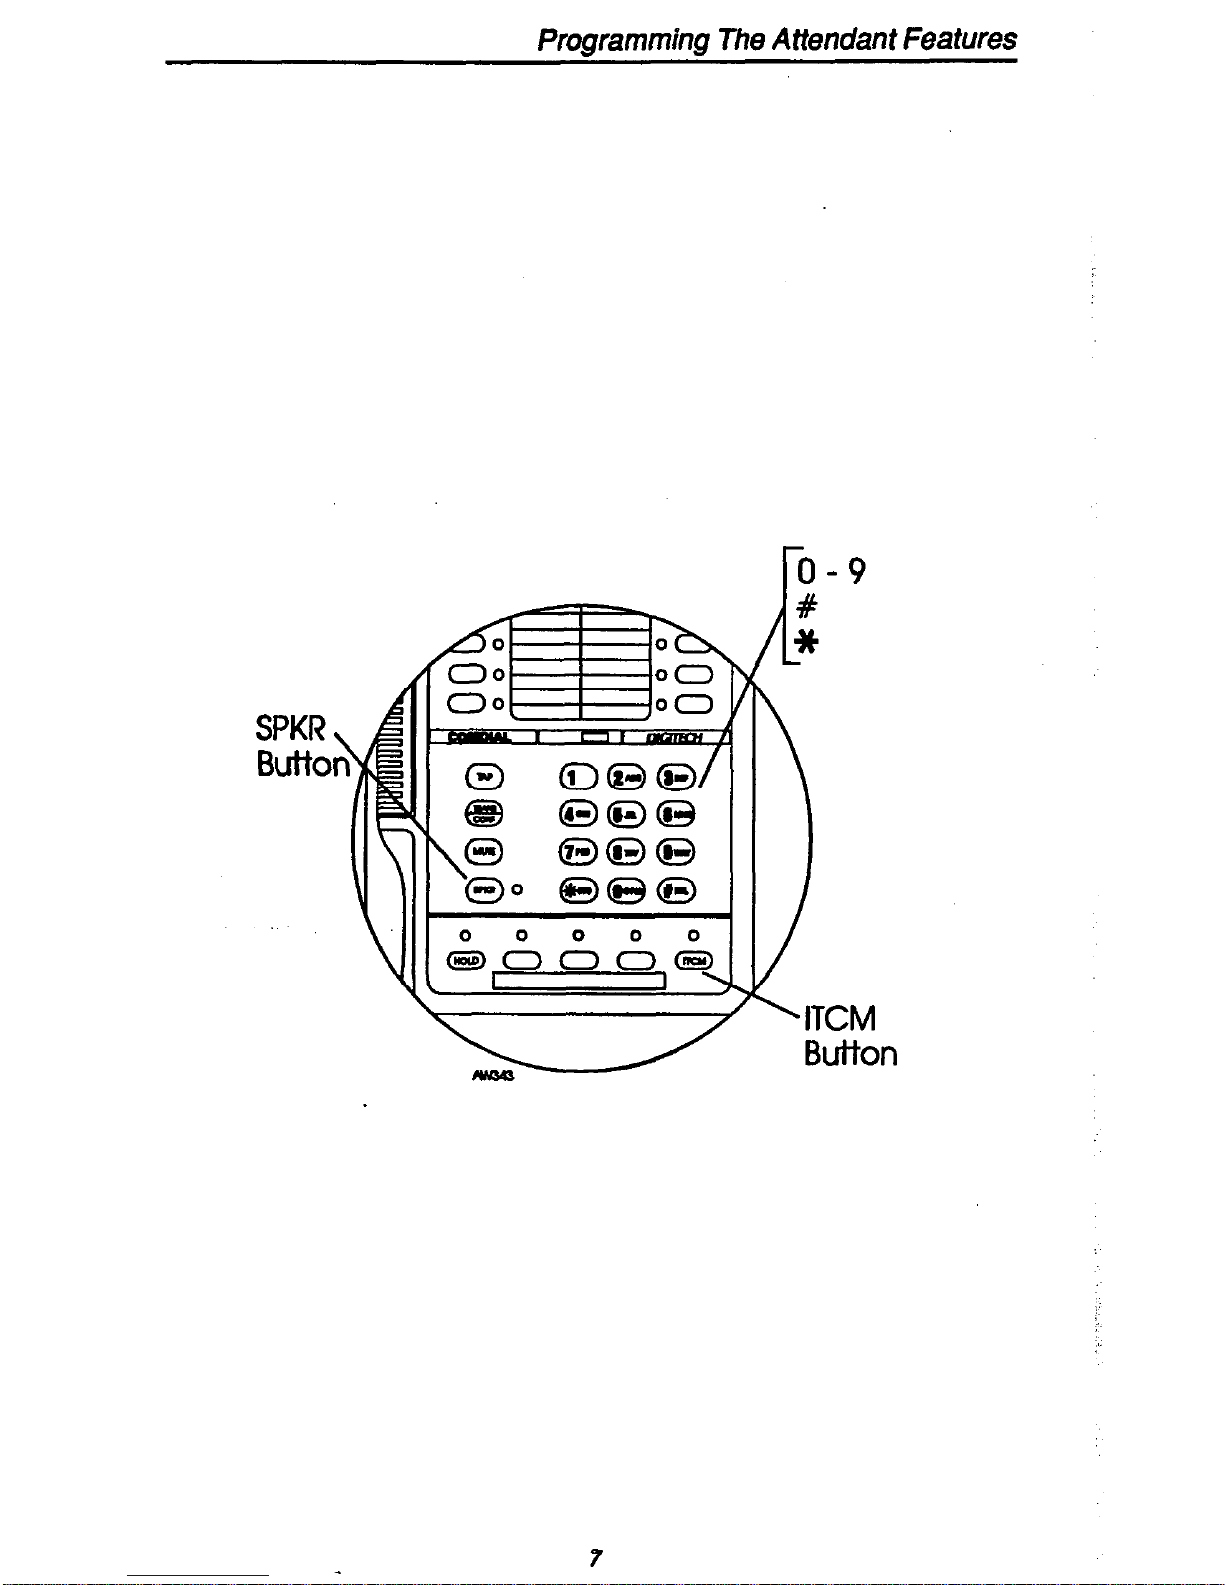
Line Disable Programming
You can disable a line and make it unavailable for system use if it becomes unusable for some reason.
Disable a line as follows:
l
press ITCM,
l
dial+##OO32,
l
dial l# - 99#, 001 - 128 forliaes 1 - 128,
NOTE: If the desired line code is less than three digits, dial # once qfter you dial
the code. For example, dial I# for line I or 19# for line 19.
l
press # to disable line (LCD speakerphone displays show a $ to
indicate a disabled line),
l
press SPKR to end.
To m-enable line,
l
repeat the previous procedure,
Page 10
Programming The Attendant Features
r0 - 9
’ - ’
‘ITCM
Button
Page 11
rluyrarrrr~~~~~~ I IIU nrrenuanr reawres
Naming The System Telephones
You can assign either a personal name or a group name to each system
telephone. This name can be up to seven letters in length and will show
up in the user’s display and/or in the called party’s display. Typical
names could be SRVC, MKTG 1, K SMlTH.
Name the system telephones as follows:
Use letter code table to compose names for all telephones requiring them (up to seven letters per name is allowed),
press ITCM,
dial+##OO53,
select telephone to be named by dialing the extension number
(dial number plus # if extension number is less than four digits),
dial # to any clear current entry,
dial two-digit codes that correspond to letters in name,
dial # to save name,
dial next extension number (plus # if less than four digits), dial #
to clear current entry, dial codes for letters, dial # to save,
repeat previous step until all telephones are named,
press SPKR to end.
Page 12

Programming The Attendant Features
SPKR w
Button
J
4
I
i
continued on the following page . . .
9
Page 13

Programming The Attendant Features
Letter Code Table
IO
Page 14

Programming The Attendant Features
Station Names
(Record telephone names here. Copy this sheet if you need more
record space.)
71
Page 15

Programming The Attendant Features
Naming The Telephone Lines
You can assign names to lines to aid users in identifying the proper line
to use. A line name can be up to seven letters in length and will show
up in the user’s display
Name the system telephones as follows:
l
Use letter code table to compose names for all lines requiring
them (up to seven letters per name is allowed),
l
press ITCM,
l
dial%#OO33,
l
dial l# - 99#, 001 - 128 to select line 1 - 128,
NOTE: If the &sired line code is kss than 3 digits, dial # once after you dial the
code. For exa@e. dial 1#
for line 1
or 19#
for
line 19.
l
dial #to any clear current entry,
l
dial two-digit codes that correspond to letters in name,
l
dial #to save name,
l
dial next line number (plus # if less than three digits), dial # to
clear current entry, dial codes for letters, dial # to save,
l
repeat previous step until all telephones are named,
l
press SPKR to end.
72
Page 16

Programming The Attendant Features
SPKR
Butto
continnedonthe folknvingpa~c...
13
Page 17

Programming The Attendant Features
Letter Code Table
Page 18

Programming The Attendant Features
Line Names
(Record line names here.
Copy this sheet if you need more record
space.)
‘._:
C’.%
.‘:
_..,
:“
15
Page 19

Programming The Attendant Features
Setting The Night Transfer Of Ringing Mode
You can enable an operating mode that automatically transfers all in-
coming calls to a particular telephone or group of telephones for
answering.
To enable or disable the night hansfetof ringing mode,
l
press ITCM,
l
dial##O*OO,
l
dial 1 to enable the feature,
I
l
dial 2 to bun the feature off,
l
press SPKR to end.
SPKR
But-to
16
Page 20

rfogrammrng 1 ne Attenaant Peatures
Setting The System Clock
The system clock provides a date and time for display at LCD speaker-
phones connected to the system.
To program the system clock for current dge and time,
l
press
ITCM,
l
dial+#IO+#O 1,
l
dial two digits
(01-12)
for month,
l
dial two digits
(01-31)
for day,
l
dial two digits (00-99) for year,
l
dial two digits (00-i3) for hour,
l
dial two digits (00-59) for minute,
l
dial # to save,
l
press
SPKR
to end.
SPkR
But-to
17
Page 21

Programming The Attendant Features
Storing The System Speed Dial Numbers
You can store up to 100 system speed dial numbers. at your attendant.
telephone that every system user can access from his.or her telephone.
Typically, these are numbers that ate frequently called by many different users and emergency numbers that you want readily available to
everyone. Distribute a list of these stored numbers to the system users
for their reference.
Before you begin programming, use the record sheet on the following
page to write down this information:
l
the dialing code of the storage location (001 - 299),
0 the line that will be used to access each outside number,
l
the telephone numbers or feature codes you are storing.
To program system speed dial numbers,
l
press ITCM,
l
dial++#OO 02,
l
dial code for storage location (001 - 299),
l
dial a code to state a line, line group or prime line/last line used
for the call to dial on,
NOTE:
lfthe
desired line code is less than three digits,
dial # once after you
dial
the code . For aample. dial 1#
for
line I or 19#
for line
19
.
l
dial l# - 99#, 001 - 128 for lines 1 - 128,
ma
l dial 801- 816
for line groups 1 - 16,
ma
l
dial 000 for prime or last line used,
l
dial the number to be stored
(up
to 32 digits); if you need a pause
between numbers, pmss the HOLD button and continue entering
the remaining digits. If you need a hookflash, press the TAP button and continue entering the remaining digits,
l
press TRANSKONP to store number,
l
dial next storage location, store line choice and speed dial num-
ber, and press TRANWONP,
l
repeat previous step until all numbers are stored,
l
press
SPKR
to end.
18
Page 22

Programming The Attendant Features
Button
ITCM
Button
Continued on the
fdiowin~
pge
. . .
70
Page 23

Prgwamming The Attendant Features
System Speed Dial Numbers
(Record system speed dial here. Copy this sheet if you need more
record space.)
20
Page 24

Programming The Attendant Features
Transferring The Attendant Functions To The
Alternate Attendant Telephone
The system installer can arrange for another telephone to serve as an alternate attendant location. You can transfer the attendant functions,
available at your telephone, to the alternate attendant telephone when-
ever you wish to do so,
To transfer attendant functions to the alternate attendant telephone or to
rehun the functions to your station,
l
press ITCM,
l
dialf#O+NOO,
l
dial 1 to enable transfer or dial 2 to disable the transfer,
0 press#totransferthefun ti c on or to return it to the main attendant
telephone,
l
press SPKR to end.
SPKR \
Buttor
21
Page 25

Using Special Attendant Buttons
Special Attendant Button Operations
In addition to the many feature buttons the system can make available
to any
station, the
DXP
provides the attendant position with several special purpose feature buttons to enhance call processing. These special
purpose buttons are described below:
Alternate Button:
When an attendant presses this button, all calls nor-
mally routed to his or her telephone are then routed to an alternate
attendant’s telephone instead. In some cases, your alternate attendant
will be able to route all calls to a third alternate attend+nt.
Both Button: This button provides a means for an attendant to etablish
a conference between the attendant’s station, a current call, and the last
call that was placed on hold.
Overflow Button:
When an attendant presses this button, calls that nor-
mally ring at the attendant’s telephone also ring at an overflow
attendant’s station.
Queue Button:
When multiple calls are ringing or are on hold at an
attendant’s station, the system places them in a queue. The attendant
can use this but&on to determine how many calls are queued awaiting
service.
Serial Call Button:
When a caller wishes to speak to more that one person or department, the attendant uses this button to place the caller in a
serial mode of multiple transfers to each desired party. In the serial
mode the system automatically transfers the caller to another party as
soon as a present party hangs up. The system places the caller in the
serial mode as soon as the attendant hangs up.
Test/Busy Button: This button provides the attendant
a means to test
the status
of
specific lines. Attendants
can use this button to determine
whether irrGvidual lines are idle, busy or on hold.
To
forward all calls to an alternate attendant,
l
press the installer-programmed ALTERNATE button. If an alternate attendant is programmed, the light next to the
ALTERNATE
button will illuminate and the LCD will indicate
the location of the alternate attendant.
To cancel the alternate mode,
22
Page 26

Using Special Attendant Buttons
l
press the ALTERNATE button again.
To establish a conference between the attendant station, a held call, and
an active call,
l
press the installer-programmed BOTH button.
If you wish to cancel the conference condition and return one of the
lines to hold,
l
press HOLD,
l
presstheline b tt
u on for the held call you wish to re-engage.
/ Programmable
Buttons (May
include installer-
programmed
Special Attendant
Alternate button)
/ Programmable
Buttons
Button
Conhued on page 24. . .
23
Page 27

Using Special Attendant Buttons
To direct incoming calls to an overflow attendant during peak calhng
pXiOdS,
l
press the installer-programmed
OVERFLOW
button. If an over-
flow attendant is programmed, the light next to the
OVERFLOW
button will illuminate and incoming calls will ring
at both stations.
To cancel,
l
press the
OVERFLOW
button again.
To determine how many calls are queued at the attendant position and
awaiting service (on hold, parked, or ringing),
l
press the installer-programmed QUEUE button. The LCD display will indicate how many calls am in the ring queue and the
hold queue, respectively. The display remains on the LCD
momentatily.
Note: Hold recall& tranvjii recalls and park recalls am counted in the ring queue
and not the hold queue.
To place an active call in a serial transfer,
l
press the installer-programmed
SERIAL
button (the LCD will
read “0 SERIAL EXT:“, with the first digit indicating how many
intercom numbers am already entered, the “EXIY indicates a
promt for another intercom number to be placed in the serial),
l
dial intercom number or press associated DSS button,
l
repeat to add up to two mote extensions to the serial,
l
press
SPKR
to end. Serial transfer begins.
To determine the status of individual lines (idle, busy or on hold),
l
press the installer-programmed
TEST/BUSY
button (the LCD
will display the prompt “Enter Line:“),
l
dial the line number to be tested (001-128). If the line is idle, you
will hear a dial tone; if the line is busy, the LCD will display
“Busy with xxx” ; if the line is on hold, the LCD wiIl display “On
Hold at xxx” (xxx = line number).
24
Page 28

1
0
/%E
0:
00
A
00
nn
0
0
0
0
0
0
0
0
0
0
‘0000@3
/
ITCM /
AW
z
/ Programmable
Buttons (May
include installer-
programmed
Special Attendant
Alternate button)
, Programmable
Buttons
Button
25
Page 29

Understanding The LCD Displays
Display Summary
The special displays shown on your telephone during attendant
operation are summarized in this section.
Display Type
Night Transfer
When Displayed
AfkyoudifIlITcMt#O*O3,this
AlTENDANT
NIGHT MODE OFF
thyan in display if you dial 2 to dis-
.
LCD Message Programming
AfteryoudialITcM*#0*112,
YYYYYYY
The message shows up in the display
when you enter it.
Line Names
New station name appears in display
after you enter it.
26
Page 30

Understanding The LCD Displays
Station Names
New station name appears in display
Station Message Detail Accounting
(SMDA) Printout
AbcyoudiallTcM*#oo+2,rhis
l=Allrecords 5 = Department records
2 = Station reports
3 = Line report
6 = Auto reports
7 = Delete records
4 = Account code report
System Clock Setting
Displayed when setting date and time.
27
Page 31

Understanding The LCD Displays
System Speed Dial
-1
AftexyoudialITcM*#oOo22,this
appearsinthedisplay.
F)
After entering storage location one of
rhesemessages aPPe=s*
1 “Line Name” GXX
-OR-
28
Page 32

Glossary
Of Terms
Glossary
A
All-call paging:
Paging through the intercoms of all stations in the sys-
tem.
Alternate Button:
When
an attendant presses this
button, all calls normally routed to his or her telephone a then routed to an alternate
attendant’s telephone instead.
Answer button:
An installer-programmed button that allows a user to
answer a call that is audibly ringing at his or her station (it is possible
for more than one call to be ringing at the same time; however, only
one of the calls will ring audibly).
Automatic callback:
System will ring a calling telephone when a busy
called telephone becomes idle.
Automatic dialing: Using pqrammable buttons to stow numbers for
one- or two-button speed dialing.
Automatic redialing:
Turning on a program that automatically redials
the last number dialed once a minute for 10 minutes.
B
Both Button: This button provides a means for an attendant to establish a conference between the attendant’s station, a curnmt call, and the
last call that was placed on hold.
c
Call forward:
Designating another telephone to receive intercom calls
normally directed to the user’s telephone.
Call park:
Placing an active call at a particular telephone in system
hold (park orbit) and nztxieving it by any telephone.
Call pickup:
Answering a call at one telephone when it is ringing at
another telephone.
Call transfer:
Transfening a call
from
one station to another. The
transfer can be screened, i.e., you find out who is calling and announce
them to the party being called; or unscreened, i.e., you transfer the call
without identifying the calling party to the called par&y.
Central message desk:
A station that has been assigned to control
message waiting lights and deliver messages to other stations in the sys-
tem.
Class of Service programming:
Customized programming of your
system by the installer that establishes the basic operating parameters
of the system and individual stations.
D
Direct
Station Selection/Busy Lamp Field (DSSIBLF): Using one
button to place intercom calls; the button is sometimes referred to as a
DSS button. Busy lamp field or BLF is a term for a light that identifies
current call status of DSS station.
29
Page 33

Glossaw Of Terms
Do not disturb:
A mode that disables incoming call ringing and inter-
com calling.
Dual Tone Multiple Frequency (DTMF):
The tones made by your
telephone when you dial.
E
Exclusive hold:
Only the telephone placing the call on hold can
retrieve it.
Executive override:
Breaking into a conversation at a busy called
telephone. This intrusion is announced by several quick tone bursts
over the conversation.
G
Group intercom number:
A number that is available for use by
several stations.
H
Handsfke answer inhibit:
sent to it over the speaker.
A telephone can be set to block voice calls
Hookflash:
Action that occurs when the TAP button is pressed.
Needed for activating host system featutes.
Hookswitch:
The switch on a telephone which, when depressed
manually or by the handset, disconnects a call.
K
Keypad:
Buttons 0 through 9, d and # used for dialing numbers.
L
Last number redialing:
Automatically dialing the last number dialed.
Lock button:
A user can press this installer-programmed button and
dial an authorization code to deny other users access to lines and features at his or her telephone.
M
Message deposit:
Calling an LCD speakerphone and leaving a
mes-
sage on its display for the user to mad.
Messaging:
Tuming on a telephone lamp to let the user know that a
message awaits pickup and leaving a message on the display of a
telephone that gtves infotmation on your status.
Mute: A fured feature button that keeps a distant party from hearing
your conversation. This button also lets you adjust the telephone display contrast from lightto dark.
N
Night transfer:
Transferring incoming calls to a particular station(s)
for off-hour answering.
30
Page 34

wossary uf 1 erms
0
Overflow Button:
When an attendant presses this button, calls that nor-
mally ring at the attendant’s telephone also ring at an overflow
attendant’s station.
P
Personal intercom number:
A unique number assigned to a station for
the exclusive use of that station’s user.
Personal ringing tones:
A telephone can be arranged to ring in one of
four distinctive tones.
Prime line:
A line designated to a particular telephone and automat-
ically selected when the handset is lifted.
Programmable buttons:
Each telephone or station has buttons that
can be user-programmed for autodialing numbers or feature codes, or
other special purpose dialing tequitements.
Pulse/Tone switching: Changing
from pulse/rotary dial signals to
tone/DTMF signals.
Q
Queue Button:
When multiple calls are tinging or am on hold at an
attendant’s station, the system places them in a queue. The attendant
can use this button to determine how many calls are queued awaiting
service.
R
Release button:
When a telephone user presses this installerprogrammed button, the system discontinues the current active operation and returns the station to its idle state.
Response
messaging:
Responding non-verbally to a calling station by
pressing a programmed button that sends a message to the calling
station’s display.
Ringing line preference:
An automatic connection to any outside line
ringing at the station when the station handset is taken off-hook.
S
Saved number redialing:
Saving a last manually dialed number for
later autodialing.
Secure off-hook voice announce:
A private announcement that can’be
made to a busy party which they hear through the receiver of their handset.
Serial Call Button:
When a caller wishes to speak to more that one person or department, the attendant uses this button to place the caller in a
serial mode of multiple transfers to each desired party.
Silent mode button:
When the user presses this installer-programmed
button, the ringer at his or her station is turned off for the duration of
the current ringing call and is restored when a new call rings at the station.
Page 35

Page 36

Page 37

Page 38

 Loading...