

Page 1
18
MANUALE DI ISTRUZIONE
PER LAVASTOVIGLIE
INSTRUCTION MANUAL FOR
DISHWASHERS
NOTICE D’UTILISATION
POUR
LAVE-VAISSELLE
GEBRAUCHSANWEISUNG
FÜR GESCHIRRSPÜLER
Page 2

18
FOREWORD
1. Read the instructions contained in the enclosed booklet carefully, because it
contains important information on installation, operation and maintenance
safety. Store this booklet carefully for any further consultation by other
operators.
2. Having removed the packing material, check that all the equipment is
present. If there is any doubt, do not use it and contact qualified personnel.
The packing elements (plastic bags, foam polystyrene, nails, etc.) should be
kept away from children, because they are dangerous.
3. Before switching the equipment on, make sure that the model plate data
conforms to that of the electrical and water distribution network.
4. Installation should be carried out by qualified personnel according to the
manufacturer's instructions.
5. This equipment should be destined to the use which it has been conceived
for. Any other application should be considered improper and
consequently dangerous.
6. The equipment should only be used by personnel trained for its use.
7. Operators must strictly follow all hygienic requirements in the handling of
clean dishware and cutlery.
8. Do not leave the machine in an environment at temperatures lower than 0°C.
9. The protection of the machine is IP X4C, therefore it should not be washed
with high pressure directed water jets.
10. Qualified personnel only can access the control panel, after having
disconnected the machine from the primary current supply.
11. The appliance is made according to EEC 89/336 regarding radio noise
suppression and electromagnetic compatibility.
12. According to EEC directive nr.23 of 19/02/1973 and the law of actuation
nr.791 of 18/10/1987, our appliances are built-up according to the good
technique norms in force in Italy and abroad.
13. Noise level of the machine, less than 62dB(A)
Page 3

19
INSTRUCTIONS FOR USE
Page 4

INSTRUCTIONS FOR THE USER
20
OPERATION AND USE
1)Before washing make sure that:
• the wall-mounted on/off switch is switched on;
• the water tap is open;
• water is present in the distribution network;
• the pump protection filters are installed in their respective positions;
• the overflow in inserted;
• all rotating parts are free;
• the rinse aid dispenser is full;
• water temperatures maintain their regulated values:wash 55/60°C, rinse 85°C
(lamp "H1-H2" on).
• make sure that dishware is in good conditions as it may cause cleaning
difficulty and haven bacteria.
2)SWITCHING ON
Press the "Q1" button to enable the automatic wash tank filling and the
consequent triggering of the heating element. The lamp “H1-H2” flashes.
3)As soon as lamp "H1-H2" is on, pour about 30 gr. of detergent directly
into the tank, paying attention to distribute it uniformly on the filters, anyway
the quantity being according to supplier's instructions. Add 15 gr. every 7
cycles to achieve a concentration of 1,5 gr./lt. In order to respect our
environment, use only the correct amount of detergent. When using
chlorinated detergent, it is suggested to use an automatic dispenser, otherwise,
brownish spots might appear on the surfaces due to chlorine reactions.
Detergent injection should always be placed in the back of the machine (to see
page 30).
4)Introduce the dishware to wash, after having removed the solid waste and
having placed them into the proper racks. The cups and the glasses should be
turned upside down, while the cutlery should be put vertically into the proper
container, and the same applies to dishware.
Page 5
INSTRUCTIONS FOR THE USER
21
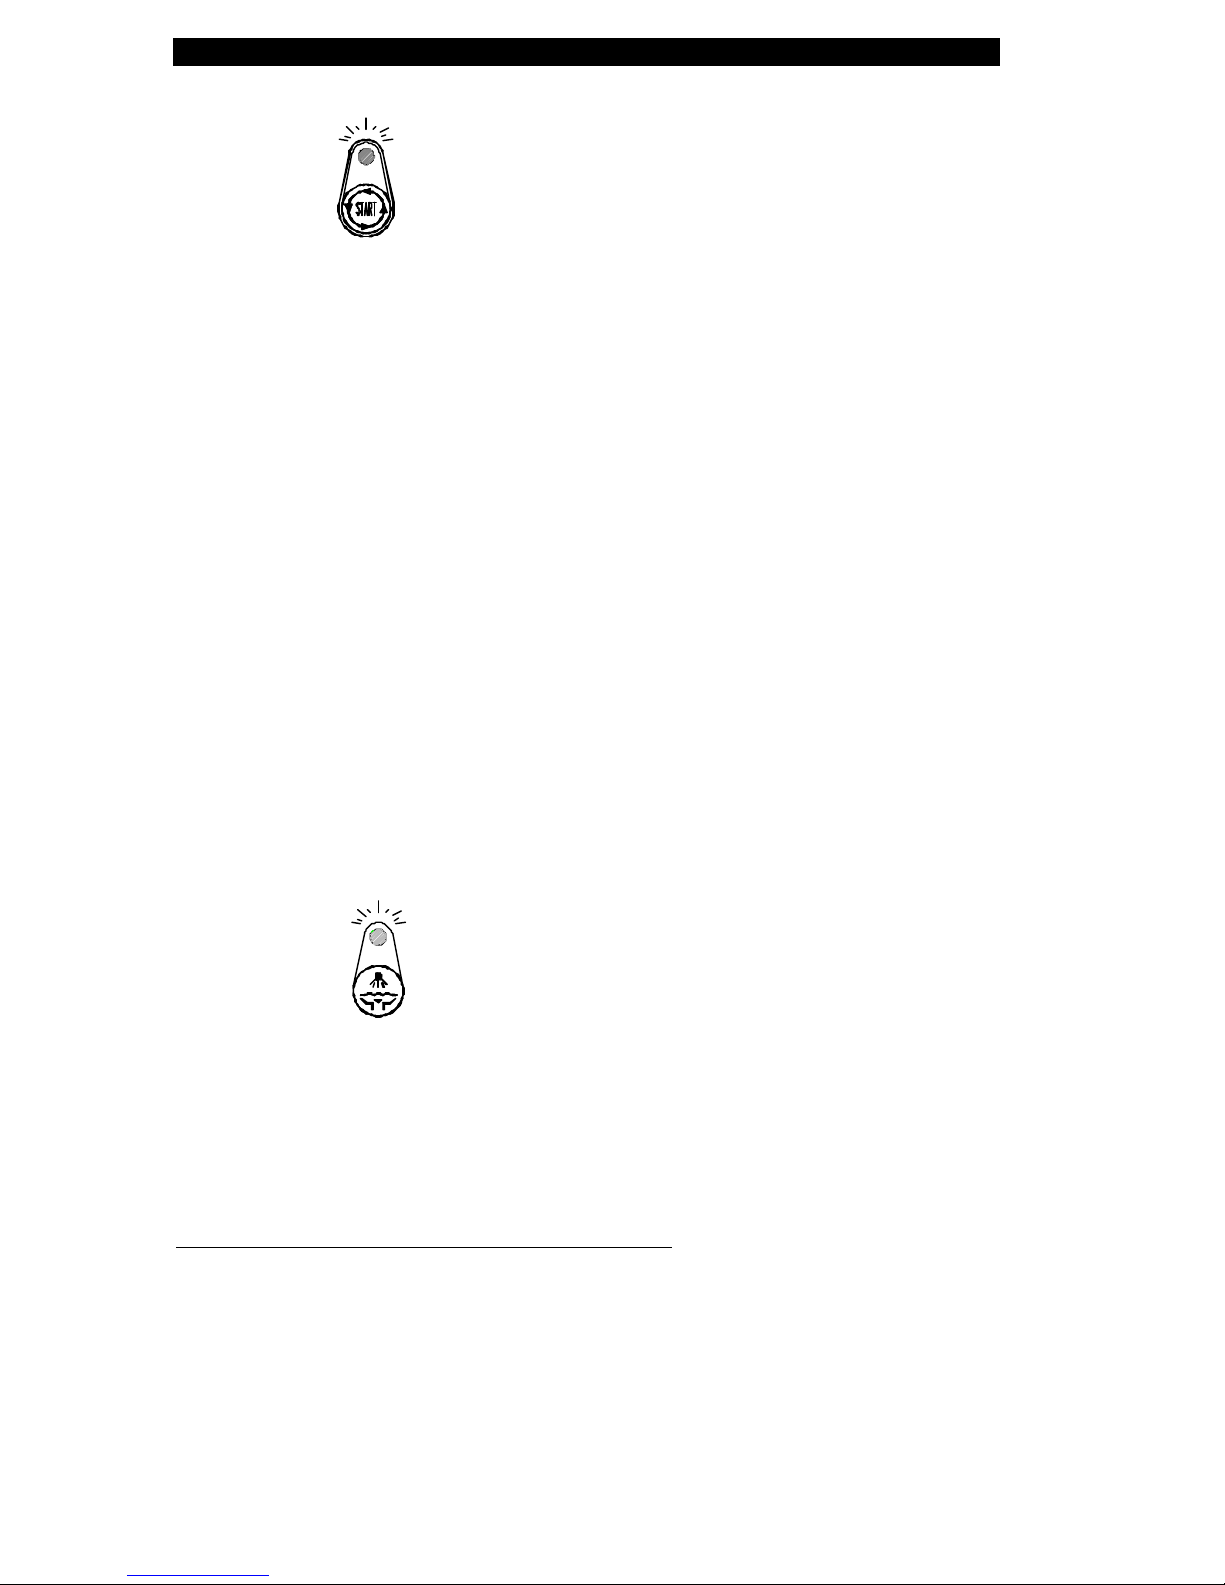
5)START
With closed door, select the wash cycle according to conditions of the
dishware:
• with normally dirty dishes press "S3" button (rapid flashing of the lamp
"H3") (short cycle started);
• with particularly dirty dishes or deep dishes , press "S3" button for 3 sec.
(slow flashing of the lamp “H3”) (long cycle started).
The end of which will be indicated by the switching off of the "H3" lamp.
N.B.: Machine in conformity with the existing hygienic standards,
guaranteeing a final rinse at 85°C. Wash cycle automatically
lengthened if final rinse temperature is not reached.When this autocycle intervenes and the cycle is pro-longed, flashes the “H3” indicator
to indicate this intervention. In any case after 8 minutes max. the
intervention is stopped and the cycle continues.
6)Remove the rack and slightly incline it to permit a perfect drain; allow
dishware to dry and after having washed one’s hands, handle the rack in order
not to touch the dishware inside then place the rack on hygienically clean
shelves.
7)DRAIN
When the wash operation has been completed open the front door and drain
the tank pulling out the overflow pipe.
For machines with drain pump open the front door, pull out the overflow pipe
and press the "S5" button for the drain cycle.
The machine will carry out the drain cycle (lamp "H5" on) for 2 minutes and
20 seconds.
To interrupt the drain cycle press "S5" button.
Page 6

INSTRUCTIONS FOR THE USER
22
8)SELF-CLEANING AND DRAIN
When the wash operation has been completed (machine off) pull out the
overflow pipe, close the front door and press the "S5" button for the selfcleanig and drain cycle.
The machine will carry out the cycle (lamp "H5" flashes) for 2 minutes and
20 seconds.
The end of which will be indicated by the switching off of the "H5" lamp.
At this point, the tank filter can be taken out, in order to be washed, then
replace it with the overflow in its place.
For further use , switch on the machine.
For any further information concerning equipment cleaning, read chapter
"USEFUL SUGGESTIONS".
9)When the washing is finished, switch off the equipment by turning off the
main supply through the general wall switch and close the water supply.
INSTRUCTIONS DURING THE WASHING
1)Do not plunge bare hands into the water containing the detergent. If this
happens, wash them immediately and abundantly with fresh water.
2)When the machine is operating, do not open the door too rapidly.
3)Use only specific anti-foaming detergents.
4)Disconnect the equipment in case the machine is out of order or it does
not work properly. For the repairs consult a technical assistance centre
authorised by the manufacturer and ask only for an original spare parts.
5)Never modify the thermostat settings.
6)Check that lamp "H1-H2" is on.
7)Wash tank water should be changed at least twice a day or according to
daily wash requirements.
8)Do not subject clean dishware to any further cleansing treatment such as
brushes or drying towels.If these instructions are not followed, the safety of
the equipment can be compromised.
Page 7

INSTRUCTIONS FOR THE USER
24
USEFUL SUGGESTIONS
1) MAINTENANCE
IMPORTANT: Before carrying out the cleaning and maintenance operations,
disconnect the equipment from the electric supply.
Frequently check and clean the nozzles. The frequency of this operation will
depend on the quantity of residues, which may result in an unsatisfactory
washing result.
For the inside and outside cleaning of the machine, do not use corrosive
products such as sodium hypochlorite (bleach) savelling water and
hydrochloric acid, acids, steel wool or steel brushes.
The presence of calcium and magnesium salt in the water can compromise
machine performance, thus ask qualified personnel to remove the deposits
periodically.
In order to avoid some oxidation risks, or chemical reactions, generally the
stainless steel surfaces have to be well cleaned.
2) OPTIMAL RESULTS:
A possible wash deficiency can be noticed when residue remains.
Marks can be caused by an insufficient rinse: in this case check
that the rinse nozzles are clean and that there is sufficient water supply
pressure.
In case of dishware residue check that:
• the washing nozzles are clean
• the water temperature is around 60°C
• there is detergent
• the pump suction filter is clean
• the racks are suitable for the dishes and cutlery that are to be washed
• the position of the cutlery and the dishes in the racks are correct
Page 8

INSTRUCTIONS FOR THE USER
25
3) TEMPORARY MACHINE NON-USE
In case the machine is stopped for some weeks, it is recommended before
closing it to fill the tank and run the machine with clean water, then empty it
out, in order to avoid the forming of bad odour and that any residue remains
in the pump.
If necessary repeat this operation until the water leaving the machine is clean.
If the machine is stopped for many weeks, it is recommended to oil the
stainless steel surfaces with paraffin oil and to discharge the water from the
boiler and the electric pump.
4)SANITIZING THE MACHINE
Sanitizing the machine at least once a week is of the utmost importance in
order to guarantee hygiene even when the machine is not in use.
It is advisable to use a disinfecting product suggested by an authorised
detergent dealer.
The use of this product will satisfy hygienic requirements, even during
machine non use.
Before switching off the machine run the machine briefly with clean
water.
5)HARD WATER CONDITIONS
If a hard water supply is present, mineral deposits will form within the machine
and also on dishware.
In order to avoid the above conditions a periodic removal of these deposits is
necessary.
The frequency and method of this operation upon consultation by your
detergent supplier.
Page 9
INSTRUCTIONS FOR THE USER
25
6) RESINS REGENERATION OF THE WATER SOFTENER
(only for machines with built-in water softener)
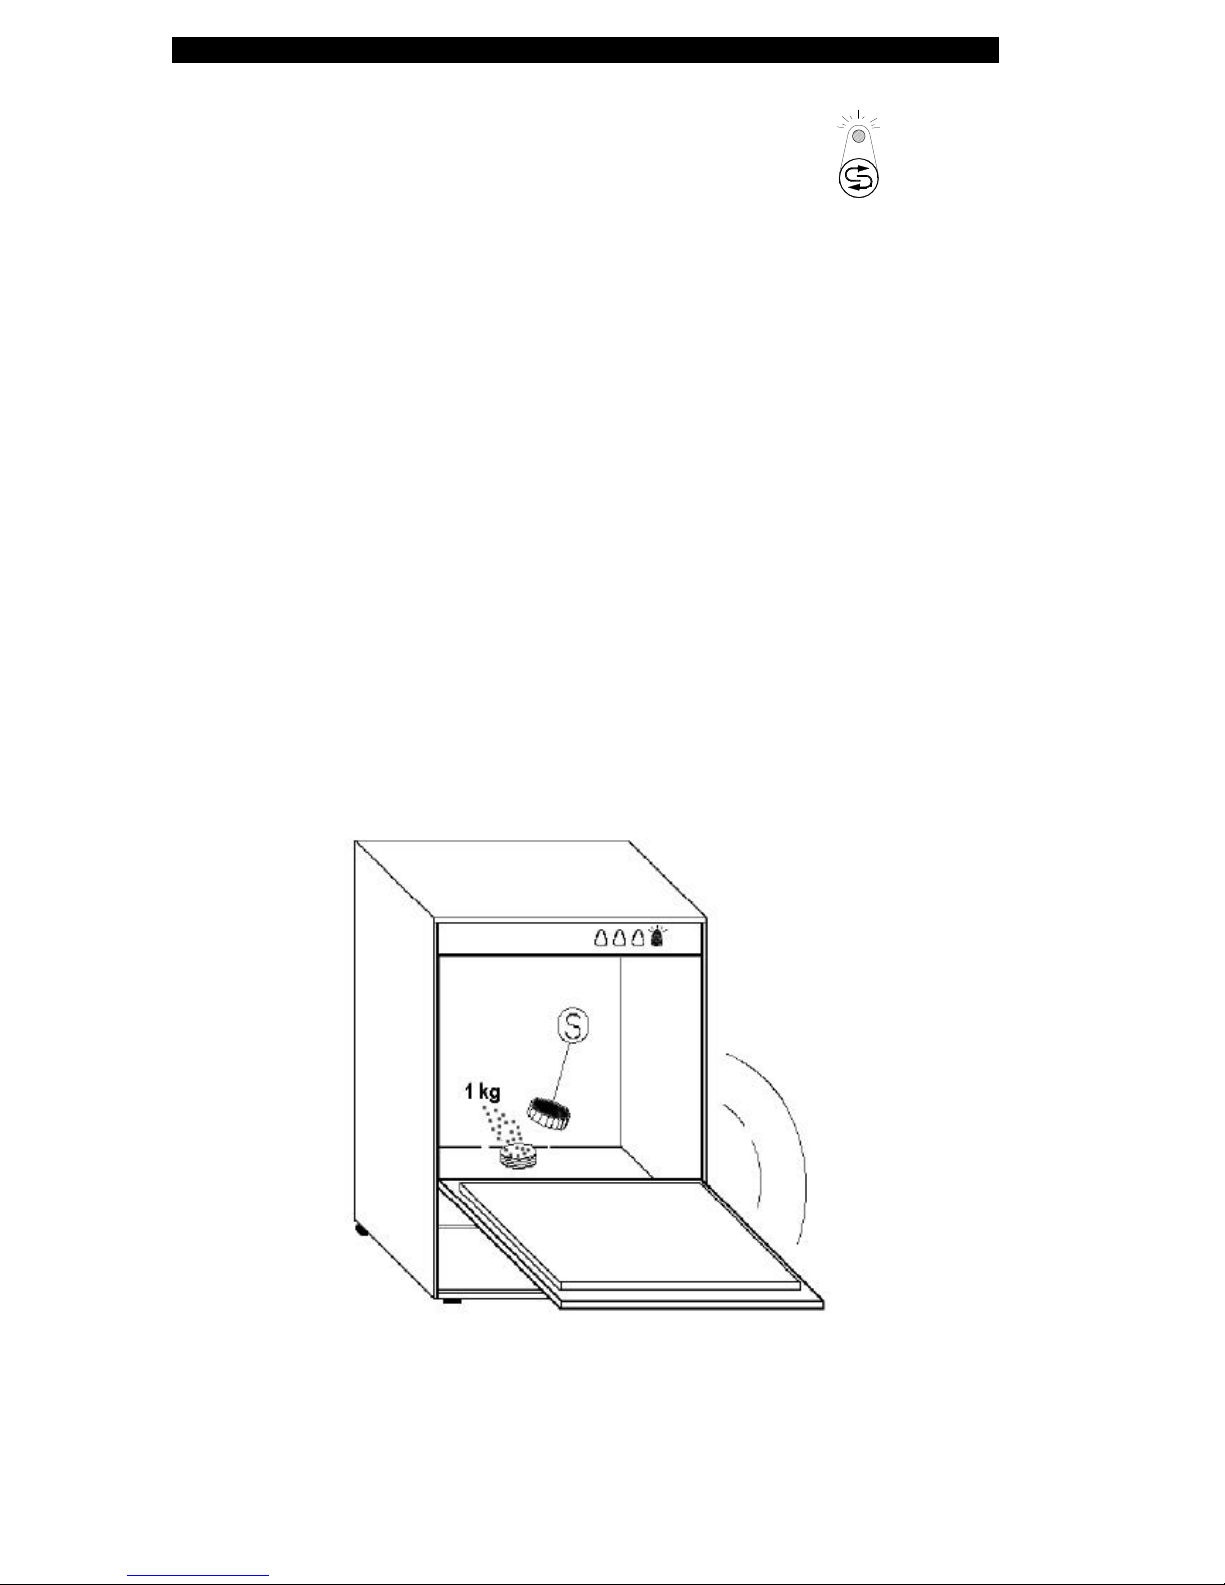
The regeneration of the water softener resins is completely automatic. The
flashing of the regeneration lamp “H4” indicates the need to regenerate the
resins, in any case the presence of some opaque spots on the glasses will
show that it is necessary to start the regeneration.
This operation has to be carried out with full tank.
First of all, make sure that in the designated tank container “S” there is some
regeneration salt (1kg is enough for about 5 regenerations).
Close the front door and press the button “S4” for approx. 3sec.
After that the lamp “H4” remains switched on for 20 minutes (during this
operation the machine cannot be used).
The end of which will be indicated by the switching off of the "H4" lamp.
Ø (For further use , first switch off the machine).
At this point switch off the machine, to empty the tank (to see page 21) and
the equipment is ready to be used.
Page 10
INSTRUCTIONS FOR THE USER
27
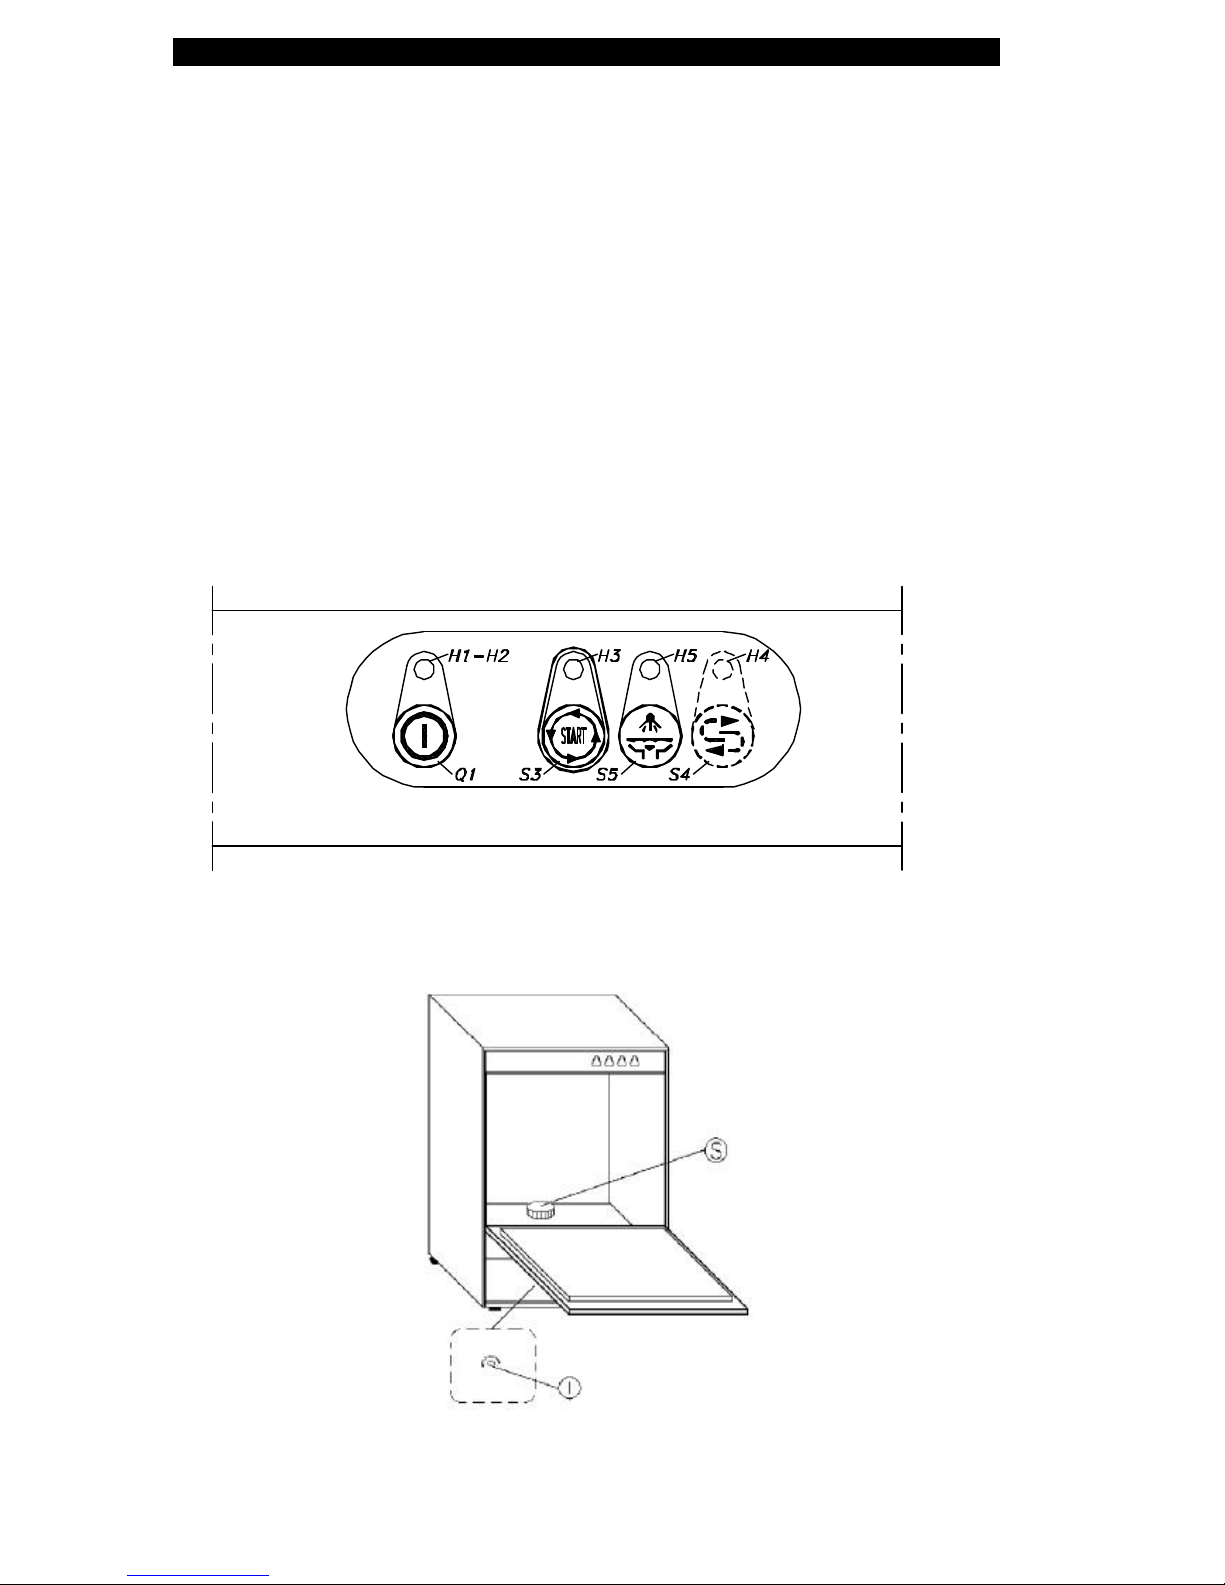
CONTROL PANELS
Q1 Main switch
S3 Push button “CYCLE SELECTION / START CYCLE”
S4 Push button “REGENERATION” (mod. FC54-EA)
S5 Push button “SELF-CLEANING / DRAIN CYCLE” (machine OFF)
Push button “DRAIN CYCLE” (machine ON / door frontal opened)
H1-H2 Pilot lamp “MACHINE ON" (flashing)
H1-H2 Pilot lamp “MACHINE READY" (fixed)
H3 Pilot lamp “MACHINE WORKING"
H4 Pilot lamp “REGENERATION” (mod. FC54-EA)
H5 Pilot lamp “SELF-CLEANING / DRAIN CYCLE
S Salt container (mod. FC54-EA)
I Regulating screw for rinse aid injector
Page 11

28
INSTALLATION AND MAINTENANCE
INSTRUCTIONS
The following instructions are addressed to a qualified personnel the only one
authorised to carry out checks and repairs, if any.
The manufacturer declines any responsibility in the case of interventions made
by a non qualified personnel or the use of spare parts other than those
supplied by the Manufacture.
Page 12

INSTRUCTIONS FOR TECHNICAL PERSONNEL
29
INSTALLATION
1)During installation, carry out proper machine levelling, which is a
prerequisite for a correct operation thereof (max. tolerance 2°).
In order to prevent any damage caused by steam going out of the machine,
make sure that the surrounding materials do not deteriorate in its presence.
After machine installation check thermostat settings, booster 85°C, tank 60°C.
2)ELECTRICAL CONNECTION
The electrical safety of this equipment is only assured if it is connected as
follows.
It is necessary to connect the equipment to an effective earthing as specified
by the electrical safety regulations in force. Check that this basic requirement
is complied with, in case of any doubt ask for a careful check of the
installation by a qualified personnel.
In the case the earthing is not efficient there will be a dispersion due to the
suppresser.
The machine shall be included in a correctly dimensioned equipotential, whose
effectiveness is to be very tight in accordance to the procedures set for in the
applicable safety standards. The connection shall be performed through a
screw marked by a plate near the rear side of the appliance.
The manufacturer declines any responsibility for any damages caused by lack
of an effective ground installation.
For the electrical connection, hook-up, have available a wall circuit breaker
switch with multiple phase (see following list) with contact aperture distance,
equal to or not exceeding 3mm and a supply cable no less than 2.5mm².
Model
220/230V∼ 220/230V3∼ 380/400V 3N∼
FC54-E
FC54-EA
20A 20A 20A
For other supplies the cable cross section must be calculated according to
voltage and length of cabling. If cabling too long adjust cable size to Amp
rating; do not pull on supply cable or install it under tension. If cable needs to
be replaced use type H07RN-F.
Page 13

INSTRUCTIONS FOR TECHNICAL PERSONNEL
30
3)WATER CONNECTION
Install a 55°C water tap and for machines with cold rinse a 12°C water tip in a
well accessible place, terminating in a 3/4" fitting, which the pipe strainer and
inlet hose shall be connected to.
Carefully comply with any national or regional regulations in force.
The operating pressure should be neither less than 2 bars or greater that 4 bars
(200/400 kPa). If water pressure is inferior then 2 bar, a pressure increase
pump is necessary. If water pressure exceeds 4 bar, a pressure reducer is
necessary.
In order to obtain best results, it is suggested that the water supply have a
hardness not greater that 15°F.
4)WATER DRAIN
Arrange a water drain towards the floor with siphon and connect the machine
with the flexible tube given with the machine, so that it leans towards the drain.
Moreover, make sure that the hose does not have constrictions.
Make sure that the building drain tubing withstands temperatures up to 70°C.
5)RINSE AID DOSAGE
Make sure that rinse aid suction hose is correctly installed in it’s proper
container. The dosage is automatic with the adjusting of the screw "I", which
after screwing to a full stop unscrew two turns. At this point the machine
automatically takes the necessary liquid for every rinse: during the washing
operations, check that the liquid of the container does not run short.
For filling the dosing tube, start the machine without plugging the
overflow in: at that point switch the machine on and off (press "Q1").
Repeat this operation several times at intervals of few seconds, until the
rinse aid reaches the injector. Wait until the machine reaches the correct
temperature (lamp “H1-H2” on). Make some empty cycles, then try to wash:
if the objects washed show some drops, this means that the rinse aid is
insufficient. On the contrary, the presence of marks can mean that there is too
much rinse aid or the water is too hard. The regulation can change according
to the kind of rinse aid.
Page 14
INSTRUCTIONS FOR TECHNICAL PERSONNEL
31
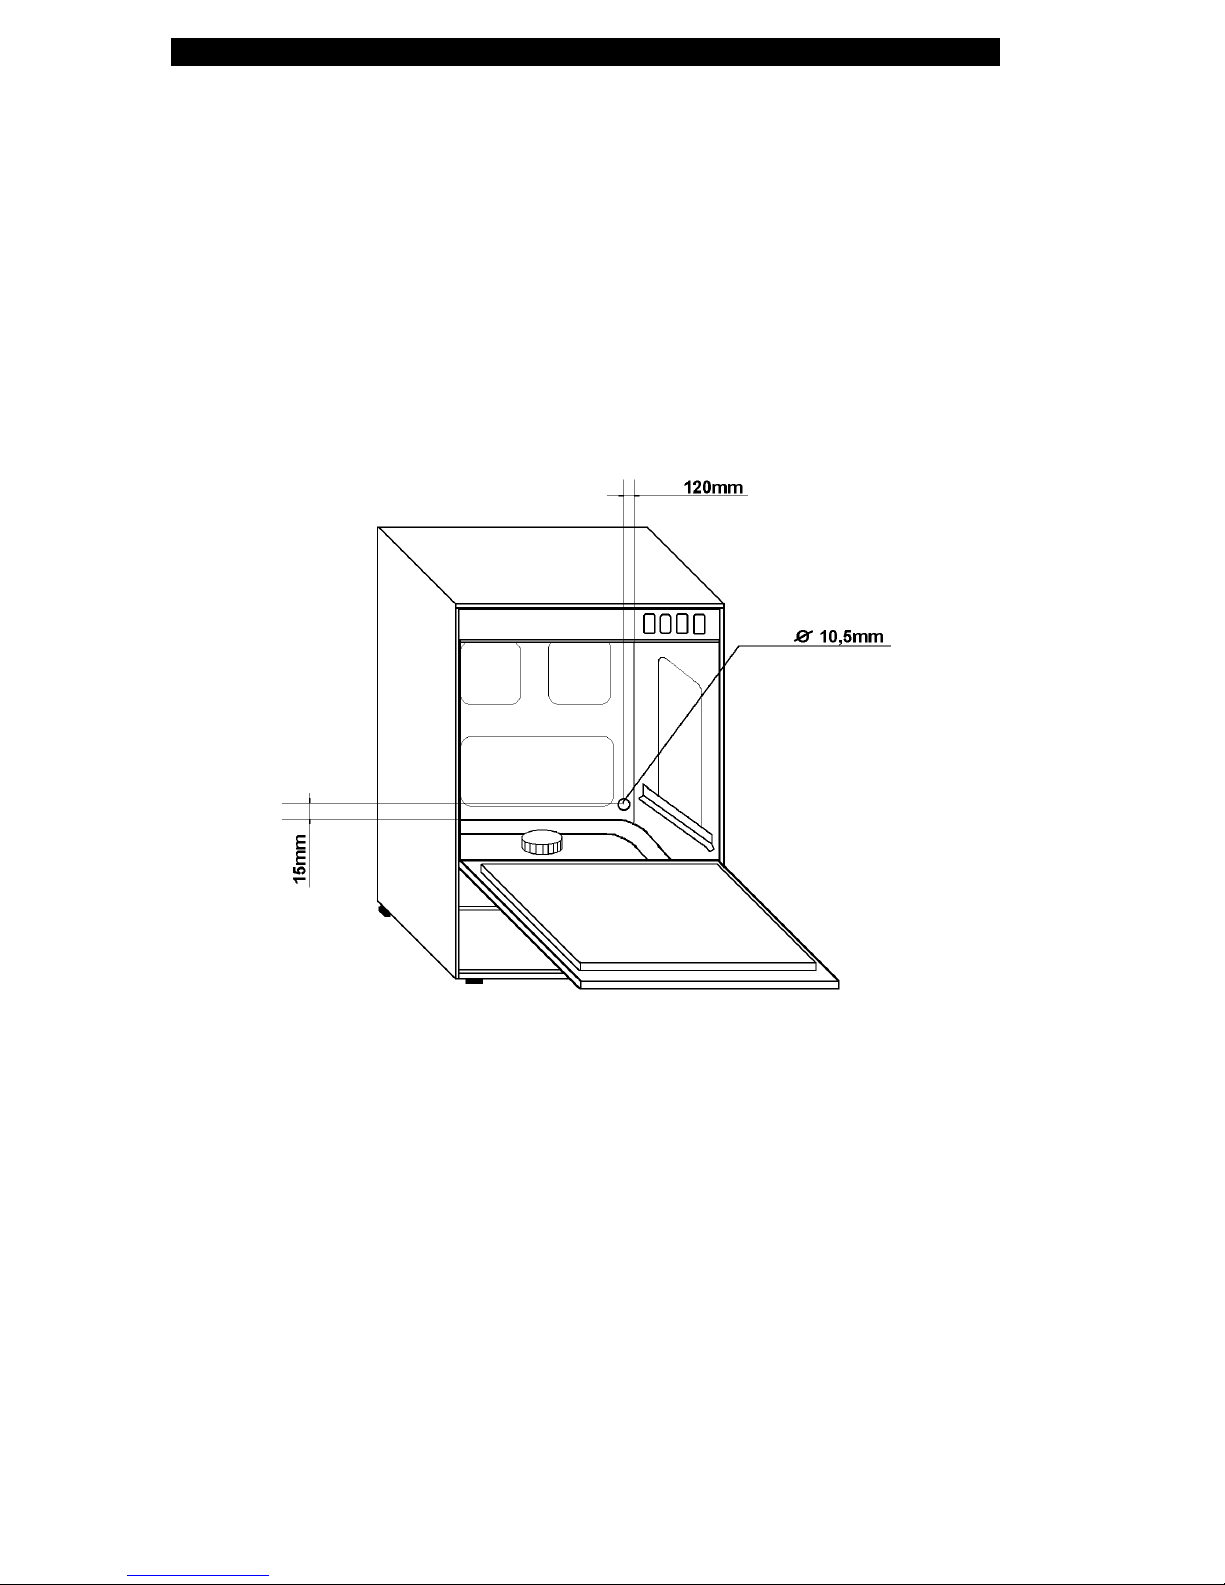
6)DETERGENT DOSAGE (for machines with built-in detergent dispenser)
With the screw on the side of the detergent pump, close completely the
product intake, then slowly open the screw until the desired intake quantity has
been reached. The correct quantity is indicated by the detergent supplier.
Check that the intake of the pipe during the rinse cycle is as preset. (1cm = 1g
approximately). Maximum intake or delivery distance: 2 meters.
To see the image for the detergent immission hole in the tank.
To see the electrical diagram enclosed for the electrical connection
(cables nr. 10 and 7).
Page 15
INSTRUCTIONS FOR TECHNICAL PERSONNEL
32
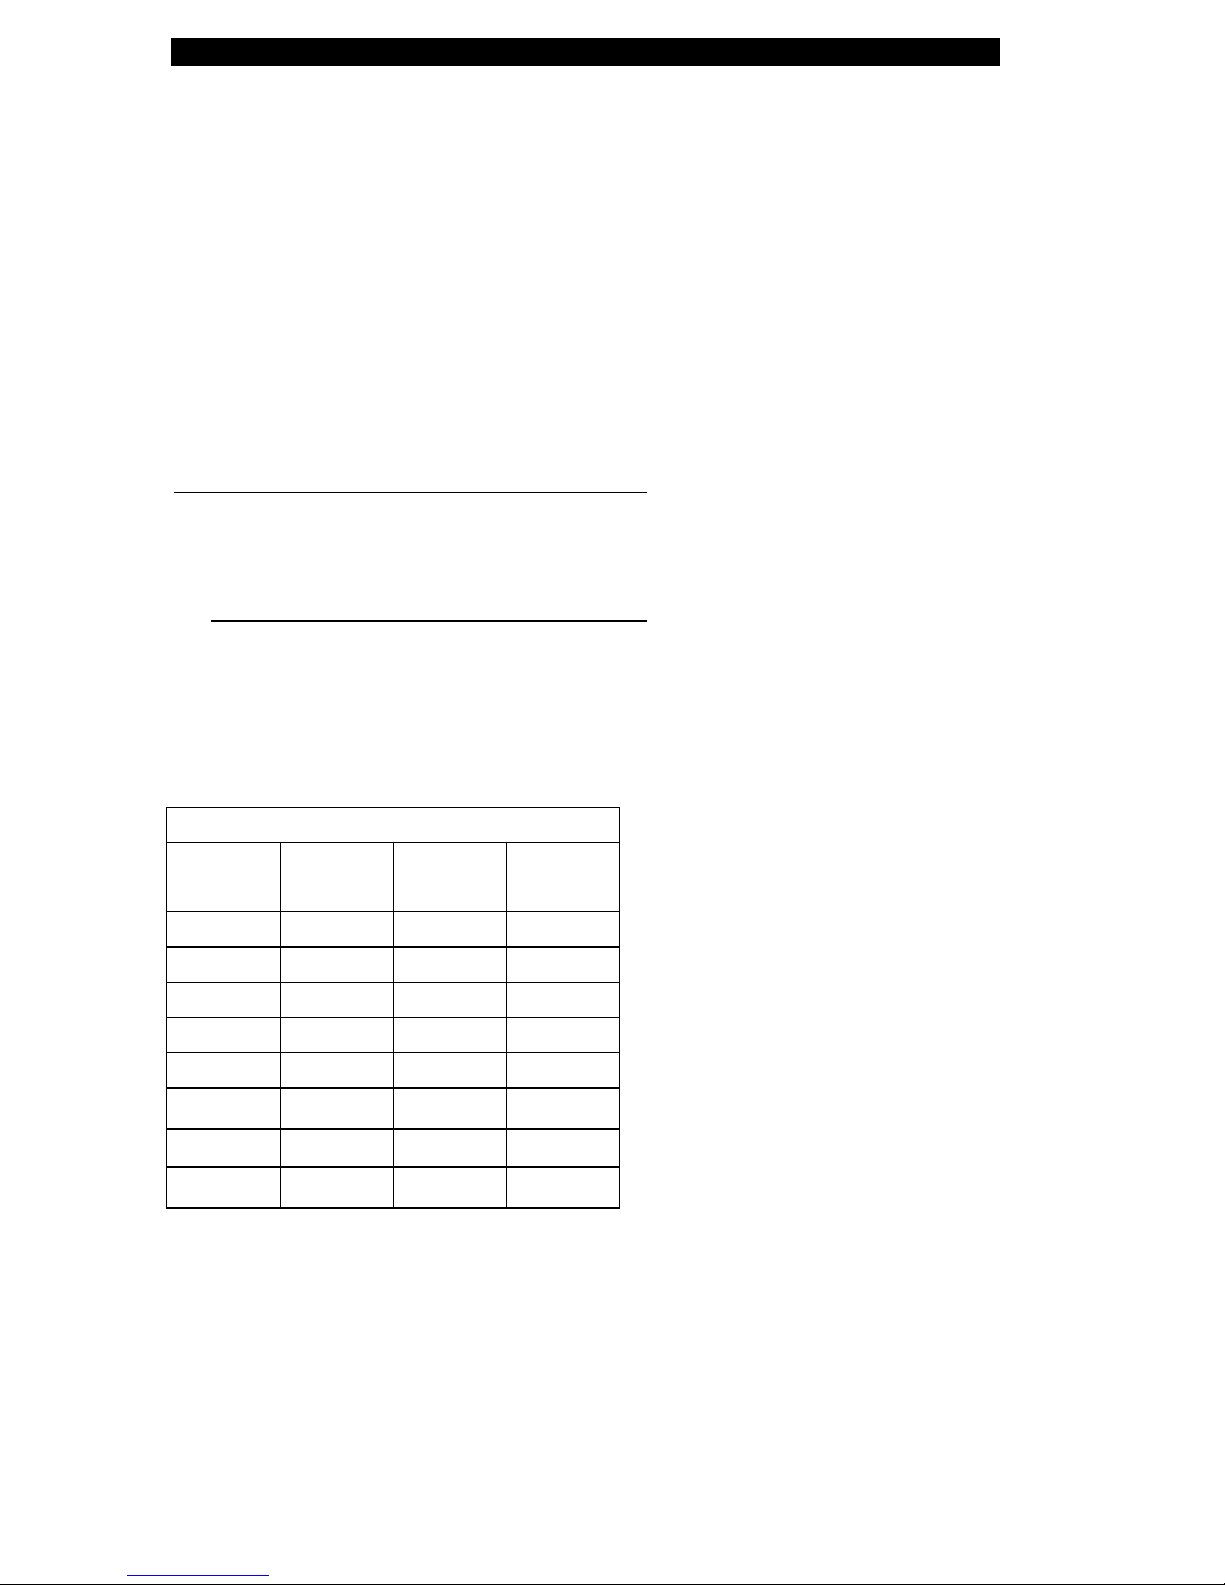
7) WASH CYCLE SETTING
Using the "S5" button it is possible to select different wash cycles according
to the type of requirement.
Set the cycles time, as follow:
A. Turn on the machine by switching on the wall switch and keep pressed
"S5" button (lamps "H1-H2, H3 and H5" flash).
B.
Release the "S5" button.
The lamps will show the Short cycle settings (see the table).
C. Press "Q1" button to change the setting.
D. Press "S5" button to confirm the setting.
E.
Now the lamps will show the Long cycle settings (see the table).
F. Press "Q1" button to change the setting.
G. Press "S5" button to confirm the setting.
H.
At this point the machine return in position off.
The bold print represents the normal wash settings.
WASH CYCLES
TOTAL
TIME
LED
H1-H2
LED
H3
LED
H5
55" OFF OFF OFF
65” OFF OFF ON
75” OFF ON OFF
90” OFF ON ON
100” ON OFF OFF
120” ON OFF ON
150” ON ON OFF
180” ON ON ON
Page 16

INSTRUCTIONS FOR TECHNICAL PERSONNEL
33
ENERGY CONSUMPTION
Mod. Tank
capacity
(l)
Water
consumption
per cycle (l)
Tank
heater (W)
booster
heater (W)
Pump
(W)
Total
power
(W)
Max hourly
production
racks with
inlet water
at 55°C
Max hourly
production
racks with
inlet water at
12°C
FC54-E 15 3.5 2000 3000 450 3450 30/20 10
FC54-EA 15 3.5 2000 3000 450 3450 30/20 10
In the event of low water supply temperature, the will be a subsequent
machine output drop.
Page 17

INSTRUCTIONS FOR INSTRUCTIONS FOR TECHNICAL PERSONNELTECHNICAL PERSONNEL
33
WIRING DIAGRAM
Q1 Main switch
S3 Start switch
S4 Regeneration switch
S5 Self-cleaning / drain switch
H1-H2 Pilot lamp power on / machine ready
H3 Pilot lamp machine working
H4 Pilot lamp regeneration
H5 Pilot lamp Self-cleaning/drain cycle
A1 Control electronic panel
A2 Power electronic panel
S1 Door microswitch
Y1 Rinse solenoid valve
Y4 Regeneration solenoid valve
C3 Condensator
C1 Anti noise filter
X1 Terminal board
M3 Wash pump
MD Detergent dispenser
M5 Drain pump
M2 Rinse boiler pump
S2 Pressure switch
E2 Booster heater
E3 Tank heater
K1 Main relay
KH2 Machine ready relay
KS2 Tank filling relay
KM3 Wash pump relay
KM2 Rinse pump relay
SE2-SE2a Booster thermostat
SE2b Booster safety thermostat
SE3 Tank thermostat
The manufacturer declines any responsibility for any printing errors
contained in this booklet. The manufacturer also reserves the right to make
any modifications to its products that do not affect the basic characteristics
thereof.
Page 18

05.2001
CODICE 900173
 Loading...