

Page 1
XFINITY™ HOME SECURITY
USER MANUAL
Page 2
WELCOME TO
XFINITY HOME SECURITY
Whether you’re home or away — at work or on the go —
XFINITY™ Home Security makes it easy for you to stay connected to
your home and family. This guide will help you get started right away.
CONTENTS
SYSTEM AND SERVICE
SPECIFICATIONS 1
SYSTEM STATUS ICONS 2
TOUCH SCREEN 3
Introduction 3
Home Screen 4
Security Bar 4
System Icon 4
Arm 5
Disarm 5
Emergency 5
Settings 6
Home Management 6
Information/Media 7
SECURIT Y PANEL 11
Arm/Disarm 12
Arm with Bypass 12
Arm/Disarm with
Key Chain Remote 12
WEB ACCESS 13
Signing In 14
Website Summary Tab 14
Security 15
Other Devices 16
Notable Events 16
Cameras 17
Today’s Schedule 17
History Tab 18
Alerts Tab 18
Automations Tab 19
Schedules Tab 19
System Tab 20
Suppor t 20
MOBILE ACCESS 21
Log On 22
To Arm/Disarm Your
Security System 22
Cameras 23
Other Devices 24
iPHONE/iPOD TOUCH ACCESS 25
Security 26
Cameras 27
Lights 27
Thermostat 28
BROWSER REQUIREMENTS 29
Required Components 29
Browser-Specific Limitations 30
Supported Operating
Systems and Browsers 3 1
qUES TIONS? cus tomer.comcas t.com/homes ecurity
Page 3
1
System Status Icons
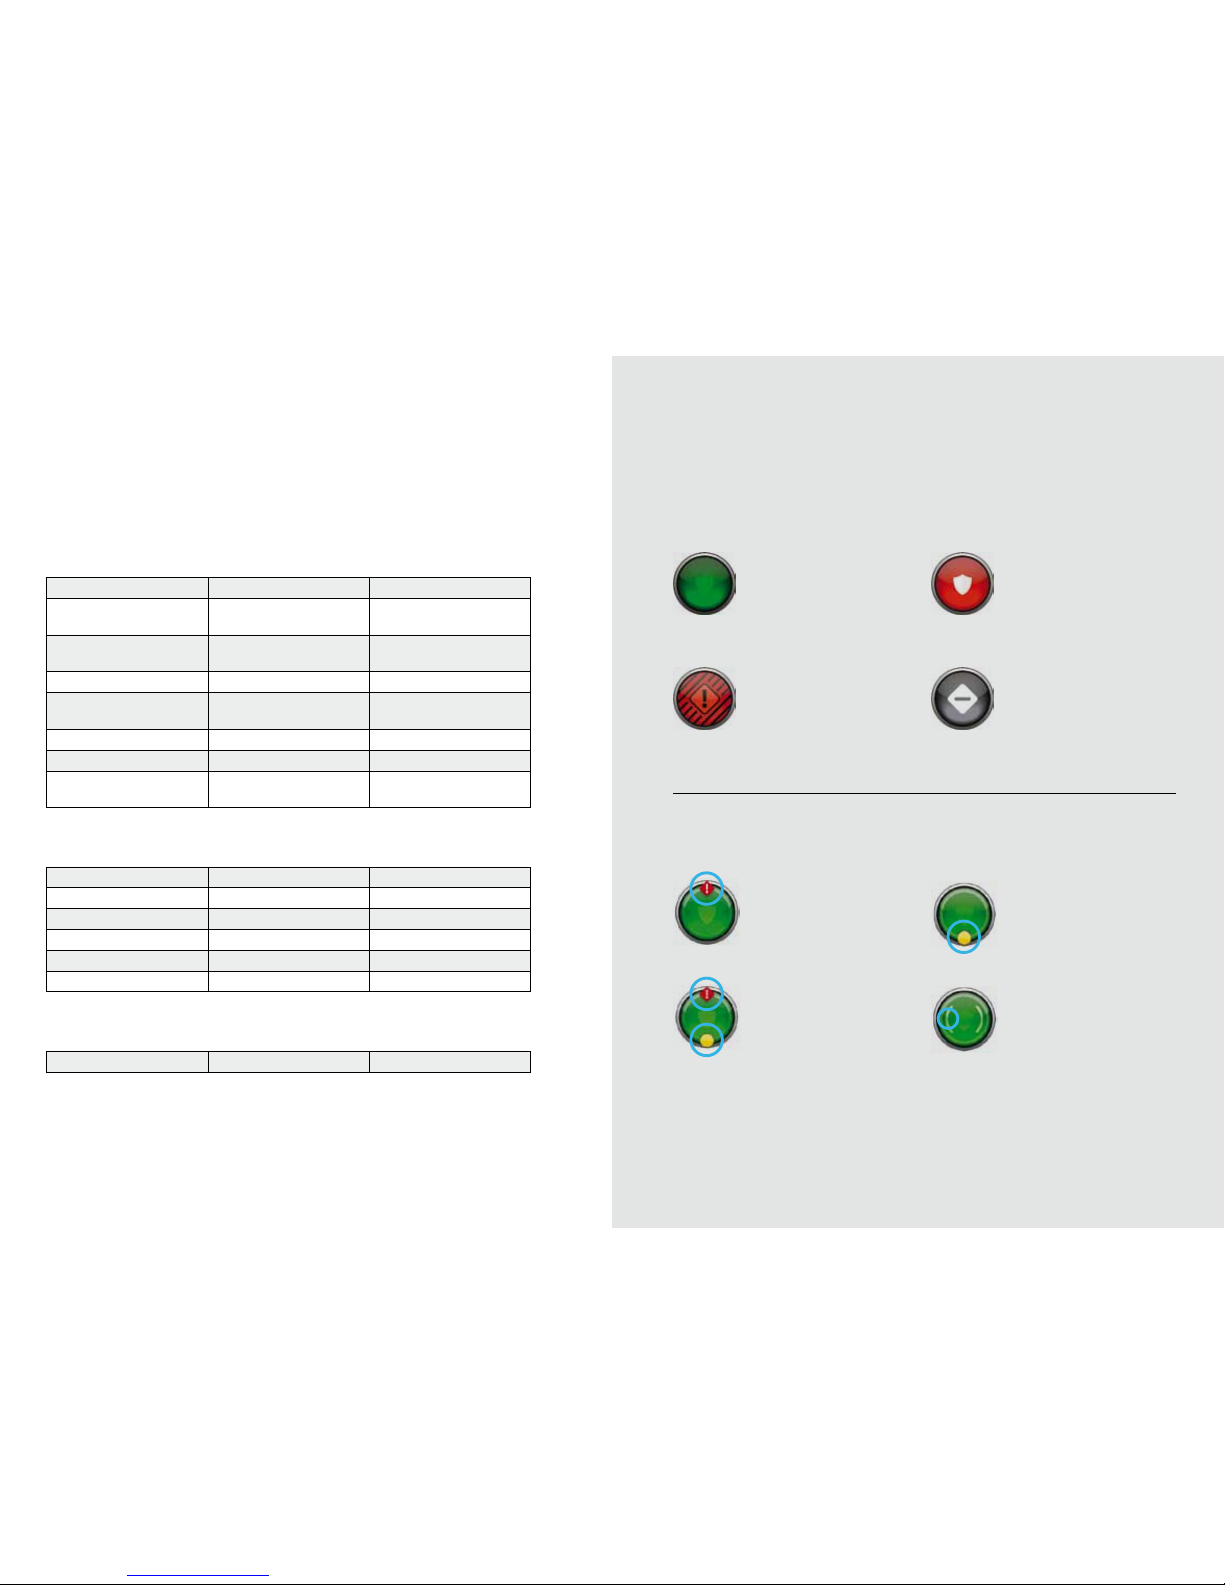
All interfaces, except for the security panel, include the following system icons that
provide an at-a-glance overview of the status of your system.
The securit y system
is disarmed.
A red diamond indicates
a sensor problem.
An alarm
state requires
immediate attention.
The securit y system is
armed, either all or door s
and windows only.
The securit y panel or
control box is oine.
Smaller symbols appear on the green or red system icons when there is more
information to report:
Sometimes both a red
diamond and a yellow
circle appear, indicating
both a problem with a
sensor and an open door
or window.
A yellow circle indicates
that doors and windows are
open. A number appears in
the yellow circle to indicate
the number of open sensors.
A wave forms ar ound the
shield to indicate that
motion is detected.
1
1
System and Service Specifications
The table below details the features that are included with your XFINITY Home Security
package. Remember — to order any of the Add-On features, or to upgrade your service,
simply call 1.800.XFINITY.
Core Services Basic Preferred
24/7 Monit oring YES YES
Wireless B ackup (Central
Station Moni toring)
YES YES
Web Port al Access Glanceable Status
& Arm/Disarm
Complete access
Mobile Access NO YES
Fire and Car bon Monoxide
Monitorin g*
NO YES
E-mail and Text Al erts NO YES
Full Touch Screen Acc ess NO YES
Home Automa tion (Lights
and Thermo stat)*
NO YES
Equipment Basic Preferred
Security Panel YES YES
Wireless Keypad YES YES
Motion Detector YES YES
Window/Door Sensors YES (2) YES (4)
Touch Screen NO YES
Key Chain Remote NO YES
Add-On Features Basic Preferred
Video Monitoring* NOT AVAILABLE AVAILABLE*
*Requires equipment purchase.
2qUES TIONS? cus tomer.comcas t.com/homes ecurity
Page 4
3
01 //
TOUCH SCREEN
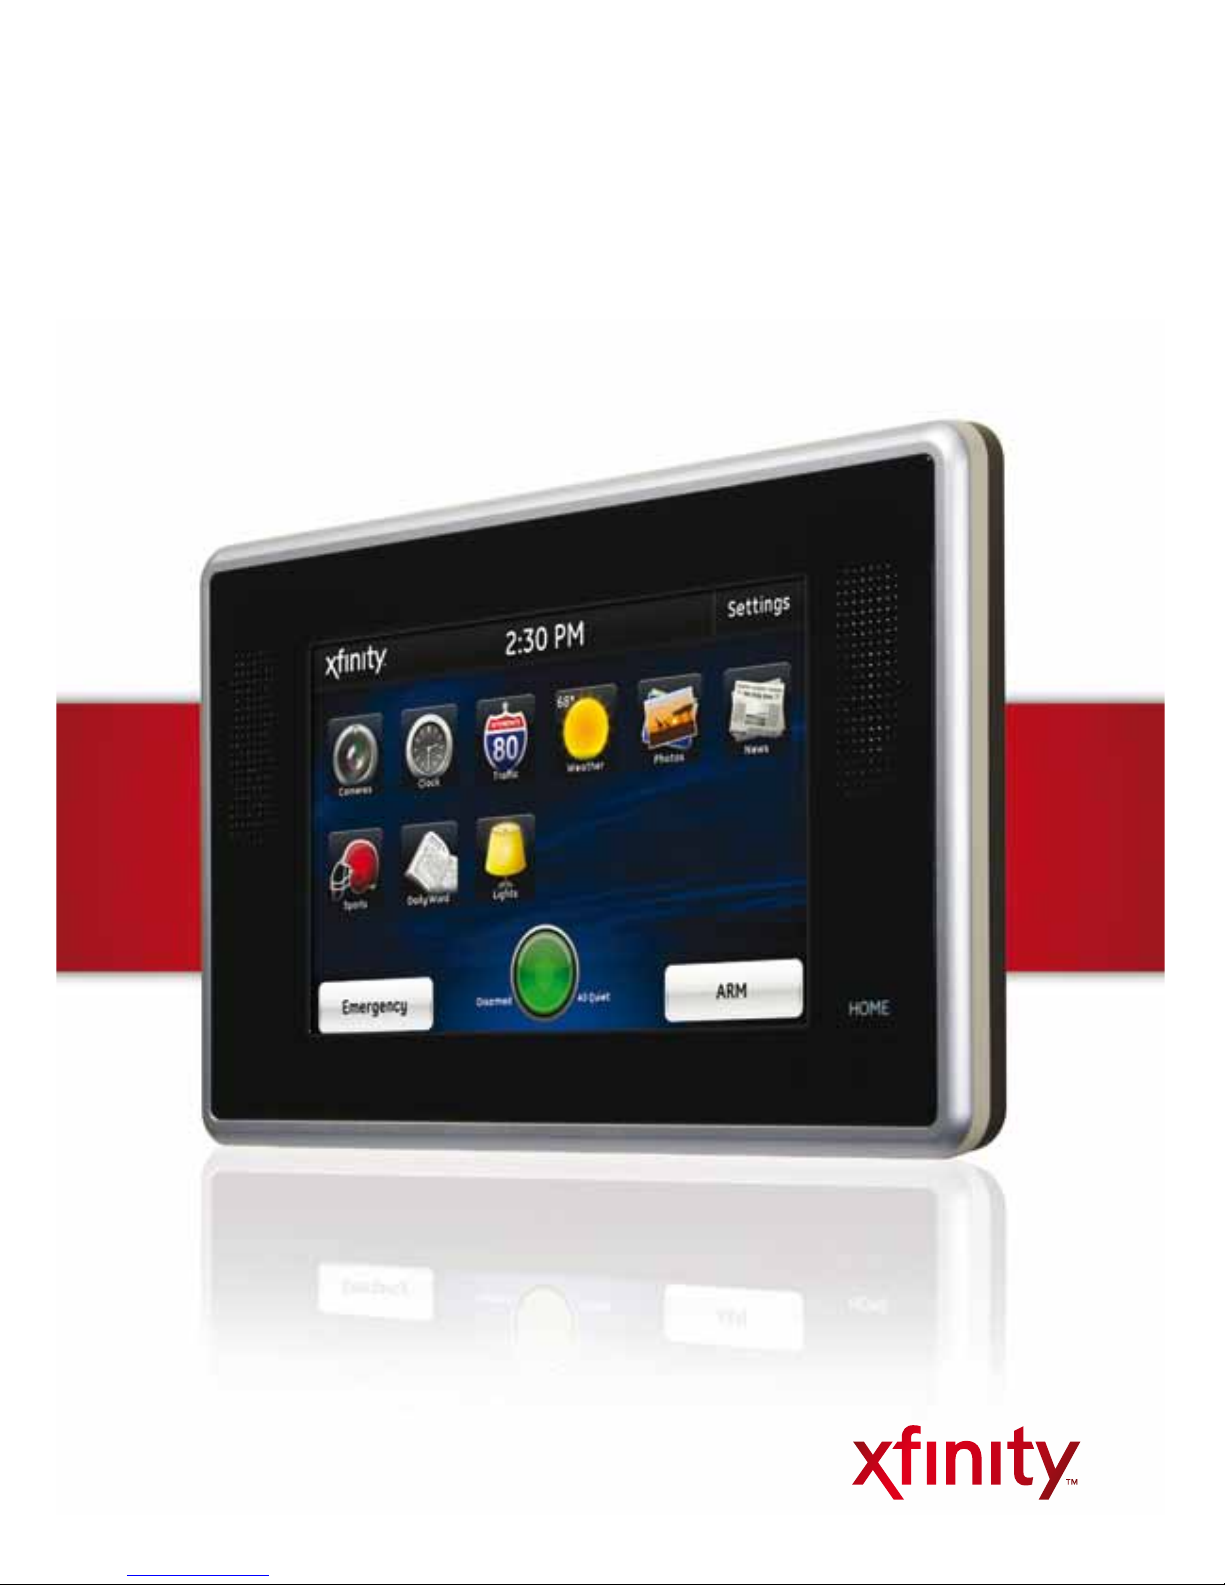
The interactive Touch Screen acts as the control center
that enables you to operate your security system and
interact with your home at the touch of a button. Use
it to arm and disarm your system, view live video from
cameras placed in your home, change light settings
and view real-time web content, all from the full-color
display. The following section provides an overview of
your Touch Screen and oers quick tips on how to use
the various features.
Home Screen
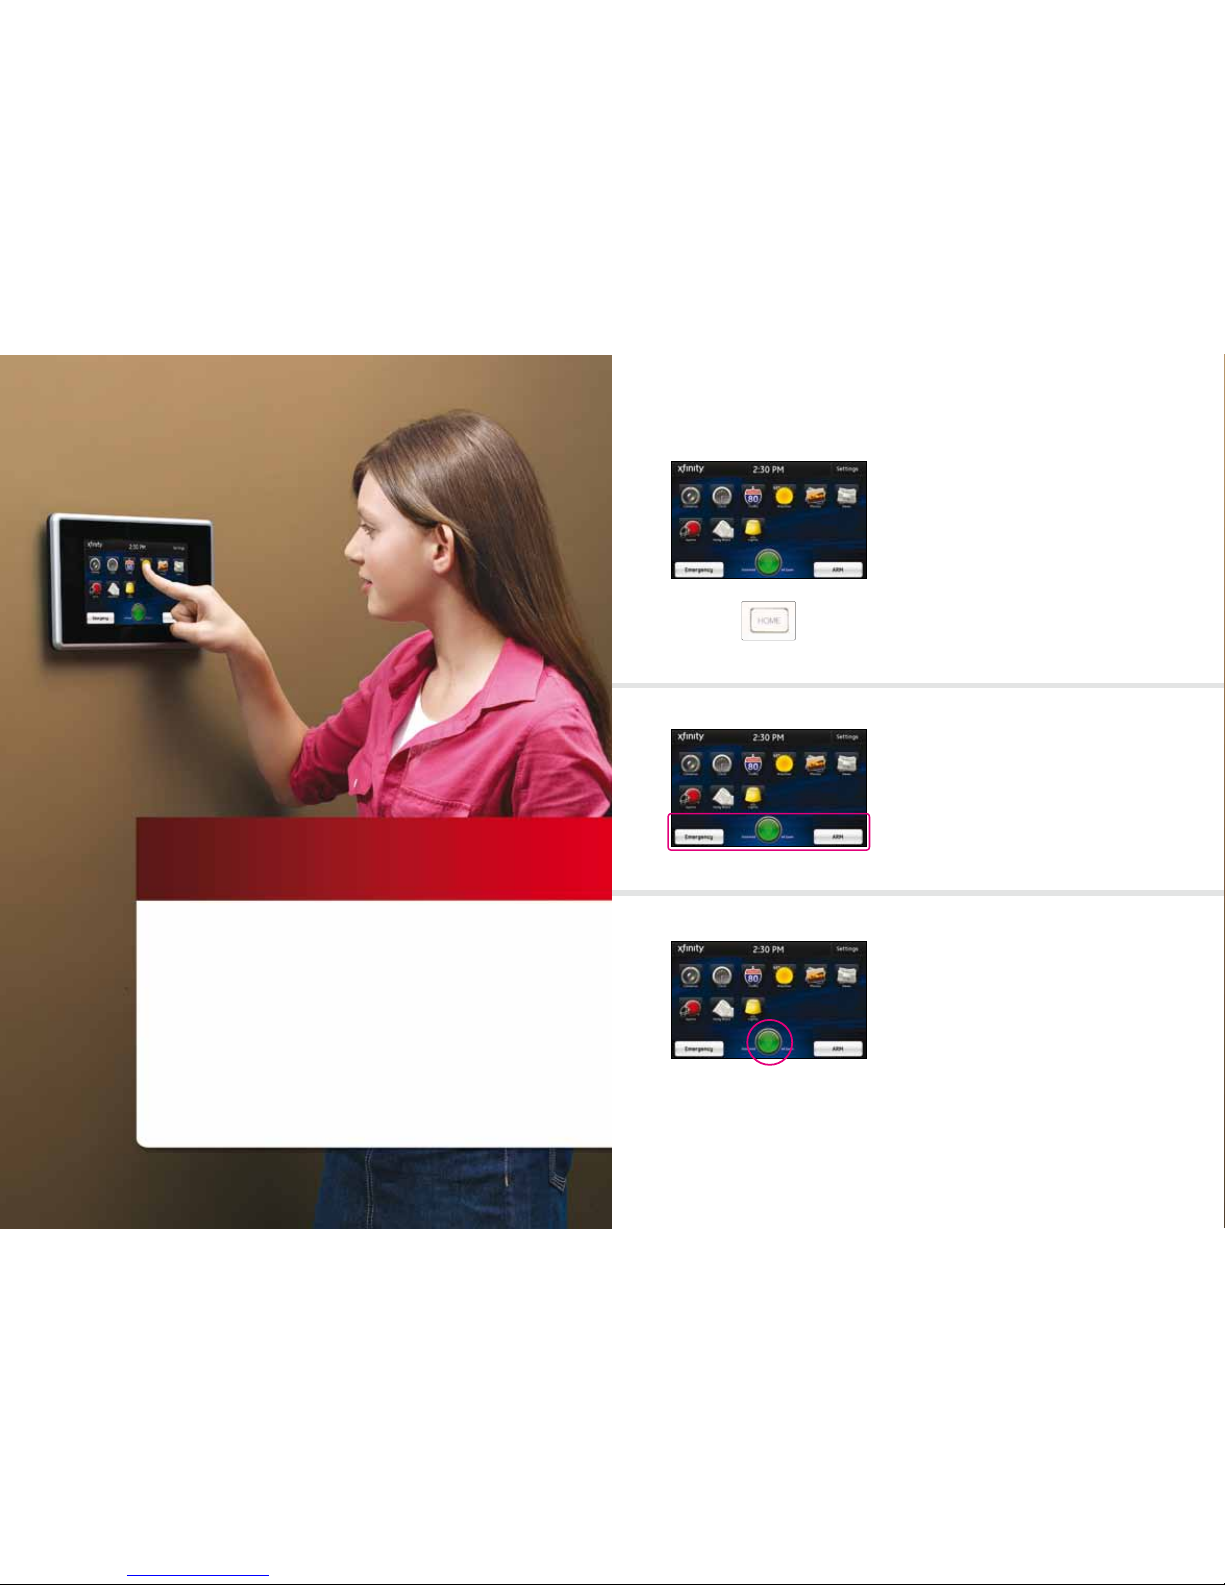
The Home Screen is the main display that provides
quick access to all Touch Screen features. In addition
to the descriptive icons that make it easy to navigate,
this screen provides a visible and audible alert if a
sensor is triggered when the system is armed or if
an environmental sensor, such as a smoke detector,
is activated.
Press the [HOME] button on the Touch Screen
at any time to return to the Home Screen.
Security Bar
The Security Bar, along the bottom of the Home
Screen, enables you to control your security system
and, at a glance, know if doors are open, motion is
detected, devices need attention and more.
System Icon
The System Icon is a graphical representation of
the overall status of your system, while text on
either side provides additional details.
Refer to Page 2 for an overview of the various
system status icons.
4qUES TIONS? cus tomer.comcas t.com/homes ecurity
Page 5
5
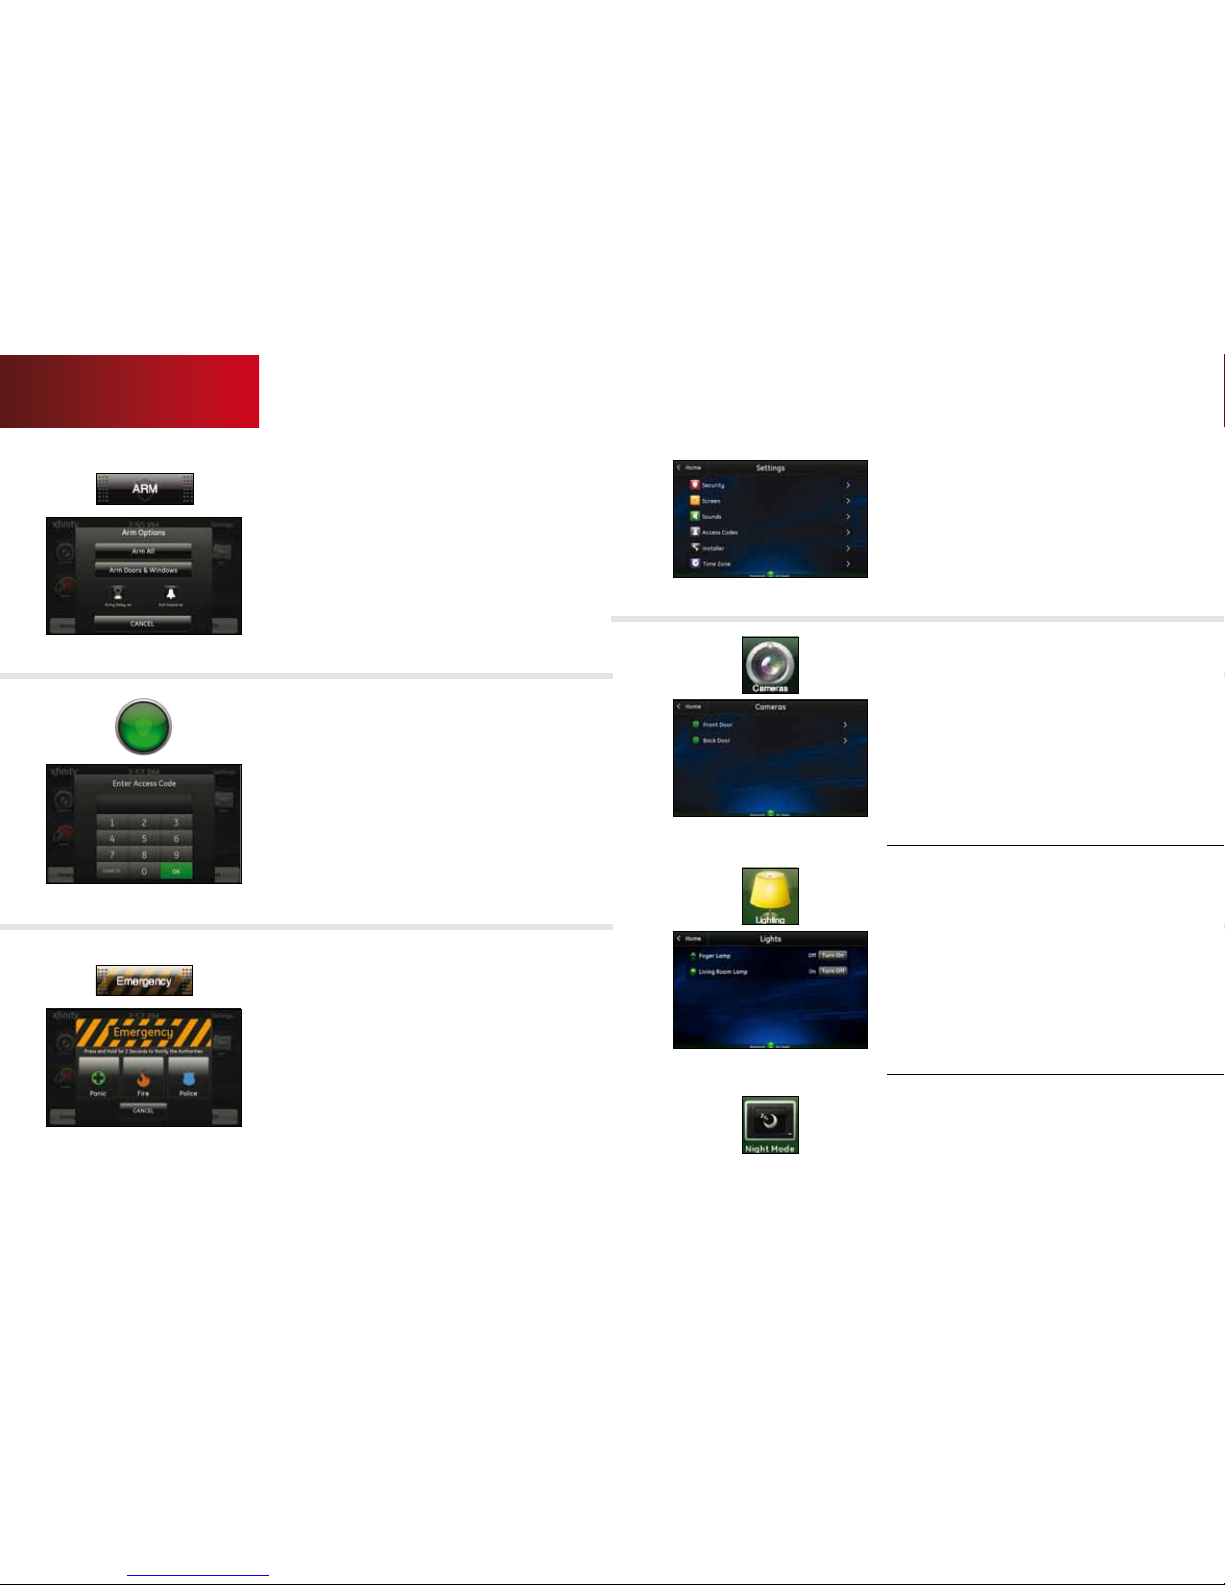
Arm
1. Touch the [ARM] button o n the Home Screen.
2. Select [Ar m Doors & Windows] to arm t he sensors
on your doors a nd windows only, or [Arm All], w hich
also includes the mo tion detectors .
3. Or touch [CANCEL] to return t o the Home Screen
without ar ming the system.
Note: The Touch Screen generates s hort, audible
alerts while arming, i ndicating 60 seconds for exit.
Audible alerts last fo r 30 seconds for entry.
Disarm
1. Touch the [Disarm] button on t he Home Screen.
2. Ent er your access code.
3. Touch [OK ].
Emergency
Sends an immediate alarm to the central monitoring
station, indicating an emergency of a specific type —
medical, fire or police.
1.
Touch [Emergency] on the Home Screen to display the
individual emergency buttons.
2. Press the applicable button for 2 seconds to alert the
proper authorities.
3. Note: Touch [CANCEL] to cancel the alarm.
Touch Screen
Settings
Displays a list of settings options to customize your
Touch Screen. For example, touch:
• [Screen] to change display backg round or to select a
screen sa ver.
• [Access Codes] to add or delete users or set the security
passcode for users.
• [Time Zone] to set the current time and your time zone.
Home Management
View live video from in-home cameras, adjust lighting
and darken your Touch Screen display.
Cameras
When you touch [Cameras] on the Home Screen,
the Touch Screen displays a live video feed for the
cameras installed on your system.
1. Press [>] to go to the next video feed (if applicable).
2. Press [<] to go to the previous video feed (if applicable).
3. Touch the display to enlarge the video image.
Night Mode
Touch Night Mode to darken the Touch Screen and
eliminate the light. Touch the screen or press the
Home button when you are ready to wake it up.
Lighting
The Touch Screen allows you to adjust the lighting
throughout your home from a single location.
1. Touch the [Lighting] icon to display a list of the lighting
modules installed in your home, as well as the current
setting of each.
2. For lights equipped with an on/o switch only, touch the
name of the lamp to change the current setting to the
ON or OFF position.
3. For lamps equipped with a dimmer function, touch the
name of the lamp to display the Light screen for that
lamp. Use the brightness level icon to adjust the lighting.
6qUES TIONS? cus tomer.comcas t.com/homes ecurity
Page 6
7
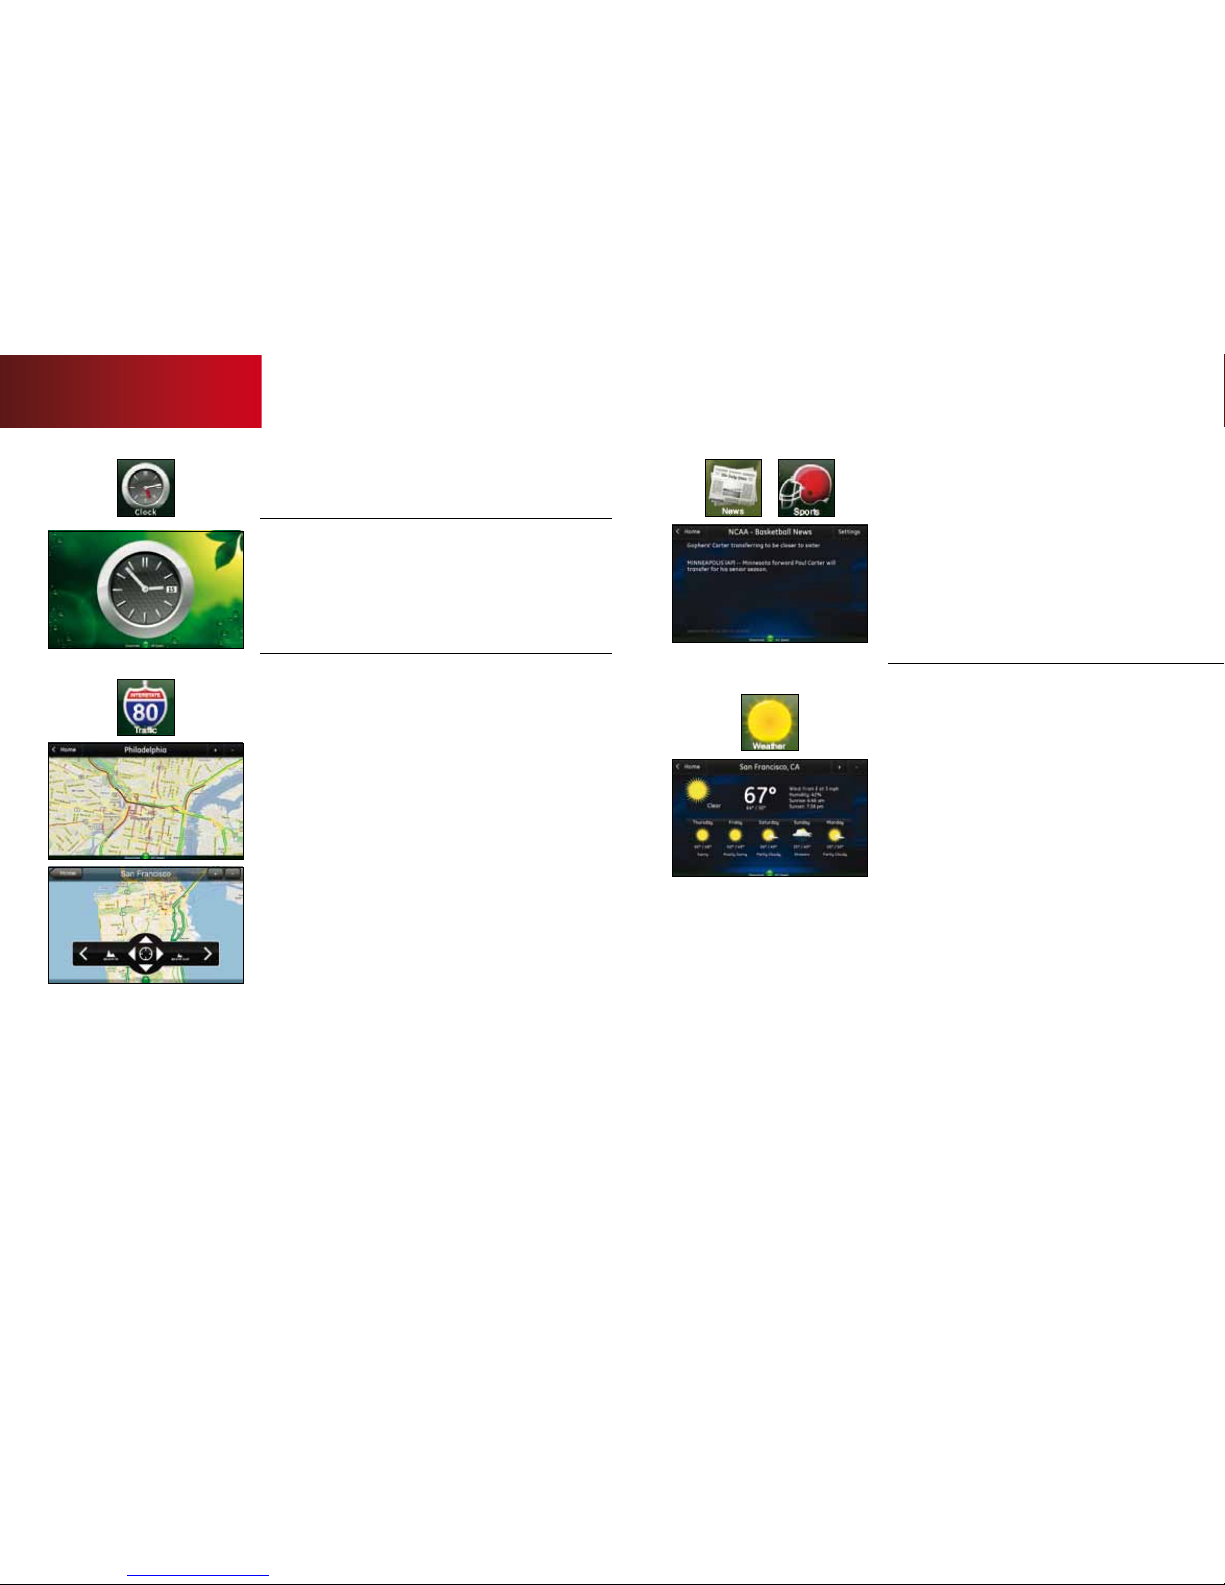
News/Sports
Displays headlines, pictures and brief stories in
a slideshow format.
1. P ress [Sports] or [News].
2. Touch the display.
3. Use the [<] and [>] buttons to scroll through the stories.
4. P ress [Settings] to customize the stories y ou receive.
Weather
Displays the current weather conditions and a
five-day forecast.
To add a location:
1. P ress [+].
2. Enter the zip code.
3. Press [OK].
4. To remove a location, press [-] when it is selected.
To view multiple weather repor ts:
1. Touch the displa y.
2. Press [>] to view the ne xt location.
3. Press [<] to view the pr evious location.
Touch Screen
Information/Media
Quick-glance, customizable information.
Clock
Touch the [Clock] icon to display the time.
1.
To view it as an analo g clock, touch the display.
2. Touch [Analog].
Trac
Displays a map of your area with live trac data.
• Green patterns indi cate no trac delays .
• Yellow patterns indicate slig htly delayed tra c.
• Red patterns indic ate stop-and-go tra c.
To find a new location:
1. Touch [+].
2. Use the key pad to enter the name of the loc ation.
3. Press [OK].
4. To remove the lo cation from your presets, press [-]
when it is selected.
To navigate:
1. Touch the display.
2. Press [zoom in] to zoom in and [zoom out] to zoom out.
3. Press [next] and [previous] to scroll th rough your
preset lo cations.
4. U se the [arrows] to navigate .
8qUES TIONS? cus tomer.comcas t.com/homes ecurity
Page 7
9
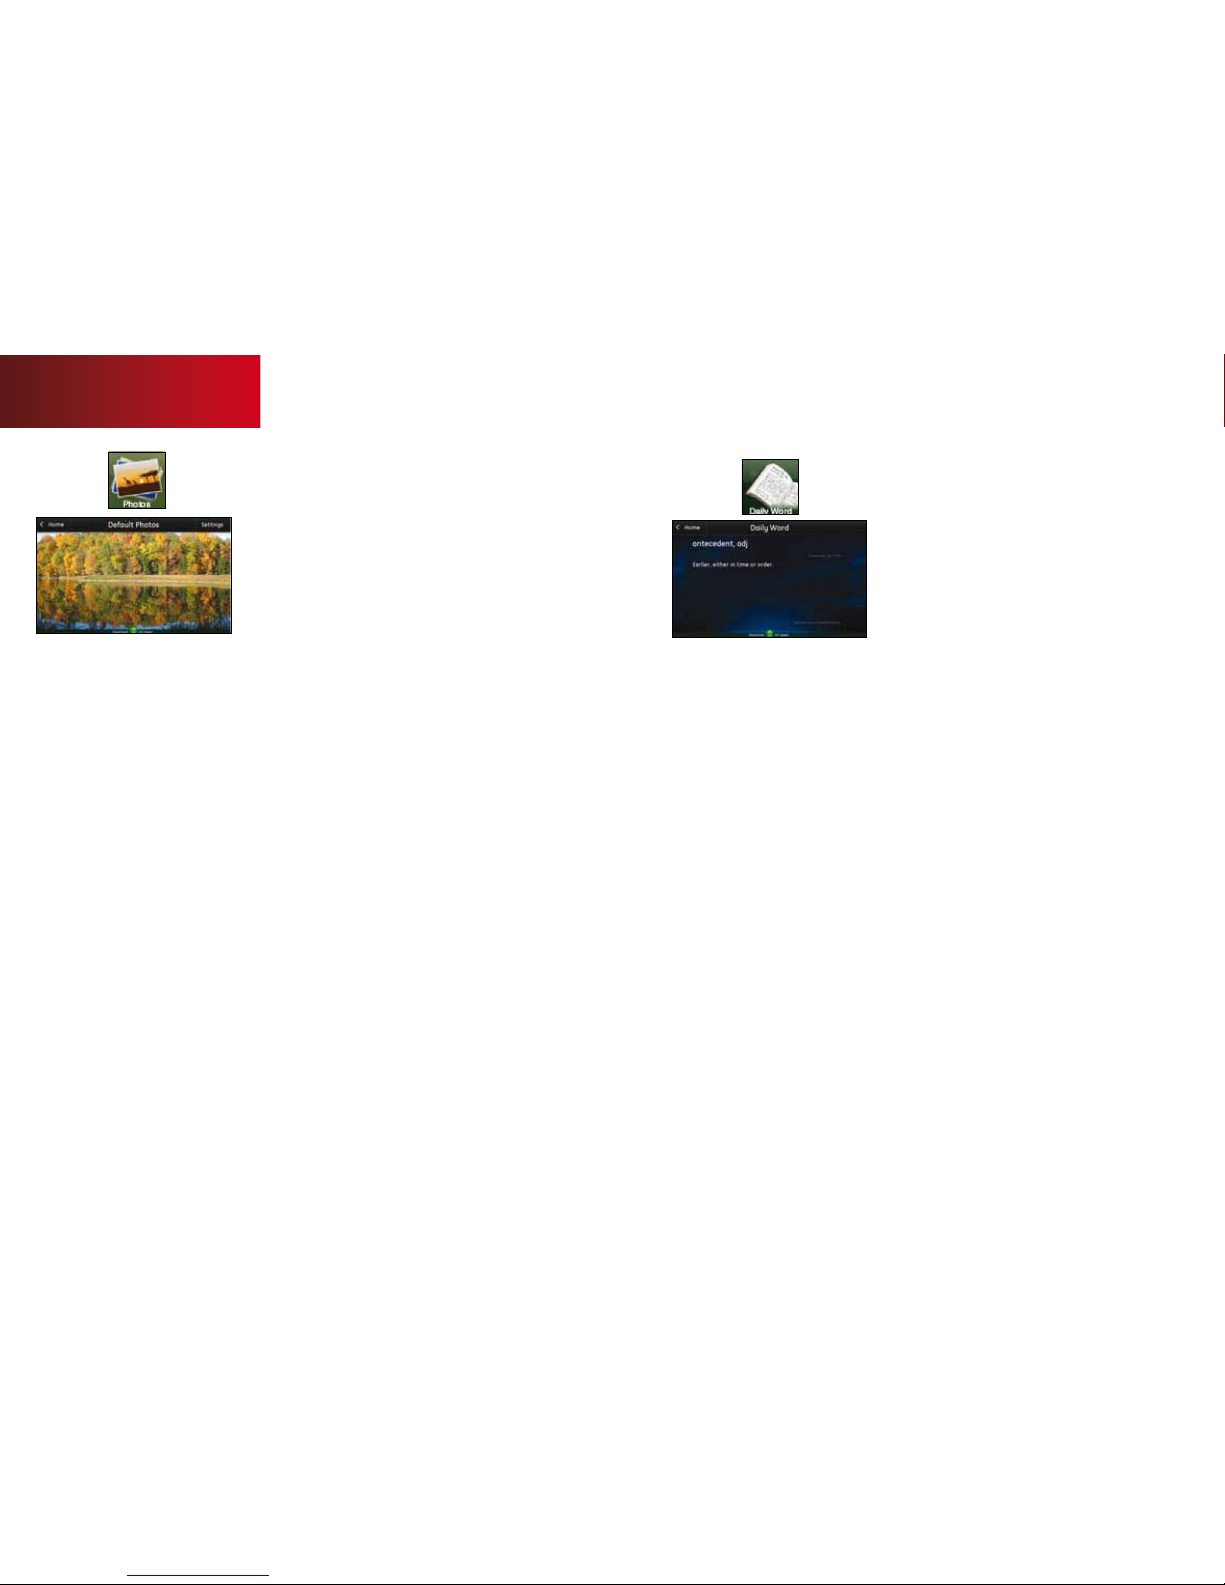
Photos
Displays photos from your Yahoo! flickr account in
full-screen mode on the Touch Screen. A sample
photo set will appear when the Yahoo! flickr feature
is not enabled.
1.
Press [Photos].
2. Touch the display.
3. Use the [<] and [>] buttons to scro ll through
your photos .
Note: You need a Yahoo! flickr account with at least
one photo set to pe rsonalize this feature. If you do
not have a Yahoo! flickr account, you can sign up for
one free at flickr.com and upload the p hotos you
want to view on your Touch Screen.
To set your Touch Screen to display public photos
from your Yahoo! flickr account:
1.
Press [Photos].
2. Touch [Settings].
3. Touch [Yahoo!/flickr Account].
4. Touch [flickr Account ID].
5. Delete any de fault entry, enter yo ur flickr
account ID and to uch [OK].
6. Touch Yahoo! Us ername, enter your usernam e
and touch [OK].
7. Touch Yahoo! Passwo rd, enter your passwor d
and touch [OK].
8. Touch [Use New Account Settings].
Note: If you do not have a Yahoo! flickr account you
can sign up for one free at flickr.com.
Daily Word
Displays word of the day and its definition.
Touch Screen
10qUES TIONS? cu stomer.comca st.com/home security
Page 8
11
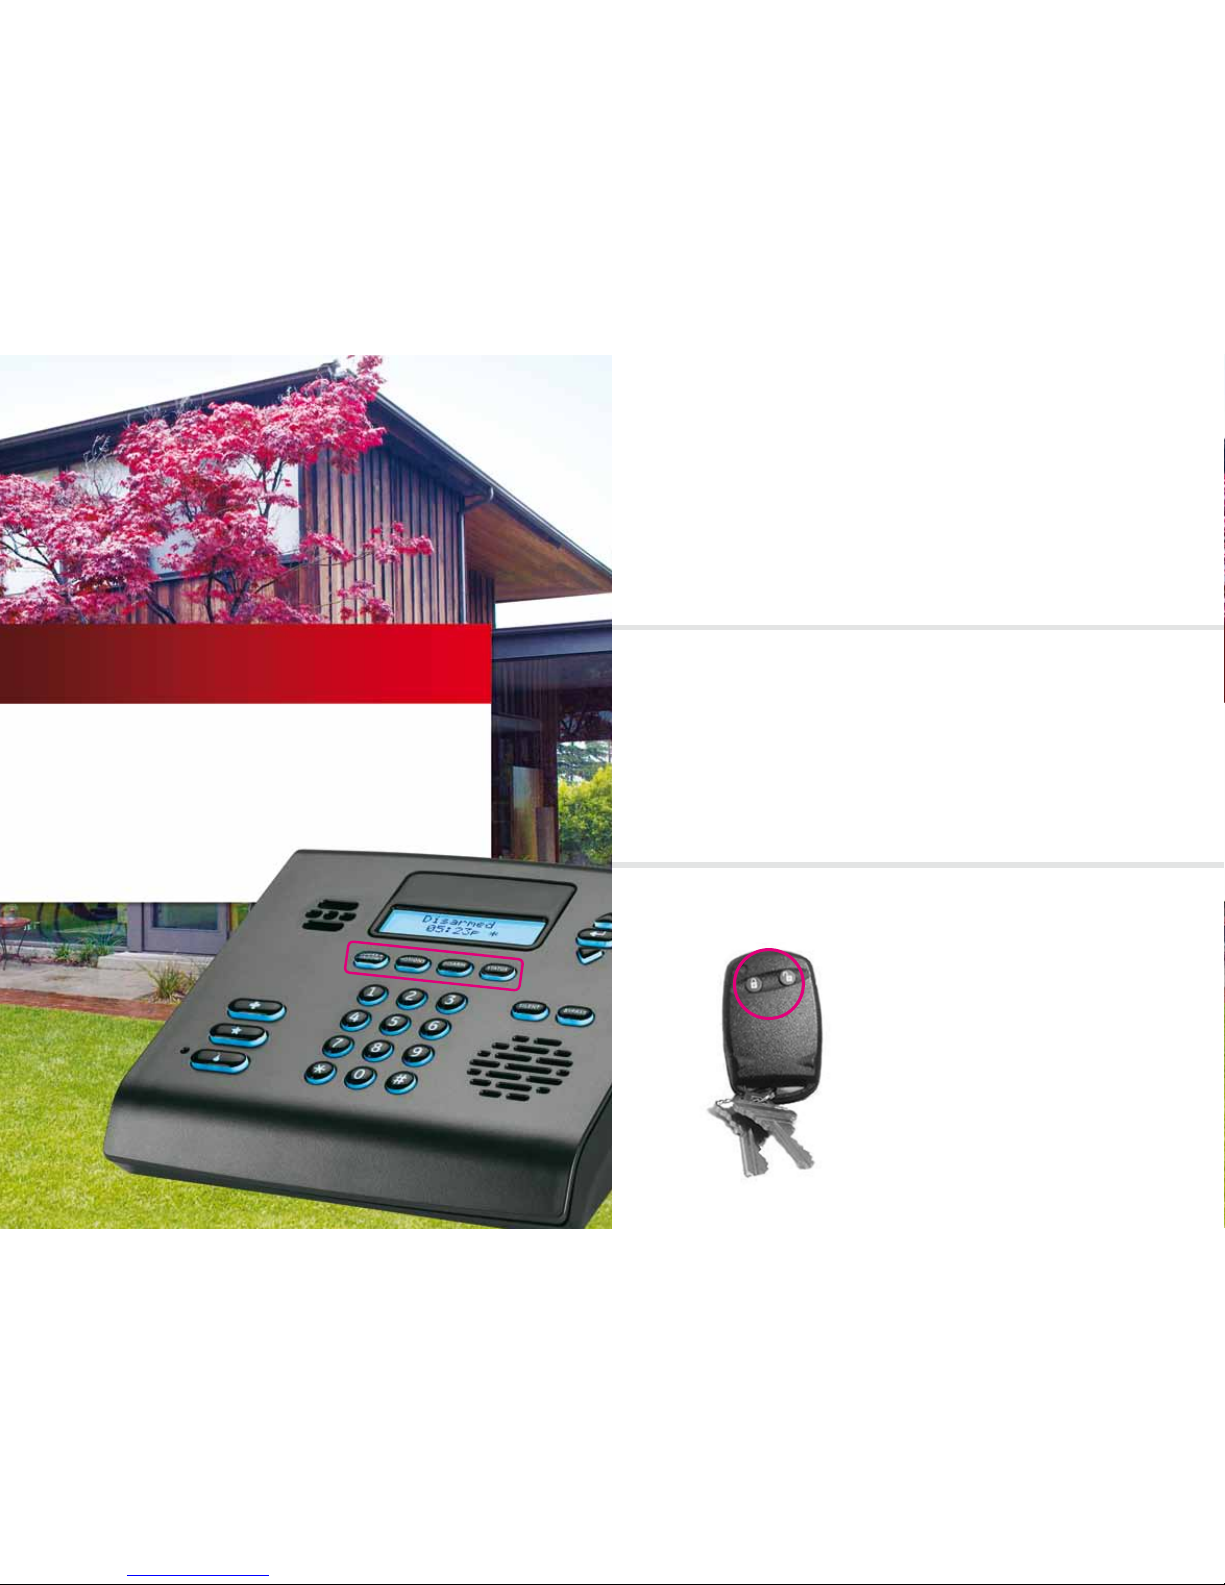
The Security Panel provides additional access to
your security system. You can use it to arm and
disarm your system and more. This manual also
shows you how to arm and disarm the system
with your Key Chain Remote.
02 //
SECURITY PANEL
Arm/Disarm
1. Press [DOORS+WINDOWS] to arm the sensor s on
your doors an d windows only.
2. Press [DOORS+WINDOWS] and then press [MOTIONS]
to set the s ystem to Arm All, which al so includes the
motion det ectors.
3. To disarm the sys tem, press [DISAR M] on the panel
and enter your a ccess code.
Arm with Bypass
You can arm your system even if a door or window
is open.
1. To arm the sensors on y our doors and windows only,
press [DOORS+WINDOWS]. The system w ill display
a warning that a d oor or window is open. Press
[DOORS+WINDOWS] again to arm the system.
2. To Arm All, press [DOORS+WINDOWS] twice and
then press [MOTIONS].
Arm/Disarm with Key Chain Remote
1. Press the [lock symbol] button un til a red LED
flashes once to ar m Doors+Windows.
2. Press the [lock symbol] twice to se t Arm All. The red
LED on the key ch ain remote should flash twi ce — once
for each push.
3. To disarm, press th e [unlock symbol] button unt il
you see the r ed LED blink once.
4. I f the alarm fails to disarm, go to t he control panel
and press the [DIS ARM] button and ent er your
access code. Or c ontact your Centra l Monitoring
Station as soon a s possible.
12qUES TIONS? c ustomer.comca st.com/home security
Page 9
13
Access your interactive home security system
through your personal, secure web page. Check
the status of your home, arm and disarm your
system, see live video of your home, view video
clips and pictures, change settings and much
more, from anywhere you have Internet access.
03 //
WEB ACCESS
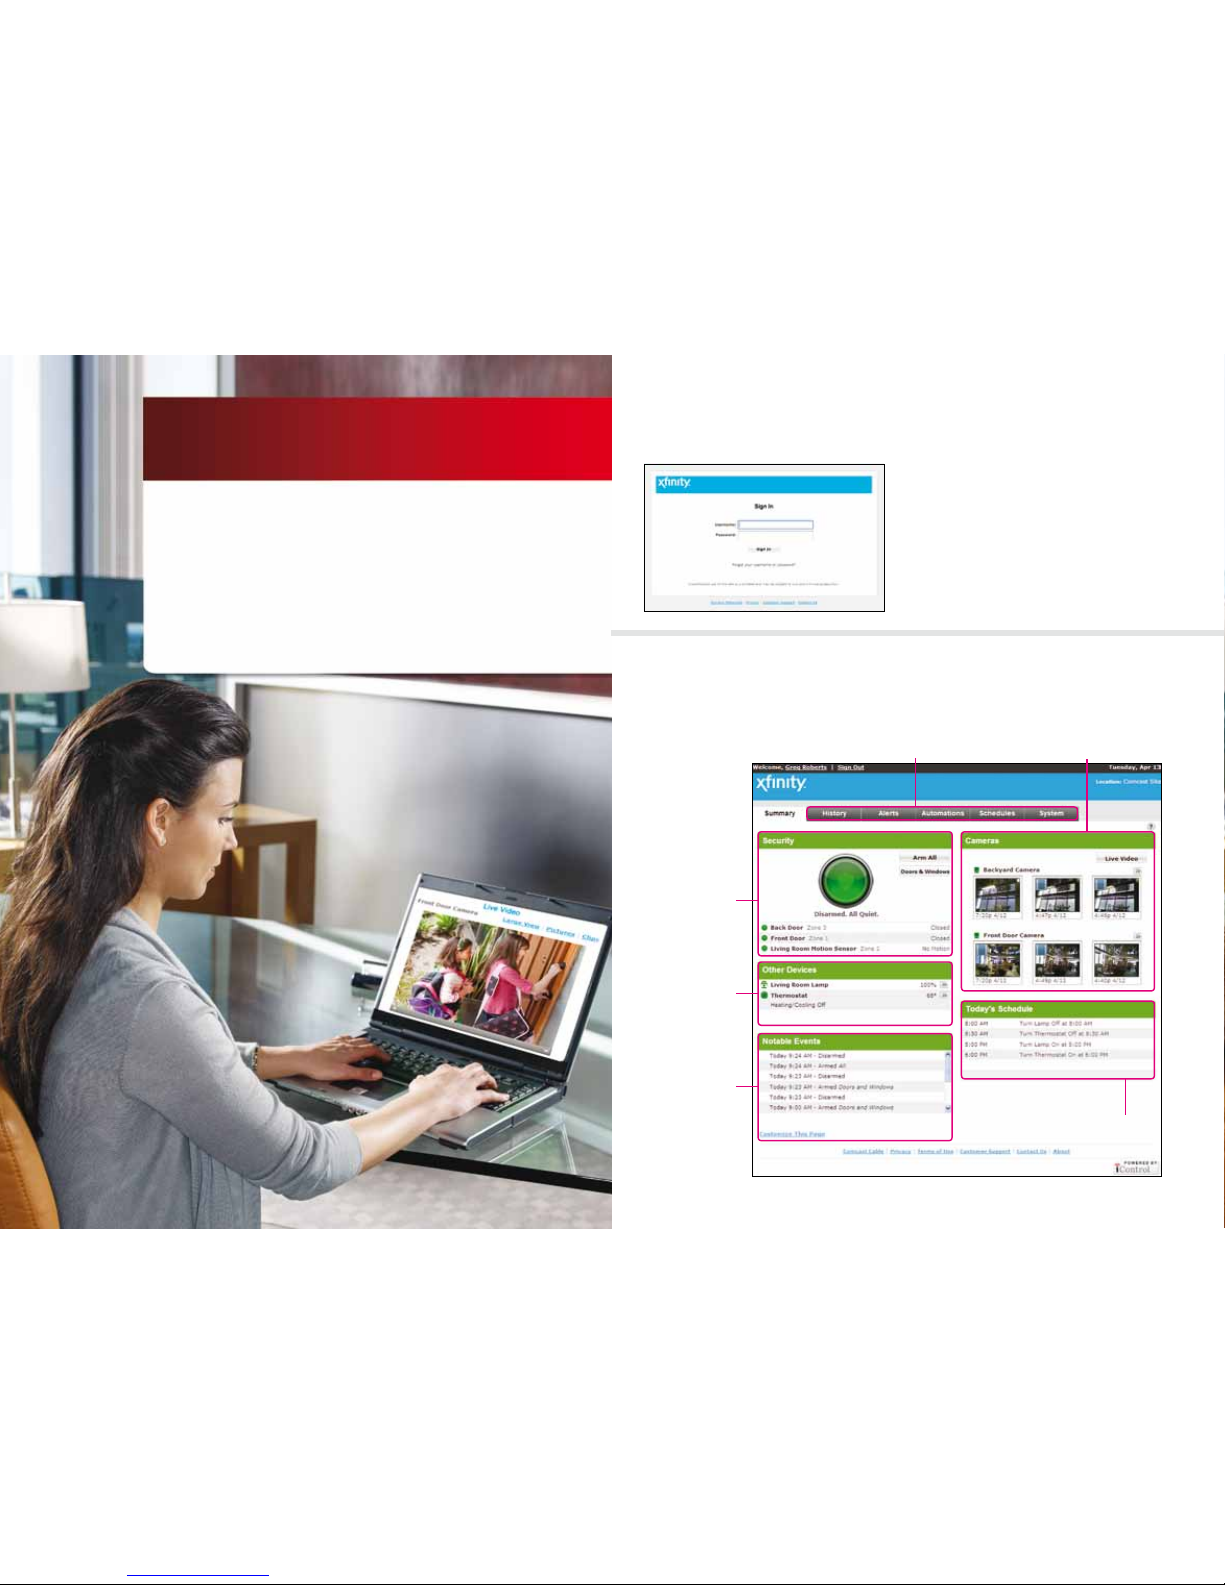
Website Summary Tab
The Summary tab provides a snapshot overview of your entire system.
From this page, you can view general status information about your home
and security system, and access various tabs to change system settings.
See Page 1 7See Page s 18–20
See Page 1 7
See Page 15
See Page 1 6
See Page 1 6
Signing in
You will need to sign in each time you access
the website.
1. Go t o xfinity.com/xhslogin.
2. Enter your Comcast.net Username and Password.
3. Click [Sign In].
Forgot your Username and Password?
Call 1.800.XFINITY for support.
14qUE STIONS? c ustomer.comc ast.com/hom esecurit y
Page 10
15
2
4
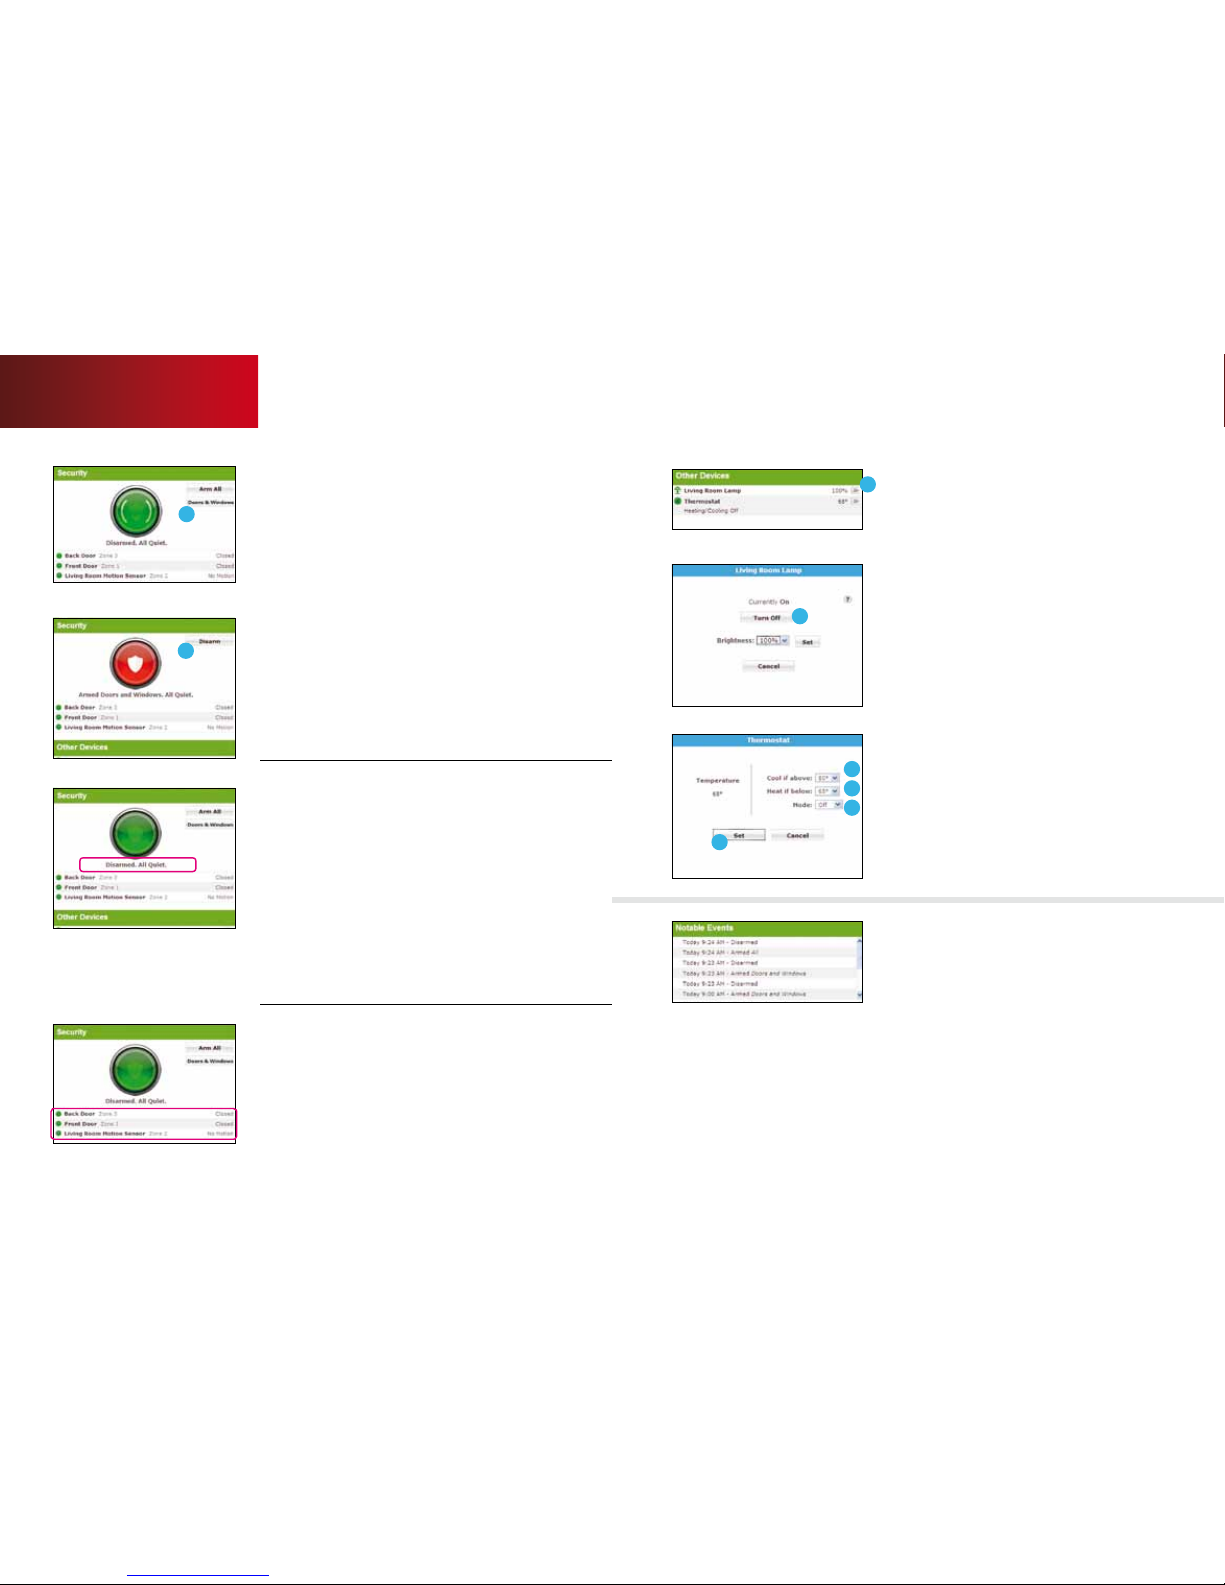
Security
Indicates the overall status of your
security system.
To arm/disarm your security system:
1. Click [Arm All] to activate all security sensors including
motion senso rs.
2. Click [Doors & Windows] to activa te security sensor s
on doors and win dows only.
3. Once clicked , your system will arm in a fe w seconds
and indicate the n ew status.
4. C lick [Disarm] to return the secur ity system to th e
disarmed st ate.
Current Home Management Mode:
Your system will default to various modes based
on its status:
•Home Your system is dis armed. You are at home and
do not want to r eceive alerts o f triggered sensor s (for
example, wh en someone opens a door or windo w).
•Sleep Doors & Win dows are armed. You are at h ome
and do not want m otion sensor alerts bu t do want
door/window sens or notifications (po ssibly when you
are sleeping or nap ping).
•NotHome Arm All is armed. N o one is at home, and
you want all sen sors active.
Device States
The current state of all securit y devices connected
to your system appears here. Click the device
name to see the recent history.
1
2
2
3
4
5
Other Devices
Indicates the status of devices connected to the
system and allows you to quickly turn lights on or o
and adjust your thermostat. If a scroll bar is visible,
you can scroll down to see more information.
To turn a light on or o:
1. Click [>>] next to the light y ou want to adjust. A
pop-up windo w will appear with the curre nt status.
2. If the light is an O n/O Lamp, click [Turn On] or
[Turn O].
3. If the ligh t is on a dimmer, use the pulldown menu
to adjust the desir ed brightness and click [Set ].
To adjust the thermostat:
1. Click [>>] next to the thermos tat you want to
adjust. A pop- up window will appear with the
current t emperature.
2. Select a Cool if above temperature
3. Select a Heat if below temperature
4. Choose a heating or cooling m ode.
5. Click [Set]. Your change will t ake eect in
a few second s.
Notable Events
View details of recent activity that might warrant
attention (i.e., alarms, unexpected conditions,
etc.). Click an event for more details.
To view additional event histor y:
1. S croll to the bottom of t he list.
2. Click [More].
Web Access
16qUES TIONS? cu stomer.comca st.com/home security
Page 11
17
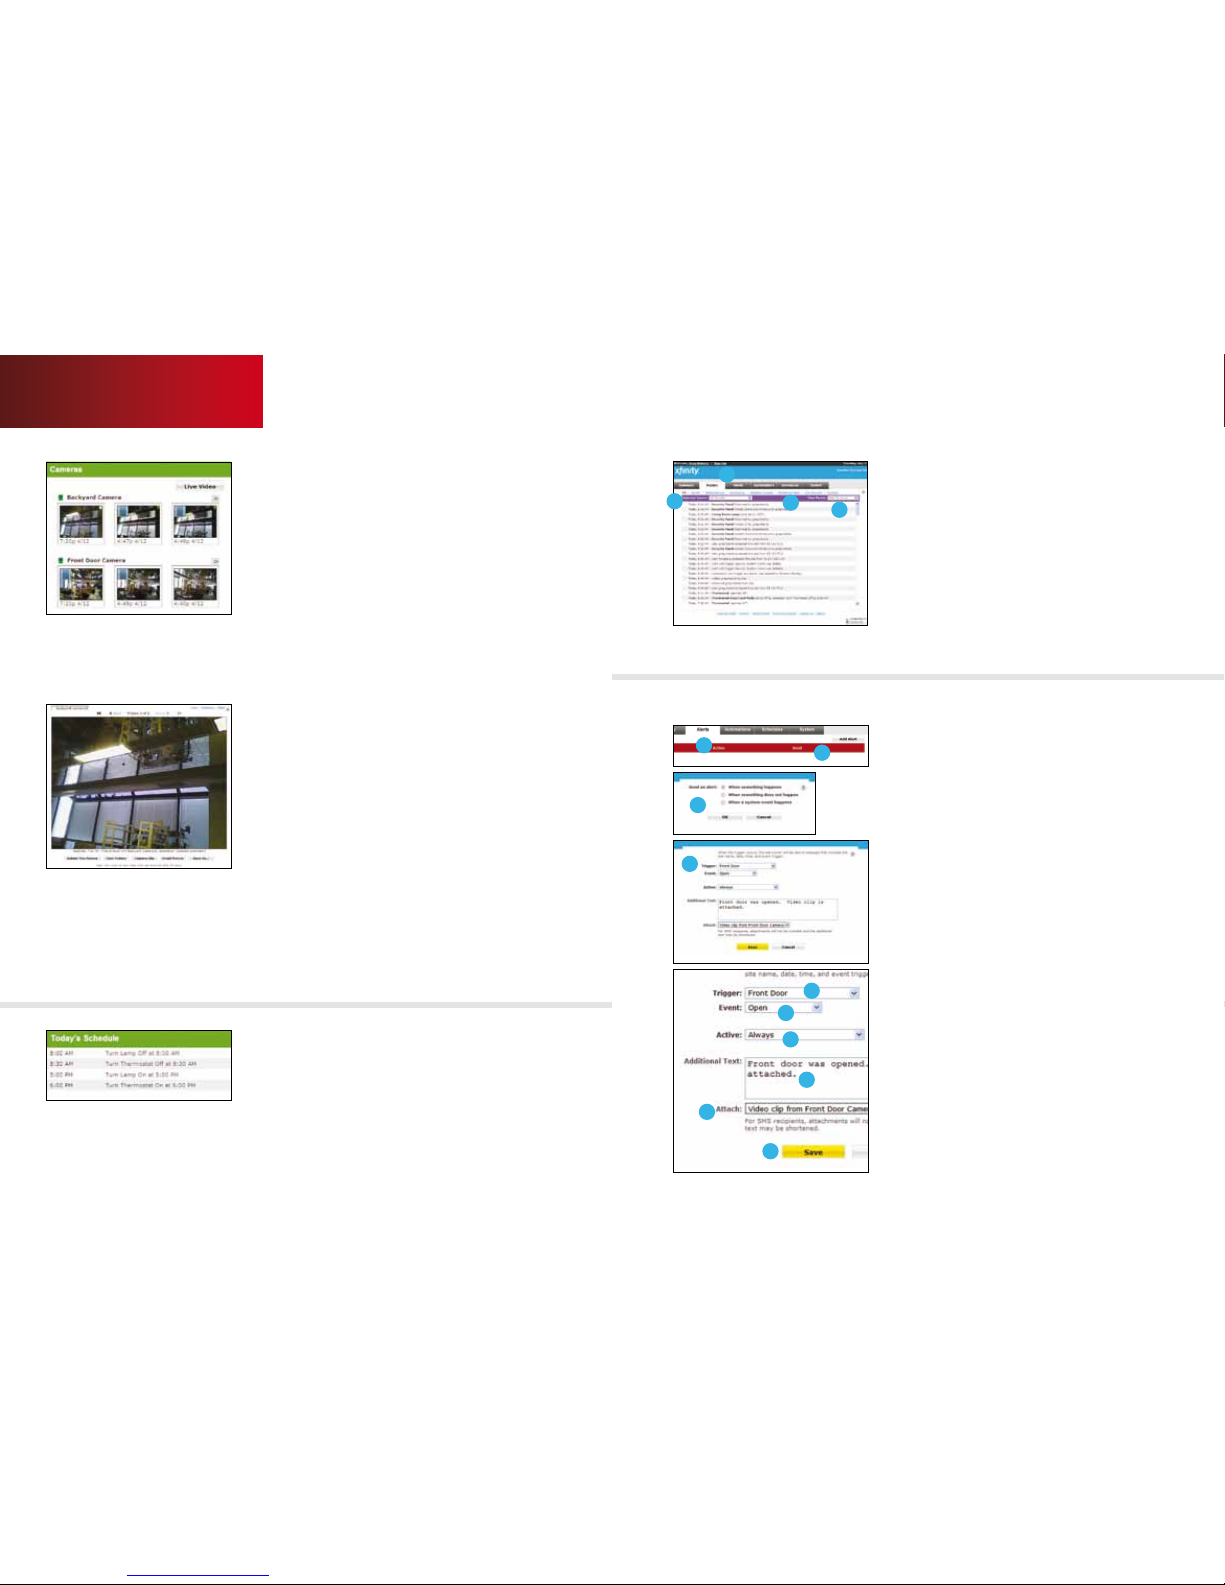
Cameras
Displays live video and recent video clips and
pictures from the cameras installed in your home.
To view individual pictures or video clips:
1. Click any pic ture or video clip from the c amera you
want to see (v ideo clips have the < add video fi lm
icon > in the top lef t corner).
2. In the large v iew, click [< Older] to view the prev ious
picture or v ideo clip.
3. Click [Newer >] to view the next pic ture or video clip.
4. U se the buttons at the bo ttom of the screen to
delete the pic ture or clip, e-mail the clip, sav e it
to your compute r and more.
To view live video:
1. Click [Live Video]. A new window will appear with
the reques ted video.
2. If you ha ve more than one camera conne cted to your
system , click Large View abov e one of the video
screens to co ntrol the respect ive camera.
3. Click [Take Picture] to capture a st ill image. You can
access the ne w image in the Cameras sect ion of the
Summary pag e.
4. C lick [Capture Clip] to take and save a sh ort video.
You can access the ne w video clip in the Cameras
section o f the Summary Page.
Note: Please refer to pages 29 –31 for full vide o
viewing browser require ments.
Today’s Schedule
View schedules you created that control your
system and devices. To learn how to add a new
schedule, see the Schedules tab section.
2
1
1
2
3
4
3
4
4
5
6
7
8
9
History Tab
View details of actions the securit y system has
taken during the past 24 hours, or as far back as
30 days.
1. Cli ck the History tab.
2. Click [Selected Device] to narrow your v iew to a
certain de vice.
3. Selec t an action from the top me nu to narrow the
history d own further.
4. C lick [Time Period] to change the time period o f
activ ities that are displayed.
Alerts Tab
Click the Alerts tab to set your system to send
an e-mail or text-message alert to you and others
when events occur, or do not occur, in your home.
To add an Alert:
1. Cli ck the Alerts tab.
2. Click [Add Alert].
3. To be alerted w hen an event occurs, click “ When
something happ ens” and then OK. You can also set
up alerts f or anticipated event s that do not occur
(“When so mething does not happen”) or w hen a
system e vent happens.
4. Select the “trig ger” that will initiate th e alert.
5. Select the spe cific event that is to oc cur.
6. Use the Active menu to determine when you want
the alert to occur.
7. Crea te a custom message to acco mpany the
notifica tion.
8. Indicate if you wo uld like the system to at tach
a picture or v ideo clip to your alert.
9. Click [Save].
Tip: Use aler ts to notify you w hen your children
arrive h ome from school, or when t he pet sitter or
maid enters y our home.
Web Access
18qUES TIONS? cu stomer.comca st.com/home security
Page 12
19
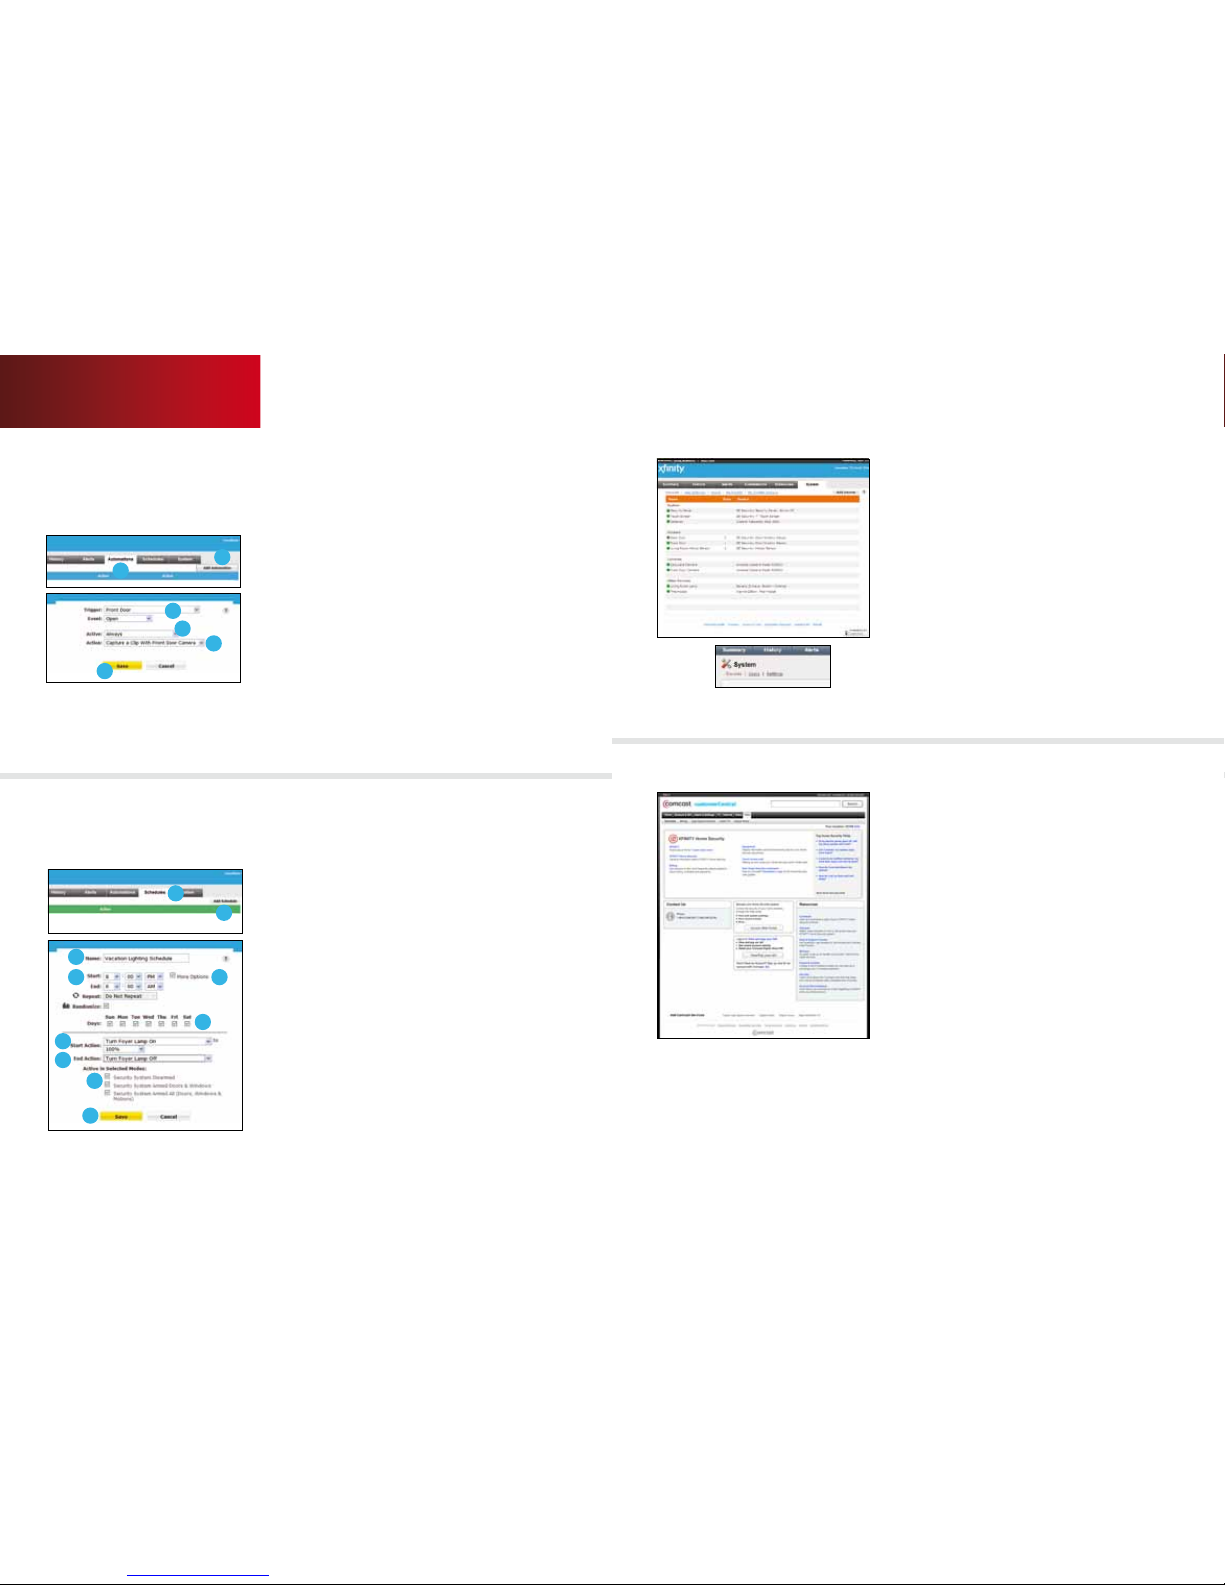
System Tab
Click the [System] tab to view the status of all
devices connec ted to your system. Green lights
indicate all devices are online and working properly.
Click [Users] to view a list of users who have access
to your system. Select [Add User] to invite a new
user to use your system or to give access to an
existing user.
Click [Settings] to change time zone and Home
Management Mode settings.
Support
Click [Customer Support] at the bottom of the
page. You can choose to get online help or fill
out the customer suppor t form to contact
Customer Support.
1
2
3
4
5
6
2
1
3
4 5
6
7
8
9
10
Automations Tab
Initiate specific actions when certain devices
are triggered.
To add an Automation:
1. Clic k the Automations tab.
2. Click [Add Automation].
3. Select a Trigg er and an Event. For examp le, Front
Door and Open.
4. Us e the Active menu to de termine when you want
the Automat ion to occur.
5. Select th e Action that will happen wh en this
event occ urs.
6. Click [Save].
Tip: Use Auto mations to help you save ener gy. For
example, set your system to turn lights and thermostats
o when mot ion sensors detect no m otion.
Schedules Tab
Your alarm system can be set to conduct various
activities at predetermined days and times.
To create a new scheduled event:
1. C lick the Schedules tab.
2. Cli ck [Add Schedule].
3. Give your ne w schedule a name. For instance ,
“Turn On/O Ligh t.”
4. Selec t the time you would like this to occur.
5. Check “Mor e Options” to establish Star t and Stop
times for this sch edule.
6. Sele ct the days this schedule w ill occur.
7. Choose a St art Action. For inst ance, “ Turn Patio
Lamp On” to turn t he patio light on.
8. Ch oose an End Action. For ins tance, “Turn Patio
Lamp O ” to turn the patio light o.
9. Select the H ome Management Modes for this a ction
to occur.
10. Click [Save].
Tip: Use Schedules to help you save energy. Set lights and
thermostats to turn o when you usually leave for work,
and back on when you usually arrive home every day.
Web Access
20qUES TIONS? c ustomer.comca st.com/home security
Page 13
21
As an alternative to accessing your system through
the web, you can use most web-enabled mobile
phones, PDAs and smart phones to check the
status of your home, arm/disarm your system,
capture and view pictures, change thermostat
settings, turn lights o and on, modify lighting
levels and view recent events.
04 //
MOBILE ACCESS
1
2
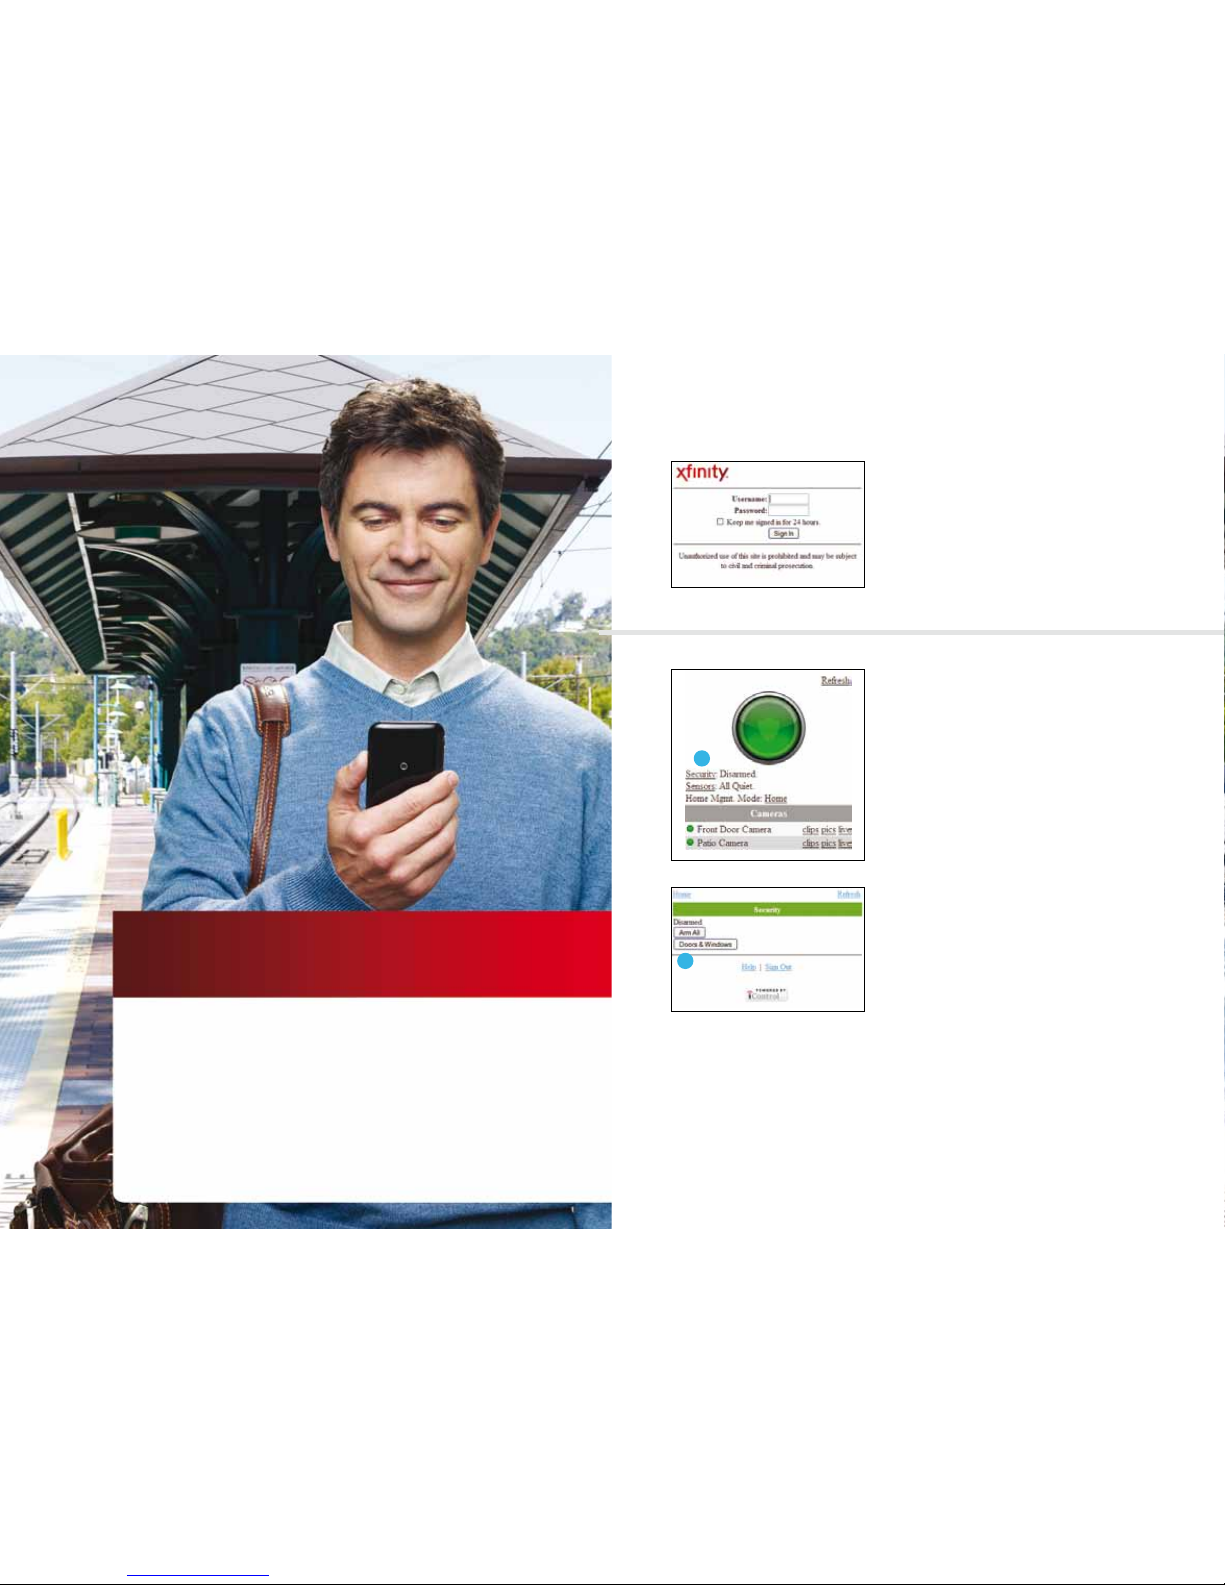
Log on
1. L aunch the web browser on yo ur mobile phone.
2. Go to xfinity.com/xh slogin.
3. Enter your Comc ast.net Username and Pa ssword.
Forgot your Username and Password?
Call 1.800.XFINITY for support.
To Arm/Disarm Your Security System
1. Tap [Security].
2. Select [Doors & Windows] to arm the sensors on
your doors and windows only or [Arm All], which
also includes the motion detectors.
3. To disarm your system, tap [Security] and select
[Disarm].
22qUE STIONS? c ustomer.comc ast.com/hom esecurit y
Page 14
23
3
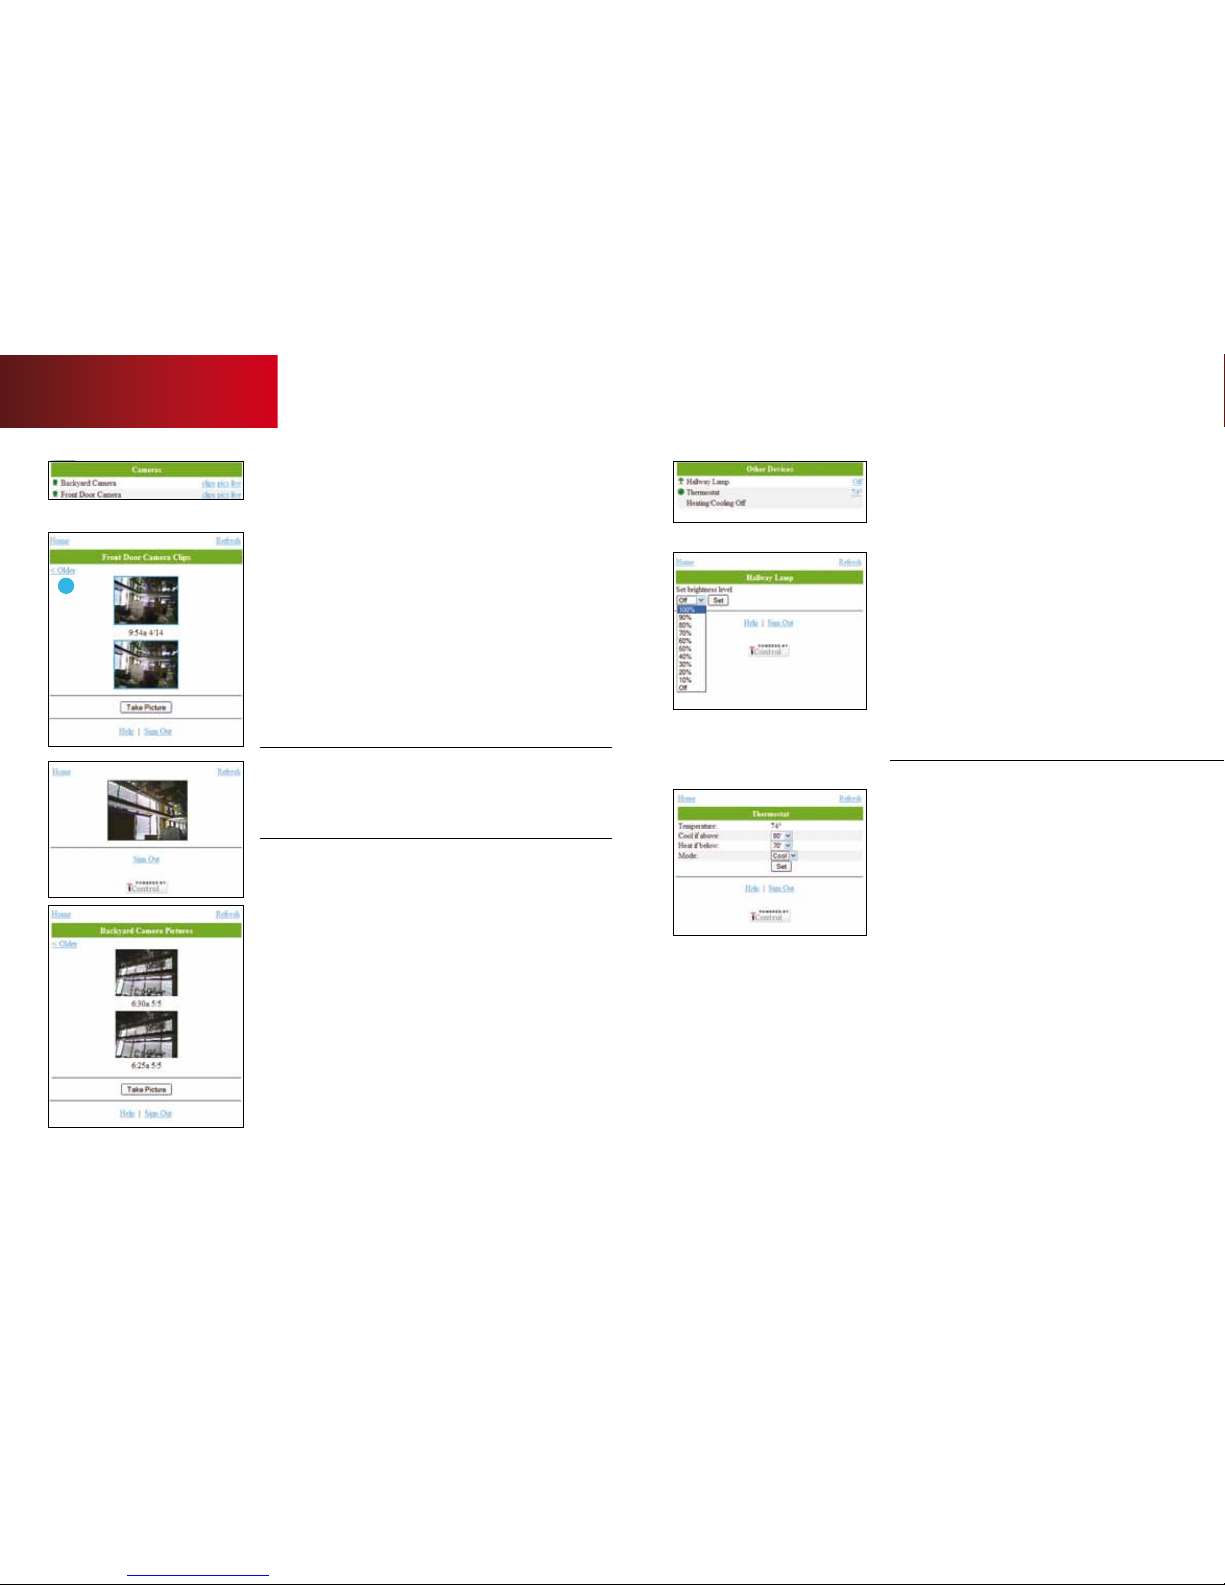
Cameras
Take and watch video clips or see live video of
your home (check your phone owner’s manual
to determine if your handset supports video).
You can also take and view pictures.
Video
1. Se lect the camera you wan t to access.
2. Tap [clips] to view the most rece nt video clips.
3. Tap [< Older] to view prev ious clips, and [Newer >]
to view mor e recent clips.
4. Tap [Capture Video Clip] to manually capture a video clip.
Live Video
To see live video, select the camera you want to
access and then tap [live].
Pictures
1. Se lect the camera you wan t to access.
2. Tap [pics] to view the t hree most recent pic tures
taken with tha t camera.
3. Tap [< Older] to view prev ious pictures, and [Newer >]
to view mor e recent pictures .
4. Tap [Take Picture] to manually take a photo.
Other Devices
Thermostat and lighting settings can be changed
by clicking displayed temperatures and light levels.
Lighting
1. Se lect the lamp you want to adjus t.
2. Tap the displayed light sta tus.
3. Tap [Turn On] to turn the light on .
4. Tap [Turn O] to turn the ligh t o.
5. If the lig ht is on a dimmer, use the pulldown menu
to adjust the desir ed brightness.
6. Tap [Set].
Thermostat
1. Select the t hermostat you wan t to adjust and tap
the tempera ture.
2. Use the pulldow n menu to select the “Cool if above”
temperat ure.
3. Use the pulldo wn menu to select the “Heat if below”
temperat ure.
4. Choose a “Mode” (Heat/C ool/O).
5. Tap [Set].
Mobile Access
24qUES TIONS? cu stomer.comca st.com/home security
Page 15
25
The iPhone application allows you to access a core
set of security system functions using your iPhone
or iPod Touch. The application contains only the
essential functionality available through web access.
To launch the application, tap
on the home
screen of your iPhone or iPod Touch.
Note: This application requires your iPhone or iPod Touch to be
connected to the Internet. If you have never set up the Wi-Fi connection
for your device, refer to your Apple documentation for instructions.
05 //
iPHONE/iPOD TOUCH ACCESS
1
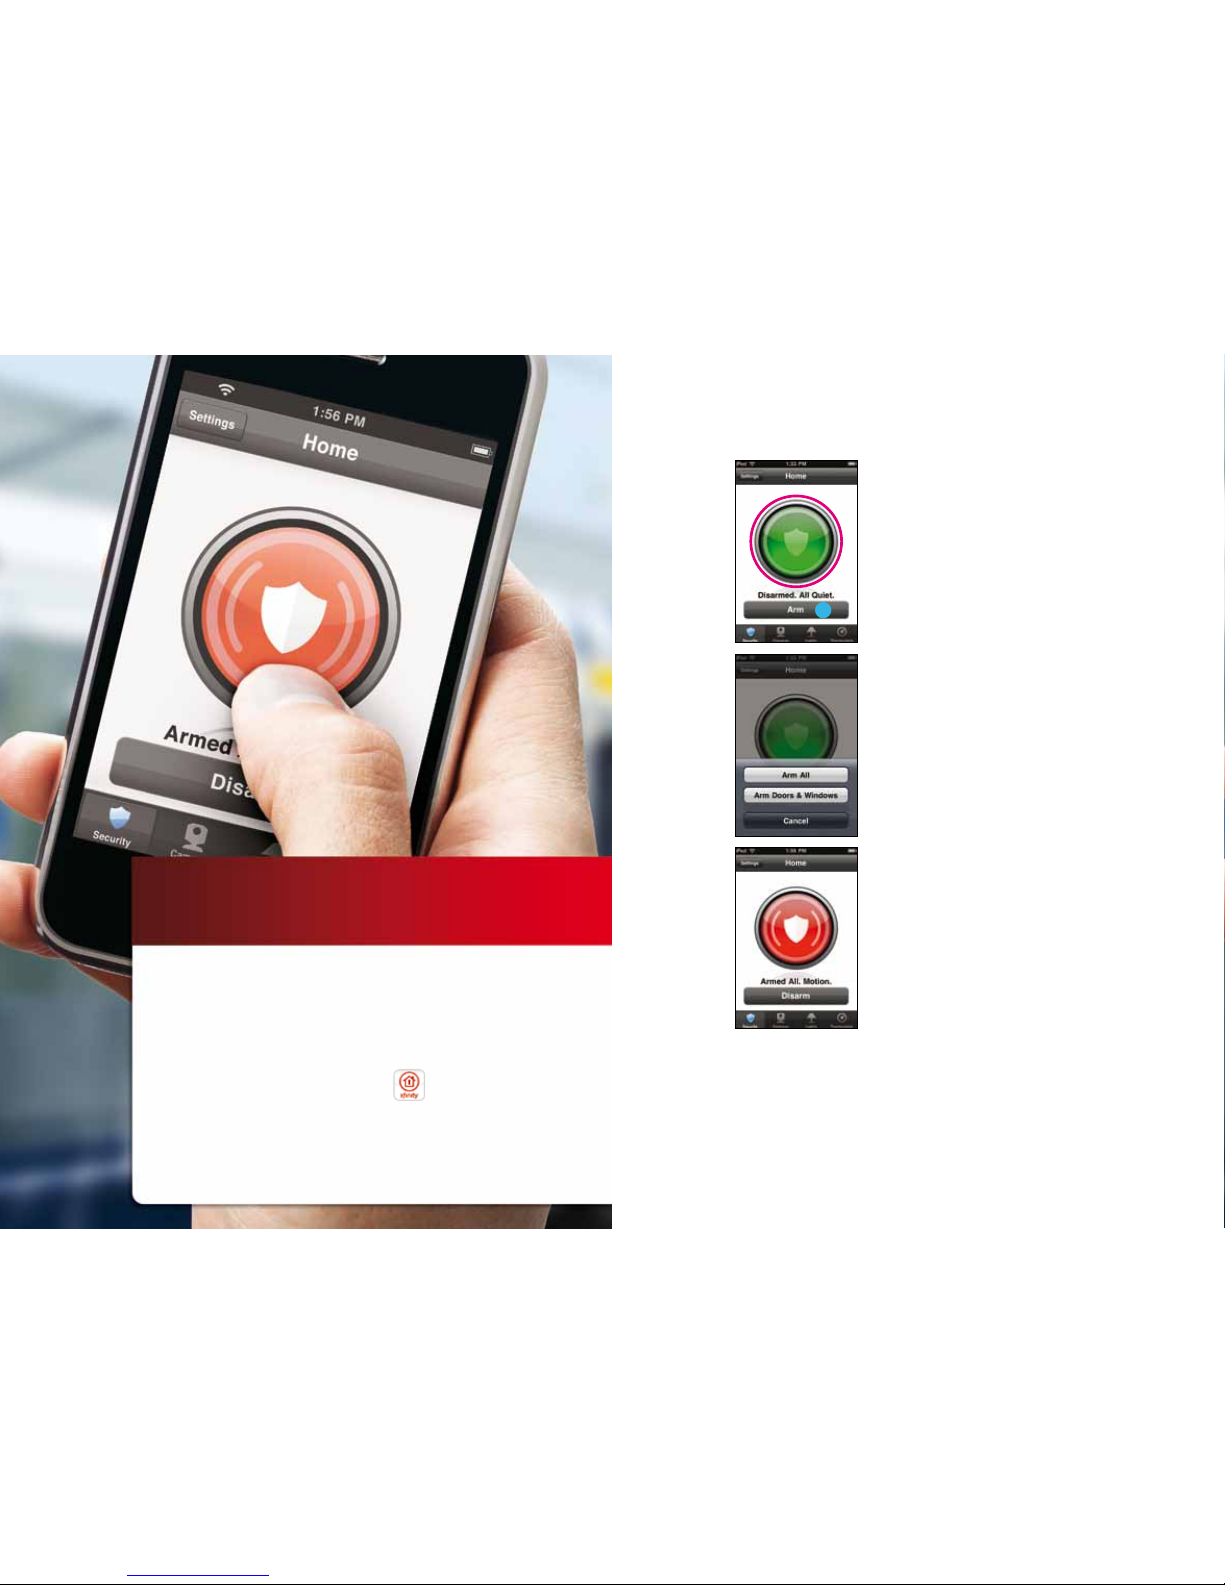
Security
The Securit y screen is the home screen for the
application. It indicates the status of your security
system and enables you to arm and disarm it.
To arm/disarm your security system:
1. On th e Security scre en, tap [Arm].
2. Tap [Arm All] to activate all security sensors,
including motion sensors.
3. Tap [Arm Doors & Windows] to activ ate security
sensors on do ors and windows only.
4. On ce activated, yo ur system will arm in a few
seconds and indica te the new status.
5. Tap [Disarm] to return the se curity syste m to the
disarmed st ate.
26qUES TIONS? c ustomer.comca st.com/home security
Page 16
27
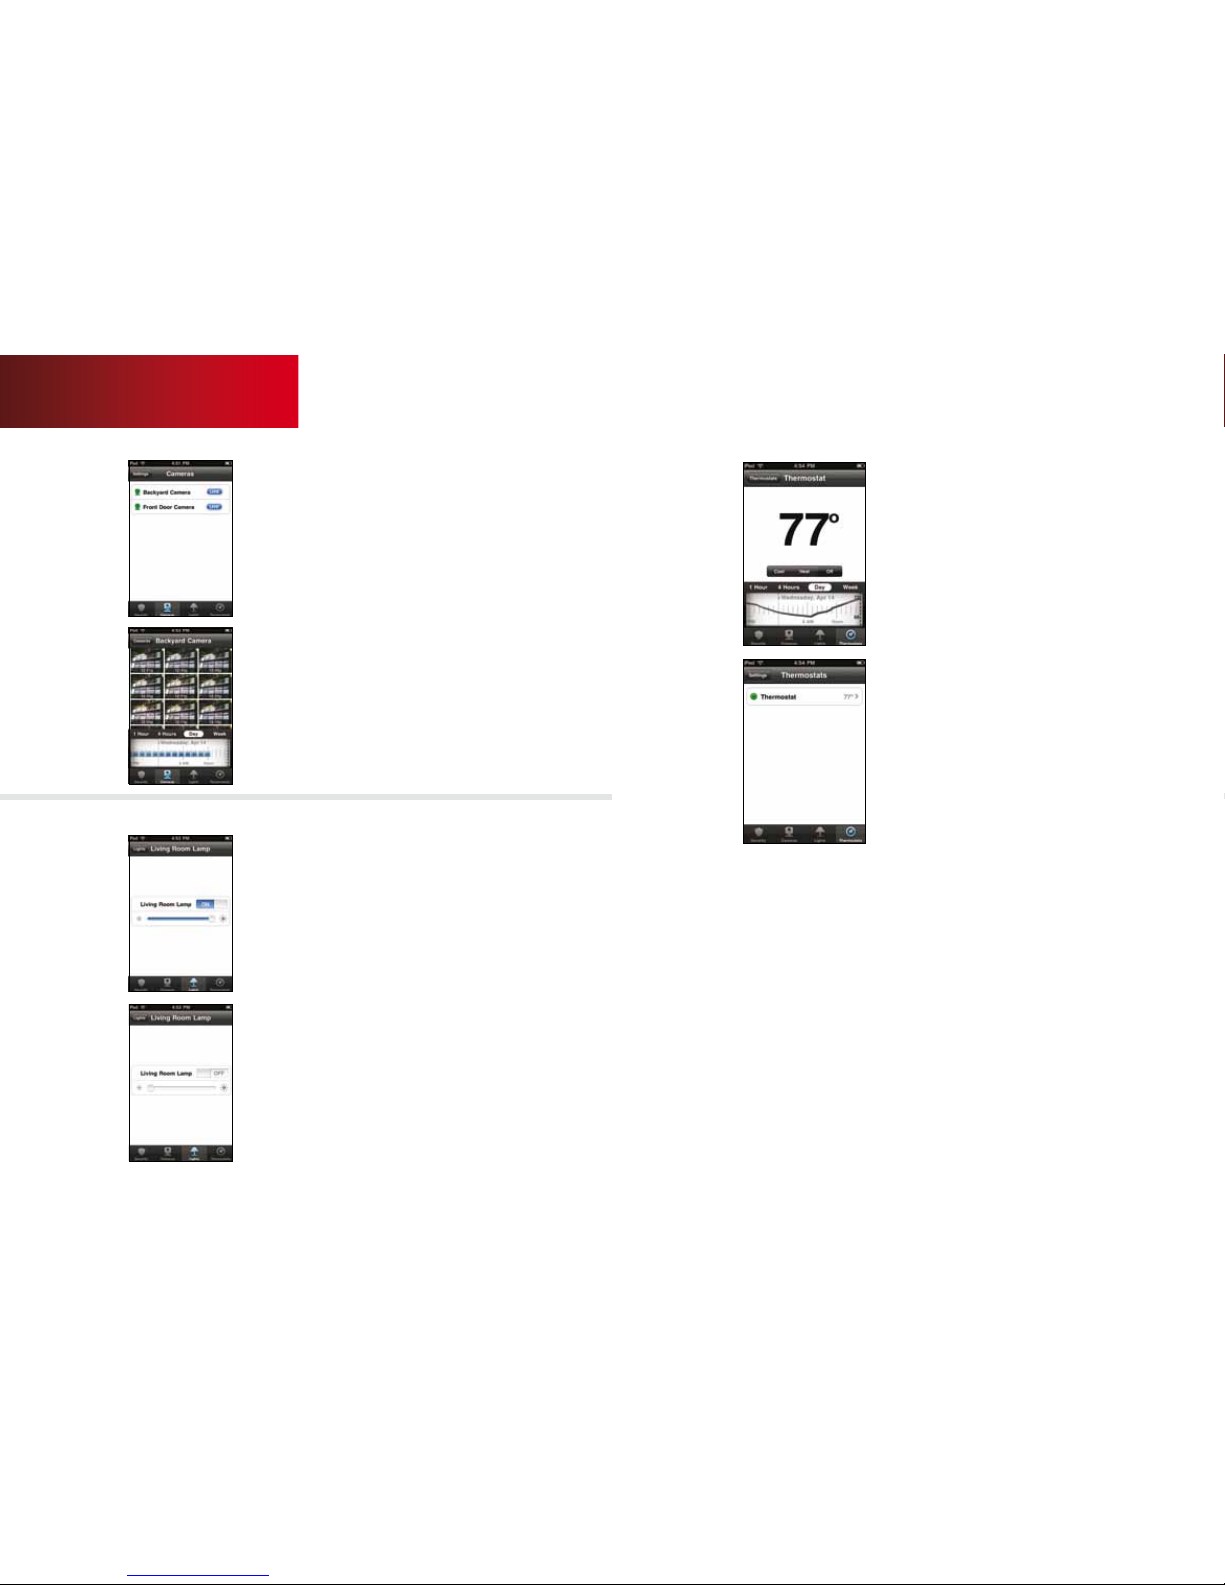
Cameras
The first time you tap [Cameras], the Cameras
screen appears and lists all installed and available
cameras at your site. Here you can:
1. Tap [Live] next to a ny camera to display live vid eo
from the cam era.
2. Tap the name of any camera t o view thumbnails of
the pictur es and video clips captured b y that camera.
3. Search throug h recent thumbnails and video clips by
tapping [1 Hour], [4 Hours], [Day] or [Week]. Scroll
through the c alendar to narrow your sear ch even
more.
4. Tap on the icon s that appear in the calendar to vie w
the clip or image. Tap any pict ure or video thumbnail
for a full-size v iew of that picture or v ideo clip.
Lights
The Lights screen lists all of the lights connected
to your system via the plug-in modules.
1. Tap the name of any light to displa y the Light screen
for that ligh t.
2. If the light is on, tap [O ] to turn it o.
3. If the light is o, tap [On] to t urn it on.
4. I f the light includes the dimmer func tion, you can
adjust its br ightness by sliding the slide bar. Slide to
the left t o make the light dimmer. Slide to the righ t
to make the light br ighter.
5. When you turn o a light with a dimmer, the brightness
level goes all t he way to the left. W hen you turn that
light on again, th e brightness level go es all the way to
the right — full brightness.
Thermostat
The Thermostat screen lists all of the installed
thermostats at your site.
1. Tap the name of any thermo stat to display more
informat ion about that thermost at.
2. Press the up an d down arrows to adjus t the heat and
cool set poin ts.
3. The timeline b elow the temperature disp lays a graph
that indicate s the temperature fluc tuations during
the select ed period of time.
4. T he numbers on the right sho w the high and low
temperat ures during the selecte d period of time.
5. Tap [Options] as another means to chan ge set points
in addition to chang ing the thermostat mod e.
iPhone/iPod Touch Access
28qUES TIONS? c ustomer.comca st.com/home security
Page 17

29
Required Components
Watching live video in the web portal requires
certain third-party components that are often
already preinstalled with your web browser.
If they are not installed, when you attempt to
play live video, a message appears prompting
you to install them.
The required components are:
• Sun Java Runtim e Environment (J RE) 1.5 or later
• Apple QuickT ime Player 7 or later
You can download JRE 1.5 or later at:
http://www.java.com/en/download/manual.jsp
You can download QuickTime 7 or later at:
http://www.apple.com/quicktime/download/
Note: You do not need to install iTunes, and you
do not need to su bmit an e-ma il address in order
to install QuickTime.
Browser-Specific Limitations
Most supported browsers with the default
configuration play video clips and run live video
with no problems. A few specific versions of
browsers do have known issues.
The following are known
browser-specific limitations:
• The Quick Time video player on Fir efox 3.0
with Mac OS X has k nown video quality issu es.
• View ing live video with Saf ari with Mac OS X
occasionally c auses the browser to clos e
unexpec tedly. If this problem occur s, restart
the brows er.
• Video c lip playback on Firefox 3. x with Mac OS X
might be blank. I f this problem occurs, r esize the
video windo w.
• Video c lip playback on Safari wi th Snow Leopard OS
might occasi onally show a question mark ico n (?)
instead of v ideo. If this problem occur s, try to play
the clip again.
• View ing live video does not w ork with Chrome
Beta for Ma c.
Browser Requirements
30qUES TIONS? c ustomer.comca st.com/home security
Page 18
31
Notes
Supported Operating Systems
and Browsers
Windows XP SP3 (32-bit)
Chrome 3.0+
Firefox 3.0.1 1+
Firefox 3.5
Firefox 3.6
Internet Explorer 6 SP3
Internet Explorer 7
Internet Explorer 8
Windows 7 (64 -bit)
Chrome 3.0+
Firefox 3.5
Firefox 3.6
Internet Explorer 7
Internet Explorer 8
Windows Vista (32-bit)
Chrome 3.0+
Firefox 3.0.1 1+
Firefox 3.5
Firefox 3.6
Internet Explorer 7
Internet Explorer 8
Mac OS X (10.5 & 10.6)
Firefox 3.0.1 1+
Firefox 3.5
Firefox 3.6
Safari 3.2.3+
Safari 4.0.3+
Browser Requirements
32qUE STIONS? c ustomer.comc ast.com/hom esecurity
Page 19
A
Copyright © 2010 iControl Networks, Inc. All rights reserved. iControl, iControl Networks,
Powered by iControl and the iControl logos are trademarks of iControl Networks.
 Loading...