

Page 1
Digital Transport Adapter Easy Setup Guide
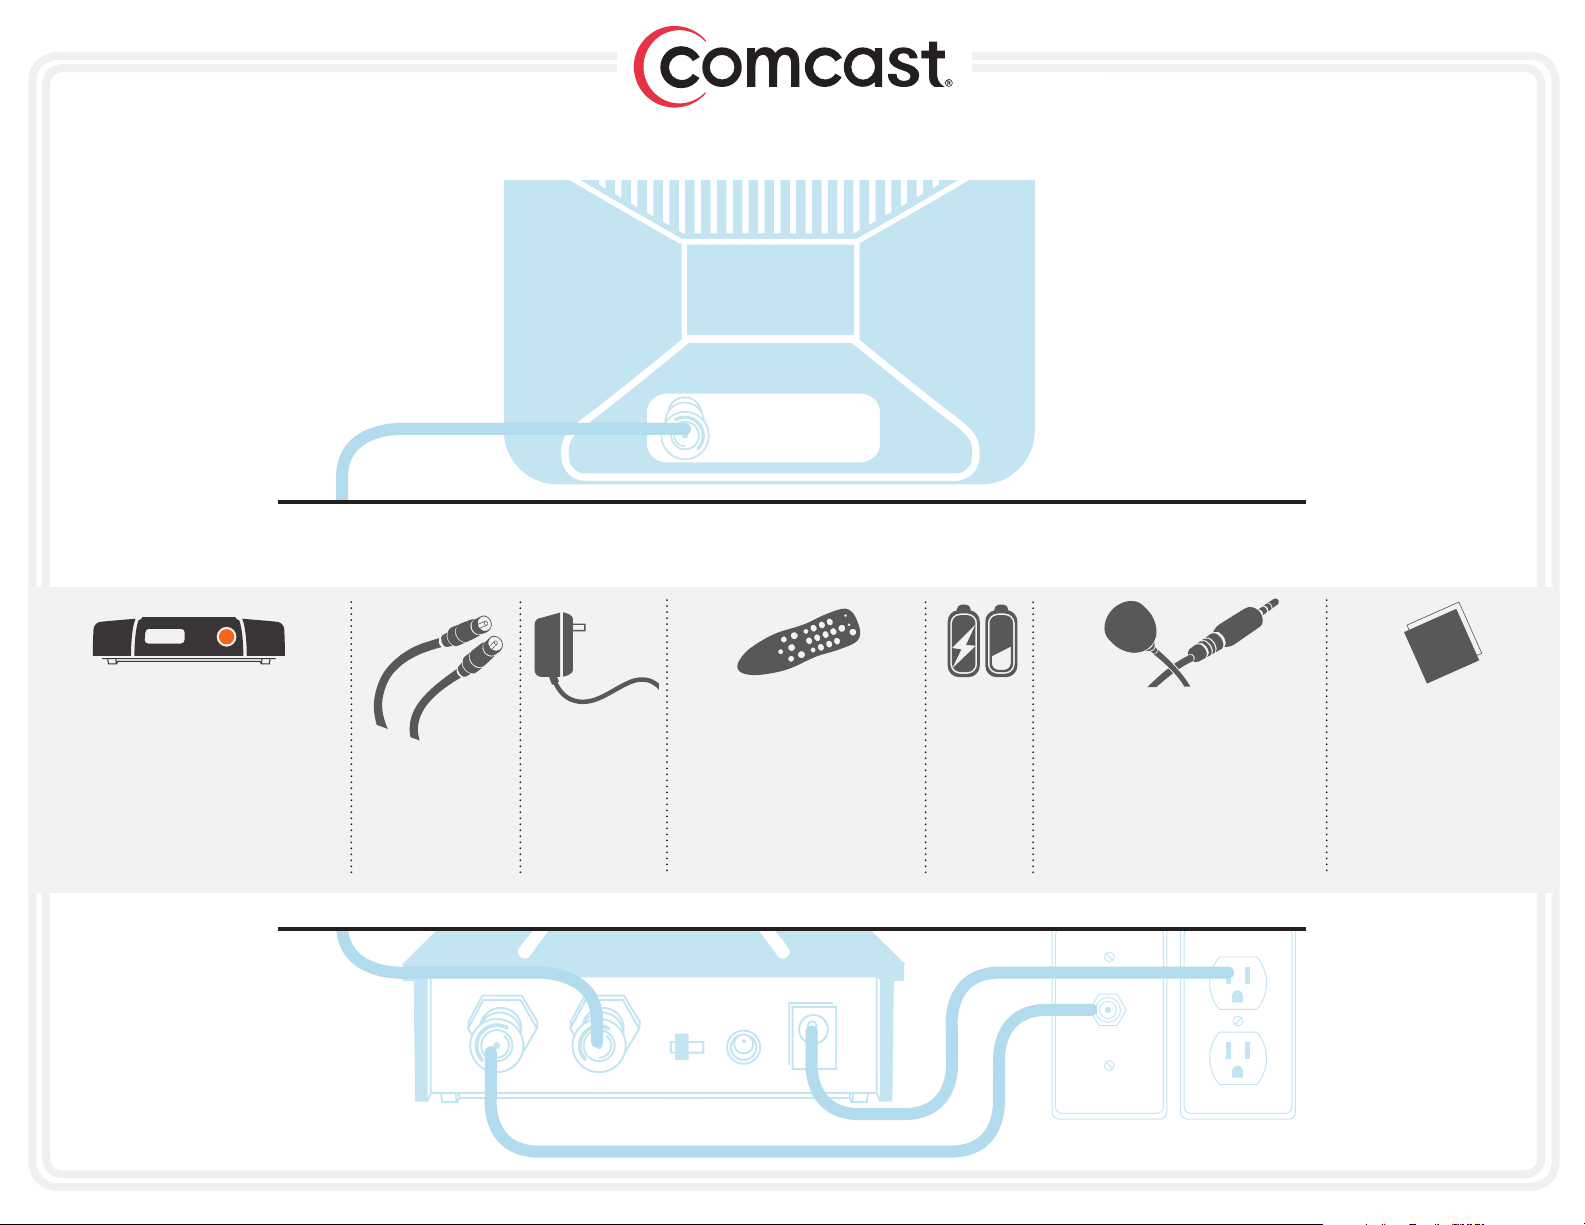
What’s included in this Install Kit?
Digital Transport Adapter (DTA)
You’ll be connecting the DTA to the
cable wall outlet and to your TV
(or TV and VCR).
Note: Each TV will need to be connected to
a Comcast DTA or a Comcast Digital Cable
Box, but not both.
3-Foot
Coax Cable
Power Cord
Remote Control
In order to operate the DTA you
must use the remote control
included with this kit.
Programming instructions for the
remote control are included
in this guide.
2 AA
Batteries
Remote Control Signal
Receiver
If you prefer to hide the DTA behind
your TV, you will need to connect
this to your DTA so your new
remote control can send
signals to it.
Adhesive Fasteners
Use these if you want to stick
the DTA to your TV.
Note: Please be careful. We
can’t be responsible for any
damage done to any surface
you stick these to.
Page 2
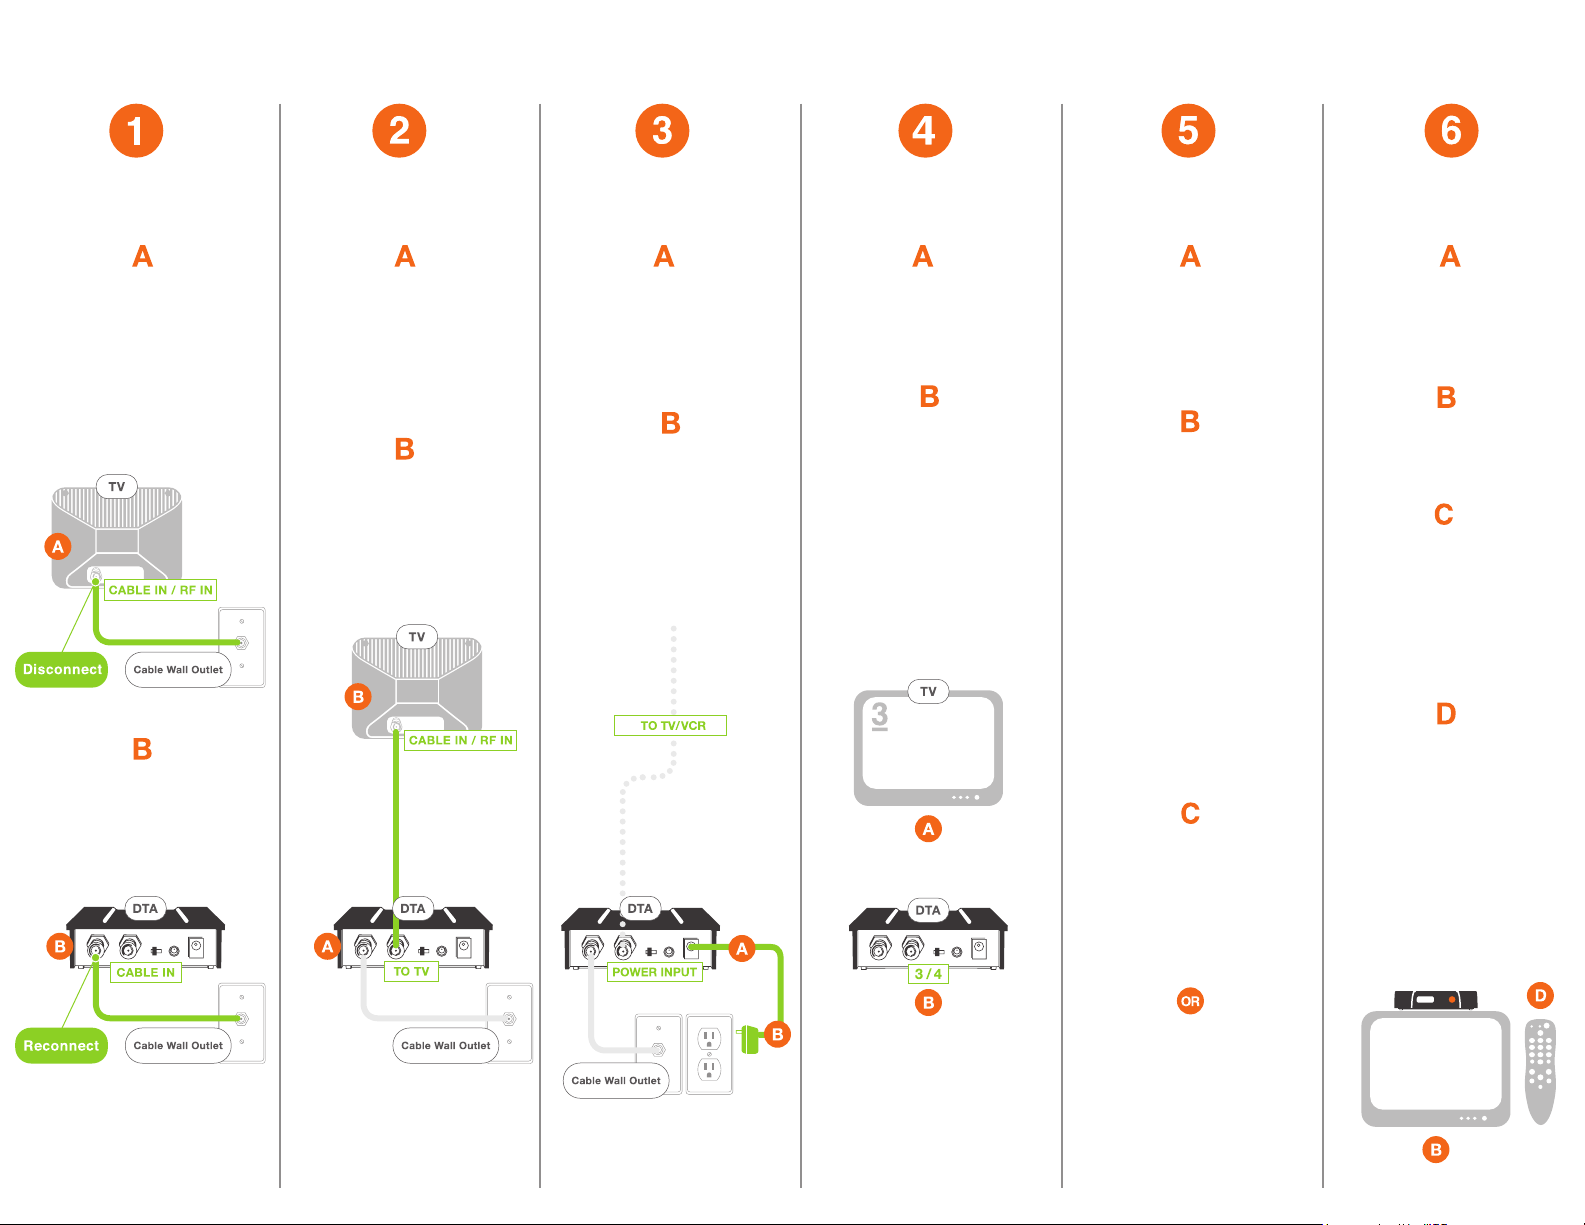
Installation and Activation Steps: TV
Connect the DTA to
the Cable Outlet
Locate the cable that currently
runs from the cable wall outlet
to the back of your TV. Leave one
end of the cable connected to
the wall, but disconnect the other
end from the back of your TV.
Reconnect this end of the cable
to the “Cable In” input on the
back of the DTA.
DTA to the TV
Find the 3-foot coax cable
included in this kit. Connect one
end of the cable to the “To TV”
input on the back of the DTA.
Connect the other end to the
“Cable In/RF In” input on the
back of your TV.
Power Up Activate Connect the
Plug the round end of the power
cord into the “Power” input on
the back of the DTA.
Plug the other end into a live
power outlet or surge protector.
Set the Channel
Turn on your TV and tune it to
channel 3.
Set the switch on the back of the
DTA to channel 3.
Note: Some parts of the country
use channel 4. If you do not
have a picture after completing
the activation, you may need to
switch both your TV and the DTA
to channel 4.
If you received more than one
Comcast device, you must connect
all of them before activating.
Ensure your remote control has
been programmed for your TV.
Note: See the “Using Your Remote
Control” panel for programming
steps.
To complete your activation
you will need your account
information and the serial
number of each device you
are activating. You may have
written this information down.
You have two choices for activating
your service.
visit us at
www.comcast.com/digitalnow
Conrm
Your Service
After completing Step 5, wait a few
minutes.
Make sure your TV is on.
Confirm that the DTA is connected
to the power outlet and that the
light on the front is solid
(not blinking).
Using the remote control to operate
your DTA, scroll through your
channels and make sure they are
all working.
Note: If the light is blinking, or
your channels are not showing up,
turn to the Troubleshooting section
of this guide.
call our automated activation
line at 1-888-634-4434
Page 3

Installation and Activation Steps: TV + VCR
Connect the DTA to
the Cable Outlet
Locate the cable that currently
runs from the cable wall outlet
to the back of your VCR (or other
recording device). Leave one end
of the cable connected to the
wall, but disconnect the other
end from the back of your VCR.
Reconnect this end of the cable
to the “Cable In” input on the
back of the DTA.
DTA to the VCR
Find the 3-foot coax cable
included in this kit. Connect one
end of the cable to the “To TV”
input on the back of the DTA.
Connect the other end to the
“Cable In/RF In” input on the
back of your VCR.
Power Up Activate Connect the
Plug the round end of the power
cord into the “Power” input on
the back of the DTA.
Plug the other end into a live
power outlet or surge protector.
Set the Channel
Turn on your TV and tune it to
channel 3.
Set the switch on the back of the
DTA to channel 3.
Note: Some parts of the country
use channel 4. If you do not
have a picture after completing
the activation, you may need to
switch both your TV and the DTA
to channel 4.
If you received more than one
Comcast device, you must connect
all of them before activating.
Ensure your remote control has
been programmed for your TV.
Note: See the “Using Your Remote
Control” panel for programming
steps.
To complete your activation
you will need your account
information and the serial
number of each device you
are activating. You may have
written this information down.
You have two choices for activating
your service.
visit us at
www.comcast.com/digitalnow
Conrm
Your Service
After completing Step 5, wait a few
minutes.
Make sure your TV is on.
Confirm that the DTA is connected
to the power outlet and that the
light on the front is solid
(not blinking).
Using the remote control to operate
your DTA, scroll through your
channels and make sure they are
all working.
Note: If the light is blinking, or
your channels are not showing up,
turn to the Troubleshooting section
of this guide.
call our automated activation
line at 1-888-634-4434
Page 4

Troubleshooting Using Your Remote Control
To program the remote to control your TV’s power and
volume, do the following:
1. Turn on your TV.
2. Press and hold “Set” until the red light on the
remote blinks twice. Release “Set.”
3. Enter 9 - 9 - 1. The red light on the remote will blink
twice.
4. Point the remote at the TV and press ”CH +” one or
more times until the TV turns off.
Note: You may need to press “CH +” numerous times.
5. Press “Set” once to lock in the code. The red light on
the remote will blink twice.
6. Press Power to turn your TV on.
If you need more help, please refer to the programming
guide included with the remote.
To control the volume, press and hold the volume up
“Vol +” or volume down button “Vol -”. To change the
channel, press the channel up “CH +” or channel down
“CH -” button, or press the channel number and enter.
Using the Remote Control Signal Receiver
IF THE REMOTE CONTROL DOES NOT WORK:
• Make sure the batteries are inserted correctly.
• Make sure your remote can ”see”the front of the DTA (or the front
of the Remote Control Signal Receiver).
• If you are using the Remote Control Signal Receiver, make sure it is
connected firmly to the DTA.
IF THERE IS NO LIGHT ILLUMINATED ON THE FRONT OF THE DTA:
• Make sure the power cord is attached to the DTA and plugged into
a live electrical outlet.
IF THERE IS NO PICTURE ON THE TV AND THE LIGHT ON THE DTA
IS BLINKING:
• Make sure you have contacted Comcast to activate the DTA, as
described in Step 5.
• Wait a few minutes. If the light is still blinking, call Comcast at
1-888-634-4434.
IF THERE IS NO PICTURE ON THE TV AND THE LIGHT ON THE DTA IS
SOLID:
• Make sure the TV and DTA are both set to the same channel
(both 3, or both 4).
• Try switching the TV and DTA to the other channel (3 or 4).
• If you’re also connected to a VCR, make sure the VCR is turned on.
• Make sure the DTA is connected directly to the cable outlet
in your wall.
• Make sure all the cables are firmly connected.
SET
VOL
+
CH
/
-
LANG
/
+
-
IF THE AUDIO IS IN A LANGUAGE YOU DON’T EXPECT TO HEAR:
• You may have accidently changed it to an alternate language
option. Press the “LANG” button on your remote control one or
two times.
IF YOU NEED ADDITIONAL SUPPORT,
GO TO WWW.COMCAST.COM/DIGITALNOW
OR CALL 1-888-634-4434
If you want to hide the DTA behind the TV, or if the DTA will not
reach the front of the TV, you can hide it and use the Remote
Control Signal Receiver. Plug the smaller end of the Remote
Control Signal Receiver into the “IR In” port on the back of
the DTA. Position the other end of the Remote Control Signal
Receiver where it can be seen from the front of the TV.
 Loading...