

Read all instructions BEFORE assembly and USE of product. KEEP INSTRUCTIONS FOR FUTURE
USE. Record the following information for quick reference.
Note: Illustrations are only representative and not actual.
Attach copy of sales receipt.
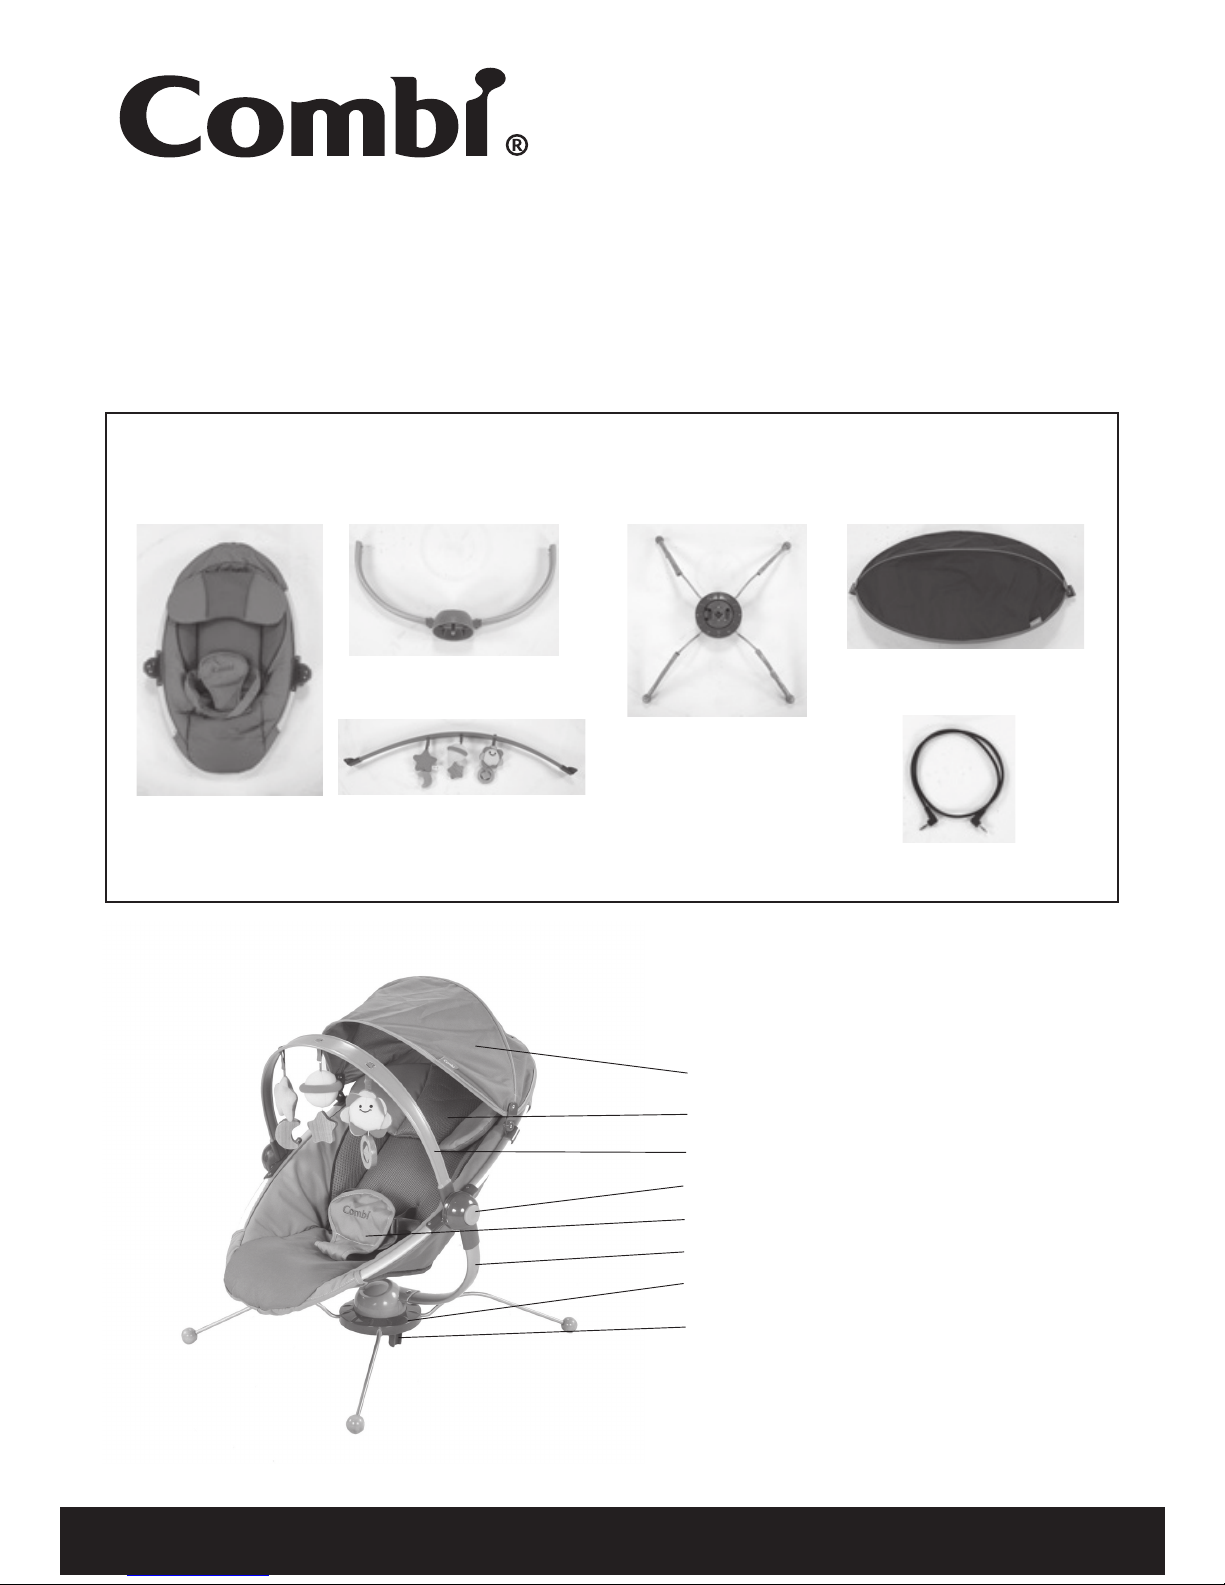
Parts List
Name of Parts
Make sure you have all the parts listed below before using your Bouncer. If any parts are
missing, call Consumer Affairs at 1-800-992-6624.
Combi USA, Inc. • 1962 HWY 160 W, Suite 100 • Fort Mill, SC 29708 • www.combi-intl.com
Consumer Affairs 1-800-992-6624
Pod Bouncer
Instruction Manual
Date Purchased: _______________________________ Model Number: __________ - _______ Color _______________________________________________
Canopy
Toy Bar
Seat
Support Base
1 Canopy
2 Head Pillow
3 Toy Bar
4 Recline Button
5 3-Point Harness
6 Support Bar
7 Base
8 Anti-Bounce Lever
Mini to Mini
Connector
Support Bar

- 2 -
WARNINGS:
READ ALL INSTRUCTIONS BEFORE ASSEMBLY AND USE OF THE BOUNCER. KEEP INSTRUCTIONS
FOR FUTURE USE. ADULT ASSEMBLY REQUIRED. DO NOT USE THIS BOUNCER IF IT IS DAMAGED
OR BROKEN. KEEP SMALL PARTS AWAY FROM CHILDREN.
In the event of damage or problems, discontinue use and contact Consumer Affairs
for instructions: 1-800-992-6624.
FALL HAZARD:
● Never leave child unattended.
● Child's activity can slide bouncer. Use only on floor.
Never use on any elevated surface.
● Always use 3-point harness. Adjust harness to fit
snugly around your child.
● Maximum weight of child must not exceed 25
lbs. (12.4 kgs). Never use for a child able to sit up
unassisted.
● Do not left product by using the toy bar.
● Do not left product while occupied.
● Never use this bouncer as a car seat.
Maximum combined weight capacity for both
storage pockets MUST not exceed 1lb.
SUFFOCATION HAZARD:
● Never use on a soft surface (bed, sofa, cushion), as
seat may tip over and cause suffocation.
● Never add a pillow, comforter or padding. Use only
the pad provided by Combi.
STRANGULATION HAZARD:
● Strings can cause strangulation. DO NOT place items
with a string around a child's neck such as hood strings
or pacifier cords.
● Do not suspend strings over product or attach strings
to toys.
● Do not use product in an area where there are cords,
such as window blind cords, phone cords, etc.
All products specifications are subject to change without notice. Sizes and weights are intended as guides and are approximations.
Combi® reserves the right to modify the products in its line during the course of the year. Non contractual media. Colors are as accurate as the media in which they appear allows.
©Combi USA, Inc. 2004
FAILURE TO FOLLOW THESE WARNINGS AND ASSEMBLY
INSTRUCTIONS COULD RESULT IN SERIOUS INJURY OR
DEATH.
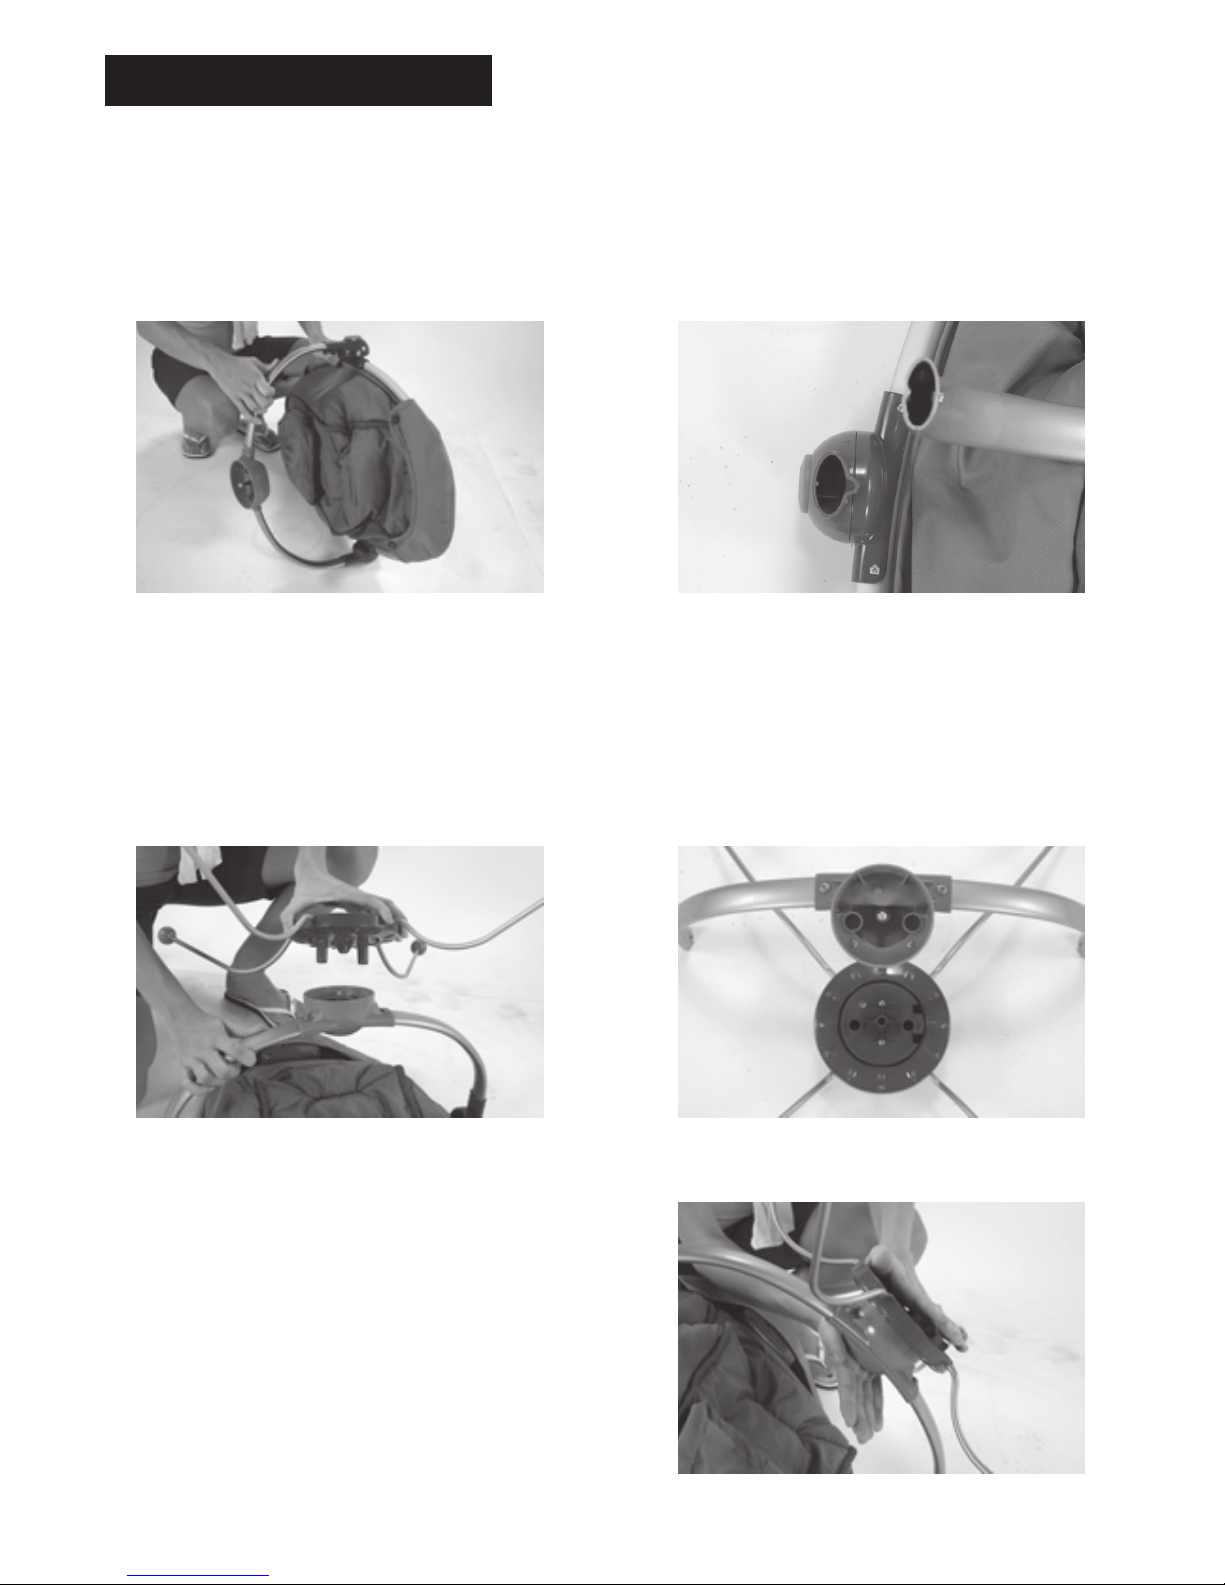
1. Attach the Support Bar by pressing into the Seat Base until the metal pins
snap into place as shown in figure 1.
The Support Bar can only be attached one way. Notice that one side of the
Seat Base and Support Bar is notched, as shown in figure 2, and the other
side is not. Be sure you have the correct sides aligned before attempting to
attach.
- 3 -
2. Align the Support Bar with the Support Base as shown in figure 3. The
Support Bar and Support Base can only be attached one way. Notice the
metal post in the Support Bar and the middle hole in the Support Base
are slightly off center as shown in figure 4. Aligning these will ensure the
Support Bar and Support Base will be attached correctly.
3. Slide the Support Base onto the Support Bar
and press firmly until you hear them snap
together as shown in figure 5. Lift up on
the Support Base to ensure they are locked
together.
gure 1 gure 2
gure 3 gure 4
Assembling the Bouncer
gure 5

- 4 -
Attaching the Toy Bar
1. Slide the Toy Bar onto the Seat as shown
in figure 6. The Toy Bar will only attach
one way, so if it will not attach try it the
other way.
gure 6
Attaching the Canopy
Reclining the Bouncer
1. Unzip the pocket and remove the Canopy
as shown in figure 7.
2. Snap the Canopy onto the Seat frame as
shown in figure 8.
3. Once the Canopy is attached, you can
slide it up or down on the Seat frame
so it aligns with the top of the Seat as
shown in figure 9.
1. Press in the Recline Buttons on both
sides of the Seat while rotating the Seat
to the desired recline level as shown in
figure 10. Then let go of the Recline
buttons and move the Seat up and down
slightly to ensure it is locked in position.
gure 7
gure 8 gure 9
gure 10

- 5 -
Using an External Music Device
1. Unzip the pocket in the back of the Seat
and remove the Mini to Mini cable that is
included.
2. Insert one end into the Bouncer and
the other end into your music device as
shown in figure 14. You can place small
MP3 players in the small pocket on the
back of the Seat as shown in figure 15.
gure 14
gure 15
Adjusting the Head Pillow
1. Detach the hook and loop fastener on back of the seat as shown in figure 11.
Adjust the Headrest to the desired height as shown in figure 12. Then reattach
the hook and loop fastener in the back of the seat.
gure 11 gure 12
Connecting
Disconnecting
gure 13
Using the Restraint System
Connect restraint system by fastening the clip on
the belt, as shown in figure 13.
Disconnect restraint system by pressing sides of
the clip on the belt.
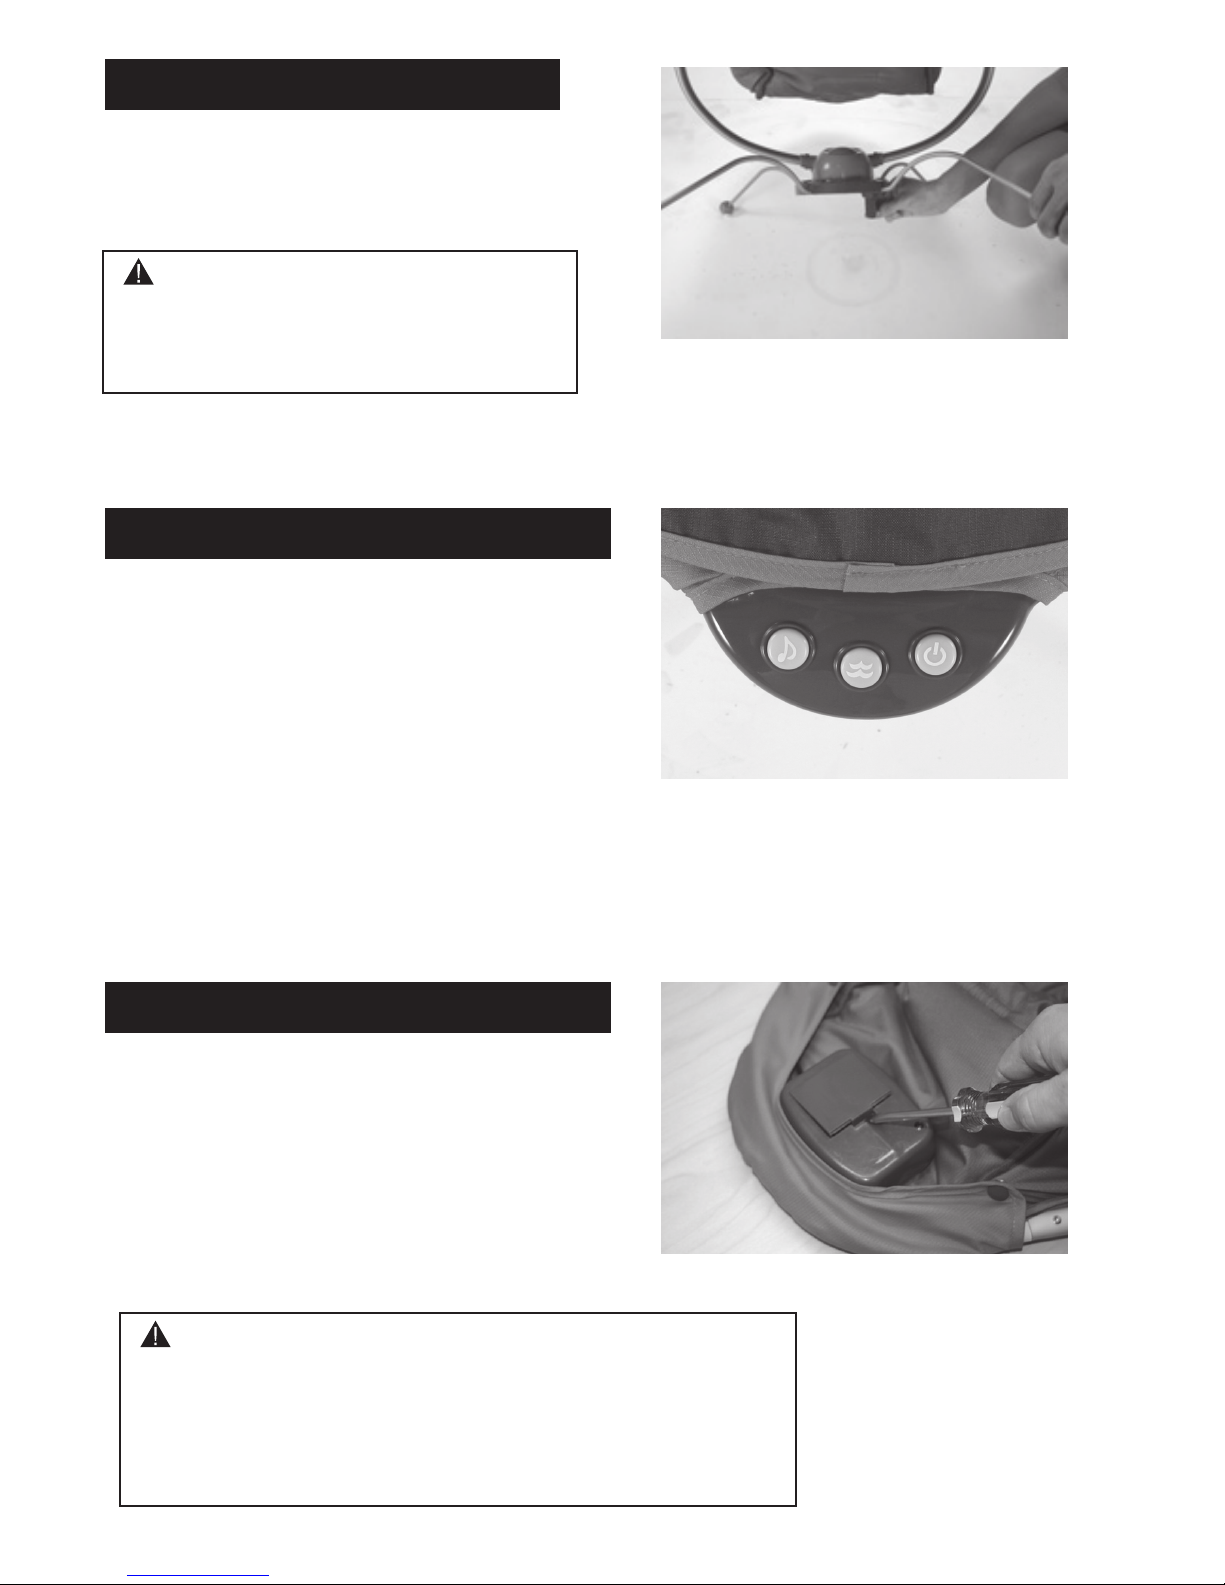
Using the Anti-Bounce Lever
Using the Music / Vibration Unit
Installing the Batteries
1. Pull down the Anti-Bounce Lever from the
bottom of the Support Base as shown in
figure 16.
1. Turn on the power by pressing the power
button.
2. Turn on the music by pressing the music
button.
3. Turn on the vibration by pressing the
vibration button.
4. Press the buttons again to turn off the
desired function.
1. The battery compartment is located
underneath by the foot of the seat. Use
a flat screwdriver to remove battery lid as
shown in figure 18.
2. Insert 3 AA batteries and close the battery
compartment lid.
gure 16
gure 17
gure 18
- 6 -
WARNING
Do not lift up the Bouncer with a child in it.
The Bouncer may tip over and the child could
be injured.
WARNING
● Do not mix old and new batteries.
● Do not mix alkaline, standard, or rechargeable batteries.
● Remove batteries when bouncer is stored for long periods of time
or when batteries are exhausted.
● Dispose of exhausted batteries properly.
● Keep batteries out of children's reach.
PowerVibration
Music

- 7 -
MUSIC AND SOUND EFFECTS ARE NOT WORKING
- Check that the battery is in the correct position as indicated inside the unit.
- Replace with a new battery, if necessary.
Routine Maintenance
Trouble Shooting
STORE IN A COOL AND DRY AREA.
ALWAYS MAKE SURE FRICTION PADS ARE KEPT CLEAN , CLEAN WITH WATER ONLY.
TO CLEAN FRAME AND SEAT COVER, USE A DAMP CLOTH. NO BLEACH OR DETERGENT.

If you would like to place an order for the replacement parts, please fill out the form below and
return to the following address:
Combi or Fax this completed form to
Attn: Consumer Affairs Department
1962 Highway 160 W, Suite 100
Fort Mill, SC 29708-8027
IMPORTANT: We must have this information to process your order:
Model Number: ________ - ______ Color & Pattern of Fabric: _____________________________________________________
Parts List for the Pod Bouncer
Price Quantity Total
1. Toy Bar (Toys included) $20.00
2. Toy Bar (without Toys) 6.00
3. Stuffed Sun 6.00
4. Stuffed Planet 6.00
5. Stuffed Star 6.00
6. Canopy 10.00
7. Mini to Mini Connector 3.99
8. Head Pillow 12.00
Amount of Order
ADD
Shipping & Handling
Sales Tax (6%)
(SC residents only)
Total
Charge to my credit card:
o VISA o MASTERCARD
o DISCOVER
Card Number
Expiration Date __________ - ___________ - ____________
Cardholder’s Signature
Parts Order Form
If you need to order other parts for your Bouncer, please call us toll-free
at 1-800 -992- 6624.
Shipping and Handling Fees: Add $8.00 for orders $34.99 and under. Add
$13.00 for orders $35.00 and over. Note: Additional shipping charges will apply
outside of the Continental U.S.
Combi USA reserves the right to change pricing at any time.
Ship To:
Customer Name
Street Address
Street Address
City, State, Zip
Telephone Number
082207
803-548-3663
Combi USA, Inc. • 1962 HWY 160 W, Suite 100 • Fort Mill, SC 29708 • www.combi-intl.com
Consumer Affairs 1-800-992-6624
Pod Bouncer
Instruction Manual
 Loading...