


Catalyst
Instruction Manual
CombiUSA.com
©2012 CombiUSA
Read all instructions BEFORE assembly and USE of product.
KEEP INSTRUCTION FOR FUTURE USE. Record the following
information for quick reference.
Note: Illustrations and photographs are only representative and not actual.
Attach copy of sales receipt for future reference.
Date of Purchased: _________________________
Model Number:___________ - ________________ (Located near rear of basket)
Color: ______________________________________
Combi USA, Inc.
3520 Westinghouse Blvd., Suite B • Charlotte, NC 28273
Customer Service 1.800.992.6624

WARNINGS & GENERAL SAFETY INFORMATION
WARNING///////////////////////
AVOID SERIOUS INJURY FROM FALLING OR SLIDING OUT – ALWAYS USE RESTRAINT
SYSTEM. NEVER LEAVE CHILD UNATTENDED! PLEASE READ THESE INSTRUCTIONS
CAREFULLY AND KEEP FOR FUTURE REFERENCE.
CombiUSA.com
In the event of damage or problems, discontinue use and contact
Combi Customer Service for instructions: 1-800-992-6624
All operating and assembly procedures
should be performed by an adult:
• Avoid serious injury from falling or sliding out.
Always use restraint system.
• Never lift and carry the stroller while occupied.
The stroller may fold.
• Never allow your child to stand in or on the stroller..
• Never carry more than one child in stroller. Do not
allow a child to ride or sit on areas of the stroller
other than seat.
• Never leave child unattended.
• Never use the stroller on steep slopes, stairs,
escalators, beaches, rough roads, mud, etc.
• Never hang items on the handle or place items
on canopy. This could cause the stroller to become
unbalanced or tip over.
• Always engage the brake when parking the stroller.
• Never allow children to lean over sides of stroller.
It may become unbalanced and tip over.
• Excessive weight in basket (or items placed in basket
which overow the top or side of basket) may cause
a hazardous condition. Do not load more than 10 lbs
(4.5kg) in the basket.
• To avoid nger entrapment or pinching, use care when
folding and unfolding the stroller. Be certain the
stroller is fully erected or folded, and locked in position
before allowing your child near the stroller.
• ALWAYS secure your child with the infant carrier
restraint system before using it with the stroller.
• This stroller is intended for walking speed only.
NEVER use while jogging, skating, etc.
• Child may slip into leg opening and strangle.
Never use in reclined carriage position unless the
restraint system is fully secured.
• Completely remove all plastic bags and packing
material before using this product to prevent a
possible choking hazard.
• Never carry stroller by using the approved infant car
seat handle.
• If unable to securely attach the approved Infant Seat
to your stroller, discontinue use and contact Combi
Customer Service.
• TIPPING HAZARD: Never place weight on rear of infant
seat while attached to the stroller. This could cause the
stroller to become unbalanced and tip over.
• Use only approved infant carriers with this stroller.
• To ensure your child’s safety, please refer to an
approved Infant Seat instruction manual before using
it with the stroller.
• WARNING: Do not use the seat in bassinet mode as a
stand-alone unit. Serious injury may occur.
Total Maximum weight of the child MUST NOT exceed
50 lb (22.7 kg).
• Completely remove all plastic bags and packing
material before using this product to prevent a
possible choking hazard.
2 Catalyst Instruction Manual
Note: All products specications are subject to change
without notice. Sizes and weights are intended as guides and
are approximations. Combi® reserves the right to modify the
products in its line during the course of the year. Non contractual media. Colors are as accurate as the media in which they
appear allows.

PARTS LIST
VIEWING WINDOW
HANDLE ADJUSTMENT
BUTTON
FOLDING LEVERS
RECLINE ADJUSTMENT STRAP
(NOT SHOWN)
STROLLER
FRAME
STORAGE BASKET
BRAKE
REAR
WHEELS
CombiUSA.com
CANOPY
BUMPER
BAR
HARNESS AND BUCKLE
SEAT
SWIVEL LOCK
& WHEEL RELEASE
SWIVEL LOCK & WHEEL RELEASE
FRONT
WHEELS
CAR SEAT ADAPTER*
*CAR SEAT NOT INCLUDED
Catalyst Instruction Manual 3

CombiUSA.com
TO INSTALL THE BACK WHEELS:
Slide the wheel into the axle until it
locks into place.
TO REMOVE THE BACK WHEELS:
Press the gray button on axle and
pull the wheel out.
STROLLER ASSEMBLY
INSTALL/REMOVE WHEELS
TO INSTALL
THE FRONT WHEELS:
Slide each front wheel
into the housing until it
locks into place.
TO REMOVE
THE FRONT WHEELS:
Press the gray button
and pull wheel out
from housing.
UNFOLD STROLLER
NOTE: Apply the brake before unfolding.
STEP 1: Pull latch outward with your thumb to release
locking mechanism.
STEP 2: Pull up on the handle until frame locks
open.
STEP 3: Check that the frame is locked
properly by gently pushing down on the handle.
4 Catalyst Instruction Manual

STROLLER ASSEMBLY
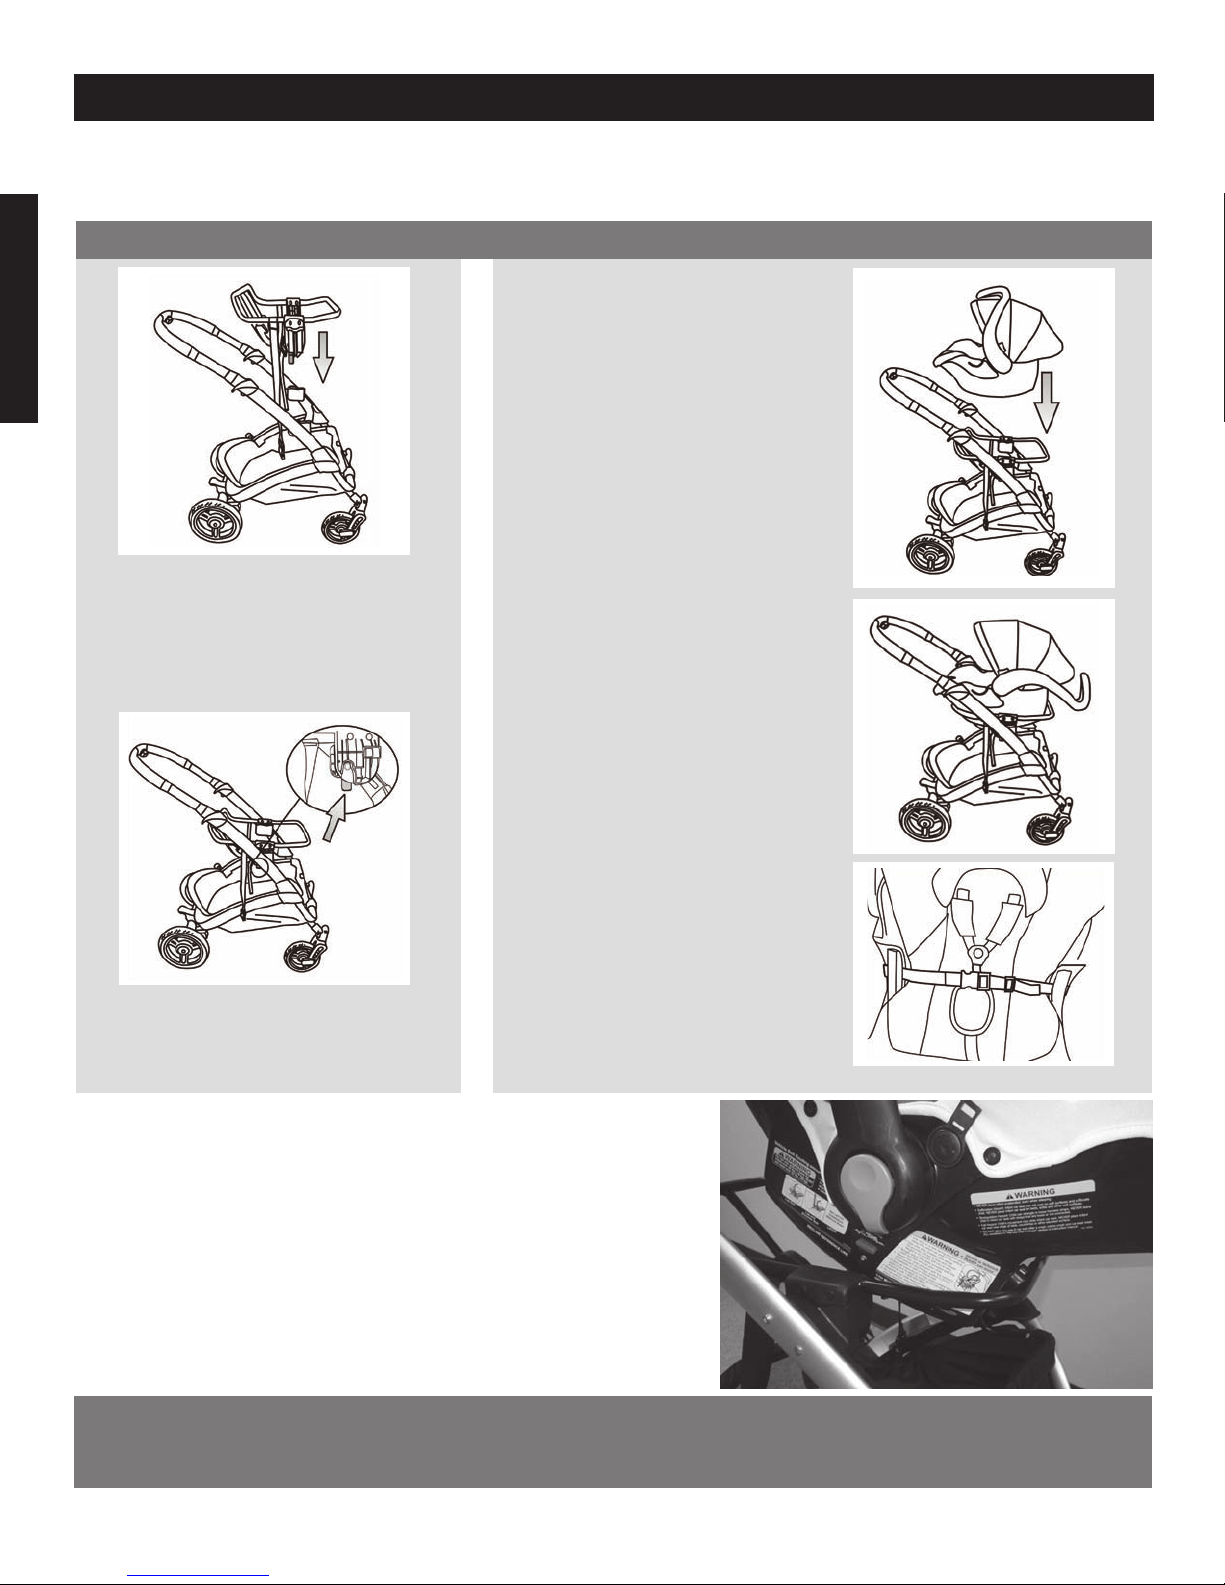
ATTACH/REMOVE SEAT
CombiUSA.com
STEP 1: Insert the posts on the sides of the seat into
the slots of the frame. Push until you hear it “click” on
STEP 3: To remove, push both release buttons (gray)
and lift seat from the frame.
both sides.
STEP 2: Gently pull up on seat to be sure it is properly
attached to the frame.
NOTE: Seat can attach in either forward or rear-facing direction.
ATTACH/REMOVE THE BUMPER BAR CANOPY INSTALLATION
STEP 1: Insert metal post into bumper bar
attachment slots found on both sides of seat.
NOTE: The metal post can only be installed one way. Match oval
guides beside the metal post to the oval guides on seat adapter.
STEP 1: Snap each side of canopy attachment to
seat frame, just above bumper bar.
STEP 2: To remove, locate release lever on the inside
of bumper bar latch. Use one nger to release button,
and the other hand to release locking mechanism.
Repeat on the other side.
NOTE: White dot indicates location of release lever
STEP 2: Pull canopy fabric over seat back. Attach
snaps at the rear of the seat (x2).
NOTE: Canopy coverage is adjustable.
Catalyst Instruction Manual 5

CombiUSA.com
STROLLER OPERATION
USING THE SWIVEL/LOCKING SYSTEM SET THE BRAKE
TO LOCK WHEEL SWIVEL: Align swivel wheel for
forward travel, then push lever down to lock.
TO UNLOCK: Slide button up
NOTE: Lock wheel swivel if traveling through rough
terrain or sand for improved stroller performance.
HARNESS ADJUSTMENT ADJUST CANOPY
STEP 1: Detach adjustment clip from the 5-point
harness.
TO LOCK THE BRAKE:
STEP 1: Brake is located on the rear axel at the
bottom center of the stroller frame.
STEP 2: Push down on pedal to lock stroller.
TO RELEASE BRAKE: Push the pedal up.
TO ADJUST CANOPY: Pull sunshade out until you
hear a “click”. Repeat until desired coverage is
reached.
STEP 2: While holding clip on strap, move the loop
of the strap up or down to adjust. (Remove harness
pad, if needed)
STEP 3: Once adjust is complete, place harness
pad back on to the strap and clip back into 5-point
harness.
6 Catalyst Instruction Manual
VIEWING WINDOW
Back Side
Front Side
TO USE VIEWING WINDOW:
To open window, lift window cover and fold forward,
over canopy. To close window, fold window cover
rearward and attach with magnet.

STROLLER OPERATION
SEAT POSITIONS
POSITION #1
INFANT MODE
WARNING: TO AVOID SERIOUS INJURY OR DEATH,
never use Position #2 or #3 with an infant. ALWAYS
use the restraint system.
POSITION #2
TODDLER
RECLINE MODE
POSITION #3
TODDLER
UPRIGHT MODE
ADJUST SEAT POSITION
RECLINE THE SEAT BACK
CombiUSA.com
TO ADJUST THE SEAT BACK RECLINE: Locate
the recline mechanism on the rear of the seat back.
Position ngers on the front and back of the red
recline release lever, then pull down to desired
position.
Pull the lever near the top of the seat and tilt to
desired position. Release the lever to lock in one of
three preset positions.
ADJUST THE HANDLE POSITION
TO ADJUST THE HANDLE POSITION: Push the
grey button, the slide handle to the desired position.
RETURN TO UPRIGHT POSITION: While holding
the recline strap, push recline mechanism to the
desired position.
USING THE HARNESS
TO LOCK: Slide both belt ends together until it
locks.
TO OPEN: Depress button at center and pull apart
WARNING: Use the 5-point harness to restrain the
child while in the stroller at all times. Adjust harness
to t child securely.
Catalyst Instruction Manual 7

CombiUSA.com
INFANT MODE
SETUP
STEP 1: Lift rear lever rmly and completely.
STEP 3: Unlatch secure buckle strap located under
the foot rest.
STEP 2: Shift seat to a horizontal position.
STEP 4: Gently press down on the leg rest to
complete the conversion to Infant Position.
Remove child before removing or adjusting seat.
8 Catalyst Instruction Manual
WARNING
DO NOT carry seat by Bumper Bar

STROLLER OPERATION
FOLD STROLLER
CombiUSA.com
STEP 1: Activate the brake (Press downward on
brake pedal) to prevent stroller from rolling forward
while folding.
STEP 3: Slide Folding Levers to release stroller frame.
STEP 2: Place handle in lowest position.
STEP 4: Lower stroller frame until locking mechanism
engages on the left side of stroller.
STEP 5: Gently lift stroller by handle to ensure locking mechanism is engaged.
NOTE: When folding frame with seat attached, seat must be in forward facing and upright position.
WARNING: To avoid nger entrapment or pinching, use care when folding and unfolding the stroller. Be certain the
stroller is fully erected or folded, and locked in position before allowing your child near the stroller .
Catalyst Instruction Manual 9
Combi Car Seat Adapters are Compatible with the following infant car seats: Combi® Shuttle, Combi® Shuttle
33, Combi® Navette 22, Chicco® Key Fit® 30, Graco® SnugRide® 35 and Graco® SnugRide® 30. Instructions are
slightly different for each manufacturer.
CombiUSA.com
To attach car seat adaptor:
Insert the posts on the sides of the
car seat adapter into the slots of
the frame. Push until you hear a
“click” on both sides.
CAR SEAT ADAPTER INSTRUCTIONS
*To attach an infant car seat:
1. Lock stroller wheels to
prevent stroller movement.
2. Hold car seat above the
mounting points on stroller.
3. Push car seat downward
onto the mounting points
on stroller. Listen for the
“click” to indicate the car
seat is secured to the
stroller.
4. Route car seat attachment
straps through the car
seat’s vehicle belt path.
(Refer to Car Seat
Instruction Manual for
additional information)
5. Pull upward on car seat
to be sure car seat is
To remove car seat adaptor:
Pull inward on both red levers,
then pull adapter upward.
*Special Instruction for Combi® Shuttle Car Seat:
Insert the rear portion of Shuttle car seat into the car seat adaptor as
shown on the right. Align the orange tabs on each side of the Shuttle
car seat with the red arrow on the car seat adaptor. Push down on
the front portion of the Shuttle car seat. Listen for the audible “click”
to indicate proper insertion of the car seat. Pull upward on car seat to
be sure car seat is secured to stroller. Route the car seat attachment
straps through the car seat vehicle belt path.
NOTE: You must ALWAYS use the safety belt to secure the car seat.
Always pull upward on the car seat to ensure that it is secure before routing the car seat attachment straps.
If the seat is not secured to the car seat adaptor, then remove the car seat and re-start.
10 Catalyst Instruction Manual
secured to stroller.

CAR SEAT ADAPTER INSTRUCTIONS
*Special Instruction for Chicco® KeyFit Car Seat:
Insert the rear portion of car seat into the car seat adaptor as shown on
the right. Push down on the front portion of the car seat. Pull upward
on car seat to be sure car seat is secured to stroller. The car seat
attachment straps connected to the car seat adaptor must be placed
over the seat. Routing the car seat attachment straps through the car
seat vehicle belt path is not required.
*Special Instruction for Graco® Snug Ride Seat:
Hook the rear portion of the seat onto the car seat adaptor as shown on
the right. Push down on the front portion of the car seat to ensure that
the two metal U-shaped brackets at the bottom of the seat are secured
onto the plastic hooks on the car seat adaptor. Pull upward on car seat
to be sure car seat is secured to stroller. Route the car seat attachment
straps through the car seat vehicle belt path.
CombiUSA.com
ROUTINE MAINTENANCE
Store in a cool and dry area, especially in the summer.
To avoid damaging stroller, NEVER place items on top
of stroller during storage.
Canopy, Restraint System, and Basket:
Hand wash with a soft bristle brush. Wipe out excess
water with a dry cloth and allow to dry in a shaded area.
For stubborn dirt, dilute a mild detergent with warm
water and apply directly to the dirty area. Wipe away the
detergent with a warm, damp cloth.
Stroller Frame
Briskly wipe o any mud and dirt. To clean the frame,
wipe with a damp cloth then wipe out any traces of
moisture on the frame with a dry cloth.
Excessive exposure to the sun could cause premature
color fading of stroller plastic and fabric.
Wheel Assemblies:
After prolonged normal use, the wheels of your stroller
may not swivel or turn as easily as when the stroller
was new. This is usually due to a buildup of dirt in the
swivel mechanism. Before adding lubrication, remove
the swivel wheels by pressing in the release button, then
wipe o mud and dirt. Do not use soap and water to
wash wheels. Periodically check that all screws, bolts and
nuts are tight.
Avoid lubricating the swivel wheels whenever possible.
Excessive lubrication or adding lubricant to swivel
wheels when new may cause them to develop a shimmy
or wobble that may quicken their deterioration.
Add silicone* to the wheel assemblies in small amounts.
Do not use oil-based lubricants because oil attracts dust
and would hinder the movement rather than improve it.
*Silicone spray is available at most hardware stores.
CLEANING THE SEAT
Hand Wash
Do Not Use Bleach
Dry Flat
Do Not Iron
Do Not Dry Clean
Catalyst Instruction Manual 11

ROUTINE MAINTENANCE
REMOVING SEAT
STEP 1: Remove the canopy (Refer to Canopy
Installation)
STEP 2: Unfasten the snaps (x12) around the edge of
seat frame. Unfasten the snaps (x3) under the seat.
CombiUSA.com
STEP 3: Unfasten Velcro® straps located near the
footrest on the seat frame.
STEP 4: Remove the lap portion of the harness straps.
SEAT BELT REMOVAL
STEP 1: Route shoulder belt retainer at the rear of the
seat through the slot.
STEP 2: Detach adjustment clip from the 5-point
harness.
Follow the above direction in reverse to assemble
12 Catalyst Instruction Manual
Combi USA, Inc.
3520 Westinghouse Blvd., Suite B • Charlotte, NC 28273
Customer Service 1.800.992.6624 10/12
 Loading...