


Combi Activity Rocker 9710 Owner's Manual
COMBI International Corporation • 199 Easy St. • Carol Stream, IL 60188 • www.combi-intl.com
Customer Service 1-800-992-6624 • 10:00 a.m. - 5:00 p.m. Central Time • Monday - Friday
Instruction Manual
Record the following information for quick reference.
Date Purchased:__________________Model Number: 9710 - _______ Color _____________________________________
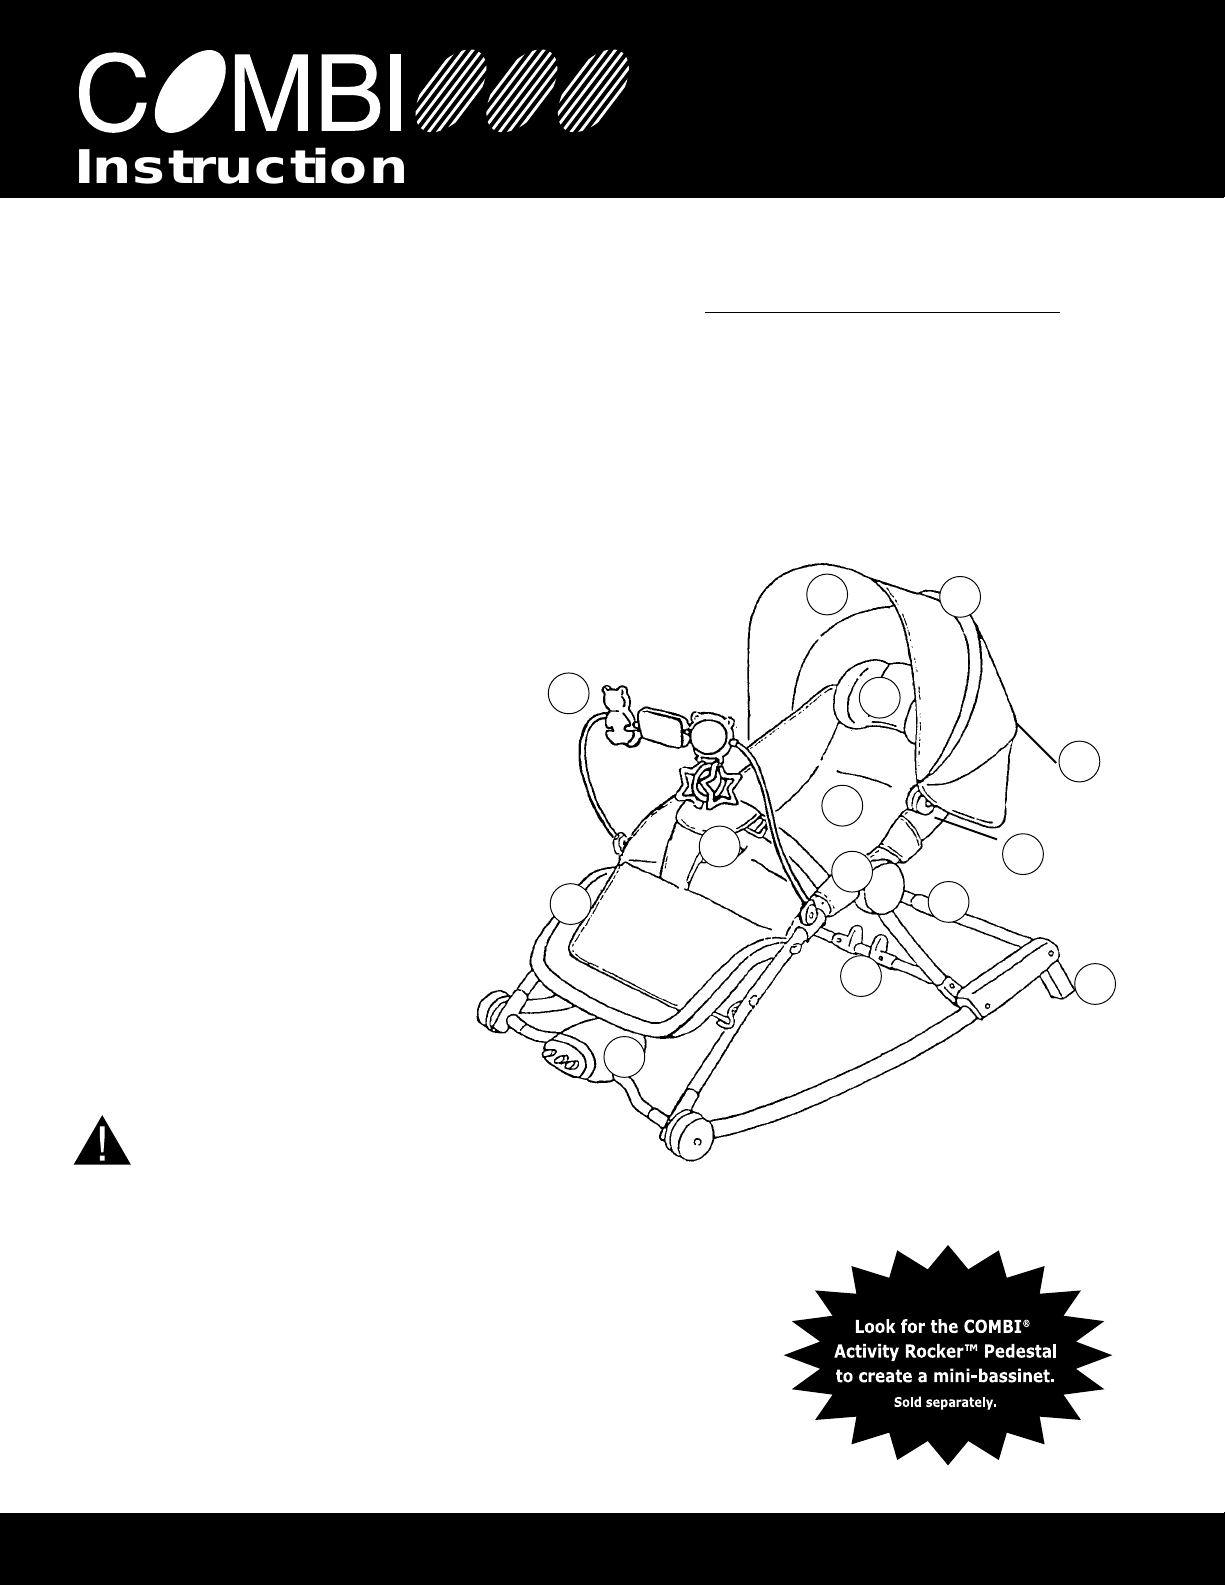
Name of Parts
1 Canopy
2 Adjustable Visor
3 Toy Bar
4 Footrest
5 Armrest
6 Pillow
7 Parking Stand
8 Seat Cushion
9 Folding Lever
10 2-Speed Vibrating Unit
11 Rotating Grip
12 Canopy Holder
13 Waist Belt
14 Recline Release Lever
(On the backside of seat)
Fabric Pattern
Activity Rocker
™
9710
Thank you for purchasing a COMBI®Activity Rocker™. It has been designed with both you and the baby in
mind. Should you need assistance with your COMBI
®
Activity Rocker™, call us toll free at 1-800-992-6624
from anywhere in the U.S. Our Customer Service Department hours are Monday through Friday 10:00 a.m. 5:00 p.m. Central Time. Our Customer Service Representatives are trained to give you assistance with questions you may have concerning assembly, parts, or use. Please have the model number ready when you call.
Should you loan/give/sell this Activity Rocker™ to anyone else, be sure to supply this instruction manual as
well. Adult assembly is required. Requires one size “C” alkaline battery
(not included).
The illustrations in this instruction manual are for reference and ease of understanding only. The actual item may differ from the diagrams.
WARNING
If the Activity Rocker™is not used in compliance with these instructions, serious injury may result.
- Never leave child unattended.
- Avoid serious injury from falling or sliding out. Always use seat belt.
- Always use on the floor. Never use on any elevated surface or near steps
or stairs.
- Never use the Activity Rocker™ as a baby carrier.
- Do not allow your child to stand in or on the Activity Rocker™.
- Never lift the Activity Rocker™ using the toy bar as a handle.
- Maximum weight - 25 lbs.
- Never use the Activity Rocker™ as a car seat.
1
2
14
5
12
6
9
11
10
4
7
3
8
13
COMBI International Corporation • 199 Easy St. • Carol Stream, IL 60188 • www.combi-intl.com
Customer Service 1-800-992-6624 • 10:00 a.m. - 5:00 p.m. Central Time • Monday - Friday
- 2 -
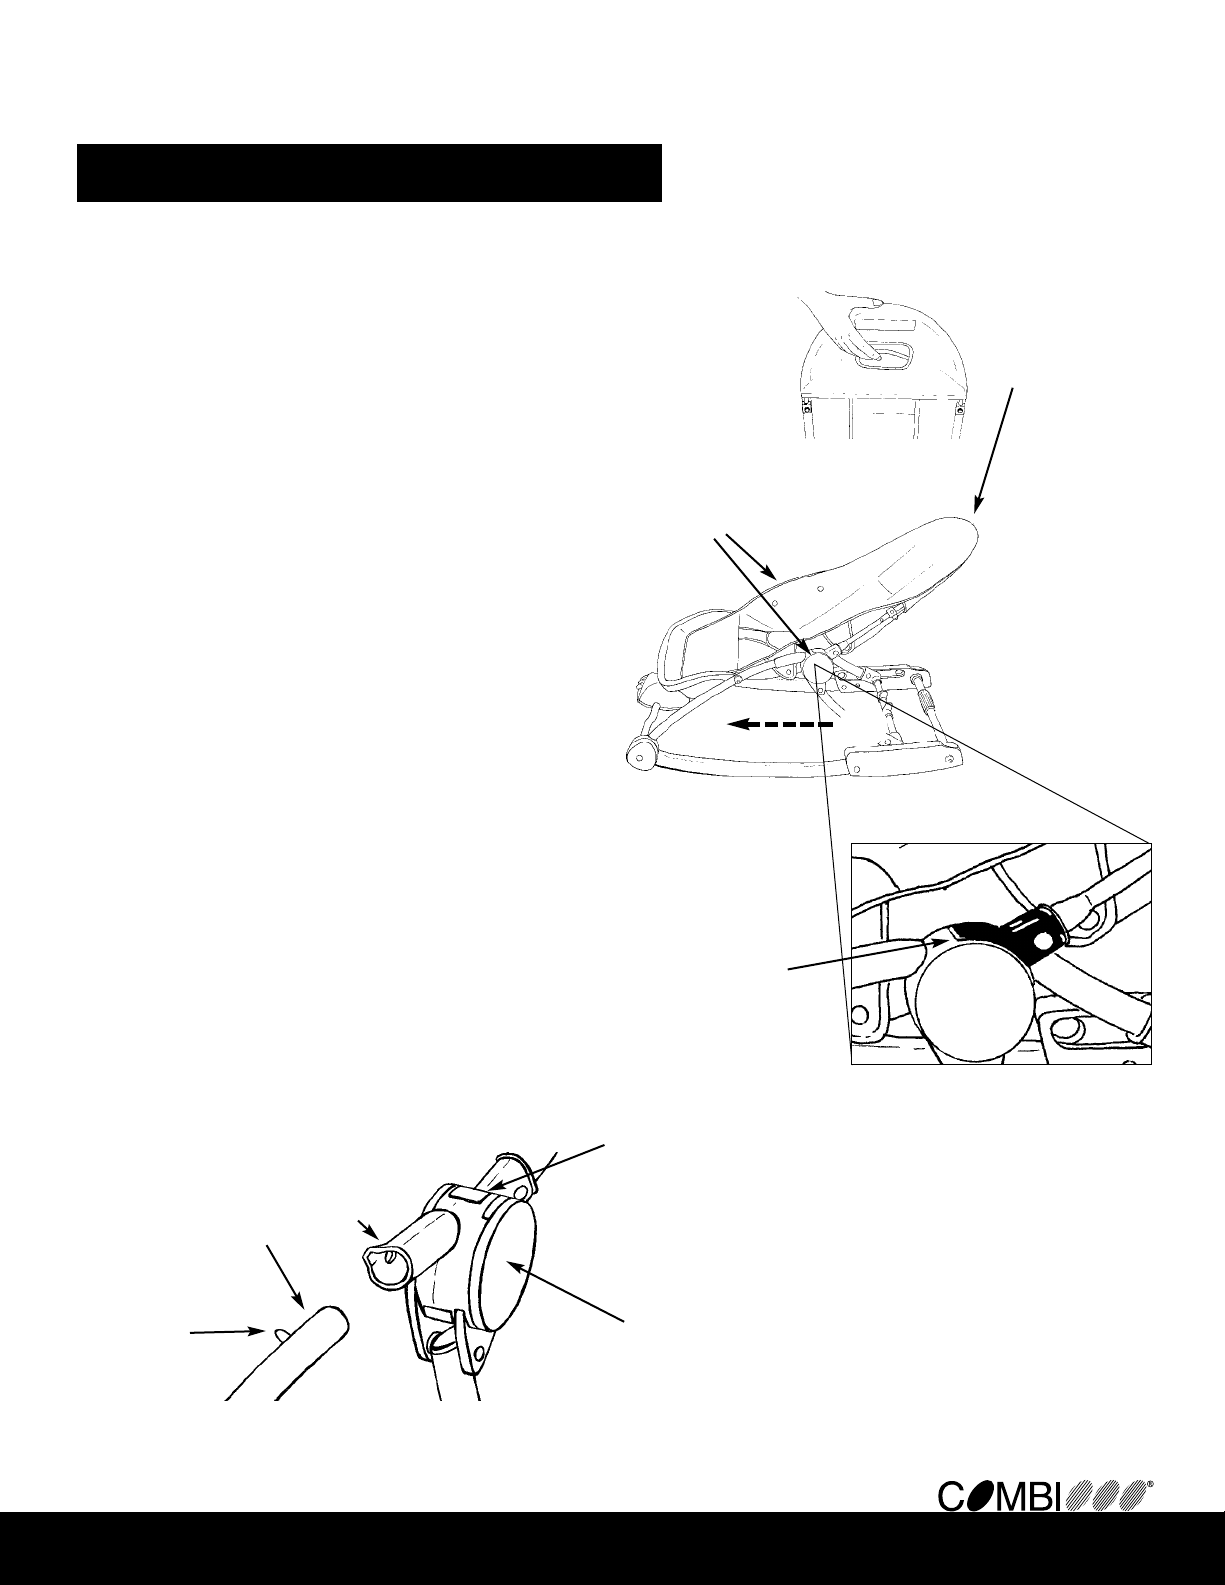
Assembling the Main Frame
1. Place the Activity Rocker™ on the floor.
Kneel down behind the seat. (A)
2. You must reset and balance the armrest reclining
position slot guides before proceeding.
To balance the slots guides:
Squeeze the reclining lever (B) located behind the
seat and push the seat forward to full upright
position. Then release the reclining lever to lock
the seat into position. Check to make sure the
armrest slot guides are in the same forward locked
position. (C)
3. To connect the leg (D) to the frame, grasp the top
of the leg with one hand and the frame (next to the
armrest) with the other hand. (E)
4. Insert the leg into the opening of the frame tube
until you hear a click and the lock pin can be seen
through the hole in the armrest
5. Be sure that the seat cushion’s metal hooks
(located above and below the armrest) go over the
frame and snap under the seat cushion.
6. To make sure that the Activity Rocker
™ is ready
for use, place one hand behind the top of the seat
cushion and push up until the folding lever (F)
slides completely forward into place.
Armrest
Front leg
Armrest reclining
slot guide.
Armrest reclining
position slot guides.
Kneel behind
the seat to
reset and
balance the
armrest
reclinging
guides.
Note: Both armrest slot
guides must be locked in
the forward position
before connecting the leg
to the frame tube.
Recline
release
lever
located
behind the
seat.
(A)
(B)
(D)
(E)
(C)
Frame
Tube
(F)
Lock Pin
COMBI International Corporation • 199 Easy St. • Carol Stream, IL 60188 • www.combi-intl.com
Customer Service 1-800-992-6624 • 10:00 a.m. - 5:00 p.m. Central Time • Monday - Friday
- 3 -
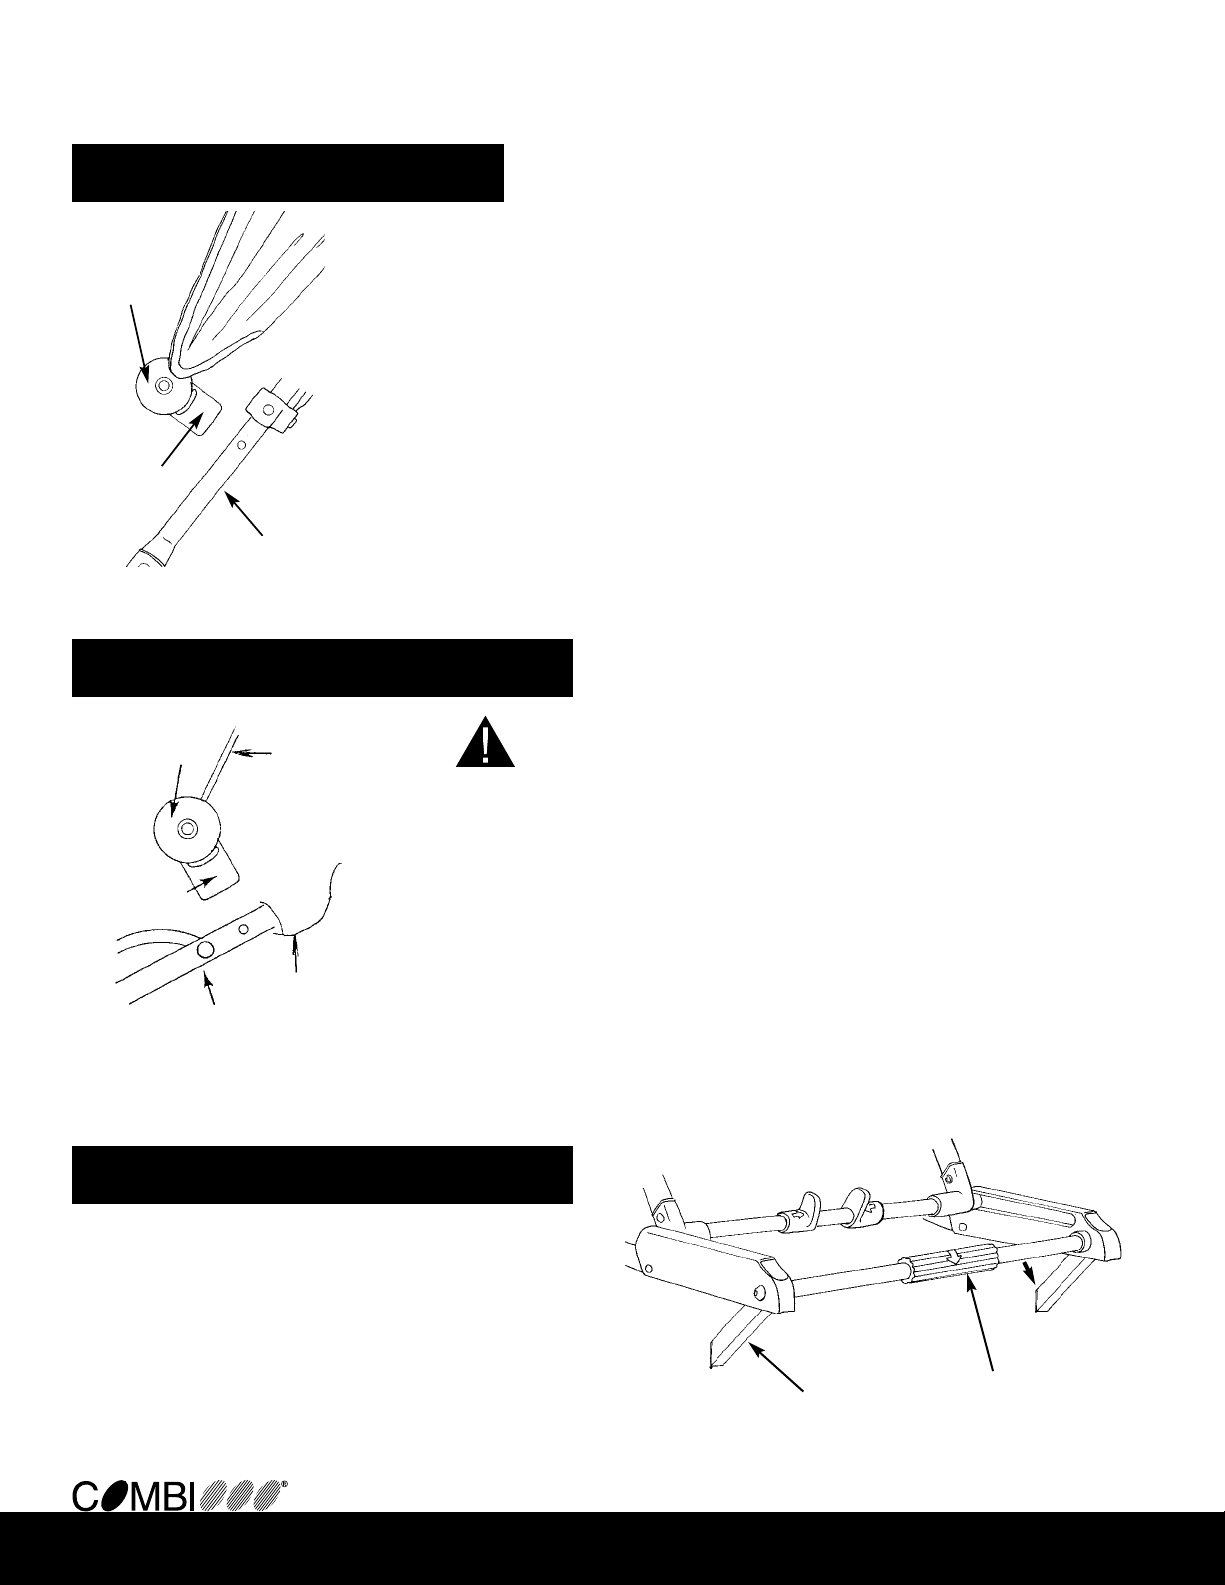
Using the Parking Stand
Installing the Toy Bar
To install the toy bar, place the notch in the clamp of the toy bar holder into the hole on the front tube (located above the footrest).
Note:
Clamp must be positioned behind the toy bar holder in order to insert into
the front tube.
Toy bar
Toy bar
holder
Clamp
Front tube
Seat cushion
WARNING
Never lift Activity Rocker™using the toy bar.
First, kneel behind the Activity Rocker™. Grasp the
rotating grip with one hand, lift up slightly, and rotate the
bar. To fold the parking stand, grasp the rotating grip
and turn it in. Parking stand will be released.
Rotating grip
Parking stand
Attaching the Canopy
Attaching the Canopy
To install the canopy place the notch in the clamp of the canopy holder into the
hole on the reclining tube. (Located above the armrest).
Note:
Clamp must be positioned behind the canopy holder in order to insert into the frame.
Canopy
Holder
Clamp
Reclining Tube