

Page 1
Q412005001 – 03/16 –Ind B
P/N: Q412005001
Pour sortir l’appareil du carton, veuillez lire attentivement les consignes de la
notice.
Nous vous remercions d’avoir choisi un produit COMAP.
Pour bénéficier du service clientèle et technique, veuillez enregistrer votre produit en renvoyant le
coupon de la carte de garantie ou en vous enregistrant sur savcomapwt@comap.eu
WATER TREATMENT UNIT
Komeo water treatment unit
Please read the instructions in the manual carefully before removing the device from
the box. Thank you for choosing a COMAP product.
To take advantage of technical and customer service, please register your product by returning the reply
coupon from the warranty card, or register via savcomapwt@comap.eu
CLEAN
TECHNOLOGY
Page 2

Page 3
Contents
I - Important recommendations Page 4
a) Important safety instructions and symbols
b) Device-related safety instructions
c) Guarantee (booklet provided in Appendix)
II - Description of Komeo Page 9
III - Before installation Page 10
IV - Installing Komeo Page 14
V - Starting the machine Page 17
VI - Description of the touch screen Page 18
a) Description of indicator lights
b) Description of menus
c) Downloading the remote control application
d) Pairing the unit with the application
VII - Maintenance / Troubleshooting Page 21
a) Replacing the filters cartridge
b) Replacing the UVc lamp
c) Automatic prefilter cleaning
d) Manual prefilter cleaning
e) Replacing the fuse
VIII - Troubleshooting guide Page 24
a) Guide to errors
b) What to do in case of a power cut
c) Other maintenance operations
d) What to do in case of a long absence
Page 4
I - Important recommendations
a) Important safety instructions and symbols
Before using this device, please read this guide
carefully and keep it for future reference. Only
use this device for its intended purpose and in
accordance with the instructions given in the guide.
This device must not be used by children under the
age of 8 years or by persons of diminished physical,
sensory or mental capacity or persons without any
experience or knowledge unless they are properly
supervised or if they have been given instructions
concerning the safe use of the device and have
understood the risks involved. Children must not
play with the device. The cleaning and maintenance
to be performed by the user must not be carried
out by unsupervised children. The warnings and
important safety instructions in this guide do not
purport to cover every situation that is likely to
occur. It is your responsibility to apply common
sense and caution during installation, maintenance,
and operation of the device.
b) Device-related safety instructions
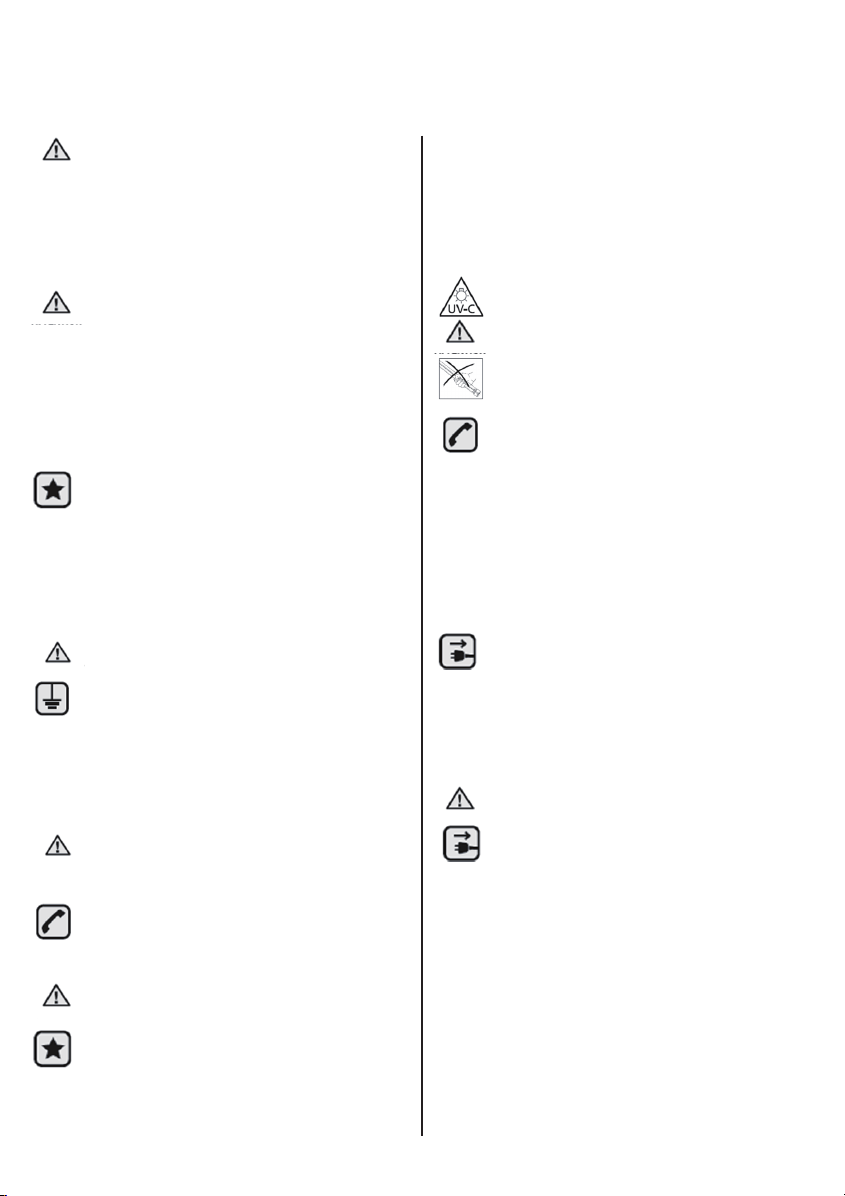
Risks or hazardous actions likely to lead to
WARNING
serious, or even fatal, injury.
Inappropriate or hazardous use likely to
CAUTION
cause slight injury or equipment damage.
Read the "Safety instructions" section
of this guide
carefully, and keep the guide in a safe place so that
you can refer to it in the future. A guarantee leaflet
is also supplied with this guide. It gives details of
the terms of the guarantee and the general safety
instructions that apply to all of our products.
Ensure that the product is earthed and
connected to a socket protected by a 30 mA
residual current circuit breaker. Seek
assistance from a professional if necessary.
Contact the technical support department for
help (0033 (0)4-75-85-28-11)
Notes
CE Noce
This product is compliant with the directives
concerning Low Voltage (2006/95/EC, Electromagnetic
Compatibility (2004/108/EC), limiting the use of
certain dangerous substances in electrical and
electronic equipment (RoHS), and Radio (1999/5/EC).
The warnings and important safety instructions in
this guide do not purport to cover every situation
that is likely to occur. It is your responsibility to apply
common sense and caution during installation,
maintenance, and operation of the device.
DO NOT attempt
DO NOT disassemble
DO NOT touch
Apply the instructions to the letter.
Disconnect the plug from the socket.
The purpose of these warning symbols is to help
users avoid any risk of injury. They must be obeyed
under all circumstances.
Keep this user guide
WARNING
Dangerous leakage of UV-C radiaon can
occur if the device is used in a manner not
intended or if its casing is damaged. Even
at small doses, UV-C radiaon can be
hazardous to eyes and skin. Machines that
are obviously damaged should not be put
into operaon. The device must be
disconnected from the power supply
before you replace the UV-C emier.
4
Page 5
If the power supply cable is damaged,
it must be replaced by the
manufacturer, its aer-sales service
department, or similarly qualied
persons in order to prevent
any danger.
Disconnect the mains power supply
cable from the device before
removing the cover and before
carrying out any maintenance.
Do not modify the device.
Keep the box for use as a mounng
template for the device.
Install the device on a cold water
system (temperature between 5°C
and 30°C).
If the pressure in the cold water
system exceeds 3 bar, a pressure
reducing valve must be installed.
Opmum operaon of the device
is achieved at ow rates below
2 m³/ hour.
Ensure that your device is located in
a temperate locaon (temperature
between 5°C and 35°C).
The device needs to be connected to
the electrical network. Make sure it is
installed near an electrical socket. If
not, have a socket installed.
It is recommended that the device
be placed within 2 metres of a waste
water drain (optional).
Connect the Komeo hydraulically
according to DTU 60.1, 60.11.
Never connect the power cable to
WARNING
a socket that has not been properly
earthed, and ensure that it complies
with local and national regulations.
Never start up a device that shows any
signs of damage. In case of doubt, call
the aer-sales service department.
Do not install the device in a locaon
where it is exposed to direct sunlight
or near a cooker, heater, or other
devices.
Any damage to the insulation of the
electrical components is likely to
cause electrocution or fire.
Do not connect several devices to the
same multi-socket.
Do not connect the power supply plug
to a badly installed wall socket.
Do not use a cable whose sheath
WARNING
cracked or damaged at any point or at
one of its ends.
Do not pull the power cable or bend it
WARNING
too tightly, and do not place heavy
objects on it. Do not tie it in a knot.
Do not use aerosols near the device.
Do not install this device in a location
WARNING
where gas leaks are likely to occur.
In case of a leak in the device,
disconnect Komeo from the electrical
network.
This device must be earthed. To
earth the device, do not connect it
to a gas pipe, a plastic water pipe, or
a telephone line. To do so could cause
a risk of electric shock, electrocution,
or fire.
A shut-off valve and a standardised
CAUTION
non-return valve must be installed
upstream and downstream from the
device. For proper WiFi operation, it is
preferable to place Komeo in an area
covered by your wireless router.
If not, add a WiFi relay.
54
Page 6
Secure the device to the wall on a solid
CAUTION
surface able to support 25 kg on four
mounting points. The wall plugs
provided are intended for use in
materials such as concrete. For other
types of material, use appropriate
mounting hardware.
Do not install this device near a heat
CAUTION
source or any flammable material.
Do not install this device in a damp,
oily, or dusty environment, or
in a location where it is directly
exposed to sunlight or water. Failure
to apply this recommendation could
cause electrocution or fire.
It is recommended that you call on
a qualified technician or a repair
company to install or repair the device
or to update the software via the USB
key. Failure to apply this
recommendation could cause a risk of
electric shock, fire, injury, or
malfunction of the device.
Do not touch the device's power plug
WARNING
if your hands are wet.
The device must be earthed and
connected via a standardised
230-Vac/16-A Phase/Neutral + Earth
connector and protected by a 30-mA
circuit breaker. Failure to apply this
recommendation would lead to a risk
of electrocution or injury.
The fuse must be replaced by
WARNING
a qualified technician or repair
company.
If the power cable is damaged,
immediately ask the manufacturer or
certified repair technician to
replace it.
CAUTION
Insert the power supply plug to that the
cable hangs down.
If the power cable is plugged in
upside down, the cable could break,
causing a fire or electrocution.
Do not climb onto the machine. Do
not place any object (such as laundry,
lighted candles, lighted cigarettes,
metallic objects, etc.) on the machine.
Do not place any container of water or
filter bowl on the machine.
Do not attempt to look at the UVc
lamp when it is switched on. This
could cause irreversible damage to
CAUTION
the retina and skin.
Do not touch the UVc lamp with
bare hands.
In case of traces of dust or water
leakage in the device, disconnect
it and contact COMAP after-sales
service. Shut off the water supply
and switch the device to Bypass
Mode (shunting the water circuit).
When commissioning the device, start
by supplying it with water and check
that there is no leakage in the device
or the installation before connecting
it to the electricity supply.
In the event of an extended absence
of power supply, whether deliberate
or not, disconnect the power cable,
remove the protective cover, and set
the battery unit switch to OFF. Apply
these steps in reverse when normal
power is restored.
If the machine is releasing a chemical
CAUTION
odour or smoke, disconnect it
immediately and contact COMAP
after-sales service.
Modifications can lead to injury and/
or property damage. Modifications
applied to this device by a third
party are not covered by the COMAP
service guarantee. COMAP accepts no
liability in the event of safety issues or
damage resulting from modifications
made by a third party.
Do not apply violent shocks or
excessive force to the device or in
6
Page 7
the quartz enclosure (glass tube)
housing the UVc lamp. This could lead
to cracking or breakage of the glass
tube, bringing the lamp into contact
with water from the circuit. This could
lead to injury or electrocution.
Be aware of the working life of
CAUTION
consumables and replace them in
strict accordance with the instruction
manual. Never perform maintenance
on the device with the power cable
plugged in. The battery unit takes
over to display the maintenance
procedures on the touch screen.
Never plug the power cable into the
socket until the cover is closed.
Do not attempt to repair, disassemble,
or modify the device yourself.
This instruction manual is a guide to
installing the Komeo water treatment
unit. The illustrations it contains are
not contractual.
76
Page 8

Technical characteristics:
Electrical functions:
Anti-scaling by electrical field, with two treatment ratings. Rimeau technology
Atex CSTBat N° 575 – 05/1995.
Stainless UVc treatment chamber. 25-watt UVc lamp.
Drinking water standard: Not less than 25 mj/cm², in accordance with French Health
directive in the circular of 19/01/1987 (achieved with a max. instantaneous flow in
the water system of 1.5 m³/h).
Electricity consumption slaved to water utilisation by an integral flow sensor
(automatic standby function).
3.5" touch screen. Resolution 320 x 240 pixels
2.4-GHz single-band WiFi card. IEEE 802.11b/g/n.
Motorised valve for prefilter inlet and outlet.
Pressure sensors and flow meter.
Electrical power supply: 230 V AC 50-60 Hz with earth.
Rating: 30 W
Pollution degree: 1.
Overvoltage category: 2.
Hygrometric and altitude operating conditions: RH: 90% / 2000 m.
Waterproofing standard: IP 21.
Electrical standard: CE compliant
Fuse: F 500 mA AH (5 x 20 mm).
Hydraulic functions:
Stream self-cleaning prefilter with 2 filter ratings: 90 µm and 40 µm on stainless mesh.
10 µm BIRM cartridge filter® combined with extruded active carbon: treats chlorine, iron
and manganese, and reduces nitrate content.
10 µm KDF® cartridge filter combined with extruded active carbon: treats heavy metals
and micro-pollutants.
Max. system pressure: 4 bars / 400 KPa.
Water temperature: 5 to 30 °C.
Filtered water delivery rate: max. 2 m³/h
Max. hardness: up to 45 °f or 25 °dH.
¾’’ male inlet/outlet (or female using angle unions supplied).
Integral air purge in head.
Water purge for decompression.
Dimensions cm (H x L x D): 59 x 59 x 17.
Weight: 20 kg.
Accessories and consumables:
10 μ 15" BIRM® cartridge filter with extruded active carbon (Cat. No.: Q511016001).
10 μ 15" KDF® cartridge filter with extruded active carbon (Cat. No.: Q511015001).
25 W UVc lamp (Cat. No.: Q512013001).
Four LR6 1.5-V batteries.
Quartz tube O-ring (Cat. No.: Q513010001).
Self-cleaning filter mesh + prefilter bowl seal (Cat. No.: Q511017001).
O-ring for filter bowl (Cat. No.: 527199).
BIRM® is a registered trademark of the Clack Corporation. KDF® is a registered trademark
of KDF Fluid Treatment.
8
Page 9
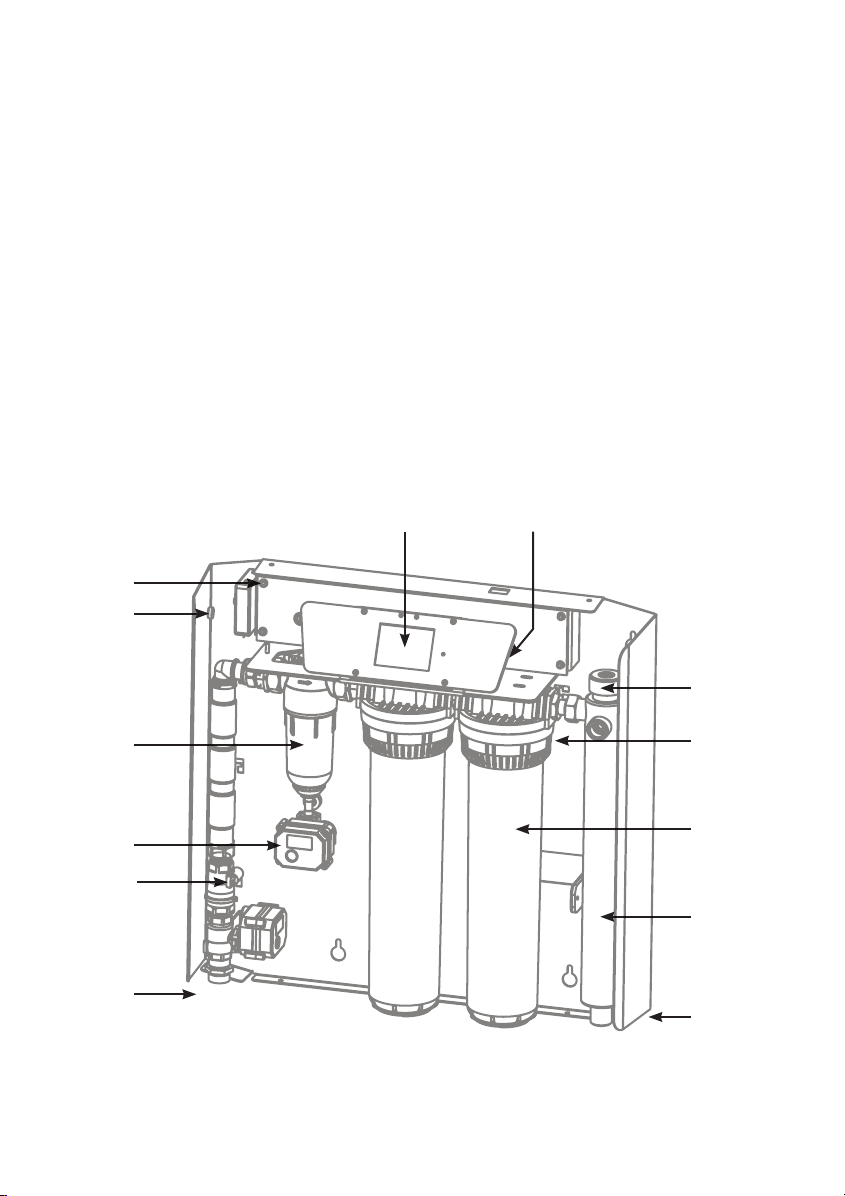
II - Descripon of Komeo
1. Inlet and outlet
2. Flow meter chamber - Anti-scaling Power operated inlet valve.
3. Prefilter
4. Power operated valve
5. 15" filter bowls
6. Filter nut
(10)
(9)
(3)
7. UVc lamp connector
8. Anti-bacteria UVc chamber
9. Power cable
10. Pack of 4 batteries
11. Water purge
12. Touch control interface
(12) (11)
(7)
(6)
(4)
(2)
(1)
(5)
(8)
(1)
98
Page 10

III - Before installaon
1
III - Avant l’installation
COMAP WT vous recommande vivement de faire appel à un professionnel pour
installer Komeo. Des suggestions de raccordements sont proposées, l’installation
doit se faire dans les règles de l’art.
Vérifier la présence du sachet accessoire
comprenant :
La notice et le livret de garantie, 4 joints,
Retirer le capot afin de déclipser les rondelles
de fixation de l’appareil au cartons inférieur
2
COMAP WT strongly recommends calling on a professional to install Komeo. Connection
suggestions are offered, and the installation must be carried out according to good
professional practice.
Remove the cover to unclip the washers that secure the device to the bottom of the box.
❷
1
❶ ❶
1
❶
1
❶
1
Check for presence of the accessory pouch
containing:
❷
The instruction manual and guarantee
leaflet, four seals, four wall plugs, four LR6
1.5-V batteries, four screws and two TH
hardness test strips, Ø8 pipe, one filter key
and one prefilter key, a UVc lamp packaged
in a protective tube (to be mounted and
connected at the time of installation).
Remove the four fasteners
Komeo base to the box, and withdraw Komeo.
❷
❷
❷ securing the
Take the spacers from the bottom of the
box to mount the device on the wall.
10
Page 11

Vérifier la présence
obligatoire en amont
de l’appareil:
D’un réducteur de
pression, d’un clapet anti -
retour
normalisé,
de
vanne
d’arrêt (amont et aval),
ainsi que le nécessaire pour
installer un bypass sur
l’appareil (fortement
recommandé).
1
1
2
❷
bar max.
BEFORE INSTALLATION
SHUT OFF WATER SUPPLY DO NOT PLUG IN
➊
≤ 2 m3/h
≤ 4 bar
5 °C ≤ T° ≤ 20°C
5 °C ≤ T° ≤ 35°C
❹ ❺
❻
❼
UVc lamp
allow 50 cm
❸
Check for the presence of the following
essential components upstream from the
device: pressure reducer, standardised
non-return valve, shutoff valve (upstream
and downstream), as well as everything
required to install a bypass on the device
(strongly recommended).
❽
1110
Page 12

Check that the mounting points and the lines connecting them are level.
Procéder à la mesure de la dureté de votre
eau (TH) à l’aide des bandelettes test
livrées av ec Komeo. Pour ce faire, plonger
la bandelette dans un verre d’eau du
robinet. Égouter l’excès d’eau puis
comparer après une minute avec l’échelle
précédente. Cette valeur vous sera utile
pour régler la puissance de l’antitartre de
Komeo (pour procéder à cette mesure, lire
les instructions sur les bandelettes de test
Se servir du carton comme
gabarit et d’un niveau pour
tracer les points de fixation de la
centrale. Utiliser les points de
fixation de la centrale sur le
carton.
Attention de bien positionner le
carton dans le bon sens.
Prévoir 50 cm d'espace disponible au dessus de Komeo pour sortir la
lampe UVc lors de son remplacement.
Contrôler le nivellement des points de fixation et leurs entraxes.
Allow 50 cm clearance above the Komeo unit to remove the UVc
lamp when replacing it.
Measure the hardness of your water (TH) using the test
Fig:III-16
Medium-hard water
TH < 9° F
9° F ≤ TH < 18°F
18° F ≤ TH < 27°F
Very hard water
27° F ≤ TH < 36°F
36° F ≤ TH < 45°F
TH ≥ 45°F
strips supplied with the Komeo unit. To do this, immerse
a test strip in a glass of tap water. Shake off the excess
water, wait one minute, and then compare the colour
to the scale shown above. This value will affect the antiscaling power setting you apply to Komeo (to perform this
measurement, read the instructions on the test strips and
read the value in °f) or in °e).
Use the box as a template and
use a level to mark the mounting
points for the unit. Use the unit
mounting points on the box.
Take care to place the box in the correct
orientation.
Drill using a 6-mm diameter drill bit (the correct diameter
for the wall plugs supplied with the equipment).
These wall plugs are for use in a dense material.
You should check whether these wall plugs are appropriate
for your substrate. If not, you must obtain appropriate
wall plugs.
12
Page 13

Remove the wall plugs from the screws and place the
spacers between screw and wall plug. Choose appropriate
wall plugs for the material and the weight of the machine
(25 kg with water, with four mounting points).
Insert the wall plugs in the holes, allowing the screw to
protrude 5 mm beyond the spacer.
Place Komeo on its mounting points, check that the spacers
are correctly positioned (between the machine and the
wall), and tighten the four mounting screws.
1312
Page 14

Mettre en place les éléments hydrauliques de liaison
que vous avez choisis pour le raccordement de
Komeo sur votre installation.
Bien respecter le sens de circulation de l'eau (entrée
à gauche et sortie à droite).
Mettre en place le tube d’évacuation en le clipsant
dans le raccord.
Raccordement électrique
IV - Installing Komeo
Hydraulic connection
BEFORE INSTALLATION
SHUT OFF WATER SUPPLY DO NOT PLUG IN
Check for the presence of a pressure reducer (not supplied) upstream from Komeo. If not, install one set to
4 bars max. The installation of a bypass (not supplied) and upstream isolating valves is recommended. The
installation of a non-return valve is mandatory. Mark the position of the union on the pipe, and then cut the
pipe. Shape the tube orifice. Position and crimp the union. Finally, tighten the hose onto the union.
Position the hydraulic connection components you have
chosen to connect Komeo to your installation.
Take care to observe the water flow direction (inlet to the
left and outlet to the right).
Position the drain tube by clipping it in the union.
DO NOT PLUG IN
l’égout à
de
, En cas
If there is no drain connection near the device, provide
a 5-litre container for prefilter cleaning. For connection to
the drain, provide a pipe connection (the self-cleaning of
the prefilter is performed under pressure and this could
cause the black pipe to come out of the drain connector).
fixation
se fait
noir
).
14
Page 15

Repères : 1 à 10 non fourni
Ne pas brancher électriquement l’appareil.
Avant la mise sous tension du réseau, veiller à ce
que l’interrupteur du bloc pile de secours soit sur la
position ON.
Placer les piles LR61,5V fournies comme indiqué
sur la photo et respecter la polarité du boîtier.
Placer et connecter la Lampe UVc fournie dans un
tube d’emballage de protection pour le transport.
Se référer à la procédure de maintenance
remplacement de la lampe UVc § VII – b) /
fig : VII-4
Une fois le raccordement hydraulique effectué, la
mise en eau se fait par ouverture d’une vanne
amont et ouverture d’un robinet afin de chasser
l’air. Fermer progressivement le robinet dès que de
l’eau en sort. Vérifier que Komeo et les
raccordements sont parfaitement étanches.
Replacer le capot et le visser avec les 4 vis
fournies.
Brancher votre appareil sur le réseau électrique et
suivre le guide de démarrage pour paramétrer le
réglage de l’heure, de la date, de la langue, de la
dureté de l’eau, du mode de raccordement à
l’égout ainsi que du mode de fonctionnement de la
lampe UVc.
À noter que par défaut, Komeo est paramétrée en
mode préfiltre non raccordé à l’égout et lampe UVc
allumée en continu.
Lancer si nécessaire un test de fuite réseau dans
le menu maintenance (suivre les instructions sur
l’écran tactile). La mise en service hydraulique est
maintenant terminée.
Les cartouches de traitement ont besoin d’un
Raccordement électrique
Nepas brancher élect riquementl’appar eil.
Avant la mise sous t ension du réseau, veiller à ce
quel’i nterrupteur du bloc pile de secours soi t sur la
positionON.
Placer les pil es LR61,5V fournies comme indiqué
surla photo et respecter la polarité du boîtier.
Placer et connecter la Lampe UVc fournie dans un
tubed’embal lagede protecti onpour le transport.
Se référer à la procédure de maintenance
remplacement de la l ampe U Vc § VII – b) /
fig : VII-4
Une fois le raccordement hydraulique effectué, la
mise en eau se f ait par ouverture d’une vanne
amont et ouverture d’un robinet afin de chasser
l’air.Fermer progressivement le robinet dès que de
l’eau en sort. Vérifier que K omeo et les
raccordementssont parf aitementétanc hes.
Replacer le c apot et le v isser avec les 4 vis
fournies.
Brancher votre appareil sur le réseau élec trique et
suivre le guide de démarrage pour paramétrer le
réglagede l’heur e, de la dat e, de la langue, de la
dureté de l’eau, du mode de raccordement à
l’égout ainsi que du mode de foncti onnement de la
lampeUVc.
À noter que par déf aut, Komeo est paramétrée en
modepréfiltre non raccordé à l’égout et l ampe UVc
alluméeen continu.
Lancer si nécessaire un test de fuite réseau dans
Raccordement électrique
1514
alluméeen continu.
Lancer si nécessaire un test de fuite réseau dans
le menu m aintenance (suivr e les instructions sur
l’écran tactile). La mise en service hydraulique est
maintenantterm inée.
Les cartouches de trait ement ont besoin d’un
rinçage. Faire couler plusieurs litr es pour rincer les
cartouchesneuv esav antde consomm erl'eau.
Stud to be broken before
Clou à visser a casser
avant montage sur
mounting on cover
capot
main valve
Electrical connection
water meter
DO NOT PLUG IN
union
elbow or flexible union
downstream
WATER FLOW DIRECTION
non-return valve
upstream valve
WARNING
Do not connect the device to the electricity supply.
Before applying power to the circuit, ensure that the
switch of the back-up battery unit is set to ON.
Insert the LR6 1.5-V batteries supplied as indicated in
the photo, and observe the polarity of the box.
Position and connect the UVc lamp supplied in
a protective shipping tube. Refer to the UVc lamp
replacement maintenance procedure § VII – b) / fig: VII-4
drain siphon
valve
union
1514
Page 16

Ne pas brancher électriquement l’appareil.
Avant la m ise sous tension du réseau, veiller à ce
que l’interrupteur du bloc pile de secours soit sur la
position ON.
Placer les piles LR61,5V fournies comme indiqué
sur la photo et respecter la polarité du boîtier.
Placer et connecter la Lampe UVc fournie dans un
tube d’emballage de protection pour le transport.
Se référer à la procédure de maintenance
remplacement de la lampe UVc § VII – b) /
fig : VII-4
Une fois le raccordement hydraulique effectué, la
mise en eau se fait par ouverture d’une vanne
amont et ouverture d’un robinet afin de chasser
l’air. Fermer progressivement le robinet dès que de
l’eau en sort. Vérifier que Komeo et les
raccordements sont parfaitement étanches.
Replacer le capot et le visser av ec les 4 vis
fournies.
Brancher votre appareil sur le réseau électrique et
suivre le guide de démarrage pour paramétrer le
réglage de l’heure, de la date, de la langue, de la
dureté de l’eau, du mode de raccordement à
l’égout ainsi que du mode de fonctionnement de la
lampe UVc.
À noter que par défaut, Komeo est paramétrée en
mode préfiltre non raccordé à l’égout et lampe UVc
allumée en continu.
Lancer si nécessaire un test de fuite réseau dans
maintenance (suivre les instructions sur
tactile). La mise en service hydraulique est
terminée.
cartouches de traitement ont besoin d’un
couler plusieurs litres pour rincer les
neuves avant de consommer l'eau.
Raccordement électrique
DO NOT PLUG IN
V - Mise en fonctionnement de la machine
Ne brancher électriquement l’appareil qu’une fois la machine mise en eau
et le capot de protection en face avant remis en place en le fixant avec les
4 vis fournies. Se prémunir du mot de passe de votre Box Wi-Fi.
Vous allez entrer dans le guide de démarrage
via de l’écran tactile de l’appareil.
Choisir votre langue (Français par défaut) sinon
faire défiler les langues via les
flèches haut/bas,
puis appuyer sur l’icône
OK
Régler la date, l’heure, le mode de
fonctionnement de la lampe Uvc, le type de
réseau d’eau , le type de raccordement du
préfiltre auto-nettoyant (raccordé à l’égout
oui/non) et configurer la dureté de l’eau afin de
paramétrer le champ de l’antitarte électronique,
suite à la mesure préalable des bandelettes de
test de dureté TH (voir fig: III-16)
Choisir parmi la liste de réseaux Wi-Fi le nom
de votre Box (réseaux SSID) puis taper votre
mot de passe Wi-Fi en tenant compte des
minuscules et majuscules.
Votre Box peut nécessiter un paramétrage
Once the hydraulic connection has been made,
supply water by opening a valve upstream and a tap
downstream to bleed out the air. Gradually close the tap
as soon as water comes out of it. Check that Komeo and
the connections are perfectly sealed.
Reposition the cover and secure using the four screws
supplied.
Connect your device to the electrical system and follow
the start-up guide to set the time, date, language, water
hardness, mode of connection to the drain and mode of
operation of the UVc lamp.
Note that Komeo is configured by default with the UVc
lamp continuously on.
If necessary, run a system leak test in the maintenance
menu (follow the instructions on the touch screen).
Hydraulic commissioning is now complete.
The treatment cartridges need to be rinsed. Run several
litres through the system to rinse the new cartridges
before drinking the water.
OK
le menu
l’écran
maintenant
Les
rinçage. Fai re
cartouches
16
Page 17

V - Mise en fonctionnement de la machine
Ne brancher électriquement l’appareil qu’une fois la machine mise en eau
et le capot de protection en face avant remis en place en le fixant avec les
4 vis fournies. Se prémunir du mot de passe de votre Box Wi-Fi.
Vous allez entrer dans le guide de démarrage
via de l’écran tactile de l’appareil.
Choisir votre langue (Français par défaut) sinon
faire défiler les langues via les
flèches haut/bas,
puis appuyer sur l’icône
OK
Régler la date, l’heure, le mode de
fonctionnement de la lampe Uvc, le type de
réseau d’eau , le type de raccordement du
préfiltre auto-nettoyant (raccordé à l’égout
oui/non) et configurer la dureté de l’eau afin de
paramétrer le champ de l’antitarte électronique,
suite à la mesure préalable des bandelettes de
test de dureté TH (voir fig: III-16)
Choisir parmi la liste de réseaux Wi-Fi le nom
de votre Box (réseaux SSID) puis taper votre
mot de passe Wi-Fi en tenant compte des
minuscules et majuscules.
Votre Box peut nécessiter un paramétrage
spécifique si les connexions au réseau Wi-Fi
sont désactivées. Contacter le SAV COMAP en
cas de difficulté de connexion.
V - Mise en fonctionnement de la machine
Ne brancher électriquement l’appareil qu’une fois la machine mise en eau
et le capot de protection en face avant remis en place en le fixant avec les
4 vis fournies. Se prémunir du mot de passe de votre Box Wi-Fi.
Vous allez entrer dans le guide de démarrage
via de l’écran tactile de l’appareil.
Choisir votre langue (Français par défaut) sinon
faire défiler les langues via les
flèches haut/bas,
puis appuyer sur l’icône
OK
Régler la date, l’heure, le mode de
fonctionnement de la lampe Uvc, le type de
réseau d’eau , le type de raccordement du
préfiltre auto-nettoyant (raccordé à l’égout
oui/non) et configurer la dureté de l’eau afin de
paramétrer le champ de l’antitarte électronique,
suite à la mesure préalable des bandelettes de
test de dureté TH (voir fig: III-16)
V - Mise en fonctionnement de la machine
Ne brancher électriquement l’appareil qu’une fois la machine mise en eau
et le capot de protection en face avant remis en place en le fixant avec les
4 vis fournies. Se prémunir du mot de passe de votre Box Wi-Fi.
Vous allez entrer dans le guide de démarrage
via de l’écran tactile de l’appareil.
Choisir votre langue (Français par défaut) sinon
faire défiler les langues via les
flèches haut/bas,
puis appuyer sur l’icône
OK
Régler la date, l’heure, le mode de
fonctionnement de la lampe Uvc, le type de
réseau d’eau , le type de raccordement du
préfiltre auto-nettoyant (raccordé à l’égout
V - Mise en fonctionnement de la machine
Ne brancher électriquement l’appareil qu’une fois la machine mise en eau
et le capot de protection en face avant remis en place en le fixant avec les
4 vis fournies. Se prémunir du mot de passe de votre Box Wi-Fi.
Vous allez entrer dans le guide de démarrage
via de l’écran tactile de l’appareil.
Choisir votre langue (Français par défaut) sinon
faire défiler les langues via les
flèches haut/bas,
puis appuyer sur l’icône
OK
V - Starng the machine
LIST OF AVAILABLE WIFI
NETWORKS
SSID 1
SSID 2
SSID 3
SSID 4
OK
Do not connect the device to the electrical power supply until it is supplied with water and the
WARNING
protective cover on the front has been repositioned and secured using the four screws
supplied. You must be equipped with the password for your WiFi router.
LANGUAGE
English
EN
OK
You will enter the start-up guide via the device's touch
screen. Choose your language (French by default) or scroll
through the languages via the up/down arrows, and then
press the OK icon.
TIME
OK
OK
IS THE PRE-FILTER CONNECTED
TO A DRAIN?
No
Yes
No
OK
SET THE WATER HARDNESS
Greater than 17.5 °e
Greater than 17.5 °e
Less than or equal to 17.5 °e
OK
OK
DATE
ENTER THE WIFI PASSWORD
Area reserved for the keyboard
Area reserved for the keyboard
Area reserved for the keyboard
Set the date, time, UVc lamp operating mode, type of
water circuit, type of self-cleaning prefilter connection
(connected to the drain yes/no) and configure the water
hardness to configure the electronic anti-scaling field
after measuring the TH water hardness using the strips
(see fig: III-16).
By default, Komeo is set
WATER QUALITY AT INLET
Public supply water
Public supply water
Other water source
Select the name of your router from the list of WiFi networks
(SSID networks) and then input your WiFi password (casesensitive). Your router might require special configuration
if connections to the WiFi network are disabled.
Contact COMAP after-sales service in case of any
connection difficulty.
to 1. Public supply water.
This configuration can be
modified. 1 Public supply
water is only suitable for
high-quality public supply
water.
1716
Page 18

VI - Descripon of the touch screen
a) Description of indicator lights
❶ ❷
INFORMATION
MAINTENANCE
MAIN
SETTINGS
❶ Inlet valve control pushbutton in offline mode (usable by the battery unit)
❷ Indication of valve position status during a power cut
❸ System indication
❹ Touch screen
b) Description of menus
❶ ❷
INFORMATION
Machine: Pro V2
❶
INFORMATION
INFORMATION
❷
MAIN
Hardware: V1 01 006
Firmware: V1 00 012
Serial Number: 201405466
❸ ❹
MAINTENANCE
INFORMATION menu
❶
This menu tells you the Serial Number of
your Komeo.
To return to the main menu, press the house icon
in the upper left-hand corner. To go back, press
the arrow under the house icon.
SETTINGS
❸ ❹
MAINTENANCE
Pre-filter cleaning
Filter replacement
UVc lamp replacement
Network leak test
Inlet valve control
Fig: VII-1
❸
❹
MAIN
Estimated water consumption
Flow rate
Pressure
Filter wear level
UVc lamp wear level
SETTINGS
Language
Date and time
UVc lamp programming
Water hardness
Water quality at inlet
GENERAL Menu
❷
Estimated water consumption: tells you your water consumption per day, per week, and per month
Flow rate: tells you your flow rate
Pressure: tells you the instantaneous, average, and maximum pressure of the water system
Filter status: tells you the wear status of your cartridges
UVc lamp status: tells you the wear status of your UVc lamp
Emergency unit: tells you the wear status of your batteries
MAINTENANCE Menu
❸
Pre-filter cleaning: starts the prefilter cleaning procedure
Filter replacement: starts the prefilter replacement procedure
Replacing the UVc lamp: starts the UVc lamp procedure
Network leak test: launches a test to detect the presence of leaks on the water system
Inlet valve control: opens or shuts off the water system
Notifications and malfunctions: displays alerts and system errors
Alert history: lets you view the history of alerts sent by Komeo
Servicing/After-Sales Service this menu is used for servicing by After-Sales Service
18
Page 19

SETTINGS Menu
❹
Language: lets you set the language
Date and time: lets you configure the date and time
UVc lamp programming: lets you program up to three daily time slots during which the lamp
goes into economy mode.
Water hardness: sets the water hardness. To measure the hardness of your water and choose
the correct setting, use the test strip supplied in the Komeo box. Immerse it in a glass of tap
water and shake off the excess water. Wait one minute, and then compare it to the scale given in
this instruction manual, Part III - Before Installation.
According to the test result, set the electronic anti-scaling system to the correct position:
Position 1 < 17.5 °e
Position 2 between 17.5 °e and 35 °e
Prefilter drain: lets you drain the prefilter into the waste water system
Water quality at inlet: lets you set the quality of your inlet water:
1 Public supply water
2 Other water source
WiFi connection: lets you connect to your home WiFi network. Select your WiFi network and
then enter your code to connect.
c) Downloading the remote control application
To install the unit's remote control application, visit the following links using your
tablet or smartphone:
For Android: https://play.google.com/store/apps/details?id=com.comap.
watertreatment.komeo
For Apple: https://itunes.apple.com/app/proteo/id1120180106?mt=8
d) Pairing the unit with the application
To pair the Komeo unit with the remote control application, apply the following procedure:
❶ Install the Android or iOS application on your smartphone or tablet.
❷ Connect your smartphone or tablet to the same WiFi network as the unit.
❸ Go to the Information menu of the unit and enter the IP address from the Information menu of
your smartphone or tablet to pair the two devices with each other.
❹ Click OK and then wait for the two devices to be connected.
1918
Page 20

❶ ❷ ❸ ❹
❶ System in perfect operating condition.
❷ UVc lamp management mode (configuring the
time slots in economy mode).
❸ Status of the UVc lamp (lamp ON).
❹ WiFi status (WiFi enabled).
INFORMATION
MAINTENANCE
❶
❶
Alert status informing you of a minor error that does not affect the operation of the unit. ❷❶ UVc
lamp in safety mode.
❶
❸
Status of the UVc lamp (UVc lamp off). ❹❶ WiFi off.
❶❷❷❷❸❷❹
MAIN
UVc LAMP WEAR LEVEL
❸
❶
MAIN
UVc LAMP WEAR LEVEL
MAIN
SETTINGS
❶❶❷❶❸❶❹
MAINTENANCE
❷
❷
❶
Alert status informing you of a minor error that
does not affect the operation of the machine
(yellow pictogram).
❷
❷
UVc lamp in economy mode.
❷
❸
UVc lamp ON.
❷
❹
WiFi ON.
❸
❶
Komeo malfunction alarm
(red pictogram).
When the red "Malfunction Alarm" triangle is
displayed, go into the Maintenance menu and then
choose "Alerts and malfunctions". This gives you
the history of alerts and alarms. By clicking them,
you can follow the troubleshooting instructions and
reset them.
❶
b) Configuring the UVc lamp
The UVc lamp is in economy mode: the lamp is in downgraded operation. After about an hour
without water being drawn, the lamp shuts off. It automatically restarts as soon as water is
drawn again.
Important: Economy mode is not recommended for any water not sourced from a goodquality system. The UVc lamp is in safety mode: the lamp is in optimum operation. The lamp is
programmed in this mode by default.
20
Page 21

VII - Maintenance / Dépannage
a) Remplacement des cartouches de filtre
Débrancher le cordon d’alimentation de l’appareil . Celui va redémarrer en
mode maintenance et sera alimenté par le bloc pile. Démonter ensuite le
capot en dévissant les 4 vis.
Appuyer sur le menu « Maintenance ».
Une fois dans le programme de remplacement des consommables désiré,
suivre les instructions sur l’écran tactile.
En ce qui concerne la purge, se munir
d’un bidon si l’appareil n’est pas raccordé
à une évacuation d’eau usée, pour purger
le préfiltre et appuyer simultanément sur
les boutons de purge comme indiqués
sur l’écran tactile afin de créer une entrée
d’air pour l’évacuation de l’eau. Il est
préférable de fermer la vanne d’isolement
de sortie de Komeo pour éviter une
vidange par gravité des canalisations se
trouvant au-dessus de Komeo.
À la demande de Komeo suivre les
instructions sur l’afficheur et à l’aide
de la clé bleue pour filtre, desserrer
le bol de filtre pour remplacer les
cartouches de BIRM
® et de KDF®
usagées. Placer les nouvelles
cartouches et valider le changement
sur l’écran. Komeo coupe alors
automatiquement la vanne de
préfiltre pour éviter tout risque de
projection d’eau lié à la pression sur
le réseau. Il n’en reste pas moins de
l’eau dans les bols de filtre. Prévoir
un seau à placer sous le bol de
VII - Maintenance / Dépannage
a) Remplacement des cartouches de filtre
Débrancher le cordon d’alimentation de l’appareil . Celui va redémarrer en
mode maintenance et sera alimenté par le bloc pile. Démonter ensuite le
capot en dévissant les 4 vis.
Appuyer sur le menu « Maintenance ».
Une fois dans le programme de remplacement des consommables désiré,
suivre les instructions sur l’écran tactile.
En ce qui concerne la purge, se munir
d’un bidon si l’appareil n’est pas raccordé
à une évacuation d’eau usée, pour purger
le préfiltre et appuyer simultanément sur
les boutons de purge comme indiqués
sur l’écran tactile afin de créer une entrée
d’air pour l’évacuation de l’eau. Il est
préférable de fermer la vanne d’isolement
de sortie de Komeo pour éviter une
vidange par gravité des canalisations se
trouvant au-dessus de Komeo.
À la demande de Komeo suivre les
instructions sur l’afficheur et à l’aide
de la clé bleue pour filtre, desserrer
le bol de filtre pour remplacer les
cartouches de BIRM
® et de KDF®
usagées. Placer les nouvelles
cartouches et valider le changement
sur l’écran. Komeo coupe alors
VII - Maintenance / Dépannage
a) Remplacement des cartouches de filtre
Débrancher le cordon d’alimentation de l’appareil . Celui va redémarrer en
mode maintenance et sera alimenté par le bloc pile. Démonter ensuite le
capot en dévissant les 4 vis.
Appuyer sur le menu « Maintenance ».
Une fois dans le programme de remplacement des consommables désiré,
suivre les instructions sur l’écran tactile.
En ce qui concerne la purge, se munir
d’un bidon si l’appareil n’est pas raccordé
à une évacuation d’eau usée, pour purger
le préfiltre et appuyer simultanément sur
les boutons de purge comme indiqués
sur l’écran tactile afin de créer une entrée
d’air pour l’évacuation de l’eau. Il est
préférable de fermer la vanne d’isolement
de sortie de Komeo pour éviter une
vidange par gravité des canalisations se
trouvant au-dessus de Komeo.
En ce qui concerne la purge, se munir
d’un bidon si l’appareil n’est pas raccordé
à une évacuation d’eau usée, pour purger
le préfiltre et appuyer simultanément sur
les boutons de purge comme indiqués
En ce qui concerne la purge, se munir
d’un bidon si l’appareil n’est pas raccordé
à une évacuation d’eau usée, pour purger
le préfiltre et appuyer simultanément sur
les boutons de purge comme indiqués
En ce qui concerne la purge, se munir
d’un bidon si l’appareil n’est pas raccordé
à une évacuation d’eau usée, pour purger
le préfiltre et appuyer simultanément sur
les boutons de purge comme indiqués
sur l’écran tactile afin de créer une entrée
d’air pour l’évacuation de l’eau. Il est
préférable de fermer la vanne d’isolement
de sortie de Komeo pour éviter une
vidange par gravité des canalisations se
trouvant au-dessus de Komeo.
À la demande de Komeo suivre les
instructions sur l’afficheur et à l’aide
de la clé bleue pour filtre, desserrer
le bol de filtre pour remplacer les
cartouches de BIRM
® et de KDF®
usagées. Placer les nouvelles
cartouches et valider le changement
sur l’écran. Komeo coupe alors
automatiquement la vanne de
préfiltre pour éviter tout risque de
projection d’eau lié à la pression sur
le réseau. Il n’en reste pas moins de
l’eau dans les bols de filtre. Prévoir
un seau à placer sous le bol de
En ce qui concerne la purge, se munir
d’un bidon si l’appareil n’est pas raccordé
à une évacuation d’eau usée, pour purger
le préfiltre et appuyer simultanément sur
les boutons de purge comme indiqués
sur l’écran tactile afin de créer une entrée
d’air pour l’évacuation de l’eau. Il est
préférable de fermer la vanne d’isolement
de sortie de Komeo pour éviter une
vidange par gravité des canalisations se
trouvant au-dessus de Komeo.
À la demande de Komeo suivre les
instructions sur l’afficheur et à l’aide
de la clé bleue pour filtre, desserrer
le bol de filtre pour remplacer les
cartouches de BIRM
® et de KDF®
usagées. Placer les nouvelles
cartouches et valider le changement
sur l’écran. Komeo coupe alors
VII - Maintenance / Troubleshoong
En ce qui concerne la purge, se munir
d’un bidon si l’appareil n’est pas raccordé
à une évacuation d’eau usée, pour purger
le préfiltre et appuyer simultanément sur
les boutons de purge comme indiqués
sur l’écran tactile afin de créer une entrée
d’air pour l’évacuation de l’eau. Il est
préférable de fermer la vanne d’isolement
de sortie de Komeo pour éviter une
vidange par gravité des canalisations se
trouvant au-dessus de Komeo.
À la demande de Komeo suivre les
instructions sur l’afficheur et à l’aide
de la clé bleue pour filtre, desserrer
le bol de filtre pour remplacer les
cartouches de BIRM
® et de KDF®
usagées. Placer les nouvelles
cartouches et valider le changement
sur l’écran. Komeo coupe alors
automatiquement la vanne de
préfiltre pour éviter tout risque de
projection d’eau lié à la pression sur
le réseau. Il n’en reste pas moins de
l’eau dans les bols de filtre. Prévoir
un seau à placer sous le bol de
filtre .
Refermer le capot
et le visser avant la
remise en
En ce qui concerne la purge, se munir
d’un bidon si l’appareil n’est pas raccordé
à une évacuation d’eau usée, pour purger
le préfiltre et appuyer simultanément sur
les boutons de purge comme indiqués
sur l’écran tactile afin de créer une entrée
d’air pour l’évacuation de l’eau. Il est
préférable de fermer la vanne d’isolement
de sortie de Komeo pour éviter une
vidange par gravité des canalisations se
trouvant au-dessus de Komeo.
À la demande de Komeo suivre les
instructions sur l’afficheur et à l’aide
a) Replacing the filters cartridge
Disconnect the power supply cable from the unit. The unit will restart in Maintenance
WARNING
Mode, powered by the battery unit. Next, remove the cover by removing the four
screws. Select the Maintenance menu.
After reaching the desired consumables replacement program, follow the instructions
on the touch screen.
MAINTENANCE
Remove the cover
MAINTENANCE
Check that the pre-filter is connected
to a drain or a 5-L container (at least).
OK
MAINTENANCE
Loosen the filter bowl.
OK
MAINTENANCE
OK
MAINTENANCE
OK
Retighten the filter bowl in the unit. Press on the filter purgers.
Leak test OK. Reapply cover.
OK
DO NOT PLUG IN
MAINTENANCE
Insert a new filter in the bowl, taking care
not to move the seal.
OK
MAINTENANCE
OK
With regard to purging, use a container
if the device is not connected to a waste
water drain; to purge the prefilter, press the
purge buttons together as shown on the
touch screen in order to create an air inlet
for the water to drain out. It is preferable
to close the Komeo's outlet isolating valve
to prevent the pipes located above Komeo
from draining through the action of gravity.
When the Komeo requests it, apply the
instructions show on the screen. Using
the blue filter key, loosen the filter bowl
to replace the used BIRM® and KDF®
cartridges. Position the new cartridges and
confirm the change on the screen. Komeo
then automatically shuts off the prefilter
valve to avoid all risk of water splashing
due to pressure in the system. Some water
nevertheless remains in the filter bowls.
Have a bucket available to place under the
filter bowl.
Close the cover and tighten before
CAUTION
reapplying power.
2120
Page 22

b) Remplacement de la lampe UVc
Débrancher le cordon d’alimentation de
l’appareil. Celui va redémarrer en mode maintenance et
sera alimenté par le bloc pile. Démonter ensuite le capot
en enlevant les 4 vis.
Appuyer sur le menu « Maintenance ».
À la demande de Komeo, changer la lampe UVc en retirant
de chapeau de lampe et en veillant à la débrancher de la
prise située au niveau du connecteur de la lampe UVc
sans tirer sur le câble ni dévisser l’écrou de la chambre
UVc.
Remplacer la lampe usagée par une lampe neuve sans la
lâcher dans le tube quartz.
Reconnecter la nouvelle lampe replacer le chapeau de
lampe et valider le changement sur l’écran. Suivre les
instructions sur l’écran.
Attention, le modèle Q512013001 est le seul modèle de
lampe UVc compatible avec Komeo. L'utilisation d'un
autre type de lampe UVc pourrait endommager
l'appareil.
Refermer le capot et le visser avant la
remise en alimentation.
b) Remplacement de la lampe UVc
Débrancher le cordon d’alimentation de
l’appareil. Celui varedémarrer en mode maintenance et
sera alimenté par le bloc pile. Démonter ensuite le capot
en enlevant les 4 vis.
Appuyer sur le menu « Maintenance ».
À la demande de Komeo, changer la lampe UVc en retirant
de chapeau de lampe et en veillant à la débrancher de la
prise située au niveau du connecteur de la lampe UVc
sans tirer sur le câble ni dévisser l’écrou de la chambre
UVc.
Remplacer la lampe usagée par une lampe neuve sans la
lâcher dans le tube quartz.
Reconnecter la nouvelle lampe replacer le chapeau de
lampe et valider le changement sur l’écran. Suivre les
instructions sur l’écran.
Attention, le modèle Q512013001 est le seul modèle de
lampe UVc compatible avec Komeo. L'utilisation d'un
autre type de lampe UVc pourrait endommager
l'appareil.
Refermer le capot et le visser avant la
remise en alimentation.
c) Nettoyage automatique du préfiltre
Débrancher le cordon d’alimentation de
l’appareil. Celui varedémarrer en mode maintenance et
sera alimenté par le bloc pile. Ensuite, démonter le capot
en en elevant les 4 vis.
Appuyer sur le menu « Maintenance ».
Si l’appareil est paramétré et raccordé pour une
évacuation à l’égout le nettoyage automatique est
autonome, sinon :
Suivre les indications de Komeo en ayant préalablement
préparé un bidon de 5 litres. Ce dernier servira à récupérer
les matières en suspension.
A la fin du nettoyage :
refermer le capot et le visser avant la
remise en alimentation.
b) Replacing the UVc lamp
DO NOT PLUG IN
c) Automatic prefilter cleaning
WARNING
Disconnect the power supply cable from the
unit. The unit will restart in Maintenance Mode,
powered by the battery unit. Next, remove the
cover by removing the four screws.
Select the Maintenance menu.
When Komeo requests it, replace the UVc lamp
by removing the lamp cap and taking care to
disconnect it from the UVc lamp connector socket
without pulling the cable or loosening the nut from
the UVc chamber.
Replace the used lamp with a new lamp without
releasing it in the quartz tube.
Connect the new lamp, reposition the lamp cap,
and confirm the change on-screen. Follow the
instructions on the screen.
Note that Cat. No. Q512013001 is the only UVc
lamp model that is compatible with Komeo. The
use of any other type of lamp could damage
the device.
Close the cover and tighten before
CAUTION
Disconnect the power supply cable from the
unit. The unit will restart in Maintenance Mode,
powered by the battery unit. Next, remove the
cover by removing the four screws.
Select the Maintenance menu.
If the device is configured and connected to the
drain system, automatic cleaning is autonomous.
If not: follow the Komeo instructions after
preparing a 5-litre container. This container can be
used to collect the suspended materials.
WARNING
reapplying power.
When cleaning is complete: close the cover
and tighten before reapplying power.
22
Page 23

d) Nettoyage manuel du préfiltre
Débrancher le cordon d’alimentation de
l’appareil. Celui va redémarrer en mode maintenance et
sera alimenté par le bloc pile. Ensuite, démonter le capot
en enlevant les 4 vis.
Il est possible de nettoyer ou de changer
manuellement le préfiltre en déconnectant les
connecteurs du capteur de pression et la vanne
motorisée de purge.
Dévisser le bol de filtreà l’aide de la clé.
Une fois la cartouche accessible, la passer à
l’eau et la nettoyer avec une brosse. Son
remplacement est préconisé tous les 2 ans.
Refermer le capot et le
visser avant la remise en
alimentation.
e)
Changement du fusible
Porte-Fusible
Débrancher le cordon
d’alimentation de l’appareil. Celui-ci va
redémarrer en mode maintenance et sera
alimenté par le bloc pile. Ensuite, démonter le
capot en enlevant les 4 vis.
Cette opération doit se faire par un
professionnel. Appeler le SAV COMAP si
besoin.
A l’aide d’un tournevis plat appuyer et faire
un ¼ de tour dans le sens inv erse des
aiguilles d’une montre pour ouvrir le
c) Manual prefilter cleaning
e) Replacing the fuse
Fuse holder
Disconnect the power supply cable from the
unit. The unit will restart in Maintenance Mode,
powered by the battery unit. Next, remove the
cover by removing the four screws.
The prefilter can be cleaned or replaced manually
by disconnecting the connectors from the pressure
sensor and the power operated drain valve.
Loosen the filter bowl using the key.
When the cartridge becomes accessible, rinse it
and clean it using a brush. Replacement every two
years is recommended.
Close the cover and tighten before
CAUTION
reapplying power.
WARNING
Disconnect the power supply cable from the
unit. The unit will restart in Maintenance Mode,
powered by the battery unit. Next, remove the
cover by removing the four screws.
This operation must be performed by a professional.
Call COMAP after-sales service if necessary.
Using a flat screwdriver, press and turn ¼-turn
anticlockwise to open the plug of the fuse F
500mA AH.
2322
Page 24

VIII - Troubleshoong guide
a) Guide to errors
Nature of error Causes Solutions
Disconnect the power supply +
replace the LR6 1.5-V batteries +
Flashing red LEDs Items 2&3
Fig. VII-1 + touch screen off
Flashing red LEDs Item 3 Fig. VII-1 General error
UVc lamp NOK
Spent cartridges
Clogged prefilter
Spent batteries
Dangerous pressure notification
Power cut + Batteries out of order
Fuse out of order + batteries out
of order
Worn lamp > 12,000 H
Lamp blown
Ballast inoperative
Life > 1 year
Clogging detected by deltaP
Pressure sensor problem
Pressure sensor calibration
Life > 1 year
Power cut > a few days
Pressure above 4 bars
Water hammer
reboot. If the unit does not
start up, a certified technician
must replace the 5 x 20 mm F
500 mA AH fuse according to the
procedure, or call COMAP aftersales service
Press the touch screen to reactivate the screen and follow the
instructions in the Maintenance
menu: "Notifications and malfunctions"
Replace the UVc lamp Replace
the UVc lamp Contact COMAP
after-sales service
Replace the cartridge
Clean the prefilter
Replace the LR6 1.5 V batteries
Install or replace a pressure reducer Install a water hammer
prevention device Contact COMAP after-sales service
Network leak notification
Screen frozen, touch screen
inoperative, bug
Water leak in the machine
Volume of water that has flowed
without interruption > 500 L
Firmware inoperative
Badly tightened unions, damaged
seals, old seals, crack following an
overpressure, shocks, etc.
Check the water system (flush
or tap left running or obvious or
hidden leak). Manually open the
inlet valve if no leak is found, or
call COMAP after-sales service.
Program updated via USB key via
a qualified technician. Contact
COMAP after-sales service
Close the device's inlet valve, set
it to bypass (shunt), and contact
COMAP after-sales service.
24
Page 25

b) What to do in case of a power cut
Disconnect the power supply cable from the unit. The unit will restart in Maintenance
WARNING
Mode, powered by the battery unit. Next, remove the cover by removing the
four screws.
If the electrical power supply is absent, the anti-scaling treatment and disinfection
treatment (UVc lamp) functions will not be provided. The device's power operated
inlet valve will be closed via an interlock via the battery unit. The power operated
valve can be opened to obtain untreated water (the 90μm/40μm filtration and
anti-drop, micropollutant treatments are still active) by actuating the pushbutton
(Fig. VII-1) using a fine screwdriver. If the power cut continues for a long time, you can
switch the battery unit OFF to preserve battery life. Note: this operation will prevent
the power-operated inlet valve from being operated again (closed or opened) without
mains power being restored.
c) Other maintenance operations
Disconnect the device's power supply cable before any maintenance operation takes
WARNING
place. The unit will restart in Maintenance Mode, powered by the battery unit. Next,
remove the cover by removing the four screws.
Clean quartz tube and replace O-rings and quartz tube bearing seals. We
recommend you call on a certified technician or call COMAP after-sales service to
find out the details and procedures of these preventive maintenance actions.
Replacing the pressure sensors: the inlet and outlet pressure sensors are intended
to be recalibrated via the maintenance menu on the touch screen. Contact
COMAP after-sales service to obtain the recalibration procedure or to replace any
defective sensors.
Replacing the power operated valves: these valves are designed to perform many
opening and closing cycles. Contact COMAP after-sales service in case of any
defect.
Replacing the filter bowl O-rings: the filter bowl seals are wear parts that can
deteriorate over time and after repeated handling. Plan for their preventive or
corrective replacement in case of incorrect placement in the filter bowl groove
(pinching).
Prefilter mesh: self-cleaning. Can also be deep-cleaned by removing the bowl
from the prefilter and using a brush. Contact COMAP after-sales service to obtain
a procedure.
Seals: the purpose of the flat O-rings is to seal the device. They should be replaced
preventively within five years because of ageing.
Flow meter: the turbine must be cleaned preventively, or correctively in the event
of a clog. Contact COMAP after-sales service to find out the procedure.
Electronic board: to be replaced only in the event of failure. Remember to
disconnect it in the event of a storm or voltage surge. Contact COMAP after-sales
service in case of any malfunction.
Touch screen: the touch screen must be cleaned once a year using a product
suitable for touch screens. Do not use water, detergents, or any other product
not described as being suitable for cleaning touch screens. Do not carry out this
operation whilst the device is in operation.
2524
Page 26

d) What to do in case of a long absence
Disconnect the device's power supply cable before any maintenance operation takes
place. The unit will restart in Maintenance Mode, powered by the battery unit. Next,
remove the cover by removing the four screws.
WARNING
Set the battery unit switch to OFF.
Remove the active carbon + BIRM and active carbon + KDF cartridges and store
them in a clean, dry location protected from sunlight.
Return to service is performed in reverse order from the wintering procedure
(replace cartridges, set the battery unit to ON, reinstall the cover, and then plug in
the device.
Allow a few litres of water to flow out before you drink any.
These instructions can change at any time. Software updates can also be applied (patches or
the addition of new functionality).
Follow the updates on the website: www.comapwt.com
Download the Komeo remote control application to keep up to date with events in your
system, your water consumption, and the status of your consumables.
26
Page 27

2726
Page 28

COMAP Water Treatment
ZA Les petits champs - 26120 MONTÉLIER - FRANCE / E-mail : comapwt@comap.eu
Website : www.comapwt.com / Customer service:: Tel. 00 33 4 75 85 28 11 - Fax 00 33 4 75 85 42 62
COMAP SA - 16, avenue Paul Santy - BP 8211 - 69355 LYON Cedex 08
www.comap-group.com
 Loading...