

Page 1
Column Digital Photo Frame Alarm Clock Start Guide
1670-53
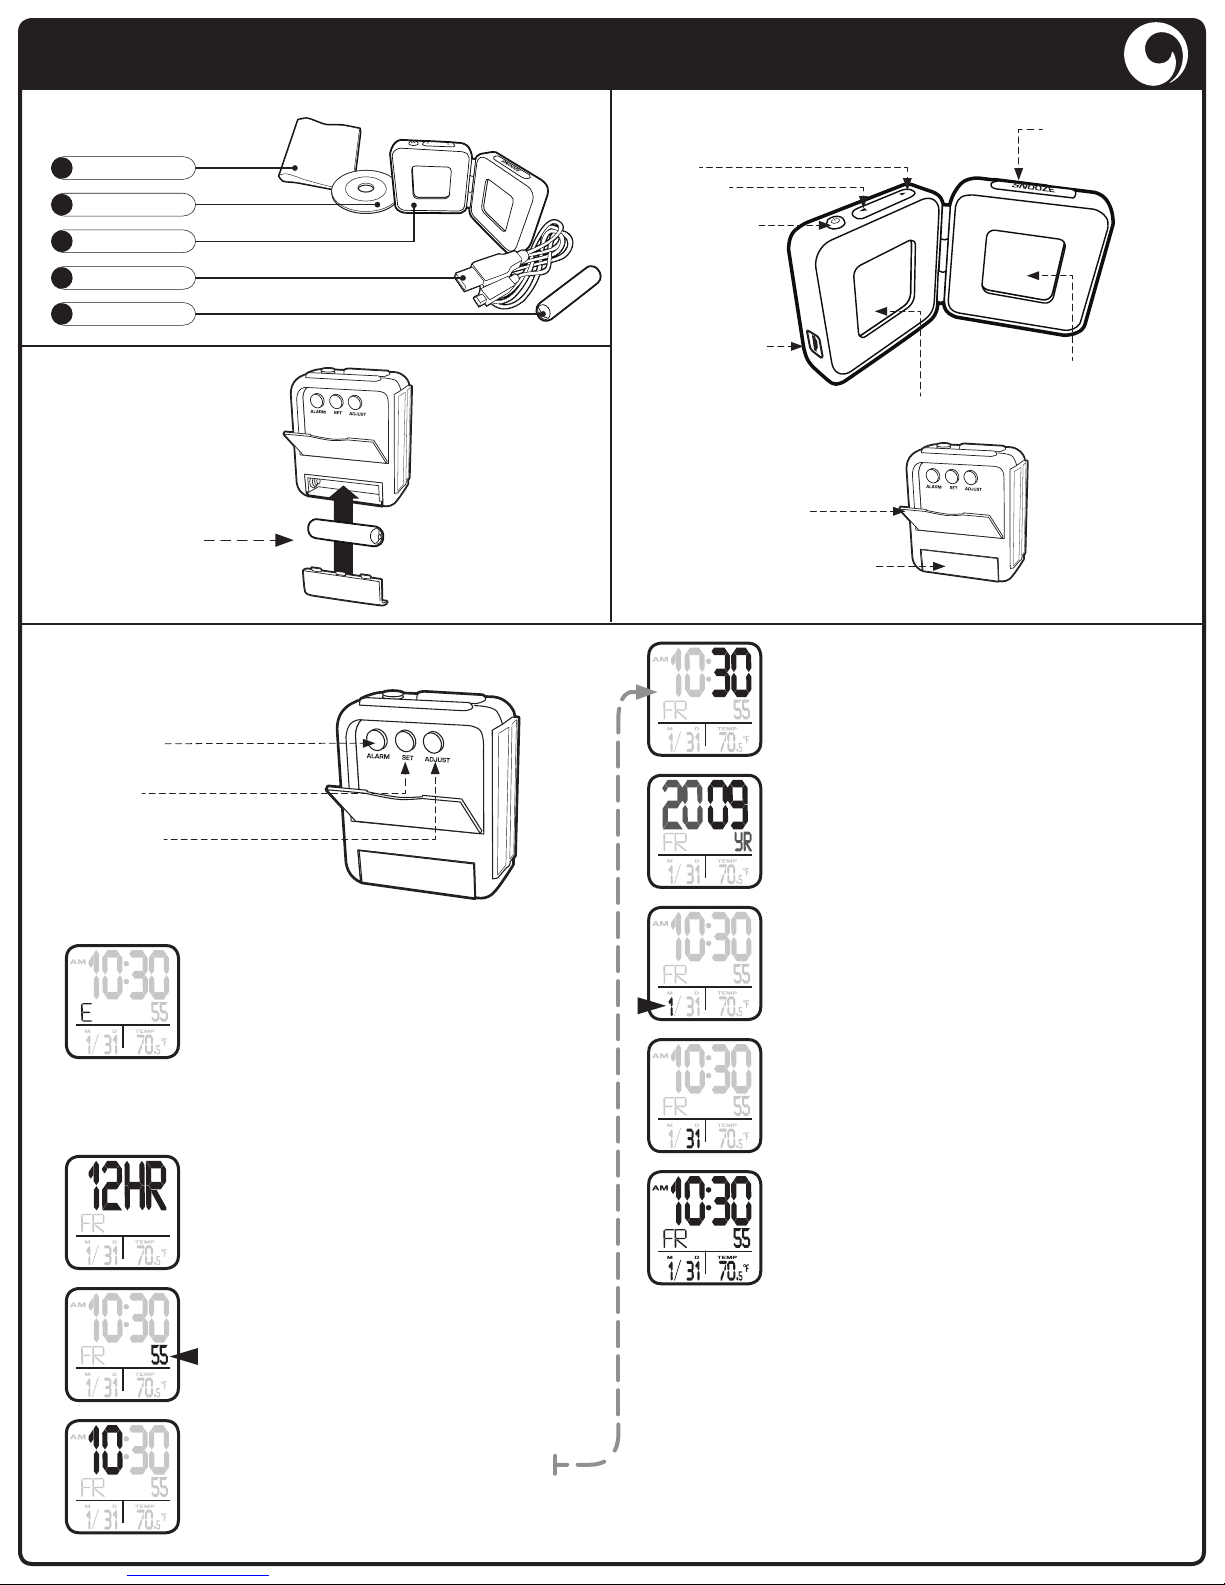
Contents:
1 User Manual
2 Install Disc
3 Photo Frame
4 USB Power Cord
5 AAA Battery
Install Battery:
Insert AAA
battery
Set the Clock:
Familiarize yourself with the buttons
necessary for setting the Alarm LCD:
Controls and Connections:
Next
Previous
Power/Menu
Hold for three
seconds to power
on/off frame,
click to turn auto
slide show on/off
Mini-USB Port
For transferring photos
and powering the frame
with no batteries
Alarm Buttons
Open the panel to reveal
buttons to set the alarm
Battery Cover for Alarm
One AAA battery
5. Press the Set button, and the minutes begin ashing.
Select the minute using the Adjust button. Hold it in
to advance the number automatically.
Photo Display Color LCD
BACK
FRONT
Snooze/Backlight
5-minute snooze button
when alarm is active
Alarm Clock LCD
Alarm
Changes display from
clock to alarm time
Set
Hold to change time
Adjust
In clock mode, changes temperature
from Fahrenheit to Celsius,
In alarm mode, turns alarm on or off,
When setting the time, increases the number
1. Ensure the time displayed is the Current Time (date
and temperature are displayed), hold the Set button
for two seconds and the language ashes to signal it
is ready to be changed.
Use the Adjust button to change the language.
E = English
D = Deutsch (German)
F = French
I = Italian
S = Spanish
2. When the language is correct, press the Set button
again to change the focus to the type of clock. Again,
use the Adjust button to change the clock to display
the time as 12-hour or 24-hour.
3. Press the Set button to change the type of clock,
and the seconds ash. Press the Adjust button to
reset the seconds to zero.
4. Press the Set button, and now the hour will begin to
ash. Select the hour using the Adjust button.
Hold it in to advance the number automatically.
6. Press the Set button, and the year begins to ash.
Select the year using the Adjust button. Hold it in to
advance the number automatically. This frame will
show years 2000 through 2099.
7. Press the Set button, and next the month ashes.
Select the month using the Adjust button. Hold it in
to advance the number automatically.
8. Press the Set button, and the day begins to ash.
Select the day using the Adjust button. Hold it in to
advance the number automatically.
9. Finally, press Set one last time, and everything is set.
Set the Alarm:
1. Press Alarm to ensure the time displayed is the alarm time, hold the Set
button for two seconds and the hour ashes to signal it can be changed.
2. Follow steps 4 and 5 above to change the time.
3. Press Set to set the alarm time, and press Alarm to turn on the alarm.
An icon on the Current Time screen indicates the alarm is set.
4. Press Alarm again to view the current time.
©2009 LEEDSWORLD
Proprietary information contained in this document is the sole property of Leedsworld.
Any reproduction in part or as a whole without written permission of Leedsworld is prohibited.
Page 2
Column Digital Photo Frame Alarm Clock Start Guide
1670-53
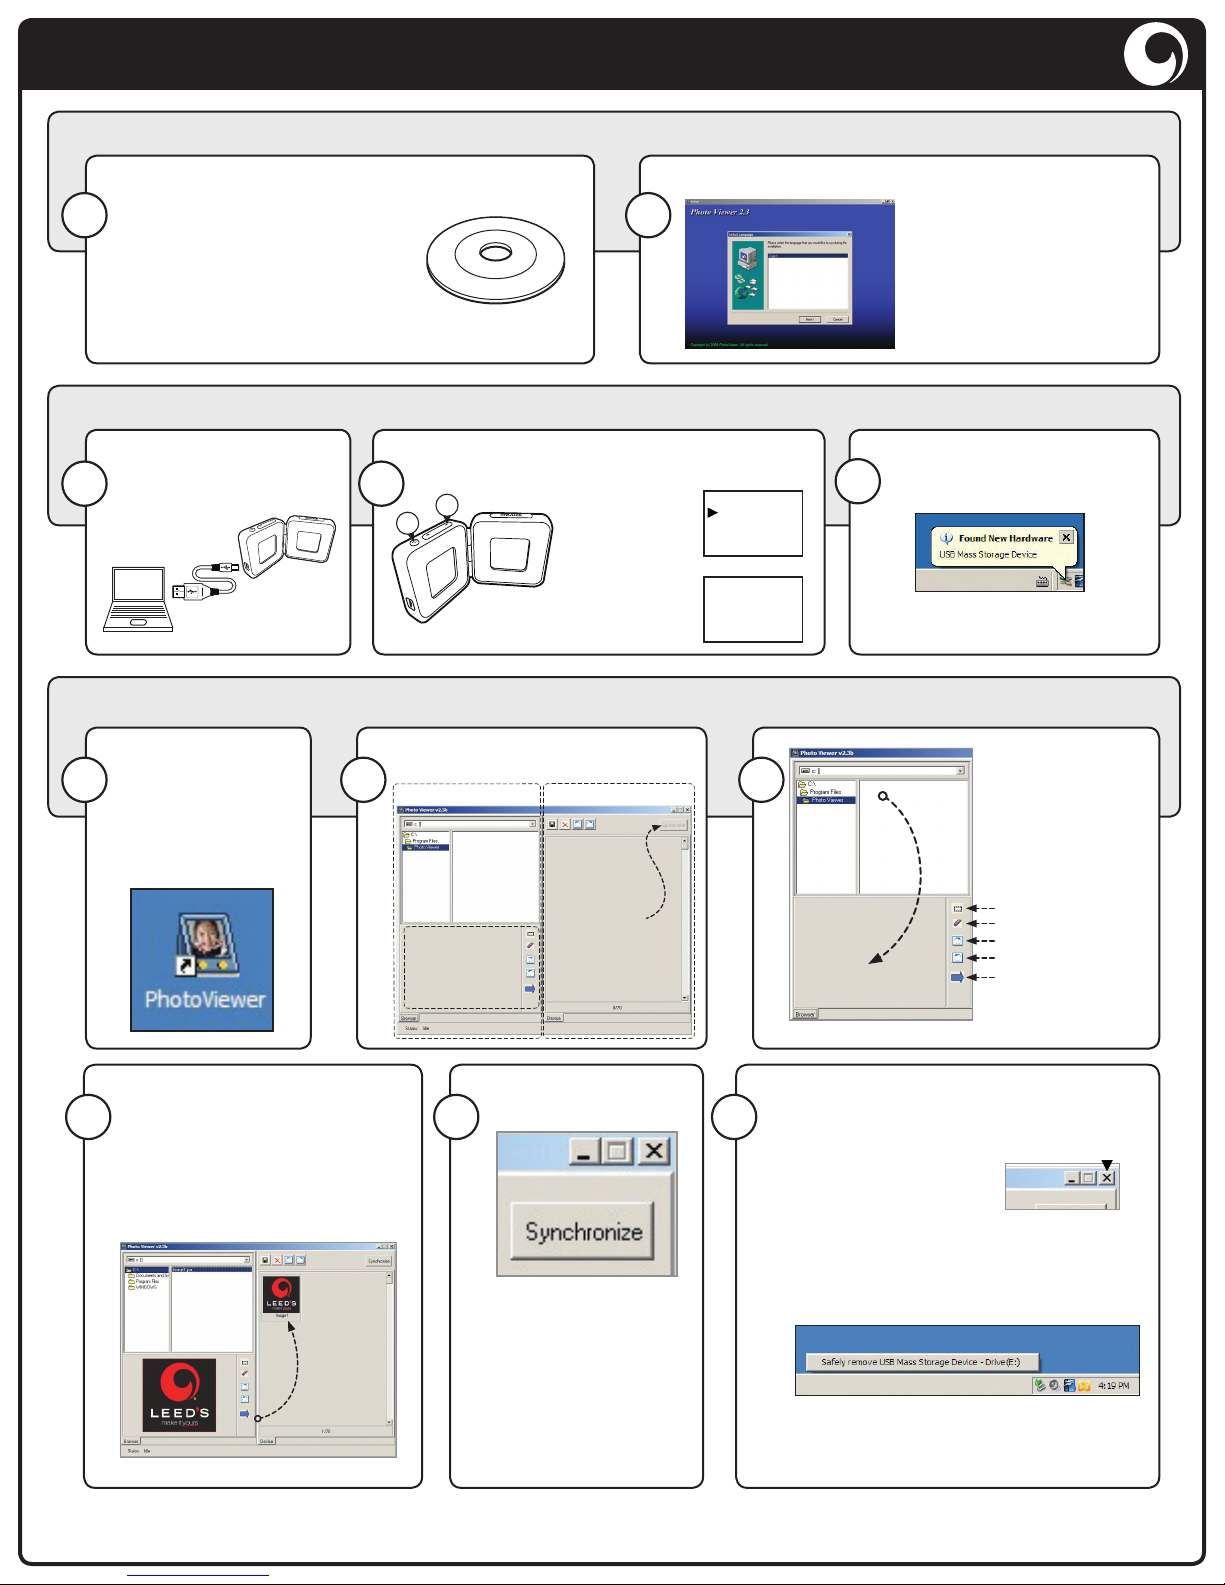
Install Photo Transfer Software
Requires Microsoft Windows™ (not Mac compatible).
The supplied disc contains an installer for the
software needed to transfer photos
1
from a computer to the photo frame.
Explore the CD Drive and doubleclick on the SETUP le.
NOTE: If you have a slot-loading CD tray, you cannot use the
supplied disc; it will jam in the drive.
Install Photo Frame Drivers
Using the supplied USB
cable, connect the frame
3
and computer.
On the Photo LCD, a prompt to connect
the frame to the computer appears.
4
1
2
Click Menu once, and the screen
displays “PC Connecting.”
Press Next to select
“USB Update.”
Transferring Photos from the Computer to the Frame
Upon opening the Setup le, the installer loads.
2
USB C harge
USB U pdate
PC Co nnecti ng
5
Follow the onscreen prompts
to complete the installation.
A desktop icon is installed.
Note: The photo frame must be
connected for the software to start.
Drivers install the rst time
the frame is connected to a
computer.
It may take a few moments
for this process to complete.
Once all drivers load,
launch the program
6
using the shortcut
that was installed
on the computer
desktop.
Click the blue arrow button to
move the image to “Device” panel
9 10
for synchronization with the frame.
NOTE: It is not yet sent to the
frame, but simply staged for
synchronization.
General Functionality:
7
Hard Drive Browser Device Window
Image preview
and edit area
Sync with frame
Sync to the Frame
Once all of the images
are ready in the staging
area to transfer to
the frame, click the
“Synchronize” button.
11
Browse for images
8
in folders located on
your hard drive.
The image tools are
described below.
Reset th e crop area
(move with mou se)
Clear t he crop area
Rotate im age clock wise
Rotate co untercloc kwise
Add image to the album
Eject the Frame
Eject the frame properly to avoid damaging
the internal memory.
Press the close button
to exit Photo Viewer.
Click “Yes” to conrm closing the program.
Eject the drive from Windows™ by clicking
the icon in the task bar:
Click “Safely Remove USB Mass Storage
Device,” unplug the USB cable, and enjoy
the digital photo frame!
©2009 LEEDSWORLD
Proprietary information contained in this document is the sole property of Leedsworld.
Any repro duction in par t or as a whole with out written pe rmission of Lee dsworld is proh ibited.
 Loading...