

Columbia Coronado 25 Owenrs Manual

TABLE OF CONTENTS
SECTION 1 - INTRODUCTION
SECTION 2 - BILL OF MATERIAL - DEFINED AND EXPLAINED
2.1 Fiberglass
2.2 Resins & Catalysts
2.3 Gelcoat
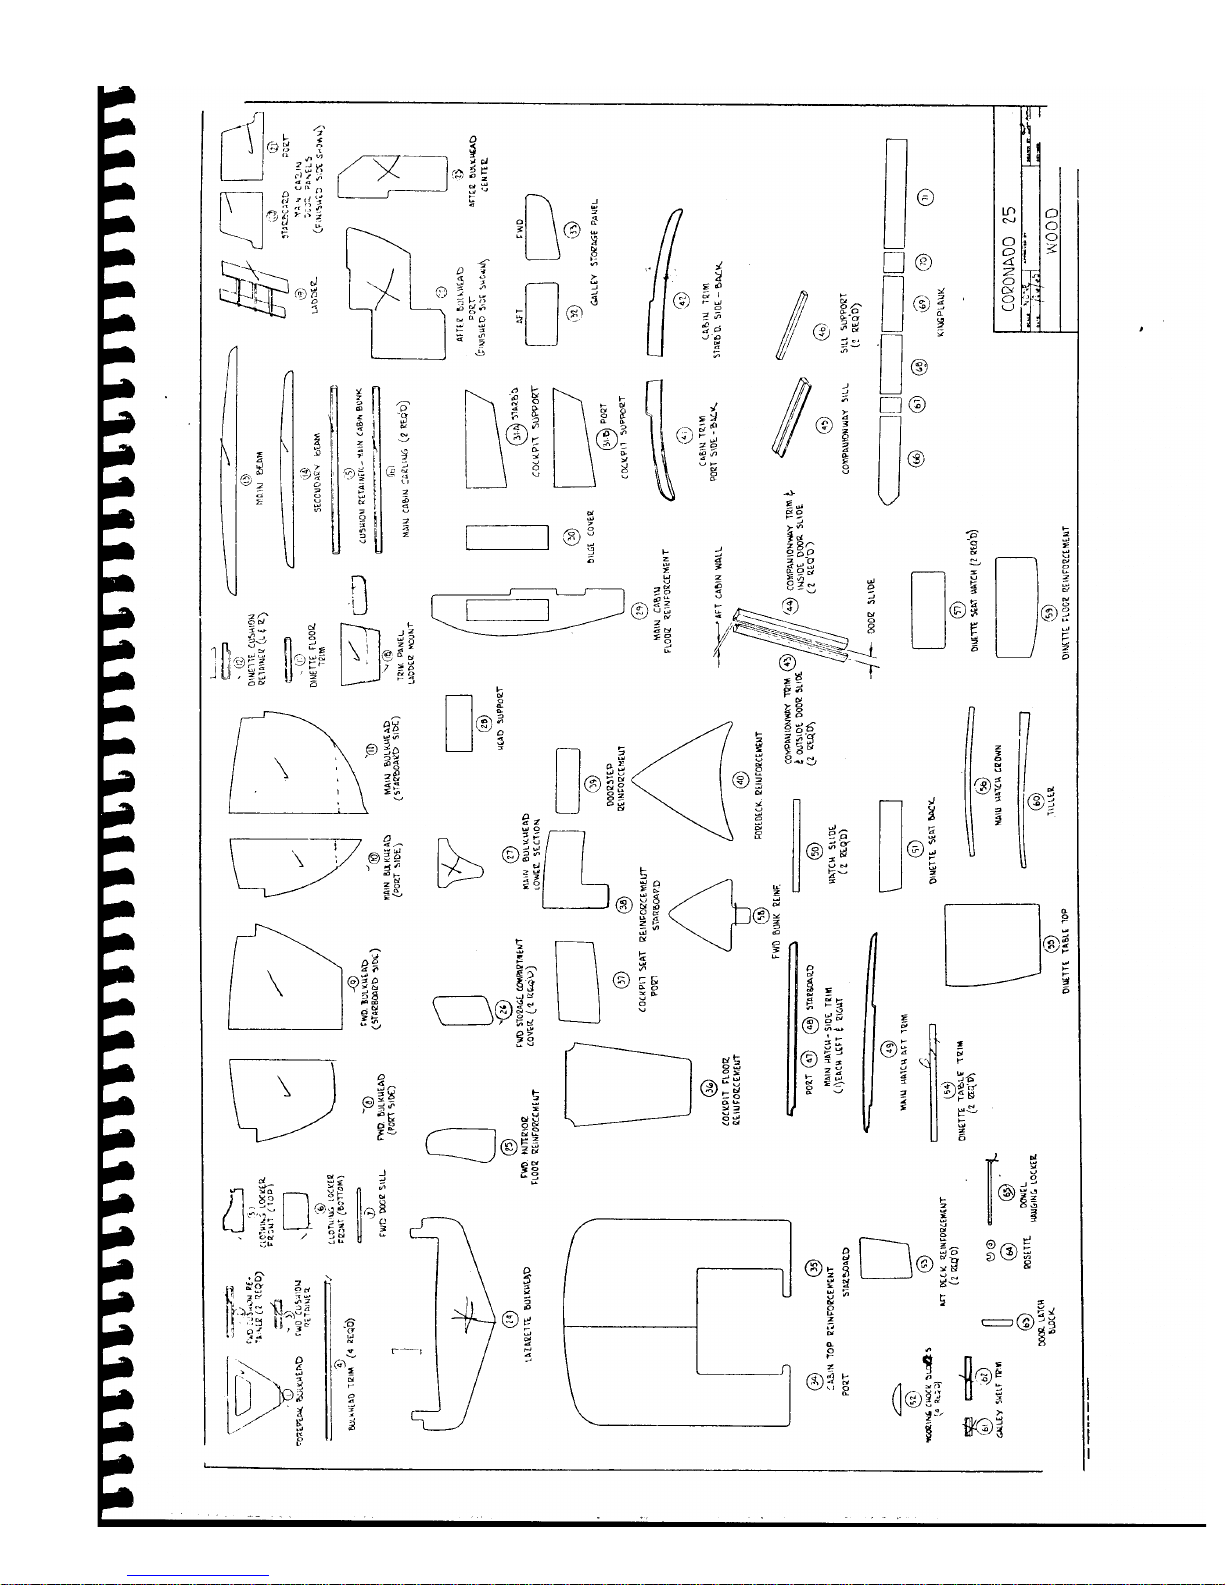
2.4 Marine Wood Products
2.5 Fasteners
2.6 Suppliers and Vendor List
SECTION 3 - TECHNIQUES
3.1 Gelcoat Touch-up and Repair
3.2 Micro Balloon Filled Resin
3.3 Bonding
3.4 Cutting, Drilling, and Grinding
3.5 Winterization
3.6 Anti-fouling Protective Coating
SECTION 4 - BLUEPRINTS AND DRAWINGS
SECTION 5 - INSTALLATION OF COMPONENT KITS
5.1 General Assembly Instructions
5.1.1 Tools Required
5.1.2 Keelingand Leveling Hull
5.1.3 Temporary Cover Over Work Area
5.1.4 Importance of Leveling
5.1.5 Order of Assembly

5.2 Hull/Deck Joints
5.2.1 Hull/Deck Joint with "H" Metal
5.2.2 Hull/Deck Joint without "H" Metal
5.3 Bulkheads and Structural Woodwork
5.4 Engine and Fuel Tanks
5.5 Thru-Hull Installations
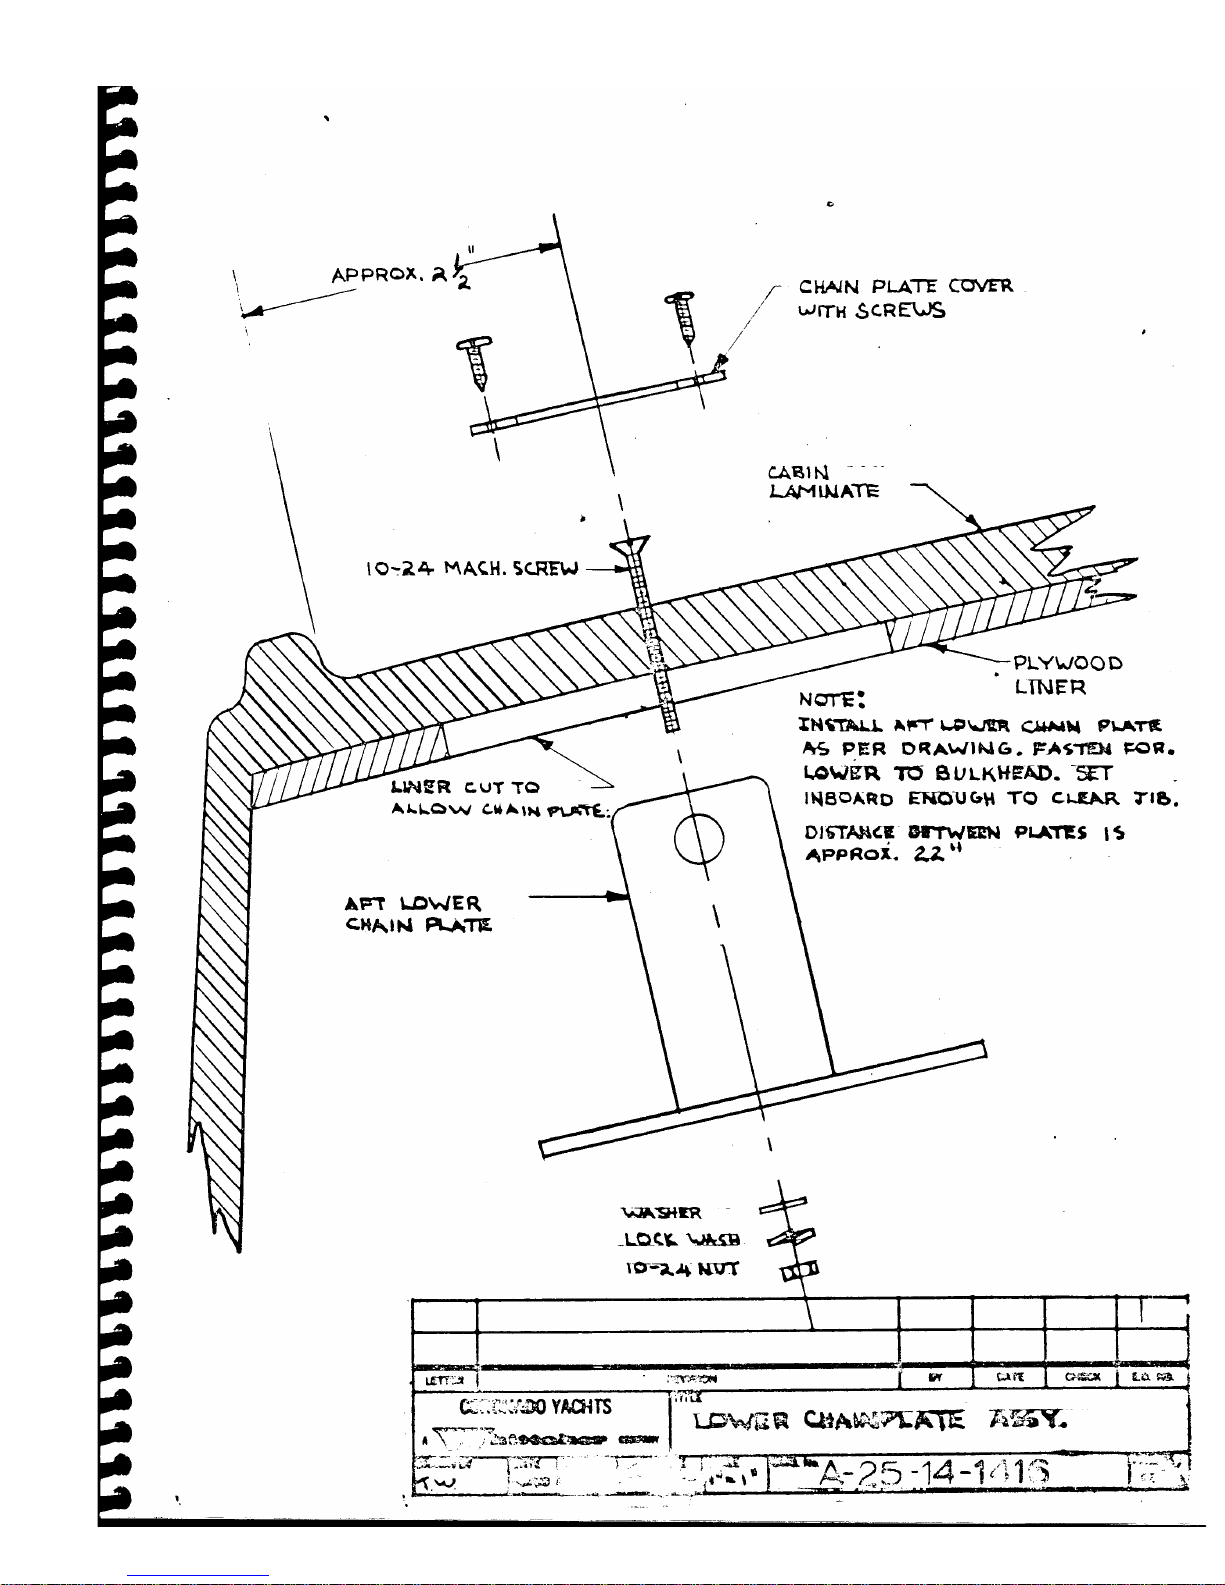
5.6 Chainplates
5.7 Rudder Assembly
5.8 Keeling Procedure
5.9 Plumbing and Water Tanks
5.10 Stove and Tank Installation
5.11 Windows
5.12 Deck Hardware
5.13 Exterior wood
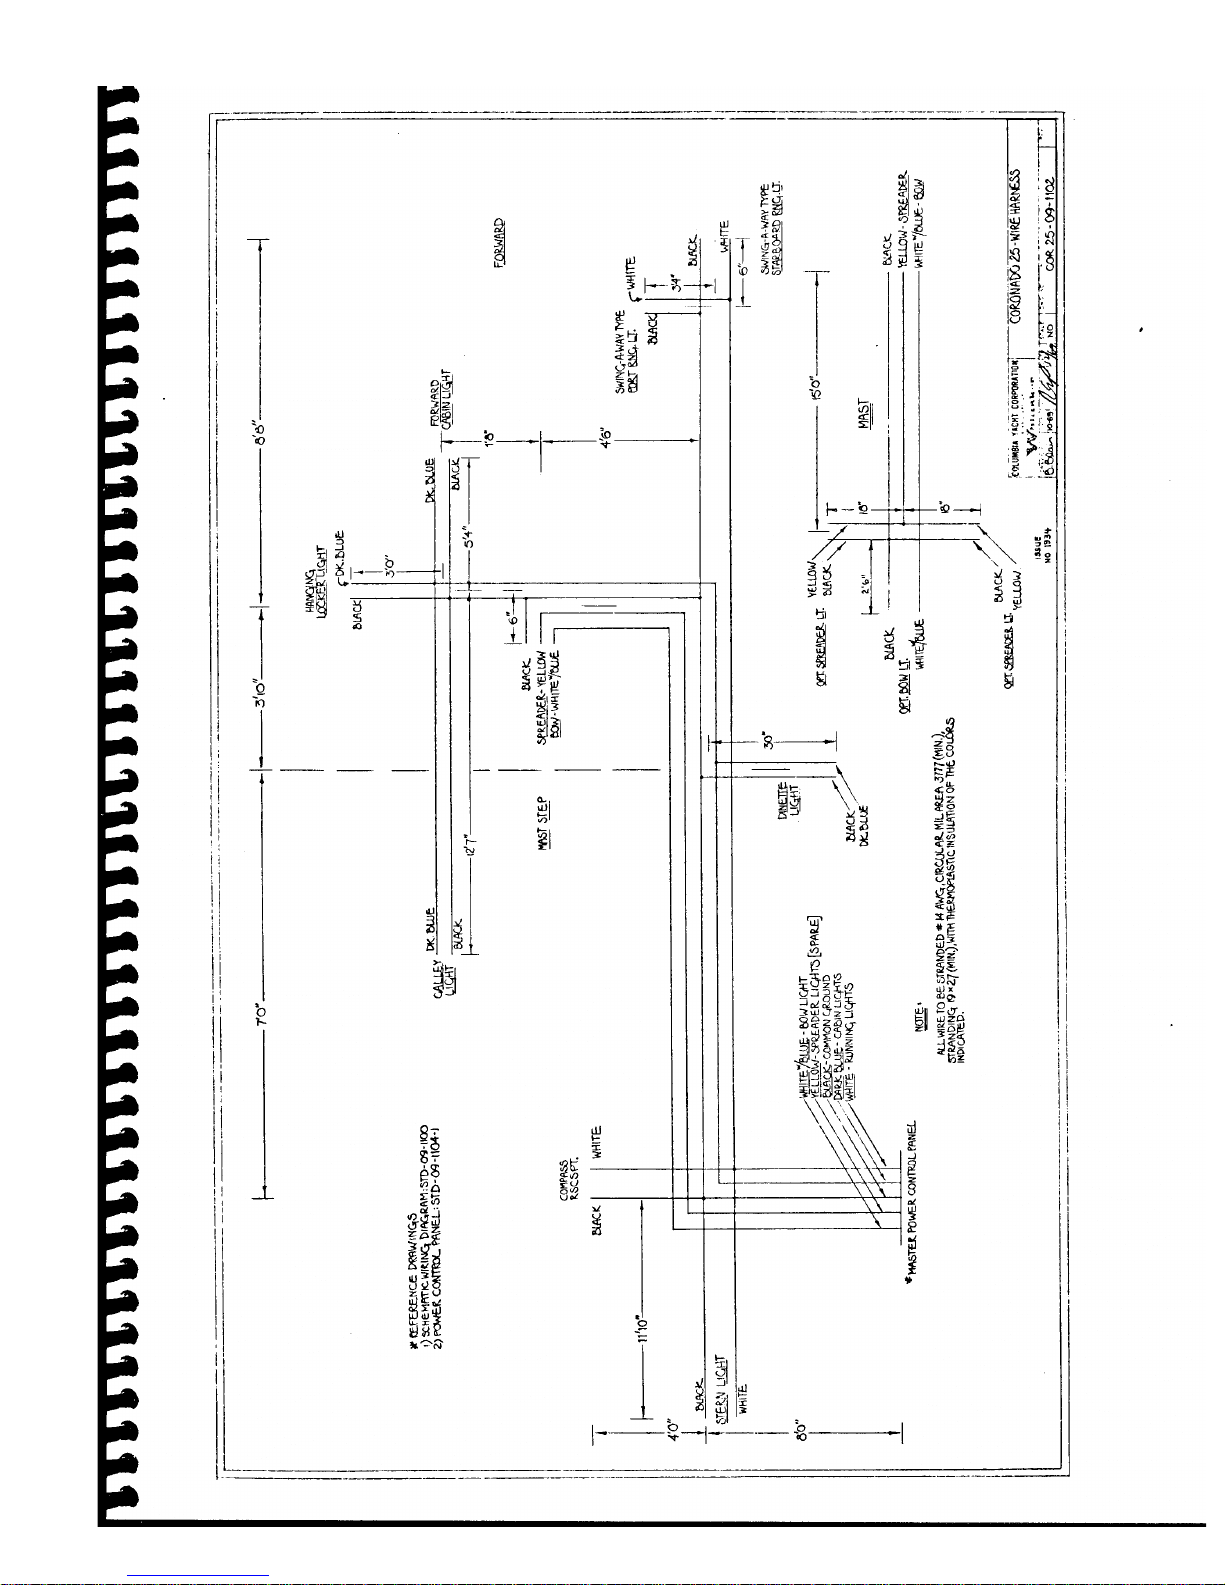
5.14 Electrical System
5.15 Cabinetry and Interior Wood
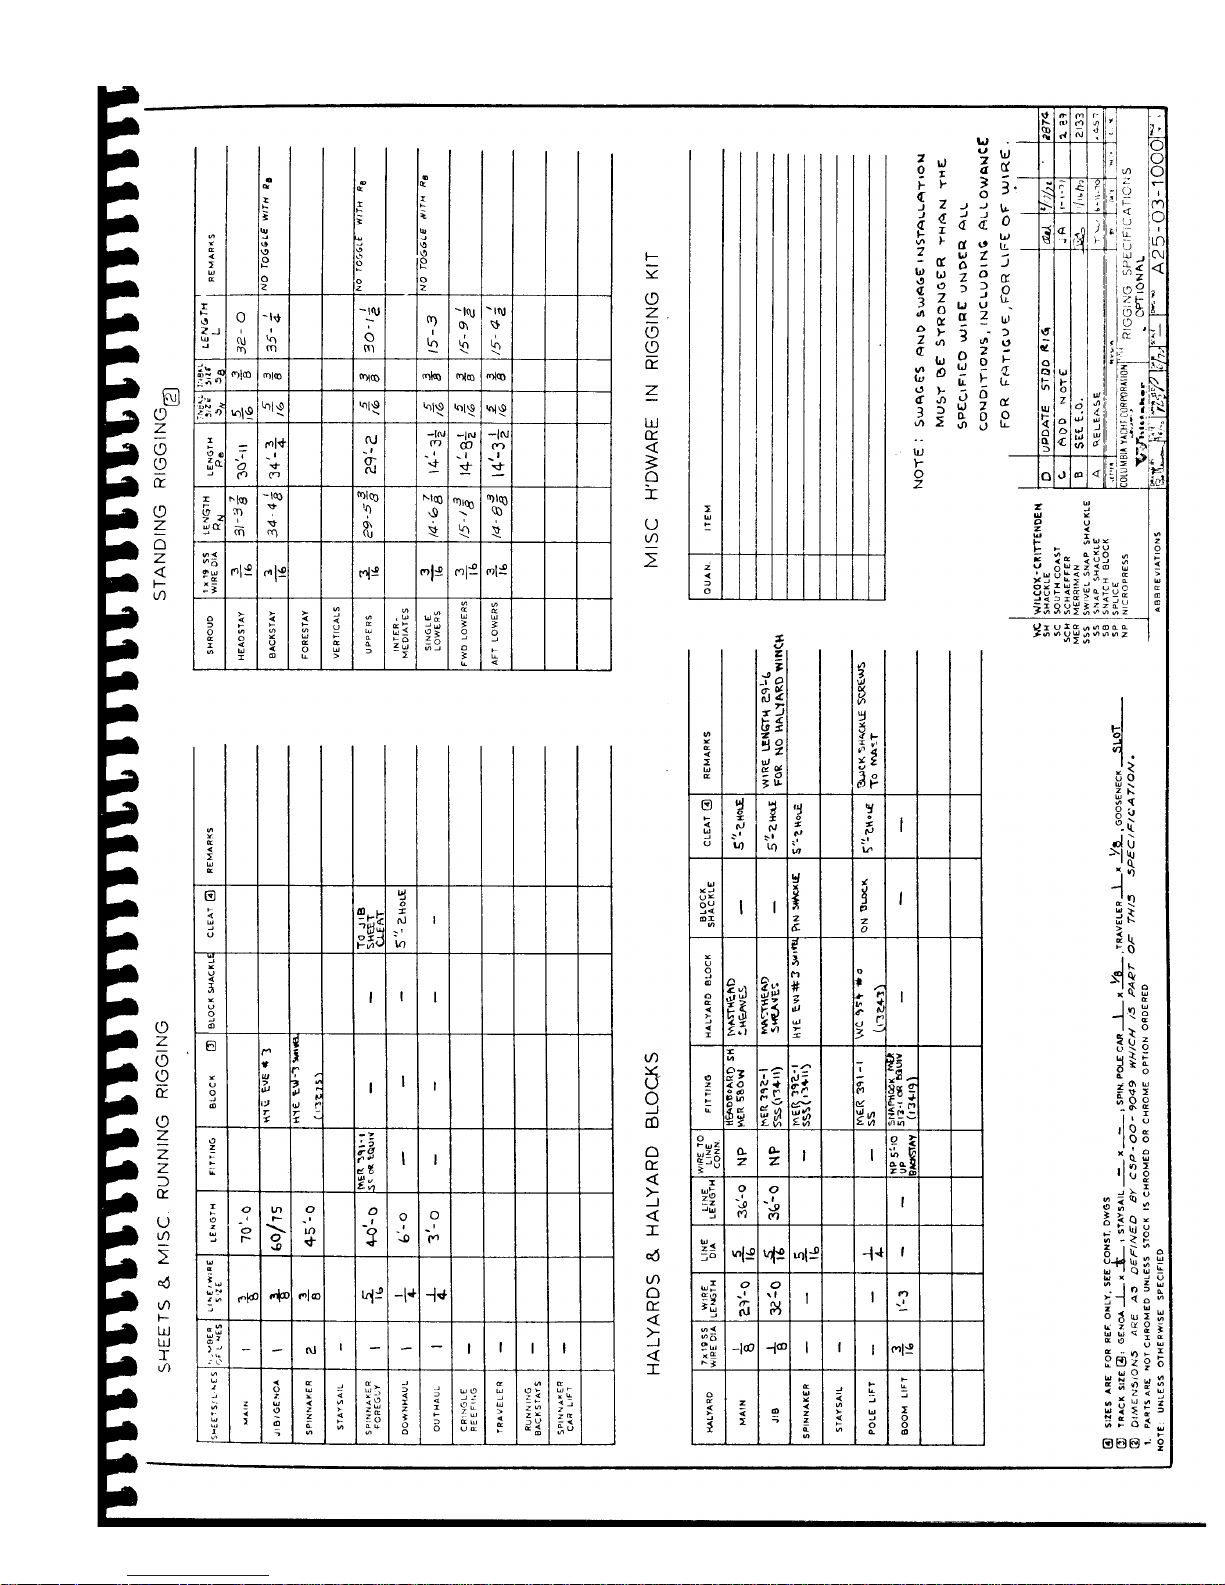
5.16 Spars and Rigging
5.17 Launching and Commissioning
SECTION 6 - FIBERGLASS REPAIR
6.1 Introduction to Fiberglass
6.2 Surface Repairs
6.3 Fracture and Puncture Repairs
6.4 Finishing Techniques

SECTION I
INTRODUCTION
This Builders Instruction Manual has been prepared by experts with a great
deal of knowledge and experience in the field of fiber glass boat building.
This knowledge and experience is represented in the pages you are about to
read.
The manual has been broken down into six separate sections:
1. General
2. Techniques
3. Bill of Material - Defined & Explained
4. Blueprints and Drawings
5. Installation of Component Kits
6. Fiberglass Repair
Section 5 covers the installation and assembly of your Sailcrafter Yacht. You
will be referring to this section continuously. Sections 2 and 3 deal with the
jargon, processes, and procedures used in the fiber glass sailboat
construction. These sections should be read first, as they will help you to
understand what is being said in the Installation Section.
Section 4 deals with blueprints, drawings, and data concerning the
assembling of your Sailcrafter Yacht. This section will be used in
conjunction with Section 5.
The language used in the Manual has been simplified for your understanding.
Many terms have been defined and explained as they are used every day in
fiberglass sailboat fabricating plants. It is recommended that you read
through the entire manual to become completely familiar with all the terms,
processes, and techniques before starting assembly of your yacht.
If, during the construction of your yacht, you need advice or information you
may contact the Engineering Department by writing Sailcrafter Yacht Kits, 275
McCormick Avenue, Costa Mesa, California 92626, attention Chief Engineer. You
will receive a prompt reply.

SECTION 2
BILL OF MATERIAL - Defined and Explained
2.1 Fiberglass
There are three different types of fiberglass reinforcements:
a) Mat b) Cloth c)
Woven Roving
Depending on the "Lamination Schedule" or area of construction, these three
types of fiberglass are combined.
a) The fiber glass MAT is a very strong material and is
designated by the approximate weight per square foot: 3.0 oz.
mat, for example. However, "squeegeeing and brushing" of the
wet fitted material may cause it to tear or ball up.
b) The CLOTH, always used in conjunction with mat, is most
satisfactory for a finished surface. The designation for cloth
refers to the approximate weight per square yard: 7-1/2 oz.
cloth, for example.
c) WOVEN ROVING is used for structural purposes in conjunction with
mat. This is the material that provides maximum strength and
rigidness to a fiberglass laminate. Without woven roving a
laminate of fiber glass cloth and mat would bend and flex. Woven
roving, like mat, is designated in approximate weight per square
yard: 24 oz. woven roving, for example.
NOTE: A detailed explanation concerning the nature of
fiber glass is covered in Section 6 on fiber glass
repair.
2.2 Resins and Catalysts
The resin used to solidify the fiber glass in all Sailcrafter Yachts is a
polyester resin. Use only polyester resins when applying fiber glass to your
Sailcrafter Yacht - other types of resin will not be compatible.

SECTION 2
Page 2
2.2 (continued)
Before the resin can be applied to fiber glass for a "bond" or lay-up", it
has to be catalyzed. The catalyst is an "agent" which works chemically to
cure the resin into a solid state.
Once a batch of resin has been "catalyzed", the "pot life", or time remaining
in which the resin can be worked effectively before it turns into a solid
mass, is very limited: Catalyzation of resin should be at the rate of 1/2 to
4% per volume - increasing with decreasing temperature. For example, on a hot
day (75-800) you will want to catalyze your resin with only about 1/2o per
volume. On colder days (50-600), you will want to add more catalyst.
NOTE: It is best to read the section on Resins
in Section 6 before experimenting with resins.
2.3 Gel Coat
The glossy, finished exterior color you see on a fiber glass hull or deck
is the gel coat. Gel coat is pure resin, catalyzed, and with the
appropriate color pigment added. The gel coat finish on your Sailcrafter
Yacht is very hard and needs no maintenance except for light waxing now and
then to retain the luster of the color.
Unlike the construction resins mentioned earlier, gel coat does not harden
in the presence of air. It is necessary to cover the gel coat with a
soluble "mold release coat" or a thin layer of flexible plastic such as
Saran Wrap.,-, once covered, curing takes place in about 30 to 45 minutes.
Gel coat colors, like other pigmented materials, are difficult to match. It is
recommended that Ram gel coats be used whenever possible. A quart of gel coat
for the hull and deck have been included in your component kit.
2.4 Marine Wood Products
The lumber used for the interior should be marine plywood, exterior
plywood, or teak. A/D grade may be used for most construction. Hardwood
finished plywood may be used if a natural finish is desired. The edges of
plywood panels and bulkheads will generally be finished with a strip of
solid

SECTION 2
Page 3
2.4 (continued)
hardwood. Grab rails, toe rails, winch pads, and other
pieces of woodwork located on the deck should be made out
of oiled teak. Fiberglass bonds to teak wood are not
reliable because of the high oil content of this wood.
To bond on teak plywood, which has a fir core, the teak
outer surface must be removed to the core.
All the interior and exterior wood products needed for the completion of your
Sailcrafter Yacht can be acquired from Sailcrafter Yachts. These marine wood
products are all oiled teak and have been cut, shaped, rounded, and sanded for
immediate installation in your yacht.
2.5 Fasteners
The fasteners for all Sailcrafter Yacht fiber glass boats are passivated
stainless steel. Bolts for securing the chainplates to bulkheads, headstay,
and backstay fittings to the hull, are stainless steel bolts fitted to the
holes in the chainplates.
Deck hardware such as winches, genoa tracks, and mainsheet travelers should be
thru bolted with round or oval head bolts as appropriate. Use the largest size
bolt that will fit through the holes in the hardware.
Toe rails, cabin trim, and other decorative wood can be fastened with
self-tapping stainless steel screws. These should be long enough to protrude
through the fiber glass to the beginning of the full sized threads and then
snapped off flush. They should be countersunk and hardwood plugs glued in place
over the heads. All hand rails, grab rails, ladder fastenings, and other wood
parts that take a load should be thru bolted with stainless steel bolts. It is
good yacht building practice to have all screw slog lined up fore and aft.
While stainless steel screws are not thoroughly compatible with aluminum, they
are the best material available for fastening to the mast or boom. They should
be lubricated with a heavy silicon grease before installation in order to shut
out the water which is necessary for electrolytic action.
Fasteners for all component kits can-be acquired from Sailcrafter Yachts at any
time. These fasteners are factory approved and are all individually sealed in
plastic containers for your convenience.

SECTION 2
Page 4
2.6 Supplier/Vendors List
INTRODUCTION:
The following Suppliers/Vendors "Bill of Material" list is given as a
suggestion to help you complete your Sailcrafter Kit boat. Although not
all the "pieces and parts" have been listed, the major components for
completion are included.
BEDDING COMPOUND - DOLPHINITE DOLPHIN PAINT & CHEMICAL
922 Locust Street
Toledo, Ohio
Local marine hardware
BEDDING COMPOUND - PRC 80AT LIFE
65 Bloomingdale Rd.
Hicksville, N.Y.
Local marine hardware
BILGE PUMPS PETERS & RUSSEL
Springfield, Ohio
Balboa Marine Hardware
Newport Beach, Ca.
BODY PUTTY - POLYESTER Automotive & paint stores
Body shop
BOTTOM PAINT INTERNATIONAL SAINT CO.
21 West Street
New York, N.Y.
WOOLSEY BRAND PAINT STORE
BALBOA MARINE
Newport Beach, Calif.
CUSHIONS JOHANSEN & CHRISTENSEN
898 W. 16th
Costa Mesa, Calif.
MARSHALL & SONS
14903 Lakewood
Paramount, Ca.
Columbia Yachts, Portsmouth f/excess
stock
SC-23, SC-2`_
SC28, SC-36

SECTION 2
Page 5
2.6 (continued)
FIBERGLASS MAT, CLOTH, RICHMOND SUPPLY CO.
WOVEN ROVING Chula Vista, Ca.
MARCO CHEMICAL COMPANY 1020
W. 44th Street Norfolk, Va.
Local marine hardware
GATE VALVES BRAHAM INDUSTRIES
1249 W. Katella
Orange, Calif.
EMPIRE MACHINERY
Virginia Beach Blvd.
Norfolk, Va.
GEL COATS RAM CHEMICAL
210 E. Alondra
Gardena, Ca.
LENOIR COATINGS & RESIN
Lenoir, North Carolina
BEADS WILCOX CRITTENDEN
Middleton, Conn.
HEADS - SELF CONTAINED MONOGRAM INDUSTRIES
6357 Arizona Circle
Los Angeles, Ca 9Q045
HEADLINERS JOHANSEN & CHRISTENSEN
898 W. 16th Street
Costa Mesa, Ca.
COLUMBIA YACHT CORP.
Portsmouth, Virginia
HOSE - DUCTALL INDUSTRIAL HOSE & RUBBER
2816 E 11th Street
Los Angeles, Calif.
KENYON MARINE
Guilford, Conn.
Local marine hardware

SECTION 2
Page 6
2.6 (continued)
LIFELINES & GATES R. C. MARINE
17422 Armstrong
Santa Ana, Calif.
LIFELINE WIRE LOOS & CO.
Ponfrett, Conn.
PELICAN HOOKS & FITTINGS WILCOX CRITTEN
Guilford, Conn.
HOOD INDUSTRIES
Bakersfield, Calif.
LIGHTS - INTERIOR FIXTURES Local marine hardware
LO VOLT
2364 E. 128 th
Compton, Calif.
LIGHTS - RUNNING SWING AWAY
Wesley Street
Portsmouth, Va.
Local marine hardware
LIGHTS - NAVIGATING Perkins Marine
Miami, Florida
LUMBER - TEAK Brush Lumber
7653 Telegraph
Montebello, Calif.
HOUSE OF HARDWOOD W. Los
Angeles, Calif.
SPAR LUMBER 1325 Harbor
Long Beach, Calif.
DEAN HARDWOODS 3701
Elm Portsmouth, Va.

SECTION 2
Page 7
LUMBER - MAHOGANY THOMPSON MAHOGANY
7400 Edmund
Philadelphia, Pa.
BRUSH LUMBER
7653 Telegraph
Montebello, Calif.
SPAR LUMBER C0.
1325 Harbor
Long Beach, Calif.
- PLYWOOD U. S. PLYWOOD
2662 E. Del Amo Blvd.
Compton, Calif. 90224
STEWART PLYWOOD
14051 So. Marquardt
Santa Fe Springs, Ca.
U. S. PLYWOOD
Ingleside Rd.
Norfolk, Virginia
MEK - CATALYST HARDENER LENOIR COATINGS & RESIN
Lenoir, North Carolina
ERSKINE JOHNS
4677 Worth
Los Angeles, Calif.
Local marine hardware
MICRO BALLOONS Crystalliner
1626 Placentia
Costa Mesa, Calif.
LENOIR COATINGS & RESIN
Lenoir, North Carolina
MUFFLER SALISBURY RUBBER
401 No. Morgan
Chicago, Illinois
PAINT - VARNISH INTERNATIONAL PAINT CO.
508 N. Beacon
San Pedro, Ca.
Local paint store
Local marine hardware

Section 2
Page 8
POLYESTER RESIN LENOIR COATINGS & RESIN
Lenoir, North Carolina
RAM CHEMICAL
210 E. Alondra
Gardena.' Calif.
Local marine hardware
PROPELLER (Bronze) COLUMBIAN BRONZE
Freeport, Long Island,
New York
AAA Propeller Service
127 Industrial Way
Costa Mesa, Calif.
PULPITS (Bow & Stern) RULE INDUSTRIES
Cape Anne Industrial Park
Glouscester, Mass.
HARRIS MARINE
1308 Logan
Costa Mesa, Calif.
BALBOA MARINE HARDWARE
Newport Beach, Calif.
RELEASE, P.V.C. CRYSTALINER
1626 Placentia
Costa Mesa, Ca.
LENOIR COATINGS & RESIN
Lenoir, N.C.
ANKLE, BELLEY (Exhaust Flex ALLIED METAL HOSE CO.
Coupling) 3746 Ninth Street
Long Island City, N.Y.
SABER SAW BLADES PLETZ BROS
Industrial Park
Norfolk, Va.
Local Sears & Roebuck
Local builders supply

SECTION 2
Page 9
SCREWS, STAINLESS STEEL ITT HARPER
7307 Pulaski Hwy
Baltimore, Md.
LAVENDAR FASTENERS
884 W. 18th St.
Costa Mesa, Ca.
Local marine hardware
SINKS, STAINLESS STEEL VOLRATH
Sheybogan, Wisc.
Ziegler Harris
11341 San Fernando Rd.
San Fernando, Ca.
Local marine hardware
STOVES, ALCOHOL & BUTANE GALLEY MAID
P.O.B. 10417
Riviera Beach, Fla
KENYON MARINE
GUILFORD, CONN.
Local marine hardware
TANKS, FUEL TECSTAR INC.
16550 N.W. loth
Miami, Fla.
Vic Berry
2527 W. Coast Hwy
Newport Beach, Ca.
THRU HULL FITTINGS - BRASS R. C. MARINE
17422 Armstrong
Santa Ana, Calif.
GEM MARINE
Lake City,
South Carolina
WILCOX CRITTENDEN
Middletown, Mass

SECTION 2
Page 10
RUB RAIL - RUBBER VIP RUBBER
945 So. East Street
Anaheim, Calif.
Wefco Rubber Products
1655 Euclid
Santa Monica, Ca.
WATER HEATERS AMERICAN APPLIANCE
2425 Michigan
Santa Monica, Ca.
GALLEY MAID
Riviera Beach, Fla.
Local marine hardware
WATER PRESSURE PUMP PETERS & RUSSELL
Springfield, Ohio
Local marine hardware
WINDOW GASKET (vinyl foam tape PELTZ BROS
black 3/16" thick x 5/8" wide Norfolk, Va.
in 30' rolls). 3M & Bear #576
Industrial supply house
WIRE - PRIMARY DEL CITY WIRE CO.
P.O.B. 82457
Oklahoma City, Oklahoma
STANDARD WIRE & CABLE
3440 Overland
Los Angeles, Calif.
Local automotive supply
Local electrical supply

SECTION 3
Page 1
TECHNIQUES
3.1 Gel Coat Touch-up and Repair
Minor abrasions and scratches can be removed from gel coat with an
abrasive automobile polish followed by a wax polish such as Johnsons "J
Wax Kit". More serious damage and flashing areas should be ground until
smooth and fair with a disk or belt sander using 60 grit cutting surface.
Any depressions should be filled with polyester body putty. Ample putty
should be applied to allow for some shrinkage. When the putty has hardened
it should be sanded in turn with 220 and 400 wet or dry sandpaper.
The gel coat should be applied next by using a spray gun. The Freon
propellant type guns are satisfactory. Thin the gel coat approximately
40 percent with acetone for spraying. Add one to two percent by volume
of catalyst. More catalyst causes the resin to set faster. Curing is
slower at temperatures below 70° and does not proceed satisfactorily
below about 57°. Temperatures between 700 and 57° may be partially
compensated for by slightly more catalyst. High humidity also interferes
with curing.
After the gel coat is sprayed on, a thin layer of mold release (5006
mold release liquid from Thalco Corp.) should be applied with the spray
gun to shut out the air and permit the gelcoat to cure.
Curing should be complete in about two hours. The release is water
soluble and can be easily washed off. Sand with 400, then 600, wet or dry
sandpaper and finish with a buffer.
For additional information concerning gel coat touch-up and repair,
consult Section 6.
NOTE: Ground fiber glass is an irritant to the respiratory
system and a mask should be worn when machine sanding.
Use separate cups for gel coat and release. Mix small
quantities only of gelcoat. Clean out cup and gun with
acetone at least once an hour. Mask off surfaces
outside the work area to prevent accidental overspray.

SECTION 3
Page 2
3.2 Micro Balloon Filled Resin
Micro Balloons mixed with a polyester resin will yield micro balloon filled
resin, which is used in yacht construction for casting, fairing, and sealing. Its
"pot life" is longer and, therefore, cures more slowly than pure resin. The
slower curing time allows more "working pot life time" and generates less heat
without distortion.
Mixing Procedure
1. To prepare the micro balloon filled resin use no less than 1/2%
and no more than to of catalyst by volume. For example: 1/2 ounce
of catalyst with each gallon of clear resin.
2. Add micro balloons to the catalyzed resin slowly, stirring
thoroughly.
3. The mixture may be thick or thin and cure slowly
or quickly, depending on its application. For
example, in large areas such as the keel, rudder,
hull, and deck, fast curing is not required and
slow curing will avoid distortion.
4. The mixture should appear, and be, about the consistency of
a thin pancake batter.
5. Other areas where micro balloon filled resin is
employed should contain more catalyst and more
asbestos to form a thicker compound.
3.3 Bonding
All of the interior liners, head liners, and rubber tubes are fastened and secured
to the hull and deck by bonding. The bonding process is similar to bonding any type
of structure (rudder, bulkhead, etc.). However, some items require thicker bonds
for greater strength.
The procedures for making a bond are listed below:
a) Bonding surfaces should be sanded clean of all paint,
loose glass fibers, and any foreign matter which will
interfere with a glass-to-glass bond.

SECTION 3
Page 3
3.3 (Continued)
b) All gel coat should be sanded off.
c) Sanding should be done with coarse paper (min. 40
grit).
d) Bonding strips should extend a minimum of 4" on either
side of the bond. This means that if there is a space or
a filler between the two surfaces, glass strips wider
than 10" will be required.
e) Bond laminates should consist of the following
on all boats:
1. 4 ozs mat under 24 oz woven
roving 10" wide, covered by
7-1/2 oz. cloth 12" wide on
all bulkheads, around the
forward water tank, at the
aft end of the hull liner where
bunks and shelves contact the
hull. '
2. All other bonds should consist of 3 oz.
mat plus one layer of 7-1/2 oz. cloth.
f) No more than 2% catalyst by volume should be used in the
resin mixture.
Excellent material used in boat construction that will bond well are marine
plywood, exterior plywood, most hardwoods, and hardened plywoods. Solid
teak is an exception as it is a very oily wood which is incompatible with
the resin. To bond teak plywood the teak outer surface must be removed to
the fir core for 4" from the edge.
Should you decide to lay out your own interior and not use the hull liner
(or modify the hull liner) you will have to bond all bulkheads, cabinets,
and floor boards to the hull.
3.4 Cutting, Drilling, and Grinding
Polyester resin fiberglass is a quite hard and very durable material for
the construction of sailboats. When grinding,

SECTION 3
Page 4
3.4 (continued)
cutting, and drilling, work is done on the hull or deck, take care to watch your
tools for dulling. Drills and taps, for example, dull quickly and should be
sharpened or replaced when inspection shows wear. National Coarse Threads are
generally preferred to National Fine Threads, i.e. 10/24 NOT 10/32.
Saw cuts can be made with special sabre saw blades (see Suppliers and Vendors
List) or with an abrasive wheel on a high-speed drill motor.
Any rough or uneven surfaces may be ground or sanded with a disk, belt, or orbital
sander. Avoid breathing the dust as it is an irritant to the respiratory system.
It is suggested that a mask be worn over the mouth and nose so as not to inhale
powdered fiberglass.
Likewise, power tools should be blown free of fiberglass dust, since it is
an abrasive in bearings, motors, and gears.
NOTE: Caution should be used at all times when working with power tools
on fiberglass. The fiberglass is a very hard material and tools
have a habit of slipping, sliding, and jumping out of place.
3.5 Winterization
For all boats with inboard engines and heads that are shipped to areas that have
below-freezing temperatures, it is strongly recommended that the engine cooling
system be winterized by utilizing an approved anti-freeze. The approved
anti-freezes for the Perkins, Westerbeke, Palmer, and Atomic 4 engines are as
follows:
DOWGUARD PYRO-PERMANENT
HUBBARD - HALL SMITH BLUE CO.
PEAK TELAR
PERMA-STA ZEREX
PERMAGUARD
It is also strongly recommended that the water tanks and the head be
completely drained of water, including all the lines.

SECTION 3
Page 5
3.6 Anti-Fouling Protective Coating System
This specification covers sandblasting and the application of an
International Intergard coating No. 4424/4423 and Tri-Lux T.B.T.O.
anti-fouling paint containing Biomet coating to the keel and underwater hull
areas. It should be used on all Kit Boats that have outside ballast and is
optional on boats with inside ballast.
1. Cast Iron Keel
a) Grind entire surface of keel to white metal.
"White metal" is defined as a surface with
a gray-white uniform metallic color, slightly
roughened to form a suitable anchor pattern
for coating. The surface should be free of
visible mill scale, corrosion products, paints,
or other foreign material. It is the intent
of this specification to have a surface conforming
to Steel Structures Painting Council Surface
Preparation Specification #5.
b) All sand and dust residue is to be removed from the surface
before coating is applied.
c) The ground surface must be primed before re
rusting occurs. For outdoor locations, this
normally means that the steel should be primed
within a period not exceeding six hours after
cleaning. For indoors, low humidity locations,
longer periods may be used. The steel should
be re-ground if rain or condensed water wets
the surface prior to priming. (Priming should
not be done before the epoxy filler is applied.)
2. Epoxy Filler
Apply epoxy filler, where needed, to the dry, white metal surface
and trowel smooth. 3. Priming
a) Apply one coat of Intergard 4424/4423 to the dry, white
metal and the epoxy filled surfaces. The primer should be
thinned 5% and applied to about a thickness of 1-1/2 mil.
b) For additional information on application procedures,
cleaning of equipment and handling precautions, reference
is made to a booklet supplied by International Paint
Company.

SECTION 3
Page 6
3.6 (continued)
4. Transport and Assembly
a) During transportation of the keels from the foundry to the
boat yard, damage to the epoxy filler and the Intergard
coating will occur. Additional damage may also occur during
the fitting of the keel to the hull.
b) After the keel has been attached to the hull, repair the
damage with epoxy filler and smooth to desired contour.
c) Apply a second coat of Intergard 4424/4423 as
specified in Section 3 (Priming) to all surfaces
of the keel.
d) Allow four (4) hours drying time before top coating.
5. Anti-Fouling Coating
a) Apply one (1) coat of Tri-Lux T.B.T.O. antifouling to all
of the keel and hull.
b) Before applying the Tri-Lux anti-fouling to
the hull, the polyester gel coat should be
thoroughly sanded to provide an anchor pattern
or tooth for good adhesion.
c) Allow four (4) hours drying time.
d) Apply second coat of Tri-Lux anti-fouling as specified
in Section 5. a.
e) Allow 24 hours drying time before immersing boat in water.
f) International Tri-Lux is a vinyl anti-fouling formulated for
ship bottom use. It contains Tri-Butyl tin oxide (T.B.T.O.)
as the toxic agent. Unlike cuprous anti-foulants it may be
applied directly to a primed steel surface without the need
for an additional anticorrosive coat.


 Loading...