

Page 1

Colugo Infant Kit
Instructions
Page 2

Page 3

WARNING:
FALL AND
SUFFOCATION
HAZARD
WARNINGS
• Never leave child unattended.
Always keep child in view while in
the stroller.
Avoid serious injury from falling or
sliding out. Always use restraint
system. Child may slip into leg
openings and strangle. Never use
in reclined carriage position(s)
unless all buckles are attached and
restraint system is adjusted to fit
snugly. Do not use product once
the child can sit up unaided. This
seat is not suitable for children over
6 months. Do not add a mattress
other than the one provided.
• TO PREVENT HAZARDOUS,
UNSTABLE CONDITION, do not
place more than 10 lbs in the
storage basket.
• TO AVOID INJURY TO YOUR
CHILD: DO NOT USE STORAGE
BASKET AS A CHILD CARRIER.
• Never put purse, shopping bags,
parcels or unapproved accessory
items on the handle or canopy.
• CUP HOLDER - max .7 lb.
WARNINGS 3
IMPORTANT:
RETAIN FOR FUTURE REFERENCE.
Failure to follow these warnings and
the assembly instructions could result
in serious injury or death.
This product is for use with the
Colugo Compact Stroller for children
up to 20 lbs only.
• AVOID FINGER ENTRAPMENT:
Use care when folding and unfolding
the stroller. Be certain the stroller
is fully opened and latched before
allowing child near the stroller.
• ALWAYS ENSURE that all parts
of the child’s body are clear of
any moving parts. Do not carry
additional children, parcels, goods
or accessories in or on this product
except as recommended in the
manufacturers instructions.
• The brake must be locked while
taking the child out of stroller and
when parked.
• Keep stroller away from open fire
and other sources of strong heat.
• Do not make any alterations
or modifications to the stroller
with products not supplied by the
manufacturer as this may cause
instability or structural damage.
• Do not use on stairs or escalators.
• When folded, make sure the
stroller is stored in a place where it
does not risk falling on a child.
Page 4
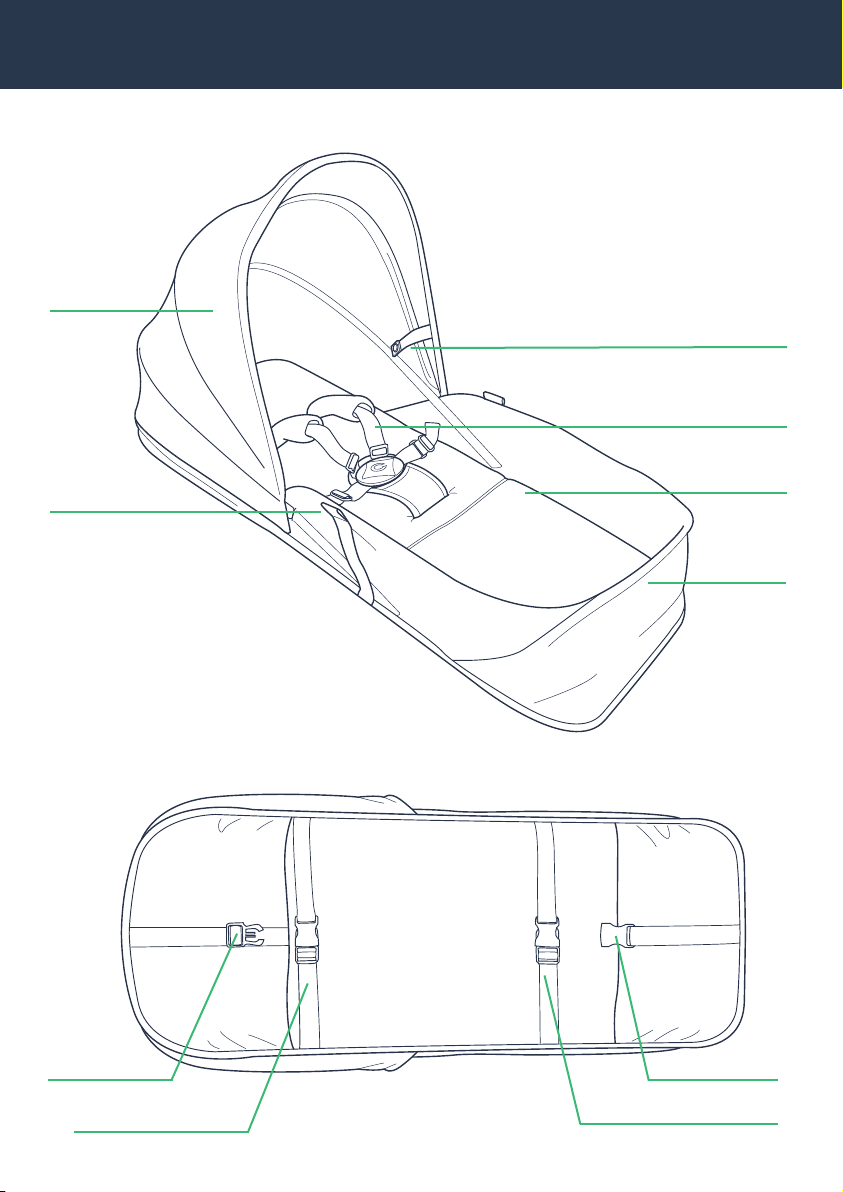
4 PRODUCT OVERVIEW
TOP VIEW
CANOPY
CANOPY SNAP
HARNESS
SIDE SUPPORT
COMFORT LAYER
FOOTREST
BOTTOM VIEW
CLOSURE STRAP
BOTTOM SUPPORT
CLOSURE STRAP
BOTTOM SUPPORT
Page 5
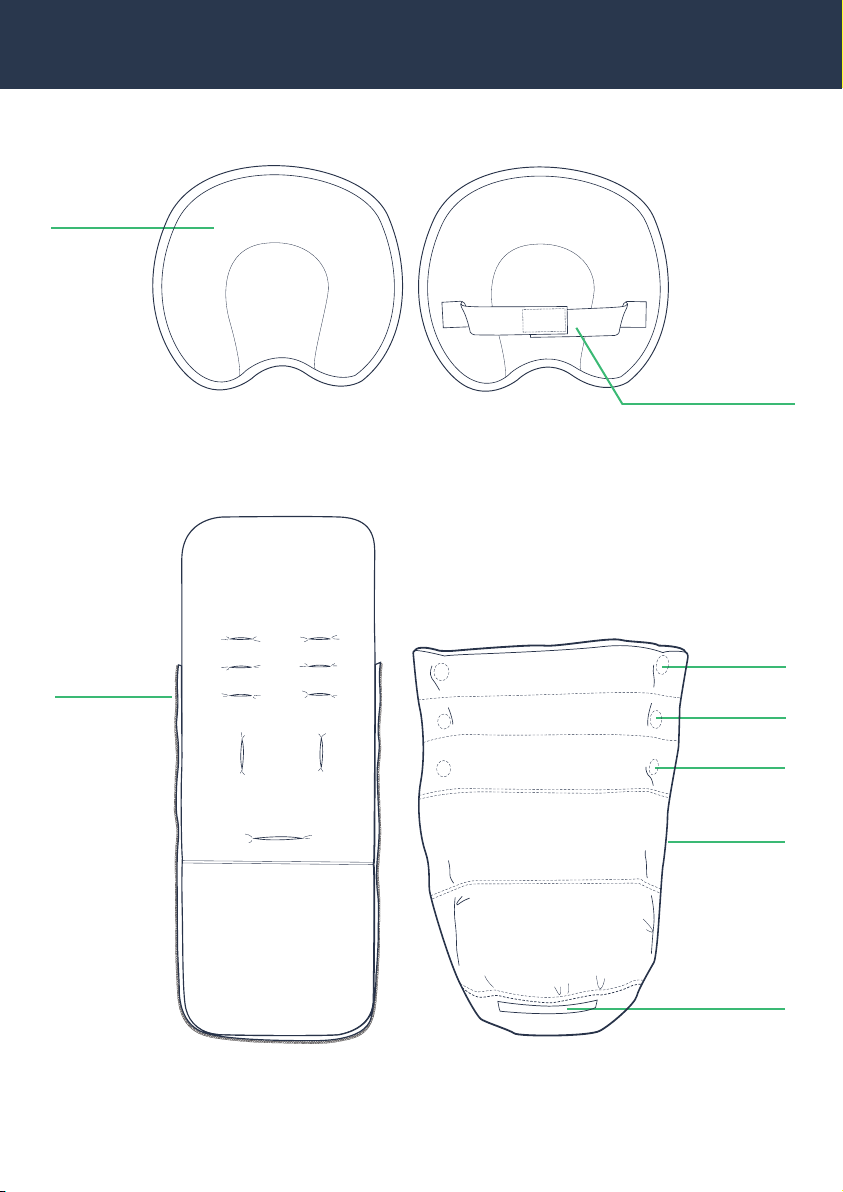
HEADREST
PRODUCT OVERVIEW 5
FRONT BACK
HEADREST FASTENER
COMFORT LAYER
FOOTMUFF
ZIPPER
MAGNET
MAGNET
MAGNET
ZIPPER
VELCRO
Page 6
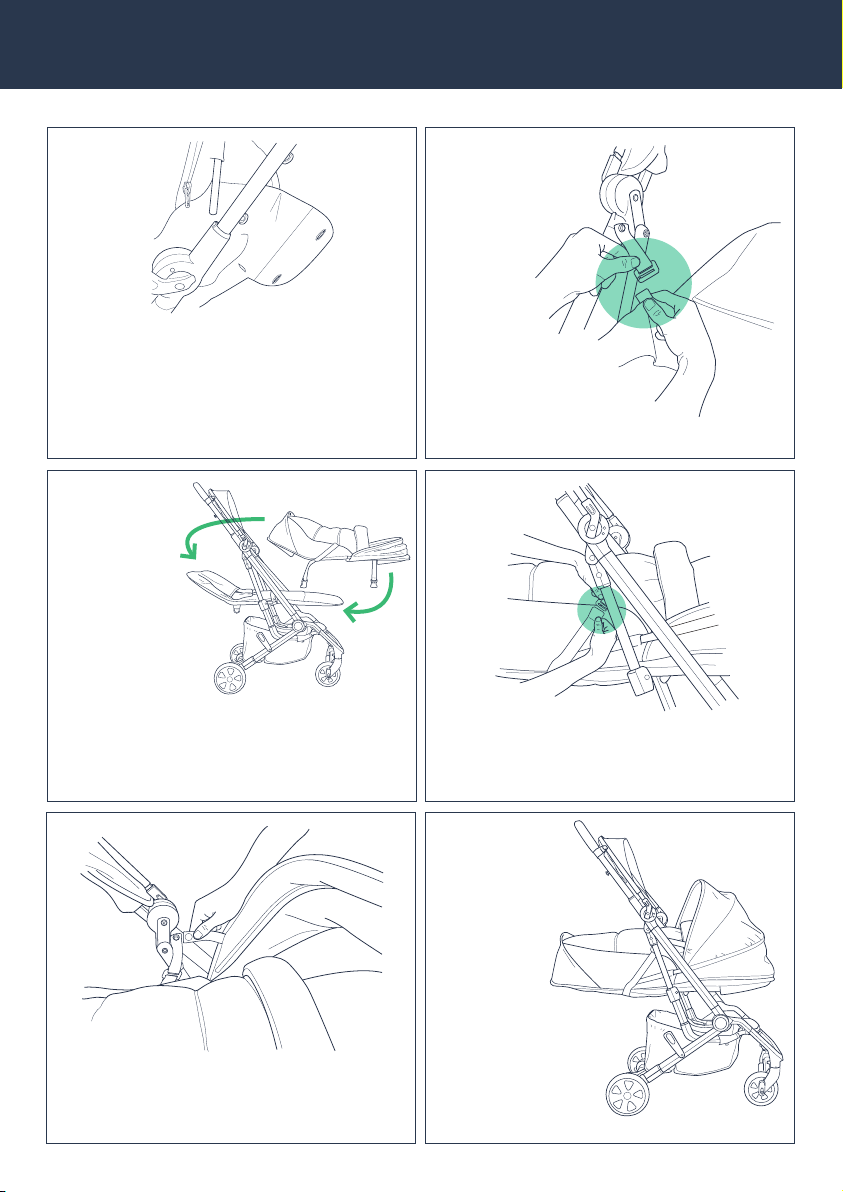
6 CONNECTING YOUR COLUGO INFANT KIT
STEP 1
Fully unbutton the base layer from
the frame. Lift the rear canopy rod
to disconnect the backrest from the
frame, then put the rod back. To fully
remove the canopy, see page 13.
STEP 3
First, slide the
canopy side over
the footrest.
Then slide the infant kit
footrest over the other side by
folding it up. Make sure all straps
are tucked under the infant kit.
STEP 2
Unhook the base
layer. Fold the sides
and rear mesh panel
onto the backrest.
STEP 4
Hook the side support
onto the frame.
STEP 5
Snap the canopy
into place.
STEP 6
Ensure the
closure straps are
secured to the
bottom with velcro.
Page 7
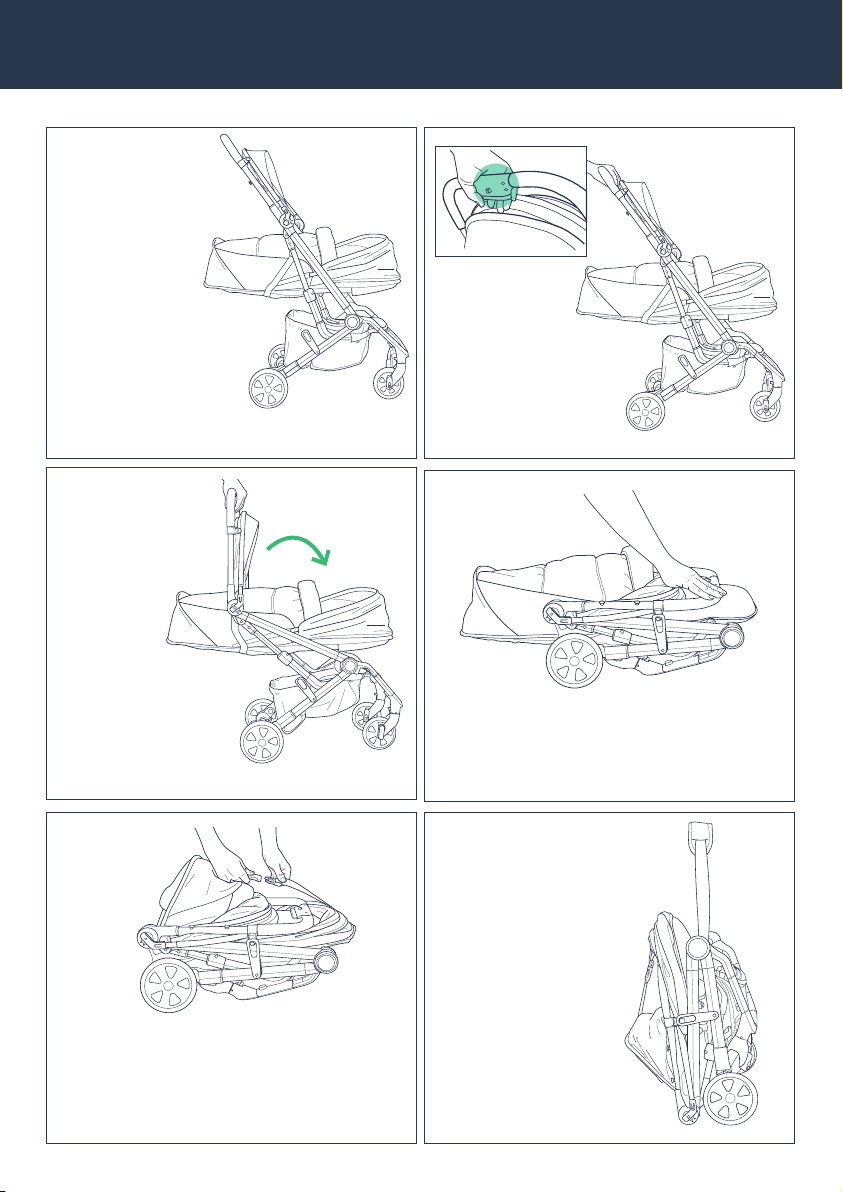
STEP 1
Ensure the
canopy is down
and the front swivel
locks are released
before folding.
STEP 2
Lock the stroller
using the brake.
FOLDING YOUR STROLLER 7
STEP 3
Grip the handle.
Press the small
button, then squeeze
the large button, to
begin the fold.
STEP 4
Push the handle
down and forward,
bringing the frame
together.
STEP 6
Fold the the infant kit footrest
toward the handlebar, remove the
closure straps from the underside
of the infant kit and fasten.
STEP 5
Ensure the fold latch is
engaged. You will hear
a ‘click.’
STEP 7
If carrying, use
the carry strap.
Page 8
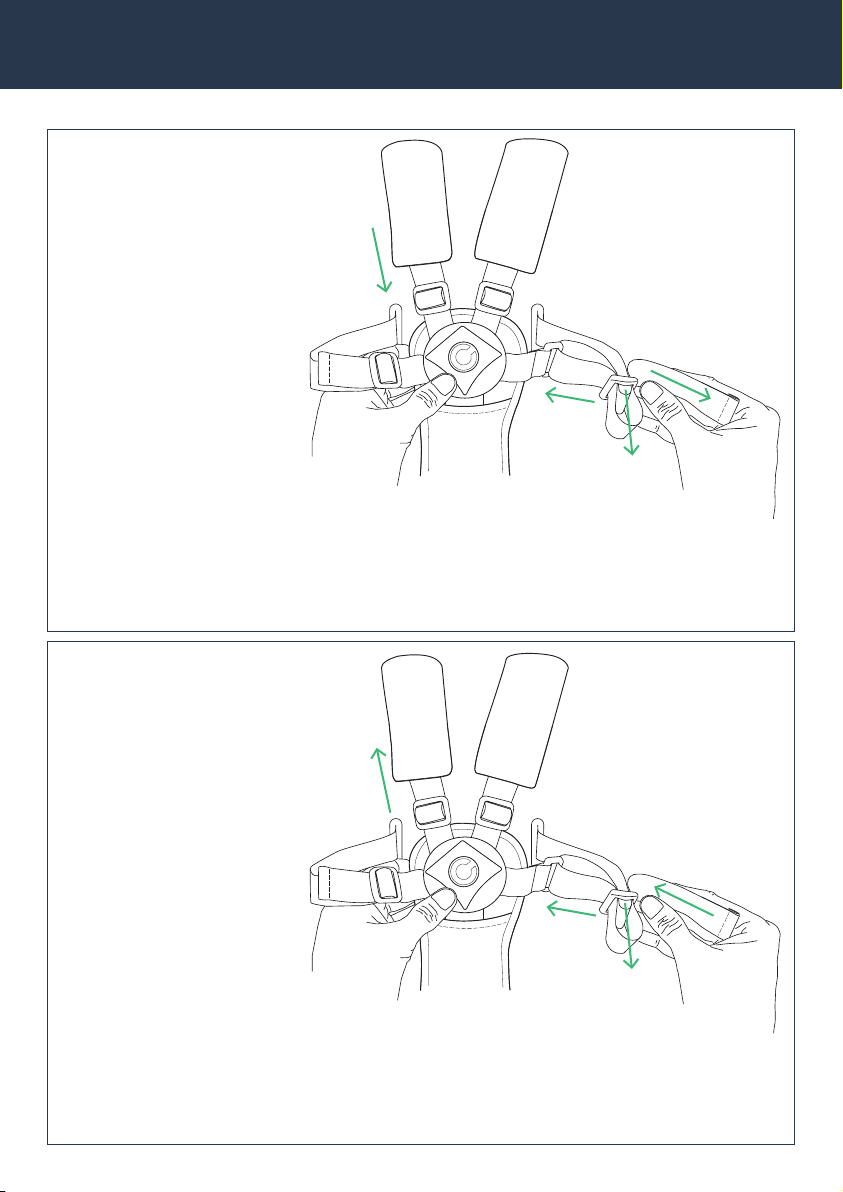
8 ADJUSTING THE HARNESS9 ADJUSTING THE HARNESS
5
2
ADJUSTING THE
WAIST BELT: SMALLER
STEP 1 Push the webbing out of
the adjuster.
STEP 2 Pull the strap end through
the adjuster to the desired length.
STEP 3 Pull the slack snug.
STEP 4 Repeat on the opposite side.
5
ADJUSTING THE
WAIST BELT: LARGER
STEP 1 Push the webbing out of
the adjuster.
STEP 2 Push the strap end through
the adjuster to the desired length.
STEP 3 Pull the slack snug.
STEP 4 Repeat on the opposite side.
3
1
ADJUSTING THE
CHEST STRAP: SMALLER
STEP 5 Slide the adjuster down
to fit your baby snugly.
2
3
1
ADJUSTING THE
CHEST STRAP: LARGER
STEP 5 Slide the adjuster up
to fit your baby snugly.
Page 9
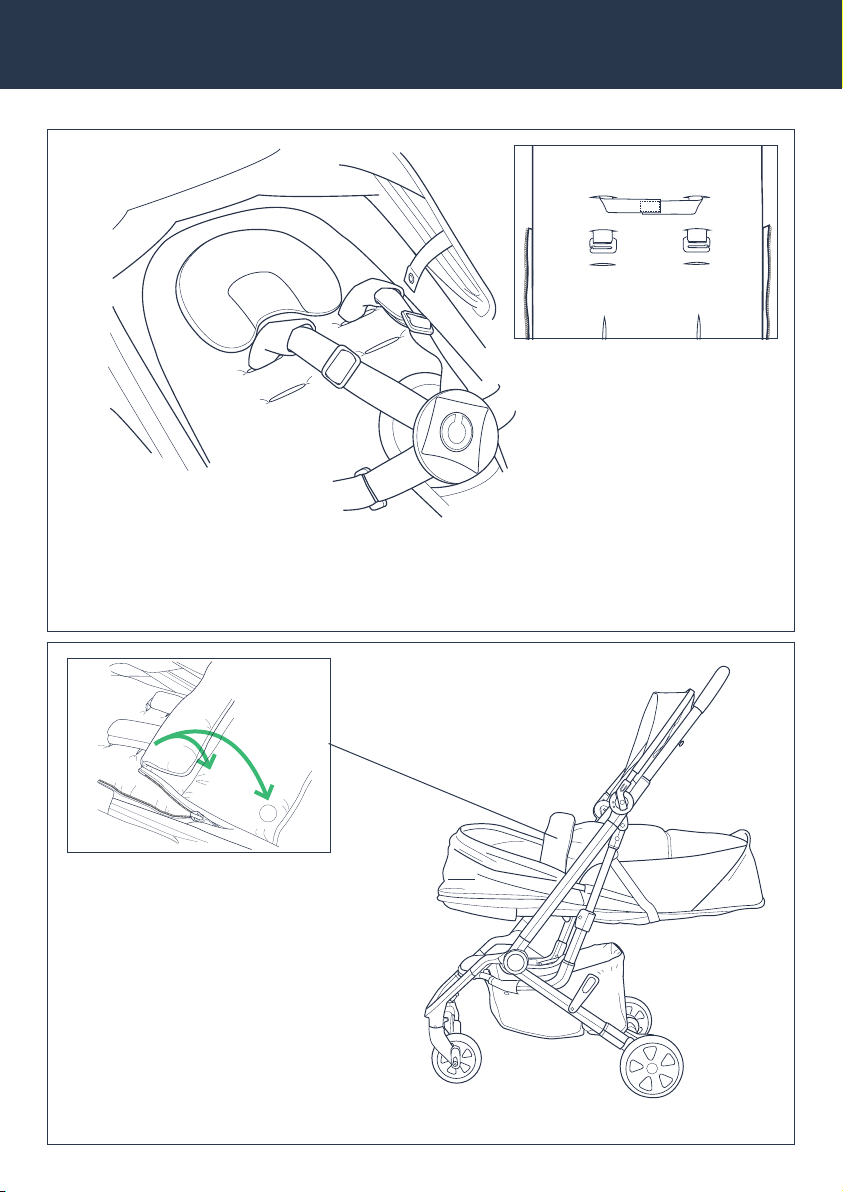
ADJUSTING THE HEAD REST AND USING THE FOOTMUFF 9
BACK
ADJUSTING THE HEAD REST
Pull the velcro straps through the comfort
layer openings just above the shoulder
straps. Fasten under the comfort layer.
ATTACHING THE FOOTMUFF
Zip the footmuff around the comfort
layer. Secure using the velcro at the
footrest. Use the magnets to adjust the
length. Always have the top folded down.
Page 10
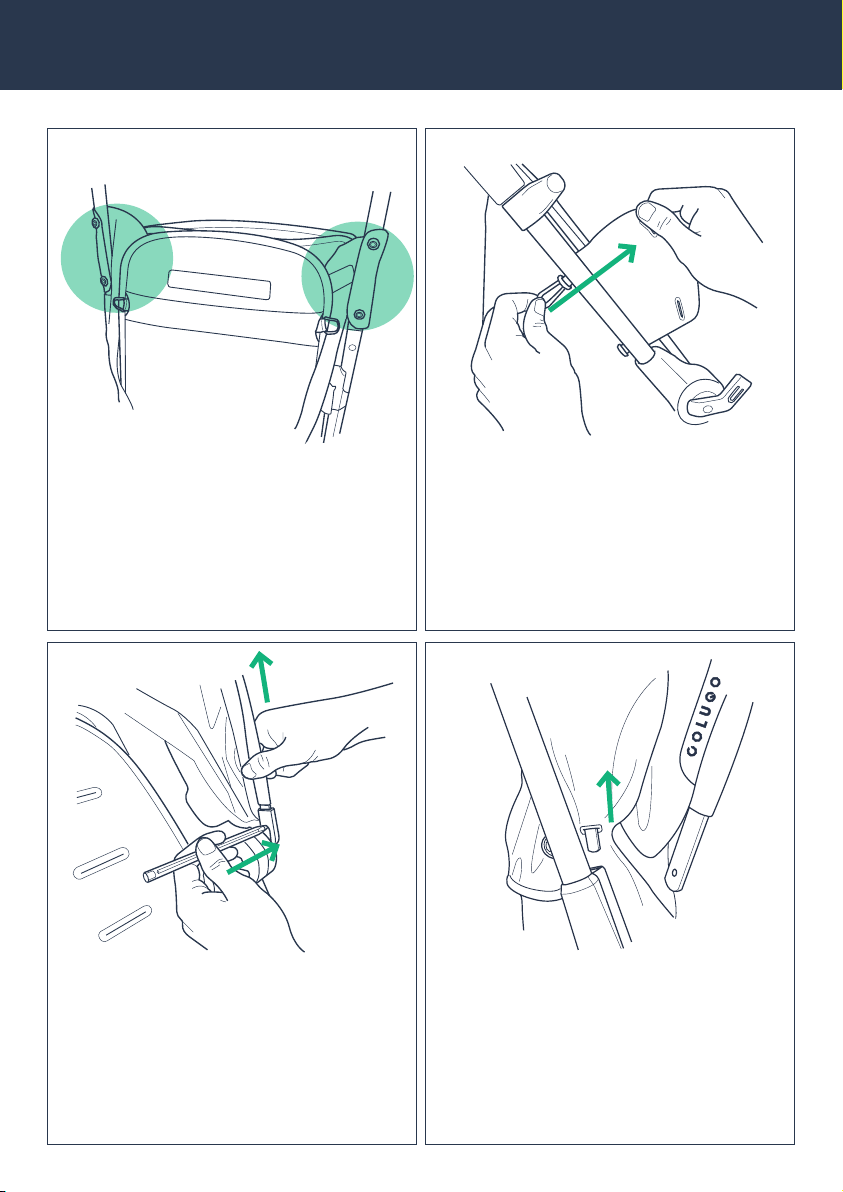
13 REMOVING THE CANOPY
STEP 1
Unbutton the base layer from the
frame (all 4 buttons).
STEP 3
Remove the front canopy rods by
pressing a ballpoint pen into the
circular space on the inside of the
canopy mount and pulling up on the
front canopy rod. Remove the pen while
pulling up. Complete on both sides.
STEP 2
Unhook the canopy elastic bands from
the buttons on the frame.
STEP 4
Remove the rear canopy rods.
Page 11

Page 12

www.hicolugo.com
STROVA, INC
3401 Grays Ferry Ave
Philadelphia, PA 19146
 Loading...