

Page 1
1
DOCUMENT NO. 88N001H © 2016 Colortrac
User Instructions
For SmartLF Scan!
Large Format Scanner
Rev. H June 2016
(f/w 1.02)
Page 2

2
DOCUMENT NO. 88N001H © 2016 Colortrac
Contents
INSTALLATION
PREPARE AND POWER ON YOUR SCANNER ............................................................. 3
UNDERSTANDING THE SCREEN AND SCANNER CONTROLS ..................................... 4
PROGRESS INDICATOR .............................................................................................. 5
TOP LEVEL OPTIONS.................................................................................................. 5
LOWER LEVEL OPTIONS ............................................................................................ 6
CALIBRATION (ONE-TIME) ........................................................................................ 7
INSTALLING THE SOFTWARE ..................................................................................... 8
CABLE, WIRELESS OR DIRECT LINK NETWORKING .................................................... 9
SCANNING
SCAN TO SCANNER MEMORY ................................................................................. 10
SCAN TO USB MEMORY .......................................................................................... 11
STARTING THE SOFTWARE...................................................................................... 12
SCAN TO COMPUTER .............................................................................................. 13
OPERATOR
TRANSFER ALL SCANS TO USB MEMORY ................................................................ 14
TRANSFER ALL SCANS TO COMPUTER .................................................................... 15
TRANSFER ALL SCANS TO SCANNER MEMORY ....................................................... 16
MAINTENANCE
UPGRADING FIRMWARE ......................................................................................... 17
CLEANING THE SCANNER .................................................................................. 18, 19
CALIBRATE THE SCANNER ....................................................................................... 20
GENERAL
OPERATING TIPS AND TROUBLESHOOTING GUIDE .......................................... 21, 22
DECLARATION OF CONFORMITY ...................................................................... 23, 24
DIAGNOSTIC
DIAGNOSTIC WARNINGS AND ERROR CODES ........................................................ 24
Page 3
3
DOCUMENT NO. 88N001H © 2016 Colortrac
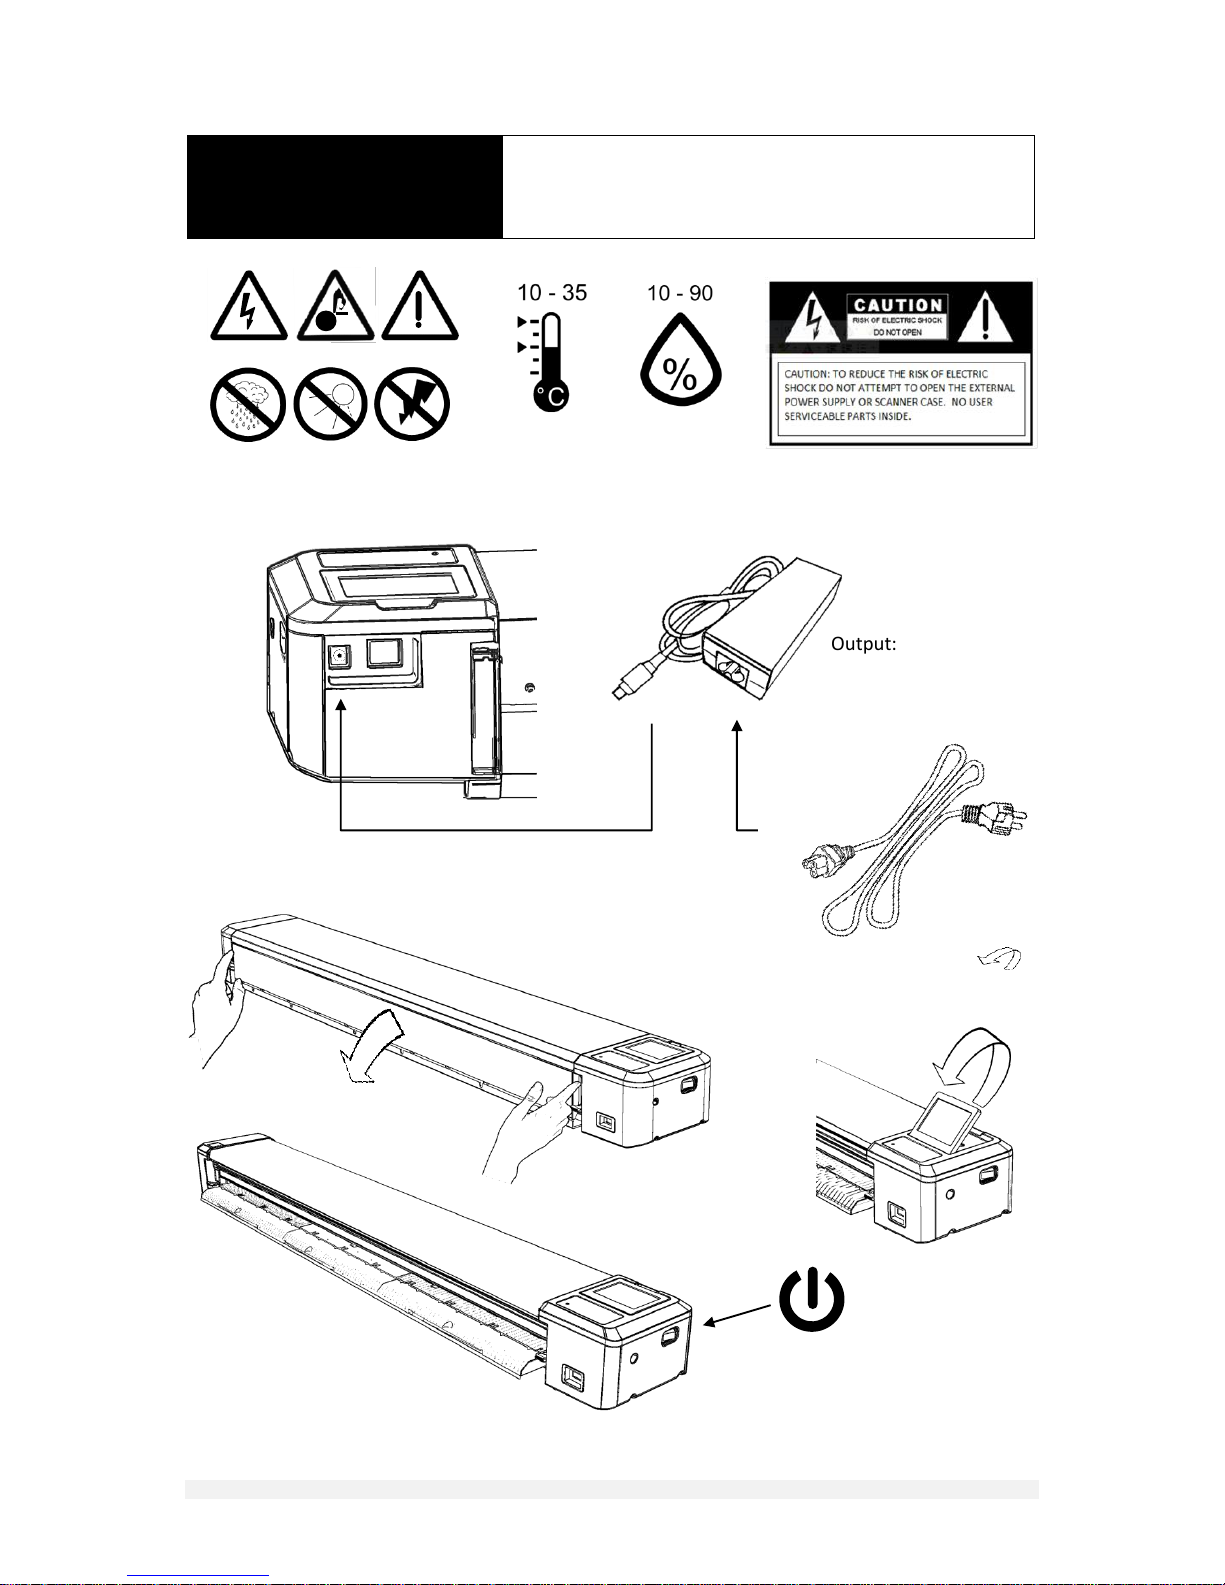
Input: 100 - 240V, 50-60Hz
Output: 3.42A at 19V
INSTALLATION
PREPARE AND POWER
ON YOUR SCANNER
Page 4
4
DOCUMENT NO. 88N001H © 2016 Colortrac
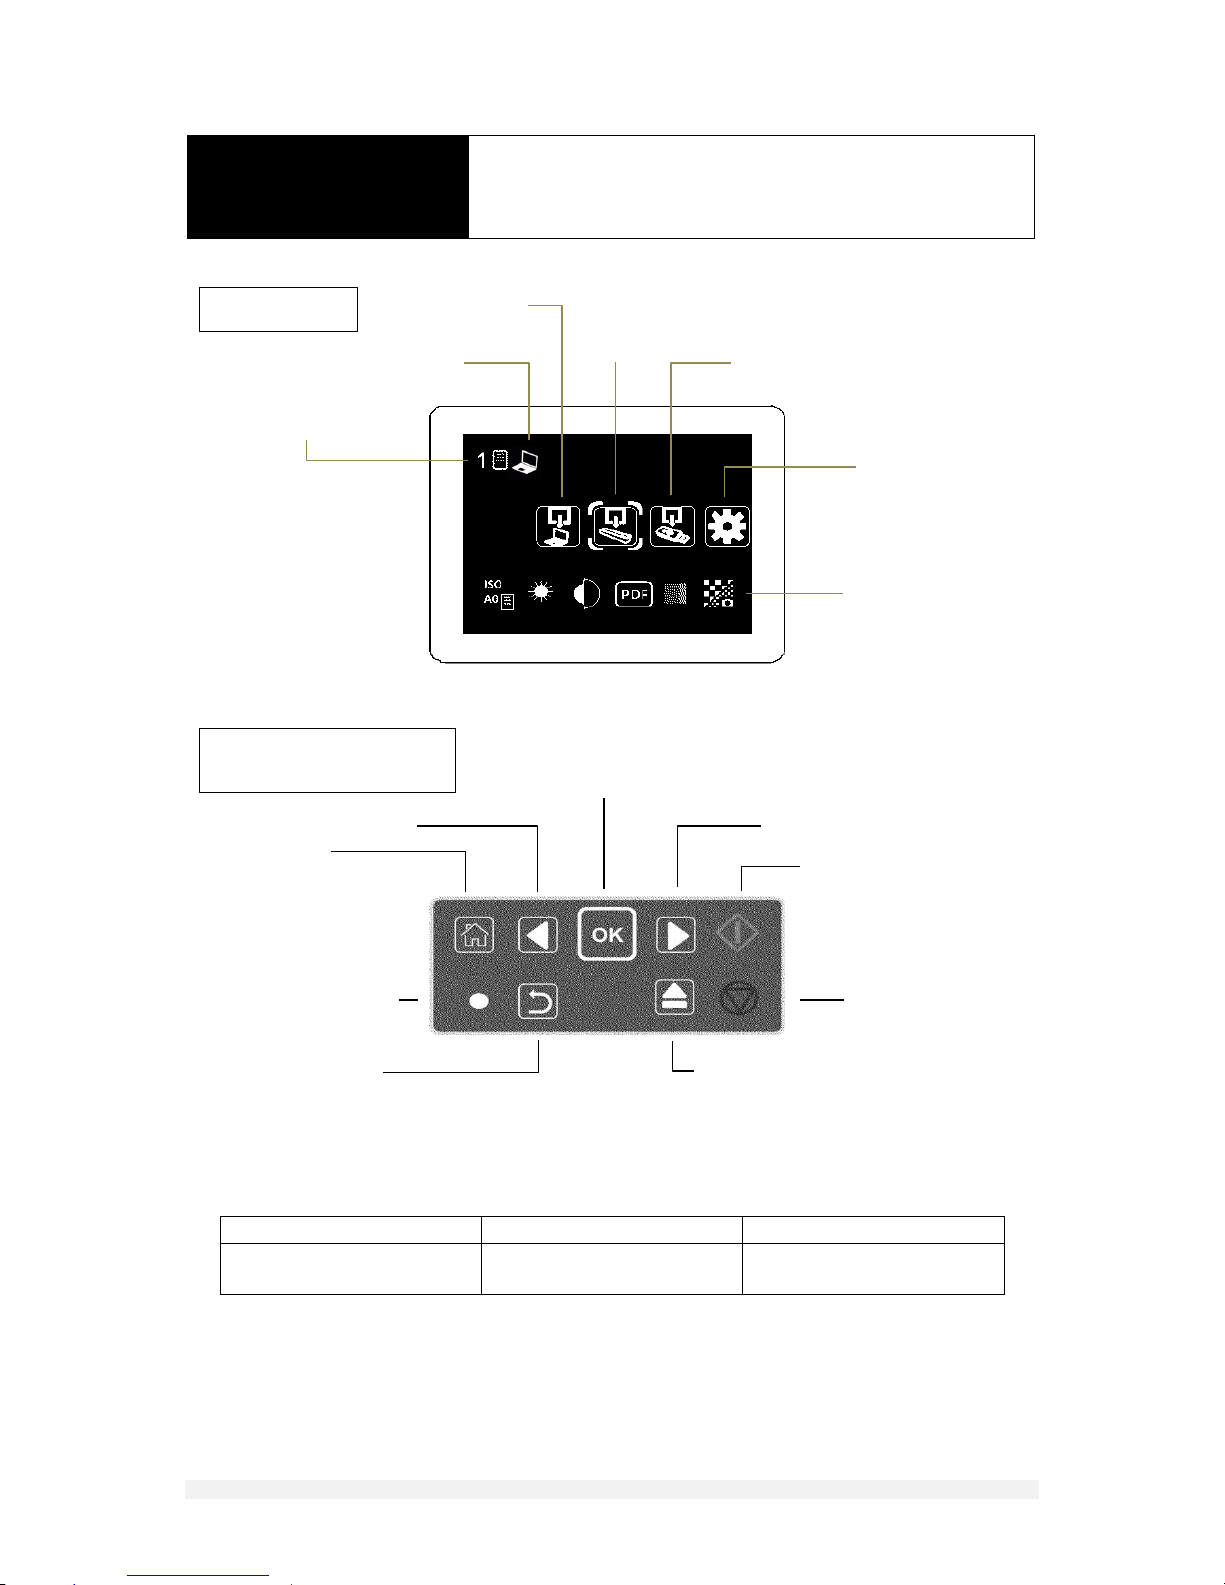
home
move left
move right
SCAN
accept / OK
scanning / busy light
up one level
eject paper
STOP
scans stored
in scanner
scan to
computer
scan to
scanner
(selected)
scan to USB
memory
set-up
options
options in use
(or defaults )
computer
connection
SCREEN
SCREEN NAVIGATION AND
SCANNER CONTROL
INSTALLATION
UNDERSTANDING THE SCREEN
AND SCANNER CONTROLS
BLUE LED
ORANGE LED
CIRCLING DOTS
POWER ON, NORMAL
OPERATION
PAPER TRAY OPEN
(MAINTENANCE)
SCANNING OR PROCESSING
SCAN DATA
Page 5
5
DOCUMENT NO. 88N001H © 2016 Colortrac
INSTALLATION
PROGRESS INDICATOR
MENUS
TOP LEVEL OPTIONS
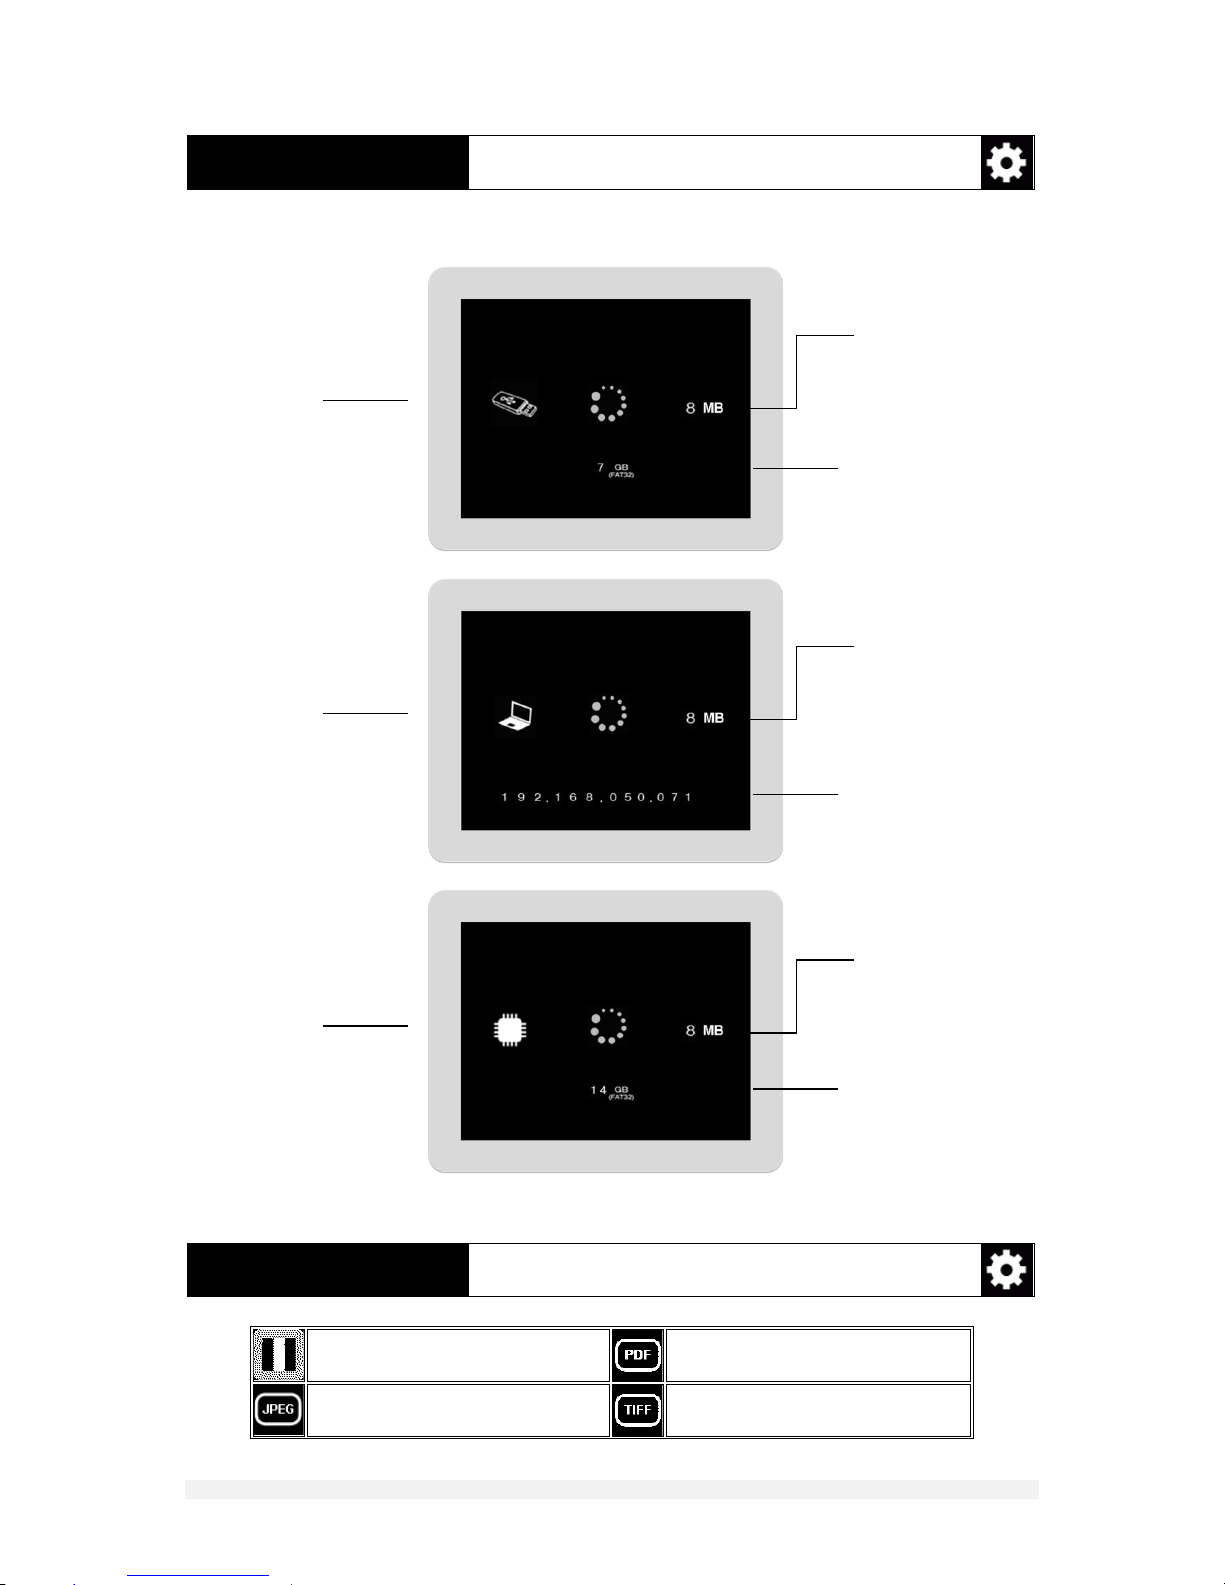
COLOR MODE (2)
SCAN TO PDF FILE
SCAN TO JPEG FILE
SCAN TO TIFF FILE
scanning to USB
stick
scanning to
computer
scanning to
scanner
memory
data sent to
USB stick
(updated)
data sent to
computer via
network (updated)
data saved
internally
(updated)
free scanner
memory
IP address of
computer
free USB stick
memory
Page 6
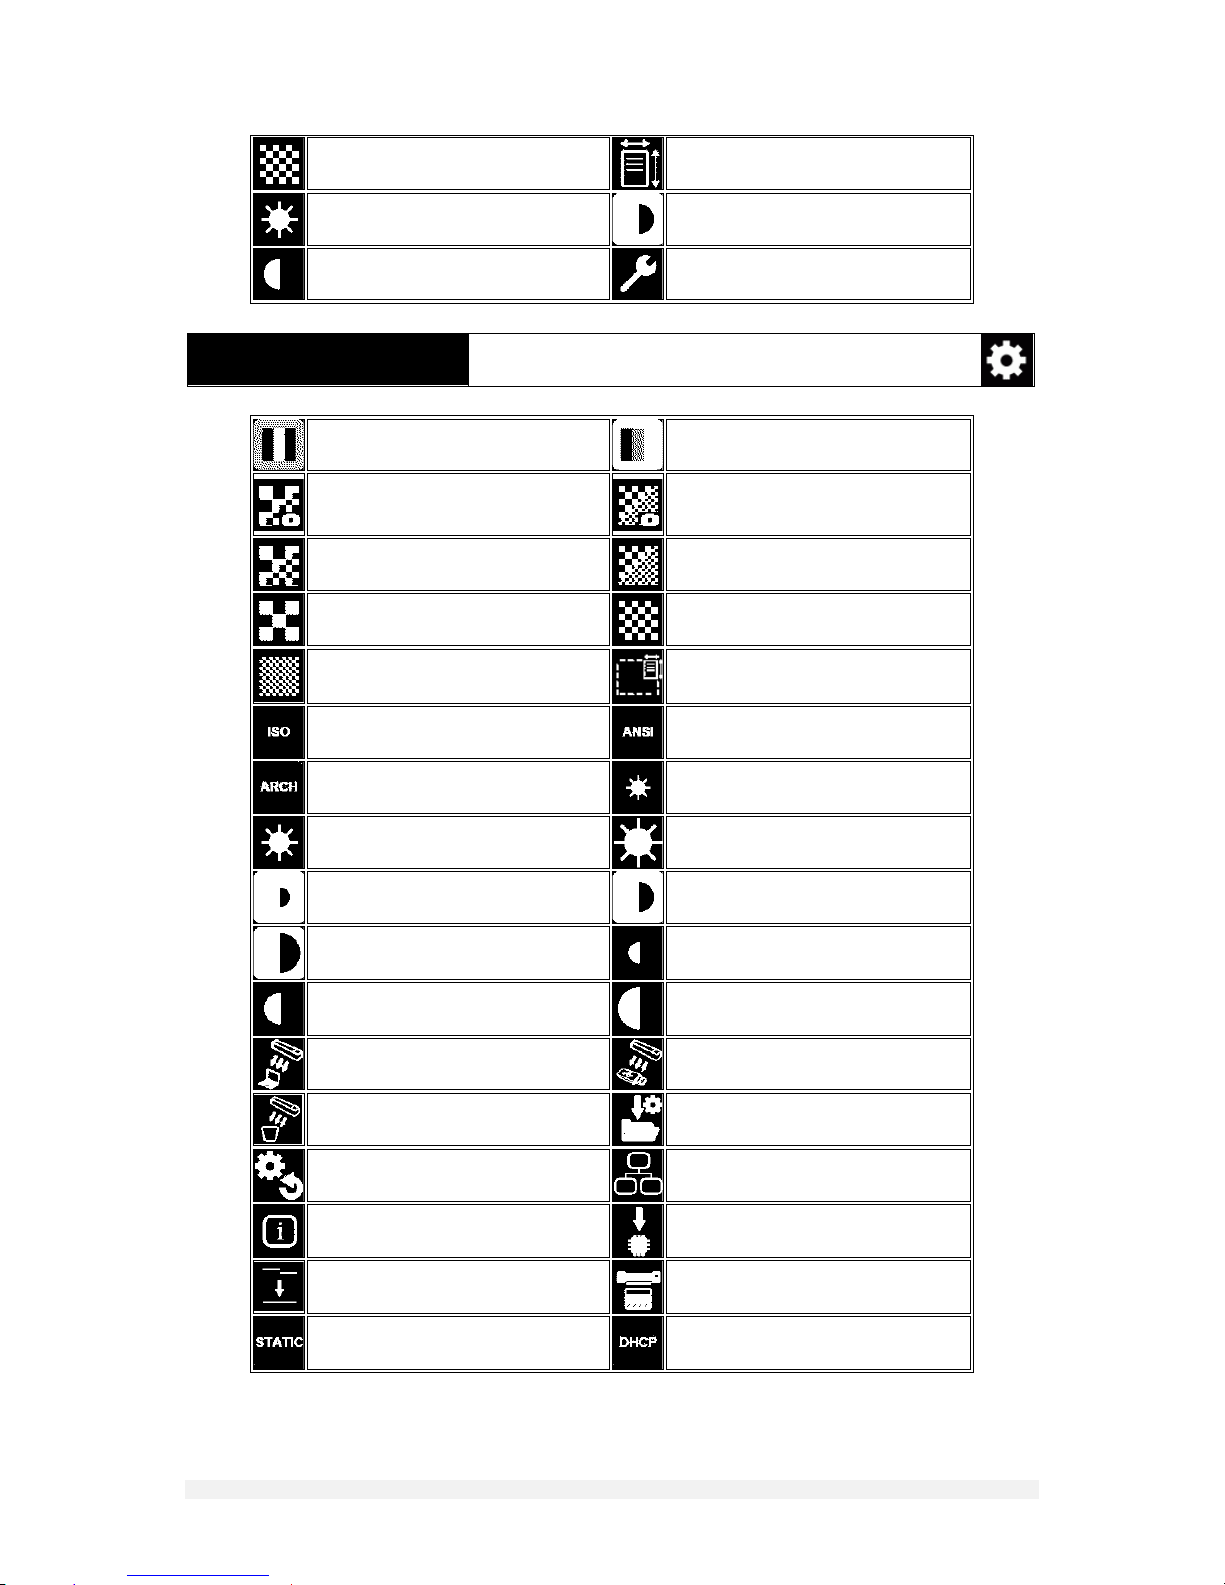
6
DOCUMENT NO. 88N001H © 2016 Colortrac
DETAIL (6)
SCAN PAPER SIZE (MULTIPLE)
BRIGHTNESS (3)
BLACK POINT (3)
WHITE POINT (3)
MORE SETTINGS (MULTIPLE)
MENUS
LOWER LEVEL OPTIONS
full color mode
grayscale mode
automatic normal picture detail
automatic high picture detail
automatic normal document
detail
automatic high document detail
fixed low detail
fixed normal detail
fixed high detail
automatic paper sizing
ISO/DIN PAPER SIZES
ANSI PAPER SIZES
ARCHITECTURAL PAPER SIZES
bright
brighter
very bright
low black point
medium black point
high black point
low white point
medium white point
high white point
move all scans to computer
all scans to USB stick
delete all scans in scanner
current settings to default
restore factory settings
NETWORK
information
update firmware
line calibrate
color calibrate
fixed IP scanner address
automatic scanner IP address
Page 7
7
DOCUMENT NO. 88N001H © 2016 Colortrac
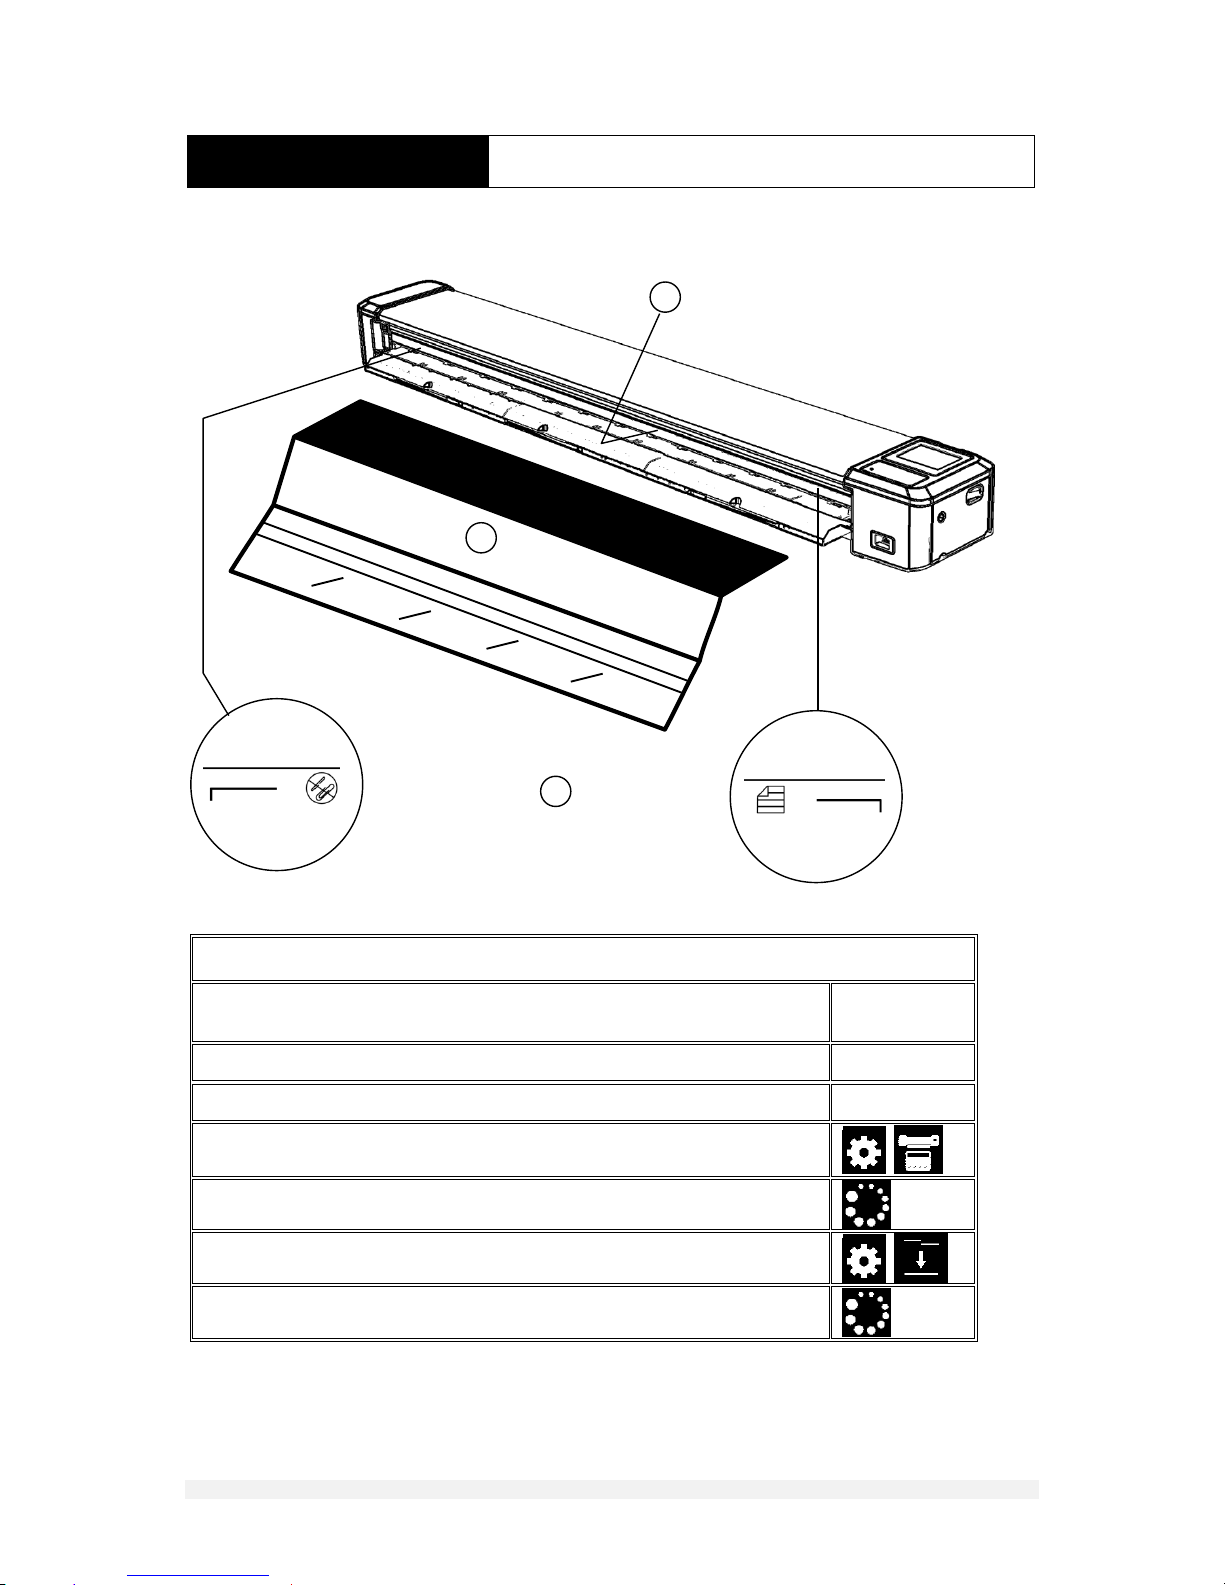
2 1 3
INSTALLATION
CALIBRATION (ONE-TIME)
STEPS
Always ensure sensor glass is clean and dry (see maintenance section if
you think the glass may be dirty)
1
Note: Calibration target is placed between width markers
2
Insert calibration target into scanner face up, black section first
3
Select settings, color calibration
Calibration target is ejected after calibration
Select settings, line calibration
Calibration target is ejected from the rear when calibration is complete
Page 8
8
DOCUMENT NO. 88N001H © 2016 Colortrac
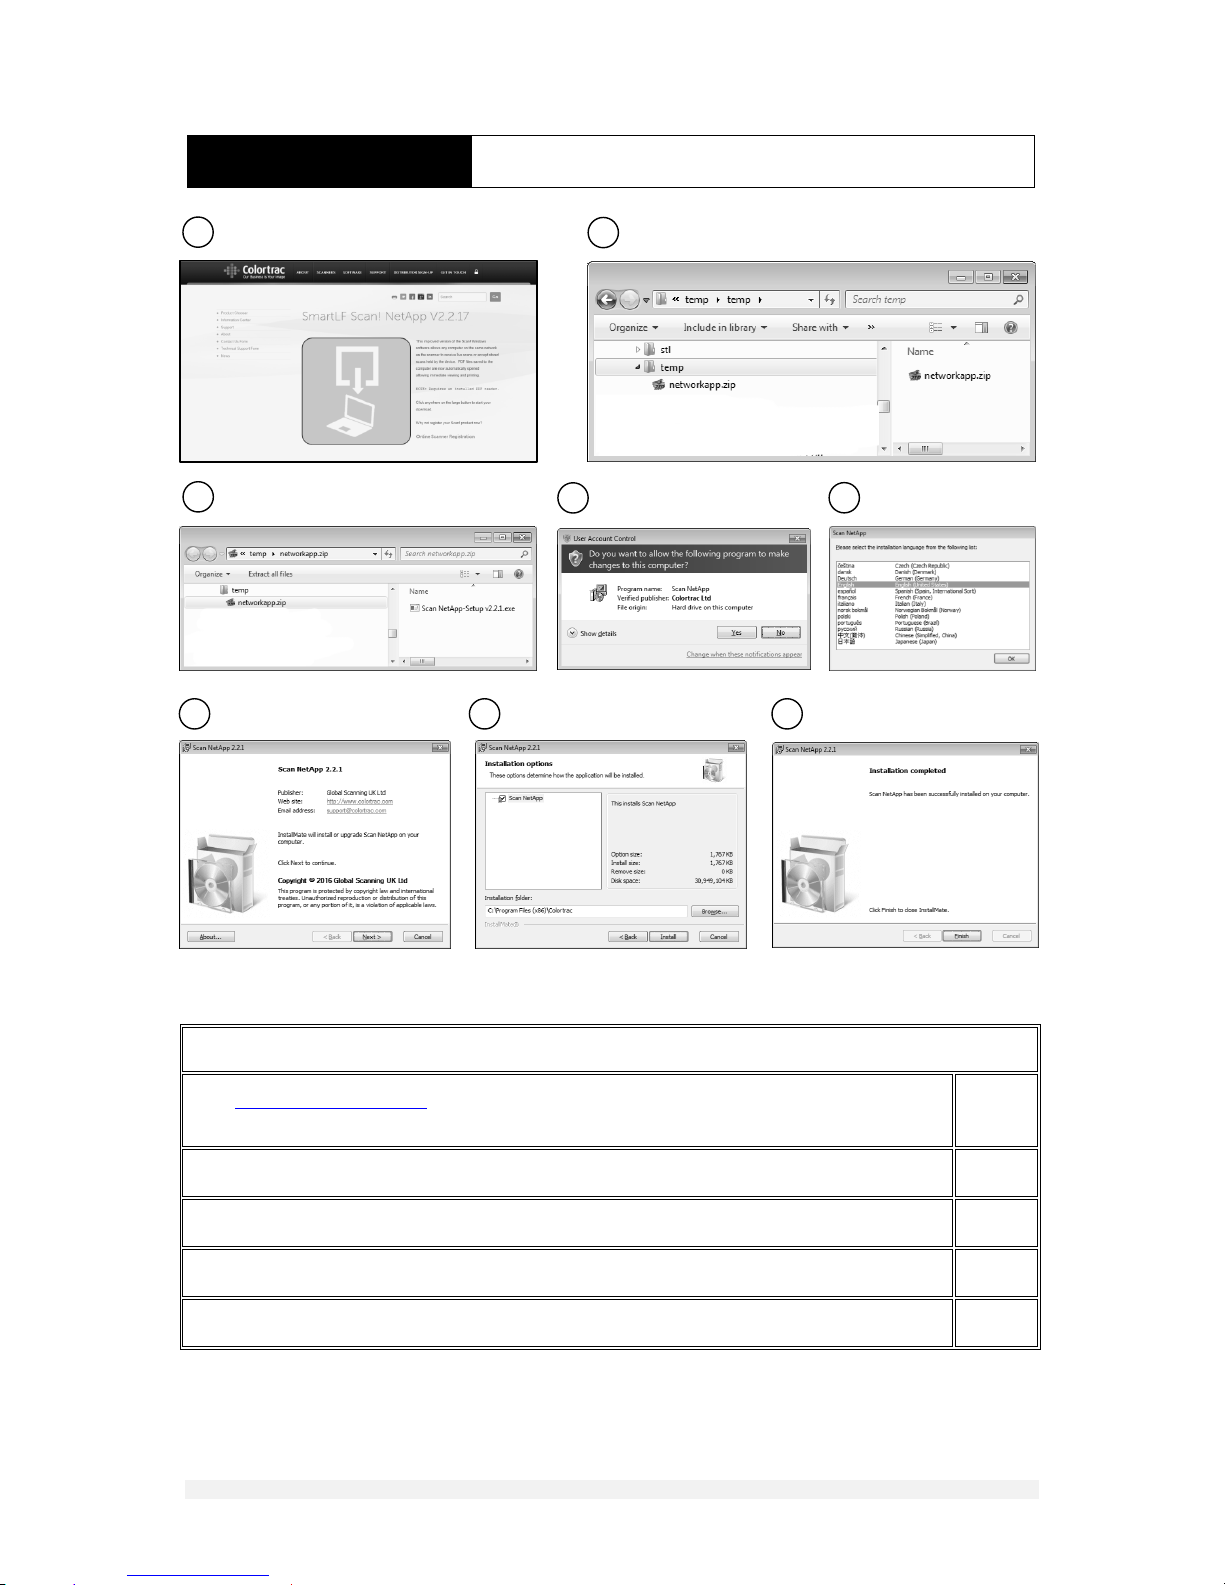
2 4 5
3
6 7 8
1
INSTALLATION
INSTALLING THE SOFTWARE
STEPS
Go to www.colortrac.com/netapp Click the large button. Windows will prompt you to open or save the file.
Save the file ‘networkapp.zip’ to your Downloads folder or any another suitable area on your pc
1,2
Double-click the zip folder to reveal the ‘Scan NetApp-Setup’ file. Double-click it to begin the installation
3
Allow changes to be made to your computer by clicking ‘Yes’
4
Choose your preferred language
5
Press Next , then Install and Finish to complete the software installation
6,7,8
Page 9
9
DOCUMENT NO. 88N001H © 2016 Colortrac
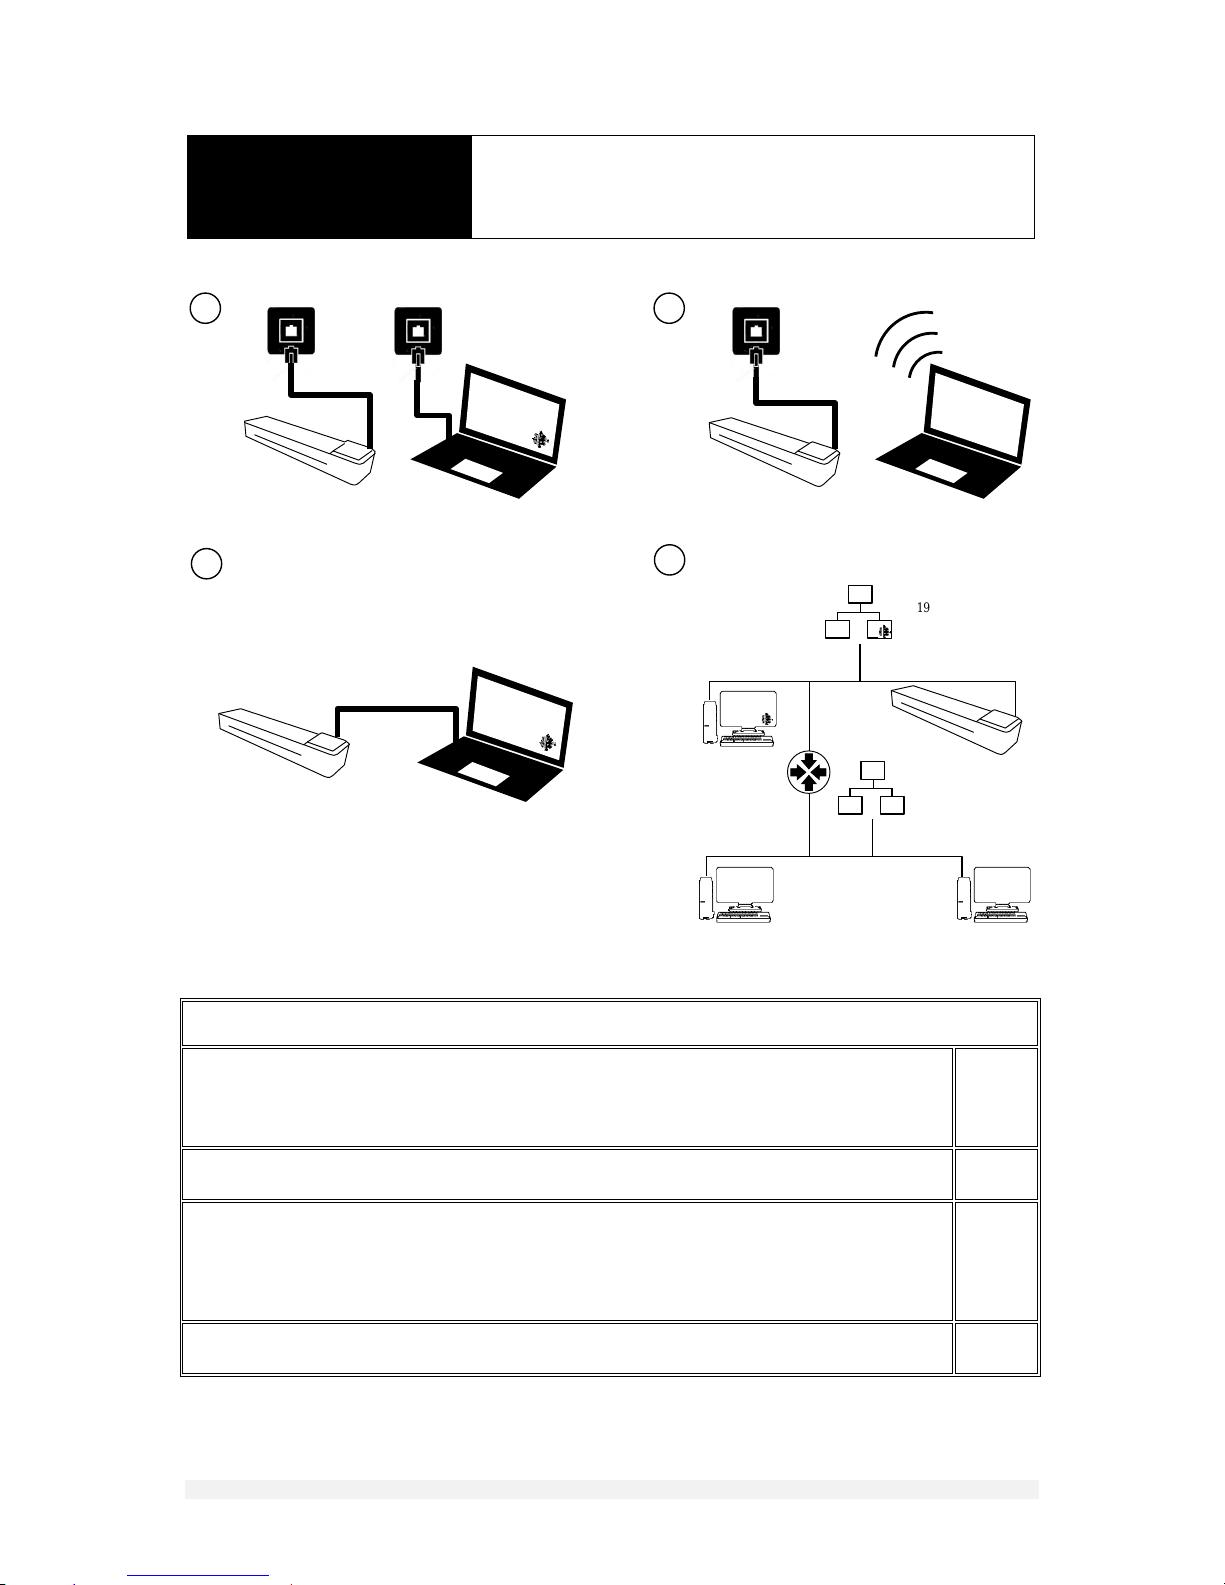
3
4
1
2
192.168.001.XXX
255.255.255.000
192.168.002.XXX
255.255.255.000
×
×
INSTALLATION
CABLE, WIRELESS OR DIRECT
LINK NETWORKING
CONNECTION OPTIONS USING THE NETWORK CABLE (INCLUDED)
Cable Scan! to the same network used by your wired computer. The Scan! is set for DHCP networking by
default. Alternatively set a suitable unique STATIC IP address in the scanner in the same network range as
your computer and the other devices on the network. Your IT person can help you with this if you are unsure.
Duplicate the subnet IP address on Scan! if your office network differs from the default (255.255.255.000).
1
If your computer is connected wirelessly to your office network follow the instructions for 1. and ensure that
the scanner is set either DHCP or with a STATIC address compatible with your network.
2
To cable network directly to your computer away from an office network you must set your computer to have
a STATIC IP address (your office computers may be already set with STATIC IP addresses). To connect, first
change Scan! to STATIC IP adressing then enter a new static IP address ensuring the first nine numbers are the
same but the last last three (XXX) are different to your computer’s IP address. Duplicate the subnet IP address
on Scan! if your computer differs from the Scan! default of 255.255.255.000.
3
Scan! is not useable across bridged networks. Look for differences in the first three sets of numbers in the IP
address.
4
Page 10
10
DOCUMENT NO. 88N001H © 2016 Colortrac
SCANNING
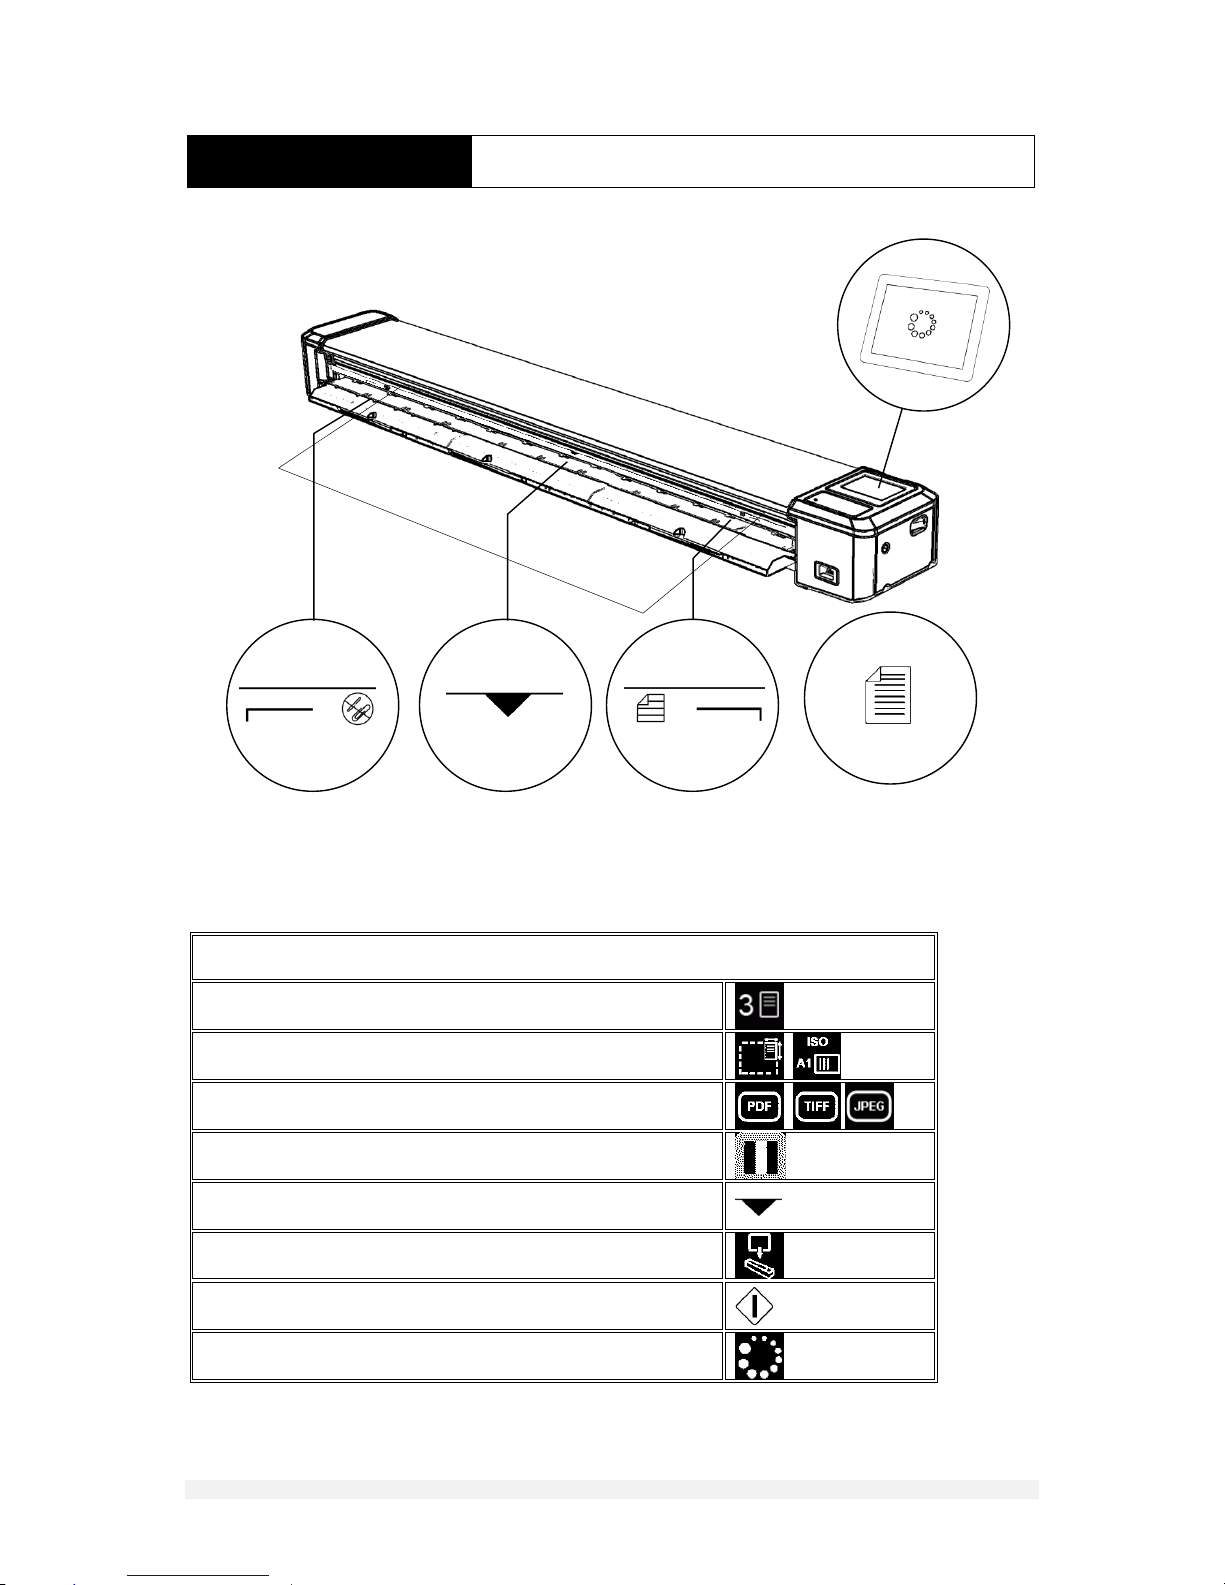
SCAN TO SCANNER MEMORY
STEPS
Check scanner memory is not full (8 scans maximum)
Check / select paper size setting
Check / select file type
Check / select color mode
Load paper in centre of scanner between limit markers
Check mode is ‘download to scanner’ (default)
Press scan button
Document will eject automatically after scan is stored
Page 11
11
DOCUMENT NO. 88N001H © 2016 Colortrac
SCANNING
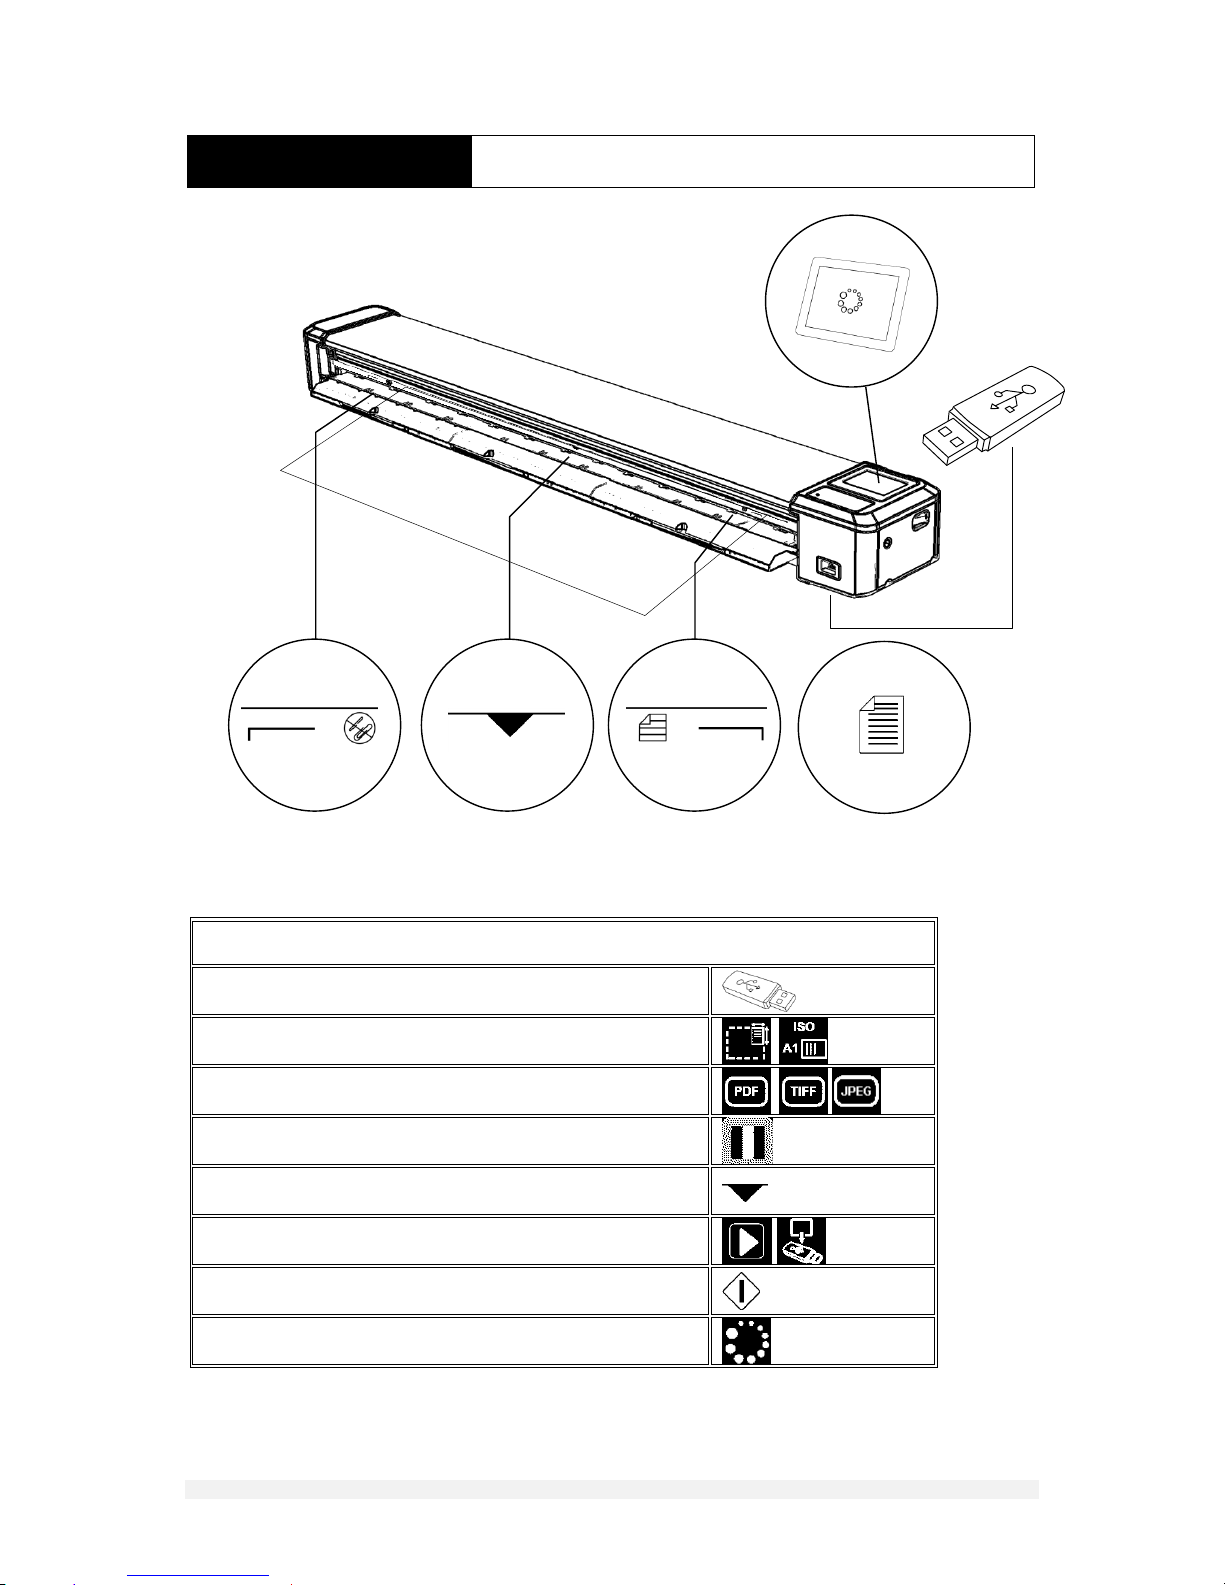
SCAN TO USB MEMORY
STEPS
Insert USB flash memory (FAT32, 4-128GB)
Check / select paper size setting
Check / select file type
Check / select color mode
Load paper in centre of scanner between limit markers
Change mode to ‘download to USB flash memory’
Press scan button
Document will eject automatically after scan is transferred
Page 12
12
DOCUMENT NO. 88N001H © 2016 Colortrac
1
2
3
4
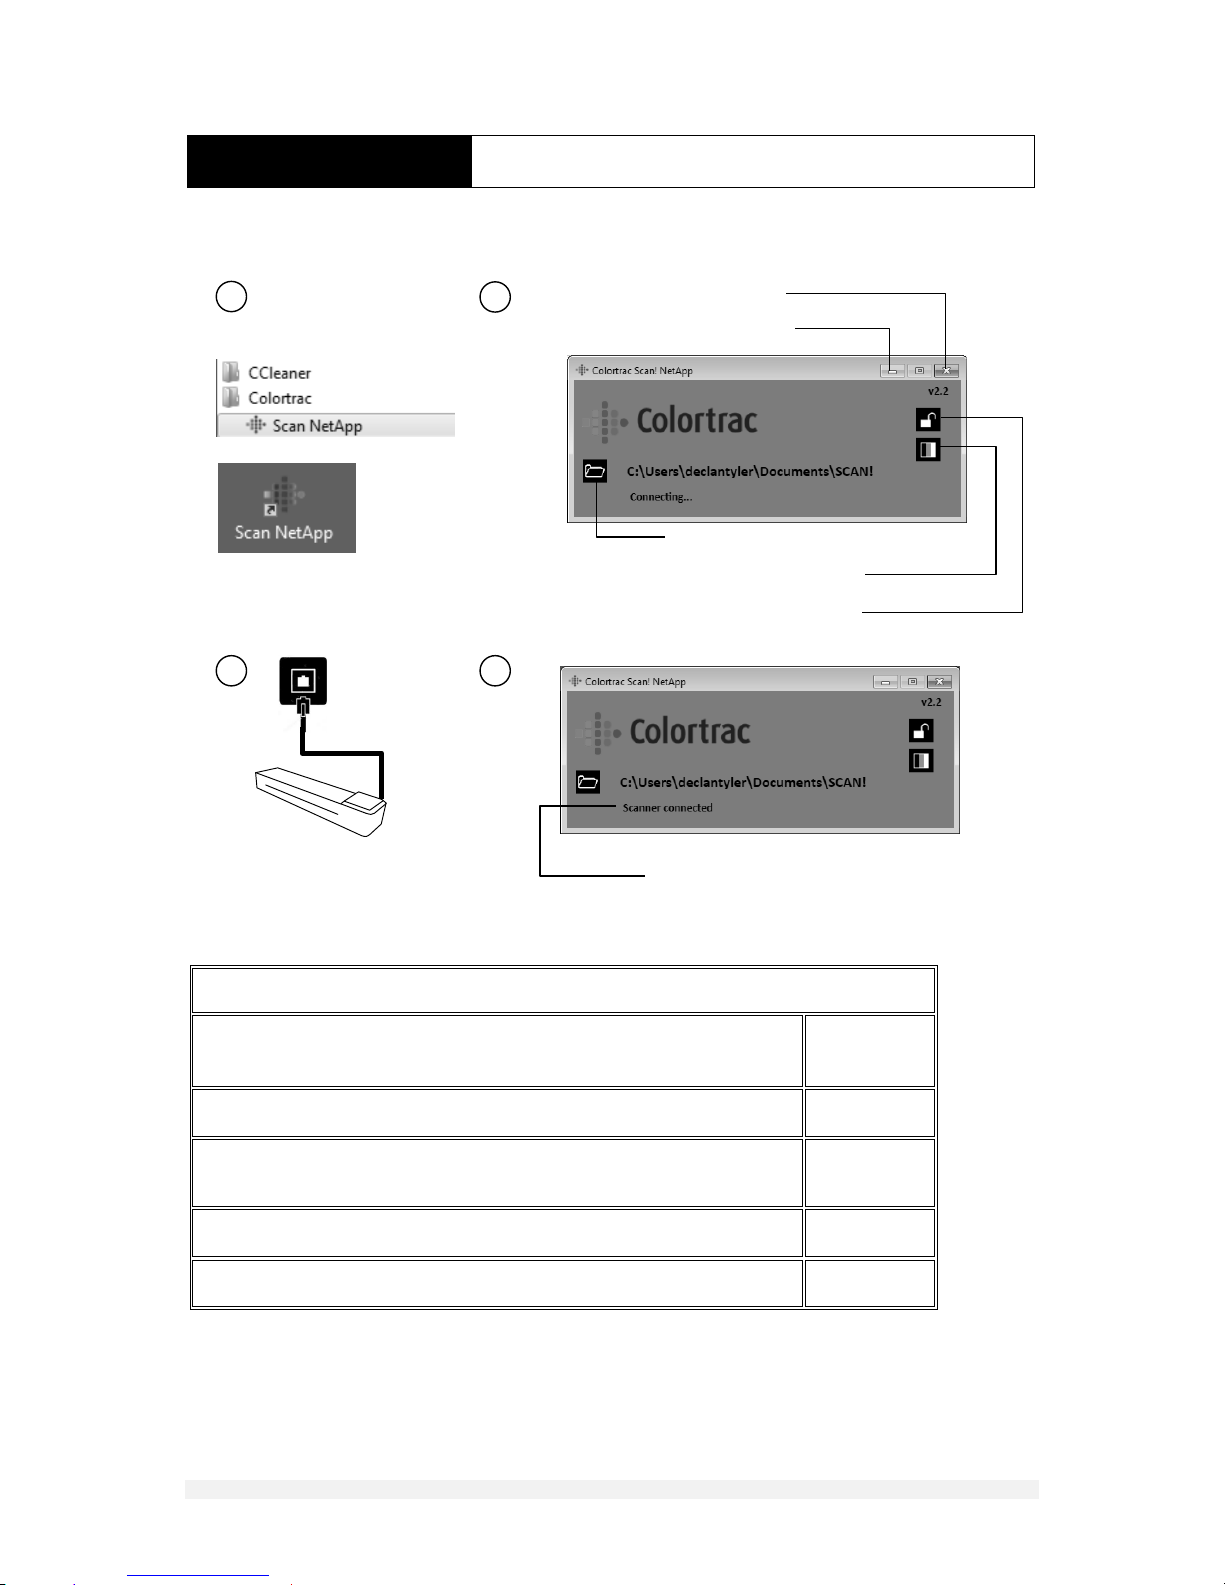
exit the NetApp
minimise
block other scanners
save grayscale as black and white
scan save folder
shows connection status
SCANNING
STARTING THE SOFTWARE
STEPS
Start Scan! NetApp from the Windows program Colortrac folder or
click the desktop icon
1
Browse to the folder you want to store your scans in
2
Toggle lock icon to block other scanners using this app after
connection
2
Toggle grayscale / bitonal icon to switch between gray and bitonal
2
Press stop/switch on/insert paper to wake and connect scanner
4
Page 13
13
DOCUMENT NO. 88N001H © 2016 Colortrac
SCANNING
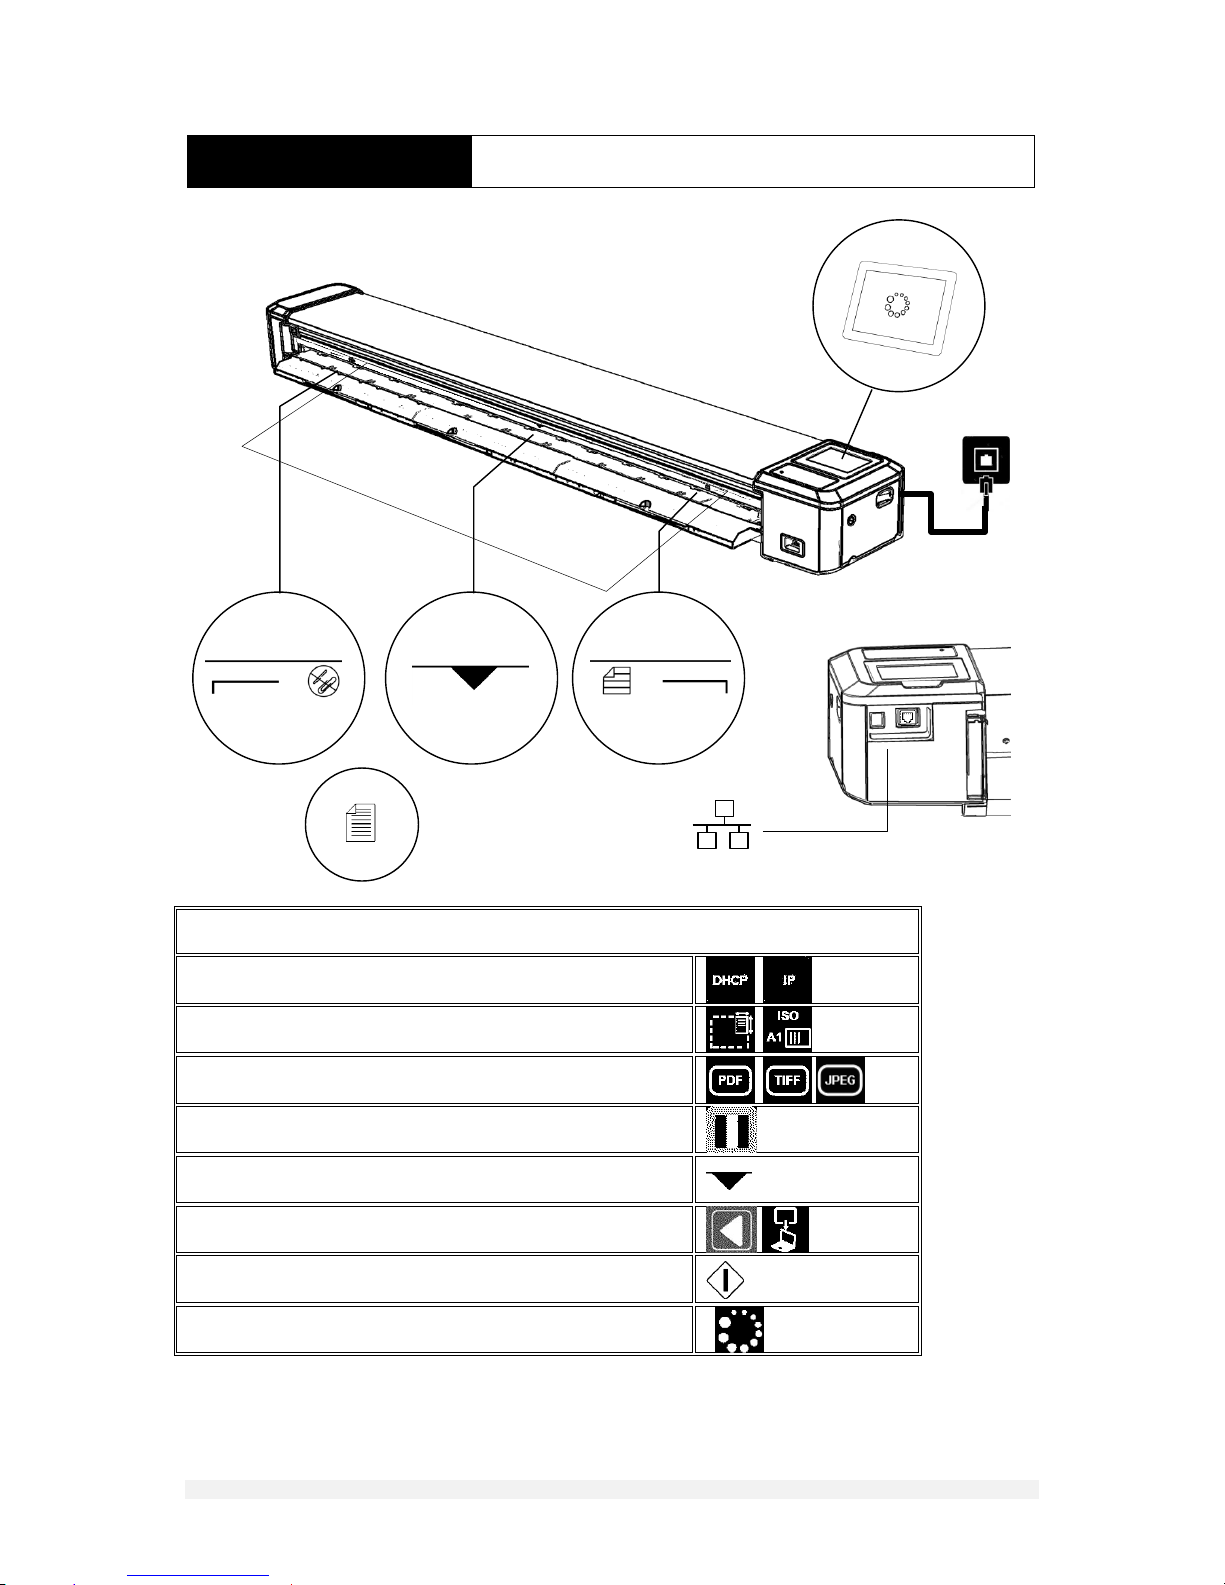
SCAN TO COMPUTER
STEPS
Connect to network, check IP protocol (see notes on p.9)
Check / select paper size setting
Check / select file type
Check / select color mode
Load paper in centre of scanner between limit markers
Change mode to ‘download to computer’
Press scan button
Document will eject automatically after scan is transferred
Page 14
14
DOCUMENT NO. 88N001H © 2016 Colortrac
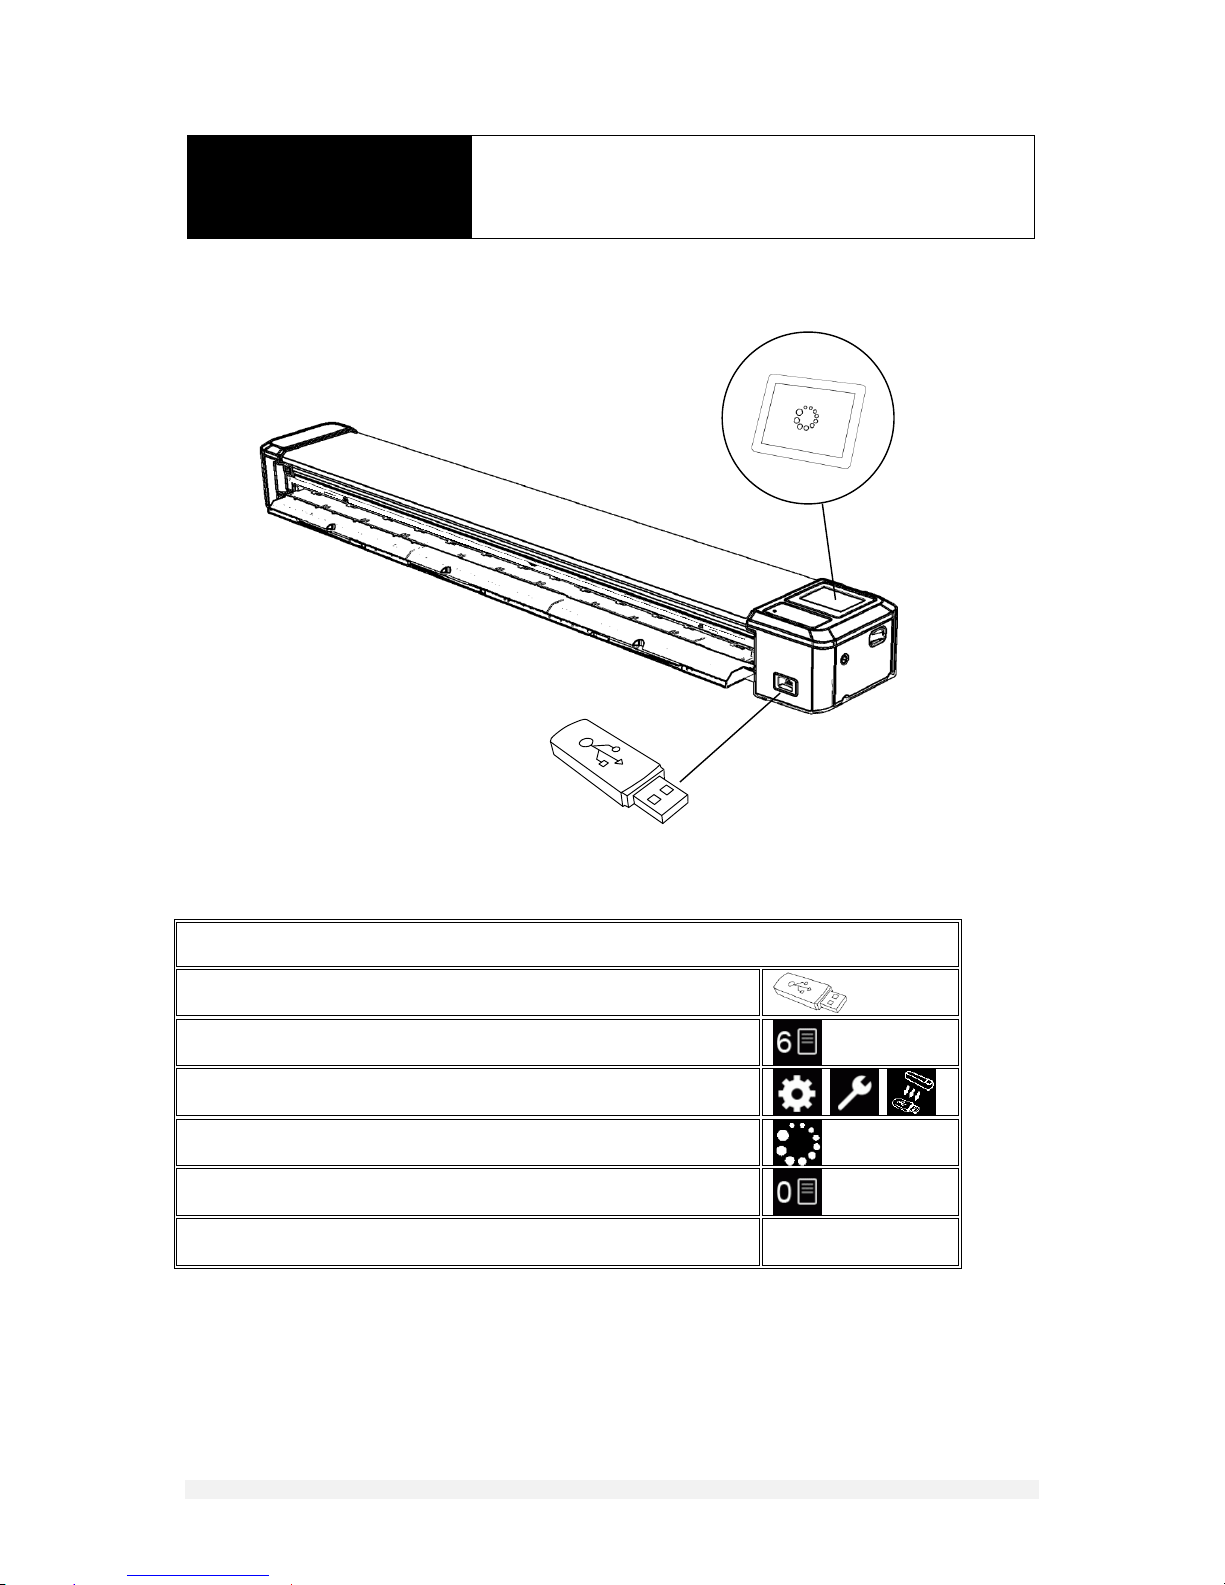
OPERATOR
TRANSFER ALL SCANS TO
USB MEMORY
STEPS
Insert USB flash memory (FAT32, 4-128GB)
Note number of scans stored inside scanner (top left of display)
Move to settings, more settings, move scans to USB flash memory
Click OK to transfer scans. Wait for process symbol to clear
Note number of scans stored inside scanner will now be zero
Remove USB flash memory
Page 15
15
DOCUMENT NO. 88N001H © 2016 Colortrac
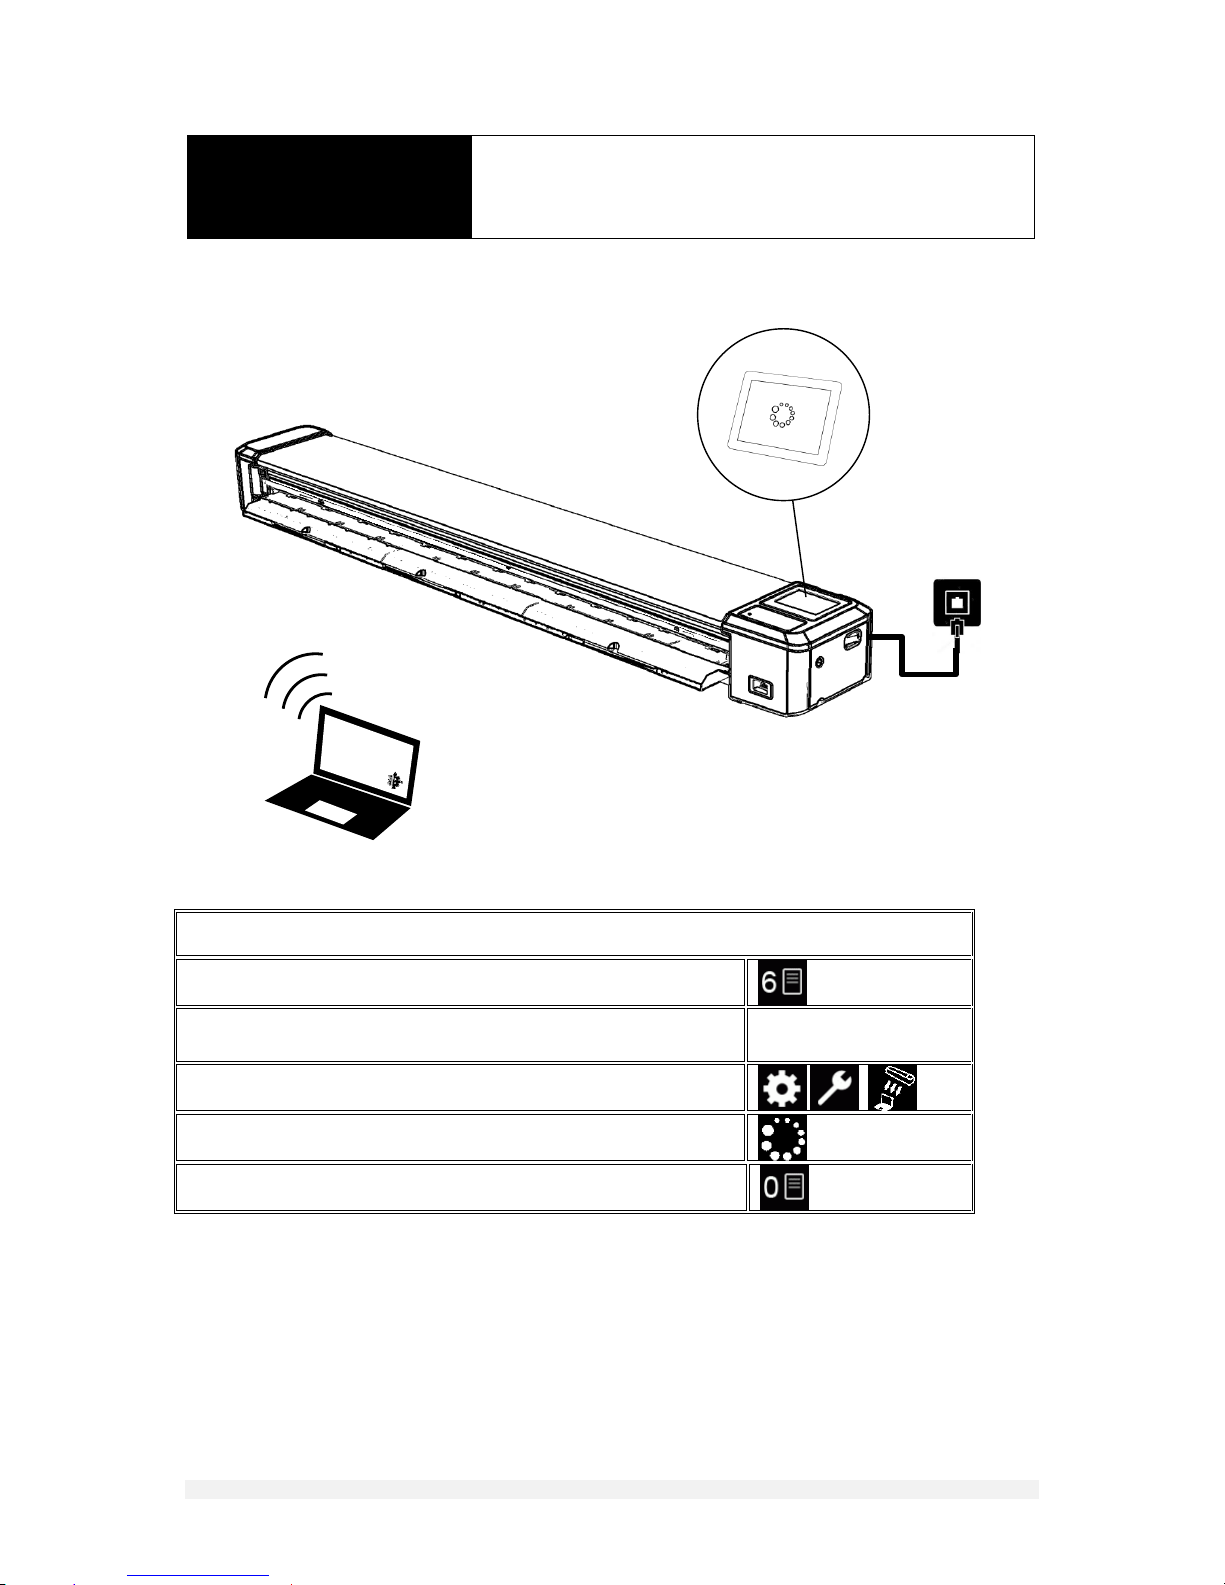
OPERATOR
TRANSFER ALL SCANS TO
COMPUTER
STEPS
Note number of scans stored inside scanner (top left of display)
Scan! must be connected to a computer – see page ‘ SCAN TO
COMPUTER (SCAN) ‘
Move to settings, more settings, move scans to computer
Click OK to transfer scans. Wait for process symbol to clear
Note number of scans stored inside scanner will now be zero
Page 16
16
DOCUMENT NO. 88N001H © 2016 Colortrac
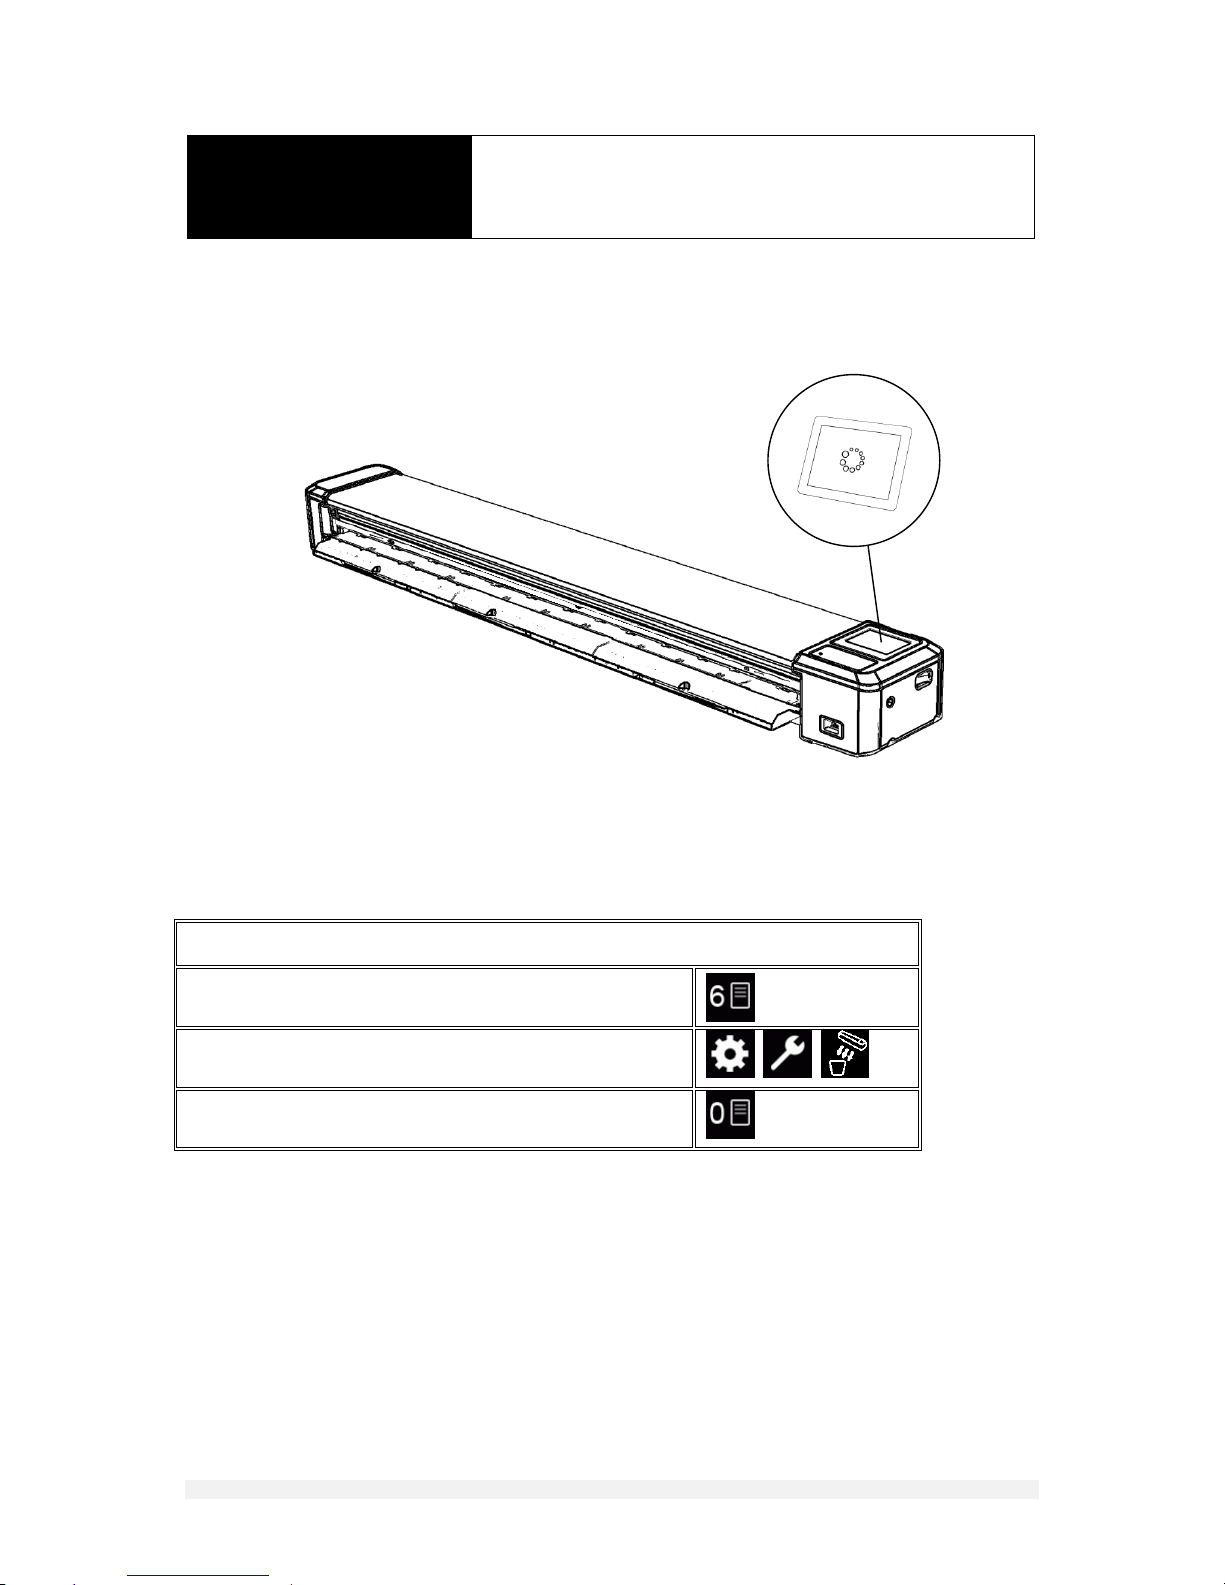
OPERATOR
DELETE ALL SCANS IN THE
SCANNER MEMORY
STEPS
Note number of scans stored inside scanner (top left of
display)
Move to settings, more settings, delete all scans in scanner
memory
Note number of scans stored inside scanner will now be
zero
Page 17
17
DOCUMENT NO. 88N001H © 2016 Colortrac
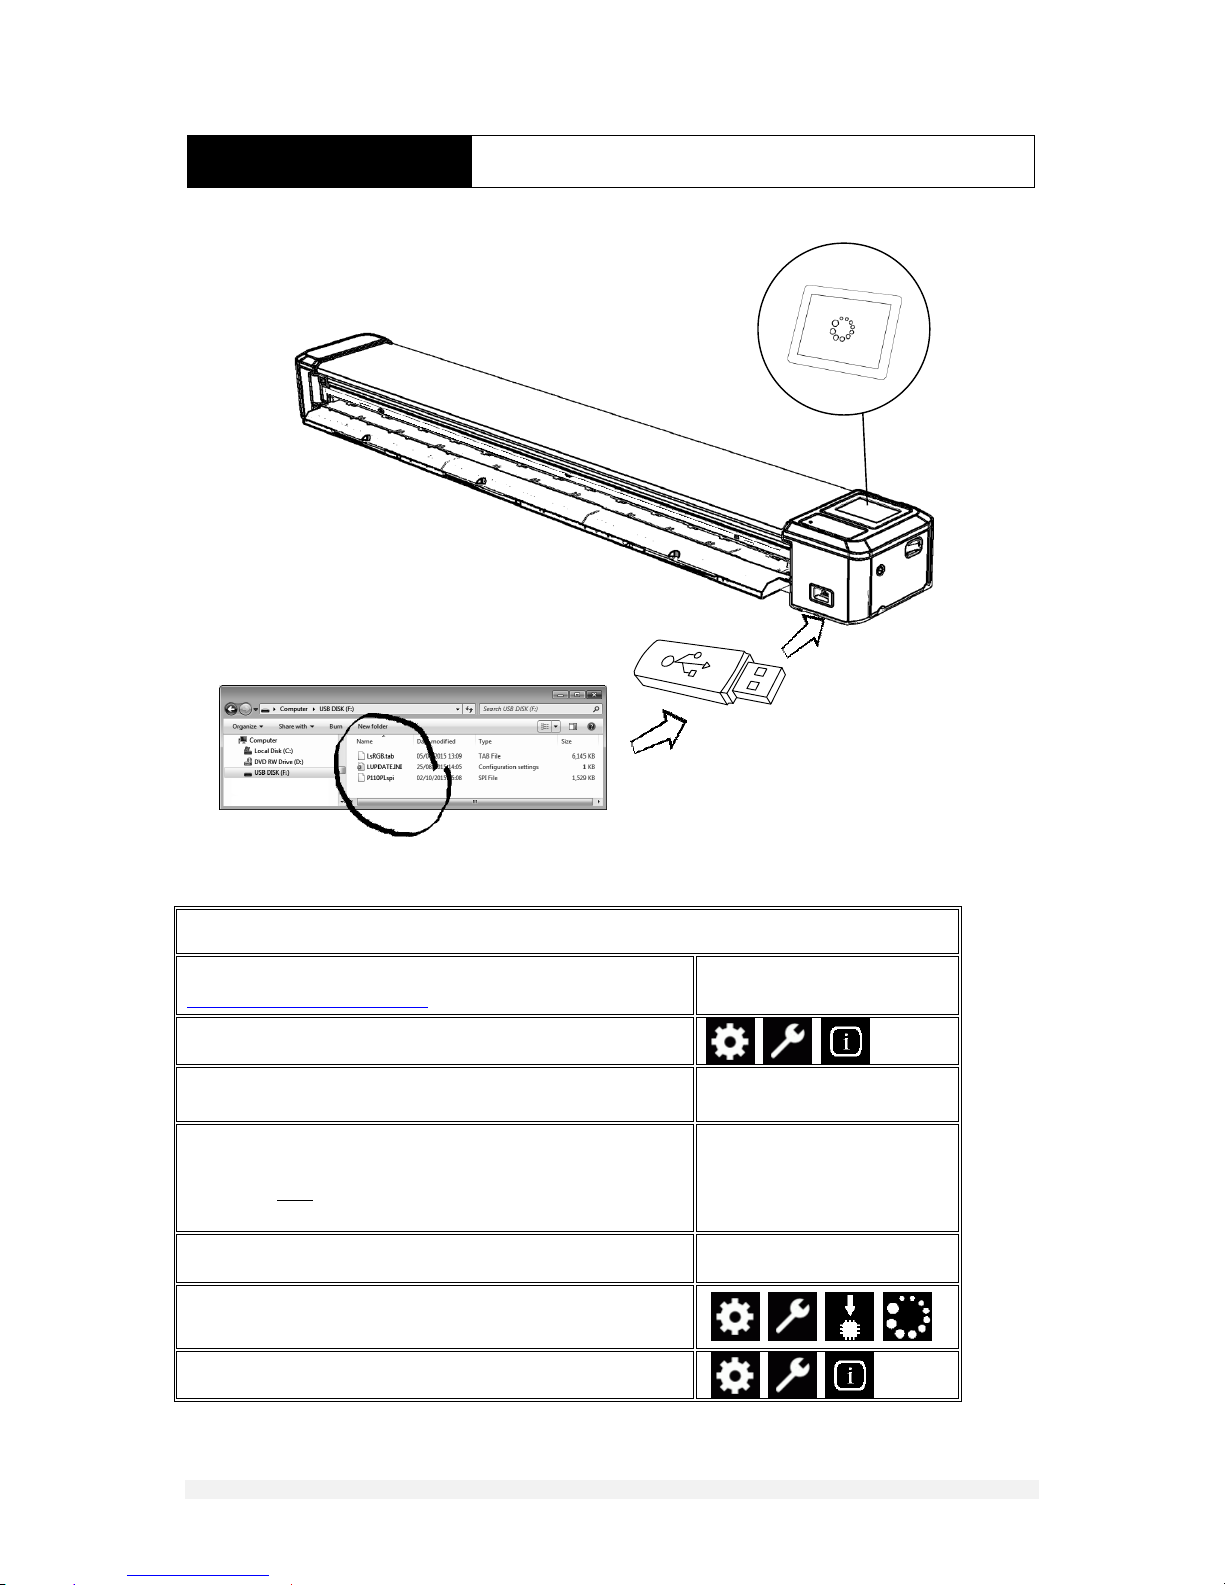
MAINTENANCE
UPGRADING FIRMWARE
STEPS
Check the latest firmware level for Scan! posted at
www.colortrac.com/support
Switch on Scan! and check fitted firmware level
Obtain an empty USB flash drive of at least 4GB capacity.
It is important the drive contains no folder or files.
Using a Windows computer copy the contents of the
firmware upgrade zip file to the USB stick. There should be
three files only on the USB memory stick to perform the
firmware upgrade on the scanner
Insert the USB stick into scanner USB socket
From the upgrade firmware icon press OK. Upgrading takes
approx. 20 seconds. Scan! will restart automatically
Now check the firmware has updated
Page 18
18
DOCUMENT NO. 88N001H © 2016 Colortrac
2
3
5 4 1
MAINTENANCE
CLEANING THE SCANNER
STEPS
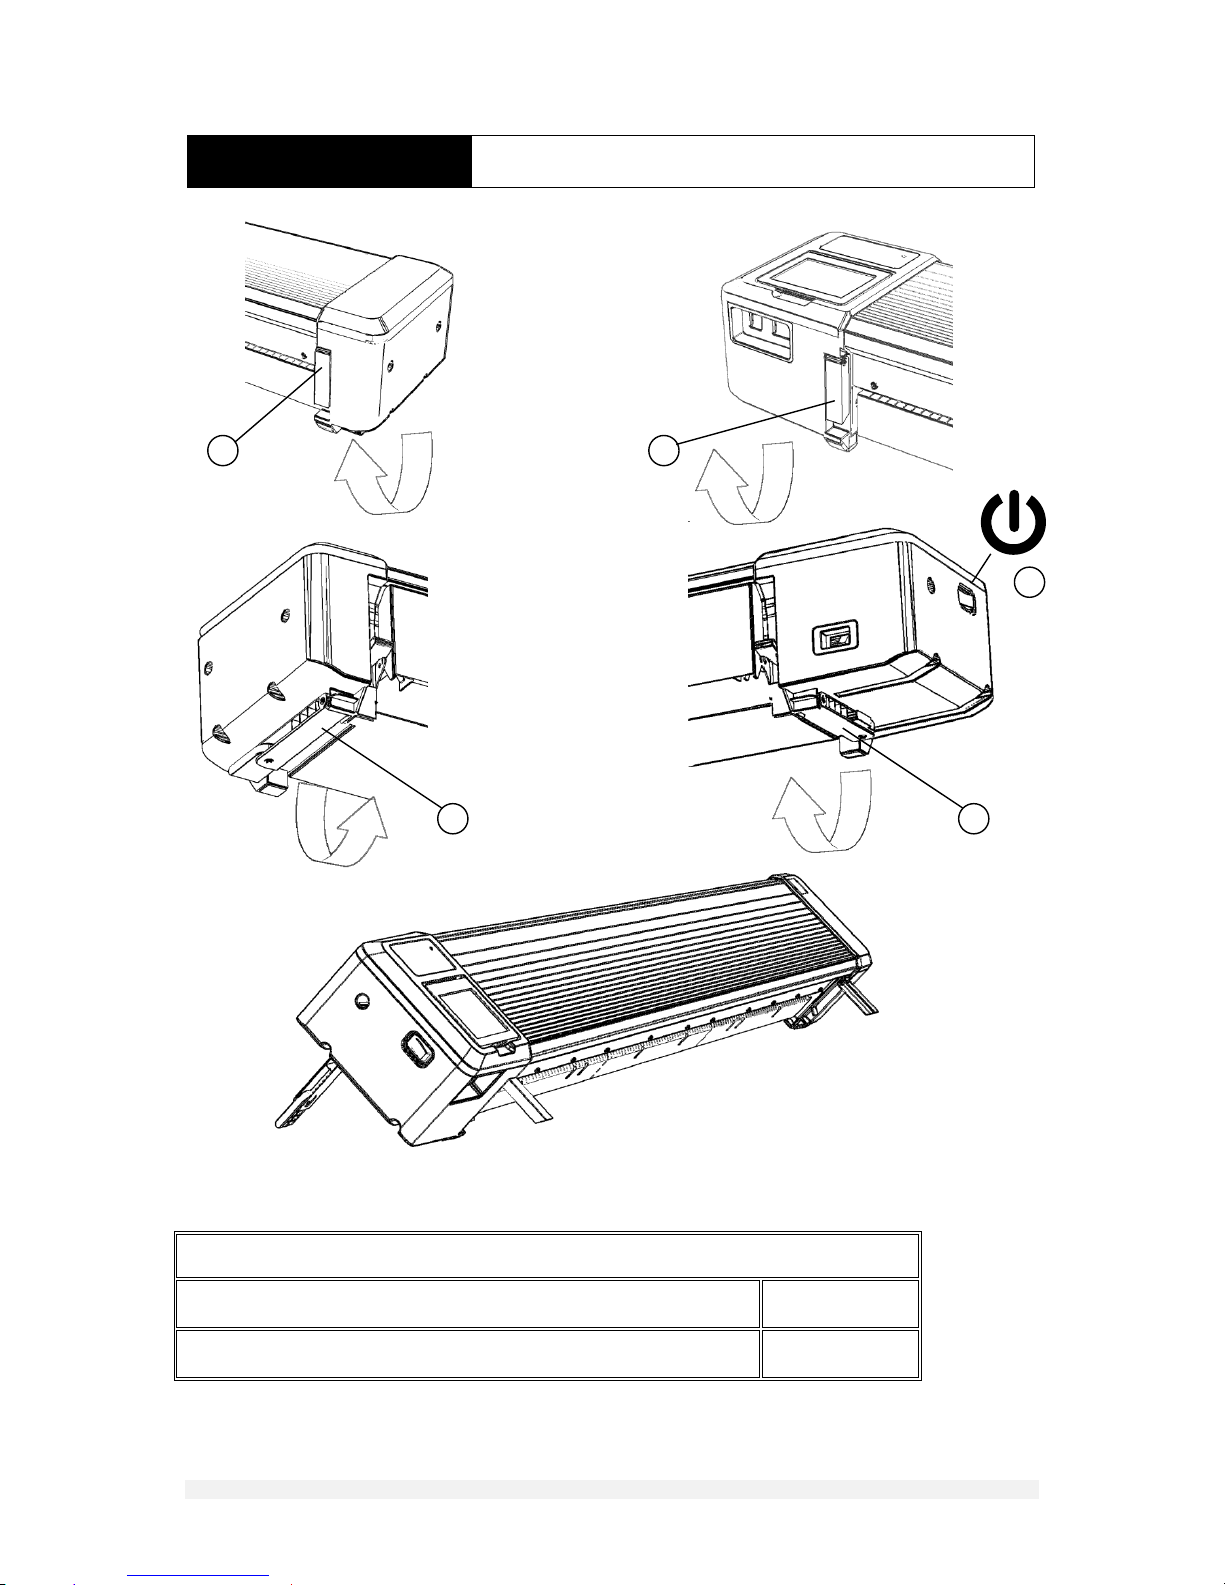
Power off the scanner and remove all connection cables
1
Fold out rear props, lean scanner back then fold out front
2,3,4,5
Page 19
19
DOCUMENT NO. 88N001H © 2016 Colortrac
5
1
3
4
2
MAINTENANCE
CLEANING THE SCANNER
STEPS
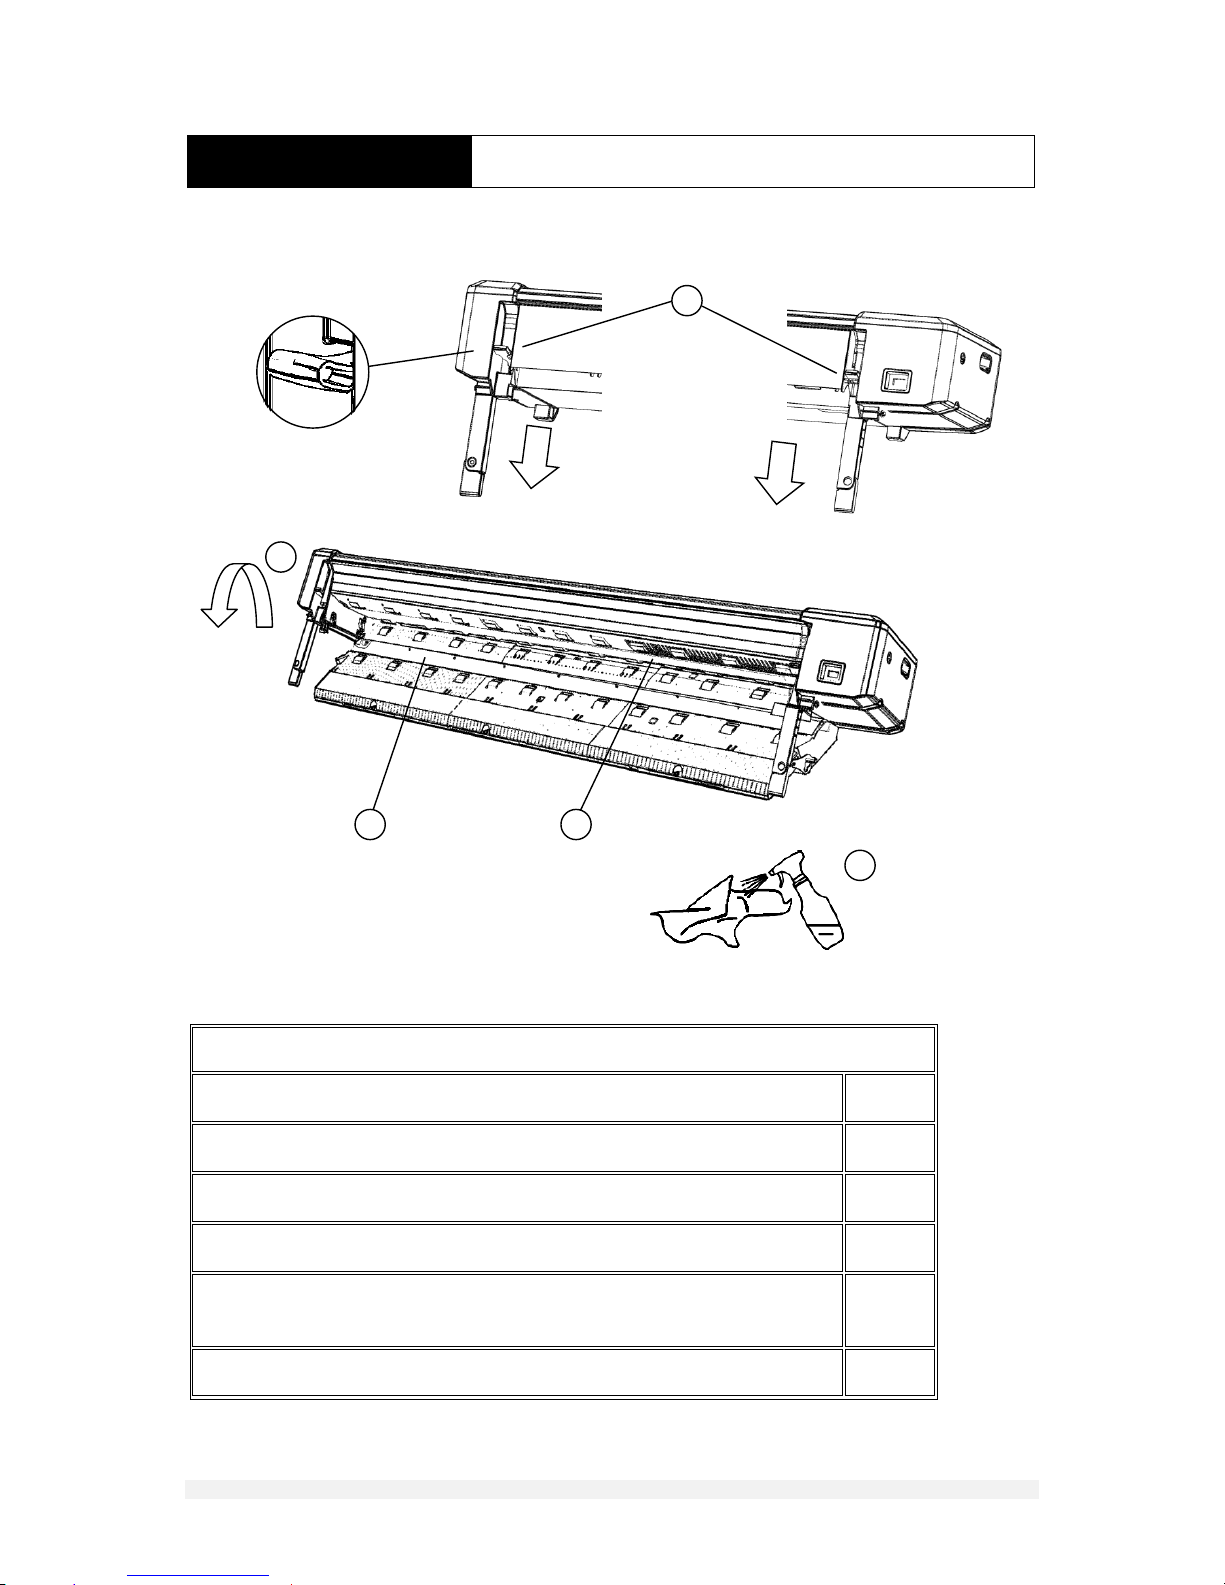
Push left and right levers downwards to lower the closed tray section
1
Support tray and fold out lower section
2
Identify white paper pressure plate (sprung)
3
Identify sensor glass
4
Periodically inspect and clean 3 and 4 using non-abrasive, non-solvent, lintfree cleaning products if required
5
Allow to dry then close tray (check for blue light when powered back up)
Page 20
20
DOCUMENT NO. 88N001H © 2016 Colortrac
2
1
3
MAINTENANCE
CALIBRATE THE SCANNER
STEPS
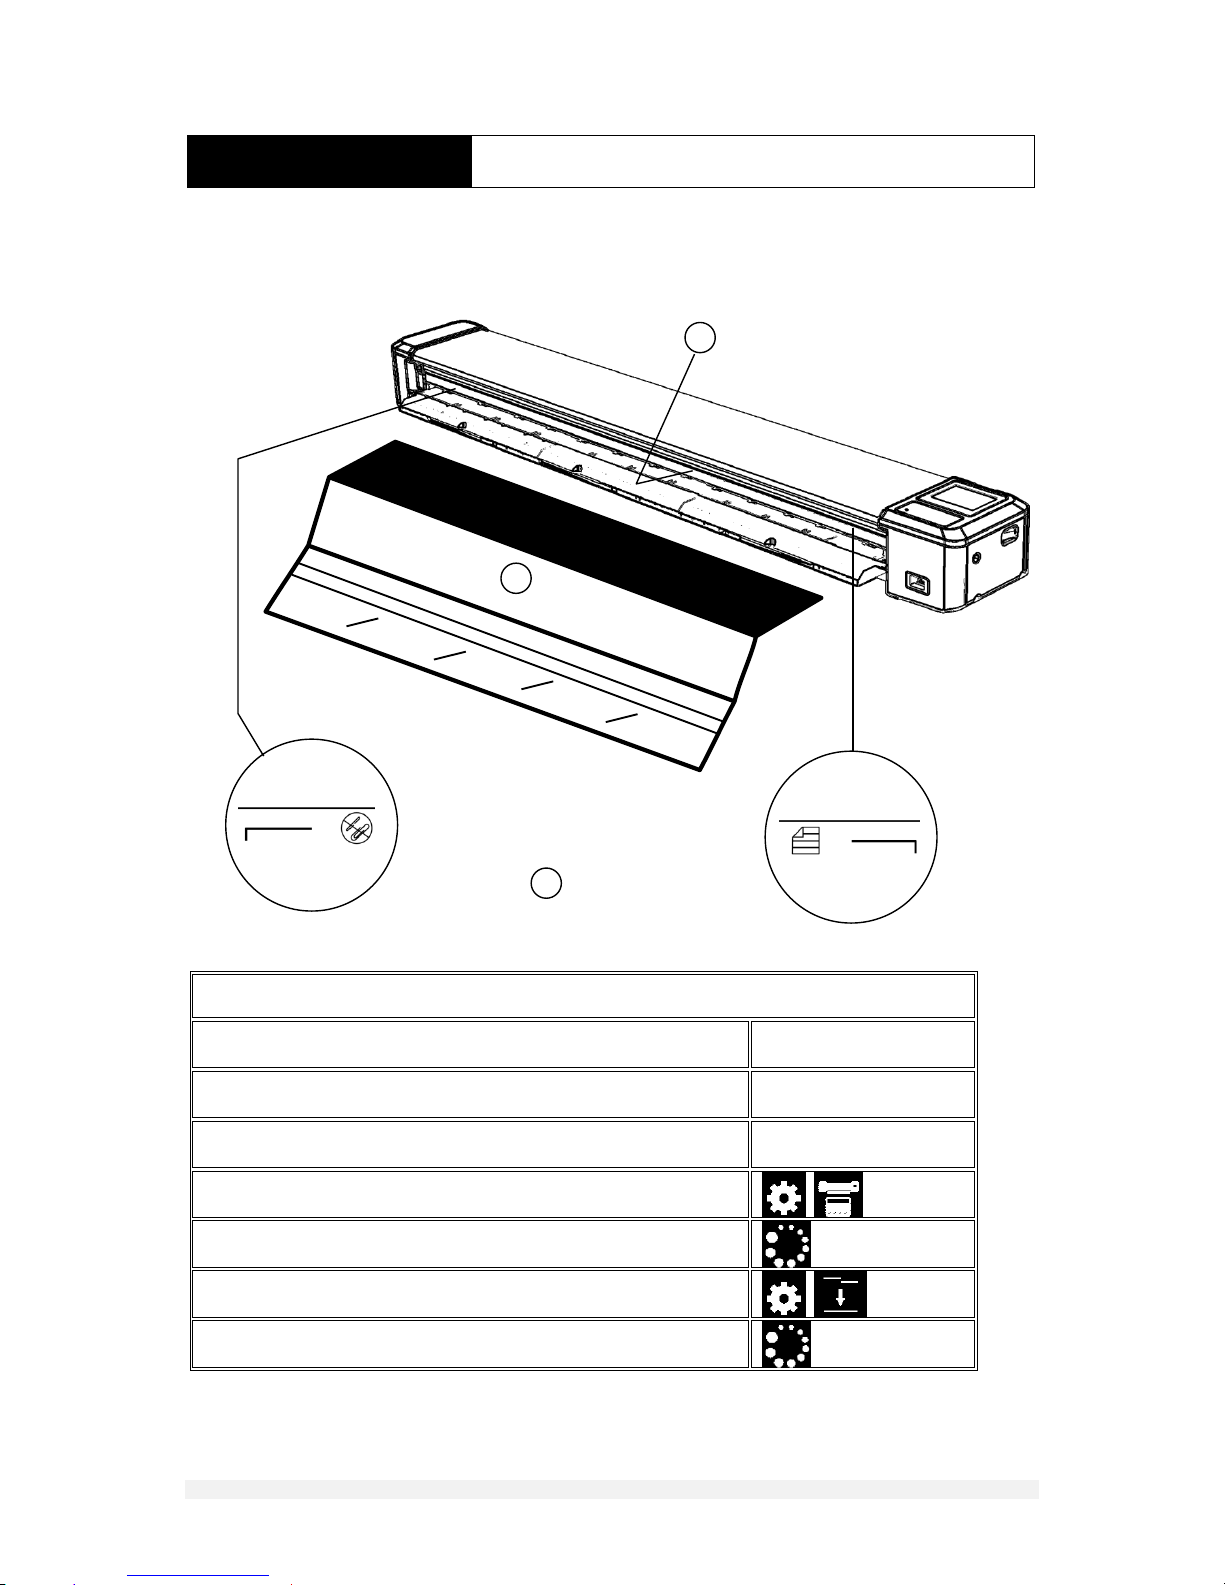
Always ensure sensor glass is clean and dry (previous section)
1
Note: Calibration target is placed between width markers
2
Insert calibration target into scanner face up, black section first
3
Select settings, color calibration
Calibration target is ejected after calibration
Select settings, line calibration
Calibration target is ejected after calibration
Page 21
21
DOCUMENT NO. 88N001H © 2016 Colortrac
GENERAL
OPERATING TIPS
GENERAL
TROUBLE SHOOTING GUIDE
Description Explanation
Blue light flashes for 1 second every 5
seconds
Scanner is in sleep mode. Press SCAN button to wake scanner or
insert media
Loaded document suddenly moves
through the scanner and is ejected.
Light flashes 1 second every 5
Scanner has entered deep power save mode. Place paper on tray
then remove it to re-power the scanner
Orange light shows and will not scan
Paper tray is still open and not properly locked at one or both
ends. Close paper tray.
When connected to a computer Scan!
starts to scan but then sends
document through scanner faster
than normal
Scan! could not find the computer on the same network. Use
‘information’ in the scanner and ipconfig from the command
prompt at the computer to verify that both devices are identical in
the first three frames of the IP address192.168.001.XXX.
Paper size is not detected properly
Scanner glass may be dirty. Inspect and clean if necessary. Note
if the glass was dirty at the time a color calibration was carried out
a perfectly clean scan glass will not help. Check the scan glass is
still clean then color calibrate and try again.
Document is ejected or does not scan
properly using automatic paper sizing
Document is wider than the scanner maximum scan width.
Rotate document if possible or change to largest manual size (Dsize portrait or E-size portrait).
Scans are not being saved when using
the USB stick
The USB flash memory stick may be damaged, worn out of poor
quality or incompatible. Change to a different type
Description Explanation / Tip
Dealing with a document that has
loaded skewed or is not lying flat on
the scanner tray
Do not press Eject or Scan. Instead slightly lower the paper tray
towards the maintenance position (p19), remove the document,
click the paper tray assembly back up into position and reload
Do not feed a document immediately
behind the document still being
processed (held but not yet ejected)
Failing to allow the scanner to finish and eject a document causes
any following document placed in the scanner to be ejected
without being staged ready to be scanned
I find it difficult sometimes to load
larger documents squarely into the
scanner
Grip the paper at each side 2”/ 50mm in from the leading edge.
With the paper slightly in tension (stretched) rest each hand on
the tray so that the leading edge is parallel and ¼”/ 6mm in front
of the white ruler. Now push the document into the scanner.
Why does the scanner not accept any
more than 8 scans when scanning
internally to its own memory
SmartLF Scan! will store a maximum of 8 scans inside its internal
memory
The processing circle icon seems to
continue beyond 1 minute.
Please restart the scanner and try again. If using a memory stick
try a different one.
Page 22
22
DOCUMENT NO. 88N001H © 2016 Colortrac
Pressing the scan button when using
the USB memory stick does not start
the scan
Wait 3 to 4 seconds after inserting the USB stick into Scan! before
pressing the scan button for the stick to be recognised properly
When using the Scan! NetApp no
scans are received into the folder
a) Power cycle the scanner
b) Determine the scanner IP address then ping it from the
computer e.g. ping 192.168.001.xxx
c) Is the NetApp running?
d) Is a NetApp running on a different computer and directing the
scans somewhere else?
e) If b and c are okay uncheck the Scanner Lock checkbox in c or d
to reset the lock (required after a firmware upgrade)
Straight lines and diagonal lines in the
scan images have very small breaks in
them when inspected at high zoom
If the scanner is subjected to strong physical shock or extremes of
temperature during storage or shipment the internal optical
alignment may be altered very slightly. Use the line calibrate
function from the more settings menu and the calibration target
to electronically re-align the scanner.
The color of the image is suddenly
changing very slightly across the
scanner
If the scanner is being used in a room where the temperature is
more warm or cold than normal or different to the environment
where the scanner was last color calibrated then it may be
necessary to recalibrate. Use the color calibrate function from the
more settings menu and the calibration target to electronically reset the color in the scanner.
Page 23
23
DOCUMENT NO. 88N001H © 2016 Colortrac
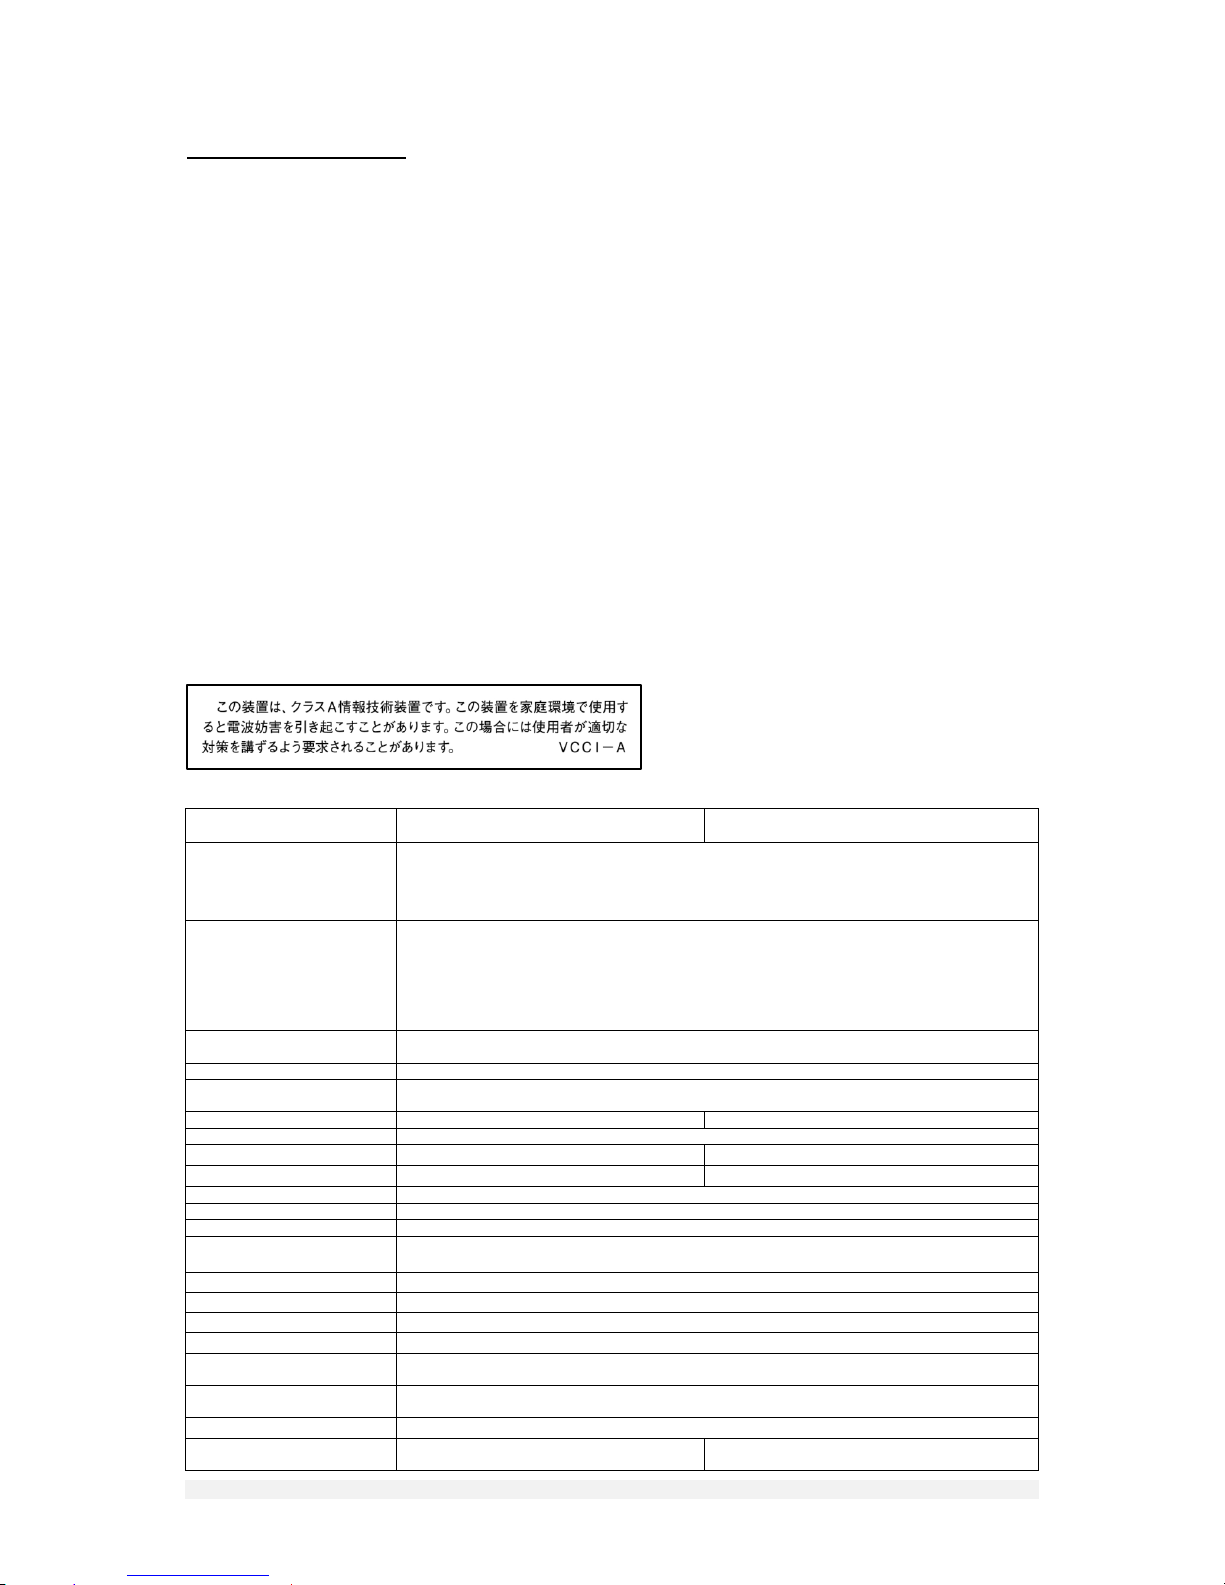
Declaration of Conformity
GLOBAL SCANNING SUZHOU CO LTD
#39 DONGJING INDUSTRIAL ZONE, #9 DONGFU RD,
SUZHOU INDUSTRIAL PARK, SUZHOU,
JIANGSU, 215123 CHINA
Model name: SmartLF Scan! 24, SmartLF Scan! 36
Function: Large Format Scanner
Rating voltage: 19V
Rating current: 3.42A
Power supply: FSP065-REBXX
(X=0-9, A-Z or Blank)
Approvals applied for: Energy Star, CB, CE, FCC, UL, CuL, VCCI, C-Tick, CCC,
BIS, KCC, EAC, BSMI, RoHS, LVD
Warning:
This is a Class A product. In a domestic environment this product may cause radio interference in
which case the user may be required to take adequate measures.
BELOW: Product warning for Class A product written in Japanese (to comply with Japanese certification and approvals.
SmartLF
Scan! 24
SmartLF
Scan! 36
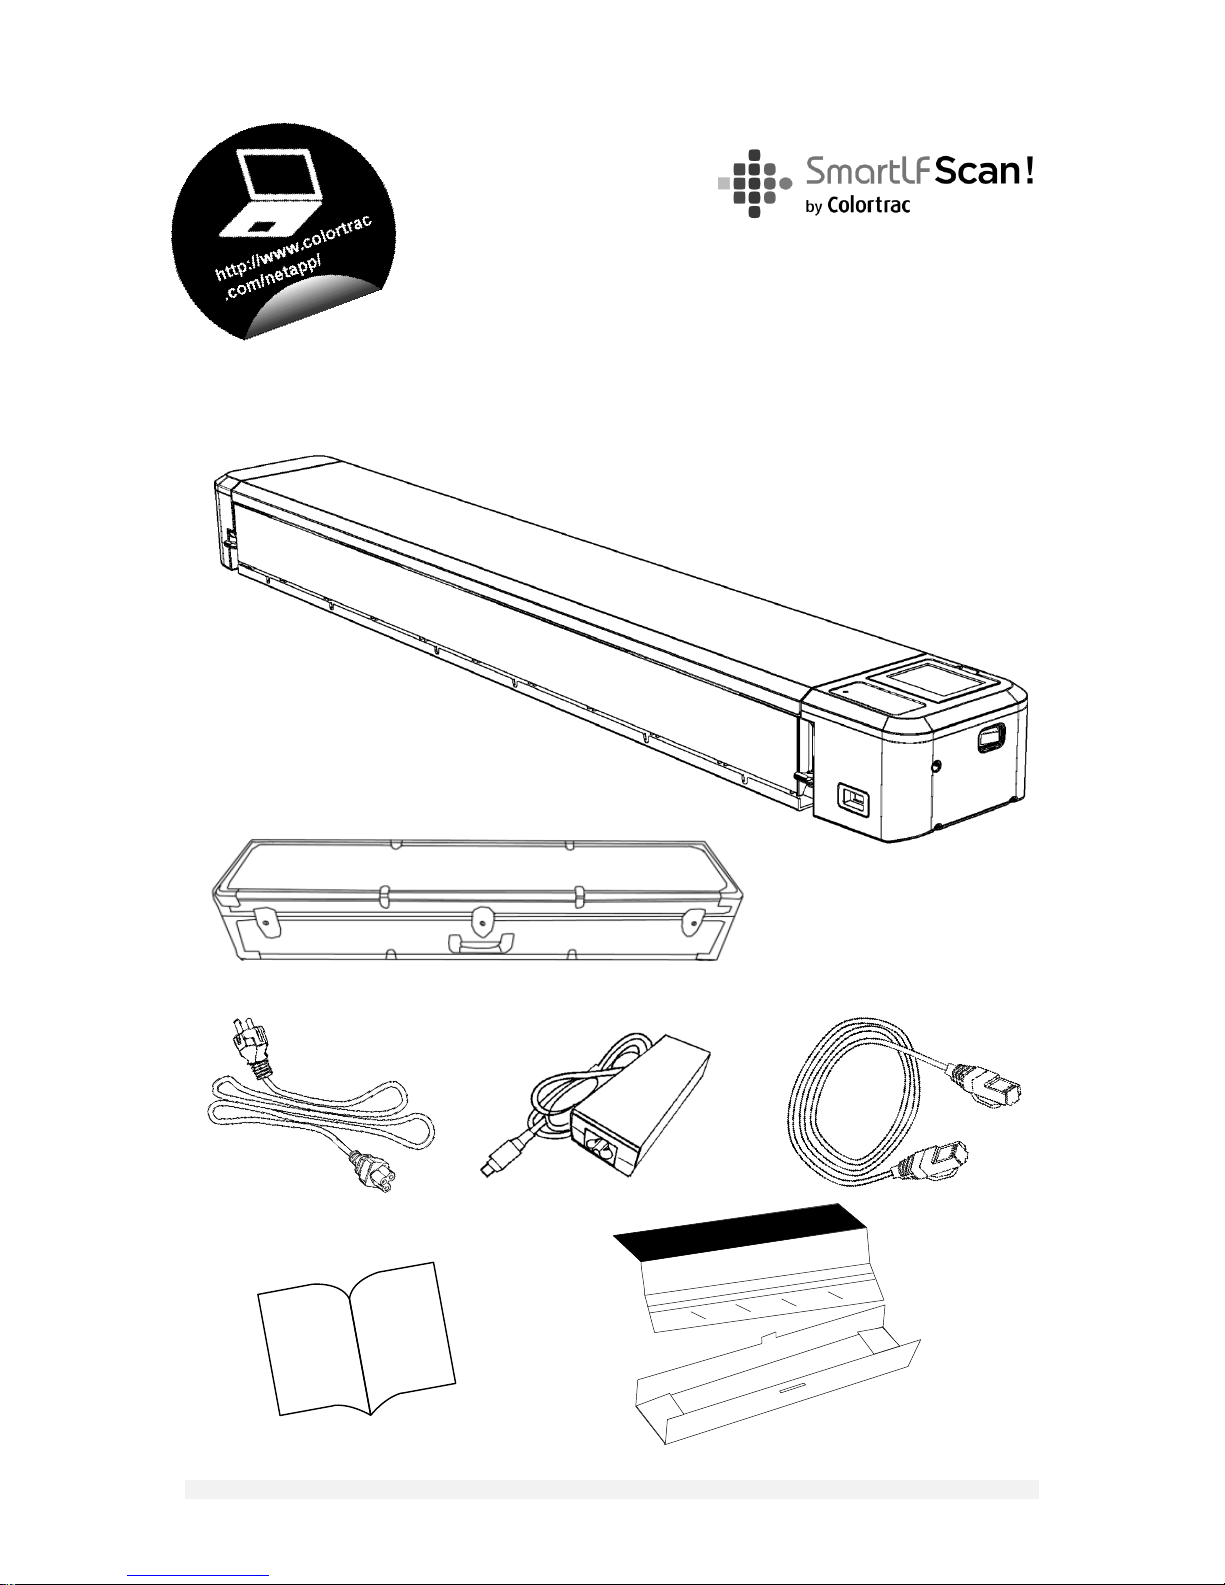
In-the-box
Scan! large format scanner
Tough wheeled carry case
Mains external power supply
Calibration target
RJ45 Ethernet cable
Scan System
Three modes of operation.
TIFF and PDF files are generated inside the scanner. They can be
1 - stored in the scanner for transfer to a PC later
2 - stored directly on a USB stick
3 - transferred via wired Ethernet, direct to a network or PC.
When connected to a PC, additional black and white binary files are available.
SmartLF Scan! is self-contained and only requires a power supply to operate.
Scan software
Scan formats are viewable using native Windows Apps. A small Windows program is supplied to receive live or stored scan files from the
scanner. This is not required for scan to USB stick operation.
Optical Resolution
600 dpi
DocLogic
intelligent image optimisation system
automatically sets dpi of document or photos according to physical size to maximise image quality and reduce file size
Max Scan Width 24” (609.6 mm)
36” (914.4 mm)
Max Image Length
50" (1270mm)
Min Media Width / Thickness
6.2” (160mm) / 0.003” (0.07 mm)
6” (150 mm) / 0.003” (0.07 mm)
Max Media Width / Thickness
26” (660mm) / 0.02” (0.5 mm)
38” (965 mm) / 0.02” (0.5 mm)
Paper sizing (image sizes)
ISO DIN / ARCH / ANSI / automatic width and length
Internal memory
approx. 6 GB or 8 scans
Scan Accuracy
0.2 % +/-1 pixel
SingleSensor
digital imaging technology
SingleSensor is a full width straight-line contact image sensor (US patent #8,922,849)
Bi-directional long-life LED light system for optimum object illumination and instant-on scanning capability
Operation modes
scan to internal memory / scan to USB stick (not supplied) / scan to networked computer
Color space
24-bit sRGB and grayscale (plus bitonal using the pc connection)
Scan speeds (maximum at 200 dpi)
4.5 inch/sec (114.3mm/sec) grayscale and 3 in/sec (76.2mm/sec) for color.
Paper Path
Centered, face-up, front entry
Data interfaces
Front: USB2 socket for scan to USB memory stick.
Rear: Ethernet RJ45 GBit for scan to computer over network
Power Requirements External power supply Input: 100~240VAC, 50-60Hz, auto-sensing +/-10%, Output: 3.42A at 19V,
Scanner power consumption: 19.4 W (scanning), 10.2W (standby), 0.05W (sleep). Energy Star qualified
Environment
Operating temperature 10oC – 35oC, Relative Humidity 10% – 90% (non-condensing)
Weight & Dimensions (WxHxD)
Scanner only 11.5 lbs (5.2 kg) / 34.3 x 6.3 x 5 inches (870 x
160 x 126 mm)
Scanner only 15.4 lbs (7 kg) / 46.3 x 6.3 x 5 inches (1175 x 160 x
126 mm)
Page 24
24
DOCUMENT NO. 88N001H © 2016 Colortrac
DIAGNOSTIC
ERROR CODES
The scanner may display one of the following error codes if it encounters a problem.
- ERR_INVALID_MODEL, // 1
- ERR_CAL_PARAMS_INVALID, // 2
- ERR_CAL_PARAMS_MISSING, // 3
- ERR_SD_MOUNT, // 4
- ERR_SD_READ, // 5
- ERR_SD_WRITE, // 6
- ERR_SD_FULL, // 7
- ERR_SD_FORMAT, // 8
- ERR_SD_CLOSE, // 9
- ERR_USB_MISSING, // 10
- ERR_USB_MOUNT, // 11
- ERR_USB_CORRUPT, // 12
-ERR_USB_READ, // 13
- ERR_USB_WRITE, // 14
- ERR_USB_FULL, // 15
- ERR_USB_DELETE, // 16
- ERR_USB_CLOSE, // 17
- ERR_ETHERNET_NO_PC, // 18
- ERR_ETHERNET_SCAN, // 19
- ERR_STITCH, // 20
- ERR_NORM, // 21
- ERR_LED, // 22
- ERR_UPDATE, // 23
Scanner incl. case: 22.3 lbs (10.1 kg) / 38.6 x 10.4 x 8.2 inches
(980 x 265 x 208 mm)
Scanner incl. case: 30.9 lbs (14 kg) / 50.4 x 10.4 x 8.2 inches (1280 x
265 x 208 mm)
Host Platform
Windows 10, Windows 8, Windows 7, 32-bit and 64-bit architectures
Certifications
ENERGY STAR qualified, CB, CE, CCC, FCC, UL, RoHS compliant
Warranty
12 months or 30,000 linear scan metres
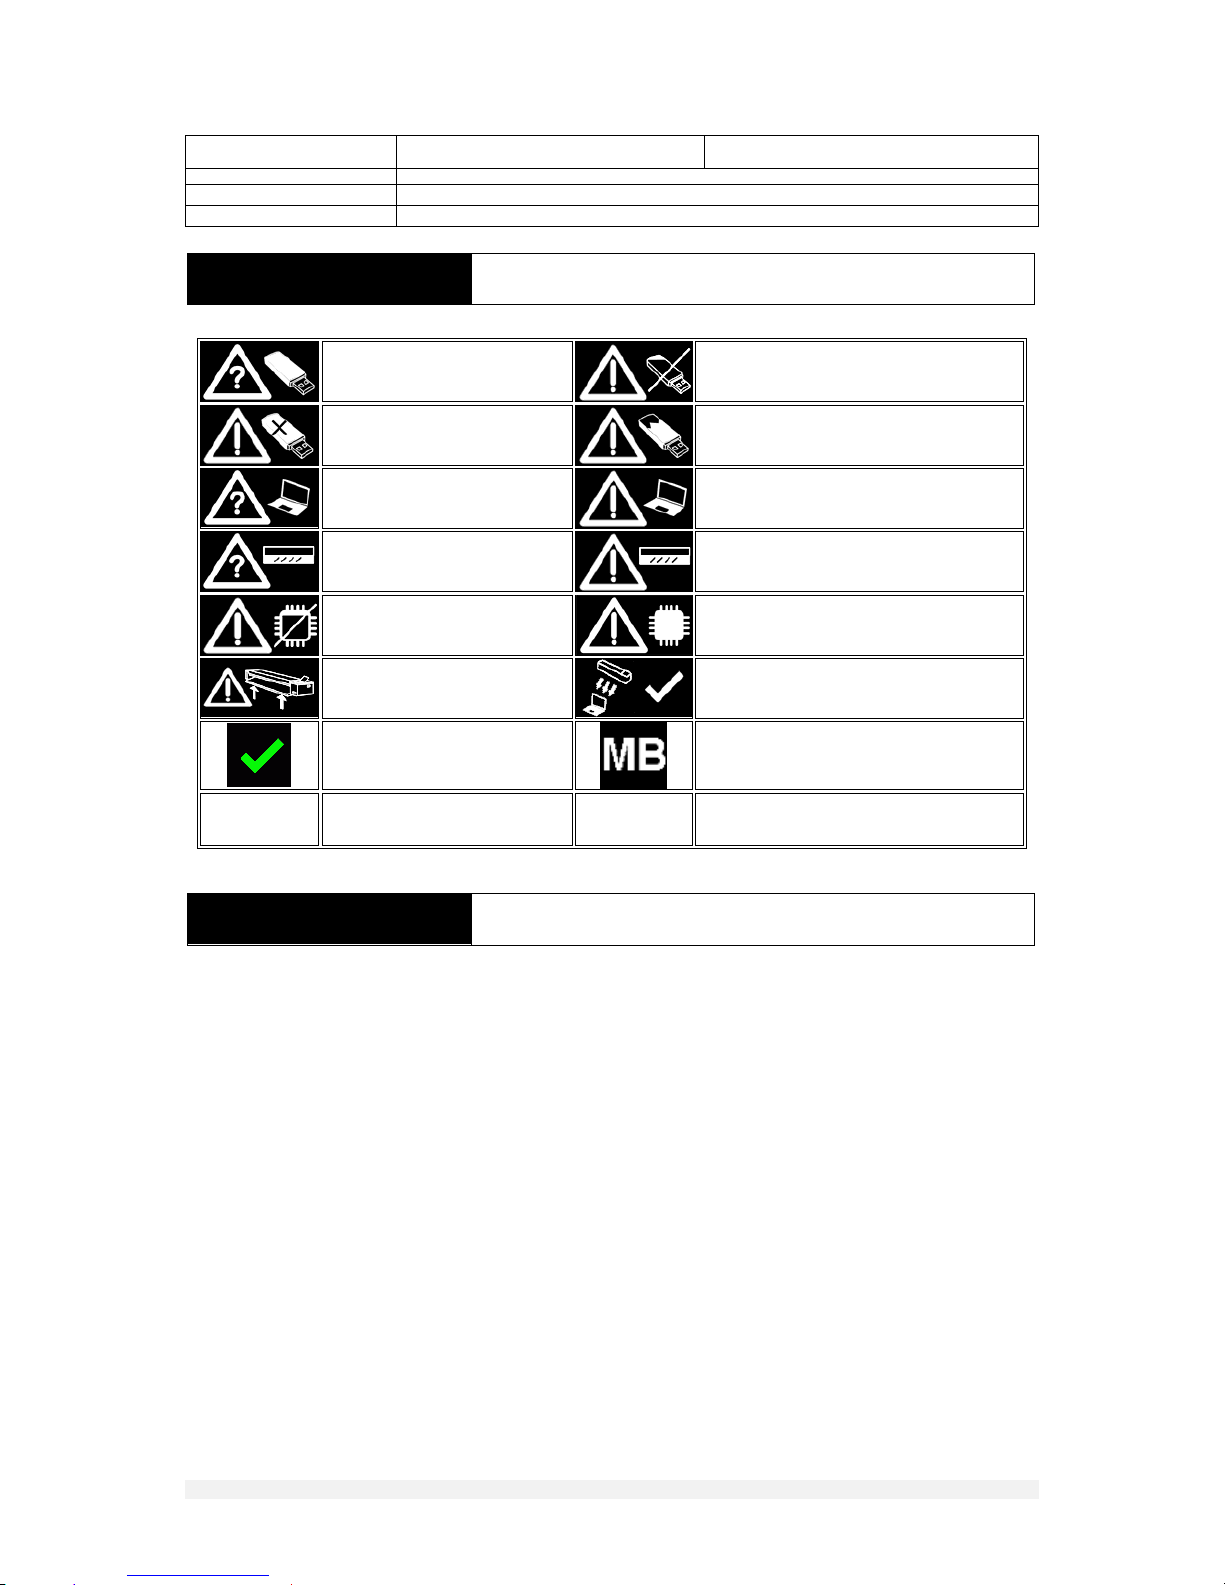
DIAGNOSTIC
ICON WARNINGS AND ERRORS
MISSING USB STICK
USB STICK FULL
USB NOT COMPATIBLE
CORRUPTED USB STICK
NETWORK NOT FOUND
NETWORK / CONNECTION PROBLEM
CALIBRATE SCANNER NOW
CALIBRATION PROBLEM
INTERNAL MEMORY FULL
INTERNAL MEMORY PROBLEM
SCANNER OPEN / NOT
SHUT
INTERNAL TO COMPUTER OK
OPERATION SUCCESSFUL
MEGABYTES SENT
0.0.0.0
COMPUTER MISSING /
NETAPP NOT RUNNING
XXX.XXX.XXX.XXX
COMPUTER CONNECTED
 Loading...