

Page 1
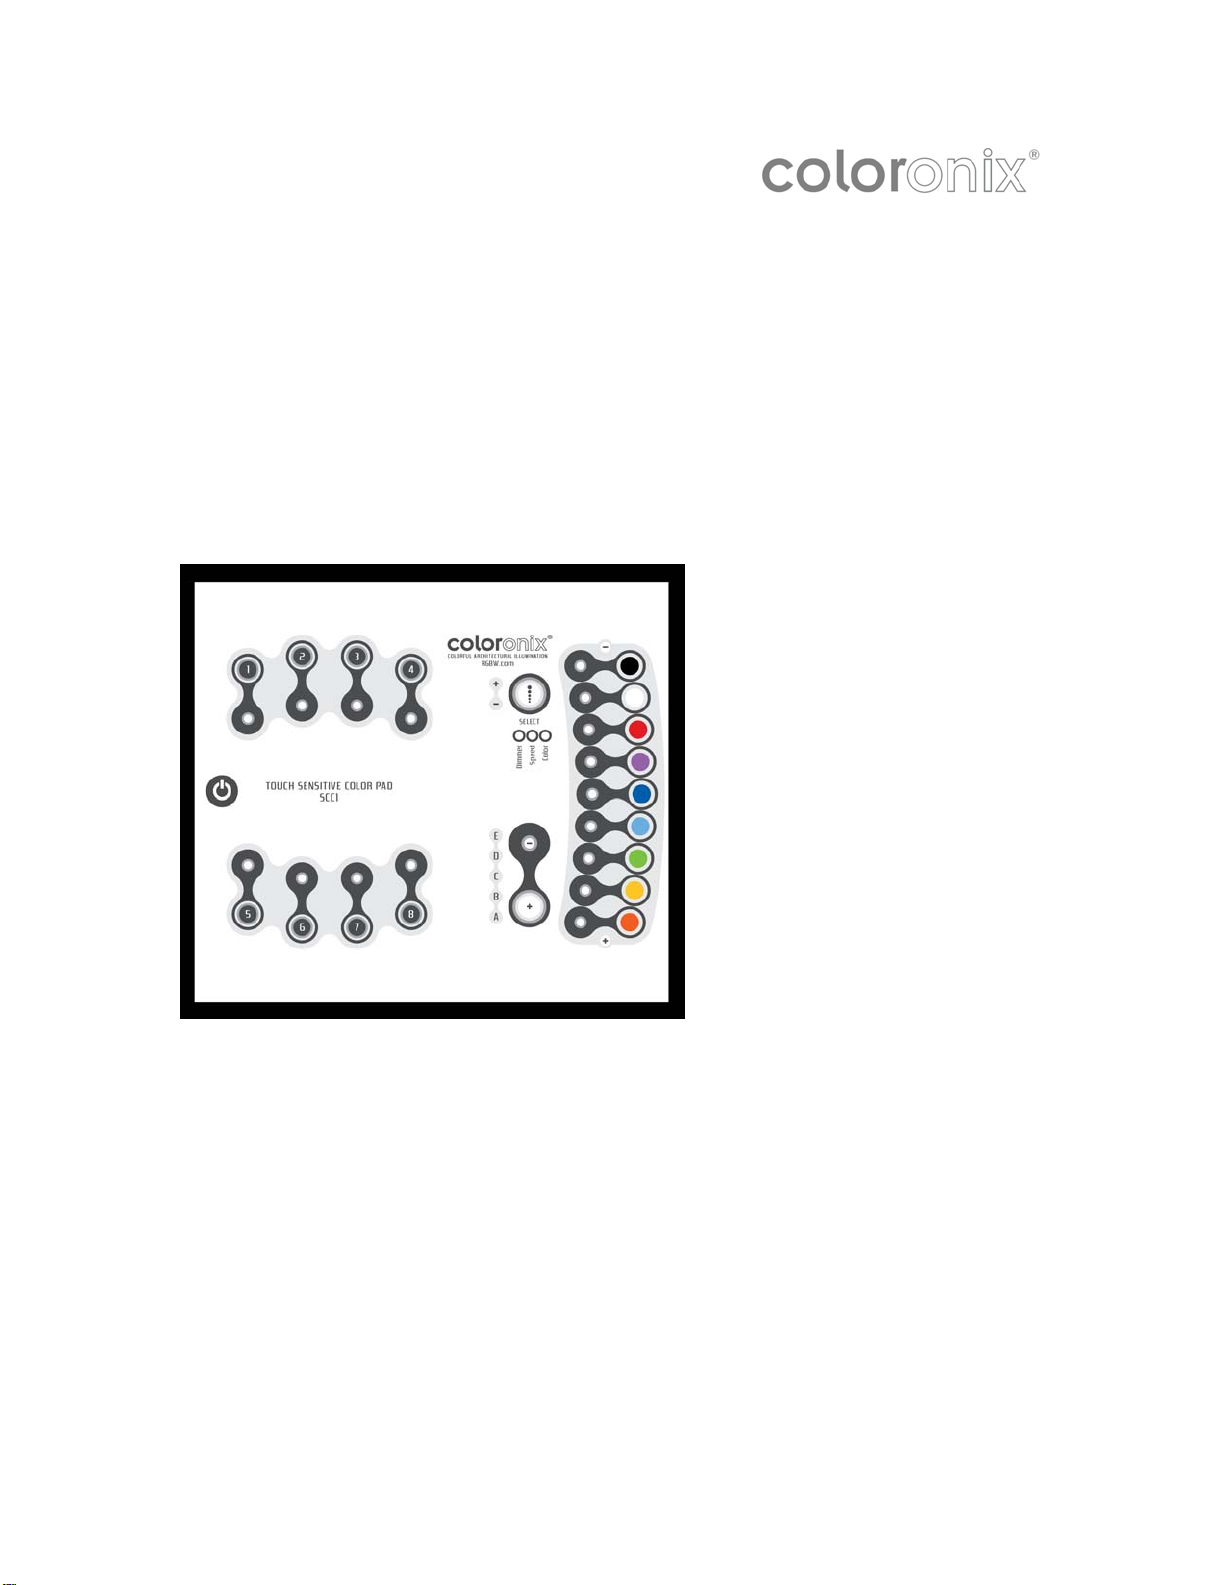
COLOR PAD
TOUCH
MANUAL
V.2.0
Page 2

Contents
Installation 3
Power Connection 3
Data Connections 3
Mounting the Interface on the Wall 4
Creating a New Show 4
The Areas Patch 5
The Fixtures Patch 4
Creating Your Scenes 6
Selecting the Fixtures 6
Scenes Construction 7
Adding an Effect to the Timelines 7
The Effects 8
Constant Level 8
Gradient 8
Phasing 8
Color 9
Matrix Effect 9
Copying Your Scenes to SCC1 9
Triggering Scenes 10
IR 11
Timeline 12
RS232 10
Page 2 of 12 —Coloronix Color Pad Touch Manual V.2.0
Page 3
Installation
Use the software installation program to install the USB drivers to the system. Once
the drivers are installed, Connect SCC1 interface to a computer by USB Windows will
then launch the installation wizard. Simply follow the instructions to install the
interface.
Power Connection
Connect 120V AC power to the supplied power supply. Confirm power button on Color
Pad turns on with blue LED.
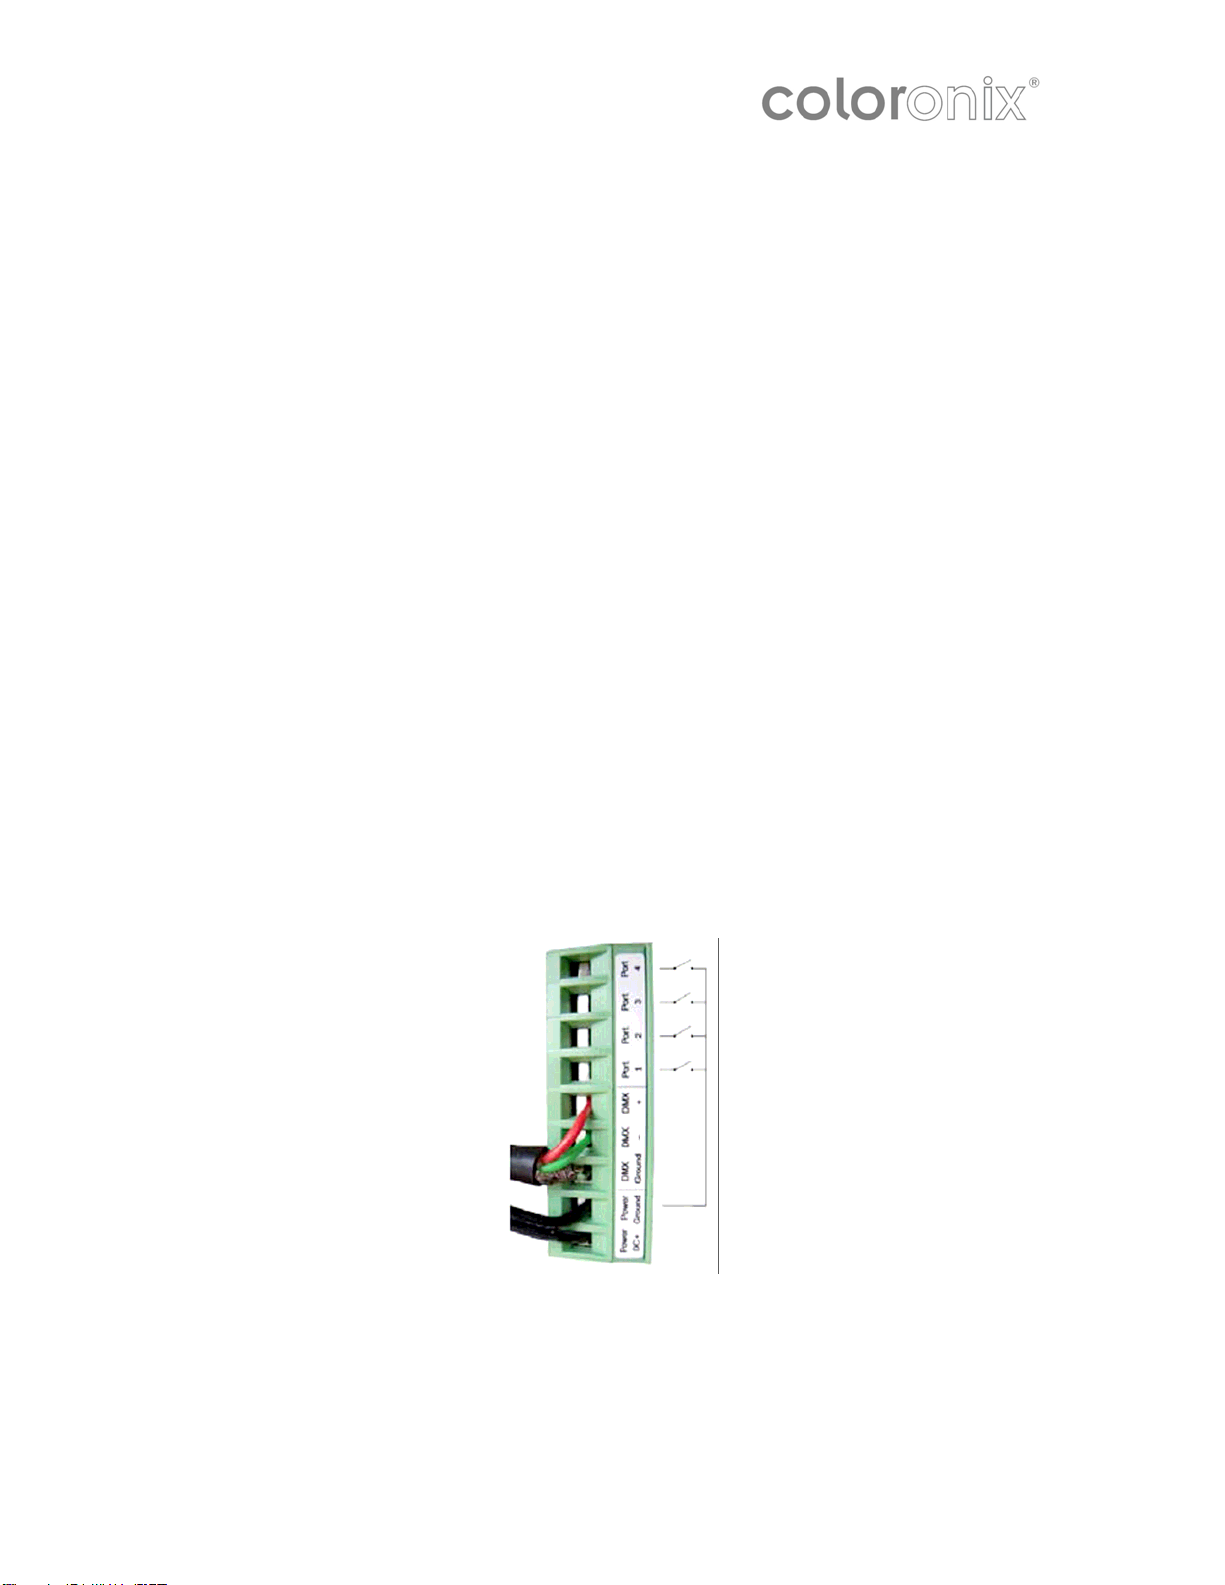
Data Connections
All connections (DMX, power, ports…) are made with the rear connectors. The 9V DC
power supply must be connected to the 2 power pins. The 1
connected to the 3 DMX pins of the main 9-pin connector block (see picture below).
This interface has 4 ports (1 to 4) to trigger 4 different scenes. To use the input
ports, you must create a connection between the ground pin and the ports (see
picture below).
Power the interface with either the external power supply or with USB. Switch the
“Power” button (next to the USB port) between USB and EXT.
WARNING: Do not move this switch while the interface is connected to the
computer.
st
DMX universe must be
Page 3 of 12 —Coloronix Color Pad Touch Manual V.2.0
Page 4
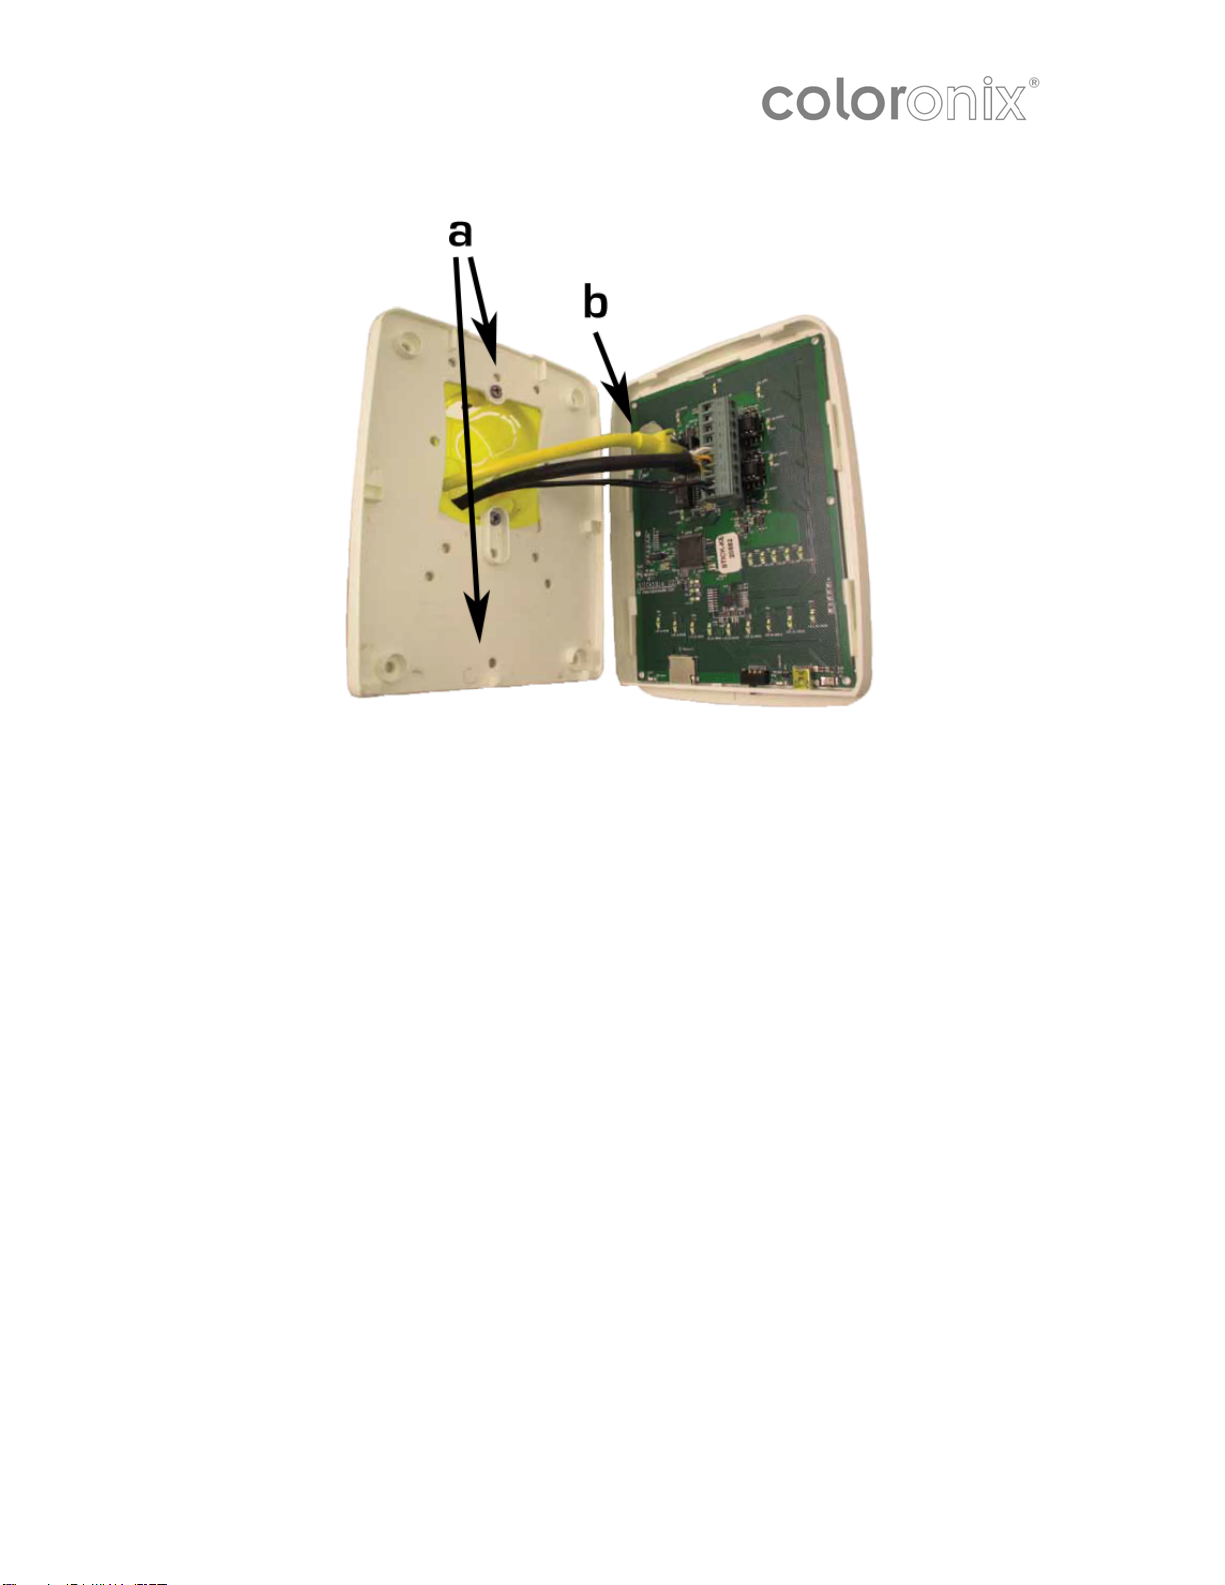
Mounting the Interface on the Wall
a. Mount the backside of the interface on the wall with 2 or more screws
b. Plug the 2 connectors (see blue arrow)
c. Close the interface, using one screw
Creating a New Show
The Fixtures Patch
Click the “Add Fixture(s)” button on the toolbar to open the “Patch Manager” window.
To add new fixtures:
1. Select a profile from the manufacturer’s list on the left side
2. Select the DMX universe (DMX Universe 1 or DMX universe 2)
3. Enter the first DMX channel (the address of the 1
4. Enter the number of fixtures
5. Click the “Patch” button.
Instead, you can also drag & drop a profile to the grid. Right-click a fixture and select
“Duplicate” to add more fixtures.
st
fixture)
Page 4 of 12 —Coloronix Color Pad Touch Manual V.2.0
Page 5

The Areas Patch
You can set up several zones/areas/rooms for a multi-room installation where a
different scene is played in each zone.
All fixtures are assigned to a “Global Area” by default. This zone can play a sequence
for all fixtures and cannot be removed.
For example, create 2 zones (Room1 and Room2). From the “Areas” window, click the
left-side button “+” to add a new zone. Click the “Rename” button from the toolbar to
rename it “Room1” and repeat the same for the second zone.
Then, click the “Areas Patch” button on the toolbar to assign your fixtures. Remember:
the fixtures are all assigned to the “Global Area” and cannot be removed from it.
This window shows a list of all DMX devices in the different universes. To assign a
DMX device to a zone, you must select the corresponding checkbox on the right side of
the list. There is a column for each zone and you can check their names by moving
your mouse over the column header (see picture below).
Note: A DMX device cannot be assigned to several zones (areas). Assigning a fixture
to a zone will remove its previous assignment.
Page 5 of 12 —Coloronix Color Pad Touch Manual V.2.0
Page 6

Creating Your Scenes
It is important to select a zone before creating a new scene. There is a list of scenes
for every zone (areas). Select a zone from the “Areas” window to display the attached
scenes in the “Scenes” window.
Click on the “+” button (on the left side of the “Scenes” window) to create a new scene.
A scene is made with the timelines, but the first thing to do is select the fixtures you
want to use from the “Groups” window. The next section shows how to set up and use
the groups.
Selecting the Fixtures
You cannot edit a scene without a fixture selected from the ”Groups” window.
Every fixture is represented by a small square. Make your selection with the mouse.
Use the “Ctrl” key for a multi-selection or use the various options from the toolbar (ALL,
HALF, INVERT…)
Page 6 of 12 —Coloronix Color Pad Touch Manual V.2.0
Page 7

It is also possible to create groups of fixtures. To create a new one:
• Select the fixtures to be added to the group
• Click on the “Add” button (on the left side of the toolbar)
A group can be deleted or renamed using the toolbar buttons.
Scenes Construction
A scene is built on a timeline. There is a line for every single fixture selected or for a
group of fixtures (i.e. rect). Several options are available (link, compress…), which are
explained in the “Timelines Options” section. The next section shows how to build a
scene with the timelines.
Adding An Effect to the Timelines
An effect can be added to the timeline by dragging & dropping. The next section
describes the available effects. An effect can be added to a single fixture or to a group
of fixtures. Click on the desired effect from the “Effects” window and drag it to the
timeline as shown below. Once you release the mouse button, the software will open
the effect options window.
Page 7 of 12 —Coloronix Color Pad Touch Manual V.2.0
Page 8

The Effects
Once the selection is made, select an effect from the “Effects” window and drag it to
the timeline. It is not possible to drag an effect if there is no fixture selected. The
following is a brief description of available effects:
Constant Level: This effect enables you to set up a static level for a selected
fixture. Once the effect is assigned to the timeline (and if the effect is assigned to a
color channel), 3 modes of color can be set up:
• Color picker
• Preset colors (red, green, cyan…)
• Manual selection of the RGB values
Note: Click on the icon on the left side of the toolbar to set up the duration of an effect.
Gradient: This effect enables you to create a fade between DMX values (color,
positions…). In the case of a color gradient, it is possible to add more points. Doubleclick on the gradient zone to add a new step. Then, select it and change its color or its
position within the gradient.
Phasing: It is possible to add a delay between your fixtures using the “Phrasing”
option. It is very useful when creating, for example, a rainbow effect.
The “Play” button previews effects.
Edit an effect by double-clicking on it on the timeline.
Click on the “Fixtures Order” button (the 3
up a direction for your phasing. Next, a window opens: use the UP and DOWN buttons
to change the order—or, record a completely new direction using the “Rec” button.
rd
button from the left on the toolbar) to set
Page 8 of 12 —Coloronix Color Pad Touch Manual V.2.0
Page 9

Color: The color-mixing tool is the easiest way to create complex color effects. First,
select an effect from the drop down menu. Then, modify its different options. The
Pallet icon varies the size, speed, colors, and number of colors of an effect
Change the order and direction of an effect by clicking on the “Fixtures Order” button
on the toolbar.
Matrix Effect:
Important: Matrix effects can only be used with Rects. You cannot drag this kind of
effect to a regular fixtures selection.
Once the matrix effect has been dragged and dropped into the timeline, a new window
opens. Select the type of effect (square, circle…).
Several options are available: number of colors, size and speed. It is possible to adjust
these settings with the corresponding rotary buttons. Once the number of colors has
been changed, select the colors from the color picker.
Copying Your Scenes to SCC1
Click the “Stand Alone” tab. Then, select the area where you want your scenes saved.
Simply drag & drop the scene to the Button Number. When you are done, click “Write
the Show on Computer”.
Page 9 of 12 —Coloronix Color Pad Touch Manual V.2.0
Page 10

Triggering Scenes
RS232
RS232 Triggering
Make a cable using the 3 pins: TX, RX and G (GND)
Set the RS232 parameters to: 9600bds 8 bits, no Parity, 2 Stop bits
- To play a scene, send 3 bytes: 1 x 255 (x = scene number)
- To stop a scene, send 3 bytes: 2 x 255 (x = scene number)
- To pause a scene, send 3 bytes: 3 x 255 (x = scene number)
- To release a pause, send 3 bytes: 4 x 255 (x = scene number)
- To reset a scene, send 3 bytes: 5 x 255 (x = scene number)
Note: the scene number (x) can be from 1 to 40. For instance, 11 means Page B
Scene #3
Page 10 of 12 —Coloronix Color Pad Touch Manual V.2.0
Page 11

IR
Timeline
Programming
Some functions are available directly from the STICK keypad using the SELECT button.
Page 11 of 12 —Coloronix Color Pad Touch Manual V.2.0
Page 12

VI Calendar
Some interfaces contain an internal clock and calendar. This allows you to trigger your scenes
by date and time. Simply drag your scenes onto the calendar. The example below will trigger
scene 1 at 10am on the 26th June.
Double click a trigger to edit. Re-occurring events can be set here. In the example below,
our scene is set to be triggered every Saturday in August.
Page 12 of 12 —Coloronix Color Pad Touch Manual V.2.0
 Loading...