


Color Kinetics i mops- 150 Installation Manual
INSTALLING iMOPS-150
Color Kinetics®iMOPS-150 is specially
designed to supply power and data to
iColor™ Cove lighting fixtures.
This fixture should be installed by a qualified
electrician in accordance with NEC and relevant local codes for power supplies with
Class 2 outputs.
WARNING: iMOPS-150 is rated for installation in environments where the temperature
does not exceed 104ºF (40ºC). To ensure
product performance, a volume of 8 cubic
feet of air is required around the unit. Do not
obstruct the vent holes on the unit’s cover.
This power supply is not suited for outdoor
locations and must be shielded from water
spray.
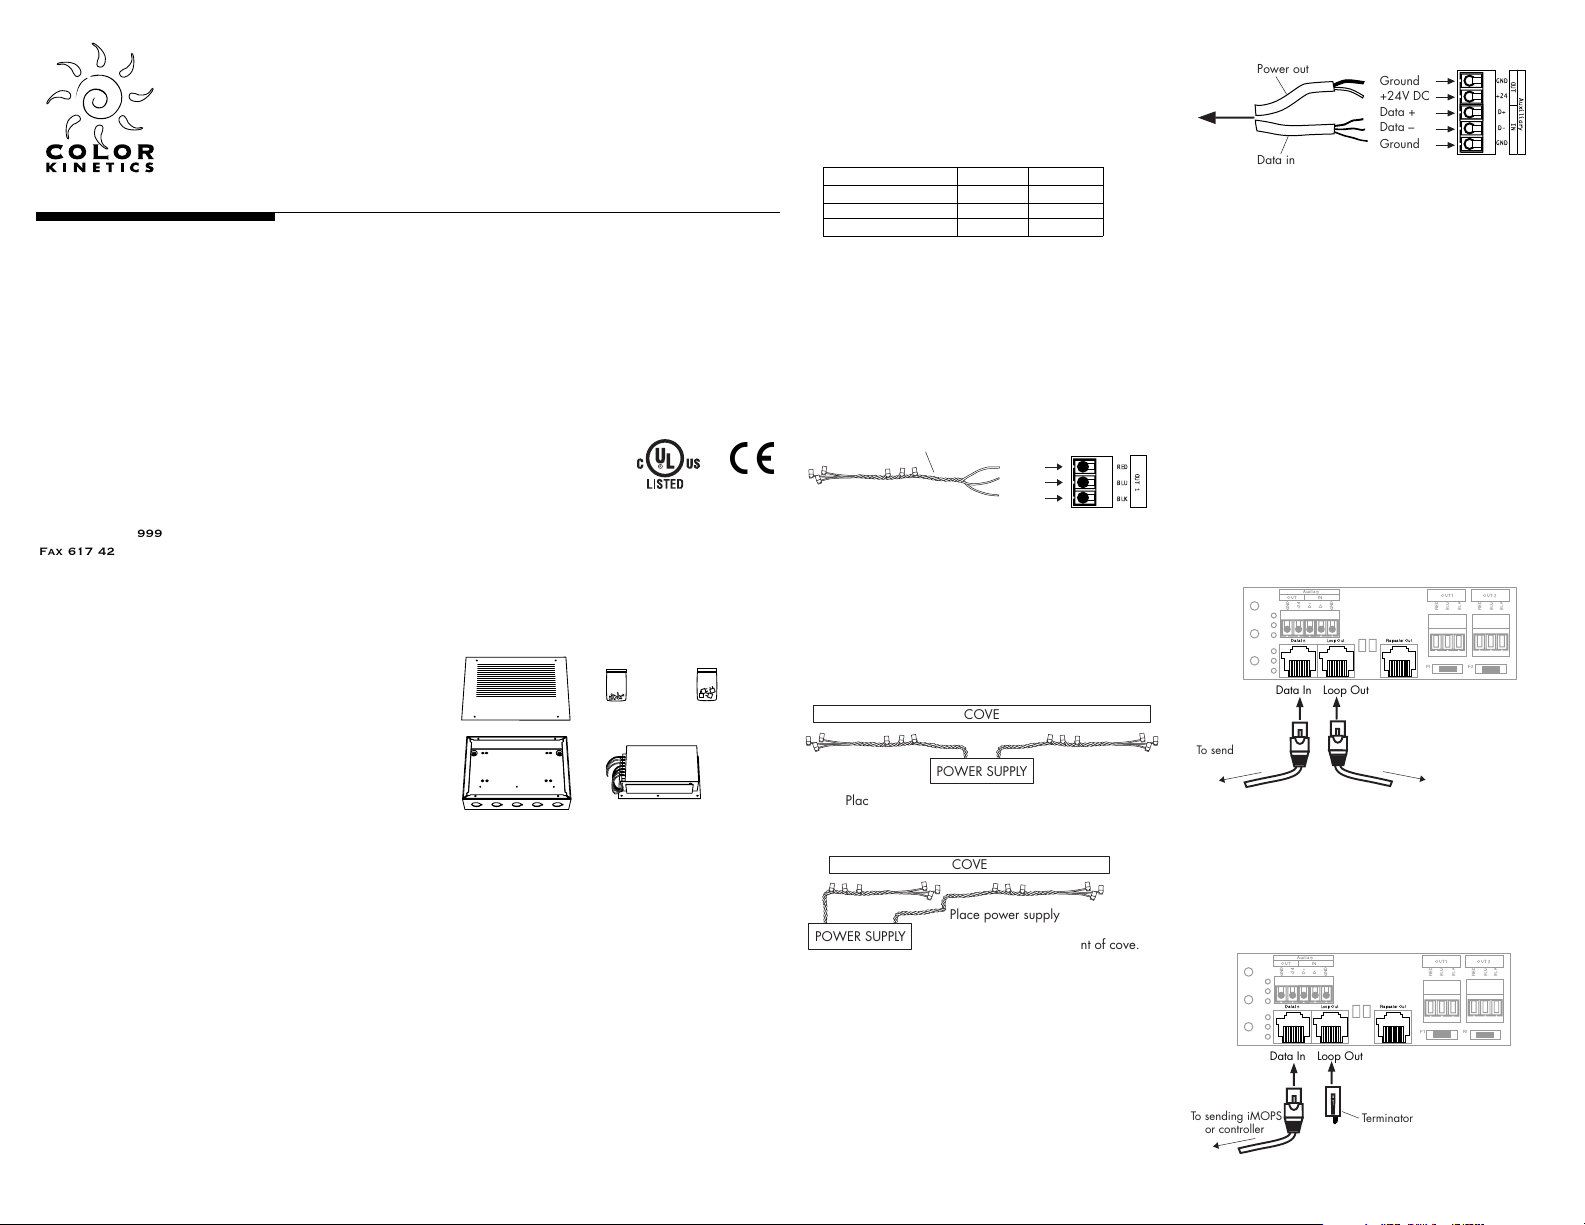
Unpacking
• Lift the power supply out of the housing,
and remove the packing material from the
cover and power supply. (See Fig. 1.)
Fig. 1
Mounting the iMOPS Housing
• Select the location to mount the housing,
keeping in mind that the maximum cable
run from iMOPS-150 to any iColor Cove
fixture is 50 feet.
• Punch out the appropriate number of
pre-formed 3/4” conduit holes. At least 3
holes are recommended to separate the
following: incoming power (line voltage),
incoming data, and outgoing data and
power (DC voltage).
• Mount the housing to the wall using four
#6 dry wall screws. Mounting holes are
located at the bottom of the housing, one
at each corner.
Connecting iColor Cove
Fixtures to the Power Supply
There are two main output terminals on the
power supply, labeled OUT 1 and OUT 2.
Number of iColor Cove segments supported:
iColor Cove 6” 12”
OUT 1 16 10
OUT 2 16 10
Total 32 20
WARNING: Make sure the power supply is
off before connecting or disconnecting fixtures. Otherwise, damage to the fixture may
result.
• Connect the iColor Cove master cable to
the green output terminals. (See Fig. 2.)
Fig. 2
Recommended wiring schemes are shown in
Fig. 3a and 3b.
IMPORTANT: In any wiring configuration,
master cable runs must not exceed fifty feet
per output terminal.
Fig. 3a
Fig. 3b
Connecting Data to the
Power Supply
• Connect the controller to the output terminal labeled AUXILIARY. (See Fig 4.) This
terminal supplies power to the controller
and also receives data, which it sends to
each iColor Cove fixture.
Fig. 4.
WARNING: The AUXILIARY terminal is
designed for use only with Color Kinetics
controllers, such as Synchronizer, Multi
Synchronizer, and iPlayer™. Do not use the
AUXILIARY terminal to power lights.
• Alternatively, you can connect the controller to the DATA IN RJ45 port. In this
case, the controller must be powered by
another source.
• To send data to another iMOPS-150 or
other Color Kinetics product with direct
DMX input, connect an RJ45 cable
between the LOOP OUT port of the sending unit and the DATA IN port of the receiving unit. (See Fig. 5.)
Fig. 5
• Make sure a terminator is installed in the
LOOP OUT port of the last unit in the
chain. (See Fig. 6.) Single units should also
be terminated. (Data terminators are available from Color Kinetics.)
Fig. 6
®
i mops-150
INSTALLATION
GUIDE
Color Kinetics Incorporated
10 Milk Street, Suite 1100
Boston, MA 02108
Tel 888 Full RGB
Tel 617 423 9999
Fax 617 423 9998
info@colorkinetics.com
www.colorkinetics.com
MODEL # PWR-iMOPS-150-01
©2000 Color Kinetics Incorporated. Color Kinetics is a
registered trademark and Chromacore, ColorBlast,
ColorPlay, iColor, iPlayer and Smartjuice are trade-
marks of Color Kinetics Incorporated.
MAN-0012 Rev 03
Cover
Housing
Screws
(#6-32)
Power
supply
Spare
fuses (4)
Master cable
Red
Blue
Black
RED
OUT 1
BLU
BLK
COVE
POWER SUPPLY
Place power supply halfway along cove and run
master cables of equal lengths to each end of cove.
COVE
Place power supply at one end
POWER SUPPLY
of cove and run master cable to
closest end and midpoint of cove.
To controller
Power out
Data in
Ground
+24V DC
Data +
Data –
Ground
OUT
GND
+24
D+
IN
D-
GND
Auxiliary
OUT
IN
D-
D+
+24
GND
GND
LoopOut
RepeaterOut
DataIn
Data In Loop Out
To sending iMOPS
or controller To receiving iMOPS
OUT1
BLU
RED
F1 F2
OUT2
BLK
BLK
BLU
RED
To sending iMOPS
or controller
Auxiliary
OUT
IN
D-
D+
+24
GND
GND
DataIn
LoopOut
Data In Loop Out
RepeaterOut
Terminator
OUT1
BLU
RED
F1 F2
OUT2
BLK
BLK
BLU
RED
Auxiliary
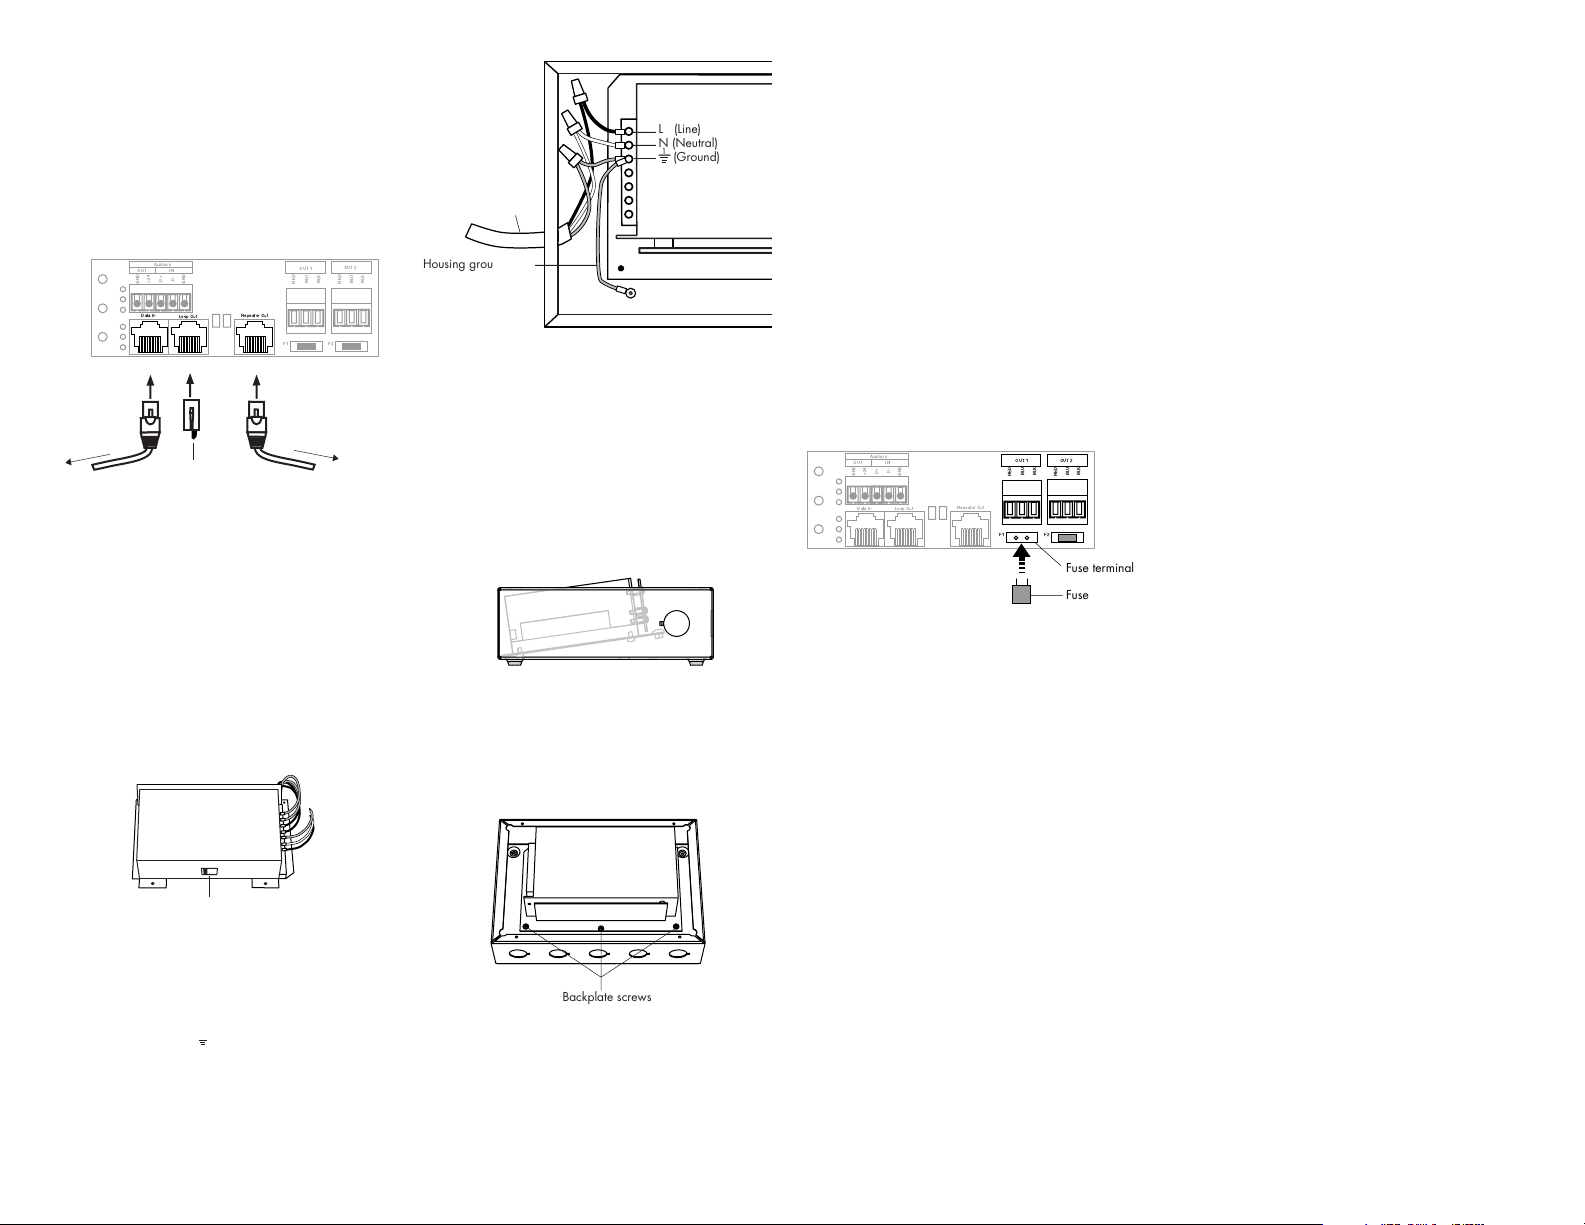
• The REPEATER port boosts the data signal
for longer chains. Use the REPEATER port
instead of LOOP OUT on every 32nd
iMOPS unit in a chain, or when the cable
run between two power supplies is more
than 400 feet. Make sure a terminator is
installed in the LOOP OUT port if the
REPEATER port is used. (See Fig. 7.)
Fig. 7
Connecting Power to the
Power Supply
NOTE: It is the end user’s responsibility to
use the proper conductors to permanently
mount the incoming facility power, and to
provide means for disconnecting the system.
• Set the voltage switch to 115 or 230V AC,
depending on your source voltage.
(See Fig. 8.) The unit is set to 230V AC as
a factory default.
Fig. 8
• Pass the power supply line through one of
the 3/4” holes in the metal housing. Attach
the appropriate conduit connector. Connect
power lines to the wires labeled N (neutral), L (line), and (ground). (See Fig. 9.)
Fig. 9
• Connect the housing ground wire to the
threaded post in the housing. (See Fig. 9.)
• Ensure that the unit is mounted inside the
housing by lining up the two tabs on the
power supply backplate with the two slits
on the inside of the housing. The unit may
need to be inserted at a slight angle as
shown in Fig.10 to slide the tabs in easily.
Fig. 10
Once the tabs are in place, attach the backplate to the housing using three of the #6-32
screws. (See Fig.11). A power screwdriver is
recommended for this step.
Fig. 11
• Place the cover on the housing, making
sure that the vent holes are located above
the power supply for proper ventilation,
and secure the cover using the remaining
four #6-32 screws. A power screwdriver is
recommended for this step.
Replacing Fuses
WARNING: Make sure the power supply is
off before connecting or disconnecting fuses.
Each of the main output terminals is
equipped with a fuse. (See Fig. 12.) If an
output terminal is not functioning, replace the
fuse as follows:
• Remove the fuse from the malfunctioning
terminal. (The fuse terminals are marked F1
for Output 1, and F2 for Output 2.)
• Insert the replacement fuse in the fuse
terminal. (See Fig. 12.) Use only fuses with
the same type and rating as the original.
Additional replacement fuses are available
from Color Kinetics.
Fig. 12
iMOPS-150 Specifications
Power Output 6 A @ 24 V DC (150 W)
Power Input 115/230 V AC
(user-selectable)
Packaging Includes (2) 50’ master
cables and NEMA-style
enclosure for installation
with power supply
Dimensions 10.5” X 7.5” X 2.7”
Connectors Screw terminal or RJ45
data input and output connectors; screw terminal
power output connectors
Listings UL listed, CE certified
Data Interface DMX512 (RS485)
compatible
ONE YEAR LIMITED HARDWARE WARRANTY
Color Kinetics Incorporated warrants its products, if
properly used and installed, will be free from defects
in materials and workmanship and will substantially
conform to Color Kinetics’ publicly available specifications for a period of one (1) year after the date the
product was purchased by the end user.
If the product fails during the warranty period, purchaser’s remedy under this limited warranty shall be at
Color Kinetics sole election:
• Repair the product by means of hardware and/or
software or
• Replace the product with another product or
• If Color Kinetics is unable to repair or replace the
particular product, refund the then current value of
the product.
This limited warranty does not cover damages due to
external causes, including, but not limited to, accident,
problems with electrical power, usage not in accordance with product instructions, misuse, neglect, modification, repair, improper installation, or improper testing. Color Kinetics is not responsible for indirect, incidental, or consequential damages resulting from any
breach of warranty or under any other legal theory
including, but not limited to, lost profits, downtime,
goodwill, damage to or replacement of equipment
and property.
To obtain warranty service, you may contact your distributor in accordance with its instructions, or you may
contact Color Kinetics. To request warranty service
you should call Color Kinetics during the warranty
period. Proof of purchase or registration is required.
When calling within warranty, please provide:
1) Your name, shipping address, and telephone num-
ber
2) A description of the model and serial number
3) An explanation of the problem
A Return Authorization (RA) number & ship-to address
will be provided to send the product back.
The warranty and remedies set forth above are exclusive and in lieu of all others, whether oral or written,
express or implied. Color Kinetics specifically disclaims any and all implied warranties, including, without limitation, warranties of merchantability and fitness
for a particular purpose. No Color Kinetics distributor,
dealer, agent or employee is authorized to make any
modification, extension, or addition to this warranty.
This warranty gives you specific legal rights, and you
may also have other rights that vary from jurisdiction
to jurisdiction.
MANUFACTURING STANDARDS
Color Kinetics products are manufactured in the USA,
Ireland, and China.
U.S. AND FOREIGN PATENTS AND PATENTS
PENDING
Color Kinetics Incorporated grants the purchaser of its
lighting products and controllers a personal and nontransferable license to use Chromacore™, its patented
technology for networkable control of LED-based colorchanging lighting fixtures for illumination, display and
design. This license is granted only by Color Kinetics
Incorporated, and may not be transferred except by
the grantor. The design, duplication, manufacture, or
sale of other products using networkable control of
LED-based color-changing lighting may be prohibited
and is not licensed hereunder. Other patents pending.
To sending iMOPS
or controller
Auxiliary
OUT
IN
D-
D+
+24
GND
GND
DataIn
LoopOut
Data In Loop Out
Terminator
RepeaterOut
Repeater
To receiving iMOPs
OUT1
BLU
RED
F1 F2
OUT2
BLK
BLK
BLU
RED
Voltage switch
1
—
L (Line)
N (Neutral)
1
—
(Ground)
Power supply line
Housing ground wire
Backplate screws
Auxiliary
OUT
IN
D-
D+
+24
GND
GND
DataIn
LoopOut
RepeaterOut
F1 F2
OUT2
OUT1
BLK
BLK
BLU
BLU
RED
RED
Fuse terminal
Fuse