

Page 1

User Manual
KE EP THI S MAN UAL F OR F UT UR E N EE DS
tc
150°C
LED
0.2m
ta
40°C
ADD 3 rd Floo r, No . 288, Gu angzh u East Li ne, Pin gwen, L anhe Town ,Nans ha Dist rict,
Gua ngzho u, Chin a
Tel. +8 6 20 8499 2 310/2 320/2 330
Fax + 86 20 8 499 236 0
E-m ail inf o@col or-im agina tion. com
Web sit e www.co lor-i magin ation .com
www.facebook.com/color.imagination.1
www.youtube.com/user/colorimaginationj
twitter.com/colorimaginej
Follow
us on
SI-166
DOTZOOM
60F
The f ollow ing poi nts hav e to b e co ns id ere d durin g the ins pecti on:
1) Al l screw s fo r in st al ling the de vices o r part s of th e de vi ce h av e to be t ightl y conne cted
and m ust not b e corro de d.
2) Th ere mus t no t be a ny d ef ormat ions on t he hous ing, co lor len ses, fixa tions a nd
ins talla tion sp ots (ce iling , suspe nsion , truss ing).
3) Me chani cally m oved pa rt s must no t show an y trace s of wear in g an d mu st not ro ta te w it h
unb al an ce s.
4) The ele ctri c power supply cables mus t not show any damag e, material fatigue or sedime nts.
Fur ther i ns tr uctions d epend ing on th e insta llati on spot a nd usag e have to b e ad he red by a
ski lled in stall er and an y safet y probl em s ha ve to be re mo ve d.
In or de r to m ake t he ligh ts in goo d condi tion an d exten d th e li fe t im e, we sug gest a re gu la r
cle aning t o th e li gh ts .
1) Cl ean the i nside a nd outs ide len s each we ek to avo id t he w eaknene ss of the l ig ht s du e to
acc umula tion of d us t.
2) Cl ean the f an each w ee k .
3) A de taile d elect ric che ck by app roved e le ct ri cal eng ineer e ach thr ee m on th , ma ke su re
tha t the cir cu it c on ta cts are i n go od c on di ti on, pre ve nt t he p oo r contact o f ci rcuit fro m
ove rh ea ti ng .
We re commend a f reque nt c le an in g of th e de vi ce . Pl ea se u se a mois t, lint - free cl ot h. N ev er
use a lcoho l or solv en ts .
The re are no s er viceabl e part s inside th e devic e. Plea se refe r to t he i ns truct ions un der
“In stall ation i nstru ction s”.
Sho uld you n eed any s pare part s, p le as e ord er genu ine par ts from y ou r lo ca l de al er.
MAINTENANCE AND CLEANING
10
Di sc on ne ct f ro m ma in s be fo re s ta rt in g ma in t en an ce o pe ra ti on .
CAU T I O N
Page 2

.01 .
If the device has been exposed to tem pe ra tu re c ha ng es d ue t o en vi ro nm en ta l ch an ge s,
do not switch i t on i mm ed ia te ly. T he a ri si ng c on de ns at io n co ul d da ma ge t he d ev ic e.
Leave t he d ev ic e switch ed o ff u nt il i t ha s re ac he d room temperature.
This device falls under pro te ct io n- cl as s I. T he re fo re i t is e ss en ti al t ha t th e de vi ce b e
eart he d.
The electric connection must carry o ut b y qu alified person.
The device shall only be used with rate vol tage and fre qu en cy.
Make su re t ha t th e available voltage is not higher than s ta ted at the end of t hi s ma nu al .
Make su re t he p ow er c ord is never crimped or damaged by sharp edg es . If t hi s wo ul d
be the case, re pl ac em en t of t he c ab le m us t be d on e by a n au th or iz ed d ea le r.
Always disconnect fro m th e ma in s, when the device is not in use or before c le an ing it.
Only handle the power cord by t he p lu g. N ev er p ul l ou t th e pl ug b y tu gg in g th e po we r
cord.
During initial start -u p so me s mo ke o r sm el l ma y ar is e. T hi s is a n or ma l pr oc es s an d
does not necessarily mean that the device is d ef ec ti ve, it s ho ul d de crease gradually.
Please don't pro je ct t he b ea m onto c om bu st ib le s ubstances.
Fixture s ca nn ot b e in st al le d on c om bustible substances, kee p mo re t ha n 50 cm
distance with wall for smooth air flow, s o th ere should b e no s he lter for fans and
ven ti la ti on for heat radiation.
If the exte rn al f le xi bl e cable or cord of t hi s lu mi na ir e is d am ag ed , it s ha ll b e ex cl us iv el y
rep la ce d by t he m an uf ac tu re r or h is s er vice a ge nt o r a si mi la r qu al if ie d pe rs on i n or de r
to av oi d a ha za rd .
This device has left t he f ac to ry in per fe ct c on di ti on . In o rd er to ma in ta in t hi s
condition and to en su re a s af e op er at io n, i t is a bs ol ut el y ne ce ss ar y for th e us er t o
follow the safety instructions and warning notes written in this user manual.
CAU T I O N
Bec aref ul wi th your o perat io ns.Wi th a da ngero us v olt age you c ans uffer a
dan gerou s el ect ric sho ck when t ouchi ng wire s!
IM P ORTANT
Dam ages ca us ed by t he disr egard o f this us er manu al a re no t subje ct to war ranty.
The d ealer w ill not a ccept l iabil ity for a ny re sulti ng defe cts o r probl ems.
SAFETY INSTRUCTIONS
1
226 -235
236 -245
246 -255
0-1 9
20- 29
30- 39
40- 79
80- 99
100 -119
120 -139
140 -159
160 -179
180 -199
200 -219
220 -239
240 -255
No fu nctio n
No fu nctio n
No fu nctio n
No fu nctio n
No fu nctio n
No fu nctio n
No fu nctio n
Mot or rese t
Int ernal p rogra m 1
Int ernal p rogra m 2
Int ernal p rogra m 3
Int ernal p rogra m 4
Int ernal p rogra m 5
Int ernal p rogra m 6
Int ernal p rogra m 7
Int ernal p rogra m 8
17
18
Spe ed
Pan /Tilt
Spe cial
fun ction
15
16
.10 .
Page 3
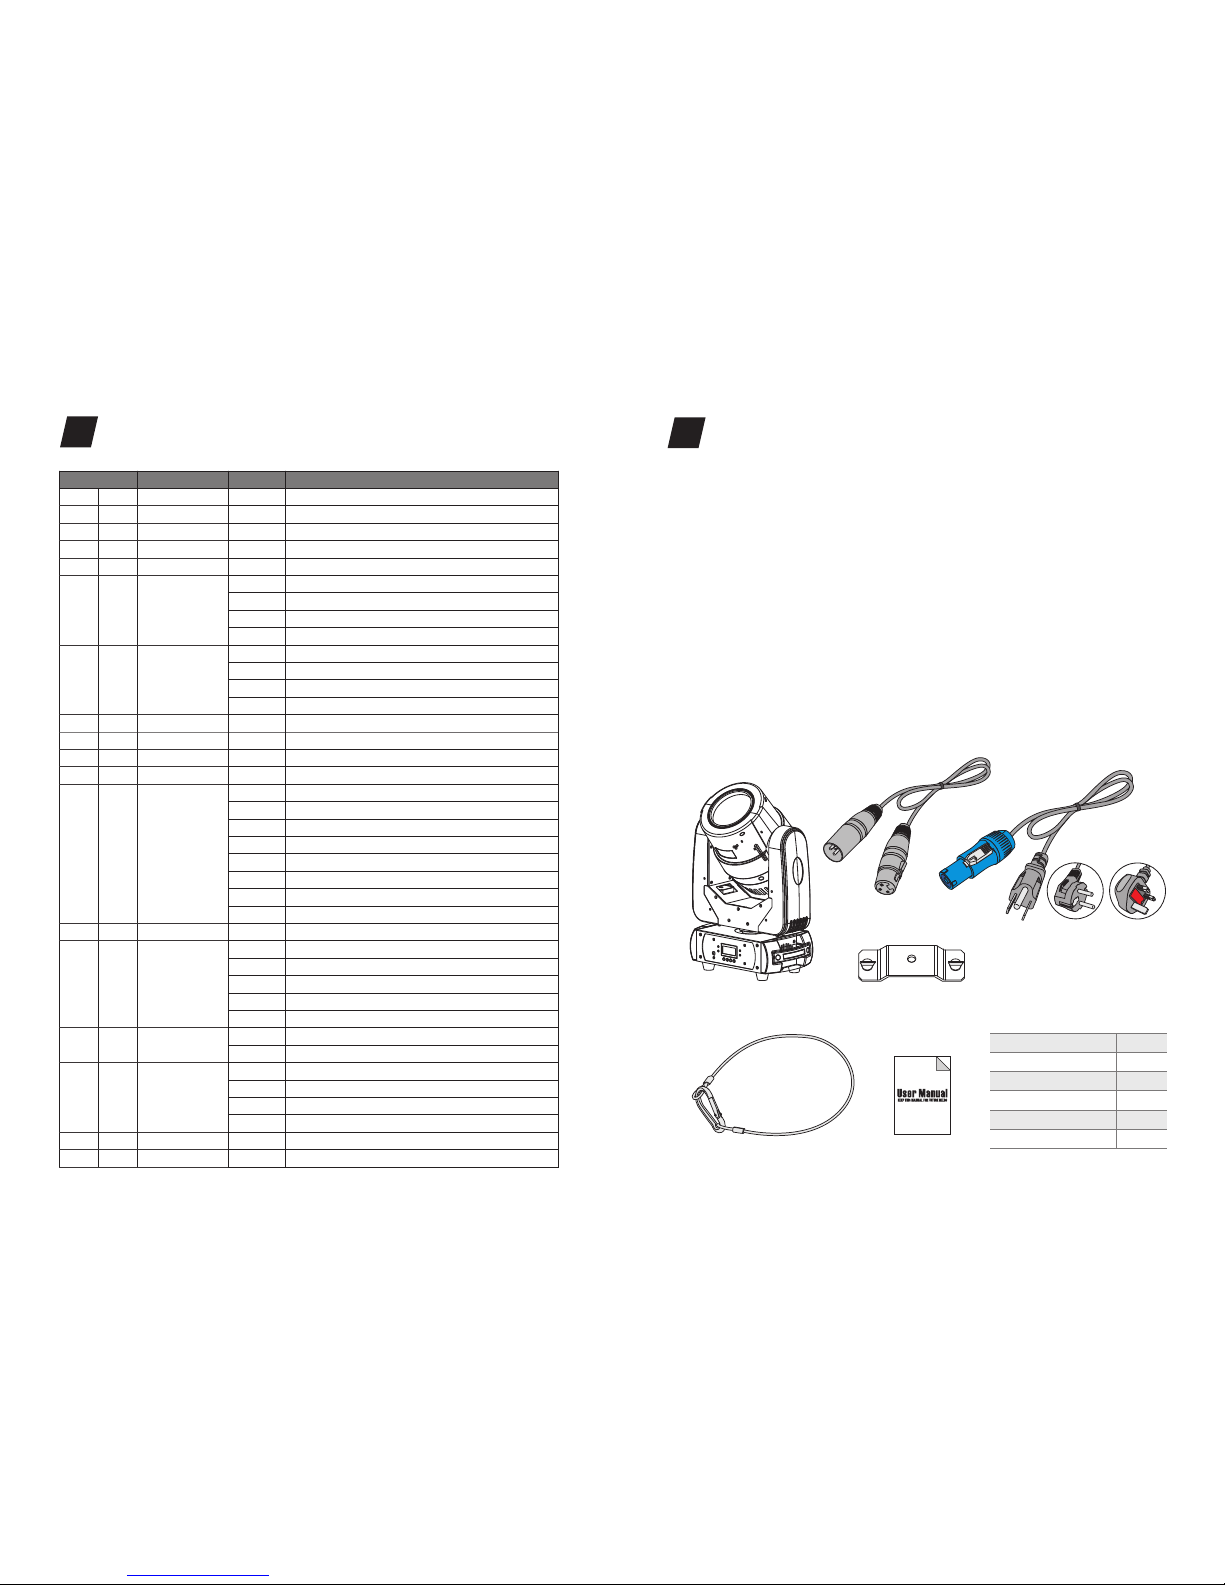
Thank you f or c hoosing our DOTZ OO M 60 F. For y ou r ow n sa fe ty, p lease re ad t hi s
manual before i ns ta ll in g th e de vice. This manual covers the import an t in fo rm at io n
on installation and applications. Plea se i ns ta ll a nd o pe ra te t he f ix tu re with following
instructions. Meanwhile, please kee p th is m an ua l we ll f or f ut ur e ne ed s.
The is made of a ne w ty pe o f hi gh t em pe ra tu re stre ng th o f
engineering plastics and cast aluminum c as in g wi th n ic e ou tl oo k. The fixture is
designed and manufactured s tr ic tl y following CE standards , co mp ly in g with
inter na ti on al s ta nd ar d DM X5 12 p ro to co l. I t’s a vailable independent ly c on trolled
and linkable with each other for operation. And it i s ap pl ic ab le f or l arge-scale live
perf or ma nc es , th ea te r, stu di o, n ig htcl ub s an d di sc os .
The adopts 1PCS 60W LEDs which
feature s hi gh b ri gh tn es s an d st ab ility. Pl ea se c ar ef ul ly u np ac k it w he n yo u re ce ive
the fixture a nd c he ck w he th er i t is d am ag ed during the transport at io n. A nd p le as e
check whether the following items are i nc lu de d in si de t he b ox :
DOTZOOM 60F
DOTZOOM 60F OSRAM LE RT DU W S2 WP 4 -I N- 1
.02 .
UNPACKING
2
①
DOTZ OOM 60F
Sig nal Cab le
Power Ca ble
Ome ga Clam p
Saf ety Cab le
Use r Manua l
1PC
1PC
1PC
1PC
1PC
1PC
①
②
③
④
⑤
⑥
④
⑤
⑥
②
③
Euro Standard
UK Standard
USA Standard
OPT IONAL
.09 .
DMX CHANNELS
9
0-2 55
0-2 55
0-2 55
0-2 55
0-1 27
128 -189
190 -193
194 -255
0-1 27
128 -189
190 -193
194 -255
0-2 55
0-2 55
0-2 55
0-2 55
0-3 1
32- 63
64- 95
96- 127
128 -159
160 -191
192 -223
224 -255
0-2 55
0-5
6-1 27
128 -189
190 -193
194 -255
0-1 99
200 -255
0-1 27
128 -189
190 -193
194 -255
0-2 55
0-2 25
Pan m oveme nt
Fin e contr ol of Pan m oveme nt
Til t mo ve me nt
Fin e contr ol of Tilt m oveme nt
No fu nctio n
Con tinuo us rota tion fa st-sl ow,For wards
Sto p rotat ion
Col or satu ratio n contr ol-co arse 0- 100%
Con tinuo us rota tion sl ow-fa st,Ba ckwar ds
No fu nctio n
Con tinuo us rota tion fa st-sl ow,For wards
Sto p rotat ion
Con tinuo us rota tion sl ow-fa st,Ba ckwar ds
Col or satu ratio n contr ol-co arse 0- 100%
Col or satu ratio n contr ol-co arse 0- 100%
Col or satu ratio n contr ol-co arse 0- 100%
Shu tter cl osed
Shu tter op en
Str obe eff ec t sl ow t o fa st
Shu tter op en
Pul se-ef fe ct i n se qu en ce s sl ow t o fast
Shu tter op en
Ran dom str obe eff ec t sl ow t o fa st
Shu tter op en
Dim mer 0%. ..100 %
OFF
ON
For wards r otati on from f ast to sl ow
Pri sm rota tion st op
Bac kward s rotat ion fro m slow to f ast
Fro st swin g out
Fro st swin g in
Pri sm inde xing
For wards p rism ro tatio n from sl ow to fas t
Pri sm rota tion st op
Bac kward s prism r otati on from s low to fa st
Zoo m from ma x.to mi n.bea m angle
Max t o min spe ed
Mod e/CH
Valu es
Des cript ion
Pan
Pan f ine
Til t
Til t fi ne
Pan
con trol
Til t
con trol
Red
Gre en
Blu e
Whi te
Shu tter
Dim mer
Rot ating
pri sm
Fro st
Rot ating
pri sm2
Zoo m
M1
1
2
3
4
5
6
7
8
9
10
11
12
13
14
15
16
Fun ction
M2
1
2
3
4
5
6
7
8
9
10
11
12
13
14
Page 4
.03 .
Spec ifi cat ions
Input Volt ag e:
LED Quantities:
Control S ig na l:
Control C ha nn el :
Power Con su mp ti on :
Dimensions:
Pac ki ng D im en si on s:
Net Wei gh t:
Gro ss W ei gh t:
Feat ure s
FEATURES & SPECIFICATIONS
3
.08 .
•
•
•
•
•
•
•
•
•
•
•
•
•
•
•
•
•
•
•
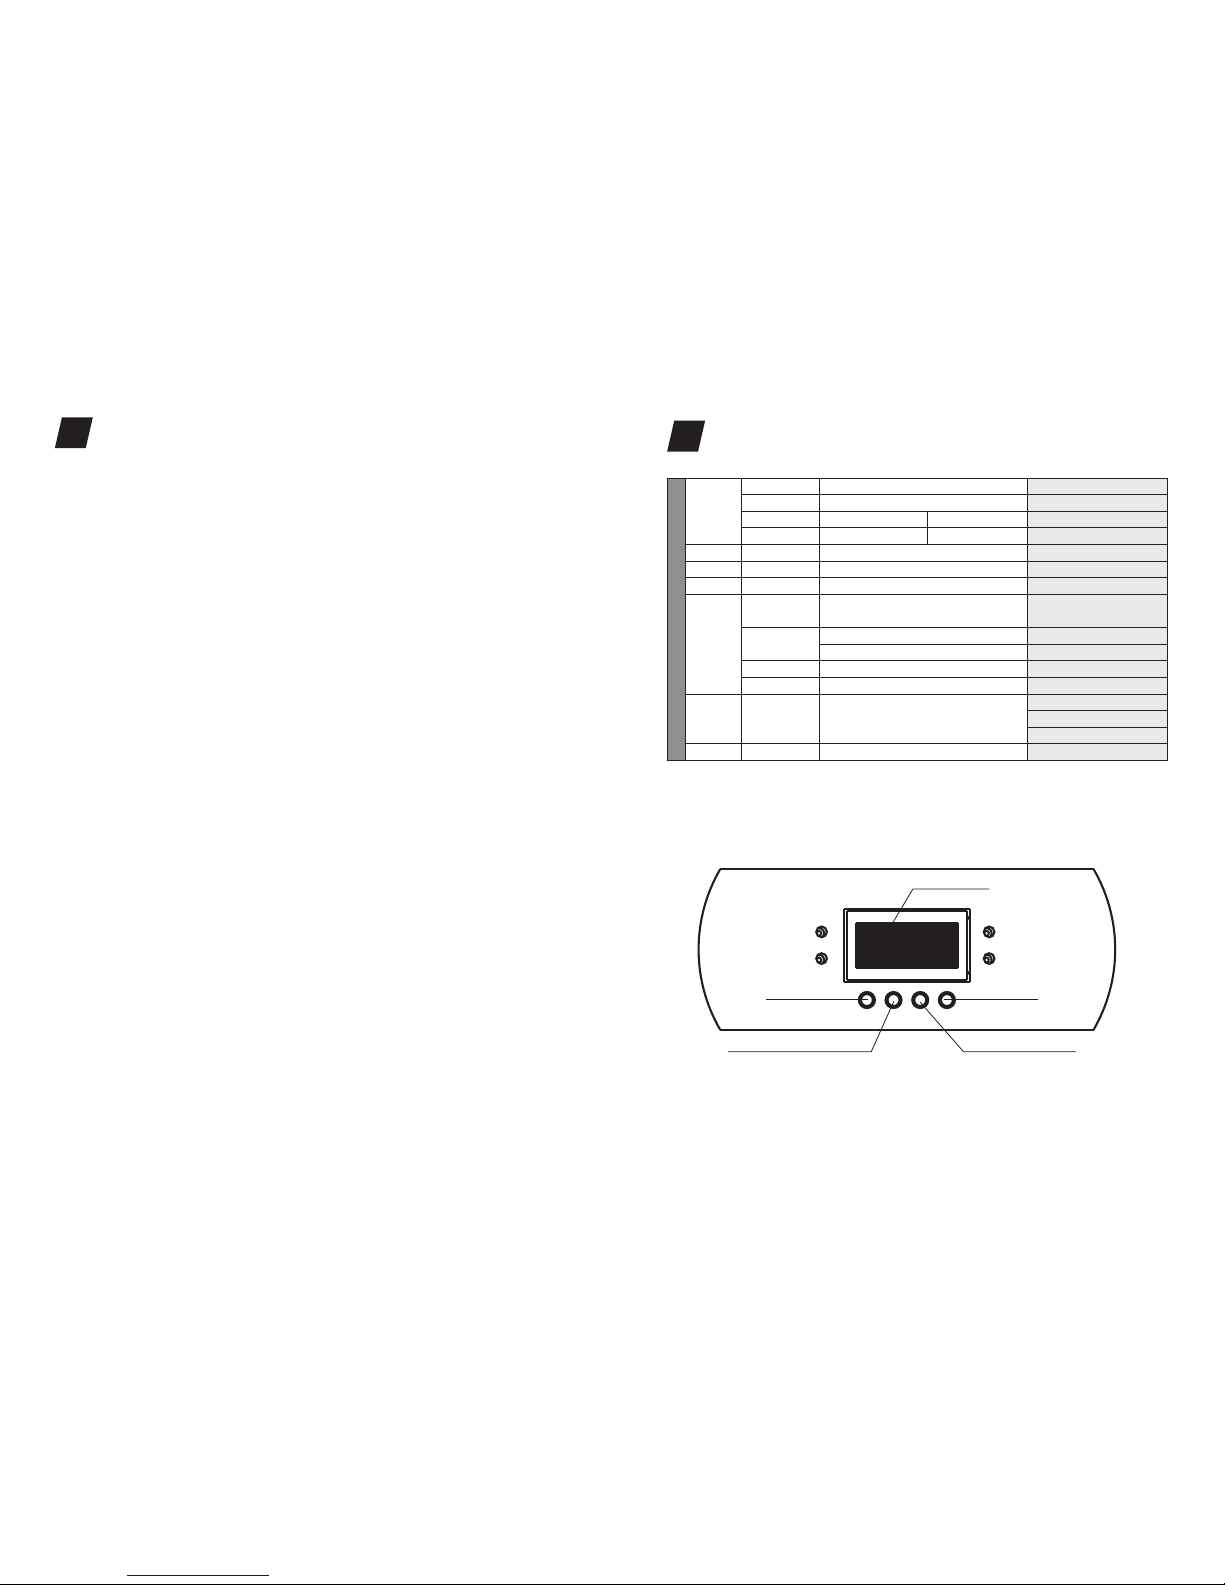
MENU OPERATIONS
8
A00 1-AXX X
Int ernal P rogra m 1~8 Mas ter/A lone
Int ernal P rogra m 1~8 Mas ter/A lone
On/ Off
Cod e(pas swork :088)
Pan ,Tilt
PAN=X XX
Slo w/Fas t
Dmx Ad dress
Sla ve
Aut o Run
Mus ic Cont rol
On/ Off
On/ Off
On/ Off
Def ault
Cal ib
Man ual
DIM M SP
M1- XXCH
M1- XXCH
M1- XXCH
V1. 0~V9. 9
MEN U
Mod e
Res et
Pan R ev
Tilt R ev
Spe cial
DMX P res
Vers ion
DMX a ddress s ettin g
Mac hine set ting
Alon e Mode
Soun d Mode
All re set
Pan re vers e movem ent
Tilt r evers e movem ent
Over loadi ng fact ory all
para mete rs
Cal ibrati on func tion
Dim mer spe ed setti ng
Cal ibrati on chan nel
Manu al cont rol
Cha nnel mod e 1
Cha nnel mod e 2
Cha nnel mod e 3
Soft ware ve rsion
1*6 0W OSRA M LE RTDU W S2 WP 4- in-1 LE D (RGBW )
50, 000 hou rs life span an d low pow er cons umpti on
Eac h color c ontro llabl e indiv idual ly
Out stand ing int ense BE AM effe ct w it h re ma rka ble col or mixi ng cove rage
Spe cific h igh res oluti on 110mm f ro nt g la ss l ens
Fli cker fr ee sour ces man ageme nt
8/1 6 Bit smo oth, fa st and pr ecise i nfini te (con tinuo us) PAN/ TI LT mov em en t
Sca n posit ion mem ory, aut o re po si ti on af ter une xpect ed move ment
Smo oth, qu ite and f ast mot orize d zoom fr om 2.5° -35°( flowe r mode) /4°-3 5°(wa sh mode )
8-F acet pr ism rot ating i n both di recti ons wit h varia ble spe ed
Flo wer eff ec t cr ea tin g spec tac ular st unnin g effec ts i n th e ai r (c lea r image a t 30°)
Eac h spot (s quare f our col or) in th e FLOWE R rotat able cr eatin g even ni cer eff ec t
Hig h speed s trobe e ffect w it h 1- 25 f la she s per sec ond
Ran dom str obe eff ec t an d pu ls e str obe eff ec t av ai la ble
0-1 00% smo oth lin ear LED d immer
8 Int ernal p rogra ms avai lable
16/ 18 DMX Ch annel s USITT D MX -5 12
DMX 512, ma ster- slave a nd soun d activ ated co ntrol lable o r auto op erati on
Hig h defin ition b lue LCD d ispla y with 4 co ntrol b utton s
Eff ic ie nt l ow no ise se lf ad justi ng fan co oling s ystem
Con stant t emper ature r eadou t and man ageme nt func tion
POW ERCON I N/OUT
3-P in XLR co nnect ors IN/ OUT
DB ra ting @ 1M =54.1 8dB
IP2 0 prote ction r ating
AC9 0- 26 0V 5 0/ 60 Hz
DMX512,master -s lave a nd s ou nd a ct ivat ed o r au to o pe ra ti on
16/18 DMX Channels USITT D MX -5 12
145W
176(D)*262(W)*386(H)mm
190(D)*260(W)*330(H)mm
8.4kg
10.5kg
1*6 0W COB 4- in -1 L ED (RG BW)
LCD DISPLAY
Menu
Up
Enter
Down
DMX
Master
Slave
Sound
Page 5
1
2
3
PIN3
PIN2
120 Ω
.04 .
.07 .
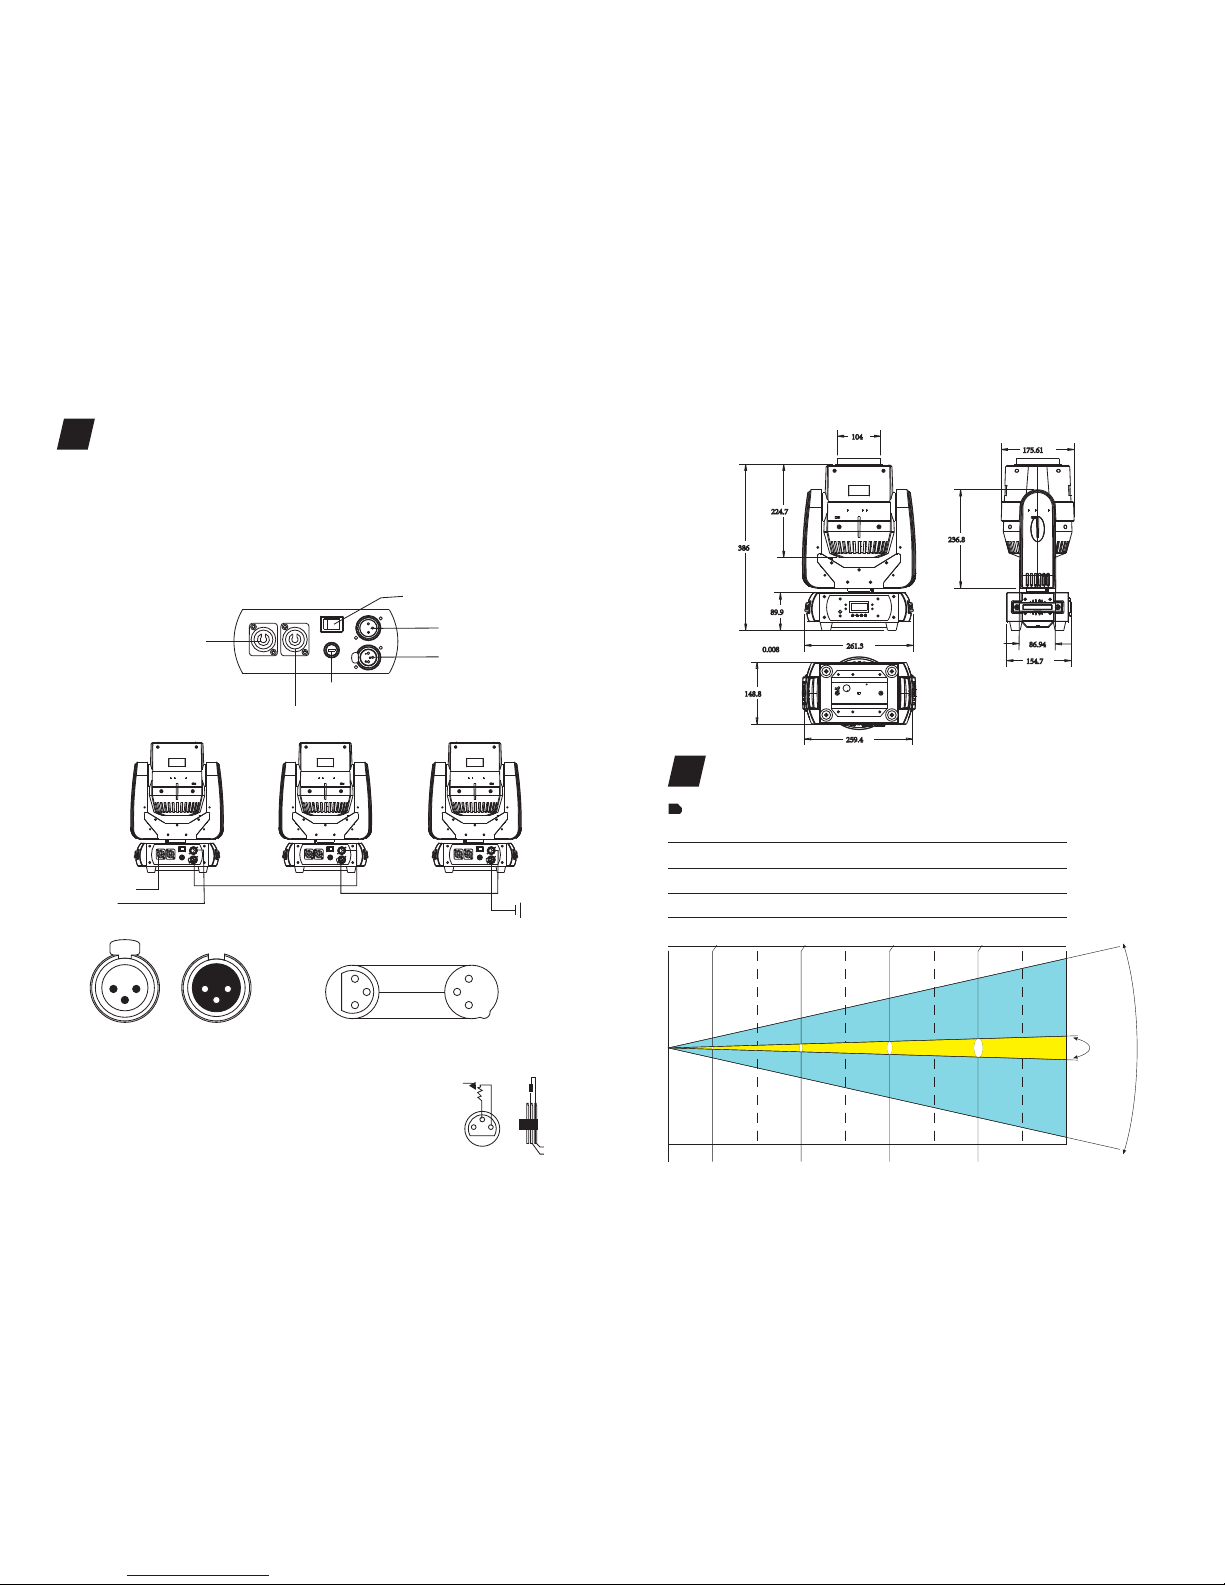
Con nec t the pr ovi ded XLR cable to th e fe ma le 3 -p in X LR o ut pu t of your controller and
the other side to t he m al e 3-pin XLR input of t he m ov in g he ad . You can cha in m ul ti pl e
Moving head to get her thro ugh seri al li nk in g. T he c ab le n ee de d sh ou ld b e tw o co re ,
scree ne d ca bl e wi th X LR i np ut a nd o ut pu t co nnecto rs. Please ref er t o th e di ag ra m
below.
DMX-51 2 con nec tion wit h DMX te rmi nator
DMX-512 CONTROL CONNECTIONS
7
DMX O utput
3-P in XLR So cket
DMX I nput
3-P in XLR So cket
1:G round
2:D ata(- )
3:D ata(+ )
1 2
3
12
3
1
2
3
1
2
3
COM MON
DMX +
DMX -
DMX 512 IN
3-P IN XLR
DMX 512 OUT
3-P IN XLR
2 1
For installations where t he D MX c ab le has to ru n a lo ng d is ta nc e
or is in an electrically noisy enviro nment, such as in a
discotheque, it is re co mm en de d to u se a D MX t er mi na to r. This
helps in prev en ti ng c or ru pt io n of t he d ig it al c on tr ol s ig na l by
electrical noise. The DMX terminato r is s im ply an XLR plug with a
POW ER IN
DMX I N
Fus e
POW ER IN
DMX I N
DMX O UT
Pow er Swit ch
POW ER OUT
PHOTOMETRIC DATA
4
2.5°~35 Beam Angle LUX 0.0929=FC° ×
Photometric Beam Angle Data
1m (3 .3ft)
3m (9 .8ft) 5m (1 6.4ft )
0m (0 ft)
2.5°
7m (2 3.0ft )
(FC/LUX)
R
G
B
W
RGB W
35°
(2.5°)
(35°)
3105 / 33429 457 / 4925 83 / 900163 / 1753
2090 / 22500
328 / 3528
57 / 619118 / 1272
4286 / 46140
663 / 7143
118 / 1276238 / 2565
3836 / 41300 617 / 6641
110 / 1194230 / 2479
2043 / 22000
1374 / 14795
253 / 2728537 / 5786
491 / 5296
126 / 1353
23 / 253
42 / 456
347 / 3740
112 / 1210
18 / 19235 / 380
664 / 7150
178 / 1925
28 / 30266 / 715
910 / 9790
190 / 2035
32 / 34162 / 671
848 / 9130
175 / 1892
32 / 341
63 / 682
Page 6

· The is for wash effect for on-site decoration purpose.
· Don’t turn on the fixture i f it ’s be en t hr ou gh s ev er e temper at ure differe nc e li ke
af ter transpor ta ti on b ec au se i t mi gh t da ma ge the light due to th e en vi ro nm en t
changes. So make su re t o op er at e th e fi xt ure until it is in normal temperature .
· This light should be ke ep a wa y fr om s tr on g sh ak in g du ri ng a ny t ra ns po rtation or
movem en t.
· Don’t pull up the light by only the head, or it might ca us e da ma ge s to the
mechanical pa r ts .
· Don’t expose the fixture in o ve rh ea t, m oi st ur e or e nv ir on me nt w it h to o mu ch d us t
when installing it. And don’t lay any power cables on the floor. Or it m ig ht c au se
electro ni c sh oc k to t he p eo pl e.
· Make su re t he i ns ta ll at io n pl ac e is i n go od s af et y co nd it io n be fo re i ns ta ll in g th e
fixture .
· Make su re t o pu t th e sa fe ty c ha in a nd c he ck w he th er t he s cr ew s are screw ed
pro pe rl y wh en i ns ta ll in g th e fi xt ure.
· Make su re t he l en s are in g oo d co nd it io n. I t’s recommended to rep la ce t he u ni ts i f
there a re a ny d am ag es o r se ve re s cr atch.
· Make su re t he f ix tu re i s op er ated by qualifie d pe rs on ne l wh o kn ow s th e fi xt ur e
before us in g.
· Kee p th e or ig in al p ac ka ge s if a ny s ec on d sh ip me nt i s ne ed ed .
· Don’t tr y to c ha ng e th e fi xt ur es w it ho ut a ny i ns tr uc ti on b y th e ma nu fa ct ur er o r
the appointed r ep ai ri ng a ge nc ie s.
· It is not in warranty range if there ar e an y ma lf un ct io ns f ro m no t fo ll ow in g th e
user manual to op er at e or a ny i ll eg al o pe ra ti on, like s ho ck s ho r t ci rcuit, electron ic
shock, l am p br oke, etc.
DOTZOOM 60F
.05 .
OPERATION INSTRUCTIONS
5
Cautions: For added pro te ct io n mo un t th e fi xt ur es i n ar ea s ou ts id e wa lk in g pa th s,
seating are as , or i n ar ea s we re t he f ix tu re might be rea ched by unauthorized
personnel.
Before mo un ti ng t he f ix tu re t o an y su rf ac e, m ake su re t ha t th e in st al la ti on a re a ca n
hold a minimum point load o f 10 t im es t he d ev ic e’s w ei gh t.
Fixture i ns ta ll at io n mu st a lw ays be secured w it h a se co nd ar y safe ty a tt ac hm en t, s uc h
as an appro pr ia te s af et y ca bl e.
Never s ta nd d ir ec tl y be lo w th e de vi ce w he n mo un ti ng , re mo vi ng , or s er vici ng t he
fixture .
INSTALLATIONS
6
.06 .
Always use and install the supplied safe ty c ab le a s a sa fe ty m ea su re to pre ve nt
accidental damage and/or injur y in t he e ve nt t he c la mp f ai ls .
Mounting points: Overhead mounting requires e xt en si ve e xp er ie nc e, i nc lu di ng
amongst others calcu la ti ng wor ki ng l oad limits, a fine knowledge of t he i ns tallation
mater ia l be in g us ed, and periodic safety inspection of al l in st al la tion mater ia l an d th e
fixture . If y ou l ac k th es e qu al if ic at io ns , do n ot a ttem pt t he i ns ta ll at ion yo ur self.
Impro pe r in st al la ti on c an r es ul t in b od il y in ju r y.
Be sure t o co mp le te a ll r ig gi ng a nd i ns ta ll at io n pr oc ed ur es b ef ore connecting the
main powe r co rd t o th e ap pr op ri at e wa ll o ut le t.
Clamp Mounting: The provides a unique mounting bracke t as se mb ly
that inte gr at es t he b ot to m of t he base, and the saf et y ca bl e ri gg in g po in t in o ne u ni t
(see the illustration below). When mount in g th is f ix tu re to truss be sure t o se cu re a n
appro pr ia te ly r at ed c la mp t o th e in cl ud ed o me ga b ra cket u si ng a M 10 s crew fitted
throu gh t he c en te r ho le o f th e “o me ga b ra cket”. As a n ad de d sa fe ty m ea su re be sure
to at ta ch ed a t le as t on e pr op er ly r at ed s af et y ca bl e to t he f ix tu re u si ng o n of the
safety cable rigging point integrated i n th e ba se a ss em bl y.
DOTZOOM 60F
Reg ar dl es s of the rigging option you choose for your , alw ay s be s ur e
to se cu re y ou r fi xt ur e wi th a s af et y ca bl e. T he f ix tu re p rovides a built-in rigging p oi nt
for a safety cable on the hanging bracket a s il lu st ra te d ab ov e. B e su re t o on ly u se t he
designate d ri gg in g point for the safety cable and never secure a sa fe ty c ab le t o a
carr yi ng h an dl e.
DOTZOOM 60F
②
① Omeg a Brack et
② Sate ty Clam p
③ Safe ty Cabl e
④ 1/4 Tu rn Quic k-Loc k Faste ners
①
③
④
1/4 Tur n 1/4 Tur n
 Loading...