

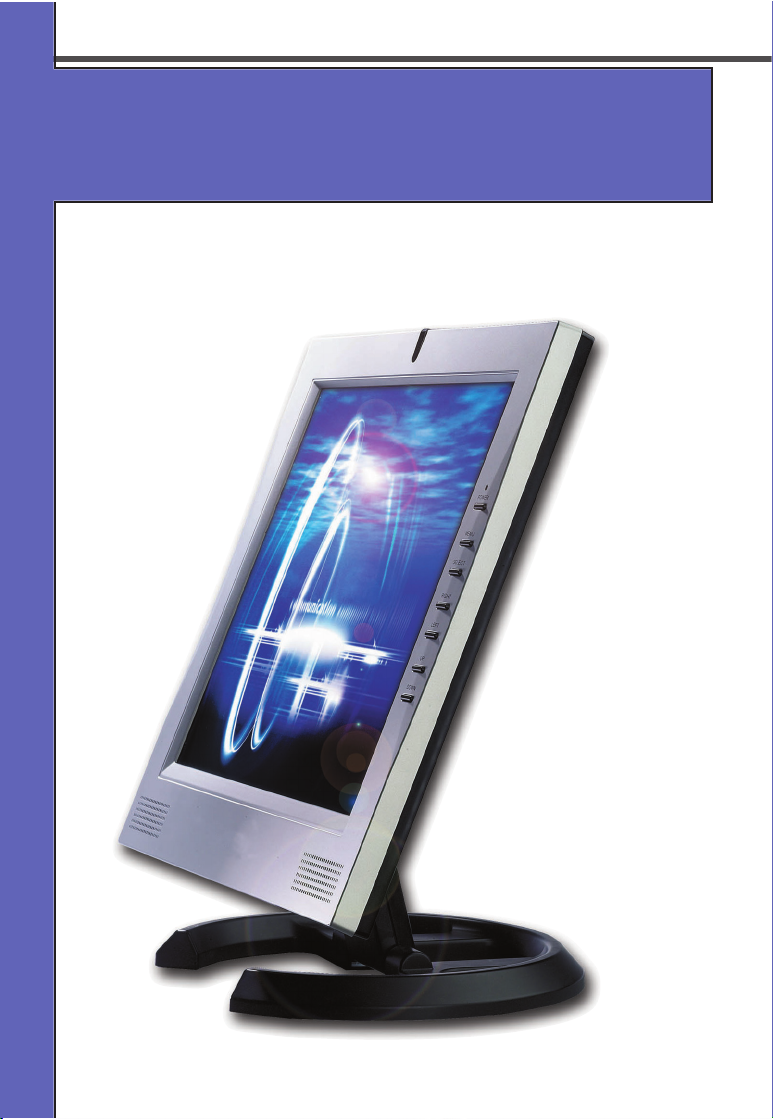
MODEL : SC-M-1514
<.<4+,5761<7:
<.<4+,5761<7:
User’s Manual

parts
Please make sure the following items are included with your monitor.
If any items are missing, contact your local dealer or Collins service center.
220V AC Adapter Cord AC/DC Power Adapter
LCD Monitor
Sound Cable
User's Manual/Warranty Card
Installation Diskette15-pin D-SUB signal Cable
PRODUCT WARRANTY CARD
Model
Serial No.
SC-M-1514 ӊ
The warranty period of the products is ONE YEAR.
Type of purchaser's damage
Repairs are needed within 10 days from the purchase date.
Repairs are needed within 1 month from the purchase date.
Damage is occurred during the installation and transportation
at the purchase date.
Repairs are needed for newly replaced product within 1 month
from the replaced date.
Replacement is impossible
Same defects are occurred up to 3 times.
Same defects are occurred up to 4 times.
Diverse defects are occurred up to 5 times.
Collins Inc. loses the product delivered for repairing from the
purchaser.
Repairs are impossible because Collins Inc. does not maintain
the repair parts within the parts maintenance period.
Collins Inc. maintains the repair parts but repairs are
impossible.
Repairs are impossible.
Repairs are possible.
Product replacement or full
refund.
Product replacement
Full refund.
Free Repairs
Product replacement or full
refund.
Product replacement after
collecting the cost for
charged repairs.
Charged repairs
N/A
N/A
Charged repairs
Charged repairs
Charged repairs
Refund after deducting the
depreciation cost and
adding 10% purchase
price.
Refund after deducting the
depreciation cost.
Limited to the extra criteria
of Collins Inc.
Charged repairs
Troubles caused
by the defects of
performance
and function
under the
normal usage.
Troubles caused by
purchaser's
intention or
negligence
Warranty Details
Warranty period
Outof Warranty period
Free Service
In the event that the general products have used for the business purpose,warranty period will be cut and
applied to six months.
Charged Service
If you call the service without following the troubleshooting in the manual, you may pay the service charge.
Please read the manual carefully.
Ɋ
Troubles caused by purchaser's negligence
ŋTroubles caused by purchaser's faulty repairs and lack of reasonable care.
ŋTroubles caused by usage of wrong supply/voltage
ŋTroubles and damages caused by dropping of product in transportation after the installation.
ŋTroubles caused by usage of any parts not provided with the product.
ɋ
Troubles caused by other reasons.
Troubles caused by acts of God (fire, damage from salt, flood, and etc.).
Collins Inc. warrants its products to be free for ONE YEAR from the original purchasing date.
Purchaser's Name
Address
Purchased Date
Purchased agency
Table of Contents
1 page
Connecting the Monitor 2
Monitor Driver Installation
Ү Auto Installation 4
Ү Manual Installation 5
Front Panel 9
Easy Adjustment 10
OSD Menu 11
Product Features 13
Troubleshooting 14
Safety Precautions 16
Specifications 17
Standard Signal Mode 18
Standard Certification Logos 19
Warranty Card
ADJUSTMENT
ETC.
INSTALLATION
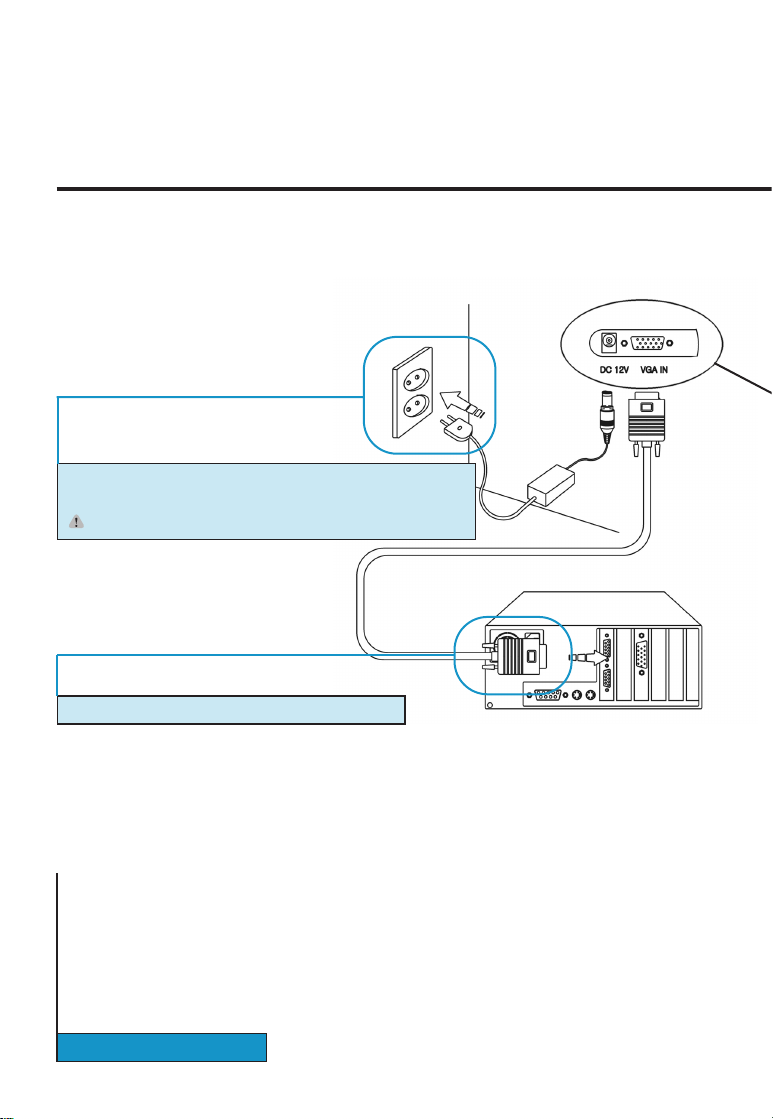
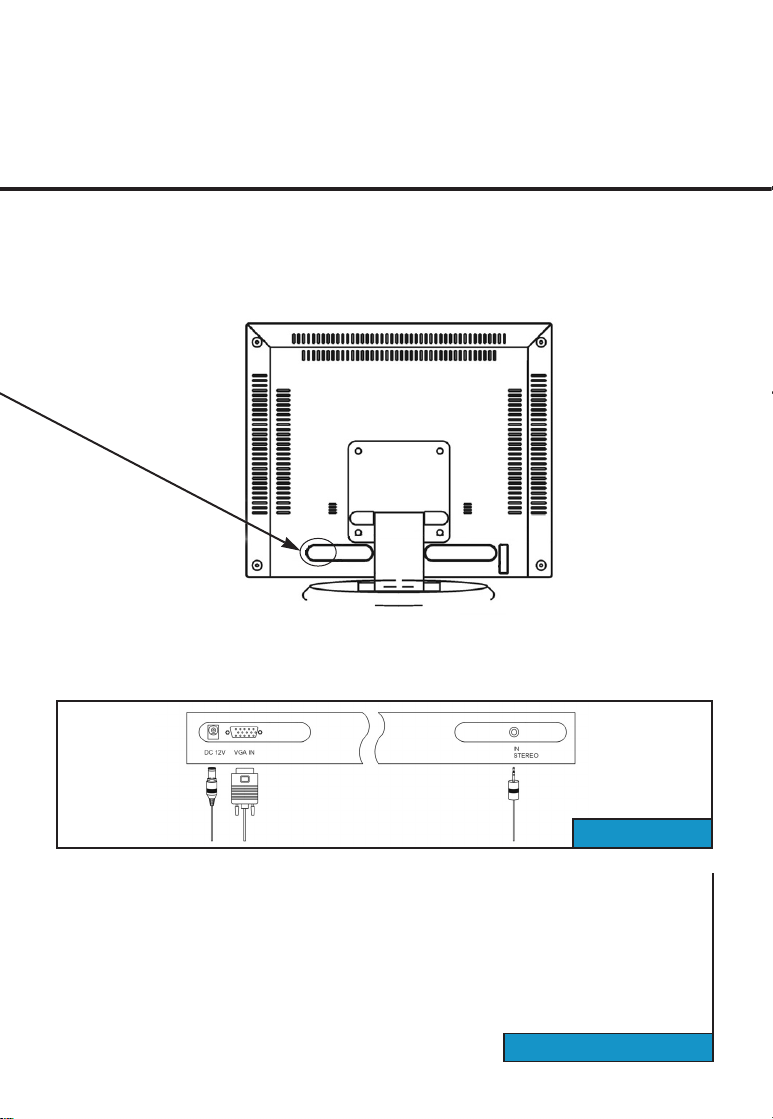
CONNECTING THE MONITOR
INSTALLATION
Make sure that both the computer and the monitor are switched off before connecting.
2 Connect the signal cable to the computer and the monitor.
1 Connect the power cord to the AC/DC adaptor and connect the
adaptor plug to the DC power connector on the back of the monitor.
Caution) Make sure that you use supplied adapter only.
(Computer backside)
2 page
INSTALLATION
3 page
SC-M-1514
MONITOR DRIVER INSTALLATION
ى
ى
1
Choose a model and click "OK"
4 If the screen performs normally after appearing
the monitor optimization mode, click "Yes"
Otherwise, click "No"
2 Click "OK"
3 Click "OK"
ƃ If you do not want the monitor optimization function, click "Cancel"
First, turn the computer and the monitor on and insert the installation disk into the floppy disk drive.
Double click on "install.exe" and follow the steps below.
If you install the monitor driver, the resolution and frequency are suitable for the monitor and you can
experience the clear screen.
INSTALLATION
4 page
Ȟ
Auto Installation
If the installation does not work automatically, install the driver manually

ى
ى
First, turn the computer and the monitor on and insert the installation disk into the floppy disk drive.
Click "Control panel" and then follow the steps given below.
5 Adjust the resolution and vertical frequency and then click "OK"
6 Click "OK"
7 Click "Yes"
Ȟ
Manual Installation
ƃ This screen shot is for the mode reset.
ƃ
Or click the right button on the mouse and then click "Properties"
ƃ If you want to change the resolution, click "No".
Repeat the above steps and set the optimal resolution.
INSTALLATION
5 page
ى
1 Click "Control panel"
2 Click "Display"

Ȟ
Manual Installation
ى
ى
ى
3 Click "Settings" 4 Click "Advanced"
7 Click "Next"
12 Select model and click "Next" 13 Click "Next"
8 Click "Display a list of all the drivers in
a specific location, so you can select the
driver you want"
9 Click "Next"
INSTALLATION
6 page

ى
ىىى
ى
14 Click "Finish" and then reboot the Windows.
10 Click "Have Disk" 11 Select the driver and click 'OK'.
5 Click "Monitor" 6 Click "Change.."
ȥ Driver installation has been completed.
INSTALLATION
7 page

Ȟ
Manual Installation
INSTALLATION
8 page
Խ Click "Start" button.
Ծ Select "Settings" tab and then click "Control Panel".
Կ Double click "Display" icon.
Հ Click "Settings" bar.
Ձ Click "All display modes".
Ղ Select a mode (resolution, colors, vertical frequency).
Ճ Click "OK".
Մ Click "Test"
Յ If the screen performs normally, click "Yes". Otherwise, select other mode (lower
resolution, colors and vertical frequency).
ſ
Note: If "All display modes" does not exist on your Widows NT, refer to Standard Signal Modes
in this manual and select a resolution and vertical frequency.
To command X-Window, you have to create a system file that called XF86Config file.
You can set your monitor with the file.
If you command XF86Config, the file can be created.
Խ
Command XF86Config and then press enter key when the first and second screen appear.
Ծ In the third screen, you can find mouse settings.
Կ Select your mouse.
Հ Next, Keyboard setting screen appears.
Ձ Select your keyboard.
Ղ Monitor setting screen appears.
Ճ First, you have to set the horizontal frequency. Refer to Horizontal Frequency in this
manual and select one of them. (You can input the frequency directly as well).
Մ You have to set the vertical frequency. Refer to Vertical Frequency in this manual and
select one of them. (You can input the frequency directly as well)
Յ Enter the model name of your monitor.
Monitor information you entered here is not directly related to commanding X-Window.
Ն Monitor setting has been completed.
Շ Complete other hardware settings and command X-Window.
IF YOU HAVE WINDOWS NT..
IF YOU HAVE LINUX..

FRONT PANEL
If you perform auto adjustment in advance of manual adjustment when you install the monitor, the
screen appears more stable.
ADJUSTMENT
9 page
Ȟ
Basic functions of the buttons
PowerȞTurns ON/OFF the monitor.
MenuȞOpens the main OSD menu and selects the highlighted
function.
Exit
Ȟ
Sets the adjustment or exits from menus and sub-menus.
Left
Ȟ
Moves the selector left on the OSD or decreases the
values of the selected function.
RightȞMoves the selector right on the OSD or increases the
values of the selected function.
Up
Ȟ
Increases Sound.
DownȞDecreases Sound.

EASY ADJUSTMENT
(Hot key)
Each button has an additional function and if you press two buttons simultaneously,
you can easily adjust the screen. You can adjust the following functions without OSD menu.
1 Exit : if you press the button once, displays the recent setting values and
if you press and hold the button, performs the factory reset.
2 RIGHT / LEFT : adjusts brightness.
3 UP / DOWN : adjusts volume.
4 Exit + Menu buttons : test screen appears and you can test the screen.
5 Exit + Left buttons : displays the software version.
SC-M-1514
ADJUSTMENT
10 page

OSD mode
Ȟ OSD H-position
Ȟ OSD V-position
Ȟ OSD Transparency
Ȟ OSD Timeout (Menu duration)
Ȟ OSD Language
12
OSD MENU
To exit from OSD menu, press ( ) button once or twice.
After OSD menu disappears, the monitor automatically saves any adjustment you have made.
11 page
ADJUSTMENT
SC-M-1514 SETTING SEQUENCE
PC mode
Ȟ Brightness
Ȟ Contrast
Ȟ Fine/Coarse
Ȟ H-frequency
Ȟ H-position
Ȟ V-position
Ȟ Color Temperature
Ȟ Color
سسس س

Ȟ Brightness
Ȟ Information
Ȟ Factory Reset
Ȟ Power ON / OFF
UTILITY mode
AUTO mode
ADJUSTMENT
12 page

This product has been approved for non-business purposes and may be used in any
environment, including residential areas. (Class A devices are for business
purposes and Class B devices radiate less radio frequency than Class A devices)
Ɔ
Display Power Manager Signaling (DPMS)
Power management circuit signaled by the computer system, will reduce power
consumption when the computer system is not in use. The power management
feature requires that the video card of the computer should support DPMS function.
Ɔ
Power Consumption
General CRT monitors consume 100W but LCD monitors consume 30W. An
advantage of this monitor is the lowest power consumption in Korea, that is, this
monitor consumes 20W that is 33% less than most LCD monitors and 3W on
Standby mode.
This monitor adopts the word best LCD panel manufactured by one of the world
best LCD panel manufacturer, Samsung Electronics Co., Ltd.. The 'wise view' logo
that is the global logo for TFT LCD monitors of Samsung Electronics Co., Ltd., is
attached to this monitor and guarantees the superior quality and performance.
This monitor is equipped with a control board for LCD monitor only that performs the
best color display and has simple and easy options. Simple design produces a
clean and tidy space.
This monitor is designed to be compatible with any PC configuration. You do not
need to substitute hardware or purchase specific software. You only need to
connect the signal cable of old CRT monitor.
PRODUCT FEATURES
etc.
13 page
Radio Frequency Compatibility Registration (Class B digital device)
Power Saving Feature
World best TFT LCD panel Other Feature
Simple Design
Other Feature

TROUBLESHOOTING
Power indicator is off.
No picture
"Check Signal Cable" message
-Make sure the power cord is properly connected or contact the service center.
-Make sure that the signal cable is firmly connected to the monitor or video sources.
Make sure the power is on.
"Out of Range" message
-The message will appear when the signal of the video card exceeds the maximum
resolution and maximum frequency. Set the maximum resolution and frequency suitable
for the monitor.
The image is too light.
The image is too dark.
-Adjust the brightness and contrast on the OSD.
Horizontal bars appear to flicker, jitter or
shimmer on the image
-Adjust the frequency and perform AUTO menu on the OSD.
etc.
14 page
High voltage flows inside of this product and may create a danger of electric shock. Never
disassemble or open the monitor. If doing so, you cannot get any warranty, repair and
substitution. When the following troubles are occurred, follow the troubleshooting in this
manual. If the troubles are occurred continuously, contact service center.

etc.
15 page
Display image is too small or too large.
In case of VGA or SVGA mode, display
image may be too small or too large.
- Change the resolution into 1024*768 using setting menu on the display properties.
Image is not stable and appears to vibrate.
-Check the display resolution and frequency from the computer or video board is an
available mode for your monitor. Refer to resolution information on the menu and
Standard Signal Modes and retry the settings. (Refer to 18page)
If you want to change the frequency,
-Frequency should be changed from the video card. Some video cards may not support
that function. Please upgrade the driver version and change the frequency. (For specific
information, refer to user's manual of computer or video card.)
If you want to change the resolution,
-Click "Control Panel" ? "Display" ? "Settings" and change the resolution.
Display image is not centered.
-Perform AUTO menu on the OSD or adjust the horizontal and vertical position.

SAFETY PRECAUTIONS
The following information is to prevent damages and secure user's safety.
Please read the following information carefully and use the monitor properly.
Power
2. Never disconnect it by pulling the
cord.
ƃ Doing so may create a danger of electric
shock or fire.
1. Never hit the monitor or scratch the monitor with sharp
materials.
ƃDoing so may damage the monitor or a danger of electric shock.
2. Unplug the monitor and Use a damp, lint-free cloth for
cleaning. Do not use keton-type materials, ethyl alcohol,
acid, toluene, ethyl acid, methyl or chloride.
ƃ Doing so may create a danger of electric shock or fire.
1. Never touch the inside of the monitor.
ƃ If you need a service, contact the service center.
When you store the monitor, keep the monitor away from direct sunlight and dust.
2. Keep the monitor away from anything magnetic.
ƃ Noise may appears on the screen.
1.Do not hold the plug with your
hands wet.
ƃ Doing so may create a danger of electric
shock or fire.
etc.
16 age
Other precautions
3.Do not force to bend the cord or put
any heavy materials on the cord.
ƃ Doing so may create a danger of electric
shock or fire.
Cleaning

SPECIFICATIONS
etc.
17 page
Model SC-M-1514
Screen size 38.1cm
Contrast Scailing 300 : 1
Display Area 304 mm(W) * 228.1mm(H)
Pixel Pitch 0.297 mm(W) * 0.297mm(H)
Type SAMSUNG SMART TFT LCD
Viewing Angle 75 / 75 / 55 / 65 (left/right/up/down)
Response Time 25ms Typ.
Backlight 4-CCFLs
Brightness 250cd/m
2
H-Frequency 30 ~ 64 KHz
V-Frequency 55 ~ 75 Hz
Panel Color 16.2M True color
Recommended 1024 * 768 @ 60Hz
Normal Mode 20W
Power-Saving
Mode
AC DC 12V 3A, 50~60Hz
Power-Saving VESA DPMS
Analog RGB
Speaker 2W + 2W (MAX)
Volume Control Analog
L
C
D
Frequency
Power
Consumption
Power
Audio
3W (Without Audio)
Interface
Resolutioin

1 720x400 31.47KHz N 70.0Hz P 28.322MHz
2 640x480 31.47KHz N 60.0Hz N 25.175MHz
3 640x480 35.00KHz N 66.7Hz N 30.240MHz
4 640x480 37.86KHz N 72.8Hz N 31.500MHz
5 640x480 37.50KHz N 75.0Hz N 31.500MHz
6 800x600 35.16KHz N/P 56.3Hz N/P 36.000MHz
7 800x600 37.88KHz P 60.3Hz P 40.000MHz
8 800x600 48.08KHz P 72.2Hz P 50.000MHz
9 800x600 46.87KHz P 75.0Hz P 49.500MHz
10 832x624 49.73KHz N 74.6Hz N 57.284MHz
11 1024x768 48.36KHz N 60.0Hz N 65.000MHz
12 1024x768 56.48KHz N 70.1Hz N 75.000MHz
13 1024x768 60.02KHz P 75.0Hz P 78.750MHz
>/)
;>/)
@/)
NO Resolution Horizontal Vertical Pixel Clock
Standard Signal Mode
etc.
18 page

FCC INFORMATION
NOTE: This equipment has been tested and found to comply with the limits for a
Class B digital device, pursuant to part 15 of the FCC Rules. These limits are
designed to pro-vide reasonable protection against harmful interference in a
residential installation.
This equipment generates, uses and can radiate radio frequency energy and, if
not in-stalled and used in accordance with the instructions, may cause harmful
interference to radio communications. However, there is no guarantee that
interference will not occur in a particular installation. If this equipment does cause
harmful interference to radio or television reception, which can be determined by
turning the equipment off and on, the user is encouraged to try to correct the
interference by one or more of the following measures:
-Reorient or relocate the receiving antenna.
-Increase the separation between the equipment and receiver.
-Connect the equipment into an outlet on a circuit different from that to which the
receiver is connected.
-Consult the dealer or an experienced radio/TV technician for help.
CAUTION : Changes or modifications not expressly approved by the manufacturer
responsible for compliance could void the user’s authority to operate the equipment.

ȞȞ
Memo
etc.
20 page
 Loading...