

Page 1
H5 500 T
INSTALLATION INSTRUCTIONS | CONSIGNES D’INSTALLATION | MONTAGEANLEITUNG
Patent information: | Informations Brevets : | Patentinformation: collingwoodlighting.com/patent
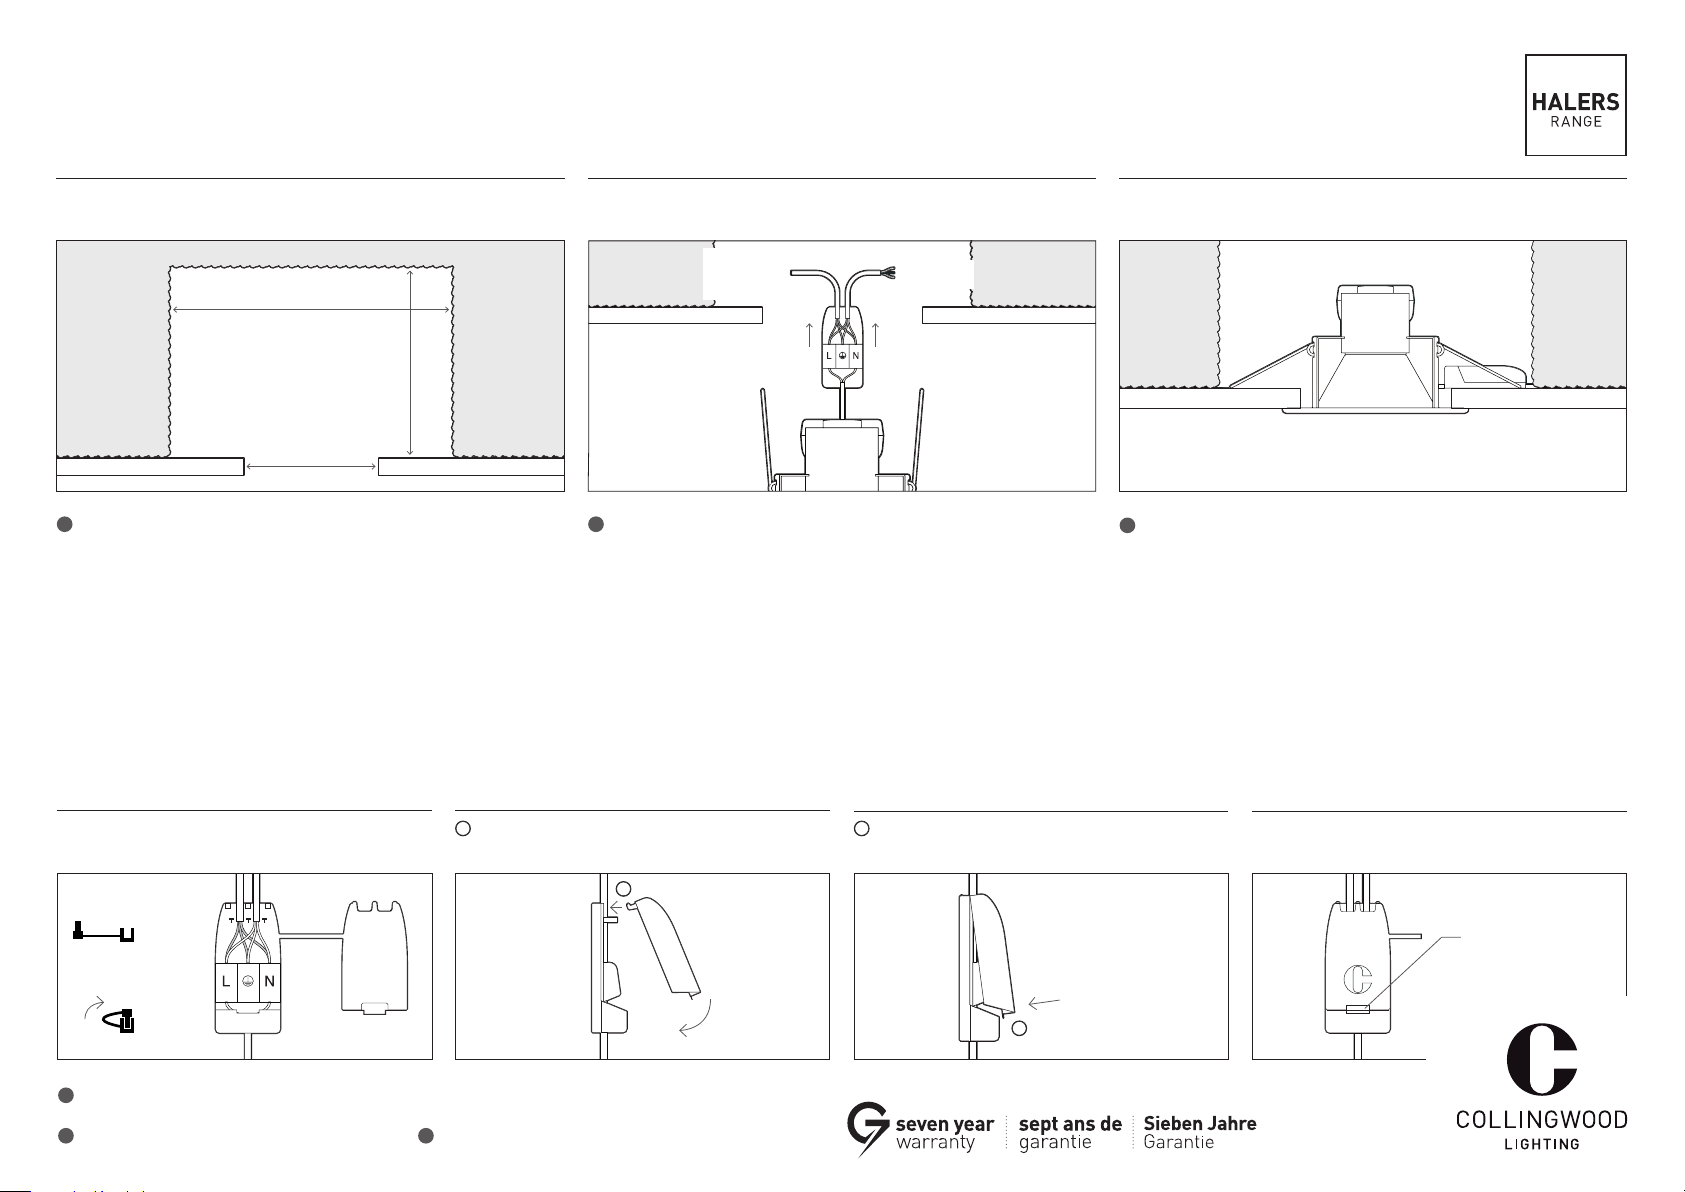
Cut ceiling hole, establish air gap |
Découpez le trou d’encastrement et prévoyez un vide d’air |
Deckenhohlraum öffnen, Luftzwischenraum sicherstellen
Insulation | Isolation | Isolierung
180mm (min)
100mm (min)
Ø95-115mm
EN FR
Installation data Données d’installation
• Isolate the mains supply, prior to wiring.
• This unit must be wired by a qualified electrician or suitable competent person.
• For dimming, a dimmer or dimming system suitable for electronic LED Drivers must be
used.
• For maximum number per circuit breaker, use the recommended quantities as for a
standard mains 50W halogen lamp.
• Collingwood Lighting advises the following maximum loads to assist functionality of the
dimming driver when used with suitable standard mains wall dimmers.
- 5 x units on a 250W dimmer
- 10 x units on a 400W dimmer
- 15 x units on a 1000W dimmer
• The above figures are for guidance only. All installations must comply with the appropriate
standards.
• Input power 8.5W / Power factor 0.95
Connect to mains |
Raccordez au secteur |
Mit Stromnetz verbinden
• Avant toute intervention, coupez le courant au disjoncteur.
• Ce produit doit être raccordé par un électricien qualifié ou une personne compétente
appropriée.
• Pour varier l’intensité, un variateur ou un système de variation compatible avec les
alimentations LED doit être utilisé.
• Pour connaître le nombre maximum de produits par disjoncteur, suivez les quantités
recommandées pour une lampe halogène de 50 W standard branchée sur le secteur.
• Collingwood Lighting conseille les charges maximales ci-dessous afin d’assurer la
fonctionnalité de l’alimentation dimmable lorsque celle-ci est utilisée avec un variateur
230V compatible:
- 5 x produits par variateur de 250 W
- 10 x produits par variateur de 400 W
- 15 x produits par variateur de 1000 W
• Les valeurs ci-dessus sont données à titre indicatif. Toutes les installations doivent être
conformes aux normes en vigueur.
• Consommation 8,5 W / Facteur de puissance 0,95
Loop in/out |
Repiquage |
Option zum
Durchschleifen
220-240V AC
50/60Hz
Install into ceiling |
Installez dans le plafond |
In Decke einbauen
IP20
IP65
DE
Montagedaten
• Trennen Sie vor dem Anschluss die Stromversorgung.
• Dieses Gerät darf nur von einer Elektrofachkraft oder einer entsprechend qualifizierten
Person angeschlossen werden.
• Zum Dimmen muss ein Dimmer oder Dimmer-System verwendet werden, welches für
elektronische LED-Vorschaltgeräte geeignet ist.
• Verwenden Sie die gleiche maximale Anzahl der Lampen pro Leitungsschutzschalter
wie für die empfohlene Anzahl handelsüblicher 50W Halogenlampen.
• Collingwood Lighting empfiehlt die folgenden maximalen Belastungen, um die
Funktionalität des Treibers beim Dimmen mit geeigneten, handelsüblichen
Netzspannungs-Wanddimmern zu gewährleisten:
– 5 Leuchten an einem 250W Dimmer
– 10 Leuchten an einem 400W Dimmer
– 15 Leuchten an einem 1000W Dimmer
• Die oben genannten Werte sind Richtwerte. Alle Anlagen müssen den entsprechenden
Normen entsprechen.
• Eingangsleistung 8,5W / Leistungsfaktor 0,95
Cord grip adaptor / Wired connector |
Serre-câble / Reliez les câbles au bornier de connexion |
Die Zugentlastungsklemme / Verkabelte Anschlussdose
2 x R02V 3 x 1.5mm
or | ou | oder
2 x 6242Y 3 x 1.5mm
t +44 (0) 1604 495 151 f +44 (0) 1604 495 095
EN
e sales@collingwoodgroup.com w collingwoodlighting.com
t +33 (0) 4 816 816 10 f +33 (0) 4 816 816 11
FR
e ventes@collingwoodgroup.com w collingwoodlighting.com
Insert pivot legs into location holes |
1
Insérez les pattes dans les trous prévus à cet effet |
Zapfen in die vorgesehenen Öffnungen schieben
1
t +49 (0)89411123 777 f +49 (0)89 411123 778
DE
e verkauf@collingwoodgroup.com w collingwoodlighting.com
2
Push firmly to snap shut |
Poussez fermement pour refermer le boîtier |
Fest zudrücken, bis Klappe einrastet
Push here |
Poussez ici |
Hier drücken
2
To open connector, lever apart |
Appuyez pour ouvrir le bornier de connexion |
Zum Öffnen der Anschlussdose Deckel hochklappen
Lever in here |
Faites effet de levier ici |
Hier hochklappen
HLI 1097 V1
 Loading...