

Page 1
WL94 MICROWAVE STEP-DIM & EMERGENCY
INSTALLATION INSTRUCTIONS / CONSIGNES D’INSTALLATION / MONTAGEANLEITUNG
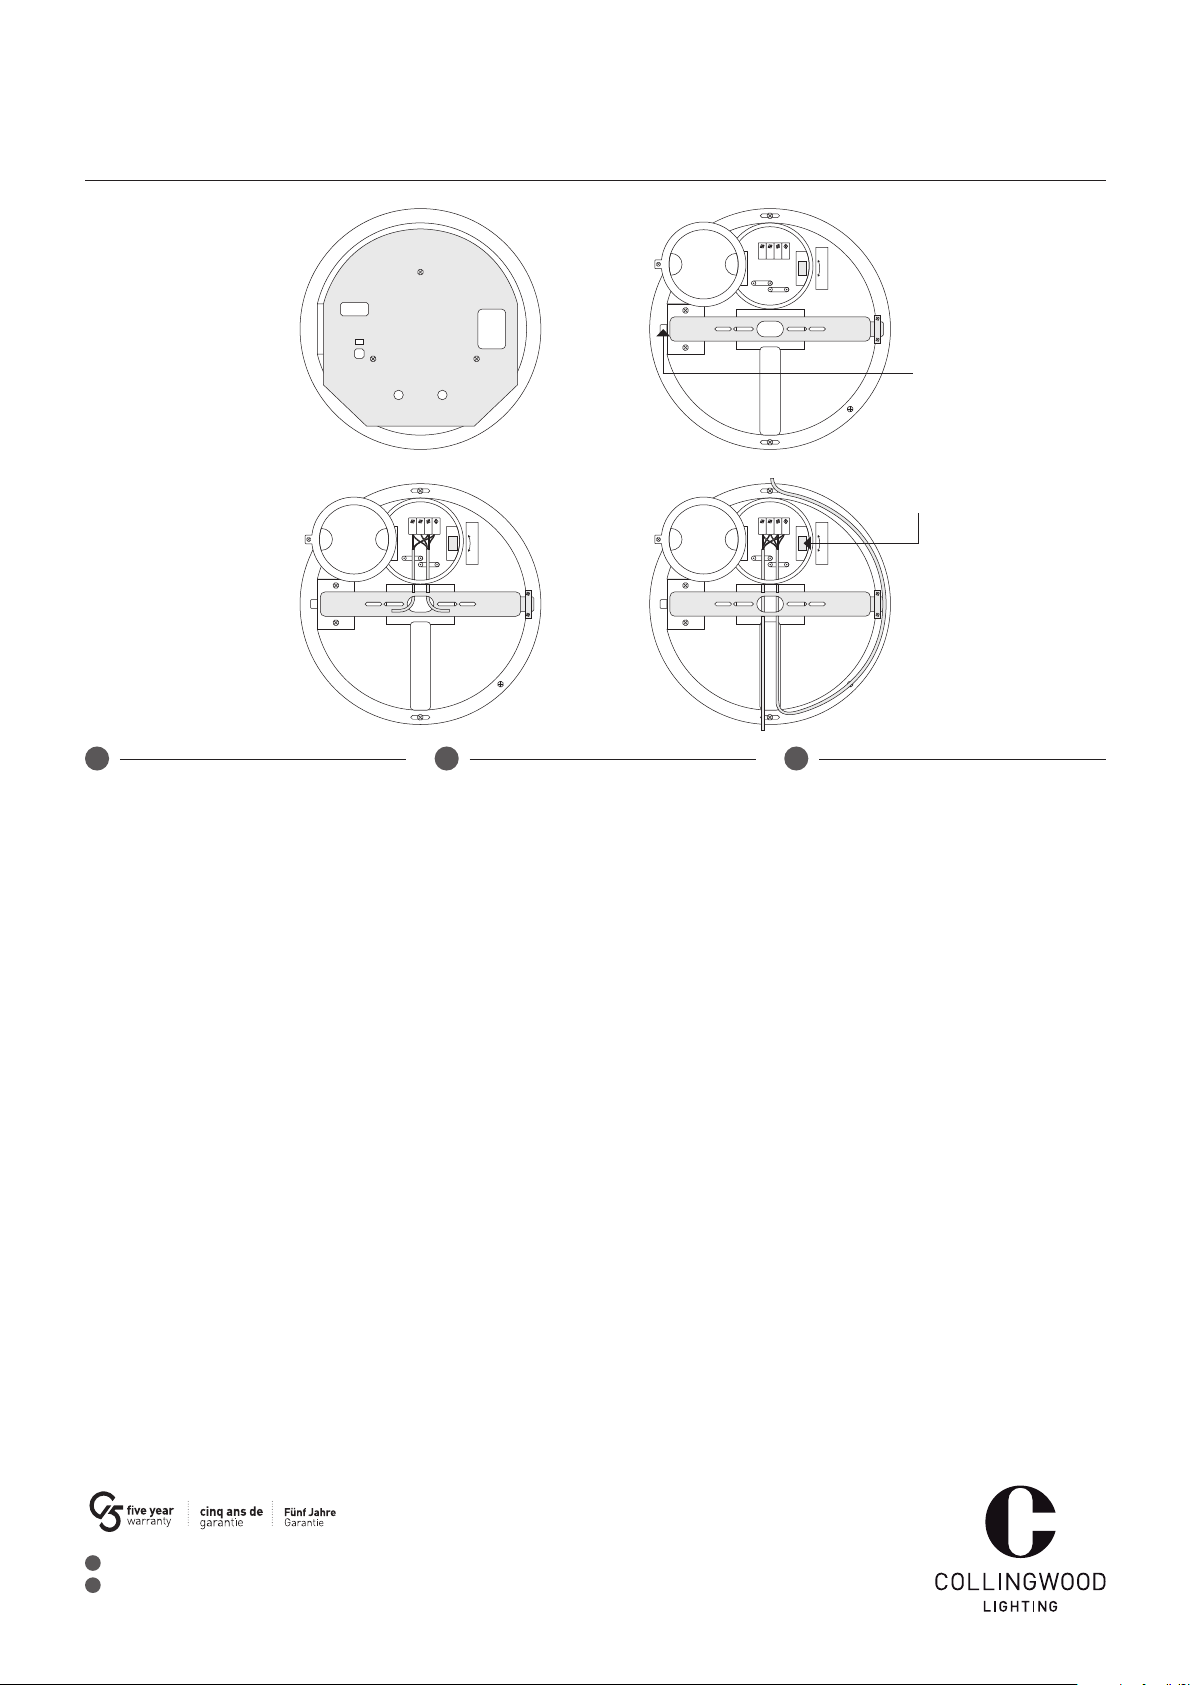
FIG 2FIG 1
OPEN CLOSE
12
NE
Bracket release
button and security screw /
Bouton de déverrouillage et
vis de sécurité /
Klemmenlöseschraube
FIG 3
NE12
OPEN CLOSE
FIG 4
12
NE
EN FR DE
Installation
1. Establish a mains supply to each bulkhead light
position. WL94 units are class II and do not require
an earth. An earth connection is provided for earth
continuity of the circuit.
2. Isolate the mains supply prior to wiring.
3. Lift the diffuser, it is not locked in place for ease of
installation.
4. Remove the three screws retaining the PCB (see Fig
1.), lift PCB and carefully twist clockwise to access
the battery.
5. Connect the battery to the PCB and write
commissioning date on the battery.
6. Refit the PCB and secure with three screws.
7. Refit the diffuser and twist clockwise, ensure both
side lines on the diffuser and back cover are aligned.
8. Secure diffuser with supplied screws (two screws with
built in washer).
9. Loosen the security screw and press the button to
release the mounting bracket. (see Fig. 2)
10. Place the bracket on the wall and mark the fixing
positions on the wall.
11. a) Centre entry point (Fig.3)
Feed the mains supply cable through the centre hole
of the mounting bracket and fix the bracket to the
wall.
b) Side entry points (Fig.4)
Fix the bracket to the wall, use channel and two side
clips to route the cables and hold them in place.
12. Twist and pull the cover located at the back of the
bulkhead.
13. Connect the mains supply to the push terminal
connector.
14. 1 = switched live, 2 = permanent live, N = neutral, E
= earth.
15. Set required colour temperature using CCT switch.
16. Set the microwave sensor step-dim. See overleaf
microwave settings session.
17. Refit the rear cover and secure with supplied screw.
18. Clip the bulkhead into the bracket and tighten the
release button security screw.
19. Turn on mains power.
Installation
1. Prévoir une connexion au secteur pour chaque hublot.
Les hublots WL94 sont classe II et ne nécessitent pas
de raccordement à la terre. Une connexion à la terre
est fournie pour la continuité du circuit de terre.
2. Avant toute intervention, coupez le courant au tableau
général.
3. Retirez le diffuseur, il n'est pas verrouillé pour faciliter
l'installation.
4. Retirez les trois vis retenant le PCB (voir Fig. 1),
soulevez le PCB et tournez soigneusement dans le
sens des aiguilles d'une montre pour accéder à la
batterie.
5. Connectez la batterie au PCB et écrivez la date de
mise en service sur la batterie.
6. Remettez en place le PCB et fixer-le avec trois vis.
7. Remettez le diffuseur et tournez-le dans le sens des
aiguilles d'une montre, assurez-vous que les lignes
latérales du diffuseur et du couvercle arrière sont
alignées.
8. Fixez le diffuseur avec les vis fournies (deux vis avec
rondelle).
9. Desserrez la vis de sécurité et appuyez sur le bouton
pour déverrouiller le support de montage. (voir Fig.2)
10. Placez le support sur le mur et marquez les
emplacements sur le mur.
11. a) Point d'entrée du câble central (Fig.3)
Faites passer le câble d'alimentation secteur dans le
trou central du support et fixez le support au mur.
b) Points d'entrée du câble latéraux (Fig.4)
Fixez le support de montage au mur, utilisez le canal
et les deux clips pour acheminer les câbles et les
maintenir en place.
12. Tournez et retirez le couvercle situé à l'arrière du
hublot.
13. Connectez l'alimentation secteur au bornier de
connexion rapide
14. 1 = commande d'allumage, 2= allumage permanent,
N = neutre, E = terre
15. Réglez la température de couleur à l'aide du
commutateur CCT.
16. Paramétrez le détecteur hyperfréquence pour
CCT Switch /
Commutateur CCT /
Farbtemperaturschalter
OPEN CLOSE
Einbau
1. Stellen Sie eine Netzversorgung für jede
Leuchtenposition her. WL94 sind Geräte der Klasse II
und benötigen keine Erdung. Ein Masseanschluss ist
für die Erdung des Stromkreises vorgesehen.
2. Trennen Sie die die Netzversorgung, bevor Sie mit
dem Verkabeln beginnen.
3. Heben Sie die Streuscheibe an, sie ist zur
Vereinfachung der Installation nicht eingerastet.
4. Entfernen Sie die drei Schrauben, mit der die
Leiterplatte befestigt ist (siehe Abb. 1), heben Sie
die Leiterplatte und drehen Sie sie vorsichtig im
Uhrzeigersinn, um an die Batterie zu kommen.
5. Verbinden Sie die Batterie mit der Leiterplatte und
vermerken Sie das Inbetriebnahmedatum auf der
Batterie.
6. Setzen Sie die Leiterplatte wieder ein und befestigen
Sie sie mit den drei Schrauben.
7. Setzen Sie die Streuscheibe wieder auf und drehen
Sie sie im Uhrzeigersinn, stellen Sie sicher, dass
beide Linien auf der Scheibe und Rückwand gleich
ausgerichtet sind.
8. Befestigen Sie die Streuscheibe mit den
mitgelieferten Schrauben (zwei Schrauben mit
eingebauter Unterlegscheibe).
9. Lösen Sie die Sicherheitsschraube und drücken Sie
den Knopf, um die Halterung zu lösen (siehe Abb. 2).
10. Halten Sie die Halterung an die Wand und markieren
Sie die Befestigungspositionen an der Wand.
11. a) Mittleres Loch (Abb. 3)
Führen Sie das Stromkabel durch das mittlere Loch
der Halterung und befestigen Sie die Halterung an
der Wand.
b) Seitliche Löcher (Abb. 4)
Befestigen Sie die Halterung an der Wand, verwenden
Sie die Kabelkanäle und die seitlichen Clips als
Kabelführung, damit sie nicht wegrutschen.
12. Drehen und ziehen Sie die Abdeckung, die sich an der
Rückseite der Wandleuchte befindet.
13. Schließen Sie die Netzversorgung an den
Steckanschluss an.
14. 1 = stromführend geschaltet, 2 = permanent
EN
FR
Collingwood Lighting, Brooklands House, Sywell Aerodrome, Sywell, Northampton NN6 0BT, United Kingdom
CWI 8219 V1
Page 2
WL94 MICROWAVE STEP-DIM & EMERGENCY
INSTALLATION INSTRUCTIONS / CONSIGNES D’INSTALLATION / MONTAGEANLEITUNG
EN FR DE
Installation data
• Isolate the mains supply, prior to wiring.
• This unit must be wired by a qualified electrician or
suitable competent person.
• The light source contained in this luminaire shall only
be replaced by the manufacturer or his service agent
or a similar qualified person.
• Battery must be replaced when the unit no longer
meet its rated emergency duration, or if a battery fault
occurs. Contact Collingwood Lighting for a suitable
replacement.
Product / Produit / Produkt WL9410CCS WL9418CCS
Rated Voltage / Tension / Nennspannung 220-240V AC 50/60Hz 220-240V AC 50/60Hz
Input Current / Courant d’entrée / Eingangsstrom 54mA 89mA
Input Power / Puissance / Eingangsleistung 10W 18W
Power Factor / Facteur de puissance / Leistungsfaktor ≥0.5 ≥0.5
Inrush Current / Courant d’appel / Einschaltstrom 11A/0.116ms 11A/0.116ms
sélectionner la variation désirée. Voir au dos pour le
paramétrage.
17. Remettez le couvercle arrière en place.
18. Clipsez le hublot dans le support et serrez la vis de
sécurité du bouton de déverrouillage.
19. Allumez l'alimentation secteur.
Données d'installation
• Avant toute intervention, coupez le courant au tableau
général
• Ce produit doit être raccordé par un électricien
qualifié ou une personne compétente appropriée.
• La source de lumière de ce produit doit être
remplacée par le fabricant, son agent de service ou
une personne qualifiée.
• La batterie doit être remplacée lorsque l’unité
ne respecte plus la durée d’éclairage de sécurité
estimée ou en cas de panne de batterie. Contactez
Collingwood Lighting pour un remplacement.
stromführend, N = neutral, E = Masse
15. Stellen Sie mit dem Farbtemperaturschalter die
gewünschte Farbtemperatur ein.
16. Stellen Sie die Abdimmstufen des Mikrowellensensors
ein. Siehe umseitig für Einstellungen.
17. Setzen Sie die hintere Abdeckung wieder auf und
befestigen Sie sie mit der mitgelieferten Schraube.
18. Stecken Sie die Sie die Wandleuchte in die Halterung
ein und ziehen Sie die Sicherungsschraube des
Auslöseknopfes fest.
19. Schalten Sie den Netzstrom ein.
Installationsdaten
• Trennen Sie die die Netzversorgung, bevor Sie mit dem
Verkabeln beginnen.
• Diese Leuchte muss von einer qualifizierten Fachperson
oder geeigneten Experten installiert werden.
• Die in dieser Leuchte enthaltene Lichtquelle darf nur
durch den Hersteller, seinen Kundendienst oder eine
ähnlich qualifizierte Person ersetzt werden.
• Die Batterie muss ausgewechselt werden, wenn
das Gerät seine vorgeschriebene Notfalldauer nicht
mehr erreicht oder wenn ein Batteriefehler auftritt.
Wenden Sie sich für ein geeignetes Ersatzprodukt an
Collingwood Lighting.
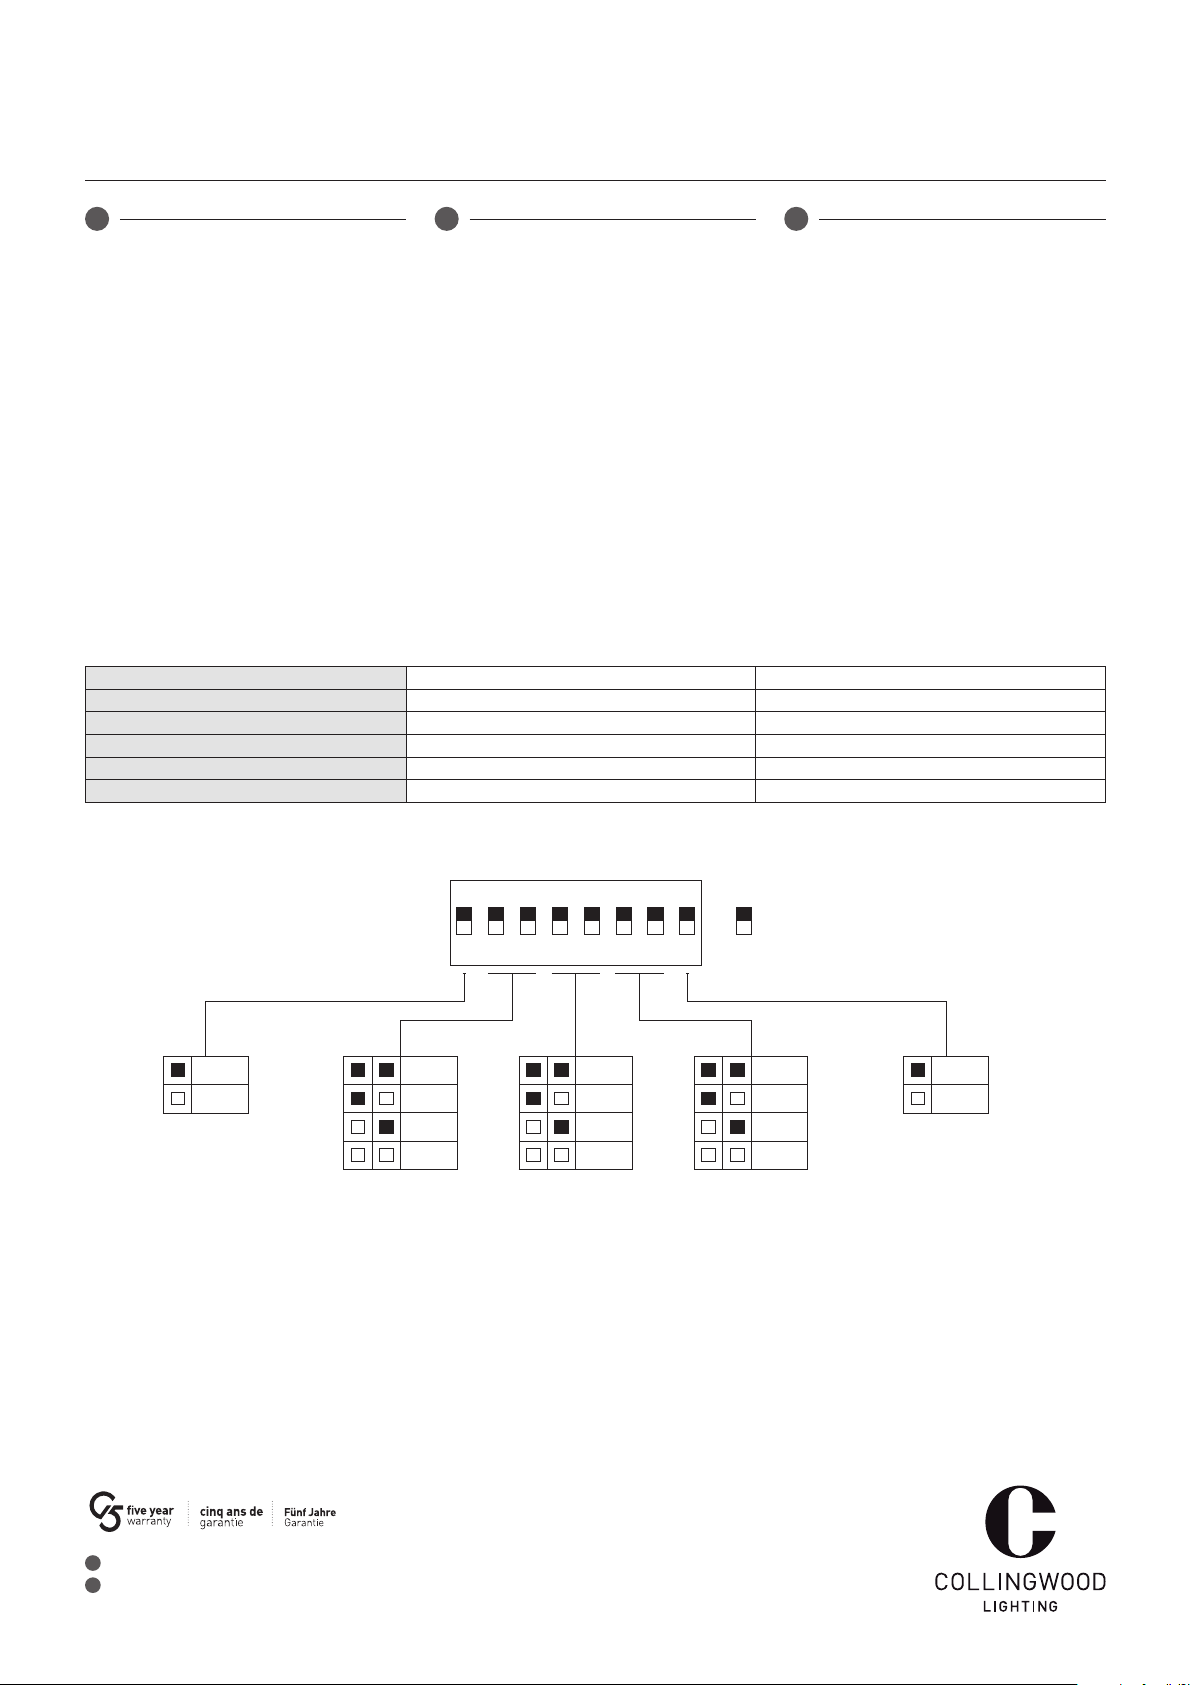
Microwave Settings / Paramètre du détecteur hyperfréquence / Mikrowellen-Einstellungen
1 2 3 4 5 6 7 8
100%
50%
Detection area /
Zone de détection /
Erfassungsbereich
Hold-time / Temps
d'éclairage maintenu / Haltedauer
Detection Area: set the sensor sensitivity according to
the mounting height. 100% is adequate to 5m mounting
height.
Hold-time: determines the period that the luminaire is at
full brightness after movement is detected.
Dusk-Dawn threshold: set the sensor to turn on the luminaire only when the ambient illuminance is lower than the
pre-set levels shown in the table.
Stand-by time: determines the period that the luminaire
remains on after the hold-time is ended.
5s
90s
5min
10min
Dusk-Dawn threshold /
Niveau de luminosité /
Dämmerungsschwelle
Zone de détection: programmez le détecteur selon
la hauteur de montage. 100% est approprié pour une
hauteur de 5m.
Temps d'éclairage maintenu: c’est la durée pour laquelle
l’éclairage est maintenu à 100% d’intensité lumineuse
après la détection d'un mouvement.
Niveau de luminosité: c'est pour paramétrer le détecteur
afin d'allumer le luminaire seulement lorsque la luminosité est en dessous du niveau indiqué dans le tableau.
Temps de veille: c’est la période pour laquelle le lumi-
Disable
100lux
40lux
10lux
Switch UP / Commutateur HAUT / Schalter oben
Switch DOWN / Commutateur BAS / Schalter unten
0s
10s
10min
+ ∞
Stand-by period /
Temps de veille /
Standbyzeit
Erfassungsbereich: Stellen Sie die Sensorempfindlichkeit
entsprechend der Montagehöhe ein. 100% entspricht 5m
Montagehöhe.
Haltedauer: bestimmt den Zeitraum, den die Leuchte
nach Bewegungserkennung mit voller Helligkeit leuchtet.
Dämmerungsschwelle: Stellen Sie den Sensor so ein,
dass die Leuchte nur dann eingeschaltet wird, wenn die
Umgebungslichtstärke niedriger ist als die in der Tabelle
angezeigten voreingestellten Werte.
Standbyzeit: bestimmt den Zeitraum, den die Leuchte
20%
40%
Stand-by dimming level
/ Niveau de varialion
en temps de veille /
Standby-Dimmstufe
EN
FR
Collingwood Lighting, Brooklands House, Sywell Aerodrome, Sywell, Northampton NN6 0BT, United Kingdom
CWI 8219 V1
Page 3
WL94 MICROWAVE STEP-DIM & EMERGENCY
INSTALLATION INSTRUCTIONS / CONSIGNES D’INSTALLATION / MONTAGEANLEITUNG
EN FR DE
Stand-by dimming level: determines the percentage
luminaire is dimmed to during stand-by period.
EN
naire reste allumé à l’intensité sélectionnée une fois que
la période d’éclairage maintenu s’est écoulée.
Niveau de varialion en temps de veille: c'est le pourcentage de variation du luminaire pendant la période de veille.
Emergency pack commissioning
1. Provide an uninterrupted mains power supply
(permanent live) for 24 hours.
Permanent live must be left on for 24hrs minimum to
fully charge the battery.
2. Check the green indicator LED light is lit. This
confirms that the batteries are charging.
3. Remove the mains supply – the bulkhead will operate
under battery power for 3 hours minimum.
4. Restore mains power to the unit, check light functions
correctly.
Note: In normal operation, the green LED will be
constantly lit to indicate that the battery is charging. If
the green LED is ever not lit, investigate immediately
and rectify the fault.
Testing
• Periodic testing of the unit must be performed in line
with the appropriate regulations.
Disposal of this product should be separate from
household waste. Please separate these items from
other types of waste and recycle them responsibly to
promote the sustainable reuse of material resource.
Household users should contact their local government
office for details of where and how they can take these
items for environmentally safe recycling.
Mise en service de l’éclairage de sécurité
1. 1. Fournissez une alimentation secteur ininterrompue
(phase permanente) pendant 24 heures.
L'allumage permanent doit resté allumé pendant au
minimum 24h afin de recharger la batterie.
2. Vérifiez que le voyant LED vert est allumé. Cela
confirme que les batteries sont en charge.
3. Coupez l’alimentation secteur - le produit
fonctionnera alimenté par sa batterie pendant 3
heures minimum.
Rétablissez l’alimentation secteur, vérifiez les
fonctions d’éclairage correctement.
Remarque : En fonctionnement normal, le voyant LED
vert sera allumé en permanence pour indiquer que la
batterie est en cours de chargement. Si le voyant n'est
jamais allumé, vérifiez immédiatement et réparez la
défaillance.
Tes t
• Des vérifications périodiques du produit doivent
être effectuées conformément aux réglementations
appropriées en cours.
Ce produit ne doit pas être éliminé avec les ordures
ménagères. Merci de le séparer des autres déchets
et de le recycler de manière responsable afin de
promouvoir la réutilisation des ressources matérielles.
Les consommateurs doivent contacter leurs autorités
locales pour plus d’information quant aux lieux et
méthodes de recyclage en accord avec la protection
de l’environnement.
nach Beendigung der Haltedauer eingeschaltet bleibt.
Standby-Dimmstufe: bestimmt die Helligkeitsstufe, auf
die die Leuchte während der Standbyphase gedimmt wird.
Inbetriebnahme der Notleuchten
1. Sorgen Sie 24 Stunden lang für eine permanente
Stromversorgung (ununterbrochene Spannung).
Um die Batterie vollständig aufzuladen, muss sie
mindestens 24 Stunden lang unter Dauerstrom
stehen.
2. Stellen Sie sicher, dass die grüne LED leuchtet. Diese
bestätigt, dass die Batterien laden.
3. Trennen Sie den Netzstrom – die Einheit läuft
mindestens 3 Stunden lang mit Batteriebetrieb.
4. Stellen Sie die Stromversorgung wieder her, prüfen
Sie, dass die Leuchte korrekt funktioniert.
Hinweis: Im Normalbetrieb leuchtet die grüne LED
konstant, und zeigt an, dass die Batterie aufgeladen
wird. Sollte die grüne LED jemals nicht leuchten,
untersuchen Sie dies sofort und beheben Sie den
Fehler.
Überprüfung
• Die Einheit muss gemäß den entsprechenden
Vorschriften regelmäßig überprüft werden.
Dieses Produkt darf nicht im Haushaltsmüll entsorgt
werden. Bitte trennen Sie diese Gegenstände
von anderen Abfallarten und recyceln Sie sie
verantwortungsbewusst, um die nachhaltige
Wiederverwendung von Materialressourcen zu fördern.
Privathaushalte kontaktieren bitte ihre regionalen
Ämter für Informationen darüber.
EN
FR
Collingwood Lighting, Brooklands House, Sywell Aerodrome, Sywell, Northampton NN6 0BT, United Kingdom
CWI 8219 V1
Page 4
WL94 MICROWAVE STEP-DIM & EMERGENCY
INSTALLATION INSTRUCTIONS / CONSIGNES D’INSTALLATION / MONTAGEANLEITUNG
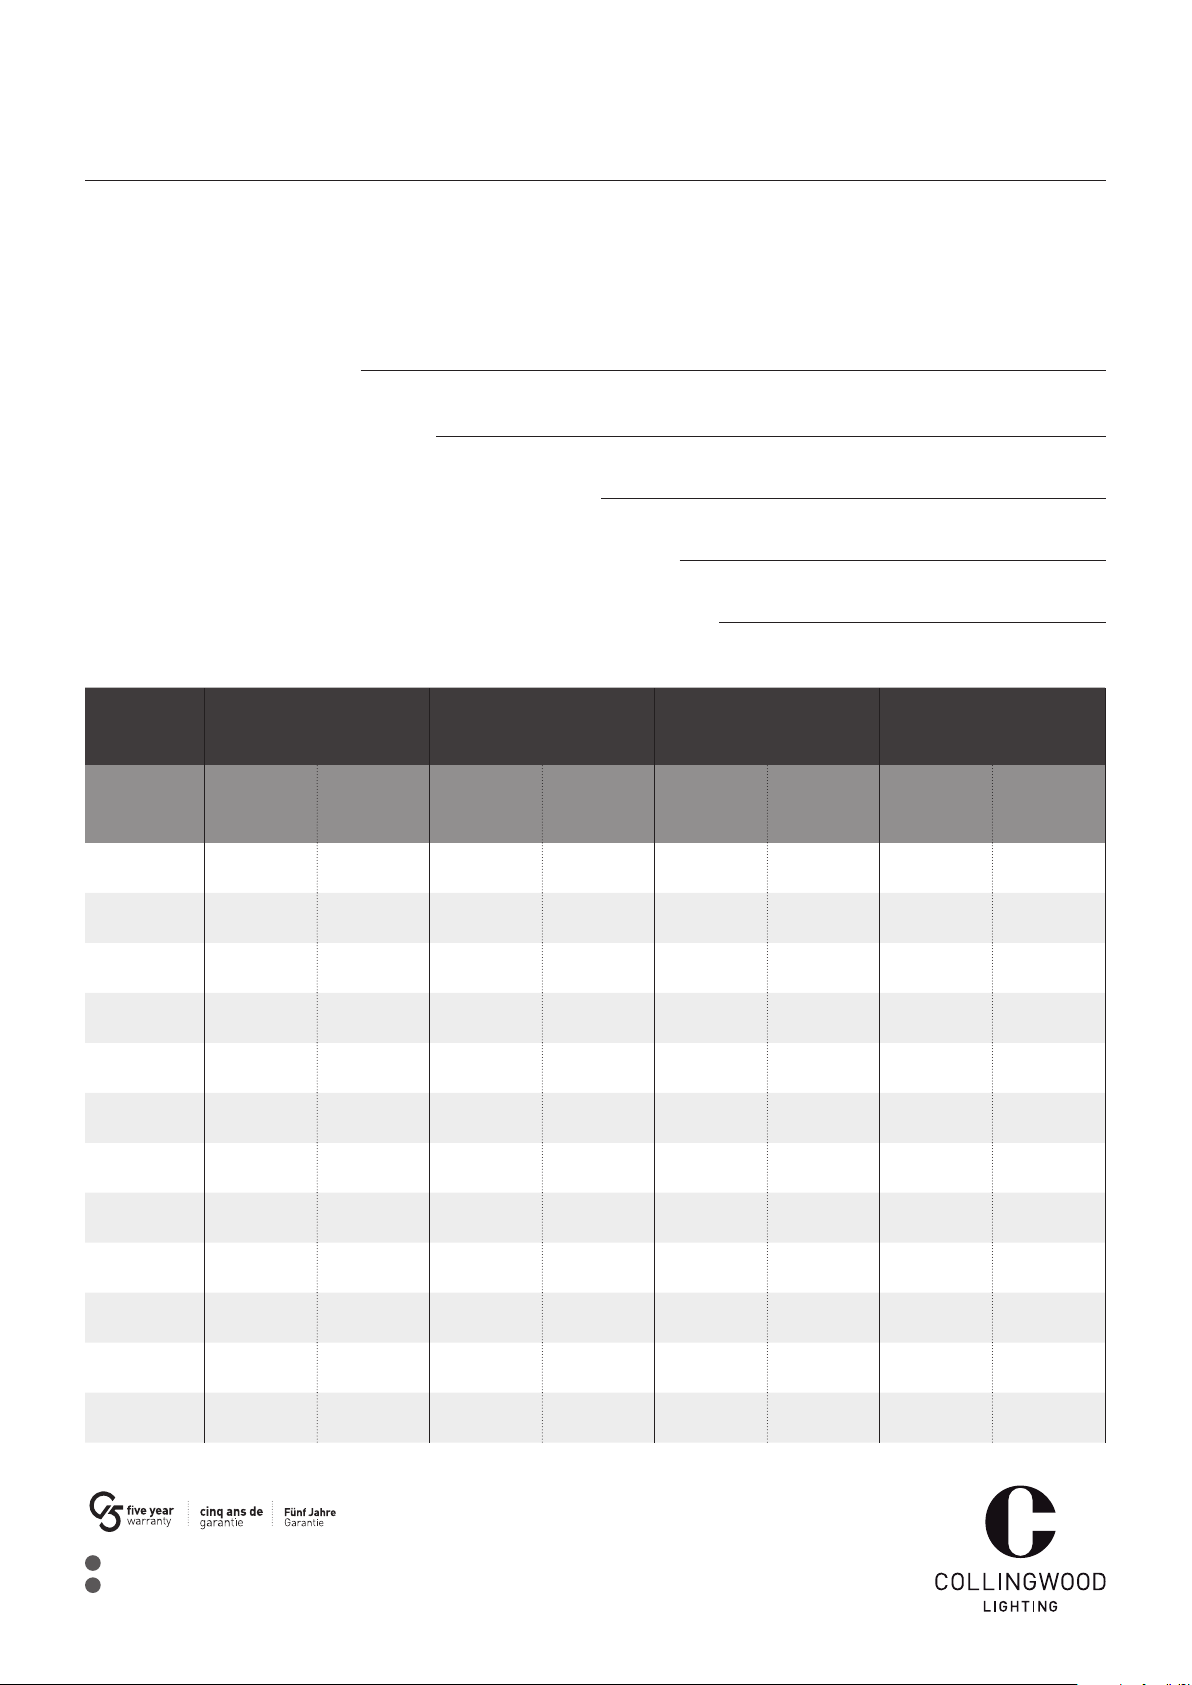
Emergency installation and maintenance record
Dossier d’installation et service de l’éclairage de sécurité
Notlicht-Installations- und Wartungsprotokoll
Product I Produit I Produkt :
Installer I Installateur I Installateur :
Date installed I Date d’installation I Installationsdatum :
Commissioning by I Mise en service par I Inbetriebnahme durch :
Date commisioned I Date de mise en service I Inbetriebnahmedatum :
Month
Mois
Monat
1
2
3
4
5
6
7
8
9
Année 1
Signed
Signature
Unterschrift
Year 1
Jahr 1
Date
Date
Datum
Année 2
Signed
Signature
Unterschrift
Year 2
Jahr 2
Date
Date
Datum
Année 3
Signed
Signature
Unterschrift
Year 3
Jahr 3
Date
Date
Datum
Année 4
Signed
Signature
Unterschrift
Year 4
Jahr 4
Date
Date
Datum
10
11
12
EN
FR
Collingwood Lighting, Brooklands House, Sywell Aerodrome, Sywell, Northampton NN6 0BT, United Kingdom
CWI 8219 V1
 Loading...