

Page 1

Fryer Series
PF46
PF56
LP46
LP56
OF49
OF59
FRYER
Owner’s Manual
DOC120319A R7
nr 7.27.16
Page 2
FRYERS
WELCOME
Congratulations on your purchase of Winston’s Collectramatic
fryer. You’ll benefit from improved production, extended
shortening life, ease of programming, and consistent quality.
For more than 40 years, Collectramatic has been the fryer of
choice for major food chains and independently operated
foodservice establishments worldwide.
CONTACT INFORMATION:
If you have questions about your Collectramatic fryer, please
contact Winston's Customer Service Center between 8:00 a.m.
and 5:00 p.m. EST, Monday through Friday.
Internet: www.winstonindustries.com
E-mail: [email protected]
Phone: 1.800.234.5286 | 1.502.495.5400
Fax: 1.502.495.5458
Mail: 2345 Carton Drive | Louisville, KY 40299 USA
CONTENTS
Welcome ..............................................................................................2
Safety .................................................................................................2-3
Receiving Your Equipment ......................................................... 4
Electrical Information.....................................................................5
Pressure Fryer (PF/LP)
Component Identication ......................................................6-7
Open Fryer (OF) Component Identication ...................8-9
Accessories ....................................................................................... 10
Assembly ...........................................................................................11
Operating Instructions: Filling ................................................ 12
Operating Instructions: Warm-Up ........................................ 13
Operating Instructions: Loading ........................................... 14
Operating Instructions: Cooking ................................... 15-16
Daily Care ................................................................................... 16-18
Controls .............................................................................................19
Programming and Settings .............................................. 20-28
Troubleshooting ..................................................................... 29-30
Aqualert® Description................................................................. 31
Warranty and Terms & Conditions ........................................32
Notes .............................................................................................33-35
SAFETY
Winston Collectramatic fryers are manufactured to equipment
industry standards, which design and test for structural
reliability for 10 years useful life. This is not a warranty. See ZAP
Warranty Agreement on page 32 for complete warranty
information applicable to your equipment.
____________________________________________
!
DANGER:
High Temperatures | High Voltage
Hot Cooking Oil Under Pressure
____________________________________________
To avoid painful, scarring, life-threatening injuries, emotional
disorders, or property damage, read and obey this sheet, all
DANGER labels, the Owner's Manual, and information
supplied with service parts before using, cleaning, or working
on this fryer.
1. ALWAYS check to make sure you can read all DANGER labels.
Take fryer out of service immediately until all unreadable labels
are replaced. Contact Winston Customer Service at
1.800.234.5286 for replacement labels.
2. INSPECT fryer for faulty, loose, or missing parts. If upon
inspection, faulty, loose, or missing parts are discovered, take
fryer out of service and do not operate fryer until it is repaired.
3. USE fryer only with Winston-approved controls.
4. DO NOT mix parts between Collectramatic fryer models.
5. DO NOT operate fryer if you feel an electrical shock. Take fryer
out of service until it is repaired.
6. DO NOT open panels or attempt repairs if you are not a trained
servicer.
7. DO NOT use fryer unless it is secured to prevent tip-over.
8. DO NOT use fryer until oor around fryer is in a clean, non-slip
condition.
9. DO NOT stand, sit, or lean on fryer.
10. DO NOT place any objects, other than fryer accessories,
near fryer.
11. DO NOT over-ll or under-ll fryer with cooking oil. Adjust hot
cooking oil (at cooking temperature) so that the oil level is
between the MAXIMUM and MINIMUM lines.
2
www.winstonindustries.com | 1.800.234.5286
Page 3
FRYERS
12. HOT LIQUIDS UNDER PRESSURE
To safely close lid:
A. Use both hands on handlebar to lower lid.
B. Pull handlebar completely into lid lock block so
that lid lock pops up (‘clank’ sound) into its
straight, locked position.
To safely open lid:
A. Wait until cook cycle is nished (timer at 00:00
and buzzer sounds).
B. Do not touch handlebar to open lid until
pressing down on lid lock causes the lid to lower.
C. Then with the lid in the lowered position, use
one hand to move handlebar to open.
13. DO NOT open drain valve until fryer power is OFF and lid is
open. Use safety gloves and place an appropriate container or
lter in position under drain valve before opening valve.
14. DO NOT install or attach any piping or tubing to drain valve
other than Winston drain valve extension.
15. DO NOT handle fryer basket without using safety gloves and
basket hook or lift assist tool.
16. DO NOT stir cooking oil in collector after the rst round
of cooking each day. Cooking oil may come up and out
of cookpot.
17. DO NOT clean or move fryer until you have disconnected fryer
from power, completely removed lid, drained cooking oil, and
removed collector. Never use “boil-out” method or water for
cleaning fryer cookpot.
18. DO NOT splash water or use hose on outside of fryer. Use only
damp towel to clean fryer surfaces outside of cookpot.
19. DO NOT use any liquids other than cooking oils in fryer
cookpot.
20. PURCHASE only Winston authorized replacement parts, which
will provide the most current danger warnings.
21. ALWAYS turn power switch to OFF anytime fryer
is not in use.
22. DO NOT use vent ball with ball-end deadweight.
1. Because this appliance utilizes high voltage, it should only be
serviced by a licensed electrician or trained servicer.
Attempting to service the appliance yourself could result in
serious, potentially fatal injuries. Please make this page
available to the servicer.
2. If an electrical shock is felt when touching appliance, shut o
power immediately (either pull power cord or turn o circuit
breaker) and call a trained servicer for repair. Failure to do so
could result in serious, potentially fatal injuries.
3. Always turn power switch o when appliance is not in use.
4. Components to be replaced only with Winston-supplied
components.
5. Wire (ground) lug on rear of appliance to be used for
connection of equipotential conductor device.
6. Appliance must be grounded.
____________________________________________
!
WARNING: Safety Hazard,
Intended Use
____________________________________________
Can cause serious injury or damage to appliance >>
Supervise untrained, young, or handicapped persons.
1. This appliance is not intended for use by persons
(including children) with reduced physical, sensory,
or mental capabilities, or lack of experience and
knowledge, unless they have been given supervision or
instruction concerning use of the appliance by a person
responsible for their safety.
2. Children should be supervised to ensure that they do
not play with the appliance.
3. This appliance is intended to be used for commercial
applications, for example in kitchens of restaurants, canteens,
hospitals and in commercial enterprises such as bakeries,
butcheries, etc., but not for continuous mass production of
food.
____________________________________________
!
WARNING: Safety Hazard,
____________________________________________
23. INSTALLATION of this fryer may require the use of a licensed
electrician. Check local codes.
____________________________________________
!
DANGER: Electrical Hazard
____________________________________________
Can cause serious injury or death >> Do not attempt to
service this appliance unless you are a licensed electrician or
trained servicer.
NEED TO CONTACT US? www.winstonindustries.com | E-mail [email protected]
Phone 1.800.234.5286 | 1.502.495.5400 | 1.502.495.5458 • Mail 2345 Carton Drive | Louisville, KY 40299 USA
Can cause serious injury or damage to appliance >>
Install appliance in such a manner that water cannot contact
cooking oil in fryer.
____________________________________________
!
CAUTION:
Prior to using equipment for the rst time, perform the daily
care procedure listed on pages 15-17.
____________________________________________
3
Page 4

RECEIVING YOUR EQUIPMENT
Thank you for your recent order. For your convenience,
we have summarized your responsibilities for receiving a
shipment and suggest procedures to follow if there is freight
damage. Once an order has left the factory all inspection
responsibilities for the shipment passes on to you.
FRYERS
If Merchandise Is Delivered in Damaged
Condition, You Must:
1. Have the driver note the damage and sign all copies
of the freight bill.
2. Examine for concealed damaged as soon as
possible.
3. Notify carrier of the freight claim immediately
(You have a 24-hour window).
4. Retain damaged merchandise and all original
packaging until inspected by carrier.
Steps to Take at Time of Delivery to Protect
Against Loss or Damage
1. Verify count. Make sure you receive as many
cartons as are listed on the delivery receipt. Note
any shortage on carrier’s delivery receipt and
have the driver note the shortage on your copy.
2. Carefully examine each carton for damage. If
damage is visible, note this fact on the delivery
receipt and have the driver clearly note the same
on your copy. If the carton appears to have internal
damage, insist that the package be opened. You
and the driver should make joint inspection of
the contents. Any concealed damage discovered
should be noted on the receipt and on your copy.
3. Immediately after delivery, open all cartons and
inspect for concealed damage.
Steps to Take When Visible or Concealed
Damage Is Discovered
1. Retain damaged items. The damaged items,
shipping cartons, and all inner packing materials
must be held in the receiving area until a carrier
representative inspects them or waives the
opportunity to inspect.
2. Call carrier to report damage and request
inspection. The call should be placed immediately
upon discovery of the damage. Claims will be
denied if not reported within 24/48 hours.
3. Conrm call in writing. For your own protection,
conrm your telephone claim in writing using
certied, return receipt requested mail.
Steps to Take When Carrier Makes Inspection
of Damaged Items
1. Have damaged items in receiving area. The
damaged items should have not been moved
from the receiving area. Allow the carrier
inspector to inspect cartons, inner packing
materials, and freight bill. Show your copy of
the delivery receipt.
2. Carefully Read The Inspection Report Before
Signing - If you do not agree with the report, do
not sign it.
4
www.winstonindustries.com | 1.800.234.5286
Page 5
INSTALLATION
ELECTRIC
The equipment is shipped from the factory without a cord. Refer to
wiring circuit diagram (pages 31-34) for installation assistance. The
equipment is wired for a 3-phase application. The 240 volt fryers
may be changed to single phase operation, as indicated in the
chart below. A licensed electrician may be required. Check local
FRYERS
codes. Following is a copy of the electrical information on the
name plate for various models of Winston’s Collectramatic fryers.
Appliance must be connected by wire and plug and must not be
fixed or hard wired. Appliance must be able to be moved for daily
cleaning.
Model Volts Hertz PH Amps Watts
Circuit
Breaker
Amps
Maximum
Appliance Weight
(Without cooking oil)
PF46C 208 60 3 29.2 10,500 US 50 153 lbs (69.40 Kg)
240 60 1 43.7 10,500 US 60 153 lbs (69.40 Kg)
240 60 3 25.2 10,500 US 50 153 lbs (69.40 Kg)
PF56C 208 60 3 29.2 10,500 US 50 169 lbs (76.66 Kg)
240 60 1 43.7 10,500 US 60 169 lbs (76.66 Kg)
240 60 3 25.2 10,500 US 50 169 lbs (76.66 Kg)
LP46 208 60 3 29.2 10,500 US 50 153 lbs (69.40 Kg)
240 60 3 25.2 10,500 US 50 153 lbs (69.40 Kg)
LP56 208 60 3 29.2 10,500 US 50 169 lbs (76.66 Kg)
240 60 3 25.2 10,500 US 60 169 lbs (76.66 Kg)
OF49C 208 60 3 29.2 10,500 US 50 114 lbs (51.70 Kg)
240 60 1 43.7 10,500 US 60 114 lbs (51.70 Kg)
240 60 3 25.2 10,500 US 50 114 lbs (51.70 Kg)
OF59C 208 60 3 29.2 10,500 US 50 130 lbs (59.00 Kg)
240 60 1 43.7 10,500 US 60 130 lbs (59.00 Kg)
240 60 3 25.2 10,500 US 50 130 lbs (59.00 Kg)
Fryer Electrical Ratings (International Voltages)
Voltage Phase Watts Amps 1 Ph Amps 3 Ph
J 208
M 240
N 415
U 200
V 230
W 380
Z 400
Other power configurations are available. Please contact factory for details.
____________________________________________
____________________________________________
Can cause serious injury or damage to appliance >>
Install appliance in such a manner that water cannot contact cooking oil in fryer.
NEED TO CONTACT US? www.winstonindustries.com | E-mail [email protected]
Phone 1.800.234.5286 | 1.502.495.5400 | 1.502.495.5458 • Mail 2345 Carton Drive | Louisville, KY 40299 USA
3 Delta 10,500 N/A 29.2
1 & 3 Delta 10.500 43.7 25.2
3 Wye 10,500 N/A 14.6
3 Delta 9,708 N/A 28
1 10,500 45.6 N/A
3 Wye 10,500 N/A 16.0
3 Wye 10,500 N/A 15.3
!
WARNING: Safety Hazard,
5
Page 6
FRYERS
PRESSURE FRYERS PF/LP MODELS
NOMENCLATURE
1
2
11
12
3
4
5
6
13
7
8
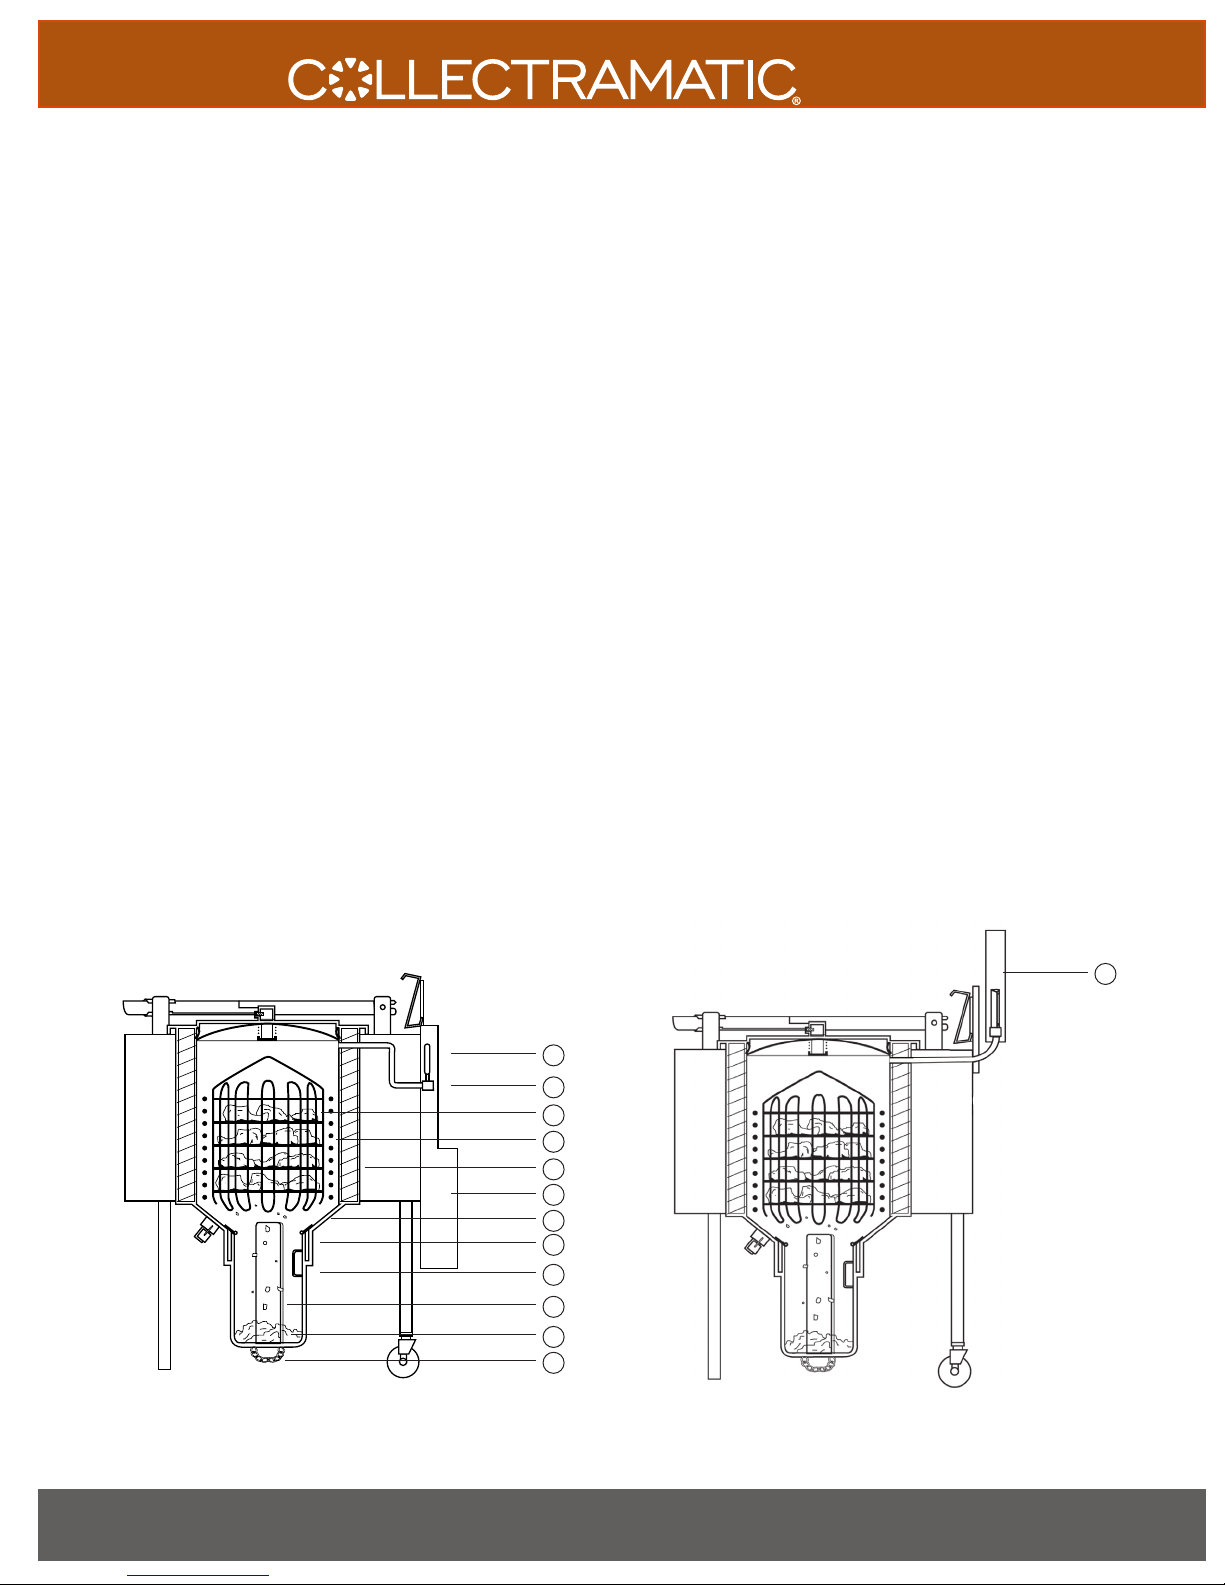
1. Lid Lock - Manually operated lock that prevents opening of fryer lid
prior to release of pressure through lid valve.
2. Handlebar - Used to raise and lower lid and secure lid to lid lock
block.
3. Lid - (pressure fryers only) Pressurizes fryer when lowered and locked
in place with heated cooking oil in cookpot.
4. Warning Label Panel - Instructions intended to advise operators of
potential hazards involved when using fryer.
5. Cookpot - Stainless steel vessel that holds heated cooking oil.
6. Lid Lock Block - Captures lid lock and handlebar assembly. Supports
basket drain hook when draining fryer basket.
7. High Limit Thermostat Manual Reset Button - (located behind small
metal plug) Used to reset the thermostat in the event that the High
Limit Thermostat Lamp turns ON.
!
DANGER: If the High Limit Thermostat Lamp turns ON
it may indicate a serious problem with your fryer. To reset the High
Limit Thermostat, allow the cooking oil to cool to below 375˚F
(190˚C). Press in the High Limit Reset button. When the cooking oil
heats up, if the High Limit Thermostat Lamps turns ON again, turn the
fryer power switch OFF, disconnect fryer from power, and call a
service technician for repair. If the High Limit Thermostat Lamp tends
to turn on frequently, call a service technician for repair.
9
10
Please note that the drawings and descriptions
dier from pressure fryer to open fryer.
8. Control Panel - will include the following components:
a. Controller - regulates cooking times and temperatures.
b. Power Lamp - controlled by Power Switch. Indicates
electrical current is applied to fryer circuitry.
c. Heat On Lamp - indicates when heaters are on.
d. High Limit Lamp - comes on if cooking oil temperature
reaches 410˚F (210˚C); heaters automatically shut o.
9. Drain Valve - When open (handle down), empties cooking oil from
cookpot.
10. Collector - “Cold Zone” container that catches particles falling from
cooking product.
6
www.winstonindustries.com | 1.800.234.5286
Page 7
FRYERS
11. Lid Gasket (pressure fryers only) - Seals between lid and
cookpot to maintain pressure in cookpot (reorder #PS1891).
12. Lid Valve - (pressure fryers only) Spring loaded pressure
release valve used to back up main vent system at rear of fryer.
Also releases pressure at end of cook cycle by means of lid
lock.
13. Power Switch - Allows operator to turn electrical power on
and o.
14. Dead Weight - (pressure fryers only) Weight in main vent
assembly that determines amount of pressure built up in
cookpot when heating cooking oil with lid down.
15. Vent Block - (PF Models only) Has hole through which steam
passes as controlled by dead weight assembly when fryer is
pressurized.
16. Clamshell Basket - (see ACCESSORIES-page 9).
17. Heater Coils - Electrical elements that heat cooking oil.
18. Insulation - Surrounds cookpot to help maintain cooking oil
temperature by reducing heat loss.
19. Muer - (PF Models only) Collects condensed steam and
mues steam vent noise at end of cook cycle.
20. Cone - Supports basket and directs falling particles from
cooking product into collector. Stirring of cooking oil should
not be attempted below cone after rst round of cooking
each day.
21. Collector Gasket - Seals between collector and cookpot wall
to maintain pressure in cookpot. (reorder #PS1892).
22. Collector Lifting Loop - With basket drain hook, means by
which collector can be handled from above and pulled up
through cookpot.
23. Heat Plate - (See ACCESSORIES - page 9).
24. Accumulated Cracklings - Particles which have fallen o from
cooking product.
25. Collector Chain Handle - handle for dumping contents of
collector.
26. Main Vent Assembly – (LP Models only) Exhaust tube through
which excess steam is released into the air.
14
15
16
17
18
19
20
21
22
23
24
25
Diagram for PF Series
Diagram for LP series (dierence noted)
NEED TO CONTACT US? www.winstonindustries.com | E-mail [email protected]
Phone 1.800.234.5286 | 1.502.495.5400 | 1.502.495.5458 • Mail 2345 Carton Drive | Louisville, KY 40299 USA
26
7
Page 8
FRYERS
OPEN FRYER OF MODEL
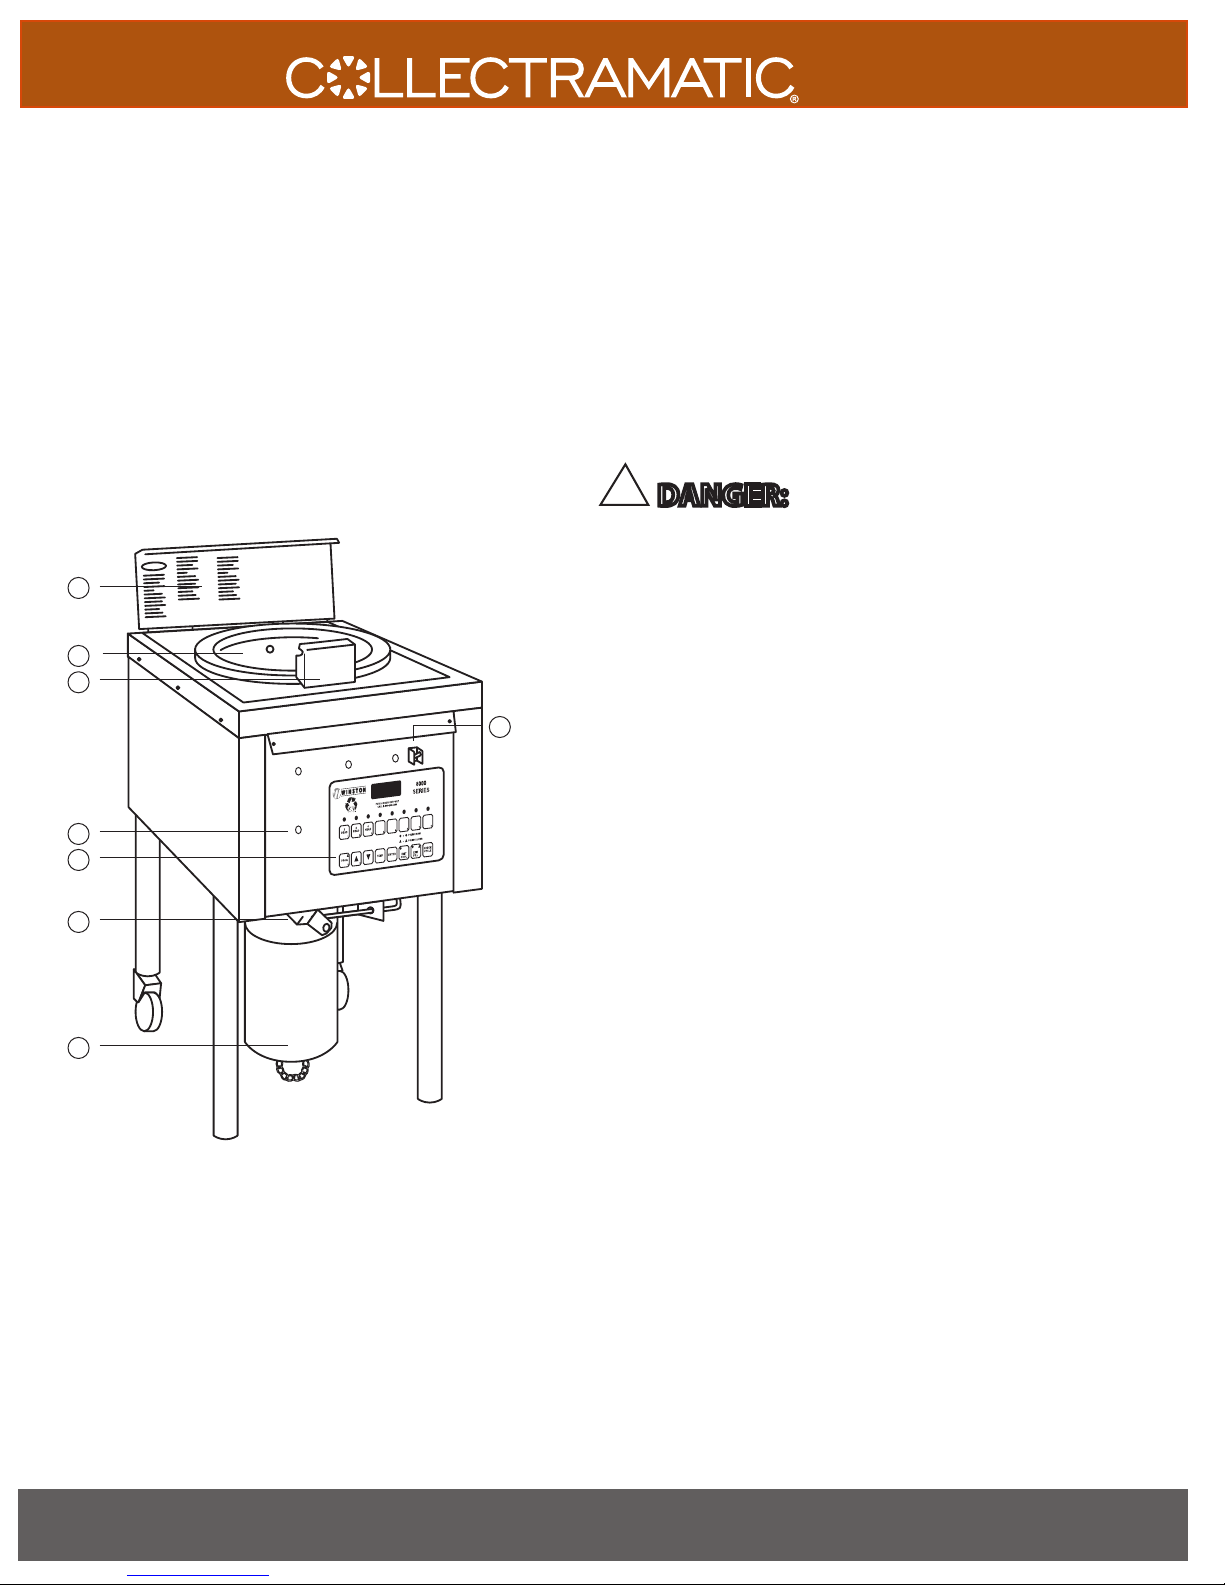
NOMENCLATURE
1
2
3
4
5
1. Warning Label Panel - Instructions intended to advise operators of
potential hazards involved when using fryer.
2. Cookpot - Stainless steel vessel which holds cooking oil.
3. Lid Lock Block - Supports basket drain hook when draining fryer
basket.
4. High Limit Thermostat Manual Reset Button - (located behind small
metal plug) Used to reset the thermostat in the event that the High
Limit Thermostat Lamp turns ON.
!
DANGER: If the High Limit Thermostat Lamp turns ON it
may indicate a serious problem with your fryer. To reset the High Limit
Thermostat, allow the cooking oil to cool to below 375˚F (190˚C). Press
in the High Limit Reset button. When the cooking oil heats up, if the
High Limit Thermostat lamps turns ON again, turn the fryer power
switch OFF, disconnect fryer from power, and call a service technician
for repair. If the High Limit Thermostat Lamp tends to turn on
frequently, call a service technician for repair.
8
5. Control Panel - will include the following components:
a. Controller - regulates cooking times and temperatures.
b. Power Lamp - controlled by Power Switch. Indicates electrical
current is applied to fryer circuitry.
c. Heat On Lamp - indicates when heaters are on.
d. High Limit Lamp - comes on if cooking oil temperature reaches
410˚F; heaters automatically shut o.
6
6. Drain Valve - When open (handle down), empties cooking oil
from cookpot.
7. Collector (long or short) - “Cold Zone” container that catches particles
falling from cooking product.
7
8. Power Switch - Allows operator to turn electrical power on
and o.
8
www.winstonindustries.com | 1.800.234.5286
Page 9
FRYERS
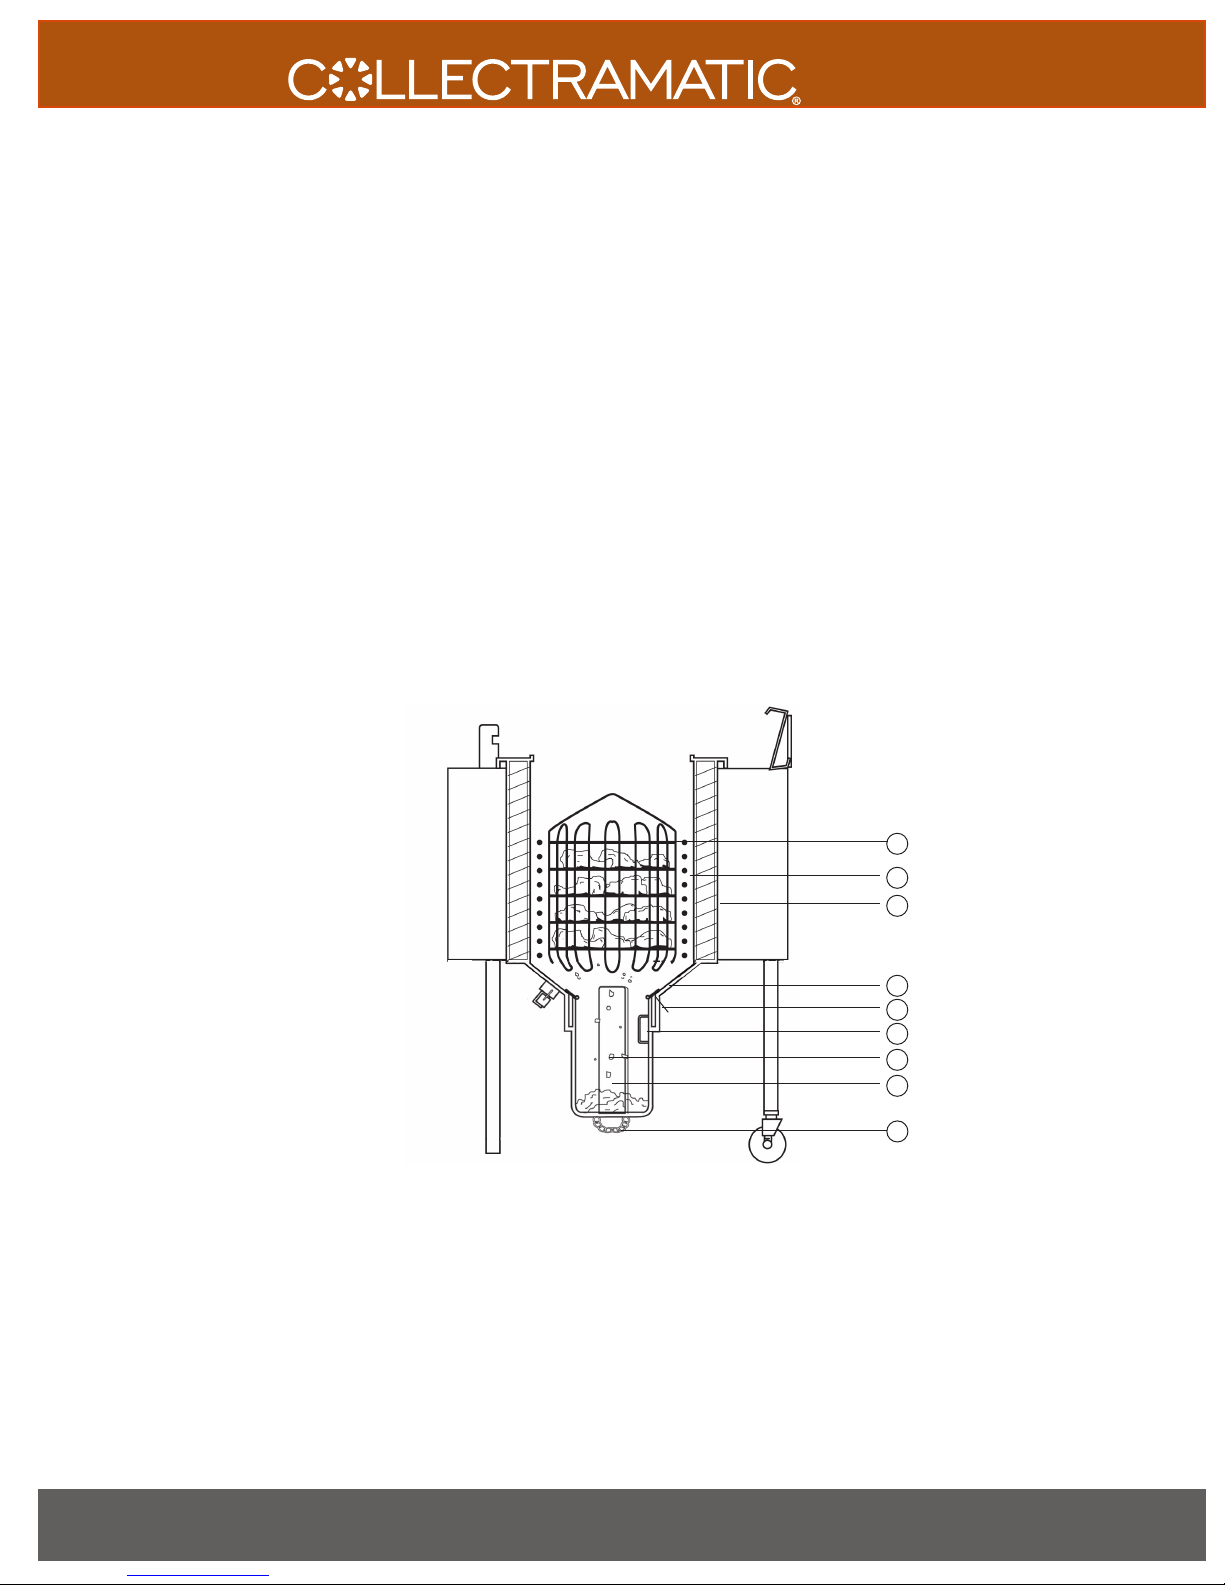
9. Clamshell Basket - (see ACCESSORIES - page 9).
10. Heater Coils - Electrical elements that heat cooking oil.
11. Insulation - Surrounds cookpot to help maintain cooking oil
temperature by reducing heat loss.
12. Cone - Supports basket and directs falling particles from
cooking product into collector. Stirring of cooking oil should
not be attempted below cone after rst round of cooking each
day.
13. Collector Gasket - Seals between collector and cookpot
wall. (reorder #PS1892).
14. Collector Lifting Loop - With basket drain hook or long hook,
means by which collector can be handled from above and
pulled up through cookpot.
15. Heat Plate – (See ACCESSORIES - page 9) Heat plate is only
used with long collector, not short collector.
16. Accumulated Cracklings - Particles which have fallen o from
cooking product.
17. Collector Chain Handle - handle for dumping contents of
collector.
9
10
11
Diagram for OF Series
NEED TO CONTACT US? www.winstonindustries.com | E-mail [email protected]
Phone 1.800.234.5286 | 1.502.495.5400 | 1.502.495.5458 • Mail 2345 Carton Drive | Louisville, KY 40299 USA
12
13
14
15
16
17
9
Page 10

ACCESSORIES sold separately
FRYERS
Basket Drain Hook
(Order #PS1154/1)
• Lower and raise basket
• Remove collector
• Lower and raise heat
plate
Safety Gloves
(Order #PS1001)
• Helps protect operator
from hot cooking oil
Heat Plate
(Order #PS1034 or
PS1918)
• Transfers heat from
Cooking Zone to Cold
Zone to keep cooking
oil hot.
Stirring Tool
(Order #PS1179)
• Used to stir cooking oil
and break apart
solidified pieces.
Clamshell Basket
4 Head
(Order #PS1159) or
6 Head (Order #PS1163)
• Allows product to be
fully immersed and
completely surrounded
by cooking oil.
Displacement Tool
(Order #PS1209)
• Forces cooking oil up
through drain valve to
allow safe removal of
collector.
Spatula
(Order #PS1979)
• Used to scrape residue
from sides of cookpot.
10
White Teflon Brush
(Order #PS1120)
• Used to clean heaters
between cooking
rounds when cooking
oil is hot.
www.winstonindustries.com | 1.800.234.5286
Qtr rack basket, wire
4-hd (Order PS2838)
6-hd (Order PS2839)
Wire shelf kit (Order
PS2837-25)
• Allows product to be
fully immersed and
completely surrounded
by cooking oil.
Page 11

ASSEMBLY OF COLLECTRAMATIC® FRYERS
!
CAUTION:
Prior to using equipment for the first time, perform the daily
cleaning procedure listed Under Daily Care on pages 15
through 17.
Before beginning the assembly process, wipe out cookpot and
collector with damp, lint-free towel. This removes any dust or
debris that may have accumulated. Never use water in the
fryer.
FRYERS
Gasket
1. After uncrating your fryer, you will find two sets of o-ring
gaskets – two large and two small. (OF Models do not
receive the large gaskets, which are for the lid.)
2. Lubricate the smaller o-ring with cooking oil and install in
groove at top of collector (see Figure 1).
3. Install collector in bottom of fryer and gently tap with
stirring tool until it seats into place.
4. Check to determine that drain valve is closed.
(See Figure 2).
5. Fill with cooking oil to one inch below Minimum fill line.
Oil will expand as it is heated. Check oil level again once it
has heated to cooking temperature to verify that oil level is
between Minimum and Maximum marks.
!
DANGER: Fire or heater damage may occur when
heaters are turned ON unless they are fully covered with
cooking oil.
6. Lubricate large o-ring with cooking oil and install in
groove around edge of lid.
FIGURE 1
FIGURE 2
Drain Valve closed
Rotated clockwise up
and back as far as
handle will move. To
open, pull counter-
clockwise forward
and down.
7. Check to be sure that main vent assembly and dead
weight (pressure fryers only) are in place at rear of fryer.
(See figures 23 and 24, page 16)
NEED TO CONTACT US? www.winstonindustries.com | E-mail [email protected]
Phone 1.800.234.5286 | 1.502.495.5400 | 1.502.495.5458 • Mail 2345 Carton Drive | Louisville, KY 40299 USA
11
Page 12
FRYERS
OPERATING INSTRUCTIONS
FILLING
The following filling procedure is to be used when cooking oil
is changed or when oil is added for the first time.
!
CAUTION:
Prior to using equipment for the first time, perform the daily
cleaning procedure listed Under Daily Care on pages 15
through 17.
1. Turn off Power Switch.
2. Clean Fryer per daily cleaning procedure -
see pages 15-17.
3. Lubricate Lid Gasket and Collector Gasket
with cooking oil before placing on fryer.
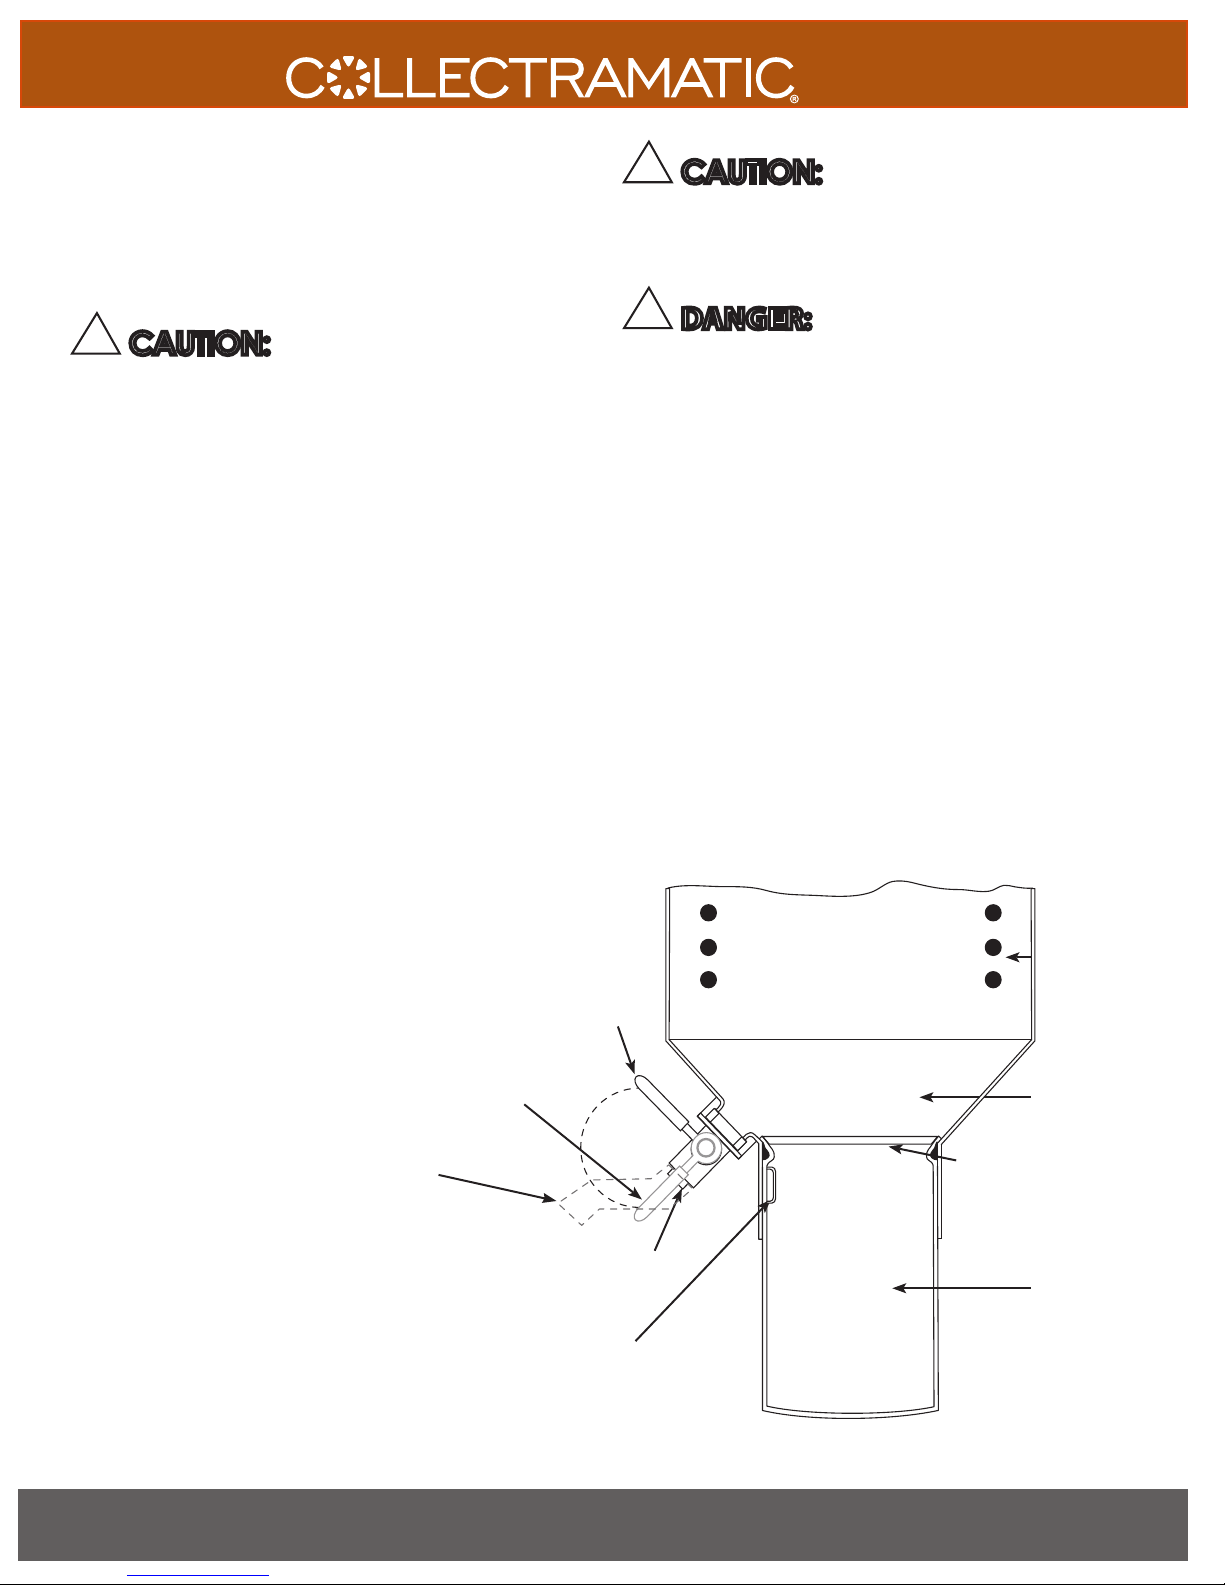
4. Check Collector and Drain Valve -
Make sure collector with gasket is seated
and drain valve is closed
(handle back – see Figure 3).
Always place lifting loop in front.
This will allow the collector to be removed with ease.
!
CAUTION:
Cooking oil may be hot enough to burn you. Be careful when
moving containers of liquid cooking oil.
!
DANGER: Fire or heater damage may occur when
heaters are turned ON unless they are fully covered with
cooking oil.
5. Add Cooking Oil - Liquid or solid cooking oil may be used.
Melt solidified cooking oils in tender or other means and
pump into fryer. Add enough cooking oil to raise liquid to
within one inch of Minimum oil level line (see Figure 4,
page 12). As oil heats, it expands. Check level again once
oil has heated to verify that level is between Minimum and
Maximum marks.
Capacities:
PF or LP46, or OF49:
Food product = 14 lbs (6.35 Kg)
Cooking oil = 64 lbs (28.8 Kg) or 8.15 gal (30.85L)
PF or LP 56, or OF59:
Food product = 18 lbs (8.2 Kg)
Cooking oil = 75 lbs (33.8 Kg) or 9.55 gal (36.15L)
12
Drain Valve Extension
(optional)
www.winstonindustries.com | 1.800.234.5286
Closed
Open
Gasket
Drain Valve
Lifting Loop
FIGURE 3 - Some features have been omitted to show greater detail.
Heater Coils
Cone
Collector
Page 13
OPERATING INSTRUCTIONS
WARM-UP
Failure to follow procedure below may result in rst batch of cooked food being o-color and
improperly done.
!
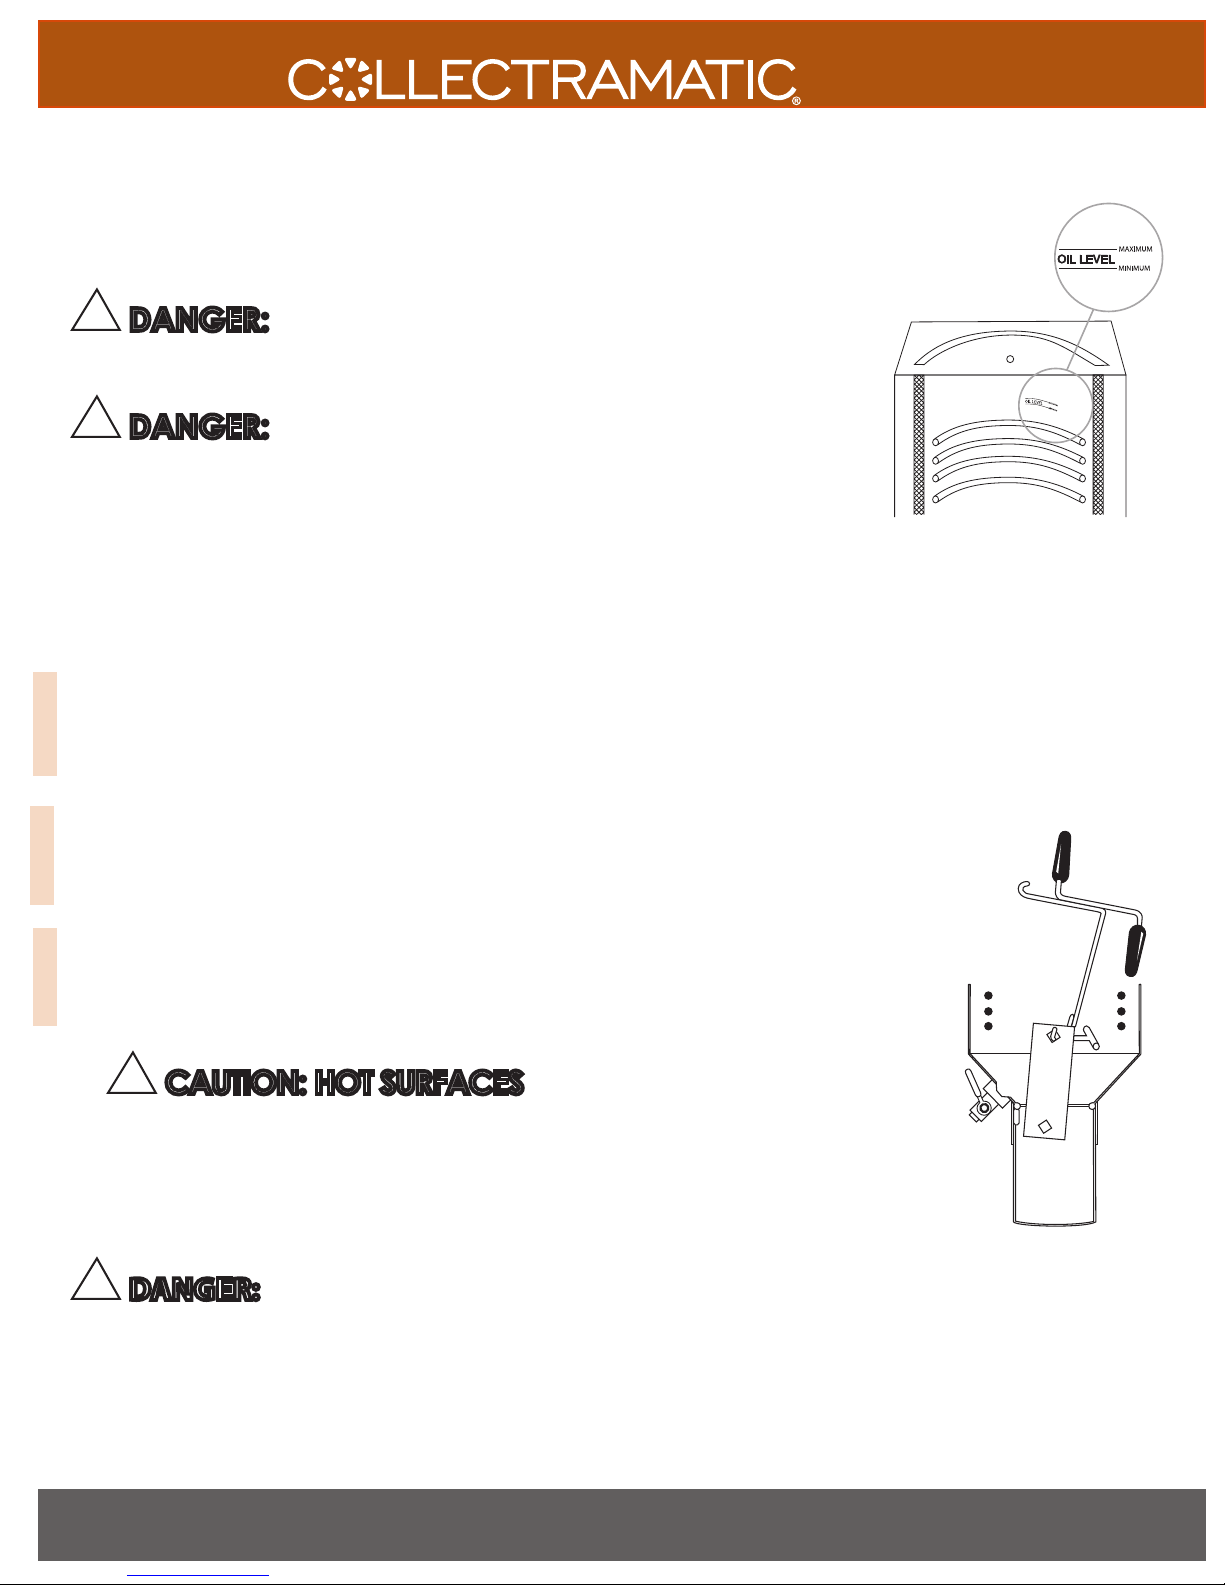
DANGER: Do not turn on power unless all heater coils are completely covered by
cooking oil. Fill shortening to a level between the Maximum and Minimum oil level lines found on the
inside of the cookpot (see Figure 4).
!
DANGER: Do not place any liquids in cookpot other than cooking oil
1. Turn on circuit breaker and Power Switch.
2. Set Controls to start warm-up process by pressing the channel button which contains the
desired programmed times and temperatures (see Programming pages 19-27).
3. STIR Signal may come on in some older models. If STIR Signal comes on IGNORE - DO NOT
STIR FRYER. IF FRYER IS STIRRED AT THIS TIME, AQUALERT® SYSTEM MAY BE ACTIVATED* - After
temperature reaches 250˚F display shows cooking oil temperature. It will then display Drop
message.
*NOTE: See Aqualert® in the Troubleshooting section for a complete explanation.
4. Deep stir cooking oil, with stirring tool, into collector vigorously for at least 15 seconds.
5. Drop message will change to cooking oil temperature. DO NOT stir cooking oil while cooking oil
1ST STIR
temperature is displayed.
6. After a little while, drop message will be displayed.
7. Deep stir cooking oil, with stirring tool, into collector vigorously for at least 15 seconds.
8. Drop message will change to cooking oil temperature. DO NOT stir cooking oil while cooking oil
2ND STIR
temperature is displayed.
9. After a little while, drop message will be displayed.
10. Deep stir cooking oil, with stirring tool, into collector vigorously for at least 15 seconds.
11. Drop message will change to cooking oil temperature. DO NOT stir cooking oil while cooking oil
temperature is displayed.
3RD STIR
12. After a little while, drop message will be displayed.
FRYERS
Heater Coils
FIGURE 4
!
13.
14. Continue to repeat stirring and letting temperature rise to Drop until collector is hot to touch.
15. Lower Heat Plate into collector using basket drain hook (Figure 5).
16. Oil Level - Add or remove cooking oil so that it is at a level between the Maximum and Minimum
!
they are fully covered with cooking oil.
17. When bottom of collector feels hot and Drop Signal comes on, fryer is ready for cooking.
NOTE: Bottom of collector MUST BE HOT in order for product to cook properly.
NEED TO CONTACT US? www.winstonindustries.com | E-mail [email protected]
Phone 1.800.234.5286 | 1.502.495.5400 | 1.502.495.5458 • Mail 2345 Carton Drive | Louisville, KY 40299 USA
CAUTION: HOT SURFACES Feel bottom of collector – must be hot to
touch. If not, deep stir cooking oil vigorously again for at least 15 seconds.
Level marks. (Figure 4).
DANGER: Fire or heater damage may occur when heaters are turned ON unless
FIGURE 5
13
Page 14
OPERATING INSTRUCTIONS
FRYERS
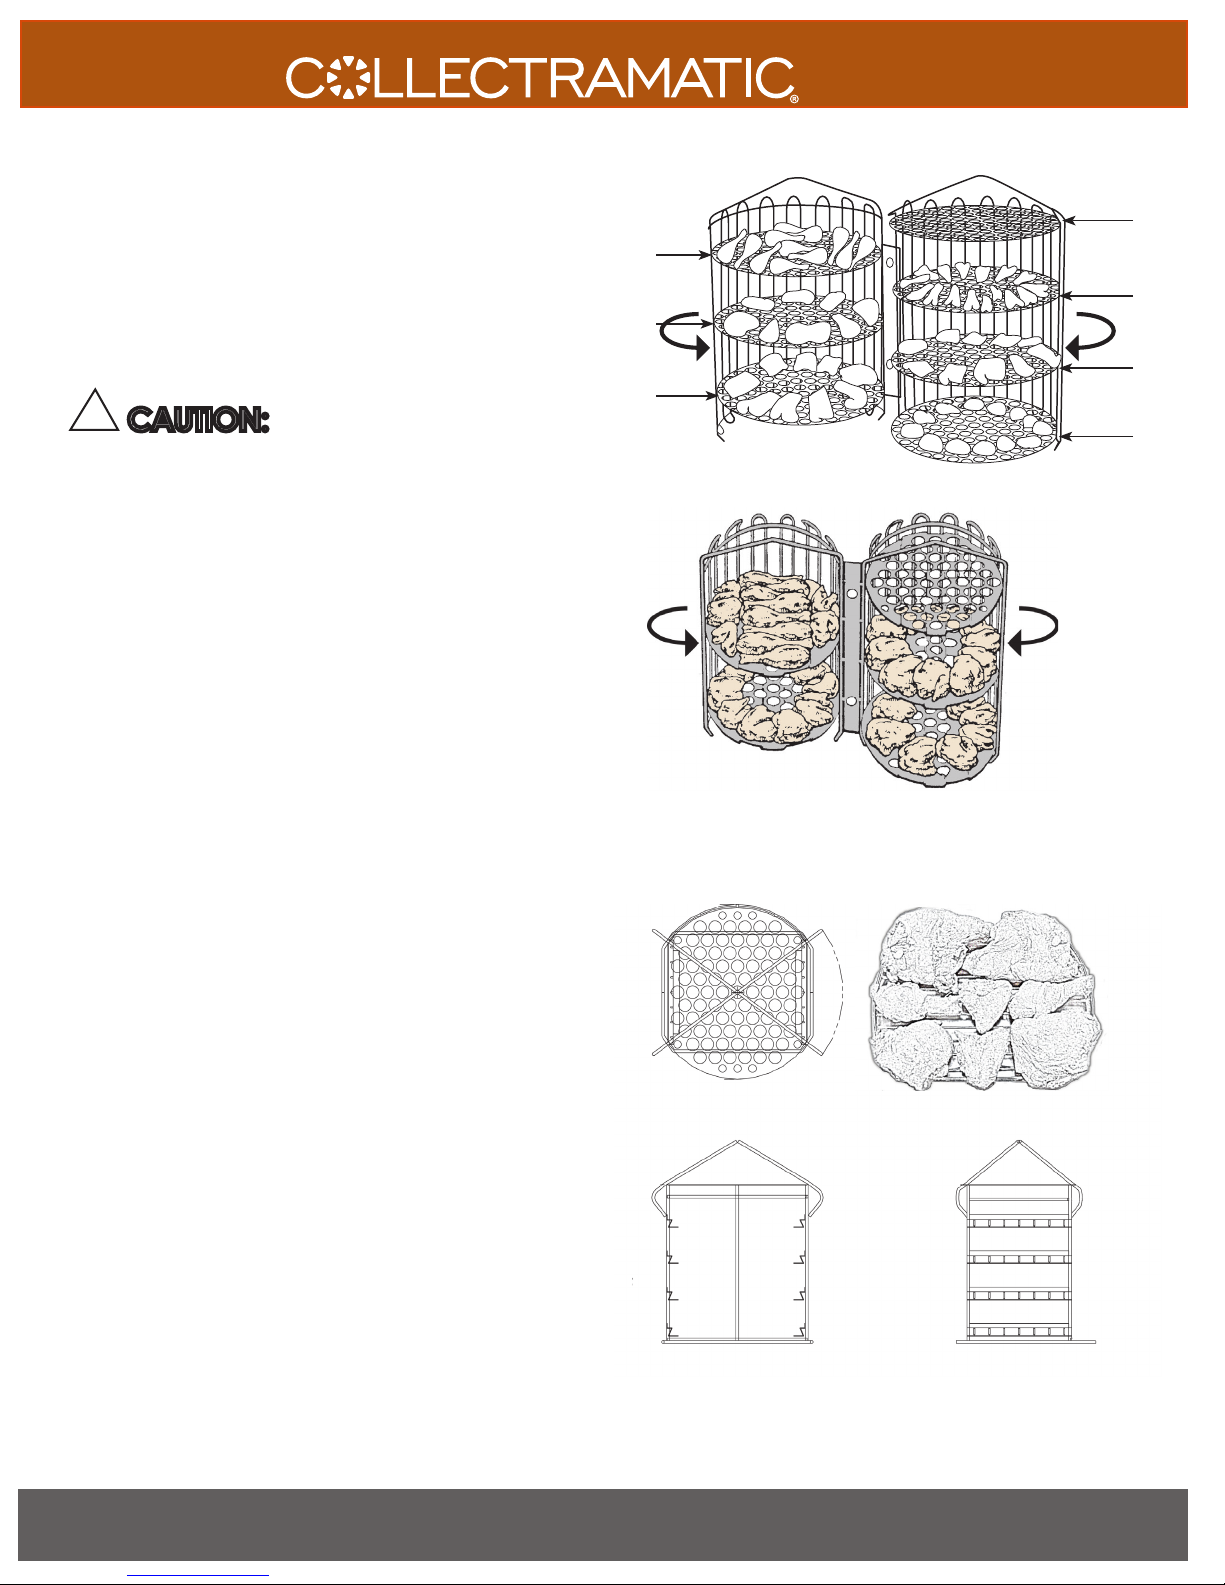
CLAMSHELL BASKET LOADING
The procedure outlined below illustrates the loading process
for chicken pieces. Other food products should be loaded in a
similar manner. Note opening in center of shelves which is
accentuated to show importance of not packing products in
too tightly, thus restricting cooking oil flow.
!
CAUTION: To help prevent product from sticking,
before loading on any basket for the first time each day,
using safety gloves, coat a clean basket by dipping in hot
cooking oil.
Load basket shelves from top down, starting at shelf #2, then
#3, etc. (Do not use shelf #1 when cooking products that may
float out of basket. Shelf #1 is basket lid.)
NOTES:
• Food pieces may touch but should not overlap.
• Use lower shelves when cooking less than full basket.
• Load shelves to allow good cooking oil flow around
product.
1
2
3
4
5
6
7
FIGURE 6
Six head clamshell basket shown loaded with chicken for
pressure frying. Shelf #2 is usually loaded with legs and thighs;
shelf #3 - wings; shelf #4, 5, 6, - thighs, keels and ribs; shelf #7 thighs (Figure 6).
Four head clamshell basket would be loaded similarly to
six head basket using shelves #2 through #5 as shown
(Figure 7).
QUARTER RACK BASKET LOADING
With Quarter Rack Baskets (Figure 8), load pans and slide into
rack.
Chicken should be placed on the rails, hanging over slightly.
Use the curve of the chicken pieces to determine how to lay
chicken on the rack in a manner that will provide as much
space between chicken pieces as possible.
Load from the bottom up and unload from the top down. After
all chicken is placed on the rack, check to make sure pieces are
not touching too much.
FIGURE 7
14
www.winstonindustries.com | 1.800.234.5286
FIGURE 8
Page 15
FRYERS
OPERATING INSTRUCTIONS
NOTE: Your cooking procedure may be specified to you through franchise agreement (or otherwise);
if so, disregard the following. Refer to Warnings, pages 2-3, regardless of procedure followed.
1. Complete Warm-Up Process - see OPERATION INSTRUCTIONS: WARM-UP page 12.
2. Follow basket loading procedure on page 13.
!
3.
4. Open frying: Leave lid open.
Pressure frying:
5. Start cook cycle by pressing the channel button. LED timer will begin countdown from
6. OPENING LID - at the end of the cook cycle (timer at 00:00), a buzzer will sound indicating that
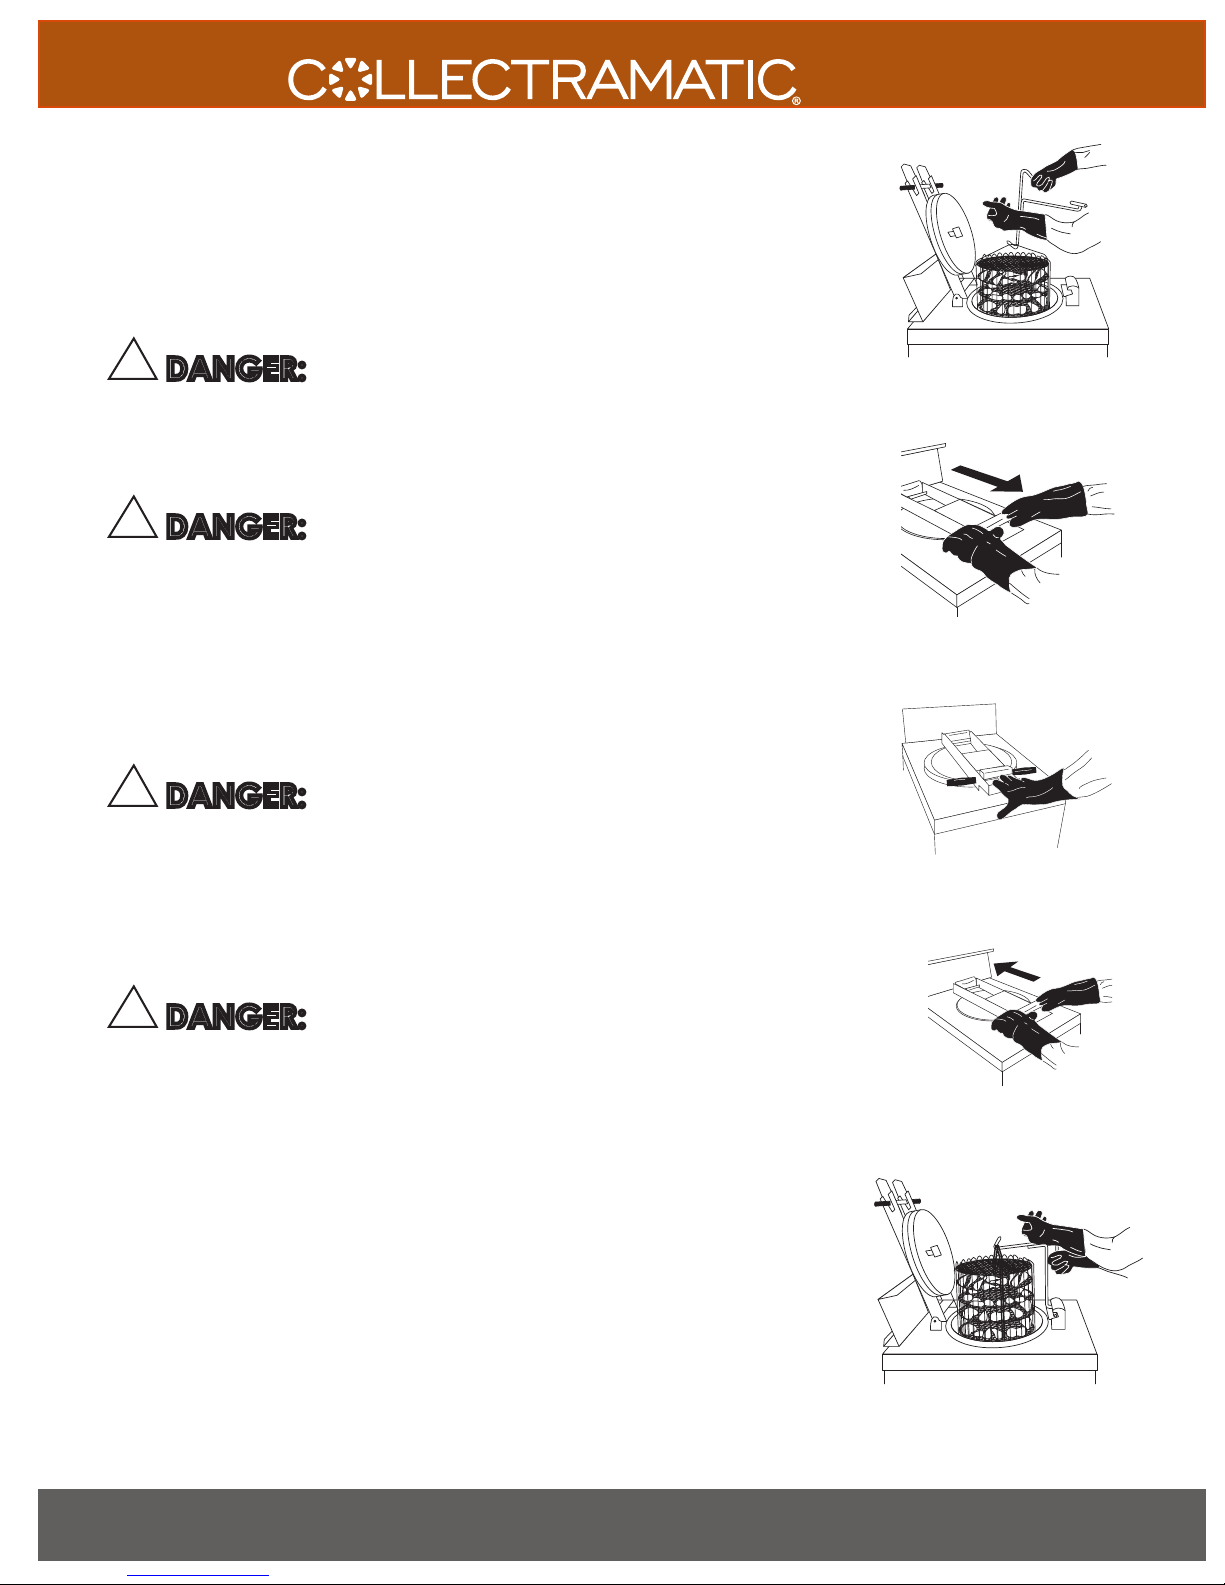
DANGER: When LOAD signal comes on, use safety gloves and basket drain hook
to lower basket slowly into hot cooking oil (Figure 9).
!
DANGER: To safely close lid:
A. Use both hands on handlebar to lower lid. (Figure 10)
B. Pull handlebar completely into lid lock block so that lid lock pops up (‘clank’ sound) into its
straight, locked position.
programmed time.
the lid can be opened and the basket can be removed from the fryer. Cancel the buzzer by
pressing the channel button.
FIGURE 9
FIGURE 10
!
7. Basket Removal
8. Unload Basket (Figure 14, next page). Place cooked products on corrugated tray and turn cavity
DANGER: To safely open lid:
A. Wait until cook cycle is finished (timer at 00:00 and buzzer sounds).
B. Do not touch handlebar to open lid until pressing down on lid lock causes the lid to lower.
(Figure 11)
C. Then with the lid in the lowered position, use one hand to move handlebar to open.
(Figure 12)
!
DANGER: Use safety gloves and basket drain hook to lift basket out of cooking
oil. Rest basket on drain hook in lid lock block at 45° angle draining excess surface oil for 15
seconds (Figure 13).
(bone) down where applicable. Place tray in holding cabinet.
FIGURE 11
FIGURE 12
NEED TO CONTACT US? www.winstonindustries.com | E-mail [email protected]
Phone 1.800.234.5286 | 1.502.495.5400 | 1.502.495.5458 • Mail 2345 Carton Drive | Louisville, KY 40299 USA
FIGURE 13
15
Page 16
OPERATING INSTRUCTIONS
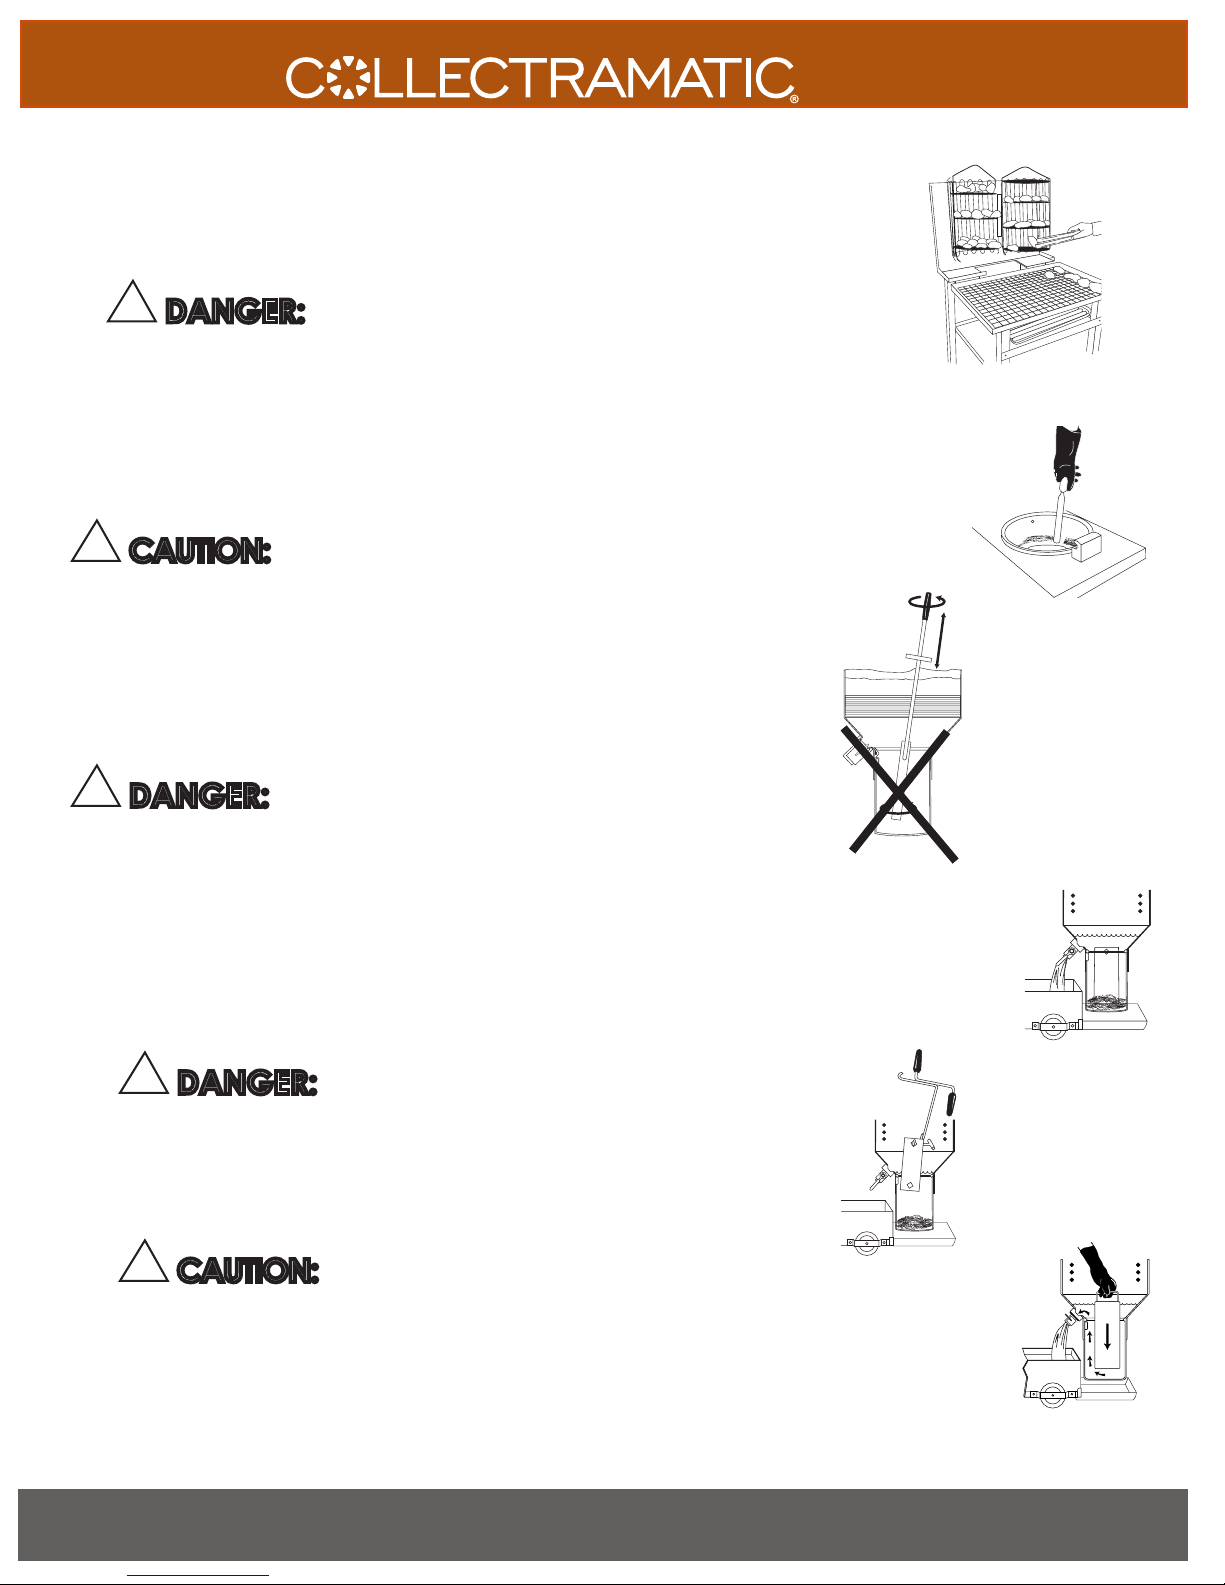
10. Cleaning After Each Round - scrape crust line from pot with spatula (supplied) (Figure
15). Brush heater coils on the front and back side with the white teflon brush
(supplied). Wipe excess moisture off of fryer lid with a dry towel.
!
11.
12. Press ‘exit cool’ button to begin warm-up for cooking next round.
DANGER: Should a STIR signal come on (in some older models), do
not stir cooking oil below cone in fryer (see Figure 16) after first round of cooking each
day. Cracklings stirred below cone may cause hot cooking oil to rapidly rise up and
out of fryer. You may be burned or badly hurt.
DAILY CARE
!
CAUTION: Prior to using equipment for the rst time, perform the daily
cleaning procedure listed below.
Most of the following Daily Cleaning Procedures apply to both OPEN and PRESSURE fryers.
Those that apply to PRESSURE fryers only are specied as such.
NOTE: Emptying the collector and filtering may have to be done at some point during the
day, depending upon how many rounds are cooked and how much breading builds up in
the collector. Typically 20 rounds of product may be cooked before having to empty the
collector and filter the cooking oil.
!
DANGER: Drain cooking oil from fryer and then empty collector at
least twice a day. If you don't, cooking oil may boil out of the fryer, burn you,
and make oor slippery.
For All Open and Pressure Fryers
1. Turn Fryer Off. Turn circuit breaker OFF or disconnect electrical power from fryer.
2. Scrape Crust Line from cookpot with spatula and brush heater coils (Figure 15).
FRYERS
FIGURE 14
FIGURE 15
Cone:
Do not stir below
the bottom of the
cone after the first
round of cooking
each day.
FIGURE 16
3. Place metal pan under open collector area.
4.
5. Remove Heat Plate - Inspect from above to see that cooking oil has drained out of
6.
7. Close Drain Valve.
16
!
DANGER: Drain hot cooking oil only into metal containers. Place
container or shortening tender under drain valve and open valve by flipping handle
down. Allow cooking oil to cool before further handling. (Figure 17)
cookpot down to level of drain valve. Wearing safety gloves, remove heat plate with
basket drain hook (Figure 18) and place in safe area to cool.
!
CAUTION: Wearing safety gloves, with drain valve still open, use
displacement tool to force enough cooking oil up and out of drain valve to allow
safe removal of collector (Figure 19).
www.winstonindustries.com | 1.800.234.5286
FIGURE 17
FIGURE 18
FIGURE 19
Page 17
DAILY CARE CONTINUED
FRYERS
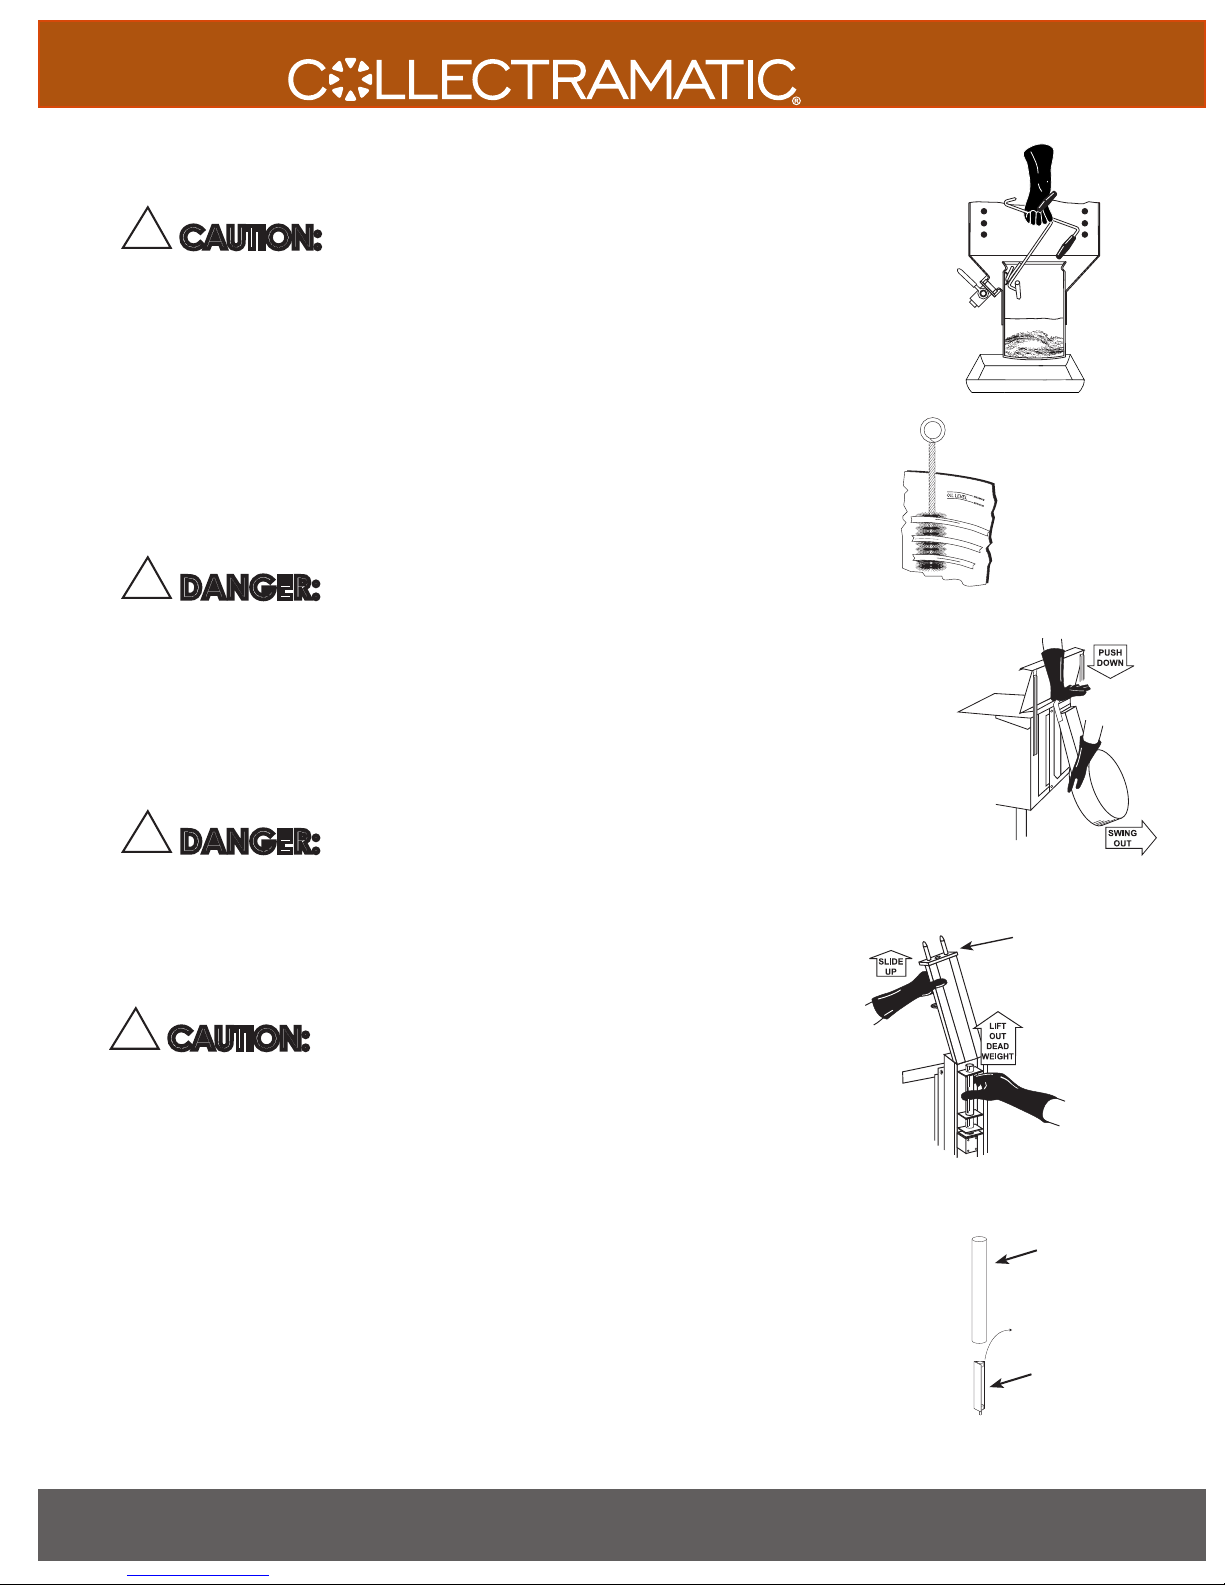
8.
9. Remove and Clean Collector Gasket
10.
11. Scrub Heater Coils with white teflon brush. Clean heaters, heater holders, and all of
12. Rinse inside of cookpot with cooking oil only.
13. Wash Accessories (using hot water only) including collector (clean gasket groove), gasket,
!
CAUTION: Wearing safety gloves, remove collector with basket drain hook
placed in collector lifter loop (Figure 20).
Note: Gasket life may be prolonged by doing the following:
• Keep spare set to alternate nightly. Lubricate with clean cooking oil before
using.
• Clean gaskets after daily use and store in a container of water in cooler.
• Do not stretch gasket more than necessary to place on collector. Discard
gasket if cracked or breaking.
• Never strike cookpot or collector with spatula or other tools. Gaskets may be damaged
on sharp, rough edges that result from such striking.
!
DANGER: Do not use “boil out” method of cleaning fryer or fill fryer with
any liquid other than cooking oil. Fryer is made to be pressurized only with cooking oils. If
pressurized with other liquids, you may be burned, badly hurt, or killed.
cookpot (Figure 21). Do not use steel wool.
heat plate, utensils, basket, etc., at sink. Wipe dry.
FIGURE 20
FIGURE 21
14.
For Pressure Fryer Models Only:
15.
16a. For PF Models: Clean Vent Components Remove deadweight and wipe out vent block
16b. For LP Models: remove deadweight from main vent assembly on rear of fryer by lifting tube.
!
DANGER: Don’t splash water on outside of fryer or wash outside of fryer
with hose. If you do, you may get water into hot cooking oil, causing it to boil over, or you
may get electrical components wet, causing a short circuit. Clean outside of fryer with
damp towel (do not use steel wool) and wipe dry.
!
CAUTION: Muffler (on PF Models) may be hot from steam condensation.
Wear safety gloves. Remove muffler (Figure 22), empty and wash in sink.
(Figure 23). Clean deadweight at sink, towel dry and place back in vent assembly.
Deadweight is under tube. (See Figure 24). Rinse deadweight and tube (inside and out) with
hot water at sink. Towel dry. Reassemble Deadweight and tube. Check O ring where vent
tube connects.
FIGURE 22
Vent
Back
FIGURE 23 (PF Models)
Tube
Deadweight
NEED TO CONTACT US? www.winstonindustries.com | E-mail [email protected]
Phone 1.800.234.5286 | 1.502.495.5400 | 1.502.495.5458 • Mail 2345 Carton Drive | Louisville, KY 40299 USA
FIGURE 24 (LP Models)
17
Page 18
FRYERS
DAILY CARE
Lid Cleaning Instructions (Pressure Fryers Only)
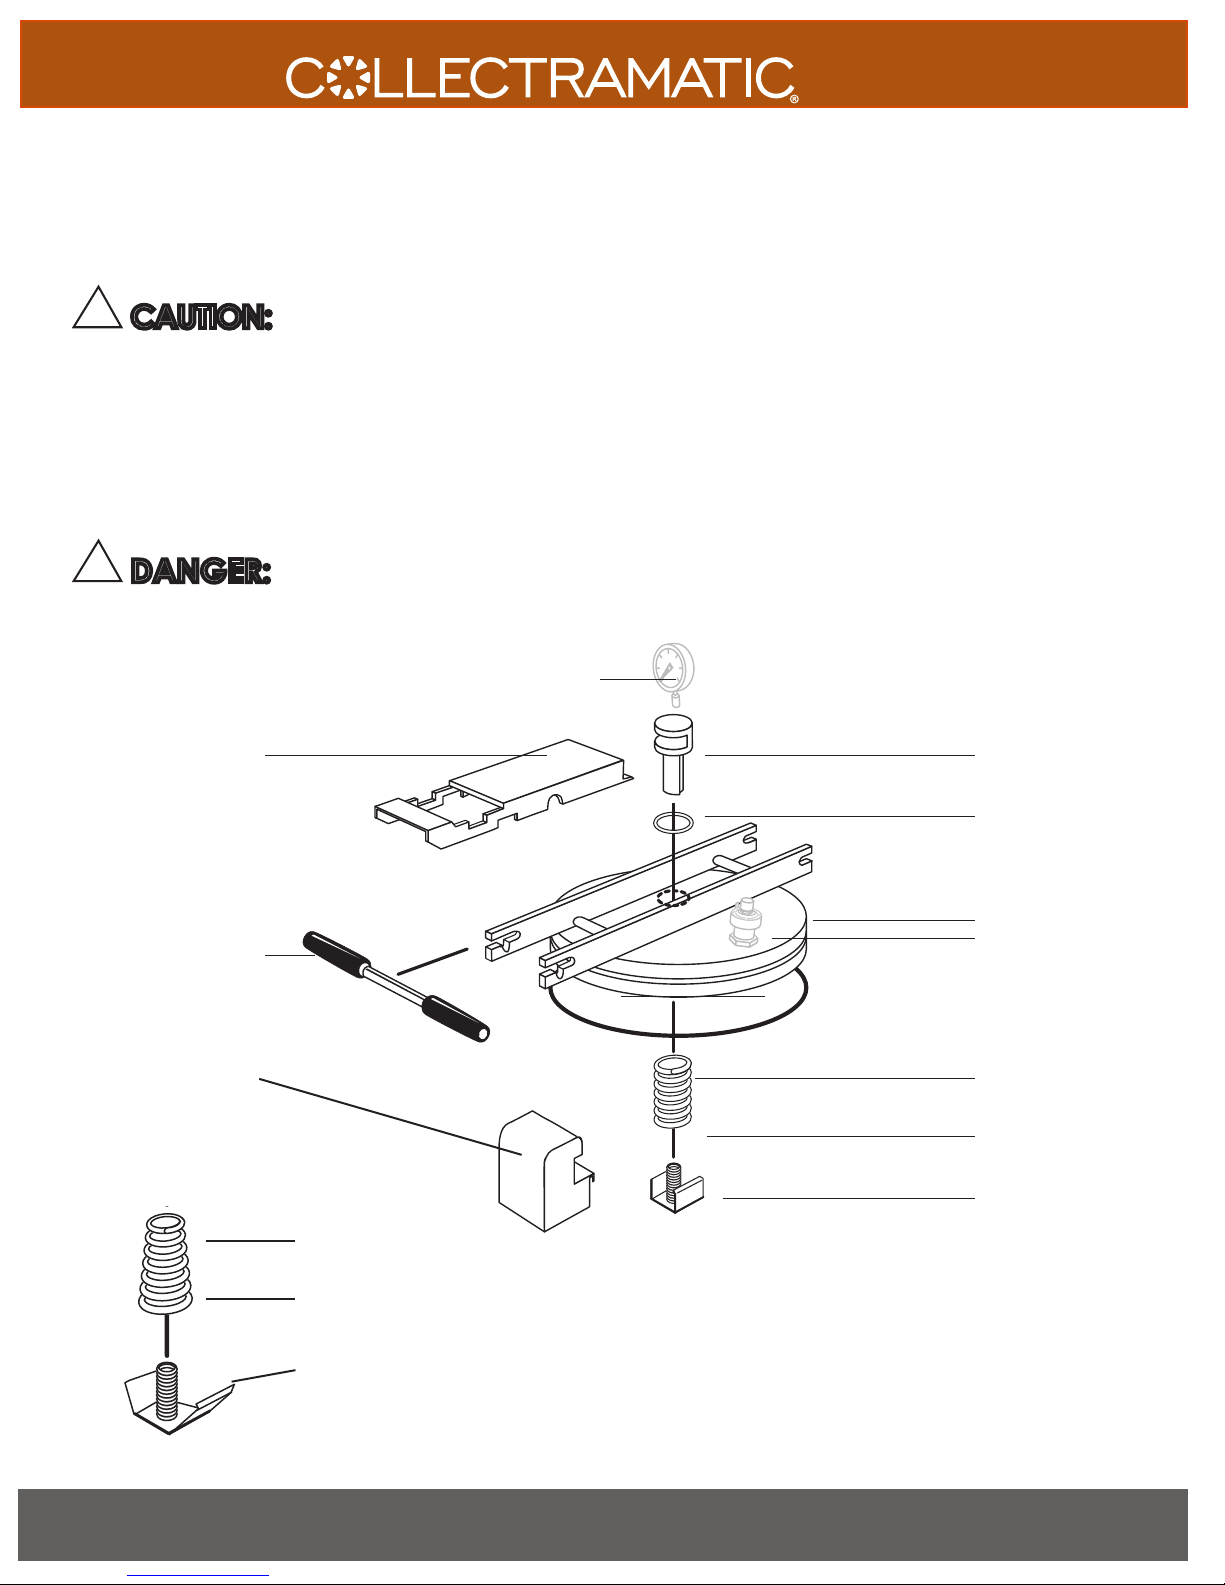
1. Remove lid from fryer and disassemble components as shown below. Remove the retainer from the lid valve before removing the
lid lock and handlebar (the lid lock will help to hold the lid valve while unscrewing the retainer).
!
CAUTION: Do not submerge the pressure gauge (if supplied) or the pressure relief valve (if supplied) in water. Do
not attempt to remove the pressure gauge from the lid. Do not remove the pressure relief valve from the lid. Do not attempt to
force foreign objects inside the pressure gauge or pressure relief valve.
2. Wash all parts at sink EXCEPT THE LID VALVE, PRESSURE RELIEF VALVE, AND PRESSURE GAUGE and dry with a towel. Wipe outside
of gauge and lid valve with a damp cloth, then wipe dry.
3. Lubricate o-ring with cooking oil and reassemble lid. Tighten retainer hand-tight.
Note: Flat end of spring faces retainer on PF Fryer; large end of spring faces retainer on LP Fryer.
4. Lubricate lid gasket with cooking oil and place on lid in groove.
!
DANGER: Replace lid on fryer only if fryer is free of any water.
5. When re-assembling lid make sure lip on lid lock is positioned properly into slot of lid valve.
LID LOCK
HANDLEBAR
LID LOCK BLOCK
PRESSURE GAUGE
(supplied on some models)
LID VALVE
O-RING
LID
PRESSURE RELIEF VALVE
(supplied on some models)
LID GASKET
SPRING (PF Model)
FLAT END (PF Model)
RETAINER (PF Model)
SPRING (LP Model)
LARGE END (LP Model)
RETAINER (LP Model)
18
www.winstonindustries.com | 1.800.234.5286
FIGURE 25
Page 19
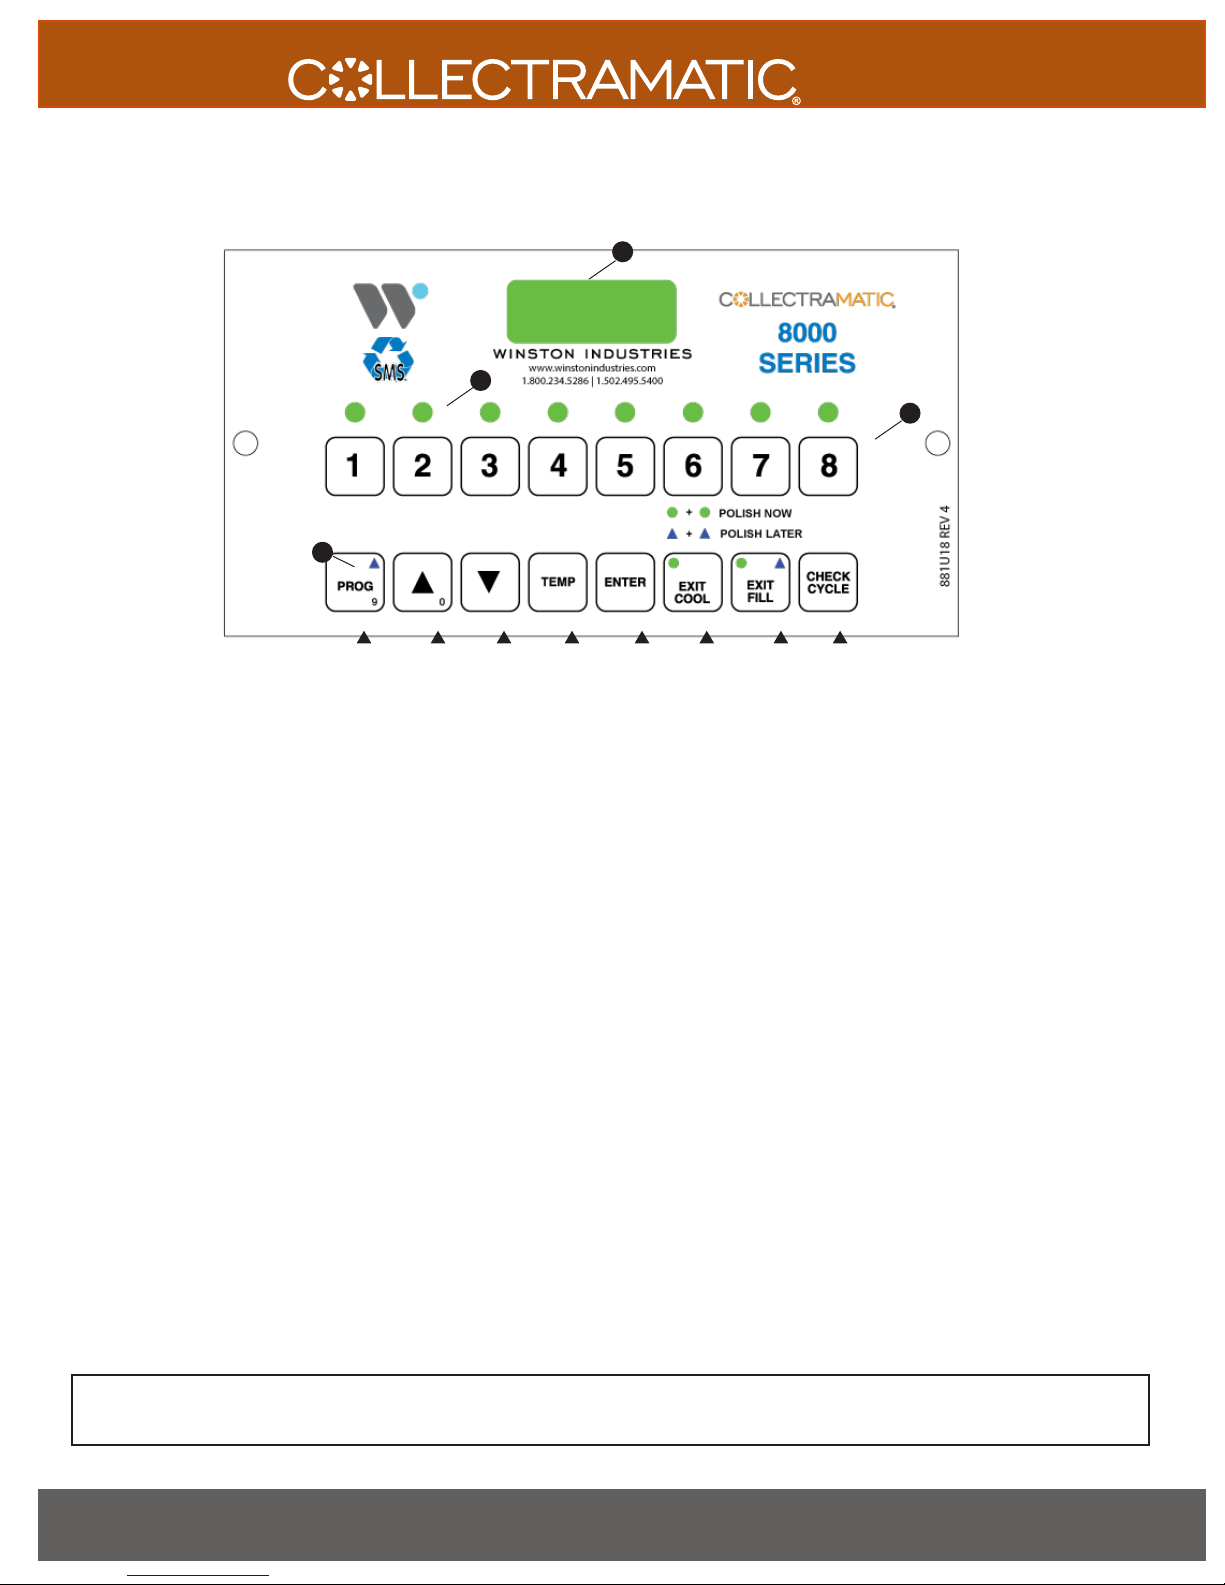
NOMENCLATURE
FRYERS
2
1
3
4
a b c d e f
g
h
1. LED Program Lamps indicate which channel is selected when lit above that channel.
2. Display readout indicates time or temperature by pressing appropriate buttons.
3. 1 - 8 Channel Buttons provide operator the ability to select desired cooking cycles. Also starts
desired cycle after fryer has preheated.
4. Programming Buttons
a. Program Button - Press button to start programming sequence.
b. Button - Increases value in program.
c. Button - Decreases value in program.
d. Temp Button -Displays current oil temperature when depressed.
e. Enter - Enter value into programming.
f. Exit Cool Button - Switches between cool (idle) mode and heat mode. When in cool mode, oil
temperature is limited to 250˚F.
g. Exit Fill Button - Used during polishing mode. Polishing mode must be initialized and requires
specialized training. Call Winston Customer Service for more information.
h. Check Cycle button - Displays total time of all time values added together. Then it displays all
values for cycle in selected channel.
Disregard this informatrion if model was purchased with alternate controls (or no controls).
NEED TO CONTACT US? www.winstonindustries.com | E-mail [email protected]
Phone 1.800.234.5286 | 1.502.495.5400 | 1.502.495.5458 • Mail 2345 Carton Drive | Louisville, KY 40299 USA
19
Page 20
FRYERS
PROGRAMMING
Programming Time/Temperature Profiles for the Winston 8000
Series Controller
The 8000 Series Controller has 16 push buttons. The eight
numbered buttons in the top row are called channel buttons. The
lower row of buttons are for programming the control.
Programming allows one of four different processes to be assigned
to each channel. The processes available for the 8000 Series Control
are PC1, PC2, PC5, and PC6.
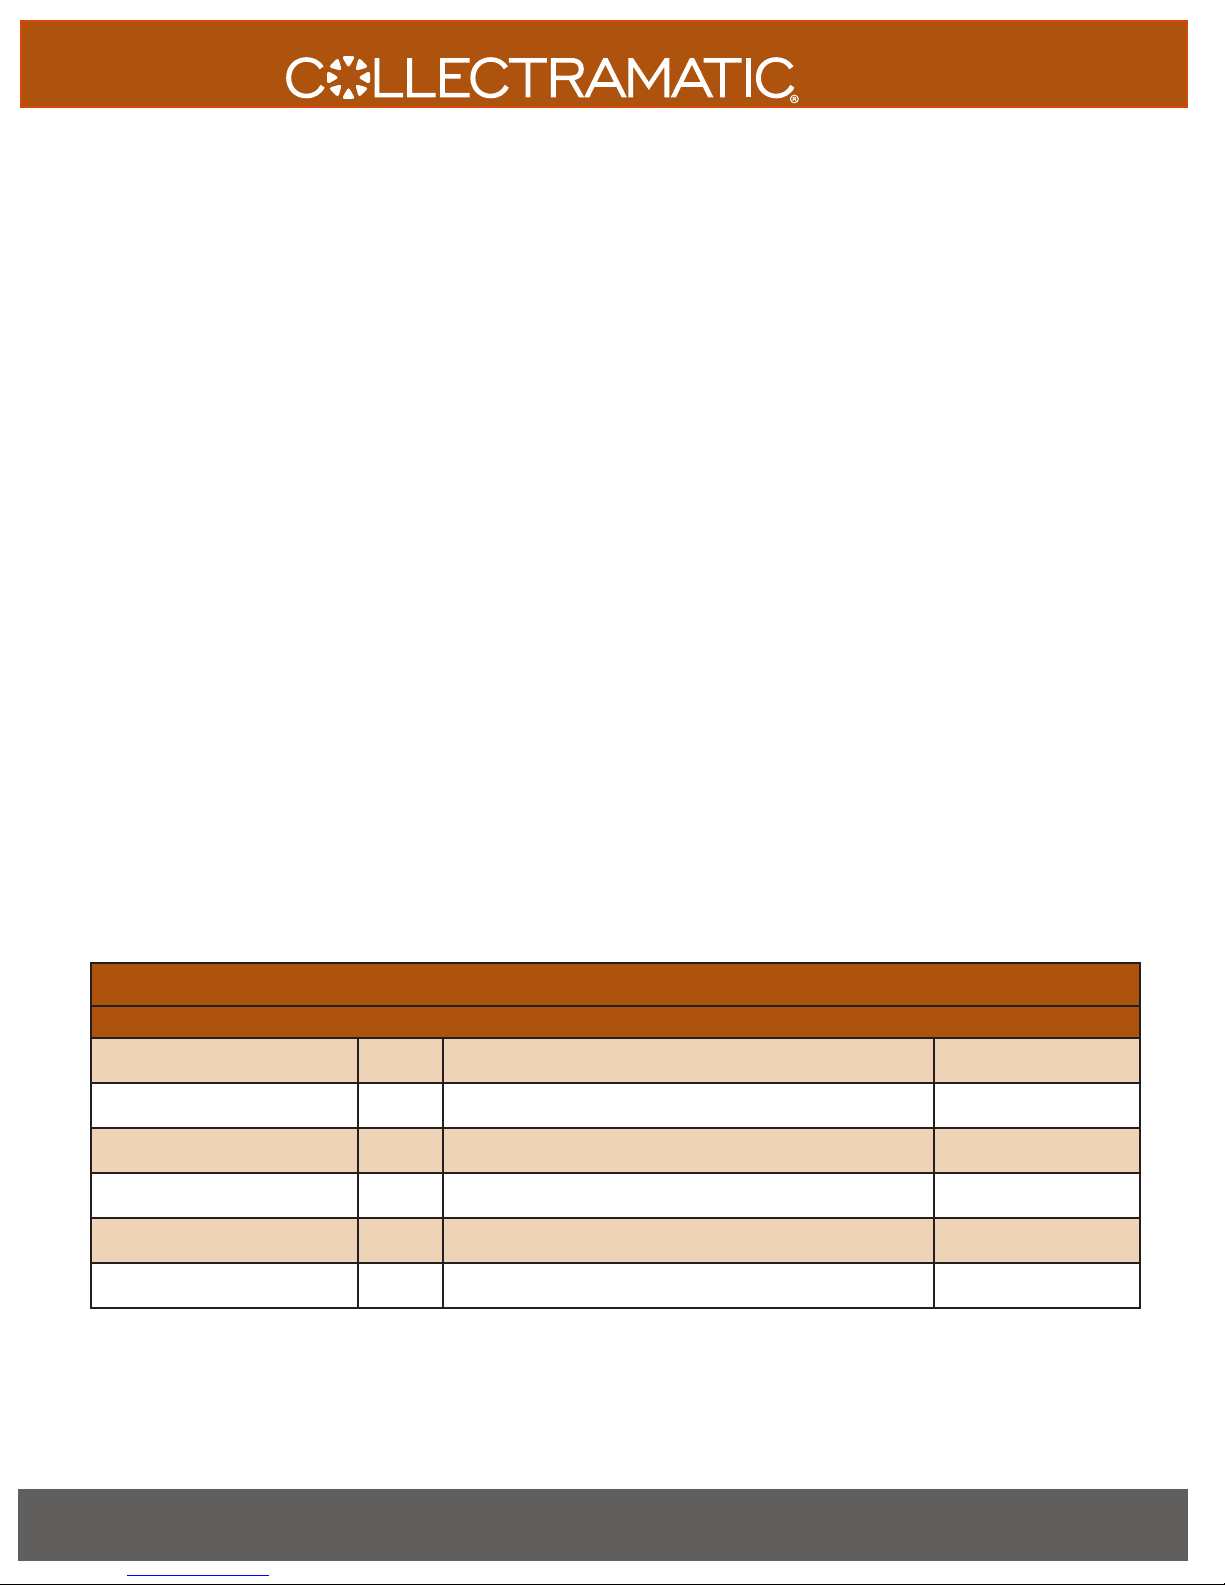
Process #1 (PC 1) allows assigning up to 6 different temperatures
to a channel. The temperatures can be set to occur at different
times during the cook cycle. For instance, a cooking cycle for a load
of chicken can be set up as shown in the following table using PC
1. In this case the chicken would cook at 350˚F (177˚C) for 1 minute
(from 15:00 down to 14:00), then the temperature setting would
change to 340˚F (171˚C) for the next minute (from 14:00 to 13:00),
and so on.
Process #2 (PC 2) allows assigning up to six different temperatures
and times to a channel just like PC 1. PC 2 also adds the capability
for Load Compensation (automatically detects the amount of
product added to the fryer and adjusts the time that the product
cooks so that it is properly done when the cook cycle finishes),
Straight Line Timing (like PC 1), or a combination of the two. PC 2
also allows programming of up to three different audible prealarms (Buzzer) to sound at any time during the cook cycle.
Process #5 (PC 5) allows assigning of one temperature and one
time to a channel. Note: Process #5 may not be available on some
models.
Process #6 (PC 6) allows assigning of two temperatures and two
times to a channel. Note: Process #6 may not be available on some
models.
When programming, the display scrolls through several screens
showing the current settings for the fryer. The first two screens
show the software ID numbers. The third screen displays the
capacity of the fryer expressed in number of chickens it will cook at
one time (4hd or 6hd). The fourth screen indicates whether it is a
pressure or open type fryer. The fifth screen shows the size of the
chicken the fryer is programmed to cook (certain fryer models will
automatically adjust the programmed settings if the chicken size
setting is changed). The sixth screen indicates whether the fryer is
set to display Fahrenheit or Centigrade.
PC 1 - 6 TEMPERATURES, 6 TIMES
(These are example settings only. Temperatures shown in Fahrenheit.)
FIRST TEMPERATURE (H1) 350˚ FIRST TIME = total cook time (T1), H1 temp starts 15:00
SECOND TEMPERATURE (H2) 340˚ SECOND TIME = time remaining when H2 starts (T2) 14:00
THIRD TEMPERATURE (H3) 330˚ THIRD TIME = time remaining when H3 starts (T3) 13:00
FOURTH TEMPERATURE (H4) 320˚ FOURTH TIME = time remaining when H4 starts (T4) 11:30
FIFTH TEMPERATURE (H5) 310˚ FIFTH TIME = time remaining when H5 starts (T5) 9:25
SIXTH TEMPERATURE (H6) 300˚ SIXTH TIME = time remaining when H6 starts (T6) 5:15
20
www.winstonindustries.com | 1.800.234.5286
Page 21
FRYERS
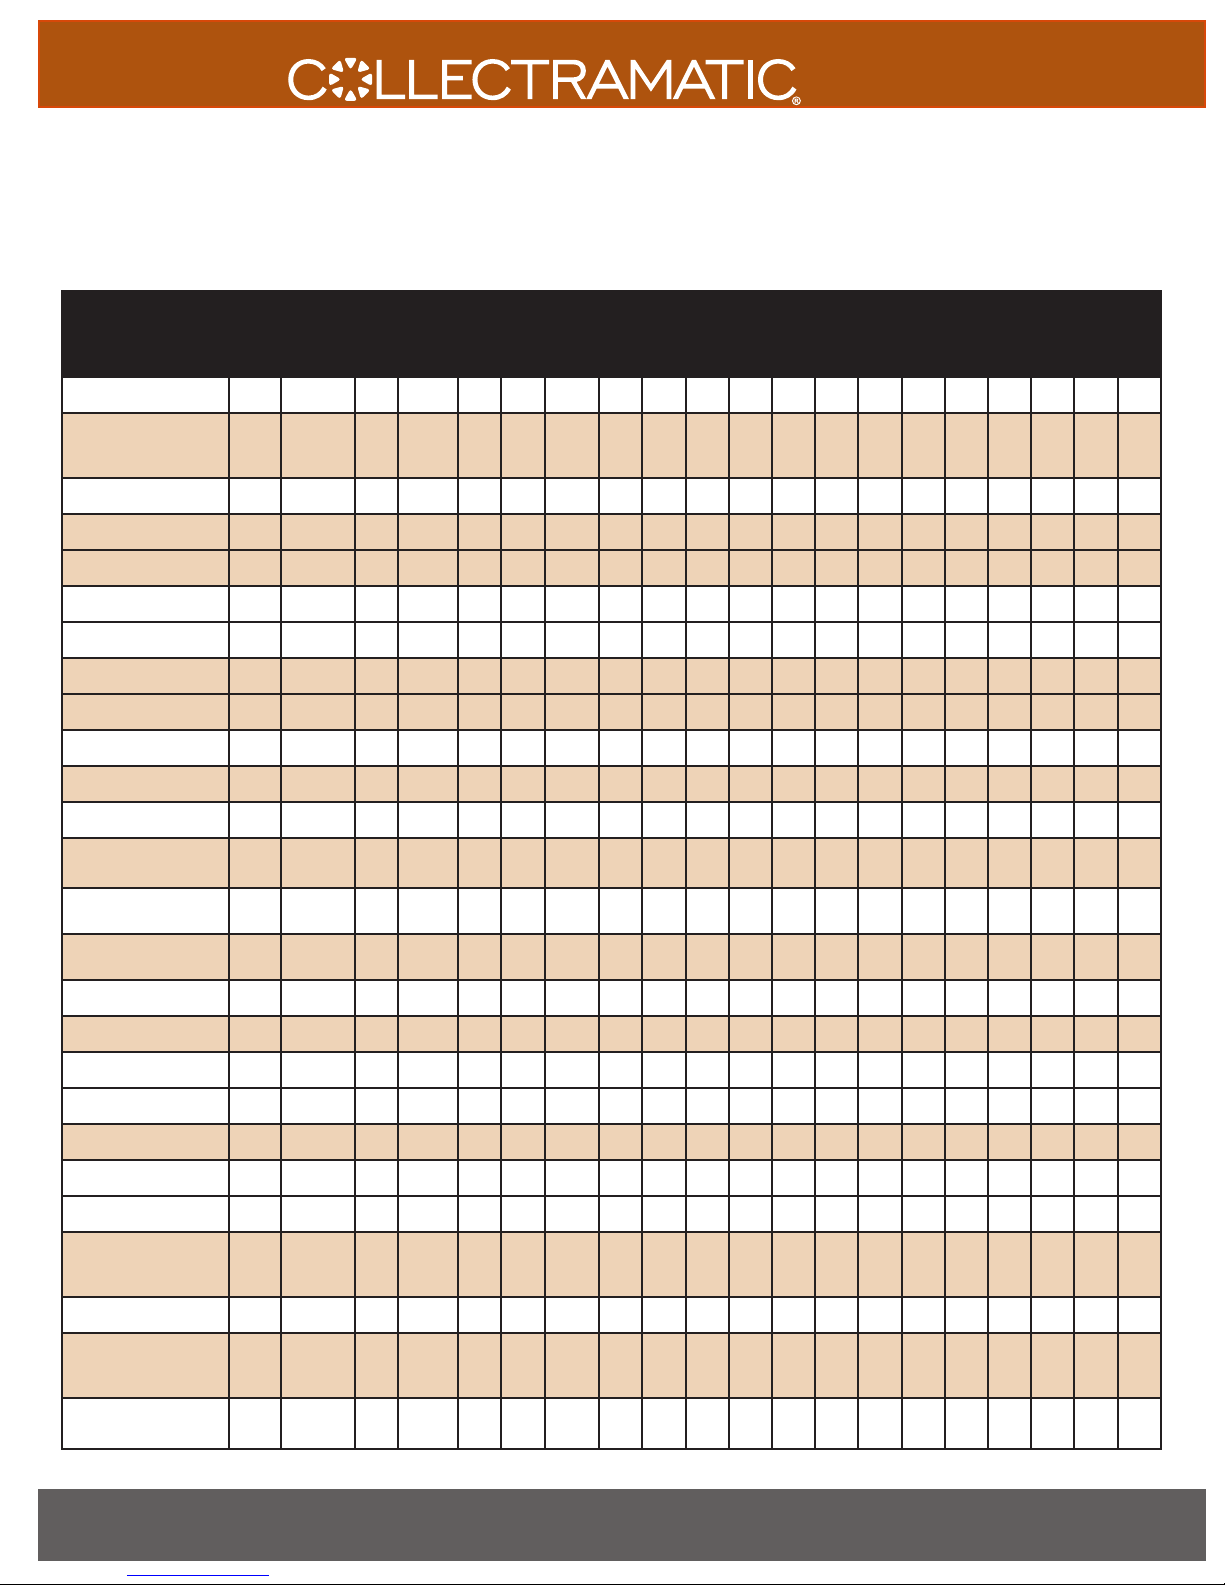
FRYER GUIDELINES BASIC SETTINGS FOR 8000 SERIES CONTROL
Product Est.
Fried Chicken
Very Crispy
(Double Breaded)
Crispy 14-15 Process 1 350 15:00 P 325 13:30 P 310 6:00 P 300 1:30 O 300 O N/A
Crispy (extended oil life)
Medium Crisp 14-15 Process 1 350 15:00 P 290 13:30 P 300 5:00 P 300 :30 O 306 O N/A
Medium (ext. oil life) 15-16 Process 1 310 15:30 O 310 0:00
Soft 14-15 Process 1 350 15:00 P 286 13:30 P 290 5:00 P 300 2:00 P 306 :30 O 306 O N/A
Soft (ext. oil life)
Chicken Wings 12-15 Process 1 350 13:30 P 325 9:00 P 300 2:00 O 310 1:00 O 310 O N/A
Chicken Strips/Filets
Chicken Nuggets 7-10 Process 1 325 7:30 P 310 6:00 O 310 0:00 N/A
Other Poultry
Turkey, Whole
(12-14#)
Turkey Breast
Duck, Whole (Crispy) 3-4
Process
Cook
Type
Time
(min)
Process 1
14-15
(lid open)
15-16 Process 1 325 15:00 O 325 0:00
15-16 Process 1 290 15:30 O 290 0:00
7-10 Process 1 325 8:30 P 290 7:30 P 300 :30 O 300 0:00 N/A
3-4
Process 1 290 50:00 P 300 1:00 O 300 0:00 N/A
per lb
4
Process 1 290 15:00 P 300 :30 O 300 0 N/A
per lb
Process 1 350 15:00 P 330 13:30 P 310 6:00 P 300 1:30 O 300 0 N/A
per lb
H1 T1 O/P H2 T2 O/P H3 T3 O/P H4 T4 O/P H5 T5 O/P H6 T6 O/P
325 15:00 O 325 0:00 N/A
Meats
Fried Ribs 13-15 Process 1 275 14:00 P 275 :30 O 275 O N/A
Pork Chops 4-6 Process 1 315 5:00 P 315 :30 O 315 O N/A
Seafood
Breaded Fish Filets 4-6 Process 5 350 5:00 O 350 0 O
Shrimp 4-6 Process 5 350 5:00 O 350 0 O
Vegetables
Onion Rings
Potato Wedges
French Fries (#5)
Finger Food Apps
(cheese sticks, etc.)
3-4
per 5
Process 5 350 3:30 O 350 0 N/A
lbs
10-12 Process 5 325 12:00 O 325 0 N/A
3-4
per 5
Process 5 350 3:30 O 350 0 N/A
lbs
4-7 Process 5 350 5:00 O 350 0 N/A
NEED TO CONTACT US? www.winstonindustries.com | E-mail [email protected]
Phone 1.800.234.5286 | 1.502.495.5400 | 1.502.495.5458 • Mail 2345 Carton Drive | Louisville, KY 40299 USA
21
Page 22
PROGRAMMING
FRYERS
By default, the controller opens the vent valve 30 seconds before
the end of a pressure cook cycle. A buzzer will automatically sound
at the end of the cook cycle when the timer reaches :00 (the
display will then show ) indicating it is time to open the lid
(when pressure frying) and remove the cooked product. Cancel the
buzzer sound by pressing the channel button.
Note: The fryer does not have to be ON to program except for
“Running the Field Diagnostics” section. Also, to cancel out of the
programming mode at any time, press and hold the button
PROG
for three seconds.
WHEN THE
COMPUTER DISPLAYS
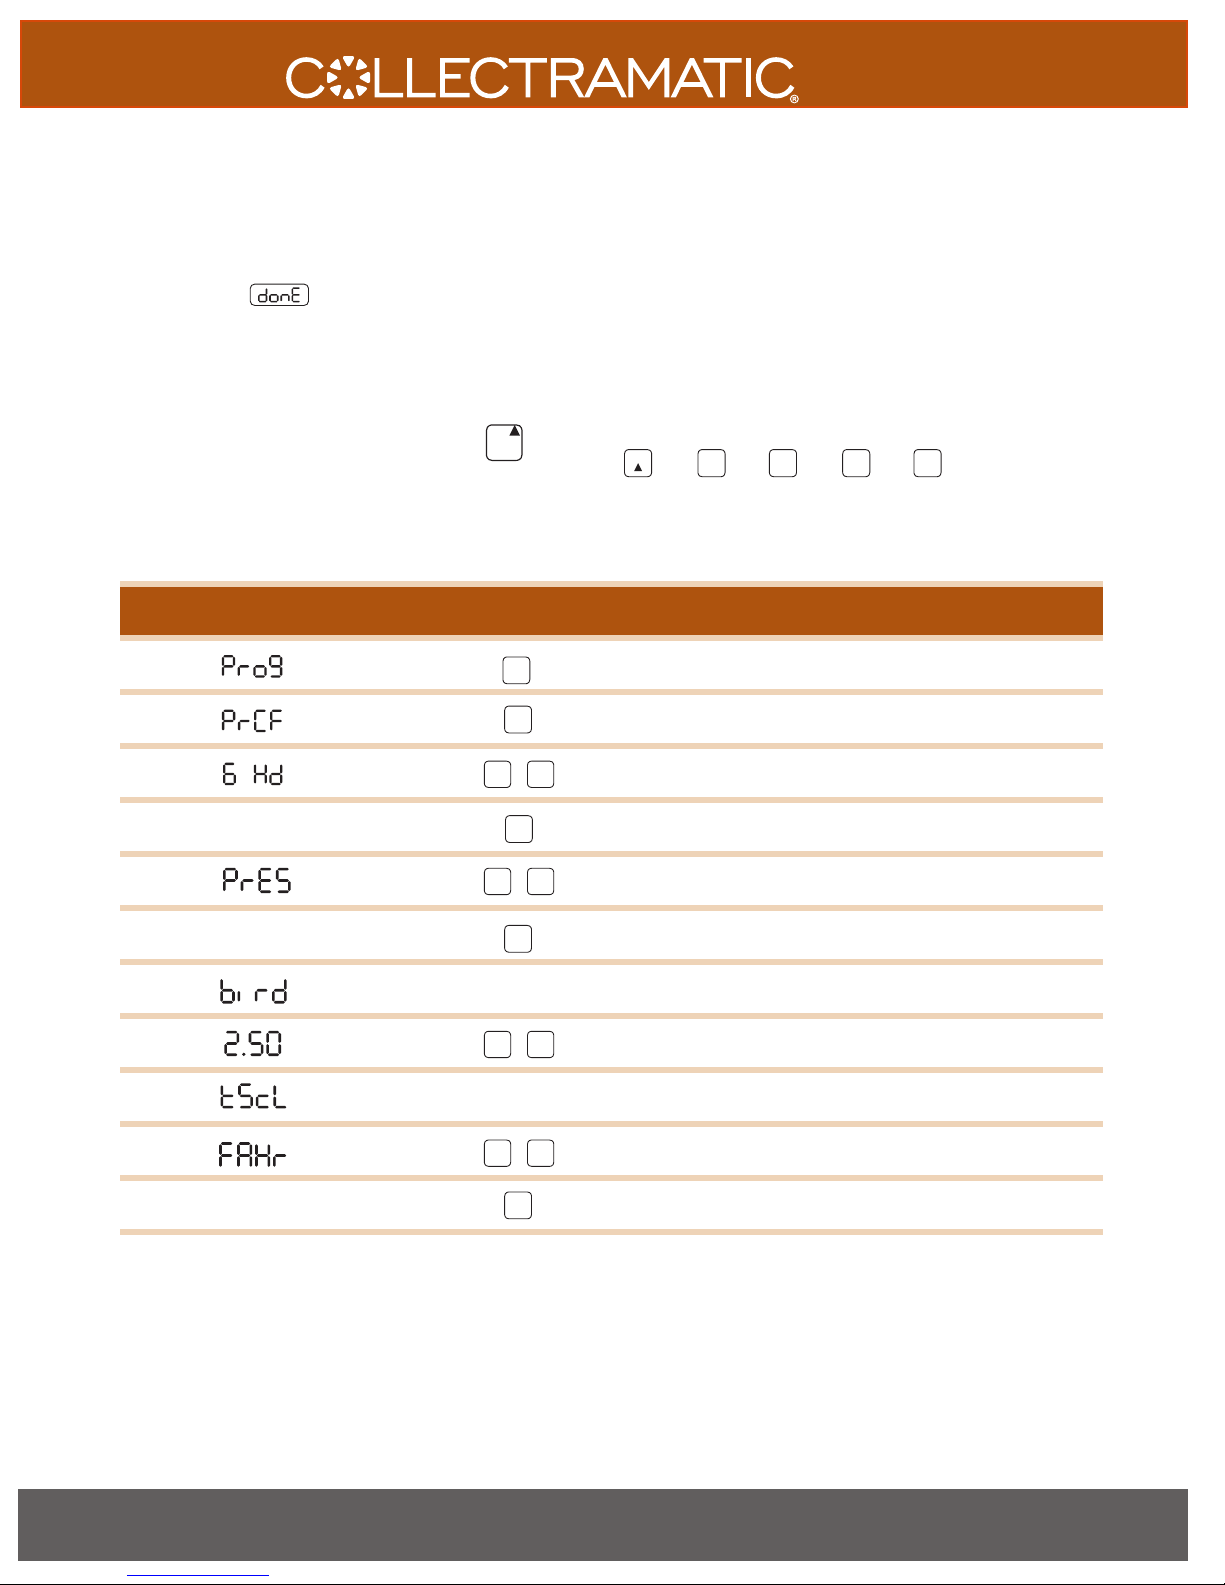
Step 2 Indicates Programming mode. Press #8 to proceed.
Step 3 Program the fryer configuration. Press ENTER to proceed.
Step 4 Modify the capacity setting. Choose 4Hd or 6Hd.
PRESS
BUTTON/ACTION
8
ENTER
or
PROGRAMMING THE FRYER CONFIGURATION
Fryer Configuration adjusts the global fryer settings. This program
allows you to set the fryer capacity from 4 to 6 head (default is 6
head), change the fryer from a pressure (default) to an open fryer,
set the bird size (for frying chicken) from 2.5 lbs. (default) to 2.75
lbs., and change the temperature scale from Fahrenheit to
Centigrade.
STEP 1
In sequence, press the following buttons to enter
programming mode.
PROG
then then then then
NOTE
ENTER
ENTER
or
Modify the pressure setting. Choose pressure (PrES) or open
(oPEn)
bird displays momentarily. Factory setpoints for either 2.5 lb. or
2.75 lb. bird.
or
Modify the bird size. Changing bird size automatically changes
set points in certain channels for specific fryer models.
Step 5 Press ENTER to proceed.
Step 6
Step 7 Press ENTER to proceed.
Step 8
Step 9
Step 10 tScl displays momentarily.
Step 11
Step 12 Press ENTER to exit.
ENTER
or
Modify the temperature scale display. Choose Fahrenheit
(FAHr) or centigrade (Cent).
Note: At any time during programming, time settings can be set to :00 indicating from that point on, the fryer will cook at the last
setting entered until the end of the cycle.
22
www.winstonindustries.com | 1.800.234.5286
Page 23
PROGRAMMING
PROGRAMMING THE SPEAKER PARAMETERS
Speaker Parameters allow you to adjust the speaker loudness and frequency (tone) settings.
FRYERS
STEP 1
then then then then
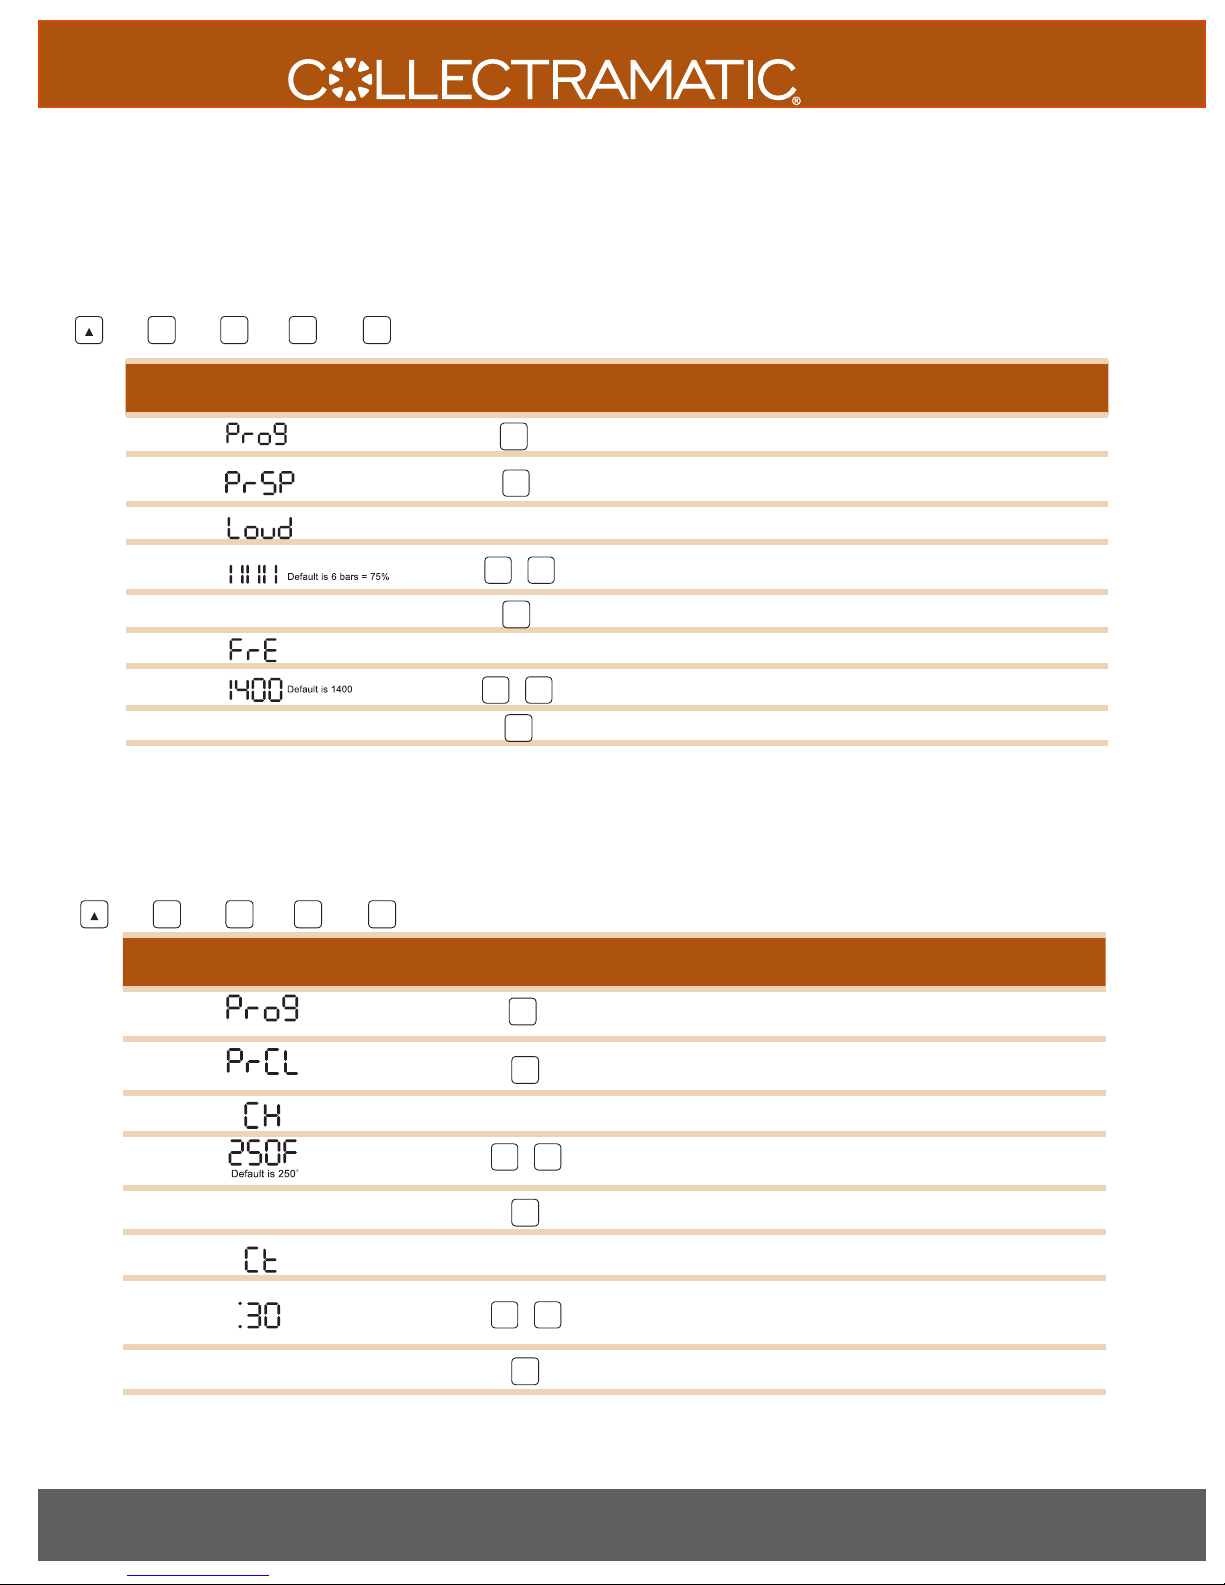
In sequence, press the following buttons to enter programming mode.
PROG
Step 2 Indicates Programming mode. Press #7 to proceed.
Step 3
WHEN THE
COMPUTER DISPLAYS
PRESS
BUTTON/ACTION
7
NOTE
Program the loudness and the tone frequency. Press ENTER to
proceed.
Step 4 Loud displays momentarily.
Step 5
Step 6 Press ENTER to proceed.
ENTER
or
Modify the speaker loudness indicated by vertical bars on
display.
Step 7 FrE displays momentarily.
Step 8 Modify the tone frequency in 100 Hz increments.
Step 9 Press ENTER to exit.
or
ENTER
PROGRAMMING THE AUTOCOOL MODE TIMER
Automatic cool mode monitors the amount of time the fryer remains in drop mode. If the fryer is in drop mode, without
cooking, for the programmed amount of time (in STEP 7 below) the controller will switch to cool mode.
STEP 1
then then then then
In sequence, press the following buttons to enter programming mode.
PROG
Step 2 Indicates Programming mode. Press #4 to proceed.
Step 3
WHEN THE
COMPUTER DISPLAYS
PRESS
BUTTON/ACTION
4
ENTER
NOTE
Program automatic cool mode parameters. Press ENTER to
proceed.
Step 4 CH displays momentarily.
or
Step 5
Step 6 Press ENTER to proceed.
ENTER
Automatic cool mode (setback) temperature. 250˚F (121˚C)
minimum 360˚F (182˚C) maximum.
Step 7 Ct displays momentarily.
Automatic cool mode timer. With the arrow buttons, modify in
Step 8
or
1-minute increments from 0 to 60 minutes. :00 disables this
feature.
Step 9 Press ENTER to exit.
ENTER
Note: At any time during programming, time settings can be set to :00 indicating from that point on, the fryer will cook at the last
setting entered until the end of the cycle.
NEED TO CONTACT US? www.winstonindustries.com | E-mail [email protected]
Phone 1.800.234.5286 | 1.502.495.5400 | 1.502.495.5458 • Mail 2345 Carton Drive | Louisville, KY 40299 USA
23
Page 24
PROGRAMMING
PROCESS 1
Programming Process #1 (PC 1) - 6 temperatures, 6 times
FRYERS
STEP 1
STEP 2
then then then then
First choose the channel you want to program.
2
1
3
5
4
7 8
6
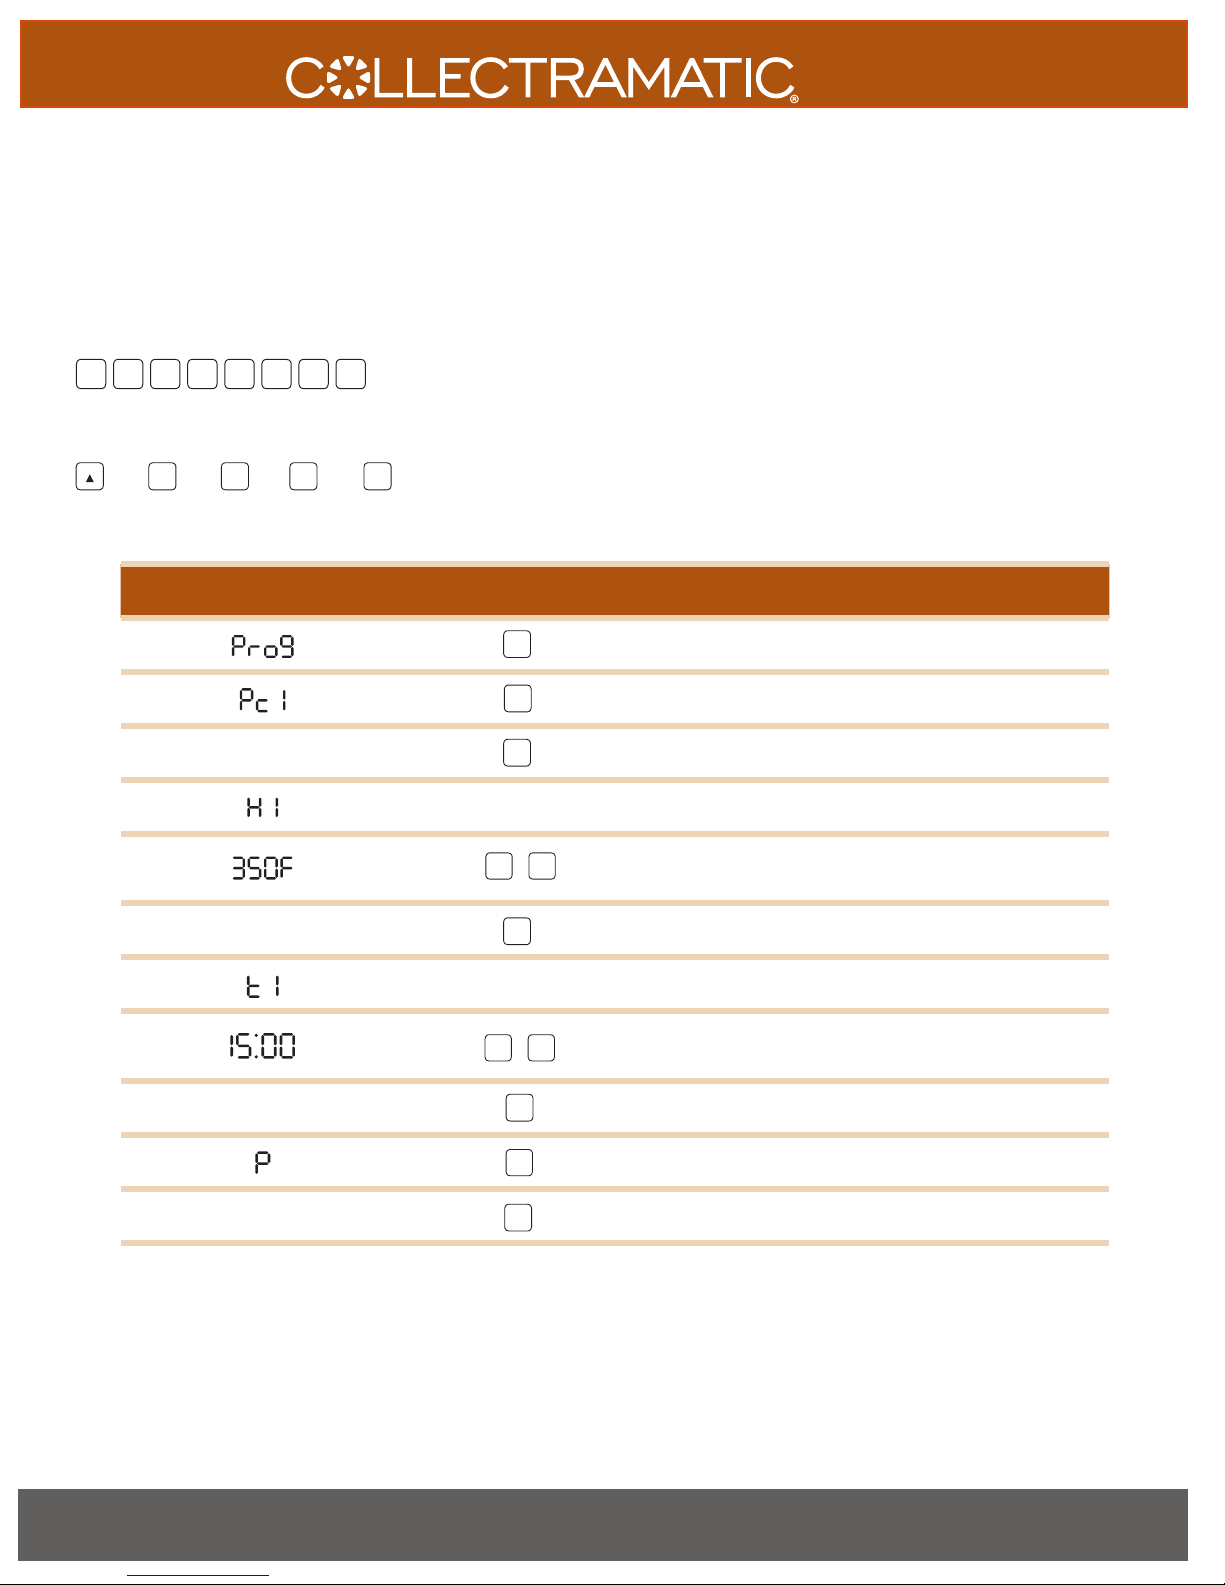
In sequence, press the following buttons to enter programming mode.
PROG
Step 3 Indicates Programming mode. Press ENTER to proceed.
Step 4 Press channel button #1 for selecting process #1.
Step 5 Press ENTER to proceed.
Step 6 H1 displays momentarily. Repeat from here for H2 through H6.
Step 7
WHEN THE
COMPUTER DISPLAYS
PRESS
BUTTON/ACTION
ENTER
1
ENTER
HEAT SETPOINTS H1 THROUGH H6
or
NOTE
Use arrow buttons to modify. Hold either button for fast
scrolling. Will display in F or C. 250˚F (121˚C) minimum, 360˚F
(182˚C) maximum.
Step 8
Step 9
ENTER
HEAT SETPOINTS T1 THROUGH T6
Press ENTER to proceed.
t1 displays momentarily.
Repeat for t2 through t6. Remember t1=total cook time, and
times t2 through t6 indicate time remaining in the cook cycle.
Use arrow buttons to modify. Hold either button for fast
Step 10
or
scrolling. Display shows MM:SS (minutes:seconds). :00 minimum
99:55 maximum.
Step 11 Press ENTER to proceed.
Step 12 Use arrow button to toggle between Open (O) and Pressure (P).
Step 13
RETURN TO STEP 6 AND REPEAT THROUGH STEP 13 UNTIL PROGRAMMING IS COMPLETE.
Note: At any time during programming, the time setting can be set to :00 indicating from that point on, the fryer will cook at the last temperature
setting entered until the end of the cycle.
24
www.winstonindustries.com | 1.800.234.5286
ENTER
ENTER
Controller proceeds to next heat setpoint (repeats starting at
STEP 6). If at final pressure setting, program mode exits.
Page 25
PROGRAMMING
FRYERS
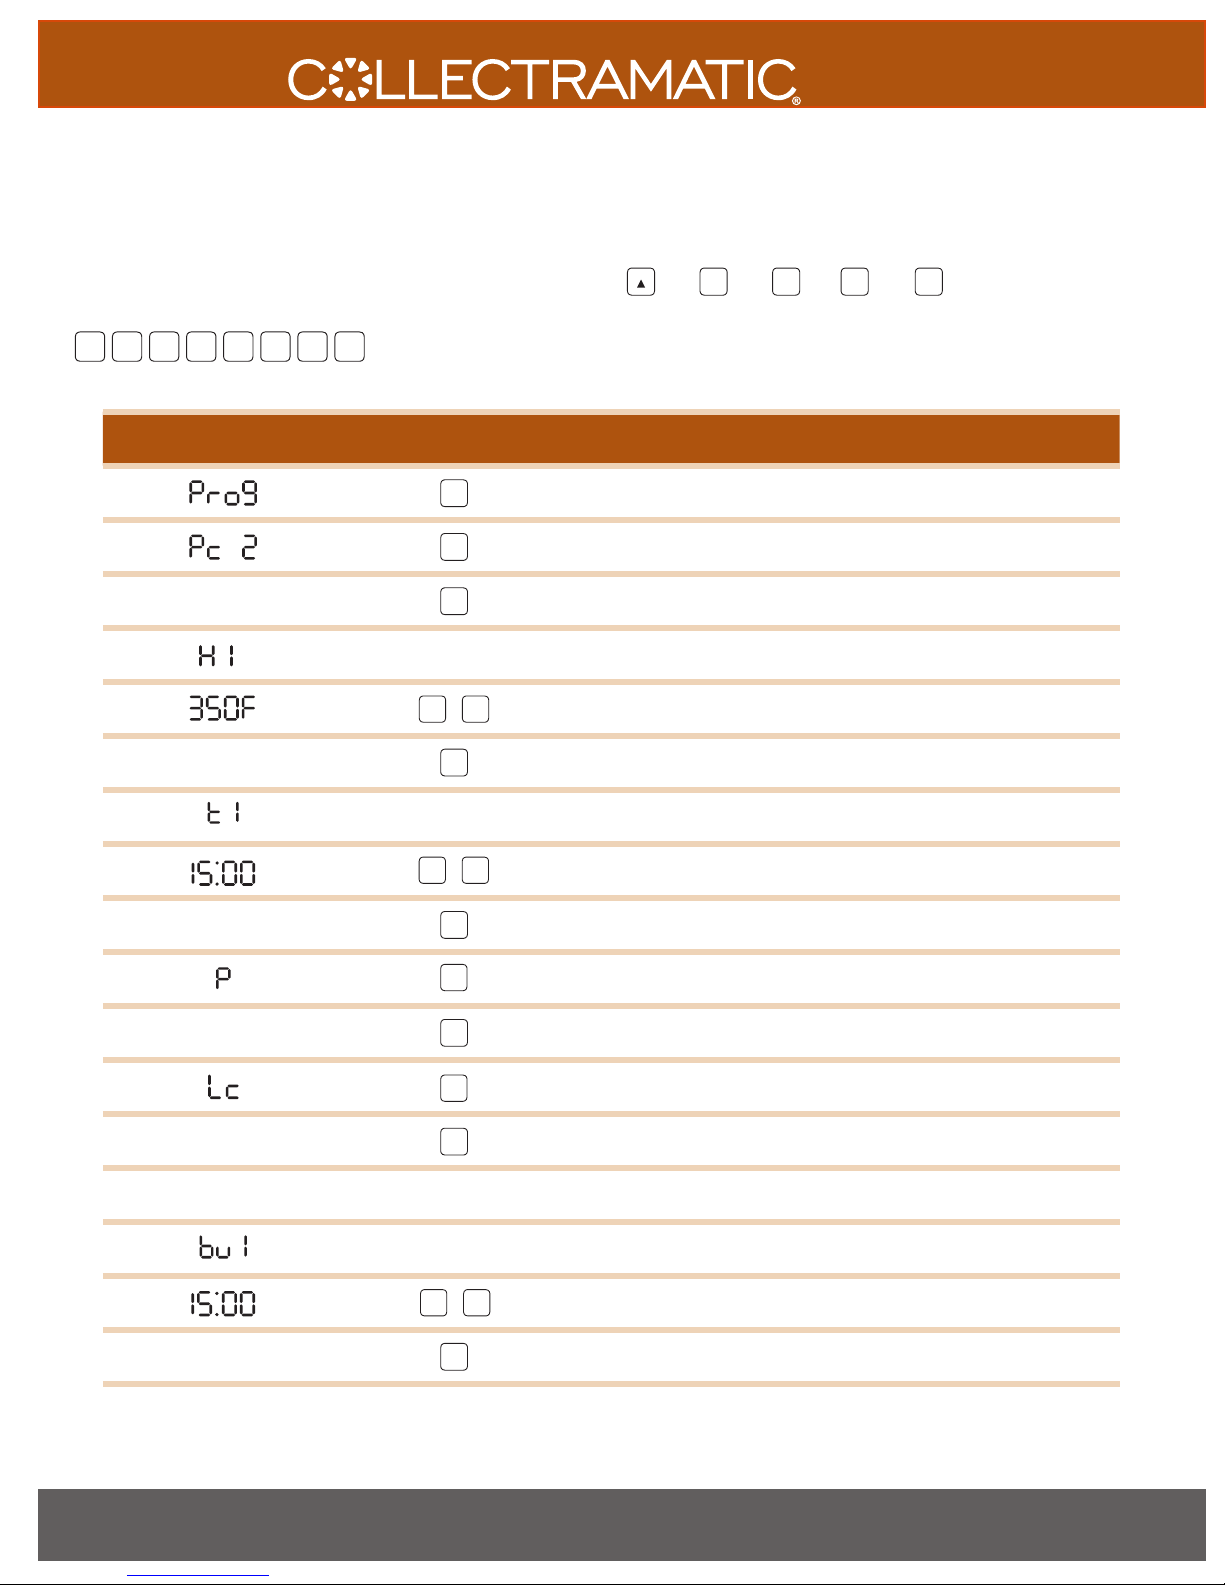
PROCESS 2
Programming Process #2 (PC 2) - 6 temperatures, 6 times, load
compensation
STEP 1
First choose the channel you want to program.
2
1
3
5
4
WHEN THE
COMPUTER DISPLAYS
Step 3 Indicates Programming mode. Press ENTER to proceed.
Step 4 Press channel button #2 for selecting process #2.
Step 5 Press ENTER to proceed.
Step 6 H1 displays momentarily. Repeat from here for H2 through H6.
Step 7
Step 8
Step 9
Step 10
7 8
6
PRESS
BUTTON/ACTION
ENTER
2
ENTER
HEAT SETPOINTS H1 THROUGH H6
or
ENTER
HEAT SETPOINTS T1 THROUGH T6
or
STEP 2
In sequence, press the following buttons to enter
programming mode.
PROG
then then then then
NOTE
Use arrow buttons to modify. Hold either button for fast scrolling. Will
display in F or C. 250˚F (121˚C) minimum, 360˚F (182˚C) maximum.
Press ENTER to proceed.
t1 displays momentarily.
Repeat for t2 through t6. Remember t1=total cook time, and times t2
through t6 indicate time remaining in the cook cycle.
Use arrow buttons to modify. Hold either button for fast scrolling. Display
shows MM:SS (minutes:seconds). :00 minimum 99:55 maximum.
Step 11 Press ENTER to proceed.
Step 12 Use arrow button to toggle between Open (O) and Pressure (P).
Step 13
Step 14
Step 15
ENTER
ENTER
ENTER
Controller proceeds to next heat setpoint (repeats starting at
STEP 6). If at final pressure setting, program mode exits.
Use arrow button to toggle between Straight Time (Str) and Load
Compensation (Lc).
Controller proceeds to next heat setpoint (restarts at STEP 6). If at final
pressure setting, proceed to STEP 16.
Return to STEP 6 and repeat through STEP 15 until bu1 displays, then go to STEP 16
Step 16
Step 17
Step 18 Press ENTER to exit programming mode.
PRE-ALARM SETPOINTS 1 THROUGH 3
or
ENTER
bu1 displays momentarily. Repeat STEP 16-18 for pre-alarms bu 2 through
bu 3.
Use arrow buttons to modify. Hold either button for fast scrolling. Display
shows MM:SS (minutes:seconds)
Note: At any time during programming, time settings can be set to :00 indicating from that point on, the fryer will cook at the last
setting entered until the end of the cycle.
NEED TO CONTACT US? www.winstonindustries.com | E-mail [email protected]
Phone 1.800.234.5286 | 1.502.495.5400 | 1.502.495.5458 • Mail 2345 Carton Drive | Louisville, KY 40299 USA
25
Page 26
PROGRAMMING
FRYERS
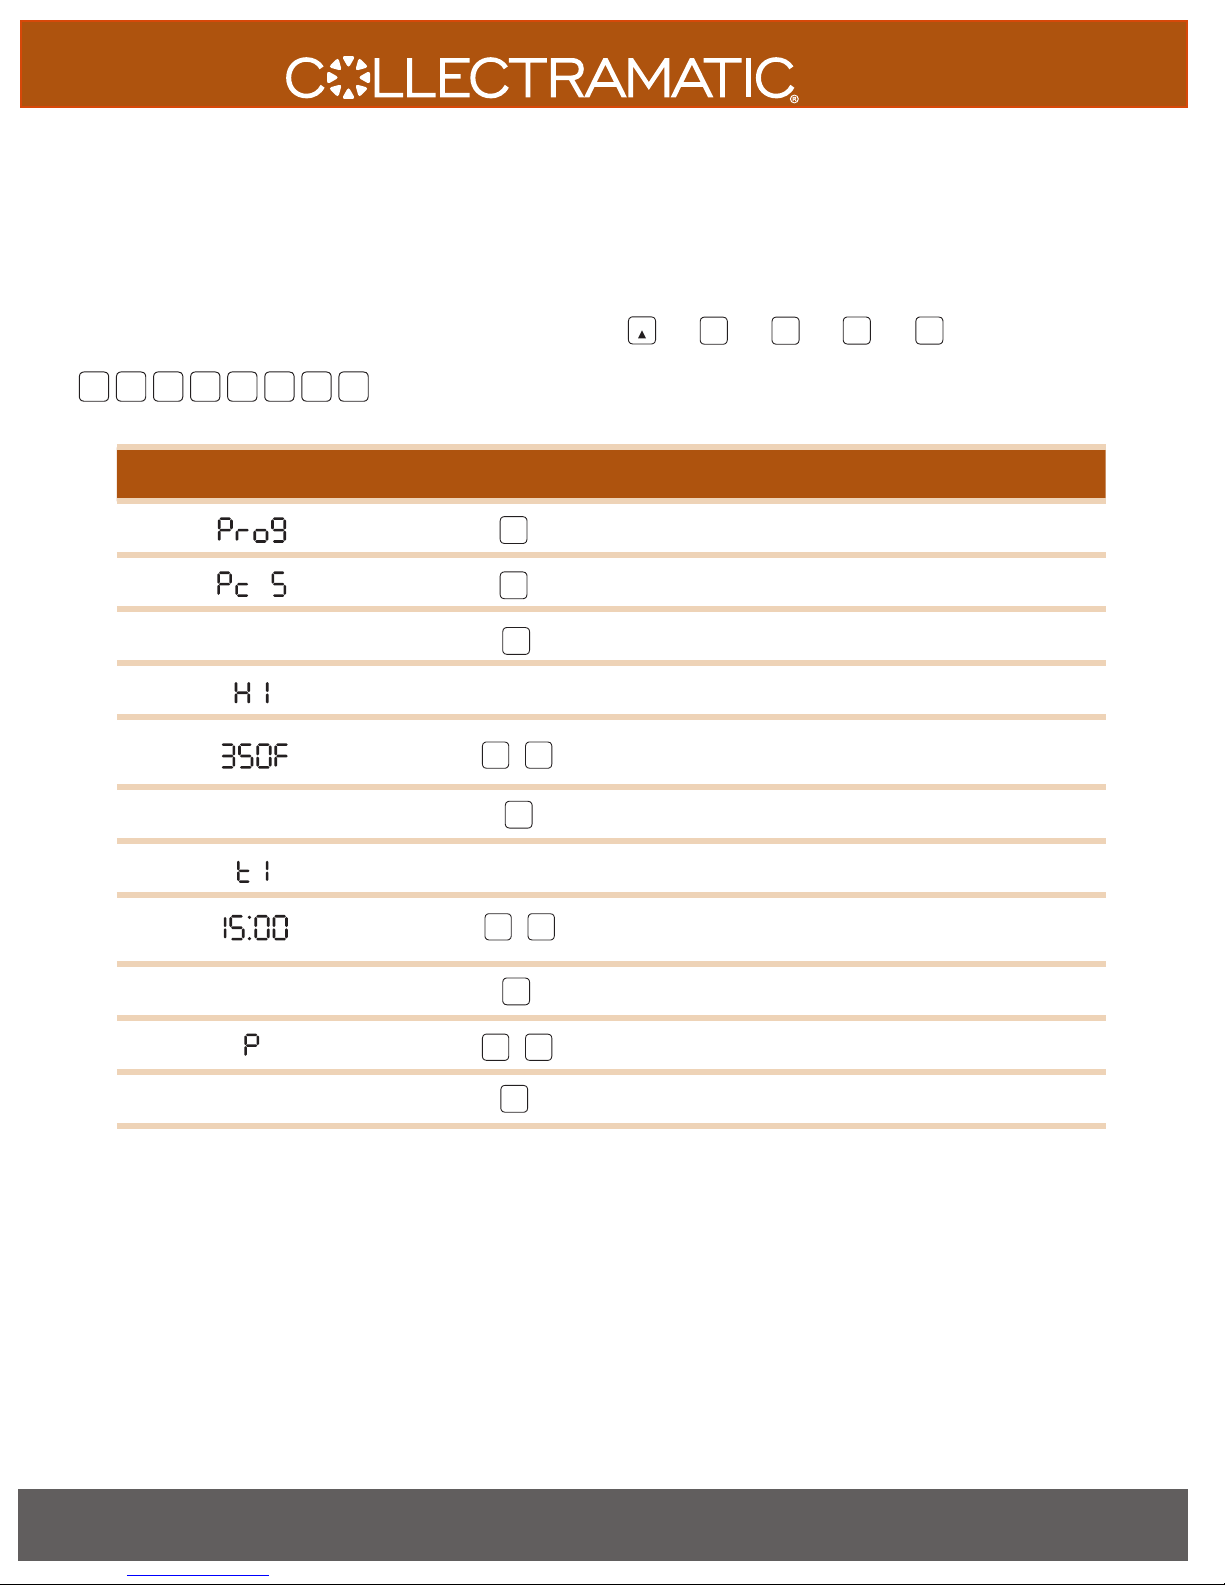
PROCESS 5
Programming Process #5 (PC 5) - 1 temperature, 1 time
STEP 2
In sequence, press the following buttons to enter
programming mode.
Note: Not all fryers have a Process #5.
PROG
then then then then
STEP 1
First choose the channel you want to program.
2
1
3
5
4
WHEN THE
COMPUTER DISPLAYS
Step 3 Indicates Programming mode. Press ENTER to proceed.
Step 4 Press channel button #5 for selecting process #5.
Step 5 Press ENTER to proceed.
Step 6 H1 displays momentarily.
7 8
6
PRESS
BUTTON/ACTION
ENTER
5
ENTER
HEAT SETPOINTS H1
NOTE
Use arrow buttons to modify. Hold either button for fast
Step 7
Step 8 Press ENTER to proceed.
or
ENTER
scrolling. Will display in F or C. 250˚F (121˚C) minimum, 360˚F
(182˚C) maximum.
Step 9 t1 displays momentarily.
Step 10
TIME SETPOINT T1
or
Use arrow buttons to modify. Hold either button for fast
scrolling. Display shows MM:SS (minutes:seconds). :00
minimum, 99:55 maximum.
ENTER
ENTER
or
Step 11 Press ENTER to proceed.
Step 12 Use arrow button to toggle between Open (O) and Pressure (P).
Step 13 Press ENTER to exit.
Note: At any time during programming, time settings can be set to :00 indicating from that point on, the fryer will cook at the last
setting entered until the end of the cycle.
26
www.winstonindustries.com | 1.800.234.5286
Page 27
PROGRAMMING
FRYERS
PROCESS 6
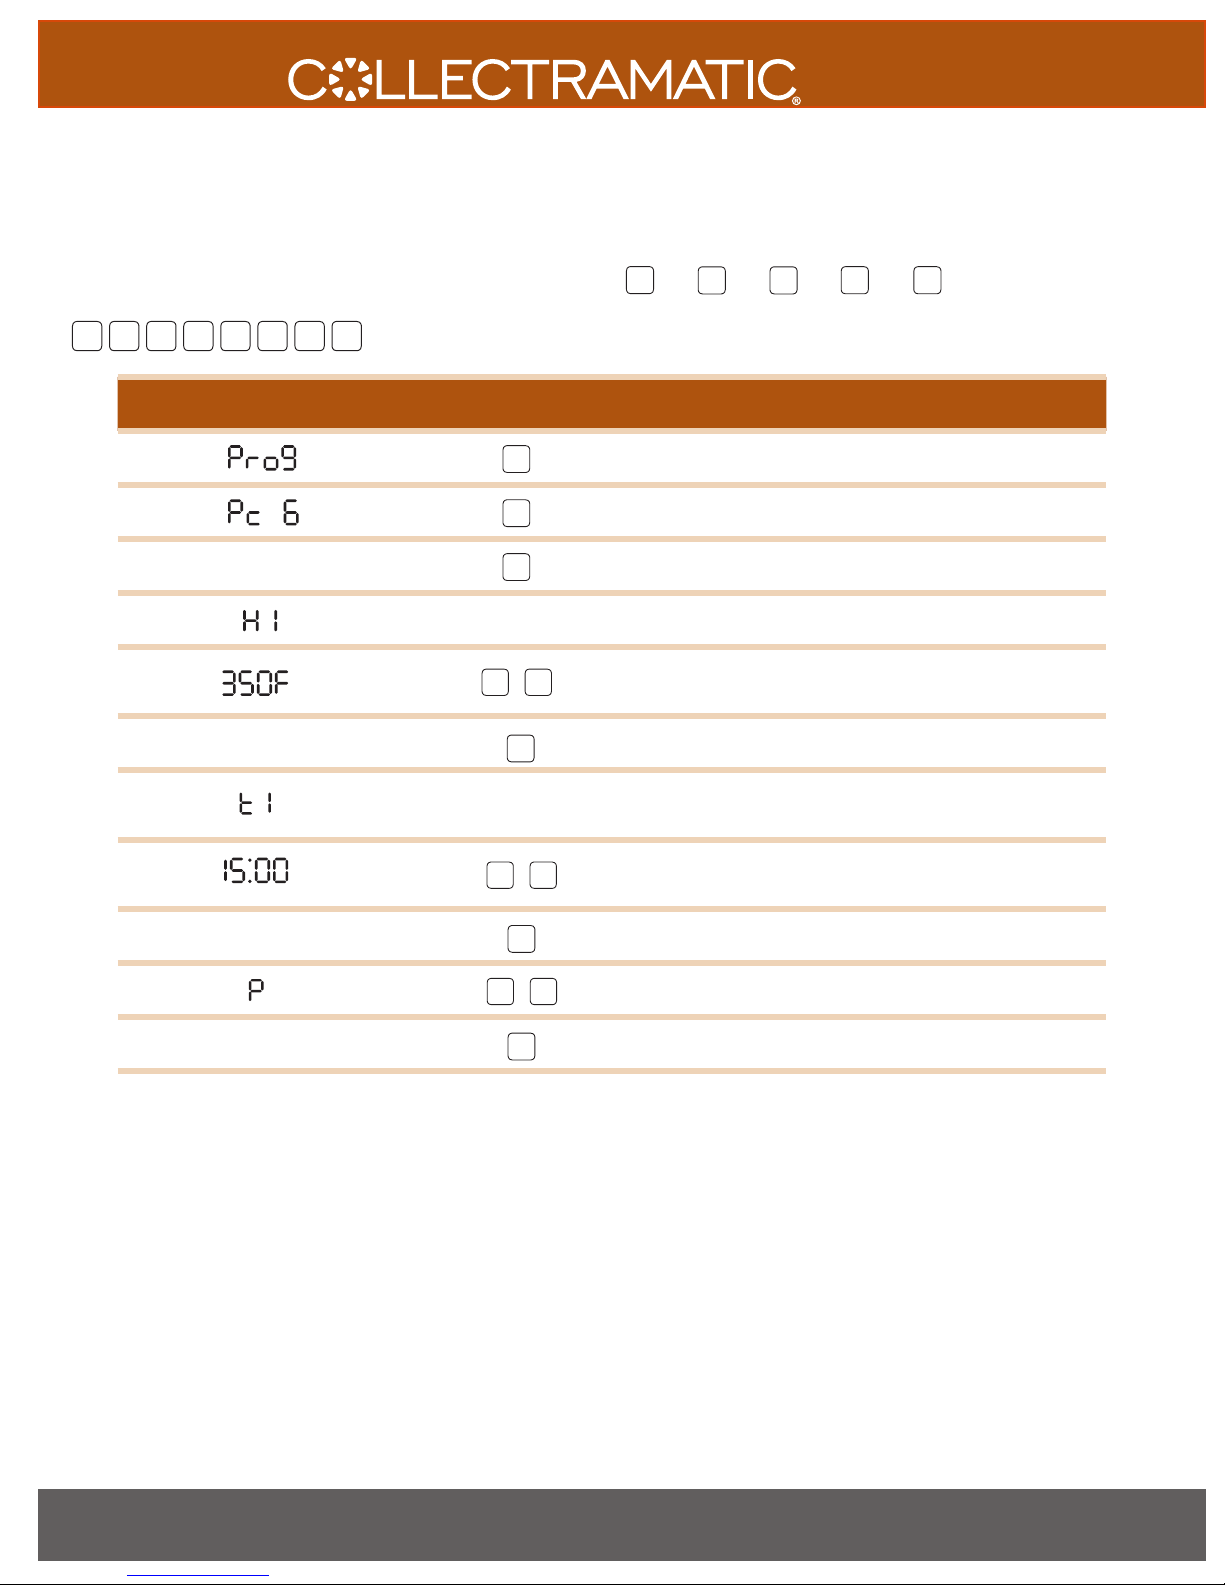
Programming Process #6 (PC 6) - 2 temperatures, 2 times
Note: Not all fryers have a Process #6.
STEP 1
First choose the channel you want to program.
2
1
3
5
4
WHEN THE
COMPUTER DISPLAYS
Step 3 Indicates Programming mode. Press ENTER to proceed.
Step 4 Press channel button #6 for selecting process #6.
Step 5 Press ENTER to proceed.
Step 6 H1 displays momentarily. Repeat from here for H2.
Step 7
7 8
6
PRESS
BUTTON/ACTION
ENTER
6
ENTER
HEAT SETPOINTS H1 and H2
or
STEP 2
In sequence, press the following buttons to enter
programming mode.
PROG
then then then then
NOTE
Use arrow buttons to modify. Hold either button for fast
scrolling. Will display in F or C. 250˚F (121˚C) minimum, 360˚F
(182˚C) maximum.
Step 8 Press ENTER to proceed.
Step 9
ENTER
TIME SETPOINT T1 and T2
t1 displays momentarily. Repeat for t2. Remember t1 = total
cook time and time t2 indicates time remaining in the cook
cycle.
Use arrow buttons to modify. Hold either button for fast
scrolling. Display shows MM:SS (minutes:seconds). :00
Step 10
or
minimum, 99:55 maximum.
ENTER
ENTER
or
Controller proceeds to next heat setpoint (repeat starting at
STEP 6). If at final pressure setting, program mode will exit.
Step 11 Press ENTER to proceed.
Step 12 Use arrow button to toggle between Open (O) and Pressure (P).
Step 13
Note: At any time during programming, time settings can be set to :00 indicating from that point on, the fryer will cook at the last
setting entered until the end of the cycle.
NEED TO CONTACT US? www.winstonindustries.com | E-mail [email protected]
Phone 1.800.234.5286 | 1.502.495.5400 | 1.502.495.5458 • Mail 2345 Carton Drive | Louisville, KY 40299 USA
27
Page 28
FRYERS
PROGRAMMING
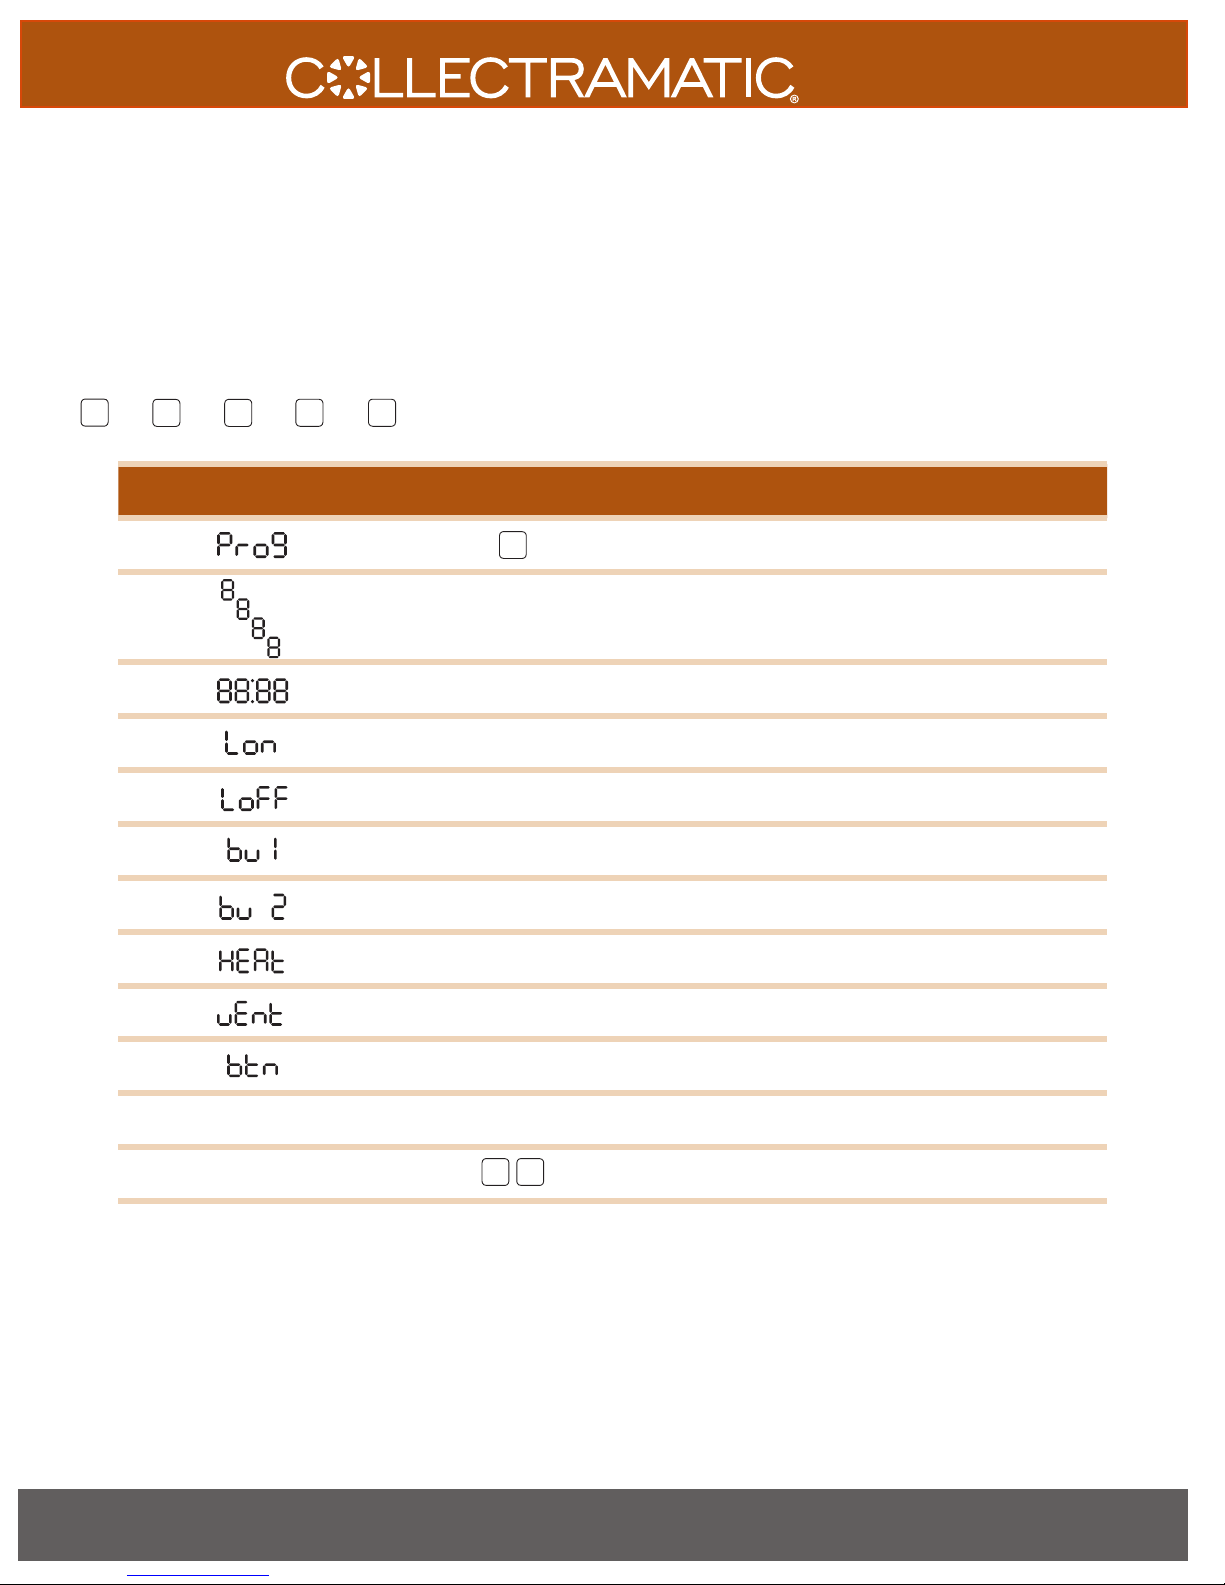
RUNNING THE FIELD DIAGNOSTICS
Field Diagnostics are used to help diagnose fryer problems. While running the Field diagnostics program, if a problem exists with fryer
components or controller, the display will show an error message.
STEP 1
STEP 2
then then then then
Turn fryer power switch ON.
In sequence, press the following buttons to enter programming mode.
PROG
Step 3 Indicates Programming mode. Press #6 to proceed.
Step 4
Step 5
Step 6 All of the product button LED’s will light.
Step 7 All of the product button LED’s will be off.
Step 8 A medium volume tone will sound.
Step 9 A high frequency tone will sound.
EN THE
COMPUTER DISPLAYS
PRESS
BUTTON/ACTION
6
NOTE
S
From left to right, on the 4-digit display,
all segments of digit 1 light, then all segments of
digit 2 light, then digit 3, and digit 4.
All segments of all digits including the colon display.
Step 10 The controller will energize the heater relay.
Step 11 The controller will call for pressure.
Step 12
Step 13 Resets computer.
Step 14 Switch power back on, holding keys 9 and 10 to reset.
Note: At any time during programming, time settings can be set to :00 indicating from that point on, the fryer will cook at the last
setting entered until the end of the cycle.
SWITCH POWER ON.
28
PRESS EACH OF THE 16 BUTTONS
SWITCH POWER OFF.
10
9
www.winstonindustries.com | 1.800.234.5286
As each button is pressed, the button number, 1 through 16,
will be displayed.
Page 29
TROUBLESHOOTING
FRYERS
We know how frustrating and costly it can be when a critical piece
of equipment is down for repairs. It is our goal to minimize service
disruptions, to get you back up and operating in the shortest time
possible.
We carefully analyze all service calls. This analysis helps us to
improve our manufacturing processes and reduces product
service issues. Generally speaking, most equipment failures can be
attributed to the following three causes:
• Faulty use and care practices.
• Electrical supply problems.
• Equipment faults.
Please refer to the Troubleshooting Chart on the next page for
common problems and solutions. If the problem you're
experiencing isn't listed, or if the standard solution fails to resolve
your problem, you will need a qualified servicer to diagnose and
repair the problem.
If your equipment is still under warranty or you are uncertain
whether or not warranty is still in place, please call Winston
Customer Service at 1.800.234.5286 (or 1.502.495.5400). Our
friendly staff will help you verify coverage and. if under warranty,
will arrange for a servicer to call on you.
If your equipment is no longer under warranty or you are
uncertain whether the warranty is still in place, please call
Customer Service at 1-800-234-5286, or visit our website,
www.winstonindustries.com, and click the Service tab to locate
an authorized servicer near you.
In order to expedite service, please have the complete model and
serial number (found on the equipment's identification tag) on
hand when you contact us.
Service parts may be purchased directly from the factory online.
Visit www.winstonindustries.com
If cabinet is in warranty, call Winston Industries at 1.800.234.5286. Identify the following:
Model Serial # (located on name plate)
Your name
Company name
Company address
Company phone
Type of problem
NEED TO CONTACT US? www.winstonindustries.com | E-mail [email protected]
Phone 1.800.234.5286 | 1.502.495.5400 | 1.502.495.5458 • Mail 2345 Carton Drive | Louisville, KY 40299 USA
29
Page 30

FRYERS
TROUBLE ....................................................................................................................................................................................................................FAULT CODE
ALL FRYERS
Power lamp fails to light ..................................................................................................................................................................................................1, [CS]
Power lamp dim ..................................................................................................................................................................................................................1, [CS]
Heat ON lamp not on when heating ...............................................................................................................................................................................[CS]
Display reads “Lo” or “Heat”, heat on lamp is off, and fryer is not heating up ......................................................................................................18
No heat (all lamps out) .....................................................................................................................................................................................................1, [CS]
Heats slowly ..............................................................................................................................................................................................................................[CS]
Cooking oil smoking excessively ..............................................................................................................................................................................2, 3, [CS]
Cooking oil foaming excessively ............................................................................................................................................................................................3
Cooking oil boils over ................................................................................................................................................................................................... 4, 5, 6, 7
Cooking oil has burnt or bad taste ..........................................................................................................................................................................8, 9, [CS]
Cooking oil breaking down too quickly ......................................................................................................................................................... 8, 9, 10 [CS]
Cooking oil leak around collector gasket .................................................................................................................................................................11, 12
Controls not responding correctly .............................................................................................................................................................................[CS], 17
Hi Limit light is lit .............................................................................................................................................................................................................[CS], 17
PRESSURE FRYERS ONLY
No pressure .................................................................................................................................................................................................................13, 14, [CS]
Low pressure ....................................................................................................................................................................................................... 14, 15, 16, [CS]
Pressure loss excessive through vent .......................................................................................................................................................................13, [CS]
Pressure loss excessive through lid valve ...................................................................................................................................................................15, 16
Does not vent at proper place in cycle (PF Models) ..................................................................................................................................................[CS]
Does not vent at end of cook cycle (PF Models) .........................................................................................................................................................[CS]
Cooking oil leaking from back of fryer ...........................................................................................................................................................................[CS]
[CS] Call for service (see page 28)
FAULT CODE .......................................................................................................................................................................................................... CORRECTION
1. Open power line (check circuit breaker) .......................................................................................................................................... Adjust or [CS]
2. Cooking oil level below top heater ........................................................................................................................................Adjust, See page 15
3. Cooking oil badly broken down ................................................................................................................ Clean or Replace, See pages 15-17
4. Cracklings left in or allowed to overfill .......................................................................................................................... Clean, See pages 15-17
5. Never stir in collector after warm-up ................................................................................................................................................... See page 16
6. Heat plate left out of collector ........................................................................................................................................................................Replace
7. Improper warm-up (solid cooking oil in collector) .......................................................................................................... Adjust, see page 16
8. Cracklings allowed to reach bottom heaters .............................................................................................................. Clean, See pages 15-17
9. Heater holder slipped - heaters touching ....................................................................................................................................... Adjust or [CS]
10. Fryer not kept clean .............................................................................................................................................................. Clean, See pages 15-17
11. Pot groove for collector gasket dirty .............................................................................................................................. Clean, See pages 15-17
12. Collector gasket dirty or damaged ...........................................................................................................Clean or Replace, See pages 15-17
13. Deadweight dirty or missing.......................................................................................................................Clean or Replace, See pages 15-17
14. Lid gasket dirty, damaged, or missing .....................................................................................................Clean or Replace, See pages 15-17
15. Lid valve O-ring not seating or missing ..................................................................................Clean, Adjust, or Replace, See pages 15-17
16. Lid valve retainer loose .................................................................................................................................................................. Adjust, see page 7
17. Maximum allowable temperature exceeded .....................................................................................................................................See page 17
18. Aqualert® sensing is activated .................................................................................................................................................................See page 30
[CS] Call for Service (see page 28)
30
www.winstonindustries.com | 1.800.234.5286
Page 31
FRYERS
Aqualert® description: Aqualert® is software built into the Collectramatic fryer controls that automatically detects
the presence of water in the cookpot and prevents the fryer from being used. Aqualert® is included in all
electronically controlled fryers with Winston-manufactured controls.
Aqualert works by sensing the rate of the rise in temperature of a liquid inside the fryer cookpot. Water heats up
more slowly than cooking oil. When the fryer is heating to cook temperature in the warm-up phase, Aqualert sensors
determine, by the rate the temperature rises in the fryer, whether the liquid is water or cooking oil. If the
temperature doesn’t rise fast enough, Aqualert will think that there is water in the fryer and the fryer will stop
heating. The fryer will remain in this suspended mode until the temperature of the liquid in the fryer drops below
180˚F (82˚C), at which point, if you have determined there is no liquid other than cooking oil in the fryer, you should
allow the fryer to make another attempt to reach the cook temperature by following the instructions below. The
Aqualert sensors will once again try to determine if there is a liquid other than cooking oil in the fryer. If the fryer
continues to enter Aqualert mode, contact Winston Customer Care at 1.800.234.5268 or +1.502.495.5400.
INSTRUCTIONS:
!
DANGER: DO NOT use any liquids other than cooking oils in fryer cookpot.
If the fryer is not heating up between the temperatures of 180˚F (82˚C) and 212˚F (100˚C) and the display toggles
between H2O and ALRT, it is locked up due to the Aqualert® sensing program.
1. Check to see if there is water or any other liquid in the cookpot other than cooking oil (cooking oil may be in a
solid or liquid state). If any liquid other than cooking oil is present, it must be removed before operating the
fryer.
2. Check the temperature of the cooking oil in the cookpot. If it is between 180˚F (82˚C) and 212˚F (100˚C), it is
locked up due to the Aqualert® sensing program.
3. Stir the oil with the fryer plugging tool until the temperature of the oil drops below 180˚F (82˚C). At this point,
the fryer heaters will come back on and the fryer will begin to heat up to the set Drop temperature. DO NOT
STIR THE OIL AGAIN UNTIL THE TEMPERATURE REACHES THE SET DROP TEMPERATURE.
4. When the set temperature is reached, stir the oil vigorously for at least a full minute until the temperature of
the oil drops well below the set temperature. BE SURE TO STIR DOWN IN THE COLLECTOR.
!
DANGER: DO NOT stir cooking oil in collector after the first round of cooking each day. Cooking oil may
come up and out of cookpot because of cracklings and product fall-off in the collector.
5. For the first frying of the day, allow fryer to heat back up to set DROP temperature. STIR AND LET TEMPERATURE
RISE BACK TO THE SET DROP TEMPERATURE AT LEAST 3 TIMES.
6.
7. When the collector is hot to the touch, place the Heat Plate in the collector and continue to follow the
!
CAUTION: HOT SURFACES - Carefully feel the bottom, outside surface of the collector. It should
be very hot to the touch. If it is not, continue to follow the stirring instructions in steps 5 and 6 above.
instructions under Operating Instructions (page 12 step 16).
NEED TO CONTACT US? www.winstonindustries.com | E-mail [email protected]
Phone 1.800.234.5286 | 1.502.495.5400 | 1.502.495.5458 • Mail 2345 Carton Drive | Louisville, KY 40299 USA
31
Page 32

FRYERS
WARRANTY AND TERMS AND CONDITIONS
Limited 1 year Warranty (excluding gaskets, lamps, hoses, power cords, glass panels, fryer baskets,
batteries, and evaporators). Warranty disclaimer for failure to clean.
WINSTON EXPRESSLY DISCLAIMS ALL OTHER WARRANTIES, EITHER EXPRESS OR IMPLIED, INCLUDING
ANY IMPLIED WARRANTY OF FITNESS FOR A PARTICULAR PURPOSE AND ANY IMPLIED WARRANTY
OF MERCHANTABILITY.
Ask us for a complete warranty disclosure or go to:
www.winstonind.com/documents/4272V089_zap_warranty_agreement.pdf.
Terms and Conditions of Sale for Winston Industries’ products are available here:
www.winstonind.com/documents/4272X833_terms_and_conditions_of_sale.pdf.
Both the Warranty and Terms and Conditions of Sale are integral to this document.
Buy Winston Parts Online!
Parts and accessories for our products are available to purchase through our online,
secure site – it’s your one-stop shop for genuine Winston replacement parts. These
parts are designed specically for our products and can help you save on costly repairs
while maintaining valuable warranty coverage.
http://www.winstonparts.com/
32
www.winstonindustries.com | 1.800.234.5286
Page 33
NOTES
FRYERS
NEED TO CONTACT US? www.winstonindustries.com | E-mail [email protected]
Phone 1.800.234.5286 | 1.502.495.5400 | 1.502.495.5458 • Mail 2345 Carton Drive | Louisville, KY 40299 USA
33
Page 34
NOTES
FRYERS
34
www.winstonindustries.com | 1.800.234.5286
Page 35
NOTES
FRYERS
NEED TO CONTACT US? www.winstonindustries.com | E-mail [email protected]
Phone 1.800.234.5286 | 1.502.495.5400 | 1.502.495.5458 • Mail 2345 Carton Drive | Louisville, KY 40299 USA
35
Page 36

Winston Industries, LLC | 2345 Carton Drive | Louisville, KY 40299
1.800.234.5286 | 1.502.495.5400 | Fax 1.502.495.5458 | www.winstonindustries.com
 Loading...