

Page 1
Coffee Percolator
Perkolator • Perkolatortrakter • Perkolaattori
ENGLISHSVENSKANORSKSUOMI
Art. No
18-4141, 34-6411
English 3
Svenska 6
Norsk 9
Suomi 12
Ver. 201101
Page 2

2
Page 3
Coffee Percolator
Article number: 18-4141, 34-6411
Please read the entire instruction manual before using and save it for future use. We apologise for
any text or photo errors and any changes of technical data. If you have any questions concerning
technical problems please contact our Customer Service Department (see address on reverse.)
Before Use
Before using the percolator for the first time, clean and rinse the inside of the percolator,
coffee basket, coffee basket lid and pump stem with warm water. Rinse carefully and let
the parts dry.
N.B. Never immerse the percolator in water.
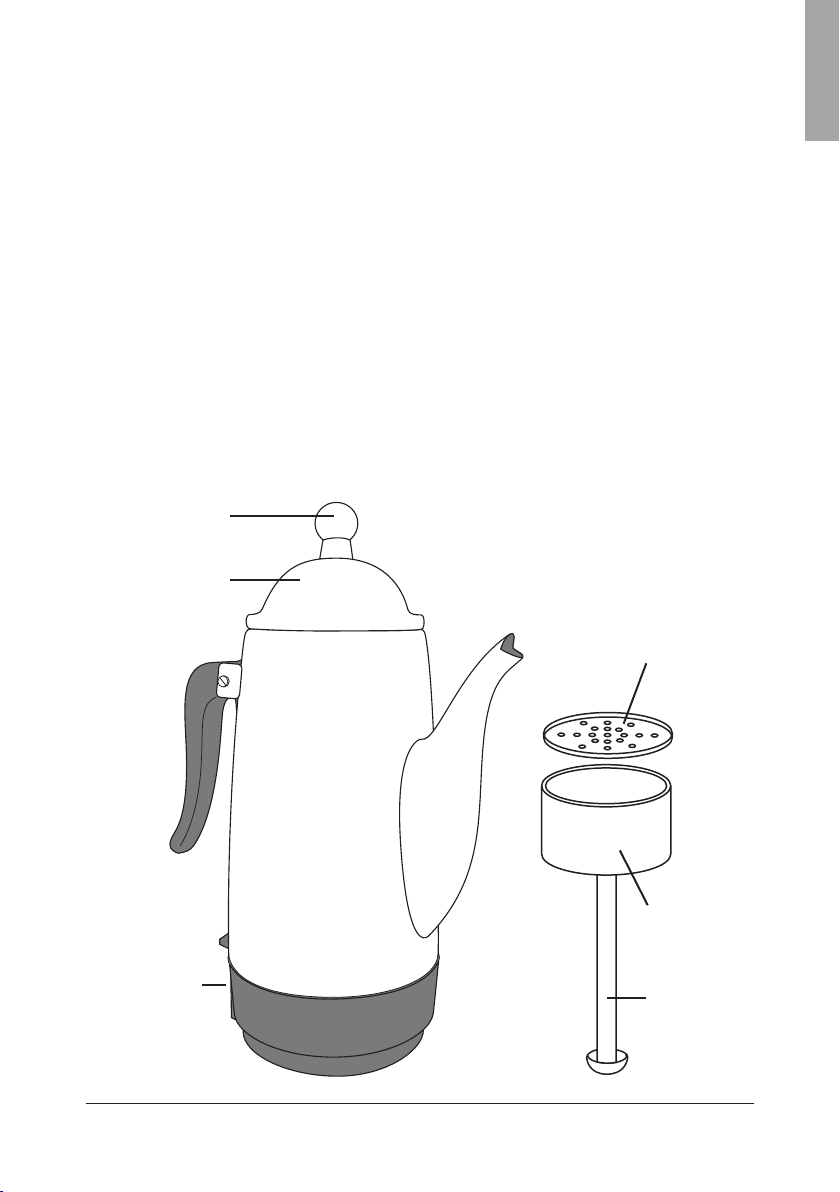
Parts
Knob
Percolator lid
Basket lid
ENGLISH
Indicator lamp
Coffee basket
Pump
3
Page 4

Operation
ENGLISH
• Fill the percolator with the desired amount of fresh, cold water.
(Use the sight glass measure in the handle). Brew at least four cups for the best results.
Important: The sight glass measures 1.6 dl/cup.
• Place the coffee basket onto the pump stem. Place this assembly into the percolator.
Measure the coffee and add it to the coffee basket. Spread the coffee evenly in the basket.
Replace the basket lid.
• Make sure that the pump stem, basket, and basket lid are correctly placed into the bottom
by turning it.
• Connect the power lead first to the percolator and then to the wall socket.
• The indicator lamp will light when the coffee is ready. The percolator’s heating element
will keep the coffee at serving temperature as long as the percolator is connected to
the wall socket. Do not use any other power lead than the one that came originally with
your machine.
• To stop brewing or warming, disconnect the power lead from the wall socket and then
from the percolator.
• If you wish to warm-up left over coffee after disconnecting you must first remove the coffee
basket assembly and pump stem from the percolator. Important: Make sure that there is
enough coffee to warm-up in the urn before connecting it.
Care and Cleaning
• Always remove the power lead before cleaning.
• Never immerse the percolator or power lead in water.
• It is very important to clean the percolator thoroughly after each use. Even a small amount
of leftover coffee grounds can ruin the taste of freshly brewed coffee.
• Make sure that you clean the pump stem and pump base washer immediately.
The washer must be able to move freely for the best brewing results to be achieved.
• The coffee basket and lid should be cleaned regularly since coffee grounds can easily
get stuck in the holes.
• The heating element (recess) and nut on the inside of percolator should be cleaned regularly.
Coffee residue on these parts can affect the brewing thermostat, which will result in the
premature triggering of the automatic on/off feature.
• Clean the outside of the percolator using a damp cloth. Never use chemical
cleaning agents.
Safety Instructions
• Connect the percolator only to 220-230 mains voltage.
• Always unplug the power lead before and after use.
4
Page 5

• Never immerse or the percolator, power lead, or plug in water or other liquids.
• Never place the percolator on hot surfaces, hobs or similar.
• Avoid allowing the power lead to come into contact with the warm exterior of the percolator.
• Before brewing or serving, make sure that the urn lid is securely in place.
• Never remove the urn lid during the brewing process.
• Do not use the percolator outdoors.
• If the percolator is damaged or in need of service, contact an authorised service facility which
possess the required specialised competence.
• Keep in mind that the percolator will become hot during use. To avoid burning yourself, only
hold the percolator by the handle.
Brewing tips
Percolator is an old and proven method of brewing coffee resulting in a rich, warm and aromatic
coffee. Over the years a lot of experience has been gathered. Below you will find some tips on
how to achieve a perfect cup of coffee for the lifetime or your percolator.
• Both filter coffee and percolator coffee may be used. Be aware that a little more coffee is
required when using percolator ground coffee.
• Rinse the coffee basket with cold water before brewing to prevent coffee grounds from
falling into the urn.
• Do not put too much coffee into the basket. Always leave at least a 1 cm space
from the top.
• Do not use warm water when brewing as this can result in weak coffee.
• Using finer ground coffee increases the likelihood of coffee residue, so a coarser ground
coffee is recommended.
• Let the coffee rest in the percolator a couple of minutes before serving to allow any residue
to settle at the bottom of the urn for a cleaner cup of coffee.
• Follow the care and cleaning instructions.
ENGLISH
Possible reasons for weak coffee
• The percolator is still warm from a previous brewing or cleaning. Let the percolator cool for
a few minutes before the next brew.
• The coffee has found its way into the pump stem and/or the washer has been trapped.
Clean the pump stem thoroughly and make sure the washer moves freely.
• An inadequate amount of water has been added to the percolator.
• The pump stem spring is too high up. Press the spring together lightly using your hands.
5
Page 6

SVENSKA
Perkolator 12-koppar
Artikelnummer: 18-4141, 34-6411
Läs igenom hela bruksanvisningen före användning och spara den sedan för framtida bruk.
Vi reserverar oss för ev. text- och bildfel samt ändringar av tekniska data. Vid tekniska
problem eller andra frågor, kontakta vår kundtjänst (se adressuppgifter på baksidan).
Före användning
Innan bryggaren används första gången, rengör och skölj ur insidan av bryggaren, kaffebehållaren, kaffebehållarlock och stigrör med varmt vatten. Skölj noga och låt delarna torka.
Obs! Sänk aldrig ner bryggaren i vatten.
Bryggarens delar
Knopp
Lock
Behållarlock
Lampa
Kaffebehållare
Stigrör
6
Page 7

Så här använder du bryggaren
• Fyll bryggaren med önskad mängd kallt, fräscht vatten. (Se vattennivåröret i handtaget).
Brygg alltid minst fyra koppar för bästa resultat.
Viktigt! Nivåmarkeringen indikerar 1,6 dl/kopp.
• Sätt kaffebehållaren på stigröret. Placera dessa delar tillsammans i bryggaren. Mät upp
och häll kaffet i kaffebehållaren. Fördela kaffet jämnt. Sätt på kaffebehållarlocket.
• Kontrollera att stigrör med kaffebehållare och lock är korrekt placerat i botten genom
att vrida på det.
• Anslut nätsladden först till bryggaren och därefter till vägguttaget.
• Lampan tänds när kaffet är färdigt. Bryggarens värmeelement håller kaffet på
serveringstemperatur så länge bryggaren är ansluten till vägguttaget. Använd inte annan
nätsladd än medföljande original.
• För att avsluta bryggning eller varmhållning, kopplas nätsladden ur vägguttaget och därefter
från bryggaren.
• Om bryggaren varit urkopplad och överblivet kaffe skall värmas upp, måste först stigrör och
kaffebehållare med lock plockas ur bryggaren.
Viktigt! Se till att det finns tillräckligt med kaffe i bryggaren innan den kopplas på.
Skötsel och rengöring
• Drag alltid ur nätsladden innan rengöring.
• Sänk aldrig ner bryggaren eller nätsladden i vatten.
• Det är av stor betydelse att bryggaren rengörs ordentligt efter användning. Till och med
små mängder gammal kaffesump kan förorsaka dålig smak vid nästa bryggning.
• Var noga med att rengöra stigröret och brickan i botten på detsamma. Brickan måste
kunna röra sig fritt, för att ett bra bryggresultat skall erhållas.
• Kaffebehållaren med lock bör rengöras kontinuerligt, eftersom kaffesump kan
fastna i hålen.
• Bryggelementet (fördjupningen) och muttern på insidan botten i bryggaren bör rengöras
regelbundet. Kaffeavlagringar på dessa delar kan påverka bryggtermostaten, vilket kan
resultera i att den automatiska av- och påslagningen sker för snabbt.
• Rengör utsidan av bryggaren med en fuktad trasa. Använd ej kemiska rengöringsmedel.
SVENSKA
Säkerhetsanvisningar
• Anslut bryggaren endast till 220-230 V.
• Drag alltid ur nätsladden före rengöring och efter användning.
• Sänk aldrig ner bryggaren, nätsladd eller stickkontakt i vatten eller annan vätska.
7
Page 8

SVENSKA
• Placera ej bryggaren på heta ytor, spisplattor eller dylikt.
• Undvik att nätsladd kommer i kontakt med bryggarens varma utsida.
• Före bryggning och servering, kontrollera att bryggarens lock är rätt placerat.
• Tag ej bort bryggarens lock under pågående bryggning.
• Använd ej bryggaren utomhus.
• Om bryggaren skadats eller är i behov av service, kontakta auktoriserad servicefirma
då specialkompetens erfordras.
• Tänk på att perkolatorn blir het under användning. Rör den bara på handtagen för att
undvika brännskador.
Brygg- och kokningstips
Perkolatorbryggning är en gammal och väl beprövad metod. Ett aromrikt och varmt kaffe erhålles. Under åren har mycket erfarenhet samlats, nedan finner du tips som ger ett gott och varmt
kaffe för lång tid framöver.
• Det går alldeles utmärkt med både brygg eller kokmalet kaffe. Observera dock att kokmalet
kaffe är något mera odrygt.
• Skölj kaffebehållaren med kallt vatten före bryggning för att förhindra att kaffesump faller
ner i bryggaren.
• Överdosera inte kaffebehållaren, lämna alltid minst 1 cm kvar till överkanten.
• Använd ej varmt vatten vid bryggning, då detta kan resultera i svagt kaffe.
• Det kan uppstå sump om finmalet kaffe används, varför ett mer grovmalet kaffe
då rekommenderas.
• Låt gärna nybryggt kaffe stå kvar i bryggaren någon minut, så att eventuell sump
hamnar i botten på bryggaren och inte i koppen.
• Följ skötsel- och rengöringsanvisningarna.
Vad är fel om kaffet blir svagt, men vattnet fortfarande hett?
• Bryggaren kan fortvarande vara varm från tidigare bryggning eller rengöring.
Låt bryggaren svalna några minuter före nästa bryggning.
• Kaffe har hamnat i stigröret och / eller brickan i botten på stigröret har fastnat.
Rengör stigröret ordentligt och se till att brickan är rörlig.
• För liten mängd vatten har fyllts i bryggaren.
• Fjädern på stigröret är för högt upp. Pressa samma fjädern med lätt handkraft.
8
Page 9

Perkolatortrakter 12-kopper
Artikkelnummer: 18-4141, 34-6411
Les nøye igjennom hele bruksanvisningen og ta vare på den til senere bruk. Vi reserverer oss
mot ev. tekst- og bildefeil, samt forandringer av tekniske data. Ved tekniske problemer eller
andre spørsmål, ta kontakt med vårt kundesenter (se opplysninger på baksiden).
Før bruk
Før trakteren brukes første gang, rengjør og skyll ut av trakteren, kaffebeholderen,
kaffebeholderlokk og stigrør med varmt vann. Skyll godt og la delene tørke.
Obs! Senk aldri trakteren ned i vann.
Trakterens deler
Knott
Lokk
Beholderlokk
NORSK
Lampe
Kaffebeholder
Stigrør
9
Page 10

Slik bruker du trakteren
• Fyll trakteren med ønsket mengde kaldt, friskt vann. (Se vannivå i håndtaket).
For best resultat. Trakt alltid minst to kopper.
Viktig! Nivåmerkingen indikerer 1,6 dl/kopp.
• Sett kaffebeholderen på stigrøret. Plasser disse delene sammen i trakteren. Mål opp og
hold kaffen i kaffebeholderen. Fordel kaffen jevnt. Sett på kaffebeholderlokket.
• Kontroller at stigrør med kaffebeholder og lokk er korrekt plassert i bunnen ved
å vri på det.
• Koble strømledningen først til trakteren og deretter til vegguttaket.
• Lampen tennes når kaffen er ferdig. Trakterens varmeelement holder kaffen på
serveringstemperatur så lenge trakteren er tilsluttet til vegguttaket. Bruk ingen annen
NORSK
strømledning enn den originale, som medfølger.
• For å avslutte trakting eller varmeholding, kobles strømledningen fra vegguttaket og deretter
ut fra trakteren.
• Dersom trakteren har vært frakoblet, og kaffe som har blitt til overs skal varmes opp,
må først stigrør og kaffebeholder med lokk tas ut av trakteren.
Viktig! Påse at det er tilstrekkelig med kaffe i trakteren før den kobles på.
Vedlikehold
• Trekk alltid ut strømledningen før rengjøring
• Senk aldri ned trakteren eller strømledningen i vann.
• Det er svært viktig at trakteren blir ordentlig rengjort etter bruk. Til og med små mengder
gammel kaffegrut kan forårsake dårlig smak ved neste trakting.
• Vær nøye med å rengjøre stigrøret, og endedelen i bunnen av det. Endedelen må kunne
bevege seg fritt, for at et bra trakteresultat skal opprettholdes.
• Kaffebeholderen med lokk bør rengjøres kontinuerlig, fordi kaffegrut kan feste seg
i hullene.
• Trakteelementet (fordypningen) og mutteren på innsiden av bunnen i trakteren bør rengjøres
regelmessig. Kaffeavleiringer på disse delene kan påvirke traktetermostaten, hvilket kan
resultere i at den automatiske av- og påslagingen skjer for raskt.
• Rengjør utsiden av trakteren med en lett fuktet klut. Bruk ikke kjemiske rengjøringsmiddel.
Sikkerhetsanvisninger
• Trakteren må kun kobles til 220-230 V.
• Trekk alltid ut støpselet før rengjøring og etter bruk.
• Senk aldri trakteren, strømledning eller stikkontakt ned i vann eller annen væske.
• Plasser ikke trakteren på varme flater, komfyrplater etc.
10
Page 11

• Unngå at strømledningen kommer i kontakt med trakterens varme utside.
• Før trakting og servering, kontroller at trakterens lokk er riktig plassert.
• Fjern ikke trakterens lokk mens trakting pågår.
• Bruk ikke trakteren utendørs.
• Dersom trakteren er skadet eller har behov for service, kontakt utsalgsstedet da
spesialkompetanse kreves.
• Perkulatoren blir svært varm ved bruk. Berør kun håndtaket for å unngå brannskader.
Trakte og koketips
Perkolatortrakting er en gammel og velprøvd metode, som gir en aromarik og varm kaffe.
Gjennom årene er det samlet mye erfaring, og nedenfor finner du noen tips som gir god og
varm kaffe i lang tid framover.
• Det går utmerket godt å bruke både filtermalt og kokmalt kaffe. Vær obs på at kokmalt
kaffe ikke er så drøy som filtermalt.
• Skyll kaffebeholderen med kaldt vann før trakting for å forhindre at kaffegrut faller
ned i trakteren.
• Fyll ikke kaffebeholderen for full. La det være minst 1 cm igjen til kanten.
• Bruk ikke varmt vann ved trakting, da dette kan resultere i svak kaffe.
• Det kan oppstå grums hvis finmalt kaffe brukes, derfor bør en mer grovmalt
kaffe benyttes.
• La gjerne nytraktet kaffe stå i trakteren et par minutter, så eventuell grums havner
i bunnen av trakteren og ikke i koppen.
• Følg vedlikeholds-og rengjøringsanvisningene.
NORSK
Hva er feil hvis kaffen er svak, men vannet fortsatt varmt
• Trakteren kan fortsatt være varm fra tidligere trakting eller rengjøring. La trakteren avkjøles
noen minutter før neste trakting.
• Kaffe har havnet i stigrøret og/eller endedelen i bunnen på stigrøret har satt seg fast.
Rengjør stigrøret ordentlig, og påse at endelen er bevegelig.
• For lite vann er fylt på trakteren.
• Fjæren på stigrøret er for høyt opp. Press sammen fjæren med litt håndkraft.
11
Page 12

Perkolaattori 12 kuppia
Tuotenumero: 18-4141, 34-6411
Lue käyttöohjeet ennen tuotteen käyttöönottoa. Säilytä käyttöohjeet tulevaa tarvetta varten.
Pidätämme oikeuden teknisten tietojen muutoksiin. Emme vastaa mahdollisista teksti- tai kuvavirheistä. Jos laitteeseen tulee teknisiä ongelmia, ota yhteys myymälään tai asiakaspalveluun
(yhteystiedot käyttöohjeen lopussa).
Ennen käyttöä
Puhdista keittimen sisäosa, kahvisäiliö, kahvisäiliön kansi ja nousuputki lämpimällä vedellä.
Huuhtele huolella ja anna osien kuivua.
Huom! Älä upota keitintä veteen.
Keittimen osat
SUOMI
Nuppi
Kansi
Säiliön kansi
Kahvisäiliö
Lamppu
Nousuputki
12
Page 13

Näin keität kahvia
• Kaada keittimeen haluttu määrä kylmää ja raikasta vettä. (Katso kahvan vesimääräputkea).
Paras tulos saadaan kun keitetään vähintään neljä kupillista kahvia.
Tärkeää! Tasomerkintä vastaa 1,6 dl:n kuppia.
• Aseta kahvisäiliö nousuputkeen. Aseta nämä osat keittimeen. Laita haluttu määrä kahvia
säiliöön. Levitä kahvi tasaisesti. Aseta kahvisäiliön kansi paikalleen
• Varmista kiertämällä, että kahvisäiliö, nousuputki ja kansi ovat kunnolla paikallaan.
• Liitä virtajohto ensin keittimeen ja sitten pistorasiaan.
• Lamppu syttyy kun kahvi on valmista. Keittimen lämpövastus pitää kahvin oikean
lämpöisenä niin pitkään, kun keitin on liitettynä pistorasiaan. Käytä ainoastaan mukana
tulevaa virtajohtoa.
• Lopeta kahvin keittäminen ja lämpimänä pito irrottamalla virtajohto ensin pistorasiasta
ja sitten keittimestä.
• Mikäli keitin on ollut poissa päältä ja jäljelle jäänyt kahvi halutaan lämmittää uudelleen, tuleen
ensin nousuputki ja sitten kahvisäiliö kansineen poistaa keittimestä.
Tärkeää! Varmista, että keittimessä on riittävästi kahvia, ennen kun laitat keittimen päälle.
Hoito ja puhdistus
• Irrota aina pistoke verkkovirrasta ennen puhdistusta.
• Älä upota keitintä tai virtajohtoa veteen.
• Keitin tulee puhdistaa huolellisesti käytön jälkeen. Myös pienet määrät jäljelle jäänyttä kahvia
saattavat aiheuttaa huonon makuista kahvia seuraavalla keittokerralla.
• Puhdista samalla myös nousuputki ja pohjan levy. Levyn tulee voida liikkua vapaasti, jotta
saavutetaan paras tulos.
• Kahvisäiliö ja kansi tulee puhdistaa säännöllisesti, jotta kahvinpurut eivät juutu reikään.
• Keitinvastus (syvennys) ja keittimen sisäpuolen mutteri tulee puhdistaa säännöllisesti.
Mikäli nämä osat ovat likaiset, automaattinen käynnistys ja sammutus saattavat tapahtua
liian nopeasti.
• Puhdista keitin ulkopuolelta kostutetulla liinalla. Älä käytä kemiallisia puhdistusaineita.
Turvallisuusohjeet
• Liitä vain 220-230 V -pistorasiaan.
• Irrota virtajohto ennen puhdistusta ja käytön jälkeen.
• Älä upota keitintä, virtajohtoa tai pistokkeita veteen tai muuhun nesteeseen.
• Älä aseta keitintä kuumalle alustalle, kuten liedelle.
• Varo, ettei virtajohto ole kosketuksessa keittimen kuumaan ulkopintaan.
SUOMI
13
Page 14

• Varmista ennen keittämistä ja kahvin tarjoilua, että keittimen kansi on kunnolla paikoillaan.
• Älä irrota keittimen kantta keittämisen aikana.
• Älä käytä keitintä ulkotiloissa.
• Mikäli keitin vaatii huoltoa, jätä keitin valtuutetulle huoltoliikkeelle.
• Ota huomioon, että perkolaattori kuumenee käytön aikana. Vältä palovammat koskettamalla
vain kahvaa.
Vinkkejä kahvin keittämiseen
Perkolaattorilla keittäminen on vanha ja hyväksi havaittu kahvinkeittomenetelmä. Perkolaattorilla
saadaan aromikasta ja oikean lämpöistä kahvia. Alla olevien vihjeiden avulla saat keittimellä
hyvän makuista kahvia vuosiksi eteenpäin.
• Keittimessä voidaan käyttää suodatin- ja pannujauhatusta. Ota huomioon, että
pannujauhatuskahvia kuluu hieman enemmän.
• Huuhtele kahvisäiliö kylmällä vedellä ennen keittämistä estääksesi kahvinpurujen
tippumisen keittimeen.
• Älä yliannostele, jätä ainakin 1 cm yläreunaan.
SUOMI
• Älä käytä kuumaa vettä kahvin keittämiseen. Kuumalla vedellä keitettäessä kahvista
tulee liian laihaa.
• Erittäin hienojakoista suodatinkahvia keitettäessä saattaa kertyä sakkaa, tämän vuoksi
suosittelemme hieman karkeampaa kahvilaatua.
• Anna kahvin seistä keittimessä muutaman minuutin ajan keittämisen jälkeen. Näin
mahdolliset purut ehtivät laskeutua keittimen pohjalle, eivätkä ne joudu kuppiin.
• Noudata huolto- ja puhdistusohjeita.
Mikä on vikana, kun kahvi on laihaa, mutta kuumaa?
• Keitin saattaa olla kuuma edellisen keittokerran tai puhdistamisen jälkeen.
Anna keittimen jäähtyä muutaman minuutin ajan ennen seuraavaa käyttökertaa.
• Kahvia on joutunut nousuputkeen tai pohjan levy on juuttunut. Puhdista nousuputki
huolellisesti ja varmista että levy liikkuu vapaasti.
• Keittimessä on liian vähän vettä.
• Nousuputken jousi on liian korkealla. Purista jousta kevyesti kädellä.
14
Page 15

15
Page 16

SVERIGE
KUNDTJÄNST Tel: 0247/445 00
Fax: 0247/445 09
E-post: kundtjanst@clasohlson.se
INTERNET www.clasohlson.se
BREV Clas Ohlson AB, 793 85 INSJÖN
NORGE
KUNDESENTER Tlf.: 23 21 40 00
Faks: 23 21 40 80
E-post: kundesenter@clasohlson.no
INTERNETT www.clasohlson.no
POST Clas Ohlson AS, Postboks 485 Sentrum, 0105 OSLO
SUOMI
ASIAKASPALVELU Puh: 020 111 2222
Sähköposti: info@clasohlson.fi
INTERNET www.clasohlson.fi
OSOITE Clas Ohlson Oy, Annankatu 34–36 A, 00100 HELSINKI
GREAT BRITAIN
For consumer contact, please visit
www.clasohlson.co.uk and click on
customer service.
INTERNET www.clasohlson.co.uk
 Loading...