

Page 1
Deep Fat Fryer
Fritös • Frityrkoker • Friteerauskeitin
Art. No: Model. No:
18-4014 153801-UK
34-7247 153801
English 3
Svenska 10
Norsk 17
Suomi 24
Ver. 200801
Page 2

Page 3

Deep Fat Fryer 3 litre
Art.no: 18-4014 Model: 153801-UK
34-7247 153801
Please read the entire instruction manual before using and save it for future use. We apologise for
any text or photo errors and any changes of technical data. If you have any questions concerning
technical problems please contact our Customer Service Department (see address on reverse.)
Contents
Safety 4
Buttons and functions 5
Getting started 6
Use 7
Care and maintenance 8
Disposal 9
Specications 9
ENGLISH
3
Page 4

4
ENGLISH
Safety
• Never leave the fryer unattended while in use.
• Never attempt to extinguish burning oil with water. Pull out the plug cable and smother the re
with a re blanket.
• Check that the correct voltage is used for the fryer. See the fryer’s product plate.
• Only use fryer in an earthed wall socket.
• Always remove the fryer from the mains before cleaning when it is not in use.
• To avoid electric shock, protect the fryer and its connection lead from damp and wet.
• Never place the fryer in water or other uid.
• Never place the electric cable on hot surfaces or sharp edges.
• Do not pull out the plug by pulling the electrical cable.
• High temperatures are generated when fryer is in use, be careful not to touch any part with
your hands. Never touch other surfaces with fryer’s handle.
• Check the electrical cable regularly. If it is damaged it should be changed by a qualied service
technician.
• Never allow children to use the appliance without adult supervision.
• Make sure the appliance’s parts are correctly assembled before use.
• Never use the appliance near sources of heat, e.g. on an oven hob.
• The appliance may only be used indoors.
• Be careful when moving fryer containing hot oil.
• Never overload the fryer’s basket.
• Never use the fryer without oil in it! If this should occur the fryer will overheat and automatically
switch off. To use the fryer again, the thermostat must be reset.
1. Disconnect from mains and let it cool down.
2. Take out the control unit and heating element from the fryer.
3. Lightly press the reset button on the back of the thermostat with a small screwdriver.
4. Assemble the parts and follow instructions for use.
• Always use accompanying attachments, never anything else.
• Never use the appliance for anything other than that it was designed for.
Page 5
Buttons and functions
ENGLISH
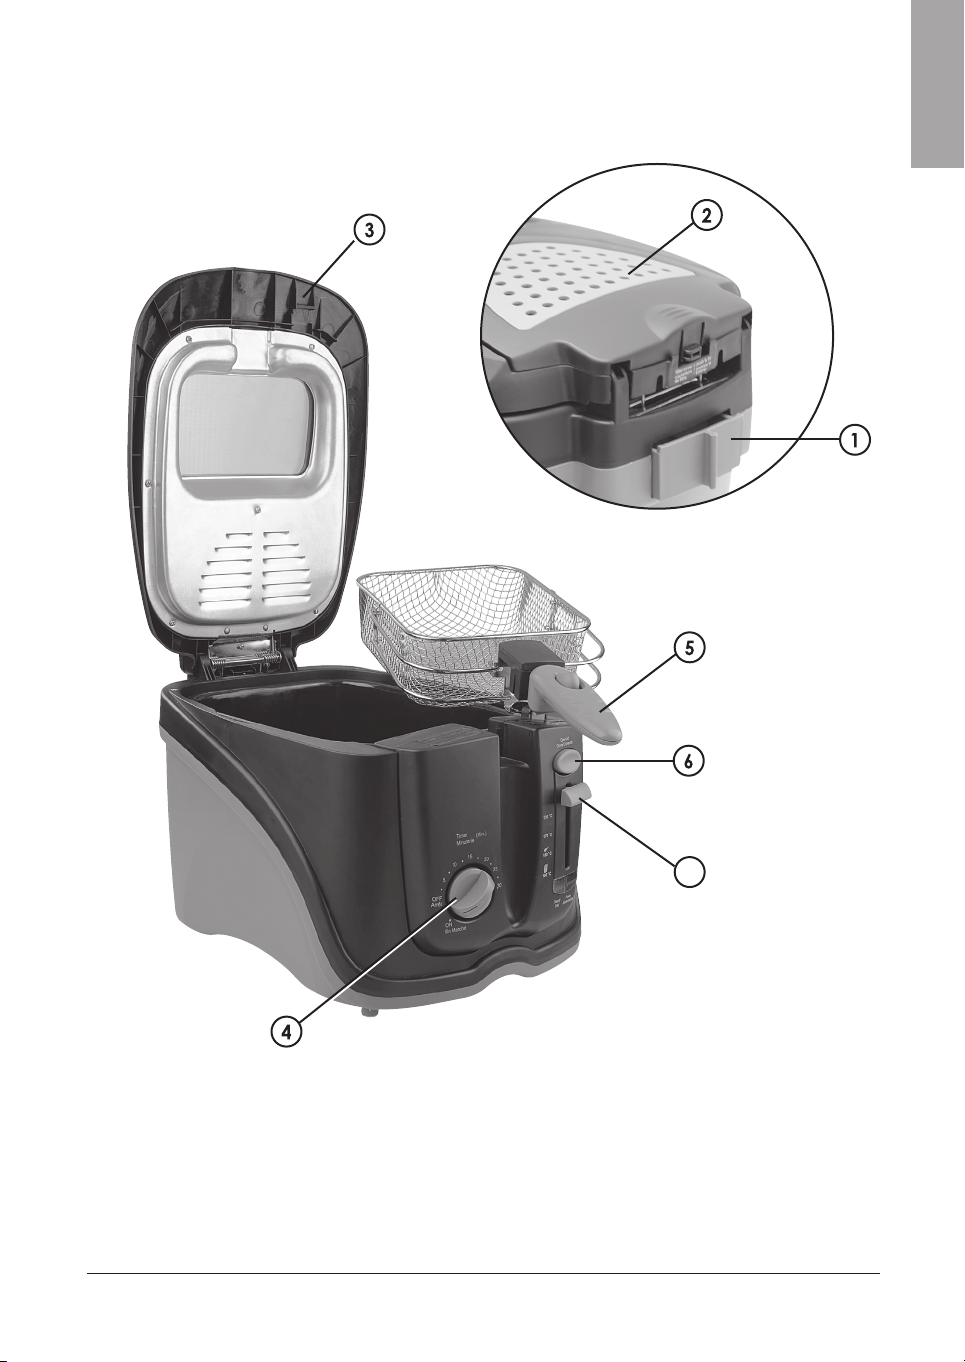
1. Condensation collector
2. Filter holder with lter
3. Lid
4. Timer
7
5. Handle
6. Button for opening
7. Temperature gauge
5
Page 6
6
ENGLISH
Getting started
1. Wash the frying basket and holder
before rst using.
2. Lift the frying basket out of the holder
and then take out the heating element
by carefully lifting the control unit and
heating element upwards. Then lift up
the fryer holder straight up out of the
fryer. Wash both the frying basket and
holder in warm water.
3. The heating element can be rinsed in
water. The control unit should never
be dipped or rinsed in water. Clean
only with kitchen paper or a damp
cloth.
Attention! The heating element and
control unit may not be placed in a
dishwasher!
4. Put the holder back and mount the
heating element and control unit.
Line up the control unit and push it
downwards. Make sure the contact is
correctly connected to the fryer.
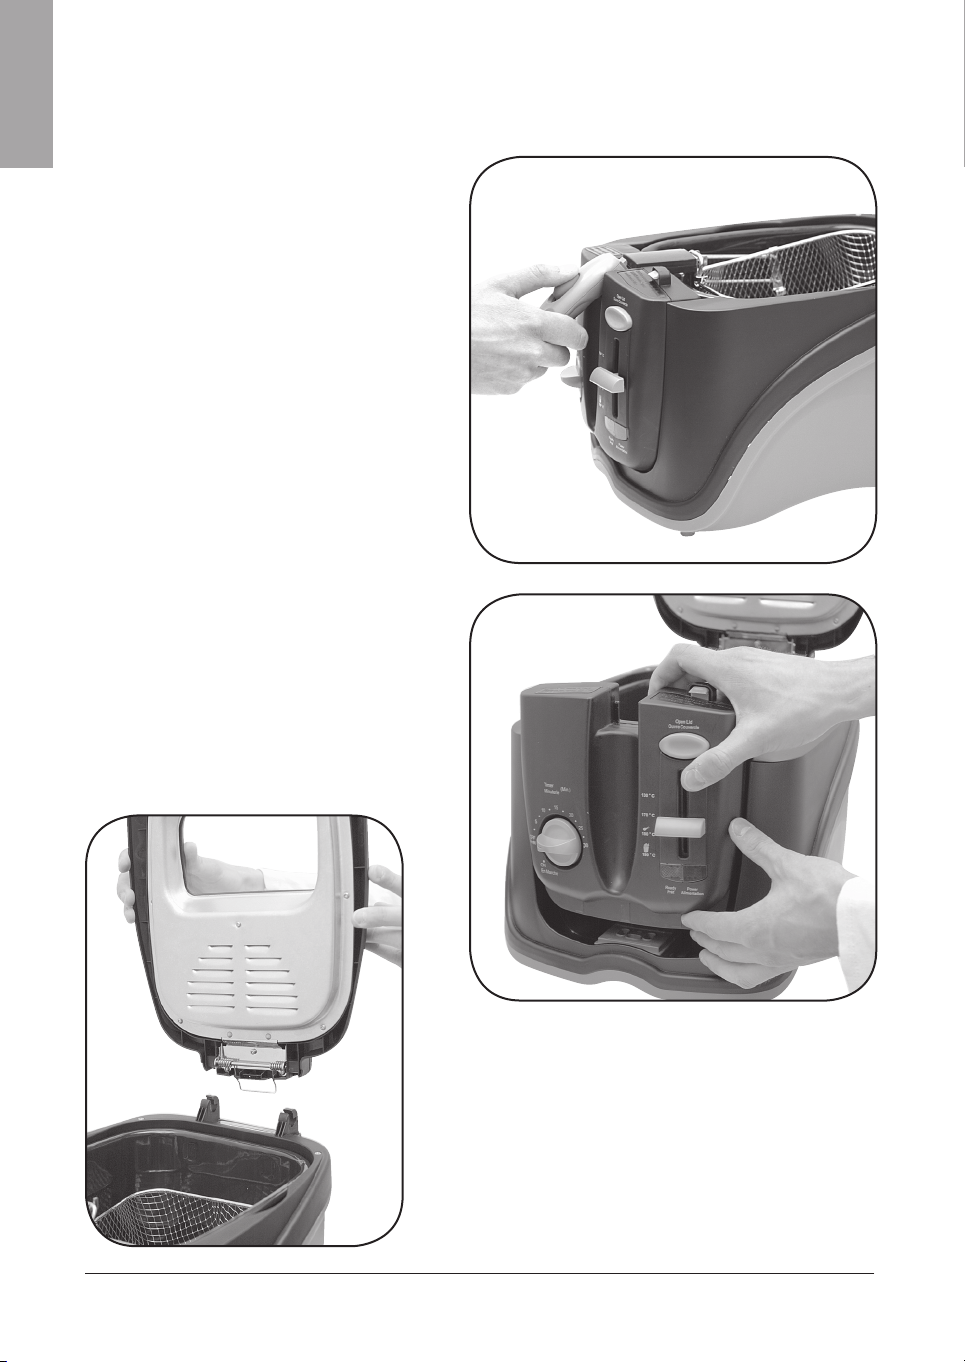
5. Mount the lid on the holder’s hinge
by holding the lid downwards and
carefully pressing the lid down in
the hinge. Check that the lid can be
closed properly.
6. Montera locket på behållarens gångjärn
genom att hålla locket lodrätt och försiktigt
trycka locket nedåt i gångjärnet. Kontrollera
att locket går att stänga ordentligt.
Page 7
Use
MAX
MIN
1. Lift the frying basket from the fryer.
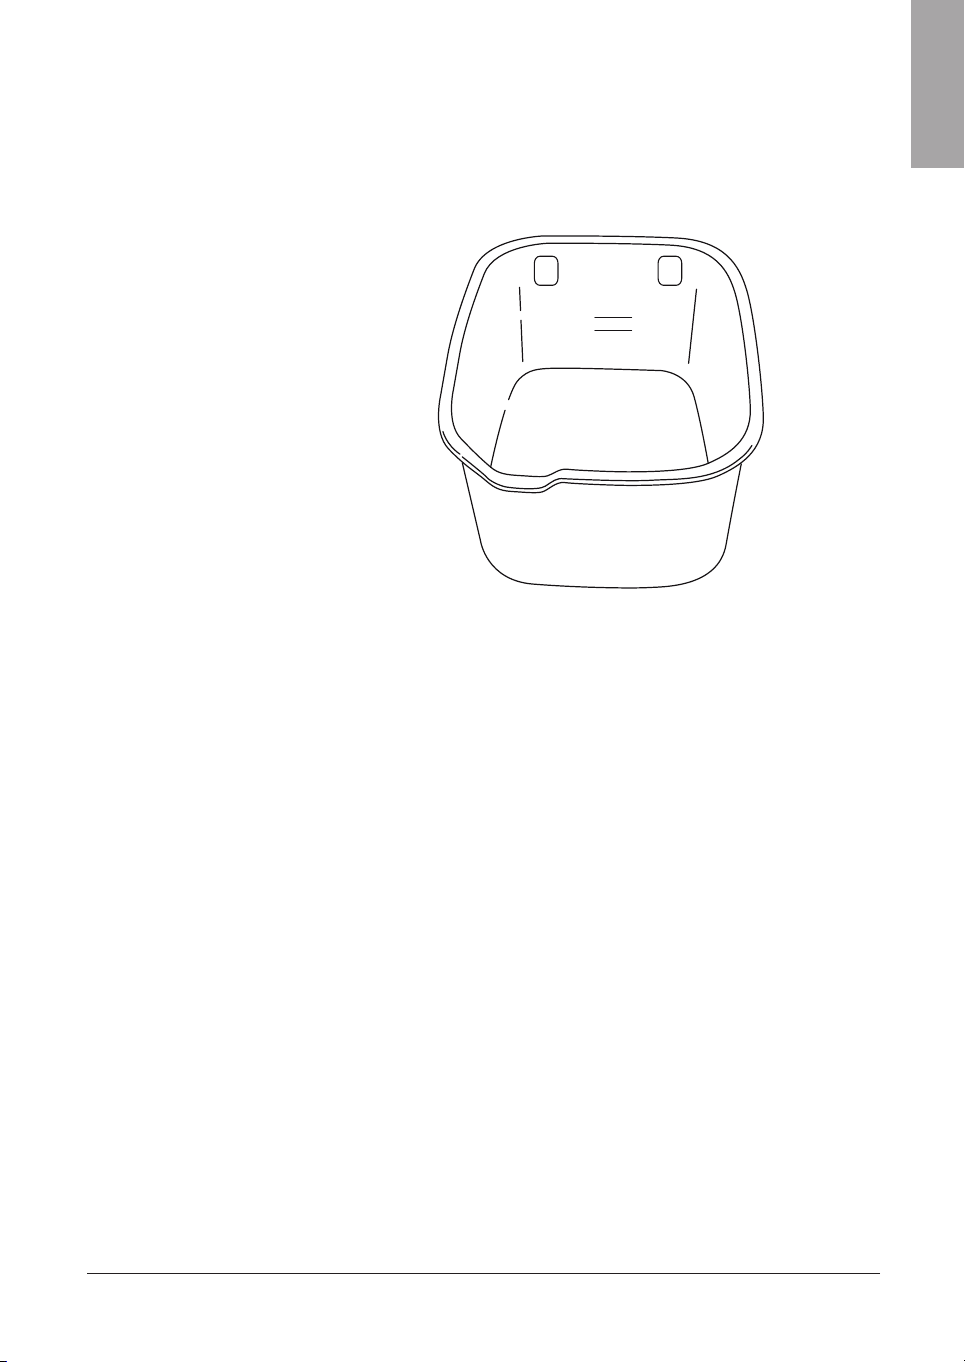
2. Fill the holder with oil recommended for frying.
Attention!
It is important that the amount
of frying oil is lled up so that
it is between the minimum
and maximum markers on
the inside of the holder. Never
overll the holder.
ENGLISH
3. Make sure rst that the fryer is switched off (setting ”OFF”) and afterwards connect the electrical
cable to an earthed socket.
4. Set the thermostat to desired temperature and close the lid by pressing the right hand front
edge. Then set the dial to ”ON” to begin heating up of the oil. The red indicator light (”Power”)
lights up.
5. When the oil has reached the correct temperature, the green indicator light appears (”Ready”).
Press ”Open Lid” to open the lid.
6. Put the frying basket on the holder and fold out handle to raise the frying basket from the oil.
Lift the handle until you hear a clicking sound.
7. Fill the frying basket with the food you intend to fry (do not overll the basket) and close the lid.
Then lower the frying basket down into the frying oil by moving the locking button towards you at
the same time as you carefully fold away the handle.
8. Set the desired frying time with the dial to begin frying. Never lift the lid when frying, check the
food through the window on the lid instead.
9. When the set time has run its course a little ”ping sound” is heard and the fryer switches off.
10. Raise the frying basket from the frying oil and allow the oil to run off for 20 seconds before you
open the lid and lift out of the frying basket to remove the fried food.
11. Adjust the oil level in relation to the amount that should be fried before you use the fryer again.
12. Make sure the fryer is switched off after use.
7
Page 8
8
ENGLISH
Time approx.
Food Temperature
Shredded chicken 190 ° C 5-8
Chicken pieces 180 ° C 15-20
Fish 170 ° C 8-10
Chips 190 ° C 3-5
Onion rings 190 ° C 3-5
Shrimps 190 ° C 2-4
(minutes)
Care and maintenance
1. Pull out the plug and make sure that the oil has cooled down (1-2 hours after use) before
cleaning.
2. Lift the frying basket out of the holder and then take out the control panel with the heating
element by lifting it straight up.
3. Remove the condensation collector from the back of the fryer by pulling it straight out. The
condensation collector gathers excess condensation which occurs when the lid is opened while
in use. Always empty the condensation collector [2] after every use.
4. Wash the frying basket and holder in warm water.
5. The heating element can be rinsed in water. The control unit should never be dipped or rinsed in
water. Clean only with kitchen paper or a damp cloth.
Attention! The heating element and control unit may not be placed in a dishwasher!
6. The outside of the fryer can only be cleaned with a lightly damp cloth.
7. The oil can be fried and reused, but should be changed after 8-10 uses. Never pour the oil down
the drain or in the open. Bring used frying oil to a recycling station.
8. Make sure the fryer and its parts are completely dry before you use it again.
Attention! Never place the fryer in water or other uid.
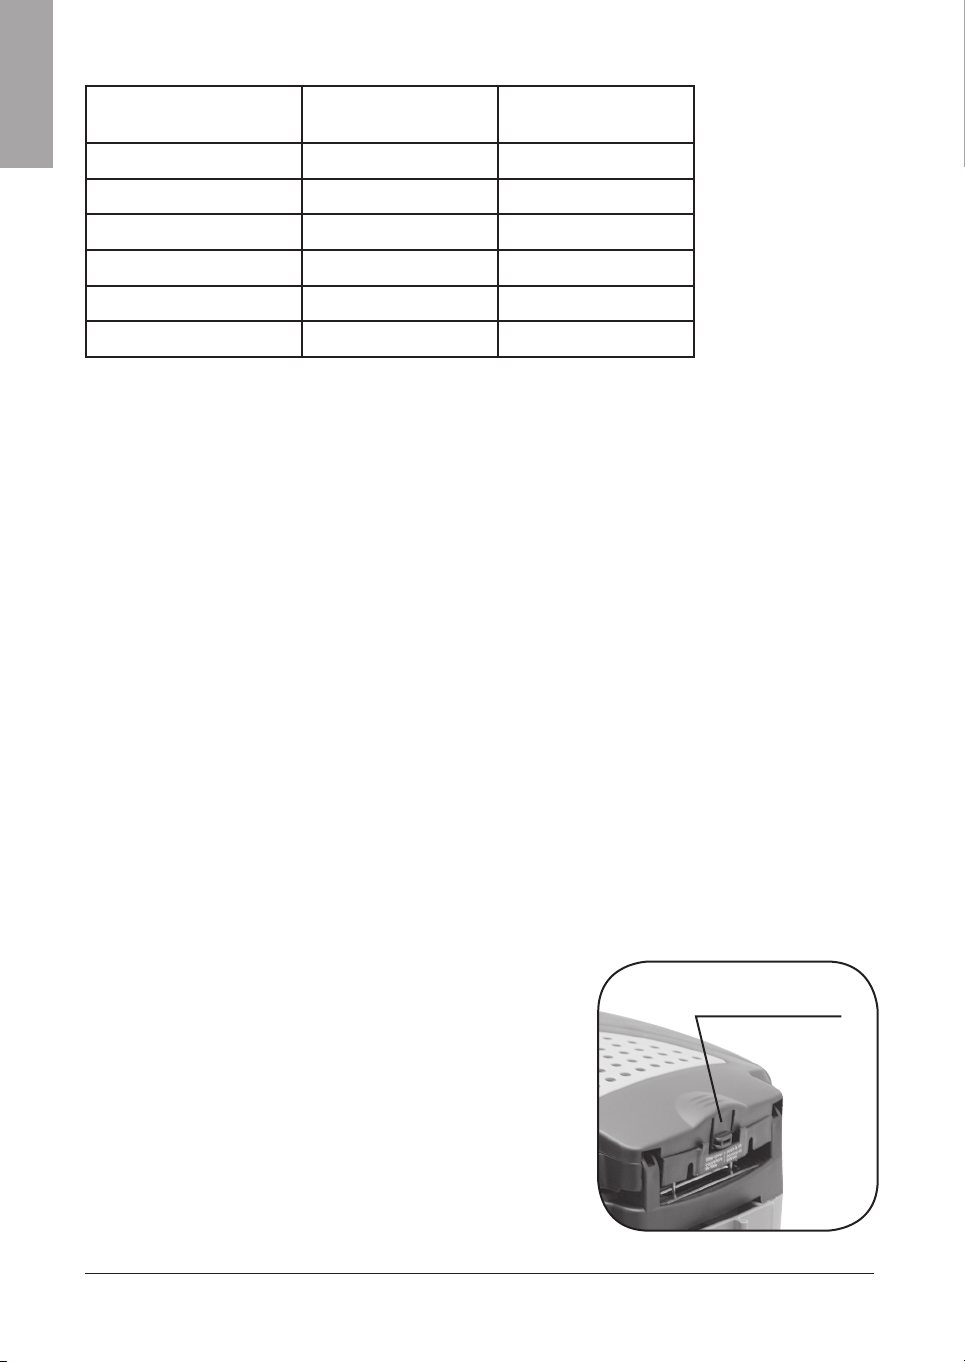
Cleaning the filter
1. Open the lter holder on the fryer’s lid by pressing the
open button [1] the same time as you lift it to the rear.
Then pull the holder straight back.
2. Remove the wihte lter from the lter holder and clean
it with warm soapy water. Let it air dry after.
3. Clean the inside of the lter holder with a lightly damp
cloth and then dry.
4. Place the lter in the lter holder with the black carbon
lter placed farthest in and the white lter farthest out
(down against the holder).
5. Put the lter holder back on the lid.
Release button
Page 9

Filtering the oil
1. Lift out the frying basket and heating element from the holder and empty the cooled
oil into a can or other suitable container.
2. Filter the oil though a coffee lter, for example.
Disposal
• When disposing of the product it should be done in accordance with local rules and
regulations. If you are unsure as to how to proceed please contact your local council.
• Used frying oil should be taken to a recycling station. Never pour the frying oil down the drain
or in the open.
Specifications
Voltage 220-240 V AC, 50 Hz
Effect 1700 W
ENGLISH
9
Page 10

10
SVENSKA
Fritös 3 liter
Art.no: 18-4014 Model: 153801-UK
34-7247 153801
Läs igenom hela bruksanvisningen före användning och spara den sedan för framtida bruk. Vi
reserverar oss för ev. text- och bildfel samt ändringar av tekniska data. Vid tekniska problem eller
andra frågor, kontakta vår kundtjänst (se adressuppgifter på baksidan).
Innehållsförteckning
Säkerhet 11
Knappar och funktioner 12
Att komma igång 13
Användning 14
Skötsel och underhåll 15
Avfallshantering 16
Specikationer 16
Page 11

Säkerhet
• Lämna aldrig fritösen utan tillsyn när den används.
• Försök aldrig släcka antänd olja med vatten. Dra ur nätsladden och kväv elden med en
brandlt.
• Kontrollera att rätt nätspänning används mot vad apparaten är avsedd för. Se apparatens
typskylt.
• Använd endast apparaten i ett jordat vägguttag.
• Koppla alltid ifrån apparaten från elnätet före rengöring eller när den inte används.
• För att undvika elektrisk stöt, skydda apparaten och dess anslutningssladd från fukt och väta.
• Sänk aldrig ned fritösen i vatten eller andra vätskor.
• Placera aldrig nätsladden över heta ytor eller över skarpa kanter och hörn.
• Dra ej ur kontakten genom att dra i nätsladden.
• Vid användning uppnås höga temperaturer, var noga med att inte röra de heta delarna med
händerna. Rör aldrig andra ytor än apparatens handtag.
• Nätsladden bör regelbundet kontrolleras. Använd aldrig apparaten om dess nätsladd eller
nätkontakt är skadad. Nätsladden får endast bytas ut av försäljningsstället eller kvalicerad
yrkesman.
• Låt aldrig barn använda apparaten utan vuxens tillsyn.
• Se till att apparatens delar är korrekt monterade före användning.
• Använd aldrig apparaten i närheten av värmekällor, t.ex. på spisen.
• Apparaten är endast för användning inomhus.
• Iakttag varsamhet vid ytt av fritös innehållande het olja.
• Överfyll aldrig frityrkorgen.
• Använd aldrig apparaten utan olja i behållaren! Skulle detta ske kommer värmeelementet att
bli överhettat och fritösen automatiskt stängas av. För att återigen använda apparaten måste
termostaten återställas.
1. Frånkoppla apparaten från elnätet och låt den svalna.
2. Ta ur kontrollenhet och värmeelement från fritösen.
3. Tryck sedan lätt med t.ex. en smal skruvmejsel på resetknappen på termostatens
baksida.
4. Montera ihop delarna och följ instruktionerna för användning.
• Använd aldrig andra än medföljande tillbehör.
• Använd aldrig apparaten till annat än den är avsedd för.
SVENSKA
11
Page 12

12
SVENSKA
Knappar och funktioner
1. Kondensbehållare
2. Filterhållare med lter
3. Lock
4. Tidsinställning
7
5. Handtag
6. Öppningsknapp
7. Temperaturreglage
Page 13

Att komma igång
1. Diska frityrkorgen och behållaren före
första användning.
2. Lyft frityrkorgen ur behållaren och
ta sedan ur värmelementet genom
att försiktigt lyfta kontrollenhet och
värmelement uppåt. Lyft sedan upp
frityrbehållaren rakt upp från fritösen.
3. Diska både frityrkorg och behållare i
varmt vatten.
4. Värmeelementet kan sköljas i vatten.
Kontrollenheten får dock aldrig
doppas eller sköljas i vatten. Torka
endast av med hushållspapper eller
lätt fuktad trasa.
Obs! Värmeelement och kontrollenhet
får ej diskas
i diskmaskin!
5. Sätt tillbaka behållaren och montera
värmelementet och kontrollenheten.
Skjut kontrollenheten rakt nedåt och
se till att kontaktstycket anslutits
korrekt mot fritösen.
SVENSKA
6. Montera locket på behållarens gångjärn genom
att hålla locket lodrätt och försiktigt trycka
locket nedåt i gångjärnet. Kontrollera att locket
går att stänga ordentligt.
13
Page 14

14
SVENSKA
Användning
MAX
MIN
1. Lyft upp frityrkorgen från fritösen.
2. Fyll behållaren med olja rekommenderad för fritering.
Obs!
Det är viktigt att mängden
frityrolja fylls på så att den
är mellan markeringarna min
och max i behållarens insida.
Överfyll aldrig behållaren.
3. Se först till att fritösen är avstängd (läge ”OFF”) och anslut därefter nätsladden till ett jordat
vägguttag.
4. Ställ in termostaten för önskad temperatur och stäng sedan locket genom att trycka i höger
framkant. Sätt sedan vredet i läge ”ON” för att starta uppvärmningen av frityroljan. Den röda
indikatorlampan (”Power”) tänds.
5. När oljan har nått rätt temperatur tänds den gröna indikatorlampan (”Ready”). Tryck på ”Open
Lid” för att öppna locket.
6. Placera frityrkorgen på behållaren och fäll upp handtaget för att höja frityrkorgen från frityroljan.
Lyft handtaget till dess ett klickljud hörs.
7. Fyll frityrkorgen med den mat som ska friteras (överfyll inte korgen) och stäng locket. Sänk
sedan ned frityrkorgen i frityroljan genom att föra låsknappen mot dig samtidigt som du
försiktigt fäller ned handtaget.
8. Ställ in önskad frityrtid med vredet för att påbörja friteringen. Lyft aldrig på locket när friteringen
pågår, kontrollera istället genom fönstret i locket.
9. När den inställda tiden har gått hörs ett ”plingljud” och fritösen stängs av.
10. Höj frityrkorgen från frityroljan och låt oljan rinna av ca 20 sekunder innan du öppnar locket och
lyfter ur frityrkorgen för att ta ur den friterade maten.
11. Justera oljenivån i förhållande till den mängd som ska friteras innan du använder fritösen en
andra gång.
12. Se till att fritösen är avstängd efter avslutad användning.
Page 15

Mat Temperatur Tid ca (minuter)
Strimlad kyckling 190 ° C 5-8
Kycklingdelar 180 ° C 15-20
Fisk 170 ° C 8-10
Pommes frites 190 ° C 3-5
Lökringar 190 ° C 3-5
Räkor 190 ° C 2-4
Skötsel och underhåll
1. Dra ur nätsladden och se till att oljan har svalnat (1-2 timmar efter användning) före
rengöringen.
2. Lyft frityrkorgen ur behållaren och ta sedan upp kontrollpanelen med värmelementet
genom att lyfta det rakt upp.
3. Ta bort kondensbehållaren från fritösens baksida genom att dra den rakt utåt.
Kondensbehållaren samlar upp kondensvattnet som uppstår när locket öppnas vid
användning. Töm alltid kondensbehållaren [ 1 ] efter varje användning.
4. Diska frityrkorg och behållare i varmt vatten.
5. Värmeelementet kan sköljas i vatten. Kontrollenheten får dock aldrig doppas eller sköljas
i vatten. Torka endast av med hushållspapper eller lätt fuktad trasa.
Obs! Värmeelement och kontrollenhet får ej diskas i diskmaskin!
6. Utsidan av fritösen kan torkas med en lätt fuktad trasa.
7. Oljan kan ltreras och återanvändas, men bör bytas ut efter 8-10 gånger. Häll aldrig oljan
i avloppet eller i naturen. Lämna din använda frityrolja vid din återvinningsstation.
8. Se till att fritösen och dess delar är helt torr innan du använder den igen.
Obs! Sänk aldrig ned fritösen i vatten eller andra vätskor.
SVENSKA
Rengöring av filter
1. Öppna lterhållaren på fritösens lock genom att trycka
in öppningsknappen (se bilden) samtidigt som du lyfter
det i bakkant. Dra sedan hållaren rakt bakåt.
2. Avlägsna det vita ltret från lterhållaren och rengör
det med varmt såpvatten. Låt sedan lufttorka.
3. Rengör insidan av lterhållaren med en lätt fuktad
svamp och torka sedan torrt.
4. Placera ltren i lterhållaren med det svarta kolltret
placerat innerst och det vita ltret ytterst (ner mot
behållaren).
5. Sätt tillbaka lterhållaren på locket.
15
Öppningsknapp
Page 16

Filtrering av oljan
1. Lyft bort frityrkorg och värmelement från behållaren och töm den avsvalnade oljan i en dunk
eller annan lämplig behållare.
2. Filtrera oljan genom t.ex. ett kaffelter.
Avfallshantering
• När du ska göra dig av med produkten ska detta ske enligt lokala föreskrifter.
SVENSKA
Är du osäker på hur du ska gå tillväga, kontakta din kommun.
• Använd frityrolja ska lämnas till din återvinningsstation.
Töm aldrig frityroljan i avloppen eller i naturen.
Specifikationer
Nätspänning 220-240 V AC, 50 Hz
Effekt 2000 W
16
Page 17

Frityrkoker 3 liter
Art.no: 18-4014 Model: 153801-UK
34-7247 153801
Les nøye igjennom hele bruksanvisningen og ta vare på den til senere bruk. Vi reserverer oss
mot ev. tekst- og bildefeil, samt forandringer av tekniske data. Ved tekniske problemer eller andre
spørsmål, ta kontakt med vårt kundesenter (se opplysninger på baksiden).
Innholdsfortegnelse
Sikkerhet 18
Knapper og funksjoner 19
Kom i gang 20
Bruk 21
Vedlikehold 22
Avfallshåndtering 23
Spesikasjoner 23
NORSK
17
Page 18

18
NORSK
Sikkerhet
• Forlat aldri frityrkokeren uten tilsyn når den er i bruk.
• Prøv ikke å slokke olje med vann. Dersom brann oppstår, trekk ut stikkontakten og kvel ilden
med et brannteppe.
• Kontroller at du bruker den spenningen apparatet er beregnet for. Se apparatets typeskilt.
• Bruk bare apparatet i jordet kontakt.
• Koble alltid apparatet fra strømnettet før rengjøring eller når det ikke er i bruk.
• For å unngå elektrisk støt, må strømledningen og apparatet holdes unna fuktighet og vann.
• Senk aldri apparatet ned i vann eller annen væske.
• Plasser aldri strømledningen på varme ater eller over skarpe kanter eller hjørner.
• Dra aldri ut stikkontakten ved å dra i strømledningen.
• Ved bruk oppnås høye temperaturer. Vær nøye med å ikke røre de varme delene med hendene.
Berør aldri andre ater enn apparatets håndtak.
• Strømledningen bør kontrolleres regelmessig. Bruk aldri apparatet hvis strømledningen
eller kontakten er skadet. Strømledningen må bare byttes av salgsstedet eller kvalisert
servicetekniker.
• La aldri barn bruke apparatet uten tilsyn fra voksne.
• Påse at apparatets deler er riktig montert før bruk.
• Bruk aldri apparatet i nærheten av varmekilder, f.eks. på komfyren.
• Apparatet er kun beregnet for innendørs bruk.
• Vær forsiktig hvis du ytter frityrkokeren når den inneholder varm olje.
• Frityrkurven må aldri være overfylt.
• Bruk aldri apparatet uten olje i beholderen! Skulle dette skje kommer varmeelementet til å
overopphetes og frityrkokeren stenges automatisk. For å bruke apparatet igjen må termostaten
tilbakestilles.
1. Apparatet må så kobles fra strømuttaket og avkjøles.
2. Ta termostaten og varmeelementet ut av frityrkokeren.
3. Trykk deretter lett med for eksempel en tynn skrutrekker på resetknappen på
termostatens bakside.
4. Monter sammen delene og følg instruksjonene før bruk.
• Bruk aldri annet tilbehør enn det som følger med.
• Bruk aldri apparatet til annet enn det som det er beregnet til.
Page 19

Knapper og funksjoner
NORSK
1. Kondensbeholder
2. Filterholder med lter
3. Lokk
4. Tidsinnstilling
7
5. Håndtak
6. Knapp for å åpne
7. Temperaturregulering
19
Page 20

20
NORSK
Kom i gang
1. Vask frityrkurven og beholderen før
første gangs bruk.
2. Løft frityrkurven ut av beholderen,
og ta deretter ut varmeelementet
ved å løfte kontrollenheten og
varmeelementet opp. Løft deretter
frityrbeholderen rett opp fra
frityrkokeren.
3. Vask frityrkurv og beholder i varmt
vann.
4. Varmeelementet kan skylles i vann.
Kontrollenheten må aldri dyppes i
vann eller skylles. Tørk kun av den
med et stykke husholdningspapir eller
en lett fuktet klut.
Obs! Varmeelement og kontroll-
enhet må ikke vaskes i
oppvaskmaskin!
5. Sett beholderen tilbake og monter
varmeelementet og kontrollenheten.
Skyv kontrollenheten rett ned og
påse at kontaktstykket kobles riktig til
frityrkokeren.
6. Monter lokket på beholderens gjengejern
ved å holde lokket loddrett og forsiktig trykke
lokket nedover i jernet. Kontroller at lokket kan
stenges skikkelig.
Page 21

MAX
MIN
Bruk
1. Løft frityrkurven opp fra frityrkokeren.
2. Fyll beholderen med olje anbefalt for fritering.
Obs!
Det er viktig at mengden olje som
fylles på er mellom markeringene
MIN og MAX på beholderens innside. Frityrkurven må aldri være
overfylt.
3. Frityrkokeren må være stengt (i posisjon ”OFF”). Deretter kobles stikkontakten til et jordet
vegguttak.
4. Still inn termostaten på en ønsket temperatur og steng deretter lokket ved å trykke i høyre
framkant. Sett så bryteren i posisjon ”ON” for å starte oppvarmingen av frityroljen. Den røde
indikatorlampen (”Power”) tennes.
5. Når oljen har nådd riktig temperatur tennes den grønne indikatorlampen (”Ready”). Trykk på
”Open Lid” for å åpne lokket.
6. Plasser frityrkurven i beholderen og fell opp håndtaket for å plassere kurven over oljen. Løft
håndtaket til du hører en klikkelyd.
7. Fyll frityrkurven med maten som skal friteres og steng lokket. Ikke fyll kurven for full. Senk
deretter frityrkurven ned i oljen ved å føre låseknappen mot deg samtidig som du forsiktig feller
håndtaket nedover.
8. Still inn ønsket frityrtid med bryteren for å starte friteringen. Løft aldri på lokket når friteringen
pågår. Kontroller i stedet ved å se gjennom vinduet i lokket.
9. Når den inntilte tiden er utløpt vil du høre en ”plingelyd” og frityrkokeren skrus av.
10. Hev frityrkurvet til over oljen og la oljen renne av i ca. 20 sekunder før du åpner lokket og løfter
kurven ut for å ta ut maten.
11. Juster oljenivået i forhold til den mengden som skal friteres, før du bruker frityrkokeren for
andre gang.
12. Husk å skru av frityrkokeren etter bruk.
NORSK
21
Page 22

22
NORSK
Mat Temperatur Tid ca. (minutter)
Strimlet kylling 190 °C 5-8
Kyllingbiter 180 °C 15-20
Fisk 170 °C 8-10
Pommes Frites 190 °C
Løkringer 190 °C 3-5
Reker 190 °C 2-4
3-5
Vedlikehold
1. Trekk ut strømledningen og påse at oljen er avkjølt (1-2 timer etter bruk) før rengjøring.
2. Løft frityrkurven opp fra beholderen og ta deretter opp kontrollpanelet med varmeelementet
ved å løfte det rett opp.
3. Ta kondensbeholderen bort fra frityrkokerens bakside ved å trekke den rett utover.
Kondensbeholderen samler opp kondensvannet som oppstår når lokket åpnes ved bruk.
Tøm alltid kondensbeholderen ( 1 ) etter hver gangs bruk.
4. Vask frityrkurv og beholder i varmt vann.
5. Varmeelementet kan skylles i vann. Kontrollenheten må aldri dyppes i vann eller skylles.
Tørk kun av den med et stykke husholdningspapir eller en lett fuktet klut.
Obs! Varmeelement og kontrollenhet må ikke vaskes i oppvaskmaskin!
6. Utsiden av frityrkokeren kan tørkes med en lett fuktet klut.
7. Oljen kan ltreres og gjenbrukes, men den bør byttes ut etter 8-10 ganger. Tøm aldri oljen
i avløpet eller i naturen. Lever inn frityroljen til din gjenvinningsstasjon.
8. Påse at frityrkokeren og dens deler er helt tørre før du bruker den igjen.
Obs! Senk aldri apparatet ned i vann eller annen væske.
Rengjøring av filter
1. Åpne lterholderen på frityrkokerens lokk ved å
trykke inn åpningsknappen samtidig som du løfter
det i bakkant. Dra deretter holderen rett bakover.
2. Løsne det hvite lteret fra lterholderen og rengjør
det med varmt såpevann. La det deretter lufttørke.
3. Rengjør innsiden av holderen med en lett fuktet
svamp og tørk det deretter tørt.
4. Plasser lteret i lterholderen med det svarte
kulllteret plassert innerst og det hvite lteret ytterst
(ned mot beholderen).
5. Sett lterholderen tilbake på lokket.
Åpningsknapp
Page 23

Filtrering av oljen
1. Løft frityrkurven og varmeelementet bort fra beholderen og tøm den avkjølte oljen i en dunk
eller en annen passende beholder.
2. Filtrere oljen gjennom, for eksempel, et kaffelter.
Avfallshåndtering
• Når du skal kvitte deg med produktet, skal dette skje i henhold til lokale forskrifter. Er du
usikker på hvordan du går fram, ta kontakt med lokale myndigheter.
• Brukt frityrolje skal leveres til din gjenvinningstasjon. Tøm aldri oljen i avløpet eller i naturen.
Spesifikasjoner
Nettspenning: 220-240 V AC, 50Hz
Effekt: 2000 W
NORSK
23
Page 24

24
SUOMI
Friteerauskeitin 3 litraa
Art.no: 18-4014 Model: 153801-UK
34-7247 153801
Lue käyttöohjeet ennen tuotteen käyttöönottoa. Säilytä käyttöohjeet tulevaa tarvetta varten.
Pidätämme oikeuden teknisten tietojen muutoksiin. Emme vastaa mahdollisista teksti- tai
kuvavirheistä. Jos laitteeseen tulee teknisiä ongelmia, ota yhteys myymälään tai asiakaspalveluun (yhteystiedot käyttöohjeen lopussa).
Sisällysluettelo
Turvallisuus 25
Painikkeet ja toiminnot 26
Käytön aloittaminen 27
Käyttö 28
Huolto ja ylläpito 29
Kierrätys 30
Tekniset tiedot 30
Page 25

Turvallisuus
• Älä jätä friteerauskeitintä ilman valvontaa käytön aikana.
• Älä yritä sammuttaa öljypaloa vedellä. Irrota pistoke pistorasiasta ja tukahduta palo
sammutuspeitteellä.
• Tarkista, että laitteen jännite on sama kuin pistorasian. Katso jännite laitteen arvokilvestä.
• Laitteen saa liittää ainoastaan maadoitettuun pistorasiaan.
• Irrota laite aina pistorasiasta ennen huoltoa sekä silloin kun sitä ei käytetä.
• Vältä sähköiskuja suojaamalla laite ja sen johto kosteudelta.
• Älä upota laitetta veteen tai muuhun nesteeseen.
• Älä sijoita johtoa kuumien pintojen tai terävien kulmien päälle.
• Älä irrota pistoketta johdosta vetämällä.
• Laite kuumenee käytössä erittäin kuumaksi – älä koske kuumiin osiin. Kosketa ainoastaan
laitteen kahvoja – älä muita osia.
• Tarkasta virtajohdon kunto säännöllisesti. Älä käytä laitetta, mikäli laite tai sen virtajohto on
vioittunut. Ainoastaan ammattilainen saa vaihtaa viallisen johdon.
• Älä anna lasten käyttää tehosekoitinta ilman valvontaa.
• Varmista ennen käyttöä, että laitteen osat on asennettu oikein.
• Älä käytä laitetta kuumien paikkojen, kuten lieden, läheisyydessä.
• Tehosekoitin on tarkoitettu ainoastaan sisäkäyttöön.
• Ole varovainen, kun siirrät friteerauskeitintä, jossa on kuumaa öljyä.
• Älä ylitäytä friteerauskoria.
• Älä käytä laitetta, jos säiliössä ei ole öljyä. Mikäli laitetta käytetään ilman öljyä, lämpövastus
ylikuumenee ja friteerauskeitin sammuu automaattisesti. Termostaatti tulee palauttaa
ylikuumenemisen jälkeen, jotta laitteen voi käynnistää uudelleen.
1. Irrota laite sähköverkosta ja anna sen jäähtyä.
2. Irrota ohjausyksikkö ja lämpövastus friteerauskeittimestä.
3. Paina termostaatin takaosassa olevaa palautuspainiketta (reset) esim. kapealla ruuvitaltalla.
4. Asenna osat takaisin ja noudata käyttöohjeita.
• Käytä ainoastaan laitteen mukana tulleita lisätarvikkeita.
• Älä käytä tehosekoitinta muihin kuin sille tarkoitettuihin tehtäviin.
SUOMI
25
Page 26

26
SUOMI
Painikkeet ja toiminnot
1. Kondenssiveden säiliö
2. Suodatinpidike ja suodatin
3. Kansi
4. Ajan asetus
7
5. Kahva
6. Avauspainike
7. Lämpötilan säädin
Page 27

Käytön aloittaminen
1. Tiskaa friteerauskori ja säiliö ennen
ensimmäistä käyttökertaa.
2. Nosta friteerauskori säiliöstä ja
irrota lämpövastus nostamalla
ohjausyksikköä ja lämpövastusta
suoraan ylöspäin. Nosta friteerauskori
friteerauskeittimestä suoraan
ylöspäin.
3. Pese friteerauskori ja säiliö lämpimällä
vedellä.
4. Lämpövastus voidaan huuhtoa
vedellä. Älä upota ohjausyksikköä
veteen, äläkä huuhtele sitä valuvassa
vedessä. Kuivaa ainoastaan
talouspaperilla tai kevyesti
kostutetulla liinalla.
Huom.! Lämpövastusta ja
ohjausyksikköä ei saa pestä
astianpesukoneessa!
5. Laita säiliö takaisin ja asenna
lämpövastus ja ohjausyksikkö.
Työnnä ohjausyksikkö suoraan
alaspäin ja varmista, että liittimet
osuvat kohdalleen.
SUOMI
6. Kiinnitä kansi säiliön saranoihin pitämällä
kantta pystysuorassa ja painamalla sitä
varovasti alaspäin saranassa. Varmista, että
kansi lukkiutuu kunnolla.
27
Page 28

28
SUOMI
MAX
MIN
Käyttö
1. Nosta friteerauskori suoraan ylöspäin keittimestä.
2. Lisää säiliöön friteeraukseen sopivaa öljyä.
Huom.!
On erittäin tärkeää, että öljyä
täytetään säiliön sisällä olevien
min- ja max-merkintöjen väliin.
Älä ylitäytä friteerauskoria.
3. Varmista ensin, että friteerauskeitin on OFF-asennossa ja liitä pistoke maadoitettuun
pistorasiaan.
4. Säädä termostaattin lämpötila ja sulje kansi painamalla etuosan oikeaa puolta. Käännä kytkin
ON-asentoon. Öljy alkaa lämmetä. Punainen merkkivalo (”Power”) syttyy.
5. Kun öljy on saavuttanut oikean lämpötilan, vihreä merkkivalo syttyy (”Ready”). Avaa kansi
painamalla ”Open Lid”.
6. Aseta friteerauskori säiliöön ja avaa kahva nostaaksesi friteerauskorin öljystä. Nosta kahvasta
kunnes se napsahtaa.
7. Laita friteerattavat ainekset friteerauskoriin (älä ylitäytä astiaa) ja sulje kansi. Laske
friteerauskori varovasti öljyyn. Vedä samalla lukituspainiketta itseäsi päin ja taita kahva
varovasti kasaan.
8. Aseta friteerausaika kääntönupista. Friteeraus alkaa. Älä nosta kantta friteerauksen aikana,
vaan tarkkaile friteerausta kannen ikkunan kautta.
9. Kun friteerausaika on kulunut, kuuluu merkkiääni ja friteerauskeitin kytkeytyy pois päältä.
10. Nosta friteerauskori öljystä ja valuta öljy friteeratusta ruoasta noin 20 sekunnin ajan ennen
kannen avaamista ja ruoan annostelua.
11. Säädä öljytaso suhteessa friteerattavan ruuan määrään ennen kuin friteeraat seuraavan
korillisen.
12. Varmista, että friteerauskeitin on käytön jälkeen pois päältä.
Page 29

Ruoka Lämpötila Aika, noin (minuuttia)
Kanasuikaleet 190 °C 5–8
Kanapalat 180 °C 15–20
Kala 170 °C 8–10
Ranskalaiset perunat 190 °C
Sipulirenkaat 190 °C 3–5
Katkaravut 190 °C 2–4
3–5
Huolto ja ylläpito
1. Irrota virtajohto ja varmista, että öljy on jäähtynyt (1–2 tuntia käytön jälkeen) ennen puhdistamista.
2. Nosta friteerauskori säiliöstä ja nosta ohjausyksikkö ja lämpövastus nostamalla sitä suoraan ylös.
3. Poista friteerauskeittimen takana oleva kondenssiveden säiliö vetämällä sitä suoraan ulospäin.
Säiliö kerää itseensä friteerauksen aikana kantta nostettaessa syntyneet kondenssivedet.
Tyhjennä kondenssiveden säiliö [ 1 ] jokaisen käyttökerran jälkeen.
4. Pese friteerauskori ja säiliö lämpimällä vedellä.
5. Lämpövastus voidaan huuhtoa vedellä. Älä upota ohjausyksikköä veteen, äläkä huuhtele sitä
valuvassa vedessä. Kuivaa ainoastaan talouspaperilla tai kevyesti kostutetulla liinalla.
Huom.! Lämpövastusta ja ohjausyksikköä ei saa pestä astianpesukoneessa!
6. Kuivaa friteerauskeitin ulkopuolelta kevyesti kostutetulla liinalla.
7. Öljy voidaan suodattaa ja käyttää uudelleen, mutta se tulisi vaihtaa uuteen 8–10 käyttökerran
jälkeen. Älä kaada öljyä viemäriin tai luontoon. Vie käytöstä poistettu friteerausöljy
ongelmajätepisteeseen.
8. Varmista ennen seuraavaa käyttökertaa, että friteerauskeitin ja sen osat ovat täysin kuivat.
Huom.! Älä upota laitetta veteen tai muuhun nesteeseen.
SUOMI
Suodattimen puhdistus
1. Avaa friteerauskeittimen kannessa oleva suodatin-pidike
painamalla avauspainiketta samalla, kun nostat sitä
takaviistoon. Vedä pidikettä suoraan taakse.
2. Poista valkoinen suodatin suodatinpidikkeestä ja puhdista
lämpimässä saippuavedessä. Anna sen kuivua ilmavassa
tilassa.
3. Puhdista suodatinpidike sisäpuolelta kevyesti kostutetulla
sienellä ja kuivaa.
4. Sijoita suodatin suodatinpidikkeeseen musta hiilisuodatin
edellä ja valkoinen suodatin seuraavaksi (säiliötä päin).
5. Aseta suodatinpidike takaisin kanteen.
29
Avauspainike
Page 30

Öljyn suodattaminen
1. Nosta friteerauskori ja lämpöelementti säiliöstä ja tyhjennä jäähtynyt öljy säiliöön tai muuhun
sopivaan astiaan.
2. Suodata öljy esim. kahvinsuodattimen läpi.
Kierrätys
• Kierrätä tuote asianmukaisesti, kun poistat sen käytöstä. Ota yhteys kuntasi jäteneuvontaan,
mikäli olet epävarma.
• Käytetty friteerausöljy tulee viedä ongelmajätepisteeseen. Älä kaada öljyä viemäriin tai
luontoon.
Tekniset tiedot
Verkkojännite 220–240 V AC, 50 Hz
Teho 2000 W
SUOMI
30
Page 31

Page 32

SVERIGE
KUNDTJÄNST Tel: 0247/445 00
Fax: 0247/445 09
E-post: kundtjanst@clasohlson.se
INTERNET www.clasohlson.se
BREV Clas Ohlson AB, 793 85 INSJÖN
NORGE
KUNDESENTER Tlf.: 23 21 40 00
Faks: 23 21 40 80
E-post: kundesenter@clasohlson.no
INTERNETT www.clasohlson.no
POST Clas Ohlson AS, Postboks 485 Sentrum, 0105 OSLO
SUOMI
ASIAKASPALVELU Puh: 020 111 2222
Faksi: 020 111 2221
Sähköposti: info@clasohlson.fi
INTERNET www.clasohlson.fi
OSOITE Clas Ohlson Oy, Yrjönkatu 23 A, 00100 HELSINKI
GREAT BRITAIN
For consumer contact, please visit
www.clasohlson.co.uk and click on
customer service.
INTERNET www.clasohlson.co.uk
 Loading...