

Page 1
Toaster
Brödrost • Brødrister • Leivänpaahdin
Art. No: Model. No:
18-4042 134801-UK
34-7830 134801
English 3
Svenska 6
Norsk 9
Suomi 12
Ver. 200803
Page 2

Page 3

2-Slice Toaster
Art.no: 18-4042 Model: 134801-UK
34-7830 134801
Please read the entire instruction manual before using the product and save it for
future reference. We apologise for any text or photographic errors and any changes
of technical data. If you have any questions concerning technical problems please
contact our Customer Service Department (see address on reverse).
Safety
• Warning: Do not touch the metal parts of the toaster when in use because they
can become very hot.
• The toaster must not be used with a timer switch or other form of remote
control.
• Due to the risk of re, never place the toaster close to or under ammable
material such as curtains.
• Always unplug the appliance from the wall socket before cleaning. Dry the
toaster using a soft, moist cloth. Never immerse the toaster in water. Remove
the bread crumbs by withdrawing the crumb tray on the back of the toaster.
• If a slice of bread gets stuck in the toaster, unplug the toaster before trying
to remove the bread. Do not use a sharp object such as a knife, as this could
damage the toaster’s heating element.
• The power lead should be regularly checked. Never use the device if the power
lead or plug is damaged.
• The power lead be changed if damaged in order to avoid the risk of chock or
re, but this should only be done by the manufacturer, qualied service station
or professional.
ENGLISH
3
Page 4
Buttons and Functions
Def
r
os
t
Re
h
ea
t
Cance
l
1 7
2
6
3 5
4
ENGLISH
8
7
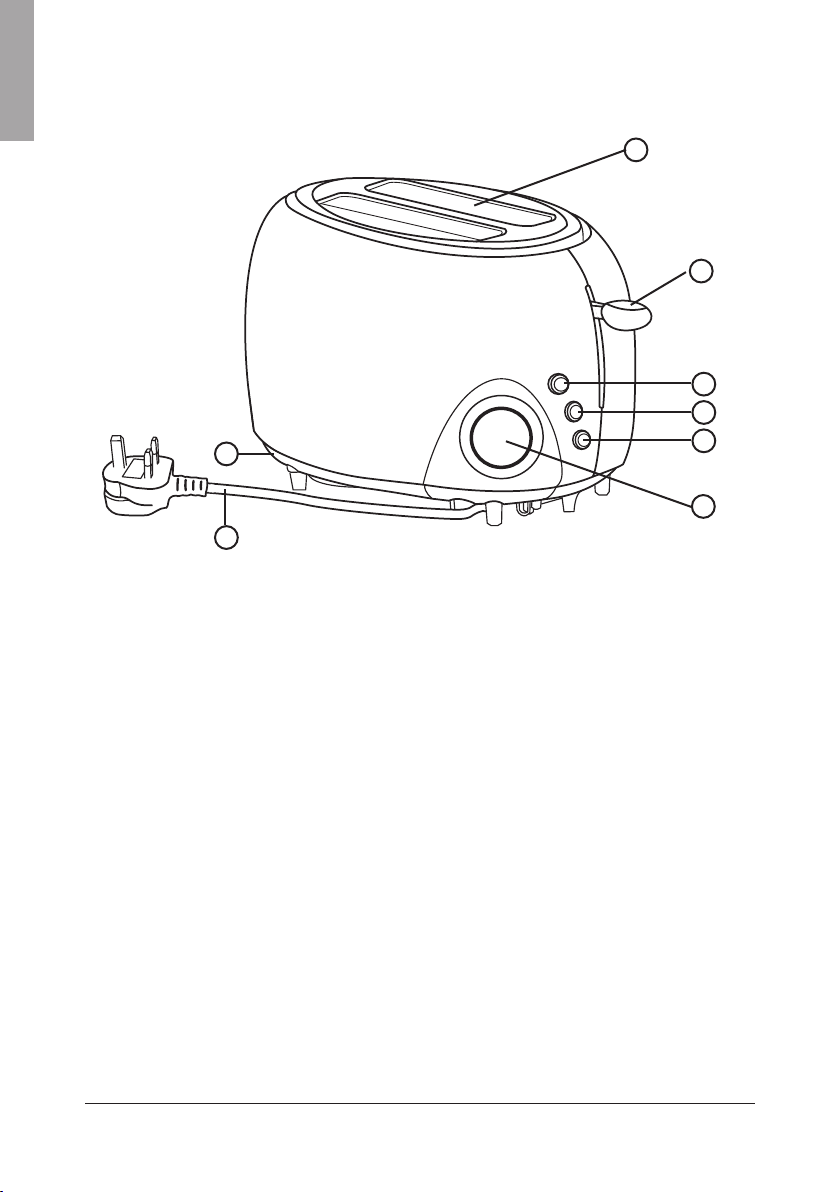
1. Slot
2. Lever
3. Defrost button
4. Reheat button
5. Cancel button
6. Browning level adjuster
7. Mains lead
8. Crumb tray
1
2
3
4
5
6
Before using the toaster for the first time
Operate the toaster on maximum setting without bread in a well ventilated area a
couple of times because it can emit a strange odour when new. This is quite normal
and is caused by residues from the manufacturing process warming up and burning.
4
Page 5

Operating Instructions
Toasting
1. Make sure that the lever is in the up position.
2. Plug the toaster into an earthed socket (230 V AC).
3. Place bread into slots.
4. Choose the desired browning level, 1 (lightest) to 7 (darkest) by turning the
browning control knob. Experiment until you nd the best position.
5. To start toasting, depress the lever until it locks. The lever will only lock into
place if the toaster is connected to a power point.
6. The toaster automatically turns itself off when the toast is ready, and the slices
pop up. The toasting process can be stopped manually at any time by pressing
the cancel button.
7. Make sure that the lever is in the up position before unplugging the toaster.
NB: If only one slice is toasted it will be browned more than it would be if two slices
are toasted at the same time.
Defrosting
Follow steps 1-5 above and then press the defrost button.
Reheating
Previously toasted bread can be reheated by following steps 1-5 above and then
pressing the reheat button. The toast will then be warmed for a short while before
the toaster automatically shuts off. Keep an eye on the toast to make sure that it
does not burn.
ENGLISH
Care and Maintenance
Always disconnect the appliance from the wall socket before cleaning. Never
immerse the toaster in water or other liquid, clean it using a soft cloth slightly
moistened with a mild detergent. Avoid solvents and abrasive cleaning agents.
Empty the crumb tray regularly.
Disposal
Follow local ordinances when disposing of this product. If you are unsure about the
disposal of this product contact your municipality.
Specifications
Power Supply 230 V AC, 50 Hz
Power 1200 W
Mains lead: 90 cm
5
Page 6

Brödrost 2-skivors
Art.no: 18-4042 Model: 134801-UK
34-7830 134801
Läs igenom hela bruksanvisningen före användning och spara den sedan för framtida bruk. Vi reserverar oss för ev. text- och bildfel samt ändringar av tekniska data.
SVENSKA
Vid tekniska problem eller andra frågor, kontakta vår kundtjänst (se adressuppgifter
på baksidan).
Säkerhet
• Varning! Rör ej metalldelarna på brödrosten under användning eftersom de
kan bli mycket varma.
• Brödrosten får ej användas tillsammans med extern timer eller någon typ av
fjärrkontroll.
• P.g.a. brandrisken, placera aldrig brödrosten i närheten av eller under brännbart
material som t.ex. en gardin.
• Drag alltid nätsladden ur vägguttaget före rengöring. Torka av brödrosten med
en fuktig trasa. Sänk aldrig ned brödrosten i vatten. Ta bort brödsmulor genom
att dra ut smulbrickan på brödrostens baksida.
• Om en brödskiva fastnar i brödrosten, drag stickkontakten ur vägguttaget innan
du försöker ta ur brödskivan. Använd inget vasst föremål som t.ex. en kniv,
eftersom detta kan skada brödrostens värmeelement.
• Nätsladden bör regelbundet kontrolleras. Använd aldrig apparaten om
nätsladden eller stickproppen är skadade.
• Om nätsladden skadats får den, för att undvika risk för elektrisk chock eller
brand, endast bytas av tillverkaren, dess serviceställe eller av en kvalicerad
yrkesman.
6
Page 7

Knappar och funktioner
Def
r
os
t
Re
h
ea
t
Cance
l
1 7
2
6
3 5
4
8
7
1. Brödfack
2. Nedsänkningsspak
3. Upptiningsknapp (Defrost)
4. Återuppvärmningsknapp (Reheat)
5. Avstängningsknapp (Cancel)
6. Steglös rostningskontroll
7. Nätsladd
8. Smulbricka
1
SVENSKA
2
3
4
5
6
Före första användning
Kör brödrosten på högsta effekt utan bröd i ett väl ventilerat utrymme ett par gånger
eftersom den kan avge viss lukt när den är ny. Detta är helt normalt och inträffar när
eventuella rester från tillverkningen värms upp och bränns.
7
Page 8

Användning
Rostning
1. Kontrollera att nedsänkningsspaken står i det övre läget.
2. Anslut stickproppen till ett jordat uttag (230 V AC).
3. Lägg brödskivor i facken.
4. Välj önskad rostningsgrad, 1 (ljusast) till 7 (mörkast) genom att vrida på ratten
SVENSKA
för rostningskontroll. Prova dig fram till rätt inställning.
5. För att starta rostningen, tryck ned nedsänkningsspaken till den fastnar.
Nedsänkningsspaken fastnar endast om brödrosten är anslutet till ett eluttag.
6. Brödrosten stängs av automatiskt när rostningen är klar, och brödskivan
åker upp. Rostningen kan avbrytas manuellt i förtid genom att trycka på
avstängningsknappen (Cancel).
7. Kontrollera att nedsänkningsspaken står i det övre läget innan stickproppen dras ur.
Anm. Rostning av endast ett bröd ger mörkare färg än vid rostning av två bröd.
Upptining
Följ steg 1-5 ovan och tryck sedan på upptiningsknappen (Defrost).
Återuppvärmning
Tidigare rostat bröd kan värmas upp igen genom att följa steg 1-5 ovan och sedan
trycka på återuppvärmningsknappen (Reheat). Brödet återuppvärms en kort stund
innan rosten stängs av. Håll gärna brödet under uppsikt så att det inte bränns.
Skötsel och underhåll
Ta alltid ur stickproppen ur vägguttaget före rengöring. Sänk aldrig ner brödrosten
i vatten eller annan vätska, utan använd en mjuk lätt fuktad trasa och ett milt
rengöringsmedel. Undvik lösningsmedel och slipande rengöringsmedel.
Töm smulbrickan ofta.
Avfallshantering
När du ska göra dig av med produkten ska detta ske enligt lokala föreskrifter.
Är du osäker på hur du ska gå tillväga, kontakta din kommun.
Specifikationer
Strömförsörjning 230 V AC, 50 Hz
Effekt 1200 W
Sladdlängd 90 cm
8
Page 9

Brødrister 2-skivers
Art.no: 18-4042 Model: 134801-UK
34-7830 134801
Les igjennom hele bruksanvisningen før bruk, og ta vare på den for framtidig bruk.
Vi reserverer oss mot ev. tekst- og bildefeil, samt forandringer av tekniske data.
Ved tekniske problemer eller andre spørsmål, ta kontakt med vårt kundesenter
(se opplysninger om kundesenteret her i denne bruksanvisningen).
Sikkerhet
• Advarsel! Metalldelene på brødristeren må ikke berøres ved bruk da disse kan
bli veldig varme.
• Brødristeren må ikke brukes i kombinasjon med eksternt tidsur/timer eller noen
form for fjernkontroll.
• P.g.a. brannfare må aldri brødristeren plasseres i nærheten av eller under
brennbart materiale som f.eks. gardiner etc.
• Trekk alltid støpselet ut fra strømuttaket ved rengjøring. Tørk av brødristeren
med en fuktig klut. Senk aldri brødristeren ned i vann. Fjern brødsmuler ved
å dra ut smuleskuffen som er på risterens bakside.
• Dersom en brødskive setter seg fast i brødristeren må stikkontakten trekkes
ut av vegguttaket før du forsøker å fjerne denne. Bruk ikke skarpe gjenstander
som f.eks. en kniv, da dette kan skade brødristerens varmeelement.
• Strømledningen bør kontrolleres regelmessig. Bruk ikke apparatet dersom
strømledningen eller støpselet er skadet.
• Dersom strømledningen er skadet skal den, for å unngå risiko for elektrisk støt
eller brann, kun byttes av produsenten, servicested eller av en fagperson.
NORSK
9
Page 10

Knapper og funksjoner
Def
r
os
t
Re
h
ea
t
Cance
l
1 7
2
6
3 5
4
1
2
NORSK
8
7
1. Brødskuff
2. Nedsenkingsspak
3. Opptiningsknapp (Defrost)
4. Gjenoppvarmingsknapp (Reheat)
5. Av-knapp (Cancel)
6. Trinnløs kontroll for risting
7. Strømledning
8. Smuleskuff
Før første gangs bruk
Kjør brødristeren på høyeste effekt uten brød i et godt ventilert lokale et par ganger
ettersom den kan avgi en viss lukt når den er ny. Dette er helt normalt og inntreffer
når eventuelle rester fra produksjonen varmes opp og brennes.
3
4
5
6
10
Page 11

Bruk
Risting
1. Kontroller at nedsenkingsspaken står i øverste posisjon.
2. Koble støpselet til et jordet uttak (230 V AC).
3. Legg brødskiver i skuffen.
4. Velg ønsket ristingsgrad, 1 (lysest) til 7 (mørkest) ved å vri på rattet for
ristingskontroll. Prøv deg fram til riktig innstilling
5. For å starte ristingen, trykk ned nedsenkingsspaken til den festes.
Nedsenkingsspaken fester seg kun hvis brødristeren er koblet til et strømuttak.
6. Brødristeren skrus av automatisk når ristingen er fullført, og brødskiven spretter
opp. Ristingen kan avbrytes manuelt før den er ferdig ved å trykke på avknappen (Cancel).
7. Kontroller at nedsenkingsspaken står i øverste posisjon før støpselet dras ut.
Anm. Risting av et brød gir mørkere farge enn risting av to brød.
Opptining
Følg trinn 1-5 over og trykk deretter på opptiningsknappen (Defrost).
Gjenoppvarming
Tidligere ristet brød kan varmes opp igjen ved å følge trinn 1-5 over og deretter
trykke på gjenoppvarmingsknappen (Reheat). Brødet varmes opp igjen en kort
stund før risteren skrus av. Hold gjerne brødet under oppsikt så det ikke blir brent.
NORSK
Vedlikehold
Ta alltid ut støpselet fra vegguttaket før rengjøring. Senk aldri brødristeren ned
i vann eller annen væske, men bruk en fuktet myk lett fuktet klut og et mildt
rengjøringsmiddel. Unngå slipende rengjøringsmiddel og løsemiddel.
Tøm smulebrikken ofte.
Avfallshåndtering
Når du skal kvitte deg med produktet, skal dette skje i henhold til lokale forskrifter.
Er du usikker på hvordan du går fram, ta kontakt med lokale myndigheter.
Spesifikasjoner
Strømforsyning: 230 V AC, 50 Hz
Effekt: 1200 W
Lengde på ledning: 90 cm
11
Page 12

Leivänpaahdin kahdelle leivälle
Art.no: 18-4042 Model: 134801-UK
34-7830 134801
Lue käyttöohjeet ennen tuotteen käyttöönottoa. Säilytä käyttöohjeet tulevaa tarvetta
varten. Pidätämme oikeuden teknisten tietojen muutoksiin. Emme vastaa mahdollisista teksti- tai kuvavirheistä.Jos laitteeseen tulee teknisiä ongelmia, ota yhteys
myymälään tai asiakaspalveluun (yhteystiedot käyttöohjeen lopussa).
Turvallisuus
• Varoitus! Älä koske paahtimen metalliosiin käytön aikana, koska ne saattavat
tulla erittäin kuumiksi.
• Leivänpaahdinta ei saa käyttää ulkoisen ajastimen tai kaukosäätimen kanssa.
• Älä sijoita leivänpaahdinta palavien materiaalien, esim. verhojen, läheisyyteen.
Näin estät tulipalon vaaran.
SUOMI
• Irrota pistoke pistorasiasta ennen laitteen puhdistamista. Kuivaa leivänpaahdin
kostutetulla liinalla. Älä upota laitetta veteen. Poista leivänmurut vetämällä
murualusta ulos leivänpaahtimen takapuolelta.
• Jos leipäpala jumittuu paahtimeen, irrota pistoke pistorasiasta, ennen kuin yrität
poistaa sen. Älä käytä leivän poistamiseen terävää esinettä, kuten veistä, koska
tämä voi vahingoittaa leivänpaahtimen lämmityselementtejä
• Tarkasta virtajohdon kunto säännöllisesti. Älä käytä laitetta, mikäli johto tai
pistoke on vioittunut.
• Vioittuneen johdon saa vaihtaa ainoastaan valmistaja, sen määräämä
huoltopiste tai valtuutettu ammattilainen. Näin vältetään sähköiskut ja tulipalot.
.
12
Page 13

Painikkeet ja toiminnot
Def
r
os
t
Re
h
ea
t
Cance
l
1 7
2
6
3 5
4
8
7
1. Leipäaukko
2. Vipu
3. Sulatuspainike (Defrost)
4. Uudelleenlämmityspainike (Reheat)
5. Keskeytyspainike (Cancel)
6. Portaaton paahtoasteen säätö
7. Virtajohto
8. Murutarjotin
1
2
3
4
5
SUOMI
6
Ennen ensimmäistä käyttökertaa
Käytä leivänpaahdinta muutaman kerran täydellä teholla hyvin tuuletetussa tilassa.
Leivänpaahtimesta saattaa tulla hajua ensimmäisillä käyttökerroilla. Tämä on täysin
normaalia ja johtuu valmistuksessa muodostuneiden jäänteiden kuumenemisesta ja
palamisesta.
13
Page 14

Käyttö
Leivän paahtaminen
1. Varmista, että vipu on yläasennossa.
2. Liitä pistoke maadoitettuun pistorasiaan (230 V AC).
3. Laita leivät paahtimeen.
4. Valitse haluttu paahtoaste, 1 (vaalein) - 7 (tummin) paahtoasteen säätönupilla.
Hae paras aste kokeilemalla.
5. Aloita paahtaminen painamalla vipu alas, kunnes se pysähtyy. Vipu pysähtyy
ja jää ala-asentoon vain silloin, kun leivänpaahdin on liitetty pistorasiaan.
6. Paahdin sammuu automaattisesti, kun paahto on valmis. Leivänpalat
ponnahtavat ylös. Paahtaminen voidaan keskeyttää manuaalisesti ennen
paahtoajan loppumista painamalla keskeytyspainiketta (Cancel).
7. Varmista, että vipu on yläasennossa ennen pistotulpan irrottamista pistorasiasta.
Huom. Yksi leipä paahtuu tummemmaksi kuin kaksi leipää paahdettuna yhtä aikaa.
Sulatus
Suorita kohdat 1–5 yllä ja paina sen jälkeen sulatuspainiketta (Defrost).
SUOMI
Uudelleenlämmittäminen
Aiemmin paahdettu leipä voidaan lämmittää uudelleen: suorita kohdat 1-5 ja paina
sen jälkeen uudelleenlämmityspainiketta (Reheat). Leipää lämmitetään hetki.
Lämmitystä kannattaa valvoa, jotta leipä ei pääse mustumaan.
Huolto ja ylläpito
Irrota pistoke pistorasiasta ennen laitteen puhdistamista. Älä upota leivänpaahdinta
veteen tai muuhun nesteeseen. Käytä puhdistamiseen kostutettua liinaa ja mietoa
pesuainetta. Älä käytä liuotusaineita tai hankaavia puhdistusaineita. Tyhjennä
murutarjotin säännöllisesti.
Kierrätys
Kierrätä tuote asianmukaisesti, kun poistat sen käytöstä. Ota yhteys kuntasi
jäteneuvontaan, mikäli olet epävarma.
Tekniset tiedot
Virtalähde 230 V AC, 50 Hz
Teho 1200 W
Johdon pituus 90 cm
14
Page 15

Page 16

SVERIGE
KUNDTJÄNST Tel: 0247/445 00
Fax: 0247/445 09
E-post: kundtjanst@clasohlson.se
INTERNET www.clasohlson.se
BREV Clas Ohlson AB, 793 85 INSJÖN
NORGE
KUNDESENTER Tlf.: 23 21 40 00
Faks: 23 21 40 80
E-post: kundesenter@clasohlson.no
INTERNETT www.clasohlson.no
POST Clas Ohlson AS, Postboks 485 Sentrum, 0105 OSLO
SUOMI
ASIAKASPALVELU Puh: 020 111 2222
Faksi: 020 111 2221
Sähköposti: info@clasohlson.fi
INTERNET www.clasohlson.fi
OSOITE Clas Ohlson Oy, Yrjönkatu 23 A, 00100 HELSINKI
GREAT BRITAIN
For consumer contact, please visit
www.clasohlson.co.uk and click on
customer service.
INTERNET www.clasohlson.co.uk
 Loading...