

Page 1
* Carefully and thoroughly read this manual before using
Manufactured by ISO 9001/
14001 certied plant.
View us at www.colido.com
All rights reserved Print-rite
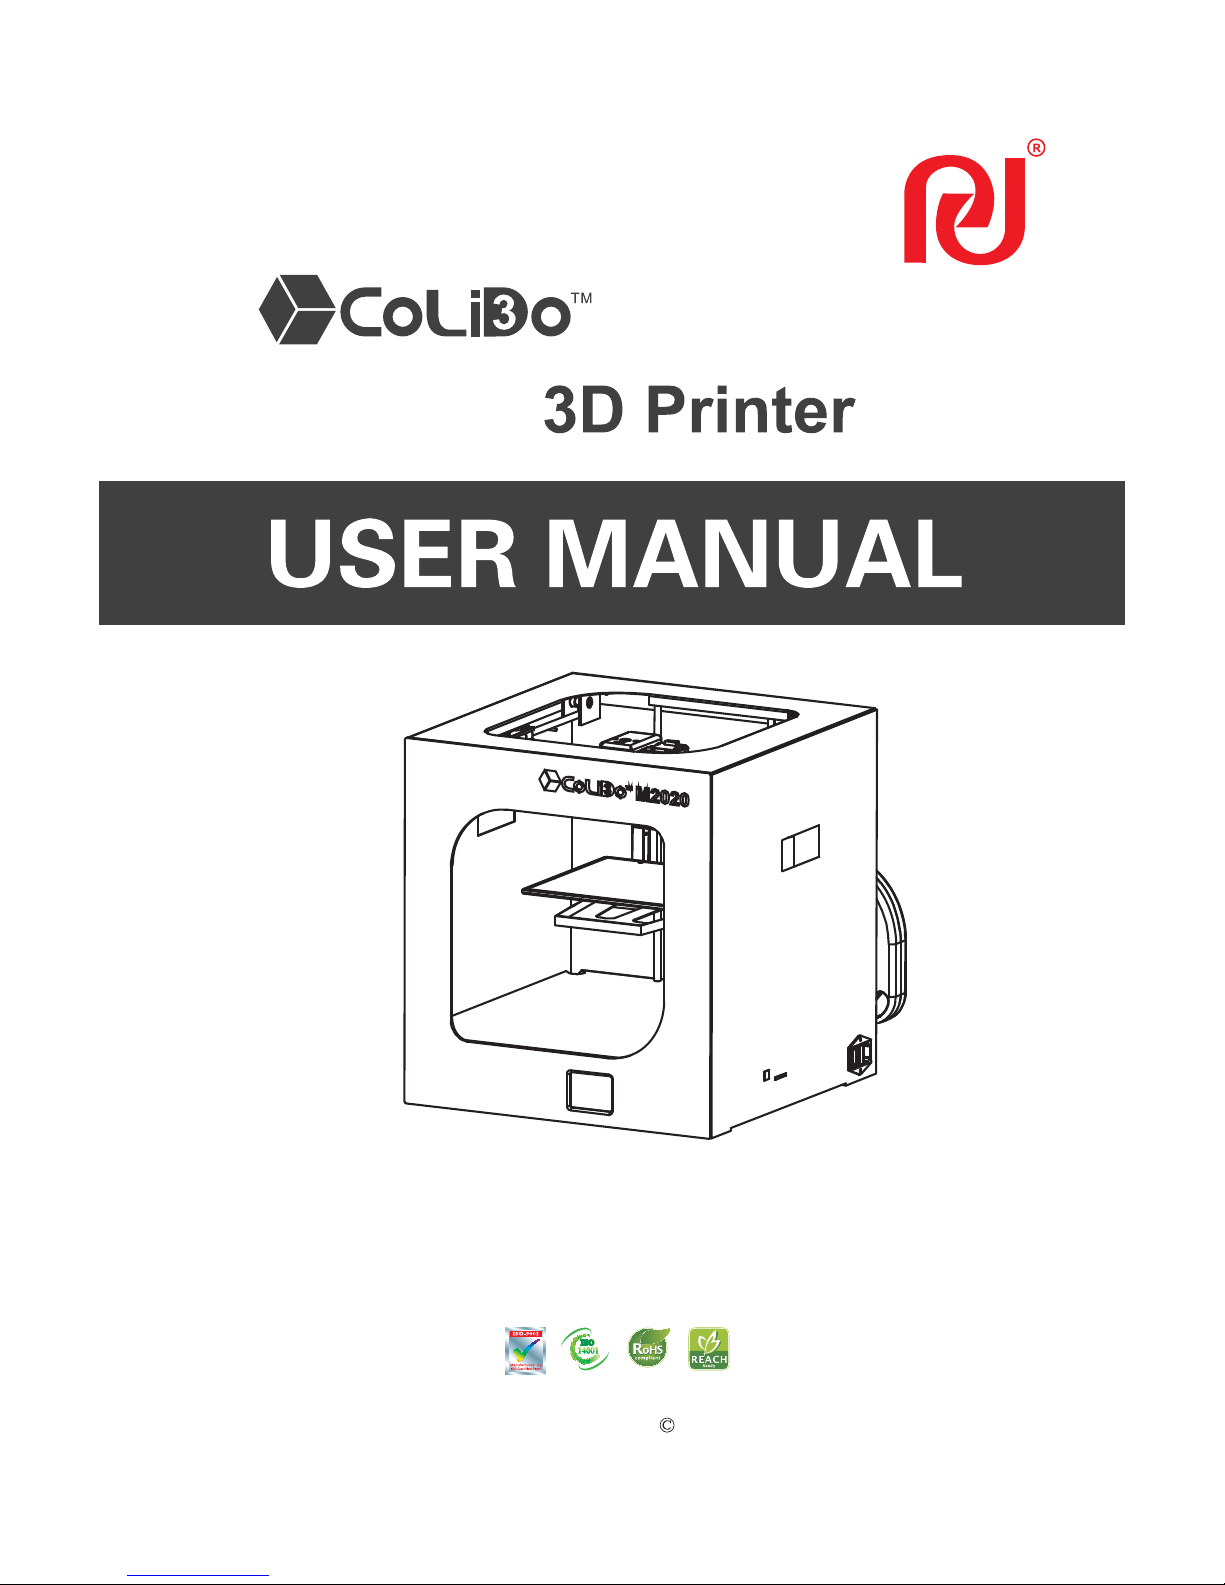
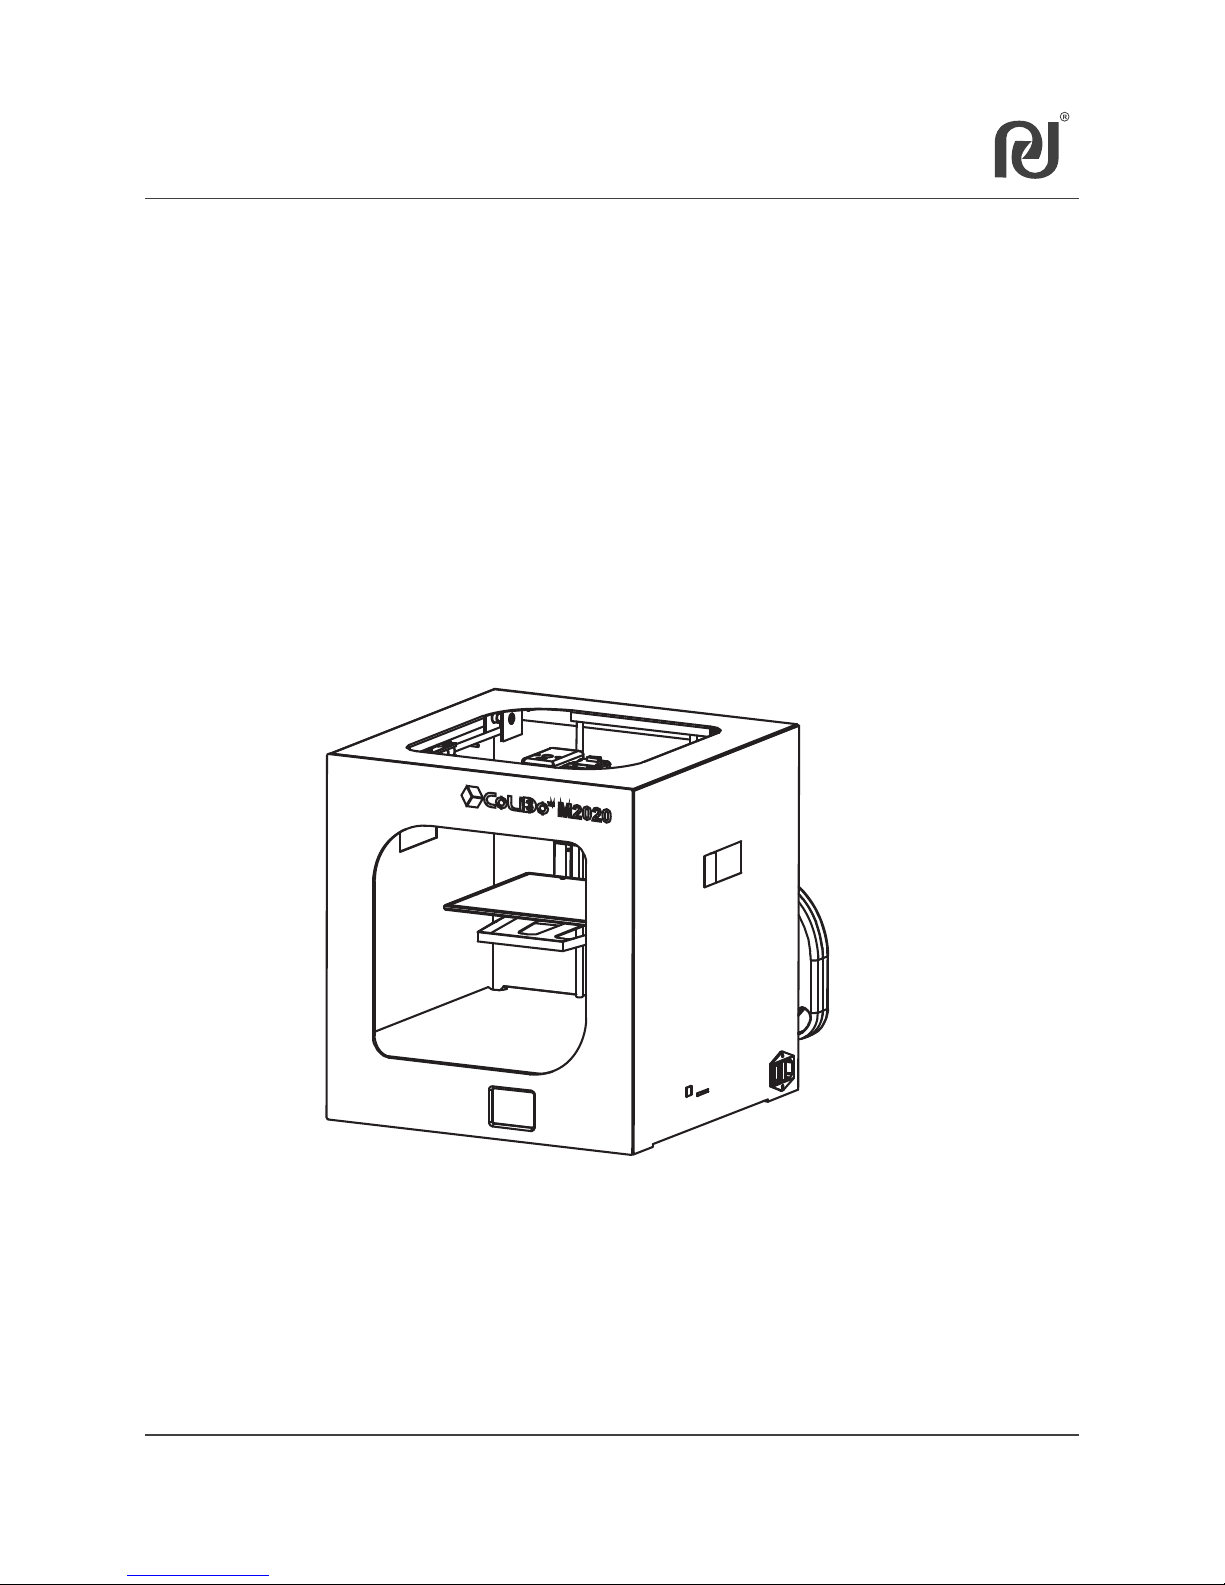
M2020
Page 2
Safety Alert Symbol
USER MANUAL
Index
02
Chapter 1 Introduction 03
Chapter 2 Safety and Compliance
04
Interference of Radio and Television 05
5.1 Unpack Printer
08
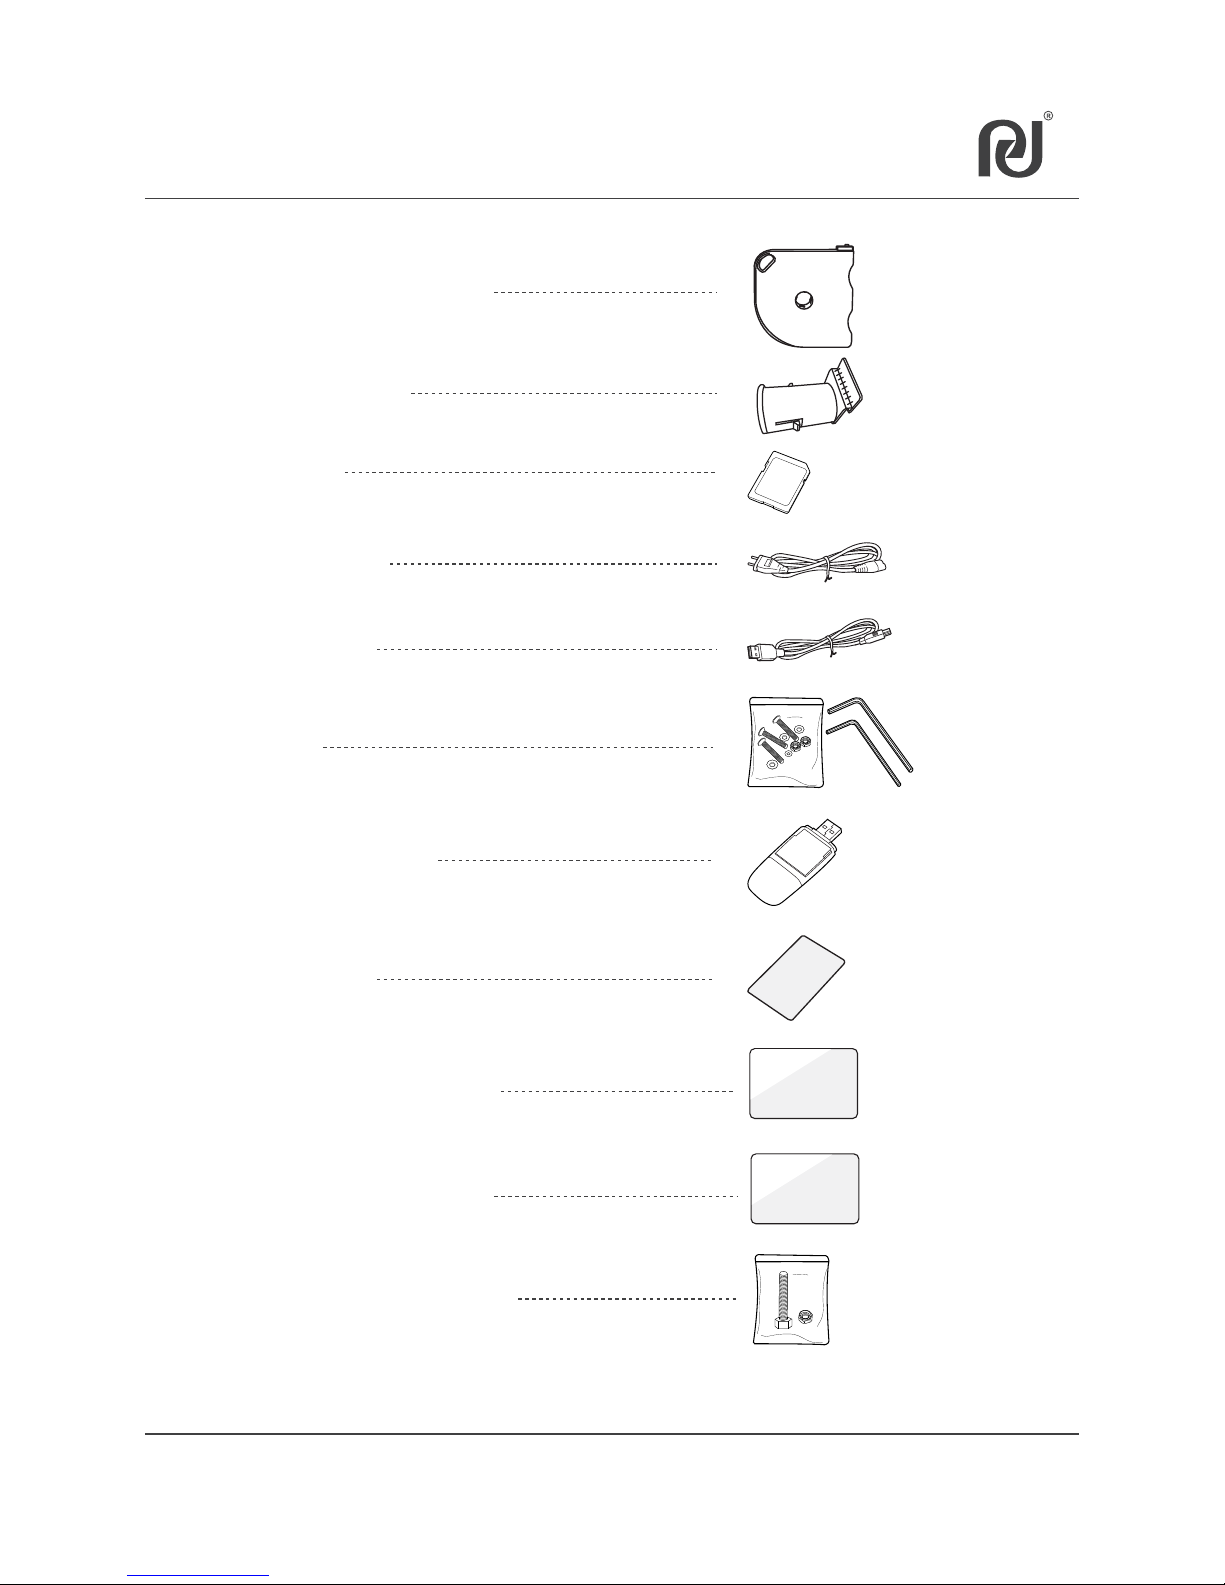
5.2 Accessory Checklist
09
5.3 Take out 3D Printer from packing box
10
5.4 CoLiDo Desktop 3D Printer Structure Illustration
11
5.5 Unlock Printer Head and Heat Table
12
5.6 Install Spool Holder
13
5.7 Mount Filament
14
5.8 Load the Filament to Printer Head
15~16
5.9 Install Glass Platform
17~18
5.10 Power on CoLiDo- Printer
19
Chapter 3 Specification
06
Chapter 4 Print Principle 07
Chapter 5 Set up CoLiDo Printer
6.2 Calibrate Mode
21~23
24~25
6.1 Main Menu
20
6.3 Nozzle & Filament Test
26~27
6.4 Print test with SD Card
28
6.5 Prepare Menu
29~30
6.6 Change Filament
33~34
6.8 SD Card Menu
Chapter 6 CoLiDo Printer Calibrate and Test
Chapter 8 Maintenance
53
Chapter 7 Install and set up REPETIER-HOST to print
7.1 Install REPETIER-HOST
35~38
7.2 REPETIER-HOST Setup
39~41
7.3 Print with Repetier-Host
42~44
Chapter 9 Troubleshoot 54~56
31~32
6.7 Control Menu
7.4 Repetier-Host Basic 3D Printing
45
7.5 Repetier-Host Advanced 3D Printing
46~52
Page 3
Chapter 1 Introduction
03
This User Manual is designed to start your journey with CoLiDo
Desktop 3D Printer in the right direction.
In Chapter 1~5, you can learn the basics knowledge of CoLiDo
Desktop 3D Printer, how to unbox safely, how to assemble correctly.
In Chapter 6~9, you can learn how to calibrate the platform,
how to print, how to maintain and how to troubleshoot.
Welcome you to the world of CoLiDo Desktop 3D Printer.
Following this manual will help you fully understand the Printer and
make amazing products.
Page 4
Chapter 2 Safety and Compliance
04
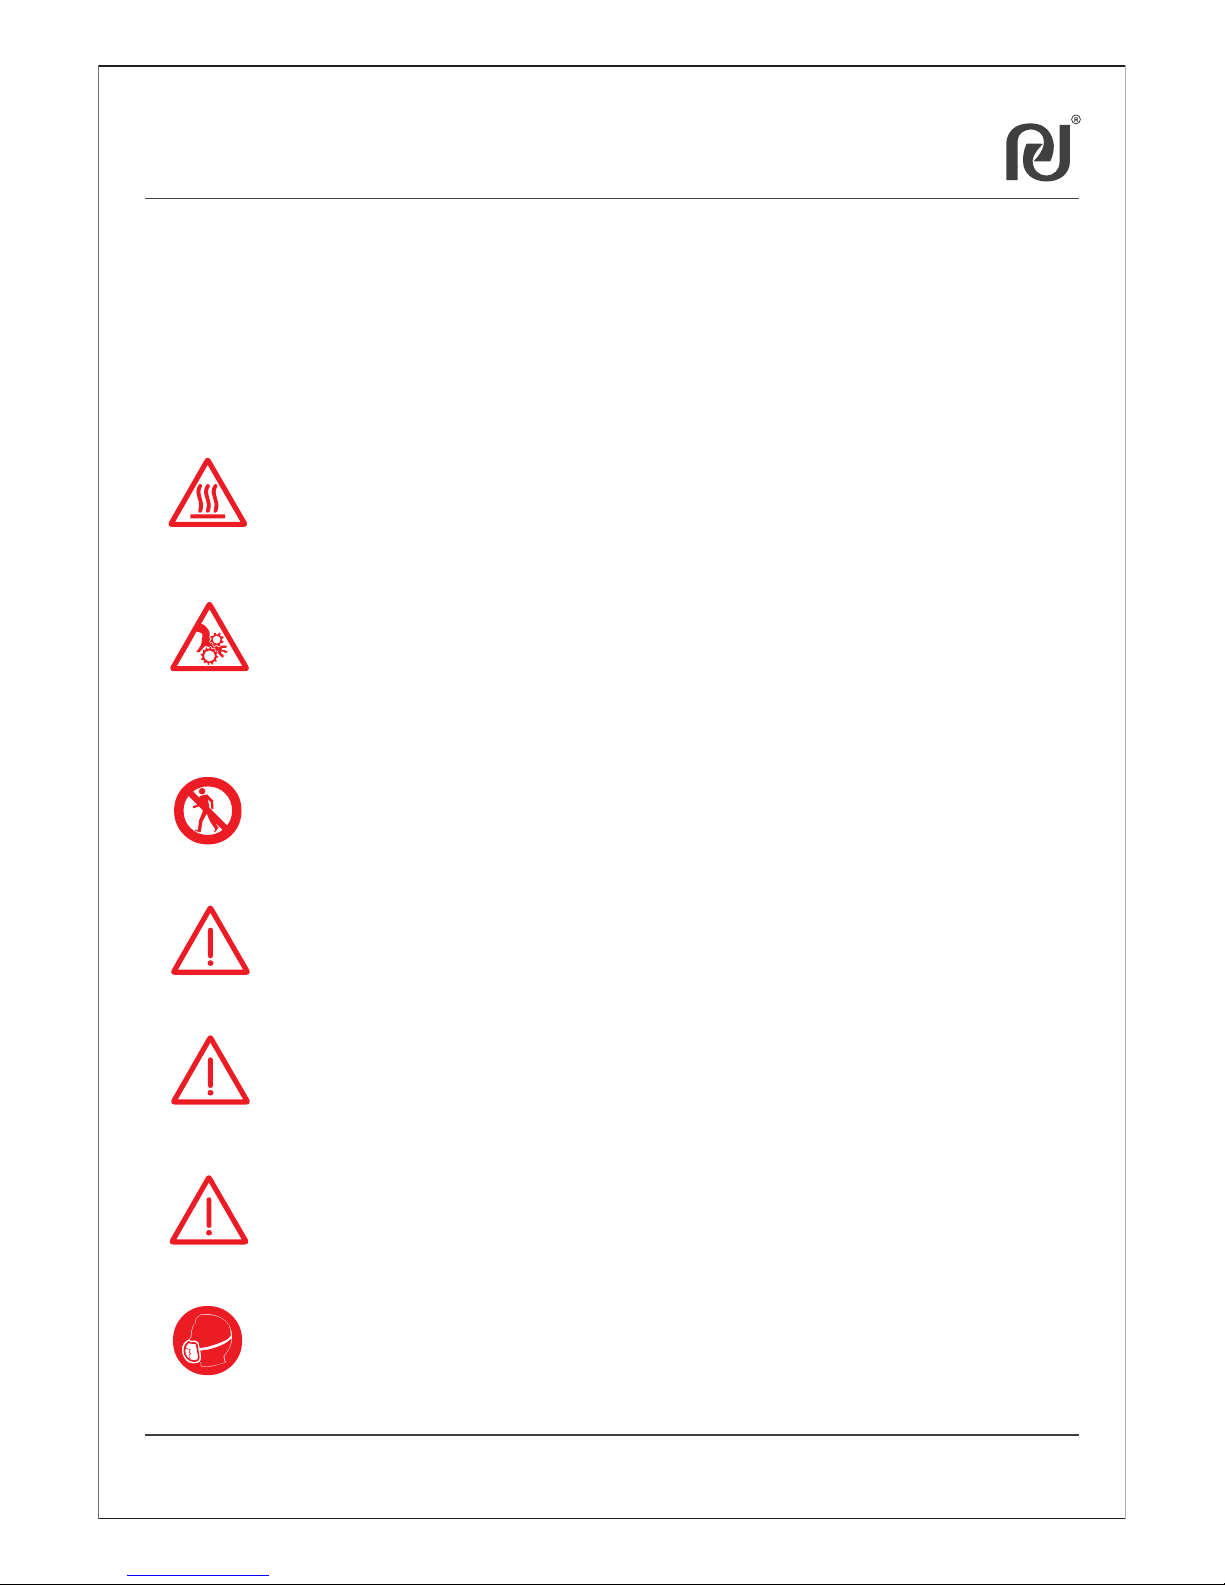
In this manual, Safety Alert Symbol will be marked in the start of safety
message. The Safety Alert Symbol means potential safety hazards which
will possibly harm you or others and cause product or property loss.
WARNING: HOT SURFACE, DO NOT TOUCH
Desktop 3D Printer has high temperature when working.
Make sure the Desktop 3D Printer cool down before touching inside.
WARNING: HAZARDOUS MOVING PARTS, KEEP FINGERS AND OTHER
BODY PARTS AWAY
The moving parts of Desktop 3D Printer will possibly cause harm. Do not
touch the Desktop 3D Printer inside when the printer is working.
WARNING: Make sure stand by Desktop 3D Printer when it working.
CAUTION: Be careful when using Print-Rite unapproved material, which
may damage Printer and impact print quality.
CAUTION: Disconnect power plug from power socket during emergency.
CAUTION: Power socket must be located near the Printer and within reach.
CAUTION: Place Desktop 3D Printer in well-ventilated area as it
will melt plastic and emit plastic odor when printing.
Safety Alert Symbol
Page 5

Chapter 2 Safety and Compliance
05
Interference of Radio and Electromagnetism
The Printer will generate, apply and radiate Radio Frequency Energy. If the
Printer is not installed and used in accordance with the manual, it may cause
harmful interference to radio communications. However, there is no warranty
to the interference if the Printer is installed in a special environment. If the
Printer does cause harmful interference to the receiver of radio or television,
which can be determined by turning on and turning off the Printer, the user is
suggested to adopt below one or more methods to eliminate the interference:
1. Change the orientation and location of the receiving antenna.
2. Increase the distance between the Printer and the receiving device.
3. Connect the Printer and the receiving device separately with two power
sockets in different power supply circuit.
4. Get help from the dealer of the Printer or an experienced radio/
TV technician.
Page 6
Print Technology: Fused Deposition
Modeling
Construction Dimension: 200*200*200mm
Layer Resolution Setting: 0.1~0.4mm
Positional Accuracy: XY: 0.011mm
Z: 0.0025mm
Filament: PLA/ABS
Filament Diameter: 1.75mm
Nozzle Diameter: 0.4mm
Printing
Chapter 3 Specification
Frame: Steel
Platform: Coated glass
XYZ Bearing: Steel
Stepper Motors:
1.8° step angle,
1/16 micro-stepping
Mechanical
Storage Temperature: 0
o
C ~ 32 oC [32 oF~ 90 oF]
Operating Temperature:
15 oC ~ 32 oC [60 oF~ 90 oF]
Power: 220W
Input Voltage: 100V~240V 50/60HZ
Electrical
Printer Size: 430*430*475MM
Package Size: 530*530*590MM
Printer Weight: 22.5KG
Delivery Weight: 24.5KG
Dimension
Software package: REPETIER-HOST
File Type: .STL,.GCO
Operating System: WINDOWS, MAC OS, LINUX
Connection: USB, SD Card
Software
06
Page 7
CoLiDo Desktop 3D Printer makes solid, three-dimensional objects by melting
PRINT-RITE PLA/ABS filament.
The designed 3D files are converted into CoLiDo command through computer
software“Repetier-Host”and sent to the CoLiDo printer via SD Card or USB
Cable. Then, the printer will heat up and melt PRINT-RITE PLA/ABS filament
and push it out from the nozzle to make a solid object layer by layer.
This method is called Fused Deposition Modeling or FDM.
Chapter 4 Print Principle
07
Page 8
Before setting up CoLiDo Printer, please note that
the Printer has been inspected and packed carefully
at the manufacturing facility.
Hope you can take more time to unpack carefully
and set it up.
Chapter 5 Set up CoLiDo Printer
08
CAUTION: Do not forcely tear anything when unpack and setup CoLiDo
Printer. It may damage the Printer.
5.1 Unpack CoLiDo Printer
1
Place the printer package box on a dry and flat surface when opening.
2
Take out all accessories inside the Printer box.
Please refer to the Accessory Checklist at next page.
NOTE: In case there are any missing accessory, kindly email the Printer
serial number, name and qty of missed accessory to
[email protected].
Page 9
5.2 Accessory Checklist
Spool Holder 1PC
SD Card 1PC
Power Cable 1PC
USB Cable 1PC
Tools 1 Set
SD Card Reader 1PC
Test Sheet 1PC
09
PLA Filament 1PC (500g)
ABS Filament 1PC (500g)
PLA Glass Platform 1PC
ABS Glass Platform 1PC
3D printed samples 1 Set
Page 10
10
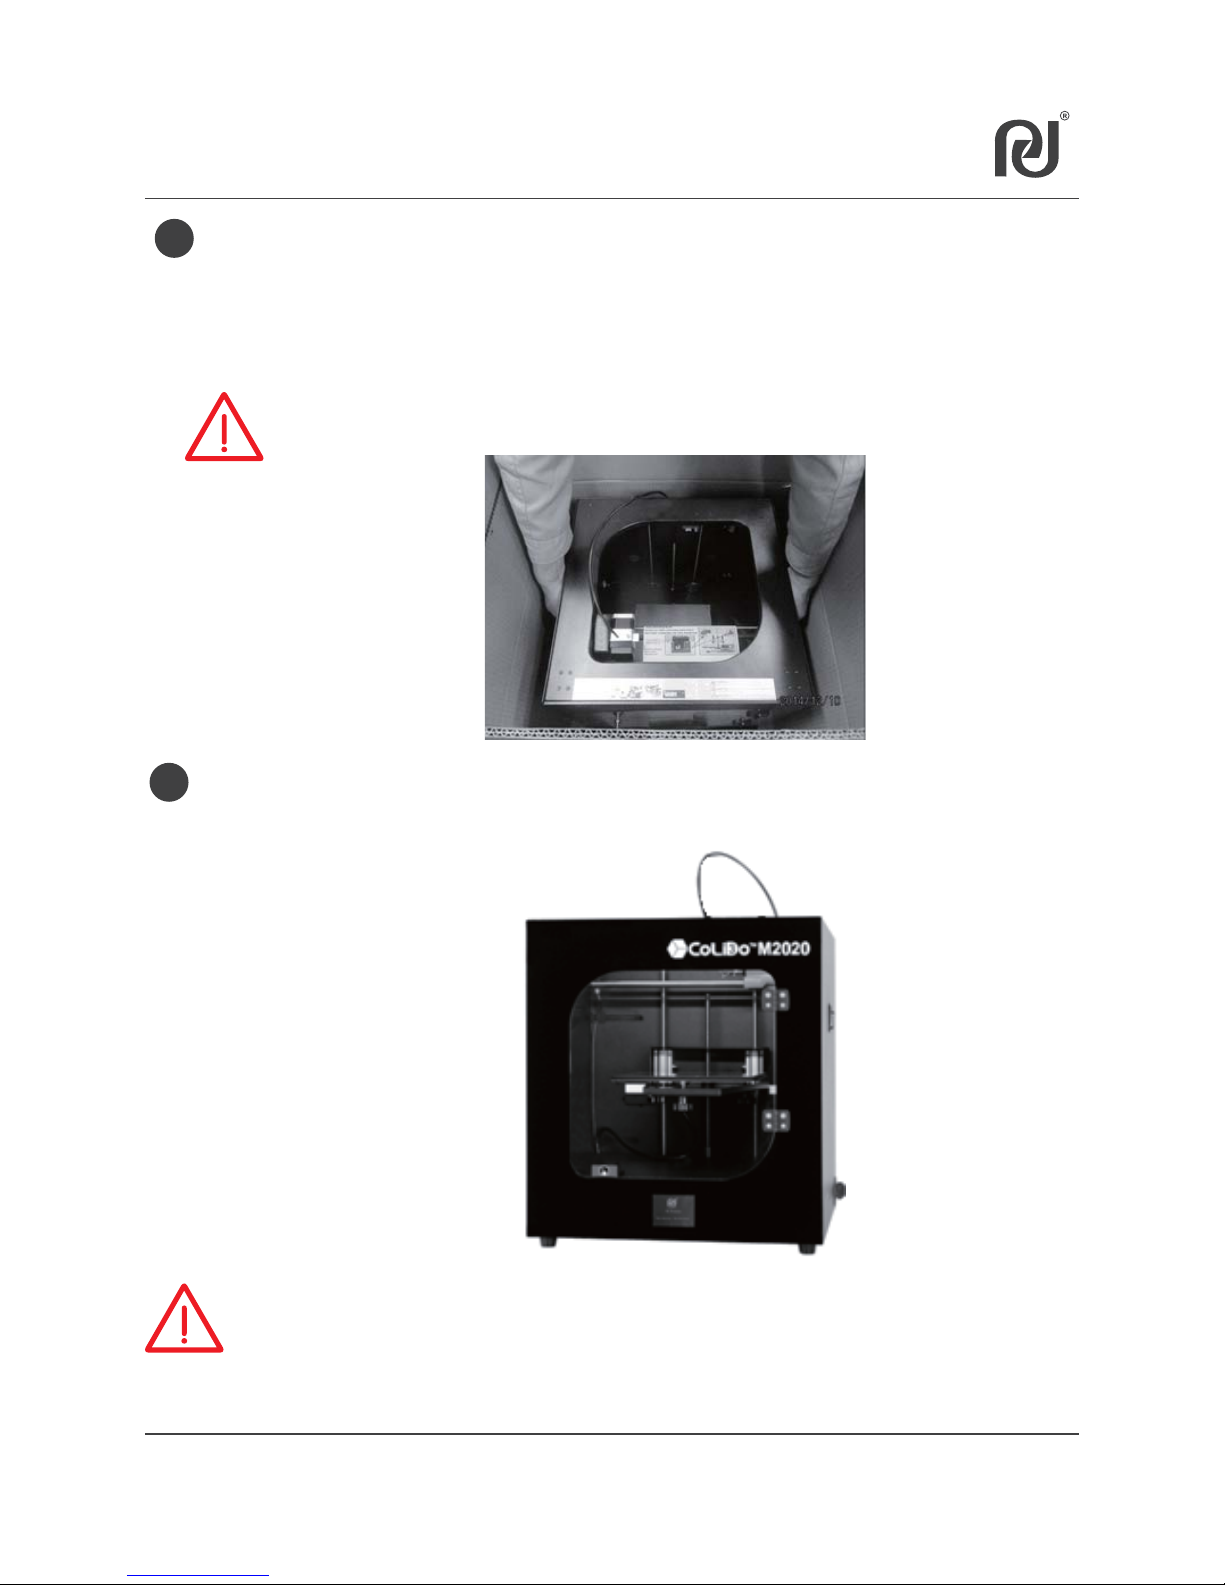
5.3 Take out CoLiDo Printer from packaging box
1
Hold firmly the package foam of the Printer as shown on picture.
Carefully lift up the printer when taking it out of the box. Place the
Printer on flat ground and carefully remove the package foam and
bag of the Printer.
2
CoLiDo Printer is unpacked. Please keep the packing material in good
shape. It will be re-used in the future to avoid unnecessary damage
during transportation.
NOTE: Do not pull or twist the cable at any time.
NOTE: Please keep the packaging box and packaging foam in good
shape, it must be packed with original package when return the
printer for maintenance or repair to avoid unnecessary damage
during transportation.
Page 11
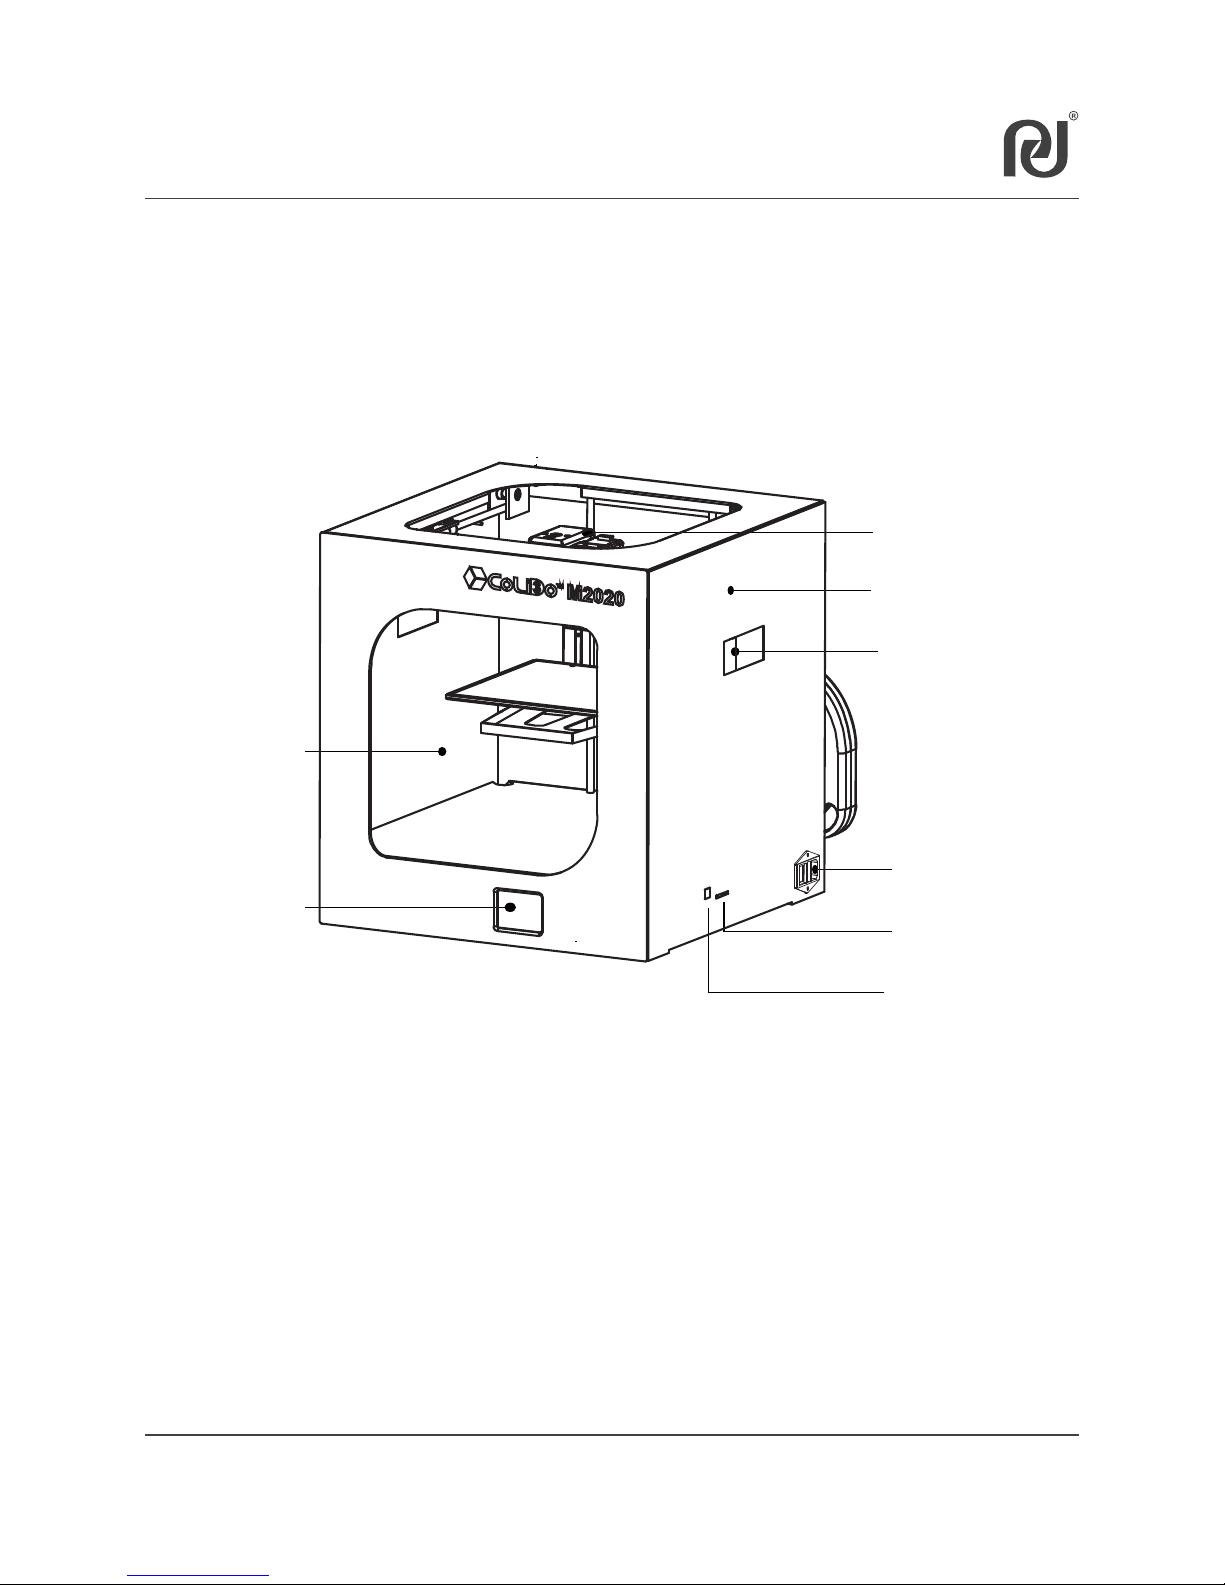
5.4 CoLiDo Desktop 3D Printer Structure Illustration
11
Frame
Lifting Handle
Front Door
Touch Screen
Power Port
SD Card Slot
USB Port
Printer Head
Page 12
12
Screws
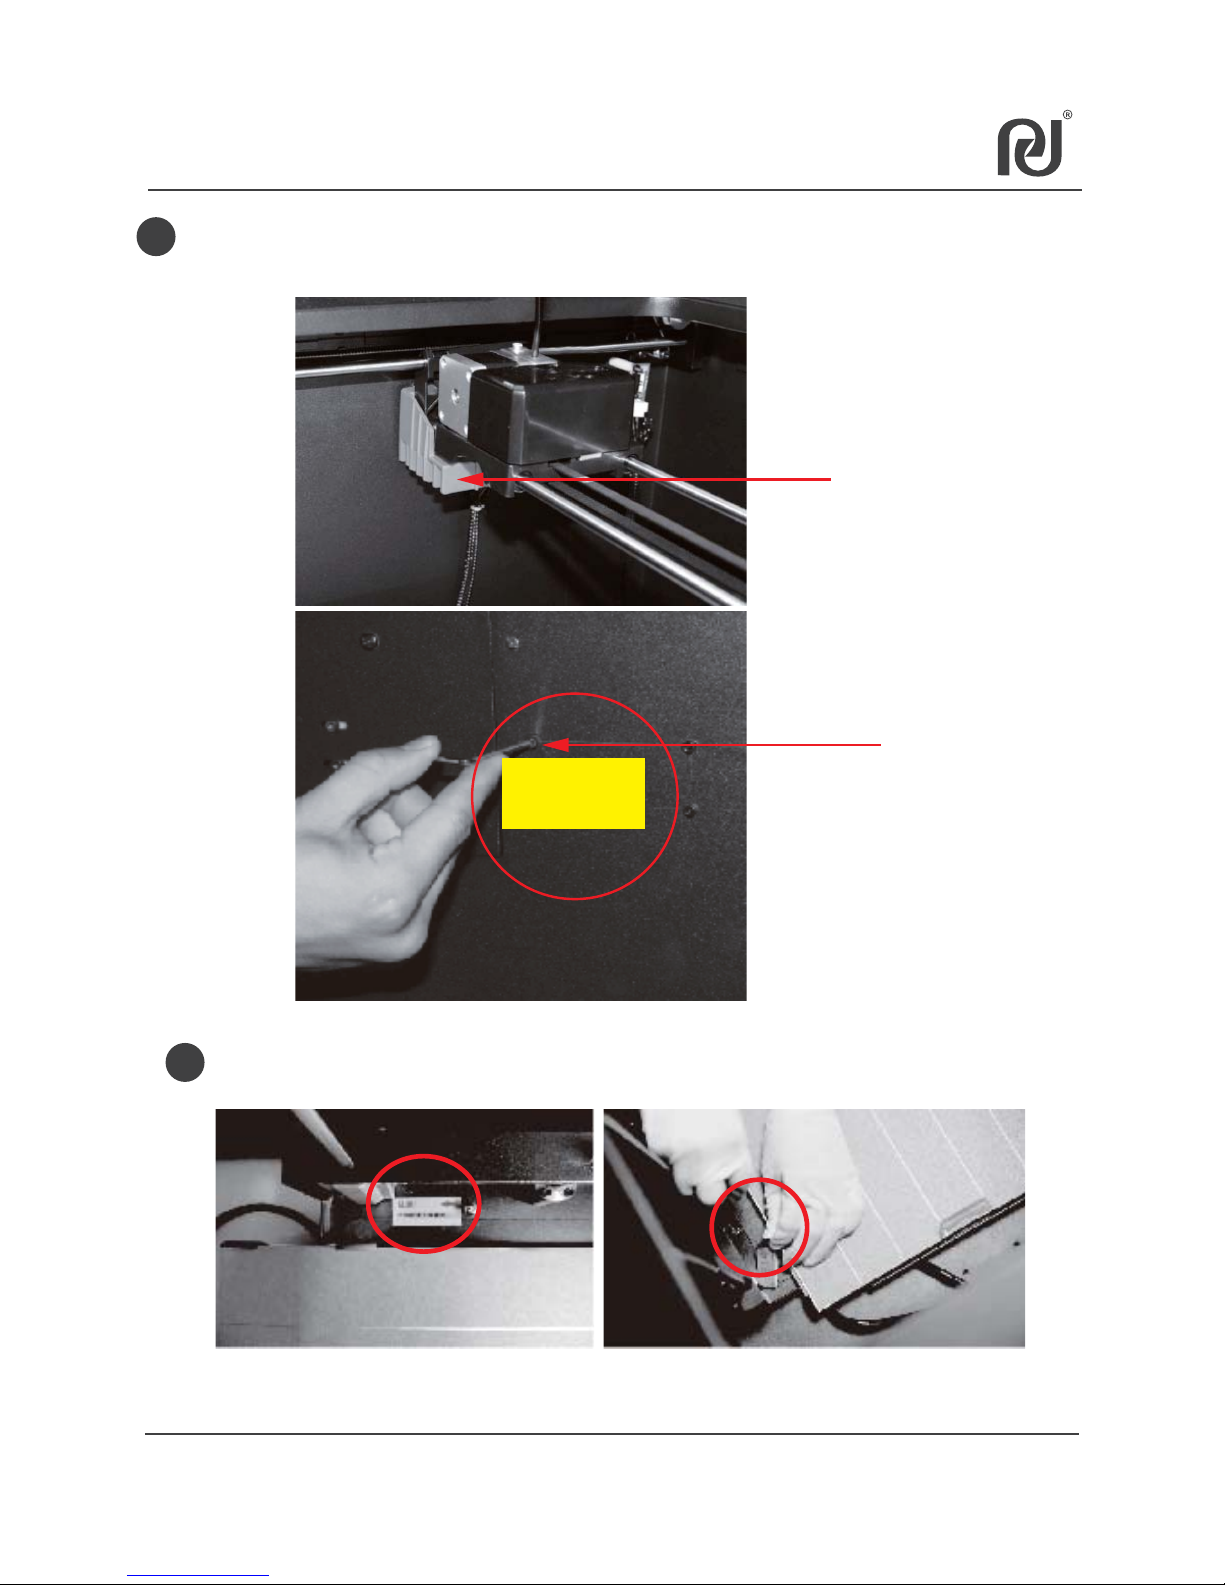
5.5 Unlock Printer Head and Heat Table
Remove the two locking brackets by unlocking the 4 screws to release the
printer head. (Use the Allen Key in the Accessory)
Locking bracket
Reminder!
Remove the locking bracket
by unlocing the 4pcs screws
before using.
1
2
Remove the locking screw
Remove the locking screw to release the Heat Table.
Page 13
13
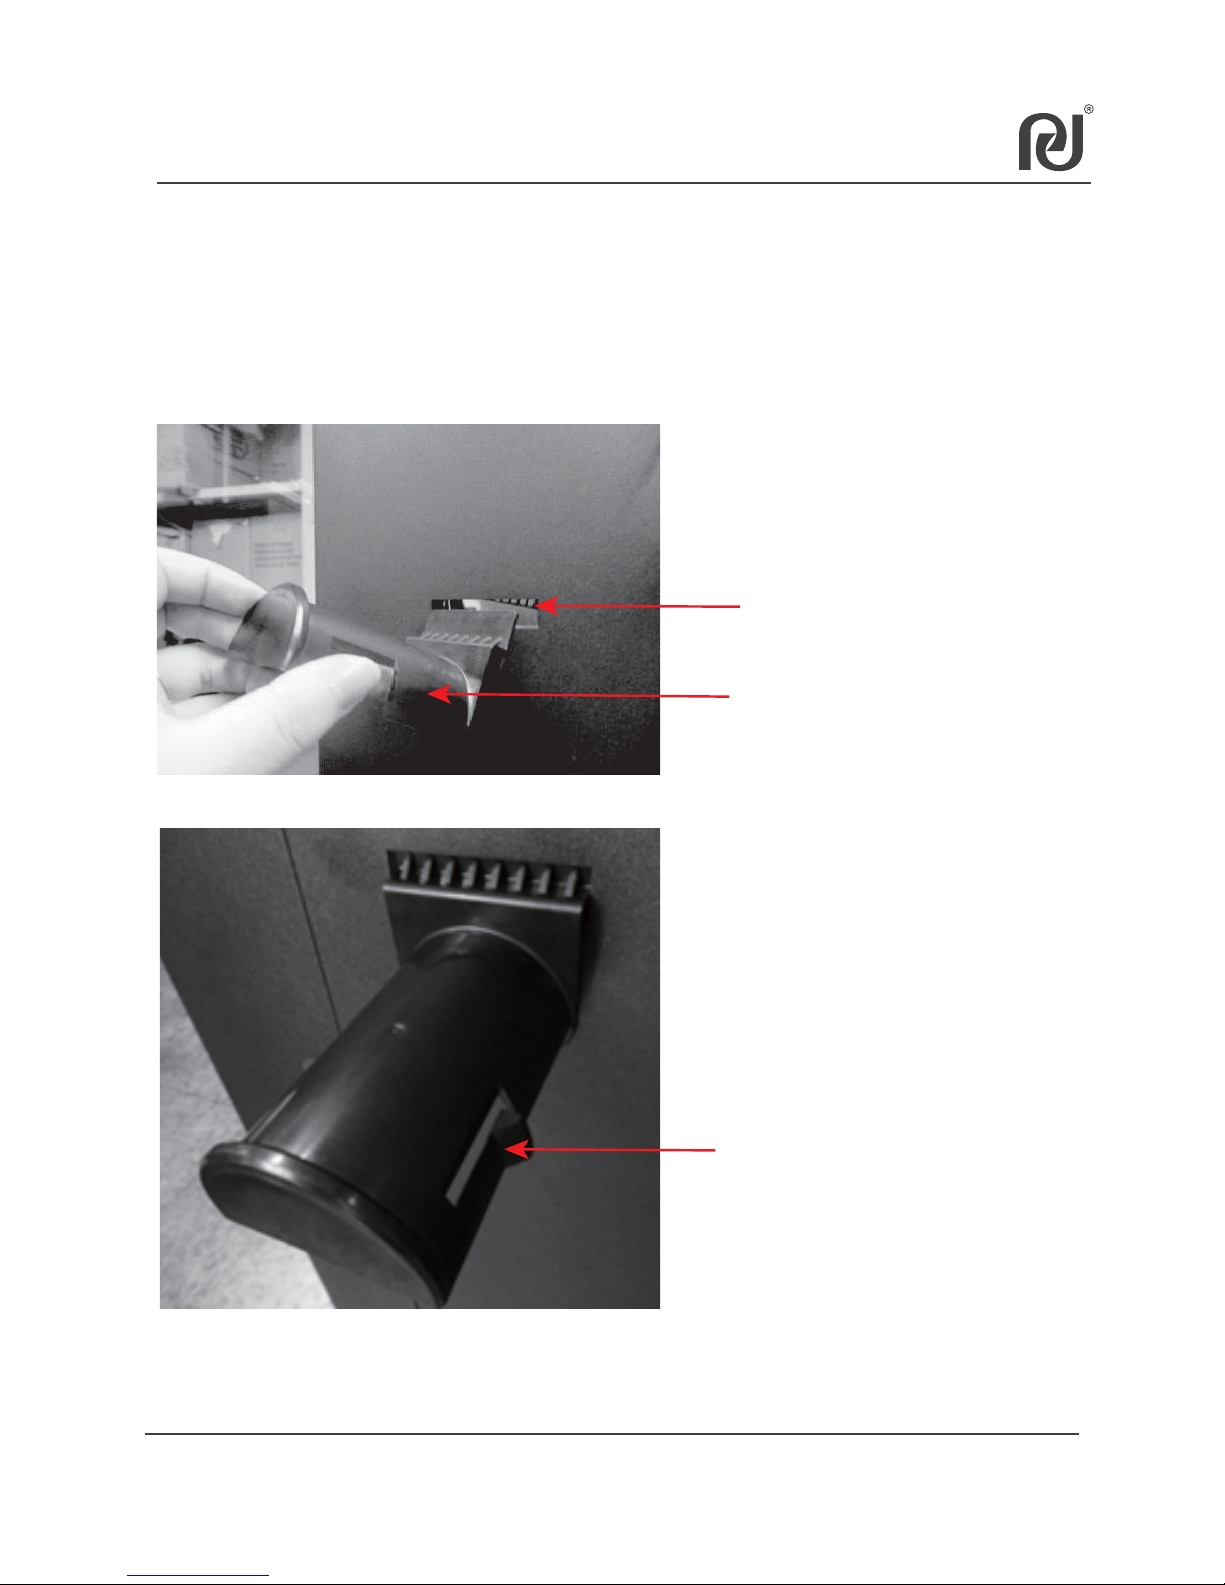
5.6 Install Spool Holder
Insert Spool Holder into the Spool Holder Slot located at the back of the
printer and put down to lock as shown below.
(Back view of the Printer)
Spool Holder
Spool Holder Slot
Spring of Spool Holder
Page 14
14
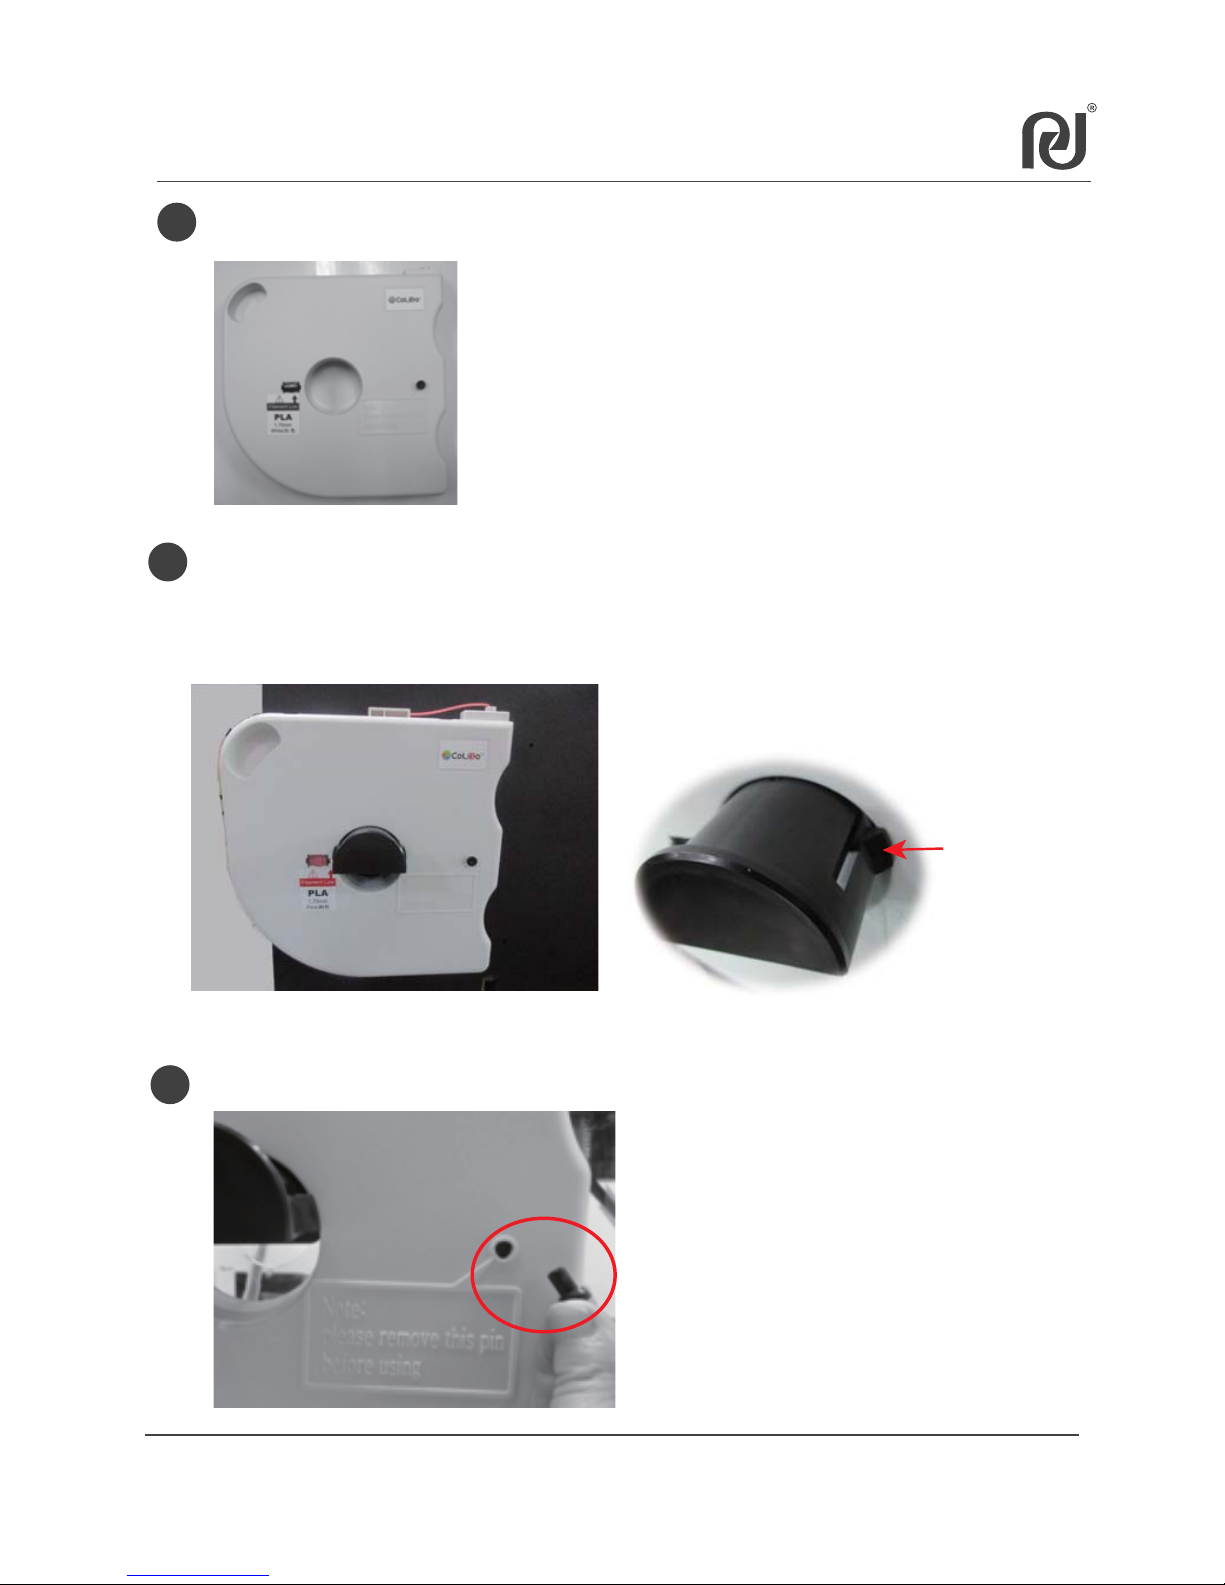
5.7 Mount Filament
1
Take out filament cartridge from the box and remove the vacuum bag.
2
Mount filament cartridge on the spool holder and lock by the spring of
the spool holder.
NOTE: The black thumb pin and the printed“Note”must be facing front.
3
Remove the black thumb pin to release filament.
NOTE: To avoid damage to the
cartridge, do not pull filament
until:
1. Black thumb pin is removed.
2. Cartridge is installed into the
printer.
Spring of
Spool Holder
Page 15
15
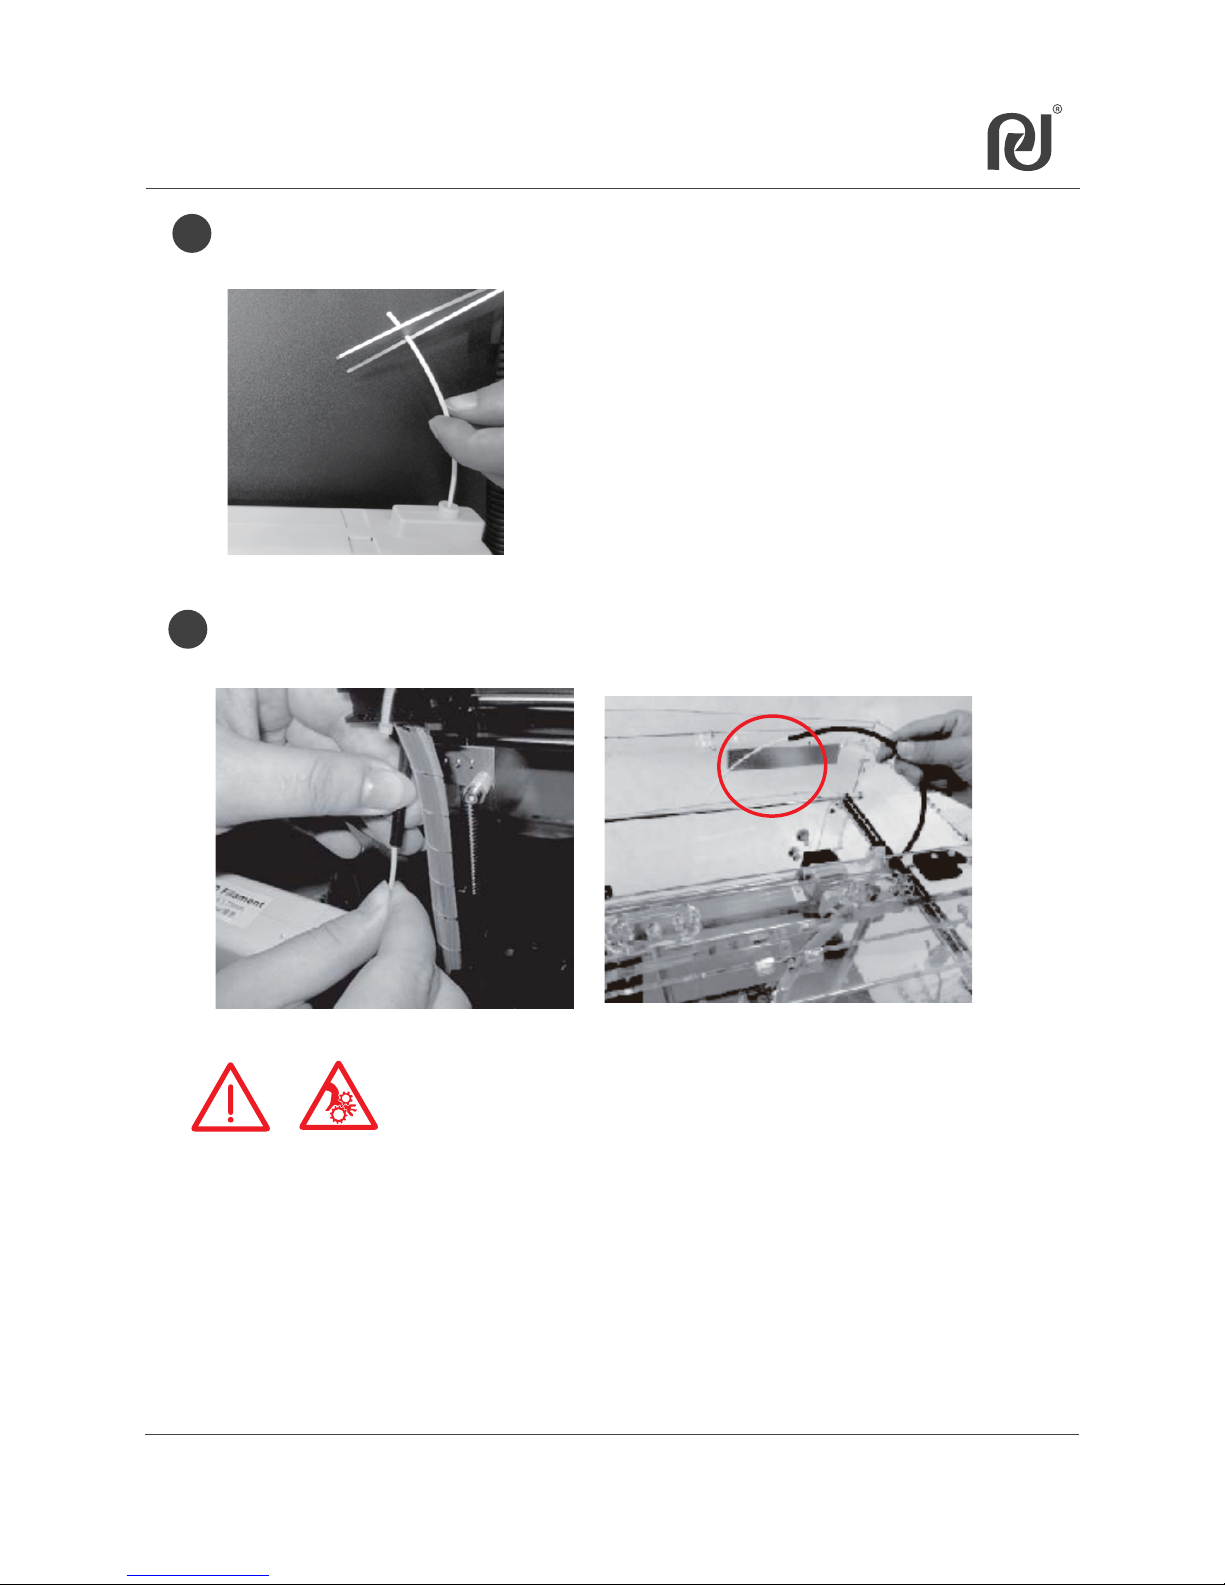
NOTE: Do not forcedly pull out the filament
from the cartridge in case the filament
disorder inside the cartridge.
Do not push back excess filament into the cartridge.
1
2
Gently pull the filament from the cartridge.
Cut the filament tip flat using scissor for easy installation.
5.8 Load the Filament to Printer Head
NOTE: Make sure that the Filament is inserted into the tube properly
to avoid filament jam during operation.
Insert filament into the tube (see below picture) until it
comes out from the other end of the tube.
Ensure that the filament is mounted on the left of the printer (Back view
of the Printer) and rotate counterclockwise direction.
Page 16
16
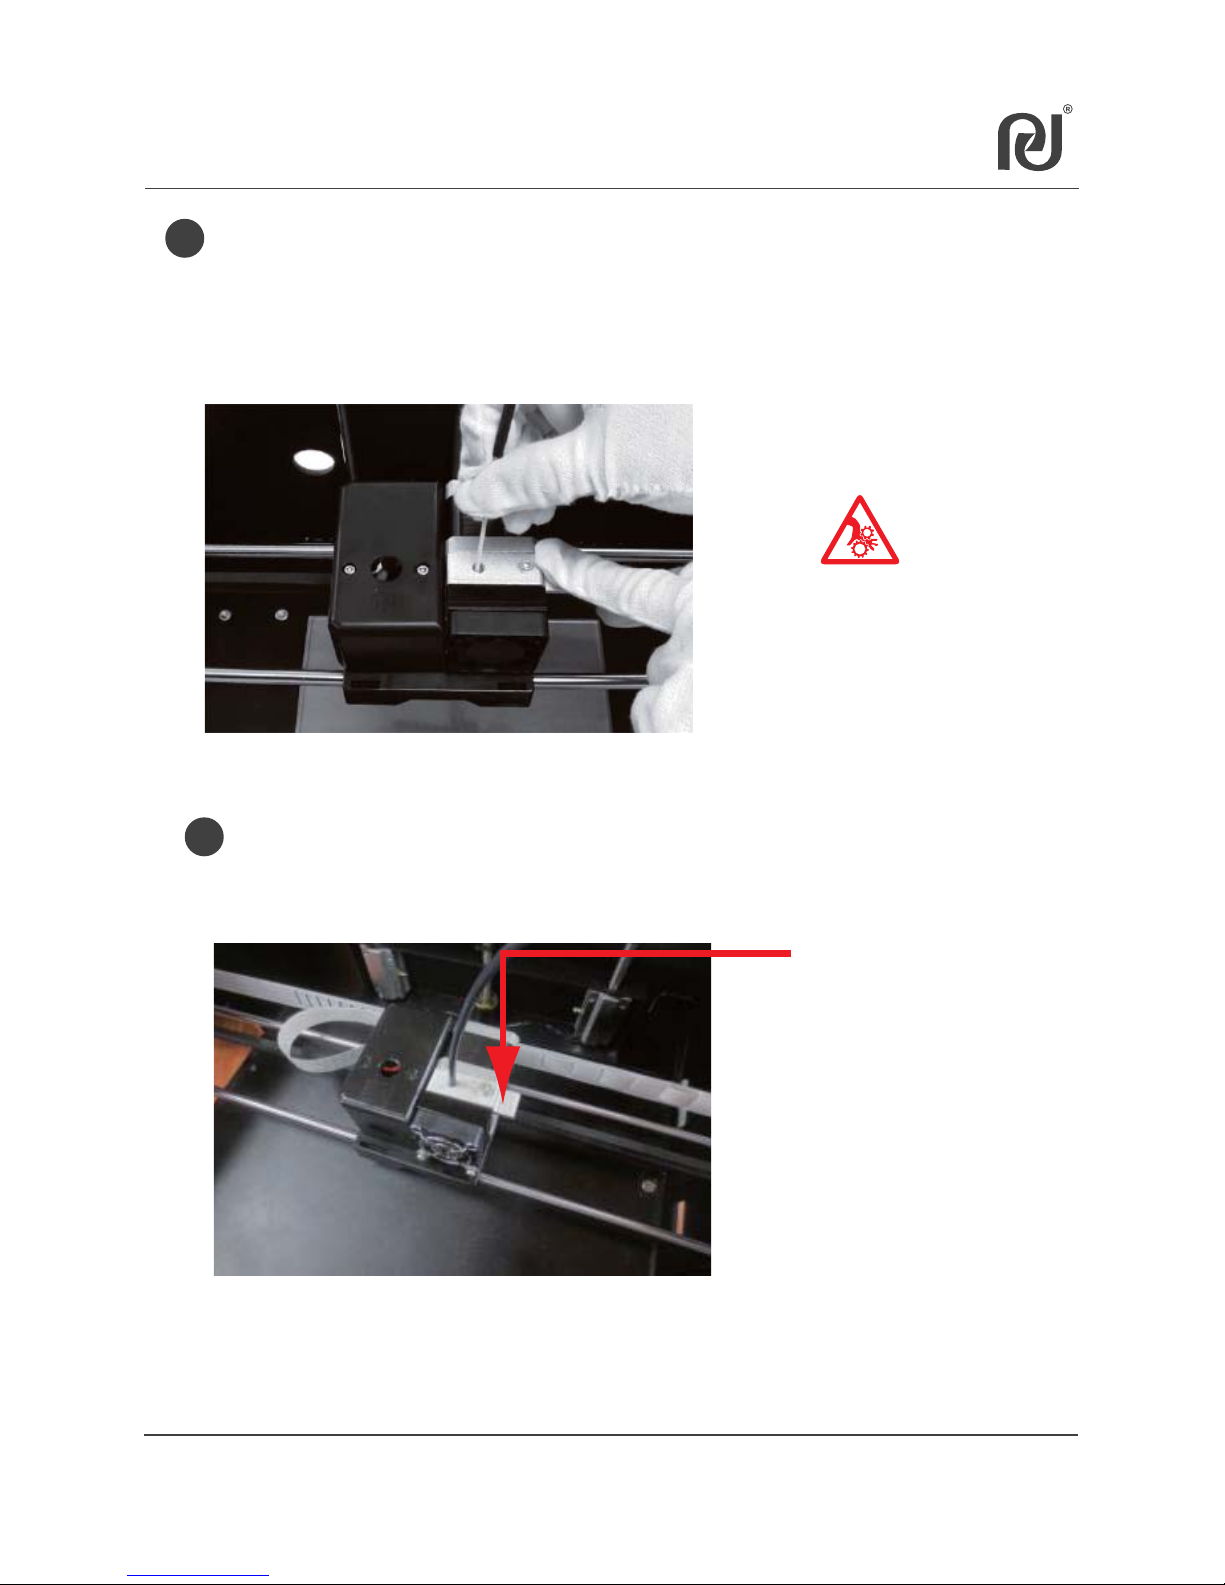
3
4
Push down the Printer Head arm.
Insert the filament into the hole located on the top of Printer Head.
It is better to make the filament more straight and insert it until reach
the end of the nozzle.
5.8 Load the Filament to Printer Head
Push and release the Printer Head arm to lock the filament.
Printer Head arm
Page 17
17
5.9 Install Glass Platform
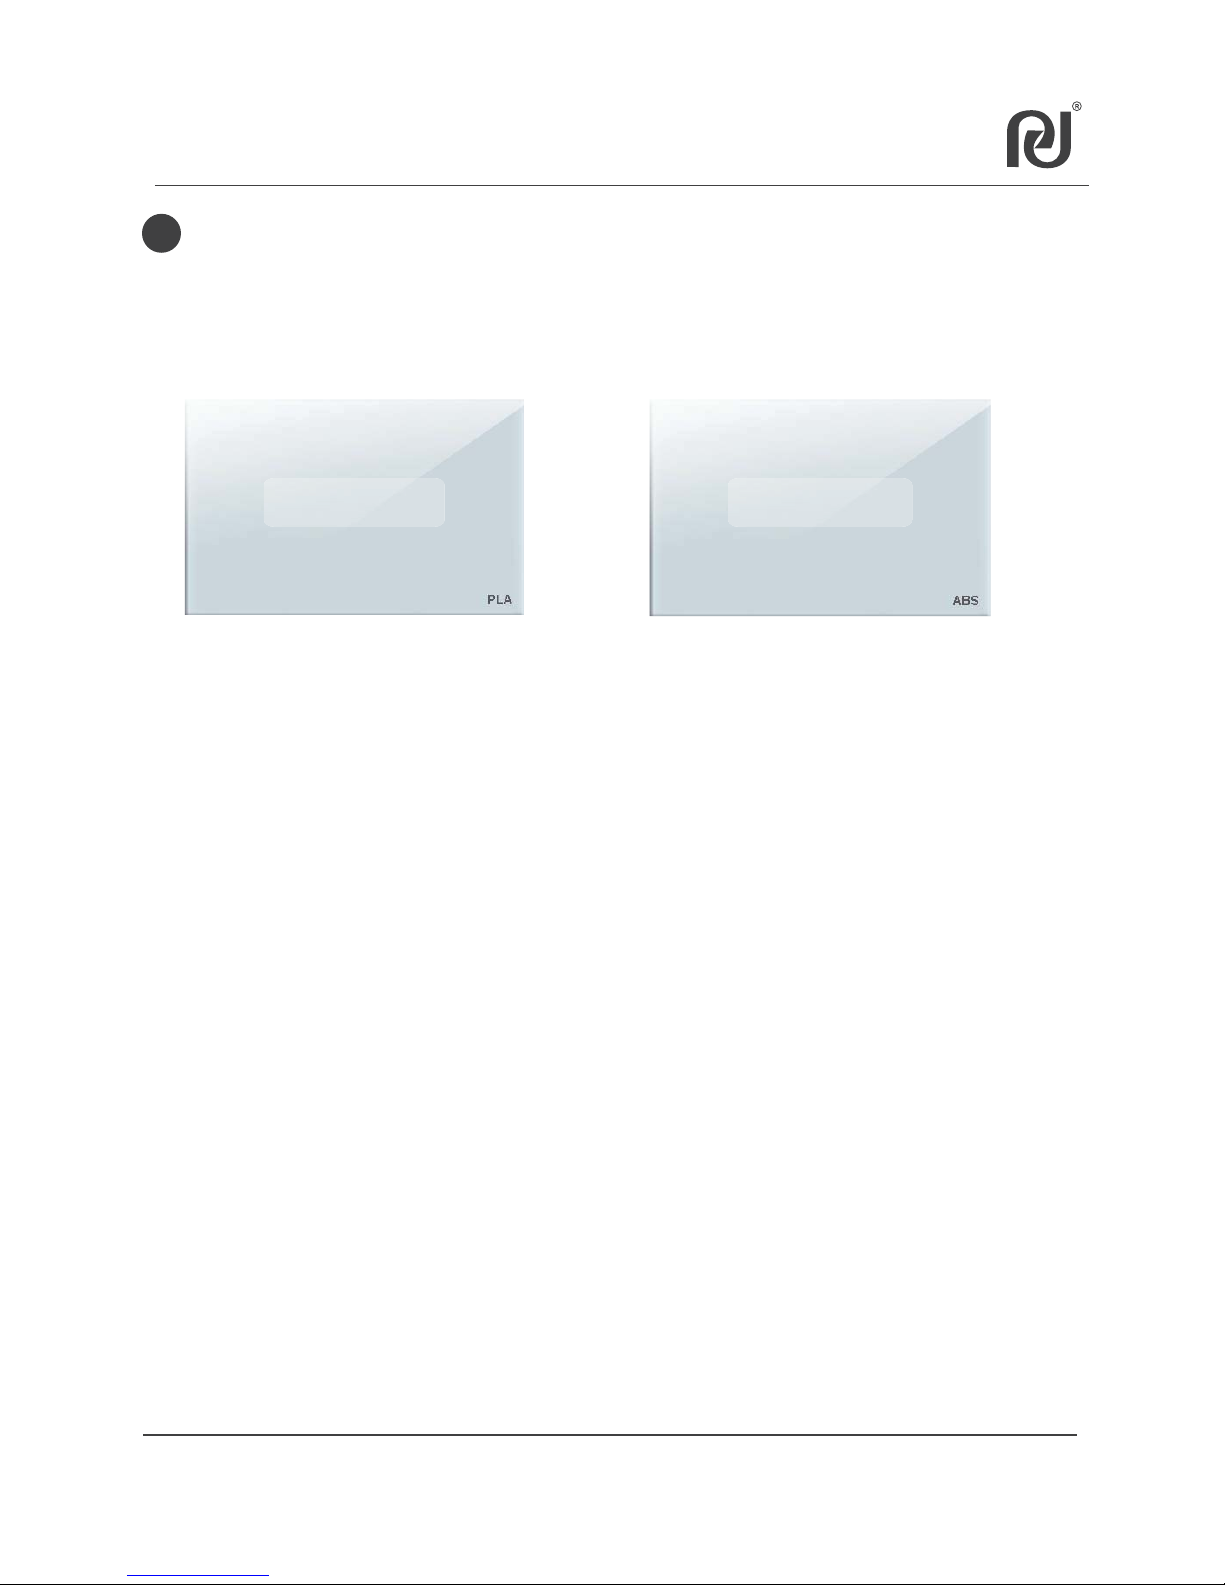
1
Get two Glass Platforms from package .
Select Glass Platform according to the selected filament material that will
be used. The two platforms are coated Glass Platform which mark
“PLA”or “ABS”to distinguish.
ABS Use Only
PLA Use Only
NOTE:
1. Do not change the platform heating temperature setting to avoid the
printed object not sticking on the platform.
(PLA platform: 65~70℃, ABS platform: 100~110℃)
2. Clean the glass platform using lint-free cloth or wet tissue. Don’t use
alcohol or any cleaning chemical solution in cleaning the glass platform,
it will damage the glass coating.
3. Please wait for the platform temperature to cooldown (25~30℃)
before removing the printed object. Quickly removing the printed object
will cause damage on the printed object and/or glass coating.
Coated Glass Platform
Page 18
18
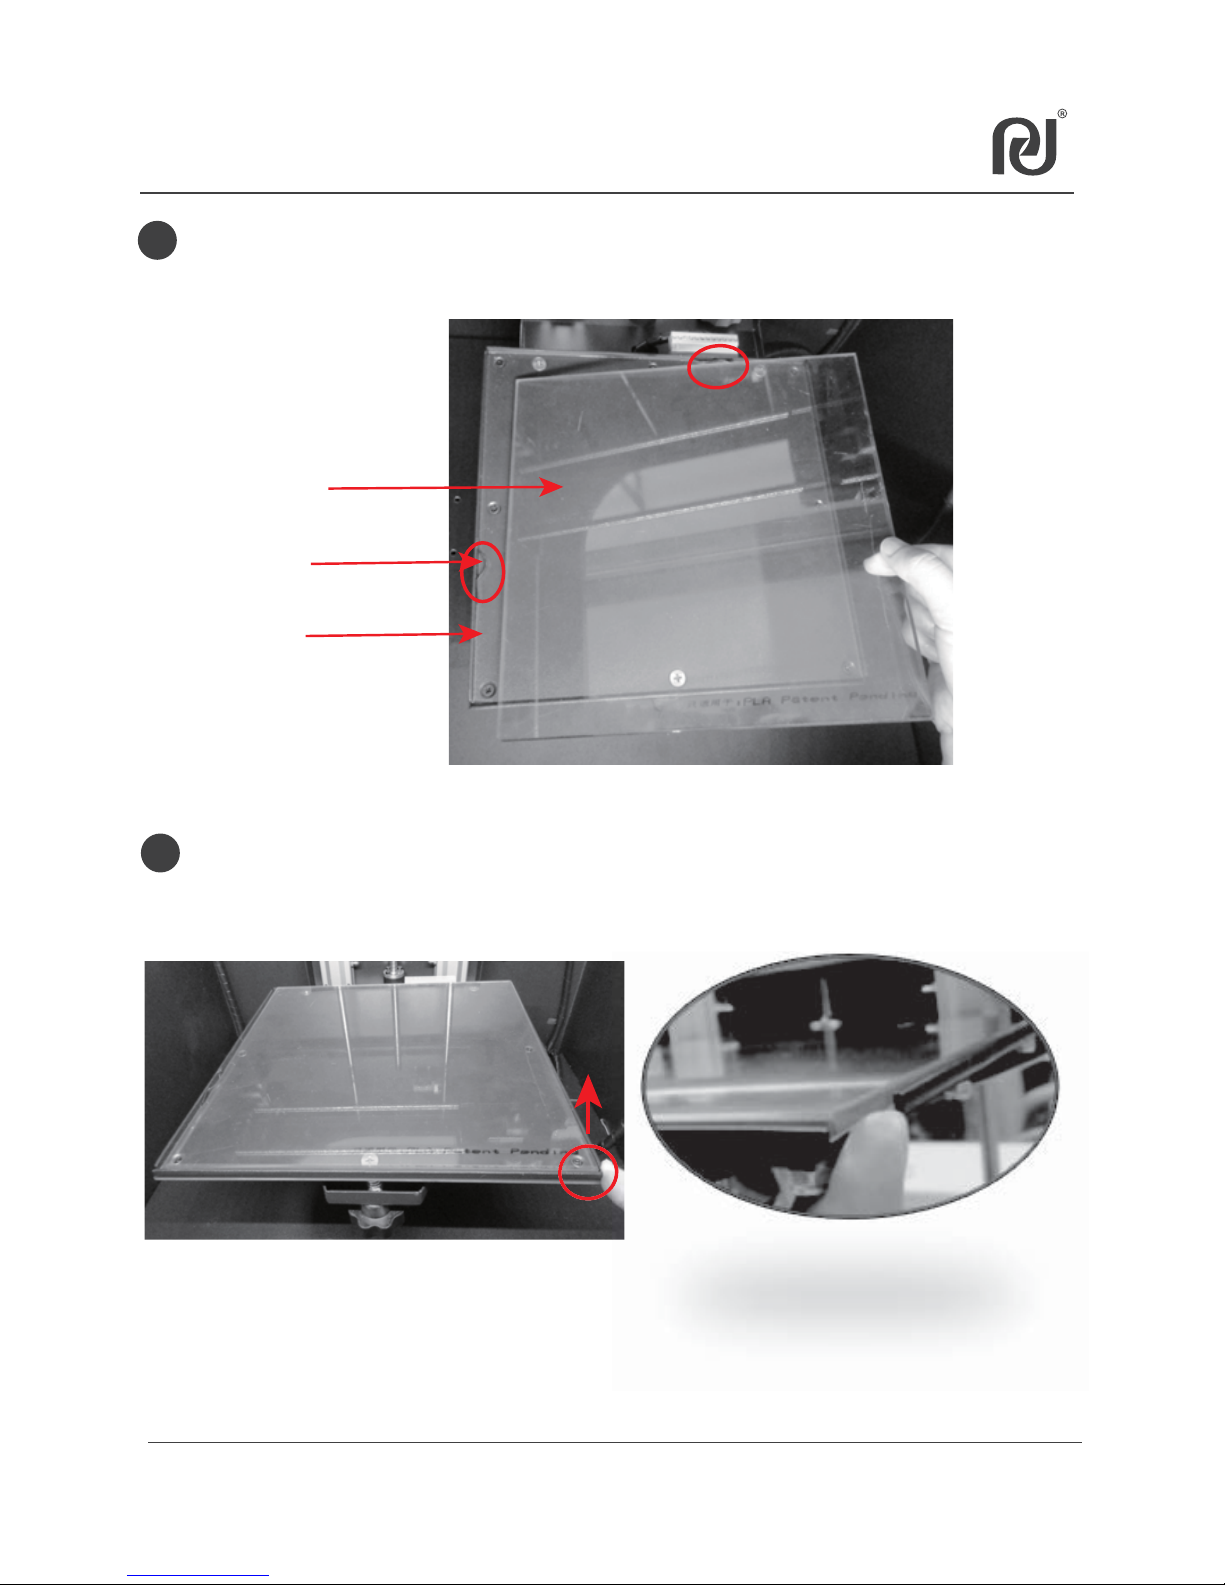
5.9 Install Glass Platform
2
Install the Glass Platform to the Heat Table of the Printer and locked by
2 spring sheets in the Heat Table.
Heat Table
Glass Platform
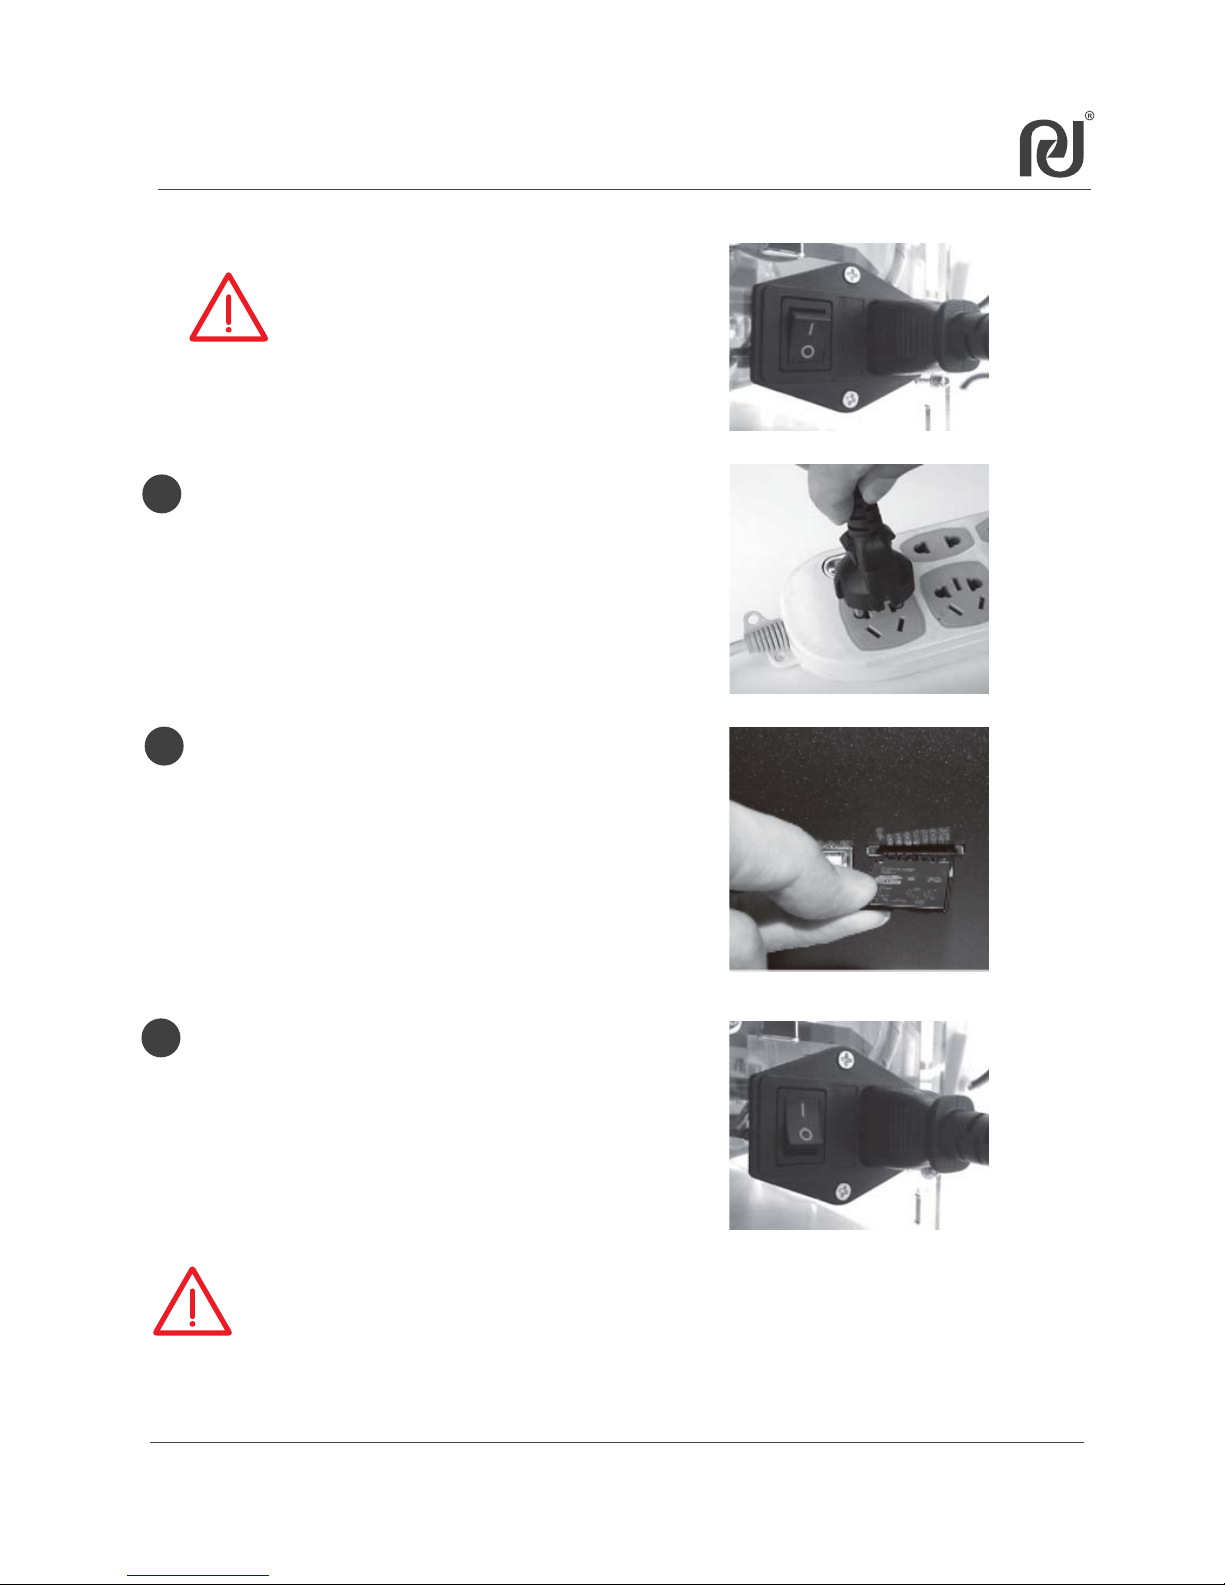
3
To uninstall the Glass Platform, push the right lower conner as below
picture.
Spring Sheet
Page 19
19
5.10 Power on CoLiDo Printer
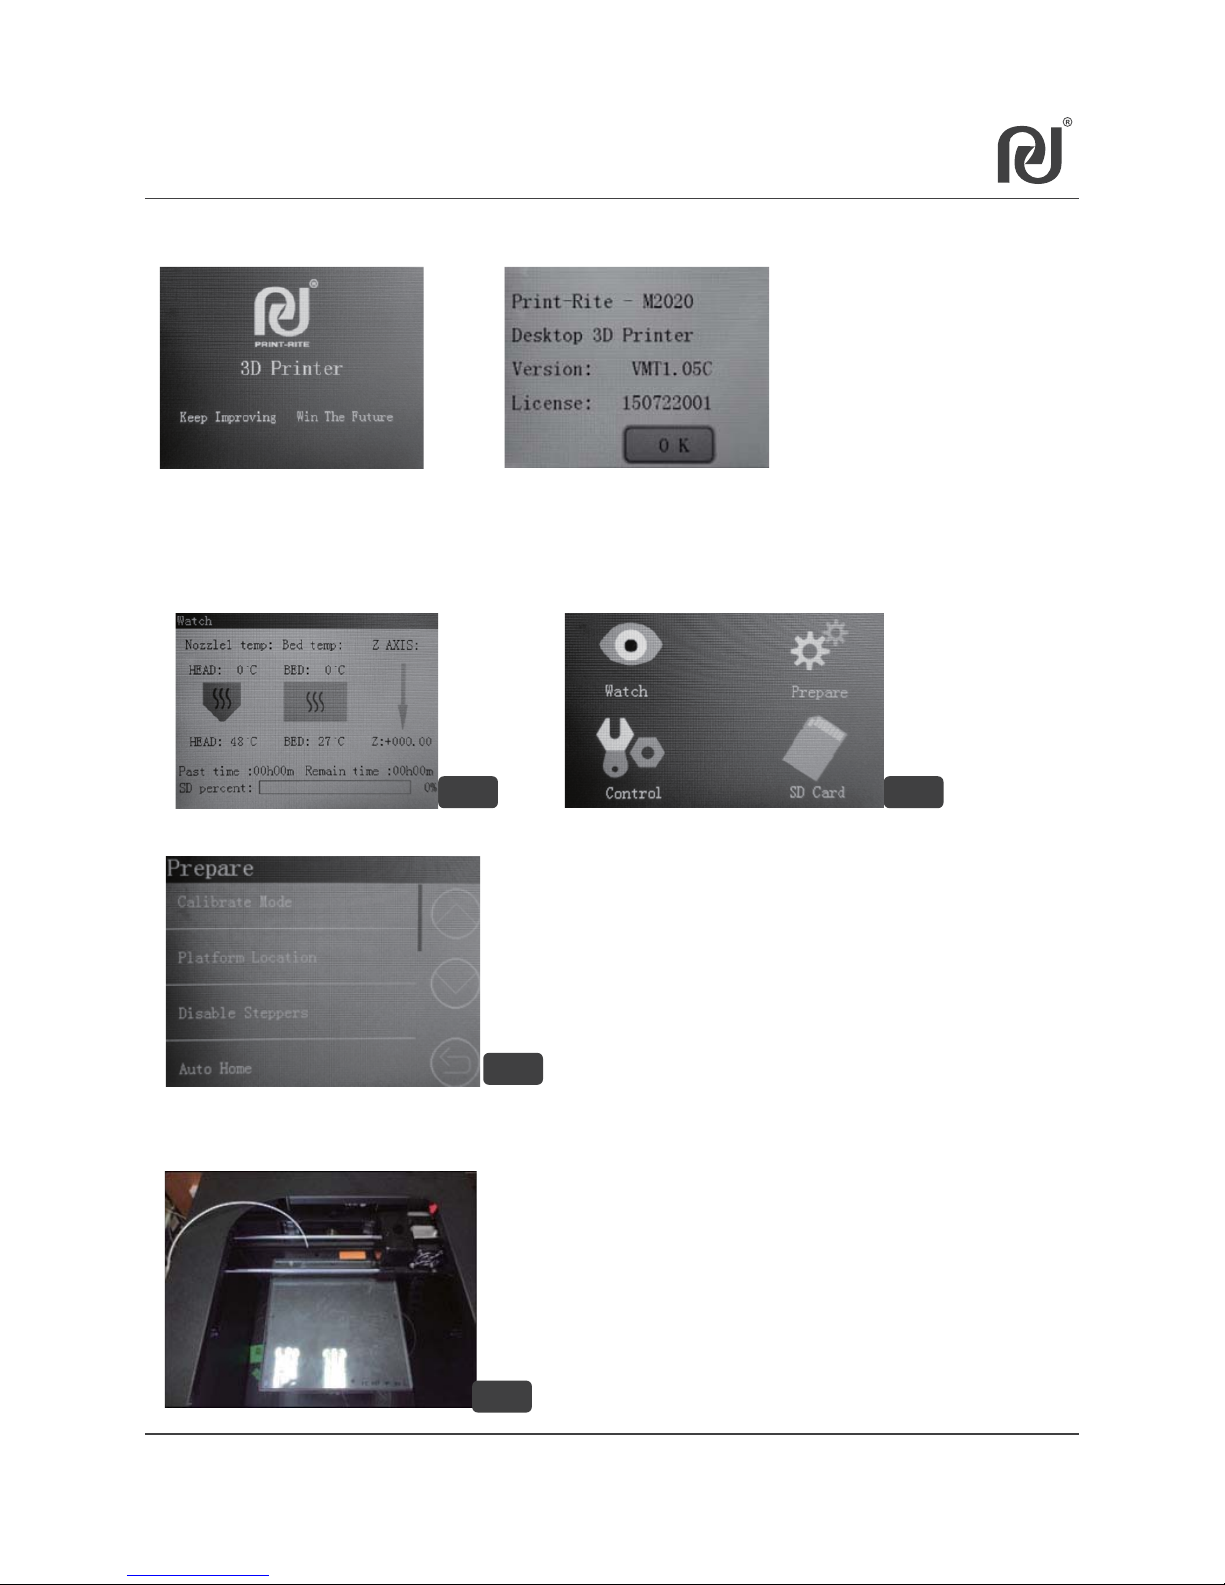
NOTE: Make sure printer switch
is at “O” position.
Connect Power Cable to the Printer
1
3
Plug-in the power cable to AC
power source.
Power on the printer by switching
to“I” position as shown.
2
CAUTION:
Only use the Power Cable included in the package.
Power Supply Socket should be near to the Printer , such
the power can be disconnected easily in case of emergency.
NOTE: The socket-outlet should
be installed near the printer and
should be accessible.
NOTE: Before inserting or removing
SD Card, please turning off the printer
to avoid damanging the SD Card.
Properly insert the SD Card in SD Card
slot. (SD card stores .gco files
to print directly)
Page 20
20
Chapter 6 CoLiDo Printer Calibrate and Test
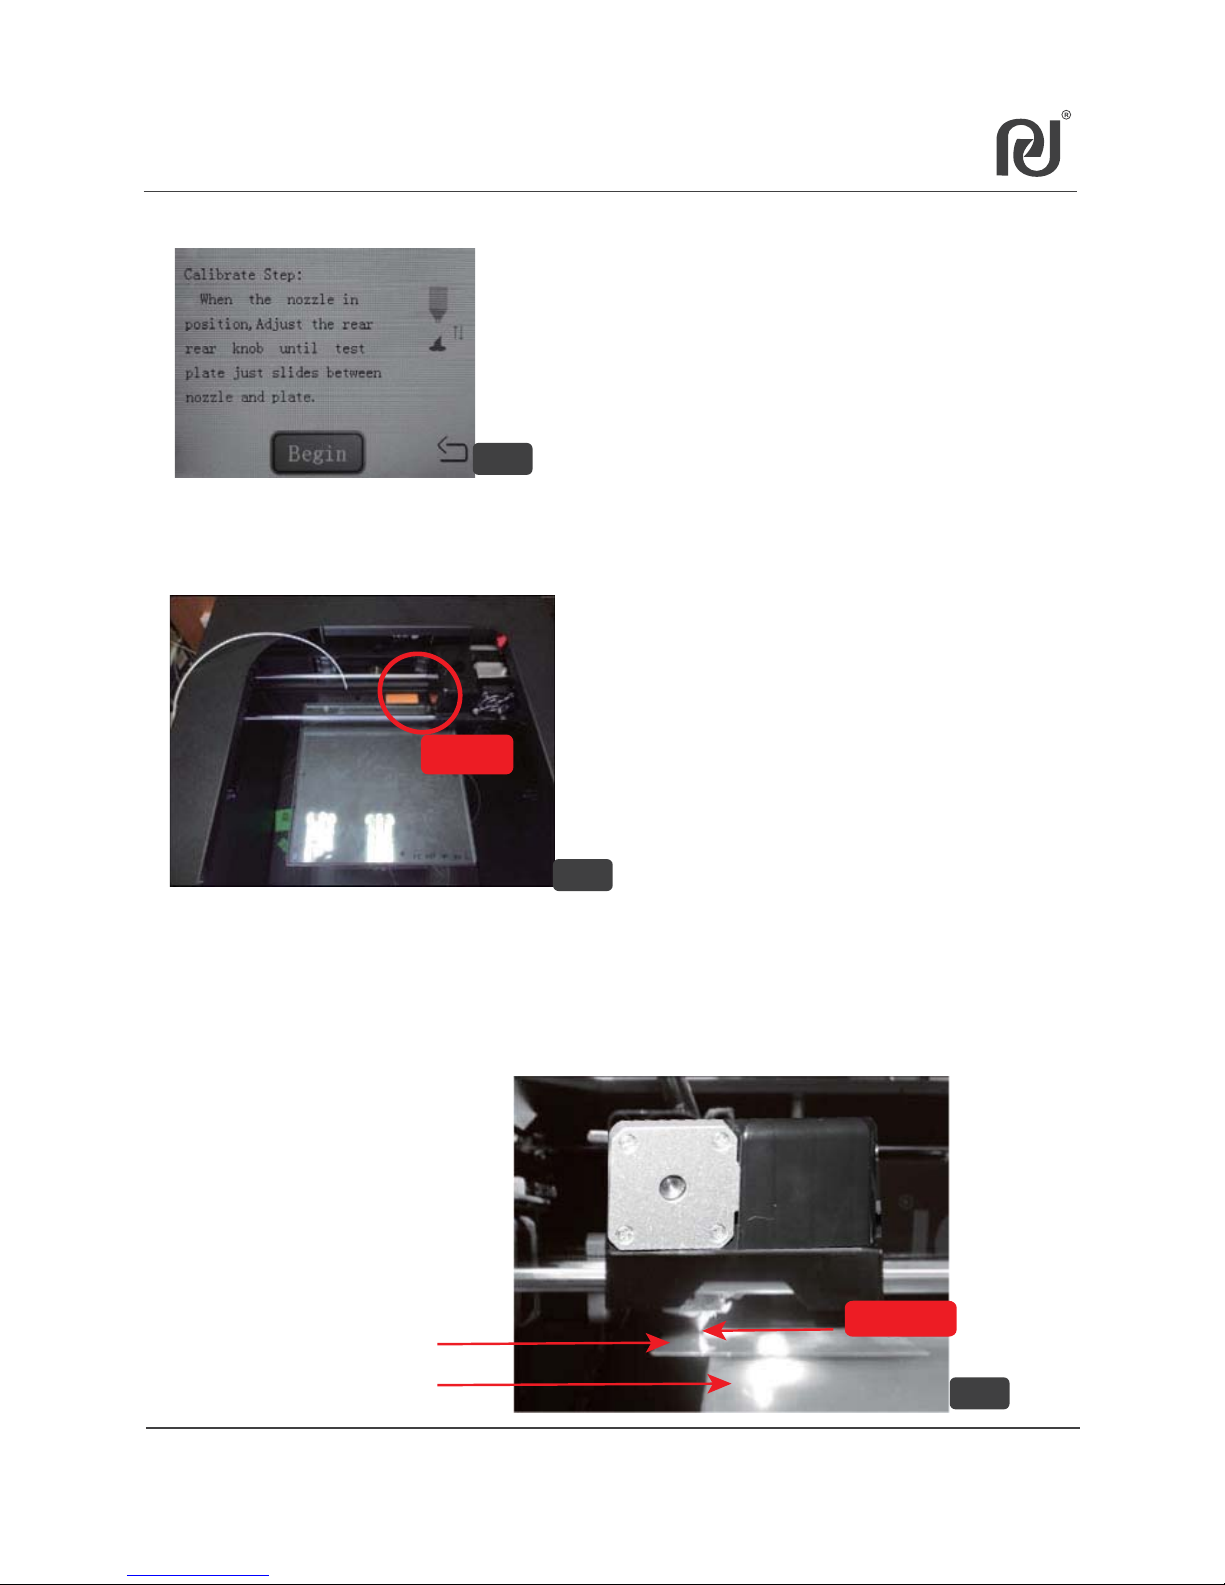
Initial display of LCD Panel
6.1 Main Menu
C
6.1.1 Touch “OK” to go to “Watch”menu (picture A). Touch the screen to go to
the main menu and you can see four submenus (picture B).
6.1.2 Touch“Prepare”to go to“Prepare”submenu. (picture C)
6.1.3 Touch“Calibrate Mode”, the printer head will go to HOME position, also the
platform will be lifted up to remove the white foam under the platform (picture D).
A B
D
Page 21
6.2 Calibrate Mode
21
6.2.1 Touch “Begin” to start the calibration .
E
F
NOTE: “Calibrate Mode”is to guide user to
operate the printer and to check the
printer work well.
6.2.2 The platform will move up and the printer head will go to the 1st location
Point 1 (picture F).
Point 1
Nozzle Tip
6.2.3.1 Use the test sheet to check the gap between the nozzle tip and the
platform. (see picture G)
6.2.3 Start to calibrate the table and nozzle.
Glass Platform
Test Sheet
G
Page 22
22
6.2 Calibrate Mode
LED Light OFF
Note: If the calibration standard condition is not met, platform level must
be adjusted.
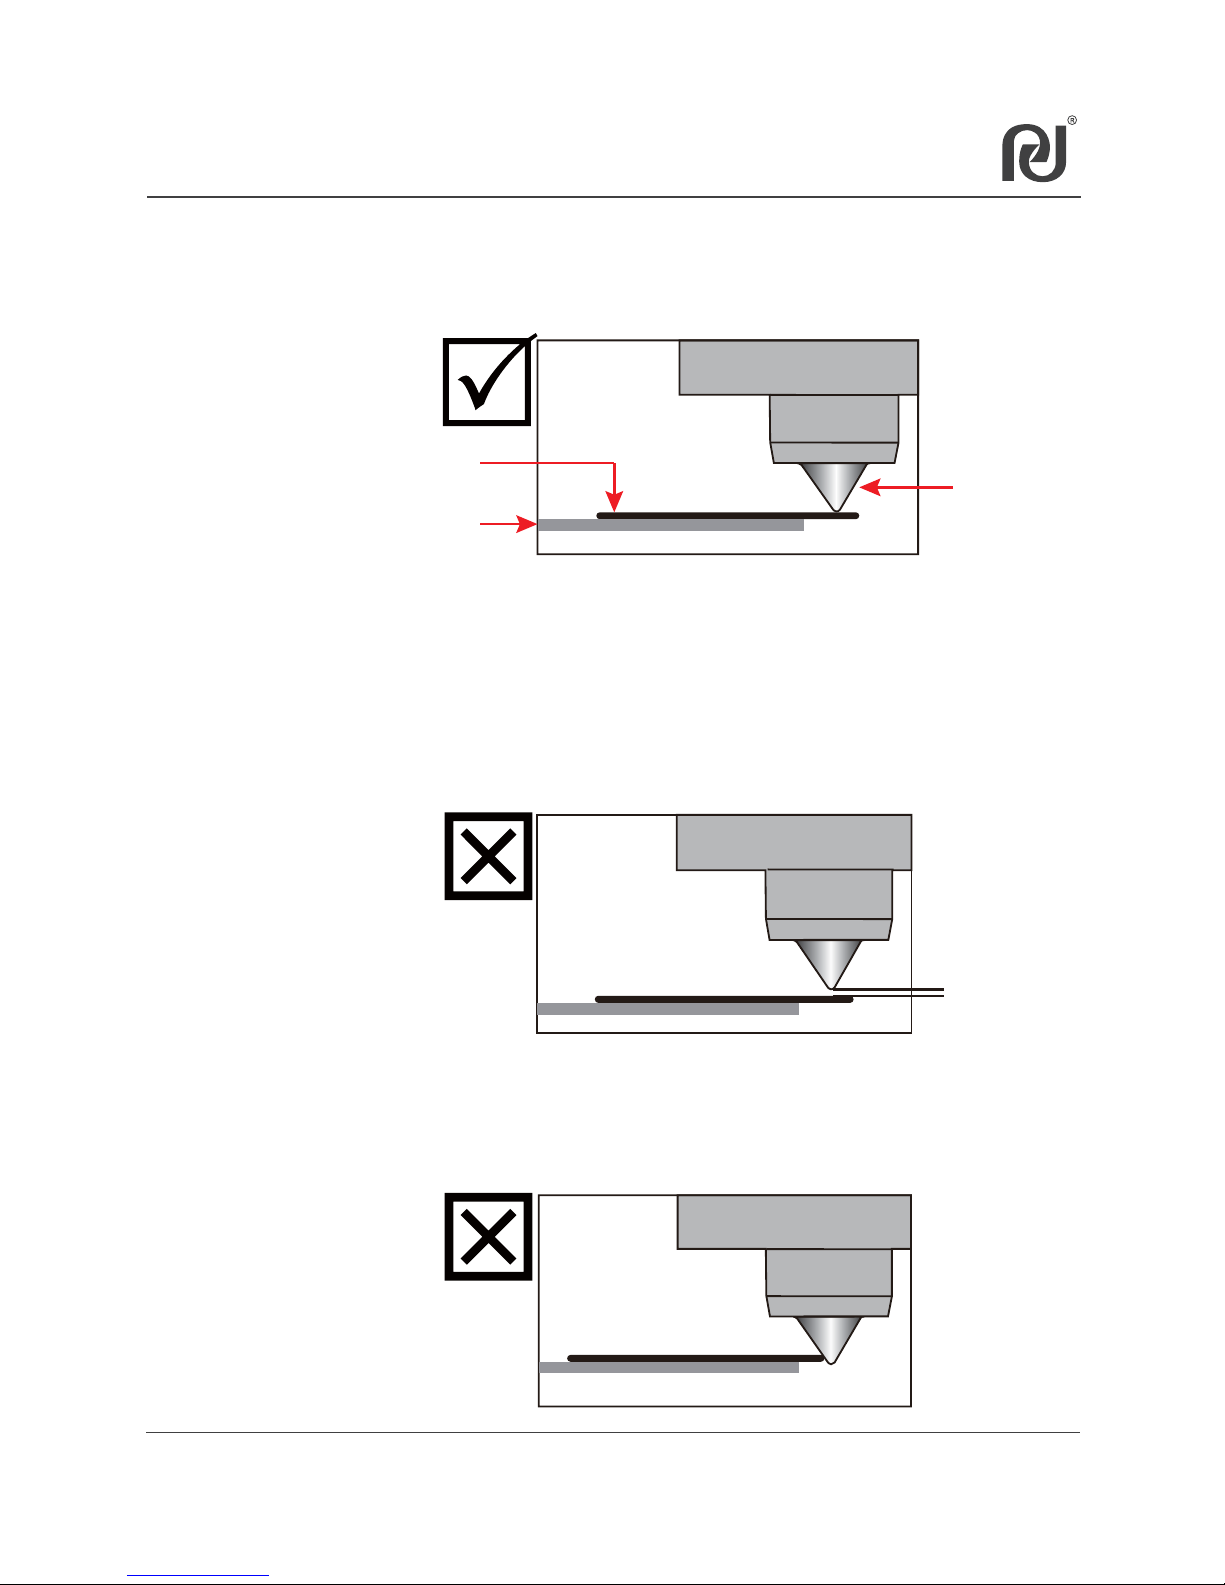
6.2.3.2
Calibration Standard Condition:
The test sheet must be lay down flat in the platform,
and the test sheet must be touching the nozzle tip.
Condition 1: There is a gap between the nozzle tip and the test sheet.
Adjustment 1: Rotate the adjusting knob under the platform clockwise
until the test sheet just touch the nozzle tip as standard
condition.
Condition 2: The test sheet is over the nozzle tip.
Adjustment 2: Rotate the adjusting knob under the platform counterclockwise
until the test sheet can just touch the nozzle tip as standard condition.
Nozzle
Platform/Heat Table
Test Sheet
Page 23
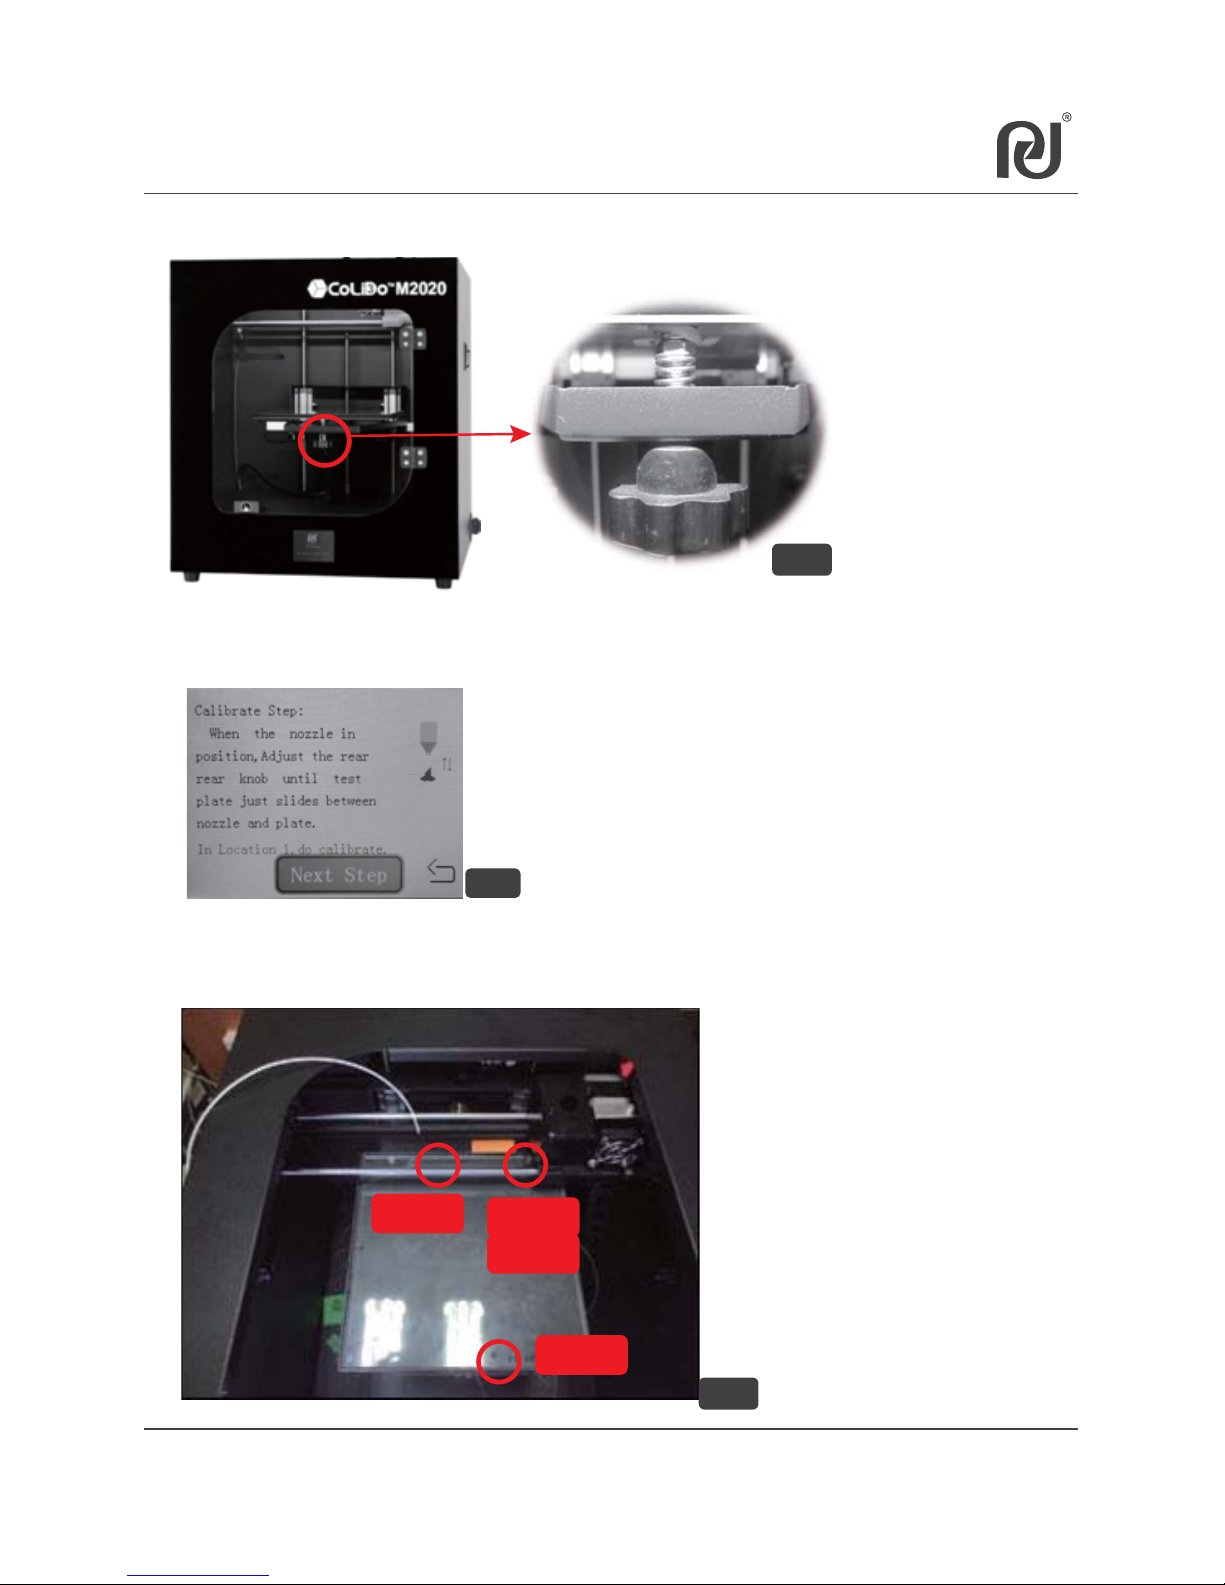
The adjusting knob location as picture H (total 3PCS).
H
6.2.4 After rotate the adjusting knob to meet the Calibration Standard Condition,
Touch “Next Step”(picture I) to go to next point to calibrate.
6.2.5. Follow 6.2.3 procedure to calibrate point 2,3 and 4 as picture J.
(Point1 is same to Point4)
I
23
6.2 Calibrate Mode
J
Point 1
Point 2
Point 3
Point 4
Adjusting Knob
Page 24
6.3 Nozzle & Filament Test
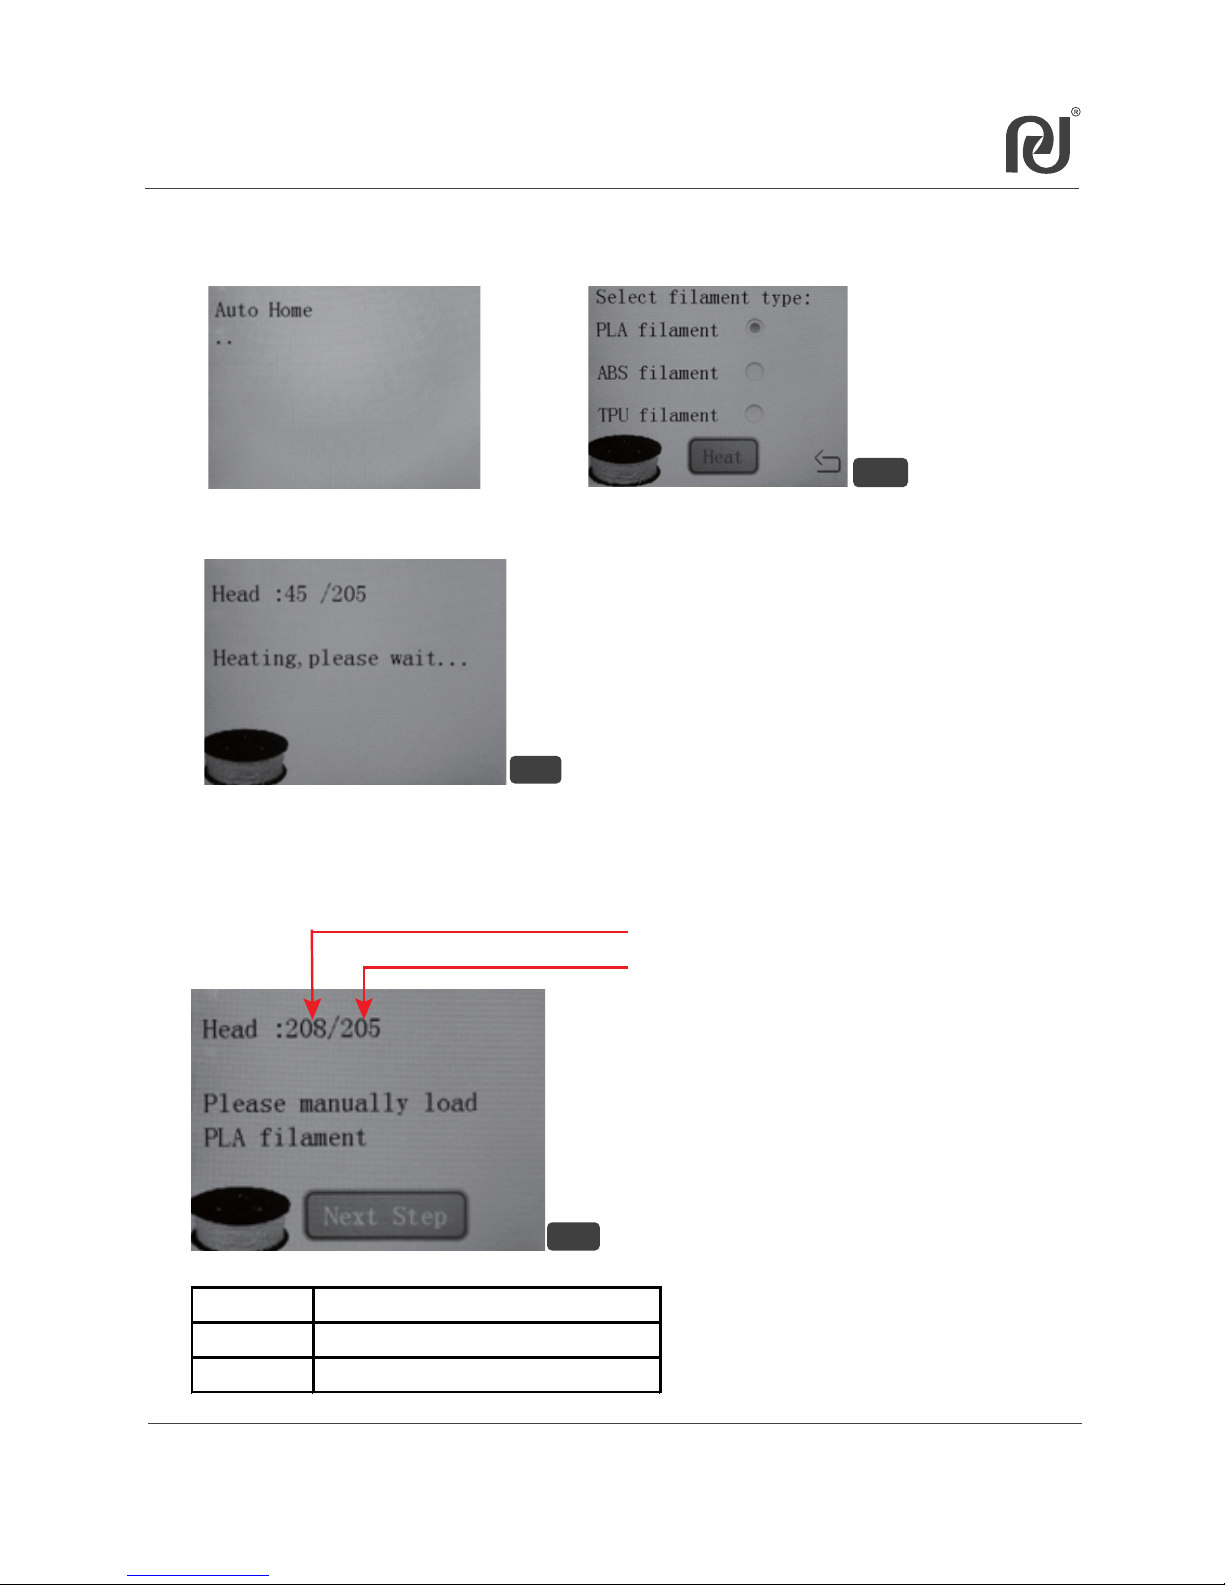
24
6.3.1 After calibration, the printer head will go to Home postion and the screen
will show Picture K, select the filament you are using.
6.3.3 Once the nozzle actual temperature reaches the setting temperature,
The screen will show Picture M, make sure the filament is inserted into the
printer head correctly.
Filament Nozzle Setting Temperature
PLA
205ć
ABS
220ć
NOTE: the setting temperature for PLA
and ABS is different as below. Incorrect
temperature setting will result to printer
damage.
Nozzle Actual Temperature
Nozzle Setting Temperature
6.3.2 Touch “Heat”to heat up the nozzle as picture L.
K
L
M
Page 25
N
25
6.3 Nozzle & Filament Test
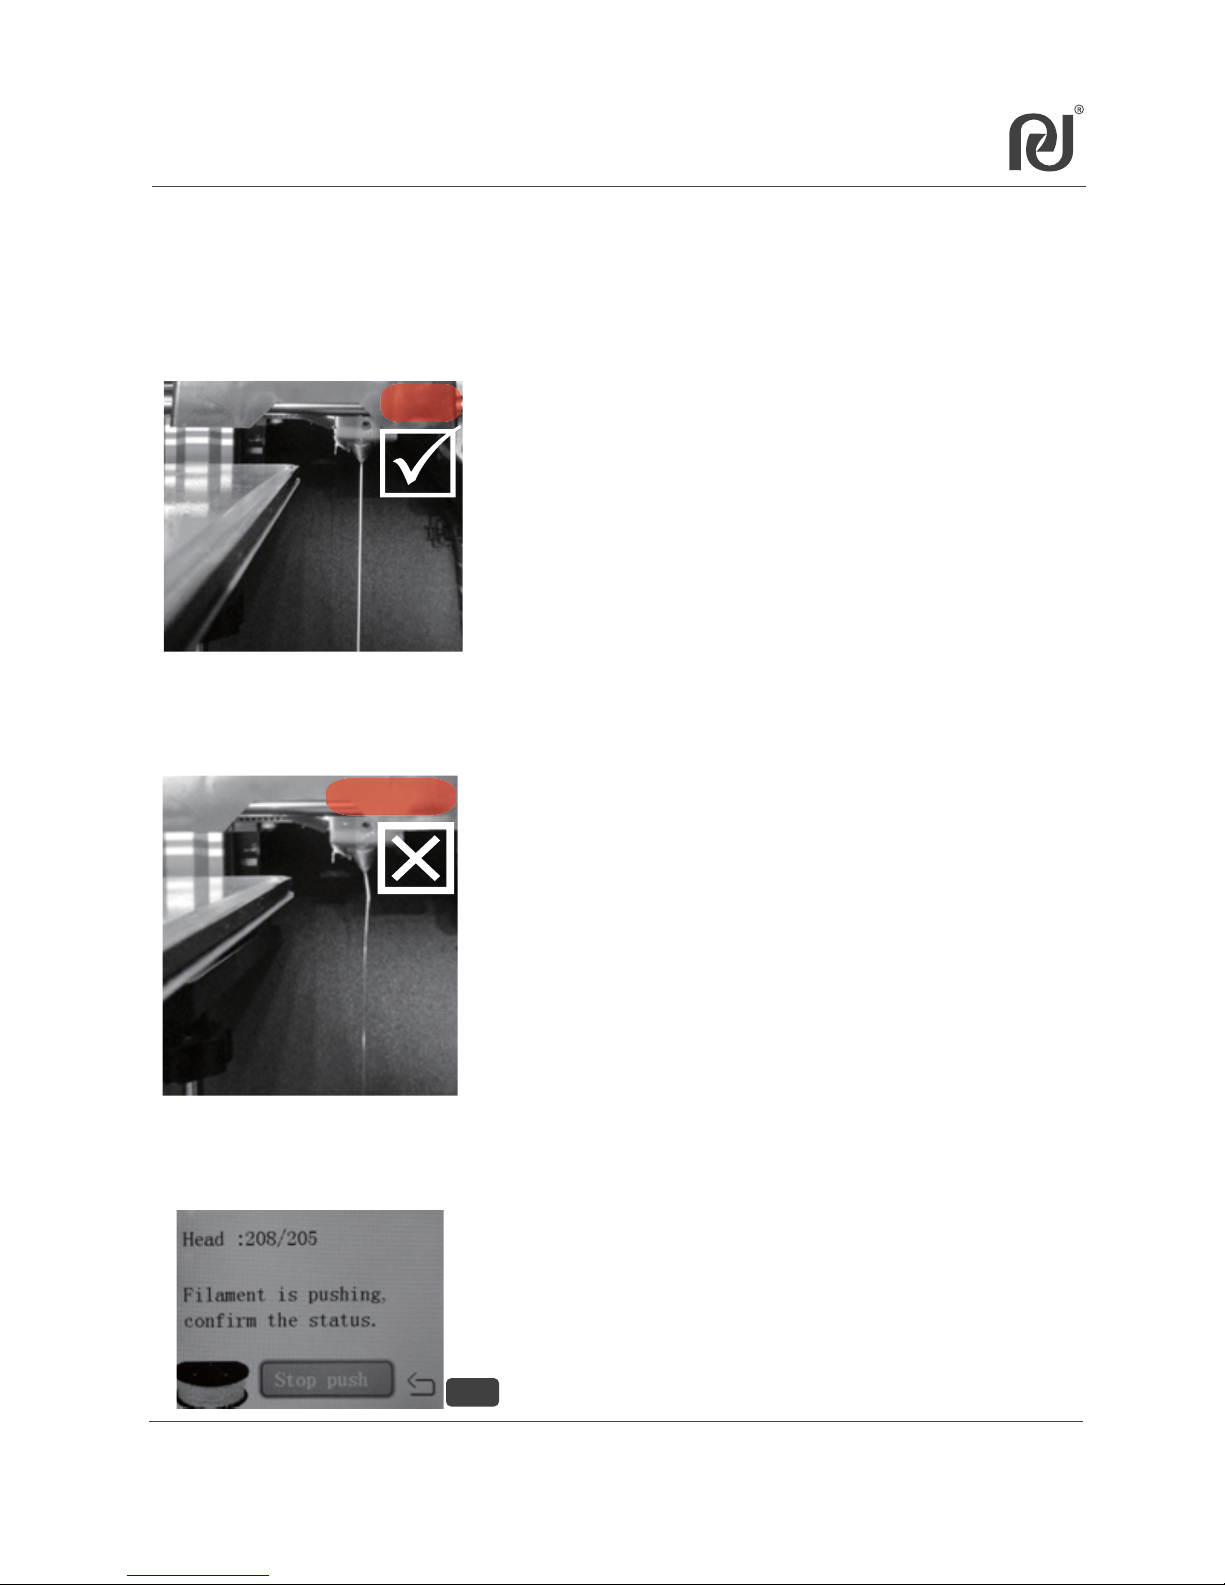
6.3.3 Touch “Next Step”, the filament will auto load into the nozzle and
flow out from the nozzle. Check the melted filament flow condition
base on below instruction.
Good condition:
The melted filament flow out smoothly and continuously from the nozzle.
Good
Note: If the filament flowing is in No Good condition,
check the following.
a. Nozzle Temperature - must be the equal to
the set temperature and according to the
filament material melting temperature.
b. Nozzle Cleanliness - No Clogging by refer
to troubleshoot clogged nozzle label on the
side of the printer.
c. Filament Insertion on the receiving port
correctly.
If problem still occur kindly email
[email protected]
No Good condition:
The melted filament do not flow out smoothly and continuously from the
nozzle.
No Good
6.3.3 After checking the flowing status, touch “Stop push”as picture N to stop
the filament flowing and go to the printing test.
Page 26
26
6.4 Print test with SD Card
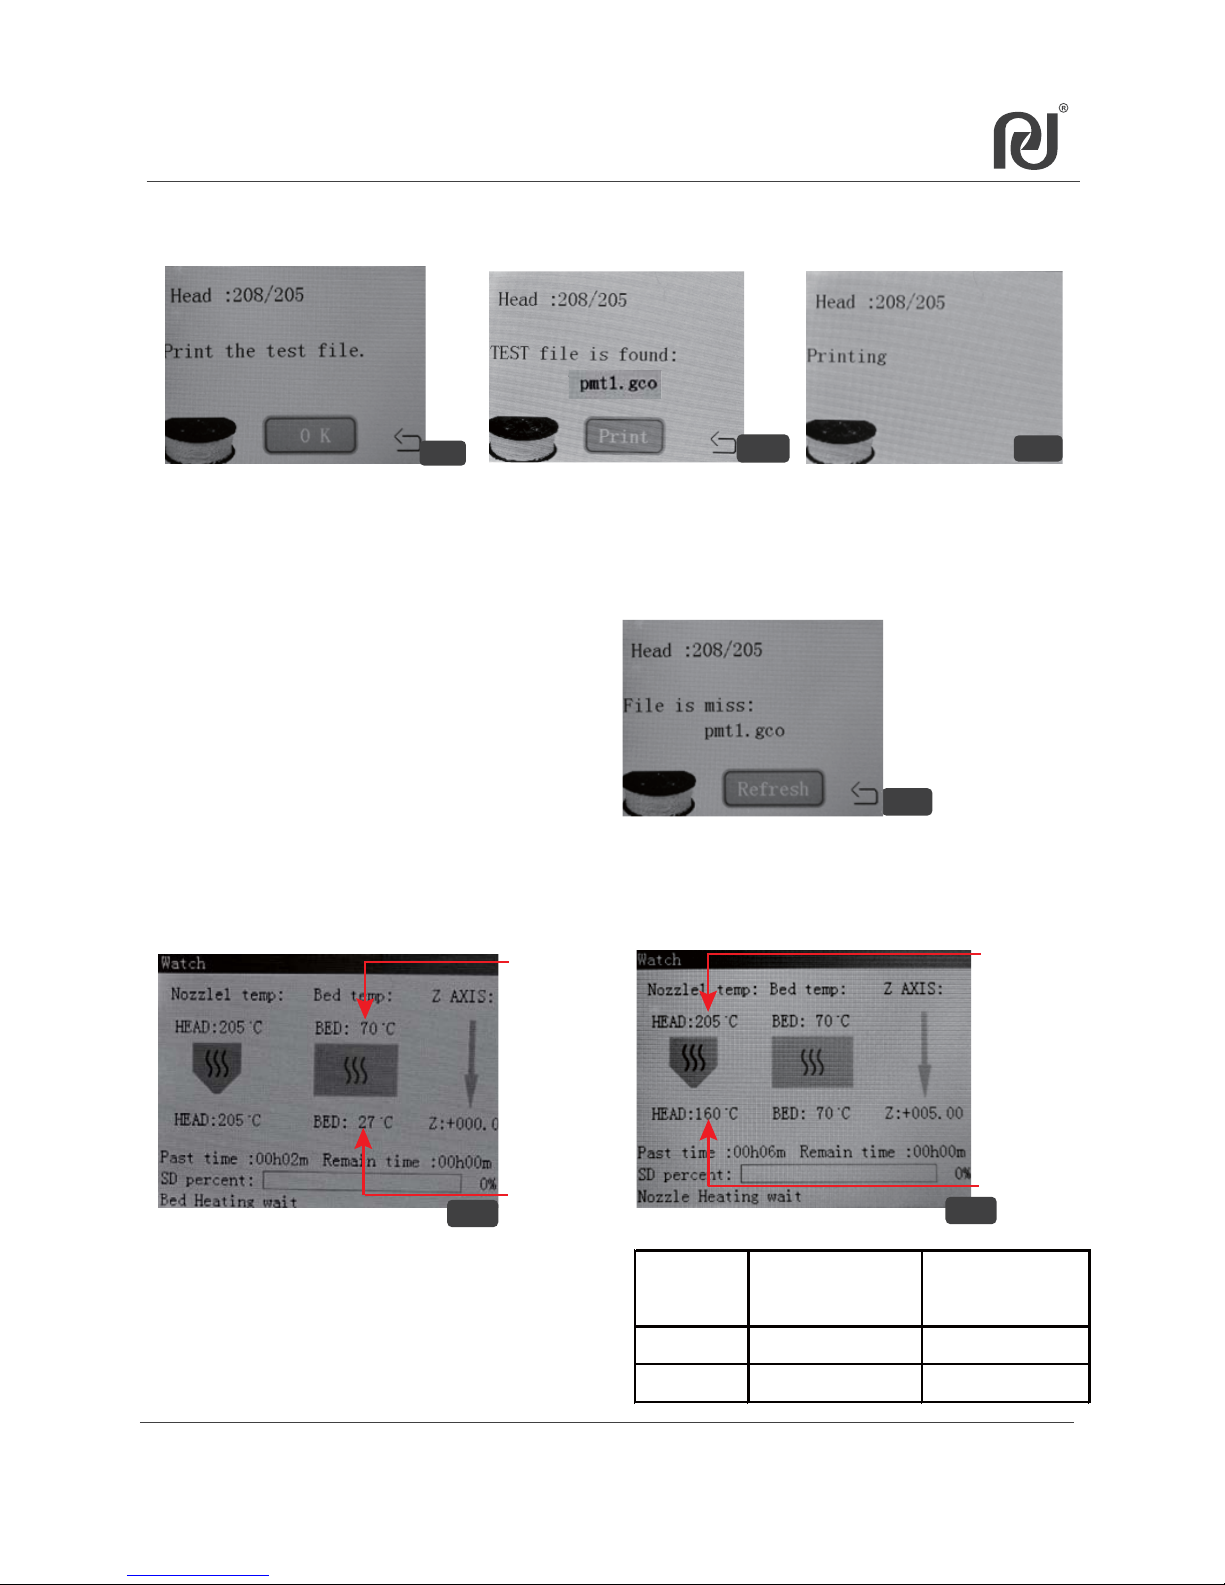
6.4.1 The screen will show as picture O, touch “OK”, and touch “Print”
(picture P) to print the test file.
R
Platform
Actual Temp
Platform
Setting Temp
NOTE: The platform setting temperature for PLA
and ABS is different . Incorrect temperature
setting will result in the object sticking on
the platform.
S
T
NOTE: If screen shows no test file such as picture R, means that the test file cannot be
found n SD card. Check the following.
1. Check if the SD Card is inserted into the SD card slot well.
2. Check if the test file is saved in the SD Card. The test file name will be updated base
on the shipped printer.
(For example:
PMT1.gco for PLA filament and
AMT1.gco for ABS filament)
O
P
Q
6.4.2 The printer will start to heat up the platform temperature to the setting
temperature (Picture S), then heat up the nozzle temperature to the
setting temperatuer(Picture T).
Nozzle
Setting Temp
Nozzle
Actual Temp
)LODPHQW
1R]]OH6HWWLQJ
7HPS
3ODWIRUP
6HWWLQJ7HPS
3/$ ഒ aഒ
$%6 ഒ aഒ
Page 27
U
27
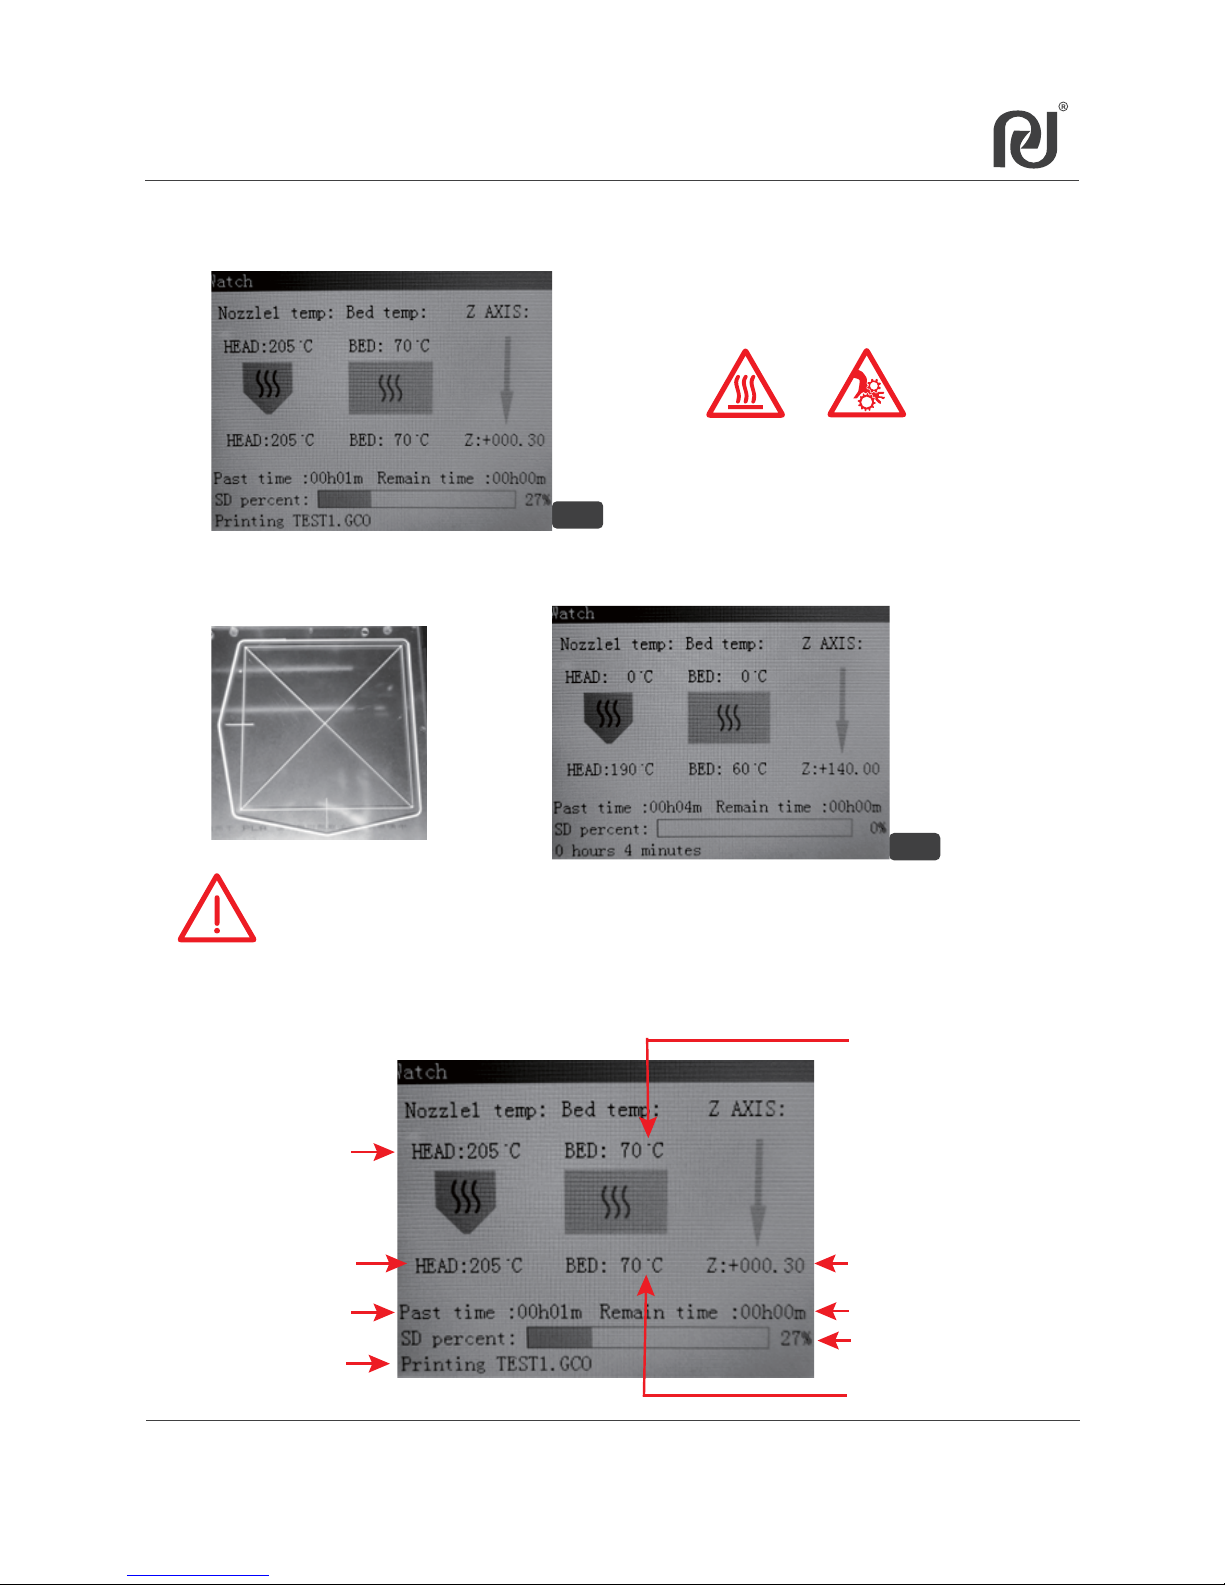
6.4.4 Finish printing the test file, the platform and the nozzle will start to
cooldown (picture V).
NOTE: Please wait for a few minutes to cooldown
the platform before removing the printed object.
6.4.5 LCD Display Screen Definition
6.4 Print test with SD Card
6.4.3 Once the nozzle temperature reachs the setting temperatuer (Picture U),
the heating is done and the printer start to print.
V
Nozzle Setting Temp
Platform SettingTemp
Printing Consume Time
Actual Height of
Z Screw Rod
Printing Remain Time
Printed Job Status
Printing File Name
Nozzle ActualTemp
Platform Actual Temp
Page 28
28
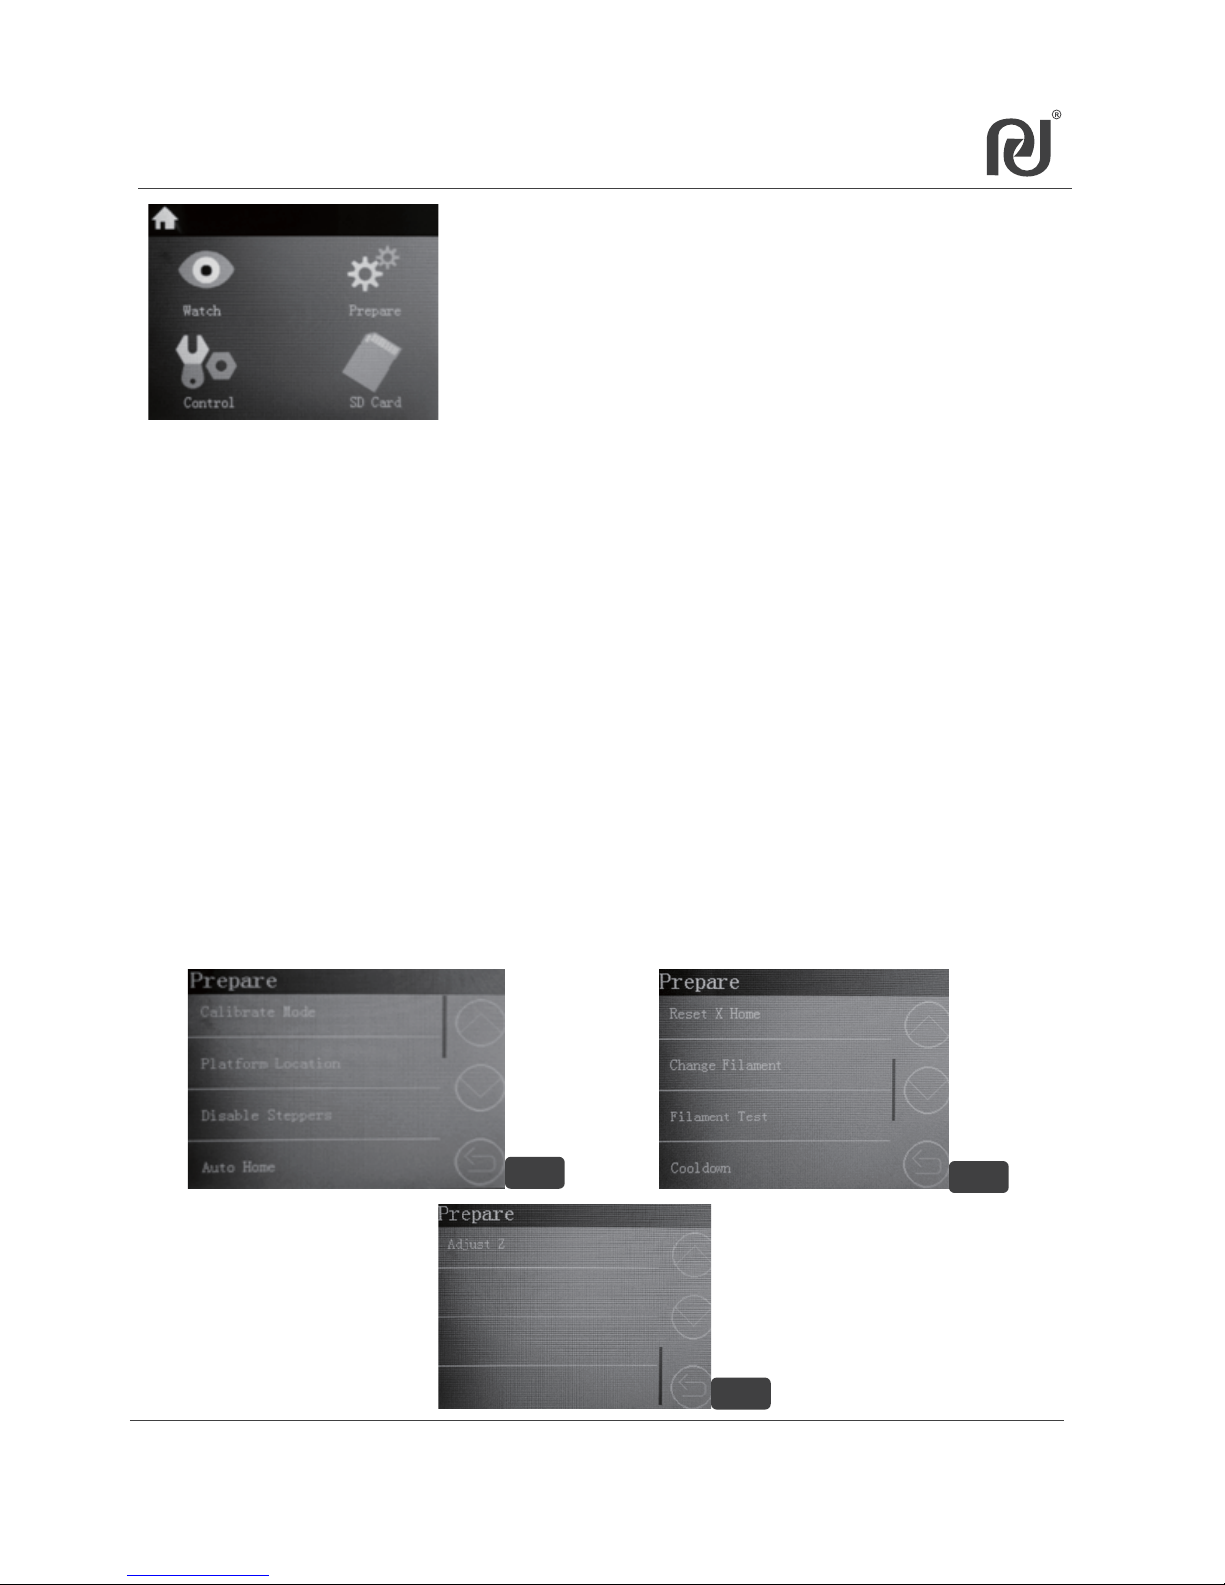
6.5 Prepare Menu
There are 9 submenus under “Prepare” as below picture I~III:
1、Calibrate Mode → Printer calibration and test (Refer to 6.1~6.4).
2、Platform Location → Platform calibration mode (Refer to 6.2).
3、Disable Steppers→Unlock X/Y/Z motors, can move the position of the
platform and the printer head manually.
4、Auto Home→Printer Head will go to initial home position.
5、Reset X Home→Printer Head return to X initial position. Y, Z position will
not be changed.
6、Change Filament →Load or unload filament (Refer to 6.6)
7、Cooldown→Cool down the temperature of the platform and the nozzle to
room temperature.
8、Adjust Z→ Move up/down the platform in Z direction. It can be set
0~200mm. For example, set 50mm, the platform will move to get the
distance between the nozzle and the platform 50mm.
I
II
III
Page 29
e
Heating up the nozzle temperature to the
setting temperature.
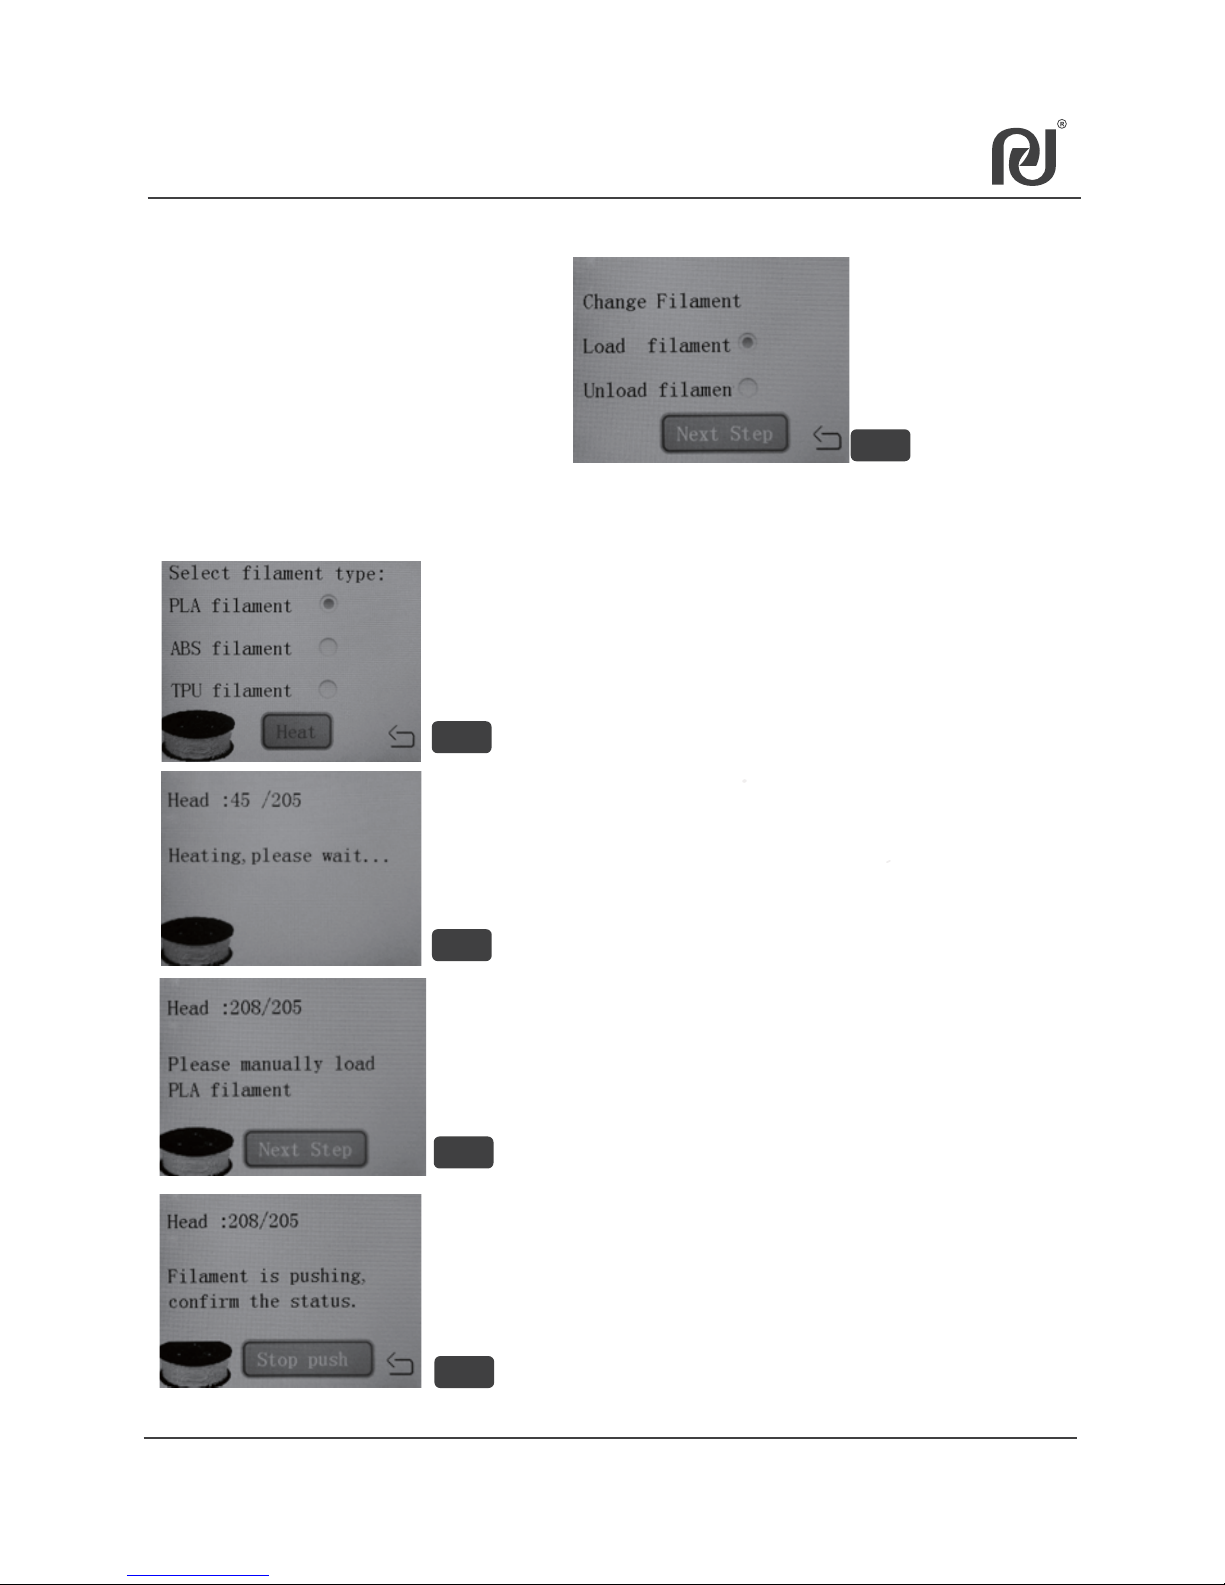
“Change Filament”has two submenus: (as picture a)
Load Filament
Unload Filament
6.6.1 Select“Load Filament”and “Next Step”, proceed auto load filament
as below picture b~e.
a
b
d
c
Select the filament material you are using,
touch “Heat”.
Once the nozzle temperature reachs the setting
temperature, refer to 5.8 to load the filament,
touch“Next Step”.
The filament will be auto loaded into the nozzle
and flow out from the nozzle. Refer to 6.3, check
the filament flowing condition. After checked,
touch “Stop push”to stop flowing.
29
6.6 Change Filament
Page 30
30
6.6 Change Filament
g
h
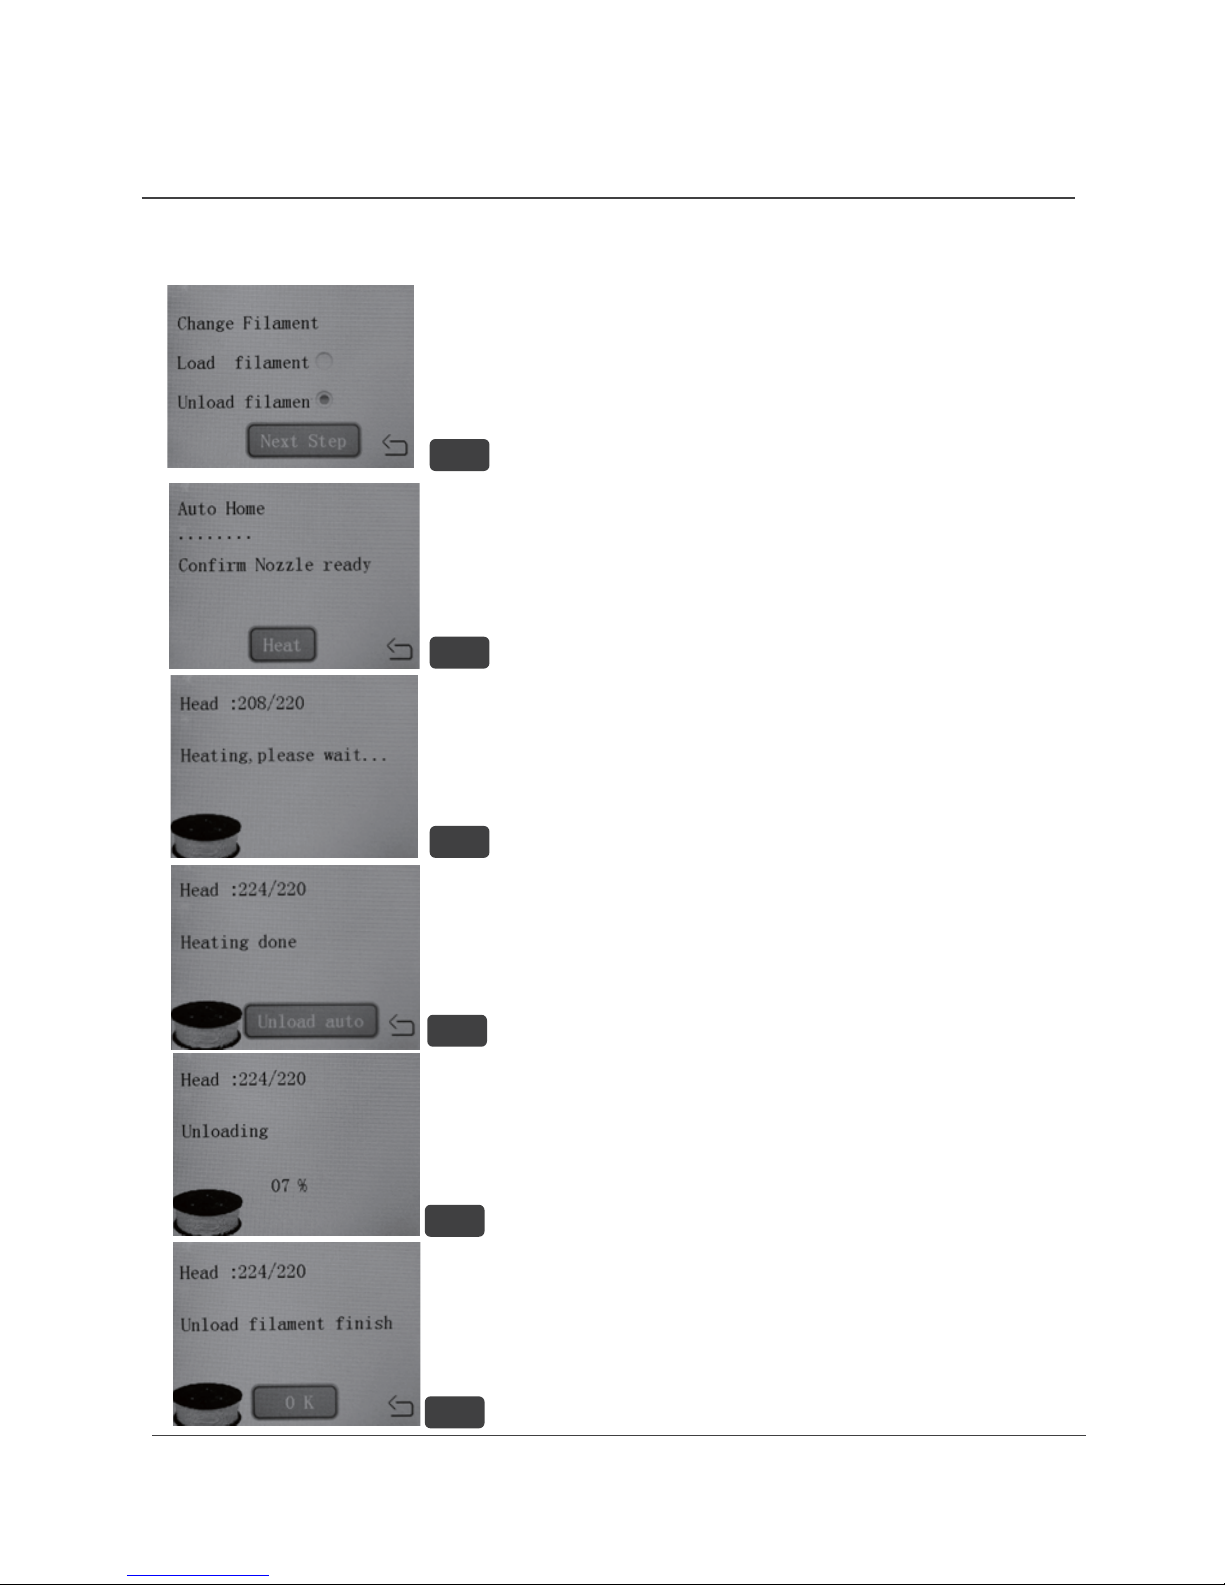
6.6.2 Select “Unload Filament” and “Next Step”(as picture f), proceed
auto unload filament as picture g~k..
Heating up the nozzle temperature to the setting
temperature.
The printer head will go to home position, touch
“Heat”to heat up the nozzle.
Filament unload finish, touch “OK”.
Remove the filament from the printer head
easily.
i
Once the nozzle temperature reachs the setting
temperature, touch “Unload auto”.
The filament will be auto unloaded from the nozzle.
f
k
j
Page 31
6.7 Control Menu
31
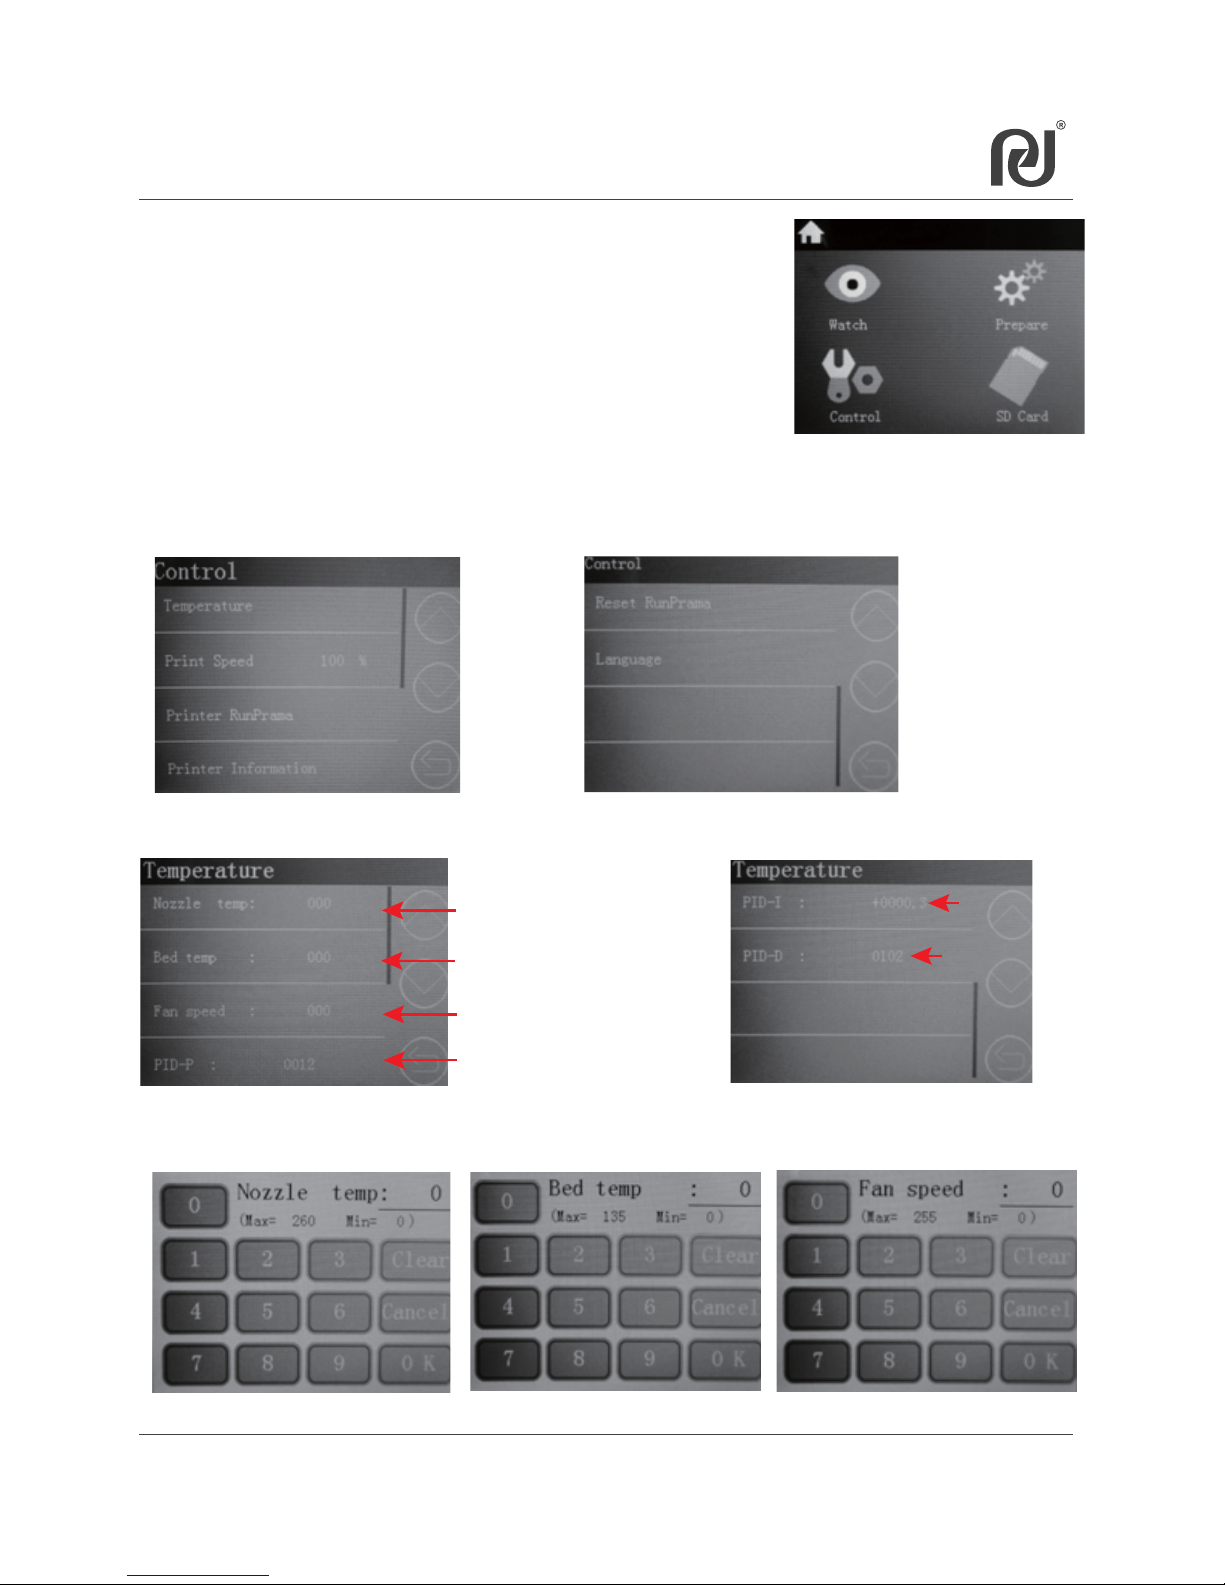
There are 6 submenus under “Control”:
1. Temperature →to adjust the nozzle and the
platform temperature.
2. Print Speed: 100%→to adjust the printing speed.
3. Printer RunPrama →to refer to the printer status.
4. Printer Information →to refer to the printer basic
information.
5. Reset RunPrama→Manufacturer setup. Forbit user to adjust.
6. Language →to select the language you want.
6.7.1 “Temperature” menu can set up below parameter:
Setting method: touch the screen to go to submenu, select the data by refer to the Max and Min,
touch “OK”to confirm.
Setup nozzle setting temp
Setup platform setting temp
Setup Fan speed
Forbid to adjust
Forbid to adjust
Forbid to adjust
Nozzle settinig temp (0~260℃) Platform settinig temp (0~135℃)
Fan settinig speed (0~255)
Page 32
6.7 Control Menu
32
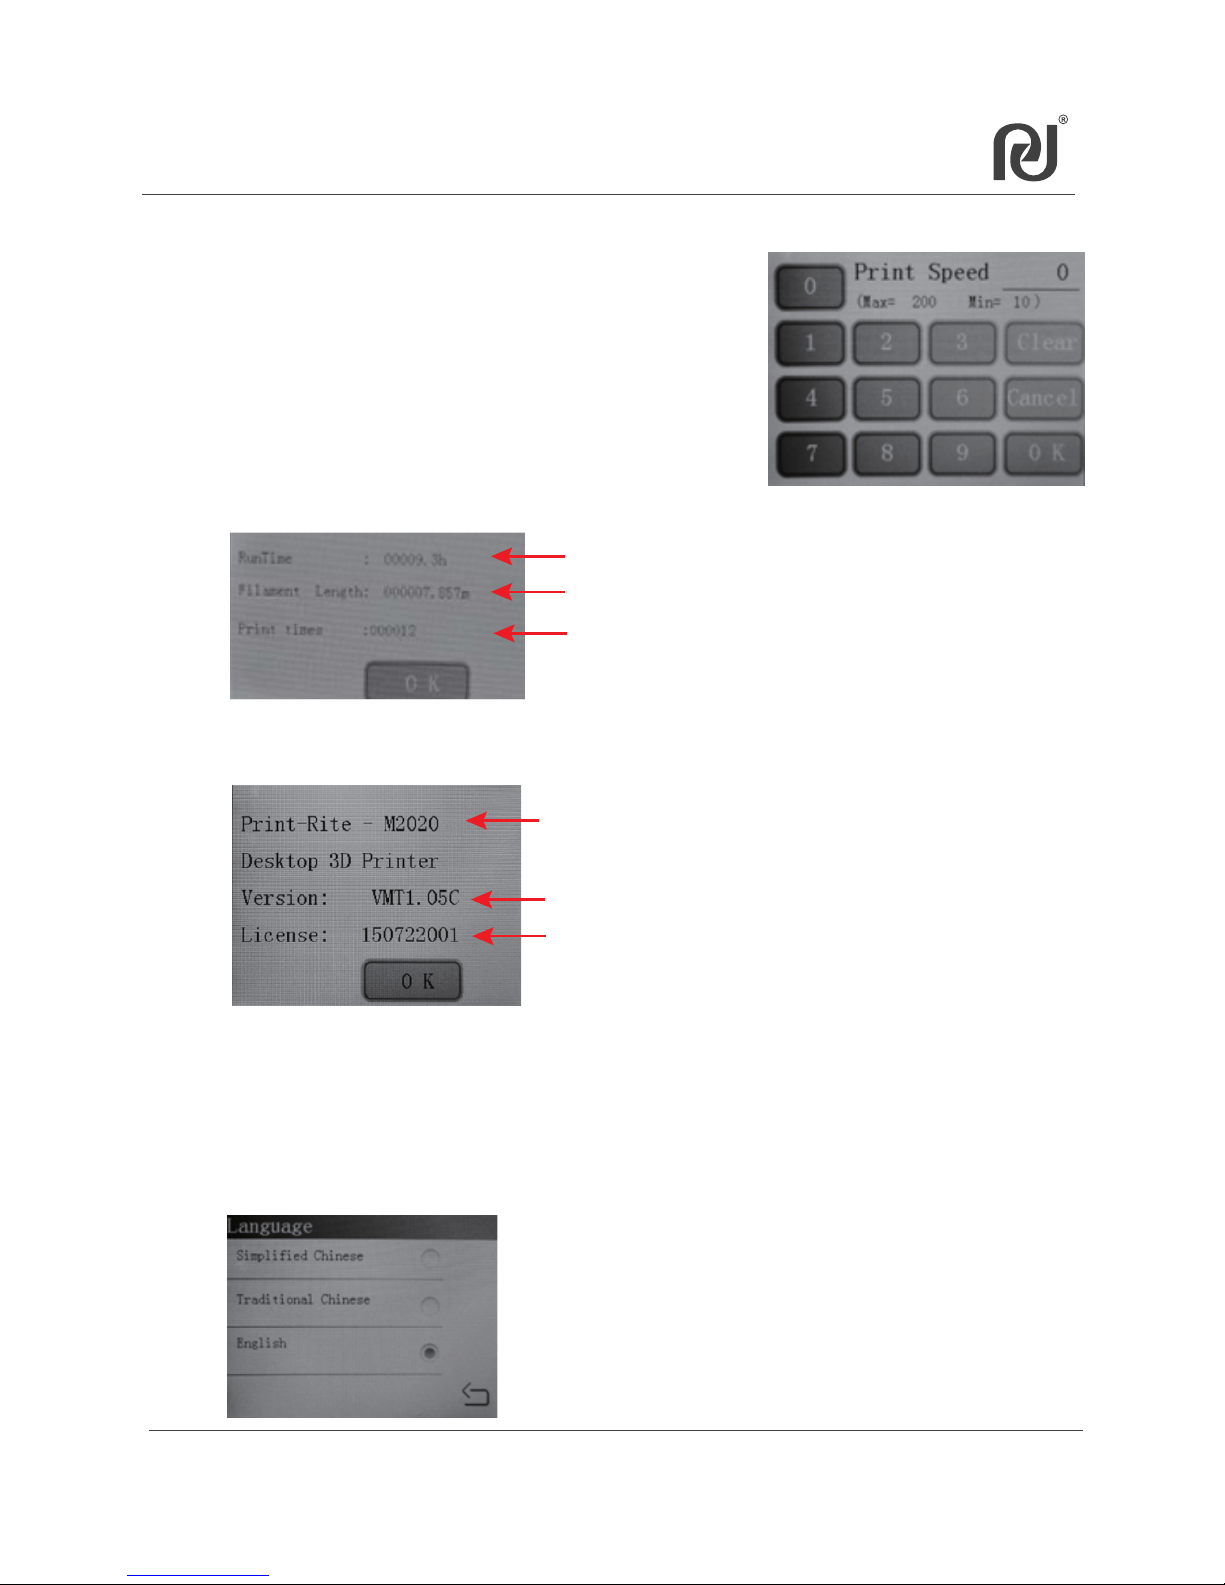
6.7.2 “Print Speed”is to adjust the printing speed base on current 100%.
6.7.3 “Printer RunPrama”menu.
The printer total turning-on time
Filament total usage in the printer
6.7.4 “Printer Information”menu.
The printer total printed times
6.7.5 “Reset RunPrama”is for the manufacturer to reset the printer
information. It forbid the user to adjust.
6.7.6 “Language”menu.
The number can be adjusted from 10% to 200%.
The number increases, the printer speed also increases.
Printing too fast will impact the printing effect, too
slow will increase the printing time. It need be adjusted
base on actual condition and the default is 100%.
Currently it can select “Simplified Chinese”,
“ Traditional Chinese”and “English”.
The printer version No
The printer type
The printer version release date
NOTE: The actual Version No and License No will be
depend on the shipped printer.
Page 33
6.8 SD Card Menu
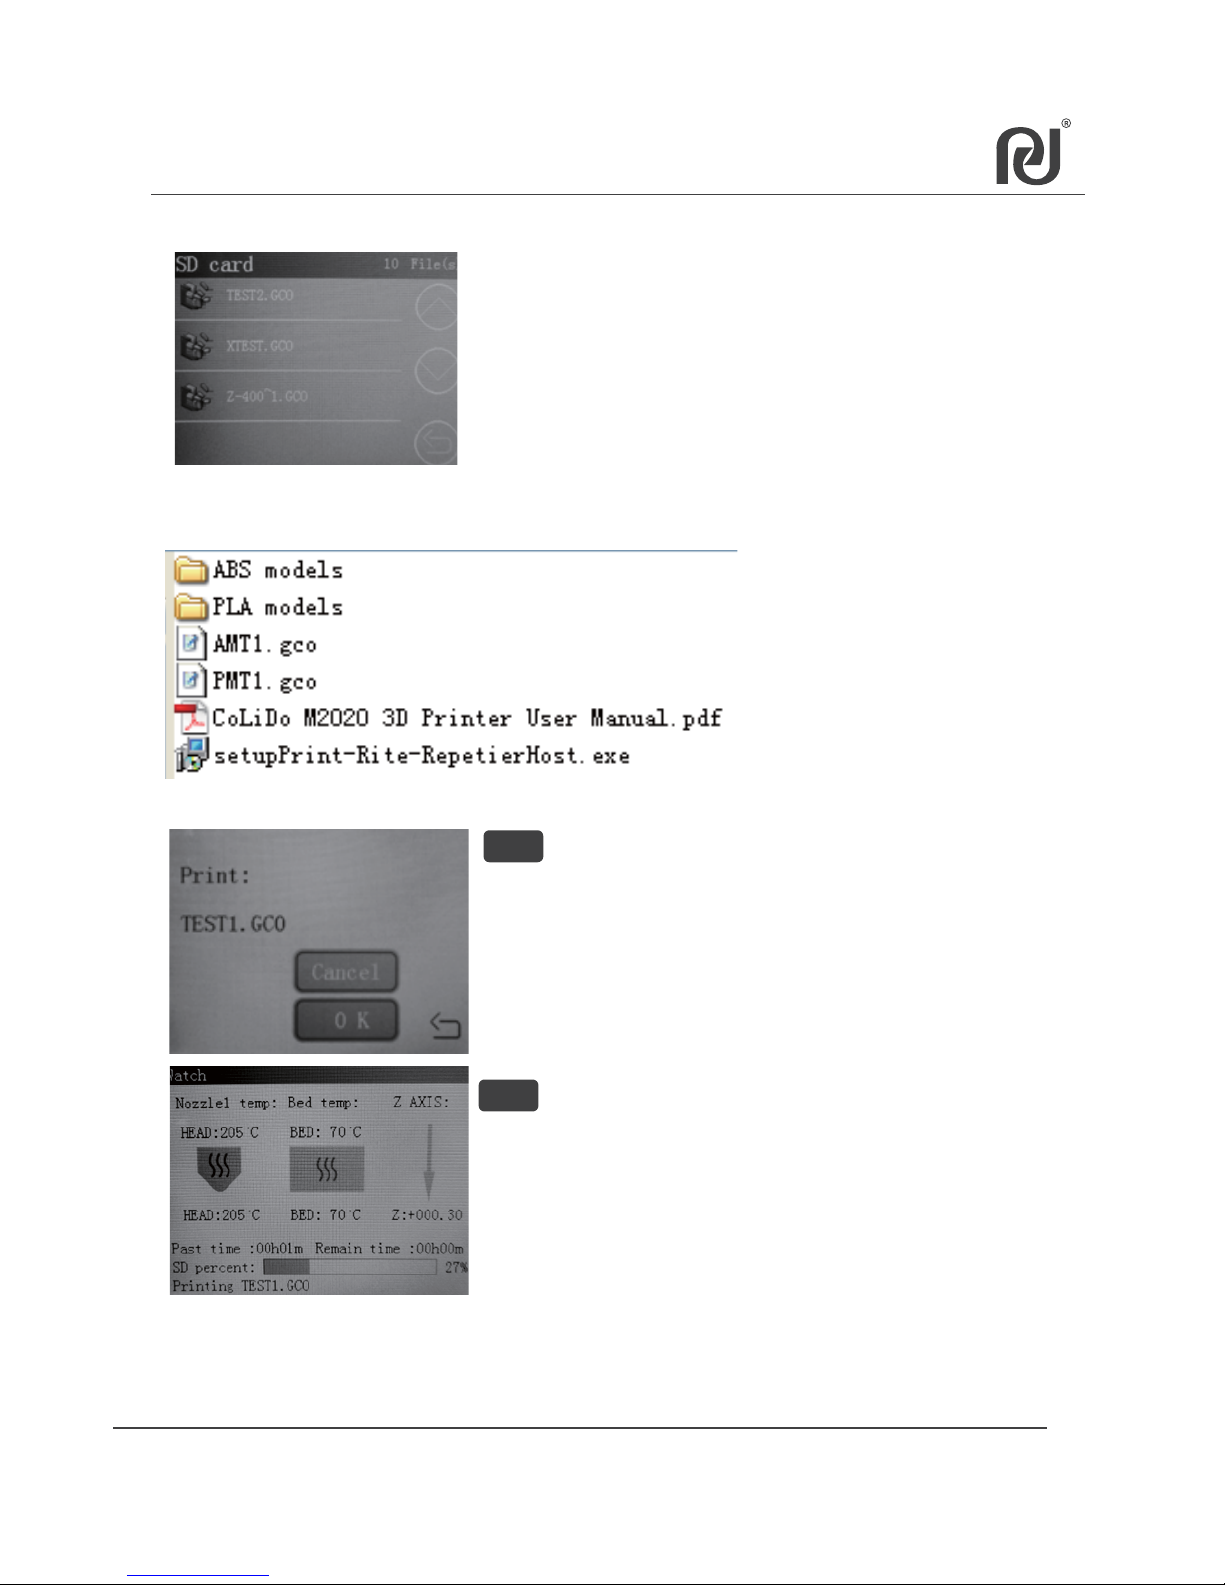
“SD Card ”is to select the print file from SD Card to print.
6.8.1 The default documents saved in SD Card when out of factory is:
A
33
(it will be updated depend on the shipped printer)
B
A
Once the platform temperature and the
nozzle temperature reach the setting
temperature, the printer start to print.
NOTE: The printer just can read the G-code (GCO). You can print .GCO file with SD Card directly.
Otherwise, you can convert .STL file to .GCO file using software REPETIER, then save the GCO in
SD card to print directly or connect REPETIER in the computer to print through USB cable .
6.8.2 Touch the screen to select the print file that you want to print (.GCO file) .
Touch “OK”to confirm the file you selected.
Page 34
34
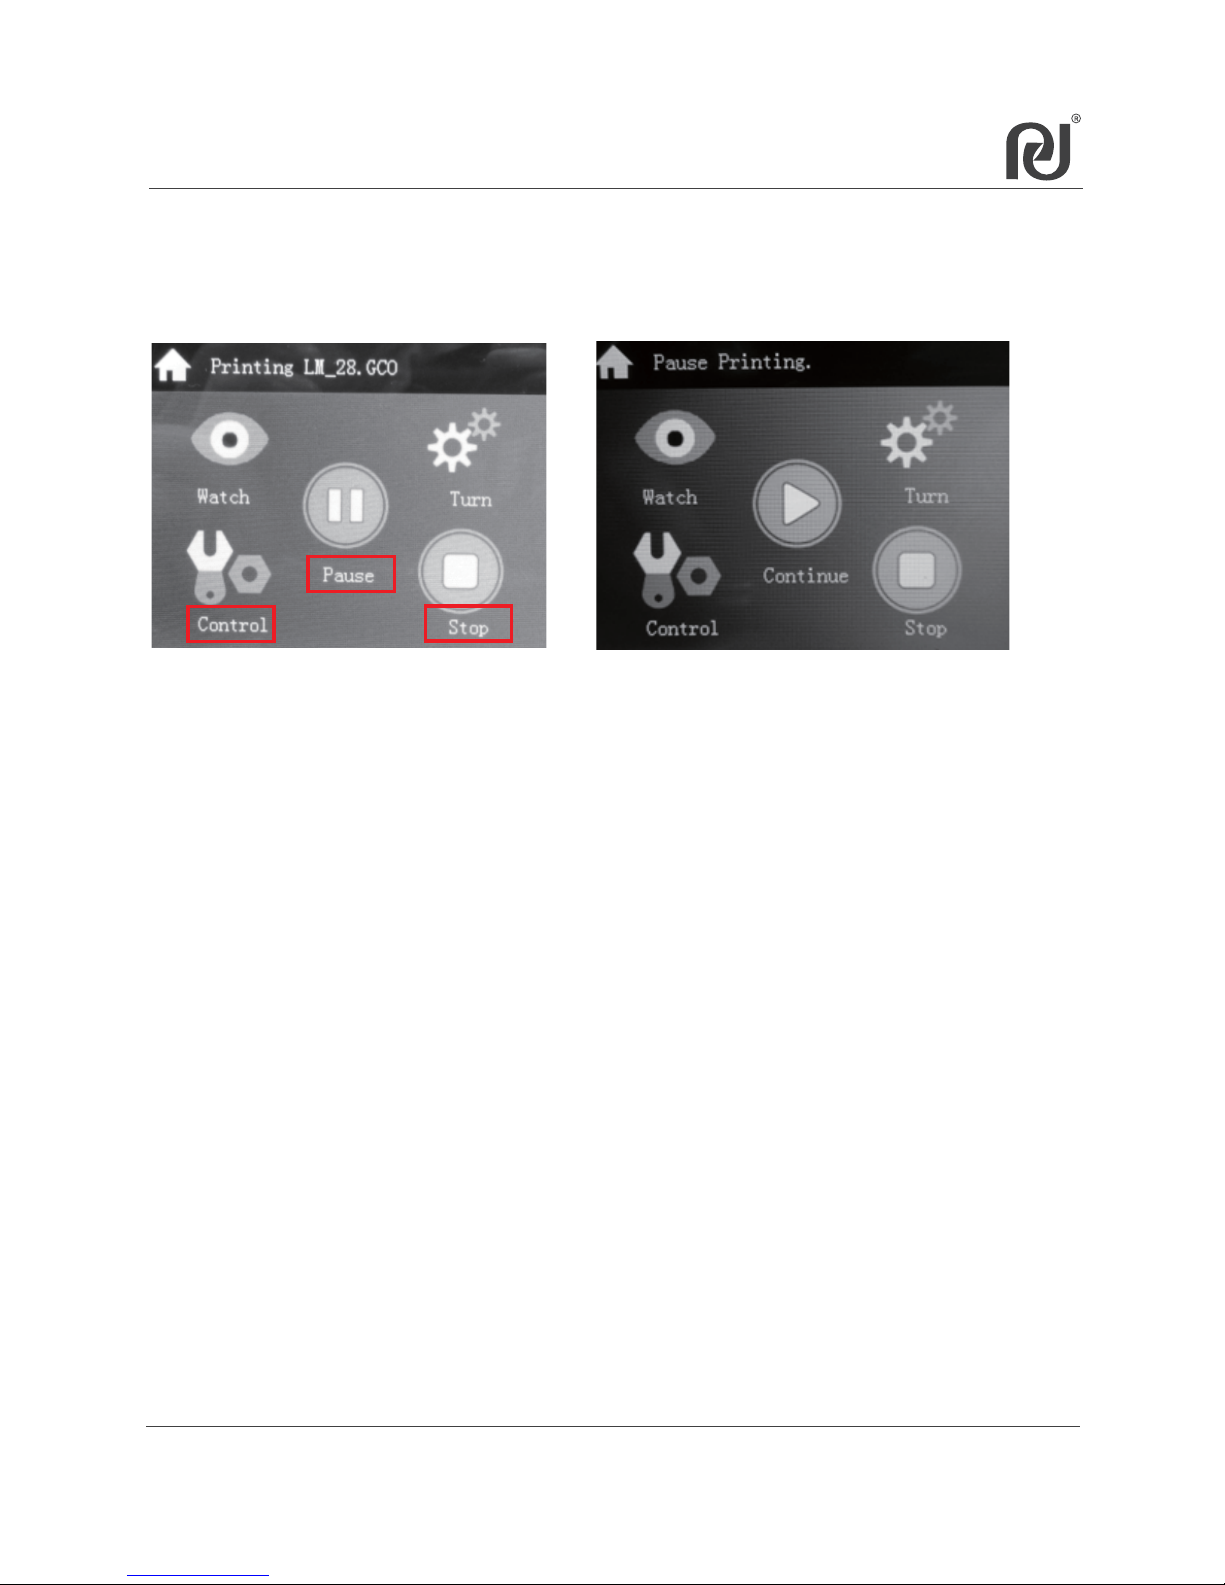
NOTE: When pause printing, the printer head will go to home position and
be locked. The nozzle and the platform temperature will keep on.
a. Please clear up the remained filament outside the nozzle tip before
resume printing.
b. If resume printing after pause long time, please make sure the nozzle
no clogged by pressing the printer head arm and pushing the filament
into the nozzle until the filament flow out smoothly.
6.8 SD Card Menu
6.8.3 Pause Printing Feature:
1. Touch screen during printing and select “Pause”;
2. Touch screen after pause, select “Continue”to resume printing.
6.8.4 Stop Printing Feature:
1. Touch screen during printing and select “Stop”;
2. Once stop, the printer head will go to home postion. the nozzle and
the platform temperature will cooldown.
The printing cannot be resumed.
6.8.5. Adjust Printing settings Feature:
During printing, touch screen and select “Control”submenu. You can
adjust the setting temperature, printing speed or review the printer
information. (Refer to 6.8)
Page 35
35
1
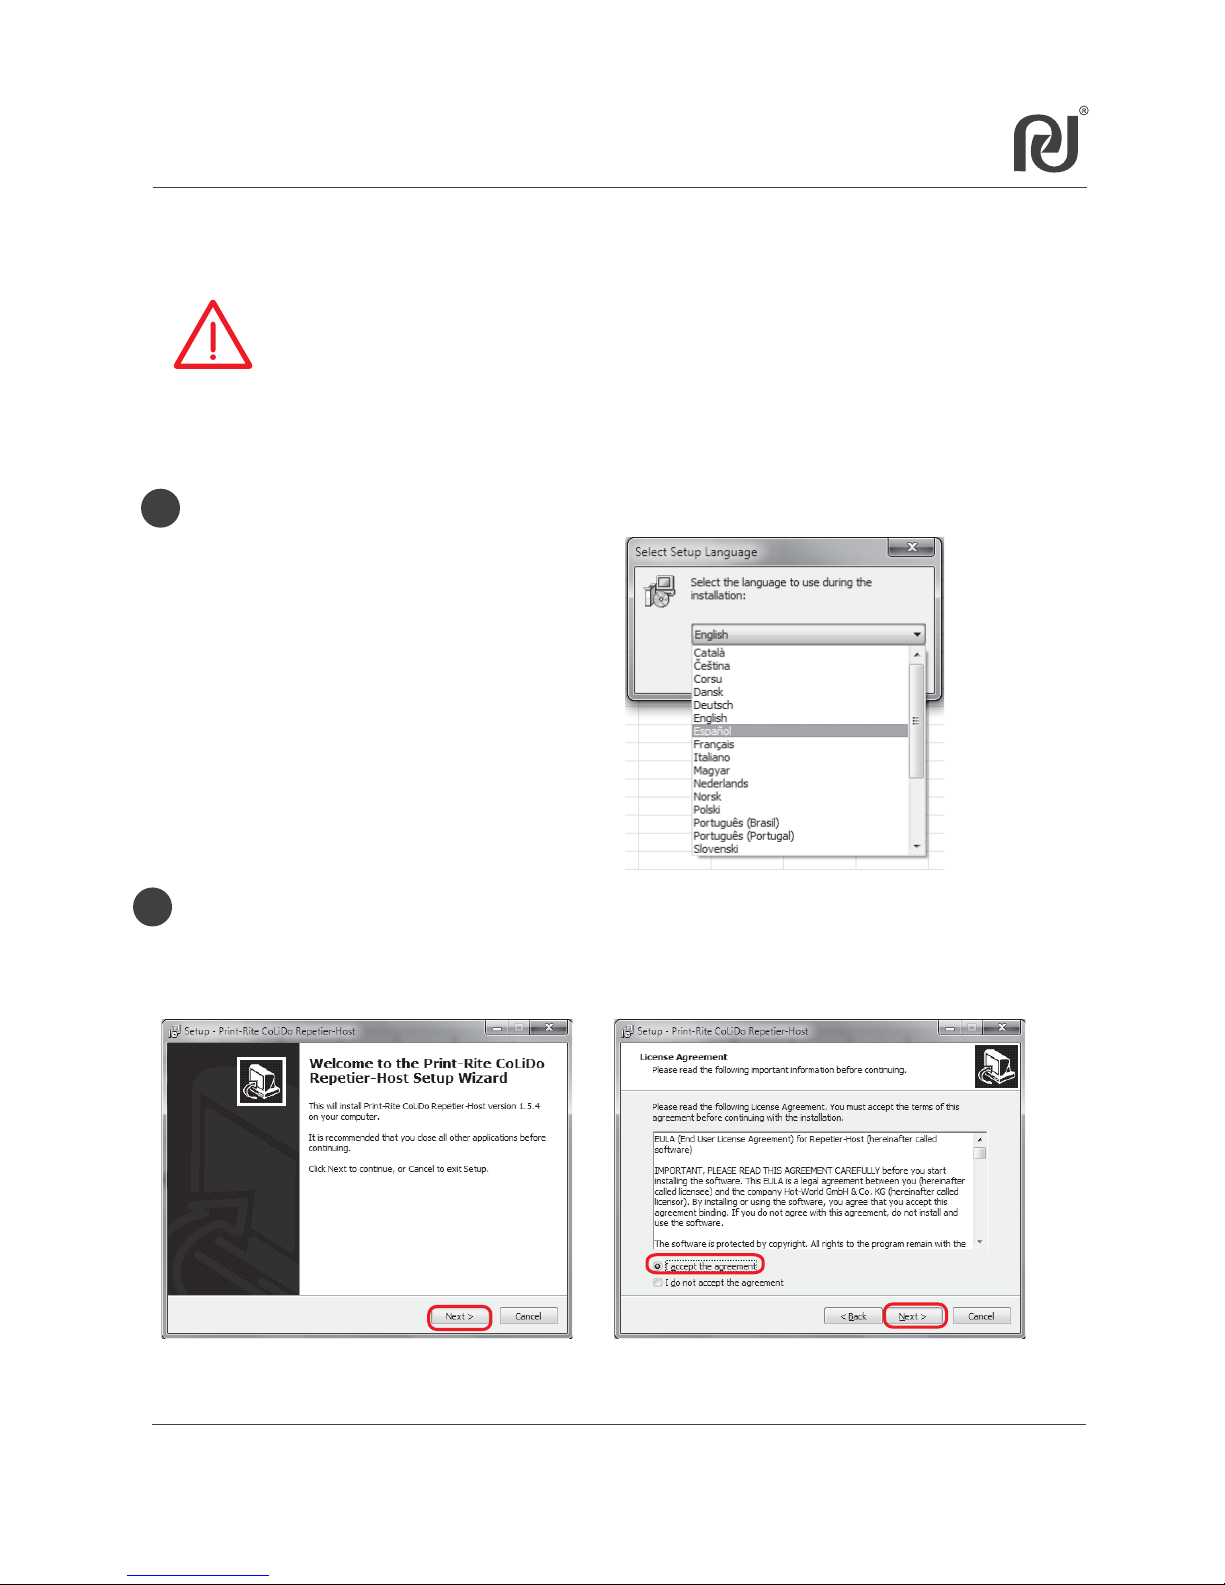
Find“setupColido-RepetierHost_1_5_5.exe”in SD Card, double click
to start.
2
Start to install. (You will be asked“Do you want to allow the following
program to make changes to this computer?”,please click“Yes”to
continue installation.
REPETIER-HOST is a software which is used to slice the 3D models
(.GCO or .STL) and command CoLiDo Printer to print.
Chapter 7 Install and set up REPETIER-HOST to print
Click“Next”
Click“I accept the agreement”,
Click“Next”
7.1 Install REPETIER-HOST (WINDOWS)
If you want to print files from computer, you need install REPETIER-HOST.
Computer Operation System:WINDOWS 7, MAC OS, LINUX
Select Setup Languange to use
during the installation.
Page 36
36
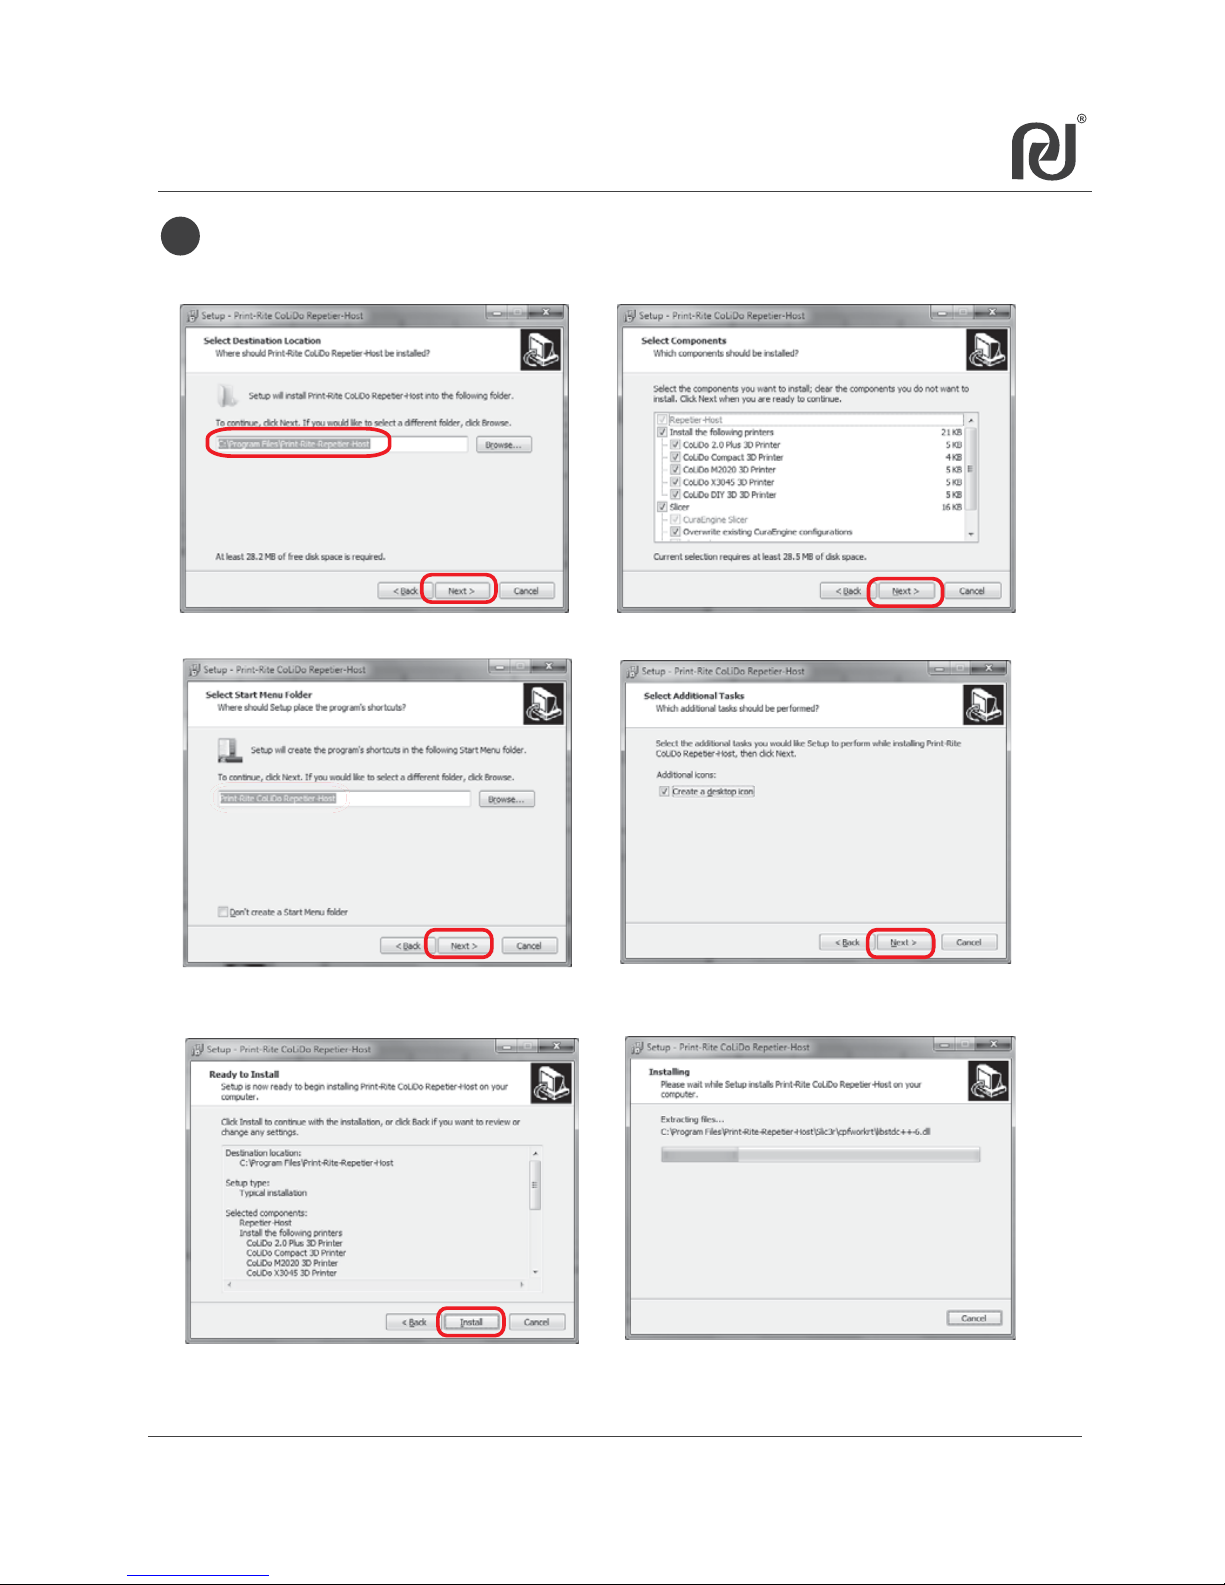
3
Select a destination to save the software and select the components
should be installed, then click “Next”and“Install”.
7.1 Install REPETIERHOST (Cont.)
Click“Next”
Click“Create a desktop icon”
Click “Next”
Click“Install”
if antivirus message appear, please
allow the operation timely.
Click“Next”
Click“Next”
Page 37
37
4
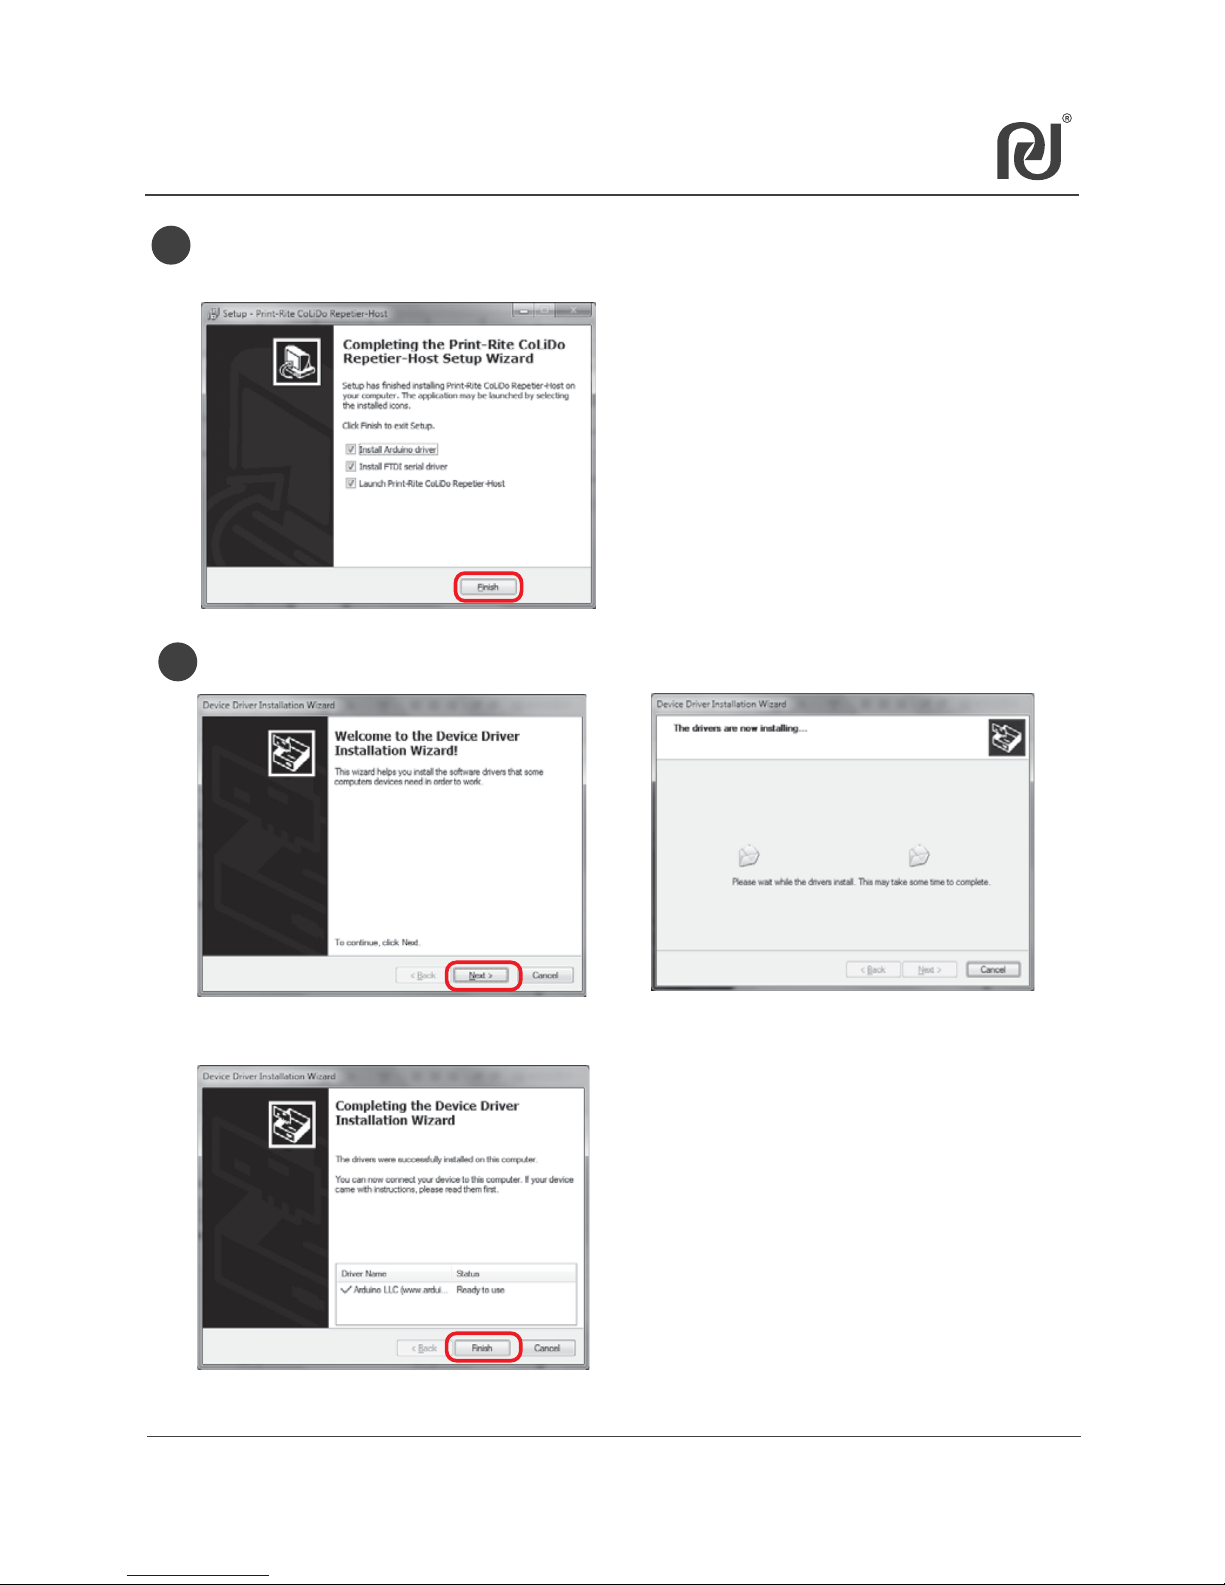
5
Click “Install Arduino driver”, “Install FTDI serial driver” and
“Launch Print-Rite CoLiDo Repetier-Host” and then click “Finish”.
7.1 Install REPETIER-HOST (Cont.)
Install Arduino drivers.
Click“Finish”
Click“Next”
Click“Finish”
Page 38
38
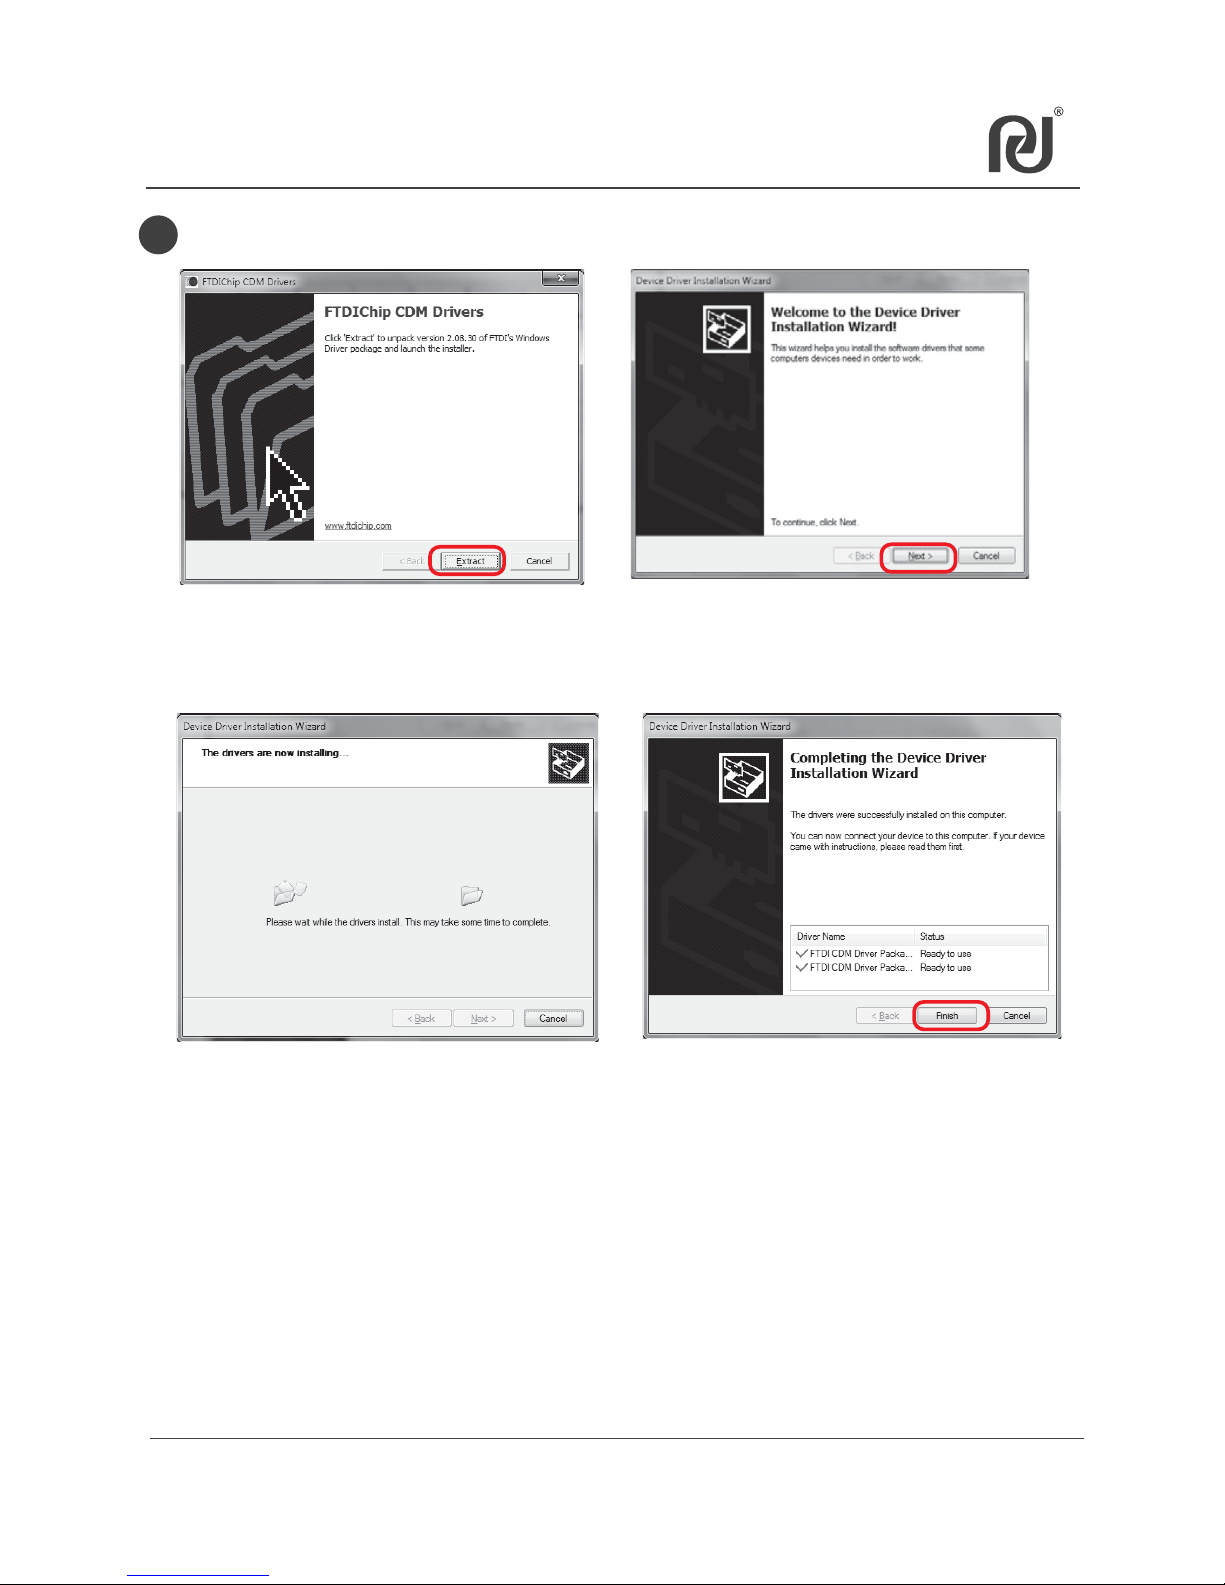
Install FTDI Drivers.
7.1 Install REPETIER-HOST (Cont.)
6
Click“Extract” Click“Next”
Click“Finish”
Page 39
39
7.2 REPETIER-HOST Setup
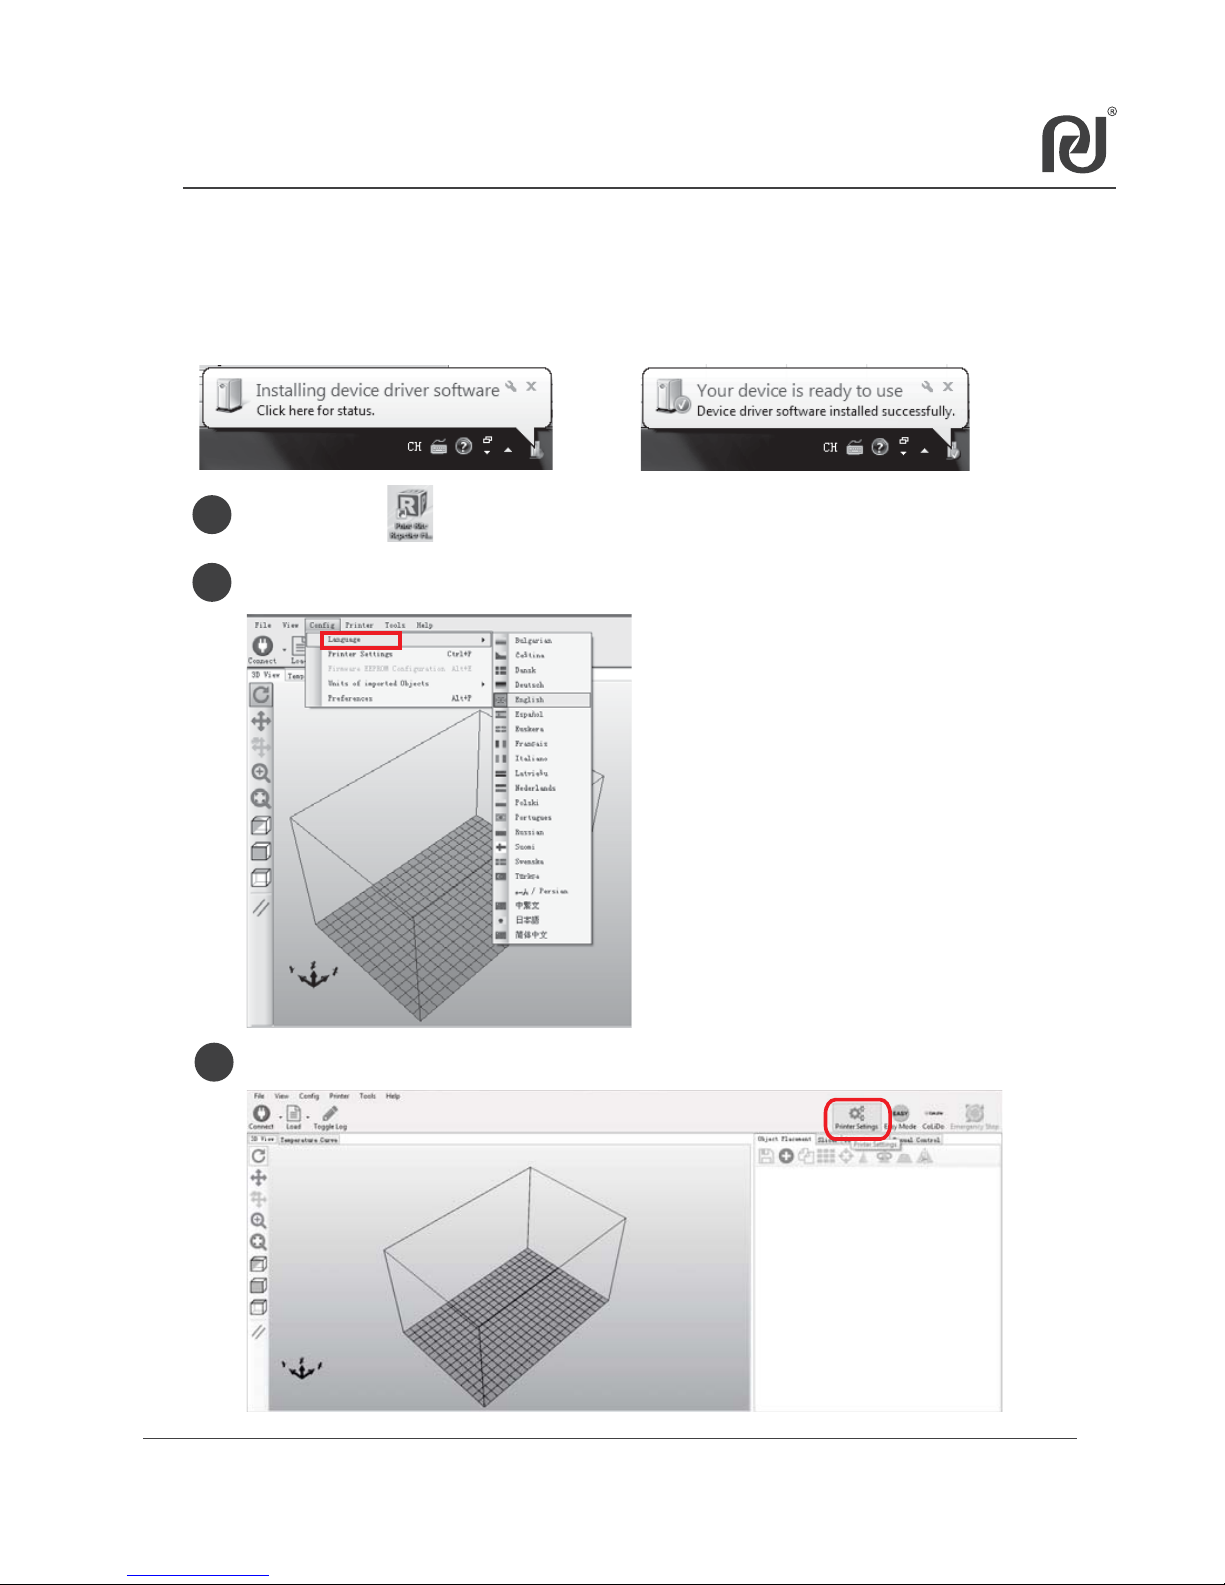
1
double click ,to go into “Repetier‐Host”software.
2
click “Printer Settings”.
3
Printer Settings
Connect the printer to the computer using USB Cable and
Turn ON the printer.
Select language you want in the software, “Config”- “Language”.
When the computer is the first time connecting the printer, there is connectio
reminder at the right bottom of the computer.
Page 40
40
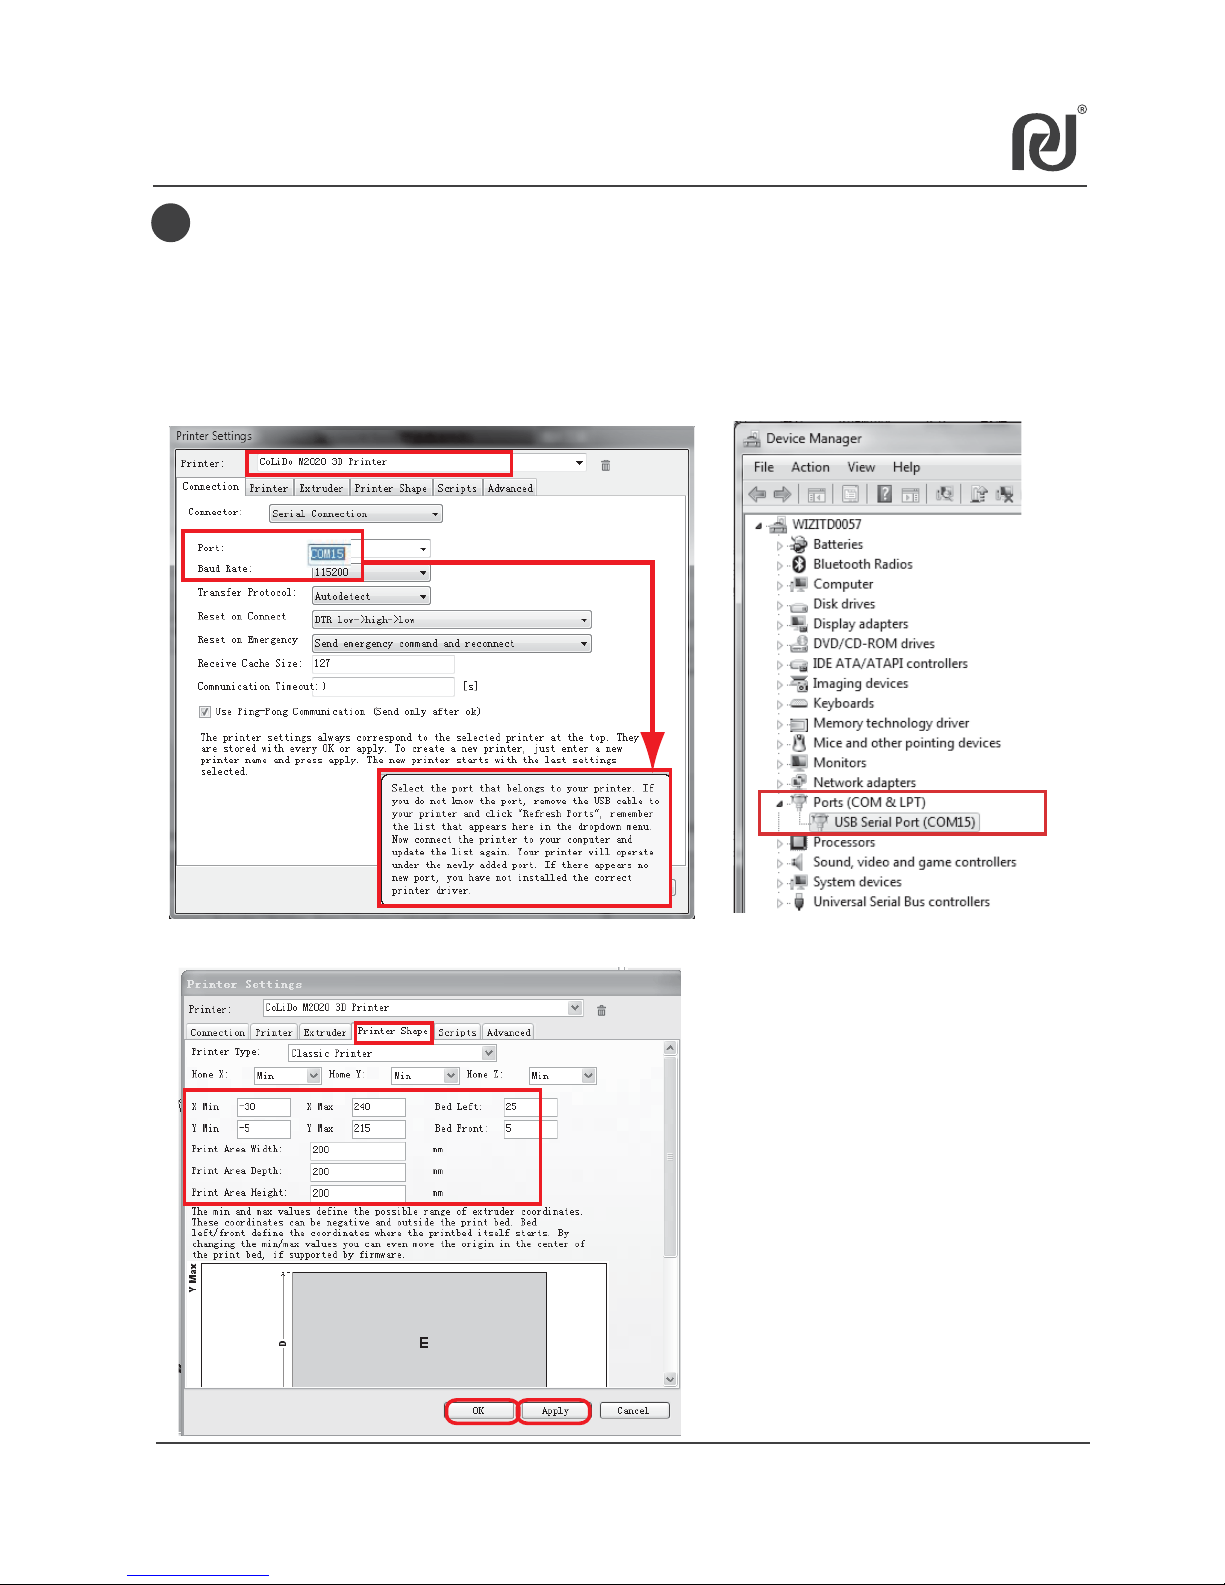
Printer Settings as below.
NOTE: COMx dependant on different computer or 3D printer you are using.
Different 3D printer has different COMx, which can be located and matched with
COMx in Device Manager as below.
Printer Shape: as below data. After checked, click “Apply” and “OK”.
4
7.2 REPETIER-HOST Setup (Cont.)
Connection: Select Printer: CoLiDo M2020 3D Printer; Baud rate: 115200.
Select the correct Port COMx such the printer can connect witht the Repetier.
(COM1 cannot be selected)
Page 41
41
7.2 REPETIER-HOST Setup (Cont.)
6
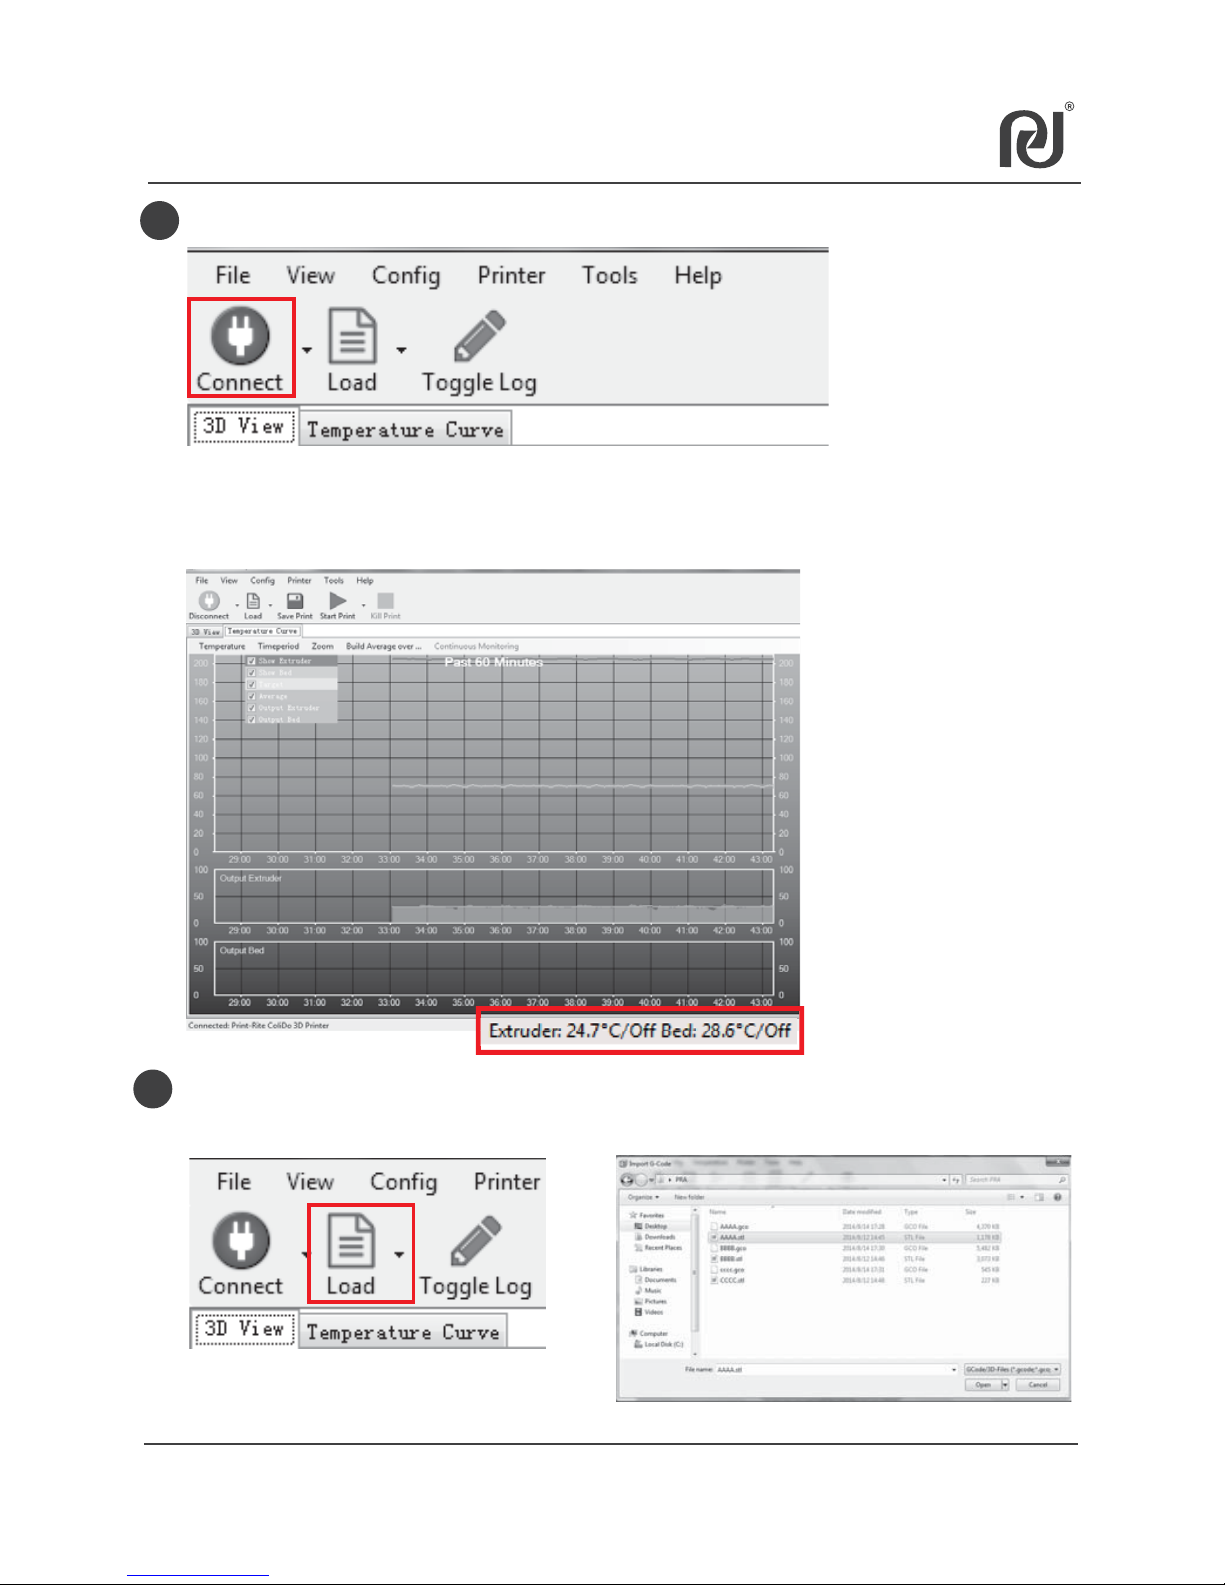
Click “Load”, select the print file that you want to print and click “Open”.
Note: The print file should be with .GCO or .STL format.
5
Click “Connect”.
NOTE: After the printer is really connected with the Repetier software, the actual
extruder and bed temperature of the printer will be shown in the bottom of the
Repetier software. Also, the Temperature Curve is moving.
Page 42
42
7
7.3 Print with Repetier-Host (Cont.)
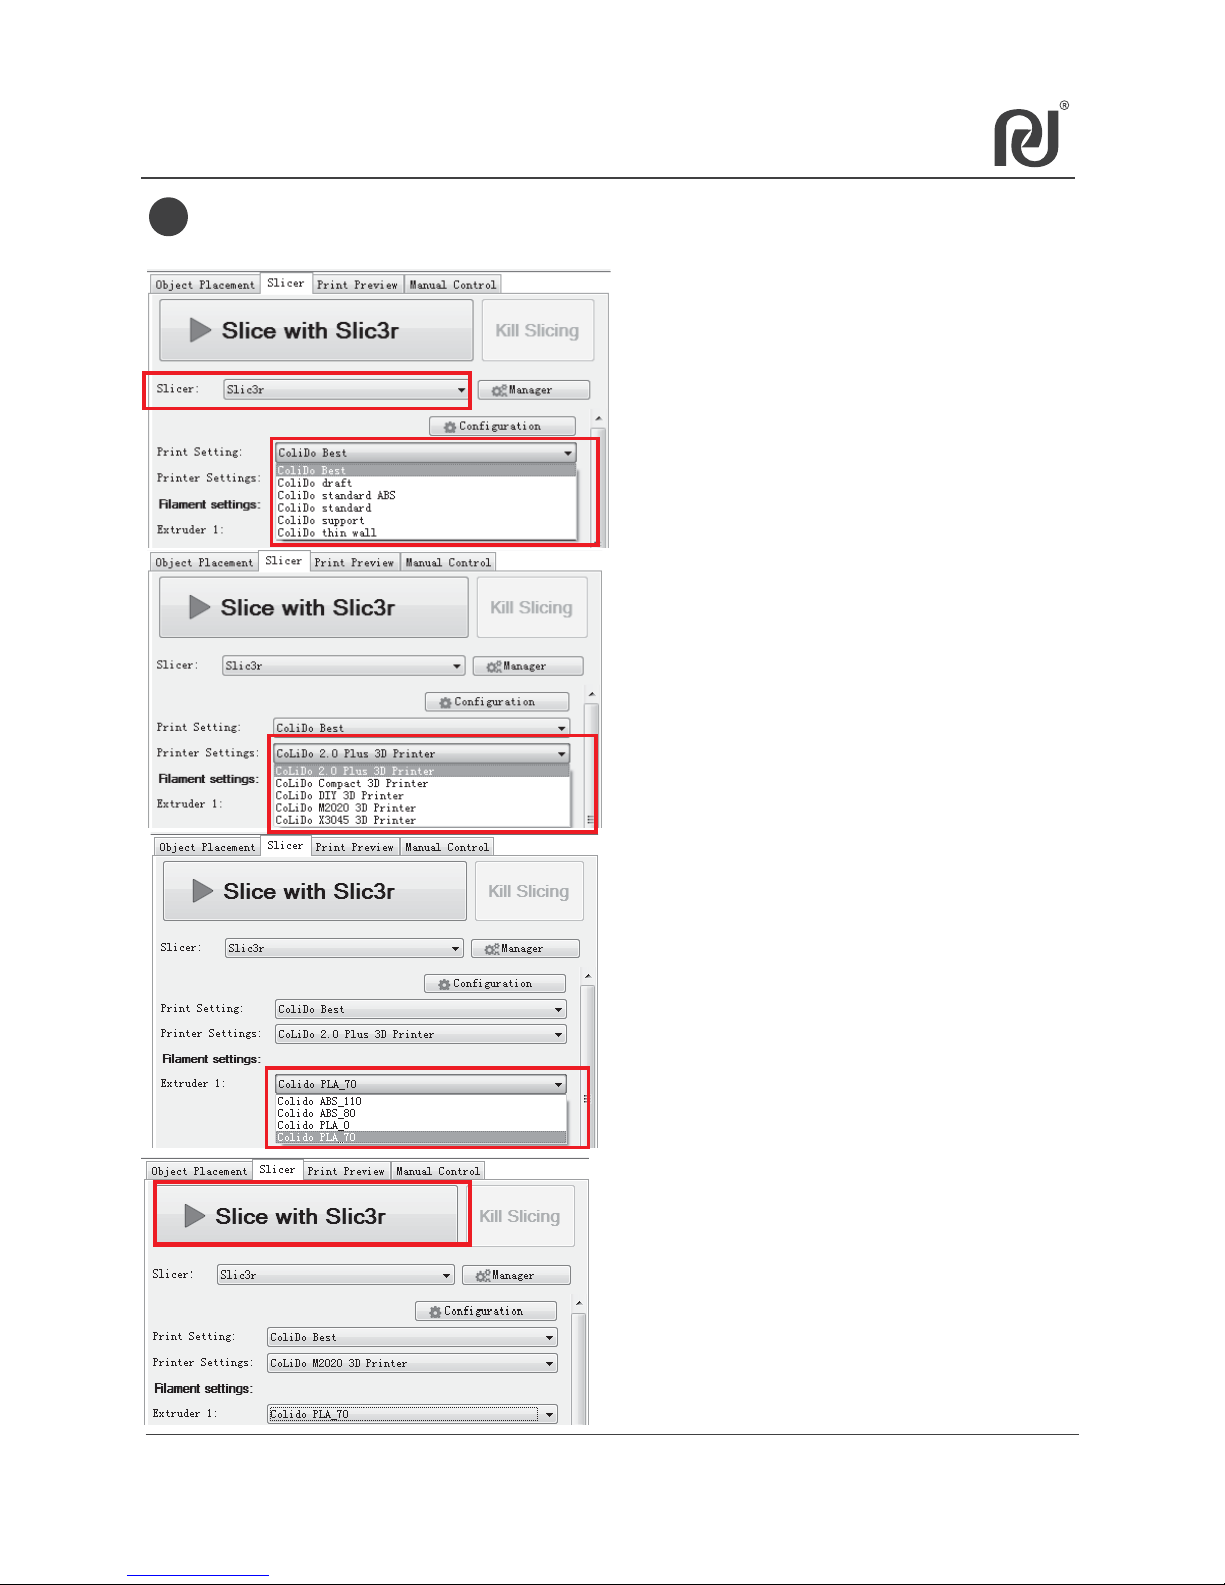
Select the print effect that you want to print, select PLA or ABS filament
that you are using. Then click“Slice with Slic3r” to generate G-code.
Step 2: Select the effect that you want to print
Step 3: Select printer type “CoLiDo M2020 3D
Printer”you are using
Step 5: Click “Slice with Slic3r”to slice the file
to generate g-code
CoLiDo Best - For small object
CoLiDo standard - For big object
CoLiDo standard ABS - For ABS material object
CoLiDo draft - For fast printing
CoLiDo support - For the model adding support
CoLIDo thin wall - For the thickness lower 2mm
thin wall object
CoLiDo ABS_110
- For ABS Filament with platform temp 110℃
CoLiDo ABS_80
- For ABS Filament with platform temp 80℃
CoLiDo PLA_0
- For ABS Filament with platform temp 0℃
CoLiDo PLA_70
- For PLA Filament with platform temp 70℃
Step 4: Select Extruder base on the PLA/ABS
filament you are using and the platform
required temperature
Step1: Select “Slic3r”
Page 43
43
8
9
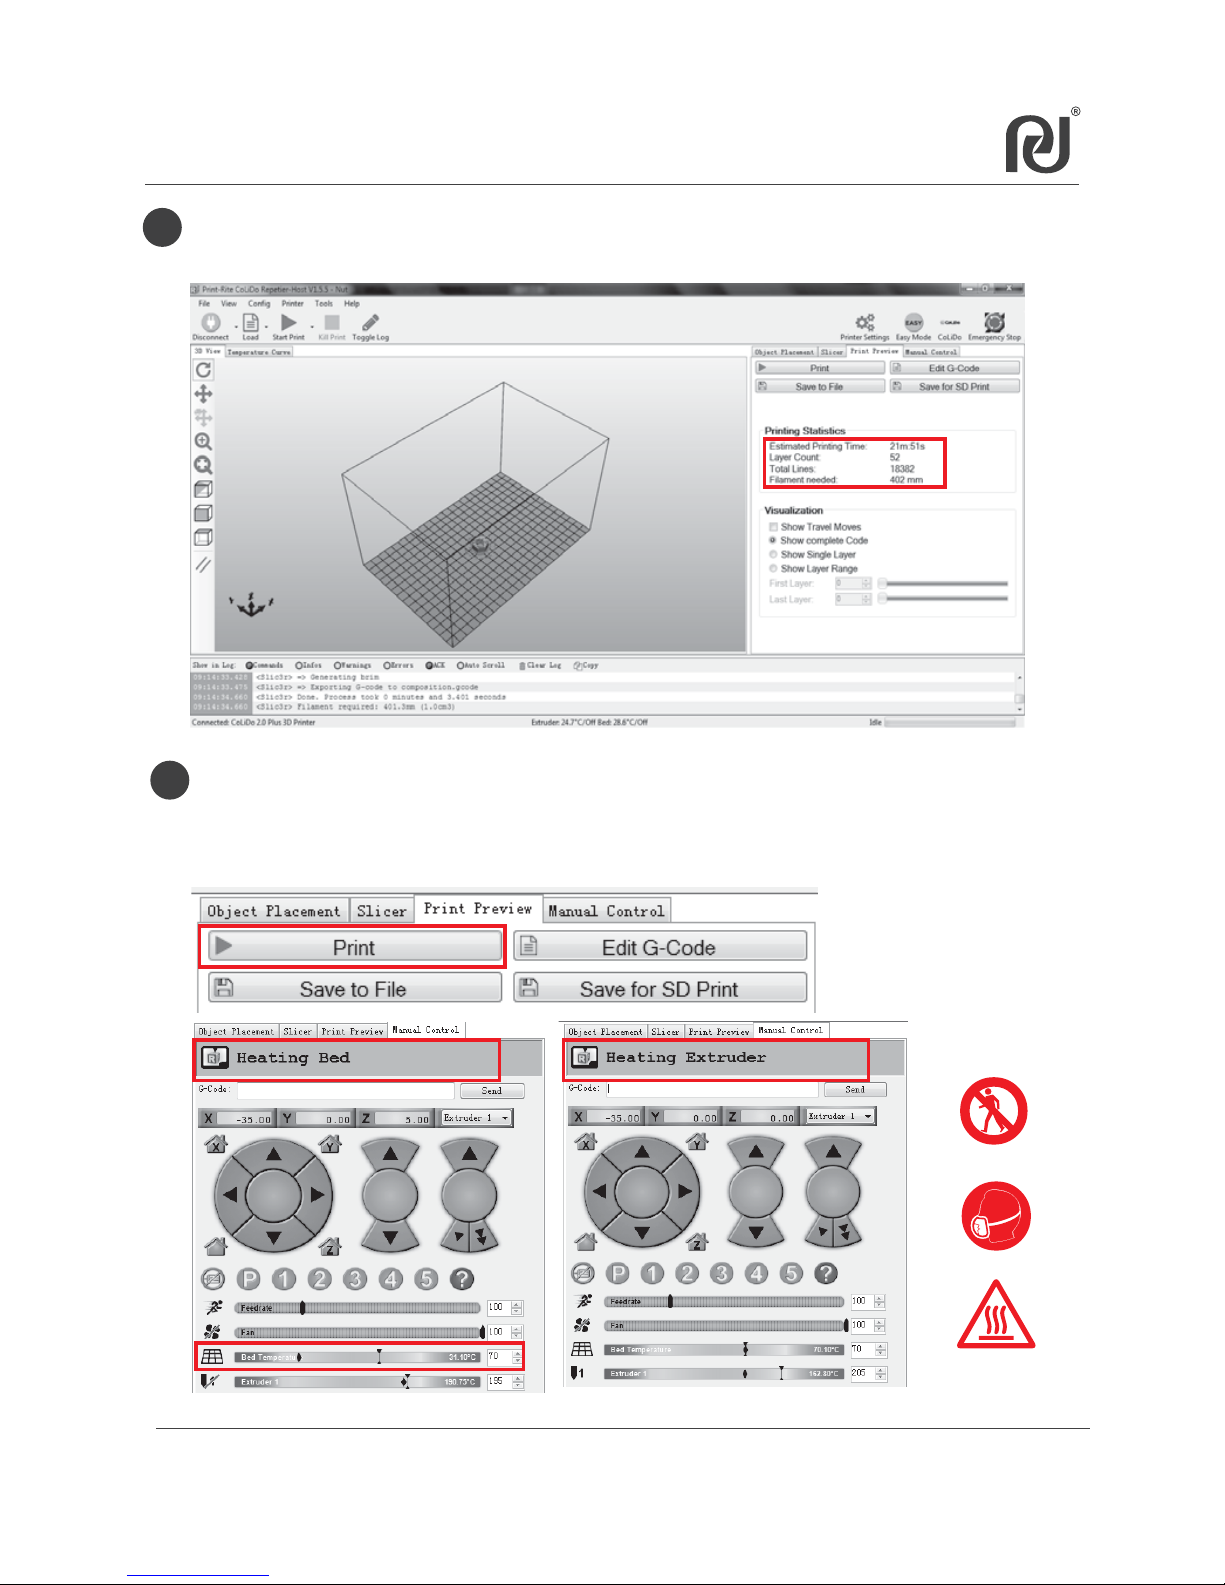
After slice, you can see the estimated printing time and filament usage.
Also, you can see the printed shape of the object in the “3D View”.
Estimated printing time
Estimated filament usage
Click “Print”, start to print.
Once the platform and the nozzle actual temperature reach the setting
temperature, the printer will start to print.
7.3 Print with Repetier-Host (Cont.)
Page 44
44
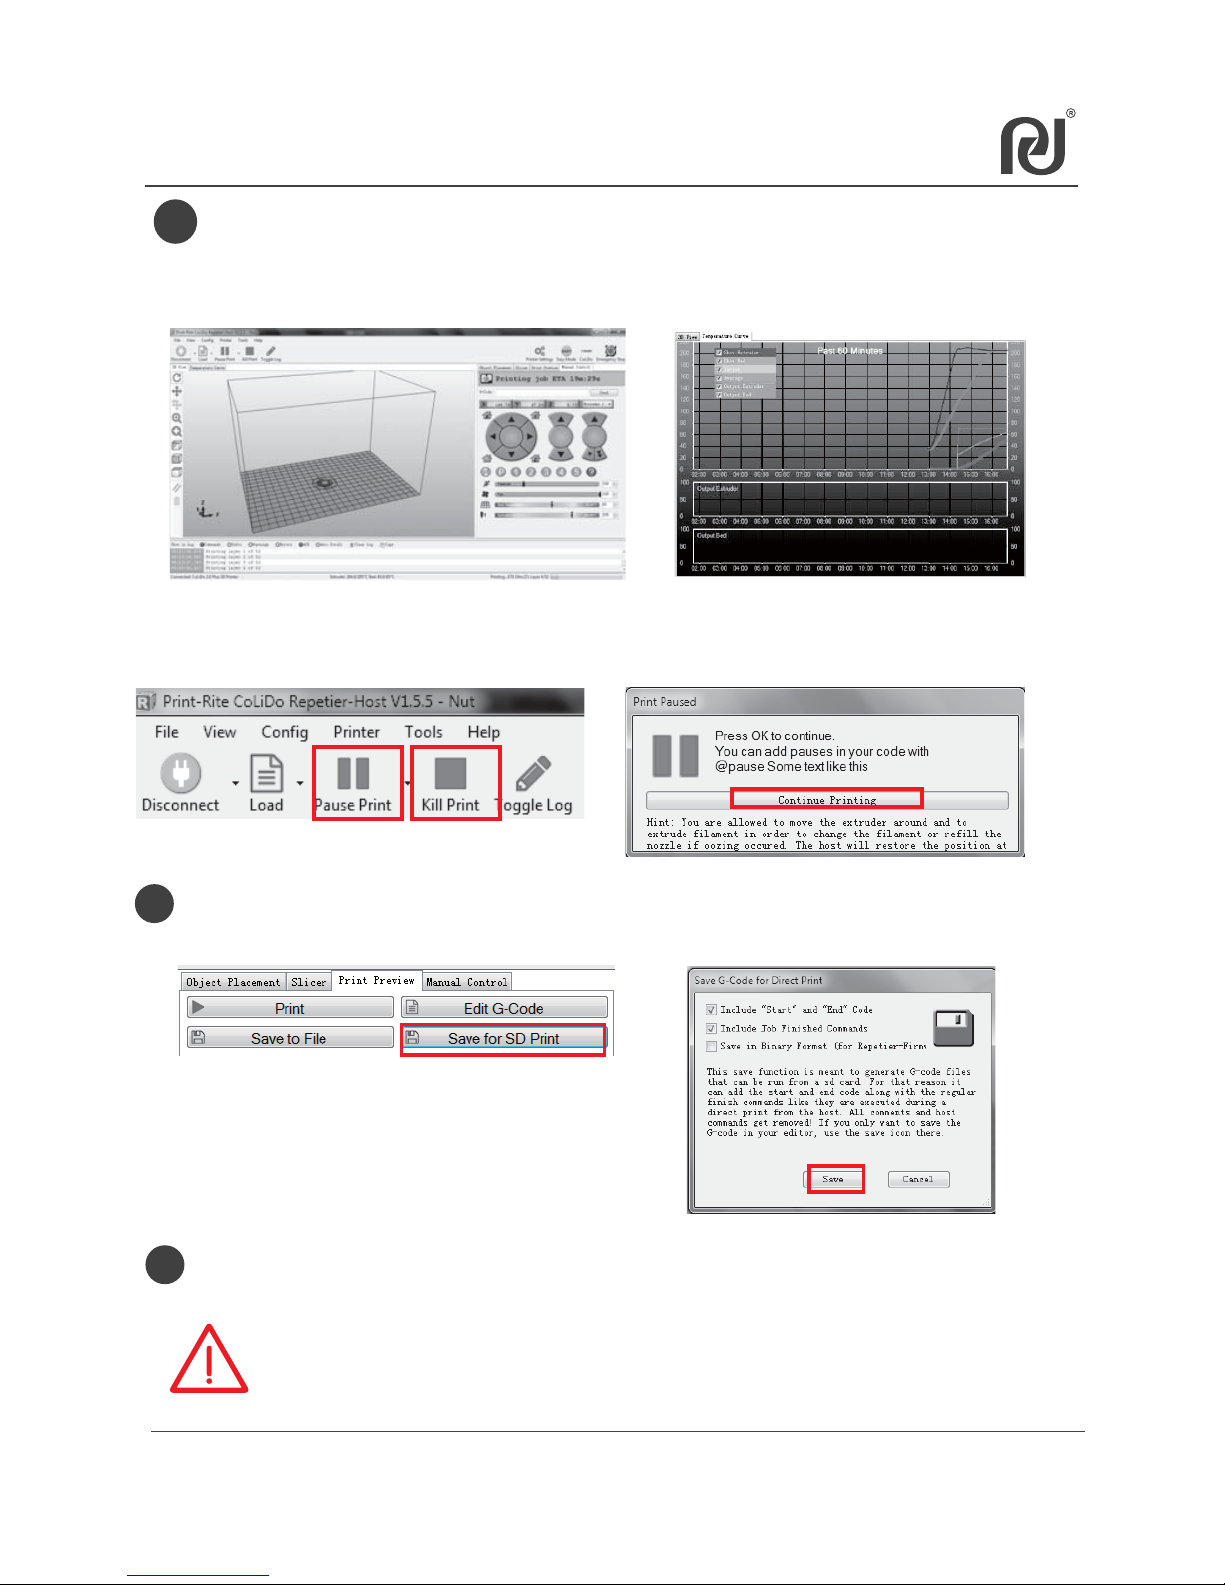
If want to print the file using SD Card, you can click “Save for SD Print”
after slice, to save the GCO file in the computer or SD Card.
10
11
Printing.
12
Caution: Please wait for a few minutes
to cooldown before remove the
printed object.
Finish Print.
1. You can see the
printing track from “3D View”;
You can se temperature go up/down from“Temperature Curve”.
2. You can click “Pause Print” and “Continue Printing” to pause/resume printing.
You can click “Kill print” to stop the printing and cannot be resumed.
7.3 Print with Repetier-Host(Cont.)
NOTE: The saved file name just can be
English words, number, underline,
blank space.
Page 45
45
7.4 Repetier-Host Basic 3D Printing
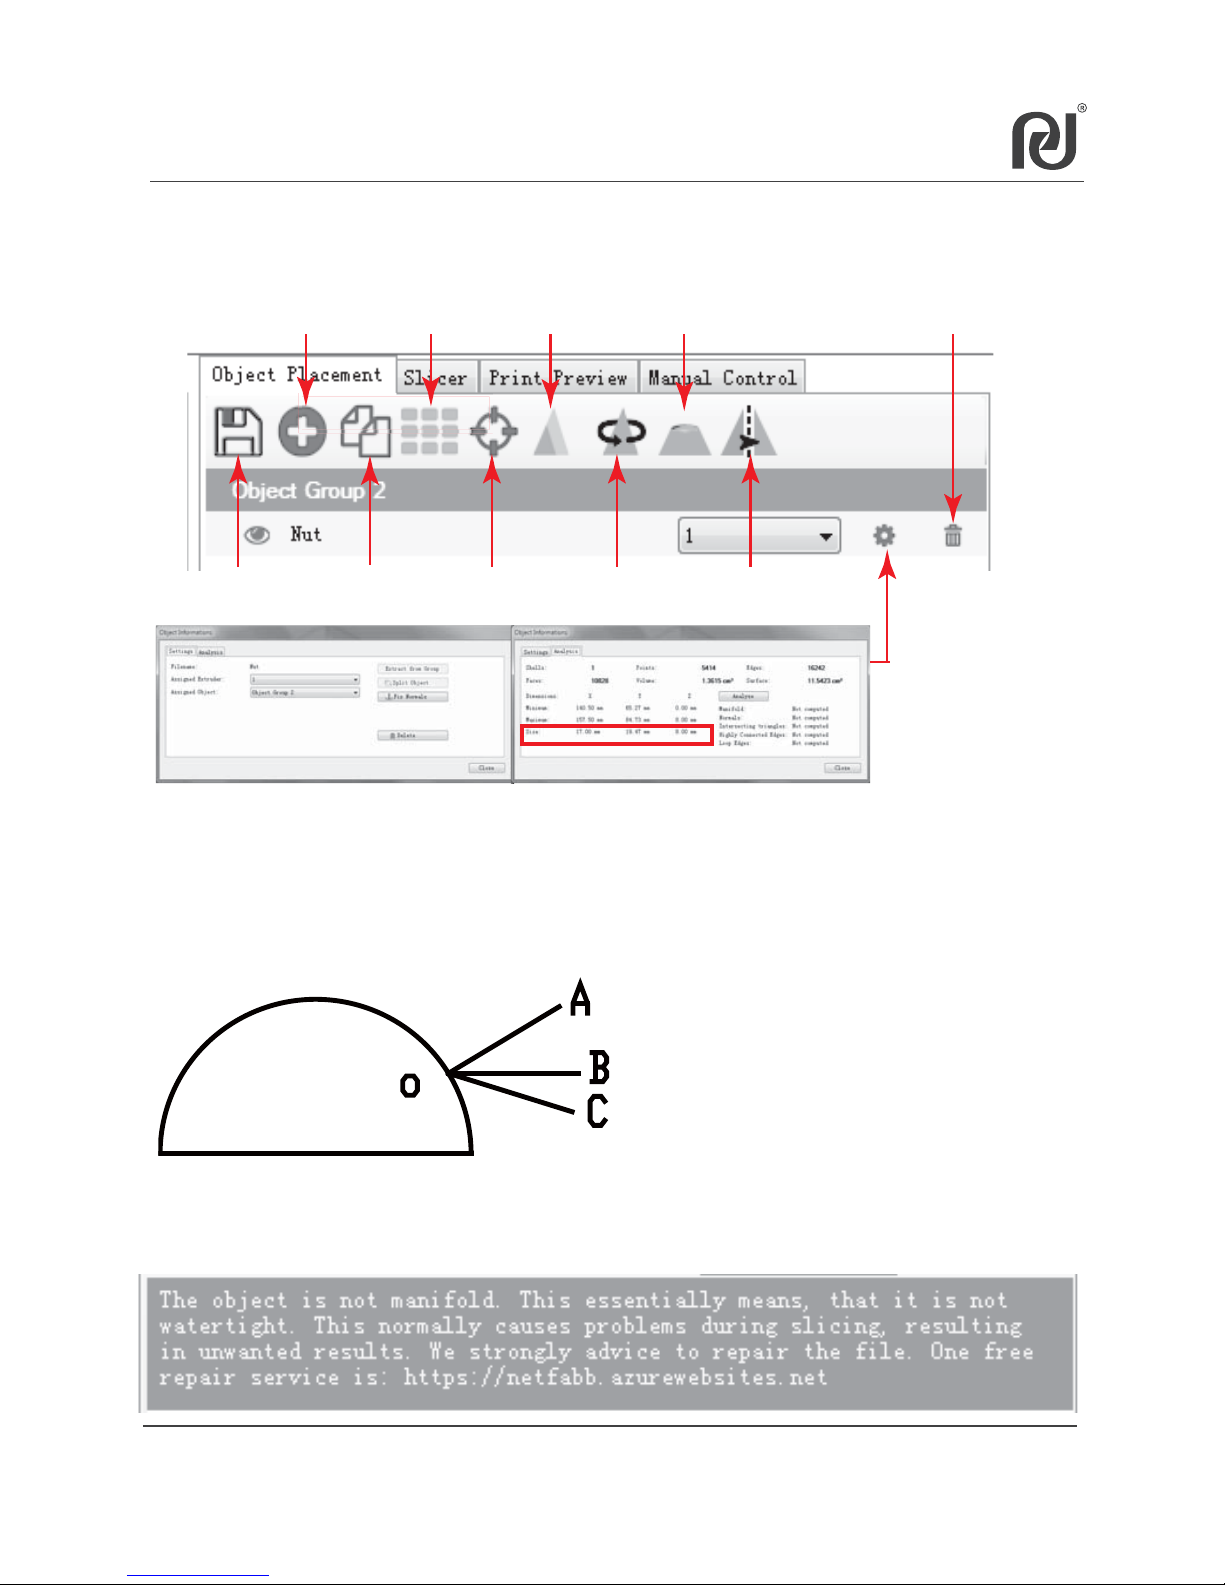
1. 3D object can be adjusted such as scale down/up X/Y/Z, rotate X/Y/Z, copy,
mirror, autoposition and split before slice. After adjusting the object, It is
better to click “Center Object”.
2. For 3D printing layer by layer base on FDM process, we suggest printing
the model with OA structure. If printing the model with OB or OC structure
(Call Overhang Printing), the parallel or downward layer will fall down on
the model or on the platform due to no supporter to the layer. So, you need
add supporter for overhang object.
Remark:
OA – the structure is upward to stretch
OB – the structure is parallel to stretch
OC – the structure is downward to stretch
Save the adjusted
3D object
Add other 3D object
Autopostion Scale up/down
Copy 3D model
to print more
Center the
object
View cross section
Rotate X/Y/Z Mirror 3D model
Delete
Obejct Informations
3D model dimension
3. The 3D model must be closed surface or line to print base on FDM process.
If below message appeares, it is better to repair the object before printing.
Recommend repaire website: https://netfabb.azurewebsites.net.
Page 46
46
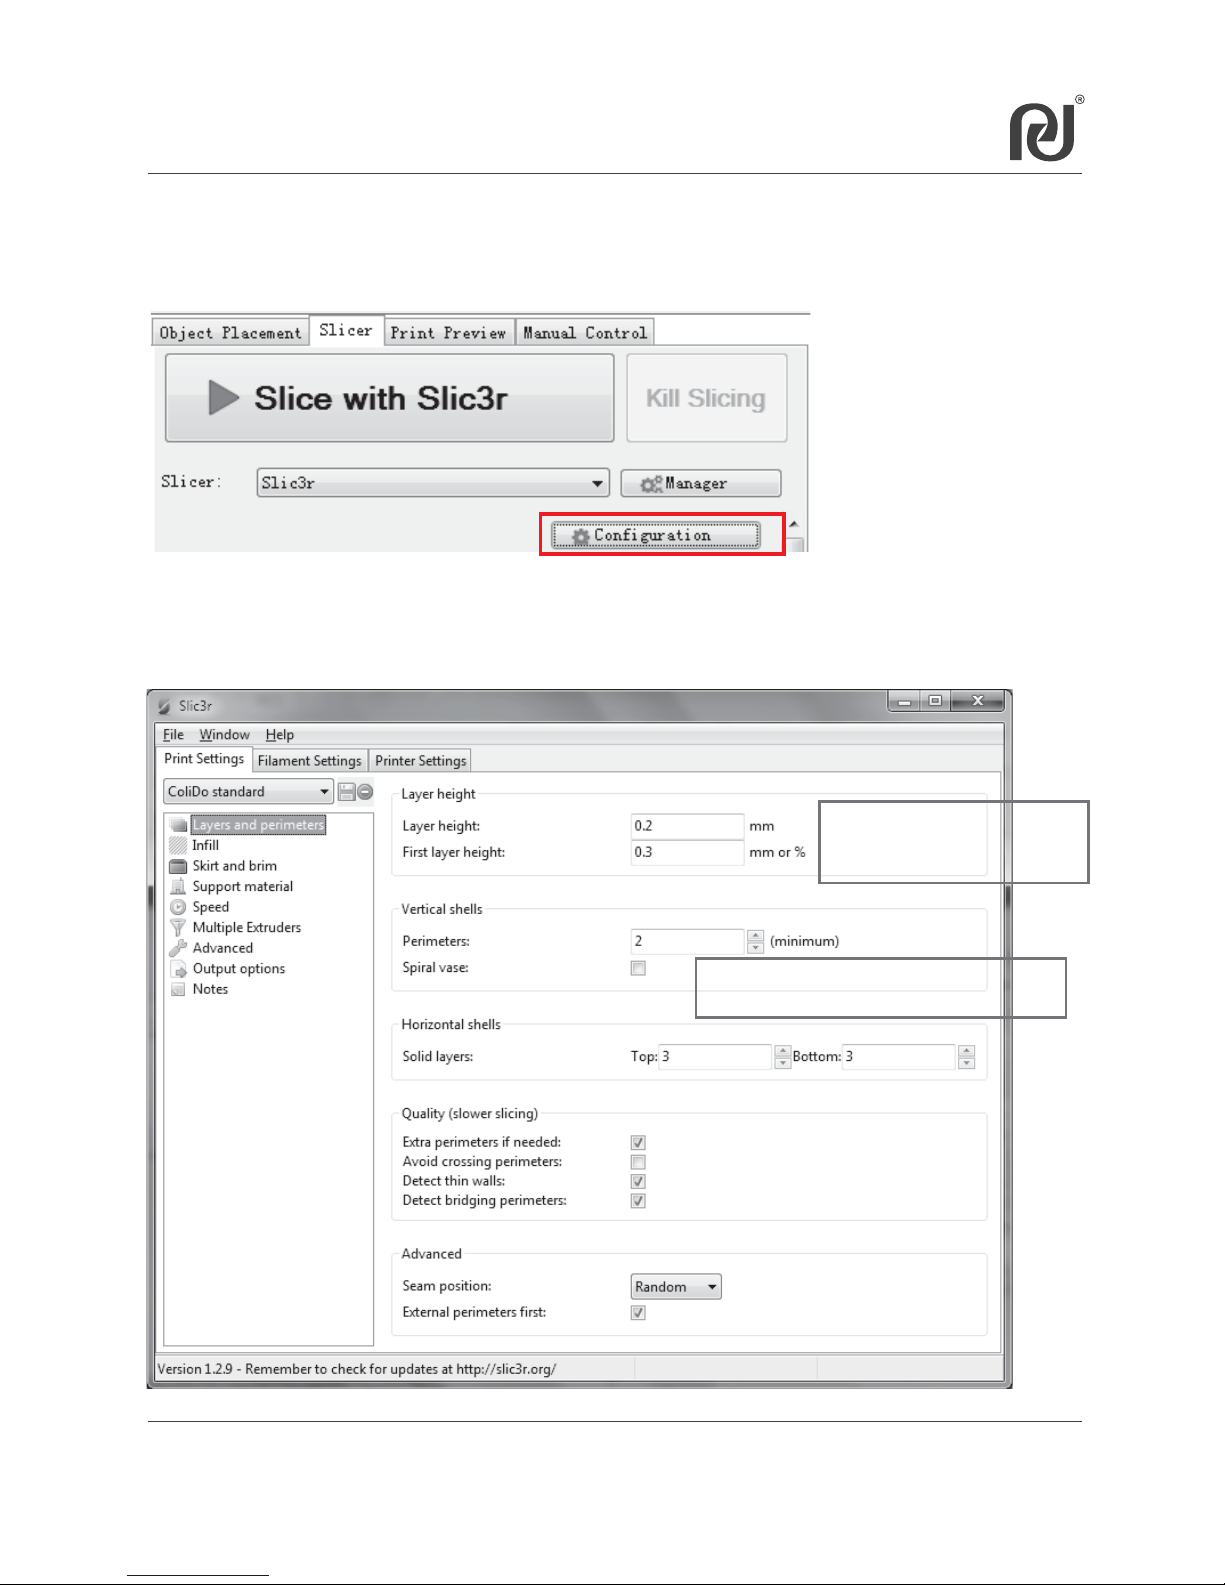
7.5.1 Slic3r settings
For printing setting, you can click “Configuration” to review or have your
customized “Print/Filament/Printer Settings”in Slic3r for advanced user.
7.5 Repetier-Host Advanced 3D Printing
7.5.1.1 Print Settings (For example “CoLiDo standard”)
a. Layers and perimeters
Lower the Layer height and
higher the p rinting p rec is e ,
but lo ng er the printing time.
Select “Spiral vase”, will print thin wall
model or hollow model.
Page 47
47
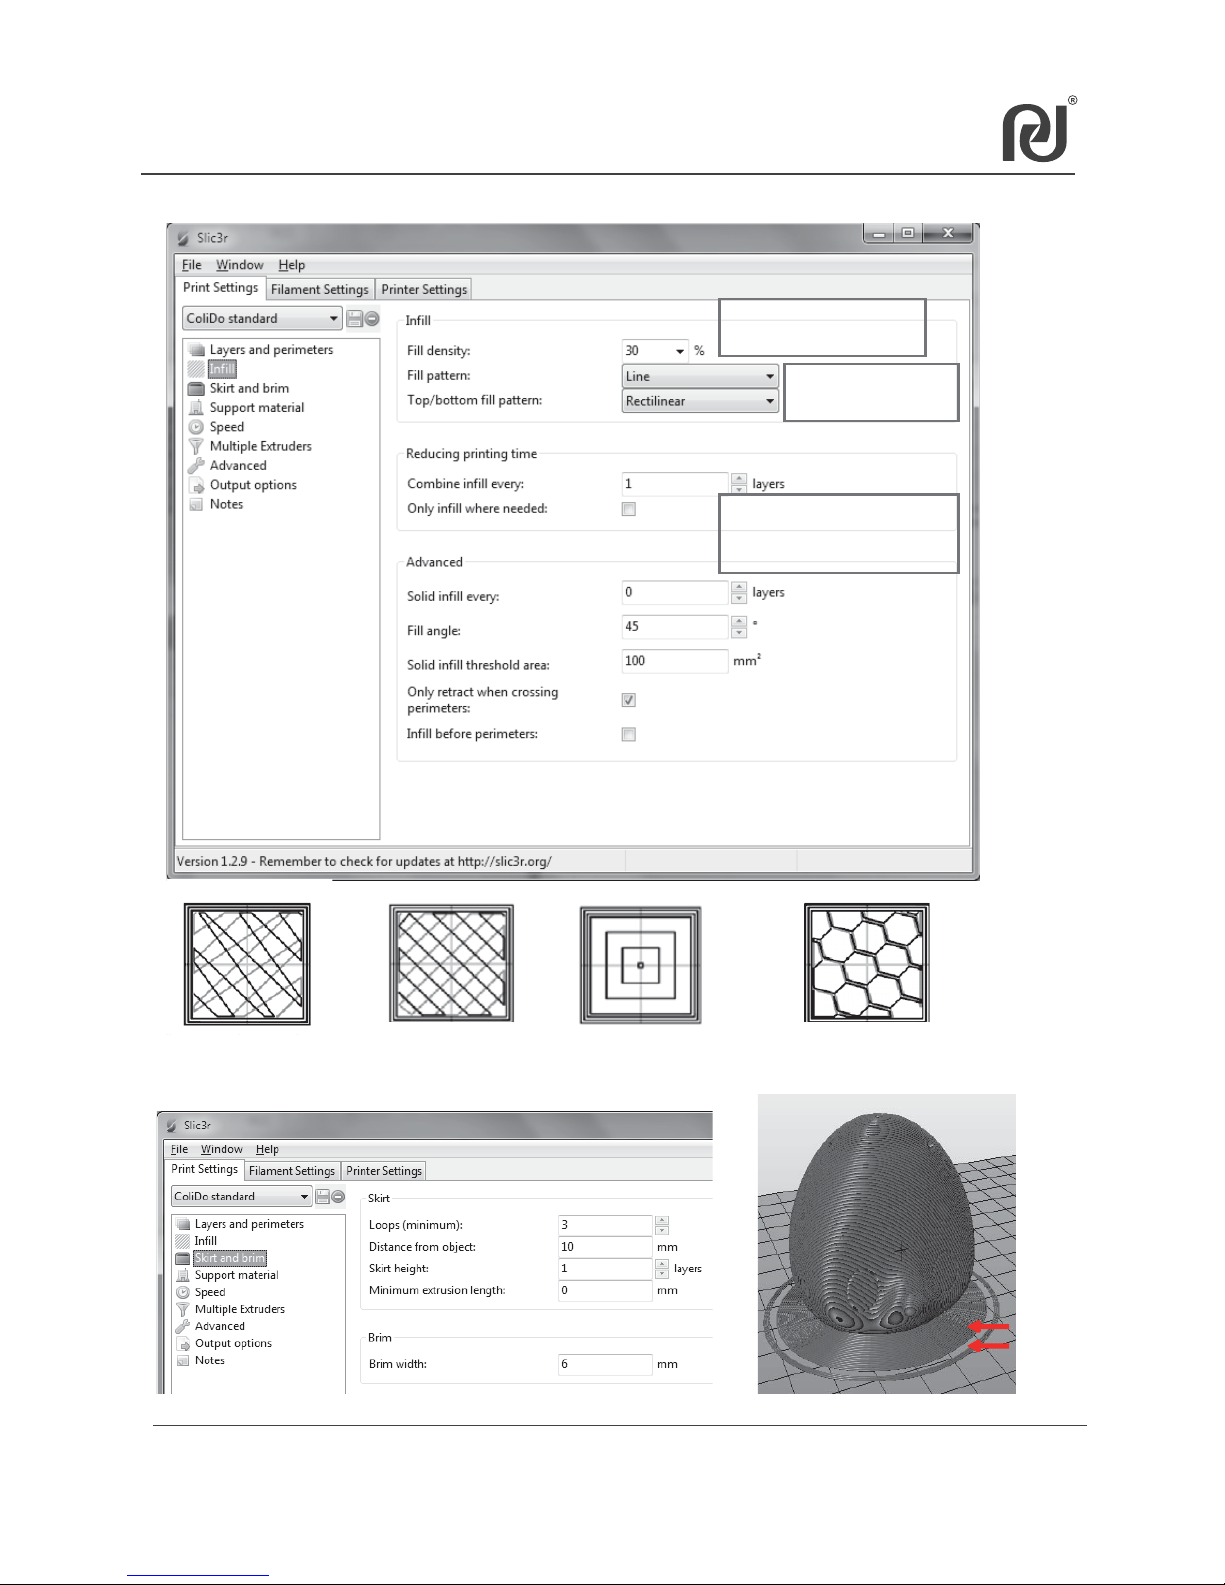
7.5 Repetier-Host Advanced 3D Printing
b. Infill
c. Skirt and brim
Higher fill density and
longer printing time
Select “Only inf ill where
needed”, will only print the
outside single perimeter.
4 fill p attern : as
right picture.
Line
Rectilinear
Concentric
Honeycomb
Brim
Skirt
Page 48
48
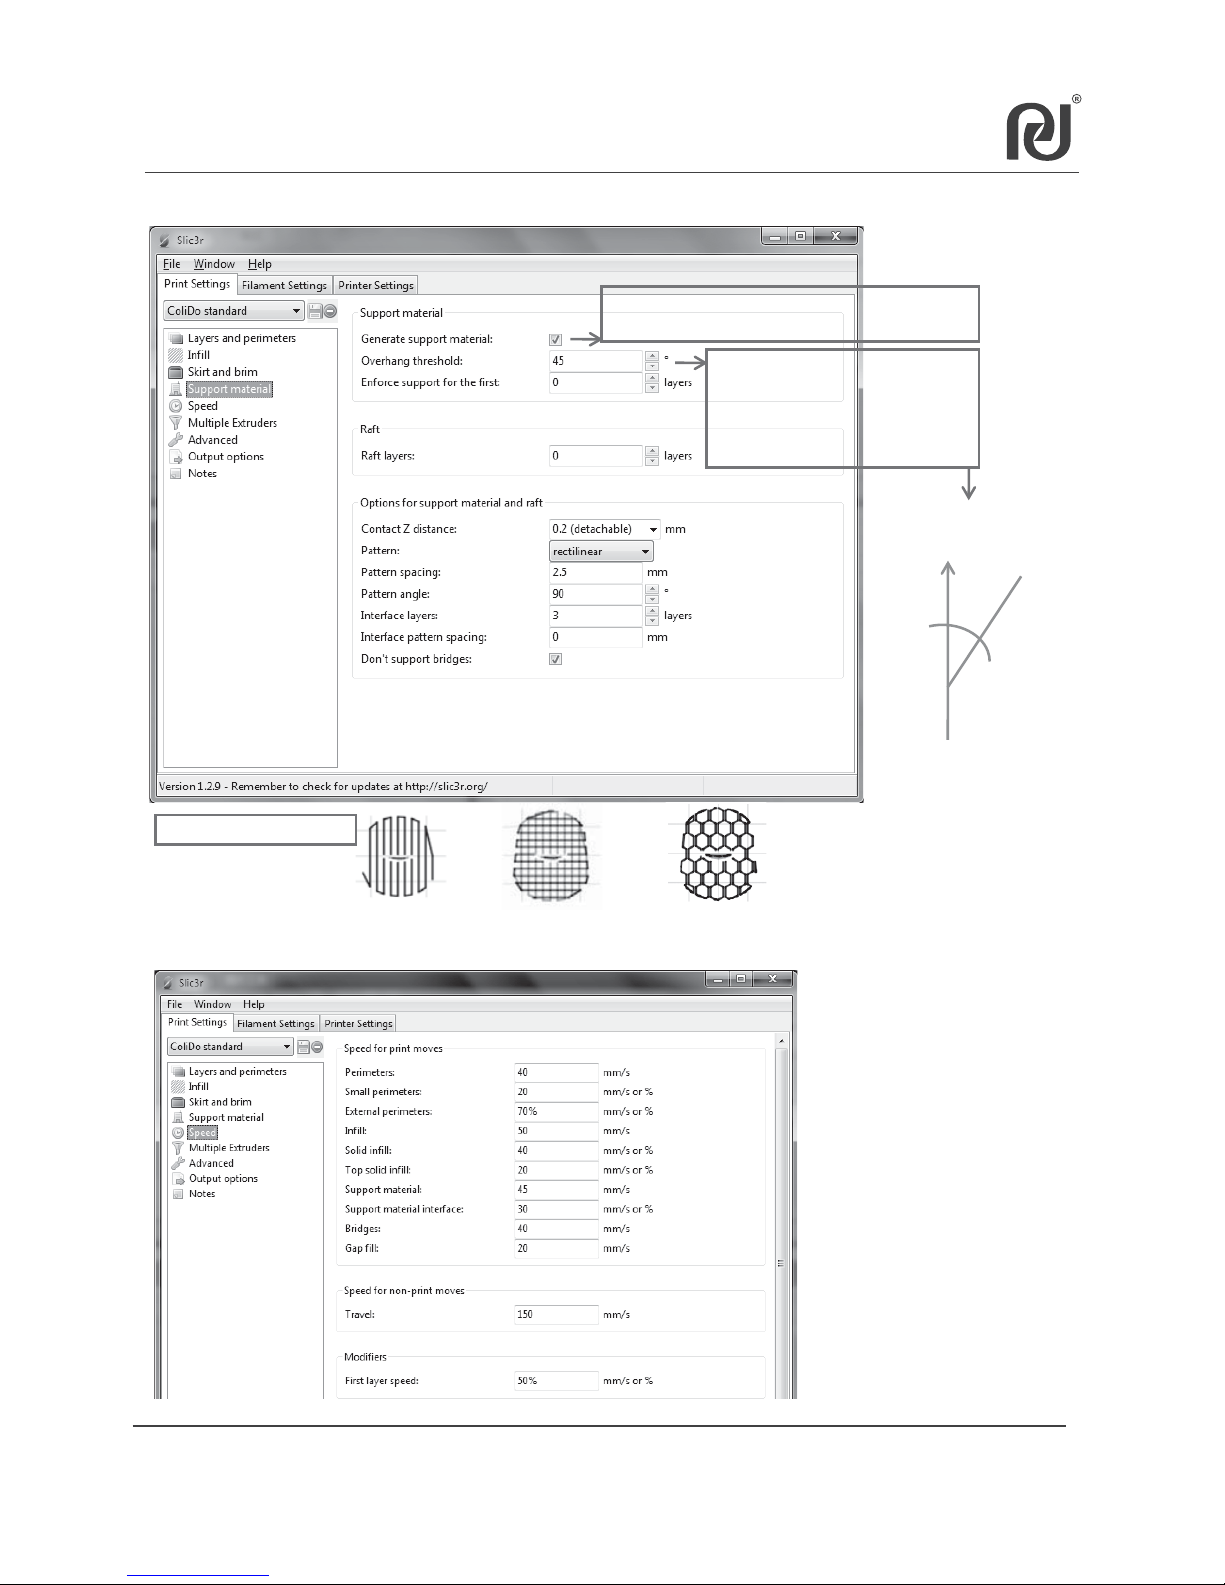
7.5 Repetier-Host Advanced 3D Printing
d. Support Material
e. Speed
Selec t “Generate support material”, will auto
print supporter on the model.
Once the angle of the overhang
structure OA is b igger than the
“setting angle”, the support
material will be auto generated.
We suggest 45degree
Z
O
A
45ć
Overhang
threshold:
Rectilinear
Rectilinear Grid
Honeycomb
Support Material Pattern:
Page 49
49
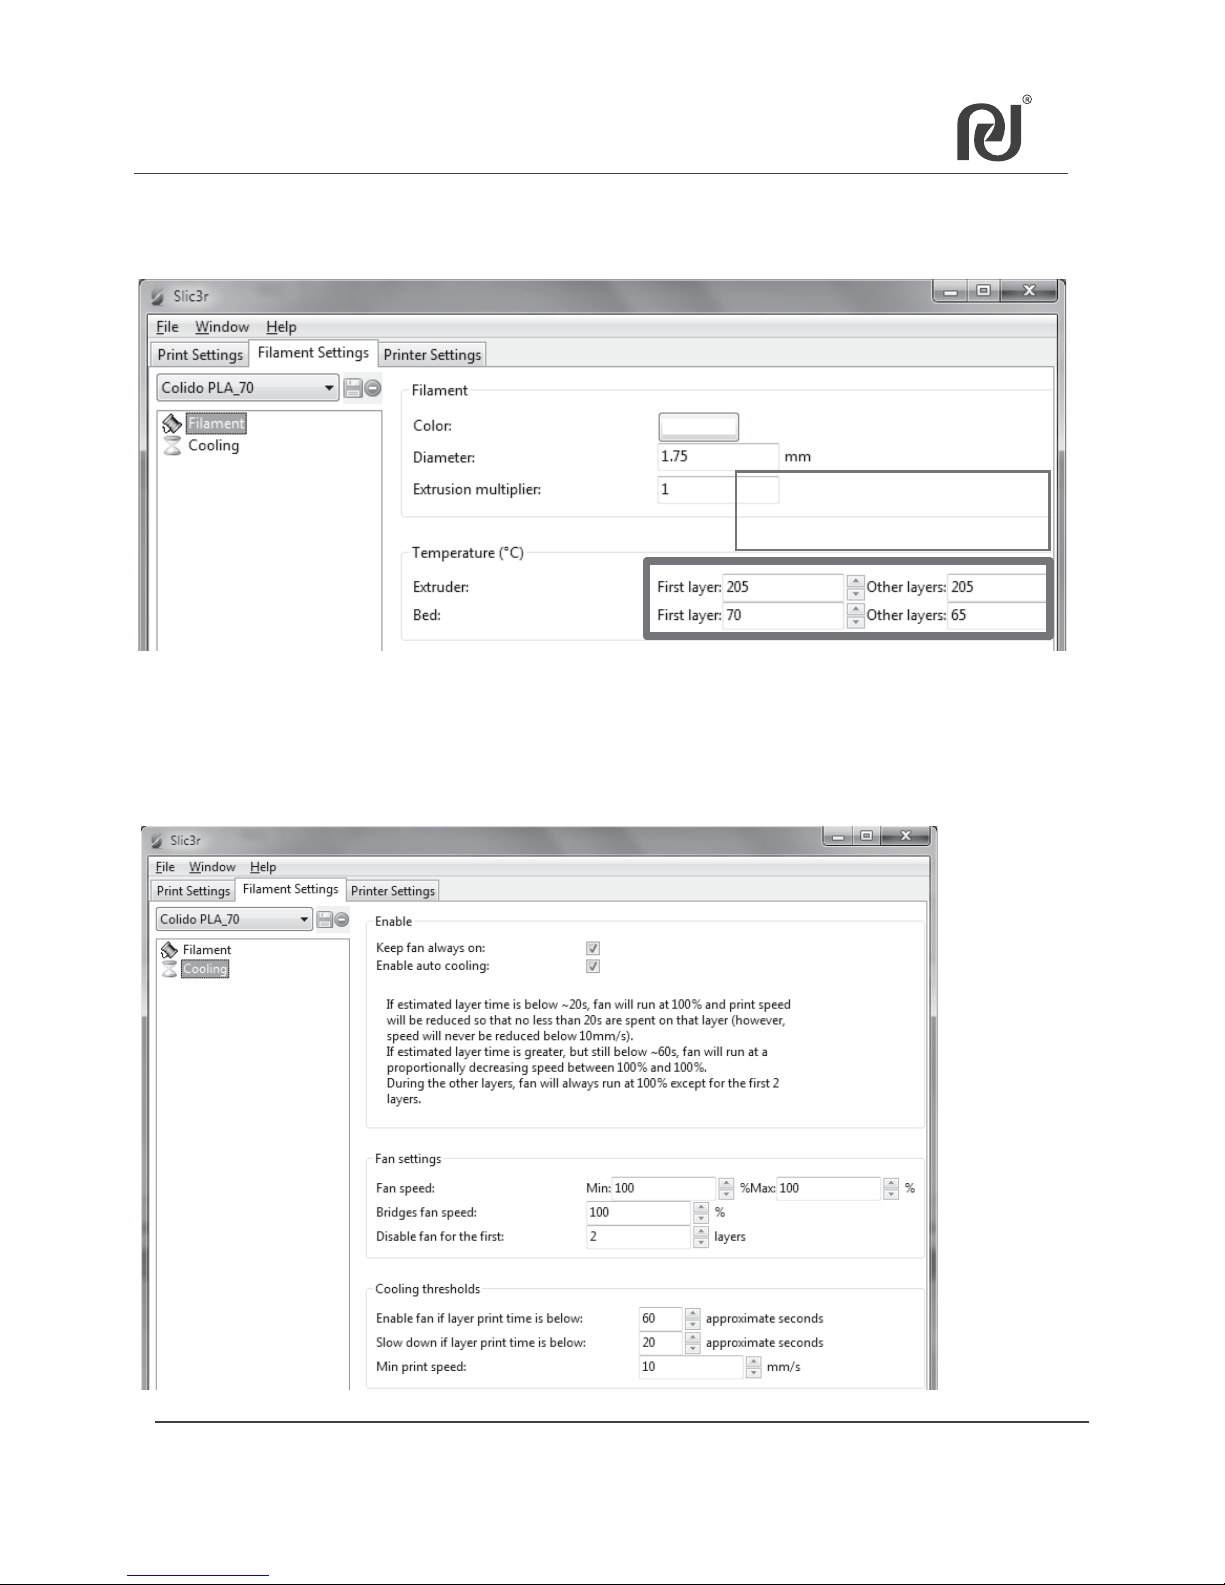
7.5 Repetier-Host Advanced 3D Printing
7.5.1.2 Filament Settings (For example “CoLiDo PLA_70”)
NOTE:
To revise the temperature, need click the up/donw narrow instead of revise the number
directly.
a. Filament
Setup the extruder and
bed setting temperature
b. Cooling
Page 50
50
7.5 Repetier-Host Advanced 3D Printing
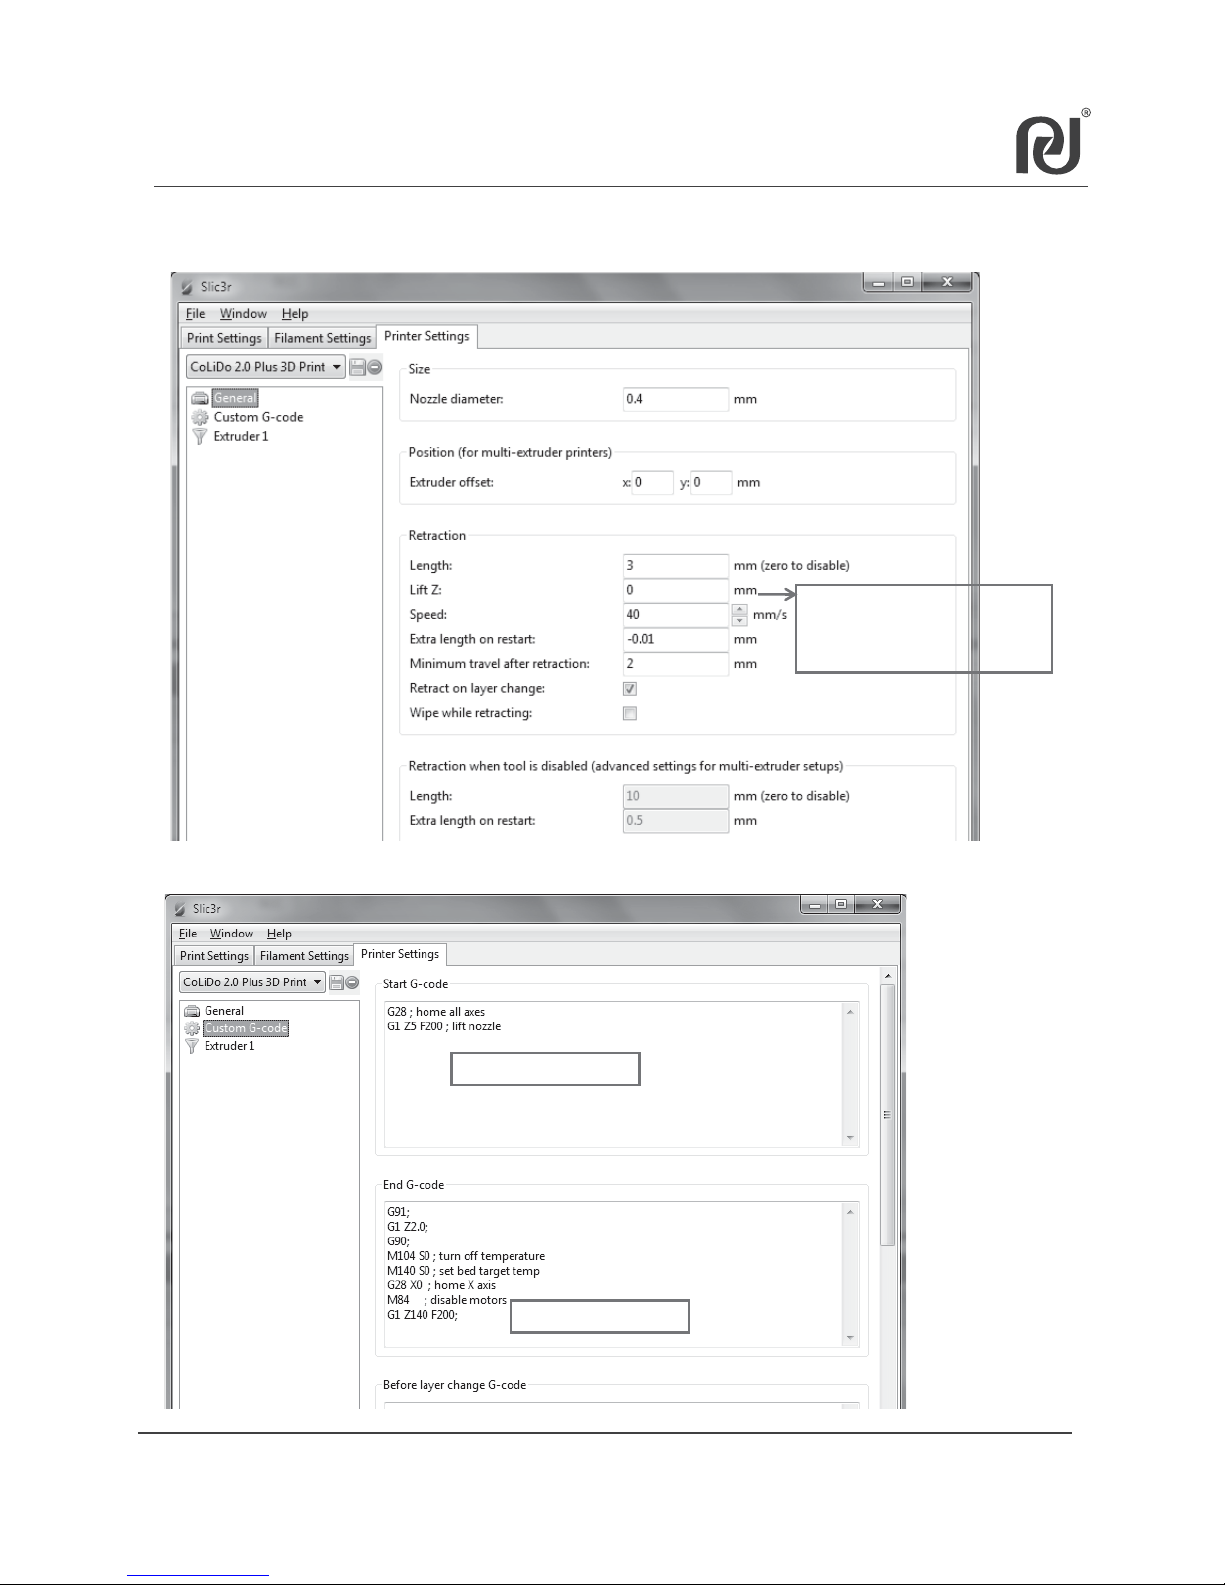
7.5.1.3 Printer Settings
a. General
b. Custom G-code
When p rinting many ob jects at
the same time, revise the “Lift Z”
f ro m “0” t o “2~5” to avo id the
nozzle cross the object..
Action before printing.
Action after printing.
Page 51
51
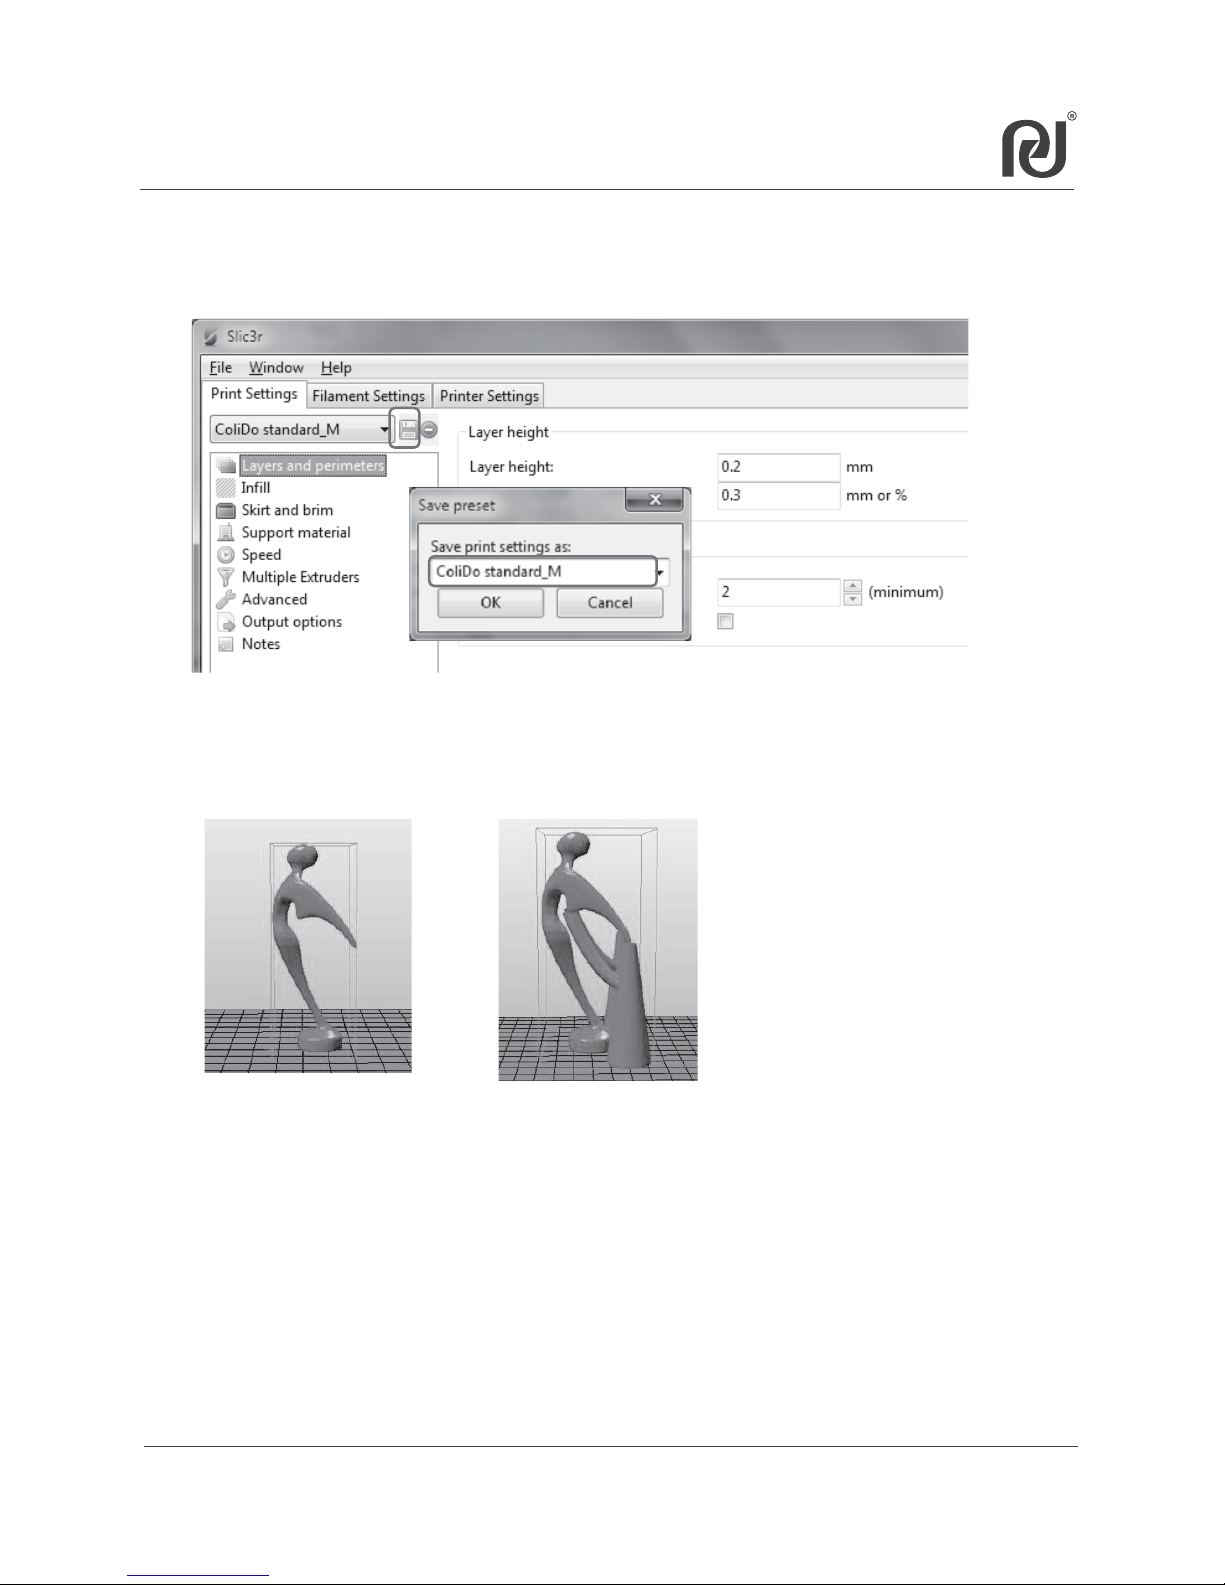
7.5 Repetier-Host Advanced 3D Printing
7.5.1.4 Save the settings
If you want to save the revised settings , click “Save” and have customized
name. Then you can select customized name/settings when you slice.
7.5.2 Other Skills
a. Design supporter on the 3D model to aviod overhang structure
(the supporter can be easily removed.)
b. When printing the hollowed-out object, it is better to lower the nozzle
temperature by 5~10 degrees to avoid silky threads.
c. If the object is bigger than the printer printing area, it is better to divide the
object in several parts to print, then assemble together.
If the object is smaller, it will easy moving on the platform and offset, it is better
to copy printing several objects at one time.
d. The printing environment has minor impact on the filament sticking condition.
If cold printing environment, it is better to increase the nozzle temperature
5~10℃ and vice versa.
Page 52
52
7.5 Repetier-Host Advanced 3D Printing
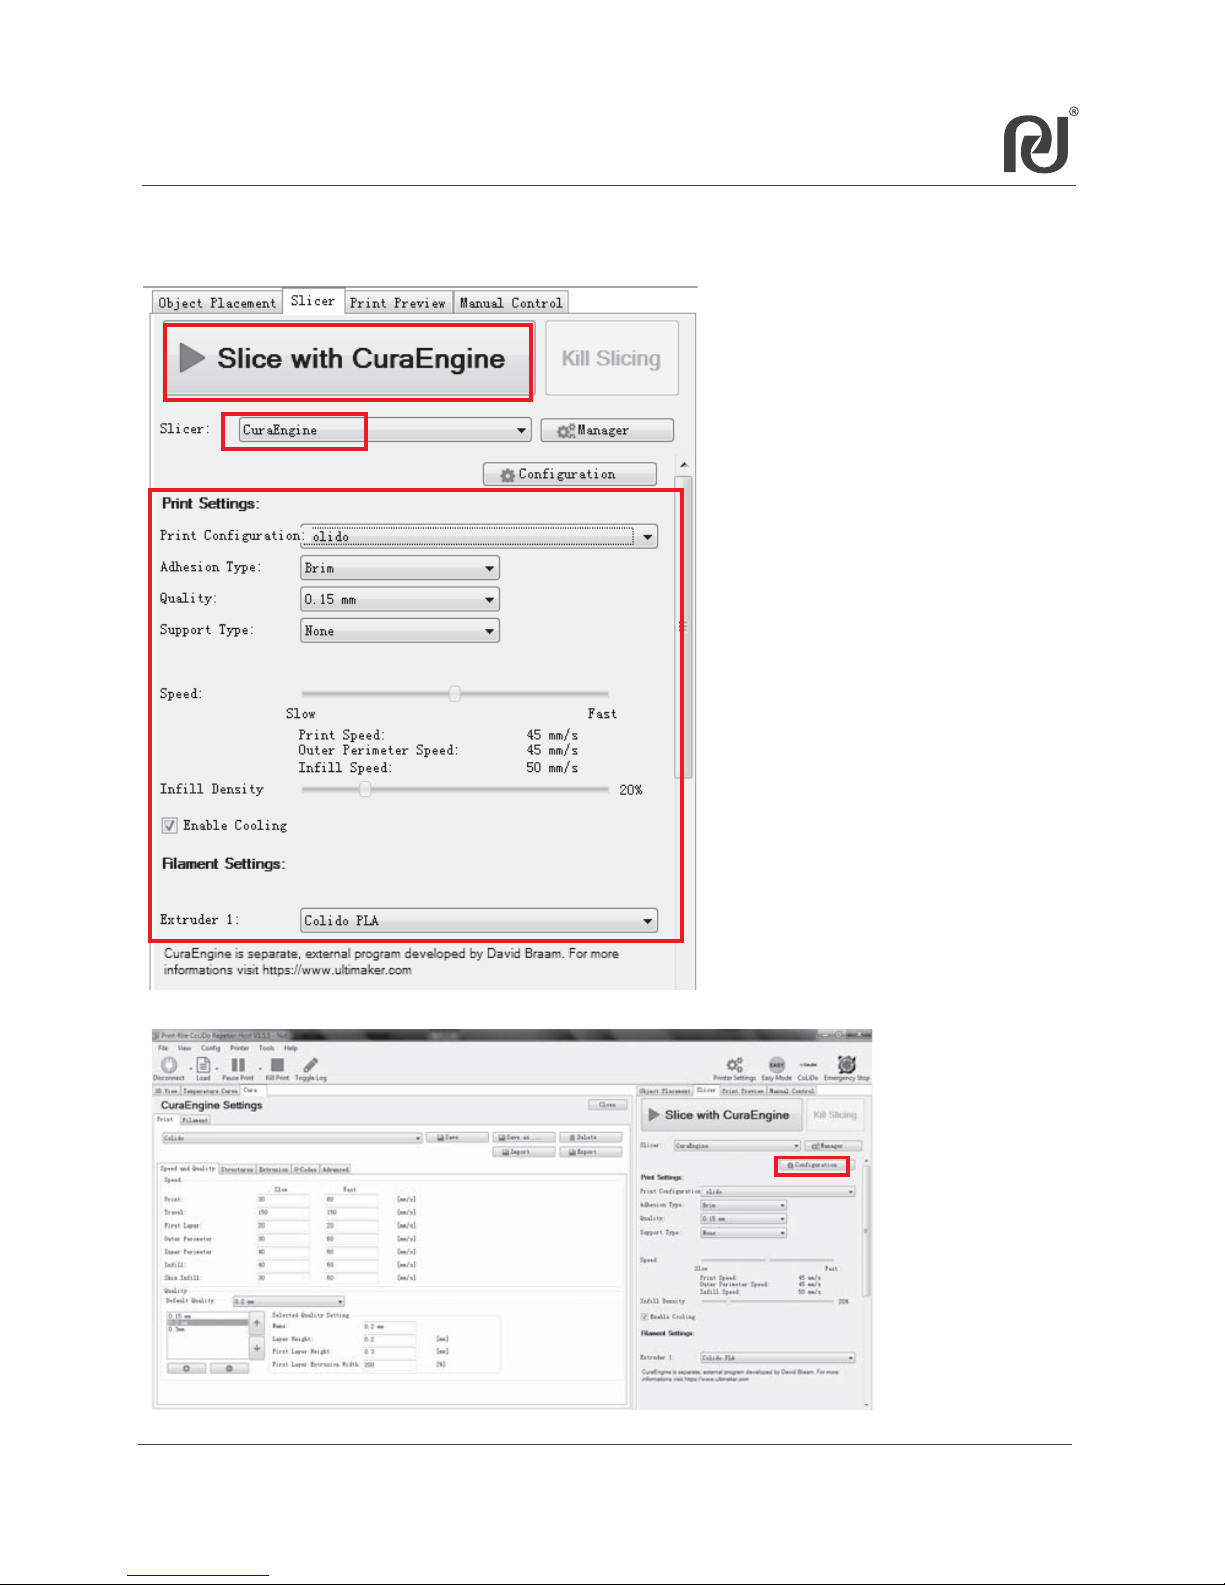
7.5.3 CuraEngine
It is another slicer software to convert 3D model to g-code.
Step1: Select “CuraEngine”;
Step2: Select “Print Settings”and
“Filament Settings”;
If you want to view or customize CuraEngine settings, cilck “Configuration”.
Step3: Click “Slice with CuraEngine”.
Page 53
53
Chapter 8 Maintenance
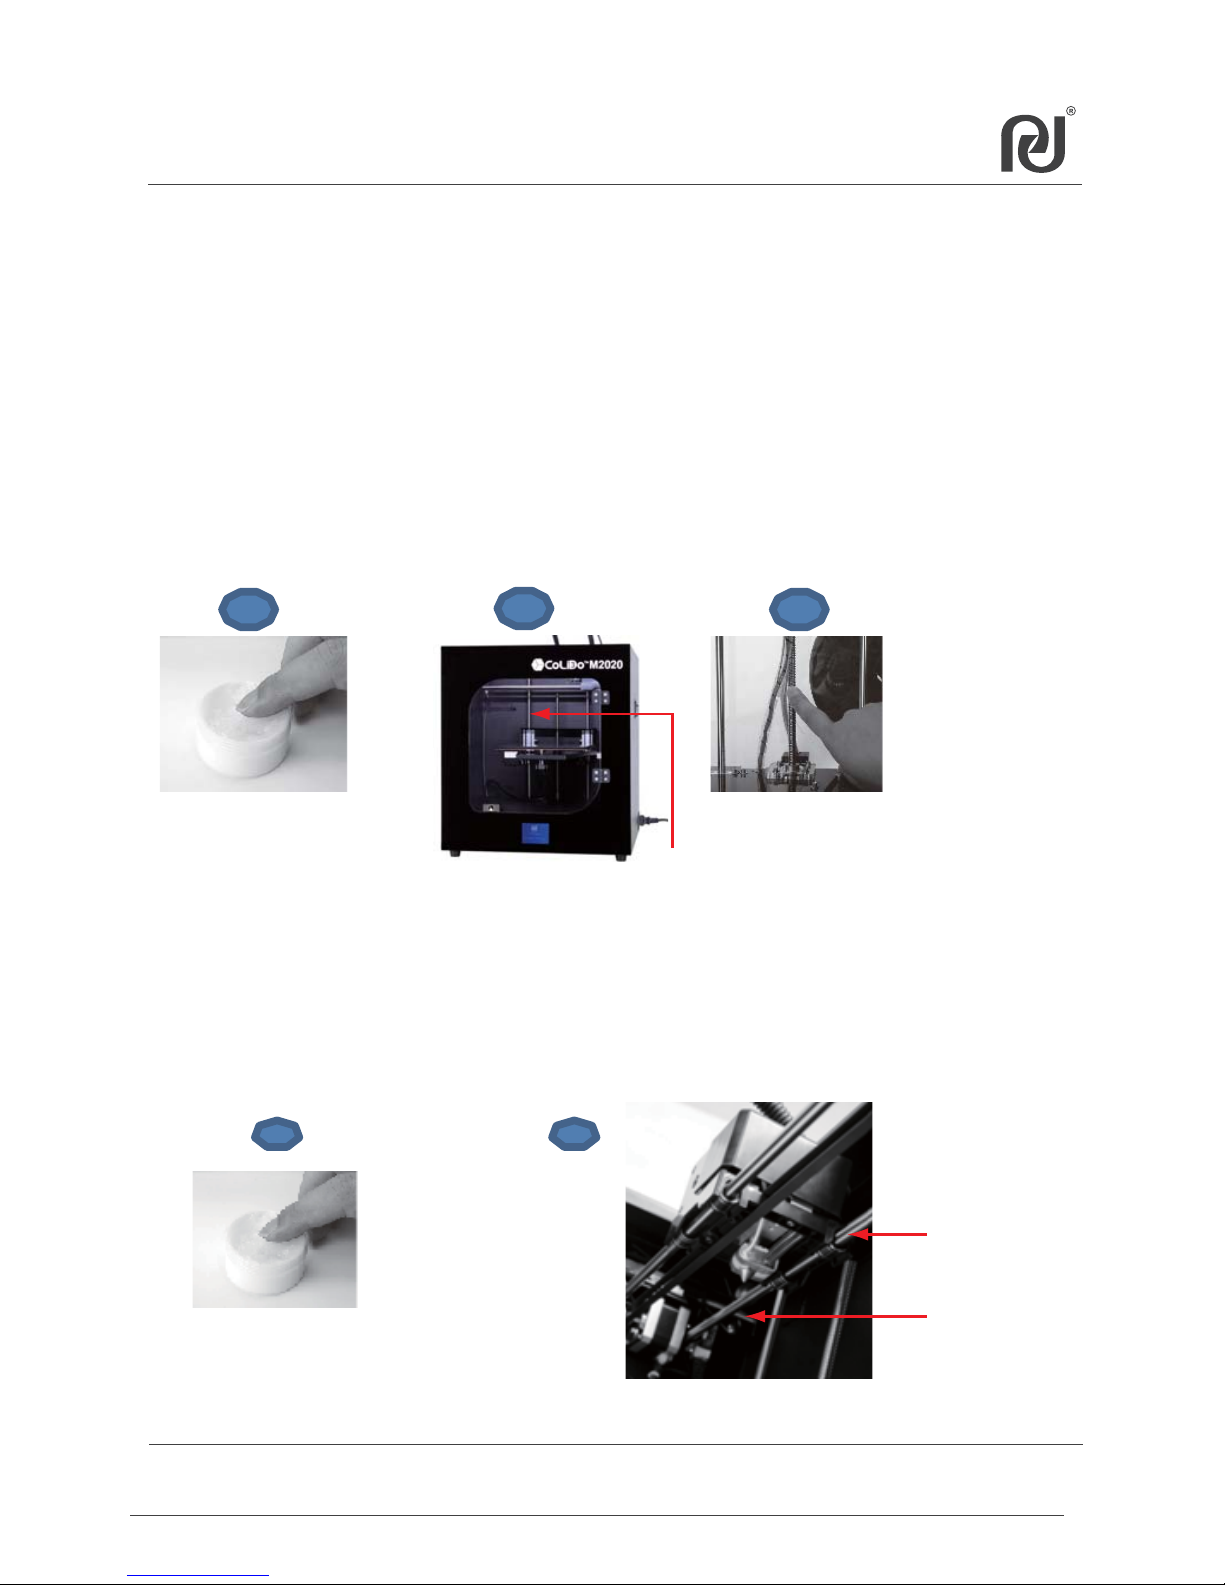
Lubricate the Z-axis Screw Rod and the X-axis Idler Pulley
After printing around 50 hours, you should lubricate the Z-axis screw rod and
the X-axis Idler Pulley.
To lubricate Z-axis screw rod, please follow up below process:
1. Prepare the lubricate (own by customer) such as SKF Bearing Grease .
2. Slowly rotate the Z screw rod to move up/down the platform of the
3D Printer.
3. Use a clean, lint-free cloth to spread the grease onto the top/bottom
of the Z-axis screw rod.
4. Make sure the grease cover the inside of the Z-axis screw rod.
To lubricate X, Y Rods, please follow up below process:
1. There are 4pcs X Rods and 2pcs Y Rods on the printer as below picture.
2. Apply small amount of the grease directly onto the exposed area of the Rods and
manually move the printer head forward/backward and left/right to spread the grease.
Too much lubricate will cause the printer head moving blocked.
1 2
Y Rod
X Rod
1
2
3
Z Screw Rod
Page 54
54
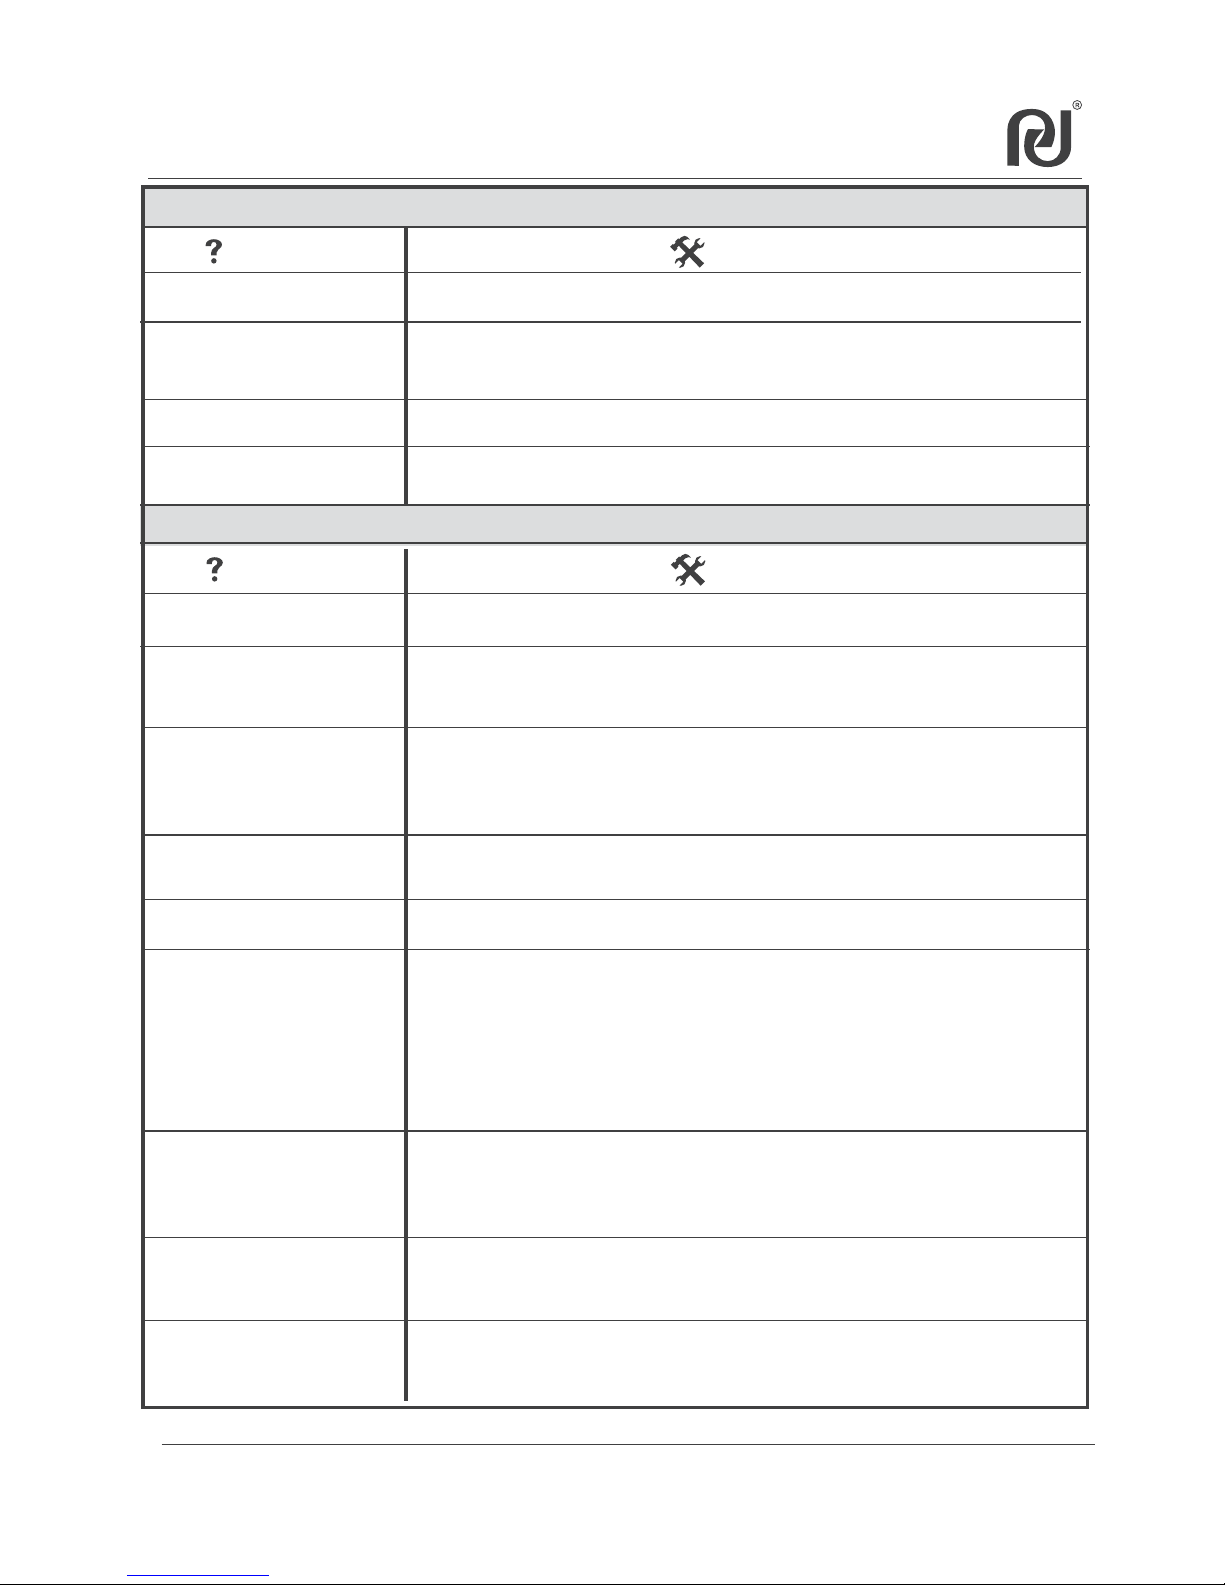
Chapter 9 Troubleshoot
Consumable (Filament)
What is the PLA/ABS default
setting temperature?
1. PLA: Nozzle temperature is 205℃,Platform temperature is 65~70℃;
2. ABS: Nozzle temperature is 220℃,Platform temperature is 100~110℃.
How to store the filament
when the printer will is out of use
for a long period of time?
3D Printer
Does the printer support offline
printing?
Support offline printing by using SD card.
How long will it take to print
an object?
How to fix the clogged nozzle?
The required time depends on the object size and resolution level. The higher the resolution
level, the slower printing speed. The printer is configured with different print setting option:
Best, Standard, draft. After you select the printing setting to slice, the repetier software will
show the needed time .
1. Refer to chapter 6.6, once the nozzle reached the setting temperature, please press the
printer head arm and at the same time pull on the filament to extract it from the nozzle.
2. Refer to the label on the printer, clean the nozzle using longer Allen Key in the accessory.
3. Disassemble the printer head by unlocking the screws on the Fan, clean the blocked
filament inside the nozzle.
Can I adjust the parameter
during printing?
For new user, we do not suggest adjusting the parameter during printing.
For advanced user, you can push the knob to select “Control” to adjust Nozzle or Bed
temperature and printing speed during printing.
How can I know if the printer is
properly working?
Refer to chapter 6.2~6.4 in user manual, print one of the test file in SD Card supplied with
printer. (For example: PCT1.gco for PLA filament, ACT1.gco for ABS filament)
The filament cannot come out
from the nozzle during printing?
1. The platform maybe too close to the nozzle tip, which will prevent the filament extruding
from the nozzle. Please select "Prepare"-"Calibrate Mode" of LCD screen to re-calibrate
the platform. ( refer to chapter 6.2 in user manual)
2. Remove the filament from the printer head (refer to chapter 6.6 in user manual), cut the
filament tip flat, make a length of filament straight and re-load it into the printer head.
Make sure that the filament is properly inserted into the nozzle receiving port.
3. Disassemble the printer head, check the gear which is pulling the filament into the nozzle.
If there are presence of filament powder residue is filled in, clean the gear using the brush.
Check also if the gear tooth is damaged. If yes, replace the gear with a new one.
The printer makes a clicking noise
when printing?
1. The filament is not properly inserted into the nozzle . Please unload the filament,
cut the end of the filament flat and re-load into the printer head. (refer to chapter 5.8)
2. It maybe a short length of the filament blocked in the nozzle from the last time it printed.
Refer to chapter 6.6 in user manual, heat the nozzle and push the blocked filament
into the nozzle tip by loading new filament, the blocked filament will be melted out.
The filament cannot be removed
from the printer head?
1. Check if the nozzle actual temperature reachs the setting temperature;
2. Refer to chapter 6.6 in user manual, when the nozzle actual temperature reach the
setting temperature, press the printer head arm and push a bit filament into the
nozzle until the filament come out from the nozzle, then pull the filament out quickly.
How about the length of 1000g
and 500g PLA/ABS filament?
1. 1000g: PLA 330~340m,ABS 390~400m;
2. 500g: PLA 160~170m,ABS 190~200m.
Can Printrite filament compatible
with other 3D printer?
Yes, Printrite filament can compatible with other FDM 3D printer, such as Makerbot, Afinia,
Reprap, UP!, etc. The filament diameter should be 1.75mm.
Question Solution
Question Solution
The printed sample stick to the
platform too tight and cannot
be removed?
1. Please wait a few minutes for the platform and the printed samples cooldown, then
remove the printed sample.
2. If the printed samples still stick to the platform tightly, please carefully remove it using
a scalpel.
If you do not use the the filament for a long time, keep your filament spool or cartridge in
a closed plastic bag to avoid the filament absorbing the moisture. Also, ensure insert the
filament tip into the small hole of the spool to avoid filament entangle when use next time.
Page 55
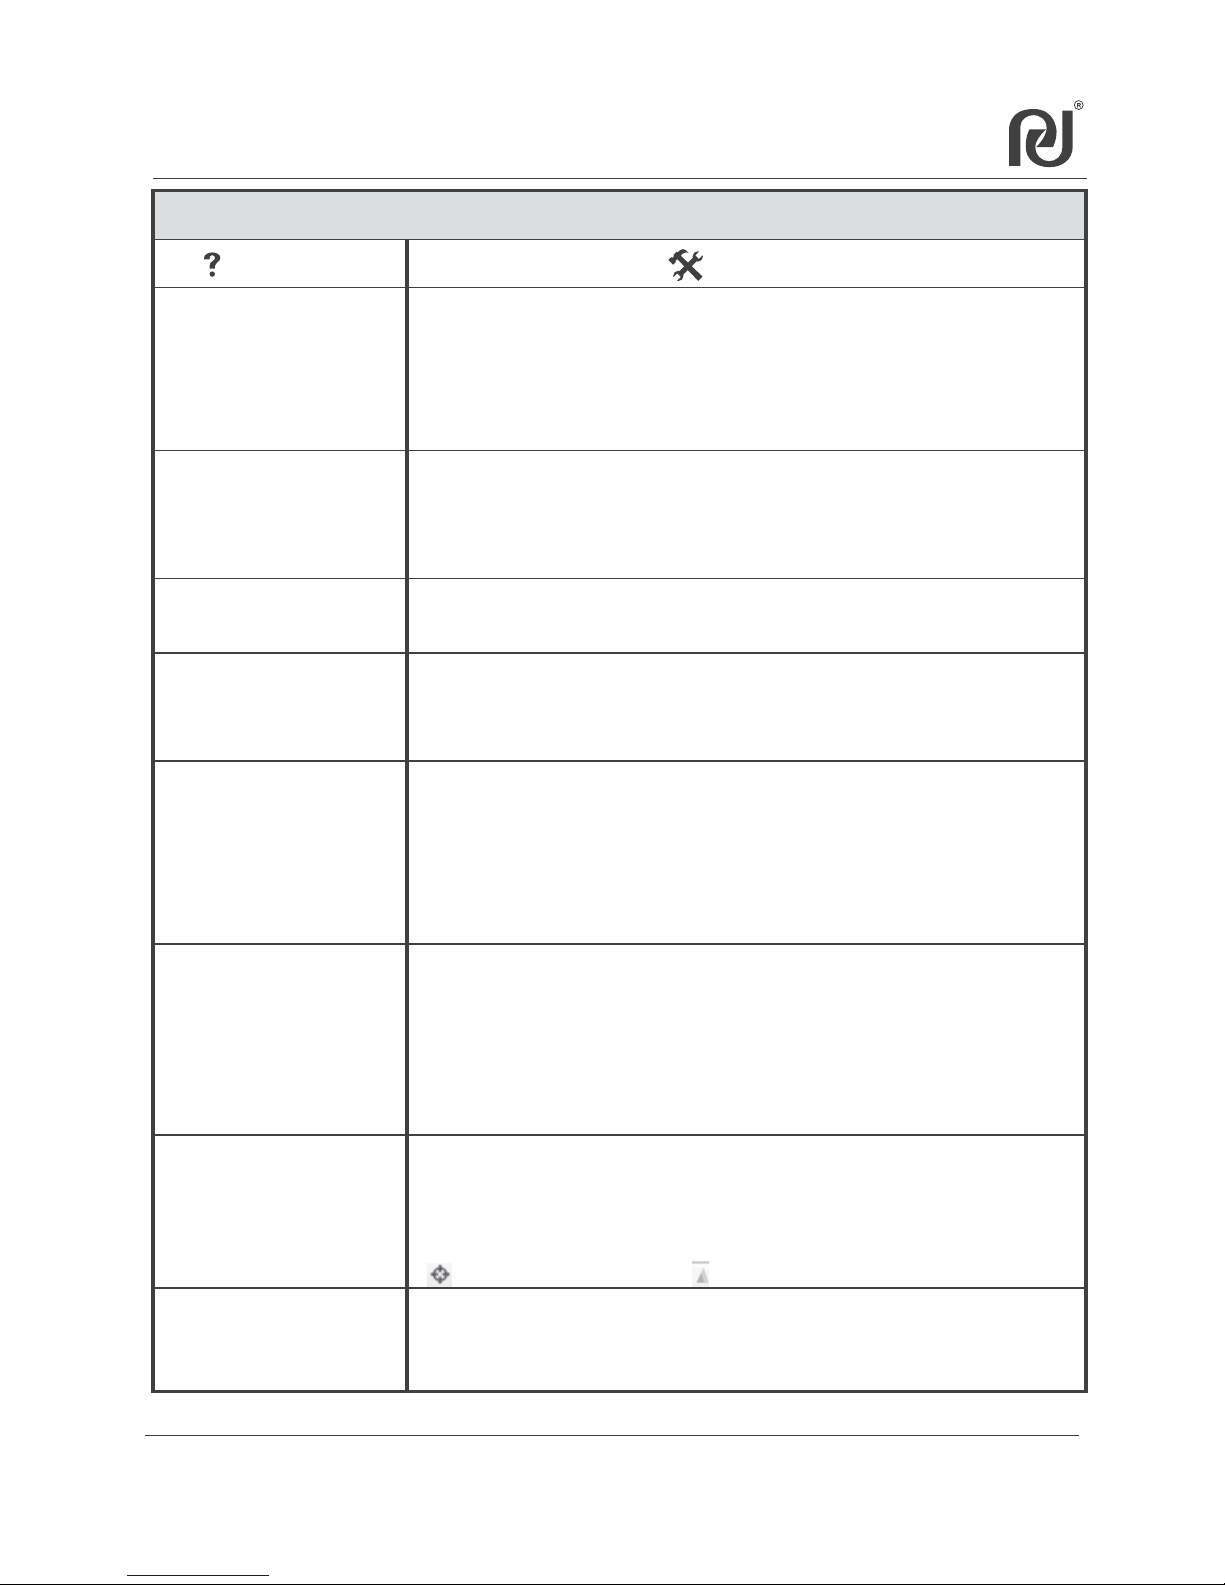
Chapter 9 Troubleshoot
The printed object cannot stick
to the platform?
1. Make the temperature setting correct. PLA, nozzle temperature is 205℃, platform
temperature is 70℃; ABS: nozzle temperature is 220℃, platform temperature is 110C.
Make sure the selected setting is matched with the material you are using.
2. Re-calibrate the platform to meet "calibration standard condition" (The test sheet must
be lay down flat in the platform and the test sheet must be touching the nozzle tip).
3.Make sure that the glass platform you are using is correct base on the filament material.
No dust, oil or damage coating on the glass platform. If yes, please clean up using lint-free
cloth or replace the platform.
The printer cannot read the files
on SD card and cannot start to
print with SD Card?
1. Turn off the printer and turn on again the printer.
2. If the printer still cannot read the file, please check if the files saved in SD card in
.GCO format and correct file name (Engilsh word, number, underline, blank space). If the
file is not .GCO format, please convert it to .GCO format through Repetier-Host software.
(refer to chapter 7.3 in user manual).
3. Pl
ease double check if the SD card insert into the SD card slot well. If not, please re-insert.
3D Printer
Need stop during printing?
1. During printing with SD Card, touch the screen to select "Stop print". Once stop, the
printing cannot be resumed. The printer head will go to home position and the
nozzle & bed temperature will cooldown.
NOTE: Please be more patience after selecting "Stop print", the printer need ~30s to buffer.
2. During printing with Repetier control, click “Kill Job”. The printer head will stop moving
and the nozzle & bed temperature will cooldown.
3. If the printing still not stop after above, please turn off the printer, wait ~10s and turn it
back on. Then touch the screen to select "Prepare"-"Auto Home" so the printer head
go to home position.
Download files from 3D model
website cannot be printed well?
1. Refer to chapter 7.2 & 7.3 in user manual, re-setup Repetier-Host and select correct
filament material to print.
2. The printed object will have different printing effect with different filament material. For
example, if the object cannot be printed well with ABS filament, you can test to print with
PLA filament.
3. Check if the object shape is closed drawing, if it need scale up/down, rotating, adding
supporter, etc to meet FDM process by refer to 7.5.
If Repetier-Host shows warning message when load the object, it is better to repair the
object through the website: https://netfabb.azurewebsites.net
How to set parameters for the 3D
printer to insert them in
Repetier/Slic3r software?
1. The Repetier-Host software of the printer has standard settings for selecting to use
directly.
2. For the advanced user, click “Configuration” to revise the parameters. Refer to 7.5 in
user manual for detail.
The STL file cannot be sliced to
gco file in Repeiter software?
When load STL file to Repetier software, the object will show all dark blue color in the 3D
view window, it means that the file can be sliced.
1. If the object show some red and some green, it mean the object has unclosed line or
surface and cannot be sliced. Also, Repetier-Host will show warning message to suggest
repairing the object.
2. If the object is not touch with he printing area or exceed the printing area, please click
“ ”place in the middle, or click “ ” to scale down and then place in center.
Question Solution
How to clean the excess filament
around the nozzle?
Preheat up the nozzle to 220℃ by touch the screen to select“Control”-”Temperature””Nozzle”. Once the nozzle actual temperature reachs the setting temperature 220℃,
clean the nozzle using the lint-free cloth or tissue.
Need pause/resume during
printing?
1. During printing with SD Card, touch the screen to select "Pause print";
Then touch the screen o select “Resuming print”.
NOTE: Please be more patient after selecting "Pause print", the printer need ~30s to buffer.
2. During printing with Repetier control, click “Pause Job” and then click “Continue
Printing”.
55
Page 56
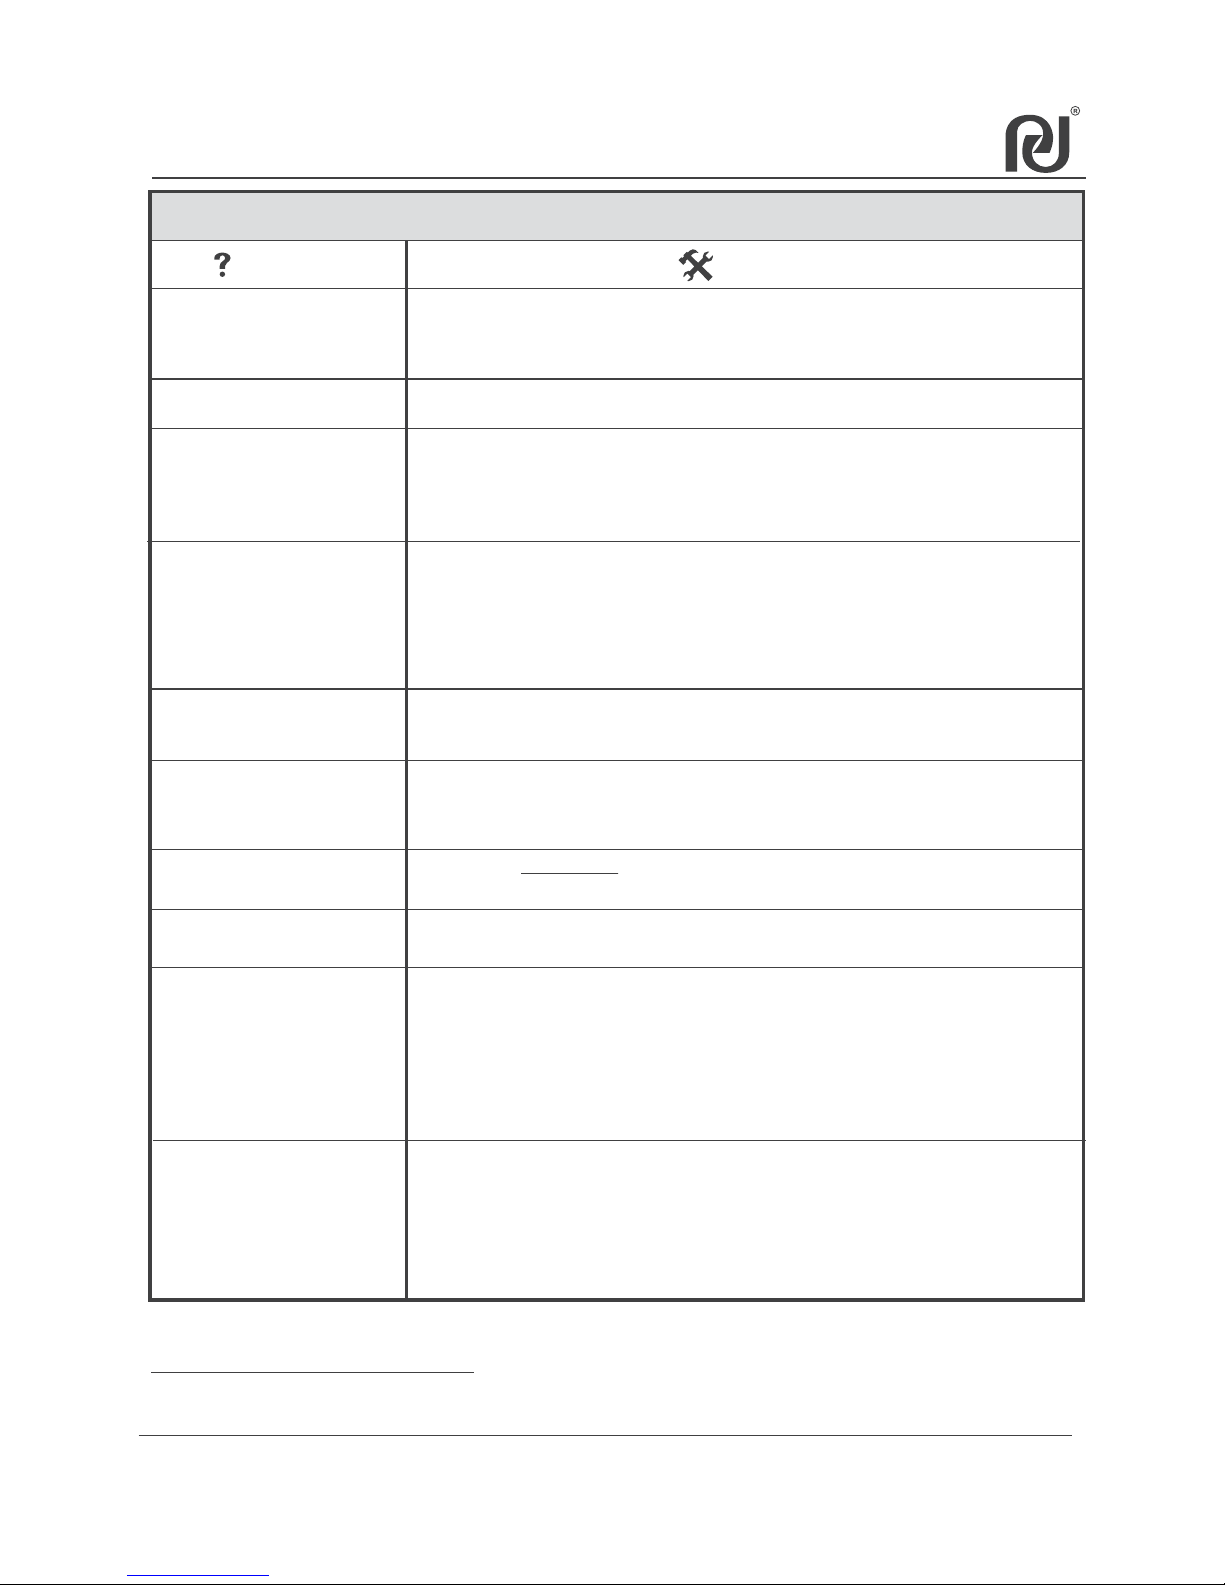
Chapter 9 Troubleshoot
56
Repetier-Host software cannot
connect to 3D printer though the
software installed correctly?
1. Ensure the printer connect to computer with USB cable and turn on;
2. Refer to chapter 7.2 , make sure that the selection of COM port in printer setting is right.
The port should be the last one when turn on the printer and matched with COM port in
Device Manager. Once connected, the Temperature Curve will be moving.
NOTE: “COM1” cannot be used.
The printed object easy to warp
when printing?
1. Adjust the adjusting knob to have the nozzle tip more close to the platform.
2. The contact area of the object to the platform is too small, use Repetier software to
add brim before slicing: Click“Configure”- “Brim”, add the Brim width with
“8~10mm”.
3. Add the nozzle temperature higher 5~10℃.
4. Maybe have a cover to cover the top of the printer when printing ABS to avoid the heat
dissipation too fast.
How to get free 3D modeling
software?
Website to download free 3D modeling software:
http://www.hongkiat.com/blog/25-free-3d-modelling-applications-you-should-not-miss/
How to get free 3D model
to print?
1. Use 3D modelling software such as UG, 3DMAX and above free software to design your
3D model file and save as STL format.
2. Use scanner to scan 3D model . We recommend scanner “Structure Sensor”which need
work with APPLE IPAD.
3. Download 3D model from Website:
http://www.thingiverse.com
http://www.hongkiat.com/blog/download-free-stl-3d-models/
http://www.hongkiat.com/blog/60-excellent-free-3d-model-websites/
If you need more assistance, kindly please contact with us:
Email: [email protected]
Question Solution
3D Printer
How to evaluate if the filament
enough or not to print the object?
After convert STL file to GCO file in Repetier-Host software, customer can see the needed
filament usage (Length) of printing the object . Customer can evaluate the actual filament
length is enough to meet the needed filament length.
How to clean the coating glass
platform if the remain filament
stick on it?
1. Clean the glass platform using lint-free cloth or wet tissue. Do not use alcohol or any
cleaning chemical solution in cleaning the glass platform, it will damage the glass coating.
2. If still cannot clean the remain filament on the glass platform, please replace a new one.
How much the printing speed? The printer printing speed is 20~120mm/s.
How to download Repetier
for Mac OS or Linux?
Go to website Repetier.com to free download the Repetier software for opertion system
Mac OS or Linux.
How to do if the LCD Disply show
“Err: MINTEMP”?
CoLiDo printer operation temperature is 15℃~32℃, please place the printer under the
right room temperature such the printer can have good printing. Once change the printer
to place in the right room temperaure, need turn off and turn on back to refresh the printer.
CoLido Printer parts life time ?
Nozzle : 1500hours
PLA and ABS Glass Platform : 300 times use in same location
Motor : 3000 hours
End Stop (Limit Switch) : 10000 times
Belt : 2000hours
Linear bearing : 3000hours
Fan : 20000h
 Loading...