

Page 1

Start up Guide
UMA and MA
Ultra-microbalances
and Microbalances
Page 2
To view a complete user manual
scan QR code.
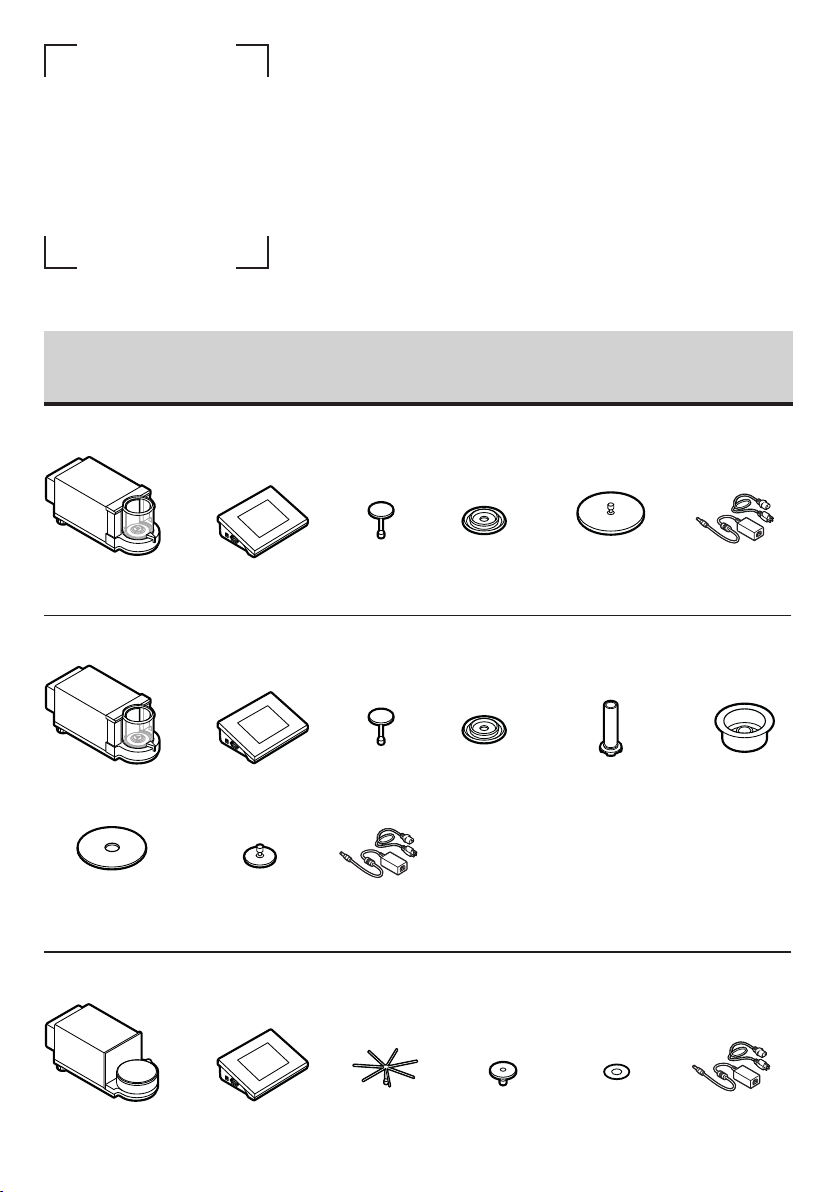
1. CONTENT
For models: UMA-T-2 | MA-T-2 | MA-T-5 | MA-11-T | MA-T-21
Microbalance
x 1
For models: MA-T-21.P
Microbalance
x 1
Glass lid with
an opening
x 1
For models: MA-T-5.F
Microbalance
x 1
Terminal
x 1
Terminal
x 1
Additional
glass lid
x 1
Terminal
x 1
Weighing pan
x 1
Weighing pan
x 1
Power supplier
and a cable
x 1
Cross-shaped
holder
x 1
Anti-draft
shield
x 1
Anti-draft
shield
x 1
Weighing pan
holder
x 1
Glass lid for the
weighing chamber
x 1
Glass vessel
x 1
Centering ring
x 1
Power supplier
and a cable
x 1
Evaporation ring
x 1
Power supplier
and a cable
x 1
Page 3
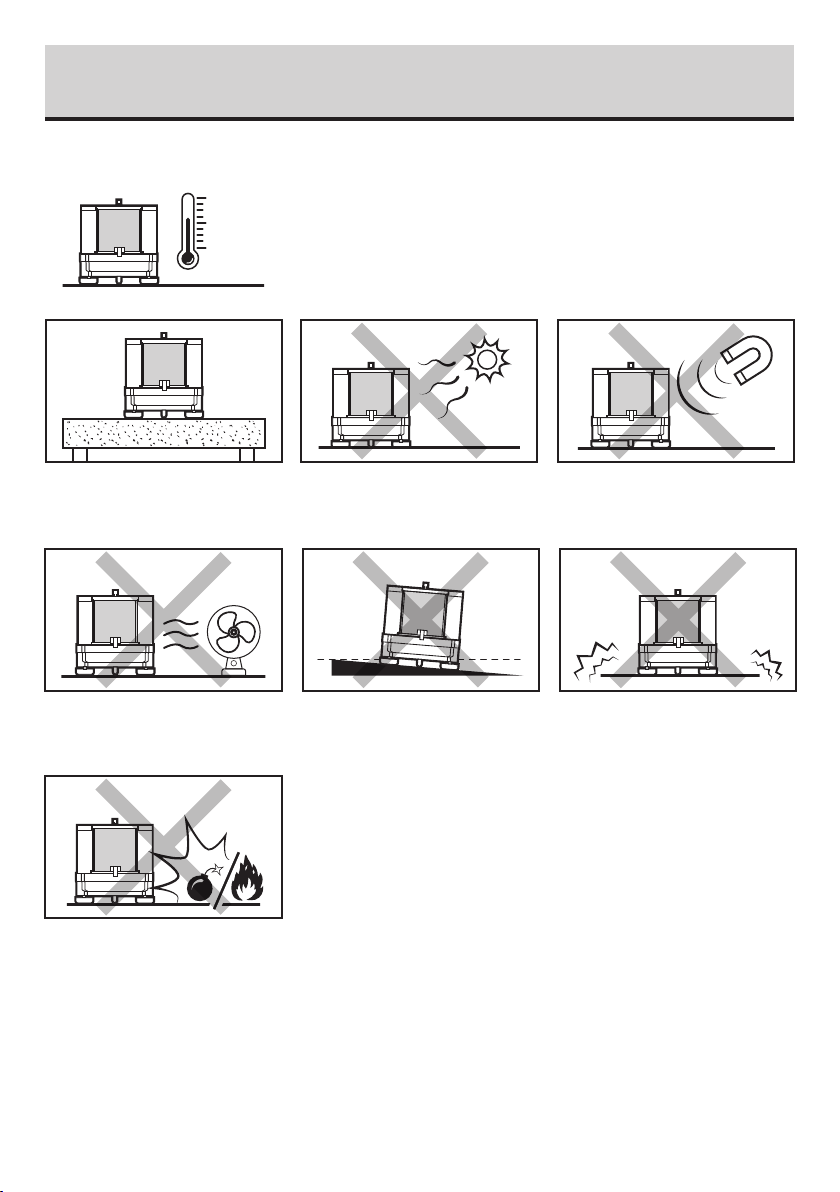
2. RECOMMENDATIONS AND WARNINGS
o
+40
+104
+10oC
+50
Operate the device in a room where the temperature ranges between 10–40 °C
C
o
F
(50–104 °F) and where the relative humidity is below 80%. Temperature must
change slowly and gradually.
o
F
Using the anti-vibration table is recommended in order to enable the most
stable and repeatable measurement.
Avoid air drafts and air movements
at the workstation.
Not intended for usage within EX
zones. Not intended for weighing
explosive or flammable substances.
Place the balance away from heat
sources. Avoid exposing the balance
to the sunlight.
Make sure that the balance is placed
on an even surface.
Avoid exposing the balance to a
magnetic field. Do not weigh magnetic
substances.
Do not place the balance on an unstable
surface exposed to shocks and
vibrations.
Page 4
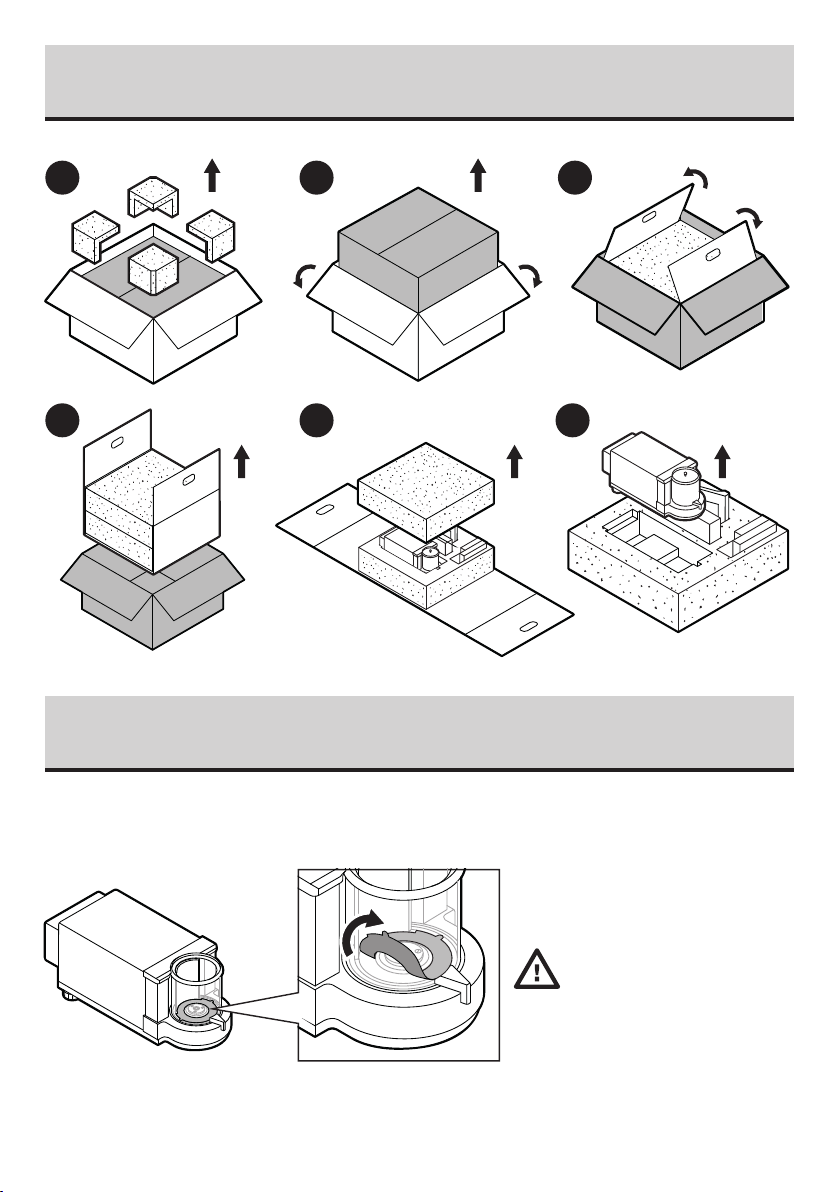
3. UNPACKING
1 2 3
54 6
4. COMPONENTS ASSEMBLY
4.1. Removal of the protection
Prior to microbalance
assembly remove the
protection.
Page 5
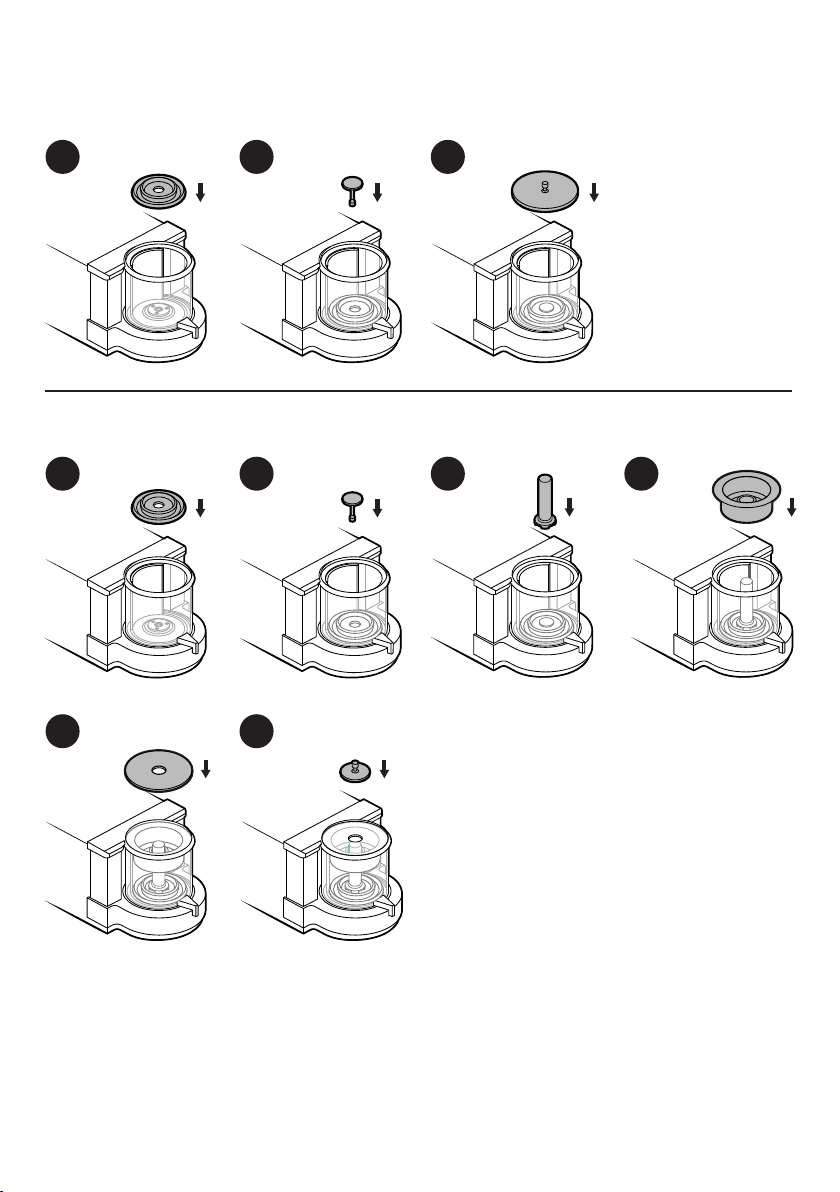
4.2. Weighing chamber components assembly
For models: UMA-T-2 | MA-T-2 | MA-T-5 | MA-11-T | MA-T-21
1 2 3
For models: MA-T-21.P
1 2
5 6
3 4
Page 6

For models: MA-T-5.F
MAIN
DISPLAY
DC
13,5-16V
5 6 7
4.3. Connecting the terminal
DC
-16V
13,5
5. PREPARING FOR WORK
Place the device at the workstation, wait until
it reaches room temperature.
5.1.
Balance temperature stabilization time
1 2 3
1-12 h
Prior to switching the device on, let it
reach room temperature (estimated
stabilization time: 1-12 hours).
Connect the power cord into the AC
socket located at the back of the device.
Connect the device to the
mains.
Page 7

5.2. Switch the balance on
Supplementary unit
Weighing
Tare
Gross
0.000000 g
0%
Home
0.000000 g
Packaging
0.000000
100%
Automatic adjustment
Automatic adjustment
To switch the device on, press ON / OFF key.
5.3. Balance leveling
Weighing
1
Home
Supplementary unit
Tare
Gross
Packaging
Press "Leveling" button.
3
0.000000
0%
Log in
0.000000 g
0.000000 g
100%
Upon start, confirm or reject
automatic calibration.
Leveling
2
Incorrect leveling screen.
Leveling
4
To level the balance turn its feet, keep turning
the feet until an air bubble takes the central
position.
Your balance is ready to use!
Balance has been leveled.
Page 8

6. PANEL AND SCREEN
6.1. Panel keys
Proximity sensor
Select working mode
(programmable button)
Select profile
(programmable key)
Internal adjustment
(programmable key)
Enter SETUP,
function key
6.2. Home screen
Press to display list
of working modes
Weighing result
window
Weighing
Home
Supplementary unit
Tare
Gross
Packaging
SETUP
Weighing
Home
0.000000
0%
Supplementary unit
Tare
Gross
Packaging
Log in
0.000000
0%
0.000000 g
0.000000 g
Log in
0.000000 g
0.000000 g
Proximity sensor
Switching on / off
100%
Zeroing
Taring
Approve and send the weighing
result to a printer or a computer
Level status
Status bar
100%
Configurable additional
information field
Editable quick
access toolbar
Parameters Help Products Adjustment Packaging Taring
Page 9

7.
Supplementary unit
Weighing
Tare
Gross
0.000000 g
0%
Home
0.000000 g
Packaging
0.000000
100%
Log in
BASIC OPERATIONS
7.1. Adjustment
Weighing
1
Home
0.000000
0%
Supplementary unit
Tare
Gross
Packaging
Press "Adjustment" button.
7.2. Zeroing
Weighing
Home
Supplementary unit
Tare
Gross
Packaging
SETUP
Unload the weighing pan and press
"Zero" button.
Log in
0.000000 g
0.000000 g
Log in
0.000129
0%
0.000000 g
0.000129 g
100%
100%
2
Automatic adjustment
Completed
Adjustment completed. Press button
for confirmation
Weighing
21
Home
0.000000
0%
Supplementary unit
Tare
Gross
Packaging
The balance has been zeroed.
Log in
0.000000 g
0.000000 g
100%
7.3. Taring
Weighing
Home
Net
Supplementary unit
Tare
Gross
Packaging
SETUP
When the weighing result has been displayed
press "Tare” button.
Log in
0.231185
0%
0.231185 g
0.000129 g
100%
Weighing
21
Home
Supplementary unit
Tare
Gross
Packaging
Balance has been tared.
Log in
0.000000
0%
0.231185 g
0.000000 g
100%
Page 10

7.4. Working modes / units selection
Working modes
Weighing
1
Parts counting
2
Checkweighing
3
Dosing
4
Weighing
Dosing
Checkweighing
Formulas
Percent weighing
Solids density
Liquids density
Peak hold
Press the pictogram to view list
of all available working modes.
Weighing
Home
0%
Supplementary unit
Tare
Gross
Packaging
Statistics
Parts counting
Animal weighing
7.5. Working modes settings
Weighing
Home
0.000000
0%
Supplementary unit
Tare
Gross
Packaging
Log in
0.231185 g
0.000000 g
100%
0.000000
0.000000 g
0.000000 g
100%
Press the pictogram to view
list of all available units.
21
Supplementary unit
Tare
Gross
Packaging
Unit
g
mg
ct
lb
oz
Gram [g]
Miligram [mg]
Carat [c]
Pound [lb]
Ounce [oz]
Troy ounce [ozt]
Pennyweight [dwt]
Hong Kong Tael [tlh]
Singapore tael [tls]
Taiwanese tael [tlt]
Weighing
Home
0.000000
0%
Log in
0.000000 g
0.000000 g
Chinese tael [tlc]
Momme [m]
Grain [gr]
Tical [ti]
Newton [N]
Baht [baht]
Tola [tola]
Mesghal [msg]
User unit 1
User unit 2
100%
Press "Working mode" icon and select
respective working mode.
3 4
Settings Buttons Information
Settings
Printouts Profile
Press "Settings" icon to view settings list.
Press information field to access current
working mode options.
SettingsWeighing
Tare mode Single
1
Automatic footer printout
2
printout / Enter mode
3
Printout Standard
4
Air buoyancy compensation
5
Minimum sample weight
6
Settings list is displayed, set respective
parameter values.
Page 11

8. SETTINGS
Some balance settings are accessible for Administrator exclusively.
Prior balance parameters setup, log in as the Administrator.
8.1. Administrator's login
1
Weighing
Home
0.000000
0%
Supplementary unit
Tare
Gross
Packaging
Log in
0.000000 g
0.000000 g
Log in
100%
To enter ''Users'' menu press "Log in" button.
Automatic adjustment
3 4
****
to confirm.
8.2. User settings
2
2
1
2
Operators
Log out
Admin
Admin
Users list is displayed, select "Admin" option.
Weighing
Home
0.000000
0%
Supplementary unit
Tare
Gross
Packaging
Admin
0.000000 g
0.000000 g
You have logged in the administrator.Enter "1111" password and press button
100%
Prior balance users setup, log in as the Administrator.
Weighing
Home
0.000000
0%
Supplementary unit
Tare
Gross
Packaging
Log in
0.231185 g
0.000000 g
100%
21
Parameters
Adjustment
Database Communication Peripherals
Operators Profiles
Operators
Press "Parameters” button. Press "Operators" button.
Page 12

Edit record
Name
Name
1
1
Code
2
Password *******
3
Name ad Surname
4
Acces level User
5
Account active Yes
6
1
Operators
Admin
43
Press "Add" button. Select "Name" parameter.
Name
John Smith
65
Edit record
Name John Smith
1
Code
2
Password *******
3
Name ad Surname
4
Acces level Operator
5
Account active Yes
6
Enter user name. User name has been entered.
Following the above procedure, set remaining
7
parameters:
Code:
Enter user ID
Password:
Enter user password
First and last name:
Enter user's first and last name
Edit record
Name John Smith
1
Code
2
Password *******
3
Name ad Surname
4
Acces level Operator
5
Account active Yes
6
Access levels:
(user, advanced, admin)
Account status:
(active or inactive)
Page 13

8.3. Proximity sensors setup
Soft key 7 Tare
7
8
Button F1 Working mode
Button F2 Profile
Button F3 Adjustment
Left profimity sensor None
Right procimity sensor None
9
10
11
12
Buttons
Prior proximity sensors setup, log in as the Administrator.
You can assign the proximity sensors with different functions for each working mode (the sensors will trigger
different operation for each working mode). The diagram presents sensors setup for the weighing mode.
Weighing
1 2
Home
0.000000
0%
Supplementary unit
Supplementary unit
Tare
Tare
Gross
Gross
Packaging
Packaging
Press information field to access current
Admin
Log in
0.000000 g
0.231185 g
0.000000 g
0.000000 g
100%
Weighing
Settings Buttons Information
Printouts Profile
Buttons
Press "Buttons" button.
working mode options.
3 4
Buttons
Soft key 7 Tare
7
Button F1 Working mode
8
Button F2 Profile
9
Button F3 Adjustment
10
Left profimity sensor None
11
Right procimity sensor None
Right procimity sensor None
12
12
Select "Right Sensor" parameter.
Automatic adjustment
None
Profile
Adjustment
Zero
Tare
Select function that is to be assigned to
the right sensor.
In order to set left sensor function repeat steps 3 and 4, this time select Left Sensor parameter. Following the
above procedure you can also set sensors for remaining working modes.
Page 14

10. PERIPHERAL DEVICES CONNECTORS
Computer Printer
RS ID transponder
card reader
DB9
Barcode
scanner
Stack-light PLC
controller
External THB ambient
conditions module
DB15
Barcode
scanner
RS ID transponder
card reader
PrinterComputer
Barcode
scanner
Page 15

10. DEVICE CLEANING
10.1. General Recommendations
Prior to cleaning, it is necessary to
disconnect th e balance from the mains.
Avoid using cleansers containing chlorine, corrosive chemicals and bleach. Do not use
cleansers containing abrasive substances or scouring preparations.
Use soft cloths made of microfiber,
natural fiber or man-made fiber. Avoid
using abrasive cloths or cloths that might
scratch the surface.
Apply the cleanser onto the cloth first.
Avoid applying the cleanser directly
onto the device.
10.2. Glass components
Prior to cleaning the glass panes, it is necessary to disassemble them first.
For detailed instruction on panes disassembly, refer to user manual.
Clean glass components using a solution of water and detergent (liquid soap,
dish-washing detergent, glass cleaner, etc.). In case of heavy contamination,
a mild solution of vinegar or baking soda can be used.
10.3. Plastic and powder coated steel components
Prior to cleaning the plastic housing, it is necessary to disassemble
weighing pan components (cover, weighing pan, etc.).
Clean plastic components using a solution of water and detergent
(liquid soap, dish-washing detergent, glass cleaner, etc.).
10.4. Stainless steel components
Prior to cleaning the stainless steel components, it is necessary
to disassemble them first.
Clean stainless steel components using a solution of water and detergent
(liquid soap, dish-washing detergent, glass cleaner, etc.). In case of heavy
contamination, a mild solution of vinegar or baking soda. can be used.
Page 16

625 East Bunker Court Vernon Hills
IL 60061 USA
Phone: 1-800-323-4340
Fax: 1-847-247-2929
E-Mail: sales@coleparmer.com
 Loading...