

Page 1

Operating Instructions
Cole-Parmer CON 550
Conductivity/TDS/Temperature Controller
Cole-Parmer Instrument Company
625 East Bunker Court, Vernon Hills, Illinois 60061
Tel: 1-847-549-7600 or Toll-free: 1-800-323-4340
Fax: 1-847-247-2949
www.coleparmer.com
Page 2

CONTENTS page
I. INITIAL INSPECTION AND ASSEMBLY 2
II. GENERAL INTRODUCTION 3
III. USING THE CON 550 4
A.FRONT PANEL 4
B.NORMAL MODE DISPLAY 5
C.REAR CONNECTORS 7
D.TURNING ON/OFF THE INSTRUMENT 8
IV. MODEL CON 550 MODES 9
A. MAIN DISPLAY MODE 9
B. CALIBRATION/SETTING MODE 11
a.PASSWORD CHECK PAGE 12
b.USER SETTING PAGE 12
c.CONDUCTIVITY CALIBRATION PAGE 13
d.CONDUCTIVITY CONTROL SETTING PAGE 16
e.COND mA OUT SETTING PAGE 17
f.TEMP mA OUT SETTING PAGE 17
g.ID&PASSWORD PAGE 17
V. CONTROLLING THE RELAYS 18
A. RELAY ISOLATION VOLTAGE 18
B. RELAY OUTPUT LOAD 18
C. RELAY ACTION, SETPOINT, HYSTERESIS
MODE & HYSTERESIS VALUE 18
D. CONDUCTIVITY/TDS RELAYS 19
VI. 4-20 mA OUTPUT 19
A. ISOLATION VOLTAGE 19
B. OUTPUT LOAD 19
C. CONDUCTIVITY OR TDS LINEAR CURRENT
OUTPUT 20
VII.RS485 INTERFACE OPERATION 21
A. INTRODUCTION 21
B. PREPARING THE METER 21
VIII.ERROR DISPLAYS AND TROUBLESHOOTING 21
IX. SPECIFICATION 22
X. WARRANTY 23
XI. RETURN OF ITEMS 24
1
Page 3
I. INITIAL INSPECTION and ASSEMBLY
Carefully unpack the instrument and accessories. Inspect for damages made in
shipment. If any damage is found, notify your Cole-Parmer representative
immediately. All packing materials should be saved until satisfactory operation is
confirmed.
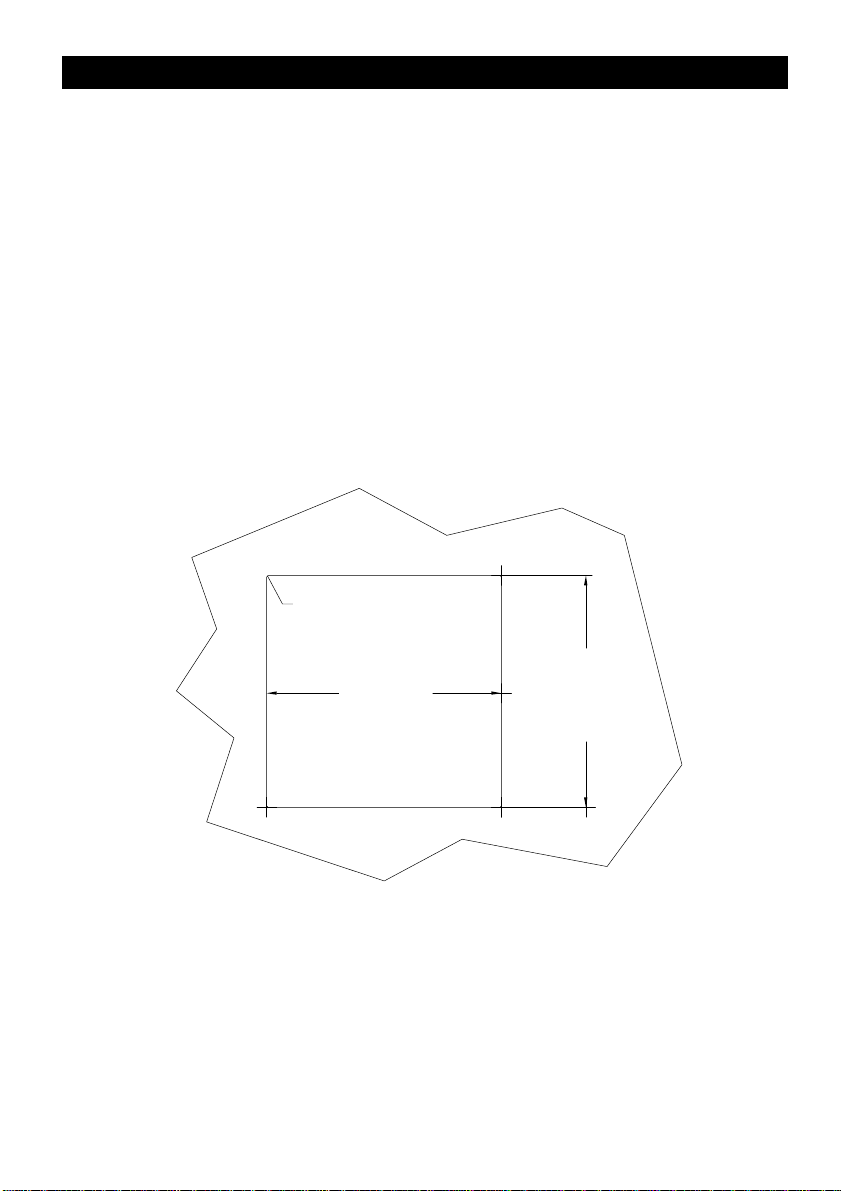
MOUNTING PROCEDURE
1. Make a cutout on any panel, with a thickness of 1/16 in. (1.5 mm)
to 3/8 in. (9.5mm).
2. Remove the mounting assembly from the controller and insert the
controller into the cutout.
3. Replace the mounting bracket assembly onto the controller and
secure the controller to the mounting panel.
PANEL CUTOUT DIMENSIONS
0.04"R(1.0mm) MAX.
0.04
3.66"
93.00mm?
0.00
1.00
0.00
3.66"
93.00mm?
0.04
0.00
1.00
0.00
Warning:
If the equipment is used in a manner not specified by the manufacturer, the
protection provided by the equipment may be impaired.
2
Page 4

Cleaning the instrument:
1. Be sure to remove the power before attempting to clean the meter.
2. Use a lint free cloth and clean water or neutral detergent.
3. Wipe the outer surface of the instrument only.
4. Wipe-dry the instrument before powering again.
II. GENERAL INTRODUCTION
The Cole-Parmer CON 550 (Conductivity and Temperature) System, is a rugged
microprocessor based instrument assembled in a watertight ¼ DIN case,
designed for use in laboratories and process control applications.
The model CON 550 microprocessor allows the user to easily recalibrate the
parameters for the probes. The Conductivity system requires only a single
calibration. The microprocessor also performs a self-diagnostic routine every time
you turn on the unit providing you with basic information about the stability of the
instrument.
The system simultaneously displays Conductivity, Temperature, relay status and
mA output in one LCD graphic screen. This system uses a two-wire or four-wire
type sensor for the conductivity and a precise thermistor for temperature,
providing you with accurate readings for all your measurements.
The model CON 550 is equipped with two relays: two programmable High/Low
control relays for conductivity/TDS. All relays are hysteresis driven and
configurable to CENTER mode. The system also have two isolated 4-20mA
analog output, offset and span configurable for Conductivity/TDS & temperature
display.
The model CON 550 comes with a RS485 interface which can easily let the user
log all data with an IBM
©
PC/AT compatible computer.
3
Page 5
III. USING THE CON 550
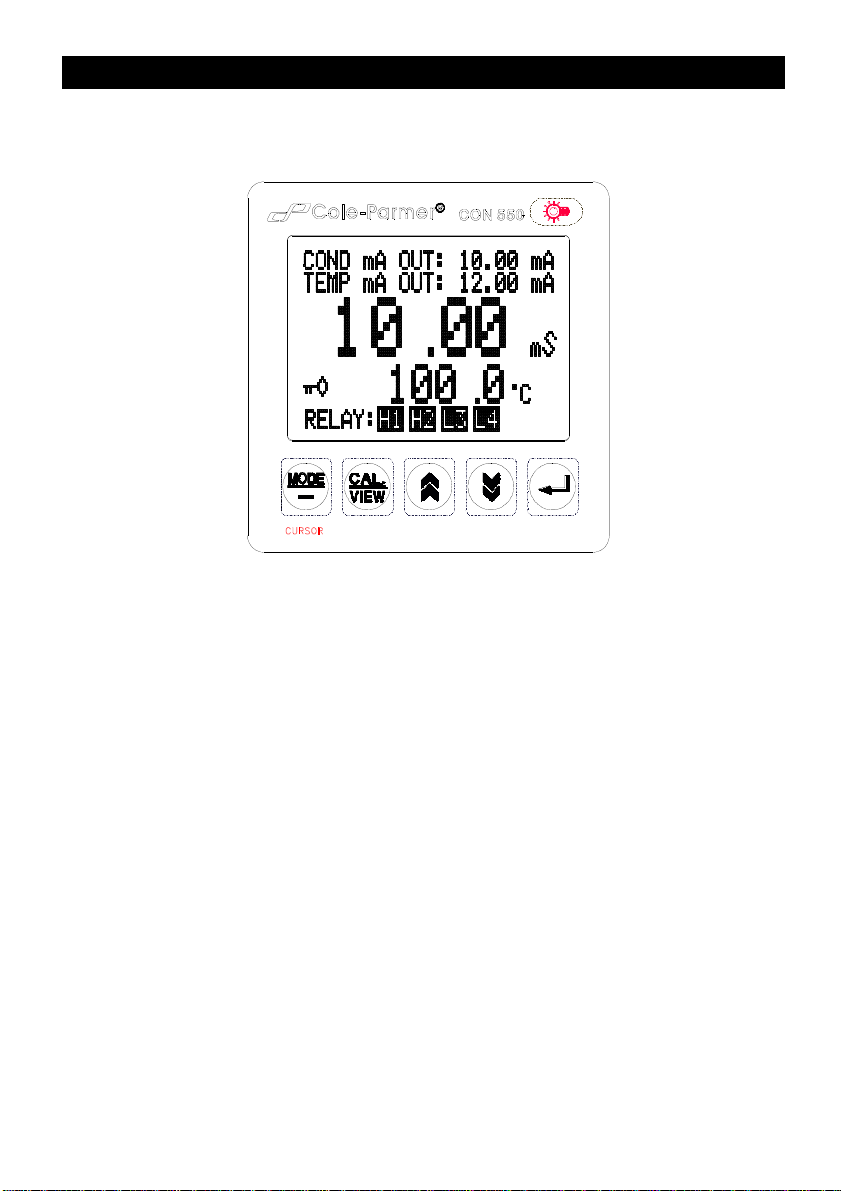
A. FRONT PANEL
1. The [MODE/-] key.
1a. In Normal mode, pressing this Key will change the display to Conductivity or
TDS.
1b. In Calibration/Setting mode, pressing this key will move to the next digit of
the current active parameter.
1c. In Calibration/Setting mode, pressing this key for 2 seconds will move you
back to the previous parameter. Pressing this key for 2 seconds at the first
parameter of the page will move you back to last parameter of the previous page.
2. The [CAL/VIEW] key.
2a. During any normal mode, pressing this key will switch to first
Calibration/Setting screen.
2b. During Calibration/Setting mode, pressing this key will switch to the next
available Calibration/Setting page. Pressing this key at the last User/Calibration
page will return the user to the Normal mode.
4
Page 6
3. The [] UP key.
During Calibration/Setting mode, pressing this key will increment the current
blinking digit of the active parameter.
4. The [] DOWN key.
During Calibration/Setting mode, pressing this key will decrement the blinking
digit of the active parameter.
5. The [] ENTER key.
During Calibration/Setting mode, pressing this key will save the current modified
parameter and move to the next parameter on the page. If the parameter is the
last one on the page then it will move to the first parameter on the next available
page.
6. The [
Pressing this key will turn on or turn off the backlight of the LCD. The backlight
will automatically turn off if there is no key activity within two minutes.
7. LCD screen.
] LIGHT key.
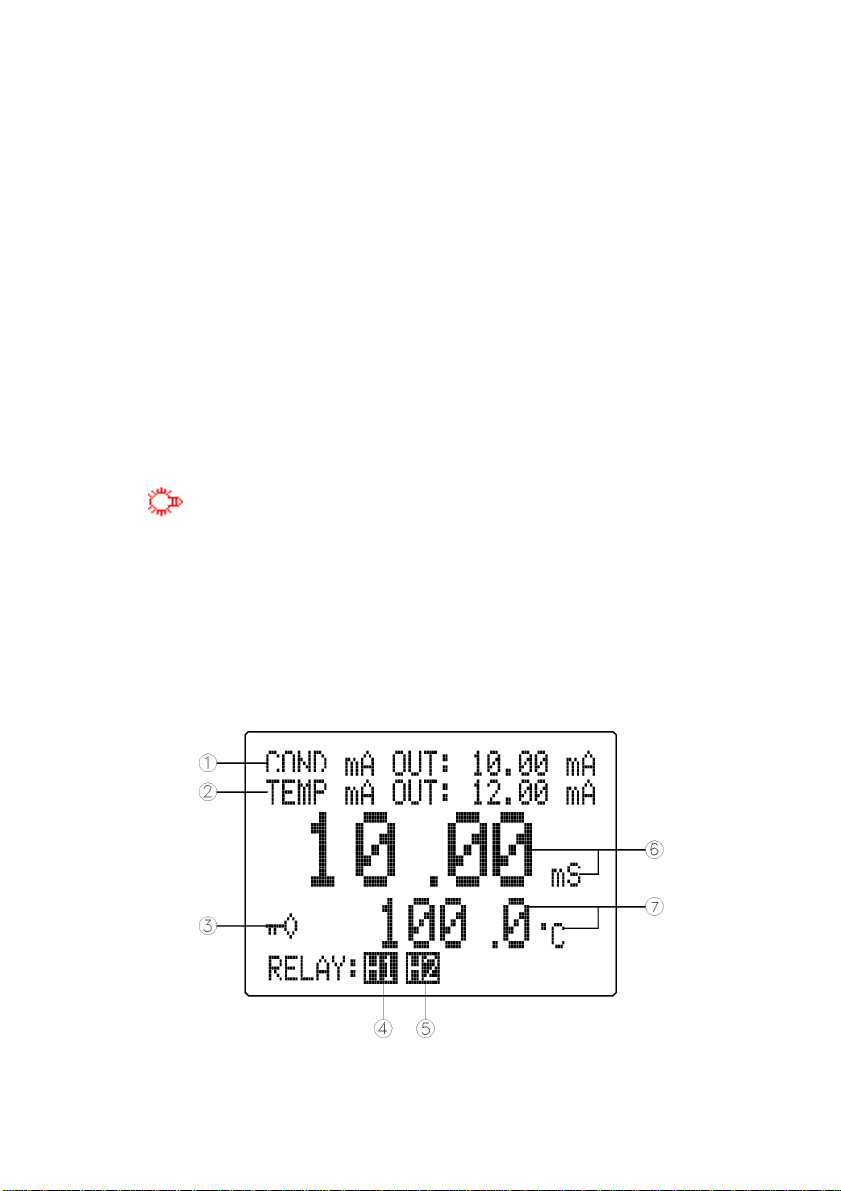
B. NORMAL MODE DISPLAY
5
Page 7

1. COND mA OUT –this will display the actual conductivity output of the isolated
4-20 mA output.
2. TEMP mA OUT - this will display the actual temperature output of the isolated
4-20 mA output.
At POWER-ON this will show “OFF” for about 3 seconds before going to normal
operation. After going to the Calibration/Setting pages when the unit is not
password locked this will show ”FROZEN” for about 3 seconds before returning to
normal operation.
3. ( ) key icon annunciator - this will be displayed if the Calibration /Setting
pages are locked, meaning the user will not be able to change the values unless
the correct 4 digit number has been entered at the PASSWORD CHECK page.
4. H1 or L1 annunciator -
displayed then the relay is ON. (H stands for high action control and L stands for
low action control)
this is the status of Conductivity/TDS Relay 1, if this is
5. H2 or L2 annunciator – this is the status of Conductivity/TDS Relay 2, if this is
displayed then the relay is ON.
6. Conductivity or TDS display.
7. Temperature display.
6
Page 8
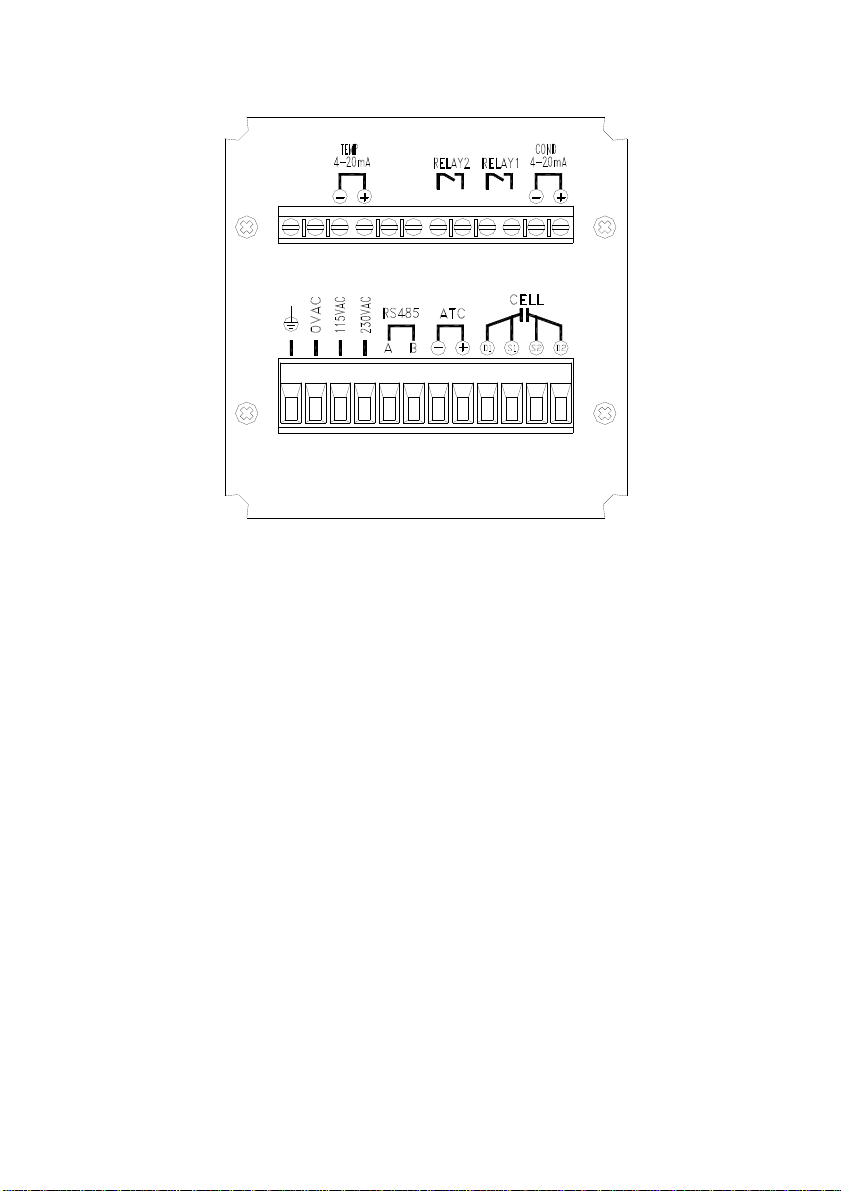
C. REAR CONNECTORS
Before wiring the probes, relays, analog output, RS485 and the power cord, be
sure that you are connecting to the right terminal as shown above (be sure the
ac-plug is not plugged-in). Remember that the unit is ON once the user plugs in
the power cord to an AC power supply.
1. Connect the AC line to the rear of the instrument. The model can be used with
115 or 230 VAC 50/60 Hz. Power consumption is 6 watts. Make sure the
EARTH connector is connected to the earth lead of the AC power line.
2. Connect the proper load to the output relays. Make sure that the load does
not exceed the relay rating, 5 Amp at 115 VAC and 2.5 Amp at 230 VAC.
3. Set the proper load to the 4-20mA output connector. Make sure that the load
impedance is less than 500 Ohms.
4. If the user uses a two-wire conductivity probe, the user needs to short terminal
D1 with terminal S1 and terminal D2 with terminal S2.
CAUTION: Make sure you connect the AC power cord to the correct AC
terminals. Connecting incorrectly may damage the unit permanently.
7
Page 9

D. TURNING ON/OFF THE INSTRUMENT
By just plugging the unit to a correct AC
voltage, the unit will be ready for use.
There is no Power key so unplugging
and plugging the unit will turn OFF or
turn ON the unit respectively.
After the unit is turned on, it will perform
some basic self diagnostics and will
display “OK” or “BAD”. If you received
any “BAD” messages, turn OFF the unit
and turn it ON again. (see VIII. ERROR
DISPLAYS AND
TROUBLESHOOTING ).
If the message persists, then you might need to call our Applications Specialists.
After the self-diagnostic is complete, the temperature will be displayed on the
lowest part of the screen and you are ready to make conductivity or TDS
measurements. Just immerse the probes halfway to the liquid. If possible do not
allow the probes to touch any solid object in the solution. There should be no air
bubbles around the probes either. Shaking or moving the probes vigorously
before recording any measurement will dislodge any bubbles formed in the
probes.
PROBE HANDLING AND MAINTENANCE
REMINDER: If the user uses a two-wire conductivity probe, the user needs to
short terminal D1 with terminal S1 and terminal D2 with terminal S2.
Handling the probe
To ensure accurate and repeatable results:
1. The probe (cell) must be clean before making any measurements. If measuring
low conductivity solutions, extraordinary cleanliness may be necessary.
2. The probe cell plates must be totally submerged in the solution. The electrode
chamber must be free of trapped air or particulates. You may need to tap the
probe gently to dislodge any air bubbles.
3. Ideally, the probe should be at least 1/4 inch away from any object, including
the sides and bottom of the container.
8
Page 10

4. Stirring may be necessary for high accuracy readings.
5. If possible, isolate the solution container from ground potentials.
6. Electrical fields and stray currents caused by stirrer motors, heaters, etc., can
interfere with the measurements. The user should determine the effects of these
and make the necessary corrections either by shielding or by disconnecting those
units that cause trouble.
7. Always rinse the cell carefully before using it in another solution.
8. Never store a dirty or contaminated probe.
Storing the probe
1. Always rinse the probe thoroughly with de-ionized or clean tap water to remove
contaminants before storing it.
2. For short-term storage it is recommended to immerse the probe in deionized
water to keep the plates wet. For long-term storage, after rinsing the probe
thoroughly, the exterior body should be wiped dry before storing it.
IV. MODEL CON 550 MODES
A. MAIN DISPLAY MODE
Turning ON the unit will always display
Conductivity in normal mode.
This instrument is designed to provide 3
distinct measurements:
1. Temperature - current temperature
of the solution.
2. Compensated Conductivity –
conductivity reading adjusted to a
calculated value which would have
been read if the sample had been at the user reference temperature.
The conductivity of solutions of ionic species is highly dependent on temperature,
varying as much as 3% for each change of 1°C (Temperature Coefficient (TC) =
a
9
Page 11

3%/°C). In addition, the temperature coefficient itself varies with the nature of the
ionic species present.
Because the exact composition of a natural media is usually not known, it is best
to report conductivity at a particular temperature, e.g. 10.2 mS at 15°C. How ever
in many cases, it is also useful to compensate for the temperature dependence in
order to determine at a glance if gross changes are occurring in the ionic content
of the medium over time. For this reason, the model CON 550 allows the user to
output conductivity in either raw or compensated form. If the User Temperature
Coefficient (TC) is set to 0.00% then an uncompensated Conductivity is output to
the screen. If the TC is not zero then the Model CON 550 uses the temperature,
TC, raw Conductivity and the reference temperature to display the compensated
Conductivity.
The calculation is carried out as in the equation below:
Compensated Conductivity = Conductivity/(1+TC*(T- RT))
Where: TC = Temperature Coefficient
T= Solution temperature
RT= Reference Temperature
Note:
The TDS is based on the specific conductance reading of the solution, setting the
TC to 0.00% will change the reading of conductivity to uncompensated
conductivity.
3. Total Dissolved Solid (TDS) –The calculation is carried out as in the equation
below:
TDS = Compensated Conductivity * (TDS Factor)
TDS – is an approximation of the total weight of all solids that are dissolved in a
volume of water. This is expressed in ppt (parts per thousand) also referred as
g/L(gram per liter) or ppm (parts per million) also referred as mg/L (milligram per
liter).
* In general, the total dissolved solids concentration is the sum of the cations
(+charged) and anions (-charged) ions in the solution. The TDS reading provides
a qualitative measure of the amount of dissolved ions, but does not tell us the
nature or ion relationships.
10
Page 12

Temperature and Conductivity (or TDS) are always simultaneously displayed in
the graphic LCD screen in normal mode. You can select conductivity or TDS
reading by pressing the [MODE/-] key in normal mode.
B. CALIBRATION/SETTING MODE
Pressing the [CAL/VIEW] key for about 2 seconds during normal display mode
will bring-up the first page of 6 pages of the Calibration/Setting mode. Pressing
[CAL/VIEW] key will switch to the next page until the last page, where pressing
[CAL/VIEW] again will return the user to main display mode.
Below is a simple flowchart showing the path of the [CAL/VIEW] key:
1. You can change any blinking options or digit by pressing the [] or [] keys.
2. For options in digit format you need to press the [MODE/--] key to move to the
next digit.
11
Page 13

3. If you are satisfied with the selection you made you need to press the []
ENTER key to save the changes and move to the next option.
4. If you don’t need to change the current blinking option just press the []
ENTER key to move to the next parameter.
5. If you need to go back to the previous parameter press the [MODE/-] key for
2 sec.
a. PASSWORD CHECK page
You will only see this page if the unit is
password locked. To change any
settings or calibration you need to
unlock the system to remove the
“PASSWORD LOCKED” message.
You need to enter the correct 4-digit
number on the “ENTER PASSWORD”
input. You can still view all the pages
of Calibration/Setting mode if the
system is password locked by just
pressing the [CAL/VIEW] key on this
page. If the unit is “PASSWORD
LOCKED” going to Calibration/Setting mode will not affect the function of the
relays.
CAUTION: If the unit is not locked then every time the user enters the
Calibration/Setting mode the relays and analog out will be frozen.
b. USER SETTING page
You will only see this page if the unit is
not password locked. This page is just a
warning, telling you that all relays are
frozen, and that you can calibrate and
change the settings.
NOTE: FROZEN MEANS ALL THE
RELAYS AND THE
ANALOG OUT WILL MAINTAIN THEIR
LAST STATE UNTIL THE USER
RETURNS TO MAIN DISPLAY MODE.
12
Page 14

c. CONDUCTIVITY ( & TDS) CALIBRATION page
1. BASE CELL K – this is the basic
probe cell constant. You can choose
0.01, 0.10, 1.00 or 10.0. Be careful in
changing this option since it will set
the actual cell constant to this value
and you must calibrate the cell
constant before you can accurately
use the unit.
2. RANGE – for every basic cell constant you can choose 3 different ranges for
conductivity and an additional 3 ranges if you want your relay controls to be in
TDS. Whichever you choose you can still view the reading in TDS or conductivity
but the relay control will always be what you choose here. Choosing mS or uS
range will let the conductivity readings trigger the relays set point, choosing
ppt/ppm will let the TDS readings trigger the relays. Conductivity and TDS have
the same range limit except for the units displayed.
3. REF. TEMP. – if the Temperature Coefficient (TC) is not zero, then the model
CON 500 will use the value here to calculate and display the compensated
conductivity or TDS. The display will be the value as if the temperature is the
Reference Temperature. The normal reference temperature is between 15 to
25°C but you can actually select between 10 to 29°C in this option.
4. TEMP. COEFF. – this will be used by conductivity or TDS if you want your
display to be compensated. Setting this option to 0.00% will disable
compensation. You can select between 0.00% to 4.99%.
5. TDS FACTOR– TDS Factor, this value is multiplied with the conductivity to get
the TDS value. The user can directly adjust this value from 0.300 to 0.999.
6. C@25°C - if the user is calibrating the Cell Constant, the user must enter the
conductivity value of the standard solution at 25°C.
Before calibration remember to do the following:
1. Use properly stored standard solutions and a clean calibration container.
13
Page 15

2. Rinse the probe with de-ionized or distilled water (wipe dry) before using in
standard solutions.
3. After immersing into the solution, let the reading stabilize for about 1 minute
and shake the probe lightly to remove any air bubbles.
4. If possible and to minimize errors, perform the calibration as close as possible
to the selected reference temperature.
Accurate Calibration of the Model CON 550
1. Clean the probe thoroughly.
2. Wait for about 30 minutes after you turned on the instrument to stabilize the
circuitry before calibrating the probe.
3. Choose a calibration solution which most similar to the sample being
measured.
a. For seawater select 50 mS conductivity standard.
b. For fresh water select 1 mS conductivity standard.
c. For brackish water select 10 mS conductivity standard.
4. Select the correct base cell constant for the probe.
5. Select the correct range for the standard solution.
6. Input the temperature coefficient of the standard solution. Most standard salt
calibration solution has a TC between1.91% to 2.00%. If the TC is not
available, use the default of 2.00%.
7. During calibration, the user reference temperature is disregarded. The
reference temperature is fixed at 25°C since this temperature is the most
popular reference temperature for all if not most standard solutions.
8. Immerse the probe into the solution. Do not let the probe touch any part of the
container and allow at least 1 minute so the temperature reading will stabilize.
9. Shake the probe lightly to remove air bubbles from the probe.
10. Wait for the conductivity reading to be stable.
14
Page 16

11. Press the [ENTER] key to capture the stable reading and freeze the reading.
The model CON550 will blink at the first digit to tell the user that he/she can
now input the standard solution value.
12. Input the standard solution value by using the []
increment/decrement the blinking digit), the [MODE/-] key (to select another
digit).
13. Press the
model, CON550 will display a new cell constant.
14. The model CON550 is now ready for conductivity/TDS measurements.
[] key to save the standard solution value. After saving the
and [] keys (to
Before reading the sample (unknown solution):
1. Clean the probe thoroughly.
2. Move to CONDUCTIVITY CALIBRATION page.
3. Set the RANGE to the approximate range of the solution.
4. If you want a compensated reading, input the most similar Temperature
Coefficient of the sample or use the default of 2.00%. Set the Temperature
Coefficient to 0.00% if you want just the raw uncompensated conductivity.
5. If the TC is not 0.00% you need to select a reference temperature or set it to
the default of 25°C.
6. Move the display to the normal mode.
7. Immerse the probe into the solution. Do not let the probe touch any part of
the container and allow at least 1 minute so the temperature reading will
stabilize.
8. Shake the probe lightly to remove air bubbles from the probe.
9. Read the display. Press the [MODE/-] key to toggle between conductivity and
TDS reading.
15
Page 17

d. CONDUCTIVITY (or TDS) CONTROL SETTING page
1. RELAY1 (action) - the action for
this relay is changeable, you can
choose “HI”-action or “LO” action. (In
HI-action, the relay will turn ON if the
conductivity or TDS is greater or
equal to RELAY1 value, in LO-action,
the relay will turn OFF if the
conductivity or TDS is greater or
equal to RELAY1 value, which is
modified by the hysteresis value and
hysteresis mode. )
(See chapter V. CONTROLLING THE RELAYS.)
Use []
After you select the RELAY1 action, you can now select the RELAY1 set point.
Use []
select another digit and the
2. RELAY2 (action) - the action for this relay is changeable, you can choose
“HI”-action or “LO” action. (In HI-action, the relay will turn ON if the conductivity
or TDS is greater or equal to RELAY2 value, in LO-action, the relay will turn
OFF if the conductivity or TDS is greater or equal to RELAY2 value, which is
modified by the hysteresis value and hysteresis mode.)
(See chapter V. CONTROLLING THE RELAYS.)
Use
After you select the RELAY2 action you can now select the RELAY2 set point.
Use []
select another digit and the
and [] keys to select the RELAY1 action and press [] key to save.
and [] keys to change the blinking digit, use the [MODE/-] key to
[] key to save the new set point.
[] and [] keys to select the RELAY2 action and press [] key to save.
and [] keys to change the blinking digit, use the [MODE/-] key to
[] key to save the new set point.
3. HYSTERESIS (value) - this is the actual value of the hysteresis.
16
Page 18

e. COND mA OUT SETTING page
1. 4mA OUT (offset) – this value will be
used in conjunction with 20 mA to plot
the current output. (See chapter VI. 4-
20 mA OUTPUT.)
2. 20mA OUT (span) – this value will be
used in conjunction with the 4 mA value
to plot the output. (See chapter VI. 4-20
mA OUTPUT.)
f. TEMP mA OUT SETTING page
1. 4mA OUT (offset) – this value will be
used in conjunction with 20 mA to plot
the current output. (See chapter VI. 4-20
mA OUTPUT.)
2. 20mA OUT (span) – this value will be
used in conjunction with the 4 mA value
to plot the output. (See chapter VI. 4-20
mA OUTPUT.)
g. ID & PASSWORD page
1. RS 485 ID – this is the unique
ID/Address for the unit. If you are
connecting multiple model CON550 or
other Cole-Parmer models for logging
purposes then this ID/Address must be
unique for each connected unit. This
ID/Address is the same address that
must be used by the PC program to
communicate with this unit.
2. PASSWORD SET - this is your
security code if the unit is locked the
value here will not be available. You need to input the correct code in the
PASSWORD CHECK page.
17
Page 19

CAUTION: The user is responsible in remembering their password number
otherwise you would no be able to calibrate or change the settings.
V. CONTROLLING THE RELAYS
A. RELAY ISOLATION VOLTAGE
The maximum isolation voltage of the relay output contacts is 1500 VDC. The
voltage differential between the relay output contacts and the load should not
exceed 1500 VDC.
B. RELAY OUTPUT LOAD
The current through the relay output contacts should not exceed 5 Amp at
115 VAC and 2.5 Amp at 230 VAC in order not to cause permanent damage to
the relay contacts. This rating is specified for resistive loads only.
C.RELAY ACTION, SETPOINT, HYSTERESIS MODE &
HYSTERESIS VALUE
If the relay action is set to HI hysteresis mode is EDGE, the relay will turn ON
at [(RELAY SETPOINT) + (hysteresis value)], and will turn OFF at (RELAY
SETPOINT).
If the relay action is set to LO hysteresis mode is EDGE, the relay will turn
OFF at [(RELAY SETPOINT) + (hysteresis value)], and will turn ON at (RELAY
SETPOINT).
Relay Action Hysteresis mode Effective RELAY-
ON Setpoint
HIGH EDGE S.P. S.P. –(H.V)
LOW EDGE S.P S.P.+(H.V.)
S.P. = Relay Set point
H.V.= Hysteresis value (DeadBand)
Effective RELAYOFF Setpoint
18
Page 20

D. CONDUCTIVITY/TDS RELAYS
C
.
LOW
SET
POINT
ON
SP
ON
hysteresis
Low set ON/OFF control
OFF
COND.
OFF
OFF
OFF
hysteresis
High set ON/OFF control
HIGH
SET
POINT
ON
OND
SP
ON
EDGE CONTROL
There are two independent Relay channels for the TDS or conductivity display
which has independent set point and HIGH or LOW action setting. The hysteresis
mode (EDGE) and hysteresis value will be used by both relays.
The action of the relays is dependent on set point, relay action (HIGH or LOW),
hysteresis mode (EDGE), hysteresis value and the current conductivity or TDS
display.
VI. 4 - 20 mA OUTPUT
A. ISOLATION VOLTAGE
The maximum isolation voltage of the 4-20 mA output is 500 VDC. The voltage
differential between the 4-20 mA output and the load should not exceed 500
VDC.
B. OUTPUT LOAD
The maximum load is 500 . Output current inaccuracies may occur for load
impedance in excess 500 .
19
Page 21

C. CONDUCTIVITY OR TDS LINEAR CURRENT OUTPUT
C
.
mA mA
Conductivity
/ TDS output
20mA
20mA
OND
4mA 4mA
Adjustable
Bandwidth Bandwidth
Decreasing current for
increasing conductivity
COND.
Set
point point
Adjustable
Set
Increasing current for
increasing conductivity
The linear analog output will be dependent on the 4 mA setting, 20 mA setting
and the current conductivity or TDS display.
The analog output is based on the following equation :
mA
= 4mA + (16mA) * (D
(c)
- C(4)) / (C(20) – C(4))
(c)
Where :
mA
D
= analog output
(c)
= current conductivity or TDS display
(c)
C (4) = conductivity or TDS user setting for 4 mA
C (20) = conductivity or TDS user setting for 20 mA.
Note :
1. The absolute difference of the 4mA and 20mA settings must be greater or
equal to 10 LSD (Least Significant Digit) of the user range.
2. If the absolute difference is smaller than 10 LSD the current output will
display “ERROR”.
20
Page 22

VII. RS485 INTERFACE OPERATION
A. INTRODUCTION
This section assumes you are familiar with the basics of computer programming,
data communication, the RS485 interface and possess a copy of any
programming language software capable of interfacing with a RS485 card or a
RS232-RS485 converter (third party vendor) module.
A demo program for Windows (XP, 7) is included in the accompanying disk.
B. PREPARING THE METER
This meter comes equipped with a 2-wire RS485 interface. Just connect each
terminal to the respective RS485 terminal on your PC. (If the DEMO program is
not working, try reversing the connections of the terminals.) After you have
connected the meter (or multiple meters with unique ID number) correctly and
turned on both the meter(s) and the computer, you are now ready to program a
simple routine to read data from the instrument.
Read the included file “Model CON550 protocol.doc” to help you make a program
to communicate with the Model CON550.
VIII. ERROR DISPLAYS AND TROUBLESHOOTING
LCD
display
"TERR" "OVER" Conductivity, TDS
"TERR" "UNDR" Conductivity, TDS
"OVER" -10.0~
"LERR" -10.0 ~
ATC
display mode
or Cell Calibration
or Cell
Calibration
Conductivity, TDS
120.0°C
120.0°C
or Cell Calibration
Conductivity, TDS
or Cell Calibration
Possible cause(s)
[Action(s)]
a. Temperature > 120.0°C.
[Bring solution to a lower
temperature.]
[Replace temperature probe.]
b. No temperature sensor..
[Use a temperature probe.]
Temperature < -10.0°C.
[Bring solution to a higher
temperature.]
Reading over user specified
range .
[Change range to higher level]
Compensated Calibration
exceeds temperature limit.
21
Page 23

[Increase or decrease the
solution temperature]
EEPROM :
BAD
ROM : BAD
RAM : BAD
Power-on Unit has failed its EEPROM
test.
[Turn instrument OFF and
back to ON again.]
[Return for service. (see
Warranty)]
Power-on Unit has failed its ROM test.
[Turn instrument OFF and
back to ON again.]
[Return for service. (see
Warranty)]
Power-on Unit has failed its RAM test.
[Turn instrument OFF and
back to ON again.]
[Return for service. (see
Warranty)]
IX. SPECIFICATIONS
Conductivity/TDS
Range Basic Cell K Resolution Accuracy
0 to 9.999 uS/ppm 0.01 0.001 uS/ppm 0.5% ±1 LSD
1 to 99.99 uS/ppm 0.01 0.01 uS/ppm 0.5% ±1 LSD
10 to 300.0 uS/ppm 0.01 0.1 uS/ppm 0.5% ±1 LSD
0.0 to 99.99 uS/ppm 0.1 0.01 uS/ppm 0.5% ±1 LSD
10 to 999. 9 uS/ppm 0.1 0.1 uS/ppm 0.5% ±1 LSD
0.1 to 3.000 mS/ppt 0.1 0.001 mS/ppt 0.5% ±1 LSD
0 to 999.9 uS/ppm 1.00 0.1 uS/ppm 0.5% ±1 LSD
0.1 to 9.999 mS/ppt 1.00 0.001 mS/ppt 0.5% ±1 LSD
1.0 to 30.00 mS/ppt 1.00 0.01 mS/ppt 0.5% ±1 LSD
0 to 9.999 mS/ppt 10.0 0.001 mS/ppt 0.5% ±1 LSD
1 to 99.99 mS/ppt 10.0 0.01 mS/ppt 0.5% ±1 LSD
10 to 300.0 mS/ppt 10.0 0.1 mS/ppt 0.5% ±1 LSD
Temperature
Range Resolution Accuracy
-10.0 to 120.0 °C 0.1 °C ±0.3 °C
22
Page 24

Conductivity / TDS
TDS Factor Range 0.300 to 0.999 (user selectable)
Reference Temperature 10°C to 29°C (user selectable)
Temperature Coefficient 0.00 to 4.99% (user selectable)
Temperature Compensation Automatic
Temperature
Temperature sensor Thermistor, 10 k at 25°C
4-20mA Output
Current output range 4 to 20 mA (isolated)
Current output scale user programmable
Maximum load 500
Accuracy ± 0.1 mA
Isolation voltage 500VDC
Controller
Control type ON/OFF control
Relay output 5A at 115VAC or 2.5A at 220VAC
GENERAL
Keys Audio feedback in all keys
Security protect 4-digit password
Communication RS485
Power: 115VAC or 230VAC 50/60Hz
Power consumption 6 watts
Fuse 315mA/250V fast acting glass tube
Ambient temperature range 0.0 to 50.0 °C
Display: 128x64 graphic LCD w/ backlight
Case IP67 ¼ DIN case, depth 155mm
Weight 950 g
23
Page 25

X. WARRANTY
The Cole-Parmer Instrument Company warrants this product to be free from
significant deviations in material and workmanship for a period of one year. If
repair or adjustment is necessary and has not been the result of abuse or misuse,
within the twelve month period, please return, freight-prepaid, and correction will
be made without charge (see note on return of items). Cole-Parmer alone will
determine if the product problem is due to deviations or customer misuse.
Out of warranty products will be repaired for a nominal charge.
XI. RETURN OF ITEMS
Authorization must be obtained from our Customer Service Department before
returning items for any reason. When applying for authorization, please include
data regarding the reason the items are to be returned. A restocking charge will
be made on all unauthorized returns.
For your protection, items being returned must be carefully packed to prevent
damage in shipment and insured against possible damage or loss. Cole-Parmer
will not be responsible for damage resulting from careless or insufficient packing.
Note : The Cole-Parmer Instrument Company reserves the right to make
improvements in design, construction and appearance of our products without
notice.
We stand behind our products. For additional information on our products,
warranty, or returns please contact our office or visit our website listed on
front page.
24
Page 26

英文说明书
机型:Con550 编制人:汪蕾 日期:2013-04-10
文件编号:KCon550-02 修改人:汪蕾 日期:2013-04-10
版本:02 核准人: 日期:
25
 Loading...