

Page 1
Aluminum
Heating Mantles
User Guide
ON/OFF
HOT
Version 1.3
Page 2
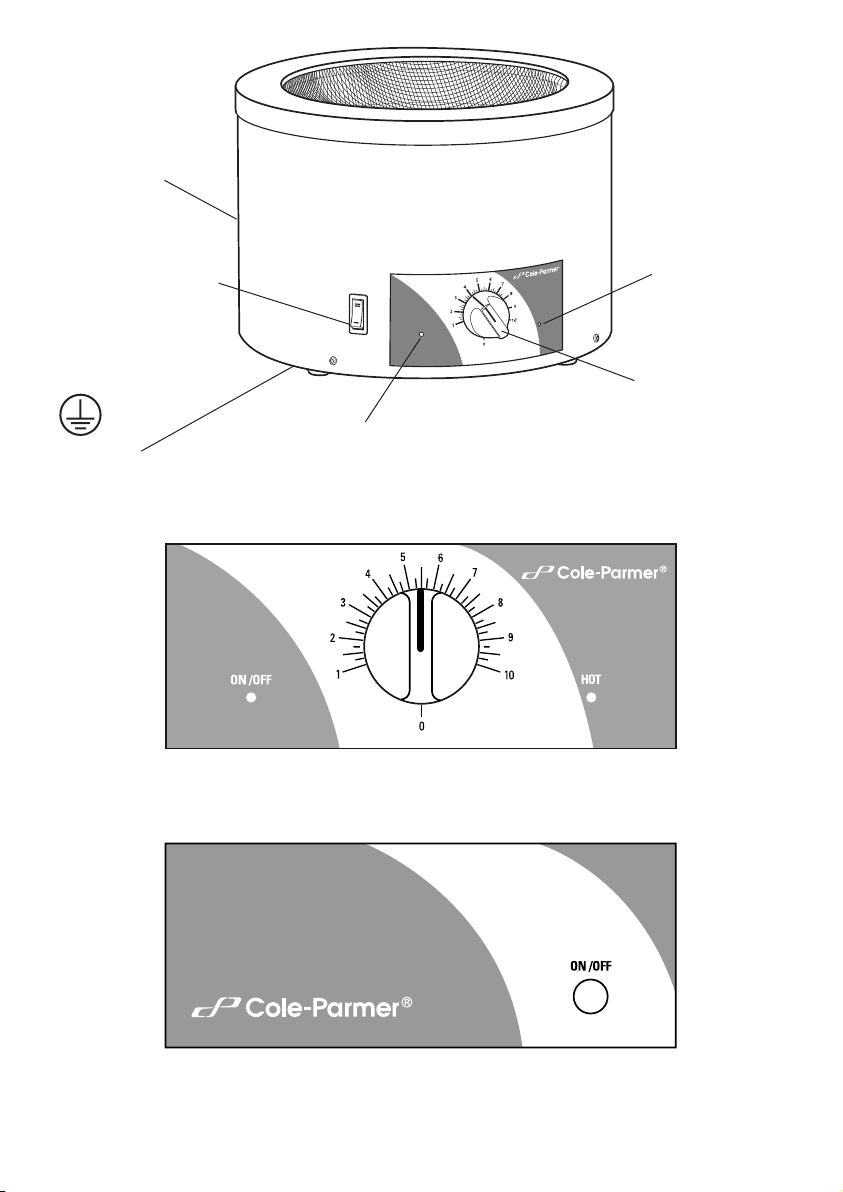
IEC power
inlet socket
Power supply switch
(large-volume models).
Power to either the
lower part of the
element or the upper
and lower parts.
Protective
conductor terminal
(Do not loosen or
disconnect).
ON/OFF
HOT
Power ON LED light
Figure 1: Front view
Figure 2: Controlled Mantle Models
Heating LED light
Power on/off and
heating control dial
Figure 3: Uncontrolled Mantle Models
2
Page 3

Aluminum Heating Mantles
Introduction
Thank you for purchasing this Cole-Parmer product. To get the best performance from the
equipment, and for your own safety, please read these instructions carefully before use.
Before discarding the packaging check that all parts are present and correct.
This equipment is designed to operate under the following conditions:
❖ For indoor use only
❖ Use in a well ventilated area
❖ Ambient temperature range +5°C to +40°C (+41°F to +104°F)
❖ Altitude to 2000 m (6500 ft)
❖ Relative humidity not exceeding 80%
❖ Power supply fluctuations not exceeding 10% of nominal
❖ Overvoltage category II IEC60364-4-443
❖ Pollution degree 2 IEC664
❖ Use with a minimum distance all round of 300 mm (12 in.) from walls or other items
If the equipment is not used in the manner described in this manual and with accessories other than
those recommended by the manufacturer, the protection provided may be impaired.
Electrical Installation
THIS EQUIPMENT MUST BE GROUNDED
Before connection please ensure that the line supply corresponds to that shown on the
rating plate located on the back of the unit.
Power requirements:
120 V Models Watt Fuse 230 V Models Watt Fuse
37013-00 75 1 A 37013-02 75 500 mA
37013-01 75 1 A 37013-03 75 500 mA
37013-04 100 1.25 A 37013-06 100 0.5 A
37013-05 100 1.25 A 37013-07 100 0.5 A
37013-08 200 2.5 A 37013-10 200 1.25 A
37013-09 200 2.5 A 37013-11 200 1.25 A
37013-12 280 3.15 A 37013-14 280 2.5 A
37013-13 280 3.15 A 37013-15 280 2.5 A
37013-16 380 5 A 37013-18 380 2.5 A
37013-17 380 5 A 37013-19 380 2.5 A
37013-20 500 5 A 37013-21 500 2.5 A
37013-22 800 10 A 37013-23 800 5 A
The 120 V Models are provided with a NEMA 5-15 plug. The 230 V Models are provided with a UK
3-pin and a “Schuko” 2-pin plug.
Should the cable not be suitable for connecting to the power supply, replace the plug with a suitable
alternative.
3
Page 4

THIS OPERATION SHOULD ONLY BE UNDERTAKEN BY A QUALIFIED ELECTRICIAN.
NOTE: Refer to the equipment rating plate to ensure that the plug and fusing are suitable for the
voltage and wattage stated.
The wires in the power cable (120 V) are colored as follows:
BLACK - HOT/LIVE
WHITE - NEUTRAL
GREEN - EARTH
The wires in the power cable (230 V) are colored as follows:
BROWN - HOT/LIVE
BLUE - NEUTRAL
GREEN/YELLOW - EARTH
IF IN DOUBT CONSULT A QUALIFIED ELECTRICIAN
Should the power cable need replacing, a cable of 1 mm2 of harmonized code H05W-F connected to
an IEC320 plug should be used.
The appropriate power cable should be connected BEFORE connection to the power supply.
General Description
Cole-Parmer Heating Mantles are ideal instruments for heating fluids in round-bottomed flasks in the
modern laboratory. The controlled mantles contain a built-in control dial and energy regulator. The
uncontrolled mantles require the use of an external temperature controller. All mantles are constructed
of a powder coated aluminum case to provide excellent chemical resistance. All units combine the
traditional heating element with a built-in earth screen and, depending on the size, can support up to
three lab support rod positions.
The following tables identify the different sizes and groups within the Heating Mantle range:
Controlled Mantles Uncontrolled Mantles
Flask Capacity 120 V 230 V 120 V 230 V
50 ML 37013-00 37013-02 37013-01 37013-03
100 ML 37013-04 37013-06 37013-05 37013-07
250 ML 37013-08 37013-10 37013-09 37013-11
500 ML 37013-12 37013-14 37013-13 37013-15
1000 ML 37013-16 37013-18 37013-17 37013-19
2000 ML - - 37013-20 37013-21
5000 ML - - 37013-22 37013-23
Available separately are multiple types of external controllers, glassware, and lab support rods to
support various laboratory applications. Please visit the Cole-Parmer website www.coleparmer.com
for further information.
*
*Large volume mantles contain a switch to alternate the power supply between the upper and lower
parts of the heating element, or lower parts only (for when heating smaller volumes).
4
Page 5

Safety Advice
❖ HIGH TEMPERATURES ARE DANGEROUS as they can cause serious burns to operators and
ignite combustible material. Users should be aware of the following safety advice:
❖ USE CARE AND WEAR PROTECTIVE GLOVES TO PROTECT HANDS.
❖ DO NOT use combustible substances near hot objects.
❖ NEVER lift or carry the instrument until it has been switched off and allowed to cool for at least
30 minutes. The hot warning light will give guidance.
❖ The unit should be carried using both hands with the fingers under the side edges.
❖ NEVER move or carry the unit with containers on the top or while still connected to the power
supply.
❖ DO NOT mix combustible liquids or use the equipment in hazardous atmospheres.
❖ NEVER place a cold glass vessel into a mantle which is already hot.
❖ When a lab support rod is installed with apparatus attached, or with swivelling support rods, take
care that there is sufficient weight on the plate to prevent the whole unit tipping over.
❖ DO NOT position the unit such that it is difficult to disconnect it from the power by removing the
power cable from the socket at the back.
❖ DO NOT position the unit such that the ventilation slots are blocked or otherwise obstructed.
❖ DO NOT leave equipment switched on without a charged flask and it is not recommended to
leave any heating apparatus unattended during operation.
❖ AVOID SPILLAGES: Always fill the glassware / vessel away from the heating mantle. Only
introduce a pre-filled, clean, wiped-dry flask into the heating mantle. If spillage does occur,
disconnect unit from the power supply and follow instructions in the Servicing and Repair section.
❖ DO NOT operate or handle any part of the product with wet hands or use on surfaces that may
become flooded.
❖ NEVER connect uncontrolled mantles directly to the mains supply, these are designed for use with
an external controller.
Before Use
Position the mantle on a firm level surface but DO NOT connect to the power supply yet.
Please refer to the installation instructions for any accessories before applying power and ensure
there is sufficient room for the unit to operate and that the ventilation slots are not blocked or
otherwise obstructed.
NOTE: This product should be connected to a mains supply source which incorporates an RCD or
GFCI device that has a tripping current of 30mA or less.
5
Page 6

Controlled Mantle Models
Connect the power cable attached IEC socket of the mantle as illustrated in Figure 4 and connect
directly to the power supply.
Uncontrolled Mantle Models
Connect the power cable attached to external temperature controller to the IEC socket of the mantle
as illustrated in Figure 5 and connect to the power supply. This product requires an external controller
to operate. Please note, the illustration of controller may be different depending on the model. Please
visit the Cole-Parmer website www.coleparmer.com for further information.
Protective
conductor terminal
(Do not loosen or
disconnect).
Figure 4
Figure 5
Operation
Place a pre-filled, clean, wiped-dry glass vessel of the appropriate size into the mantle. Wherever
possible the glass vessel should be supported by means of the lab support rod and clamp (available
separately). Switch the unit ON and adjust the controller regulator or control dial on the front of the
unit to the desired setting. To switch the unit OFF, adjust the controller regulator or control dial to the
OFF position and disconnect the power supply.
NOTE: Glassware should always be supported to maintain a vertical position.
WARNING: The top surface of the instrument and the glass vessel will be HOT. Use protective
equipment to prevent burns and protect from cuts that may be caused by breakage of glass
vessels. Handle any hot vessel with care.
WARNING: The mantle may still be HOT beyond 30 minutes, even though the "HOT" warning
light has gone out.
WARNING: Do not leave heaters switched on when not in use or unattended.
6
Page 7

Cleaning and Care
Before Attempting Cleaning:
Ensure that the unit is cool, and disconnect from the power supply.
WARNING: Ensure the unit is disconnected from the power supply before attempting
maintenance or servicing.
Metal Casework:
The unit should be cleaned using a damp cloth and a mild detergent solution. Cleaning is made easier
if spillages are attended to promptly. In any case, spillages of acids and alkalies MUST be removed
immediately as these chemicals can attack and damage the casework finish. Ensure that the
appropriate safety precautions are observed.
NOTE: Do not use solvents for cleaning any parts of this equipment.
Servicing and Repair
This product range does not require any routine servicing, but in the case of damage or an open
circuit, the unit has replaceable fuses and heater cartridge. In case of accidental spillage, instructions
for cleaning and decontamination are also included in this section.
In the event of product failure it is recommended that any repair is only undertaken by suitably
qualified personnel. For advice, please contact Cole-Parmer quoting the model and serial number.
Only spare parts supplied by the manufacturer or its agent should be used. Fitting of non-approved
parts may affect the performance of the safety features of the instrument.
If in doubt, please contact Cole-Parmer.
Fuse Replacement
The mains fuse holder is located at rear the unit next to the power inlet. Refer to the Power
Requirements section (on page 3) for correct fuse type and rating for your model. To replace the
fuses, ensure the unit is OFF and disconnected it from the power supply. Open the drawer of the IEC
electrical input socket and remove the installed fuses. Ensure the fuses are of the correct rate and
type before reinstalling the drawer into the unit.
NOTE: Periodic electrical safety
testing is recommended on a
yearly schedule or after any
servicing to ensure safe
operation.
7
Page 8

Heater Cartridge Replacement
WARNING: Contains Rockwool mineral insulation which can cause irritation. When handling the
cartridge, a suitable face mask which bears the CE mark or BS/EN 149 should be used. Gloves
should be worn to prevent skin irritation, but if experienced it can be lessened by rinsing hands
under cold running water before washing.
Replacement Procedure for Controlled Mantle Models
Remove the glassware from the mantle and disconnect the power supply after allowing it to cool. Turn
the mantle upside down onto a clean dry surface. Remove the cross-head screws from around the
base of the mantle and if necessary, remove the cross-head screws retaining the rod support clamp
to the case and remove the clamp. Remove the M3 nuts retaining the heater cartridge and, with the
exception of the 5-liter mantle, disconnect the two sleeved wires from the IEC socket. On the 5-liter
mantle, disconnect cartridge wires from the switch, IEC socket and inline connector. Lift the heater
cartridge clear of the case and disconnect the earth wire attached to the heater assembly.
WARNING: DO NOT DISCONNECT ANY OTHER EARTH WIRE.
Reconnect the earth wire to the earth terminal on the replacement heater cartridge. Insert the heater
cartridge into the case and fasten it to the rim using the clips provided, which locate on the fixing
studs. Reconnect the heater wires and case ensuring correct alignment of fixing studs, cartridge and
cartridge wires to IEC socket. Fasten the base to the case using the screws previously removed.
NOTE: Periodic electrical safety testing is recommended on a yearly schedule or immediately after
any servicing to ensure safe operation.
Replacement Procedure for Uncontrolled Mantle Models
Remove the glassware from the mantle and disconnect the power supply after allowing it to cool. Turn
the mantle upside down onto a clean dry surface. Remove the cross-head screws from around the
base of the mantle and hinge the base to one side. Remove the M3 nuts retaining the heater cartridge
and disconnect the heater wires. Lift the heater cartridge clear of the case and disconnect the earth
wire attached to the heater assembly.
WARNING: DO NOT DISCONNECT ANY OTHER EARTH WIRE.
Reconnect the earth wire to the earth terminal on the replacement heater cartridge. Insert the heater
cartridge into the case and fasten it to the rim using the M3 nut previously removed. Reconnect the
heater wires and fasten the base to the case using the screws previously removed.
NOTE: Periodic electrical safety testing is recommended on a yearly schedule or immediately after
any servicing to ensure safe operation.
In Case of Accidental Spillage
8
Page 9

Please note, the equipment cannot be assumed to meet all the safety requirements of
EN 61010-2-010 until the drying out process has been fully completed.
WARNING: DO NOT TOUCH THE MANTLE IF A SPILLAGE/BREAKAGE HAS
OCCURRED. DISCONNECT THE POWER DIRECTLY AT THE POWER SUPPLY
SOURCE.
Drying Out Procedure
In the event of spillage or glassware fracture, disconnect the power supply and allow the unit to cool.
Wearing suitable hand protection to prevent burns and cuts from heated glassware, carefully remove
any pieces of broken glassware. If decontamination is necessary, see section below. If not, wipe off all
excess liquid from the mantle and surrounding area using an absorbent soft cloth and drain off any
residual fluid retained in the mantle. In the case of excessive spillage or flask fracture, invert the mantle
and allow it to drain for minimum of one hour. To complete the drying process, place the entire mantle
in the correct orientation inside a heated oven at 50°C (122°F) for a minimum period of 40 hours. If
required, replacement heater cartridges are available on the Cole-Parmer website.
NOTE: Periodic electrical safety testing is recommended on a yearly schedule or immediately after
any servicing to ensure safe operation.
In Case of Contamination
WARNING: THE BELOW PROCEDURE IS INTENDED AS A GUIDE. SHOULD SPILLAGE OF A
TOXIC OR HAZARDOUS FLUID OCCUR, THEN ADDITIONAL SPECIAL PRECAUTIONS MAY
BE NECESSARY.
Decontamination Procedure
If the equipment has been exposed to contamination, the Responsible Body is responsible for
carrying out appropriate decontamination. If hazardous material has been spilt on or inside the
equipment, decontamination should only be undertaken under the control of the Responsible Body
with due recognition of possible hazards. Before using any cleaning or decontamination method, the
Responsible Body should check with the manufacturer that the proposed method will not damage the
equipment. Prior to further use, the Responsible Body shall check the electrical safety of the unit. Only
if all safety requirements are met can the unit be used again.
NOTE: In the event of this equipment or any part of the unit becoming damaged or requiring service,
the item(s) should be returned to the manufacturer for repair accompanied by a decontamination
certificate. Copies of the Certificate are available from the manufacturer or can be extracted from this
user guide (see pages 13-14). At the end of its service life, the product must be accompanied by a
Decontamination Certificate.
9
Page 10

Warranty
Cole-Parmer warrants this equipment to be free from defects in material and workmanship, when
used under normal laboratory conditions, for a period of one (1) year. In the event of a justified
claim, Cole-Parmer will replace any defective component or replace the unit free of charge.
This warranty does NOT apply if:
❖ Any repair has been made or attempted other than by the manufacturer or its agent.
❖ Any minor coating chips or scratches occur during normal use (i.e., wear and tear).
❖ Damage is caused by fire, accident, misuse, neglect, incorrect adjustment or repair, damage
caused by installation, adaptation, modification or fitting of non-approved parts.
10
Page 11

Technical Specification
Flask capacity 50 to 250 ml 500 to 1000 ml 2000 to 5000 ml
Case material Powder-coated Powder-coated Powder-coated
aluminum aluminum aluminum
Thermal insulation Rockwool mineral Rockwool mineral Rockwool mineral
Max element 450°C (842°F) 450°C (842°F) 450°C (842°F)
temperature
Internal dimensions 50 ml: 52 x 31 mm 500 ml: 106 x 61 mm 2000 ml: 168 x 94 mm
(w x d) (2 x 1.2 in.) (4.1 x 2.4 in.) (6.6 x 3.7 in.)
100 ml: 67 x 39 mm 1000 ml: 136 x 78 mm 5000 ml: 224 x 190 mm
(2.6 x 1.5 in.) (5.3 x 3 in.) (8.8 x 7.4 in.)
250 ml: 86 x 48 mm
(3.3 x 1.8 in.)
Dimensions 175 x 175 x 150 mm 220 x 220 x 170 mm 320 x 320 x 220 mm
(w x d x h) (6.8 x 6.8 x 5.9 in.) (8.6 x 8.6 x 6.7 in.) (12.6 x 12.6 x 7.5 in.)
Net weight 0.75 kg (1.7 lb) 1.5 kg (3.3 lb) 2.75 kg (6.1 lb)
Electrical supply
Fuse rating
See Electrical Supply Section under Power Requirements on page 3.
11
Page 12

This page intentionally left blank
Page 13

DECONTAMINATION CLEARANCE CERTIFICATE
For the Inspection, Repair or Return of Medical, Laboratory or Industrial Equipment.
Prior to a Service Engineer working on equipment that has been in an environment where substances
hazardous to health may have been used, you are requested to provide the following information:
Company: Address:
Department:
Contact Name:
Tel Number:
Fax Number:
Model Number: Serial Number:
Please answer all questions by indicating YES/NO as applicable and by providing details below:
1. Has the equipment been exposed to any of the following;
A. Blood, body fluids, pathological specimens YES/NO Provide details if YES
B. Biodegradable material that could become a hazard YES/NO Provide details if YES
C. Other biohazard YES/NO Provide details if YES
D. Chemical or substances hazardous to health YES/NO Provide details if YES
E. Radioactive substances. State name(s) and quantities YES/NO Provide details if YES
of isotopes and checks made for residual activity
F. Other hazards YES/NO Provide details if YES
2. Please provide details of any hazard present as indicated above. Include details of names and
quantities of agents as appropriate:
3. Your method of decontamination (please describe):
4. Are there likely to be any areas of residual contamination (please specify):
I declare that the above information is true and complete to the best of my knowledge and belief.
Authorized signature: Name (please print):
Title/Position:
For and behalf of: Date:
Use reverse side if additional space is needed.
13
Page 14

Page 15

These products meet the relevant EC
harmonized standards for radio frequency
interference and may be expected not to
interfere with, or be affected by, other equipment with
similar qualifications. We cannot be sure that other
equipment used in their vicinity will meet these standards
and we cannot guarantee that interference will not occur
in practice. Where there is a possibility that injury,
damage or loss might occur if equipment malfunctions
due to radio frequency interference, or for general advice
before use, please contact the manufacturer.
Declaration of Conformity
Catalog Number: Description:
37013-00 ALUMINUM HEATING MANTLE, CONTROLLED, 50 ML, 120 V
37013-01 ALUMINUM HEATING MANTLE, UNCONTROLLED, 50 ML, 120 V
37013-02 ALUMINUM HEATING MANTLE, CONTROLLED, 50 ML, 230 V
37013-03 ALUMINUM HEATING MANTLE, UNCONTROLLED, 50 ML, 230 V
37013-04 ALUMINUM HEATING MANTLE, CONTROLLED, 100 ML, 120 V
37013-05 ALUMINUM HEATING MANTLE, UNCONTROLLED, 100 ML, 120 V
37013-06 ALUMINUM HEATING MANTLE, CONTROLLED, 100 ML, 230 V
37013-07 ALUMINUM HEATING MANTLE, UNCONTROLLED, 100 ML, 230 V
37013-08 ALUMINUM HEATING MANTLE, CONTROLLED, 250 ML, 120 V
37013-09 ALUMINUM HEATING MANTLE, UNCONTROLLED, 250 ML, 120 V
37013-10 ALUMINUM HEATING MANTLE, CONTROLLED, 250 ML, 230 V
37013-11 ALUMINUM HEATING MANTLE, UNCONTROLLED, 250 ML, 230 V
37013-12 ALUMINUM HEATING MANTLE, CONTROLLED, 500 ML, 120 V
37013-13 ALUMINUM HEATING MANTLE, UNCONTROLLED, 500 ML, 120 V
37013-14 ALUMINUM HEATING MANTLE, CONTROLLED, 500 ML, 230 V
37013-15 ALUMINUM HEATING MANTLE, UNCONTROLLED, 500 ML, 230 V
37013-16 ALUMINUM HEATING MANTLE, CONTROLLED, 1000 ML, 120 V
37013-17 ALUMINUM HEATING MANTLE, UNCONTROLLED, 1000 ML, 120 V
37013-18 ALUMINUM HEATING MANTLE, CONTROLLED, 1000 ML, 230 V
37013-19 ALUMINUM HEATING MANTLE, UNCONTROLLED, 1000 ML, 230 V
37013-20 ALUMINUM HEATING MANTLE, UNCONTROLLED, 2000 ML, 120 V
37013-21 ALUMINUM HEATING MANTLE, UNCONTROLLED, 2000 ML, 230 V
37013-22 ALUMINUM HEATING MANTLE, UNCONTROLLED, 5000 ML, 120 V
37013-23 ALUMINUM HEATING MANTLE, UNCONTROLLED, 5000 ML, 230 V
This product complies with the requirements of the EU Directives listed below:
2004/108/EC EMC Directive
2006/95/EC Low Voltage Directive (LVD)
2011/65/EC RoHs Directive
Page 16

For technical, sales or
servicing information,
contact:
Cole-Parmer
625 East Bunker Court
Vernon Hills, IL 60061-1844
Toll-Free: 800-323-4340
Phone: 847-549-7600
Fax: 847-247-2929
www.coleparmer.com
M7153CP
 Loading...