

Page 1
Range of
Hotplates & Stirrers
User Guide
Version 1.1
Page 2
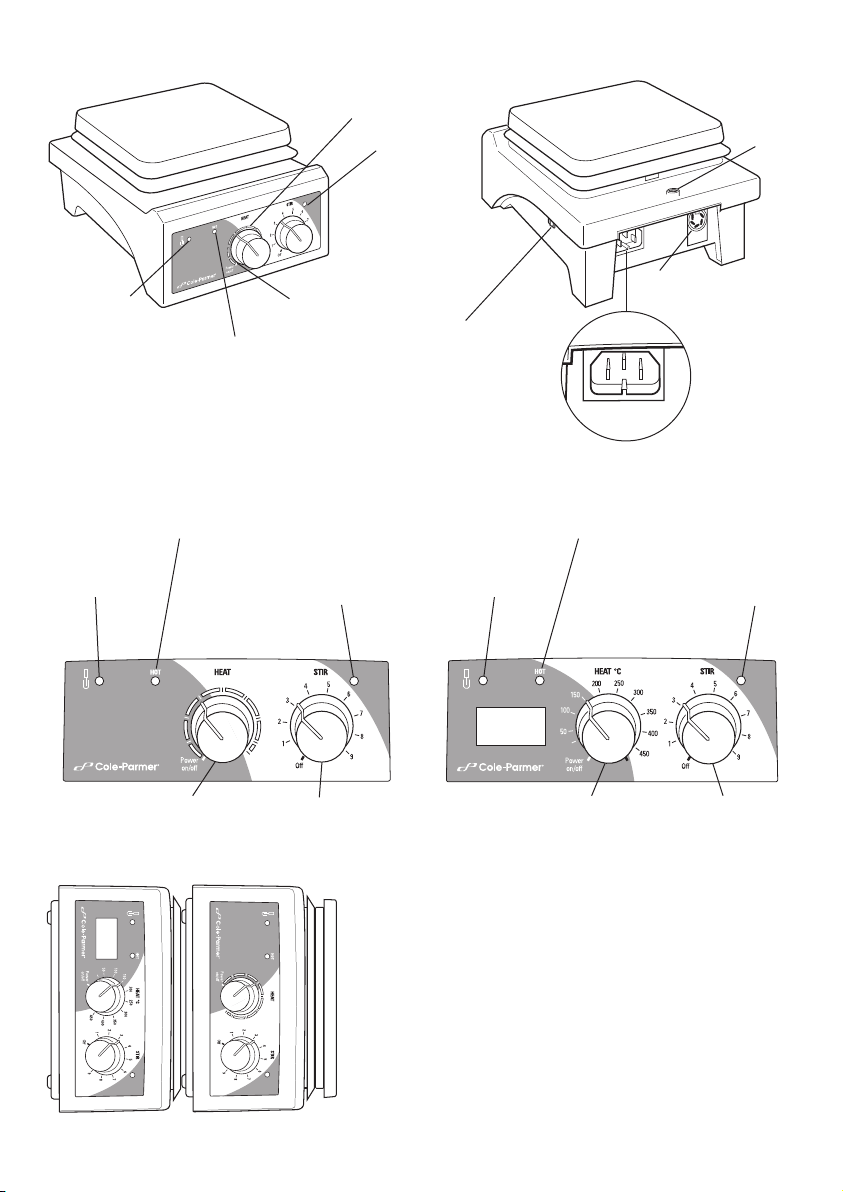
Figure
HEAT
STIR
HOT
Power
on/off
4
3
2
1
off
5
6
7
Power
on/off
100
150
250
200
300°C
50
HEAT
1 - Front view
LED heat display
Stirrer
on
light
Figure
2 - Rear view
Retort
rod
fitting
Temperature
Controller
indicator
‘Hot’ warning light
Power on green light
Power on/off
switch
(not on stirrer
only unit)
IEC power
socket for
hot condition
plug
Figure 3 - Front panel (analog versions) Figure 4 - Front panel (digital versions)
DIN socket
‘Hot’ warning light
Temperature
Controller
indicator
Heat control
Temperature
Stir on
light
Controller
indicator
Stir control
‘Hot’ warning light
Heat control
Stir on
light
Stir control
Figure 5 - Stacked on side view (as viewed from above)
2
Page 3

Hotplates & Stirrers
Introduction
Thank you for purchasing this Cole-Parmer product. To get the best performance from the
equipment, and for your own safety, please read these instructions carefully before use.
Before discarding the packaging check that all parts are present and correct.
This equipment is designed to operate under the following conditions:
❖ For indoor use only
❖ Use in a well ventilated area
❖ Ambient temperature range +5°C to +40°C (+41°F to 104°F)
❖ Altitude to 2000m, (6500ft)
❖ Relative humidity not exceeding 80%
❖ Power supply fluctuations not exceeding 10% of nominal
❖ Overvoltage category II IEC60364-4-443
❖ Pollution degree 2 IEC664
❖ Use with a minimum distance all round of 200mm, (8 in.) from walls or other items
If the equipment is not used in the manner described in this manual and with accessories other than
those recommended by the manufacturer, the protection provided may be impaired.
Electrical Installation
THIS EQUIPMENT MUST BE GROUNDED
Before connection please ensure that the line supply corresponds to that shown on the
rating plate located on the base of the unit.
Power requirements:
230v Models 120v Models
04801-22 500W 04801-20 500W
04801-26 700W 04801-24 700W
04801-52 50W 04801-50 50W
04801-56 50W 04801-54 50W
04801-62 550W 04801-60 550W
04801-67 750W 04801-65 750W
04801-66 550W 04801-64 550W
04801-70 750W 04801-68 750W
There is an IEC hot condition power socket (C16) for a hot condition IEC plug (C15).
The 230V unit is provided with a power/mains lead fitted with an IEC hot condition (C15) plug and
with either a UK 3-pin plug and a “Schuko” 2-pin plug for connection to the power supply.
The 120V unit is provided with a power/mains lead fitted with an IEC hot condition (C15) plug and
with a NEMA 5-15 plug for connection to the power supply.
Should the cable not be suitable for connecting to the power supply, replace the plug with a suitable
alternative.
THIS OPERATION SHOULD ONLY BE UNDERTAKEN BY A QUALIFIED ELECTRICIAN.
3
Page 4
NOTE: Refer to the equipment rating plate to ensure that the plug and fusing are suitable for the
voltage and wattage stated.
The wires in the power cable (230V) are colored as follows:
BROWN - HOT/LIVE
BLUE - NEUTRAL
GREEN/YELLOW - EARTH
The wires in the power cable (120V) are colored as follows:
BLACK - HOT/LIVE
WHITE - NEUTRAL
GREEN - EARTH
2
Should the power cable need replacing, a cable of 1mm
of harmonized code H05RR-F or H05RN-F
connected to an IEC hot condition plug should be used.
IF IN DOUBT CONSULT A QUALIFIED ELECTRICIAN
The appropriate power cable should be connected BEFORE connection to the power supply.
Safety Advice
❖HIGH TEMPERATURES ARE DANGEROUS as they can cause serious burns to operators and
ignite combustible material. Users should be aware of the following safety advice:
❖USE CARE AND WEAR PROTECTIVE GLOVES TO PROTECT HANDS.
❖DO NOT use combustible substances near hot objects.
❖NEVER lift or carry the instrument until it has been switched off and allowed to cool for at least 30
minutes. The hot warning light will give guidance.
❖The unit should be carried using both hands with the fingers under the side edges.
❖NEVER move or carry the unit with containers on the top plate or while still connected to the power
supply.
❖There is a danger of liquid spillage if containers are over-filled and stirred at high speed. Always
build stirrer speed slowly and never stir more rapidly than necessary.
❖NEVER place a cold glass vessel onto a hotplate which is already hot.
❖NEVER use a retort rod longer than 600mm (23.6 in.).
❖When a retort rod is installed with apparatus attached, or when swivelling support rods, take care
that there is sufficient weight on the plate to prevent the whole unit tipping over.
❖When using a retort stand, in order to provide the unit with adequate ventilation the base of the
retort stand must NOT exceed 19.5 mm (0.75 in.) in height and 125 mm (5 in.) in width.
4
Page 5

Operation
1
2
3
4
5
6
7
8
9
STIR
off
Power
on/off
HEAT
Power
on/off
HEAT
Analog Hotplate Models
Switch the unit on using the power on/off switch (see Figure 2).
The control dial labelled “HEAT” on the front panel controls the heat output and hence the plate
temperature. The approximate temperature is indicated visually by LED back-lighting that increases
from Green to Red. The temperature range for your model can be referenced in the technical
specifications section.
Turn the control dial clockwise to the desired plate temperature. As the plate heats up the LED
temperature segments around the dial will light up in turn and their light intensity increase until the
surface temperature is reached. The LED temperature segments refers to the temperature of the top
plate and not to the temperature of the contents of the vessel being heated. Conversely if the unit is
cooling, the LED temperature segments will go out as the plate approaches the set temperature.
Digital Hotplate Models
Switch the unit on using the power on/off switch (see Figure 2). When the control dial labelled “HEAT”
is pointing to the Power on/off position, the LED display will show the word “OFF”. Turn the control
dial to the required temperature which will be shown on the LED display. The temperature will
increase in 5°C (41°F) steps. A few seconds after setting the temperature, the display will revert to
showing the actual temperature of the hotplate.
If the unit is switched off using the power on/off switch while the control dial is in a set position, the
next time the unit is switched on, the LED display will show the word “On” followed briefly by the
previously set temperature. The display will then revert to the actual top plate temperature and the
unit will then begin to heat to the set temperature.
WARNING: When the surface becomes too HOT to touch the red "HOT" warning light on the
front panel will begin to flash (see Figure 1). This will continue to flash while the plate
temperature is above 50°C (122°F) for a maximum of 30 minutes, even if the unit is
disconnected from the electricity supply.
WARNING: The plate may still be HOT beyond 30 minutes when large masses are left on the
plate, even though the "HOT" warning light has gone out.
WARNING: The top surface of the instrument may be HOT, especially in free air when a
surface temperature of 450°C (842°F) can be achieved on the ceramic top models and 325°C,
(617°F) on the metal top models. Do not leave heaters switched on when not in use.
5
Page 6

Stirring Models
1
2
3
4
5
6
7
8
9
STIR
off
Your unit is provided with two 25mm (1 in.) PTFE stirrer bars. These should be placed in the liquid to
be stirred. They are suitable for liquid volumes up to 500mL (16 fl oz).
Turn ON by turning the dial clockwise from the OFF position.
The control dial labelled “STIR” on the front panel controls the stirrer speed. When switched on, a
green light illuminates (see Figure 1). The dial is graduated with an arbitrary 1-9 scale. Turning the dial
to a higher number increases the stirrer speed.
Using the Optional Temperature Controller Accessory
The temperature controller allows accurate temperature control of aqueous and oil based samples in
the laboratory and can be used in two different modes, as a precise temperature controller from 20°C
to 200°C (20°F to 392°F) or as a digital thermometer from -4 to 325°C (25°F to 617°F).
Connection of the temperature controller probe is via the DIN probe socket located at the rear of the
hotplate (see Figure 2).
In control mode, the heat control of the hotplate is disabled, allowing precise control of sample
temperature via the temperature controller. The illuminated contact thermometer indicator LED
indicates communication between the temperature controller and hotplate (see Figure 3).
When used in monitor mode, the controller operates as a digital thermometer and the hotplate
temperature is controlled by the “HEAT” control dial as described above. In this mode the LED
temperature segments adjacent to the “HEAT” control dial (analog models) or the LED temperature
display (digital models) refer to the surface temperature of the hotplate not the sample.
For full instructions on use please refer to the temperature controller user guide.
Cleaning and Care
Before Attempting Cleaning:
Ensure that the top is cool, disconnect from the power supply.
Metal Casework:
The metal casing should be cleaned using a damp cloth and a mild detergent solution.
Ceramic Top Units:
A damp cloth will normally remove most types of contamination. For more difficult stains a domestic
cream cleanser is recommended.
Cleaning is made easier if spillages are attended to promptly. In any case, spillages of alkali,
phosphoric acid and hydrofluoric acid MUST be removed immediately as these chemicals can attack
and damage the glass ceramic. Ensure that the appropriate safety precautions are observed.
6
Page 7

During cleaning and general operation take care not to scratch the surface of the top plate as this
could result in subsequent thermal breakage.
WARNING: A ceramic top which is scratched, chipped, chemically etched or damaged must
not be used.
Metal Top Units:
The metal top plate should be cleaned using a damp cloth and a mild detergent solution.
Cleaning is made easier if spillages are attended to promptly. In any case, spillages of acids and
alkalis MUST be removed immediately as these chemicals can attack and damage the surface of the
coated aluminum alloy. Ensure that the appropriate safety precautions are observed.
Preparation of Media
Take particular care when heating liquids having a high viscosity. Viscous liquids can act as thermal
insulators and can cause thermal breakage of the glassware. This is very important with media
solutions as the viscosity will usually increase as the temperature rises.
❖Check that the stirring action is sufficient to agitate the whole of the liquid. Unstirred areas in the
liquid can result in uneven heat transfer and “hot spots” in the glassware. This can induce thermal
stress and so cause failure.
❖Check the stirring action regularly to ensure that it remains adequate as the viscosity of the solution
increases.
❖Always use the largest magnetic stirrer bar possible and, if necessary, use a mechanical overhead
stirrer.
❖Do not use glass vessels with thick walls, e.g. Pyrex Heavy Duty Ware or standard beakers and
flasks having capacities of 5 liters (170 fl oz) or greater.
❖NEVER heat glass bottles on a hotplate.
❖Ensure that the heat is built up slowly to avoid localized overheating.
❖Ensure the glassware is completely free from scratches or other defects.
❖Place the hotplate in a tray large enough to contain the liquid in the event of glassware failure.
❖Wear the appropriate safety clothing, e.g. gloves, goggles, protective apron etc.
Storage
The unit is designed so that the top plate fits into the base plate of the next unit for easy and
compact storage when placed on their side (see Figure 5).
Accessories
Retort Rod
The optional Retort rod is available to support apparatus used with the instrument. The instrument is
equipped with a fitting on the rear to accept the support rod accessory available from Cole-Parmer
(see Figure 2). To fit the rod to your instrument, first isolate unit from the power supply and allow to
cool. Screw the threaded end of the support rod into the fitting on the rear of the instrument. The
shape of the base also allows a rectangular shaped retort rod stand, whose dimensions must not
exceed 19.5mm (0.75 in.) high and 125mm (5 in.) wide, to be placed directly underneath the unit.
The Retort Rod accessory is 12mm (0.47 in.) wide x 600mm (23.6 in.) high.
Temperature Controller
For more information on the optional temperature controller and its usage, please see page 6.
7
Page 8

Heating Blocks
A complete range of modular heating blocks for heating round bottom flasks is available for use with
the metal top hotplates.
Please visit the Cole-Parmer website www.coleparmer.com for further information.
Troubleshooting
Error Codes
The following error codes are displayed if the instrument detects an error condition. On the digital
models the errors are shown as Er1, Er2 etc. on the LED display. On the analog models, the Er1
condition is shown by flashing the first LED on the temperature scale, Er2 would be shown by flashing
the second LED and so on.
❖Er1 – Probe Range Error – If temperature controller reports probe temperature of > 325°C (617°F)
or < -99°C (-146°F).
❖Er2 – Communication Lost Error – Communications with the temperature controller have been lost.
❖Er3 – Hotplate Temperature Error – If the hotplate measures its temperature > 585°C (1085°F)
or < -9.9°C (-14°F).
❖Er4 – Hotplate Ambient Error – If the temperature sensed inside the hotplate (not the plate
temperature) is 85°C (185°F).
❖Er5 – Character Error – An unknown character was received from the temperature controller
accessory.
❖Er6 – Probe Out Error – The instrument detects that the temperature controller probe has been
removed from the solution being heated.
❖Er7 – Timeout Error – The temperature controller did not respond to a request in the required
time.
Servicing and Repair
This product range does not require any routine servicing.
Note: There are no internal user replaceable parts.
In the event of product failure it is recommended that any repair is only undertaken by suitably qualified
personnel. For advice, please contact Cole-Parmer quoting the model and serial number.
Only spare parts supplied by the manufacturer or its agent should be used. Fitting of non-approved
parts may affect the performance of the safety features of the instrument.
Note: The magnetic stirrer drive utilizes strong magnets.
If in doubt, please contact Cole-Parmer.
8
Page 9

Warranty
Cole-Parmer warrants this equipment to be free from defects in material and workmanship, when
used under normal laboratory conditions, for a period of three (3) years. In the event of a justified
claim, Cole-Parmer will replace any defective component or replace the unit free of charge.
This warranty does NOT apply if:
❖A ceramic top has broken due to mechanical impact, scratching, chipping or chemical etching.
❖Any repair has been made or attempted other than by the manufacturer or its agent.
❖Any minor coating chips or scratches occur during normal use (i.e., wear and tear).
❖Damage is caused by fire, accident, misuse, neglect, incorrect adjustment or repair, damage
caused by installation, adaptation, modification or fitting of non-approved parts.
9
Page 10

Technical Specication
Stirring Hotplates 230v: 04801-67 230v: 04801-62 230v: 04801-70 230v: 04801-66
120v: 04801-65 120v: 04801-60 120v: 04801-68 120v: 04801-64
Plate material Coated Glass ceramic Coated Glass ceramic
aluminum/silicon aluminum/silicon
Plate dimensions 150 x 150mm / (6 x 6 in.) all models
Heated area 150 x 150mm 120 x 120mm 150 x 150mm 120 x 120mm
(6 x 6 in.) (4.75 x 4.75 in.) (6 x 6 in.) (4.75 x 4.75 in.)
Heater control Analog Analog Digital Digital
Heater power 700W 500W 700W 500W
Max. plate temp 325°C / (617°F) 450°C / (842°F) 325°C / (617°F) 450°C / (842°F)
Min. set temp - - 25°C / (77°F) 25°C / (77°F)
Stirrer speed, rpm 100-2000 100-2000 100-2000 100-2000
Max. stirring capacity* 15 L / (4 gal.) all models
Supports Temperature Controller Yes Yes Yes Yes
Accuracy with Controller ±1 C / (±2°F) ±1 C / (±2°F) ±1 C / (±2°F) ±1 C / (±2°F)
Dimensions (w x d x h) 172 x 248 x 120mm 172 x 248 x 122mm 172 x 248 x 120mm 172 x 248 x 122mm
(6.75 x 9.75 x 4.7 in.) (6.75 x 9.75 x 4.8 in.) (6.75 x 9.75 x 4.7 in.) (6.75 x 9.75 x 4.8 in.)
Net weight all models 2.9kg / (6.4 lbs)
Power 750W 550W 750W 550W
Electrical supply 120V, 60Hz 120V, 60Hz 120V, 60Hz 120V, 60Hz
or 230V, 50Hz or 230V, 50Hz or 230V, 50Hz or 230V, 50Hz
Hotplates 230v: 04801-26 230v: 04801-22
120v: 04801-24 120v: 04801-20
Plate material Coated Glass ceramic
aluminum/silicon
Plate dimensions 150 x 150mm / (6 x 6 in.) 150 x 150mm / (6 x 6 in.)
Heated area 150 x 150mm / (6 x 6 in.) 120 x 120mm / (4.75 x 4.75 in.)
Heater control Analog Analog
Heater power 700W 500W
Max. plate temp 325°C / 615°F 450°C / 842°F
Supports Temperature Controller Yes Yes
Accuracy with Controller ±1 C / (±2°F) ±1 C / (±2°F)
Dimensions (w x d x h), mm 172 x 248 x 120 (6.75 x 9.75 x 4.7 in.) 172 x 248 x 122 (6.75 x 9.75 x 4.8 in.)
Net weight 2.2kg / (4.8 lbs) 2.2kg / (4.8 lbs)
Power 700W 500W
Electrical supply 120V, 60Hz or 230V, 50Hz 120V, 60Hz or 230V, 50Hz
Stirrers 230v: 04801-56 230v: 04801-52
120v: 04801-54 120v: 04801-50
Plate material Stainless steel Glass ceramic
Plate dimensions 150 x 150mm / (6 x 6 in.) 150 x 150mm / (6 x 6 in.)
Speed control Analog Analog
Stirrer speed, rpm 100-2000 100-2000
Max. stirring capacity 15 L / (4 gal.) 15 L / (4 gal.)
Supports Temperature Controller No No
Dimensions (w x d x h) 172 x 248 x 109mm 172 x 248 x 107mm
(6.75 x 9.75 x 4.3 in.) (6.75 x 9.75 x 4.2 in.)
Net weight 2.0kg / (4.4 lbs) 2.0kg / (4.4 lbs)
Power 50W 50W
Electrical supply 120V, 60Hz or 230V, 50Hz 120V, 60Hz or 230V, 50Hz
*Based on water contained in a 20 liter (5.2 gal.) glass bottom ask.
10
Page 11

These products meet the relevant EC
harmonized standards for radio frequency
interference and may be expected not to
interfere with, or be affected by, other equipment with
similar qualifications. We cannot be sure that other
equipment used in their vicinity will meet these standards
and we cannot guarantee that interference will not occur
in practice. Where there is a possibility that injury,
damage or loss might occur if equipment malfunctions
due to radio frequency interference, or for general advice
before use, please contact the manufacturer.
Declaration of Conformity
Catalog Number: Description:
04801-22 CP UNDERGRAD CERAMIC HOTPLATE, 230V
04801-20 CP UGRAD CERAM HOTPLATE, 120V60HZ
04801-52 CP UNDERGRAD CERAMIC STIRRER, 6x6 230V
04801-50 CP UGRAD CERAM STIRRER, 6x6, 120V60HZ
04801-62 CP UNDERGRAD CERAMIC HEAT & STIR, 6x6, 230V
04801-60 CP UGRAD CERAM HEAT&STIR, 6x6,120V60HZ
04801-66 CP UGRAD CERAMIC HEAT/STIR DIG, 6x6,230V
04801-64 CP UGRAD CERAM HEAT&STIR DIG, 6x6,120V
04801-26 CP UNDERGRAD METAL HOTPLATE, 6x6, 230V
04801-24 CP UGRAD 120V60HZ METAL, 6x6,HOTPLATE
04801-56 CP UNDERGRAD METAL ANALOG, STIR, 6x6,230V
04801-54 CP UGRAD METAL STIR, ANALOG, 6x6, 120V60HZ
04801-67 CP UNDERGRAD METAL HEAT & STIR, 6x6, ANALOG, 230V
04801-65 CP UNDERGRAD METAL HEAT & STIR, 6x6, ANALOG, 115V
04801-70 CP UGRAD METAL HEAT&STIR DIGITAL, 6x6, 230V
04801-68 CP UGRAD METAL HEAT&STIR DIG, 6x6, 120V
These products comply with the requirements of the EU Directives listed below:
2004/108/EC EMC Directive
2006/95/EC Low Voltage Directive (LVD)
2011/65/EC RoHs Directive
Page 12

For technical, sales or
servicing information,
contact:
Cole-Parmer
625 East Bunker Court
Vernon Hills, IL 60061-1844
Toll-Free: 800-323-4340
Phone: 847-549-7600
Fax: 847-247-2929
www.coleparmer.com
 Loading...