

Page 1
c
Temperature
Controller
User Guide
Version 1.2
Page 2
c
HEAT
STIR
HOT
100
50
Power
on/off
heat-stir
US152
150
200
250
4
3
2
1
off
5
6
7
US152
HOT
1
2
3
4
5
6
7
8
9
STIR
undergrad
off
Power
on/off
100
150
250
200
300°C
50
HEAT
Power
on/off
100
150
250
200
300°C
50
HEAT
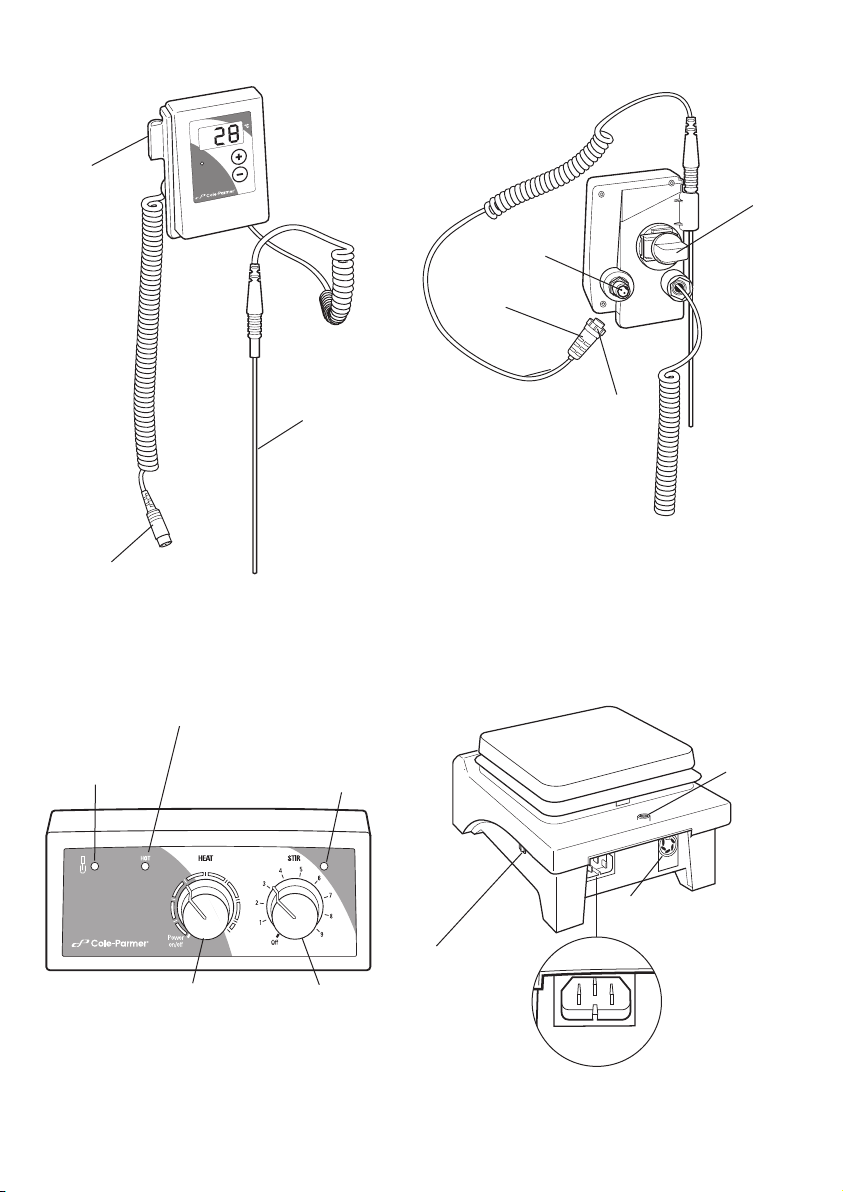
Figure 1 - front view
Probe
holder
Controller plug
Figure 2 - rear view
Retort
clamp
Probe
socket
Probe
plug
Locking
Temperature
collar
probe
Figure 3 - Hotplate front view Figure 4 - Hotplate rear view
Temperature
Controller
indicator
‘Hot’ warning light
Stir on
light
DIN socket
Power on/off
Heat control
Stir control
switch
(not on stirrer
only unit)
2
Retort
rod
fitting
IEC power
socket for
hot condition
plug
Page 3

Temperature Controller
Introduction
Thank you for purchasing this Cole-Parmer product. To get the best performance from the
equipment, and for your own safety, please read these instructions carefully before use.
Before discarding the packaging check that all parts are present and correct.
This equipment is designed to operate under the following conditions:
❖ For indoor use only
❖ Use in a well ventilated area
❖ Ambient temperature range +5°C to +40°C (+41°F to +104°F)
❖ Altitude to 2000 m (6500 ft)
❖ Relative humidity not exceeding 80%
❖ Use with a minimum distance all round of 200 mm (8 in.) from walls or other items
If the equipment is not used in the manner described in this manual and with accessories other than
those recommended by the manufacturer, the protection provided may be impaired.
General Description
The temperature controller is the ideal instrument for the accurate temperature control of aqueous
and oil based samples in the laboratory. The temperature controller can be used in two different
modes: as a precise temperature controller from 20 to 200°C (68 to 392°F ) or as a digital
thermometer from -4 to 325°C (24.8 to 617°F). With digital setting and display of temperature, the
temperature controller is accurate to ±0.5°C (±1°F).
The temperature controller is compatible with the following Cole-Parmer hotplates and hotplate
stirrers:
120 V Models 240 V Models
04801-20 04801-22
04801-24 04801-26
04801-60 04801-62
04801-64 04801-66
04801-65 04801-67
04801-68 04801-70
3
Page 4

Safety Advice
❖HIGH TEMPERATURES ARE DANGEROUS as they can cause serious burns to operators and
ignite combustible material. Users should be aware of the following safety advice:
❖USE CARE AND WEAR PROTECTIVE GLOVES TO PROTECT HANDS.
❖DO NOT use combustible substances near hot objects.
❖NEVER lift or carry the instrument until it has been switched off and allowed to cool for at least 30
minutes. The hot warning light will give guidance.
❖The unit should be carried using both hands with the fingers under the side edges.
❖NEVER move or carry the unit with containers on the top plate or while still connected to the power
supply.
❖There is a danger of liquid spillage if containers are over-filled and stirred at high speed. Always
build stirrer speed slowly and never stir more rapidly than necessary.
❖NEVER place a cold glass vessel onto a hotplate which is already hot.
❖NEVER use a retort rod longer than 600 mm (23.6 in.).
❖When a retort rod is installed with apparatus attached, or when swivelling support rods, take care
that there is sufficient weight on the plate to prevent the whole unit tipping over.
❖When using a retort stand, in order to provide the unit with adequate ventilation the base of the
retort stand must NOT exceed 19.5 mm (0.75 in.) in height and 125 mm (5 in.) in width.
Installation Instructions
The Temperature Controller is designed for use with either a metal top or ceramic top hotplate
(compatible models listed under General Description heading).
Place the hotplate on a firm, level surface. Open the jaws of the retort clamp on the rear of the
temperature controller by turning the clamp dial counter-clockwise. The clamp can be used with retort
rods from 9.5 to 13 mm (0.37 to 0.5 in.) diameter. Slide the temperature controller on to the retort rod
and tighten by turning the clamp dial clockwise.
NOTE: DO NOT OVER-TIGHTEN
Connect the temperature controller plug to the DIN probe socket at the rear of the hotplate
(see Figures 1 and 4).
Connect the probe plug to the probe socket at the rear of the controller (Figures 2 and 4). To ensure
the best connection, tighten the locking collar on the plug by turning clockwise.
Connect the power supply lead to the IEC socket at the rear of the hotplate and switch the unit on.
To switch on the temperature controller, turn the heat control dial on the hotplate clockwise (Figure 3).
NOTE: The controller power is supplied by the hotplate
The temperature controller and hotplate are now ready for use. Correct communication between the
temperature controller and the hotplate is indicated by the illuminated amber temperature controller
indicator on the front panel of the hotplate.
NOTE: The hotplate and controller will perform an automatic self-test at power up, before
the current temperature of the probe is displayed. The factory default set temperature is
20°C (68°F).
4
Page 5

Operation
Controller Positioning
The temperature controller is supplied with a detachable temperature probe (Figure 2). This useful
feature enables the temperature controller to be positioned away from damaging fumes.
The temperature controller is factory set such that the retort clamp is positioned for mounting on a
vertical retort rod. To mount the temperature controller on to a horizontal retort rod, ease back the
clamp situated at the rear of the controller sufficiently to clear the right-angled raised location. Rotate
clockwise by 90° until the clamp snaps back into the position.
Probe Positioning
For optimum temperature control, ensure the end of the sensing probe is immersed at least 20 mm
(0.75 in.) deep into the medium being controlled. The temperature probe when not in use should be
placed in the probe holder located on the left-hand side of the control panel. For safety and to avoid
contamination, always wipe the probe clean prior to placing into holder.
Using the Temperature Controller
The temperature controller can be used in two different modes, either as a temperature controller
(‘control mode’) or as a digital thermometer (‘monitor mode’).
Using Control Mode
Ensure that the temperature controller is connected to the hotplate. Also ensure the temperature
probe is attached to the controller and immersed in the medium to be controlled before switching on
the power.
Analog Models
Turn the unit on using the On/Off switch at the side of the unit. The temperature controller will power
up in monitor mode. To turn on the temperature controller in control mode, turn the heat control
clockwise on the front panel of the hotplate.
Digital Models
Turn the unit on using the On/Off switch at the side of the unit. The temperature controller will power
up in the last mode used. To change from monitor mode to control mode, press either the '+' or '-'
key on the temperature controller. To turn on the temperature controller in control mode, turn the heat
control clockwise on the front panel of the hotplate; the LED display will show "---".
The temperature controller in control mode is indicated by the illuminated amber indicator on the front
panel of the hotplate (Figure 3). The LED and display will be visible on the temperature controller panel
(Figure 5) and the current temperature of the medium will be displayed.
Thermometer
LED
Figure 5 - temperature controller panel
Increase
temperature
set point
Decrease
temperature
set point
5
Page 6

To set the Temperature in Control Mode
Press the + or - key once to initiate the temperature set point mode. This is indicated by a flashing
LED on the temperature controller display. To select the temperature, use the ‘+’ or ‘ –‘ keys to obtain
the desired temperature. To set the temperature, release the key. The LED will cease flashing once the
temperature has been set. With the probe in the sample, the thermometer LED will illuminate as
follows:
❖Green – temperature set point not reached
❖Amber – liquid at set point
❖Red – liquid hotter than set point
NOTE: To obtain accurate temperature control, the minimum temperature set point must be
at least 15°C (59°F) above the surrounding ambient temperature.
Using Monitor Mode
To use the temperature controller in monitor mode together with the hotplate, ensure the unit is
switched off using the power switch at the side. Hold down both the ‘+’ and ‘ –‘ keys simultaneously
on the temperature controller and turn the power switch to ‘ON’. Once the digital display illuminates,
release the keys on the temperature controller. Monitor mode will be indicated by a red flashing LED
at the bottom right-hand corner of the display of the temperature controller. The amber control LED
on the front panel of the hotplate will NOT be illuminated in monitor mode.
NOTE: When in monitor mode, the temperature controller operates as a digital thermometer
only, and no longer controls the temperature of the medium in use. The hotplate
temperature can now be manually adjusted to the desired setting.
Switching between Monitor and Control Modes
To change from monitor mode to control mode, press either the ‘+’ or’ –‘ key on the temperature
controller once. The unit will revert to control mode, and will be indicated by the illuminated amber
contact thermometer indicator visible on the front panel of the hotplate. The red LED on the bottom
right-hand corner of the temperature controller display will go off when the unit is in control mode.
NOTE: For safety reasons, when reverting from monitor to control mode the
temperature controller will default to the set point temperature of 20°C (68°F).
6
Page 7

Troubleshooting
Reading Error Codes
In the event of malfunction the temperature controller can self-diagnose certain fault conditions. In this
case the display will show a message in the form of ‘Err XX’ where XX is either a single or double digit
code, which identifies the fault.
Error Code Fault Condition Remedy
Err 1 Thermometer not calibrated Return to manufacturer
Err 2 Electronic fault Return to manufacturer
Err 4 Probe plug removed Reconnect probe.
in control or monitor Continuing error code indicates
mode hotplate fault - return to
manufacturer
Err 8 Probe out of sample when Replace probe in sample
in control mode
Err 16 Ambient temperature inside hotplate Switch off at power source and
too high (controller attached) allow to cool
Accessories
A range of accessories is available for use with the temperature controller. Please visit the
Cole-Parmer website at www.coleparmer.com for further information.
Servicing and Repair
This product range does not require any routine servicing.
Note: There are no internal user replaceable parts.
In the event of product failure it is recommended that any repair is only undertaken by suitably
qualified personnel. For advice, please contact Cole-Parmer quoting the model and serial number.
Only spare parts supplied by the manufacturer or its agent should be used. Fitting of non-approved
parts may affect the performance of the safety features of the instrument.
If in doubt, please contact Cole-Parmer.
7
Page 8

Warranty
Cole-Parmer warrants this equipment to be free from defects in material and workmanship, when
used under normal laboratory conditions, for a period of three (3) years. In the event of a justified
claim, Cole-Parmer will replace any defective component or replace the unit free of charge.
This warranty does NOT apply if:
❖Any repair has been made or attempted other than by the manufacturer or its agent.
❖Any minor coating chips or scratches occur during normal use (i.e., wear and tear).
❖Damage is caused by fire, accident, misuse, neglect, incorrect adjustment or repair, damage
caused by installation, adaptation, modification or fitting of non-approved parts.
Technical Specification 04801-80
Probe Stainless steel
Temperature range ºC 20 to 200ºC
Accuracy ºC ±0.5ºC
Resolution 1ºC
Dimensions (width x depth x height) 90 x 75 x 123 mm (3.54 x 3 x 4.84 in.)
Net weight 0.3 kg (0.7 lb) (inc. probe)
IP rating IP54
8
Page 9

This page intentionally left blank
Page 10

This page intentionally left blank
Page 11

These products meet the relevant EC
harmonized standards for radio frequency
interference and may be expected not to
interfere with, or be affected by, other equipment with
similar qualifications. We cannot be sure that other
equipment used in their vicinity will meet these standards
and we cannot guarantee that interference will not occur
in practice. Where there is a possibility that injury,
damage or loss might occur if equipment malfunctions
due to radio frequency interference, or for general advice
before use, contact the manufacturer.
Declaration of Conformity
Catalog Number: Description:
04801-80 TEMPERATURE CONTROLLER
This product complies with the requirements of the EU Directives listed below:
2004/108/EC EMC Directive
2006/95/EC Low Voltage Directive (LVD)
2011/65/EC RoHs Directive
Page 12

For technical, sales or
servicing information,
contact:
Cole-Parmer
625 East Bunker Court
Vernon Hills, IL 60061-1844
Toll-Free: 800-323-4340
Phone: 847-549-7600
Fax: 847-247-2929
www.coleparmer.com
 Loading...