

Page 1
04661- 43
04661- 44
04661- 45
04661- 46
04661- 39
04661- 40
User manual
Magnetic Stirrer with Heating
Magnetic Stirrer
Stir
Heat
Timer
04661- 29
04661- 30
Stir
Timer
04661- 41
04661- 42
Stir
Heat
Page 2

Page 3

Contents
Safety instructions . . . .. . ... . .. . . .. . . .. . ... . .. . . .. . . .. . ... . .. . . .. . .
Maintenance and cleaning .. . ... . .. . . .. . . .. . ... . .. . . .. . . .. . ... . .. . . .. .
Warranty . . ... . ... ... . ... . ... . ... ... . ... . ... . ... . .. . ... . ... . ... . ..
Model:
Support rod installation
04661-43
04661-44
. .. . . .. . ... . .. . . .. . . .. . ... . ... . .. . . .. . . .. . ... .
04661-39
04661-40
04661-45
04661-46
04661-41
Switching on .. ... .. . .. . .. . .. . .. ... ... ... .. . .. . .. . .. . .. ... ... ... .. . .. . .. . .
Plate overview ... . ... . .... .. . . .. . ... . .. . . .. . . .. . ... . ... . .. . . .. . . .. .
Setting safety temperature .. .. . . .. . ... . .. . . .. . . .. . . .. . ... . .. . . .. . . .. . .
Setting heating temperature . . .. . . .. . .. . ... . .. . ... . .. . .. . . .. . .. . ... . .. .
Setting stirring speed ... . .. .. . . .. . ... . .. . . .. . . .. . ... . ... . .. . . .. . . .. . .
Reverseible / Intermittent stirri ng func tion ... .. .. . . .. . ... . .. . . .. . . .. . ... .
Setting the timer ... . ... .. .. . . .. . ... . .. . . .. . . .. . ... . ... . .. . . .. . . .. .
Locking function . . .. . . .. . ... . .. . . .. . . .. . ... . .. . . .. . . .. . ... . .. . . .. .
Switch off and data saving .. . ... . .. . . .. . . .. . ... . .. . . .. . . .. . ... . .. . . ..
Troublesh ooting guide . . .. . .. . . .. . .. . .. . ... . .. . .. . ... . .. . .. . .. . . .
Technical data . .. . ... . .. .. . . .. . ... . .. . . .. . . .. . ... . ... . .. . . .. . . .. . .
Model:
Switching on .. . ... . .. . . .. . . .. . ... . .. . . .. . . .. . ... . .. . . .. . ... . ... . .
04661-29
04661-30
Plate overview ... . .. . . .. . . .. . ... . ... . .. . . .. . . .. . ... . .. . . .. . ... . ...
Setting stirring speed and reverse mode . . .. . ... . .. . . .. . . .. . ... . .. . ... .
Setting the timer ... . .. . . .. . . .. . ... . .. . . .. . . .. . ... . .. . . .. . . .. . ... . .
Switch off and data saving .. . ... . .. . . .. . . .. . ... . .. . . .. . . .. . ... . .. . . ..
Troubleshooting gu ide .. . . .. . ... . .. . . .. . . .. . ... . .. . . .. . . .. . ... . .. . . .
Technical data ... . .. . . .. . . .. . ... . .. . . .. . . .. . ... . .. . . .. . . .. . ... . ...
1 2-
04661-42
13 15-
10
11
12
12
16
17
18
19
20
20
21
22
3
3
4
5
6
7
8
9
Standard accessories
User man ual
Magnetic Stirrer with Heating
04661-43
04661-44
04661-45
04661-46
04661-39
04661-40
04661-41
User manual ×1
04661-42
Stirring bar ×1
Power
Magnetic Stirrer
Stir
Heat
Timer
04661-29
04661-30
Stir
Timer
Stir
Heat
line ×1
Page 4

Safety instructions
·When operating the magnetic stirrer, please follow the safety instructions, the accident prevention regulations, and pay attention to your
occupational health.
· Notice: Effects of magnetic field should be taken into account(e.g.data storage, cardiac pacemakers...)
· Risk of burns! The heating plate can reach a high temperature of 280 °C when the stirrer is working. Please exercise caution when
touching the outer housing and the heating plate. Pay attention to the residual heat even after the instrument is shut down.
!
· Ensure that the power cord does not make contact with the heating plate.
· Wear appropriate protective equipments when operating.
!
Otherwise there may have risks from:
- Splashing of medium
- Ejection of stirrer bar
- Release of toxic or flammable gases
·Place the instrument on a stable, clean, anti-slip, dry and fireproof surface.
·Ensure the base of instrument is clean and intact.
·Check and ensure the instrument and accessories remain intact before each use. Do not use damaged components.
·Slowdown the speed if
- The medium splashes out of container in high speed
- The container shifts on the plate
· Beware of hazards due to:
!
- Flammable materials
- Low-boiling flammable medium
- Improper container size
- - Overflows of the medium
The container is in an unsafe condition
• The instrument may be heated up under normal use.
• The medium in the container can still be heated up due to high speeds rotation of the magnetic stirrer bar, even if the heating function is
not on.
• Process pathogenic materials only in airtight container within a suitable fume hood.
Do not operate the instrument in explosive atmospheres, with hazardous substances or under water.
•
!
21211
Page 5
Safety instructions
• Only use medium that will not react dangerously with the energy generated through processing or through other ways e.g. light irradiation.
• Safe operation is only guaranteed with the accessories described in the ‘Optional accessories’ section.
• Please use the accessories listed on the manual in accordance with the operating instructions.
• Ensure that the external temperature sensor is immersed in the medium when connected to thermometer(Pt1000s).
• Accessories must be securely installed and firmly attached to the instrument and the centre of gravity of the assembly must lie within the
surface on which it is set up.
• Always disconnect power before installing accessories.
• The instrument can only be disconnected from the power supply by pulling out the power plug.
• Caution: Do not spill corrosive liquids on the instrument! Do not use the instrument under water!
!
• Caution: High voltage!The appliance should be opened only by professionally trained maintenance and repair personnel.
!
• The mains voltage must be in accordance with the voltage marked on the nameplate
• Unplug the instrument from the electric outlet if it will be unused for a long period of time.
• Do not cover the device with cloth or plastic film, or the instrument will be overheat.
• Keep the instrument and accessories from pressing and colliding.
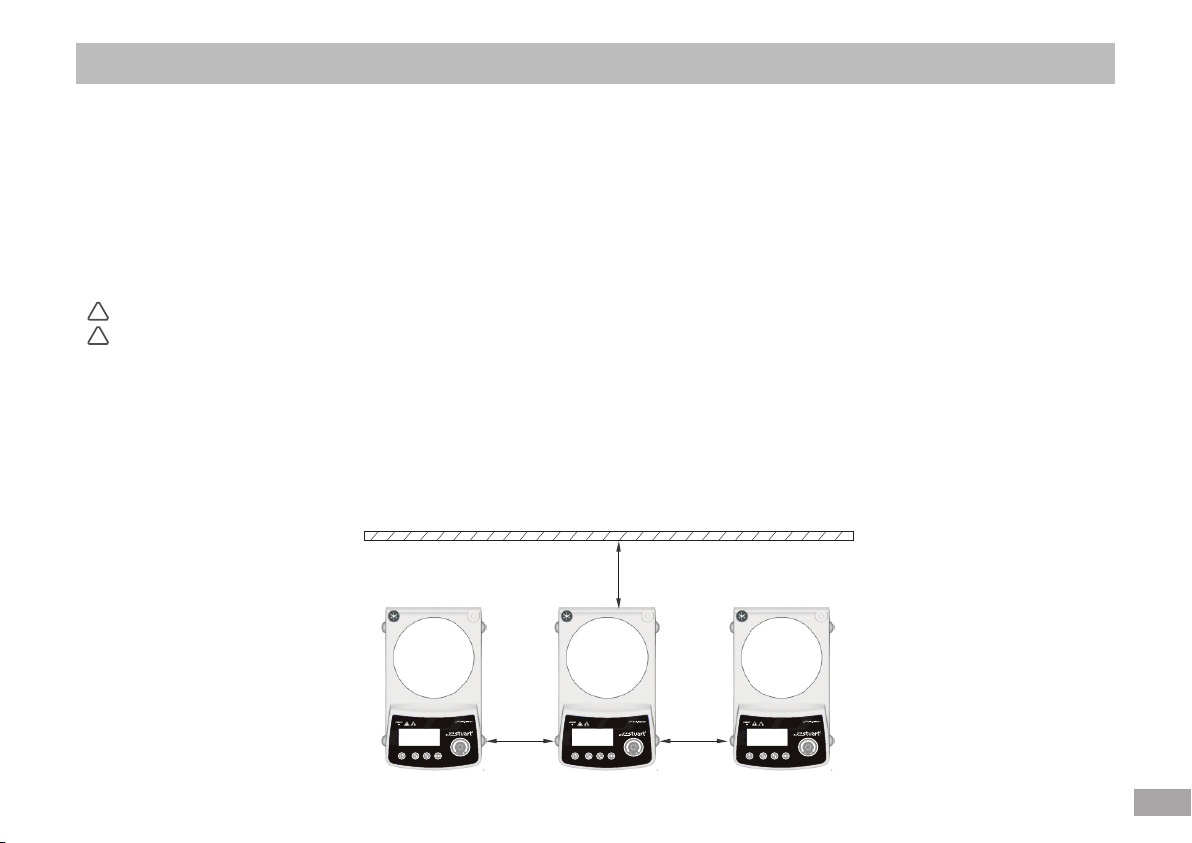
• The minimum distance between the instrument and above should be 800mm.
• Ensure the distance between the instruments and the distances between the
instrument and the surrounding walls is at lease 100mm.
>10 0mm
>10 0mm >10 0mm
2
Page 6

Maintenance and cleaning
• Keep the surface of the plate clean and intact.
• Unplug the power line before cleaning.
• Minimize exposure to moisture when cleaning instrument.
• Wear protective gloves when cleaning.
• We only recommend using the cleaning methods listed below, using alternate cleaning methods may cause damage to the instrument.
Suggested cleaning methods:
Dyes------------------------Isopropyl alcohol
Construction materials------Water containing active agent / isopropyl alcohol
Cosmetics-------------------Water containing active agent / isopropyl alcohol
Foodstuffs ------------------Water containing active agent
Fuels------------------------Water containing active agent
Warranty
• This instrument is warranted for a period of 24 months from the date of invoice. For claims under the warranty please contact Cole Parmer . After receiving confirmation from our warranty department, you will be liable for freight costs.
• The warranty does not cover normal wear and tear of parts or accessories, nor does it apply to improper use, abnormal operation or
insufficient maintenance which is not in accordance with the instructions in this user manual.
• Make sure the instrument is clean and free from any materials that may harm people before sending for repair.
• Please send the instrument back to Cole-Parmer in its original packaging. If you couldn’t find the original packaging, ensure to use
suitable packaging to protect the instrument during transportation.
21213
Page 7
Support rod installation
Model:
04661-43
04661-44
04661-39
04661-40
04661-45
04661-46
04661-41
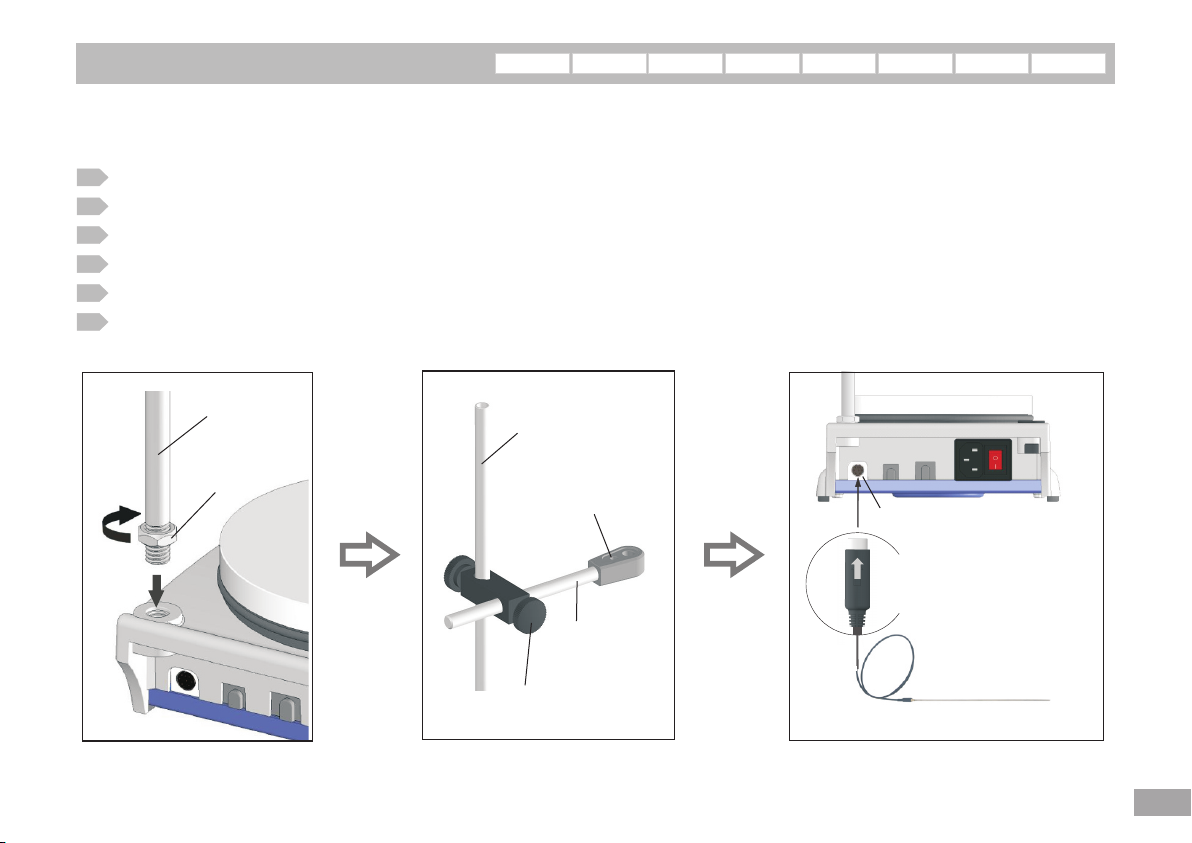
If using external temperature sensor to measure temperature of the medium, please install support rod, horizontal head
clamp, horizontal holding rod and external temperature sensor.
1
Remove the white protective cap of the tapped hole
2
Remove the protective cap from support rod
3
Screw the support rod into the tapped hole, until the end stop is reached
4
Using a wrench to tighten the nut on the support rod
Install horizontal head clamp and horizontal holding rod as illustrated
5
Install external temperature sensor
6
04661-42
Support rod
Screw nut
Support rod
Pt1000s Slotted hole
Horizontal
holding rod
Horizontal head clamp
Sensor interf ace
Attentio n!
When plug in the sensor, make
sure the arro w poi nt up ward.
Pt1000s temperature sensor
4
Page 8
Switching on
Model:
04661-43
04661-44
04661-39
04661-40
04661-45
04661-46
04661-41
04661-42
Preparation before start up
C
heck that the power voltage is in accordance with the voltage marked on the nameplate and the electric outlet is well grounded.
1
The instrument may be damaged and there may be security problem if someone does not strictly follow the above instruction. The
instrument should be operated under appropriate temperature and humidity according to the technical parameters in this manual.
2
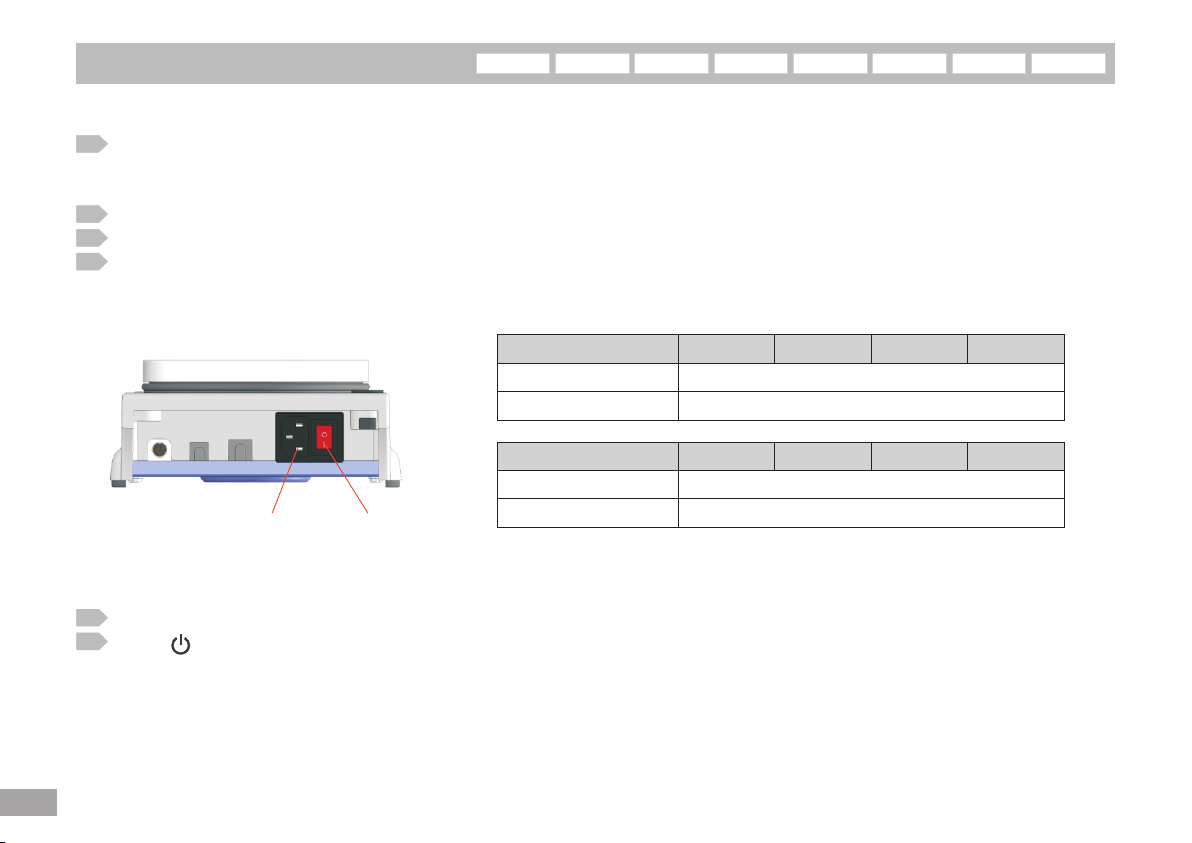
Set the power switch on the back of the device to the “O” (Power off) position.
3
Connect the power line.
4
If using external temperature sensor to measure temperature of the medium, please plug the sensor connector into the sensor
interface on the back of the instrument.
21215
Power soc ket
Power swi tch
Mode
Supply voltage
Power frequency
Mode
Supply voltage
Power frequency
04661-39
04661-43
04661-44
04661-40
115V±10%
~50/60Hz
220V±10%
~50/60Hz
04661-45
04661-46
04661-41
04661-42
Switching on
1
Set the power switch to the “ | ” (Power on) position and the “Standby” indicator will be lit and the system enters into standby status.
2
Press (power on / off) to activate the instrument, and then the standby indicator will go off.
Page 9
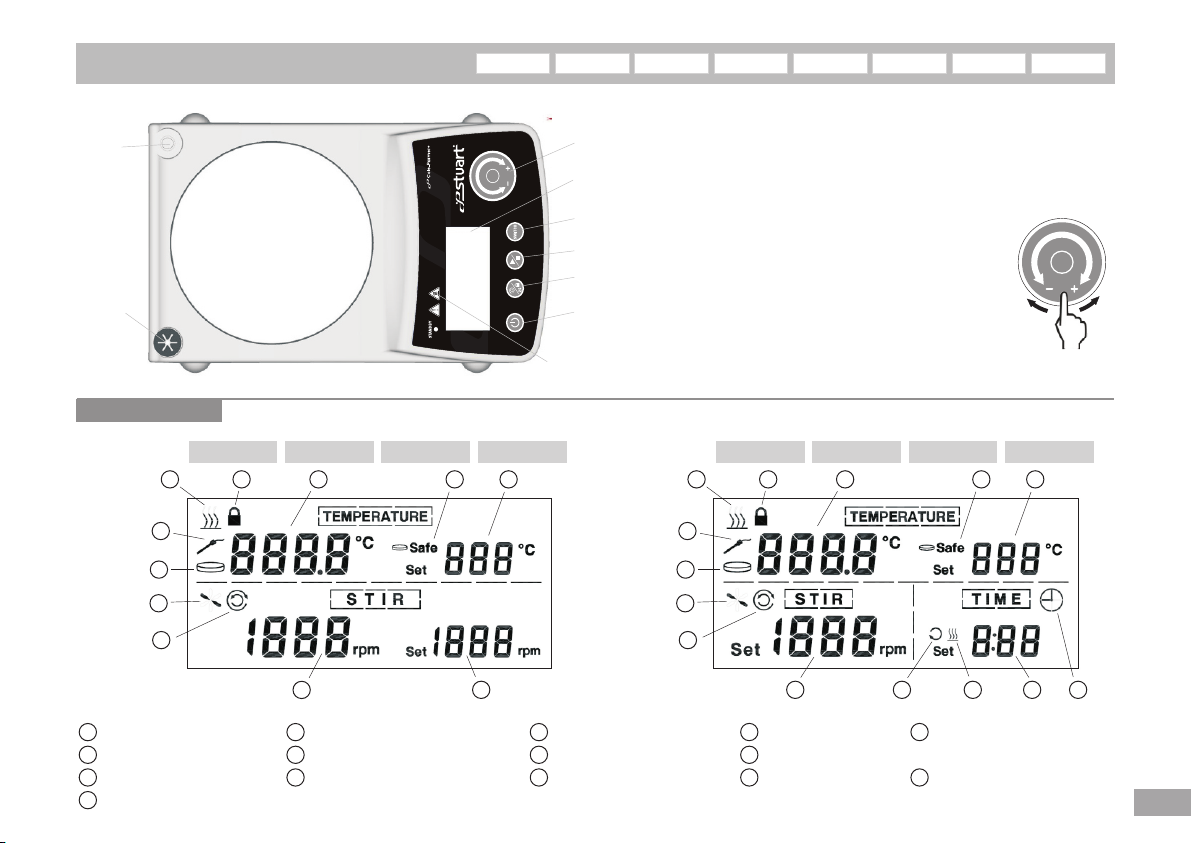
Plate overview
Model:
04661-43
04661-44
04661-39
04661-40
04661-45
04661-46
04661-41
04661-42
Rod tapped hole
Stirring bar
Storage socket
LCD dis pla y
Model:
04661-39
5 1
6
7
8
9
Item De sig nation
Setting temperature
6
External sensor icon
10
Real-time stirring speed
15
Timing icon(Dynamical)
Touch wheel
LCD display
Switch
Start / Stop
Function key
Power on/off
Hot warning indicator
04661-40
34
10
Plate safety temperature icon Real-time temperature
7
Heating plate icon
11
Stir setting speed
04661-41
2
04661-42
11
321
8
12
Stirring icon(Dynamical)
Stir timing icon
How to use the touch wheel
Touch and move your finger around the “Touch wheel”
clockwise+ / counterclockwise- (follow the direction of
the arrow) to adjust the setting of different configuration
with the adjustable increment. The faster
the movement of the finger the larger
the adjustment of the setting parameter
and vice versa so that one can rapidly
adjust to the desired configuration zone
and then slow down the finger movement
to accurate position.
Model:
5 1
6
7
8
9
04661-43
11
4
Key-lock icon
9
Reversible/Int ermittent mode icon
13
Heat timing icon
04661-44
34
04661-45
12
5
Heating icon(Dynamical)
14
Timer setting time
2
13
04661-46
14 15
6
Page 10

Setting safety temperature
Notice! If using an external temperature sensor (Pt1000s) to measure the temperature of the liquid medium, user must connect the
!
Model:
04661-45
04661-46
04661-41
04661-42
external temperature sensor and probe into the liquid medium before activating the heating function. Do not remove the external
temperature sensor during the heating, otherwise the internal components will be damaged.
Do not set the safety temperature higher than the ignition point of the medium used. The safety temperature should be set at least
!
25 degrees lower than the ignition point of the medium.
1
Press (Power on/off) until standby indicator goes off and the system enters into setting operation status. The LCD screen will be
lightened and (Plate safety temperature icon) will flash showing that the system is now in the setting area of plate safety
temperature;
2
When the safety temperature setting is switched on, then touch and move your
finger around the “Touch wheel” (clockwise+ / counterclockwise-) to adjust the
setting data of safety heating temperature with the adjustable increment of 1°C,
and total adjustable range is . After setting the safety temperature,
50°C ~360°C
the heated top plate temperature will not exceed the setting safety temperature
to keep the liquid medium from damage;
3
After the safety temperature is finished, press (Start/Stop) or “Switch” key to record and save the safety temperature
setting and system will automatically switch to heating temperature setting area;
If the safety temperature is not been set in 15 second, the indicator on the LCD screen will be deemed to be the safety heating
temperature and the system will automatically switch to heating temperature setting area;
The safety temperature can only be set right after pressing button, and cannot be set again during operation. Once the safety
heating temperature is set, it cannot be adjusted again until next start up.
Notice
The setting of plate safety temperature is to make sure the sample liquid will not be damaged. However if the initial plate
!
temperature is too low, it will slow down the heating speed, therefore, if the plate temperature, considering the sample liquid ,
is allowed to be set higher than the safety temperature, please set the plate to the highest safety temperature 360°C, it will
help to accelerate the heating speed.
21217
Page 11

Setting heating temperature
Model:
04661-43
04661-44
04661-39
04661-40
04661-45
04661-46
04661-41
Start heating
Press “Switch” key until the “Set” indicator on the temperature setting section flashes and the system will enter into heating
1
temperature setting status;
When the heating temperature setting is switched on, then touch and move your finger around the “Touch wheel”
2
(clockwise+ / counterclockwise-) to adjust the heating temperature with the adjustable increment of 1°C;
Model
Plate temperature setting range
Sensor temperature setting range
3
Press (Start/Stop) to start stirring after temperature setting, and the heating indicator will be shown on. When the
temperature of the hotplate is higher than 50°C, the hot top alter indicator will be on;
Notice: 1. When setting the heating temperature, the “heating temperature” must be 10°C less than the “Plate safety temperature”
04661-45
Room temperature - 340°C
Room temperature - 320°C
04661-46
04661-41
2. When (Start/Stop) is pressed and the set temperature is lower than the temperature
the system will not perform the heating operation.
temperature sensor,
04661-42
04661-43
04661-44
Room temperature - 260°C
Room temperature - 160°C
04661-39
actual measured by the
3. Do not heating the hotplate without Liquid in the container.
4
During the heating, user can repeat the above 1, 2 steps to alter the temperature setting.
Stop heating
To stop heating, press “Switch” key until the “Set” indicator on the heating setting section flashes and the system entering into stirring
speed setting status, then press (Start/Stop) to stop heating and the heating indicator will disappear.
Risk of burns!
°
the “Hot warning indicator” will not stop flashing until the temperature of the hotplate is lower than 50 C
When the temperature of the hotplate is higher than 50 C even after the device is shut down,
!
°
04661-42
04661-40
8
Page 12

Setting stirring speed
Start stirring
Press “Switch” key until the “Set”
1
indicator on the stir setting section
flashes and the system will enter into
stirring speed setting status;
22
When the stirring speed setting is
switched on, then touch and move
your finger around the “Touch wheel”
(clockwise + / counterclockwise - )
to adjust the stirring speed;
3
Press (Start/Stop) to start stirring, and the stir indicator will be shown on and rotate;
Model:
04661-43
04661-44
Model:
04661-45
04661-45
04661-45
04661-43
04661-44
04661-46
04661-46
04661-46
04661-39
100 - 1800RPM
10RPM
04661-41
04661-41
Model:
Rotation speed range
04661-42
Speed adjustable increment
04661-42
04661-40
04661-43
04661-43
04661-39
04661-45
04661-46
04661-40
04661-44
04661-39
100 - 1600RPM
04661-44
04661-39
20RPM
04661-41
04661-41
04661-42
04661-42
04661-40
04661-40
4
During the stirring, user can repeat the above 1, 2 steps to alter the speed setting.
Stop stirring
To stop stirring, press “Switch” key until the “Set” indicator on the stir setting section flashes and the system entering into stirring
speed setting status, then press (Start/Stop) to stop stirring and the stir indicator will disappear.
21219
Page 13

Reversible / Intermittent stirring function
Activate / inactivate reversible stirring function / intermittent
04661-45
Activate
When the stirring function is switched on, one can press the (function key) to activate the reverse stirring mode, and the
Reverseible st irrin g function
04661-46
04661-41
04661-42
2S
04661-43
Intermittent s tirri ng function
04661-44
04661-39
04661-40
Reverse / Intermittent stirring mode indicator will be shown on. The stir bar will reverse stirring direction every 45 seconds
with a 5 second break before every change.
Inactivate
When the reverse stirring mode is active, press to turn off reverse stirring function, and the Reverse / Intermittent stirring
mode indicator will be off.
Model:
04661-43
04661-44
04661-45
2S
04661-46
Model:
04661-39
04661-40
04661-41
04661-42
10
Page 14

Setting the timer( )3 timing function
Model:
04661-43
04661-44
04661-45
04661-46
Enable the timer
Notice: The timer can only be enabled when heating or stirring function is activated
1
Press “Switch” key until the “Set” indicator on the timer setting section flashes and the system will enter into timing function setting
status;
2
When in timing function setting status, user can touch and move finger on the “Touch wheel” to adjust the timing with the adjustable
increment of 5 minutes and the time range of 0 - 9 hours;
3
When finished setting, press (Start/Stop) to start countdown with the timer indicator shown on the LCD screen.
If there is only heating function activated
before user sets the timer, user can press
(Start/Stop) to active heating timer,
the timer indicator and the heating
indicator will be shown on the LCD
screen simultaneously, and the device goes
on heating until the timer countdown
finishes.
TI ME
Set
Disable the timer
If user wants disable the timer, user can press “Switch” key until the “Set” indicator on the timer setting section flashes and the system
will enter into timing function setting status;Press (Start/Stop) to stop countdown with the timer indicator disappear from
Timing heating function
Timing stirring function
If there is only stirring function activated
before user sets the timer, user can press
(Start/Stop) to active stirring timer,
the timer indicator and the stirring
indicator will be shown on the LCD
screen simultaneously, and the device goes
on stirring until the timer countdown
finishes.
TI ME
Set
the LCD screen.
Timing stirring & heating function
If both s tirring and heating functio ns are
activ ated before user sets the timer, user
can press (S tart/Stop) to a ctive
both st irring and heating timer, the tim er
indicator , the stirring i ndica tor
and the h eatin g indicato r will be
shown o n the LCD screen simultan eously,
and the d evice goes
on stir ring and
heati ng until the
timer c ountdown
finis hes.
TI ME
Set
212111
Page 15

Locking function
Model:
04661-43
04661-44
04661-39
04661-40
04661-45
04661-46
04661-41
04661-42
Activate
Press (Function key) for more than 2 seconds in operation status, as a result,
all the keys on the operation panel will be locked, and the “Lock indicator” will be
shown on the LCD while all keys stop working.
Inactivate
Press (Function key) for more than 2 seconds when the lock function is on,
as a result, the lock function will be off, and the “Lock indicator” will disappear
while all keys start working again.
Switch off and data saving
2S
2S
Model:
04661-43
04661-44
04661-39
04661-40
04661-45
04661-46
04661-41
04661-42
Power off
1
Press (Power on/off) then the device will go on standby and the “Standby” indicator will lit.
2
Set the power switch on the back of the device to the “ ” position, the “Standby” indicator will go out and the device will be turn off.
O
Risk of burns!
°
will not stop flashing until the temperature of the hotplate is lower than 50 C
Notice: Unplug the instrument from the electric outlet before left it unused for a long period of time。
When the temperature of the hotplate is higher than 50 C even after the device is shut down, the “Hot warning indicator”
!
°
Notice:Unplug the instrument from the electric outlet before being left unused for a long period of time。
Auto save function
When using to turn off the instrument, will be saved automatically and the system will automatically restore
the previous settings next time when user restarts the instrument.
the related parameters
12
Page 16

Troubleshooting guide
Model:
04661-43
04661-44
04661-39
04661-40
04661-45
04661-46
Before contacting your supplier in case of an issue, please check below for troubleshooting some common issues.
04661-41
04661-42
Problem
Instruments does not power on
Stir bar bounces irregularly
Stir bar does not rotate
Figures on LCD flash for no reason
or operation key does not function
Possible causes
The power line and the power outlet
is disconnected
The power socket is in poor electrical
contact condition or un-powered
Container is too far from plate center
Mismatch of stir bar specifications and models
Irregularities in the shape of the stir bar and of
the bottom of the container
The material of the container is Fe or Cu
which will be magnetized
If container diameter is same as stir bar length.
When stirring speed is slow, stir bar touches the
container which leads to stop
The power voltage is lower
Solutions
Make sure the power line correctly
connected with the power socket
Replace the power outlet with the one in
good electrical contact condition
Position directly on center of plate
Use stir bar recommended for model
Increase or decrease the speed until the
stir bar begins to rotate evenly
Use glass or 304 stainless steel container
Use a big container or change to shorter
stir bar
Turn off other high power instrument or add
another A.C.stabilized voltage power supply
212113
Page 17

Troubleshooting guide
Model:
04661-43
04661-44
04661-39
Error Code
Error code display on the LCD screen when a malfunction occurs during operation
Code
E 0.0
E 2.1
E 2.2
E 4.0
E 4.1
E 4.2
E16.1
E32.1
E32.2
Cause
Temperature inside
device too high
Heating parts malfunction
Heating circuit malfunction
Motor control circuit malfunction
Motor get stuck
Motor malfunction
Temperature control sensor
malfunction
External temperature sensor is
plugged out during heating process
External temperature sensor
malfunction
Effect
Heating function shutdown
Heating function shutdown
Heating function shutdown.
Motor shutdown.
Heating function shutdown
Heating function shutdown
Heating function shutdown
04661-40
04661-45
04661-46
04661-41
Solution
Turn off the device and wait for it to cool down
Turn off the device
Warning! Only an authorized maintenance
-
and repair personnel can carry out an internal
checking on the heating part
s
Turn off the device
Warning! Only an authorized maintenance
-
and repair personnel can carry out an internal
checking on the motor
Turn off the device
Warning! Only an authorized maintenance
-
and repair personnel can carry out an internal
checking on the temperature sensor
Turn off the device and restart it
Replace the malfunctioned Pt1000 Temperature
sensor or the external contact temperature sensor
04661-42
14
Page 18

Troubleshooting guide
Model:
04661-45
04661-46
04661-41
04661-42
Code
E 8.0
E16.2
E16.3
E16.4
E64.0
Cause
Safety temperature
circuit malfunction
Temperature safety
sensor malfunction
Difference between temperature of
safety sensor and temperature of
control sensor is larger than 20 C
when not heated
Difference between temperature of
safety sensor and temperature of
control sensor is larger than 20 C
when heated
Surface temperature of the base
plate is higher than the set safe
temperature
°
°
Example of LCD screen displays Error code
Effect
Heating function shutdown
Heating function shutdown
Heating function shutdown
Solution
Turn off the device
-Warning! Only an authorized maintenance and
repair personnel can carry out an internal checking
on the safety temperature circuit
Turn off the device
-Warning! Only an authorized maintenance and
repair personnel can carry out an internal checking
on the temperature sensor
Switch off device until the surface temperature of the
base plate is lower than the selected safe temperature
limit
212115
Page 19

Technical data
Model
Maximum stirring quantity(H2O)
Motor output
Rotation Speed range
Stirring function
Heating power output
Heating temperature increases speed(1L H2O)
Safety temperature setting range
Plate temperature setting range
Sensor temperature setting range
Plate temperature control accuracy
External temperature sensor(Pt1000) accuracy
Timer
Display
Stirring bar length range
Heating Plate Material
Heating Plate Size
Dimensions (W x D x H)
Weight
Power input
Permissible ambient temperature
Permissible relative moisture
Storage temperature
IP protection class (DIN EN 60529)
04661-45
Reversible stirring function: 45 seconds
Room temperature - 340°C
Room temperature - 320°C
0 - 9 hours
04661-46
20L
5W
100 - 1800RPM
600W
6.5°C/min
50 - 360°C
20 - 80mm
2.3kg
630W
04661-41
Aluminum alloy ceramic coating
5 - 40 °C (In operation)
04661-42
175 x 270 x 76mm
-10 - 70 °C
04661-43
±5°C
±1°C
LCD
O 135mm
80%
IP 42
04661-44
Intermittent mode: 45 seconds
Room temperature - 260°C
Room temperature - 160°C
0 - 9 hours
04661-39
5L
3W
100 - 1600RPM
300W
3.5°C/min
20 - 50mm
1.8kg
320W
04661-40
16
Page 20

Page 21

User manual
Magnetic Stirrer
04661- 29
04661- 30
Stirr
Timer
Page 22

Switching on
Preparation before start up
1
C
heck that the power voltage is in accordance with the voltage marked on the nameplate and the electric outlet is well grounded.
The instrument may be damaged and there may be security problem if someone does not strictly follow the above instruction. The
instrument should be operated under appropriate temperature and humidity according to the technical parameters in this manual.
2
Set the power switch on the back of the device to the “O” (Power off) position.
3
Connect the power line.
Mode
Power voltage
Power frequency
Power soc ket
Switching on
1
Set the power switch to the “ | ” (Power on) position and the “Standby” indicator will be lit and the system enters into standby status.
2
Press (Power on / off) to activate the instrument, and then the standby indicator will go off.
Power swi tch
115V±10%
212117
04661-29
~50/60Hz
04661-30
220V±10%
Page 23

Plate overview
Stirring b ar Storage socket
LCD dis pla y
5
3
4
1 2
Touch wheel
LCD disp lay
Switch
Start / Stop
Function k ey
Power on/off
How to use the touch wheel
Touch and move your finger around the “Touch wheel”
clockwise+ / counterclockwise- (follow the direction of
the arrow) to adjust the setting of different configuration
with the adjustable increment. The faster
the movement of the finger the larger
the adjustment of the setting parameter
and vice versa so that one can rapidly
adjust to the desired configuration zone
and then slow down the finger movement
to accurate position.
9
8
76
Item Designati on
1
Setting in dicator
2
Stir setti ng speed
3
Stirring i con(Dynamical)
4
Rever sible mode icon
5
Real- time stirring s peed
6
Setting in dicator
7
Timer sett ing time
8
Timing ico n(Dynamical)
9
Timer remaining ti me
18
Page 24

Setting stirring speed and reverse mode
stirring
Start
Press “Switch” key until the “Set” indicator on the stir setting section
1
flashes and the system will enter into stirring speed setting status;
22
When the stirring speed setting is switched on, then touch and
move your finger around the “Touch wheel” (clockwise + /
counterclockwise - ) to adjust the stirring speed
increment of 10rpm and total adjustable range is 100 1800RPM
3
Press (Start/Stop) to start stirring, and the stir indicator
will be shown on and rotate;
4
During the stirring, user can repeat the above 1, 2 steps to alter the
speed setting.
Notice: The liquid will rotate to generate resistance stirring and fluctuation, the motor speed will also change. The actual speed display
error ±3% and set the speed, this is the real speed real-time display.
Stop
To stop stirring, press “Switch” key until the “Set” indicator on the stir setting section flashes and the system entering into stirring
speed setting status, then press (Start/Stop) to stop stirring and the stir indicator will disappear.
When the stirring function is switched on,one can press the
(function key) to activate the reverse stirring mode, and the
reverse stirring mode indicator will be shown on. The stir
bar will reverse stirring direction every 45 seconds with 5 second
break before every changing.
I When the reverse stirring mode is active, press to turn off
reverse stirring function, and the reverse stirring mode indicator
will be off.
stirring
Activate / inactivate reversible stirring function
Activate:
nactivate:
with the adjustable
- ;
212119
Page 25

Setting the timer
Enable the timer
1
Press “Switch” key until the “Set” indicator on the timer setting section flashes and the
system will enter into timing function setting status;
2
When in timing function setting status, user can touch and move finger on the “Touch
wheel” to adjust the timing with the adjustable increment of 5 minutes and the time
range of 0 - 9 hours;
3
When finished setting, press (Start/Stop) to start countdown with the timer
indicator shown on the LCD screen. .
The remaining time shows on the LCD
Disable the timer
If user wants to disable the timer, user can press “Switch” key until the “Set” indicator on the timer setting section flashes and the system
will enter into timing function setting status;Press (Start/Stop) to stop countdown with the timer indicator disappear from
the LCD screen.
Switch off and data saving
Power off
1
Press (Power on/off) then the device will go on standby and the “Standby” indicator will lit.
2
Set the power switch on the back of the device to the “ ” position, the “Standby” indicator will go out and the device will be turn
off.
Notice:Unplug the instrument from the electric outlet if being unused for a long period of time.
Auto save function
When using to turn off the instrument, the set speed / set time will be saved automatically and the system will automatically restore
the previous settings next time when user restart the instrument.
O
20
Page 26

Troubleshooting guide
Before contacting your supplier in case of issue, please check below for troubleshooting some common issues.
Problem
Instruments does not power on
Stir bar bounces irregularly
Stir bar does not rotate
Figures on LCD flash for no reason
or operation key does not function
Possible causes
The power line and the power outlet
is disconnected
The power socket is in poor electrical
contact condition or un-powered
Container is too far from plate center
Mismatch of stir bar specifications and models
Irregularities in the shape of the stir bar and of
the bottom of the container
The material of the container is Fe or Cu
which will be magnetized
If container diameter is same as stir bar length.
When stirring speed is slow, stir bar touches the
container which leads to stop
The power voltage is lower
Solutions
Make sure the power line correctly
connected with the power socket
Replace the power outlet with the one in
good electrical contact condition
Position directly on center of plate
Use stir bar recommended for model
Increase or decrease the speed until the
stir bar begins to rotate evenly
Use glass or 304 stainless steel container
Use a big container or change to shorter
stir bar
Turn off other high power instrument or add
another A.C.stabilized voltage power supply
212121
Page 27

Technical data
Model
Maximum stirring quantity(H2O)
Motor output
Rotation Speed range
Reverse of rotation direction
Timer
Display
Stirring bar length range
Heating Plate Material
Heating Plate Size
Dimensions (W x D x H)
Weight
Power input
Permissible ambient temperature
Permissible relative moisture
Storage temperature
IP protection class (DIN EN 60529)
04661-29
20L
5W
100 - 1800RPM
45 seconds
0 - 9 huors
LCD
20 - 80mm
Aluminum alloy ceramic coating
5 - 40 C (In operation)
O 135mm
175 x 270 x 76mm
2kg
30W
°
80%
-10 - 70 C
IP 42
°
04661-30
22
Page 28

Toll-Free: 1-800-323-4340
Phone: 1-847-549-7600
Fax: 1-847-247-2929
Coleparmer . com
 Loading...