

Coleman ELITE 17'X9', SCREENED WEATHERMASTER ELITE 2000000146 Instructions Manual

SCREENED WEATHERMASTER®ELITE 17'X9'
1
Layout & Positioning of Tent
– Layout and position tent with screen room
facing desired direction. (illus. 1)
– Stake down tent, starting with the corners.
Do not stretch too tight. Angle the stakes
slightly toward the tent. (illus. 2)
Keep the floor taut.
– Stake down the remainder
of the stake loops.
– Unzip the door.
2
Assemble & Place Roof Poles
– Assemble all shock-corded
roof poles. When assembled will
form a continuous arch with both
ends pointing down. (illus. 3)
– Select center curved roof poles,
and insert through the two center
roof sleeves and the front screen
room roof sleeve all with grey
webbing on sleeve ends. (illus. 4)
– Select rear roof pole, (orange
sticker), and insert through the roof
sleeve with orange webbing sleeve
end at rear of the tent. (illus. 4)
When You Are Ready
To Set Up Your Tent
– Select a level campsite
clear of rocks, branches
and other hard or sharp
objects.
– Do not set up your tent
under trees.
– For best results in windy
conditions, position the
end of tent into the wind.
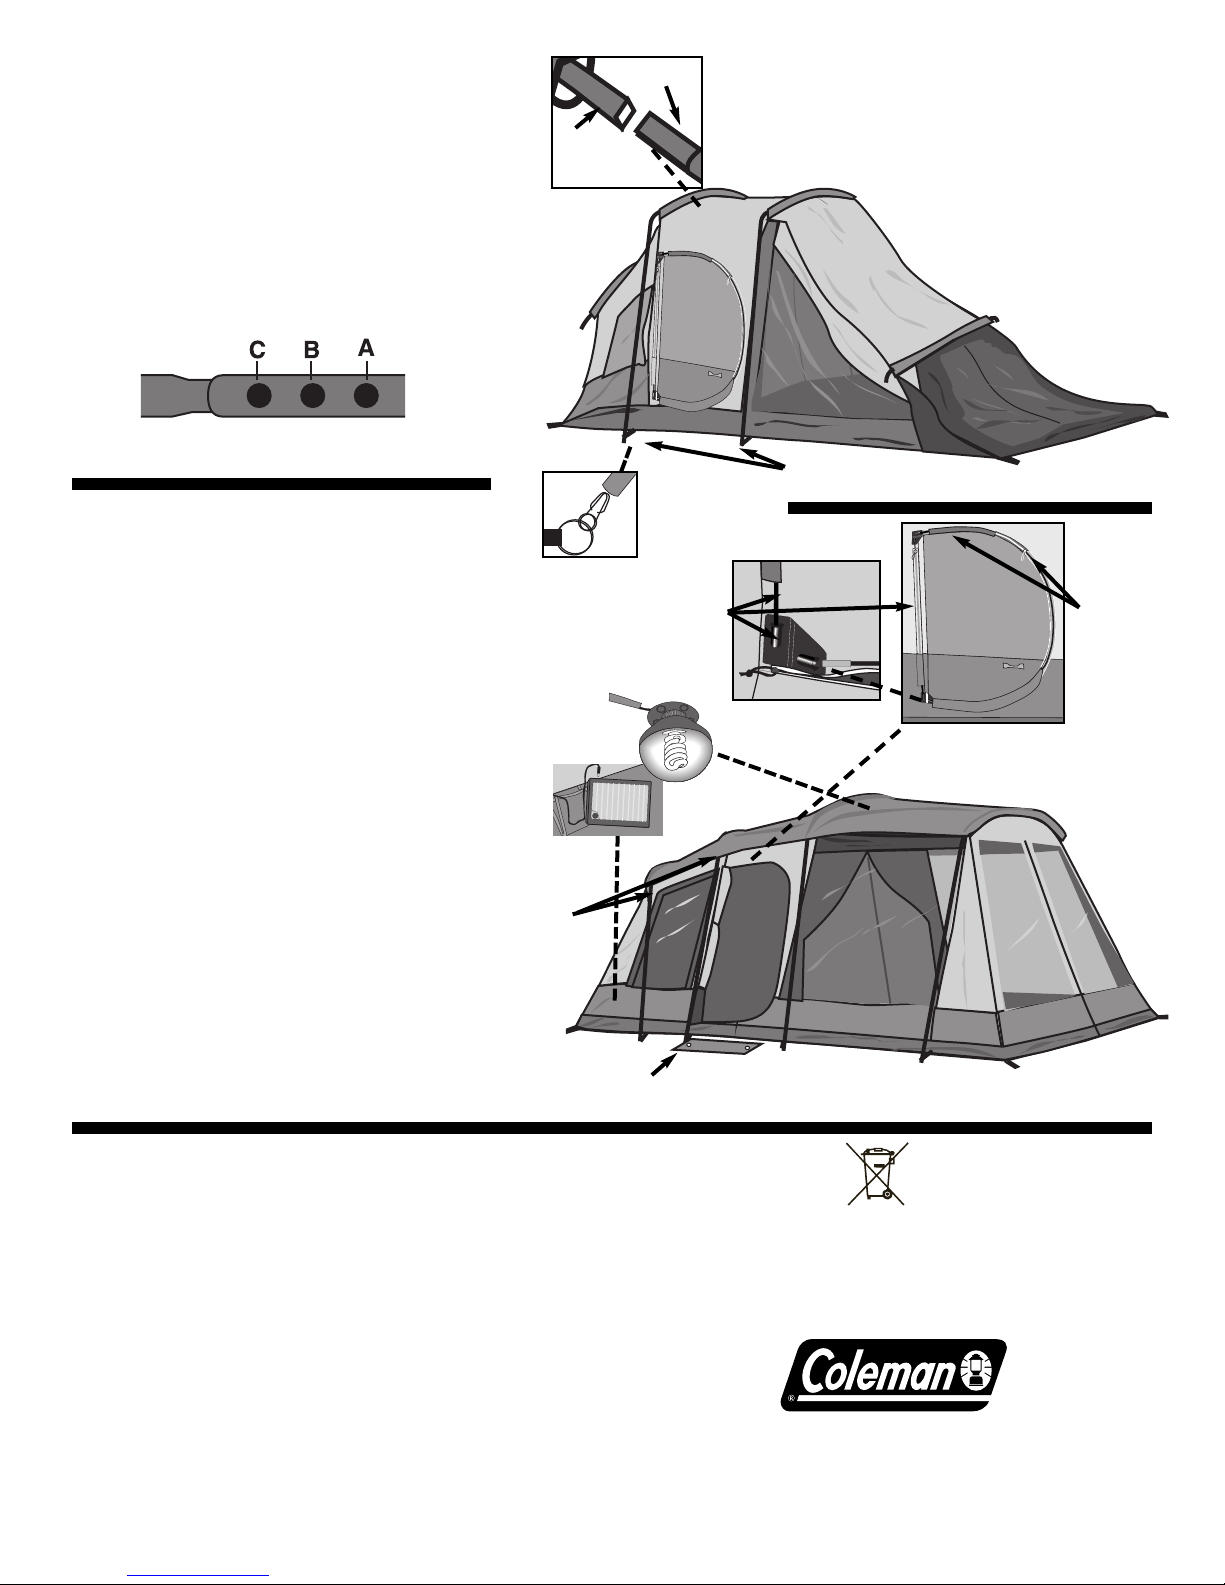
(3) Center Curved Roof Poles
Part No.
5010000474
(1) Rear Pole
(Orange Sticker) Part No.
5010000475
(6) Center Upright Poles
Part No.
5010000477
(1) Vertical Hinge Door Pole (short with
plastic tips) Part No.
5010000479
(1) Hinge Door Pole (long with
plastic tips) Part No.
5010000480
(2) Rear Brace Poles
(Orange Sticker) Part No.
5010000476
Rainfly Part No.
5010000478
Instructions apply to Part Number 2000000146
illus. 3 Curved roof pole assembly.
illus. 4 Curved roof pole system shown
inserted through pole sleeve.
illus. 2
Stake loops
properly staked
Front of
screen
door
Roof sleeve
illus. 1
Roof pole sleeve
Shock-corded poles
Forms an arch
POLE ASSEMBLY PARTS
Color coded
webbing
Color coded
webbing
3
Raise Center of Tent
– Assemble center shock-corded brace poles
(longer poles).
Pole should be initially adjusted to the inner
most hole “A”. (illus. 7)
– Insert square end of brace poles into curved
roof poles and raise tent upright. (illus. 5, 6, 7)
– Brace poles should attach to squeeze
pins at bottom of tent. (illus 8)
– Repeat for brace poles at front of screen area.
illus. 5
Shown with both center brace poles
in position and curved poles
through center pole
sleeves.
Center brace poles
4
illus. 6 When attaching the brace poles to the
curved poles make sure that the brace poles
naturally point straight down.
illus. 11 Tent shown completely set-up. Note the different
angles of the end brace poles.
Brace pole
Curved
poles in
pole sleeve
illus. 7 Poles should be initially
adjusted to the inner most hole “A”.
illus. 8
Insert squeeze pin
into pole
illus. 9 Hinged Door
Pole Stop
illus. 10 Hinged Door
Stake down doormat
Raise Ends of Tent,
Add Hinged Door
– Assemble end (orange sticker, round ends)
(remaining grey upright pole) shock-corded
brace poles.
– Insert (orange sticker) brace poles into end roof
assemblies. MAKE SURE when attaching brace
poles to curved poles that the bottom of the brace
pole naturally points down and toward the
center of the tent. (illus. 11)
– Brace poles should attach to squeeze pins at
bottom of tent. (illus. 8)
– Adjust poles to accomodate for terrain.
– Drape narrower end of rainfly over tent-wider end
over screen room, covering the center and end
poles sleeves. Attach “S” hooks on rainfly into
holes in brace poles. (illus. 11)
– Assemble and insert (short) Vertical Hinged Door
Pole through vertical sleeve and into pole stop.
Gently apply pressure to insert top end into top
pole stop and zip sleeve closed. (illus. 9, 10)
– Assemble and insert (long) Hinged Door Pole
through curved door sleeve and into pole
top pole stop. Gently apply pressure to insert
bottom end into bottom pole stop and zip
sleeve closed. (illus. 9, 10)
– Add light kit. (see instructions inside light kit)
Long Door
Pole inserts
into sleeve
and pole
stops, then
zips in.
Vertical Door
Pole inserts
into sleeve
and zips in
illus. 10 Light
illus. 11
Charger
Rainfly
hooks to
brace
poles
THE COLEMAN CO., INC.
3600 N. Hydraulic • Wichita, Kansas 67219
1-800-835-3278 • www.coleman.com
MADE IN CHINA
PRINTED IN CHINA REV. 2/08
Things You Should Know
•
Under certain conditions (cold weather, high humidity, etc.) condensation will form on
the inside surfaces of your tent. Condensation is caused by water vapor from your
breath, perspiration, or any wet clothing inside your tent. It is NOT LEAKAGE through the
tent fabric. It can be minimized by removing wet clothing from your tent and by providing
good ventilation through the tent.
•
Never store tent, even for a short period of time, without drying it thoroughly and
brushing off caked dirt. Do not pack stakes or poles inside your tent. Use a separate
storage bag.
•
STAKES SHOULD BE REMOVED BY PULLING ON THE STAKE ITSELF. NEVER
PULL ON THE TENT FABRIC OR TENT STAKE LOOP TO REMOVE STAKE.
•
TENT POLES SHOULD NOT BE LEFT TELESCOPED TOGETHER DURING
STORAGE.
•
Do not leave your tent set-up for weeks at a time, be aware that exposure to the
ultraviolet rays of the sun can seriously damage material and/or cause it to become
discolored.
WARNING: Fluorescent tube(s) contain mercury (Hg)
and must be recycled or disposed of according to local,
state or federal laws. Call (800) 835-3278 or visit
www.coleman.com/recycle/ for recycling instructions
or safe disposal locations.
WARNING: KEEP ALL FLAME AND HEAT SOURCES AWAY FROM THIS
TENT FABRIC. This tent meets the flammability requirements of CPAI-84.
The fabric may burn if left in continuous contact with any flame source.
The application of any foreign substance to the tent fabric may render the
flame-resistant properties ineffective.
 Loading...