

Coleman OUTFITTER 700-L Owner's Manual
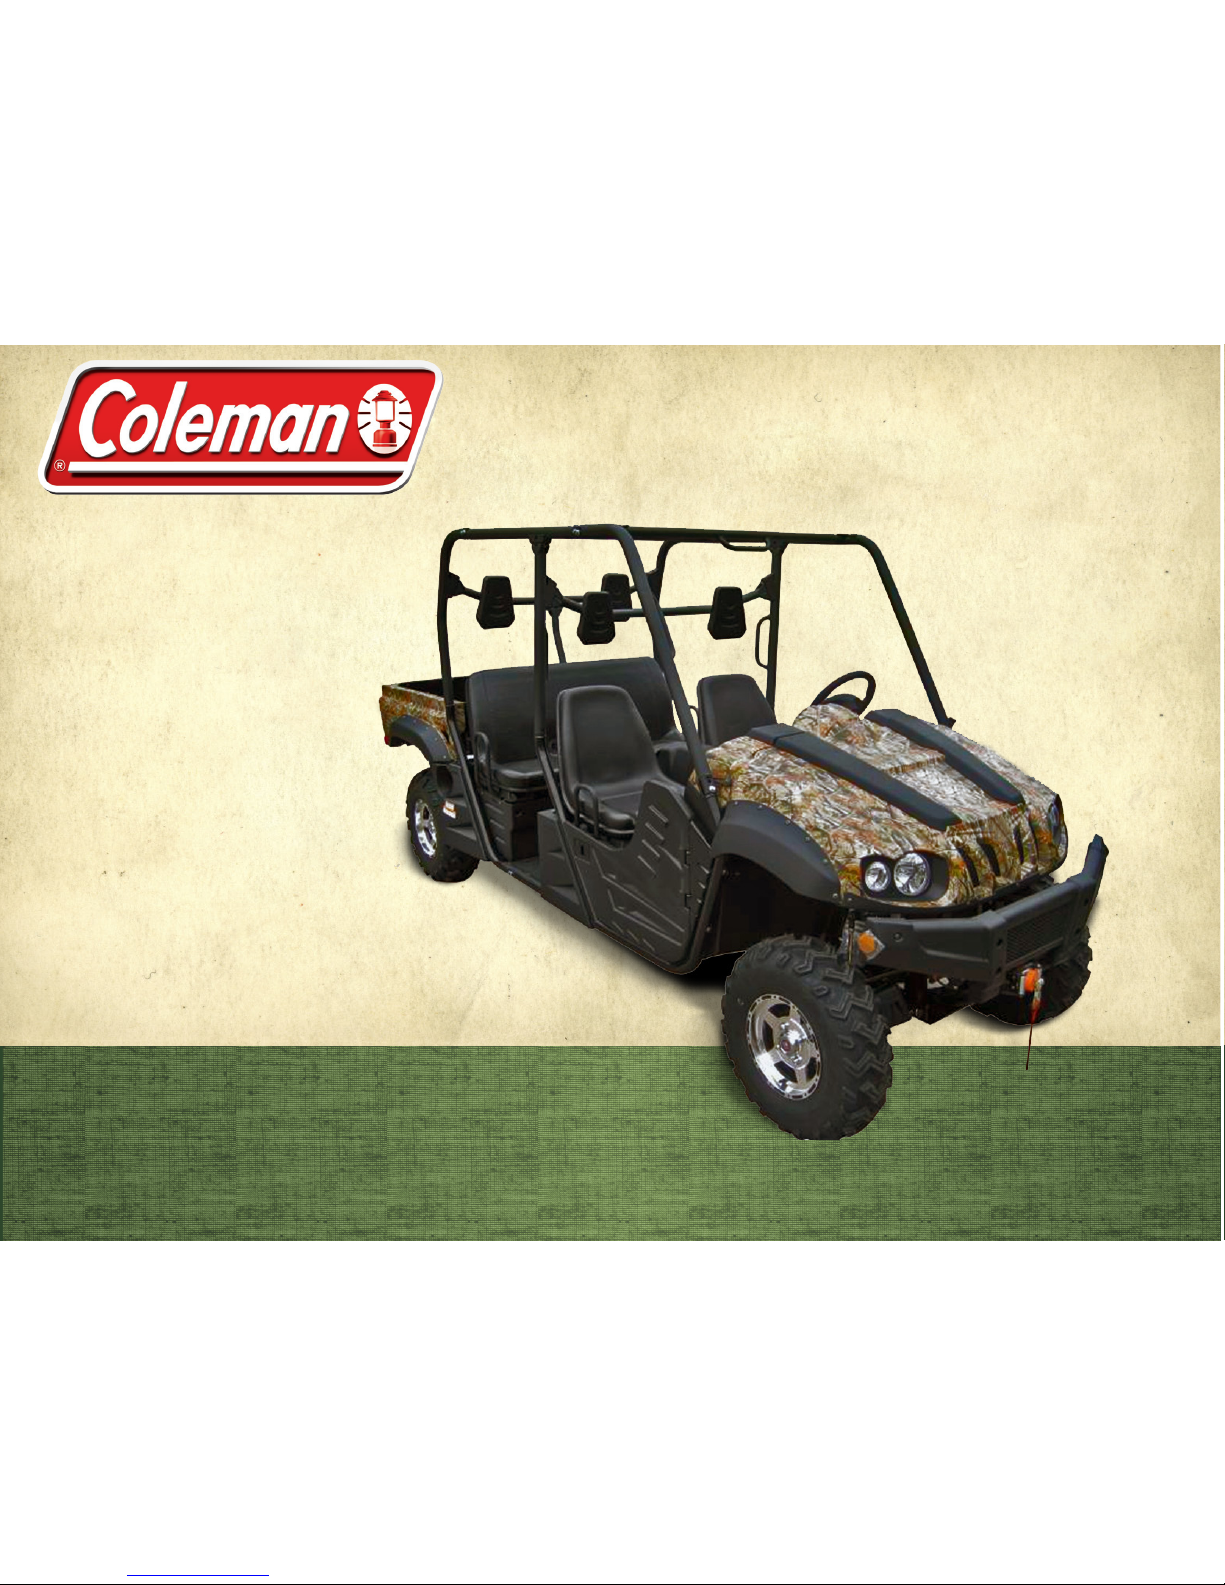
POWERSPORTS
OWNER’S MANUAL
(888)-405-8725 Coleman Powersports
2010 E University Drive , Suite 15, Tempe, AZ. 85281
700-L
No one under the
age of 16 should
operate this UTV
OUTFITTER

Congratulations on your purchase of a Coleman UTV. This Owner’s/Operator’s manual will
provide you information regarding safe operation, operational instructions, maintenance and
care. Fully understanding this manual and following all of the instructions herein will provide the
knowledge needed to have safe and enjoyable UTV operation.
For questions regarding operation and maintenance of this UTV, please call Coleman
Powersports toll free 888 -405-8725
Important Safety Message
No one under the age of 16 should operate this UTV.
A UTV handles differently from other vehicles including motorcycles and cars. A collision or
rollover can occur quickly, even during routine maneuvers such as turning,driving on hills and
over obstacles.
Reading the Owner’s/ Operator’s Manual
It is important this manual is read from cover to cover carefully by the UTV owner and all
operators. Parents should review the manual carefully with their children. Never allow anyone to
operate the UTV without rst reading and understanding the Owner’s/Operator’s manual.
This Owner’s/ Operator’s manual should be a permanent part of the UTV and should
remain with the vehicle at all times. The manual should also remain with the vehicle if sold.
Owner's Manual
IMPORTANT MANUAL INFORMATION
FAILURE TO FOLLOW THE WARNINGS CONTAINED IN THIS MANUAL CAN RESULT IN SERIOUS INJURY
OR DEATH. Particularly important information is distinguished in this manual by the following
notations:
The Safety Alert Symbol means ATTENTION!
YOUR SAFETY IS INVOLVED!
Failure to follow WARNING instructions could result in severe injury or death to
the machine operator, bystander or a person inspecting or repairing the
machine.
A CAUTION indicates special precautions that must be taken to avoid damage
to the machine.
A NOTE provides key information to make procedures easier or clearer.
NOTE:
Owner's Manual

!
WARNING
The rst part will identify a POTENTIAL HAZARD.
The second part will describe WHAT COULD HAPPEN if the
warning or caution is ignored.
The third part will describe HOW TO AVOID THE HAZARD.
CAUTION
or
This manual is based on the latest product information available at the time
of publication. Coleman Powersports has a policy of continually improving its products. Due to
improvements, or other changes, there may be some discrepancies. We reserve the right to make
product changes at any time, without notice and without incurring any obligation to make the
same or similar changes to vehicles previously built or sold.
Coleman Powersports is concerned about the environment and believes in conserving and protecting all natural resources. For this reason , owners should recycle, trade in, or dispose as
appropriate, batteries, oil and tires.

IMPORTANT NOTICE
This UTV is designed and manufactured for OFF - ROAD use only. It is illegal and unsafe to operate this
UTV on any public street, road or highway.
This UTV complies with all applicable OFF - ROAD noise level and spark arrester laws and regulations in
effect at the time of manufacture.
Please check your local riding laws and regulations before operating this UTV.
When the temperature is below -4°F (-20°C), park the UTV in a place where the temperature is higher
than -4°F (-20°C). Start the UTV after the UTV has warmed up. Please see page 6-3 on the warming up
process.
engine; make sure the radiator fan is on for 3 minutes before turning off the power switch.
Starting the UTV for the first time will take longer because the fuel will need reach the fuel
injectors. To start the UTV the first time, hold the ignition key on at 5-second intervals. Allow the
starter to rest 15 seconds between each start attempt.
Owner's Manual
Curve speed must be slower than 19 mph (30km/h).
Follow the proper parking procedures when the temperature is higher than 100°F (38°C): Turn off the

Location of the Warning and
Specification Labels
1-1
Safety Information
2-1
Description and Vehicle
Identification
3-1
Identification Number Records
3-3
Vehicle Identification Number
3-3
Control Functions
4-1
Main Switch
4-1
Indicator and Warning Lights
4-2
Multi-function Meter Unit
4-5
Odometer and Trip Meter Modes
4-6
Clock Mode
4-6
To Set the Clock
4-7
Fault Codes Display of the
Electronic
4-7
Fuel meter
4-7
Switches
4-8
Accelerator Pedal
4-13
Brake Pedal
4-14
Parking Brake Lever
4-15
Drive Select Lever
4-16
Fuel Tank Cap
4-16
Front Seats
4-17
Rear Seats
4-18
Seat Belt For Front Seats
4-19
Seat Belt For Rear Seats
4-19
Glove Compartment
4-22
Cargo Bed
4-22
Opening and Closing the Tailgate
4-23
Lifting and Lowering the Cargo
Bed
4-23
Front and Rear Shock Absorber
Adjustment
4-25
Trailer Hitch Bracket
4-27
Auxiliary DC Jack
4-28
1
2
3
4
Owner's Manual
Coleman Limited Warranty 0-0

Pre Operation Checks
5-1
Brakes
5-2
Brake Pedal
5-2
Brake Fluid Level
5-2
Brake Fluid Leakage
5-3
Brake Operation
5-3
Fuel
5-4
Gasohol
5-4
Engine Oil
5-5
Coolant
5-6
Final Gear Oil
5-7
Differential Gear Oil
5-7
Throttle Pedal
5-8
Throttle Freeplay
5-8
Throttle Freeplay Inspection
5-9
Throttle Freeplay Adjustment
5-9
Steering Wheel Inspection
5-10
Seat Belts
5-10
Fittings and Fasteners
5-10
Lights
5-10
Switches
5-10
Tires
5-11
How to Measure Tire Pressure
5-12
Tire Wear Limit
5-13
Operation
6-1
Starting the Engine in Low
Temperatures
6-1
Starting the Engine
6-2
Warming Up
6-4
Drive Select Lever Operation and
Driving In Reverse
6-4
Parking
6-7
Parking on a Slope
6-8
Vehicle Break-in Period
6-9
Engine Break-In
6-9
Accessories
6-11
Loading
6-12
5
6
Owner's Manual

Driving Your Vehicle
7-1
Getting to Know Your Vehicle
7-1
Learning to Operate Your Vehicle
7-5
Turning your Vehicle
7-6
Braking
7-7
Going Uphill
7-8
Going Downhill
7-10
Crossing Through Shallow Water
7-11
Vehicle Immersion
7-12
Riding Over Rough Terrain
7-15
Riding in Brush or Wooded Areas
7-15
Encountering Obstacles on the
Trail
7-16
Periodic Maintenance and
Adjustment
8-1
Periodic Maintenance Chart for the
Emission Control System
8-3
General Maintenance and
Lubrication Chart
8-4
Hood
8-7
Console
8-8
Engine Oil and Oil Filter Cartridge
8-9
To Check the Engine Oil Level
8-9
To Change the Engine Oil
8-10
Final Gear Oil
8-13
Changing the Final Gear Oil
8-14
Differential Gear Oil
8-16
Changing The Differential Gear Oil
8-16
Coolant
8-18
Axle Boots
8-19
Spark Plug Inspection
8-20
Inspection
8-21
Installation
8-21
Cleaning the Air Filter Elements
8-22
V-belt Cooling Duct Check Hose
8-26
V-belt Case Drain Plug
8-27
Cleaning the Spark Arrester
8-27
7
8
Owner's Manual

Valve Clearance
8-29
Front Brake Pad Check
8-29
Rear Brake Pad Check
8-30
Checking the Brake Fluid Level
8-31
Brake Fluid Replacement
8-32
Checking the Brake Pedal
8-32
Parking Brake Lever Free Play
Adjustment
8-33
Brake Light Switch Adjustment
8-35
Cable Inspection and Lubrication
8-35
Brake Pedal and Accelerator Pedal
Lubrication
8-36
Rear Knuckle Upper and Lower
Pivot Lubrication
8-37
Steering Shaft Lubrication
8-37
Wheel Removal
8-38
Wheel Installation
8-39
Battery
8-40
Battery Maintenance
8-42
Fuse Replacement
8-43
Replacing Headlight Bulb
8-45
Headlight Beam Adjustment
8-48
Tail/brake Light Bulb Replacement
8-48
Troubleshooting
8-50
Solution to Common Problems in
the Vehicle
8-51
Cleaning and Storage
9-1
Cleaning
9-1
Storage
9-3
Specifications
10-1
Faultcode of Electronic Injection
System
11-1
USA EPA Emissions Limited
Warranty
12-1
9
10
11
12
Owner's Manual

This Warranty is NOT the Emissions Control Warranty. Please note this is a general Limited Warranty for this product. It
IS NOT an Emissions Control Warranty. Please see the Emissions Control Warranty in this manual for warranties covering
The Warranty
Coleman Powersports, distributor of Coleman UTV’s, offers the following warranty to the initial purchaser of this new
Coleman product. The initial purchaser is dened as the rst person to purchase a new Coleman UTV from an Authorized
Retailer of Coleman Power Sport products.
What is a Defect?
the date of purchase shown on the sales receipt. During this period of time, Coleman Powersports, will, at its option,
either repair or replace any original Coleman part which is covered by this warranty and is proven to be defective in
workmanship or material.
To qualify for this warranty the part:
1. Must have been purchase from Coleman Powersports or from an authorized Coleman Powersports Retailer.
2. This warranty does not apply to any vehicle which is used in competition or used in a manner not consistent with the
normal and proper intended use for the vehicle. This vehicle is not intended for rental or commercial use.
Who Can Perform Repairs Under this Warranty?
Repairs under this warranty should be performed by an authorized Coleman Powersports retailer or comparable servicing
dealer.
How to get service under this warranty
To get warranty service call Coleman Powersports at 888-405-8725 for the location of your local servicing retailer / dealer.
Please do not return the product to the retailer where the product was purchased unless instructed to do so by Coleman
Powersports. The retailer of this product does not make any warranty of its own and has no authority to implement this
warranty on behalf of Coleman Powersports without the approval of Coleman Powersports. A COPY OF YOUR SALES
RECEIPT IS REQUIRED FOR WARRANTY SERVICE.
Emission components. The Emissions Control Warranty can be found on page 12-1
The limited warranty period for this product is 1 year from the date of purchase shown on the original sales receipt.
The Product is warranted to be free from manufacturing defects in material and workmanship for a period of 1 year from
Coleman Powersports Limited Warranty

What this Warranty Does Not Cover
This warranty does not cover the following
1. Damage due to lack or improper maintenance as described in this manual.
2. Damage which is caused by normal use and not caused by a defect in materials or workmanship.
3. Use of the product which is not consistent with the intended use as described in the operating instructions.
4. Any expendable maintenance item which need replacement or service as part of normal maintenance, unless such
items have defects in material or workmanship which cause failure or premature wear.
5. Any product which has been altered or modied in a manner not consistent with the original design of the product or in
a manner not approved by Coleman Powersports.
6. Tires
7. Damage or failures due to abuse, neglect, or misuse of the product.
Limitations of this Warranty
This warranty does not cover and Coleman Powersports disclaims any responsibility for:
1. Loss of time or loss of use of the product.
2. Transportation costs to and from the authorized center.
3. Other loss or damage to other equipment or personal items.
Length of Implied Warranties
Any implied warranties are limited to the duration set forth in this warranty. Coleman Powersports does not make any
claim as to the merchantability or tness for a particular purpose which would extend longer than the duration of this
written warranty.
Check you State Laws as some State Laws do not allow limitations as to the duration of an implied warranty. Some States
may also not allow limitation or exclusions based on incidental or consequential damages.
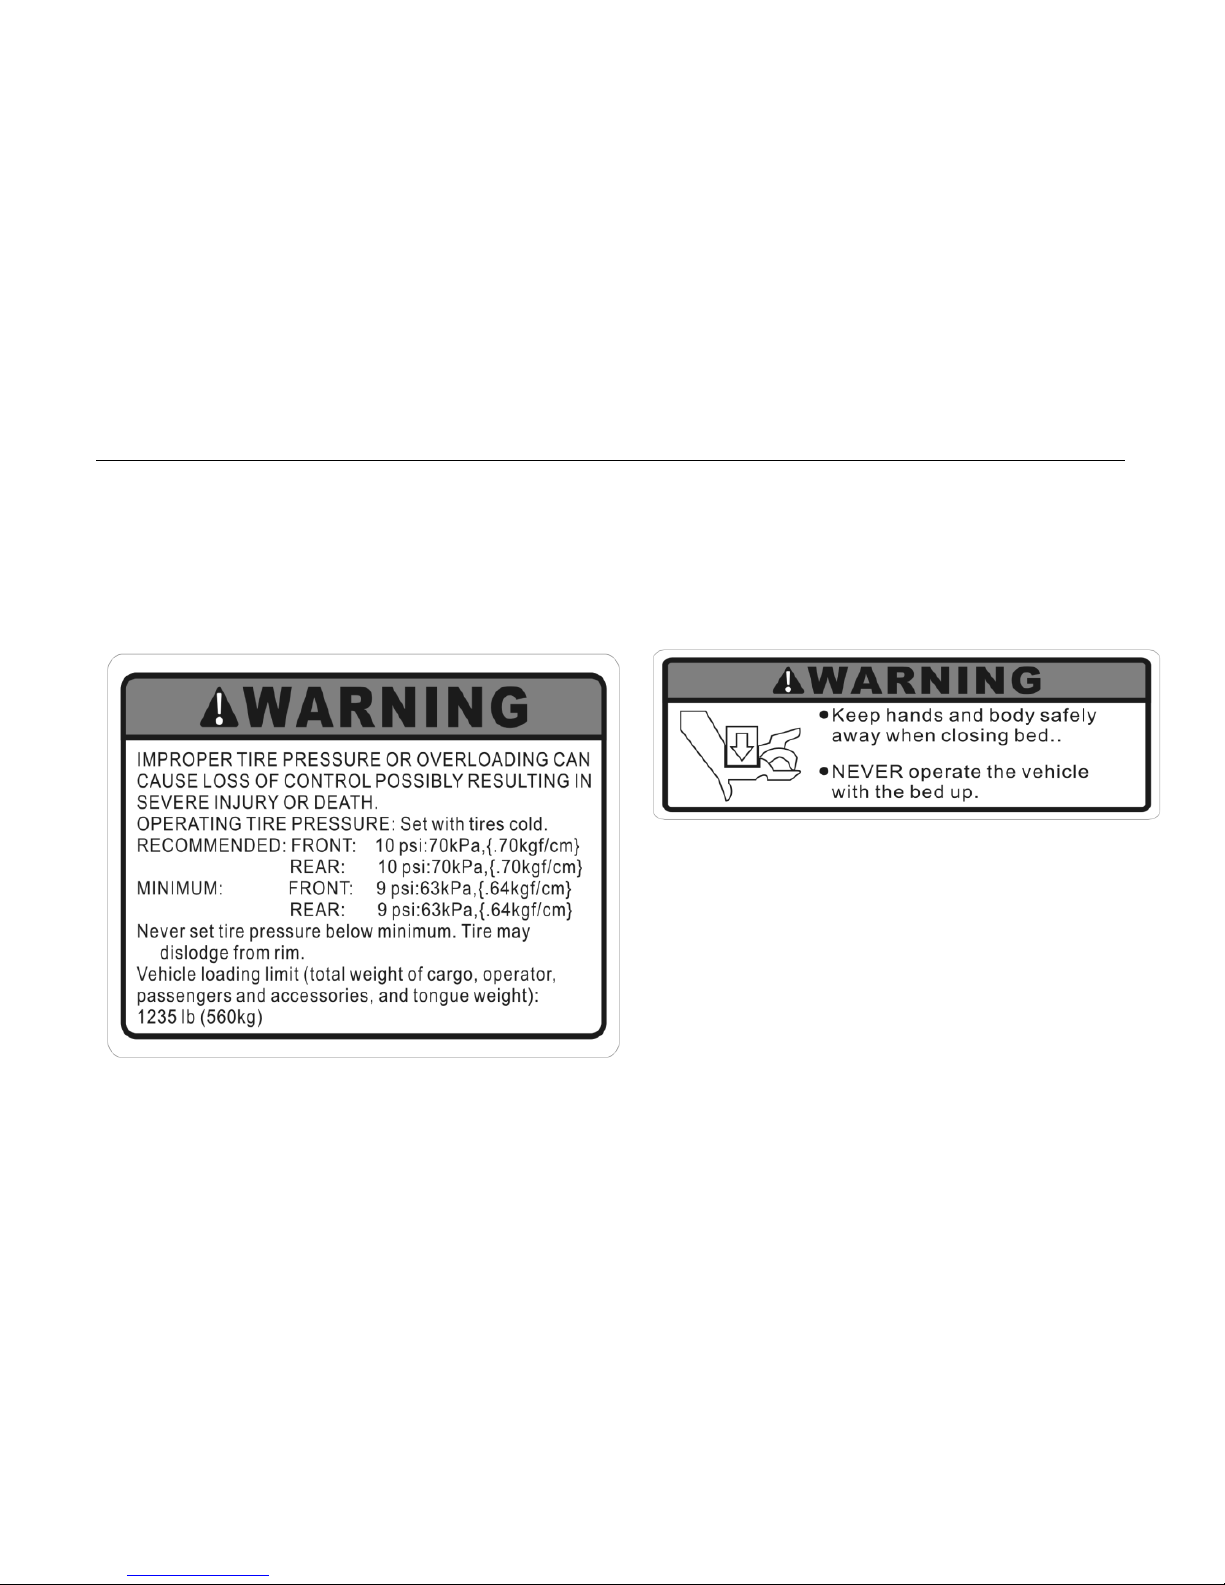
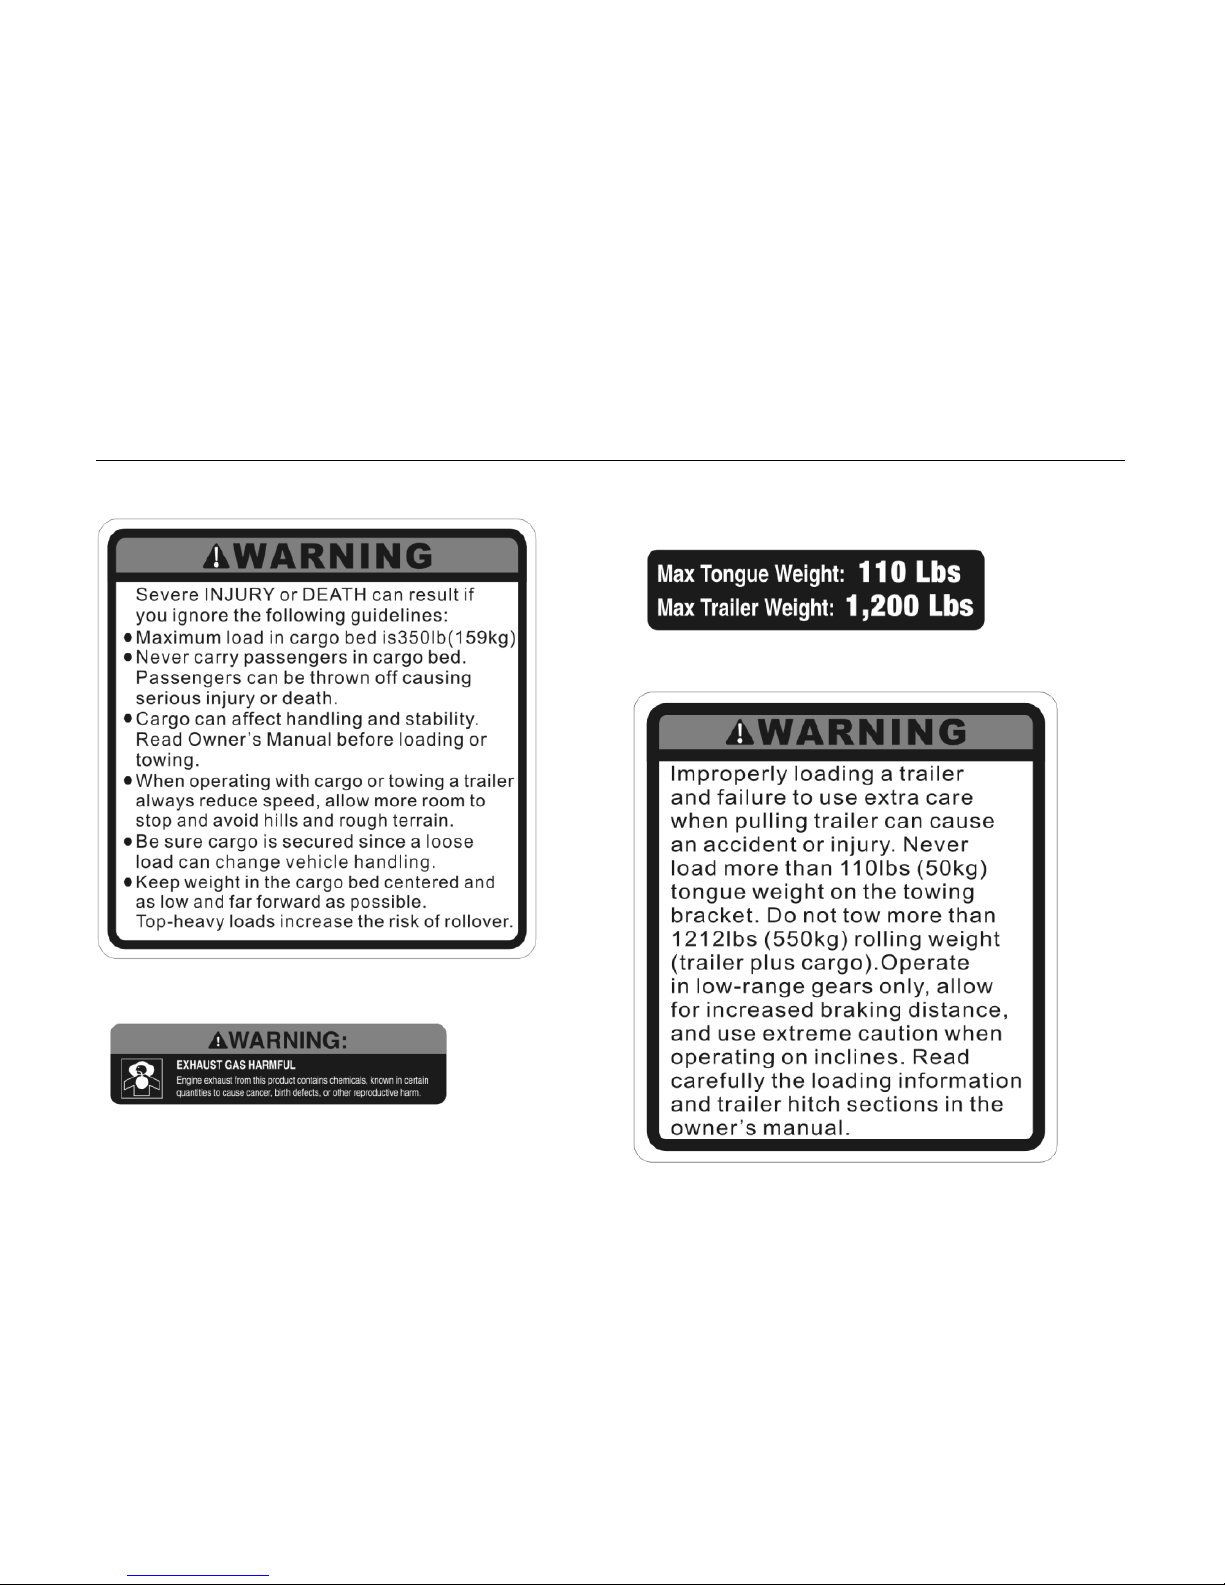
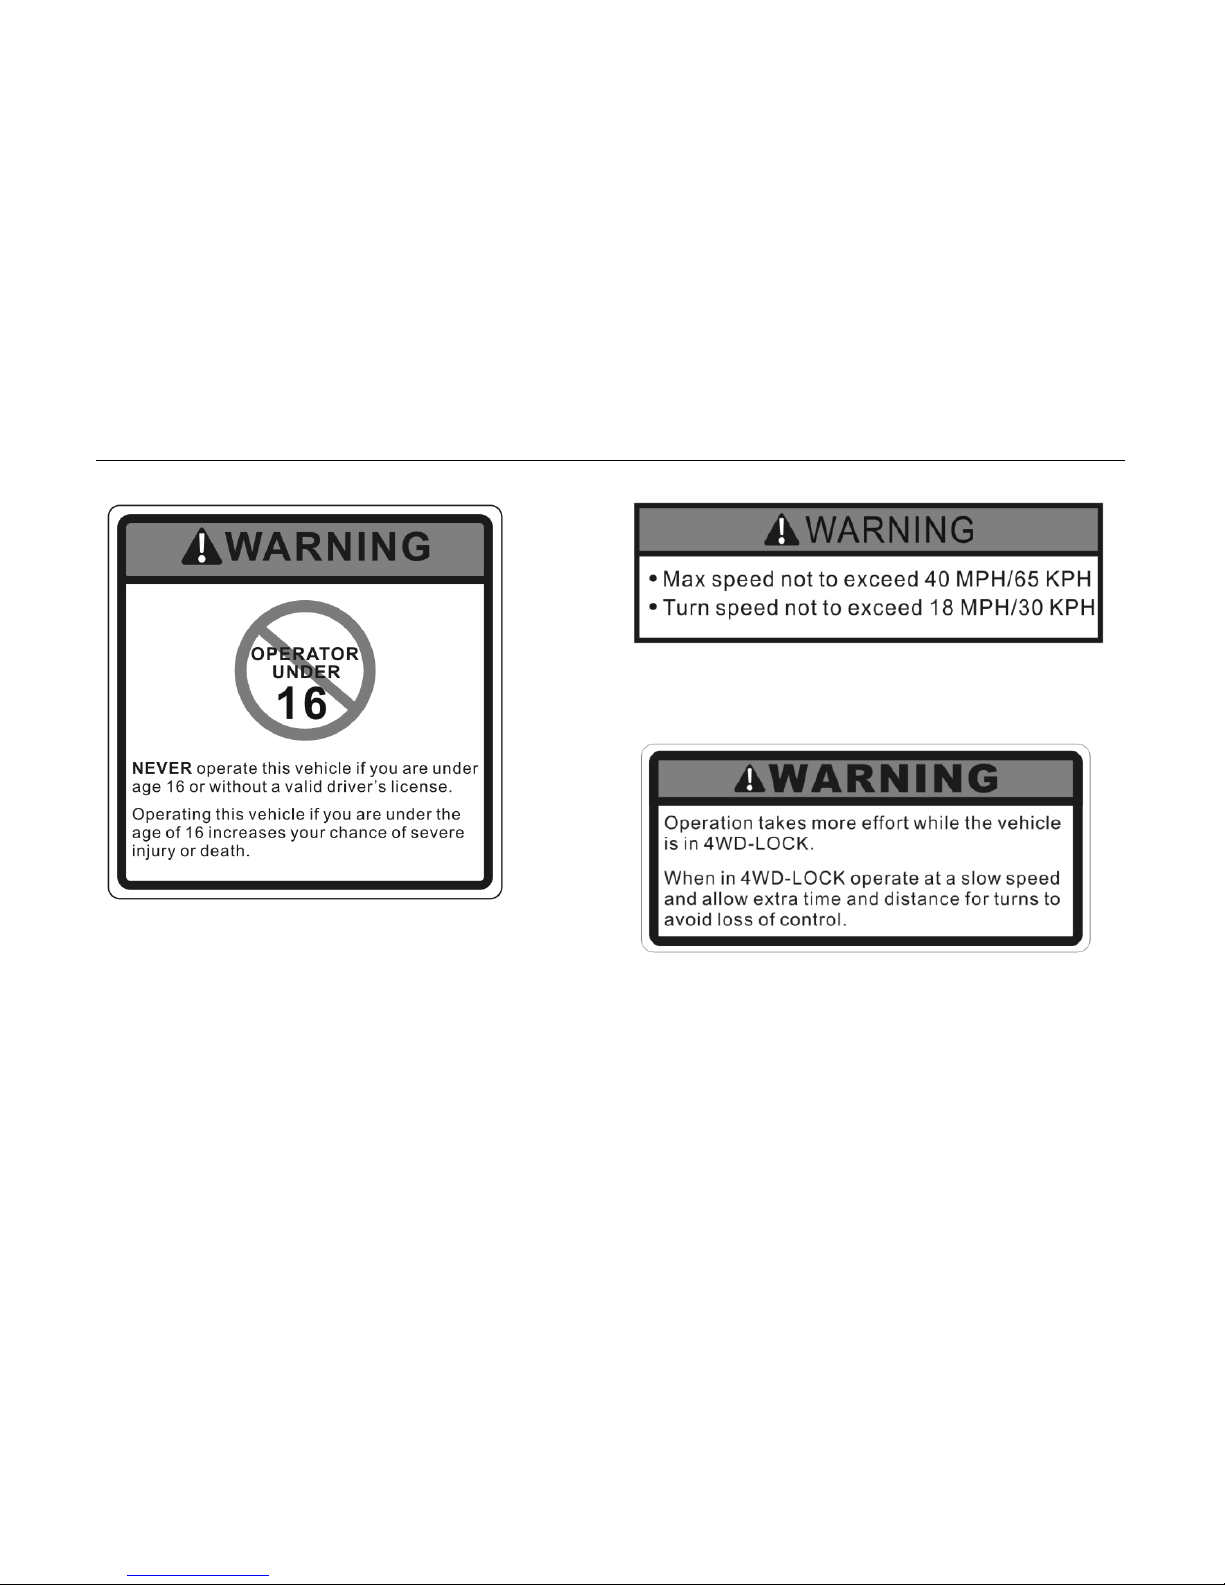
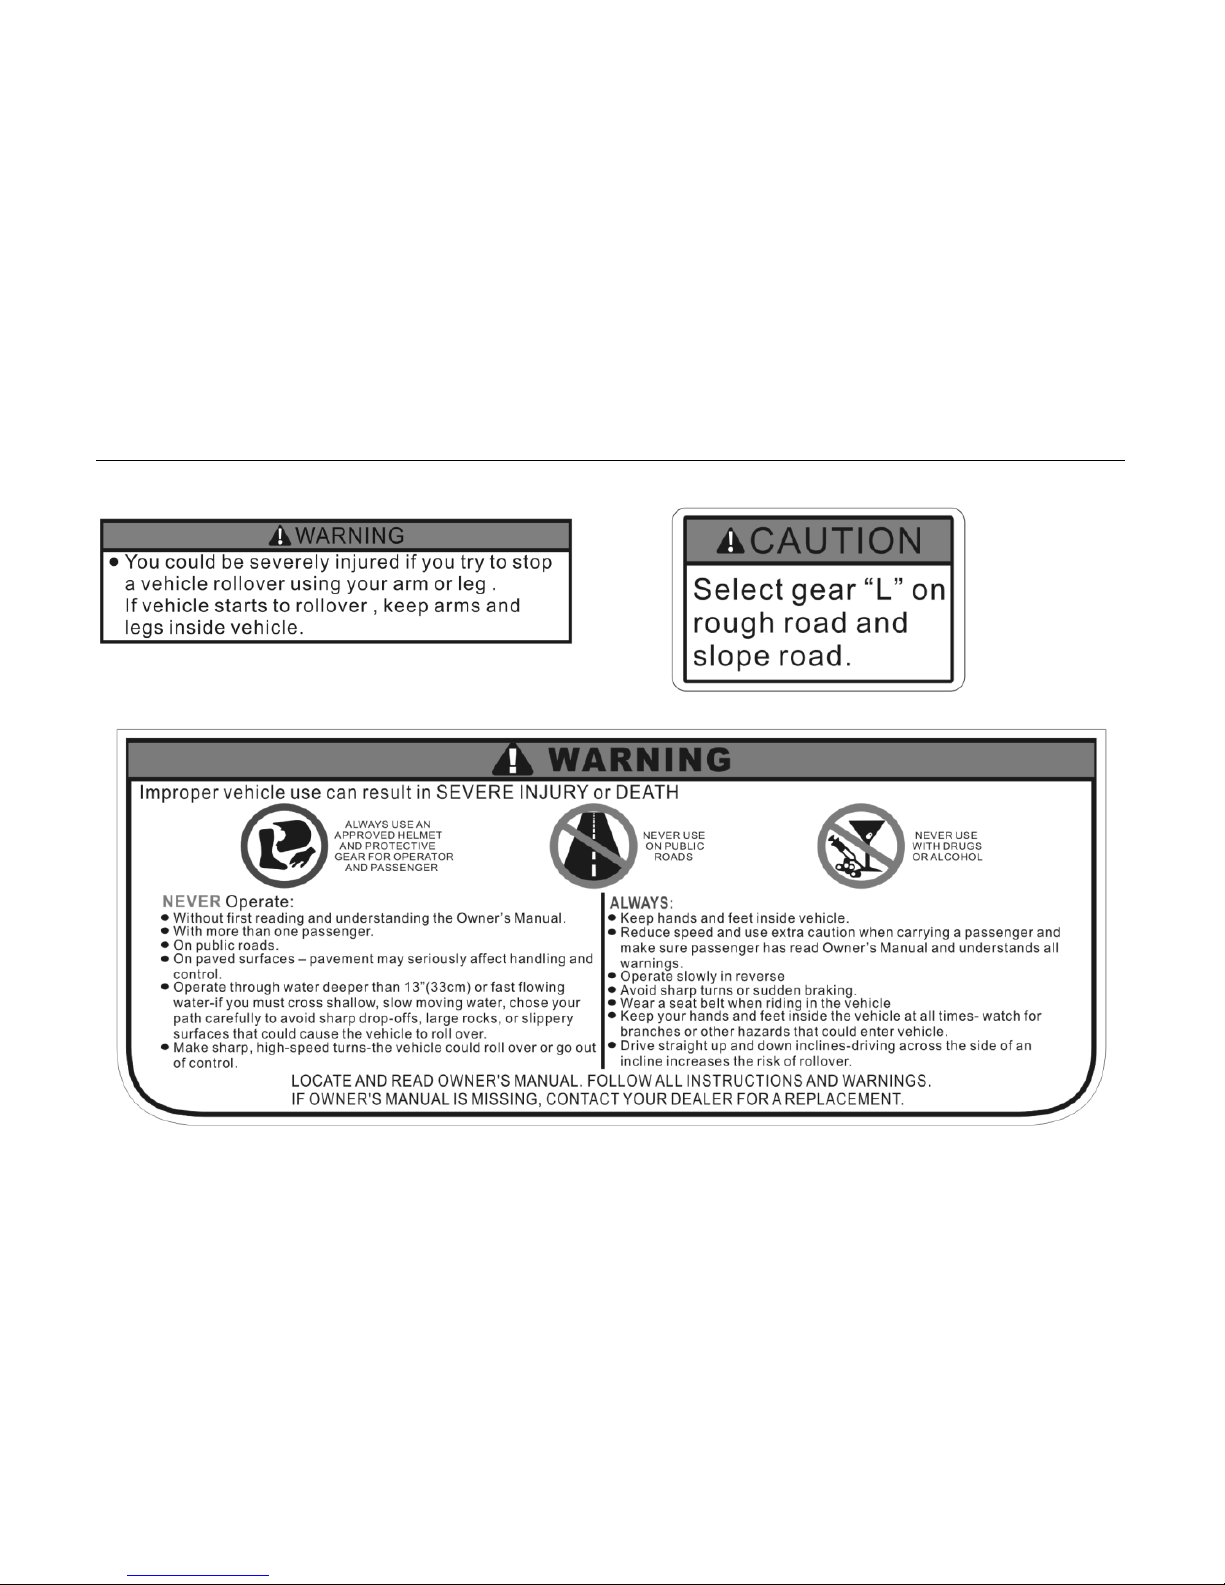
Location of the Warning and Safety Labels 1-1
1-2 Location of the Warning and Safety Labels
Read and understand all of the labels on your vehicle. They contain important information for
safe and proper operation of your vehicle.
Never remove any labels from your vehicle. If a label becomes difficult to read or comes off, a
replacement label is available from your dealer.
1 2
Location of the Warning and Safety Labels 1-3
3
5
6
4
1-4 Location of the Warning and Safety Labels
7 8
9
Location of the Warning and Safety Labels 1-5
10 11
12

1-6 Location of the Warning and Safety Labels
13 14
15
16
Safety Information 2-1
This off-highway utility vehicle handles differently from other vehicles including cars and UTVs.
SEVERE INJURY OR DEATH can result if you do not follow these instructions:
● Read this manual and all labels carefully and follow the operating procedures described.
● The vehicle is designed to carry the driver and three passengers, one driver and one passenger on
front seats, and two passengers on rear seats. NEVER CARRY PASSENGERS IN THE CARGO
BED.
● Always be sure the driver and passenger are wearing seat belts.
● Never give a ride to a passenger who is too small to reach and hold the handgrip fixed before the
seat.
● Always avoid operating the vehicle on any paved surfaces, including sidewalks, driveways, parking
lots, and streets.
● Never operate this vehicle on any public street, road, or highway, even dirt or gravel streets
● Never operate this vehicle without wearing an approved motorcycle helmet that fits properly. You
should also wear eye protection (goggles or a face shield), gloves, over-the -ankle boots,
long-sleeved shirt or jacket, and long pants.
● Never consume alcohol or drugs before or while operating this vehicle.
● Never operate at speeds too fast for your skills or the conditions. Always go at a speed that is proper
for the terrain, visibility, operating conditions, and your experience.
SAFETY INFORMATION

2-2 Safety Information
● Never attempt jumps or other stunts.
● Always inspect your vehicle each time you use it to be sure it is in safe operating condition,
Always follow the inspection and maintenance procedures and schedules described in this
manual.
● Always keep hands, arms, feet, and legs inside the vehicle at all times during operation. Keep
your feet on the floorboard. Never hold onto the enclosure. Your hand could be injured if it is
caught between the enclosure and an obstacle outside the vehicle.
● Always keep both hands on the steering wheel when driving.
● Never wrap your thumbs and fingers around the steering wheel. This is particularly important
when driving in rough terrain. The front wheels will move right and left as they respond to the
terrain, and this movement will be felt in the steering wheel. A sudden jolt could wrench the
steering wheel around, and your thumbs or fingers could be injured if they are in the way of the
steering wheel spokes.
● Always go slowly and be extra careful when operating on unfamiliar terrain .Always be alert to
changing terrain conditions when driving the vehicle.
● Never operate on excessively rough, slippery, or loose terrain until you have learned and
practiced the skills necessary to control the vehicle on such terrain. Always be especially
cautious on these kinds of terrain.
● Never turn at excessive speed. Practice turning at slow speeds before attempting to turn at
faster speeds. Do not attempt turns on steep inclines.

Safety Information 2-3
● Never operate the vehicle on hills that are too steep for it or for your abilities. Go straight up and down
hills where possible. Maximum slope angle: 15°.
● Never operate on hills that are slippery or ones where you will not be able to see far enough ahead of
you. Never go over the top of a hill at speed if you cannot see what is on other side.
● Always follow proper procedures for going uphill. If you lose control and cannot continue up a hill,
back down the hill with the engine in reverse gear. Use engine braking to help you go slowly. If
necessary, use the brakes gradually to help you go slowly.
● Always check terrain before going down hills. Go as slowly as possible. Never go down a hill at high
speed.
● Always check for obstacles before operating in a new area.
● Never operate the vehicle in fast flowing water or water deeper than the floorboards on this model.
Remember that wet brakes may have reduced stopping ability. Test your brakes after leaving water. If
necessary, apply the brake several times to let friction dry out the linings.
● Always be sure there are no obstacles or people behind you when you operate in reverse. When it is
safe to proceed in reverse, go slowly.
● Do not brake abruptly when carrying loads in the cargo bed.
● Always use the size and type of tires specified in this manual.
● Always make sure the tires have the proper tire pressure as described in this manual.
● Never exceed the stated load capacity. Cargo should be as far forward in the bed as possible, and
distributed evenly from side to side. Be sure cargo is secured so that it cannot move around during
operation. Reduce speed and follow instructions in this manual for carrying cargo or pulling a trailer.
Allow greater distance for braking.
2-4 Safety Information
WARNING
POTENTIAL HAZARD
Improper handling of gasoline.
WHAT CAN HAPPEN
Gasoline can catch fire and you could be burned.
HOW TO AVOID THE HAZARD
Always turn off the engine when refueling. Do not refuel right after the engine has been running
and is still very hot. Do not spill gasoline on the engine or exhaust pipe/muffler when refueling.
Never refuel while smoking, or while in the vicinity of sparks, open flames, or other sources of
ignition such as the pilot light of water heaters and clothes dryers.
When transporting the vehicle in another vehicle, be sure it is kept in an upright position.
Otherwise, fuel may leak out of the engine or fuel tank.
WHAT CAN HAPPEN
Gasoline is poisonous and can cause injuries.
HOW TO AVOID THE HAZARD
If you should swallow some gasoline or inhale a lot of gasoline vapor, or get some gasoline in
your eyes, see your doctor immediately. If gasoline spills on your skin, wash with soap and
water. If gasoline spills on your clothing, change your clothes.
Safety Information 2-5
WARNING
POTENTIAL HAZARD
Starting or running the engine in a closed area.
WHAT CAN HAPPEN
Exhaust fumes are poisonous and may cause loss of consciousness and death within a
short time.
HOW TO AVOID THE HAZARD
Always operate your vehicle in an area with adequate ventilation.
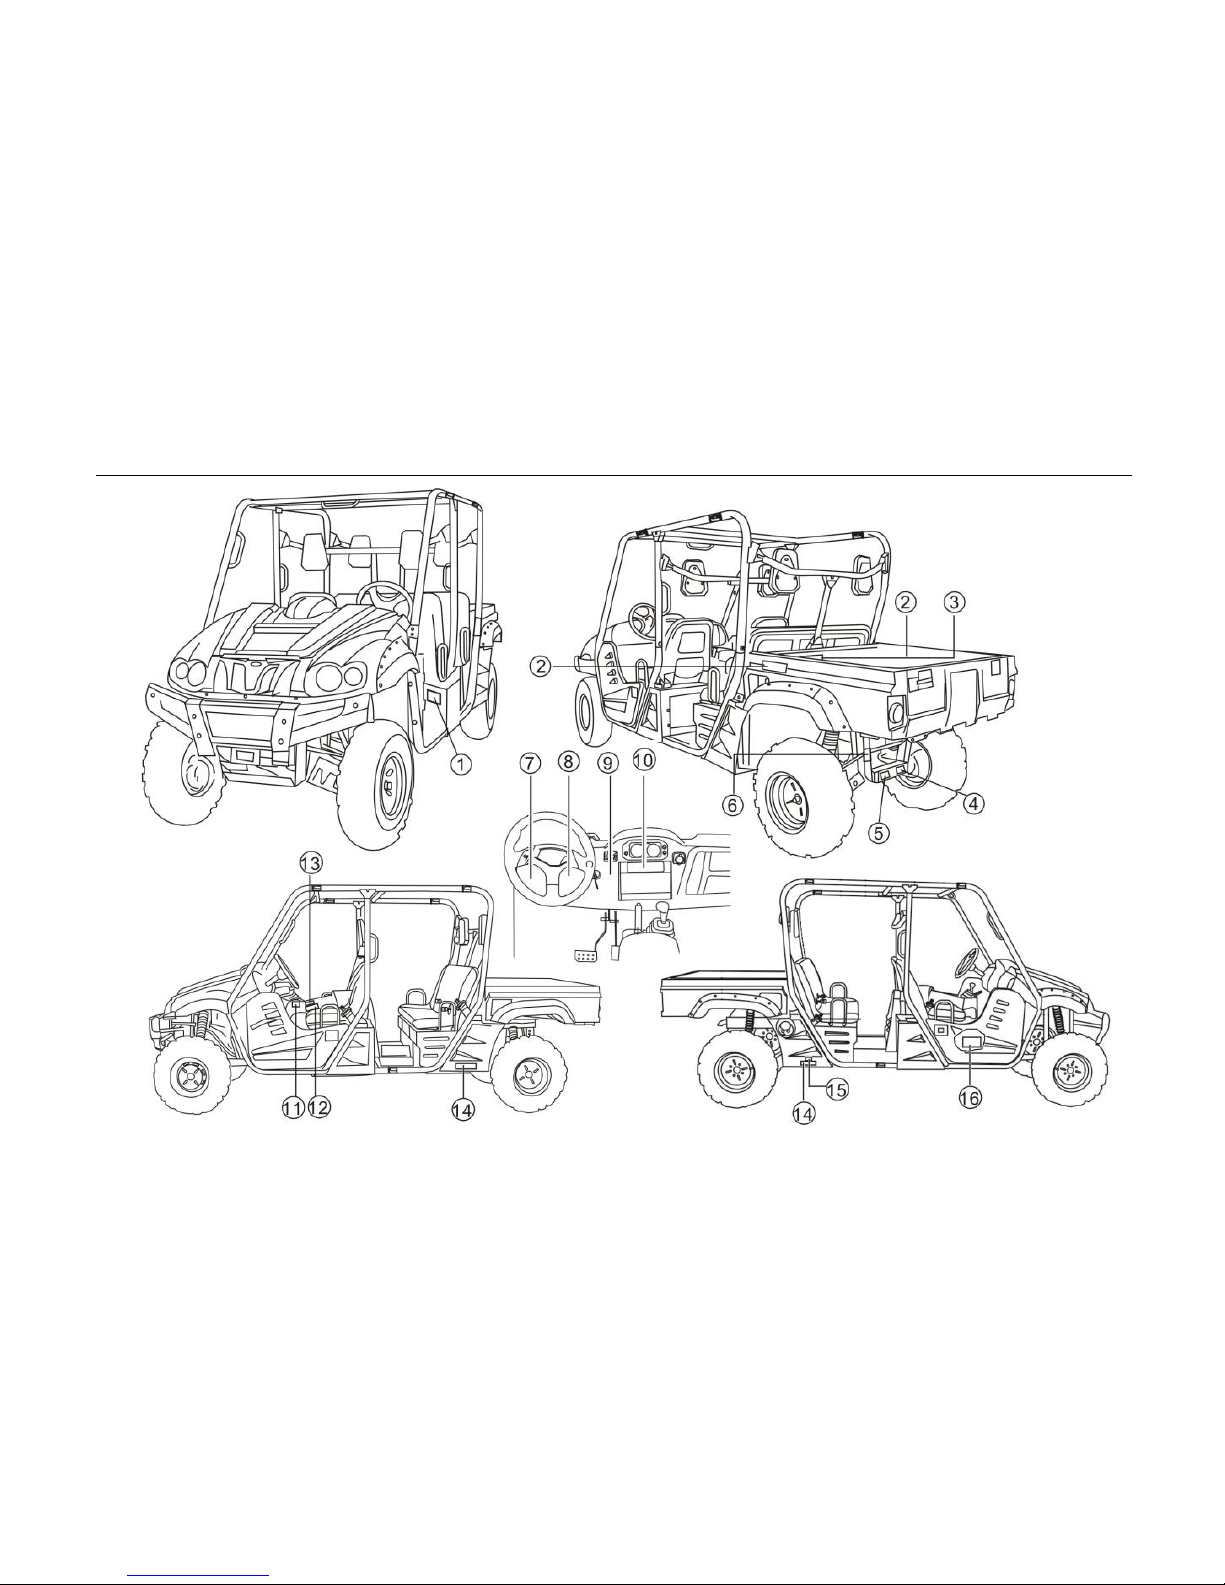
3-1 Description and Vehicle Identification
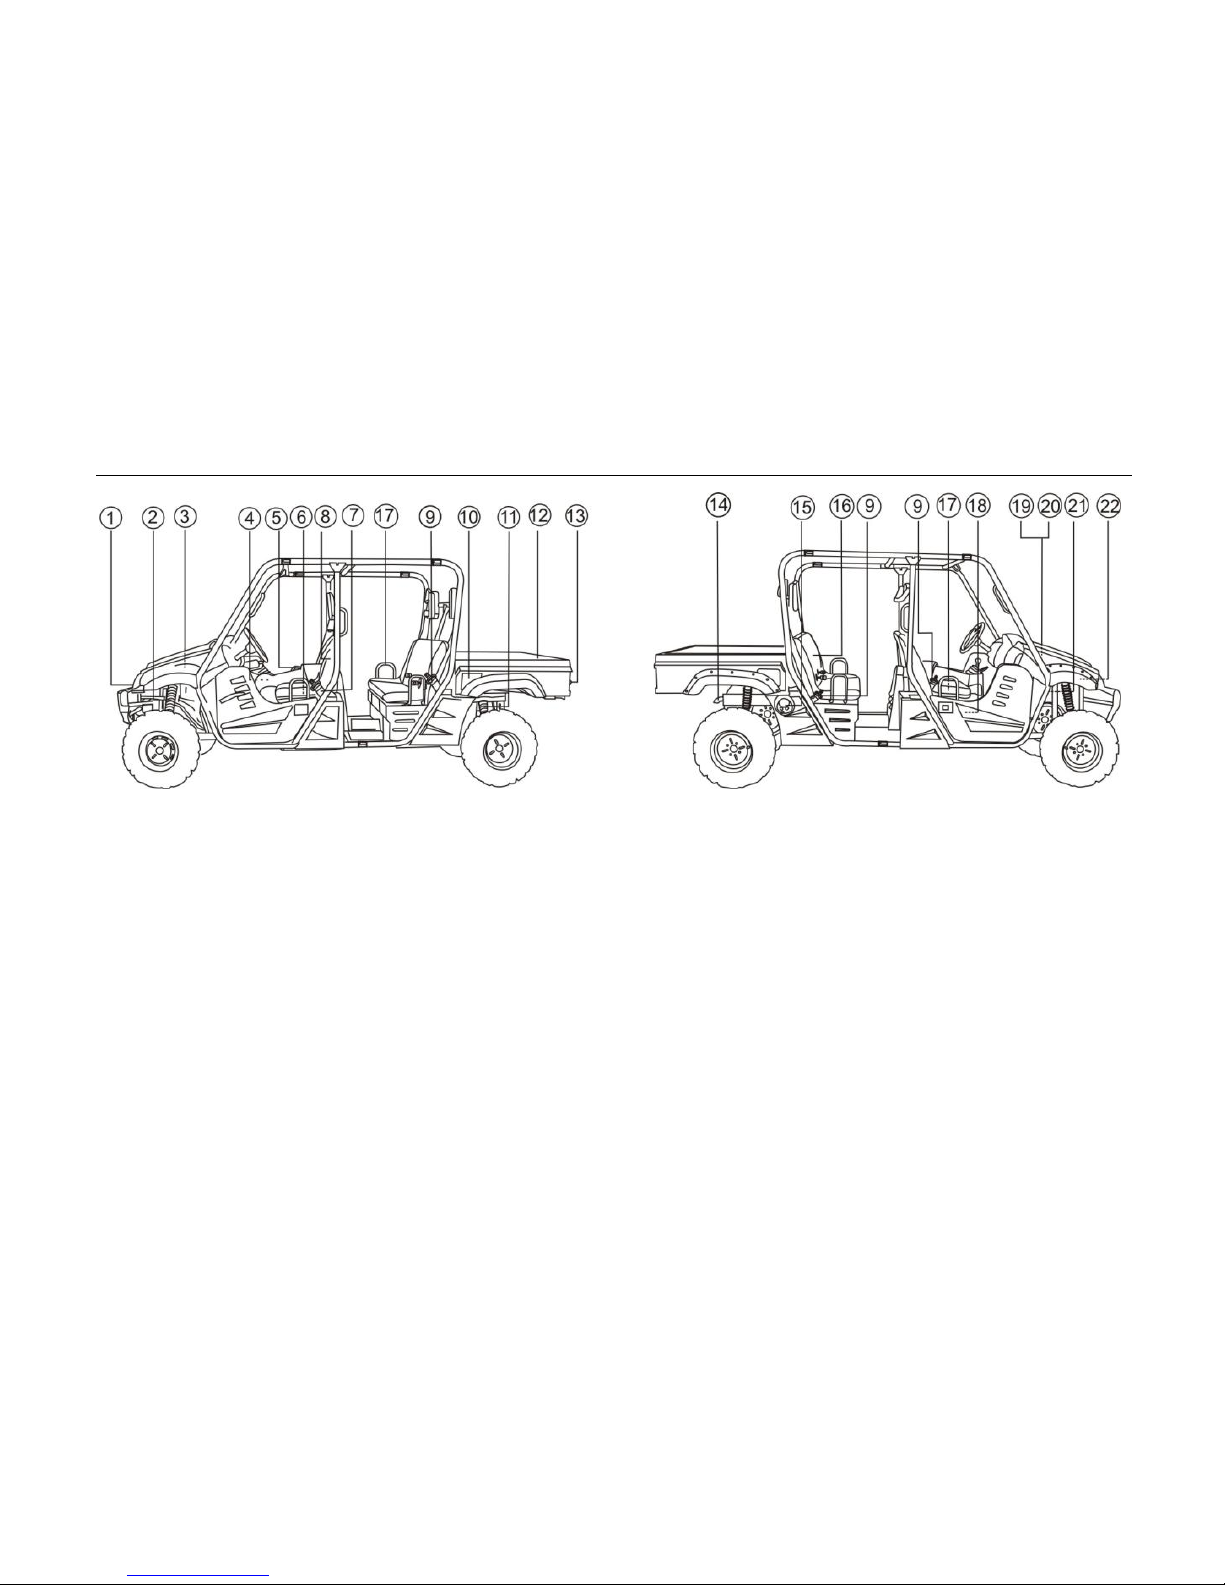
1. Headlights
2. Front shock absorber assembly adjusting ring
3. Brake fluid reservoir
4. Air filter element(engine and air intake duct)
5. Spark plug
6. V-belt case
7. Driver seat belt
8. Driver seat
9. Passenger seat belt
10. Cargo bed release levers
11. Rear shock absorber assembly adjusting ring
12. Cargo bed
13. Tail/brake lights
14. Spark arrester
15. Fuel tank cap
16. Passenger seat
17. Oil filter cartridge
18. Engine oil dipstick
19. Battery
20. Fuses
21. Coolant reservoir
22. Radiator cap
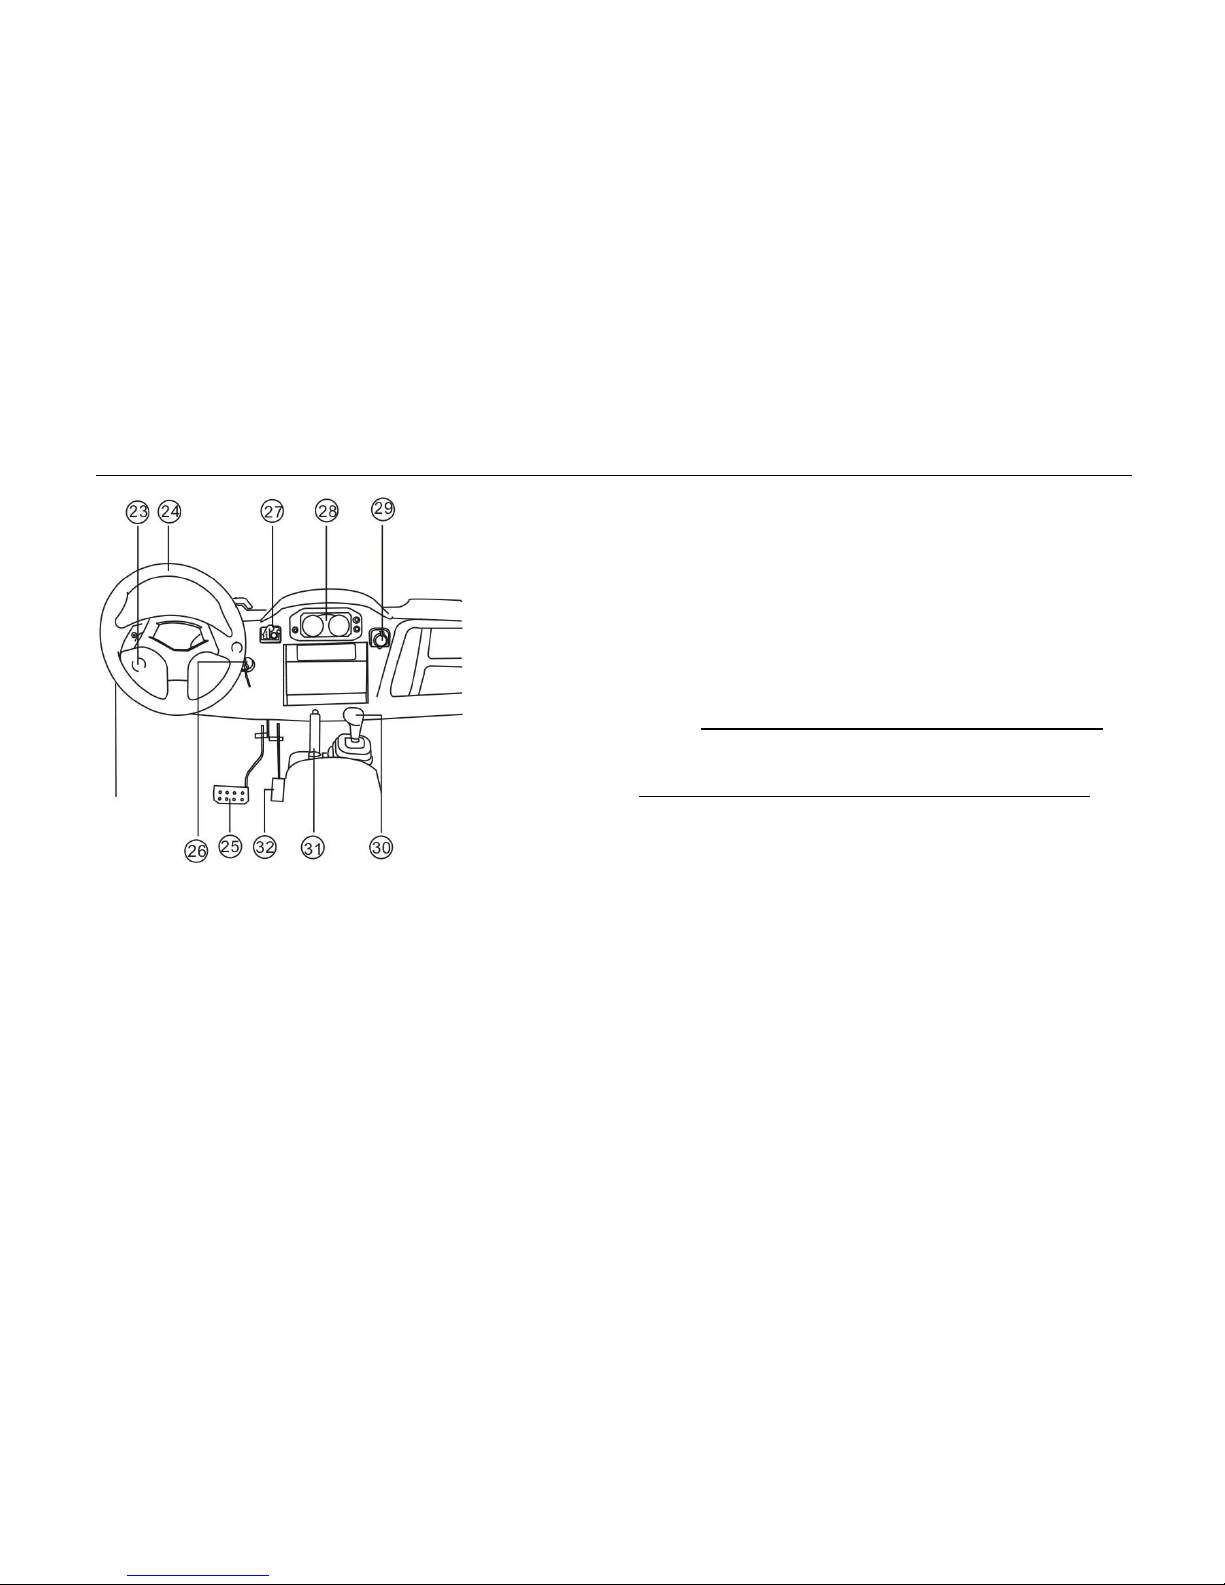
Description and Vehicle Identification 3-2
23. Light switch
24. Steering wheel
25. Brake pedal
26. Main switch
27. On-Command four-wheel-drive and differential lock switches
28. Multi-function meter unit
29. Auxiliary DC jack
30. Drive select lever
31. Parking brake lever
32. Accelerator pedal
NOTE:
The vehicle you have purchased may differ slightly
from those in the figures of this manual.
3-3 Description and Vehicle Identification
Identification Number Records
Record the key identification number, vehicle
identification number and model label
information in spaces provided for assistance
when ordering spare parts from a service
center or for reference in case the vehicle is
stolen.
1.KEY IDENTIFICATION NUMBER:
2.MODEL LABEL INFORMATION
○
●
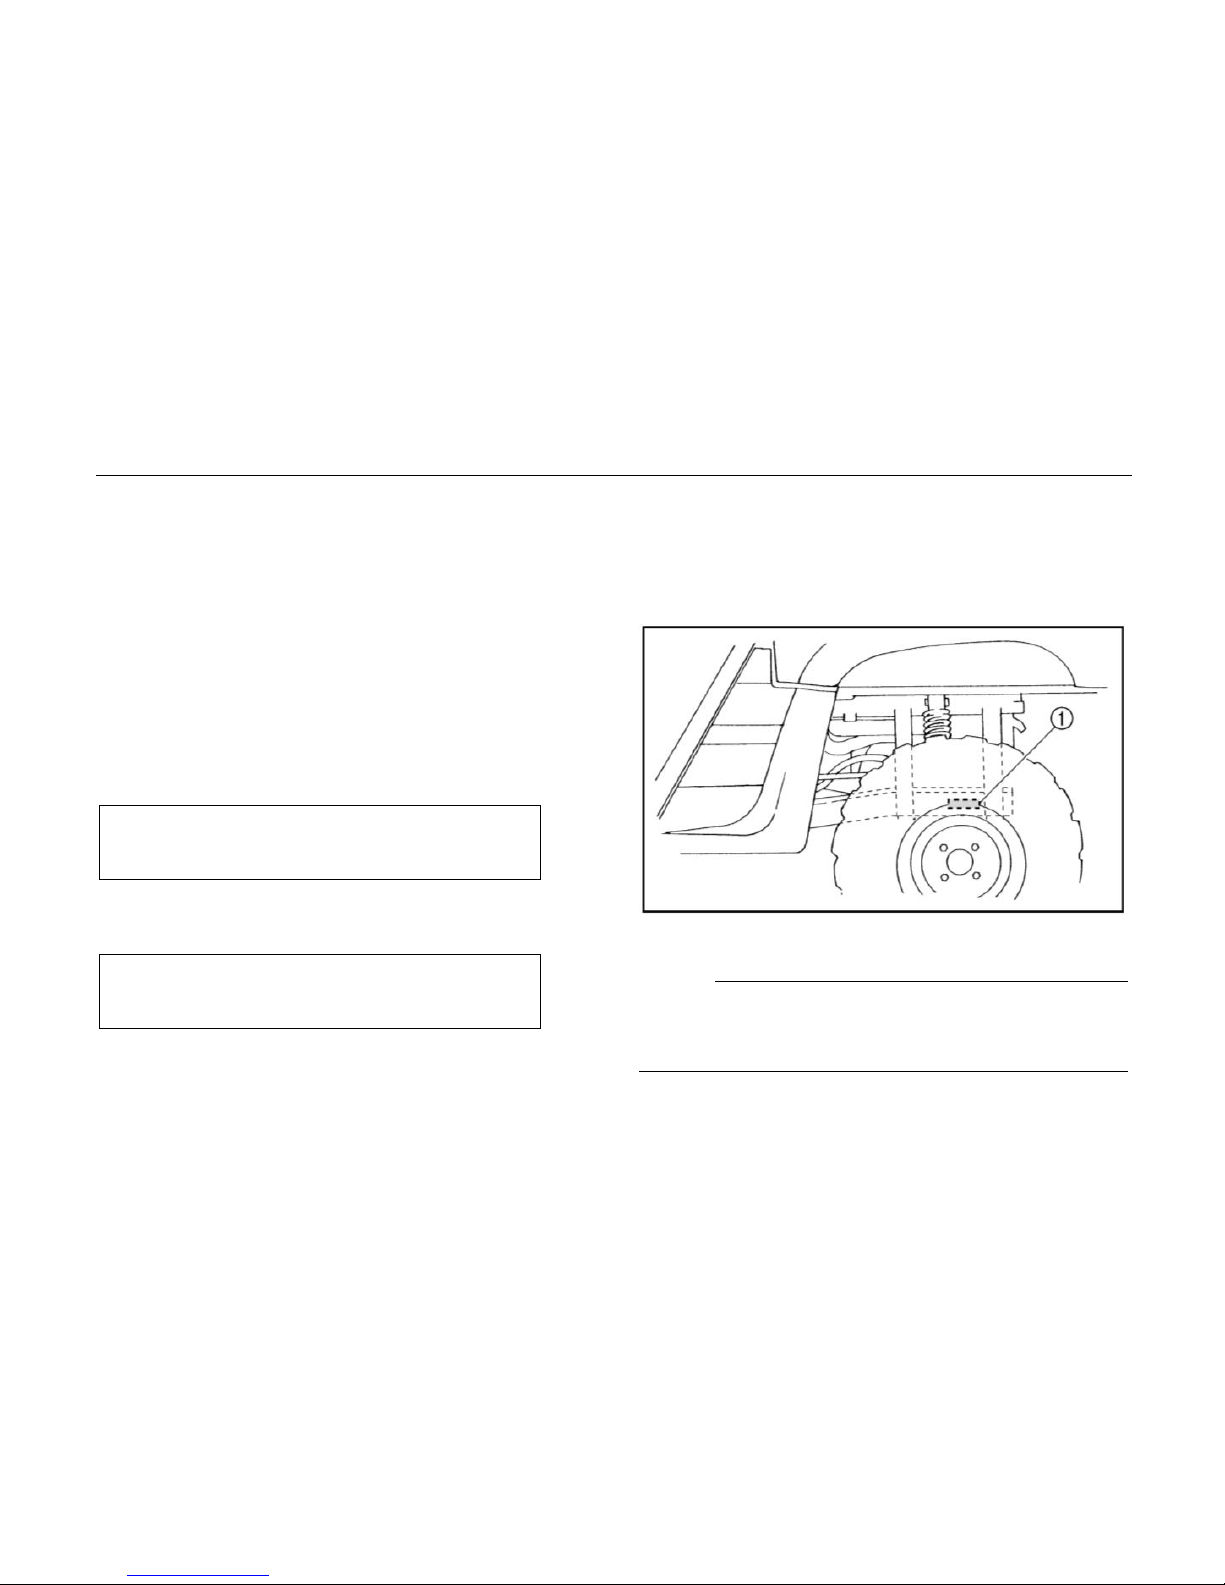
Vehicle identification number
The Vehicle identification number is stamped
into the frame.
1. Vehicle identification number
NOTE:
The vehicle identification number is used to
identify your vehicle.
Control Functions 4-1
CONTROL FUNCTIONS
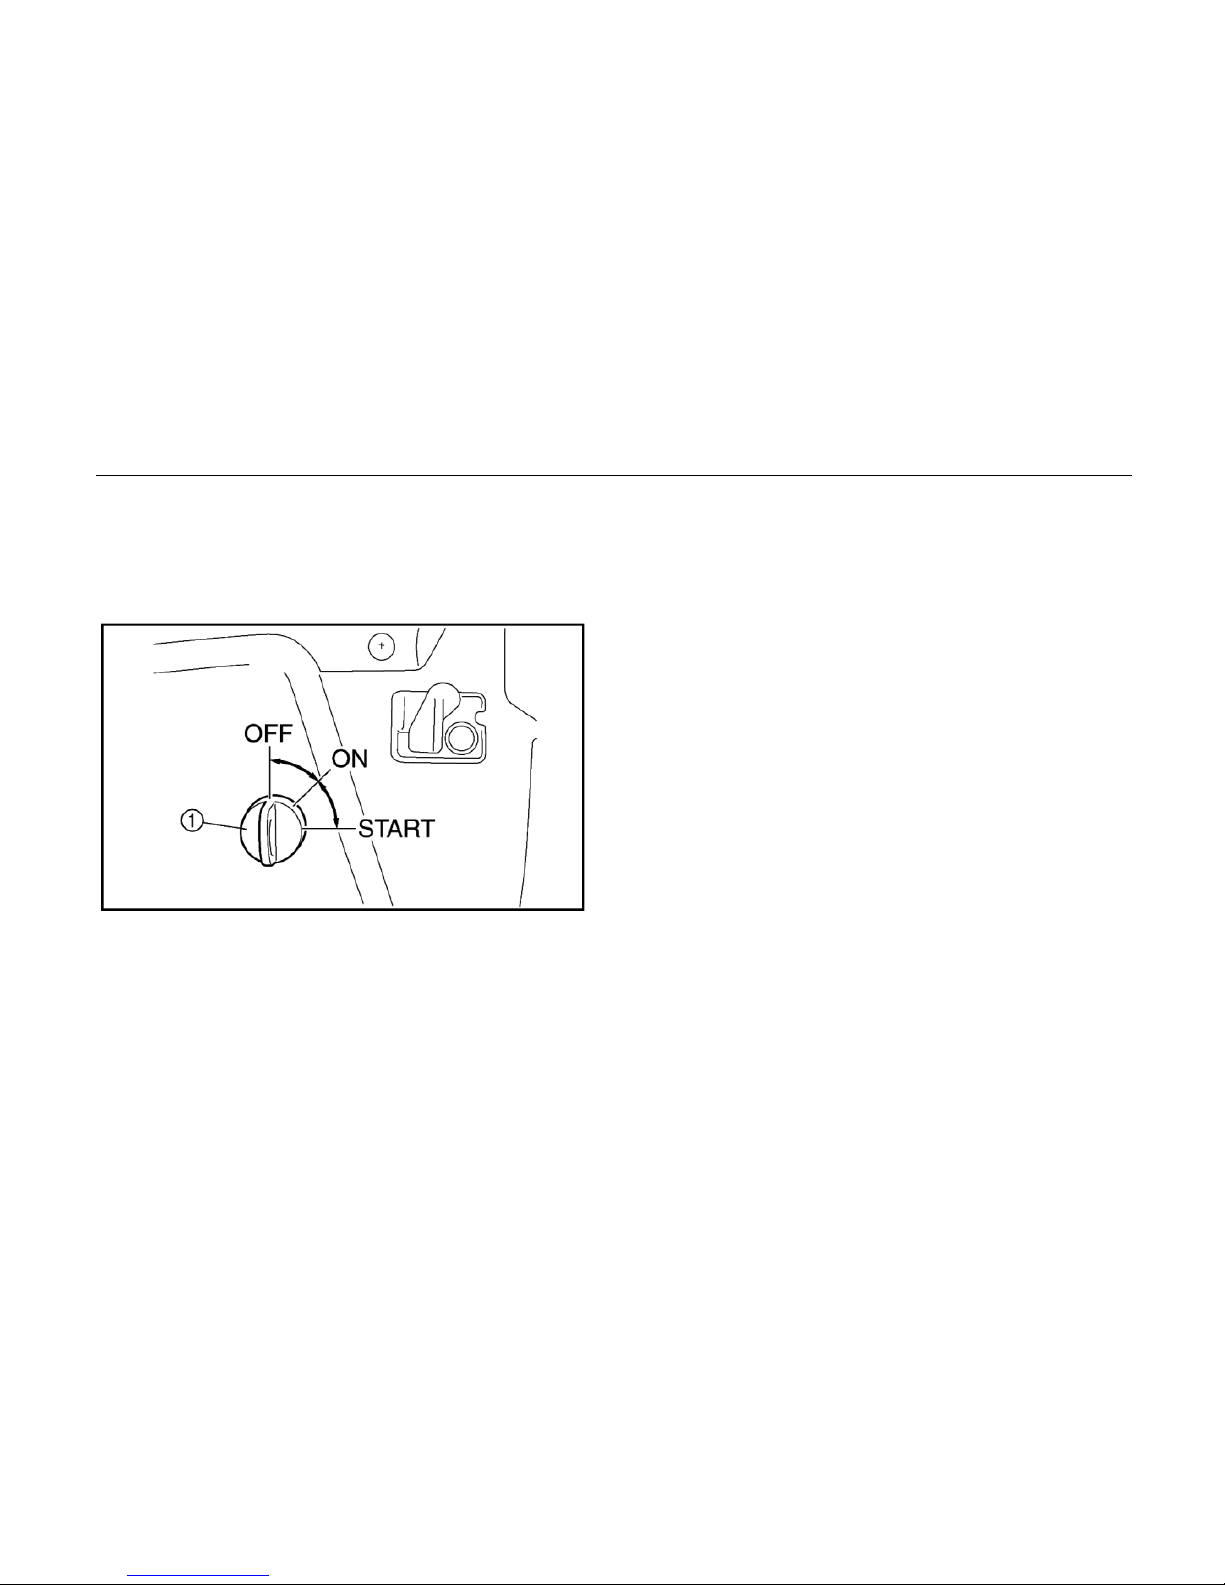
Main switch
1. Main switch
Functions of the respective switch positions
are as follows:
ON:
All electrical circuits are supplied with power,
and the headlights and taillights illuminate
when the light switch is on.
OFF:
All electrical circuits are switched off. The key
can be removed in this position.
START:
The electric starter is engaged by turning and
holding the key in this position. Release the
key when the engine starts.
4-2 Control Functions
1CAUTION:
● Do not operate the electric starter
continuously for more than 5 seconds at
a time, or starter damage could occur.
Wait at least 5 seconds between each
start attempt.
● Do not turn the key to the ―START‖
position with the engine running, or
damage to the electric starter can result.
● See starting instructions prior to starting
the engine. (See pages 6-1— 6-3 for
details.)
Indicator and warning lights
1. High-range indicator light ―H‖
2. Parking brake indicator light ―P‖
3. Low-range indicator light ―L‖
4. Four-wheel locked showing light
5. Neutral indicator light ―N‖
6. Reverse indicator light ―R‖
7. On-Command four-wheel-drive/differential gear lock
indicator ― ‖/ ― ‖
8. Coolant temperature warning light ― ‖
9. Far light indicator
10. Position indicator
11. Emergency indicator.
12. On-Command differential gear lock indicator light

Control Functions 4-3
―DIFF. LOCK‖
On-Command differential gear lock indicator light “DIFF. LOCK”
This indicator light and the On-Command
differential gear lock indicator in the display
come on when the On-command differential
gear lock switch is set to the ―LOCK‖
position.
NOTE:
When the switch is set to ―LOCK‖, the
On-Command differential gear lock indicator
light will flash until the differential gear is
locked.
Low-range indicator light “L”
This indicator light comes on when the drive
select lever is in the ―L‖ position.
High-range indicator light “H”
This indicator light comes on when the drive
select lever is in the ―H‖ position.
Neutral indicator light “N”
This indicator light comes on when the drive
select lever is in the ―N‖ position.
Reverse indicator light “R”
This indicator light comes on when the drive
select lever is in the ―R‖ reverse position.
Furthermore, this indicator light flashes when
the engine is being raced for 10 seconds or
more.

4-4 Control Functions
NOTE:
If the indicator light flashes under any other
circumstances or the speedometer does not
show the speed while riding, have a dealer
check the speed sensor circuit.
Parking brake indicator light “P”
This indicator light comes on when the
parking brake is applied.
On-Command four-wheel-drive/differential
gear lock indicator
“ ”/ “ ”
The On- Command four- wheel-drive indicator ― ‖ comes on when the On-Command
four- wheel-drive switch is set to the ―4WD‖
position.
The On-Command differential gear lock indicator ― ‖ in the On-Command four-wheel-
drive indicator also comes on when the
On-Command differential gear lock switch is
set to the ―LOCK‖ position.
NOTE:
● Due to the synchronizing mechanism in
the differential gear case, the four-wheeldrive indicator may not come on until the
vehicle starts moving.
● When the on-command differential gear
lock switch is set to ―LOCK‖, the indicator
― ‖will flash until the differential gear is
locked.
Coolant temperature warning light “ ”
When the coolant temperature reaches a
specified level, this light comes on to warn
that the coolant temperature is too hot, If the
light comes on during operation, stop the
 Loading...