

Page 1
CVW9HD Instruction Manual
IMPORTANT
- Do not open the battery door while submerged in water.
- Close the battery door properly for the best water-tight seal.
- Ensure that the latch on the battery door is correctly closed.
- Rinse with clean water after use.
- Rinse and clean the microphone and speaker ports after
submersion.
1. Getting to Know Your Camera
Ultra Slim Waterproof Design
Waterproof up to 10 ft. / 3 meters
Full HD digital Video Camcorder – 1920x1080p; 30fps 12.0
Mega Pixels Max Resolution Digital Still Camera
Full HD digital Video Camcorder – 1920x1080p; 30fps
HDTV HDMI high definition interface output
2.0” LTPS Color LCD display
Micro SD / SDHC
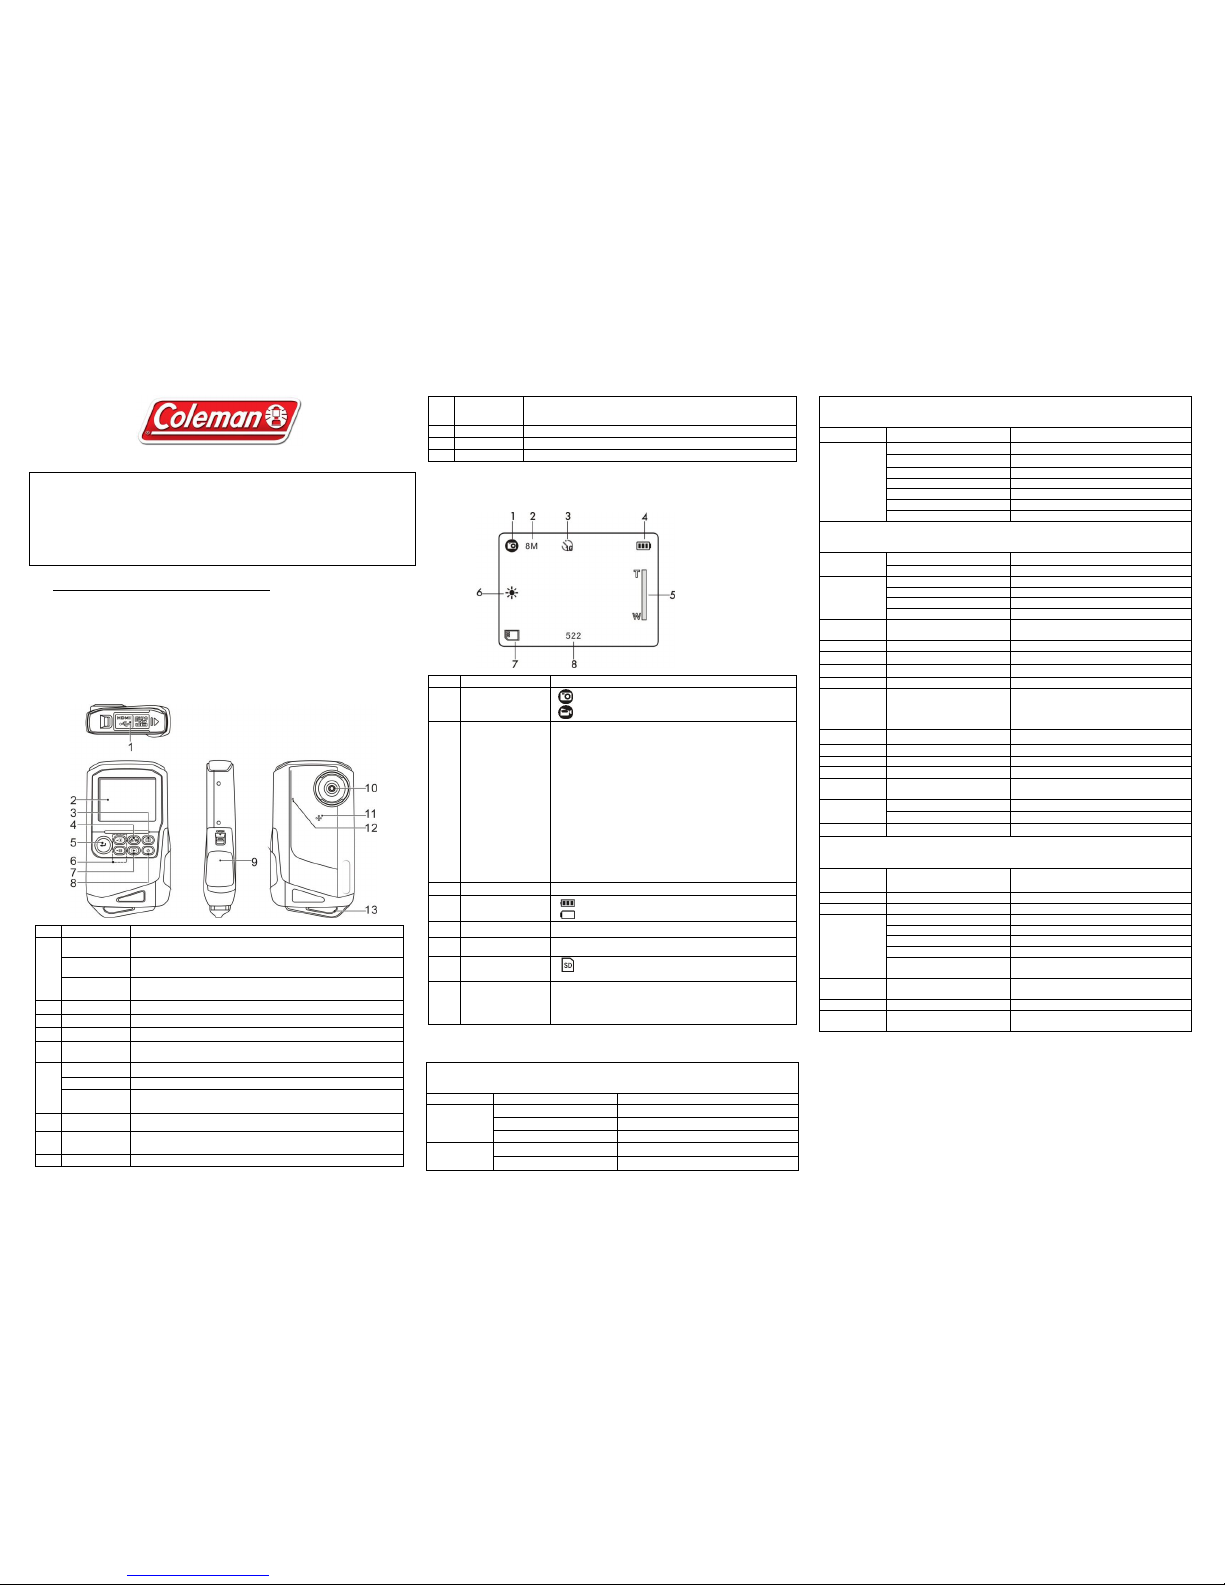
2. Camera Overview
Item
Part
Function
1
USB Interface
Download images and video clips to a computer using the included USB
cable.
Micro SD Card
Slot
SD card storage location.
HDMI Interface
View images and video clips on an HDTV by plugging in the supplied
HDMI cable into the HDMI interface on your camcorder and TV.
2
LCD Screen
Displays photos, video clips, camera settings and menu.
3
Menu Button
Press to enter into settings mode,
4
Mode Button
Press to enter into PHOTO / MOVIE mode.
5
OK Button
Press to take photographs or to start and stop recording a video clip.
Press to confirm changes in menu mode.
6
Zoom Buttons
Digital zoom-in and out during photo and video mode.
Volume Buttons
Setting the volume in video playback mode.
Up / Down
Buttons
UP and DOWN directional selection in menu mode.
7
Playback Button
Press to enter into playback mode when in PHOTO or MOVIE mode.
8
Power Button
1. Press this button to power the unit of or off.
2. Press this button to select the icons display.
9
Battery Door
Compartment for the AA batteries.
10
Lens
Optical input to records video and capture images.
Note: Keep the lens clean. Dirt and fingerprints will affect the quality of
the picture.
11
Speaker
Audio output for video playback
12
Microphone
Audio input.
13
Strap Hook
Hook for attaching the wrist strap to the camera.
3. Explanation of Status Icons
Item
Function
D
1
Current Mode
PHOTO mode.
VIDEO mode.
2
Current Resolution
PHOTO
8M = 3264x2448 pixels
5M = 2560x1920 pixels
3M = 2048x1536 pixels
VIDEO
FULL HD = 1920x1080 pixels; 30fps
1080P30 – 1440x1080 pixels; 30fps
720P30 = 1280x720 pixels; 30fps
WVGAP60 = 848x480 pixels; 60 fps
WVGAP30 = 848x480 pixels; 30 fps
VGA = 640 x 480 pixels
QVGA = 320x240 pixels
3
Self-Timer Status
Shows the current Self-Timer setting.
4
Battery Status
Indicator
Battery status, fully charged.
Battery status, no charge remaining.
5
Zoom Indicator
Shows current Zoom setting.
6
White Balance
Status
Shows the current White Balance setting.
7
Micro SD Card
Indicator
A A micro SD card is inserted and will be used as storage
for photos and videos.
8
Photo / Video
Counter
Show the pictures remaining in PHOTO mode.
Shows the time remaining in VIDEO mode.
Show the elapsed time during recording
Shows the total amount of pictures and videos.
4. Details for Camera Setup
PHOTO Settings
In photo mode, press the MENU button and select PHOTO, then press the OK button to enter photo
setup mode.
Quality
Super Fine/Fine/Normal
Picture quality setting
Size
3M pixel resolution
2048 x 1536 pixels (3.0 Mega Pixels)
5M pixel resolution
2592 x 1944 pixels (5.0 Mega Pixels)
8M pixel resolution
3200 x 2400 pixels (8.0 Mega Pixels)
Self-timer
On
Self-timer selected, 10 sec delay
Off
Turn off the self-timer
VIDEO setting
In video mode, press the MENU button and select VIDEO, then press the OK button to enter video
setup mode.
Quality
Super Fine/Fine/Normal
Video quality setting
Resolution
Full HD
1920×1080 up to 30fps
1080P30
1440x1080, up to 30fps
720P30
1280x720, up to 30fps
WVGAP60
848x480, up to 60fps
WVGAP30
848x480, up to 30fps
VGA
640x480, up to 30fps
QVGA
320x240, up to 30fps
Setup
In photo/video mode, press the MENU button and select SETUP by pushing the Directional DOWN
Key, then press the OK button to enter camera basic setup options.
TV type
NTSC
American and Japanese TV format
PAL
European TV format.
Auto power off
Off
Auto Power-Off off.
1 min
Auto power off in 1 min if no input detected.
3 min
Auto power off in 3 min if no input detected.
5 min
Auto power off in 5 min i if no input detected.
Time setup
Year / Month / Day / Hour /
Minute
Setting the timestamp on the image or video
clip.
Quick view
3s / 1s / 0.5s / Off
Select picture review time after photo taking.
Volume
00 ~ 64
Setting the volume,
Default Setting
Yes / No
Restore to default settings.
Format
Yes / No
Format the SD card.
Language
English / Deutsch / French /
Italian / Spanish / Nederlands
/ Portuguese / CHS / CHT /
Russian
Select display language.
Beep Sound
Off / High / Low
Setting the beep sound volume.
S.image
On / Off
Setting the opening screen on or off.
S.sound
On / Off
Setting the opening sound on or off.
File number
Reset / Sequential
Slide Show
Pause
10s / 5s / 3s / Off
Setting the image slide time.
Frequency
50Hz /
Set for European electricity frequency.
60Hz
Set for American electricity frequency.
FW Version
View the firmware version.
Effect
In photo/video mode, press the MENU button and select EFFECT by pushing the Directional
DOWN Key, then press OK to enter effect options.
Scene
Auto/Landscape/Portrait/
Sport/Night landscape
Choose an existing scene mode.
ISO
Auto / 200 / 400
ISO Sensitivity select.
Metering
Center / Average / Spot
Metering setting.
White Balance
Auto
Automatic white balance mode.
Sunny
White balance setting for Daylight/Outdoor scene.
Cloudy
White balance setting for Cloudy/Outdoor scene.
Fluorescent
White balance setting for fluorescent indoor light.
Incandescent
White balance selected for tungsten indoor
lighting .
Effects
Negative / Normal/ B/W /
Sepia
Effects setting.
Sharpness
Standard / Hard / Soft
Sharpness setting.
EV Setting
0, +/-0.3 , +/-0.7, +/-1.0,
+/-1.3, +/-1.7, +/-2.0
Level of exposure.
Note: The camera will remain in the last setting when powered ON / OFF.
5. Using the camera
5.1 Battery Installation
1. Open the battery door.
2. Insert 2x AA alkaline batteries into the camera.
3. Close the battery door.
4. Press the POWER button to turn on the camera.
Page 2
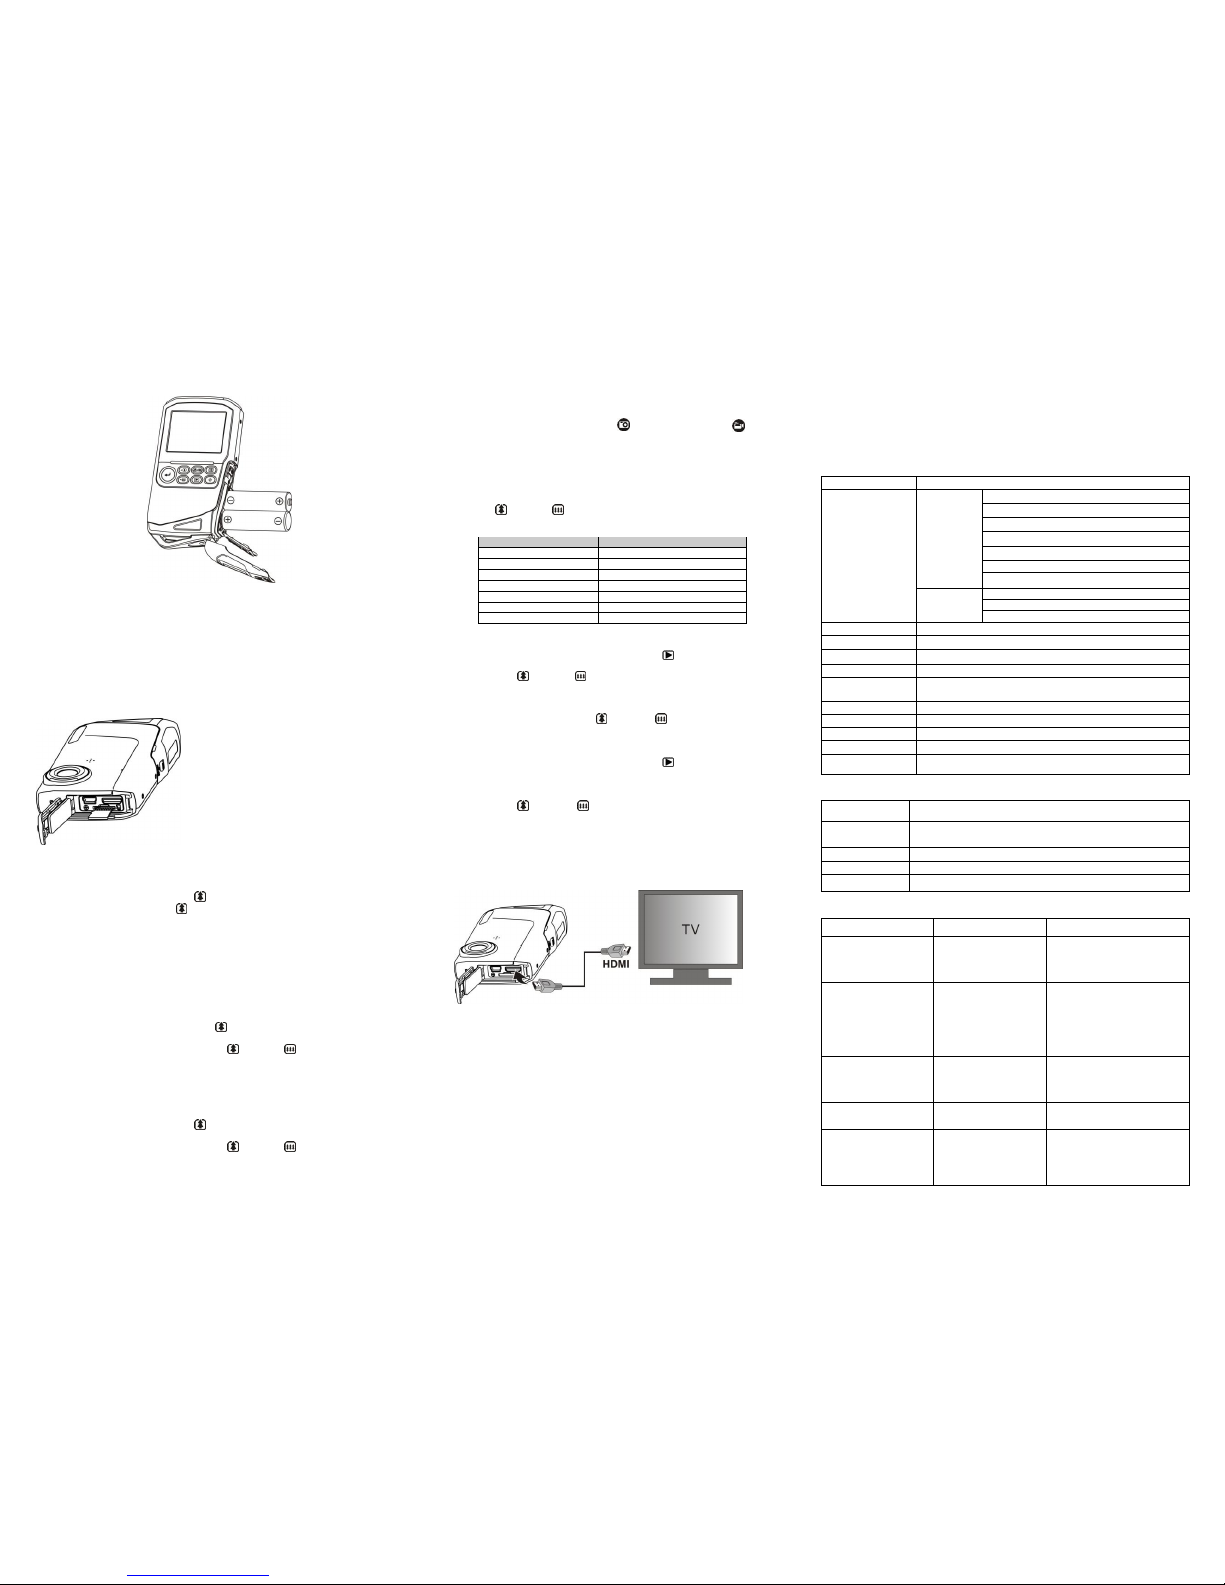
5.2 Inserting a Micro SD Memory Card (not included)
1. Power off the camera.
2. Open the bottom USB/SD Card door.
3. Insert the SD card into the camera by clicking it in.
4. Close the bottom USB/SD Card door.and ensure the latch is properly closed.
NOTE: There is only one right direction to insert the Micro SD memory card into the slot. Do not
force the card into the slot, or else it may damage both the camera and the Micro SD
memory card.
NOTE: The Micro SD memory card must be formatted before taking photographs. See the following
sections for more information.
5.3 Formatting a Micro SD Card
1. Press the MENU button in PHOTO or VIDEO mode.
2. Select FORMAT by pressing the UP key and press the OK button.
Select YES by pressing the UP key.
3. Press the OK button to confirm and continue formatting the Micro SD card.
Note: During formatting of the Micro SD card, all data, pictures & video (if present) will be erased;
make sure you backup your data before formatting the memory.
5.4 Setting the Resolution
VIDEO recording mode
1. Press the MENU button in video mode,Select VIDEO and press the OK button to enter
options selection.
2. Select RESOLUTION by pressing the UP ( ) button, then press the OK button to enter
resolution selection.
3. Select desired resolution by pressing the UP ( ) / DOWN( ) buttons;
Full HD (1920×1080), 1080P30(1440x1080), 720P30 (1280 x 720), WVGAP60 (848 x 480)
WVGAP30 (848 x 480), VGA (640 x 480), QVGA(320 x 240)
then press the OK button to confirm setting.
PICTURE taking mode
1. Press the MENU button in photo mode, Select PHOTO and press the OK button to enter
option selection.
2. Select the SIZE by pressing the UP ( ) button, press the OK button to enter resolution
selection.
3. Select desired resolution by pressing the UP ( ) / DOWN( ) buttons;
3M (2048 x 1536), 5M (2592 x 1944), 8M (3200 x 2400)
then press the OK button to confirm setting.
5.5 Taking video or pictures
1. Turn on your camera.
2. Press the MODE button to select PICTURES ( ) or VIDEO recording mode( )
3. Use the LCD screen as a viewfinder composing the scene.
4. Press the OK button for taking a PICTURE, or press this button to start / stop VIDEO recording.
Note: 1. Keep camera and the object steady when making records to avoid blurry images.
2. Max video file size is 4GB.The unit will stop recording automatically.
5.6 Zoom IN and OUT
Your camera can zoom in up to 4 X
Pressing the UP ( ) / DOWN ( ) buttons for selecting desired scene / view.
Note the zoom bar in screen showing the zooming range.
Resolution
Digital zoom
QVGA 30fps
4X
VGA 30fps
4X
WVGA 30fps
4X
WVGA 60fps
4X
720P 30fps
4X
1080P 30fps
2X
Full HD 30fps
Without Digital Zoom
5.7 Playback PICTURES and VIDEO clips
1. In PHOTO / VIDEO mode, Press the PLAYBACK button ( ) to enter PICTURES / VIDEO
Playback mode.
2. Pressing the UP ( ) / DOWN ( ) button to select desired PICTURE / VIDEO.
3. Pressing the OK button to confirm selected VIDEO or see full size PICTURE.
4. When viewing video clips, Press the OK button to start playing the video and press again to
pause.
5. When playing the video, press the UP ( ) / DOWN ( ) buttons for fast forward or
rewind the VIDEO.
5.8 Delete photographs and video clips
1. In PHOTO / VIDEO mode, Press the PLAYBACK button ( ) to enter PICTURES / VIDEO
Playback mode.
Select the photo or video to delete.
2. Press the MENU button to enter the delete mode.
3. Pressing the UP ( ) / DOWN ( ) buttons for select delete current image(YES) or delete
all images and press the OK button to confirm.
4. Pressing the MODE button to exit.
6. Connecting the HD DV camcorder
6.1 Connect to TV
When you wish to view on High Definition (HD) TV, please use supplied HDMI cable and connect
as shown below:
Set your HDTV to corresponding HDMI INPUT (review TV Manual if needed) and use camera
buttons in the same way as you use camera during PLAYBACK mode.
Enjoy watching pictures and HD VIDEO on large HDTV screen!
6.2 Connect to Personal computer
You may also connect your HD camcorder to PC for viewing PICTURES and VIDEOS on the
computer monitor as well as expanding your system to enjoy a wide range of functions. You may
edit your videos or images and send them to friends over the Internet or even post your own
VIDEOS on YouTube! Millions of people may view them!
Upload to YouTube
Please install MEDIAIMPRESSION. This software enables upload to YouTube. This will take you
directly to YouTube website for easy upload of videos.
Installing DirectX and ArcSoft MediaImpression
1. Please insert provided CD into computer’s CD ROM and follow screen prompts to install
DirectX and MediaImpression in your computer
2. Use USB cable to connect HD camcorder to computer
3. Open My Computer> Removable Disk and select image or video file
4. Click to open and watch High definition video played back.
You may also install QuickTime (not bundled on supplied CD) or other suitable programs for best
video playback.
HD Video data is very complex; use Win XP, Vista, MAC 10.4.9 and newest computers – older and
slower computers may not play your HD Video clips so well.
7. Specification
Image Sensor
5.0 Mega pixel CMOS sensor
Resolution
VIDEO
Full HD (1920×1080) up to 30fps
1080P30 (1440x1080), up to 30fps
720P30 (1280x720), up to 30fps
WVGAP60 (848x480), up to 60fps
WVGAP30 (848x480), up to 30fps
VGA (640x480), up to 30fps
QVGA (320x240), up to 30fps
PICTURES
8.0 Mega pixel (3200x2400)
5.0 Mega pixel (2592x1944)
3.0 Mega pixel (2048x1536)
Lens
F/2.8 f=8.5mm
LCD display
2.0” fine grade LTPS color LCD display
White balance
Auto / Sunny / Cloudy / Fluorescent / Incandescent
VIDEO format
MOV
External memory card
Support up to 16GB SD memory card ( card is required to store video &
pictures, class 4 or above SD card is recommended )
File format
VIDEO: MOV ; PICTURE: JPEG
Self timer
10 second options
PC interface
USB 2.0 port
Power source
2x AA alkaline batteries
TV-out
High Definition VIDEO: HDMI
Standard TV (NTSC or PAL) output: HDMI
8. PC system min requirement
Operating System
Windows 7 / Vista / XP
Mac 10.4.9 or above
CPU
Pentium III / 1GHz (minimum)
Pentium 4 / 3.0GHz or above processor (recommended)
RAM
At least 256MB (minimum) 1GB (recommended)
Interface
USB available port
Display Card
nVidia Geforce 7600 or ATI X 1600 or above
9. Troubleshooting
Problem
Cause
Solution
Cannot turn ON the
camcorder
1. Low battery power.
2. Battery not inserted
properly.
1. Replace with new 2x AA alkaline
batteries
2. Check that battery correctly
aligned when installed
VIDEO or PICTURES
cannot be saved when you
are taking them.
1.Micro SD card has not
been installed
2. The Micro SD card has
not been formatted
properly.
3. Memory is full. Display
shows ‘MEMORY FULL’.
1. Install Micro SD card
2. Format the Micro SD card at
SETUP mode of the camera.
Please refer to section 5.3.
3. Download the pictures and videos
from the camera to the computer
to create storage space.
Computer does not
recognize your camcorder
when connected. (You
cannot find removable disk)
Connection failure.
Make sure all cable connections are
secured. Restart the computer if
necessary.
The battery life is very short.
Incorrect or old, used up,
battery
Replace with new 2x AA alkaline
batteries
Blurry images
1. The HD camera is not
held steady during
recording
2. The lens of HD DV
camera is dirty.
1. Hold the HD DV camera steady
when taking pictures, wait to hear
the beep sound
2. Clean the lens with soft dry cloth.
 Loading...