

Page 1
DURABILITY • POWER • PERFORMANCE
Manual Revision #: 11222014 AT
www.colemanbbqs.com
Serial # __________________________________
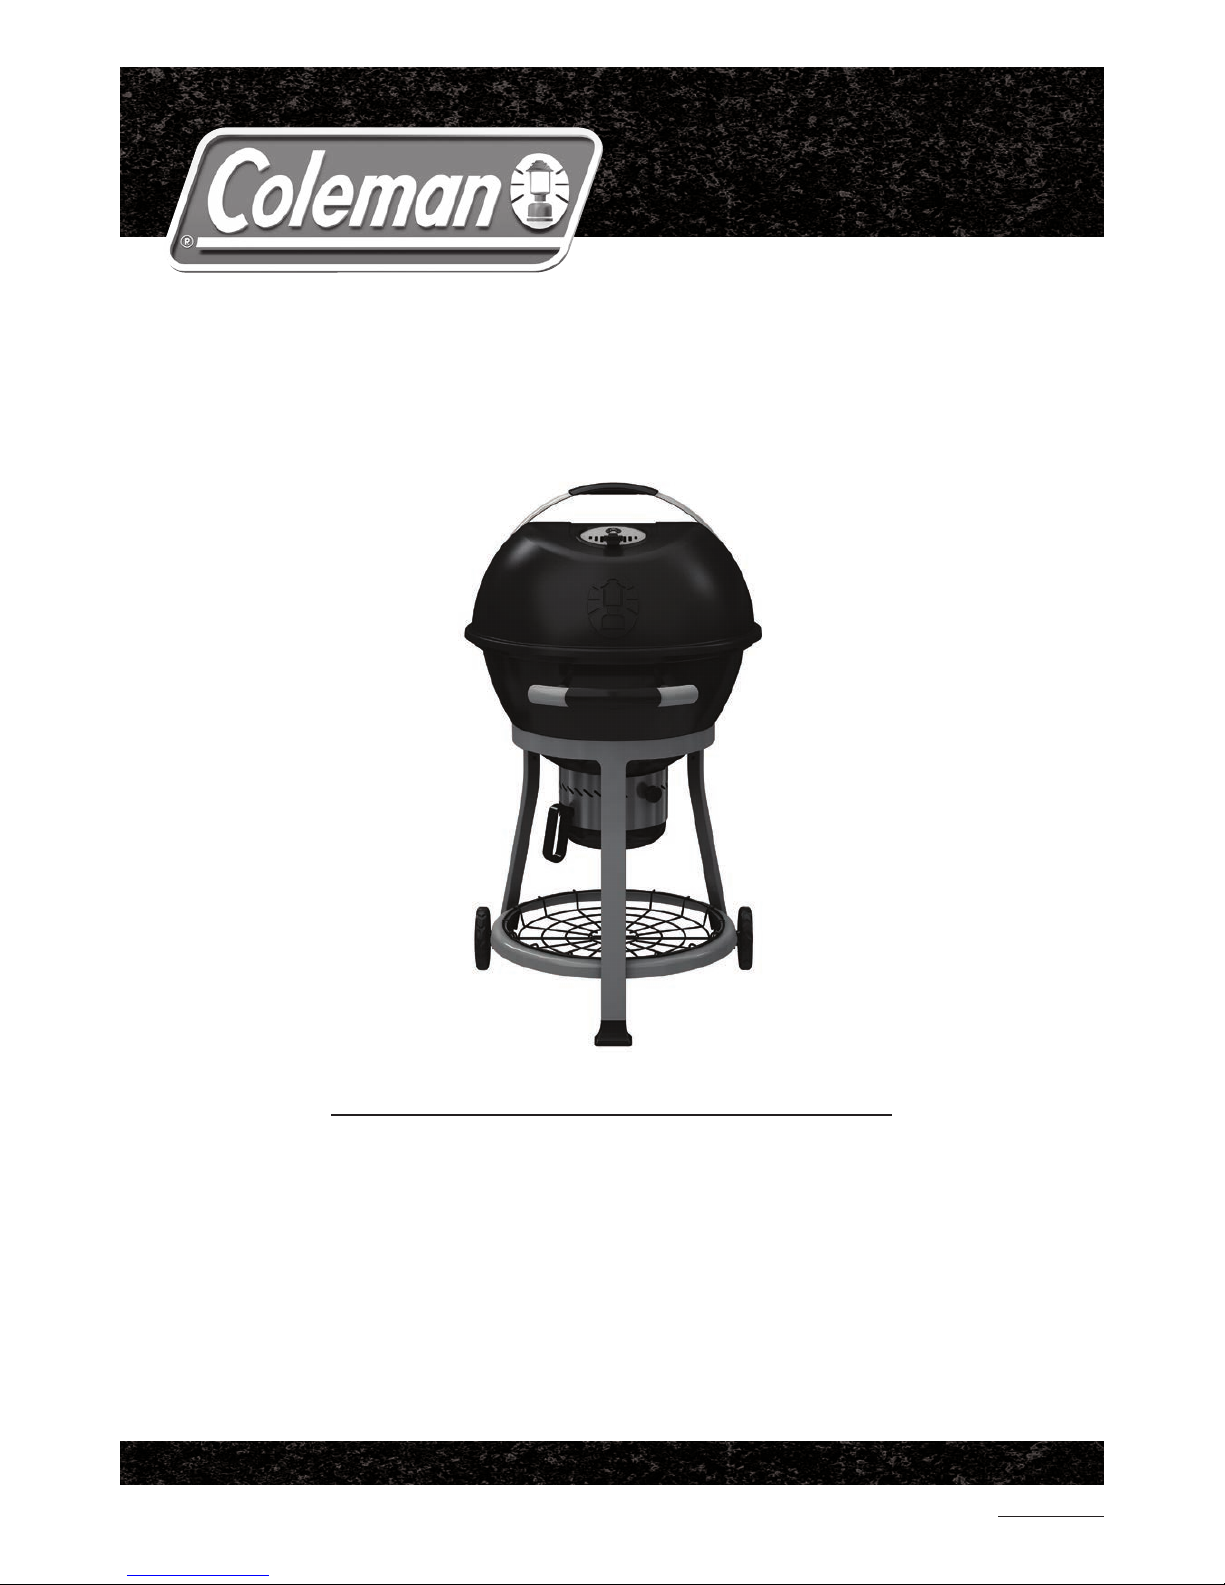
COOKOUT
TM
CHARCOAL KETTLE
ASSEMBLY MANUAL
85-3688-4 (C30501) Charcoal
LIMITED 2-YEAR WARRANTY
Read and save manual for future reference.
Assemble your COOKOUT™ immediately. Missing or damaged parts
should be claimed within 30 days of purchase.
For product inquiries, parts, warranty and troubleshooting support,
please call 1-800-275-4617.
Page 2
2
THIS MANUAL MUST REMAIN WITH THE PRODUCT AT ALL TIMES
To ORDER non-warranty replacement parts or accessories,
or to register your warranty, please visit us on the web at
www.colemanbbqs.com
CAUTION
Read and follow all safety statements, assembly instructions, use and
care directions before attempting use this product.
INSTALLER OR ASSEMBLER/CONSUMER
This manual should be kept with the COOKOUT™ at all times.
WARNING
Failure to follow all of the manufacturer’s instructions could result in hazardous
fires, explosions, property damage, or serious personal injury or even death.
WARNING
IN DIRECT SUN, AND IN OPERATION, YOUR COOKOUT’S SURFACES WILL
BECOME VERY HOT.
THIS COOKOUT™ IS FOR OUTDOOR USE ONLY
CONTACT CALL CENTRE IF ANY PARTS ARE MISSING
1-800-275-4617
STOP
Do not return this product to the store.
IF YOU NEED HELP OR PARTS, CALL THE COLEMAN® HOTLINE
1-800-275-4617
HOURS: 9AM-7PM EST Mon-Fri, CLOSED Saturday and Sunday
GET HELP FOR:
MISSING/DAMAGED PARTS • ASSEMBLY • TROUBLESHOOTING
• WARRANTY ASSISTANCE • PRODUCT INFORMATION
TIP: ASSEMBLE YOUR GRILL IMMEDIATELY. MISSING OR DAMAGED PARTS
MUST BE CLAIMED WITHIN 30 DAYS OF PURCHASE.
WARRANTY AND SERVICE
Page 3

3
TABLE OF CONTENTS
Danger 4
Safe Usage 4
Lighting Instructions 5
Operating Instructions 7
Putting Out the Fire 8
Ash Removal 8
Maintanence and Storage 9
Cooking Tips 10
Hardware Pack 11
Parts List 12
Exploded Diagram 13
Assembly Instructions 14
Warranty & Service 24
To ensure your satisfaction and for follow-up service,
register your BBQ online at
www.colemanbbqs.com
Page 4

4
• Do not move the COOKOUT™ when hot or in operation.
• Do not locate in windy settings. High winds adversely aect cooking performance.
• Do not use gasoline, alcohol, lighter fluid, or other highly volatile fluids to ignite charcoal.
• Do not remove ashes from the ash collection until charcoal is completely extinguished and cooled.
• Keep the lid closed during the preheat period, with vents fully opened.
• Never touch the cooking grate, charcoal grate, the charcoal, ash catcher, or the exterior of the
COOKOUT™ during or after use.
• Only put charcoal on the charcoal grate. Do not place charcoal directly into the fire bowl, ash catcher or
on the cooking grate.
• Barbecue mitts should always be worn while cooking, adjusting air vents, adding charcoal, and handling
the lid. Use proper barbecue tools, with long, heat-resistant handles.
• Do not use water to control flare-ups or to extinguish charcoal, as it may damage the porcelain finish.
Close air vents and replace the lid to extinguish charcoal.
• To control flare-ups, slightly close the vents. To completely extinguish fire, close all vents and lid
completely.
• Do not remove ashes from ash catcher until all charcoal is completely burned out and fully extinguished.
Allow ample time to cool.
SAFE USAGE
• Burning charcoal gives o carbon monoxide. Do not burn charcoal inside homes, garages, tents,
vehicles or any enclosed areas.
• Keep children and pets away from the COOKOUT™ when operating.
• Never leave the COOKOUT™ unattended while in use.
• Minimum clearance to adjacent combustible materials:
Minimum of 36˝ (91.44 cm) from furthest protruding edge on all sides of the COOKOUT™ Charcoal
Kettle
• Keep the COOKOUT™ on a secure, level surface at all times.
• Do not operate the COOKOUT™ under any overhead construction, such as; roof coverings, carports,
awnings or overhang.
DANGER
Page 5
5
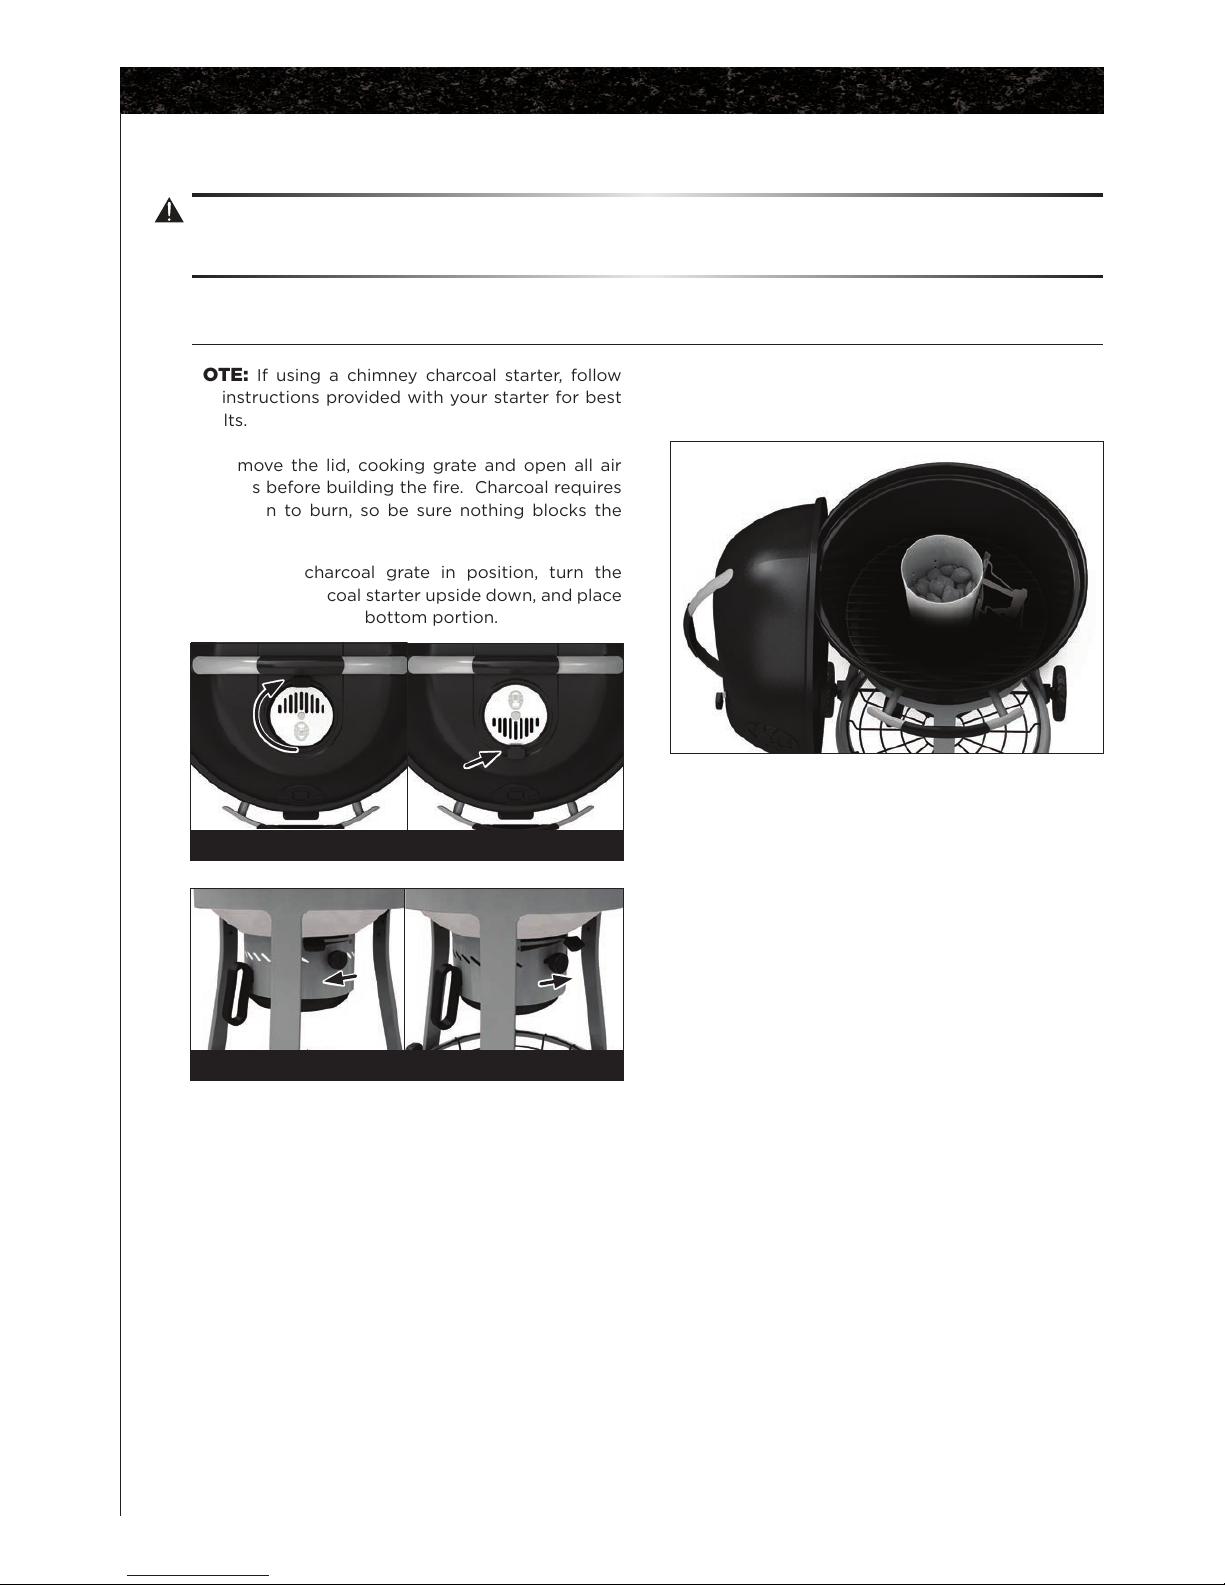
NOTE: If using a chimney charcoal starter, follow
the instructions provided with your starter for best
results.
1. Remove the lid, cooking grate and open all air
vents before building the fire. Charcoal requires
oxygen to burn, so be sure nothing blocks the
vents.
2. With the charcoal grate in position, turn the
chimney charcoal starter upside down, and place
newspaper in the bottom portion.
3. Place the chimney charcoal starter into the center
of the charcoal grate, in the upright position.
4. Fill the top half of the chimney charcoal starter
with charcoal.
5. Using a lighter, ignite the newspaper through
the holes provided in the bottom of the chimney
charcoal starter.
6. Leave the chimney charcoal starter on top of the
charcoal grate with the lid removed.
We recommend using a chimney charcoal starter, electric charcoal starter, lighting cubes or
newspaper to light charcoal. DO NOT USE LIGHTER FLUID.
WARNING
For proper air flow, remove accumulated ashes from the ash catcher, only after the coals are fully
extinguished.
CHIMNEY CHARCOAL STARTER INSTRUCTIONS
LIGHTING INSTRUCTIONS
7. READY: The briquettes are ready when the
coals are covered with a light grey ash. This
usually takes 25 to 30 minutes.
8. With a heavy, long sleeved oven mitt, carefully
empty the hot coals, from the chimney charcoal
starter onto the charcoal grate.
9. Arrange the coals into an even layer using long
cooking tongs, or pile the coals in the middle
of the grate, if both direct and indirect heat is
needed.
FLAVOUR TIP: For additional smoky avour,
add moistened avoured hardwood chips
(pre-soaked) directly on the coals before you
begin cooking.
10. Re-position the cooking grate, close the lid and
allow the charcoal to burn.
11. Wait for the cooking grate to preheat, before
adding food.
12. Re-position the lid and ensure that the air vents
are open.
13. Consult your recipe for recommended cooking
times. Use a temperature probe to check
doneness.
Opened
Opened
Closed
Closed
Page 6
6
USING LIGHTER CUBES OR CRUMBLED NEWSPAPER FOR LIGHTING
1. Place either lighter cubes (which are non-toxic, odorless and tasteless) or crumpled newspaper
into the center of the Charcoal grate.
2. Pile the charcoal briquettes into a pyramid shape directly over the lighter cubes or newspaper.
3. Using a lighter, light the lighter cubes or newspaper.
4. Once fully lit, close the lid and allow the charcoal to burn.
5. Follow step 8-14 as shown on page 5.
HOW MUCH CHARCOAL IS REQUIRED?
• Approximately 50 briquettes (1.5 kg / 3.3 lb).
• Charcoal recommendations are approximate. Longer cooking times, cold or windy temperatures will require
that additional charcoal be added to reach and maintain ideal cooking temperatures.
ADDING CHARCOAL DURING COOKING
WARNING
Always wear protective gloves. Always use long handled heat resistant tongs for loading additional
charcoal.
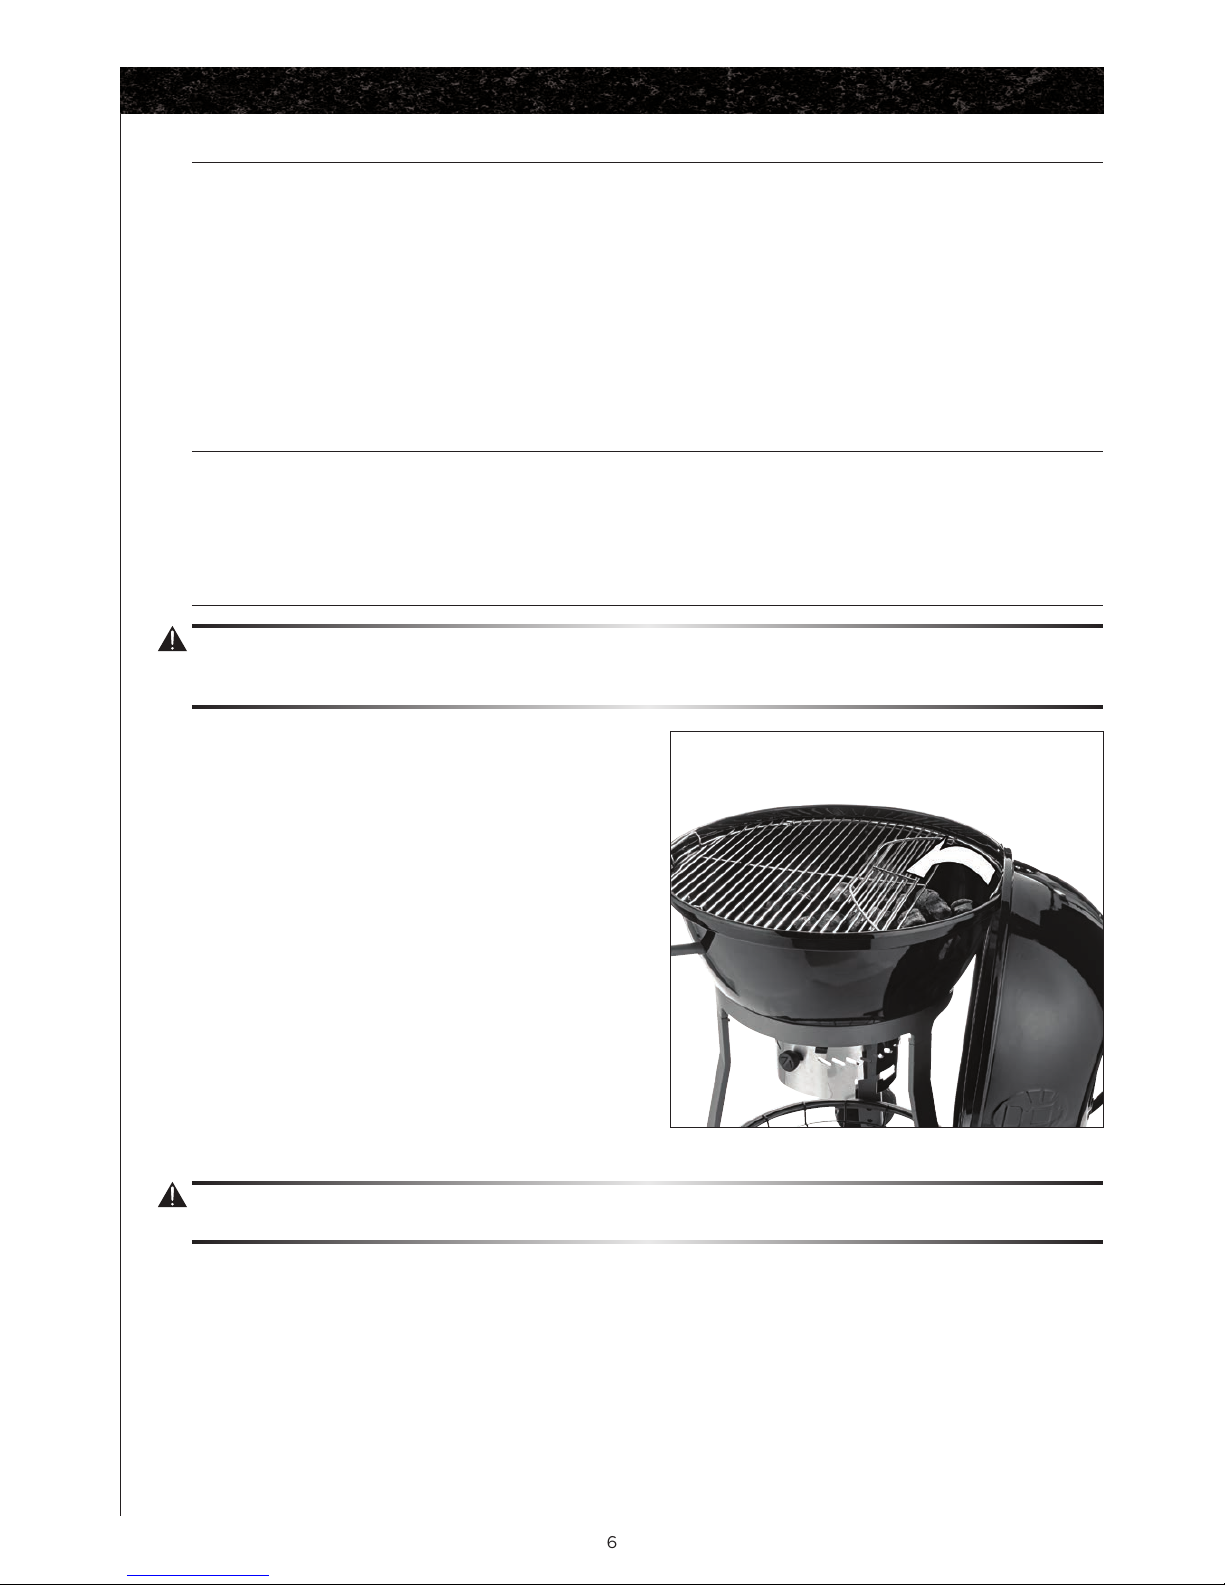
1. Remove the COOKOUT™ lid and hook it on the side
of the COOKOUT™ fire bowl.
2. Move food to one side of the cooking grate.
3. To access the charcoal grate, lift the hinged portion
of the cooking grate.
4. Load approximately 12-20 additional briquettes
(390 g - 520 g / 0.86 lb - 1.15 lb) for each additional
hour of cooking required.
ATTENTION
Never leave your kettle unattended while in use.
LIGHTING INSTRUCTIONS
Page 7
7
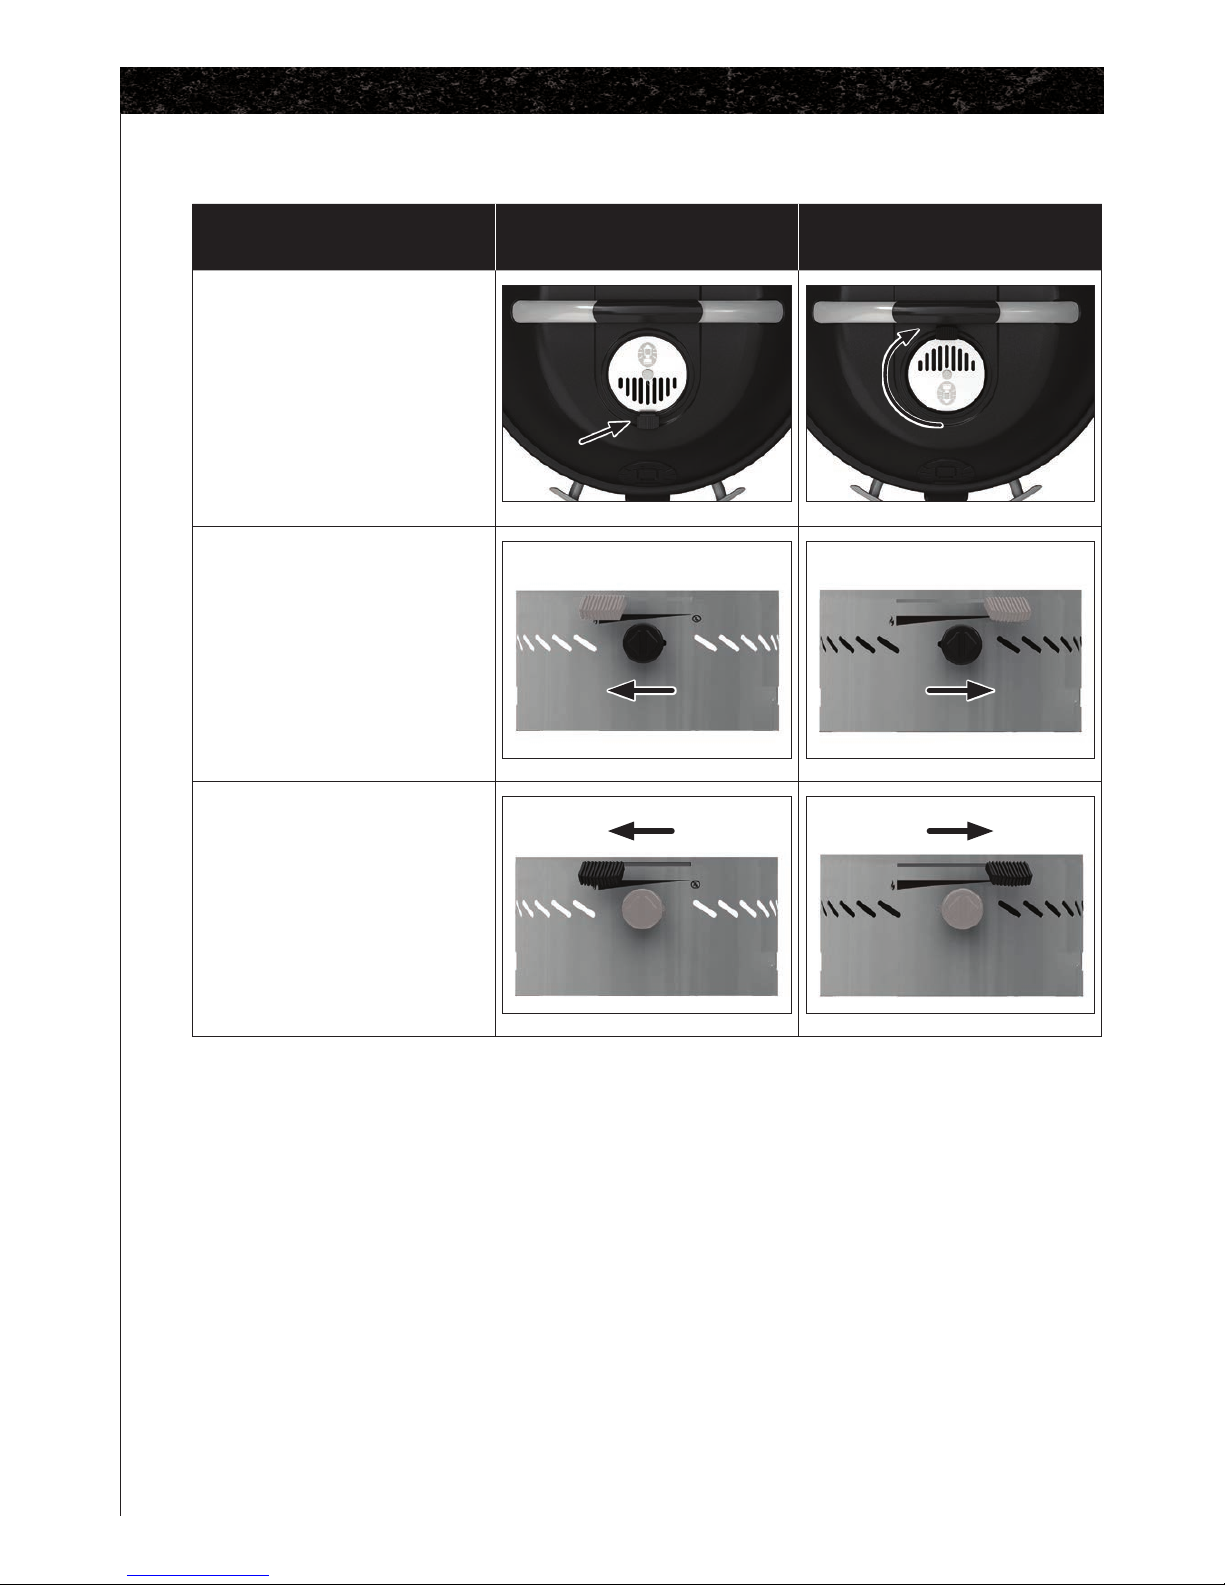
Oxygen is an essential part of building a proper fire, elevating and stabilizing cooking temperatures
and controlling cooking times. The COOKOUT™ Charcoal Kettle comes equipped with three air
intake controls.
FEATURES LIGHTING & COOKING
During lighting and operation all vents should
be in the OPEN position. More air increases
the burning temperature of the coals.
SHUT DOWN
Closing the vent either partially or
completely will help to cool down the coals.
Less air decreases the burning temperature.
COOKOUT™ Lid Vent
COOKOUT™ Fire Bowl Vent
COOKOUT™ Ash Sweep
The Ash Sweep functions as both a cleaning
tool for eliminating ash from the firebowl,
and also an air intake control while cooking.
OPERATING INSTRUCTIONS
Page 8
8
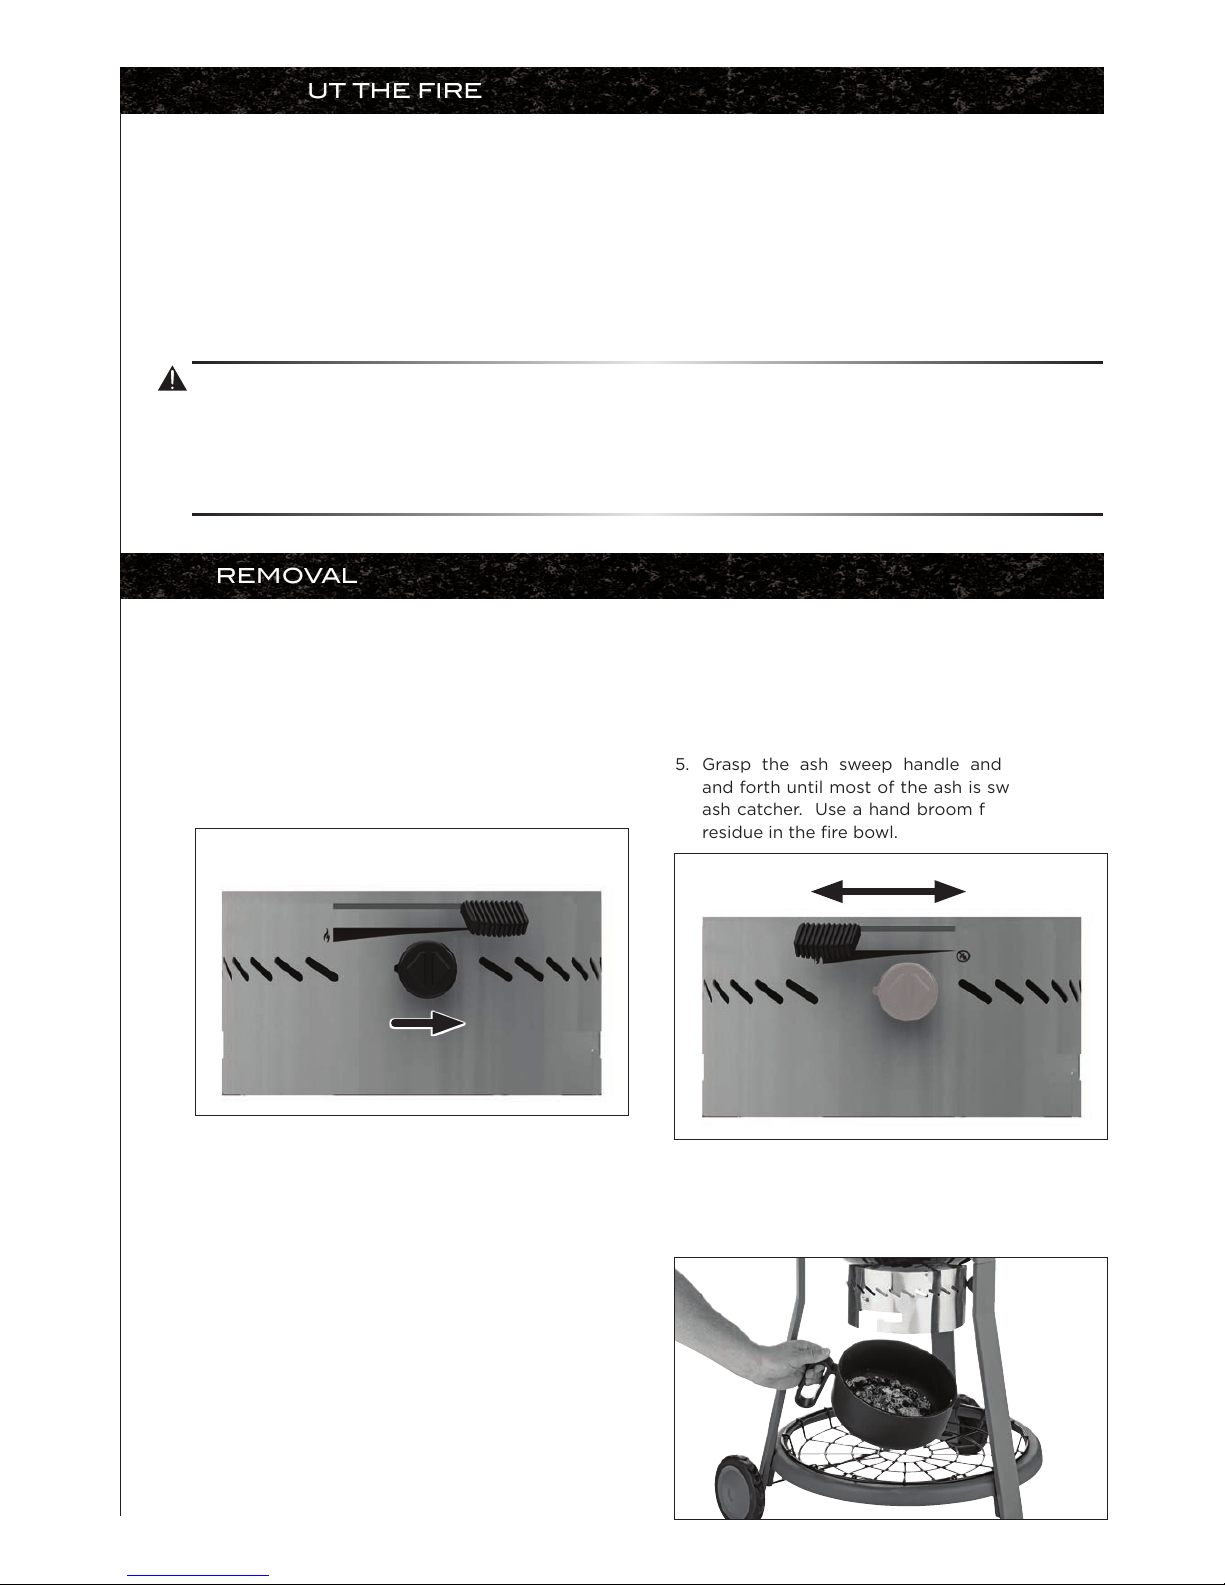
5. Grasp the ash sweep handle and move back
and forth until most of the ash is swept into the
ash catcher. Use a hand broom for any leftover
residue in the fire bowl.
6. With your heat resistant ash container handy,
remove the ash catcher from its position and
carefully dump all ashes into a heat resistant
container. Allow it to sit for 24 hours.
PUTTING OUT THE FIRE
ASH REMOVAL
Once cooking is complete, follow these steps to extinguish the fire:
1. Using protective gloves, close the COOKOUT™ lid.
2. Close all vents.
NOTE:
Assume that it will take at least 1 hour for your charcoal to extinguish and your COOKOUT™ to cool down.
There is not an ON or OFF switch for a charcoal fire. Always be cautious about making any assumptions
about when the fire is completely out and completely cool.
WARNING
o Do not store your COOKOUT™ until ash and coals are fully extinguished.
o Allow charcoal to burn out before removing from the COOKOUT™ to avoid a possible fire.
o Never dump hot coals where they might be stepped on or be a fire hazard.
o Never dump ashes or coal before they are fully extinguished.
Remove ash catcher, only after the charcoal has been extinguished and allowed to cool.
TIP:
A pile of ash left in the ash catcher can collect moisture and make cleanup a challenge. Clean the ash catcher
after every use.
1. Ensure that the ash catcher is in position.
2. Ensure that the fire bowl vent is closed.
3. Once you are sure that the ash has cooled,
remove the COOKOUT™ lid, and cooking grate.
4. Sweep all ash and debris from the charcoal grate
into the lower fire bowl. Dispose of any larger
pieces of charcoal.
Page 9

9
MAINTENANCE AND STORAGE
Before storing your Coleman® COOKOUT™ Kettle, give it a thorough cleaning. Follow the care
and maintenance instructions outlined below.
GENERAL MAINTENANCE
ATTENTION
o DO NOT USE ANY ABRASIVE CLEANERS OR STEEL WOOL on cooking or charcoal grate or
any painted, porcelain or stainless steel parts.
o Porcelain enamel components must be handled with additional care. The baked-on enamel finish is
glass-like, and will chip if struck.
FIRE BOWL AND LID
• Use a plastic paint scraper to remove build-up, food residue and ash from inside the COOKOUT ™ fire bowl
and lid.
• If necessary, wash the interior and exterior of the COOKOUT™ lid and fire bowl with a warm detergent and
water solution. Always rinse and dry thoroughly before re-installing parts.
• Spray a light coating of vegetable cooking spray on the interior surfaces of your COOKOUT™ for added
protection, only when cool.
ASH CATCHER
• Always wait for ash and grease to cool before removing the ash catcher and dumping in a non-combustible
container.
• Wash the ash catcher with soap and water, rinse and dry thoroughly before replacing.
COOKING GRATE
• Always perform a burn-o and clean-up with your brass grill brush, at the START of your cooking session,
during preheat. Leftover oil on your cooking grate will help to protect it in between cooking sessions.
• If necessary, wash cooking grate with soap and water. Do not immerse grate in water.
• Rinse and dry thoroughly with a towel.
STORAGE
• Once all surfaces are clean and dry, cover your kettle with a full length cover to protect surfaces from dirt
and moisture. If storing for long periods, it is recommended to remove the cooking grate and charcoal
grates and store in a dry place.
• If storing your kettle in a garage or on a concrete floor, it is recommended to place a large piece of cardboard
underneath the Kettle to protect from moisture.
• Always store charcoal in a cool, dry place.
Page 10

10
COOKING TIPS
• All vents must remain OPEN during lighting and cooking.
• Meat thermometers help you make sure that meats are cooked to the desired temperature.
• Prevent food from sticking and protect your grates from moisture by spreading vegetable oil or shortening
on a COLD, UNLIT cooking grate.
• Trimming fat from meat helps to avoid flare-ups and makes for healthier food.
• Apply sauces at the end of the cooking.
• Leave space around each food item on the grate to allow for even cooking and smoke penetration.
• Turn meat just once on the grill. For steaks, turn them when the juices start to bubble on the uncooked side.
The clearer the juice, the more well-done the meat.
• Avoid cross contamination. Use separate trays for uncooked and cooked food.
• Brush the grilling surface (once it’s cooled) with a wired brush to remove any stuck on food.
• If the charcoal is damp or wet, we recommend discarding it, as the performance will be drastically reduced.
NOTE:
Assume that it will take at least 1 hour for your charcoal to extinguish and your COOKOUT™ to cool down.
There is not an ON or OFF switch for a charcoal fire. Always be cautious about making any assumptions
about when the fire is completely out and completely cool.
WARNING
For your families safety, do not attempt to light the kettle until you have reviewed this manual.
WARNING
Lid, lid handle and fire bowl may be hot to the touch. Always wear protective, heat resistant grilling gloves
while using your COOKOUT™ kettle.
Page 11

11
TOOLS NEEDED FOR ASSEMBLY
• #2 Phillips screwdriver (long and short)
• Pliers
For correct hardware assembly, always
position the lock washer between the screw
and the flat washer.
HARDWARE PACK
NO.10-24UNC X10 Screw
X 22
NO.10-24UNC X13 Screw
X 3
Fiber Washer
X 14
ST4.2X6 Tapping Screw
X 1
Spacer
X 4
Hitch Pin
X 2
M10 Nut
X 1
Screw for Vent
X 2
Compression Spring
X 2
1/4’’-20UNC Wing Nut
X 2
1
9
2
3
4 5
6
7
10
8
No. Description Part Number Qty.
1 NO.10-24UNC X10 Screw 20124-10010-250 22
2 ST4.2X6 Tapping Screw 24200-42006-136 1
3 Screw for Vent G531-0048-9081 2
4 Fiber Washer G431-0018-9000 14
5 Spacer C305-0003-9000 4
6 Compression Spring G528-0058-9000 2
7 Hitch Pin G515-0013-9000 2
8 1/4’’-20UNC Wing Nut 33300-13000-032 2
9 NO.10-24UNC X13 Screw 20124-10013-250 3
10 M10 Nut 33401-10000-037 1
Lock Washer
Flat Washer
Screw
BEFORE ASSEMBLING THE COOKOUT™, READ THESE INSTRUCTIONS CAREFULLY.
Assemble the barbecue on a flat, clean surface.
Caution:
Sheet metal can cause injury. Wear gloves when installing the grill.
Page 12

12
PARTS LIST FOR 85-3688-4 (C30501)
Item No. Qty. Description Part No.
AA 1 Lid C305-0001-01
AB 1 Lid Handle C305-0100-01
AC 1 Lid Vent G531-0001-01
BA 1 Fire Bowl C305-0201-01
BB1 1 Ash Sweep C305-0006-01
BB2 1 Ash Sweep Handle G531-0047-01
BC 1 Cooking Grate C305-0300-01
BD 1 Charcoal Grate C305-0007-01
BE 1 Front Handle C305-0013-01
CA 1 Fire Bowl Vent C305-0400-01
CB 1 Fire Bowl Vent Handle C305-0009-01
CC 1 Inner Vent C305-0008-01
CD 1 Ash Catcher C305-0010-01
CE 1 Ash Catcher Handle C305-0011-01
DA 1 Upper Cart Ring C305-0500-01
DB 1 Lower Cart Ring C305-0800-01
DC 1 Cart Leg, Front C305-0014-01
DD 1 Left Cart Leg, Rear C305-0600-01
DE 1 Right Cart Leg, Rear C305-0700-01
DF 1 End Cap, Front Cart Leg C305-0016-01
DG 1 Bottom Shelf C305-0015-01
DH 2 Wheel E202-0013-01
DI 2 Wheel Cap E202-0016-01
DJ 1 Wheel Axle C305-0019-01
F1 1 Hardware Pack C305-B001-01
F2 1 Manual C305-M001-01
Page 13

13
EXPLODED DIAGRAM FOR 85-3688-4 (C30501)
AA
BA
CA
CC
CE
DI
DJ
DG
DI
CB
DB
DF
DC
DE
DA
BE
BD
BC
AB
DD
CD
BB1
BB2
AC
DH
Extras
Hardware
Pack
Manual
F1 F2
Page 14

14
ASSEMBLY INSTRUCTIONS
1
2
6
6
1
1
X 9
X 6
DE
DD
DC
DC
DA
DE
DB
DD
DA
DB
DD
DC
DE
DE
DA
DF
DC
Page 15

15
ASSEMBLY INSTRUCTIONS
3
6
10
X 1
DJ
DI
DH
DH
DI
DH
DH
DB
10
TIP: 2 people recommended for this step.
10
Page 16

16
BA
DA
DA
DG
DB
ASSEMBLY INSTRUCTIONS
4
9 4
X 3 X 3
5
Page 17

17
6
ASSEMBLY INSTRUCTIONS
BA
BB1
BA
BB2
6
2
X 1
63 7
X 1X 1 X 1
B2A1
B2
A1
B2
DA
2
Page 18

18
BA
CA
ASSEMBLY INSTRUCTIONS
7
6 6
1 4
X 3 X 3
3X
TIP: 2 people recommended for this step.
Page 19

19
8
ASSEMBLY INSTRUCTIONS
9
CD
1
X 2
CDCE
BE
BA
1 45 4
X 2 X 2X 2 X 2
A1 B2
B2
A1
A1
B2
A1
2X
Page 20

20
10
BC
BD
BA
ASSEMBLY INSTRUCTIONS
AA
AC
11
B2
A1
63 7
X 1X 1 X 1
B2A1
B2
Page 21

21
ASSEMBLY INSTRUCTIONS
12
AB
AA
A1A1
B2
B2
6
4 45 8
X 2 X 2X 2 X 2
A1 B2
A1
2X
Page 22

22
AA
AB
13
ASSEMBLY INSTRUCTIONS
Page 23

23
NOTES
Page 24

24
BEFORE YOU CALL FOR SERVICE have the following information available:
1. Serial number: The serial number can be found on the side of the COOKOUT™ carton, the cover page of
the user manuals, and on the rating label located on the COOKOUT™ cart leg.
2. Model number: The model number is located on the front cover of the user manual, the bottom right
corner of the rating label and also on your cash register receipt.
3. Proof of purchase by the original owner.
Call the Coleman® Customer Care Hotline 1-800-275-4617
HOURS: 9AM- 7PM EST Mon-Fri, Closed Saturday and Sunday
IF YOUR PRODUCT IS DAMAGED:
1. Call the Coleman® Customer Care Hotline 1-800-275-4617
2. Do not return to the store for replacement of damaged or defective parts. Coleman® Customer Care will
ensure that all in-stock replacement parts arrive at your home within 3-10 business days.
3. Concealed Damage: If damage is unnoticed until merchandise is unpacked, resolve issue by contacting
Coleman® Customer Care immediately. Missing or damaged parts should be claimed within 30 days of
purchase.
To ensure your satisfaction and for follow-up service,
register your BBQ online at www.colemanbbqs.com
LIMITED Warranty:
Winners Products, hereby warrants to the ORIGINAL PURCHASER of this Coleman® COOKOUT™ kettle
that it will be free of defects in workmanship, from the date of purchase, for the period of the warranty,
as outlined below.
Please see Limitations and Exclusions section on the following page.
Limited 2 Year:
Fire bowl
Lid
Limited 1 Year:
All remaining parts
CAUTION
Some parts may contain sharp edges – especially as noted in the manual! Wear protective gloves
if necessary. For residential use ONLY. Do not use for commercial cooking.
WARRANTY AND SERVICE
Page 25

25
LIMITATION AND EXCLUSIONS
Winners Products has the following limitations to its warranty:
1. This limited warranty is non-transferable and becomes void if used for commercial or rental purposes.
2. This warranty applies only when barbecue is used in Canada
3. Warranty is in lieu of all warranties, expressed or implied, and all other obligations or liabilities related
to the sale or use of its grill products.
4. Winners Products shall not be liable for incidental, consequential, special or contingent damages
resulting from its breach of this written warranty or any implied warranty.
5. Winners Products will repair or replace parts, at its option, proven defective under normal use and
service and which on examination during the applicable warranty period. (See exclusions to warranty
coverage below)
6. Shipping and handling charges are the responsibility of the original consumer-purchaser for all in/out of
warranty part orders.
7. This limited warranty will not reimburse you for the cost of any inconvenience, food, personal injury or
property damage.
8. Winners Products does not authorize any person or company to assume for it any other obligation or
liability in connection with the sale, installation, use, removal, return, or replacement of its equipment;
and no such representations are binding on Winners Products.
9. Visit us at www.colemanbbqs.com to register your product on line. The purchaser shall retain a copy
of the purchase invoice for future claims.
Winners Products excludes from its warranty the following:
a. Accidental damage, abuse, tampering or misuse, misapplication, vandalism, careless handling;
b. This warranty excludes surface rust or rust perforation, normal wear and tear, chipping and scratching
on paint or porcelain enamel surfaces, discolouration caused by heat and smoke, chemical exposure in
the atmosphere, and other damages which result with normal use and are otherwise uncontrollable by
the manufacturer.
c. Damages caused by improper assembly installation, or alteration.
d. Damages caused by failure to follow proper usage, safety and maintenance instructions presented
throughout this manual, that result in a fire, personal injury, or property damage;
e. Improper lighting or use of fuel or fuel lighting accelerants not recommended within this manual, and
strictly prohibited for use with this COOKOUT™.
f. Part failure due to lack of cleaning and maintenance, use of improper cleaning products, such as
abrasive and chemical cleaners, porcelain oven cleaner and other chemical cleaners which can cause
damage to surfaces;
There are no other express warranties except as set forth herein and any applicable implied warranties
of merchantability and fitness are limited in duration to the period of coverage of this express written
limited warranty.
To ensure your satisfaction
And for follow-up service, register your grill online at:
www.colemanbbqs.com
WARRANTY
Page 26

Manufactured by Winners Products Engineering Ltd.
Coleman®, and are registered trademarks of
The Coleman Company, Inc. used under license. ©2015 The Coleman Company, Inc.
Join the conversation
facebook.com/colemangrills twitter.com/colemangrills
www.colemanbbqs.com
 Loading...