

Page 1
COLEMAN® C5WP Instruction Manual
Table of Contents
Introduction ................................................................................................................ 1
Key Features ............................................................................................................... 1
What’s Included .......................................................................................................... 1
Computer System Requirements ................................................................................ 1
Use Notice .................................................................................................................. 1
Quick Look at Your Camera ......................................................................................... 2
Main Icons on the LCD ................................................................................................ 2
Prepare Your Camera for Use ...................................................................................... 3
Charging the Battery ................................................................................................... 4
Starting Your Digital Camera ....................................................................................... 5
Camera Mode ............................................................................................................. 5
Video Mode ................................................................................................................ 8
Playback Mode ........................................................................................................... 9
Camera Setup ........................................................................................................... 11
Appendix A: Technical Specifications ........................................................................ 13
Page 2

1
Introduction
Thank you for purchasing the Coleman® C5WP Xtreme 12MP Waterproof Digital Camera. When sealed
correctly, this camera is water resistant up to 33 ft (10 meters).
Key Features
Waterproof up to 33 feet (10 meters)
12.0 Mega Pixels Maximum Resolution
2.7” LCD Screen Display
Shock Resistant to 3.2 feet (1 meter)
10 Scene Modes
Anti-Shake Image Stabilization
Face Detection
Video Recording with Sound
Freezeproof up to -10 Degrees Celcius
Dustproof
Micro SD Expandable up to 8GB
Self-Timer
16MB Internal Memory
Rechargeable Lithium-Ion Battery
What’s Included
C5WP Xtreme Digital Camera
USB Output Cabke
Image Editing Software
Lithium-Ion Battery
Camera Pouch
Hand Strap
Instruction Manual
AC Adaptor
Computer System Requirements
Pentium processor or above with Windows 2000, XP
Operating System: Windows 7 / Vista / XP / Mac 10.4.9 or above
CPU: Pentium III / 1GHz (minimum) / Pentium 4 / 3.0GHz or above processor (recommended)
RAM: At least 256MB (minimum) / 1GB (recommended)
Interface: USB available port
Video Card: nVidia Geforce 7600 or ATI X 1600 or above
Note: This digital camera is plug and play compatible when used on a Mac and a PC, However, the included
software can only be used with a Windows operating system only.
Use Notice
Please read this manual carefully before using the camera, and pay attention to the following notice.
- Do not open the battery door while submerged in water.
- Close the battery door properly for the best water-tight seal.
- Ensure that the latch on the battery door is correctly closed. Ensure to press the battery door in firmly until you
hear an audible click. That audible click denotes a proper waterpoof seal.
- Ensure to cover the microphone hole with the attached microphone plug before submersion underwater.
- Rinse with clean water after use.
Page 3
2
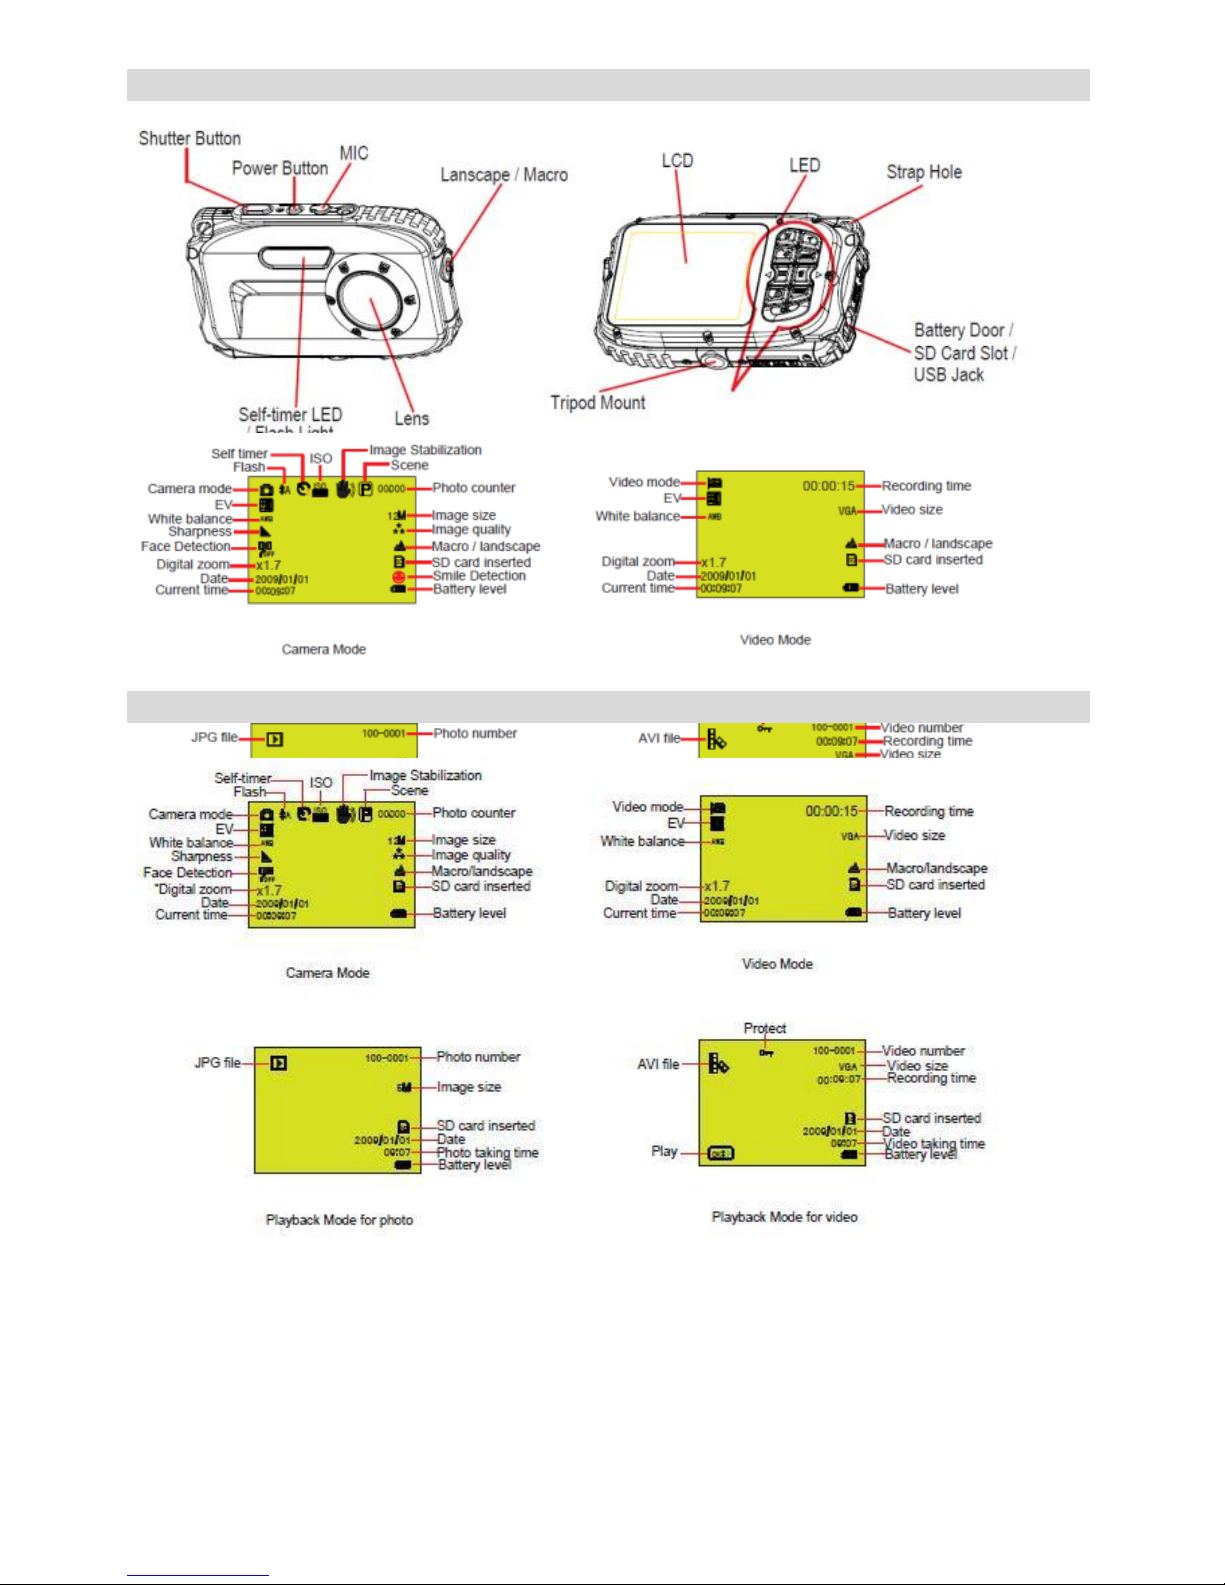
Quick Look at Your Camera
Main Icons on the LCD
Page 4
3
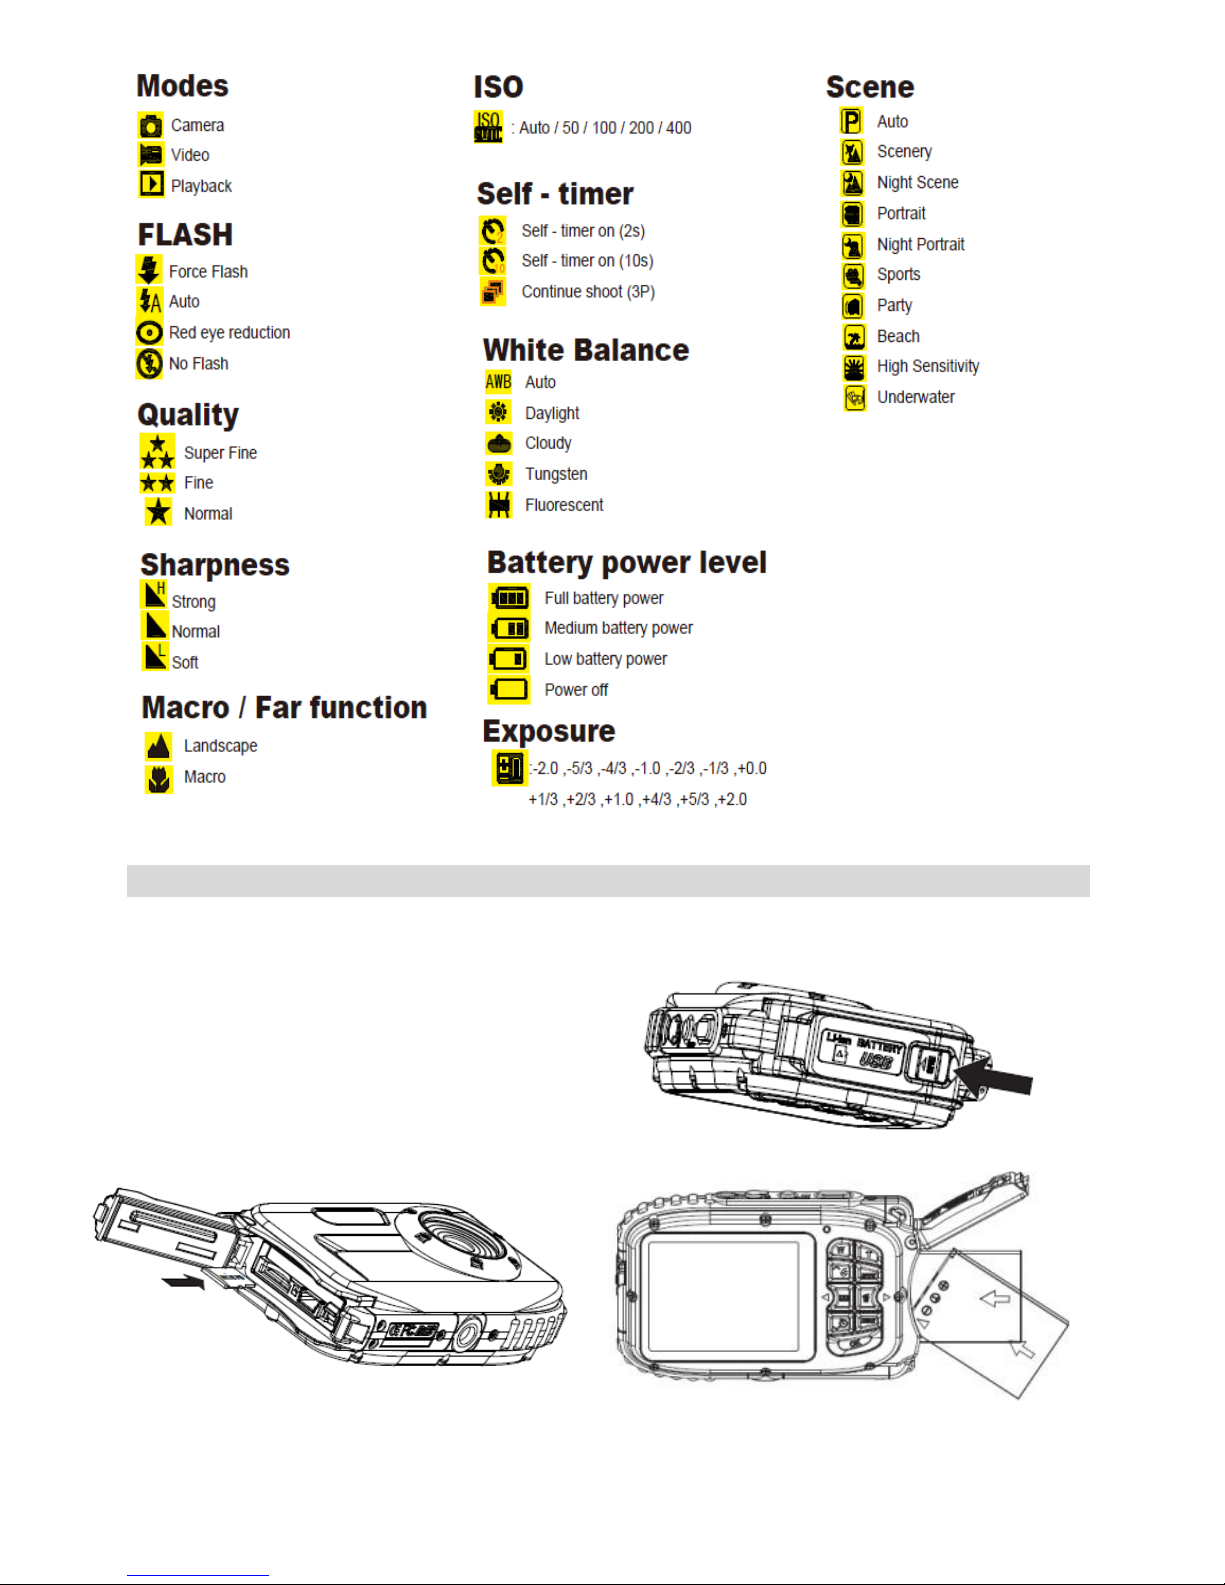
Prepare Your Camera for Use
Install the rechargeable lithium ion battery and micro SD memory card into the appropriate slots.
Your camera supportes a micro SD memory
card up to 8GB. Please refer to the diagram
for correct installation.
Micro SD card direction Battery direction
Page 5
4
Battery note:
1. “Low battery” will appear on the LCD when battery power is lowand your needs to be recharged.
2. Please remove the battery when you do not intend to use your camera for an extended period of time to
prevent leakage and corrosion.
3. Your digital camera will power off with the battery has been completely depleted.
Micro SD memory card note:
This camera supports Micro SD memory cards up to 8GB. The internal memory is for you to take one some test
photos. Please insert a compatible memory card to begin using your camera.
Locate the Micro SD memory card slot, and insert the memory card until you feel and hear an audible “click”
sound. When the icon appears on the LCD screen, this indicates that your SD card is installed correctly.
1. Formatting will delete all the data on the SD memory card including protected data.
2. Do not remove the memory card during formatting as this may permanently damage the card and render it
unusable.
3. Once you download your photos/videos to your computer, you can delete the photos/videos from your
memory card in order to free up some space and continue using your camera.
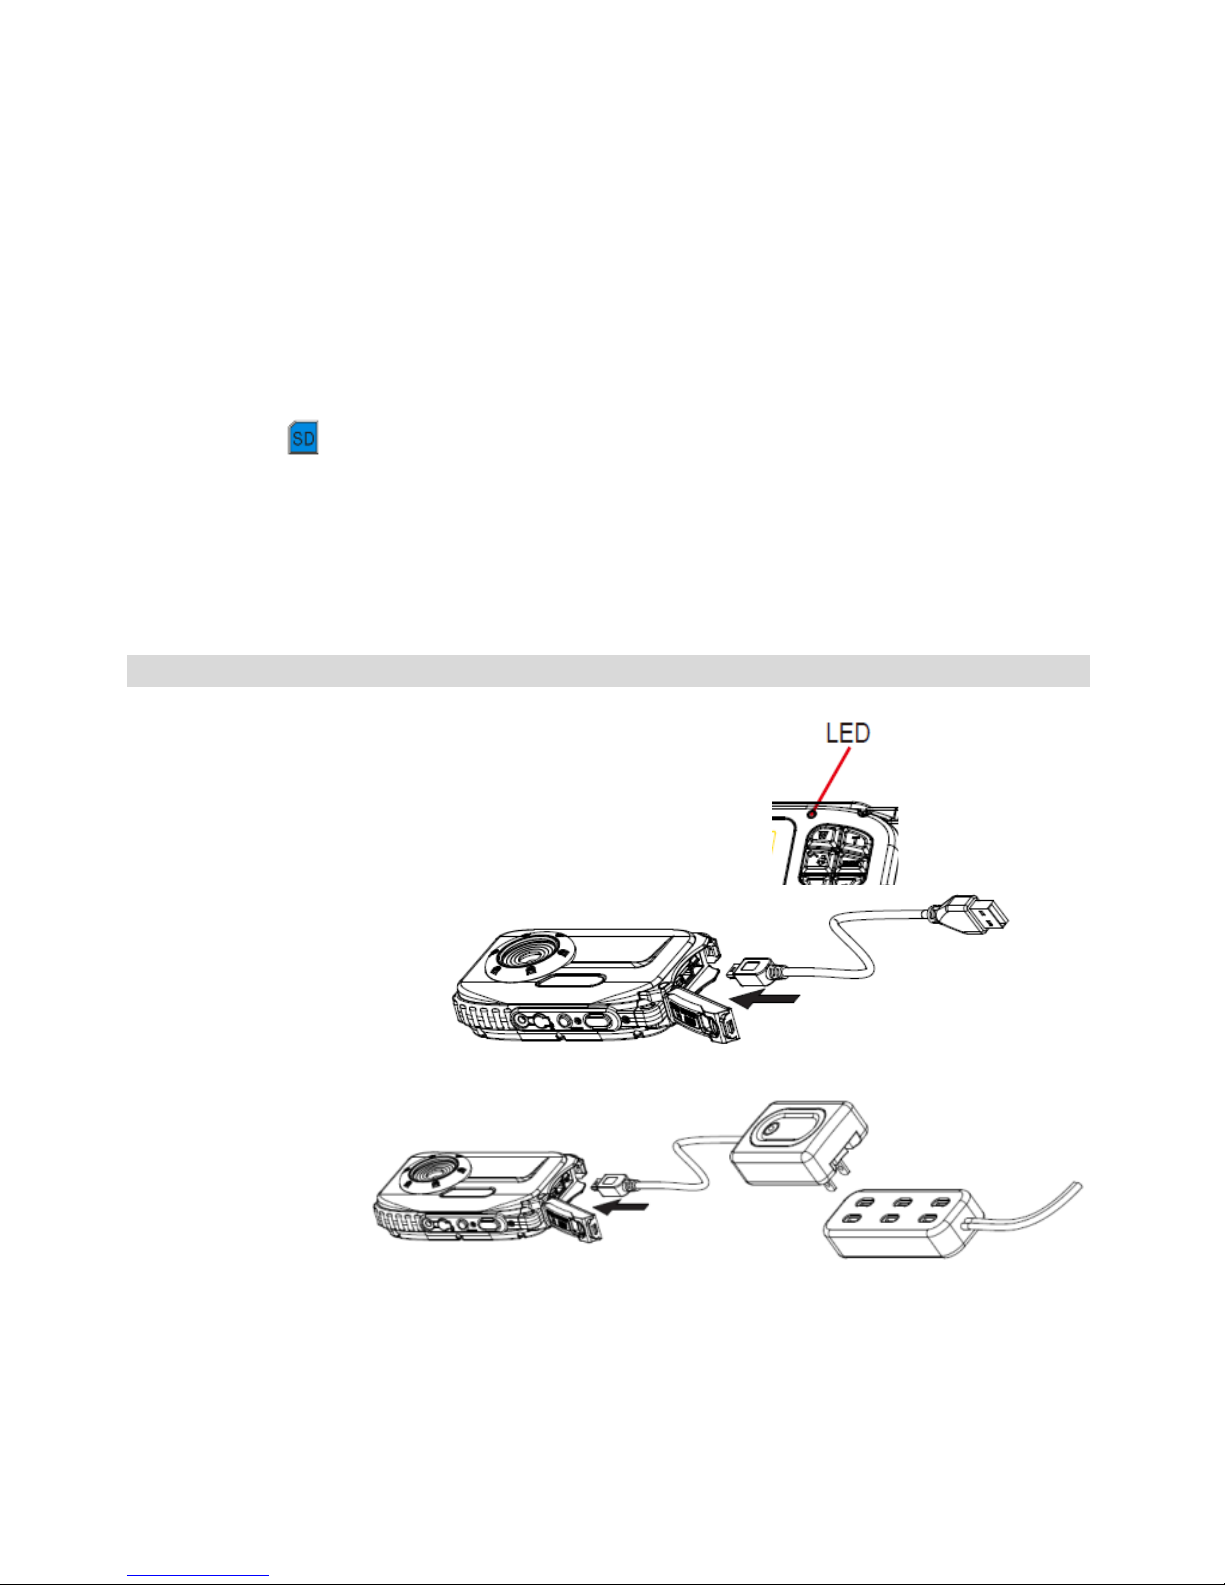
Charging the Battery
1. Insert the battery into your camera.
2. Please use the supplied USB cable to connect your
camera and computer or USB charger for charging.
When the battery is charging, the LED will light up.
[1] Via the computer:
[2] Via the USB charger:
Please follow the above illustration for charging.
Notice: The specification of the charger: INPUT:100~240VAC/ OUTPUT: 5VDC. Do not use any other charger
to charge your camera. Using a charger other that the one supplied will cause permament damage and will
void your warranty.
Page 6

5
Starting Your Digital Camera
There are 3 modes on your camera.
Camera Mode: Take still photos.
Video Mode: Capture video.
Playback Mode: View, print, and edit photos and view videos.
Power on
Press the Power button once to turn your camera on. The LCD will light up and it will sound a “beep”. This audible
alert indicates that your camera is turned on and ready for use.
Power off
Press the Power button once to turn your camera off. When there is insufficient battery power, your camera will
automatically power off.
Camera Mode
Taking Photos
In the top right corner of the LCD, a counter will display the amount of pictures remaining on the memory card.
When the memory (photo capacity) is full, the LCD screen will display “Memory Full”.
Digital Zoom
Use the T and W buttons to adjust the zoom. The icon will show on your LCD screen. Press the T button to
zoom in on your subject. Push the W button to zoom back out.
Macro Shooting
On the left side of the camera, slide the macro switch to the position until the icon appears on the
LCD screen. This indicates that macro shooting is active.
Lanscape Shooting
On the left side of the camera, slide the macro switch to the position until the icon appears on the
LCD screen. This indicates that landscape shooting is active.
Flash
Press the Up button until the icon is displayed on the LCD screen. This will activate the automatic flash.
Press the Up button again until the icon is diplayed on the LCD screen. This denotes that the flash function
has been "forced on" (manual flash). If the flash is not ready, an LED will illuminate and the icon will flash
repeatedly . Wait until the flash is ready before taking a photo.
Press the Up button again until the icon is diplayed on the LCD screen. The red eye reduction is active.
Press the Up button again until the icon appears. This will turn off the flash function.
Self-Timer :
You can include yourself in a photo by using this feature to delay the time between pressing the shutter button and
when the photo is actually taken. It is recommended that you use a tripod when using the self-timer.
1. Press the Down button to select or self timer or 3 pictures continuous shooting.
Page 7

6
2. Press the shutter button to start a 2, 10 or 3 pictures continuous shooting to count down, and the photo will
automatically be taken after the self-timer has run down.
Delete :
1. Press the Mode button to enter playback mode.
2. Please press Right button to enter into the menu, and press the Up/Down button to select.
3. Press OK button to confirm the selection, and press OK button again to confirm the cancellation. Or, you
may select Left button to exit.
OK button
Menu:
You can set photo/video quality and change other setting.
Press the Menu button to enter the settings menu. Use the
Up/Down buttons to select a setting. You can chose from
Resolution, Scene, Image Stabilization, Quality , Sharpness ,
Exposure, White Balance , ISO, and Face Detection.
Resolution :
1. Enter into the MENU, and press the Up/Down buttons to
select Resolution.
2. Press the OK button, and then press the Up/Down buttons
to select the resolution.
12M , 9M , 5M , 3M , 1.3M , VGA
3. After selection, please press OK button to confirm, and
press Left button to exit. Or, press the MENU button to
return back.
Scene :
1. Enter into the MENU, and press the Up/Down buttons to
select Scene.
2. Press the OK button, and then press the Up/Down buttons
to select a scene mode, Auto, Scenery, Night Scene,
Portrait, Night Portrait, Sports, Party, Beach, High
Sensitivity, Underwater.
3. After selection, press the OK button to confirm, and press
the Left button to exit. Or, press the MENU button to
return.
Page 8

7
Image Stabilization :
1. Enter into the MENU, and press the Up/Down buttons to
select Image Stabilization.
2. Press the OK button, and then press the Up/Down buttons
to select On/Off.
3. After selection, press the OK button to confirm, and press
the Left button to exit. Or, press the MENU button to
return.
Quality :
1. Enter into the MENU, and press the Up/Down buttons to
select Quality.
2. Press the OK button, and then press the Up/Down buttons
to select the quality, Super Fine , Fine , Normal
3. After selection, press the OK button to confirm, and press
the Left button to exit. Or, press the MENU button to
return.
Sharpness :
1. Enter into the MENU, and press the Up/Down buttons to
select Sharpness.
2. Press the OK button, and then press the Up/Down buttons
to select sharpness, Strong , Normal , Soft
3. After selection, press the OK button to confirm, and press
the Left button to exit. Or, press the MENU button to
return.
Exposure :
1. Enter into the MENU, and press the Up/Down buttons to
select Exposure.
2. Press the OK button, and then press the Up/Down buttons
to select exposure,-2.0 , -5/3 , -4/3 , -1.0 , -2/3 , -1/3 , +0.0 ,
+1/3 , +2/3 , +1.0 , +4/3 , +5/3 , +2.0
3. After selection, press the OK button to confirm, and press
the Left button to exit. Or, press the MENU button to
return.
White Balance :
1. Enter into the MENU, and press the Up/Down buttons to
select White Balance.
2. Press the OK button, and then press the Up/Down buttons
to select white balance, Auto, Daylight, Cloudy, Tungsten,
Fluorescent
3. After selection, press the OK button to confirm, and press
the Left button to exit. Or, press the MENU button to
return.
Page 9

8
ISO :
1. Enter into the MENU, and press the Up/Down buttons to
select ISO.
2. Press the OK button, and then press the Up/Down buttons
to select an ISO, Auto , 50 , 100 , 200 , 400
3. After selection, press the OK button to confirm, and press
the Left button to exit. Or, press the MENU button to
return.
Face Detection :
1. Enter into the MENU, and press the Up/Down buttons to
select Face Detection.
2. Press the OK button, and then press the Up/Down buttons
to select Face Detection Off / On
3. After selection, press the OK button to confirm, and press
the Left button to exit. Or, press the MENU button to
return.
Video Mode:
Under Video mode, press the Menu button once to enter into the
menu, and press Up/Down buttons to select a setting Resolution,
White Balance, and Exposure.
Resolution:
1. Enter into Video Mode, and press the MENU button to
select Resolution.
2. Press the OK button, and then press the Up/Down buttons
to select the resolution, VGA , QVGA.
3. After selection, press the OK button to confirm, and press
the Left button to exit. Or, press the MENU button to
return.
White Balance :
1. Enter into Video Mode, and press the MENU button to
select White Balance.
2. Press the OK button, and then press the Up/Down buttons
to select a white balance, Auto, Daylight, Cloudy, Tungsten,
Fluorescent.
3. After selection, press the OK button to confirm, and press
the Left button to exit. Or, press the MENU button to
return.
Page 10

9
Exposure :
1. Enter into Video Mode, and press the MENU button to
select Exposure.
2. Press the OK button , and then press the Up/Down buttons
to select the Exposure, -2.0 , -5/3 , -4/3 , -1.0 , -2/3 , -1/3 ,
+0.0 , +1/3 , +2/3 , +1.0 , +4/3 , +5/3 , +2.0
3. After selection, press the OK button to confirm, and press
the Left button to exit. Or, press the MENU button to
return.
Playback Mode
While in Camera Mode, press the MODE button twice to enter
into Playback Mode.
Press the W button to enter into Photo Mode, and press the
Up/Down/ Left/ Right buttons to select the photo you would like
to view. After selection, press the OK button to view the photo.
When viewing the photo, you can press T Button to zoom in to the
photo, and press the Up/Down/ Left/ Right button to adjust the
viewing angle.
To enter into Playback settings, press the MENU button while
viewing a photo. Choose from Delete , Protect , Rotate, Crop,
Slide Show, and Pictbridge.
Delete :
1. Enter into Playback mode, and press MENU button to select Delete.
2. Press the OK button, and then press the Up/Down buttons to select a setting.
3. After selection, press the OK button to confirm. Press the OK button again to execute it.
OK button
Page 11

10
Protect :
1. Enter into Playback mode, and press the MENU button to
select Protect.
2. Press the OK button, and then press the Up/Down buttons
to select a setting.
3. After selection, press the OK button to confirm, and press
Left button to exit. Or, press the MENU button to return
without any selection.
Rotate :
1. Enter into Playback mode, and press the MENU button to
select Rotate.
2. Press the OK button , and then press the Up/Down
buttons to select Rotate,90°, 180°, 270°, Cancel
3. After selection, press the OK button to confirm. Or, press
the MENU button to return without any selection.
Crop :
1. Enter into Playback mode, and press the MENU button to select Crop.
2. Press the OK button , and then press the Up/Down buttons to select Crop.
3. Press the T/W buttons to select crop range, and press the Up/Down/Left/Right buttons to select an
area you want to crop.
4. After selection, press the OK button to confirm. Or, press the MENU button to return without any
selection
OK button
Slide Show :
1. Enter into Playback mode, and press the MENU button to
select Slide Show.
2. Press the OK button, and then the press Up/Down buttons
to select 2 / 5 / 8 seconds.
3. After selection, press the OK button to confirm. Or, press
the MENU button to return without any selection
Page 12

11
Pictbridge :
Your camera allows you to print the photos with a PictBridge
enabled printer. The operation is as below:
1. After selecting a photo, press the MENU button to enter
into Playback mode, and press the Up/Down buttons to
select Pictbridge.
2. Connect your camera to a compatible printer with USB
cable correctly for printing. Or, select the MENU button to
return without any selection.
Camera Setup
While in Camera or Video Mode, press the MENU button, and
then press the Right button to enter into the settings list. Press
the Up/Down buttons to select Date/Time , Auto power off ,
Beep sound , Language , Date Stamp , Frequency , Format , and
Default Setting.
Date/Time :
Select Date/Time and press the OK button to set the date
and time. After selection, press the OK button to confirm, and
press the Left button to exit. Or, press the MENU button to return.
Auto power off :
1. While in Camera or Video Mode, press the MENU and Right
buttons to select Auto Power Off.
2. Press the OK button, and then press the Up/Down buttons
to select Off , 1 Minute , or 3Minutes.
3. After selection, press the OK button to confirm, and press
the Left button to exit. Or, press the MENU button to
return.
Beep sound :
1. While in Camera or Video Mode, press the MENU and Right
buttons to select Beep sound.
2. Press the OK button, and then press the Up/Down buttons
to select Off/On.
3. After selection, press the OK button to confirm, and press
the Left button to exit. Or, press the MENU button to
return.
Page 13

12
Language :
1. While in Camera or Video Mode, press the MENU and Right
buttons to select Language.
2. Press the OK button, and then press the Up/Down buttons
to select a language, English, Deutsch, Français, Español,
Italiano, Português,
日本語, 簡体中文, 繁體中文
.
3. After selection, press the OK button to confirm, and press
the Left button to exit. Or, press the MENU button to
return.
Date Stamp :
1. While in Camera or Video Mode, press the MENU and Right
buttons to select Date Stamp.
2. Press the OK button, and then press the Up/Down buttons
to select Date/Time , Date , or off.
3. After selection, press the OK button to confirm, and press
the Left button to exit. Or, press the MENU button to
return.
Frequency :
1. While in Camera or Video Mode, press the MENU and Right
buttons to select Frequency.
2. Press the OK button, and then press the Up/Down buttons
to select 50 Hz or 60 Hz.
3. After selection, press the OK button to confirm, and press
the Left button to exit. Or, press the MENU button to
return.
Format :
1. While in Camera or Video Mode, press the MENU and Right buttons to select Format.
2. Press the OK button, and then press the Up/Down buttons to select Internal Memory or SD Card.
3. After selection, press the OK button to confirm, and press the Left button to exit. Or, press the MENU
button to return.
OK button
Default Setting :
1. While in Camera or Video Mode, press the MENU and
Right buttons to select Default Setting .
2. Press the OK button to confirm the default settings.
3. You can press Up/Down button to select Cancel or OK.
After selection, press the OK button to confirm, and press
the Left button to exit. Or, select the MENU button to
return.
Page 14

13
Appendix A: Technical Specifications
Image Sensor
5.0 Mega Pixels CMOS Sensor
Image Resolution
4032X3024Pixels (12M by interpolation), 3456X2580Pixels (9M by interpolation),
2560X1920Pixels (5M), 2048X1536Pixels (3M), 1280X960Pixels (1.3M), 640X480Pixels
(VGA)
Video Resolution
640x480 Pixels (VGA), 320x240 Pixels (QVGA)
File Format
Image
JPEG
Movie
AVI
PC CAM
Yes
External Memory
Micro SD card support upto 8GB
LCD Display
2.7 Inch TFT LCD
Lens
f=8.15mm, F3.0
Zoom
8X digital zoom
Exposure
-2.0, -5/3, -4/3, -1.0, -2/3, -1/3, +0.0, +1/3, +2/3, +1.0, +4/3, +5/3, +2.0
Scene
Auto, Scenery, Night Scene, Portrait, Night Portrait, Sports, Party, Beach, High
Sensitivity, Underwater
White Balance
Auto, Daylight, Cloudy, Tungsten, Fluorescent
Image Stabilization
Yes
ISO
Auto , 50 , 100 , 200 , 400
Flash
Auto, Force on, Force off, Red-eye reduction
Self-timer
2 or 10 sec or 3 continuous shooting
Face Detection
Yes
PictBridge
Yes
Interface
USB 2.0 High speed
System Requirements
Window 2000/XP/ Vista/Win7, Mac OS X (10.2.6 or higher)
Battery
Lithium Battery
Working Temperature
-10~40 ℃
 Loading...