

Page 1
IMPORTANT
Read this manual carefully before assembling, using or servicing these stoves. Keep
this manual for future reference. If you have questions about assembly, operation,
servicing or repair of these stoves, please call Coleman at 1-800-835-3278 or TDD:
316-832-8707. In Canada call 1-800-387-6161.
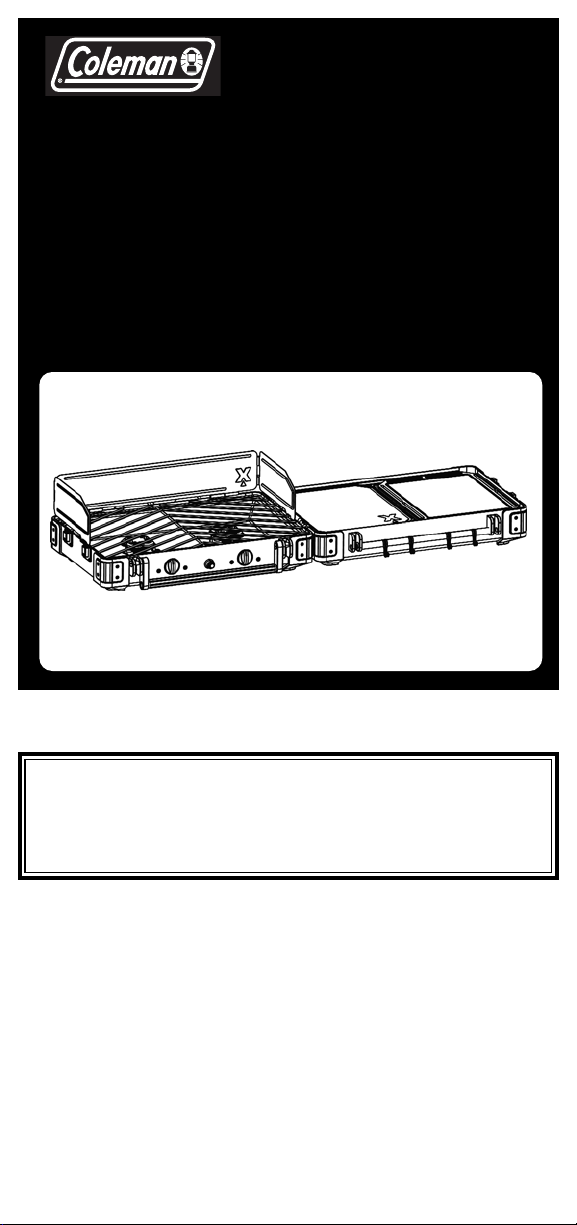
Propane Stove
Instructions for use
© 2007 The Coleman Company, Inc.
www.coleman.com
9422 Series
INSTASTART™ Electronic Ignition
Patents Pending
AAA Battery included.
Propane cylinder not included.
Page 2
English-1
If you smell gas:
1. Do not attempt to
light appliance.
2. Extinguish any
open flame.
3. Disconnect from
fuel supply.
FOR YOUR
SAFETY
Do not store or use
gasoline or other liquids
with flammable vapors in
the vicinity of this or any
other appliance.
FOR YOUR
SAFETY
CARBON MONOXIDE
HAZARD
• This appliance can produce carbon monoxide
which has no odor.
• Using it in an enclosed
space can kill you.
• Never use this appliance
in an enclosed space
such as a camper, tent,
car or home.
DANGER
WARNING
WARNING indicates a potentially hazardous
situation which, if not avoided, could result in
death or serious injury.
DANGER
DANGER indicates an imminently hazardous
situation which, if not avoided, will result in
death or serious injury.
This manual contains important information about
the assembly, operation and maintenance of this
outdoor propane appliance. General safety information is presented on this page and is also located throughout these instructions. Particular attention should be paid to information accompanied by
the safety alert symbol “ DANGER”,
“ WARNING”, “ CAUTION”.
Keep this manual for future reference and
to educate new users of this product. This manual
should be read in conjunction with the labeling on
the product.
Safety precautions are essential when any
mechanical or propane fueled equipment is
involved. These precautions are necessary when
using, storing, and servicing. Using this equipment
with the respect and caution demanded will reduce
the possibilities of personal injury or property damage.
The following symbols shown below are used
extensively throughout these instructions. Always
heed these precautions, as they are essential when
using any mechanical or propane fueled equipment.
CAUTION
CAUTION indicates a potentially hazardous
situation which, if not avoided, may result in
minor or moderate personal injury, or
property damage.
Failure to comply with the precautions and
instructions provided with these stoves can
result in death, serious bodily injury and property loss or damage from hazards of fire, explosion, burn, asphyxiation, and/or carbon
monoxide poisoning.
Only persons who can understand and follow
the instructions should use or service
these stoves.
If you need assistance or information such
as an instruction manual or labels, contact
The Coleman Company, Inc.
CALIFORNIA PROPOSITION 65:
WARNING: This fuel, and byproducts of com-
bustion of this fuel, contain chemicals known to the
state of California to cause cancer, birth defects,
or other reproductive harm.
DANGER
Page 3
English-2
• This product is fueled by propane gas. Propane
gas is invisible, odorless, and flammable. An
odorant is normally added to help detect leaks
and can be described as a ”rotten egg” smell.
The odorant can fade over time so leaking gas
is not always detectable by smell alone.
• Propane gas is heavier than air and leaking
propane will sink to the lowest level possible. It
can ignite by ignition sources including matches, lighters, sparks or open flames of any kind
many feet away from the original leak. Use
only propane gas set up for vapor withdrawal.
• Propane gas should be stored or used in compliance with local ordinances and codes or with
ANSI/NFPA 58. Turn off propane when not in use.
WARNING
DANGER
• EXPLOSION - FIRE HAZARD
• Never store propane near high heat, open
flames, pilot lights, direct sunlight, other ignition sources or where temperatures exceed
120 degrees F (49°C).
• Propane is heavier than air and can accumulate in low places. If you smell gas, leave the
area immediately.
• Never install or remove propane tank while outdoor stove is lighted, near flame, pilot lights,
other ignition sources or while outdoor stove is
hot to touch.
• During lighting and operation, this product can
be a source of ignition. Never use the stove in
spaces that contain or may contain volatile or
airborne combustibles, or products such as
gasoline, solvents, paint thinner, dust particles
or unknown chemicals. Minimum clearances
from combustible materials: 12 inches from the
sides and 48 inches from the top.
• Provide adequate clearances around air openings into the combustion chamber.
WARNING
Not for home or recreational vehicle use.
We cannot foresee every use which may be
made of our products.
Check with your local fire safety authority if
you have questions about use.
Other standards govern the use of fuel gases
and heat producing products for specific uses.
Your local authorities can advise you
about these.
• Never refill disposable cylinders.
• Use the preset regulator that came with the
stove. Do not attempt to adjust.
• Use only Coleman®accessories or parts.
During stove set-up, check all fittings for
leaks using soapy water. Never use a flame.
WARNING
• BURN HAZARD
• Never leave stove unattended when hot
or in use.
• Keep out of reach of children.
DANGER
• CARBON MONOXIDE HAZARD
• This stove is a combustion appliance. All combustion appliances produce carbon monoxide
(CO) during the combustion process. This
product is designed to produce extremely
minute, non-hazardous amounts of CO if used
and maintained in accordance with all warnings and instructions. Do not block air flow into
or out of the stove.
• Carbon Monoxide (CO) poisoning produces
flu-like symptoms, watery eyes, headaches,
dizziness, fatigue and possibly death.You
can’t see it and you can’t smell it. It’s an invisible killer. If these symptoms are present during operation of this product get fresh
air immediately!
• For outdoor use only.
• Never use inside house, camper, tent, vehi-
cle or other unventilated or enclosed
areas. This stove consumes air (oxygen).
Do not use in unventilated or enclosed
areas to avoid endangering your life.
CAUTION
• SERVICE SAFETY
• Keep all connections and fittings clean.
Inspect propane cylinder and stove propane
connections for damage before attaching.
• During set up, check all connections and
fittings for leaks using soapy water. Never use
a flame. Bubbles indicate a leak. Check that
the connection is not cross-threaded and that
it is tight. Perform another leak check. If there
is still a leak, remove the cylinder and contact
Coleman for service or repairs.
• Use as a cooking appliance only. Never alter
in any way or use with any device or part not
expressly approved by Coleman.
• Clean stove frequently to avoid grease accumulation and possible grease fires.
Page 4
English-3
To Set Up
Technical
Characteristics
Input: 30,000 BTU/H
Category: Pressure regulated propane
Fuel:
16.4 oz. disposable propane cylinders
Regulator: 5430
DANGER
• CARBON MONOXIDE HAZARD
• For outdoor use only.
• Never use inside house, camper, tent, vehicle
or other unventilated or enclosed areas. This
stove consumes air (oxygen). Do not use in
unventilated or enclosed areas to avoid
endangering your life.
■ NOTE: Use Coleman 16.4 oz. disposable
propane cylinders. The LP-gas cylinder(s) used
with stoves must be constructed and marked in
accordance with the specifications for LP-gas
cylinders of the U.S. Department of Transportation
or
Transport Canada, CAN/CSA B339
.
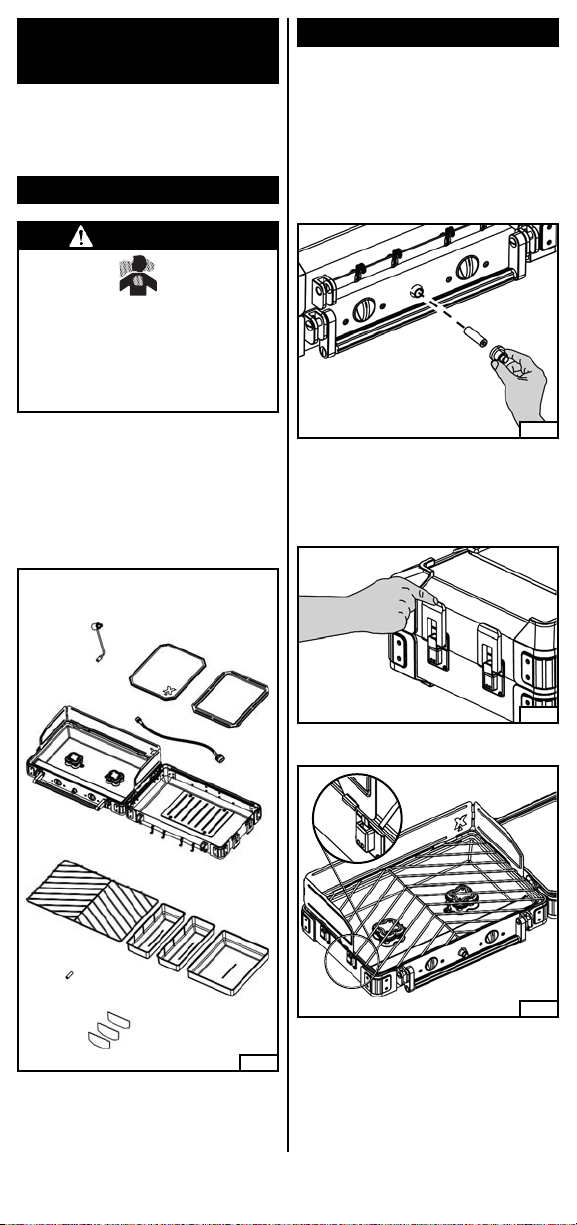
■ Remove components from carton (Fig. 1).
Fig. 1
■ Unfold the windbaffles as shown (Fig. 4).
Fig. 3
■ Position the stove with the cooking side on a
sturdy, flat surface. For outdoor use only.
■ To open the lid, unsnap the two latches on the left
side of the stove and swing open the food prep side
(Fig. 3).
Fig. 4
Regulator
Pot
Support
Stove
AAA Battery
Battery
Fig. 2
■ The battery compartment is located on the front
of the stove, near the handle.
■ Unscrew the igniter button to reveal the battery
compartment.
■ Install the AAA battery with (+) outward.
■ Replace the igniter button finger tight.
NOTE: Use a fresh AAA alkaline batter y only. Do
not use a nickel cadmium battery. Remove your
battery if you won’t be using your stove for an
extended time period (Fig. 2).
Cutting Board
Griddle
Storage Partitions (3)
Storage
Bins (2)
Reservoir
Hose
Page 5
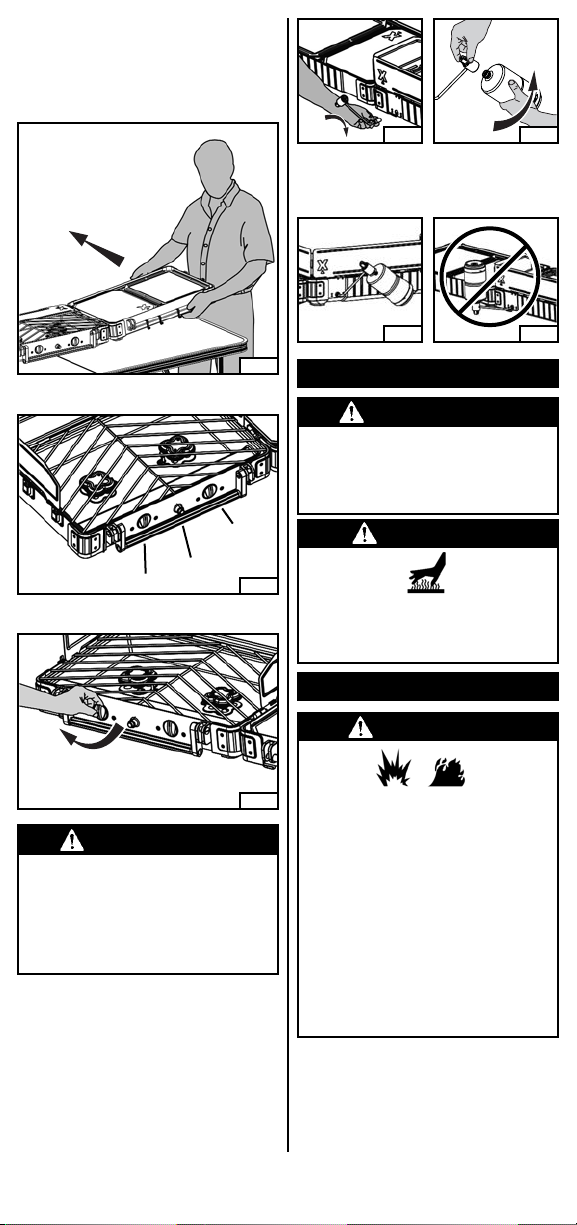
Fig. 11
■ Propane cylinder correctly installed (Fig. 10).
■ Never operate stove with propane cylinder in an
inverted position (Fig. 11).
Fig. 8
Fig. 8
Fig. 10
WARNING
• Perform leak test outdoors.
• Extinguish all open flames.
• NEVER leak test when smoking.
• Do not use the outdoor stove until connection
has been leak tested and does not leak.
Leak Check
WARNING
• BURN HAZARD
• Never leave stove unattended when hot
or in use.
• Keep out of reach of children.
To Light
DANGER
• EXPLOSION - FIRE HAZARD
• Propane is heavier than air and can accumulate in low places. If you smell gas, leave the
area immediately.
• Always attach or detach propane source outdoors; never while stove is lighted, near flame,
pilot lights, other ignition sources or while
stove is hot to touch.
• This stove is red hot during use and can ignite
flammables too close to the burners. Keep
flammables at least 12 inches from the sides
and 48 inches from the top of the stove. Keep
gasoline and other flammable liquids and
vapors well away from stove.
• The stove must not be exposed to flammable
vapors or liquids during lighting.
Fig. 6
Control Knob Identification (Fig. 6)
Right
Burner
Valve
Igniter
Button
Left Burner Valve
CAUTION
• SERVICE SAFETY
• Keep all connections and fittings clean.
Inspect propane cylinder and stove propane
connections for damage before attaching.
• During set up, check all connections and
fittings for leaks using soapy water. Bubbles
indicate a leak. Never use a flame.
■ Close both burner valves firmly (Fig. 7).
Fig. 7
■ The regulator uses a threaded fitting to attach to
the stove. It is necessary to hold the stove to
make sure the fitting is seated. Align the regulator to the fuel tube on the back of the stove and
push on. Screw on the outer threaded sleeve in
a clockwise direction until hand tight (Fig. 8).
■ Remove plastic cap from top of propane bottle
and screw propane bottle into regulator hand
tight (Fig. 9).
Fig. 5
English-4
Note:
■ The food prep side may be removed from the
stove. Firmly grasp the food prep, raise slightly, and
slide back to dis-engage the hinges. Reverse the
procedure to reattach the food prep side (Fig. 5).
Page 6

To Turn Off
■ Close the burner valves firmly (Fig. 15).
Fig. 15
To Clean
■ Make sure stove is cool.
■ Move stove away from flame (including pilot
lights) and other ignition sources.
■ Remove propane cylinder from regulator and
replace protective cap on cylinder (Fig. 16).
■ Remove regulator from stove (Fig. 17).
• MAINTENANCE
• Keep stove area clear and free from
combustible materials, gasoline and other
flammable vapors and liquids.
• Do not obstruct the flow of combustion and
ventilation air.
• A good flame should be blue with minimal
yellow tip. Some yellow tips on flames are
acceptable as long as no carbon or soot
deposits appear.
• Wipe clean with soft cloth and mild dish
detergent. Do not use abrasives (Fig. 18).
Fig. 18
DANGER
• EXPLOSION - FIRE HAZARD
• Never store propane near high heat, open
flames, pilot lights, direct sunlight, other
ignition sources or where temperatures
exceed 120 degrees F (49°C).
• The disposable cylinder must be disconnected
when the stove is in storage.
To Store
Fig. 16
Fig. 17
Match Lighting
■ Set on sturdy, flat surface. For outdoor use only.
■ Hold lighted match near burner and open
burner valve (Fig. 13).
■ Repeat for the other burner if needed.
Fig. 13
■ Adjust flame with burner valves (Fig. 14). Flame
should be blue with a hint of yellow on tips.
Fig. 14
English-5
INSTASTART™
Electronic Ignition Stoves
■ Set on sturdy, flat surface. For outdoor use only.
■ Push igniter button and hold; then open fuel
valve fully (Fig. 12).
■ Repeat for the other burner if needed.
Note: If igniter fails to light stove, replace the
battery with a fresh AAA alkaline battery. If the
igniter still fails to light stove, use match to light
burner. If the stove is wet the igniter may not spark.
Fig. 12
Page 7

■ For storage or
transport,
the regulator
may be located
in the reservoir
on the food
prep side
(Fig. 19).
Fig. 19
Fig. 20
■ To carry the stove,
check to make sure
the latches on the
side are snapped
closed and secure,
then firmly grasp the
stove by the handle
(Fig. 20).
Fuel Delivery System
English-6
To Set Up
with a 20# Cylinder
General Safety Information
WARNING
• DO NOT vent propane vapor from the cylinder
before taking it to be refilled.
• DO NOT use gas stove indoors or store any
refillable propane cylinder(s) indoors, including in the garage, breezeways, sheds or
enclosed areas.
• Keep the service valve closed and plugged or
capped (as recommended by the manufacturer) when the cylinder is not connected to the
appliance, including “empty” cylinders.
General Installation
WARNING
Keep the fuel supply hose away from any
heated surfaces. During assembly of stove and
when attaching or replacing the L.P. gas
cylinder, insure that the gas supply hose is free
of kinks and is at least 3 inches away from hot
surfaces such as the stove housing.
Liquefied Petroleum gas (abbreviated L.P. gas
or propane), is highly flammable. It becomes
liquid when stored under high pressure inside a
cylinder and vaporizes when released. L.P. gas is
heavier than air and tends to collect in low areas.
It is important that there are no leaking
connections on your stove that could cause a fire
or explosion (see the section titled “Leak Testing Refillable Cylinders”).
Portable LP stoves require a fuel delivery
system which is comprised of a valve [A], a hose
[B], a regulator [C] with vent hole [G], an L.P. gas
supply cylinder [D], a Type 1 coupling nut [E] and
a Type 1 cylinder valve [F], (Fig. 21). Illustration in
Fig. 21 is for description purposes only.
Portable L.P. Gas Barbecue
Cylinders
WARNING
Your new stove is equipped with a Type 1
coupling nut [E]. DO NOT attempt to connect
to any other refillable L.P. cylinder not
equipped with a mating Type 1 cylinder valve
[F]. This stove may only be used with
cylinder connecting devices approved by
Coleman.
Fig. 21
L.P. Gas Cylinder
WARNING
• DO NOT insert any foreign objects into the
valve outlet.You may damage the valve. A
damaged valve can cause a leak, which could
result in explosion, fire, severe personal injury
or death.
WARNING
•
Refillable cylinders must be stored
outdoors out of the reach of children and
must not be stored in a building, garage
or any other enclosed area.
Cylinder Specifications
• Any refillable L.P. gas supply cylinder used with
this stove must be approximately 12 inches
diameter and 18 inches high. The maximum fuel
capacity is 80% and is approximately 20 pounds
of propane.
• The maximum weight of a properly filled cylinder
will be approximately 38 pounds (47.7 lbs.
nominal water capacity).
• The L.P. cylinder must have a shut-off valve
terminating in a Type 1 L.P. gas cylinder valve
outlet (see item [F], Fig. 21).
A
B
C
D
E
F
G
Page 8

English-7
• A Type 1 compatible cylinder with a Type 1
cylinder valve has a back-check valve which
does not permit gas flow, until a positive seal has
been obtained.
• The cylinder must be arranged in an upright
position for vapor withdrawal. It must also include
a collar to protect the cylinder valve. A safety
relief device having direct communication with
the vapor space of cylinder must be provided.
This will expel high pressure gas if the cylinder is
over filled or overheated which could result in fire
or explosion.
• All refillable L.P. gas cylinders used with this
appliance shall be constructed and marked in
accordance with the Specifications f
or L.P. Gas
Cylinders of the U. S. Department of
Transportation (DOT) or the National Standard of
Canada, CAN/CSA-B339, Cylinders, Spheres
and Tubes f
or Transportation of Dangerous
Goods; and Commission, as applicable; and shall
be provided with a listed overfilling prevention
device, and a cylinder connection device
compatible with the connection for outdoor
cooking appliances.
• Read labels on the L.P. Gas Supply Cylinder.
• New refillable cylinders are always shipped
empty for safety.
• Allow only qualified L.P. gas dealers to fill or
repair your refillable L.P. gas supply cylinder.
• Inform the gas dealer if it is a new or used
cylinder to be filled.
• Caution the gas dealer not to overfill the cylinder.
• After filling, have the gas dealer check for leaks
and to see that the relief valve remains free to
function.
The Type 1 connection system has the following
features:
1. The system will not allow gas to flow until a
positive connection has been made.
NOTE: The cylinder control valve must be turned
off before any connection is made or removed.
2. The system has a thermal element that will shut
off the flow of gas in the event of a fire.
3. The system has a flow limiting device which,
when activated, will limit the flow of gas to 10
cubic feet per hour.
4. NEVER use stove without leak testing this
connection.
CAUTION
Have the gas dealer weigh the cylinder
after filling to ensure that the cylinder is
not over filled.
Hose and Regulator
The pressure regulator and hose assembly with
the Type 1 fitting supplied with the appliance must
be used. Do not use another hose and regulator
assembly other than the one supplied with the
stove or a Coleman® replacement pressure
regulator assembly. The pressure regulator and
hose assembly provided is factory set at an outlet
pressure of 11 inches water column (1/2 psi).
• Keep the small vent hole in the regulator clean of
dirt and debris (see item [G], Fig. 21).
• Consult your L.P. gas dealer if you think the
regulator is not working properly.
WARNING
• DO NOT attempt to adjust the regulator as
this could create a situation causing
personal injury or property damage.
• Transpor t only one refillable cylinder at a time.
• Transpor t the cylinder in an upright and secure
manner with a control valve turned off and the
cap in place.
• DO NOT transport the cylinder in the passenger
compartment, unless you have an open window
ventilation.
• DO NOT leave the cylinder in direct sunlight or in
a high heat area such as a closed car trunk. High
heat areas could cause the relief valve to vent
gas.
• Use a cylinder cap on the cylinder valve outlet
during transport and when the cylinder is not
connected to the stove.
• Keep the cylinder valve closed when not in use.
• Take the cylinder directly home after it has been
filled.
Transporting the Refillable
Cylinder
WARNING
Handle a full cylinder with care. Gas is under
high pressure.
DANGER
• NEVER store a spare L.P. gas supply cylinder
in the vicinity of any heat producing
appliance.
• NEVER fill the cylinder beyond 80% full.
Failure to follow this information exactly could
result in an explosion and/or fire causing
death or serious injury.
Page 9

English-8
1. 20 lb. Refillable Cylinder (purchase separately)
2. Fuel Hose
3. Regulator
Attachment Kit Features
Fig. 22
Connecting 20 lb. Propane
Gas Cylinders
NOTE: Your 9422 Series stove is set up from
the factory to use a 20 lb. refillable propane
cylinder. You may purchase a 20 lb.
propane cylinder from the store where you
bought your stove, or from your local
propane dealer.
WARNING
This procedure MUST be performed
OUTDOORS only! Be sure the LP cylinder
valve is closed. Attach to the stove. Read and
follow the directions on the cylinder.
1. Place the stove on a flat and level surface. Set
up the stove (see Fig. 1 through Fig. 6) and
make sure the controls are off (Fig. 23).
Fig. 23
2.
Attach the fuel hose to the regulator
(Fig. 24).
3. The regulator uses a threaded fitting to attach
to the stove. It is necessary to hold the stove to
make sure the fitting is seated. Align the
regulator to the fuel tube on the back of the
stove and push on. Screw on the outer
threaded sleeve in a clockwise direction until
hand tight (Fig. 25).
Fig. 25
1
2
3
Fig. 24
WARNING
During assembly of the stove
and when attaching or
replacing the L.P. gas cylinder,
insure that the gas supply hose
is free of kinks and/or damage
and is at least 3 inches away
from hot surfaces such as the
stove housing.
IMPORTANT!
TO ENSURE PROPER GAS FLOW,
BURNER CONTROL VALVES MUST BE
“OFF”
BEFORE OPENING THE GAS
CYLINDER VALVE
.
CAUTION
In the connection process, the stove side of
the connection will seal on the back-check
in the valve, resulting in a slight resistance.
The connection requires about one-half to
three-quarters additional turn to complete
the connection. To disconnect, turn
counterclockwise. Tighten by hand only.
DO NOT use tools.
Page 10

5. Set the LP Cylinder a flat and level surface with
the outlet valve facing toward the back of the
stove.
6. Check that the cylinder valve is closed by
turning the cylinder knob clockwise to a full stop
(Fig. 26).
Fig. 26
7. Check that both stove control knobs are in the
off position (Fig. 27).
8. Remove the protective caps from the cylinder
valve and coupling nut. NOTE: The coupling
nut connects to the large outside threads on the
valve outlet.
9. Hold the hose in one hand and insert the nipple
into the valve outlet. Be sure the nipple is
centered in the valve outlet. Hand-tighten the
coupling nut, taking care not to cross-thread the
connection (Fig. 28).
Fig. 27
10. Turn the coupling nut clockwise, tighten to a full
stop. If you cannot complete the final
connection, disconnect the coupling nut and
repeat steps 8 and 9. If you are still unable to
complete the connection, DO NOT use this
hose and valve!
11. Check that the hose has no kinks or sharp
bends and clears areas that will become hot
during use. Never put strain on the hose
where it joins a fitting.
12. BEFORE lighting stove, check all connections
for leaks using the procedure as shown in the
section titled “LEAK TESTING”.
Fig. 28
No Smoking
Leak Testing - Refillable
Cylinders
DANGER
TO PREVENT FIRE
OR EXPLOSION HAZARD:
• NO SMOKING. DO NOT use or
permit sources of ignition in the
area while doing a leak test.
• Perform leak tests outdoors
only.
• NEVER perform a leak test with
fire or flame.
English-9
20” to 24”
WARNING
• The gas hose is a tripping hazard. Keep
yourself and others away from the gas
hose when in use or attached to an
appliance.
• Do not tip or move the fuel supply.
• Turn off fuel at the cylinder and
disconnect both ends of the hose when
not in use.
• You must follow these instructions exactly
or a fire causing death or serious injury
may occur.
Dismantling High Pressure Hose
• Before dismantling the high pressure hose, be
sure gas pressure in the hose is eliminated.
• Ignite stove and turn off gas valve on cylinder.
• Allow flame to self-extinguish.
• When flame is out, close valves on appliance.
• Remove hose.
Fig. 29
Page 11

English-10
1.
Make a soapy solution of equal parts mild
liquid dishwashing detergent and water.
2.
Turn off all burner control knobs.
3.
Turn on the fuel supply. Turn the cylinder
valve knob counterclockwise (right to left)
one rotation.
4. Apply a soap solution to the connections
indicated with the arrows in Fig. 30. If bubbles
appear at these areas, a leak is indicated.
How to Check for Leaks
Fig. 30
No Smoking
No Flame
If you detect a leak:
1.
Turn off the fuel supply. Turn on the control
knobs to release pressure in the hose, then
turn the control knobs back to off.
2.
Wash off soapy solutions with cold water
and towel dry.
3.
Stop a leak by tightening the loose joint, or
by replacing the faulty part with a
replacement part recommended by
Coleman. DO NOT attempt to repair the
cylinder valve if it should become
damaged; the cylinder MUST be replaced.
4.
If you are unable to stop a leak, shut off
the gas supply at the cylinder valve.
Remove the cylinder from the stove. Call a
gas appliance serviceman or L.P. gas
dealer. DO NOT use stove until the leak is
corrected.
When to test for leaks:
1.
Perform a leak test each time the gas
supply cylinder is connected to the hose
end. Leak test anytime a part of the gas
system is replaced.
2.
Perform a leak test at least once each year
whether the L.P. gas supply cylinder has
been disconnected or not.
3.
Have a dealer check the cylinder for
deterioration after 12 years, according to
DOT regulations. Immediately replace the
cylinder if any deterioration is found.
Fixing A Fuel Leak
CAUTION
I
nspect the gas supply hose before each
use. If there are cuts, damage, excessive
abrasion or wear, replace the hose prior to
operating the appliance. During assembly
of the stove and when attaching or
replacing the L. P. gas cylinder, insure that
the gas supply hose is free of kinks and/or
damage and is at least three inches away
from hot surfaces such as the stove
housing. Use only hose replacements
specified in the parts list.
WARNING
THE FOLLOWING RULES
MUST ALWAYS BE
FOLLOWED IN THIS ORDER
(Fig. 31):
1. Check that the burner control
knobs are turned to “OFF”.
2. Turn on the fuel supply. For a
refillable L.P. gas cylinder, turn
the top cylinder valve knob
counterclockwise one rotation
to open.
3. DO NOT stand with your head
or arms over the stove.
Fig. 31
1.
Turn all burner control knobs to off.
2.
After the burner flame goes out, turn off
the fuel supply. For a refillable L.P. cylinder,
turn the L.P. cylinder knob in a clockwise
direction until it stops.
Shutting Off the Stove
Lighting Instructions -
Refillable Cylinders
1
2
3
Continue the lighting sequence by following the
section “To Light” on page 4.
Page 12

English-11
CAUTION
Be certain the gas is shut off at the
L.P. cylinder valve anytime the stove
is not in use.
Follow These Steps:
1.
Shut off the gas at the burner valve(s) and
stay away!
2.
Allow the fire to burn itself out.
3.
Once the fire is out and the appliance has
cooled, shut off the L.P. cylinder valve.
4.
Clean all parts and inspect for damage.
Parts to check for damage are the L.P.
cylinder, cylinder valve, regulator, gas
supply hose, burner valve(s) and burner(s).
5.
If any of the above mentioned components
are damaged, seek replacement from
Coleman before operating the stove again.
Locate your nearest service center by
calling
1-800-835-3278.
In Case of Grease Fire
Moving and Storage
Steps to follow before storing the stove:
• For outdoor use only. If the stove is stored
indoors, detach and leave the refillable cylinder
outdoors. If left outdoors, turn off the fuel supply
to the L.P. cylinder and cover the stove for
protection from the weather. The accessory
section of this manual lists a stove carry case
suitable for storage and carrying the stove.
WARNING
If the stove is not in use, the gas MUST be
turned off at the fuel supply cylinder.
Place the dust cap on the cylinder valve
outlet whenever the cylinder is not is use.
Only install the type of dust cap on the
cylinder valve outlet that is provided with
the cylinder valve. Other types of caps or
plugs may result in leakage of propane.
Troubleshooting
Problem: Stove will not light
when the igniter button is
pushed or has incomplete burner
flame.
Possible Causes and Solutions:
1. Lack of fuel. Check to see that the cylinder
valve is open and the cylinder has fuel.
2. Bur ner ports, orifices, valves or hose have
blockage. Clean the components.
3. Crimped fuel supply hose needs
straightened.
NOTE: The following
“Troubleshooting Causes and
Solutions” are specific to issues
related to a stove setup with a 20
lb. refillable propane cylinder.
4. Regulator failure or damaged hose need to
be replaced by an authorized service
dealer.
5. Make sure the hose to the cylinder is properly
assembled. See the section titled “Connecting
20 lb. Propane Gas Cylinders”.
6. The “Flow Limiting Device” may have been
activated. Refer to the special instructions
in the next section “For Your Additional
Safety”.
Problem:Yellow flame.
Possible Causes and Solutions:
1. Air may be in the cylinder if the cylinder
was not properly purged. Use up
remaining gas; the yellow flame may
disappear with use.
Problem: Flame blows out on low
setting or has uneven heat distribution.
Possible Causes and Solutions:
1. Lack of fuel. Check to see that the cylinder
valve is open and that the cylinder has
fuel.
2. T he “Flow Limiting Device” may have been
activated. Refer to the special instructions in
the next section “For Your Additional Safety”.
Problem: Fire at any connection.
Possible Causes and Solutions:
IMMEDIATELY shut off cylinder valve and
allow stove to cool.
1. Gas is leaking from a faulty connection.
Tighten connections with an adjustable
wrench and replace damaged parts.
Perform a leak test on all connections
before cooking on the stove again.
Problem: Flame behind control
panel or control knob area.
Possible Causes and Solutions:
IMMEDIATELY shut off cylinder valve and
allow the stove to cool.
1. Gas is leaking from a faulty connection.
Tighten connections with an adjustable
wrench and replace damaged parts.
Perform a leak test on all connections
before cooking on the stove again.
Page 13

TYPE 1 CONNECTION
English-12
YOUR NEW GAS STOVE IS
EQUIPPED WITH A TYPE 1
CONNECTION DEVICE
WHICH
HAS 3 SAFETY FEA
TURES
(FIG. 32):
1.
Proof of gas seal between the connector
and the cylinder before gas flow takes
place.
2.
A flow-limiting device designed to limit the
flow of gas in the event of a regulator or
hose failure.
3.
The connection has a thermal shut-off
which will stop the flow of gas if the
connection reaches a certain temperature.
Current refillable L.P. gas
cylinders are fitted with an
Overfill Protection Device
(O.P.D.). To insure that you retain
this safety-device, take your
cylinder to an L.P. gas service
station for filling, or when
exchanging your cylinder at a
cylinder exchange station,
request that your replacement
cylinder be fitted with the O.P.D.
feature.
DANGER
If a fire occurs at the cylinder valve, DO
NOT attempt to move the cylinder.
IMMEDIATELY call the fire depar tment
and clear the area. You can safely spray
water with a garden hose from a distance
of at least 15 feet away from cylinder until
firemen arrive.
For Your Additional Safety
Fig. 32
Thermal
Sensitive
Handwheel
1-5/16"
Acme Connection
Nipple with
Excess Flow
Valve
CURRENT GAS CYLINDERS ARE
ALSO EQUIPPED WITH AN
OVERFILL PROTECTION DEVICE
(O.P.D.) WHICH GREATLY
REDUCES THE CHANCE OF
ACCIDENTALLY O
VERFILLING
THE CYLINDER.
SPECIAL NOTE CONCERNING L.P. GAS
CYLINDERS:
It is important to insure that your gas
cylinder is properly purged before it is
filled. If you purchase a new cylinder,
please inform your propane gas dealer
that this is a new cylinder and needs to be
properly purged before being filled.
SPECIAL NOTE CONCERNING
TYPE 1 CONNECTION DEVICES:
If you notice very small flames on the
burner(s), you may have accidentally
activated the flow-limiting device in the
Type 1 connection device. Besides a
rupture in the gas hose, the flow-limiting
device may activate for one of the two
following reasons:
1.
Opening the burner valves before opening
the cylinder valve.
SOLUTION: Shut off the burner valves
and the L.P cylinder valve and open in the
proper order:
a). Open the L.P. cylinder valve first
, then
b). Open burner valve and ignite the
burner according to the instructions in
this manual for your stove.
IF YOU STILL HAVE A PROBLEM,
THEN THERE MAY BE AIR IN THE
CYLINDER DUE TO IMPROPER
PURGING.
2.
The L.P. cylinder was not properly purged
before it was filled.
SOLUTION: See your L.P. gas supplier.
Page 14

Griddle
Fig. 33
Griddle
■ Lay the griddle on the left or right side of the grate over the burner. The feet on the bottom side of the
griddle must engage the grate (Fig. 33).
Storing the Griddle
and the Cutting Board
■ Insert one edge of the griddle into the channel
on the food prep side. Push the griddle into
the channel against the foam rubber padding.
Rotate the other edge down (Fig. 34).
Cleaning the Griddle
■ Make sure stove and griddle are cool.
■ Wipe clean with soft cloth and mild dish
detergent. Do not use abrasives on the nonstick griddle surface.
NOTE TO PREVENT DAMAGE WHICH WILL
VOID THE WARRANTY:
• Do not use pots, pans, ovens, etc., on this
griddle surface.
• Do not use metal cooking utensils that could
scratch the griddle surface.
• Do not use this griddle on a campfire or
other open fire.
• Use this griddle only on the Coleman®
stove for which it was designed.
Fig.34
1
2
English-13
Fig.35
3
■ Next, hold the corners of the griddle as shown
in Figure 35. While using your thumbs to push
against the inside of the stove, in the direction
of Arrow # 3, insert the griddle into the storage
channel.
■ Install the cutting board in the same manner.
Page 15

English-14
Parts List
1
15
Accessory (sold separately)
Item Part No. Description
17 R9422-100C Carry Case
No. Part Number Description
1 9422-3161 Pot Support / Grate
2 9422-1031 Cutting Board
3 9422-3151 Griddle
4 9422-5731 Partition Kit (3 pk.)
5 9422-1011 Storage Bin
6 9422-1021 Reservoir / Basin
7 9422-1551 Cook Top
8 5430-5651 Regulator
9 9422-5701 Latch Kit
10 9422-5711 Towel Bar Kit
11 9422-5721 Handle Kit
12 9422-3861 Igniter Module
13 9422-1491 Control Knob
14 9422-5121 Electrode Assembly
15 5010000050 Hose Assembly
16 9422-5261 Burner Assembly
2
3
4
5
6
7
8
9
11
10
12
13
14
16
17
1. It is unsafe and illegal in some places to store or
use propane cylinders of greater than 1.14 kg (2.5
lbs) water capacity (approximately 1 lb. propane) in
occupied enclosures.
2. The usual storage areas for camping and picnic
equipment are the basement, attic, or garage. To
avoid the accumulation of dust, cobwebs, etc., that
is common in these areas, place your stove in a
plastic bag and seal it with a rubber band.
3. For repair service call one of the numbers on
the front cover for location of your nearest
Coleman Service Center. If a service center is not
conveniently located, attach to the product a tag
that includes your name, address, daytime
telephone number and description of the problem.
Carefully package the product and send either by
courier or insured mail with shipping and insurance
prepaid to:
For products purchased in the United
States:
The Coleman Company, Inc.
3600 North Hydraulic
Wichita, KS 67219
For products purchased in Canada:
Sunbeam Corporation (Canada) Limited
DBA Jarden Consumer Solutions
20B Hereford Street
Brampton (Ontario) L6Y 0M1
4. If not completely satisfied with the performance
of this product, please call 1-800-835-3278 in the
US or
1 800 387-6161
in Canada.
www.coleman.com
Things You Should Know
Page 16

9422-050T (20070607)
The Coleman Company, Inc. • 3600 North Hydraulic • Wichita, KS 67219 U.S.A.
1-800-835-3278 • TDD: 316-832-8707
Sunbeam Corporation (Canada) Limited • DBA Jarden Consumer Solutions
20B Herford Street • Brampton (Ontario) • L6Y 0M1 • 1 800 387-6161
© 2007 The Coleman Company, Inc. All rights reserved. Coleman® and
are registered trademarks and INSTASTART™ is a trademark of The Coleman Company, Inc.
www.coleman.com
Warranty
Limited Five Year Warranty
The Coleman Company, Inc.(“Coleman”) warrants that for a period of five years from the date of original retail
purchase, this product will be free from defects in material and workmanship. Coleman, at its option, will repair or
replace this product or any component of the product found to be defective during the warranty period.
Replacement will be made with a new or remanufactured product or component. If the product is no longer available, replacement may be made with a similar product of equal or greater value.This is your exclusive warranty.
This warranty is valid for the original retail purchaser from the date of initial retail purchase and is not transferable. Keep the original sales receipt. Proof of purchase is required to obtain warranty performance. Coleman dealers, service centers, or retail stores selling Coleman® products do not have the right to alter, modify or in any way
change the terms and conditions of this warranty.
What This Warranty Does Not Cover
This warranty does not cover normal wear of parts, parts that are not genuine Coleman® parts, or damage
resulting from any of the following: negligent use or misuse of the product; use on improper voltage or current;
commercial use of the product; use contrary to the operating instructions; disassembly, repair or alteration by anyone other than Coleman or an authorized service center. Further, the warranty does not cover Acts of God, such
as fire, flood, hurricanes and tornadoes. Warranty void if damage to product results from the use of a part other
than a genuine Coleman® part.
COLEMAN SHALL NOT BE LIABLE FOR DEFECTS THAT ARE CAUSED BY THE USE OF UNAUTHORIZED
PARTS OR SERVICE. COLEMAN SHALL NOT BE LIABLE FOR ANY INCIDENTAL OR CONSEQUENTIAL
DAMAGES CAUSED BY THE BREACH OF ANY EXPRESS OR IMPLIED WARRANTY OR CONDITIONS.
EXCEPT TO THE EXTENT PROHIBITED BY APPLICABLE LAW, ANY IMPLIED WARRANTY OF MERCHANTABILITY OR FITNESS FOR A PARTICULAR PURPOSE IS LIMITED IN DURATION TO THE DURATION
OF THE ABOVE WARRANTY OR CONDITIONS. SOME STATES, PROVINCES, OR JURISDICTIONS DO NOT
ALLOW THE EXCLUSION OR LIMITATION OF INCIDENTAL OR CONSEQUENTIAL DAMAGES OR LIMITATIONS ON HOW LONG AN IMPLIED WARRANTY LASTS, SO THE ABOVE LIMITATIONS OR EXCLUSION
MAY NOT APPLY TO YOU. THIS WARRANTY GIVES YOU SPECIFIC LEGAL RIGHTS, AND YOU MAY ALSO
HAVE OTHER RIGHTS THAT VARY FROM STATE TO STATE OR PROVINCE TO PROVINCE.
How to Obtain Warranty Service
Take the product to an authorized Coleman service center. You can find the nearest authorized Coleman service
center by visiting www.coleman.com or calling 1-800-835-3278 or TDD 316-832-8707 in the United States or 1
800 387-6161 in Canada. If a service center is not conveniently located, attach to the product a tag that includes
your name, address, daytime telephone number and description of the problem. Include a copy of the original
sales receipt. Carefully package the product and send either by courier or insured mail with shipping and insur-
ance prepaid to:
For products purchased in the United States:
The Coleman Company, Inc.
3600 North Hydraulic
Wichita, KS 67219
For products purchased in Canada:
Sunbeam Corporation (Canada) Limited
DBA Jarden Consumer Solutions
20B Hereford Street
Brampton (Ontario) L6Y 0M1
The costs of transporting the product to Coleman or an authorized service center for warranty service is the
responsibility of the purchaser.
Do not mail products with fuel in tanks, or with disposable propane cylinders. Remove glass globes from
lanterns and wrap separately.
DO NOT RETURN THIS PRODUCT TO THE PLACE OF PURCHASE.
If you have any questions regarding this warranty please call 1-800-835-3278 or TDD 316-832-8707 in the
United States or 1 800 387-6161 in Canada.
 Loading...