

Page 1
36 WATT FOLDING SOLAR PANEL
User’s Manual
Page 2

Congratulations on your Coleman® solar product purchase. This product is designed to the highest technical
specifications and standards. It will supply years of maintenance free use. Please read these instructions
thoroughly prior to installation, then store in a safe place for future reference. If at any time you are unclear about
this product, or require further assistance please do not hesitate to contact our trained professionals operating the
customer support line 1-888-478-6435 or email to info@sunforceproducts.com
36 WATT FOLDING SOLAR PANEL
Specifications and Included Items:
Power Rating: Up to 36 Watts - Maximum rating – Under optimum conditions.
Current: Up to 2.4 Amps @ 15Volts.
Dimensions: (L x W x H) 43 x 17 x 5 inches
Weight: 22lbs
Includes:
12 Volt plug
1 Set of Alligator Battery Clamps
Solar Panel
Brackets (4)
Screws (15)
LED Voltage Indicator
Support rods (3)
Stripped wire for connection to Charge controller
Warning:
Avoid Electrical Hazards when installing, wiring, operating, and maintaining your Solar Module. The solar
module included generates DC electricity when exposed to sunlight or other light sources.
For use in 12-Volt systems only.
Observe proper polarity throughout entire power cable wiring route.
Work Safely. Do not wear jewelry when working with electrical or mechanical equipment. Use protective
eyewear when working with batteries. Use extreme caution when on ladders or on a roof.
Follow all safety precautions of the battery manufacturer. Some batteries can release flammable hydrogen
gas. Do not produce sparks when working in locations where flammable gases or vapors exist. Shield
skin and eyes from battery acid. Wash thoroughly with water if skin or clothing comes in contact with acid
or any corrosive matter, which may have accumulated on the battery. Keep the terminals and casing
clean.
Use a Charge Controller for wattages greater than 15 watts.
Do not attempt to charge non-rechargeable batteries.
Always connect charge controller to battery first.
When disconnecting, always disconnect battery last.
Features:
Quick connect and disconnect to the battery.
No direct sunlight needed, will work in cloudy conditions.
Five year warranty.
Maintenance free.
Weatherproof.
Shatterproof tempered glass.
Folds in half for easy travel and storage.
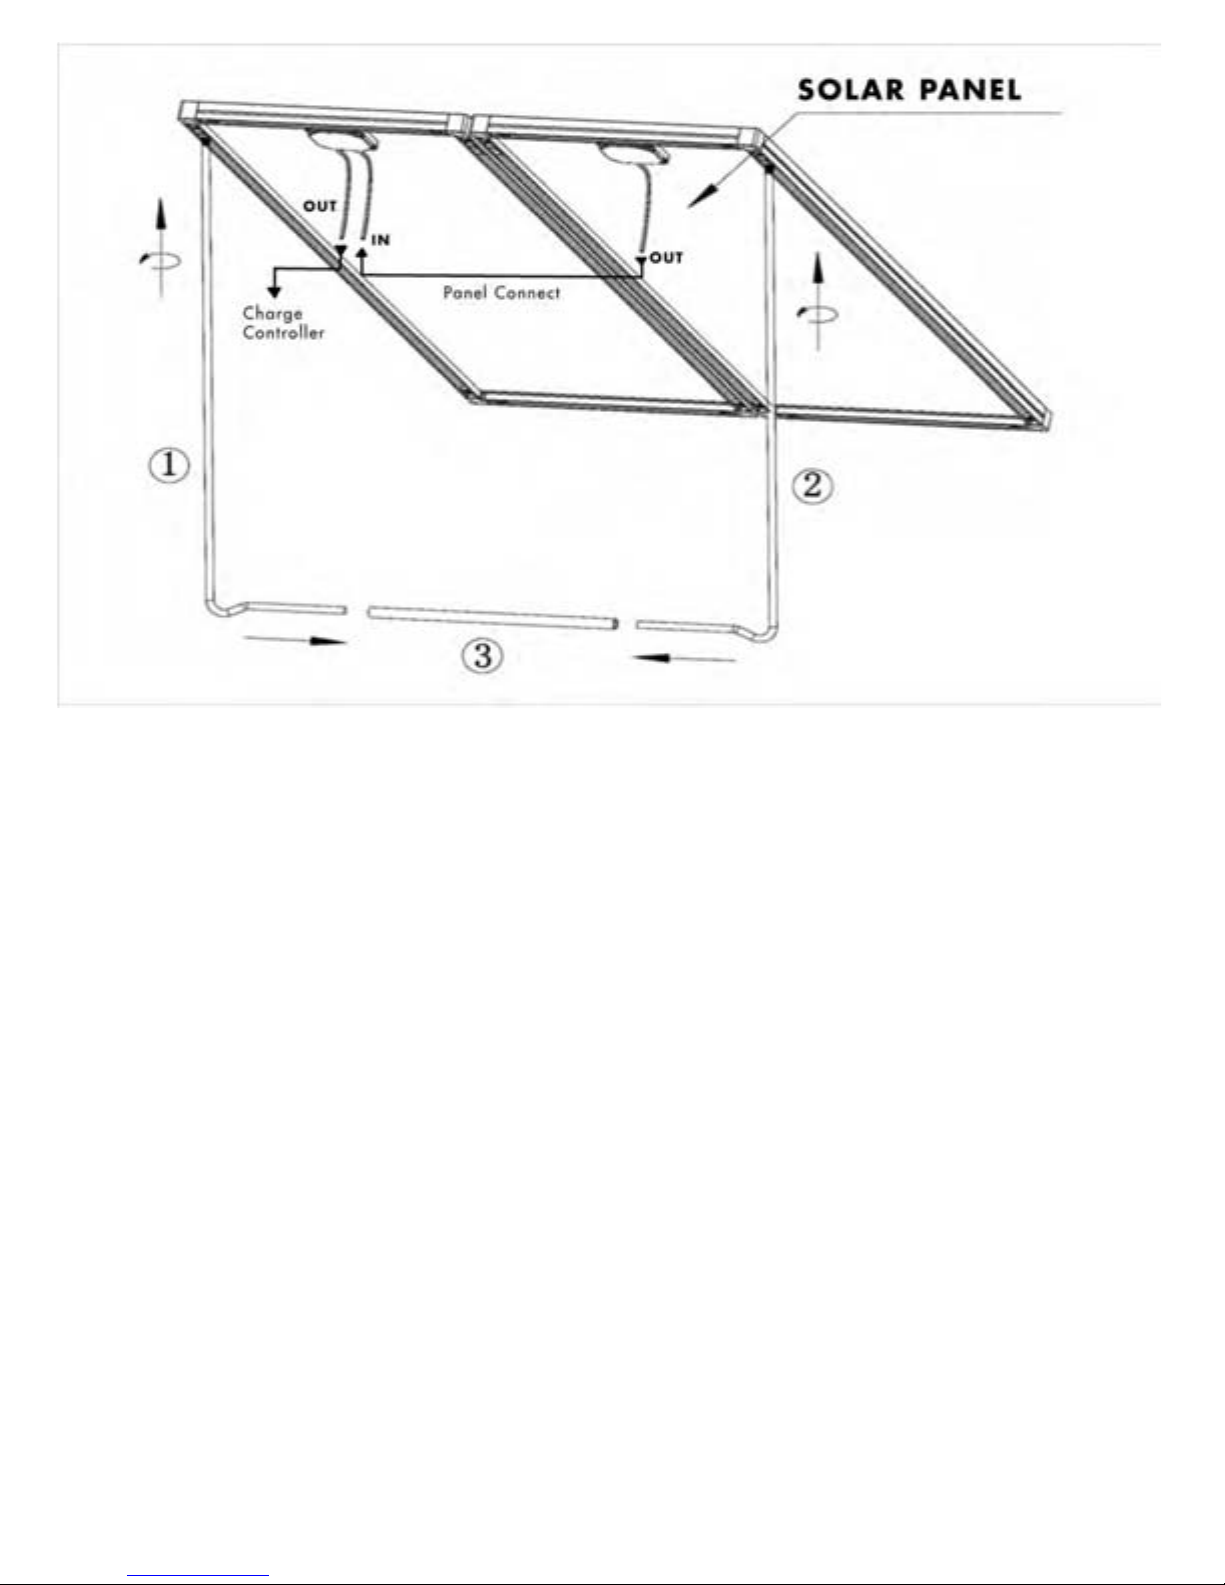
INSTALLATION:
1. Screw Support (1) and Support (2) into the receptacles located in frame of solar panel
2. Place Support (3) between Support (1) and Support (2) to increase stability
Page 3
Your 36 Watt Folding Solar Panel must be opened and the blue side must face the sun to begin charging.
PANEL CONNECTION
Connect one panel to another using the quick connects. The single long wire connector on the right panel
“OUT” goes into the small "IN" on the secondary panel. The tester LED will only light when the system is fully
connected. Your two panels are now in parallel.
Installation through the 12 Volt DC plug:
Plug the 12V DC plug into the female socket in vehicle or item. Make sure both ends are secure and aligned
correctly.
Connection to Battery by Alligator Clamps:
Connect the alligator clamps correctly by matching the red clamp which is Positive (+) to the Positive (+)
terminal on the battery. Connect the black Clamp which is Negative (-) to the Negative (-) terminal on the
battery. Follow this carefully to not cause any bodily harm.
Easily connect your solar panel to your power generator with the included barrel connector. Simply insert the
included barrel connecter into the charger input. Once your solar panel is placed in the sun charging will
commence. If using a charge controller, some alteration to the barrel connecter may be required. This will not
void any warranty.
*It is strongly recommended to use a 7 Amp Solar Charge Controller to prevent battery from
overcharging,*
CHARGE CONTROLLER: (If included)
SPECIFICATIONS
Cut-in Voltage: 13 Volts
Cut-out Voltage: 14.2 Volts
Max. Load: 105 watts
Page 4

Connect the Solar Charge Controller positive (+) wire to the positive (+) battery terminal. Then connect the Solar
Charge Controller negative (-) wire to the negative (-) battery terminal.
WARNING: The alligator clips MUST be placed on to the battery in the aforementioned order—wrong
connections may cause sparking or explosion.
Connect to Solar Panel:
Option 1
Strip the solar panel wires. Connect positive (+) wire from the solar panel to the positive (+) of the charge
controller and the negative (-) wire from the solar panel to the negative (-) of the charge controller. Ensure the
connections are secure.
Option 2
Some panels may include a “stripped wire” quick connect for use with the Solar Charge Controller. If included,
connect positive to positive and negative to negative of charge controller. Ensure connections are secure.
Operation:
The Green “Charged” light indicates a full-charged battery. When the battery reaches 14.2 Volts, the Solar
Charge Controller will cut out voltage thereby ensuring no overcharging. The yellow “Charging” light indicates a
battery that is being charged. When the battery reaches 13 Volts, the battery charge controller will cut-in and
begin charging.
Important Safety Measures
:
The Solar Charge Controller should be placed within 5 feet of the battery in a dry well ventilated area.
This Solar Charge Controller can support up to 105 watts and 7 amps of array current. It is not advisable
to use with greater wattage.
All connections should be in parallel to ensure a 12 Volt system (positive to positive and negative to
negative).
NOTE:
It is permissible to operate vehicle while the solar panel is connected, however, when driving it is
recommended to secure solar panel. This is not recommended and may be hazardous.
The 36 Watt Folding Solar Panel is weatherproof and can safely operate in most weather conditions.
Testing of the Solar Panel can be done with the green LED tester, Illumination of the light will
indicate that the panel is operating at the proper voltage. To operate the green LED light, connect light to the
panel’s small ‘OUT’ wire and place panel in a sunny area.
Maintenance Instructions:
Cleaning of the glass may be performed by the user by utilizing a clean damp cloth. Any other maintenance
to the unit should be performed by qualified service personnel or contact our experienced customer service
team.
FAQ:
What types of batteries can my solar charger charge?All 12V batteries similar to those used in cars,
boats, RV’s, motorcycles and personal water craft.
Can I overcharge my battery?
No, as long as a Sunforce 7 Amp Solar Charge Controller is used, it will protect the battery from overcharging.
Will the Solar Charger keep my battery fully charged?
The Solar Charger charges your battery with the power of the sun. With a charge controller, it will keep a
battery charged.
Page 5

How long does it take to charge a dead battery?
The Solar Charger produces 2.5 Amps per Hour in full sunlight. Depending on the size of your batteries a
40 Amp Hr battery at 50% would take 20 Hrs. By doubling the amount of panels, you would reduce the time
needed by half.
Can I extend the wire?
The 12foot wire can be extended up to a maximum of 27 feet without loss of power or voltage.
How many batteries can I charge using 1 unit?
This Solar Charger is capable of charging a bank of batteries but the charge will be divided. Ensure positive
to positive and negative to negative connections to ensure 12V.
Can this Solar Charger run my whole house?
No. This panel is best used to recharge 12V Batteries. Please check the charts on the box for charging
options.
How can I run 110V appliances with my Solar Chargers?
By using an inverter connected to the battery, this will convert the DC Power to AC Power.
Is my Solar Charger weatherproof?
Yes, this panel is fully weatherproofed.
Can I run an appliance directly from my Solar Charger without a battery?
Yes, although the Solar Charger might have inconsistent voltages which this will affect the running
appliance. It is only recommended to charge 12V batteries.
TROUBLESHOOTING:
I am not sure if my panel is functioning?
- Ensure battery is operational. Over time, a battery’s ability to recharge will deteriorate
- Ensure the distance of the wires is not longer than 30 feet and all connections are secure.
- Measure the panel voltage with a voltmeter. The voltage reading should be between 16 to 25 volts in the sun.
WARRANTY
The solar panel is covered by a five year limited warranty of 80% of power output, and must be tested under
optimal conditions. This product is warranted from defects in materials and workmanship for a period of two years
from date of purchase. This warranty does not apply in the event of misuse or abuse and or repairs or alterations.
Coleman
®
and are registered trademarks of The Coleman Company, Inc., used under license.
© 2010 The Coleman Company, Inc.
For more information or technical support
Contact: Les Produits Sunforce Products Inc. Montréal, Canada
1-888-478-6435 www.sunforceproducts.com info@sunforceproducts.com
Page 6

PANNEAU SOLAIRE PLIANT - 36 WATTS
Notice D’utilisation
Page 7

Merci d'avoir choisi un produit Coleman. Tous les efforts ont été apportés pour assurer que ce produit est conçu
selon les spécifications et les normes techniques les plus strictes. Il devrait vous fournir des années d'usage sans
entretien. Veuillez lire avec soin ces instructions au complet avant l'installation et puis les conserver en lieu sûr
pour référence ultérieure. Si, en tout temps, vous n'êtes pas sûr au sujet de ce produit ou avez besoin d'aide,
veuillez contacter nos professionnels bien formés qui travaillent au service d'assistance téléphonique au 1-888478-6435 ou transmettez un courriel à info@sunforceproducts.com
Panneau solaire pliant - 36 watts
Spécifications et articles inclus :
Puissance nominale : jusqu'à un maximum de 36 watts dans les conditions optimales
Courant : jusqu'à 2,4 ampères à 15 volts
Dimensions : (Long. x Larg. x Épais.) 43 x 17 x 5 po (109,2 x 43,2 x 12,7 cm)
Poids : 22 lb (10 kg)
Inclus : câble équipé d'un connecteur de 12 VCC, câble équipé de pinces crocodiles pour batterie, panneau
solaire, supports et vis, détecteur de tension à DEL et tiges de support. Câble dénudé pour connexions au
contrôleur de charge.
Avertissement :
• Évitez les dangers électriques lors de l'installation, du câblage, de l'exploitation et de l'entretien de votre
panneau solaire. Le panneau solaire inclus génère une tension CC lorsqu'il est exposé à la lumière solaire ou
à d'autres sources lumineuses.
• À être utilisé uniquement dans les systèmes de 12 volts.
• Observez la bonne polarité tout au long de l'acheminement du câble de puissance.
• Travaillez avec prudence. Ne portez pas de bijoux lorsque vous travaillez avec de l'équipement électrique ou
mécanique. Utilisez des lunettes de sécurité lorsque vous travaillez avec des batteries ou des perceuses.
Soyez extrêmement prudent lorsque vous êtes sur une échelle ou sur un toit.
• Prenez toutes les précautions sécuritaires suggérées par le fabricant de batteries. Certaines batteries
peuvent dégager du gaz hydrogène inflammable. Évitez de générer des étincelles lorsque vous travaillez
dans des endroits où des gaz ou des vapeurs inflammables existent. Protégez la peau et les yeux de l'acide
des batteries. Rincez minutieusement avec de l'eau si la peau ou les vêtements entre en contact avec de
l'acide ou des matières corrosives qui auraient pu s'accumuler sur la batterie. Maintenez les bornes et le
boîtier propres.
• Utilisez un contrôleur de charge lorsque la puissance excède 15 watts.
• Ne tentez jamais de recharger des batteries non-rechargeables.
• Branchez toujours en premier le contrôleur de charge à la batterie.
• Lorsque vous débranchez, débranchez toujours la batterie en dernier.
Caractéristiques
• Branchement et débranchement rapide à la batterie
• Ne requiert pas de rayons solaires; fonctionne sous un ciel nuageux
• Durable – couvert par une garantie de cinq (5) ans
• Sans entretien
• Résistant aux intempéries
• Verre trempé de sécurité
Idéal pour les locations éloignées. Se plie commodément en deux pour le voyage et l'entreposage.
Page 8

INSTALLATION :
1. Visez le support (1) et le support (2) dans les trous existants dans le cadre du panneau solaire.
2. Placez le support (3) entre le support (1) et le support (2) pour assurer la stabilité.
Votre panneau solaire pliant de 36 watts doit être ouvert et le côté bleu doit pointer directement vers le soleil
pour commencer à charger.
CONNEXION DU PANNEAU
Branchez un panneau à l'autre au moyen des « Quick Connect » (connexion rapide). Le long fil du panneau
de droite [« OUT » (SORTIE)] se branche au fil court [« IN » (ENTRÉE)] du panneau secondaire. La DEL du
détecteur de tension ne s'allumera que lorsque le système est branché correctement. Vos deux panneaux
sont maintenant branchés en parallèle.
Installation via le câble équipé du connecteur de 12 VCC :
Branchez le connecteur de 12 VCC dans la fiche femelle du véhicule ou de l'appareil. Assurez-vous que les
deux extrémités sont sécuritaire et que la polarité est respectée.
Connexions à la batterie au moyen du câble équipé de pinces crocodiles pour batterie :
Branchez correctement les pinces crocodiles à la batterie : la pince rouge positive (+) à la borne positive (+)
de la batterie; la pince noire négative (-) à la borne négative (-) de la batterie. Suivez cette procédure avec
soin pour éviter toute blessure corporelle.
Branchez facilement votre panneau solaire à l'entrée de votre source d'énergie au moyen du connecteur
torique inclus. Lorsque votre panneau solaire est placé au soleil, la charge commence. Si vous utilisez un
contrôleur de charge, une modification du connecteur torique peut être requise. Cette modification n'annulera
pas la garantie.
Nous recommandons fortement d'utiliser un contrôleur de charge de 7 ampères pour prévenir la
surcharge de la batterie.
Page 9

CONTRÔLEUR DE CHARGE : (si inclus)
Spécifications :
Tension d'activation : 13 volts
Tension de désactivation : 14,2 volts
Charge maximale : 105 watts
Branchez le fil positif (+) du contrôleur de charge solaire à la borne positive (+) de la batterie. Puis branchez
le fil négatif (-) du contrôleur de charge solaire à la borne négative (-) de la batterie.
PRUDENCE : les pinces crocodiles DOIVENT ÊTRE branchées à la batterie dans l'ordre indiqué ci-dessus;
les connexions erronées peuvent causer des étincelles et des explosions.
Branchement au panneau solaire :
Option 1
Dénudez les fils du panneau solaire. Branchez le fil positif (+) du panneau solaire à la borne positive (+) du
contrôleur de charge et le fil négatif (-) à la borne négative (-) du contrôleur de charge. Assurez-vous que les
connexions sont sécuritaires.
Option 2
Certains panneaux peuvent inclure un câble dénudé et « Quick Connect » à utilisé avec le contrôleur de
charge solaire. S'il est inclus, branchez le fil positif à la borne positive et le fil négatif à la borne négative du
contrôleur de charge solaire. Assurez-vous que les connexions sont sécuritaires.
Fonctionnement :
Le voyant vert « Charged » (Chargée) indique que la batterie est totalement chargée. Lorsque la batterie
atteint 14,2 volts, le contrôleur de charge solaire coupera la tension et, de ce fait, préviendra les surcharges.
Le voyant jaune « Charging » (En charge) indiquera que la batterie se charge. Lorsque la batterie atteint 13
volts, le contrôleur de charge de la batterie s'activera et commencera la charge.
COMMENTAIRES :
Le contrôleur de charge solaire devrait être placé à moins de 5 pi (1,5 m) de la batterie dans un endroit
sec et bien ventilé.
Ce contrôleur de charge solaire peut soutenir jusqu'à 105 watts de puissance provenant des panneaux
solaires. Nous avisons de ne pas excéder cet puissance.
Toutes les connexions devraient être en parallèle pour assurer un système de 12 volts.
Il est normal que les deux voyants clignotent (allumé/éteint) pendant le fonctionnement.
REMARQUE :
Il est permis d'opérer un véhicule lorsque le panneau solaire est branché; cependant, lorsque vous
conduisez, nous recommandons de sécuriser le panneau solaire. Ne pas se conformer à cette consigne
peut être dangereux et n'est pas recommandé.
Le panneau solaire pliant de 36 watts est résistant aux intempéries et peut fonctionner de façon
sécuritaire dans la plupart des conditions atmosphériques.
La vérification du panneau solaire peut s'effectuer au moyen du détecteur de tension à DEL verte.
L'allumage de la DEL indique que le panneau fonctionne correctement à la bonne tension. Pour utiliser le
détecteur de tension à DEL verte, branchez-le au fil court « OUT » (SORTIE) du panneau et monté le
panneau dans un endroit ensoleillé.
Instructions pour l'entretien :
Le nettoyage du verre peut être effectué par l'utilisateur au moyen d'un chiffon humide propre.
Tout autre entretien de l'unité devrait être effectué par le personnel d'entretien qualifié ou contactez notre
équipe expérimentée d'aide à la clientèle.
FAQ :
1. Quels types de batteries puis-je charger avec mon chargeur solaire?
Page 10

Toutes les batteries rechargeables de 12 volts comme celles utilisées dans les véhicules, bateaux, VR,
motocyclettes et motomarines.
2. Puis-je surcharger ma batterie?
Non, aussi longtemps qu'un contrôleur de charge de batterie est utilisé pour protéger la batterie contre la
surcharge.
3. Le chargeur solaire maintiendra-t-il ma batterie complètement chargée?
Le chargeur solaire charge votre batterie à partir de la lumière solaire. Avec un contrôleur de charge, il
maintiendra votre batterie chargée.
4. Combien de temps faut-il pour charger une batterie déchargée?
Le chargeur solaire génère 2,5 ampère par heure en plein soleil. Selon la capacité de vos batteries; une
batterie de 40 ampères-heure déchargée à 50 % demanderait 20 heures de recharge. En doublant le nombre
de panneaux solaires, vous réduisez le temps de moitié.
5. Puis-je allonger le câble?
Le câble de 12 pi (3,7 m) peut être allongé d'une longueur additionnelle de 15 pi (4,6 m) pour une longueur
maximale de 27 pi (8,2 m) sans perte de puissance ou de tension.
6. Combien de batteries puis-je charger avec une unité?
Ce chargeur solaire peut charger un ensemble de batteries; cependant, la charge sera répartie. Assurezvous que la connexion positive est à la borne positive et la connexion négative est à la borne négative pour
obtenir une tension de 12 volts.
7. Ce chargeur solaire peut-il alimenter toute la maison?
Non. Le panneau est prévu être utilisé pour recharger les batteries de 12 volts. Veuillez vérifier les tableaux
de l'emballage pour les options de charges.
8. Comment puis-je alimenter mes appareils de 110 volts avec mon chargeur solaire?
En utilisant un onduleur branché à la batterie qui convertit la tension CC à la tension CA.
9. Mon chargeur solaire résiste-t-il aux intempéries?
Oui, ce panneau est totalement résistant aux intempéries.
10. Puis-je alimenter un appareil directement à partir de mon chargeur solaire sans une batterie?
Oui, bien que le chargeur solaire puisse fournir une tension irrégulière susceptible d'affecter le
fonctionnement de l'appareil. Nous recommandons donc d'utiliser des batteries de 12 VCC.
DÉPANNAGE :
Je ne suis pas sûr que mon panneau solaire fonctionne correctement?
- Assurez-vous que la batterie est fonctionnelle. Avec le temps, la capacité d'une batterie de se recharger
se détériore.
- Assurez-vous que la longueur du câble n'excède pas 30 pi (9,1 m) et que toutes les connexions sont
sécuritaires.
- Vérifiez la tension du panneau au moyen d'un voltmètre. La tension devrait être de 16 à 25 volts lorsque
le panneau est exposé au soleil.
GARANTIE
Le panneau solaire est couvert par une garantie limitée de cinq (5) ans pour la génération de 80 % de la
puissance (mesurée dans les conditions optimales). Ce produit est garanti contre les défauts de matériaux et
de main-d'œuvre pendant une période de deux (2) ans commençant à la date de l'achat.
Cette garantie ne s'applique pas dans le cas d'une utilisation abusive et/ou si des réparations ou des
modifications ont été effectuées.
ColemanMD et sont des marques déposées de The Coleman Company, Inc., utilisées sous licence.
© 2010 The Coleman Company, Inc.
Pour de plus amples renseignements ou de l'aide au niveau technique, contactez :
Les Produits Sunforce Products Inc., Montréal, QC, Canada
1-888-478-6435 www.sunforceproducts.com info@sunforceproducts.com
Page 11

PANEL SOLAR PLEGABLE DE 36 VATIOS
Manual de Usuario
Page 12

Felicitaciones por su compra Coleman. Hemos realizado nuestros mayores esfuerzos para asegurar
que este producto esté diseñado con los más altos estándares y especificaciones técnicas. Debería
proveer de años de uso libres de mantenimiento. Por favor, lea estas instrucciones cuidadosamente
antes de instalar, luego guárdelas en un lugar seguro para sus referencias futuras. Si en cualquier
momento tiene dudas sobre este producto, o requiere de asistencia, por favor, no dude en ponerse en
contacto con nuestros profesionales capacitados que lo atenderán en la línea de soporte al cliente, al
número 1-888-478-6435, o escríbanos a info@sunforceproducts.com.
PANEL SOLAR PLEGABLE DE 36 VATIOS
Especificaciones y elementos incluidos:
Potencia: hasta 36 vatios – Potencia máxima – Bajo condiciones óptimas.
Corriente: hasta 2,4 Amp @ 15 Voltios.
Dimensiones: (Longitud x ancho x altura) 43 x 17 x 5 pulgadas.
Incluye: Enchufe para corriente directa de 12 Voltios, pinzas conectoras para batería, panel solar,
soportes y tornillos, luz LED indicadora de voltaje, barras de soporte. Cables pelados para conexión al
controlador de carga.
Advertencias:
• Evite los riesgos eléctricos durante la instalación, cableado, operación y mantenimiento de su Módulo
Solar. El módulo solar incluido genera electricidad de corriente directa cuando se expone a la luz solar o
a otras fuentes de luz.
• Para utilizar solamente en sistemas de 12 Voltios.
• Observar la polaridad apropiada a lo largo de la totalidad de la ruta de cableado.
• Trabaje en forma segura. No utilice joyas cuando trabaje con equipos eléctricos o mecánicos. Utilice
protección ocular cuando trabaje con baterías o taladros. Tenga extremo cuidado cuando se encuentre
en escaleras o en el techo.
• Siga todas las Precauciones de Seguridad del Fabricante de la Batería. Algunas baterías pueden liberar
gases inflamables de hidrógeno. No produzca chispas cuando trabaje en lugares donde existan gases o
vapores inflamables. Proteja la piel y los ojos de los ácidos de la batería. Lave cuidadosamente con agua
si la piel o la ropa entran en contacto con ácido o cualquier elemento corrosivo, que se puede haber
acumulado en la batería. Mantenga los terminales y las cubiertas limpios.
• Utilice un Controlador de Cargas para potencias superior a 15 Vatios.
• No intente cargar baterías no-recargables.
• Siempre conecte primero el controlador de carga a la batería.
• Al desconectar, siempre desconecte la batería al final.
Características
• Se conecta y se desconecta a la batería rápidamente.
• Protege contra la sobrecarga y la descarga.
• No necesita luz solar directa, funciona en condiciones nubladas.
• Es durable – con una garantía de cinco años.
• No requiere mantenimiento.
• A prueba de agua.
• Vidrio templado inastillable.
• Ideal para lugares remotos, convenientemente se pliega en dos para viajar y almacenar más
cómodamente.
Instalación
1. Atornillar el soporte (1) y el soporte (2) en los receptáculos localizados en el marco del panel solar.
2. Colocar el soporte (3) entre el soporte (1) y el soporte (2) para incrementar la estabilidad.
Page 13

Su Panel Solar Plegable de 36 Vatios debe estar abierto y el lado azul debe apuntar al sol para cargar.
Conexión del panel
Conectar un panel con el otro utilizando los conectores rápidos. El conector de un único cable largo en
el panel del lado derecho que indica “OUT” (”salida”) se conecta con el pequeño conector que indica
“IN” (“entrada”) en el panel secundario. El indicador LED de prueba solo se encenderá cuando el
sistema esté completamente conectado. Los dos paneles, entonces, están ahora en paralelo.
Instalación a través del enchufe de 12 Voltios:
Conecte el enchufe de 12 Voltios en el enchufe de 12 Voltios del vehículo u aparato. Asegúrese de que
ambos extremos estén seguros y alineados correctamente.
Instalación a la batería por pinzas de conexión a baterías:
Conecte las pinzas para conexión de baterías correctamente haciendo coincidir la pinza roja, que es
Positiva (+) con el terminal Positivo (+) de la batería. Conectar la pinza negra, que es Negativa (-) con
el terminal Negativo (-) de la batería. Siga estas instrucciones con cuidado para no causar ningún daño
corporal.
Es fácil conectar el panel solar al generador de energía con el conector de barril incluido. Simplemente
inserte el conector de barril incluido en la entrada del cargador. Cuando su panel solar se coloque al
sol, empezará la carga. Si se utiliza un controlador de carga, puede ser necesario realizar alteraciones
al conector de barril.
Es muy recomendable utilizar un controlador de carga de 7 Amp para prevenir la sobrecarga de
la batería.
Controlador de carga: (en caso de estar incluido)
ESPECIFICACIONES
Corriente de conexión: 13 Voltios
Page 14

Corriente de desconexión: 14,2 Voltios
Carga máxima: 105 vatios
Conectar cable positivo (+) del Controlador de Carga Solar con el terminal positivo (+) de la batería.
Luego conectar el cable negativo (-) del Controlador de Carga Solar con el terminal negativo (-) de la
batería.
ADVERTENCIA: Las pinzas de conexión DEBEN colocarse en la batería en el orden descrito
anteriormente – las conexiones realizadas en forma incorrecta pueden causar chispas o explosiones.
Conectar al Panel Solar:
Opción 1
Pelar los cables del panel solar. Conectar el cable positivo (+) del panel solar con el positivo (+) del
controlador de carga, y el cable negativo (-) del panel solar con el negativo (-) del controlador de carga.
Asegurarse de que las conexiones estén seguras.
Opción 2
Algunos paneles pueden incluir un “cable pelado” para conexión rápida para ser utilizado con el
Controlador Solar de Carga. Si está incluido, conectar el positivo con el positivo y el negativo con el
negativo del controlador de carga. Asegurarse de que las conexiones son seguras.
Funcionamiento:
La luz verde “Charged” (“cargado”) indica que la batería está completamente cargada. Cuando la
batería alcanza los 14,2 Voltios, el Controlador de Carga Solar cortará el voltaje, asegurando de esa
forma que no haya sobrecarga. La luz amarilla “Charging” (“cargando”) indica que la batería se está
cargando. Cuando la batería alcanza los 13 Voltios, el controlador de carga de la batería empezará la
carga.
COMENTARIOS:
El Controlador Solar de Carga debería colocarse unos 5 pies cerca de la batería en un área seca y
ventilada.
Este Controlador Solar de Carga puede soportar hasta 105 Vatios de energía solar. No se recomienda
utilizar con un vataje mayor.
Todas las conexiones deberían estar en paralelo para asegurar el sistema de 12 Voltios.
Es normal que ambas luces se enciendan y se apaguen durante el funcionamiento normal.
El Controlador de Carga de la Batería debería colocarse a unos 5 pies de la batería en un área seca y
bien ventilada.
Este Controlador de Carga de la Batería soporta hasta 105 Vatios y hasta 7 Amps.
Todas las conexiones deberían ser paralelas para asegurar sistemas de 12 Voltios (positivos con
positivos y negativos con negativos).
NOTA:
Se permite el funcionamiento del vehículo mientras que el panel solar esté conectado, sin embargo,
cuando se maneje, es recomendable asegurar el panel solar. El no hacerlo puede ser riesgoso y no se
recomienda.
El panel solar plegable de 36 Vatios es resistente al agua y se puede operar en forma segura en la
mayoría de las condiciones climáticas.
Se puede probar el Panel Solar con el comprobador de luz indicadora LED verde, el encendido de la luz
indicará que el panel está funcionando con el voltaje adecuado. Para operar la luz verde indicadora LED,
conectarla al pequeño cable conector “OUT” (“salida”) del panel y colocar el panel en un área soleada.
Instrucciones de mantenimiento:
El usuario puede realizar la limpieza del vidrio, utilizando un trapo mojado limpio.
Cualquier otra tarea de mantenimiento en la unidad debe ser realizada por el personal de servicio
calificado o póngase en contacto con nuestro personal experimentado de servicio al cliente.
Page 15

Preguntas Frecuentes (FAQ):
1. ¿Qué tipo de baterías puedo cargar con mi cargador solar?
Todas las baterías de 12 Voltios similares a las utilizadas en automóviles, botes, vehículos recreativos,
motocicletas y motos de agua.
2. ¿Puedo sobrecargar mi batería?
No, siempre que se utilice un Controlador Solar de Carga Sunforce de 7 Amp para proteger la batería
de la sobrecarga.
3. ¿El cargador solar puede mantener mi batería cargada?
El cargador solar carga su batería con la energía del sol. Con un controlador de carga, el mantendrá su
batería cargada.
4. ¿Cuánto tiempo demora en cargarse la batería?
El cargador solar produce 2,5 Amp por hora en completa luz solar. Dependiendo del tamaño de sus
baterías, una batería de 40 Amp Hr a 50%, demoraría 20 horas. Duplicando la cantidad de paneles,
reduciría el tiempo necesario a la mitad.
5. ¿Puedo extender el cable?
El cable de 12 pies puede extenderse hasta 15 pies más, para lograr un máximo de 27 pies sin generar
pérdida de energía o voltaje.
6. ¿Cuántas baterías puedo cargar utilizando una unidad?
Este cargador solar puede cargar un grupo de baterías pero la carga será dividida. Asegure las
conexiones positivas con positivas y negativas con negativas para asegurar 12 Voltios.
7. ¿Puedo hacer funcionar todos los aparatos de mi casa con este cargador solar?
No, el mejor uso de este panel es el de la carga de baterías de 12 Voltios. Por favor revisar la
información incluida en el paquete para ver las opciones de carga.
8. ¿Cómo puedo hacer funcionar aparatos de 110 Voltios con mi cargador solar?
Por medio de la utilización de un inversor conectado a la batería, que convierta a la corriente directa en
corriente alternativa.
9. ¿Mi cargador solar es resistente al agua?
Sí, este panel es completamente resistente al agua.
10. ¿Puedo hacer funcionar aparatos directamente a través del cargador solar sin una batería?
Sí, aunque el cargador solar puede tener voltajes inconsistentes y esto puede afectar el funcionamiento
del aparato. Se recomienda utilizarlo para cargar baterías de 12 Voltios.
Localización y resolución de problemas (Troubleshooting):
No estoy seguro de que mi panel esté funcionando.
- Asegurarse de que la batería sea funcional. Con el paso del tiempo, la capacidad de recarga de la batería
se deteriorará.
- Asegurarse de que la distancia de los cables no sea mayor a 30 pies y de que todas las conexiones son
seguras.
- Medir el voltaje del panel con un voltímetro. La lectura del voltaje debería estar entre 16 y 25 Voltios de
corriente directa en el sol.
GARANTÍA
El panel solar está cubierto por una garantía limitada de cinco años de 80% de producción de energía, y se debe probar en
condiciones óptimas. Este producto tiene garantía contra defectos en los materiales y la fabricación por un periodo de dos
años desde la fecha de compra.
Esta garantía no aplica en caso de uso inapropiado, abuso o reparaciones y alteraciones.
Coleman® y son marcas registradas de The Coleman Company, Inc., utilizadas bajo licencia.
© 2010 The Coleman Company, Inc.
Para más información o soporte técnico, comuníquese con:
Les Produits Sunforce Products Inc. Montréal, Canada
1-888-478-6435 www.sunforceproducts.com info@sunforceproducts.com
36Cole010511
 Loading...