

Page 1
Program: InDesign CS6
Black
DO NOT PRINT THIS PAGE
Printing Notes:
Material: 20 Pound (US) or 80 GSM (International) bond paper, white
Ink: Black
Resolution: 150 DPI or above
Printing method: Offset Printing
Binding: Saddle Stitch
Folded size: 8.5 x 11 in (W x H)
This drawing contains proprietary information and trade secrets of The Coleman Company, Inc.
METRIC
[INCH]
CRITICAL DIMENSION
CHECKING IS COMPULSORY
VOLUME
MASS
DENSITY
GENERAL TOLERANCES
EXCEPT AS NOTED
0 TO 6mm = ±0.1
>6 TO 30mm = ±0.2
>30 TO 80mm = ±0.3
>80 TO 180mm = ±0.4
>180mm = ±0.5
ANGULAR = ± 3°
cm3
grams
g/cm3
02
01
REV.
MATERIAL:
FINISH
SPEC.:
SCALE:
14-DEC-15 Melvin H. 20054446
23-OCT-15 Melvin H. 20050601NEW
DATE
SEE NOTES
SEE NOTES
DATE: DRAWN BY: APPROVED BY: REVISION
1:1
NAME:
INSTRUCTION MANUAL - HWOD H2Oasis - US
Unauthorized use or copying is prohibited.
Added component “main power switch” and related instructions; added
instructions for draining water.
23-OCT-15
MODIFICATIONS
Melvin H.
NAME
ECN NO.
The Coleman Company, Inc.
Wichita, Kansas USA 67219
COMPOSITE- NO
Leo Y.
PART
NO.:
SHEET 1 OF 1
02
4010047124
Page 2
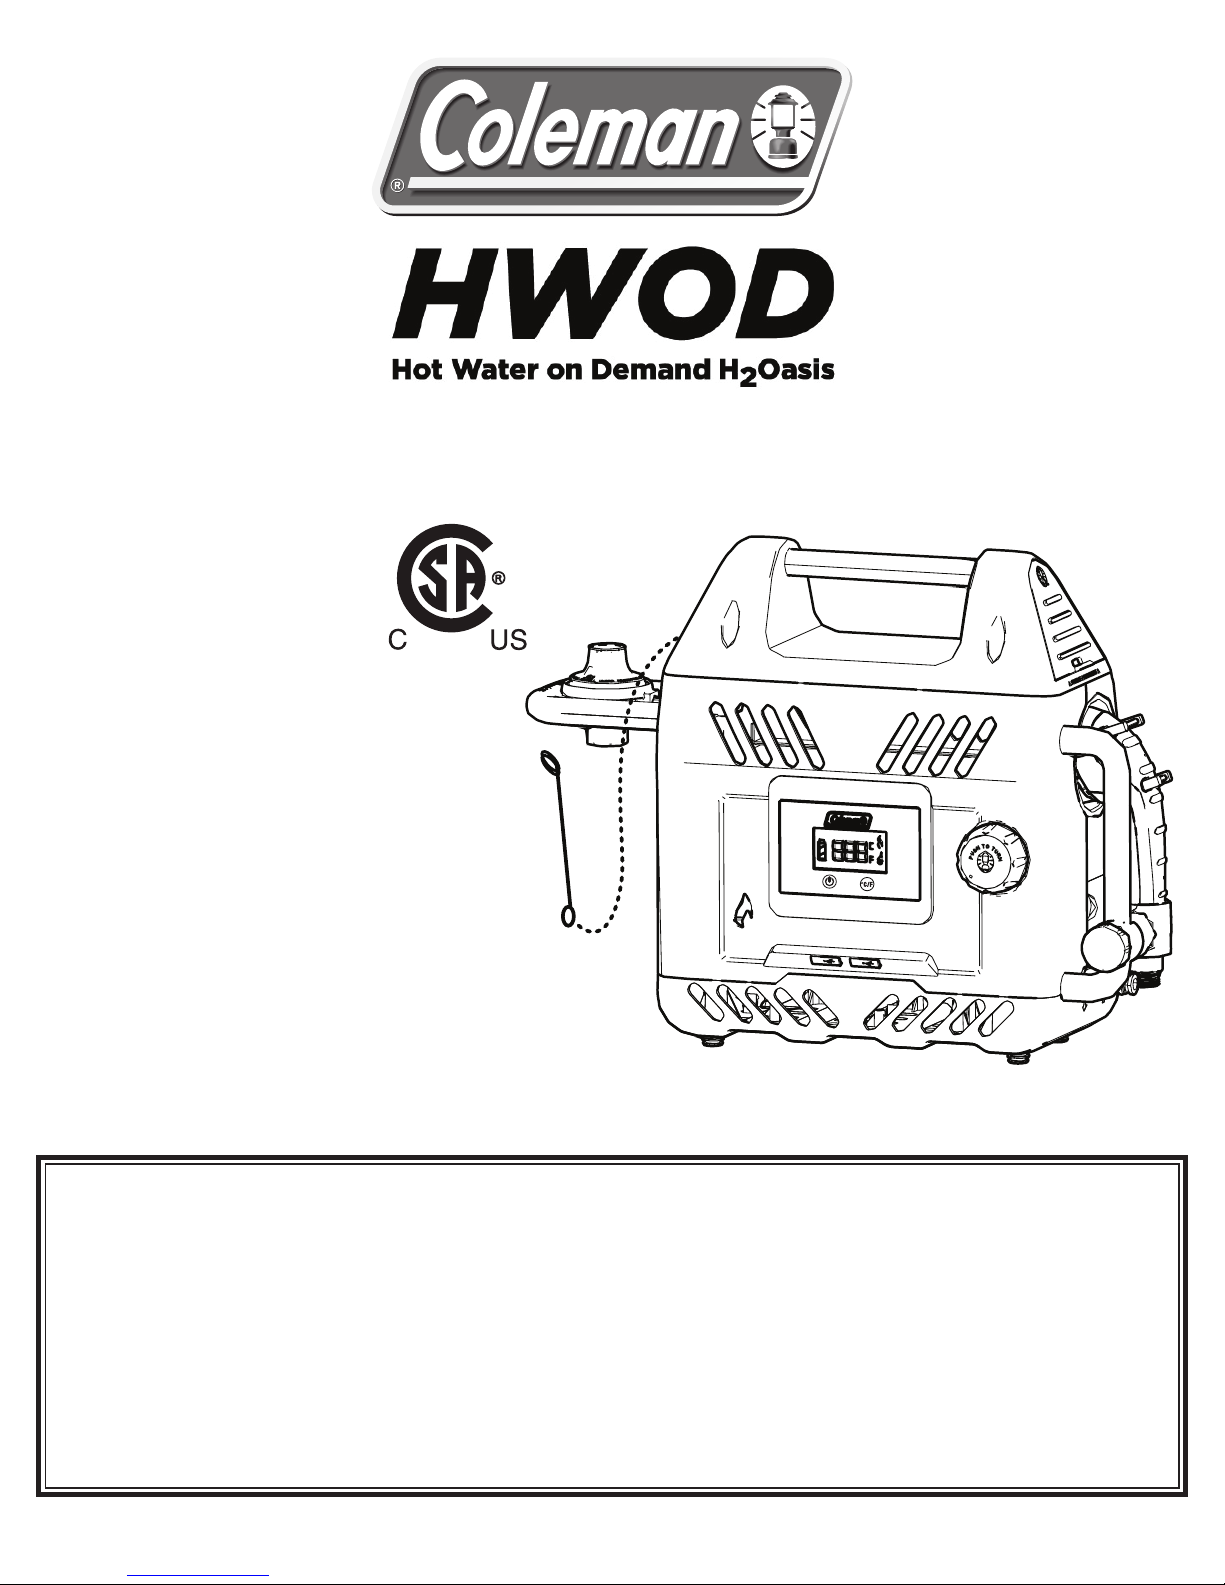
Instructions for Use
MODEL -
Series 2302-A
Series 2302-B
English ..............................2-12
Français ..........................13-25
Español ...........................25-34
- Outdoor use only -
• This portable and self-contained water heater is designed to
provide hot water for outdoor showering / cleaning tasks only.
Do not use the product to heat drinking water.
• This appliance is not designed to connect to garden hose
directly.
• This appliance is for point of use, for temporary water heating
and not for connection to a permanent inlet water connection
or for connection to a water distribution system to supply
multiple outlets.
• This appliance is designed to heat a water source up to about
30°C above ambient temperature (to a maximum of 122°F).
(For illustration purpose only, may look different from your model)
IMPORTANT
SAVE THESE INSTRUCTIONS - This manual contains important safety and operating instructions for use.
Read these instructions for use carefully.
Familiarize yourself with the appliance before connecting it to its gas container.
This instruction manual contains important information necessary for the proper assembly and safe use of the
appliance. Follow all warnings and instructions when using the appliance. If you have questions about assembly,
operation, servicing or repair of this product, please call Coleman on 1-800-835-3278 or TDD: 316-832-8707. Gas
cylinders shall be changed in a well-ventilated location, preferably outside away from people and any sources of
ignition, such as naked flames, pilot flames, electric heaters / equipment. If there is a leak on your appliance (smell
of gas) and you cannot stop the gas flow, remove the appliance to a well-ventilated location away from any ignition
source. Check for leaks using soapy water. Do not try to detect leaks using a flame.
Page 3
Contents
General Safety Information (continued)
General Safety Information 2-3
System Overview 3-4
To Set Up 4-6
Use and Operation 6-7
Helpful Hints 8
Storage 8
Maintenance 8
Chart of Indicators 9
Troubleshooting Guide 10
Technical Characteristics 10
Replacement Parts 10
Circuit Diagram 11
Warranty 12
General Safety Information
This manual contains important information about the assembly, operation
and maintenance of this water heater. General safety information is
presented in these first few pages and is also located throughout the
manual. Particular attention should be paid to information accompanied by
the safety alert symbol “
Keep this manual for future reference and to educate new users of this
product. This manual should be read in conjunction with the labeling on the
product.
Safety precautions are essential when any mechanical or propane fueled
equipment is involved. These precautions are necessary when using,
storing, and servicing. Using this equipment with the respect and caution
demanded will reduce the possibilities of personal injury or property
damage.
The symbols shown below are used throughout this manual. Always heed
these precautions, as they are essential when using any mechanical or
propane fueled equipment.
DANGER”, “ WARNING”, “ CAUTION”.
DANGER
DANGER indicates an imminently hazardous situation which, if not
avoided, will result in death or serious injury.
WARNING
WARNING indicates a potentially hazardous situation which, if not
avoided, could result in death or serious injury.
CAUTION
CAUTION indicates a potentially hazardous situation which, if not
avoided, may result in minor or moderate personal injury, or property
damage.
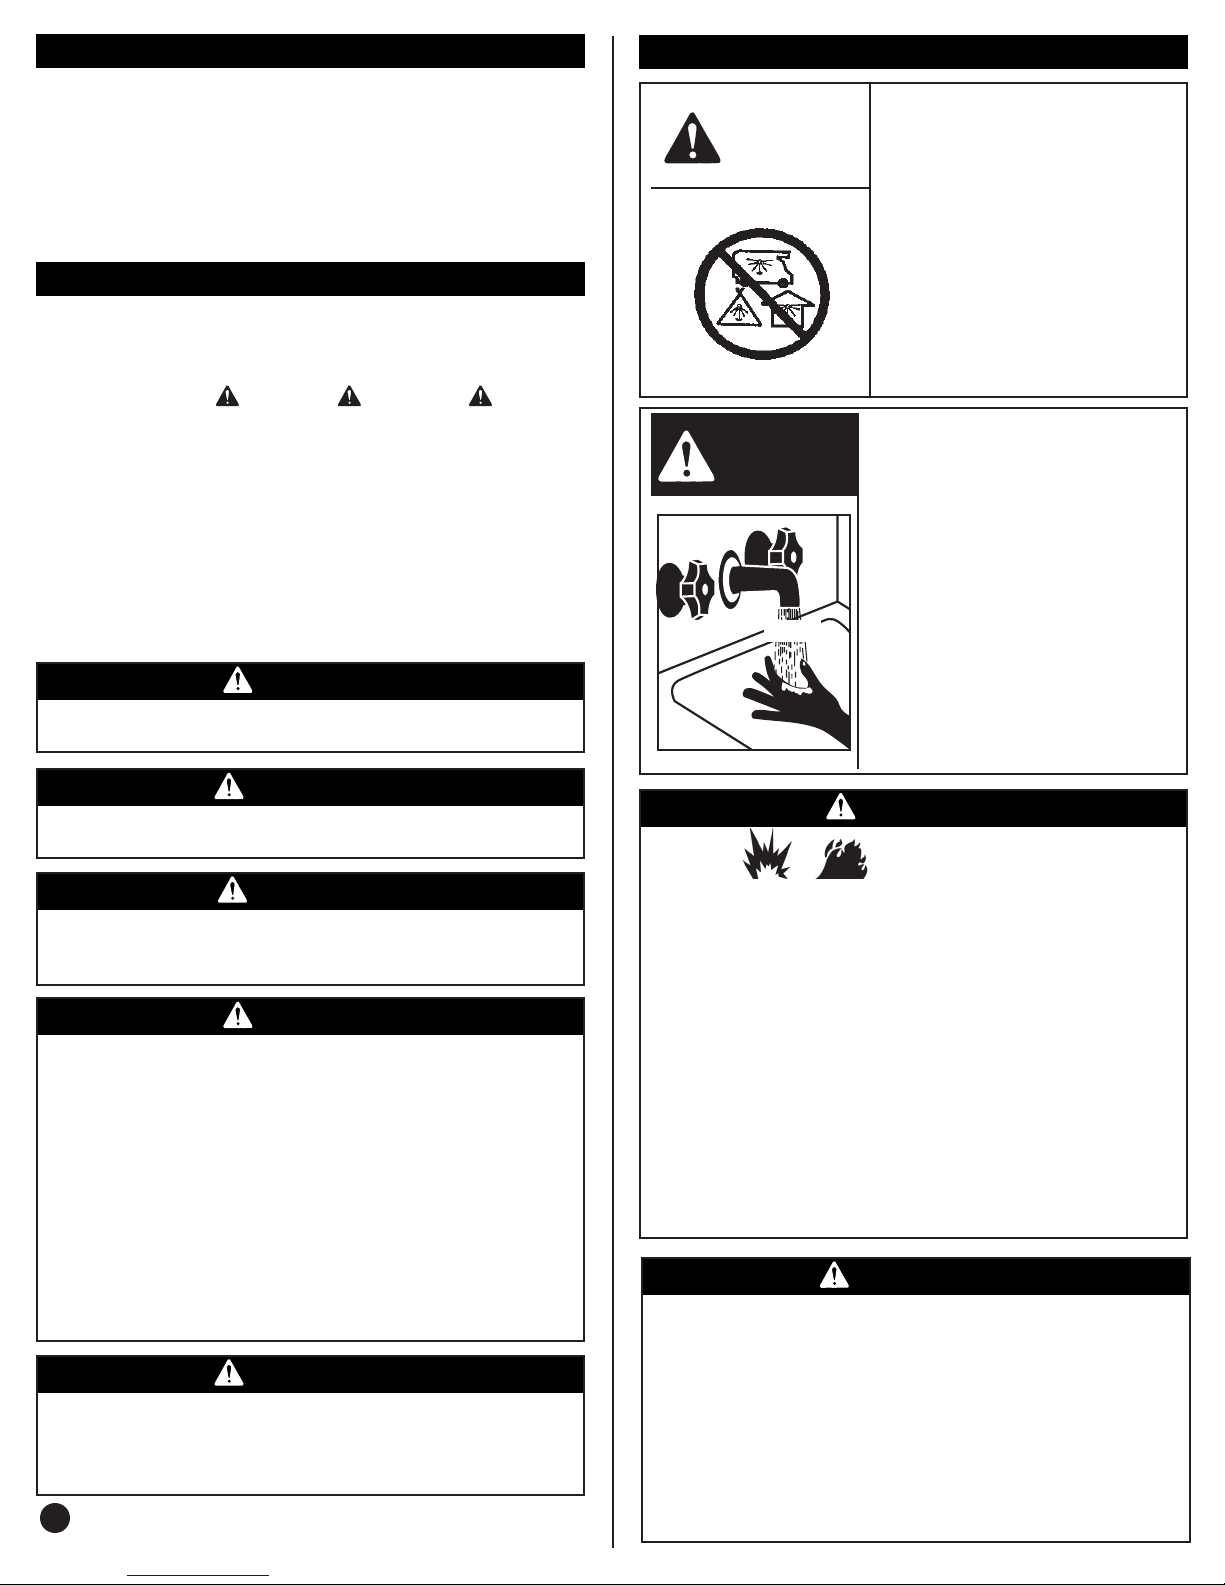
DANGER
If you smell gas:
1. Shut off gas to the appliance.
2. Extinguish any open flame.
3. If odor continues, keep away from the
appliance and immediately all your fire
department.
CARBON MONOXIDE
DANGER
HAZARD
This appliance can produce
carbon monoxide which has
no odor.
Using it in an enclosed space
can kill you.
Never use this appliance in
an enclosed space such as a
camper, tent, car or home.
Water temperature over
DANGER
125°F (52°C) can cause
server burns instantly or
death from scalds.
Children, disabled and
elderly are at highest risk of
being scalded.
HOT
See instruction manual
before setting temperature
BURN
at water heater.
Feel water before bathing
or showering.
DANGER
EXPLOSION - FIRE HAZARD
•Never store propane near high heat, open flames, pilot lights, direct
sunlight, other ignition sources or where temperatures exceed 120
degrees F (49°C).
•Propane is heavier than air and can accumulate in low places. If you
smell gas, leave the area immediately.
•Never install or remove propane tank while heater is operating, near
flame, pilot lights, other ignition sources or while heater is hot to
touch.
•During operation, this product can be a source of ignition. Never
ignite or use the heater in spaces that contain or may contain volatile
or air-borne combustibles, or products such as gasoline, solvents,
paint thinner, dust particles or unknown chemicals. Minimum
clearances from combustible materials: 12 inches (30.5 cm) from
sides & 48 inches (122 cm) from the top.
•Provide adequate clearances around air openings into the product.
Do not obstruct the flow of combustion and ventilation air.
Failure to follow these instructions could result
in fire or explosion which could cause property
damage, personal injury or death.
WARNING
Do not store or use gasoline or other flammable
vapors and liquids in the vicinity of this or any
other appliance.
2
WARNING
Not for home or recreational vehicle use.
We cannot foresee every use which may be made of our products.
Check with your local fire safety authority if you have questions
about use.
Other standards govern the use of fuel gases and heat producing
products for specific uses. Your local authorities can advise you about
these.
•Neverrefilldisposablecylinders.
•Usethepresetregulatorthatisinstalledinthewaterheater.Donot
attempt to adjust.
Page 4
General Safety Information (continued)
DANGER
Failure to comply with the precautions and instructions provided with
this product can result in death, serious bodily injury and property loss
or damage from hazards of fire, explosion, burn, asphyxiation, and/or
carbon monoxide poisoning.
Only persons who can understand and follow the instructions should
use or service this product.
If you need assistance or information such as an instruction manual or
labels, contact The Coleman Company, Inc.
•This product is fueled by propane gas. Propane gas is invisible,
odorless, and flammable. An odorant is normally added to help
detect leaks and can be described as a “rotten egg” smell. The
odorant can fade over time so leaking gas is not always detectable
by smell alone.
•Propane gas is heavier than air and leaking propane will sink to
the lowest level possible. It can ignite by ignition sources including
matches, lighters, sparks or open flames of any kind many feet
away from the original leak. Use only propane gas set up for vapor
WARNING
withdrawal.
WARNING
When using electrical products, basic precautions should always be
practiced including the following:
1. READ AND FOLLOW ALL SAFETY INSTRUCTIONS.
•Gas cylinders must be stored outdoors in a well ventilated area out of
the reach of children, any indoor storage shall comply with
AS/NZS 1596.
•Disconnect propane before storing the heater.
2. Read and follow all instructions that are on the product or provided
with the product.
3. For a cord-connected or direct plug-in power unit, do not use an
extension cord.
4. Do not install or use within 10 feet (3 m) of a pool.
5. Do not use in a bathroom.
WARNING: Risk of Electric Shock. When used outdoors, install only
to a covered Class A GFCI protected receptacle that is weatherproof
with the power unit connected to the receptacle. If one is not provided,
contact a qualified electrician for proper installation. Ensure that the
power unit and cord do not interfere with completely closing the
receptacle cover.
•Keep all connections and fittings clean. Inspect propane cylinder and
propane connections for damage before attaching.
•During set up, check all connections and fittings for leaks using
soapy water. Never use a flame. Bubbles indicate a leak. Check that
the connection is not cross-threaded and that it is tight. Perform
another leak check. If there is still a leak, remove the cylinder and
contact Coleman for service or repairs.
•Use for water heating only. Never alter in any way or use with any
device or part not expressly approved by Coleman.
•Always use in an upright position.
WARNING
SERVICE SAFETY
WARNING: Never leave heater unattended when hot or in use. Do not touch metal parts and venting holes of the heater, which may get very hot when
in use. Keep out of reach of children. THIS APPLIANCE IS NOT INTENDED FOR THE SUPPLY OF DRINKING WATER.
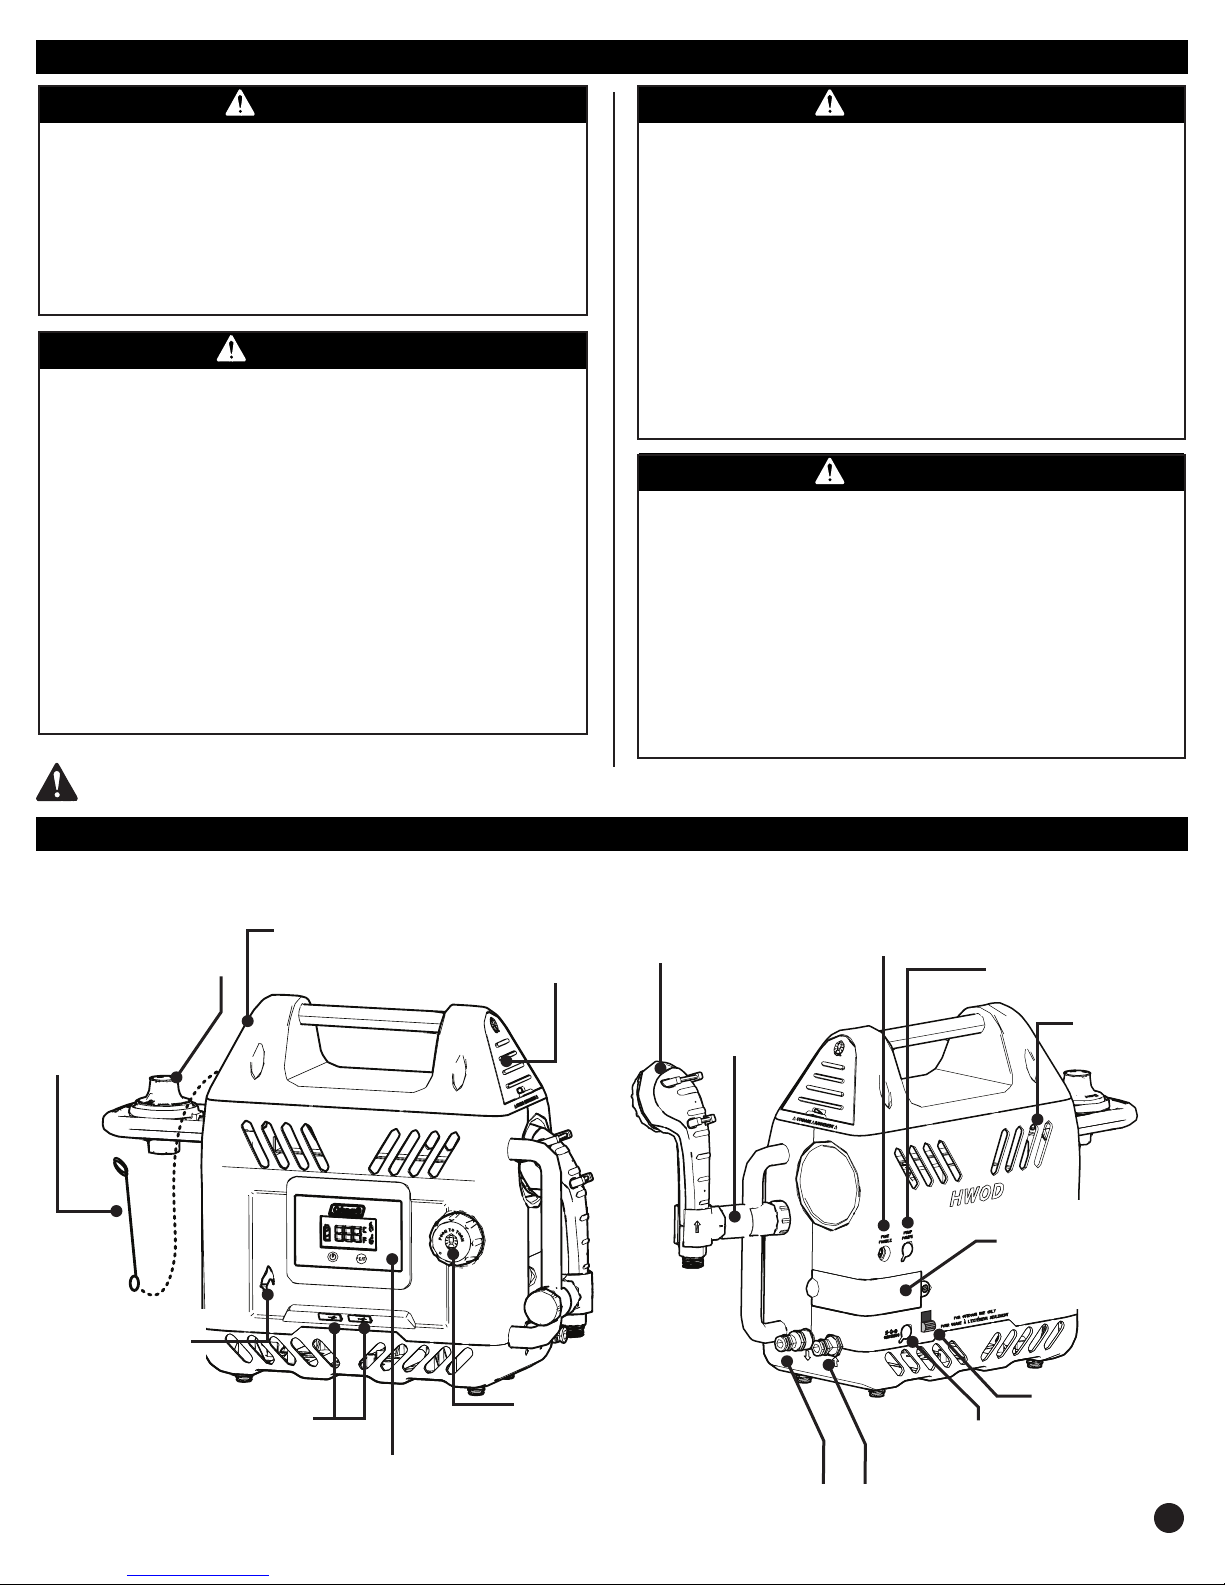
System Overview
Thank you for purchasing Coleman’s Hot Water on DemandTM unit.
Storage compartment for recharger cord
where the gas cylinder
Regulator –
is to be connected to.
Match Extension –
Use match extension
to hold and insert a
lighted match through
flame window.
Flame Window –
check status of pilot
light and burner flame,
or insert a lit match
through this window
to light the heater
manually.
model 2302-A only)
compatible devices.
USB Ports x 2 –
For charging USB
(voltage: 5V each;
current: ≤1A total)
& match extension–
12V auto recharger and 120V household
recharger cords are stored here (120V
charger Available on model 2302-A only)
(Available on
Display panel (varies by model)-
A display that shows the status of
the appliance, like water temperature,
error codes etc. See section “Chart of
Indicators”
Before You Go
Shower (varies by model)Detachable handheld shower
Shower Arm–
Adjustable shower
arm that holds the
shower in place.
Control knob – press to
turn in a counterclockwise
direction. Adjust knob to
desired water temperature.
Water outlet –
connects to shower.
Fuse Socket Replaceable fuse is
installed here.
Recharging Port –
plug 12V and 120V
Recharger cords
Water inlet –
connects to pump.
Power socket for pump –
Power the pump by
connecting the pump
power cord to this socket.
Air Vents –
Do not block air
vents.
Battery compartment –
12 volt / 2000 mAh
rechargeable Li-Ion battery
is located in compartment.
Battery operates the pump
& circuitry.
Main Power Switch–
(Available on 2302-A
only)
3
Page 5
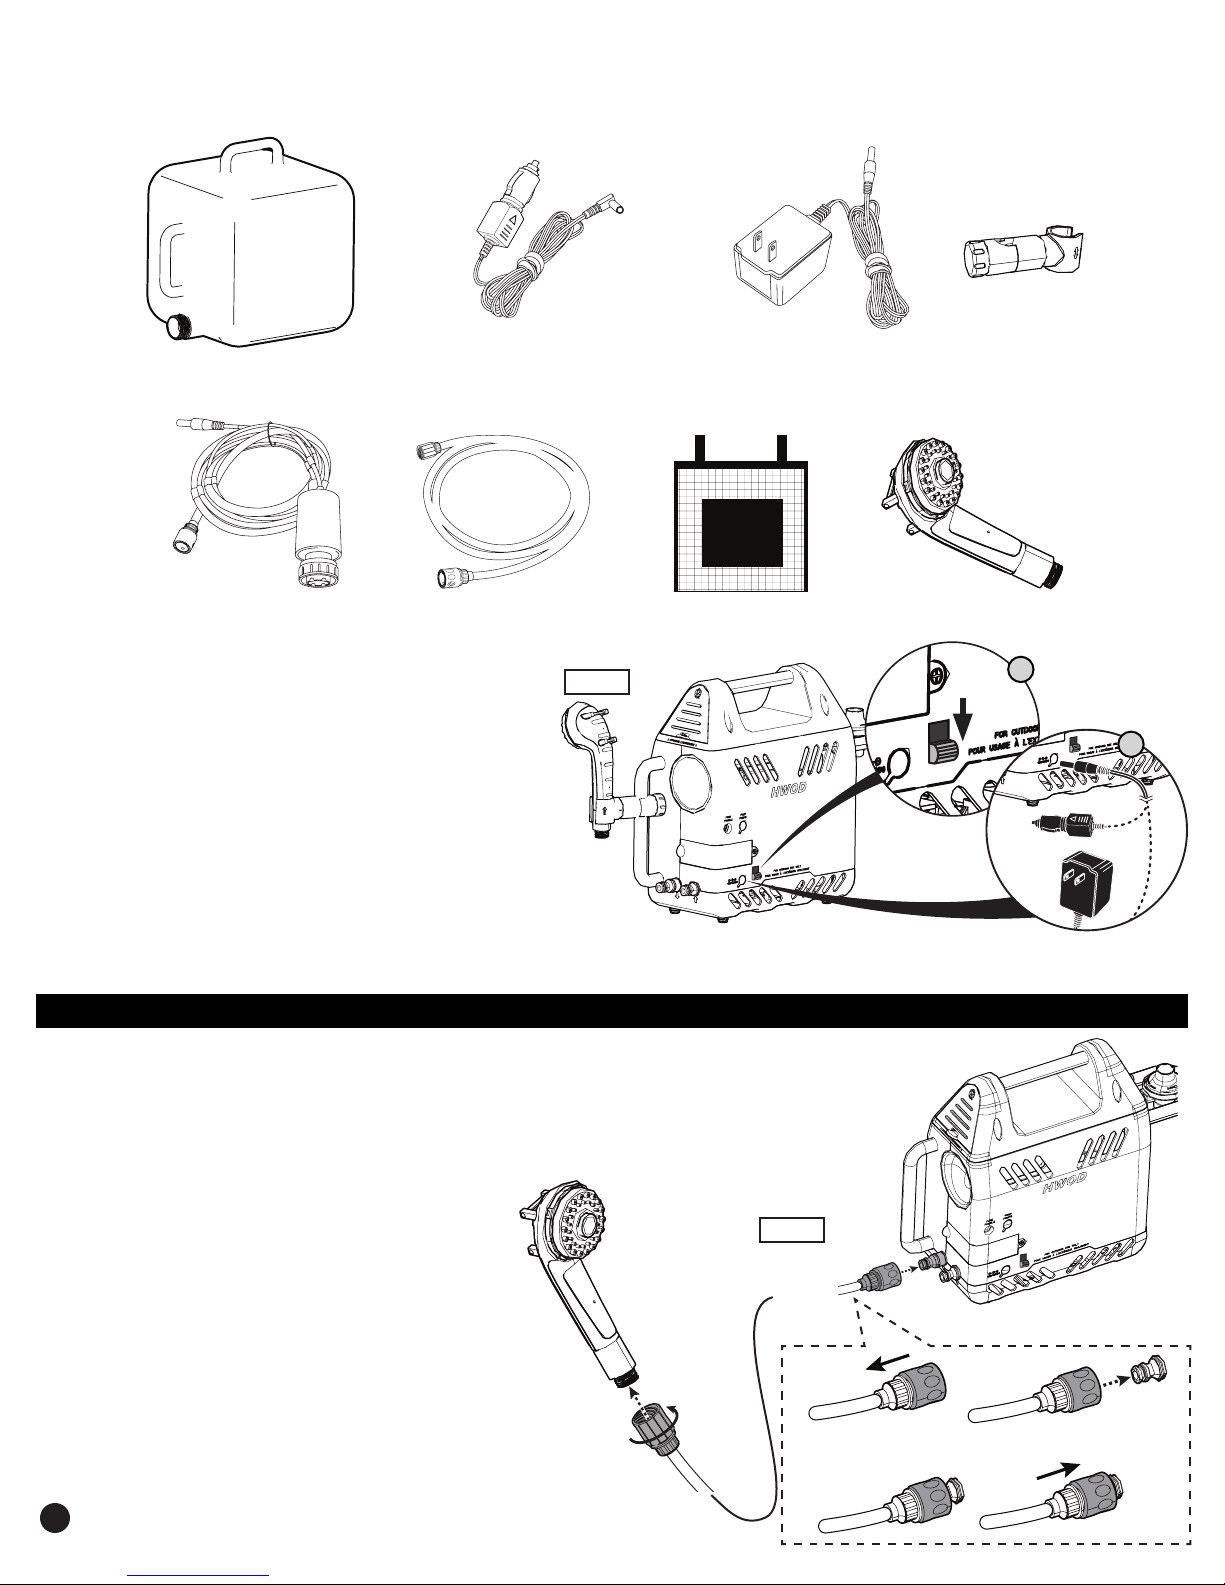
UNPACKING THE PRODUCT.
Unpack your new water heater from the carton and make sure that all of the parts are included. If you find that one of the components is missing, please
contact Coleman for a replacement: 1-800-835-3278 or TDD: 316-832-8707. Make sure to remove the protective film on the display panel on the front of the
heater before use.
12 Volt Auto Recharger Cord
5-Gallon (19 L) Collapsible
Water Carrier
THIS SIDE UP
(Located in storage compartment
of the appliance)
Pump Assembly Shower Hose Mesh Hose Carrybag
CHARGING THE BATTERY
1. Charge the battery before using your water heater for the first time.
Fig. 1
120 Volt Household Recharger Cord
(available on model 2302-A only,
located in storage compartment)
Shower Arm
Shower
(varies by model)
1
OFF
2. Turn the main power switch to “OFF” position (available on model
2302-A only)
3. (Fig. 1) Remove the rubber flap covering the charging port.
2
4. Plug either 12 Volt Auto Recharger Cord or 120 Volt Household
Recharger Cord into unit and the power source.
5. See indicator chart for battery status / charging status.
NOTE: Please charge the battery for 6 hours at the first time to
maximize the performance of the battery.
CLEANING THE PRODUCT
Clean before first use. It is strongly recommended that you clean the heater prior to using for the first time. Follow the simple steps on page 7 before you leave
home, and then clean at least once a year or when the hose becomes discolored with a white calcium build up.
To Set Up
Select a level, sturdy surface for your water heater. A picnic table or camp table is ideal. Do not operate Hot
Water on Demand
while the unit is off in freezing temperatures.)
Fill the 5-gallon (19 L) collapsible water container with water. The product may use water from a lake or stream,
but make sure that there’s no debris or sand in the water, which may clog the water system and damage the
product. It’s recommended to use a piece of cloth as filter to cover the opening of the water carrier before
filling in water.
SHOWER HEAD CONNECTION (FIG. 2)
•Shower end: threaded connector
Screw the threaded connector on the shower hose onto the end
of the shower.
•Heater end: sleeved connector
A - Pull up & hold the sleeve on the connector.
B & C - While holding the sleeve, push the connector into water outlet
until it stops.
D - Release the sleeve and the connector is locked.
IMPORTANT: To unplug the shower hose from the heater, pull up the sleeve to
unlock first, while holding the sleeve, pull out the connector.
4
TM
unit from a position directly on the ground. (This allows water to drain, preventing damage
Fig. 2
A B
C
D
Page 6
To Set Up (continued)
To power socket on heater
To water inlet
on heater
THIS SIDE UP
Fig. 3
Fig. 4
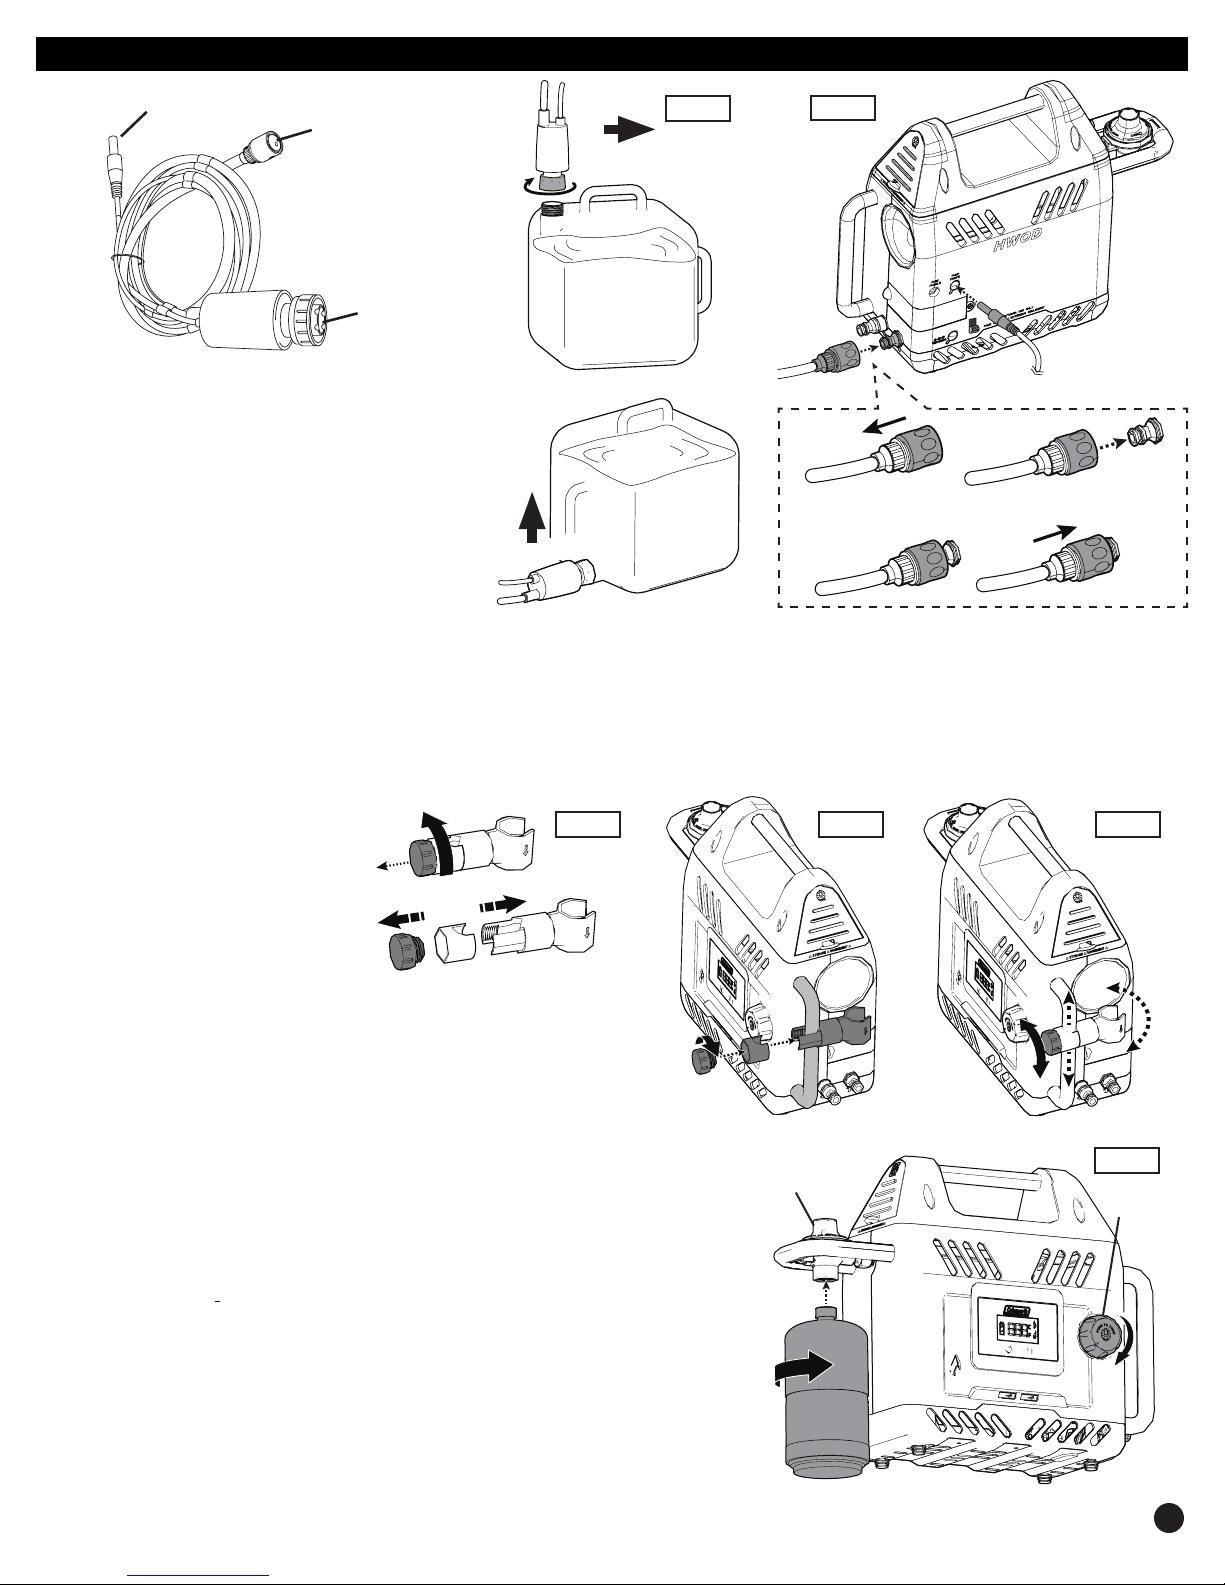
THE WATER PUMP
THIS SIDE UP
WATER PUMP CONNECTION
•Pump end (Fig. 3):
1. Place the water carrier at a level below the water heater
for proper drainage.
2. Screw the water pump to the opening of the water
container & hand tighten.
3. Lay the water container on its side so the pump is
towards the bottom of the container (step 2).
4. Make sure to rotate the pump where “THIS SIDE UP” is
facing upward so pump will prime and water will flow.
TIP: You can also submerge The Water Pump into an open
water container such as a cooler (cooler not included). Or if available, you can connect a garden hose directly to the unit. Ensure water flow is not too high,
this will affect the ability of the unit to heat water and could possibly force the outlet connection to disconnect. Conversely ensure water flow is not too low,
this can cause a low flow error. Ensure water is flowing before lighting the unit and adjust flow as required.
•Heater end (Fig. 4):
1. Plug the pump power jack into the pump power socket on the heater.
2. Plug the sleeved connector of the pump into the water inlet on the heater. (Follow same steps A, B, C, D given in section “SHOWER CONNECTION”)
SHOWER ARM INSTALLATION
1. Dismantle The Shower Arm by screwing off
the adjustment knob (Fig. 5).
2. Install The Shower Arm to the rail on
heater, and tighten by screwing on the
adjustment knob. (Fig. 6)
3. Loosen the Adjustment Knob and adjust
the angle & height of The Shower Arm,
once the desired position is reached,
tighten the adjustment knob (Fig. 7).
4. After the Shower Arm is installed, you may put The Shower onto The Shower Arm.
To water
carrier / tank
THIS SIDE UP
Fig. 5 Fig. 6 Fig. 7
A B
C
D
GAS CYLINDER INSTALLATION (FIG. 8)
This appliance shall only be used with 1 lb. Coleman Propane LPG disposable gas cylinders
certified to DOT-39 NRC 232/290 M1110.
FIT OTHER TYPES OF GAS CONTAINERS.
and the gas cylinder are in place and in good condition before connecting the gas cylinder.
Remove all transit protection material. DO NOT move the appliance during operation. After use,
turn off the control knob.
Do not use MAPP gas cylinders or any other fuel except propane.
1. Turn the control knob to OFF position.
2. Remove cap from the propane gas cylinder but do not discard.
3. While holding the propane cylinder upright, thread it into The Regulator.
IT MAY BE HAZARDOUS TO ATTEMPT TO
Check that all seals between the appliance
Fig. 8
REGULATOR
OFF
5
Page 7
To Set Up (continued)
PRESSE
GAS LEAK CHECK
•Perform leak test outdoors.
•Extinguish all open flames.
•NEVER leak test when smoking.
•Do not use Hot Water on Demand
not leak.
WARNING
TM
unit until connection has been leak tested and does
Fig. 9
1. Make 2 to 3 oz. (56~85 g) of leak check
solution (one part liquid dishwashing
detergent and three parts water).
2. Apply several drops of solution at the
connection between the propane cylinder
and the regulator.
3. Bubbles indicate a leak.
4. Check that the connection is not crossthreaded and that it is tight.
5. Perform another leak check. If there is still
a leak, remove the cylinder and contact
Coleman for services or repair.
Use and Operation
Clean before first use (see “CLEANING INSTRUCTIONS” next page). It is strongly recommended that you clean the heater prior to using for the first time.
Follow these simple steps before you leave home, and then clean at least once a year or when the hose becomes discolored with a white calcium build up.
CAUTION: accessible parts may be very hot. Keep young children away, USE OUTDOORS ONLY. Must only be operated on a horizontal surface. Not suitable
for marine environments. Do not modify this appliance. Annual service by an authorized person is recommend. Or if any of the following conditions are
noticed; incomplete ignition, appreciable yellow tipping, carbon deposition, lifting, floating, lighting back or objectionable odor. DO NOT use this appliance
if it has damaged or worn seals. DO NOT use this appliance if it is leaking, damaged or does not operate properly. To check if the gas cylinder is empty,
disconnect the cylinder from the appliance and shake from side to side. If there is no sound or movement of liquid, the cylinder is empty.
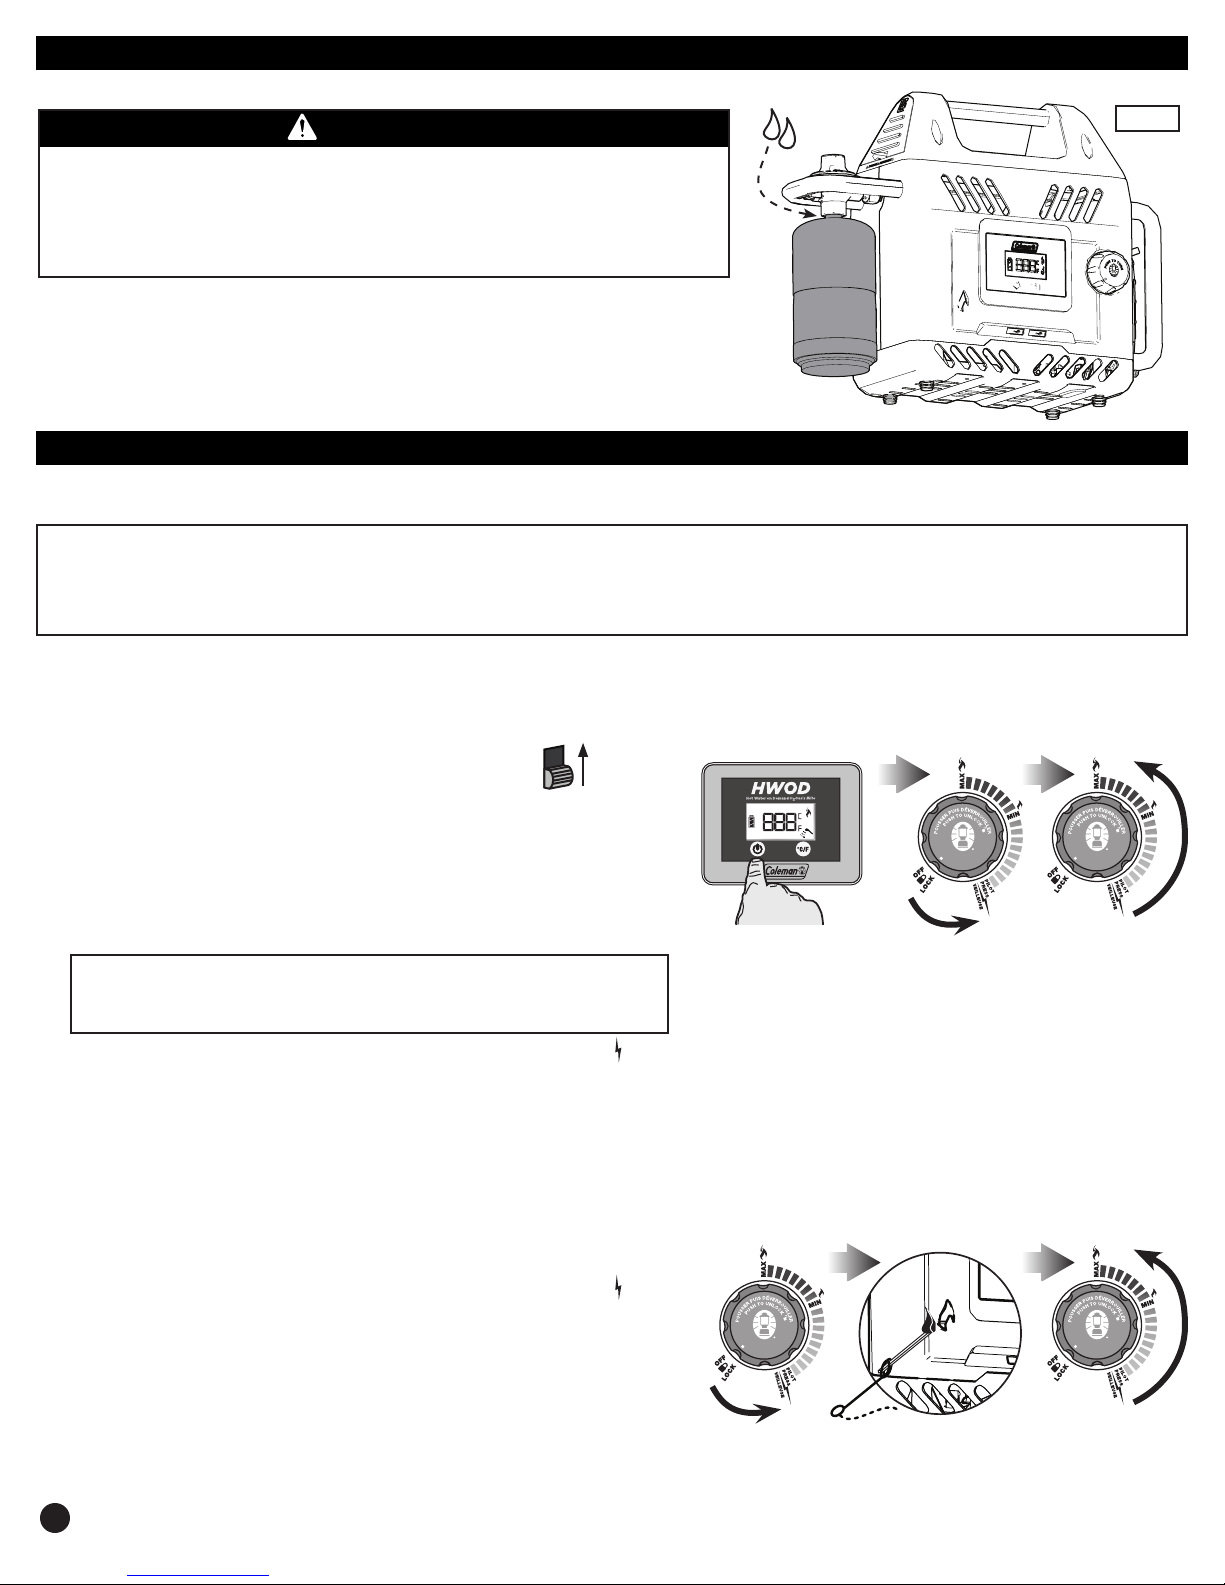
LIGHTING THE HEATER
The water heater must not be exposed to flammable vapors or liquids during lighting. Before lighting the heater, please make sure that the water supply is
ready, the shower connection & pump connection is setup, the gas cylinder is installed and the rechargeable battery is not running low (check battery status by
referencing the section “Chart of Indicators” or see section “Charging the Battery”).
• Electronic Ignition
1. Turn on the main power switch (available on model 2302-A only).
2. Turn on the electrical system by switching the power button “ON”, which is located
on the display panel. When powered on:
On MODEL 2302-A - battery indicator is lit and the current environment temperature
is displayed.
On MODEL 2302-B - a flashing green light on Display Panel indicates that the
electrical system is powered on.
ON
Varies by model
PRESSE
PRESSE
IMPORTANT: When powered on, the pump starts to pump & water starts to run,
before the heater being ignited. To conserve water usage, get yourself familiar
with the complete operation instructions before you switch the power on.
3. Press and turn the control knob counter-clockwise to the ignition position “ PILOT”.
4. Press and hold (7~10 seconds) the control knob to start the electronic ignition sequence, you will hear the clicking sound.
5. While pressing control knob, check whether the pilot light is lit by reading the indicator on the display (see section Chart of Indicators).
NOTE: Ignition takes longer time at the first use for the reason that gas runs through and fills the gas line.
6. When the pilot light is lit, then turn the control knob counter-clockwise to a setting between “MAX” and “MIN” for a desired water temperature.
NOTE: At “MAX” setting, the heater can increase the water temperature by about 30°C (If the source water temperature is 59°F, the heater will heat the
water to 113°F). If the electronic ignition fails to light the pilot light, please refer to the below section “Match Lighting” or the “Troubleshooting” section.
• Match Lighting
1. Switch the power button on.
2. Press and turn the control knob counter-clockwise to the ignition position “
PILOT”.
3. Put a lighted long wooden match near the burner by inserting it through the flame
window, then press and hold the control knob until the pilot is lit (see indicator on
display). If a long-reach match is not accessible, use the match extension (see section
“System Overview”) to hold a lighted match and feed the match through the window.
PRESSE
PRESSE
4. Turn the control knob counter-clockwise to a setting between “MAX” and “MIN” for a
desired water temperature.
NOTE: It is typical to experience a slight change in water flow & temperature when moving spray adapter from high to low heights. The heater will automatically
shut off the burner when water temperate exceeds 125°F (52°C). Should overheating occur or the gas supply fail to shut off, turn off the control knob manually.
6
Page 8
Use and Operation (continued)
SHUTTING OFF THE HEATER
1. Turn the control knob clockwise to the “OFF” position.
2. Switch off the power button on the display panel.
3. Turn the main power switch to “OFF” position (available on model 2302-A only).
IMPORTANT: User must not change the order of the shut-off-operation sequence. Alwasy shut off the burner and
gas supply by turning the control knob to the “OFF” position first, then switch off the power button.
STOPPING THE HEATER TEMPORARILY
Due to safety reasons, there’s no switch to pause the water flow while taking a shower. You can only shut off the main burner by turning the control knob
clockwise back to the ignition position “
the control knob counter-clockwise to a setting between “MAX” & “MIN” position.
Or you may shut off the heater completely by following steps in above section “Shutting Off the Heater”, then restart the whole ignition process illustrated in
section “Lighting the Heater”.
PILOT” to conserve gas, the pilot light remains lit, the pump & water keeps running. To resume heating the water, turn
OFF
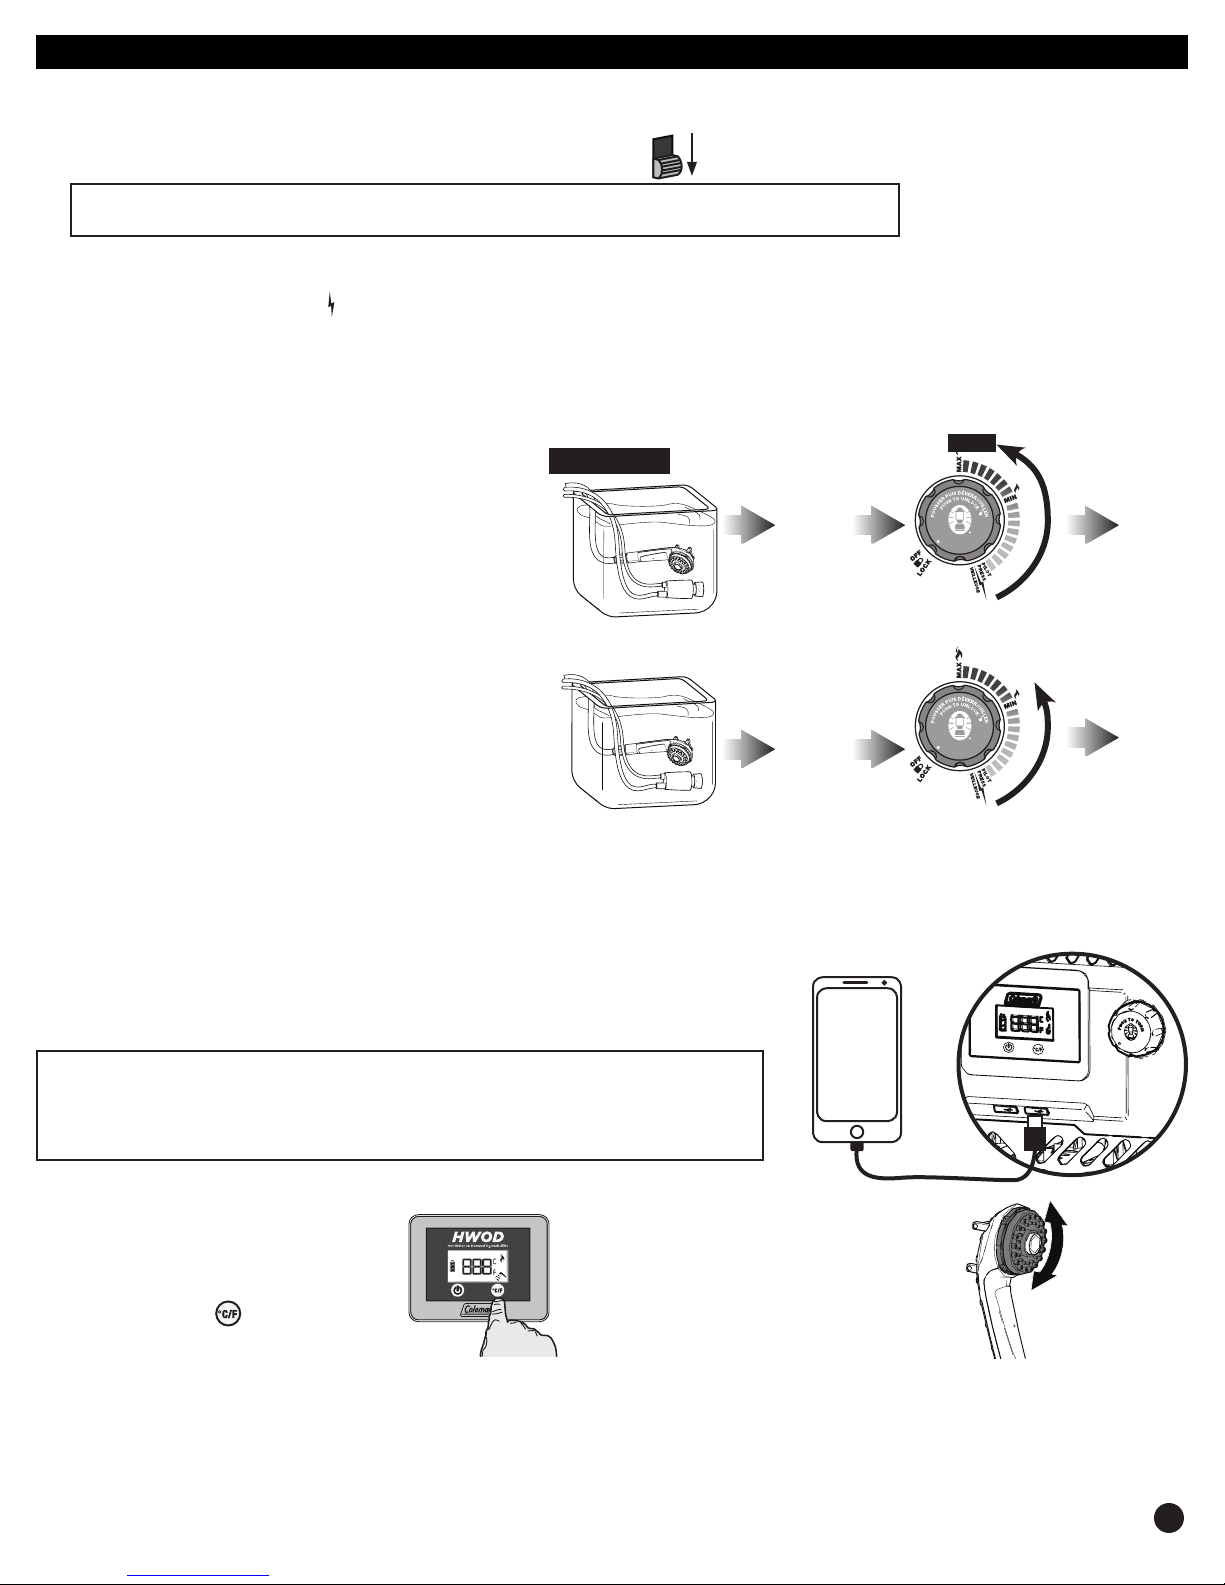
CLEANING INSTRUCTIONS
1. In a clean container mix two-gallons (7.5 L) of water with 12
oz. (340 g) of calcium, lime, and rust remover (available at the
cleaner section of hardware, general merchandise and food
stores).
2. Place the pump and shower in the container with the water/
solution. The label “This Side Up” on pump should be facing up.
3. Start the heater by following instructions in section “Lighting the
Heater” and turn the control knob to a “warm” setting.
4. Circulate the water/solution through the heater for 2 minutes,
then turn off heater by turning the knob clockwise to the “off”
position and switching off the power button on display panel.
5. Dispose of the cleaning solution in a sink or other drain, do not
dump on the ground.
6. Fill container with 2.4 gallon (9 L) of clean water.
7. Place the pump and shower in the container with the water.
8. Turn the heater on and circulate the clean water through the
water heater for 2 minutes at the “cool” setting,
9. Turn the heater off.
10. Repeat steps 6-9 with another batch of clean water.
11. Clean the screen at the pump water inlet to remove the residue that may clog the pump. See maintenance section on page 8 for instructions.
CHARGING USB COMPATIBLE DEVICES (Available on model 2302-A only)
You may charge 2 mobile phones at the same time by connecting the phones to the USB ports on the
heater. The capacity of the rechargeable battery inside the heater is 2000 mAh, which could charge a
1570 mAh mobile phone (iPhone 5s) one complete cycle.
Water / solution cycle
IGNITE
Clean water cycle
IGNITE
Warm
PRESSE
Cool
PRESSE
OFF
OFF
IMPORTANT: USB ports only work when the Main Power Switch is turned on. Do not connect
devices to the USB ports on the heater when the heater is in operation or is still hot to touch. Do
not connect devices to the USB ports on the heater if there’s a “LOW BATTERY” indication on the
Display Panel (see chart of indicators in section
“Chart of Indicators”). Do not charge devices whose battery capacity exceeds 1700 mAh.
CHANGING TEMPERATURE DISPLAY
(available on model 2302-A only)
Current water temperature is shown on Display
Panel, cycle through the Celsius / Fahrenheit
display by pressing the
on the Display Panel.
button repeatedly
CHANGING SHOWER SPRAYS
(available on model 2302-A only)
The shower features aerated, full and
fine sprays. Change the spray by rotating
the dial on the shower head. You may
shut-off the water by rotating the dial on
shower head to OFF position.
NOTE: When the heater is powered on, turning the dial on the shower
head to “OFF” position will trigger the LOW WATER FLOW warning and
shut off the unit. Please ensure shower head is open before restarting.
7
Page 9
Helpful Hints
•There’s a hook-&-loop strap on the back of the shower, you may tie the shower onto an overhead object (available on model 2302-A only).
•If you do not intend to use the water heater for a period of time (3 days or longer), it is strongly recommended to turn the main power switch to ‘OFF’. This
will prolong the charge of your battery (applicable to model 2302-A only).
•Never place the shower 6.5 feet (2 m) above the heater, otherwise the water flow may drop to a warning level triggering the shut-off mechanism.
•Never twist or bend hoses that the water runs through, which will lead to a drop of water flow and trigger the shut-off mechanism.
•The heater will typically make 40 gallons (151 L) of warm or hot water on one full battery charge and a 16.4 oz. (464 g) cylinder of propane. Make sure to pack
sufficient fuel for the duration of your outing.
•Thanks to the integrated mechanical and electrical over-temperature shut-off devices, the burner will be shut off immediately when the water temperature
reaches 122°F at the water outlet on the heater. Meanwhile the pump will continue to pump for 30 seconds, to cool down the heater.
•The water heater is ideal for many outdoor cleaning tasks. Coleman supports the Leave No Trace Principles that encourage minimal impact to the
environment while camping. You’ll find that less soap is necessary with warm water than with cool or cold water, so use small amounts of biodegradable
soap. Please dispose of your gray water responsibly. Wash yourself or dishes 200 feet (61 m) away from streams or lakes to avoid soap run-off finding its way
to a natural water source. Contact your campground or park to learn about their specific gray water disposal policy.
•Continuous operation of water heater at warm setting for 20 minutes may cause the propane cylinder to freeze up. Let the cylinder thaw or replace with a
fresh propane cylinder.
Storage
• Remove propane cylinder from heater after use and before transporting or storing the heater. Always store propane outdoors.
• Drain water from hoses and unit before storing: Disconnect hoses and lean product toward the hose connection side. Move the unit left to right while leaning
until water drainage stops.
• Recharge the battery before storing. Turn off the main power switch (applicable to model 2302-A only).
• For long term storage, clean and dry the heater and store indoors in a clean and dry location.
•Coleman’s padded carry case is ideal for storing and transporting.
Maintenance
This appliance must only be serviced by an authorized person.
• Clean water route at least once a year or whenever a white build up
appears in the hose. Refer to Cleaning Instructions on page 7 of this
manual.
• Charge battery immediately after each outing to reach optimum
performance.
• Cleaning heater exterior - Clean only when the unit is off and cool to
touch, and the gas cylinder is removed. Wipe clean with a soft cloth
damped with diswashing solution. Never use abrasives.
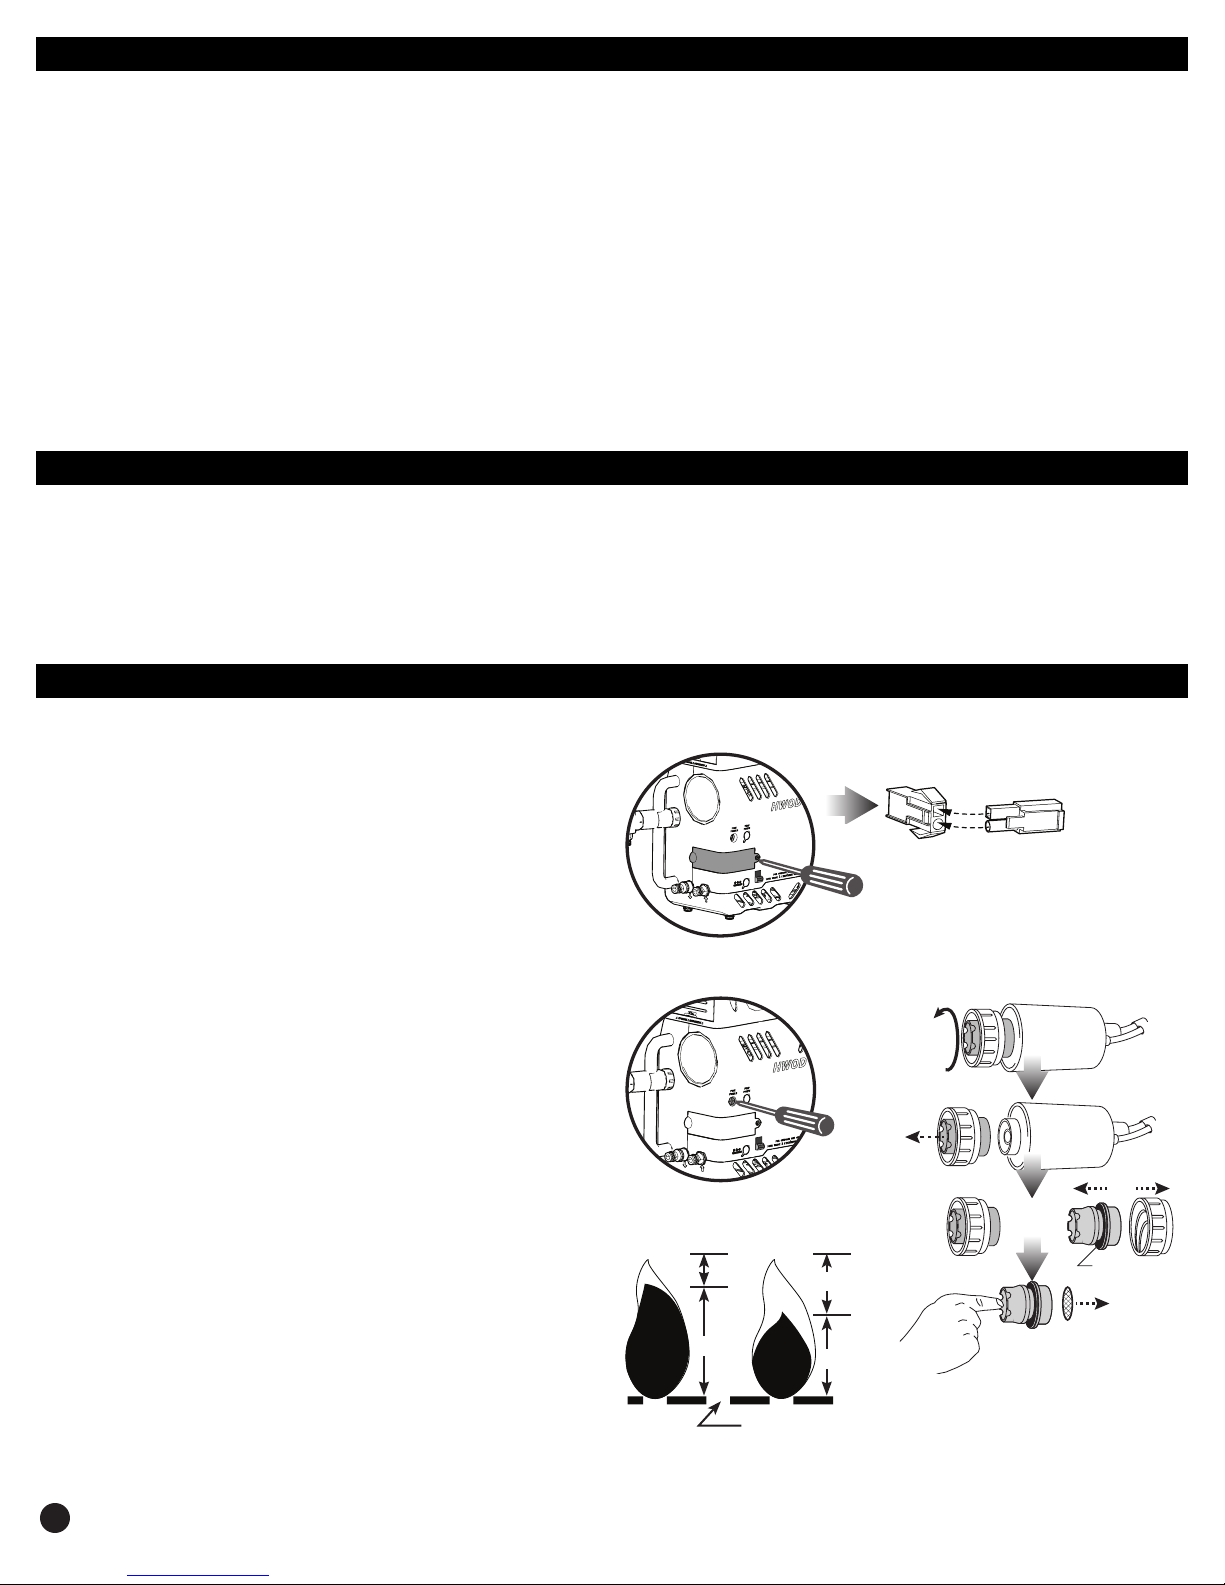
• Replacing battery (see illustrations on the right)- Use only a Coleman
replacement battery 2000027851 (12 Volt, 2000 mAh Li-Ion battery).
1. Remove the screw from the battery cover on the right side of your water
heater and remove the cover.
2. Pull the battery out from storage compartment and unplug the
connectors.
3. Replace the battery and connect the connectors, make sure the circular
pin and the rectangular pin on male connector are correctly aligned with the
circular hole and rectangular hole on the female connector. Replacement
batteries are available to order from Coleman.
• Replacing fuse (see illustrations on the right)- Use only a Coleman
replacement fuse 2000027844 (current rating: 5A).
Remove the screw from the fuse socket right above the battery
compartment, discard the defective fuse and replace with a new one.
• Cleaning pump screen (see illustrations on the right)-
1. Grip the nozzle at the end of the pump and rotate counter-clockwise to
screw it off.
2. Separate the nozzle and the ring cap.
3. Use your finger to push the pump screen out from the nozzle and clean
the screen.
4. Then reverse the steps to put the parts together.
• Checking flame (see illustrations on the right)-
Check flame by looking into the flame window on the front panel of the
appliance. A good flame should be blue with a yellow tip. Some yellow tips
on flames up to 1 inch in length are acceptable as long as no carbon or
soot deposits appear.
®
®
Battery Replacement
Fuse Replacement
Flame Check
Yellow
Blue
Burner Hole
BadGood
Yellow
Blue
Pump Screen Cleaning
Sealing
O-ring
8
Page 10
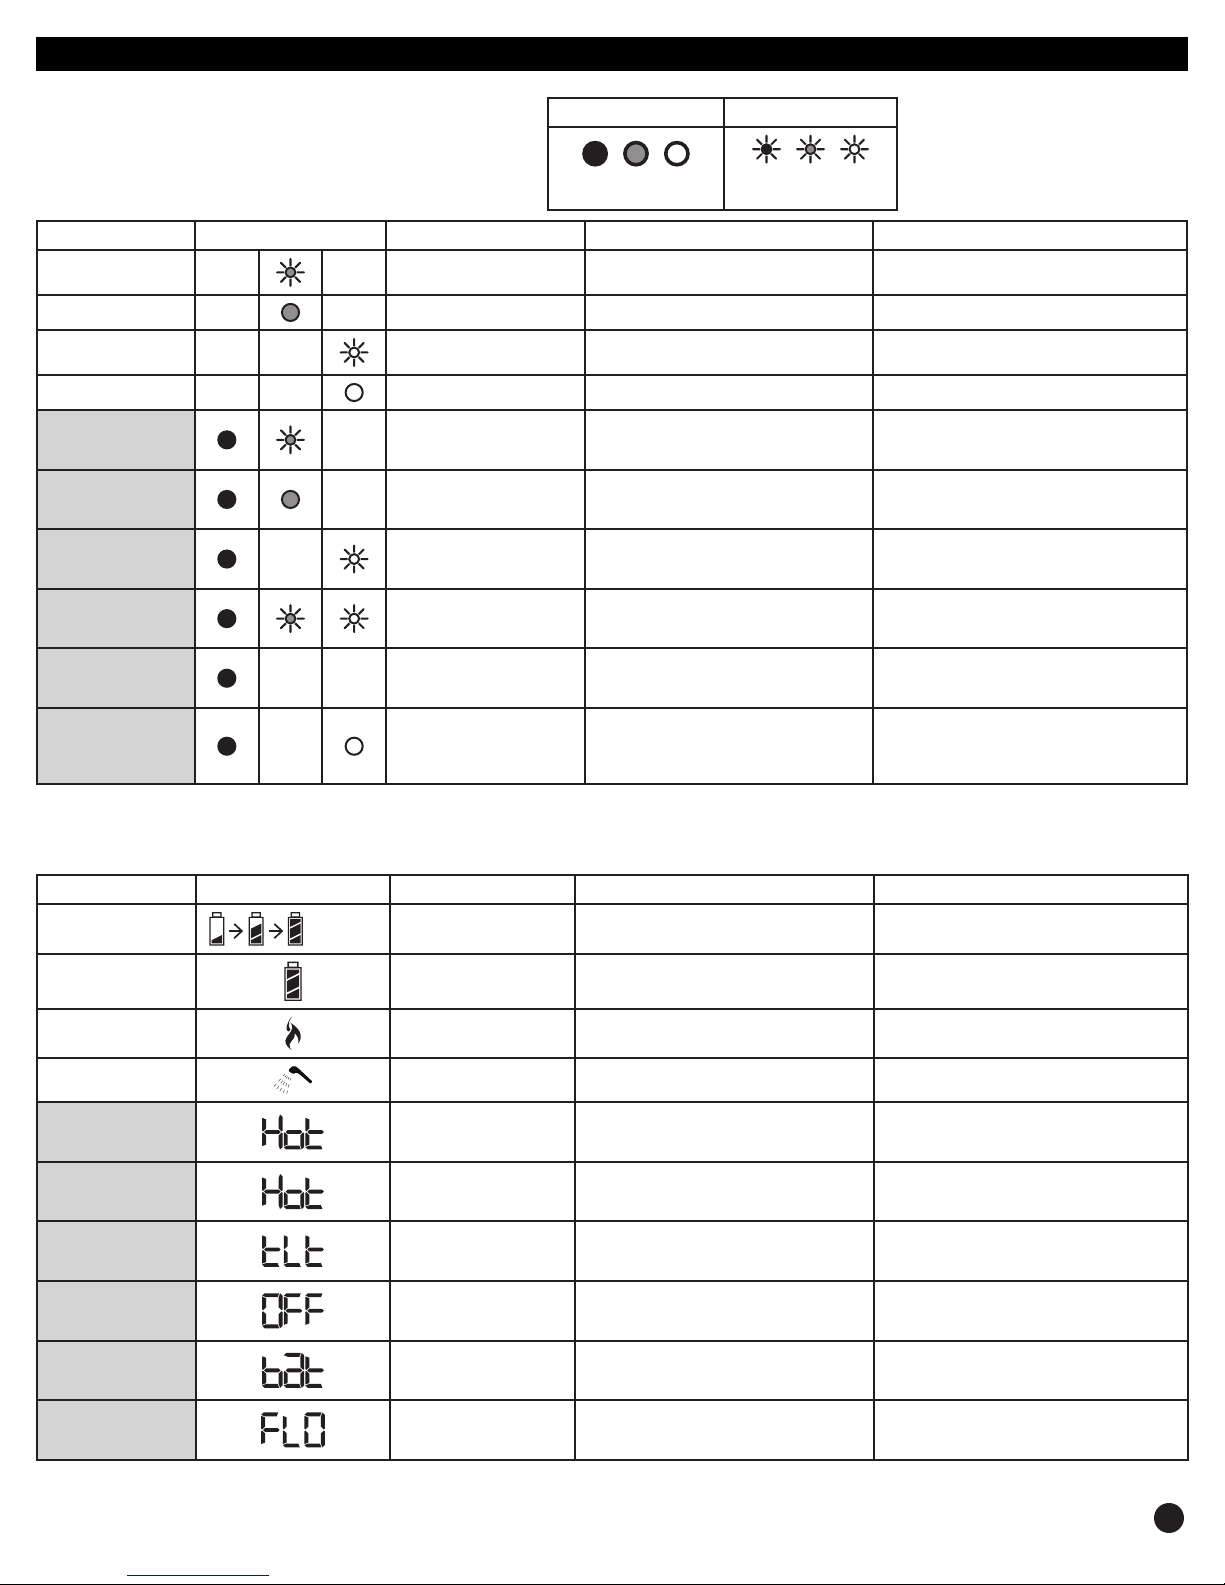
Chart of Indicators
Steady light: Flashing light:
MODEL 2302-B
/ /
(Red / Yellow / Green)
/ /
(Red / Yellow / Green)
Explanation Display of Indicators Trigger System Reaction Corrective Action
Battery being charged
Battery fully charged
Electrical system is
turned on
Pilot Light is lit
Hot water warning
(chamber)
Hot water warning
(water outlet)
Tilt warning
Flames out warning
Low battery warning
Low water flow
warning
Water temperature at heat
exchanger exceeds 131°F.
Water temperature at water
outlet exceeds 122°F.
Heater is tilted more than 30
degrees.
Flames out / pilot light out Gas & pump will be shut off immediately.
In-house battery voltage is
lower than 9.8V.
Water flow rate is lower that
0.4 gallon (1.5 L)/min.
Gas will be cut off immediately. Pump will
be shut off in 30 seconds.
Gas will be cut off immediately. Pump will
be shut off in 30 seconds.
Gas & pump will be shut off immediately.
Gas & pump will be shut off immediately.
2 seconds after the first warning is
signaled, system will detect the flow rate
again; if the flow rate is still lower than the
specified level, gas & pump will be shut off.
Turn off the control knob and the power button.
See troubleshooting section and solve the
problem, then restart the ignition sequence.
Turn off the control knob and the power button.
See troubleshooting section and solve the
problem, then restart the ignition sequence.
Turn off the control knob and the power button.
See troubleshooting section and solve the
problem, then restart the ignition sequence.
Turn off the control knob and the power button.
See troubleshooting section and solve the
problem, then restart the ignition sequence.
Turn off the control knob and the power button.
See troubleshooting section and solve the
problem, then restart the ignition sequence.
Turn off the control knob and the power button.
See troubleshooting section and solve the
problem, then restart the ignition sequence.
MODEL 2302-A
Explanation Display of Indicators Trigger System Reaction Corrective Action
Battery being charged
Battery fully charged
Pilot Light is lit
Water is running
Hot water warning
(chamber)
Hot water warning
(water outlet)
Tilt warning
Flames out warning
Low battery warning
Low water flow
warning
(animated)
Water temperature at heat
exchanger exceeds 131°F.
Water temperature at
water outlet exceeds
122°F.
Heater is tilted more than
30 degrees.
Flames out / pilot light out Gas & pump will be shut off immediately.
In-house battery voltage is
lower than 9.8V.
Water flow rate is lower
that 0.4 gallon (1.5 L)/min.
Gas will be cut off immediately. Pump will be
shut off in 30 seconds.
Gas will be cut off immediately. Pump will be
shut off in 30 seconds.
Gas & pump will be shut off immediately.
Gas & pump will be shut off immediately.
Gas & pump will be shut off 2 seconds later
Turn off the control knob and the power button.
See troubleshooting section and solve the
problem, then restart the ignition sequence.
Turn off the control knob and the power button.
See troubleshooting section and solve the
problem, then restart the ignition sequence.
Turn off the control knob and the power button.
See troubleshooting section and solve the
problem, then restart the ignition sequence.
Turn off the control knob and the power button.
See troubleshooting section and solve the
problem, then restart the ignition sequence.
Turn off the control knob and the power button.
See troubleshooting section and solve the
problem, then restart the ignition sequence.
Turn off the control knob and the power button.
See troubleshooting section and solve the
problem, then restart the ignition sequence.
9
Page 11
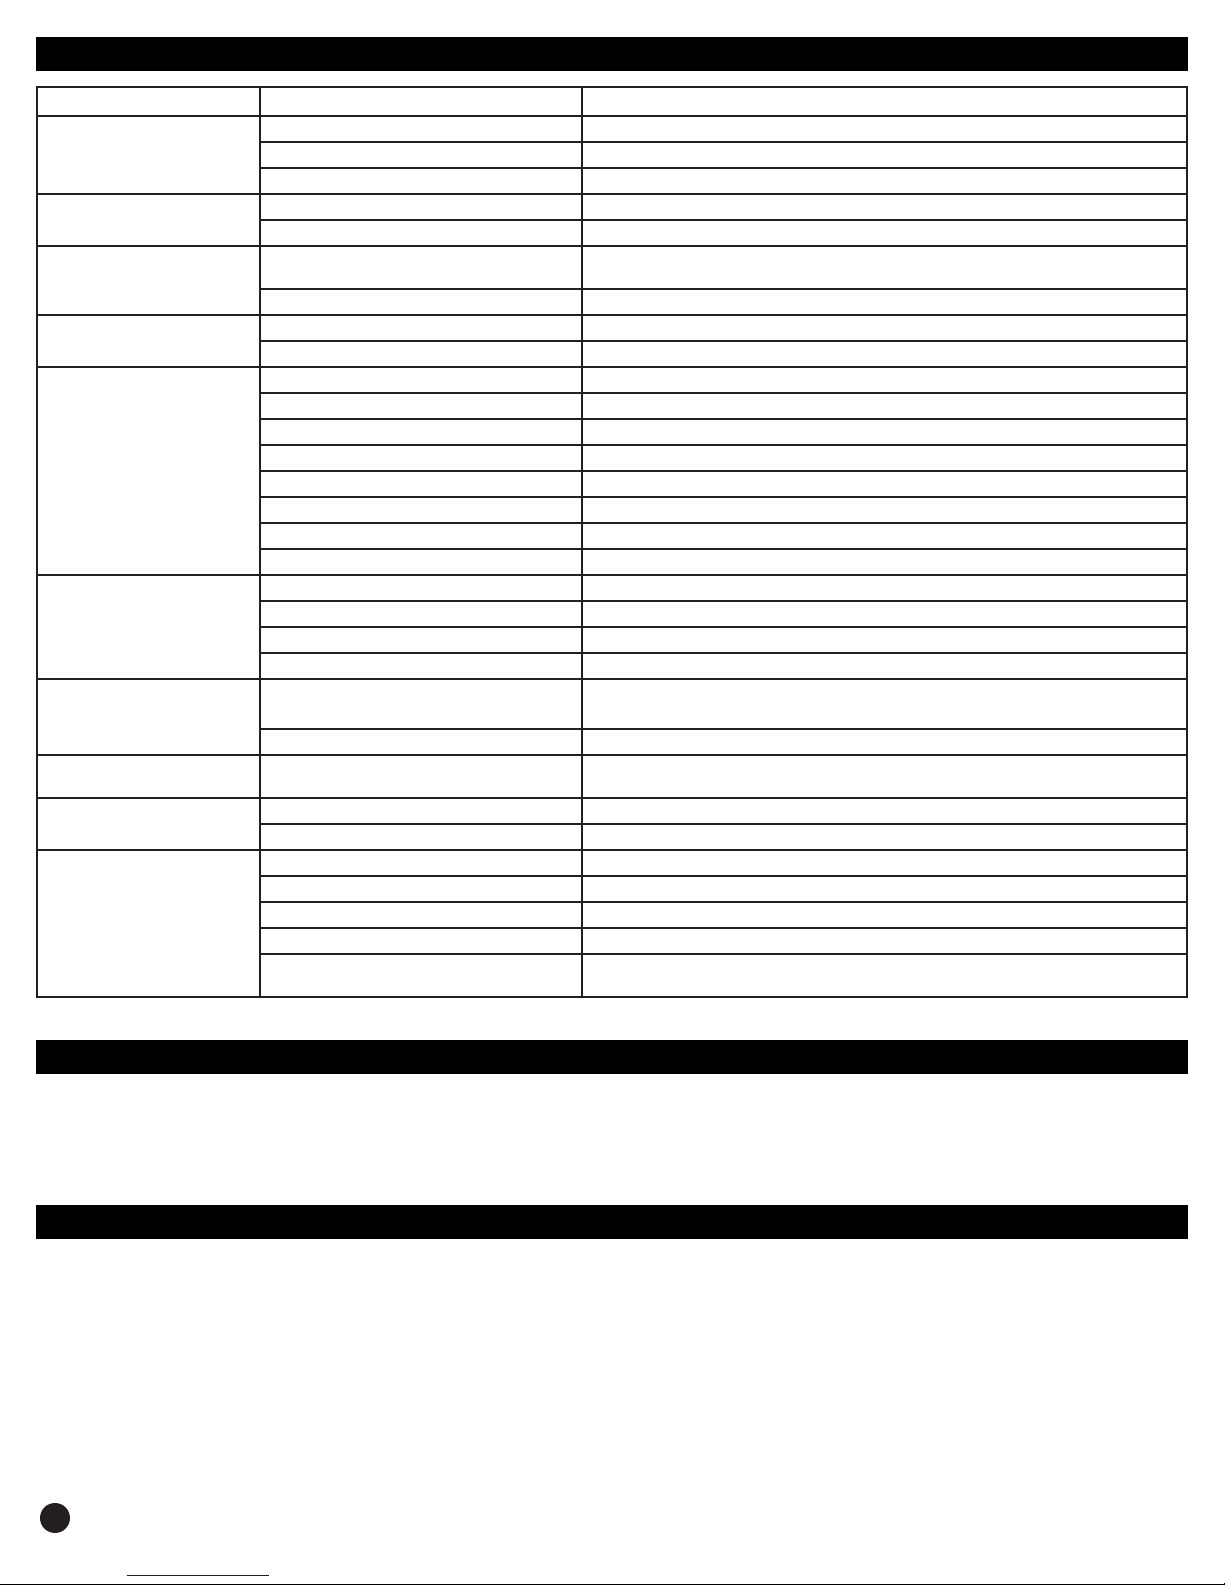
Troubleshooting Guide
Symptom Possible Cause Solution
Hot water warning
Tilt warning
Flames out warning
Low battery warning
Low water flow warning
Burner will not light
Water leakage
Hose turns white or
discolors inside
Battery won’t hold a Charge
No display
Water tank/carrier is running out of water Fill water tank/carrier with water.
Environment temperature is high Turn control knob to a cooler setting.
Temperature sensor defective Contact Coleman Service Center and return the product to Coleman when necessary.
Heater is tilted more than 30 degrees. Gas & pump will be shut off immediately.
Sensor defective Contact Coleman if under warranty.
Flames blown out by strong wind / pilot light is
out
Flame detection module defective Contact Coleman if under warranty.
Battery voltage lower than 9.8V. Recharge the battery.
Defective battery Contact Coleman if under warranty.
Pump is not in correct position Rotate pump so “THIS SIDE UP” is facing upward.
Water tank/carrier out of water Fill water tank/carrier with water.
Pump inlet screen clogged Clean the screen, seen instructions given in maintenance section.
Hose twisted / kinked Straighten hose.
Battery lead disconnected Remove battery cover & reinstall lead.
Pump power cord disconnected Plug cord into power socket on heater.
Low battery Recharge the battery.
Flow rate sensor defective Contact Coleman if under warranty.
Propane cylinder empty Replace cylinder.
Propane cylinder frosted Replace cylinder and reuse after thawing.
Fuse defective Refer to maintenance section and replace the fuse.
Electronic circuit defective Contact Coleman if under warranty.
Connectors cross-threaded;
Sleeved-connectors were not locked into place
Defective seal or break
Calcium buildup Clean heater (refer to section “cleaning instructions” on page 7)
Defective Battery Contact Coleman if under warranty.
Main power switch is neglected See Helpful Hints section on how to use the main power switch
Battery lead disconnected Remove battery cover & reinstall lead
Fuse defective Refer to maintenance section and replace the fuse.
Electronic circuit defective Contact Coleman if under warranty.
Low battery Recharge the battery.
Main power switch at “OFF” position (for model
2302-A only)
Do not use in strong wind condition. Turn off the heater completely and restart the ignition
sequence.
Reconnect the connectors.
Read instructions for connecting sleeved connectors and reconnect the connectors.
Replace sealing components (O-rings) or send to Coleman when necessary
Turn on the main power switch
Technical Characteristics
Pressure: 2.8 kPa
Injector size: 0.026 in (0.66 mm)
Total gas consumption: 21.0 MJ/h
Gas type: Propane LPG
Replacement Parts
Parts List
1. 2000027853 Shower
2. 2000027851 Li-Ion Battery
3. 2000027849 Pump Assembly
4. 2000027850 Adapter – 120V
5. 2000027848 Adapter – 12V
6. 2000027847 Water Carrier
7. 2000027845 Shower Arm
8. 2000027844 Fuse
9. 2000027842 Shower Assembly Carry bag
10. 2000027937 Shower Hose
10
- Contact Coleman -
www.coleman.com | 1-800-835-3278 | TDD 316-832-8707
Page 12
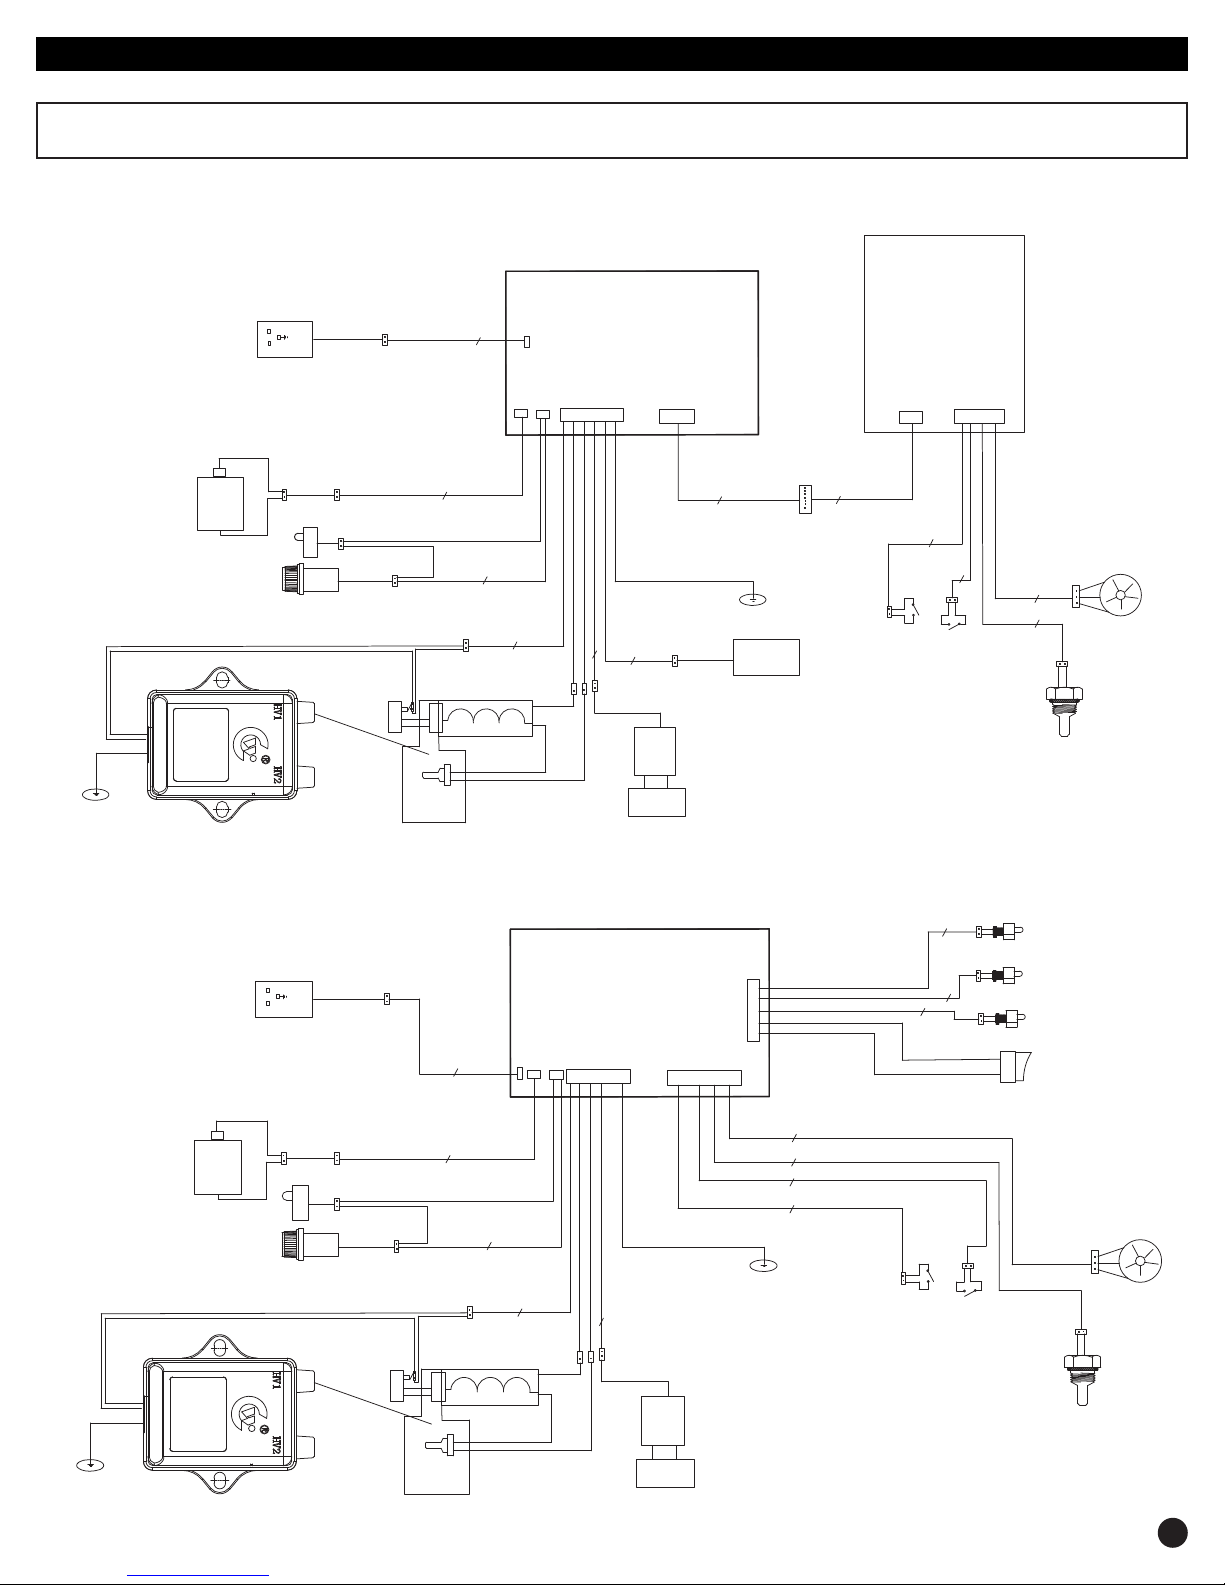
Circuit Diagram
CAUTION: Label all wires prior to disconnection when servicing controls. Wiring errors can cause improper and dangerous operation. Verify proper operation
after servicing. This connection is for low-volatage battery or direct current only. Do not connect to 120 or 240 Volts AC input.
MODEL 2302-A
L
N
Battery
Charger
2
PH01 Power Supply Module
PH01 Display
Shell of
Appliance
Rechargeable
Battery
Main Power Switch
PASS
Pulse Ignitor
L
N
Battery
Charger
Fuse
Igniting
Switch
2
Gas
Valve
Thermal
Coupler
7
2
Shell of Appliance
2
2
2
USB
Module
7
Tilt Protection
Circuit
2
2
Over-heat
Protection Circuit
Water Flow Sensor
3
2
Temperature Senor at
Water
Water Outlet
Pump
MODEL 2302-B
2
2
PH01 Power Supply Module
2
2
Yellow LED
Green LED
Red LED
Power Switch
Rechargeable
Battery
Main Power Switch
Fuse
Igniting
Switch
PASS
Shell of
Appliance
Pulse Ignitor
Thermal
Gas
Valve
Coupler
3
2
2
2
2
2
Water Flow Sensor
Shell of Appliance
2
2
Tilt Protection
Circuit
Over-heat
Protection Circuit
Temperature Senor at
Water
Water Outlet
Pump
11
Page 13

Warranty
Three Year Limited Warranty
The Coleman Company, Inc. (“Coleman”) warrants that for a period of three (3) years from the date of original retail purchase, this product will be free from
defects in material and workmanship. Coleman, at its option, will repair or replace this product or any component of the product found to be defective during
the warranty period. Replacement will be made with a new or remanufactured product or component. If the product is no longer available, replacement may be
made with a similar product of equal or greater value. This is your exclusive warranty.
This warranty is valid for the original retail purchaser from the date of initial retail purchase and is not transferable. Keep the original sales receipt. Proof of purchase is required to obtain warranty performance. Coleman dealers, service centers, or retail stores selling Coleman® products do not have the right to alter,
modify or in any way change the terms and conditions of this warranty.
What This Warranty Does Not Cover
This warranty does not cover normal wear of parts, parts that are not genuine Coleman® parts, or damage resulting from any of the following: negligent use
or misuse of the product; commercial use of the product; use contrary to the operating instructions; disassembly, repair or alteration by anyone other than
Coleman or an authorized service center. Further, the warranty does not cover Acts of God, such as fire, flood, hurricanes and tornadoes. Warranty void if damage to the product results from the use of a part other than a genuine Coleman® part.
COLEMAN SHALL NOT BE LIABLE FOR DEFECTS THAT ARE CAUSED BY THE USE OF UNAUTHORIZED PARTS OR SERVICE. COLEMAN SHALL NOT BE
LIABLE FOR ANY INCIDENTAL OR CONSEQUENTIAL DAMAGES CAUSED BY THE BREACH OF ANY EXPRESS OR IMPLIED WARRANTY OR CONDITIONS.
EXCEPT TO THE EXTENT PROHIBITED BY APPLICABLE LAW, ANY IMPLIED WARRANTY OF MERCHANTABILITY OR FITNESS FOR A PARTICULAR
PURPOSE IS LIMITED IN DURATION TO THE DURATION OF THE ABOVE WARRANTY OR CONDITIONS. SOME STATES, PROVINCES, OR JURISDICTIONS
DO NOT ALLOW THE EXCLUSION OR LIMITATION OF INCIDENTAL OR CONSEQUENTIAL DAMAGES OR LIMITATIONS ON HOW LONG AN IMPLIED
WARRANTY LASTS, SO THE ABOVE LIMITATIONS OR EXCLUSION MAY NOT APPLY TO YOU. THIS WARRANTY GIVES YOU SPECIFIC LEGAL RIGHTS,
AND YOU MAY ALSO HAVE OTHER RIGHTS THAT VARY FROM STATE TO STATE OR PROVINCE TO PROVINCE.
How to Obtain Warranty Service
Your product must be under warranty in order to obtain warranty service. If your product is defective and is within your warranty period, contact us at 1-800835-3278 (TDD 1-316-832-8707) in order to receive a return authorization. Do not return product to Coleman without authorization. You will be directed to
attach a tag to the product that includes your name, address, daytime telephone number and description of the problem. Include a copy of the original sales
receipt. Carefully package the product and send insured by UPS, FedEx Ground or Parcel Post with shipping and insurance prepaid to:
For products purchased in the United States:
The Coleman Company, Inc.
3600 North Hydraulic Wichita, KS 67219
U.S.A.
The cost of transporting the product to Coleman for warranty service is the responsibility of the purchaser. Do not mail products with fuel in tanks, or with disposable propane cylinders. DO NOT RETURN THIS PRODUCT TO THE PLACE OF PURCHASE. If you have any questions regarding this warranty please call
1-800-835-3278 or TDD 1-316-832-8707 in the United States or 1-800- 387-6161 in Canada.
For products purchased in Canada:
Sunbeam Corporation (Canada) Limited
DBA Jarden Consumer Solutions
20B Hereford Street
Brampton, ON L6Y 0M1
Page 14

MODE D’EMPLOI
Modèle -
Série 2302-A
Série 2302-B
- Usage extérieur seulement -
• Ce chauffe-eau portatif autonome a été conçu pour
fourni de l’eau chaude pour prendre des douches ou
effectuer des tâches de nettoyage uniquement.
Ne pas utiliser le produit pour chauffer de l’eau à boire.
• Cet appareil n’a pas été conçu pour être branché directement
à un tuyau de jardin.
• Cet appareil est destiné à un point d’usage, pour le
chauffage temporaire d’eau, et non pas pour être relié à une
entrée d’eau permanente ou un système d’alimentation en
eau permettant d’alimenter plusieurs sorties.
• Cet appareil a été conçu afin de chauffer de l’eau jusqu’à
une température de 30 °C au-dessus de la température
ambiante (jusqu’à un maximum de 122°F).
(pour fins d’illustration seulement, votre modèle pourrait être différent)
IMPORTANT
CONSERVER CES DIRECTIVES - Ce manuel contient des consignes de sécurité et des directives
d’utilisation importantes. Lire ces directives d’utilisation attentivement.
Familiarisez-vous avec l’appareil avant de le brancher à une source de gaz.
Ce manuel d’instruction contient des renseignements importants nécessaires pour assurer un montage approprié
et une utilisation sécuritaire de l’appareil. Respecter tous les avertissements et toutes les directives pour utiliser cet
appareil. Si vous avez des questions concernant le montage, le fonctionnement, l’entretien ou la réparation de ce
produit, veuillez communiquer avec Coleman au 1-800-835-3278 ou sur la ligne ATS suivante: 316-832-8707. Les
bonbonnes de gaz doivent être changées dans un endroit bien aéré, préférablement à l’extérieur et à l’écart des
gens et des sources d’allumage, comme des flammes vives, des flammes de pilote et des équipements électriques
de chauffage. En cas de fuite dans l’appareil (odeur de gaz) et qu’il est impossible de couper le débit de gaz,
déplacer l’appareil dans un endroit bien aéré, à l’écart de toute source d’allumage. Utiliser de l’eau savonneuse pour
détecter toute fuite. Ne pas essayer de détecter une fuite à l’aide d’une flamme.
13
Page 15

Contenu
Renseignements généraux sur la sécurité .14-15
Vue d’ensemble du système ........................16-17
Installation ..................................................... 17-18
Utilisation et fonctionnement .......................19-20
Astuces utiles ................................................21
Entreposage .................................................21
Entretien ........................................................21
Tableau des indicateurs ............................... 22
Guide de dépannage ....................................23
Caractéristiques techniques ........................23
Pièces de rechange ......................................23
Schéma de circuit .........................................24
Garantie ..........................................................25
Renseignements généraux sur la sécurité
Ce manuel contient des renseignements importants quant à l’assemblage,
au fonctionnement et à l’entretien du produit et du système. Des généralités
de sécurité sont présentées dans les premières pages puis un peu partout
dans le manuel. Faites tout particulièrement attention quand vous voyez ces
symboles: «
Gardez ce manuel pour le consulter au besoin et pour apprendre aux
nouveaux utilisateurs à se servir de l’appareil. Le manuel devrait être
compulsé de concert avec les étiquettes apposées sur le produit.
Des précautions de sécurité sont indispensables en présence de tout
appareil mécanique ou à propane. De telles précautions sont nécessaires
pour l’utilisation, le rangement et l’entretien. Utiliser cet appareil avec tous
les soins qui lui sont dus réduira les risques de blessures corporelles ou de
dommages matériels.
Les symboles illustrés ci-après sont régulièrement employés dans ce
manuel. Tenez compte de ces précautions impératives lors de l’utilisation
de tout appareil mécanique ou à carburant.
DANGER», « AVERTISSEMENT», « ATTENTION».
DANGER
«DANGER» indique une situation dangereuse qui, si elle n’est pas
contournée, entraînera la mort ou des blessures graves.
AVERTISSEMENT
«AVERTISSEMENT» signale une situation potentiellement dangereuse qui,
si elle n’est pas évitée, peut entraîner la mort ou des blessures raves.
ATTENTION
«ATTENTION» dénote un danger potentiel qui, s’il n’est pas contourné,
risque d’entraîner des blessures corporelles allant de peu graves à
moyennes ou bien des dommages matériels.
DANGER
Si vous sentez une odeur de gaz:
1. Couper l’arrivée de gaz vers l’appareil.
2. Éteindre toute flamme vive.
3. Si l’odeur persiste, rester à l’écart de l’appareil
et appeler un service de pompiers.
Tout manquement à suivre ces directives pourrait
résulter en incendie ou en explosion, ce qui
pourrait causer des dommages, des blessures et
même la mort.
AVERTISSEMENT
Ne pas entreposer ou utiliser d’essence ou
d’autres vapeurs et liquides inflammables à
proximité de cet appareil ou de tout autre appareil.
DANGER RELATIF AU
DANGER
MONOXYDE DE CARBONE
Cet appareil peut générer du
monoxyde de carbone, qui
est inodore.
L’utiliser dans un espace clos
peut vous tuer.
Ne jamais utiliser cet appareil
dans un espace clos, comme
une autocaravane, une tente,
une voiture ou une résidence.
L’eau à une température
DANGER
excédant 125 °F (52 °C)
peut causer des brûlures
graves sur le champ,
voire le décès suite à
l’ébouillantage.
Les enfants, les personnes
invalides et les personnes
âgées sont plus à risque
d’ébouillantage.
CHAUD
Se reporter au mode
d’emploi avant de régler la
BRÛLURE
température du chauffeeau.
Vérifier la température
avant de se baigner ou de
se doucher.
14
Page 16

Renseignements généraux sur la sécurité (suite)
DANGER
EXPLOSION - RISQUE D’INCENDIE
•Ne jamais entreposer de propane à proximité de sources de chaleur
élevée, de flammes vives, de flammes de pilote, de la lumière directe
du soleil ou d’autres sources d’allumage ou à des températures
excédant 120 °F (49 °C).
•Le propane est plus lourd que l’air et s’accumule dans les endroits
plus bas. Si vous sentez une odeur de gaz, quittez immédiatement la
zone.
•Ne jamais installer ou retirer le réservoir de gaz propane tant que le
chauffe-eau est en fonction, ni à proximité de flammes, de témoins
pilotes ou d’autres sources d’allumage ou pendant que le chauffeeau est encore chaud au toucher.
•Ce produit peut être une source d’allumage pendant qu’il fonctionne.
Ne jamais allumer ou utiliser le chauffe-eau dans des espaces
contenant des combustibles volatiles ou présents dans l’air ou des
produits comme de l’essence, des solvants, des diluants à peinture,
des particules de poussière ou autres produits chimiques inconnus.
Espace de dégagement minimum avec les matériaux combustibles:
12 pouces (30,5 cm) sur les côtés et 48 pouces (122 cm) du haut.
•Assurer suffisamment d’espace de dégagement autour des
ouvertures d’aération du produit.
AVERTISSEMENT
Non destiné à une utilisation dans une résidence ou un véhicule récréatif.
Nous ne pouvons prévoir toutes les utilisations que vous ferez de nos
produits.
Consultez les autorités locales en matière d’incendie si vous avez
des questions sur l’utilisation.
D’autres normes régissent l’utilisation de gaz combustibles et produits
permettant la génération de chaleur pour des fins particulières. Vos
autorités locales pourront vous conseiller à cet effet.
•Nejamaisremplirlesbonbonnesjetables.
•Utiliserlerégulateurpré-régléquiaétéinstallédanslechauffe-eau.Ne
pas tenter de l’ajuster.
AVERTISSEMENT
Lorsque vous utilisez des produits électriques, il faut toujours mettre en
œuvre des précautions de base, incluant ce qui suit:
1. REALIRE ET SUIVRE TOUTES LES CONSIGNES DE SÉCURITÉ.
2. Lire et respecter toutes les directives présentes sur le produit ou
accompagnant celui-ci.
3. S’il est question d’un appareil électrique avec cordon d’alimentation
ou branchement direct, ne pas utiliser de rallonge.
4. Ne pas installer à moins de 10 pieds (3 m) d’une piscine.
5. Ne pas utiliser dans une salle de bain.
AVERTISSEMENT : Risque de choc électrique. Lorsqu’utilisé à
l’extérieur, ne brancher l’unité qu’à une prise protégée par un
disjoncteur de fuite de terre de classe A qui est étanche. Si aucune
prise de la sorte n’est disponible, communiquer avec un électricien
qualifié pour en faire installer une. Vérifier que l’unité électrique et son
cordon n’empêchent pas la fermeture du couvercle de la prise.
AVERTISSEMENT
•Ce produit est alimenté par du gaz propane. Le gaz propane est
invisible, inodore et inflammable. Un agent odorant est habituellement
ajouté afin de faciliter la détection des fuites; l’odeur est décrite
comme une odeur d’«œufs pourris». L’agent odorant peut se
dégrader avec le temps; les fuites de gaz ne peuvent donc pas
toujours être détectées uniquement par l’odeur.
•Le gaz propane est plus lourd que l’air; en cas de fuite, il tend a se
déposer dans les endroits les plus bas possibles. Il peut être allumé
par des sources d’allumage comme des allumettes, des briquets,
des étincelles ou des flammes vives de toutes sortes, même à
plusieurs mètres de la fuite. N’utiliser que du gaz propane dans un
environnement permettant le retrait de vapeur.
•Les bonbonnes de gaz doivent être rangées à l’extérieur, dans un
endroit bien aéré et hors de la portée des enfants. Tout espace
d’entreposage intérieur doit être conforme à la norme AS/NZS 1596.
•Débrancher la source de gaz avant d’entreposer le chauffe-eau.
DANGER
Tout manquement à se conformer aux précautions et directives
accompagnant ce produit peut entraîner la mort, des blessures graves
et des dommages causés par des risques d’incendie, d’explosion, de
brûlure, d’asphyxie et d’empoisonnement au monoxyde de carbone.
Seules les personnes qui peuvent comprendre et suivre les directives
devraient pouvoir utiliser ou réparer ce produit.
Si vous avez besoin d’aide ou de renseignements, comme un mode
d’emploi ou des étiquettes, veuillez communiquer avec
The Coleman Company, Inc.
AVERTISSEMENT
SÉCURITÉ DE FONCTIONNEMENT
•Tenir tous les raccords et branchements bien propres. Inspecter la
bonbonne de propane et les raccords de propane pour assurer qu’ils
sont exempts de dommages avant de brancher.
•Lors de l’installation, vérifier tous les branchements et raccords avec
de l’eau savonneuse pour détecter toutes fuites. Ne jamais utiliser
de flamme. La présence de bulles indique une fuite. Vérifier que le
branchement n’est pas fileté de manière inappropriée et que le joint
est suffisamment serré. Exécuter une autre vérification de fuite. Si
la fuite persiste, retirer la bonbonne et communiquer avec Coleman
pour obtenir un entretien ou des réparations.
•Pour le chauffage de l’eau uniquement. Ne jamais modifier ou utiliser
un dispositif d’une manière n’étant pas explicitement approuvée par
Coleman.
•Toujours utiliser de manière érigée.
AVERTISSEMENT: Ne jamais laisser le chauffe-eau sans surveillance
quand il est chaud ou en cours d’utilisation. Ne pas toucher aux
pièces de métal et aux orifices d’aération du chauffe-eau; ils
pourraient devenir très chauds en cours d’utilisation. Tenir hors de
portée des enfants. CET APPAREIL N’A PAS ÉTÉ CONÇU POUR
L’APPROVISIONNEMENT EN EAU POTABLE.
15
Page 17

Vue d’ensemble du système
Merci d’avoir acheté une unité Hot Water on DemandTM de Coleman.
Régulateur –
là où la bonbonne de
gaz est branchée.
Rallonge d’allumette –
utiliser la rallonge
d’allumette pour tenir
et insérer une allumette
enflammée dans le
regard de la
flamme.
Regard de la flamme –
pour vérifier l’état du
pilote et de la flamme du
brûleur ou pour insérer
une allumette enflammée
et allumer manuellement
le chauffe-eau.
(disponible sur le modèle 2302-A
uniquement) pour le chargement des
appareils USB compatibles. (tension:
5V chacun; intensité: ≤1A au total)
Ports USB x 2 -
Compartiment de stockage pour cordon
de chargeur et rallonge –
les cordons des chargeurs d’auto 12V et
de maison 120V sont rangés ici (chargeur
120V disponible pour le modèle 2302-A
uniquement)
Bouton de commande –
appuyer sur le bouton puis le
tourner dans le sens anti-horaire.
Ajuster le bouton pour que l’eau
ait la température désirée.
Panneau d’affichage (varie selon le modèle)
un affichage montrant l’état de l’appareil, comme la
température de l’eau, les codes d’anomalie, etc. Se
reporter à la section «Tableau des indicateurs»
Douche (varie selon le
modèle) - Douche amovible
à tenir dans la main
Bras de douche -
Bras de douche
ajustable tenant la
douche en place.
Sortie d’eau -
se branche à
la douche.
Prise de fusible -
là où se trouve le
fusible remplaçable
Port de recharge –
pour brancher les
cordons de chargeur
de 12V et 120V
Entrée d’eau -
se branche à la
pompe.
Prise d’alimentation de la
pompe -
pour alimenter la pompe
en branchant son cordon
d’alimentation à cette prise.
Orifices
d’aération -
ne pas bloquer
les orifices
d’aération.
Compartiment à pile -
12 volt / 2000 mAh
emplacement pour la pile
de 12V/2000mAh Li-Ion
rechargeable. La pile
permet de faire fonctionner
la pompe et les circuits.
Interrupteur
d’alimentation
principale –
(disponible sur le
modèle 2302-A
seulement)
DÉBALLER LE PRODUIT.
Sortez votre nouveau chauffe-eau de sa boîte et assurez-vous que tous les pièces sont bien présentes. S’il vous manque des composantes, veuillez
communiquer avec Coleman pour obtenir un remplacement: 1-800-835-3278 ou par ATS: 316-832-8707. Assurez-vous de retirer le film protecteur se trouvant
sur le panneau d’affichage à l’avant du chauffe-eau avant de l’utiliser.
Bras de douche
Réservoir d’eau de 5
gallons (19 L) pliable
THIS SIDE UP
Cordon de chargeur d’auto 12V
(se trouve dans le compartiment
de rangement de l’appareil)
Cordon de chargeur domestique 120V
(pour le modèle 2302-A uniquement,
dans le compartiment de rangement)
Douche
Ensemble de pompe Flexible de douche Sac de transport en filet du flexible
(varie selon le modèle)
16
Page 18

CHARGEMENT DE LA PILE
1. Charger la pile avant d’utiliser le chauffe-eau pour la première fois.
2. Mettre l’interrupteur d’alimentation principale en position «OFF»
Fig. 1
OFF
1
(éteint) (applicable au modèle 2302-A seulement).
3. (figure 1) Retirer le rabat de caoutchouc couvrant le port de
chargement.
2
4. Brancher le cordon de chargeur d’auto 12V ou résidentiel 120V
dans l’unité et la source d’alimentation.
5. Se reporter au tableau de l’indicateur pour connaître l’état de la pile
et du chargement.
REMARQUE : Laisser charger la pile pendant 6heures la première fois
afin de maximiser la performance de la pile.
NETTOYER LE PRODUIT
Nettoyer avant la première utilisation. Il est fortement recommandé de nettoyer le chauffe-eau avant de l’utiliser pour la première fois. Suivre les étapes simples
se trouvant en page 20 avant de quitter la maison puis nettoyer le chauffe-eau au moins une fois par an ou lorsque le flexible se décolore par l’accumulation de
calcium blanc.
Installation
Sélectionner une surface robuste de niveau pour y poser le chauffe-eau. Une table de pique-nique ou
une table de camping sont des surfaces idéales. Ne pas faire fonctionner l’unité Hot Water on Demand
directement à partir du sol (cela permet à l’eau de se drainer et empêche l’unité d’être endommagée si la
température descend sous le point de congélation).
Remplir d’eau le réservoir de 5 gallons (19 L) pliable. Il est possible de mettre l’eau d’un lac ou d’un
ruisseau dans le produit, mais il faut s’assurer qu’il n’y a pas de débris ou
de sable dans l’eau, qui pourraient boucher le système et endommager
le produit. Il est recommandé d’utiliser un bout de tissu comme filtre
pour couvrir l’ouverture du réservoir avant de le remplir d’eau.
TM
Fig. 2
BRANCHEMENT DE LA TÊTE DE DOUCHE (FIG. 2)
•Extrémité de la douche: connecteur fileté
Visser le connecteur fileté dans le flexible de la douche se trouvant à
l’extrémité de la douche.
•Extrémité du chauffe-eau: connecteur à manchon
A - Tirer sur le manchon du connecteur et le retenir.
B et C - Tout en retenant le manchon, pousser le connecteur dans la sortie d’eau
jusqu’à fond.
D - Relâcher le manchon; le connecteur est alors verrouillé en place.
IMPORTANT: Pour débrancher le flexible de douche du chauffe-eau, tirer d’abord sur le manchon
pour déverrouiller le connecteur puis, tout en retenant le manchon, sortir le connecteur.
BRANCHEMENT DE LA POMPE À EAU
Vers la prise d’alimentation du chauffe-feau
THIS SIDE UP
Fig. 3
Vers l’entrée d’eau
du chauffe-eau
Ensemble de pompe
THIS SIDE UP
Vers le
réservoir d’eau
A B
C
D
Fig. 4
•Extrémité de la pompe (Fig. 3):
1. Mettre le réservoir d’eau sous le niveau du chauffe-eau
afin d’assurer un bon drainage.
2. Visser manuellement la pompe à eau sur l’ouverture du
réservoir d’eau.
3. Déposer le réservoir d’eau sur son côté afin que la pompe
soit orientée vers le bas du réservoir (étape 2).
4. S’assurer de faire tourner la pompe pour que la marque
«THIS SIDE UP» (ce côté vers le haut) soit vers le haut
pour que la pompe puisse s’amorcer et permettre l’eau de
s’écouler.
THIS SIDE UP
A B
C
D
17
Page 19

Installation (suite)
ASTUCE: Vous pouvez également submerger la pompe à eau dans un réservoir d’eau ouvert, comme une glacière (glacière non comprise). Si non
disponible, il est possible de brancher un boyau d’arrosage directement sur l’unité. Assurer que le débit d’eau n’est pas trop élevé; la pression affectera la
capacité de chauffage de l’unité et pourrait entraîner le débranchement de la sortie. Assurer également qu’à l’inverse, le débit d’eau n’est pas trop bas pour
éviter les erreurs de faible débit. Assurer que l’eau coule adéquatement avant d’allumer l’unité, et ajuster le débit au besoin.
•Extrémité du chauffe-eau (Fig. 4):
1. Brancher la prise d’alimentation de la pompe dans la fiche correspondante du chauffe-eau.
2. Brancher le connecteur à manchon de la pompe dans l’entrée d’eau du chauffe-eau.
(suivre les mêmes étapes, A, B, C, D, que pour la section «BRANCHEMENT DE LA DOUCHE»)
INSTALLATION DU BRAS DE DOUCHE
1. Démonter le bras de douche en dévissant la
molette de réglage (Fig. 5).
2. Installer le bras de douche sur le rail du
chauffe-eau puis serrer la molette de réglage
(Fig. 6).
3. Desserrer la molette de réglage et ajuster
l’angle et la hauteur du bras de douche. Une
fois le bras à la position désirée, serrer la
molette à nouveau (Fig. 7).
4. Une fois le bras de douche en place, il est possible de poser la douche sur le bras de
douche.
INSTALLATION DE LA BONBONNE DE GAZ (FIG. 8)
Ce dispositif doit être utilisé uniquement avec une bonbonne de gaz propane GPL Coleman de
1 lb (454 g) certifiée DOT-39 NRC 232/2990 M1110.
DE FAIRE APPEL À UN AUTRE TYPE DE BONBONNE DE GAZ.
joints entre l’appareil et la bonbonne de gaz sont présents et en bon état avant de brancher
la bonbonne de gaz. Retirer tout le matériel de protection pour le transport. NE PAS déplacer
l’appareil pendant qu’il fonctionne. Après usage, mettre le bouton de commande en position
d’arrêt.
Ne pas utiliser de bonbonnes de gaz MAPP ou autre. Seulement du propane.
1. Tourner le bouton de commande en position OFF (arrêt).
2. Retirer le capuchon de la bonbonne de propane et le conserver pour plus tard
3. Tout en retenant la bonbonne de propane debout, la fileter dans le régulateur.
IL POURRAIT ÊTRE DANGEREUX
Fig. 5 Fig. 6 Fig. 7
Vérifier que tous les
Fig. 8
RÉGULATEUR
ARRÊT
VÉRIFICATION DE FUITE DE GAZ
AVERTISSEMENT
•Exécuter le test de fuite à l’extérieur.
•Éteindre toute flamme vive.
•NE JAMAIS procéder au test de fuite tout en fumant.
•Ne pas utiliser l’unité Hot Water on Demand
été effectuée sur le raccord.
1. Préparer de 55 à 85g (2 à 3oz) de
solution de vérification de fuite (une partie
de liquide à vaisselle pour trois parties
d’eau).
2. Appliquer plusieurs gouttes de la solution
sur le raccord se trouvant entre la
bonbonne de propane et le régulateur.
18
TM
tant qu’aucune vérification de fuite n’a pas
3. La présence de bulles indique une fuite.
4. Vérifier que le branchement n’est pas
5. Exécuter une autre vérification de fuite.
Fig. 9
fileté de manière inappropriée et que le
joint est suffisamment serré.
Si la fuite persiste, retirer la bonbonne et
communiquer avec Coleman pour obtenir
un entretien ou des réparations.
Page 20

Utilisation et fonctionnement
PRESSE
Nettoyer avant la première utilisation (se reporter aux «DIRECTIVES DE NETTOYAGE» de la page suivante). Il est fortement recommandé de nettoyer le
chauffe-eau avant de l’utiliser pour la première fois. Suivre ces étapes simples avant de quitter la maison puis nettoyer le chauffe-eau au moins une fois par an
ou lorsque le flexible se décolore par l’accumulation de calcium blanc.
MISE EN GARDE: les pièces accessibles peuvent devenir très chaudes. Tenir hors de portée des jeunes enfants. N’UTILISER QU’À L’EXTÉRIEUR. Doit
être installé sur une surface horizontale. Ne convient pas aux environnements marins. Ne pas modifier cet appareil. Il est recommandé de lui faire subir un
entretien annuel par une personne autorisée. Ou si l’une des conditions suivantes est remarquée, soit allumage incomplet, flamme jaune en grande partie,
dépôt de carbone, soulèvement, flottement, ré-allumage ou mauvaise odeur. NE PAS utiliser cet appareil si ses joints sont endommagés ou usés. NE PAS
utiliser cet appareil en présence de fuites ou de dommages ou s’il ne fonctionne pas correctement. Pour vérifier si la bonbonne de gaz est vide, il suffit de la
débrancher de l’appareil et de la secouer. L’absence de son ou de mouvement de liquide signifie que la bonbonne est vide.
ALLUMER LE CHAUFFE-EAU
Au moment de son allumage, le chauffe-eau ne doit pas être exposé à des vapeurs ou des liquides inflammables. Avant d’allumer le chauffe-eau, vérifier
que le réservoir d’eau est prêt, que les raccords avec la douche et la pompe sont en place, que la bonbonne de gaz est installée et que la charge des piles
rechargeables est suffisante (vérifier l’état des piles en se référant au «Tableau des indicateurs» ou à la section «Charger les piles»).
• Allumage électronique
1. Mettre l’interrupteur d’alimentation principale en position de marche
(applicable au modèle 2302-A seulement)
2. Mettre le système électrique en marche en mettant le bouton d’alimentation en
position «ON» (marche). Ce bouton se trouve sur le panneau de commande. Une
fois sous tension:
Sur le MODÈLE 2302-A - l’indicateur de pile est allumé et la température ambiante
actuelle est affichée.
Sur le MODÈLE 2302-B - un témoin vert clignote sur le panneau de commande pour
indiquer que le système électrique est sous tension.
IMPORTANT: Une fois sous tension, la pompe se met en marche et l’eau
commence à couler, ce avant que le chauffe-eau ne soit allumé. Il est
recommandé de se familiariser avec l’ensemble du mode d’emploi avant de
mettre l’appareil sous tension pour conserver l’eau.
3. Appuyer sur le bouton de commande et le tourner en sens antihoraire pour le mettre en position « PILOT» (pilote).
4. Appuyer sur le bouton de commande et le tenir enfoncé (pendant 7 à 10secondes) afin de lancer la séquence d’allumage électronique; des clics seront
audibles.
5. Tout en tenant le bouton de commande enfoncé, vérifier si la lampe pilote est allumée en surveillant l’indicateur de l’affichage (Se reporter au Tableau des
indicateurs).
REMARQUE : L’allumage est plus long la première fois car il faut que le gaz remplisse d’abord la conduite de gaz.
6. Une fois la lampe pilote allumée, tourner le bouton de commande en sens antihoraire pour le mettre à un réglage entre «MAX» et «MIN» afin d’obtenir
une eau à la température désirée.
REMARQUE : Au réglage «MAX», le chauffe-eau peut faire monter la température de l’eau d’environ 30°C (si la température de l’eau utilisée était
de 59°F, le chauffe-eau l’amènera à une température de 113°F). Si l’allumage électronique ne fonctionne pas, se reporter à la section «Allumage à
l’allumette» ci-dessous ou à la section «Dépannage» afin de pouvoir allumer la lampe pilote.
ON
PRESSE
PRESSE
varie selon le modèle
• Allumage à l’allumette
1. Mettre le bouton d’alimentation en position de marche.
2. Appuyer sur le bouton de commande et le tourner en sens antihoraire pour le mettre en
position «
PILOT» (pilote).
3. Mettre une longue allumette enflammée près du brûleur en l’insérant dans le regard
de la flamme, puis appuyer sur le bouton de contrôle et le tenir enfoncé jusqu’à ce
que la lampe pilote soit allumée (surveiller l’indicateur de l’affichage). Si aucune longue
PRESSE
allumette n’est disponible utiliser la rallonge d’allumette (se reporter à la section «Vue
d’ensemble du système») afin de tenir l’allumette et pouvoir la faire passer dans le
regard.
4. Tourner le bouton de commande en sens antihoraire pour le mettre à un réglage entre «MAX» et «MIN» afin d’obtenir une eau à la température désirée.
REMARQUE : Il est normal de remarquer une légère variation du débit et de la température de l’eau lorsque l’adaptateur de jet est déplacé en hauteur. Le
chauffe-eau éteindra automatiquement le brûleur lorsque la température de l’eau excèdera 125 °F (52 °C). En cas de surchauffe ou de manquement à couper
automatiquement l’alimentation en gaz, fermer manuellement le bouton de commande.
PRESSE
19
Page 21

Utilisation et fonctionnement (suite)
ÉTEINDRE LE CHAUFFE-EAU
1. Tourner le bouton de commande en sens horaire, à la position «OFF» (arrêt).
2. Mettre le bouton d’alimentation du panneau d’affichage en position d’arrêt.
3. Mettre l’interrupteur d’alimentation principale en position «OFF» (éteint) (applicable au modèle 2302-A seulement).
IMPORTANT : L’utilisateur ne doit pas modifier l’ordre des étapes de la séquence d’arrêt. Toujours arrêter le brûleur et couper
l’alimentation en gaz en tournant le bouton de commande en position d’arrêt «OFF» d’abord puis couper l’alimentation.
ARRÊTER TEMPORAIREMENT LE CHAUFFE-EAU
Pour des raisons de sécurité, il n’est pas possible de couper le débit d’eau pendant une douche. Il est uniquement possible d’éteindre le brûleur principal en
tournant le bouton de commande en sens horaire pour le remettre en position d’allumage «
PILOT » afin de conserver le gaz. La lampe pilote reste allumée
et la pompe continue de fonctionner, maintenant le débit d’eau. Pour recommencer à chauffer l’eau, tourner le bouton de commande dans le sens antihoraire
pour le placer à un réglage entre «MAX» et «MIN».
Il est également possible d’arrêter complètement le chauffe-eau en suivant les étapes de la section «Arrêter le chauffe-eau» précédent. Il faut alors
recommencer l’ensemble du processus d’allumage décrit dans la section «Allumer le chauffe-eau».
DIRECTIVES DE NETTOYAGE
1. In a Dans un réservoir propre, mélanger 2 gallons (7,5 l) d’eau à 12 oz (340 g) de produit nettoyant pour calcium, calcaire et rouille (disponible dans la
section des nettoyants des quincailleries, magasins généraux ou épiceries).
2. Immerger la pompe et la douche dans le réservoir contenant la solution d’eau et de produit nettoyant. L’étiquette «This Side Up» (ce côté vers le haut) de
la pompe devrait être orienté vers le haut. \
3. Faire fonctionner le chauffe-eau en suivant les directives de la section «Allumer le chauffe-eau» et mettre le bouton de commande au réglage «Warm»
(chaud).
4. Faire circuler la solution d’eau et de produit nettoyant dans le
Cycle eau/solution
chauffe-eau pendant 2minutes puis éteindre le chauffe-eau en
tournant le bouton de commande dans le sens horaire pour le
mettre en position «Off» (arrêt) et couper l’alimentation à partir
ALLUMER
du panneau de commande.
5. Éliminer la solution de nettoyage dans un évier ou autre drain, ne
pas la vider sur le sol.
6. Remplir un réservoir de 2,4 gallons (9 l ) d’eau propre.
7. Immerger la pompe et la douche dans le réservoir d’eau.
Cycle eau propre
8. Allumer le chauffe-eau et laisser l’eau s’écouler pendant
2minutes à réglage «Cool» (frais).
9. Éteindre le chauffe-eau.
10. Répéter les étapes 6 à 9 avec de l’eau propre.
ALLUMER
11. Nettoyer le filtre moustiquaire se trouvant à l’entrée d’eau de la
pompe afin d’éliminer tout résidu pouvant boucher la pompe. Se
reporter à la section sur l’entretien de la page 21 pour obtenir des
directives.
OFF
CHAUD
ÉTEINDRE
PRESSE
FRAIS
ÉTEINDRE
PRESSE
CHARGER DES APPAREILS USB COMPATIBLES (disponible uniquement pour le modèle 2302-A)
Il est possible de charger jusqu’à 2appareils mobiles en même temps en les branchant sur les ports USB
du chauffe-eau. La capacité de la pile rechargeable se trouvant dans le chauffe-eau est de 2000mAh, ce
qui signifie qu’elle peut charger complètement un appareil mobile de 1570mAh (comme un iPhone 5s).
IMPORTANT: Les ports USB ne fonctionnent que si l’interrupteur d’alimentation principale est en
position de marche. Ne bas brancher les appareils USB lorsque le chauffe-eau est en marche ou
encore chaud au toucher. Ne pas brancher d’appareils aux ports USB du chauffe-eau en présence
d’un indicateur «LOW BATTERY» (pile faible) sur le panneau d’affichage (se reporter au tableau des
indicateurs dans la section «Tableau des indicateurs»). Ne pas charger d’appareils dont la capacité
de la pile excède 1700mAh.
MODIFIER L’AFFICHAGE DE LA
TEMPÉRATURE
(possible sur le modèle 2302-A seulement)
La température actuelle de l’eau est montrée
sur le panneau d’affichage. Pour passer
à l’affichage en Celsius ou en Fahrenheit,
appuyer sur le bouton
du panneau
CHANGER LE JET DE DOUCHE
(possible sur le modèle 2302-A seulement)
La douche peut livrer un jet aéré, complet ou fin.
Pour changer le jet, il suffit de faire pivoter le cadran
de la tête de douche. Il est possible de couper le
débit d’eau en tournant le cadran de la tête de
douche en position OFF (arrêt).
d’affichage à répétition.
REMARQUE : Lorsque le chauffe-eau est en marche, le fait de tourner le cadran de
la tête de douche à la position «OFF» (arrêt) entraînera un avertissement de faible
débit d’eau et l’arrêt de l’unité. Assurer que la tête de douche est bien ouverte avant
20
de redémarrer le chauffe-eau.
Page 22

Astuces utiles
•Il y a une courroie avec attache à boucles et crochets à l’arrière de la douche, pour l’attacher sur un objet en hauteur (disponible sur le modèle 2302-A
uniquement).
•Si vous ne pensez pas utiliser le réchauffeur d’eau pendant une période prolongée (3 jours ou plus), il est fortement recommandé de mettre l’interrupteur
d’alimentation principale en position «OFF» (éteint). Cela prolongera la charge de votre pile (applicable sur le modèle 2302-A seulement).
•Ne jamais mettre la douche à une hauteur excédant 6,5 pieds (2 m) au-dessus du chauffe-eau. Ce faisant, le système lancement un niveau d’avertissement
entraînant le déclenchement du mécanisme d’arrêt.
•Ne jamais torsader ou plier les flexibles dans lesquels passe l’eau; cela entraînera une baisse de débit d’eau et le déclenchement du mécanisme d’arrêt.
•Le chauffe-eau permet normalement de chauffer 40 gallons (151 l) d’eau sur une seule charge de pile et une bonbonne de propane de 16,4 oz (464 g).
Prendre soins d’emporter suffisamment de combustible pour la durée de la sortie.
•Grâce à la présence de dispositifs d’arrêt mécaniques et électriques en cas de surchauffe intégrés, le brûleur s’arrêtera immédiatement si la température
de l’eau atteint 122°F à la sortie du chauffe-eau. La pompe continue tout de même de faire circuler de l’eau pendant 30secondes afin de faire refroidir le
chauffe-eau.
•Le chauffe-eau est idéal pour effectuer plusieurs tâches de nettoyage extérieures. Coleman supporte les principes de passage sans laisser de traces, qui
encouragent les gens à laisser un impact minimal sur l’environnement lorsqu’ils font du camping. Vous découvrirez qu’il faut moins de savon pour laver la
vaisselle quand l’eau est froide, alors veillez à n’utiliser qu’un peu de savon biodégradable. Veuillez éliminer vos eaux grises de manière responsable. Lavezvous, ou lavez la vaisselle, à une distance d’au moins 200 pieds (61 m) de tout cours d’eau afin d’éviter la contamination d’une source d’eau naturelle par des
coulées de savon. Communiquez avec votre terrain de camping ou votre parc pour connaître leur politique d’élimination des eaux grises.
•Le fonctionnement en continu du chauffe-eau à réglage chaud pendant 20minutes peut entraîner le gel de la bonbonne de propane. Laisser la bonbonne
décongeler ou la remplacer par une autre bonbonne neuve.
Entreposage
•Retirer la bonbonne de propane du chauffe-eau après usage et avant de transporter ou d’entreposer l’appareil. Toujours entreposer le propane à l’extérieur.
•Vidanger l’eau se trouvant dans les flexibles et l’unité avant de les ranger. Débrancher les flexibles et incliner le produit du côté du branchement de flexible.
Déplacer l’unité de la gauche à la droite tout en l’inclinant, jusqu’à ce que le drainage de l’eau cesse.
•Recharger la pile avant de l’entreposer. Couper l’interrupteur d’alimentation principale (applicable au modèle 2302-A seulement).
•S’il est question d’entreposage à long terme, nettoyer et sécher le chauffe-eau puis l’entreposer à l’intérieur dans un endroit propre et sec.
•Le boîtier de transport rembourré de Coleman est idéal pour le rangement et le transport.
Entretien
Cet appareil ne doit être entretenu que par une personne autorisée.
• Nettoyer les voies d’eau au moins une fois par année ou dès qu’une
accumulation blanche est visible dans le flexible. Se reporter aux directives
de nettoyage de la page 20 de ce manuel.
• Charger la pile immédiatement après chaque sortie afin de conserver une
performance optimale.
• Nettoyer l’extérieur - Ne nettoyer l’unité que lorsqu’elle est éteinte et froide
au toucher et que la bonbonne de propane est enlevée. Essayer l’unité avec
un chiffon doux humidifié par une solution contenant du savon à vaisselle.
Ne jamais utiliser de produits abrasifs.
• Remplacer la pile (se reporter aux illustrations ci-contre à droite) - Utiliser
uniquement une pile de remplacement Coleman
®
2000027851 (pile Li-Ion de
12 volts, 2000 mAh).
1. Retirer la vis du couvercle du compartiment à pile se trouvant sur le côté
droit du chauffe-eau et retirer le couvercle.
2. Retirer la pile du compartiment et en débrancher les connecteurs.
3. Remplacer la pile et brancher les connecteurs. Vérifier que le connecteur
mâle avec tige circulaire et tige rectangulaire est bien aligné avec le
connecteur femelle à trou circulaire et trou rectangulaire. Il est possible de
commander des piles de remplacement auprès de Coleman.
• Remplacer le fusible (se reporter aux illustrations ci-contre à droite) -
Utiliser uniquement un fusible de remplacement Coleman
(capacité: 5A).
®
2000027844
Retirer la vis de la prise de fusible se trouvant directement au-dessus du
compartiment à pile. Éliminer le fusible défectueux et le remplacer par un
nouveau.
• Nettoyer le treillis moustiquaire de la pompe (se reporter aux illustrations
ci-contre à droite)-
1. Attraper le bec se trouvant à l’extrémité de la pompe et le tourner sans le
sens antihoraire pour le dévisser.
2. Séparer le bec et le capuchon annulaire.
3. Utiliser les doigts pour dégager le treillis moustiquaire du bec de la
pompe pour le nettoyer.
4. Inverser ensuite les étapes pour remonter les pièces ensembles.
• Vérifier la flamme (se reporter aux illustrations ci-contre à droite)-
Vérifier la flamme à l’aide du regard se trouvant sur le panneau avant de l’appareil. Une bonne flamme devrait être bleue avec la pointe jaune.
Une pointe jaune atteignant 1pouce de longueur est acceptable tant qu’il ne semble pas y avoir de dépôts de carbone ou de suie.
Remplacement de la pile
Remplacement du fusible
Vérification de la flamme
NonOui
Jaune
Bleu
Trous du brûleur
Nettoyage du treillis
moustiquaire de la pompe
Jaune
Bleu
Joint torique
d’étanchéité
21
Page 23

Tableau des indicateurs
Témoin qui brille en continu: Témoin qui brille en clignote:
Explications
Pile en cours de
chargement
Pile complètement
chargée
Système électrique
sous tension
Lampe pilote allumée
Avertissement d'eau
chaude (chambre)
Avertissement d'eau
chaude (sortie d'eau)
Avertissement
d'inclinaison
Avertissement de
flammes éteintes
Avertissement de pile
faible
Avertissement de
faible débit d'eau
Modèle 2302-B
Affichage des
indicateurs
/ /
(rouge / jaune / vert)
/ /
(rouge / jaune / vert)
Déclencher Réaction du système Mesure corrective
La température de
l'eau à l'échangeur de
chaleur excède 131°F.
La température de
l'eau à la sortie d'eau
excède 122°F.
Le chauffe-eau est
incliné à un angle
excédant 30degrés.
Flammes éteintes/
Lampe pilote éteinte
La tension de la pile
intégrée est inférieure
à 9,8V.
Le débit d'eau est
inférieur à 1,5l/min
(0,4gal/min).
Le gaz sera immédiatement
coupé. La pompe s'éteindra dans
30secondes.
Le gaz sera immédiatement
coupé. La pompe s’éteindra dans
30secondes.
Le gaz et la pompe seront
immédiatement coupés.
Le gaz et la pompe seront
immédiatement coupés.
Le gaz et la pompe seront
immédiatement coupés.
2secondes après le premier
avertissement, le système détecte
le débit à nouveau; si le débit est
encore trop bas, le gaz et la pompe
sont coupés.
Mettre le bouton de commande et le bouton d’alimentation
en position d’arrêt. Se reporter à la section sur le dépannage
et régler le problème puis reprendre la séquence d’allumage.
Mettre le bouton de commande et le bouton d’alimentation
en position d’arrêt. Se reporter à la section sur le dépannage
et régler le problème puis reprendre la séquence d’allumage.
Mettre le bouton de commande et le bouton d’alimentation
en position d’arrêt. Se reporter à la section sur le dépannage
et régler le problème puis reprendre la séquence d’allumage.
Mettre le bouton de commande et le bouton d’alimentation en
position d’arrêt. Se reporter à la section sur le dépannage et
régler le problème puis reprendre la séquence d’allumage.
Mettre le bouton de commande et le bouton d’alimentation
en position d’arrêt. Se reporter à la section sur le dépannage
et régler le problème puis reprendre la séquence d’allumage.
Mettre le bouton de commande et le bouton d’alimentation
en position d’arrêt. Se reporter à la section sur le dépannage
et régler le problème puis reprendre la séquence d’allumage.
Explications
Pile en cours de
chargement
Pile complètement
chargée
Système électrique
sous tension
Eau qui circule
Avertissement d'eau
chaude (chambre)
Avertissement d'eau
chaude (sortie d'eau)
Avertissement
d'inclinaison
Avertissement de
flammes éteintes
Avertissement de
pile faible
Avertissement de
faible débit d'eau
Affichage des
indicateurs
(animée)
Modèle 2302-A
Déclencher Réaction du système Mesure corrective
La température de
l'eau à l'échangeur de
chaleur excède 131°F.
La température de l'eau
à la sortie d'eau excède
122°F.
Le chauffe-eau est
incliné à un angle
excédant 30degrés.
Flammes éteintes/
Lampe pilote éteinte
La tension de la pile
intégrée est inférieure
à 9,8V.
Le débit d'eau est
inférieur à 1,5l/min
(0,4gal/min).
Le gaz sera immédiatement
coupé. La pompe s’éteindra dans
30secondes.
Le gaz sera immédiatement
coupé. La pompe s’éteindra dans
30secondes.
Le gaz et la pompe seront
immédiatement coupés.
Le gaz et la pompe seront
immédiatement coupés.
Le gaz et la pompe seront
immédiatement coupés.
Le gaz et la pompe sera coupée 2
secondes plus tard.
Mettre le bouton de commande et le bouton d’alimentation en
position d’arrêt. Se reporter à la section sur le dépannage et
régler le problème puis reprendre la séquence d’allumage.
Mettre le bouton de commande et le bouton d’alimentation en
position d’arrêt. Se reporter à la section sur le dépannage et
régler le problème puis reprendre la séquence d’allumage.
Mettre le bouton de commande et le bouton d’alimentation en
position d’arrêt. Se reporter à la section sur le dépannage et
régler le problème puis reprendre la séquence d’allumage.
Mettre le bouton de commande et le bouton d’alimentation en
position d’arrêt. Se reporter à la section sur le dépannage et
régler le problème puis reprendre la séquence d’allumage.
Mettre le bouton de commande et le bouton d’alimentation en
position d’arrêt. Se reporter à la section sur le dépannage et
régler le problème puis reprendre la séquence d’allumage.
Mettre le bouton de commande et le bouton d’alimentation en
position d’arrêt. Se reporter à la section sur le dépannage et
régler le problème puis reprendre la séquence d’allumage.
22
Page 24

Guide de dépannage
Symptom Cause possible Solution
Avertissement d'eau chaude
Avertissement d'inclinaison
Avertissement de flammes
éteintes
Avertissement de pile faible
Avertissement de faible débit
d'eau
Brûleur qui ne s'allume pas
Fuite d'eau
Flexible dont l'intérieur devient
blanc ou décoloré
La pile ne retient pas la charge
Aucun affichage
Le réservoir d'eau est vide Remplir le réservoir d'eau.
La température ambiante est trop élevée Tourner le bouton de commande à un réglage moins élevé.
Le capteur de température est défectueux Communiquer avec Coleman si l’article est garanti.
Le chauffe-eau est incliné à un angle excédant
30degrés.
Capteur défectueux Communiquer avec Coleman si l’article est garanti.
Flammes éteintes par un vent fort/lampe pilote
éteinte
Module de détection de la flamme défectueux Communiquer avec Coleman si l’article est garanti.
Tension de la pile inférieure à 9,8V. Recharger la pile.
Pile défectueuse Communiquer avec le centre de service Coleman et remplacer la pile rechargeable.
Pompe en position incorrecte
Réservoir d'eau vide Remplir le réservoir d'eau.
Treillis moustiquaire de la pompe bouché
Flexible torsadé/plié Redresser le flexible.
Connecteur de la pile débranché Retirer le couvercle du compartiment à pile et rebrancher le connecteur.
Cordon d'alimentation de la pompe débranché Brancher le cordon d'alimentation dans la prise du chauffe-eau.
Pile faible Recharger la pile.
Capteur de débit défectueux Communiquer avec Coleman si l’article est garanti.
Bonbonne de propane vide Remplacer la bonbonne.
Bonbonne de propane gelée Remplacer la bonbonne et la réutiliser une fois qu'elle sera décongelée.
Fusible défectueux Se reporter à la section sur l'entretien et remplacer le fusible.
Circuit électronique défectueux Communiquer avec Coleman si l’article est garanti.
Connecteurs mal filetés
Connecteurs à manchon mal verrouillés
Joint défectueux ou brisé
Accumulation de calcium Nettoyer le chauffe-eau (voir la section «Directives de nettoyage» de la page 20)
Pile défectueuse Communiquer avec Coleman si l’article est garanti.
L’interrupteur d’alimentation principale n’a pas été
manœuvré
Connecteur de pile débranché Retirer le couvercle du compartiment à pile et rebrancher le connecteur
Fusible défectueux Se reporter à la section sur l'entretien et remplacer le fusible.
Circuit électronique défectueux Communiquer avec Coleman si l’article est garanti.
Pile faible Recharger la pile.
Interrupteur d’alimentation principale à la position
«OFF» (désactivé) (modèle 2302-A seulement)
Le gaz et la pompe seront immédiatement coupés.
Ne pas utiliser par forts vents. Éteindre complètement le chauffe-eau et reprendre la
séquence d'allumage.
Faire pivoter la pompe pour que la marque «THIS SIDE UP» (ce côté vers le haut) soit
bien orienté vers le haut.
Nettoyer le treillis moustiquaire en suivant les directives données dans la section sur
l'entretien.
Rebrancher les connecteurs.
Lire les directives pour brancher les connecteurs à manchon puis les rebrancher.
Remplacer les composants d'étanchéité (joints toriques) et renvoyer à Coleman si
nécessaire
Se reporter à la section Astuces utiles pour savoir comment utiliser l’interrupteur d’alimentation principale.
Mettre l’interrupteur d’alimentation principale en position de marche.
Caractéristiques techniques
Pression: 2,8kPa
Taille de l’injecteur: 0,026 po (0,66 mm)
Consommation totale de gaz: 21,0MJ/h
Type de gaz: Propane GPL
Pièces de rechange
Liste des pièces
1. 2000027853 Douche
2. 2000027851 Pile Li-Ion
3. 2000027849 Ensemble de pompe
4. 2000027850 Adaptateur – 120V
5. 2000027848 Adaptateur – 12V
6. 2000027847 Réservoir d’eau
7. 2000027845 Bras de douche
8. 2000027844 Fusible
9. 2000027842 Sac de transport de l’ensemble de douche
10. 2000027937 Flexible de douche
- Communiquer avec Coleman -
www.coleman.com | 1-800-835-3278 | TDD 316-832-8707
23
Page 25

Schéma de circuit
MISE EN GARDE: Étiqueter tous les fils avant de les débrancher pour procéder aux contrôles d’entretien. Les erreurs de câblage peuvent causer un
fonctionnement inapproprié, voire dangereux. Vérifier le bon fonctionnement avec l’entretien. Ce raccord est pour une pile à faible tension ou pour du courant
continu uniquement. Ne pas brancher dans une prise CA de 120 ou 240volts.
Modèle 2302-A
L
N
Chargeur de
pile
2
Module d’alimentation PH01
Affichage PH01
Recharger
la pile
Interrupteur d’alimentation principale
PASS
Boîtier de
l’appareil
Allumeur à impulsion
Chargeur de
Fusible
Contacteur
d’allumage
2
Valve
de gaz
7
2
Boîtier de l’appareil
2
2
2
Module
USB
7
Circuit de
protection contre
l’inclinaison
2
2
Circuit de
protection contre
les surchauffes
Capteur de débit d’eau
3
2
Capteur de température à
la sortie d’eau
Raccord
Pompe à
eau
thermique
Modèle 2302-B
2
L
N
Module d’alimentation PH01
2
2
pile
2
DEL jaune
DEL verte
DEL rouge
Interrupteur
Recharger
la pile
Interrupteur d’alimentation principale
Fusible
Contacteur
d’allumage
PASS
Raccord
Boîtier de
l’appareil
Allumeur à impulsion
thermique
2
Valve
de gaz
3
2
2
2
2
Capteur de débit d’eau
Boîtier de l’appareil
2
2
Circuit de
protection contre
l’inclinaison
Pompe à
eau
Circuit de
protection contre
les surchauffes
Capteur de température à
la sortie d’eau
11
Page 26

Garantie
Garantie limitée de trois ans
The Coleman Company, Inc. (« Coleman ») garantit cet article contre tout vice de matériau et de fabrication pendant une période de trois (3) ans courants à
compter de la date de l’achat. Coleman se réserve le droit de choisir entre réparer ou remplacer cet article ou toute pièce de celui-ci dont la défectuosité a été
constatée au cours de la période de garantie. Le remplacement se fera au moyen d’un produit neuf ou remanufacturé ou bien d’une pièce neuve ou remanufacturée. Si l’article n’est plus disponible, il sera remplacé par un article semblable, de valeur égale ou supérieure. La présente constitue votre garantie exclusive.
Cette garantie n’est valable que pour l’acheteur au détail original à partir de la date de l’achat au détail initial et elle n’est pas transférable. Veuillez conserver
le reçu d’achat original. La preuve d’achat est exigée pour tout ser vice couvert par la garantie. Les concessionnaires Coleman, les centres de service et les
détaillants qui vendent des articles Coleman® n’ont pas le droit d’altérer, de modifier ou de changer d’une manière quelconque les moda lités de cette garantie.
Ce que ne couvre pas cette garantie
Cette garantie ne couvre pas l’usure normale des pièces, les pièces autres que les pièces authentiques Coleman® ou l’endommagement attribuable à toute
raison suivante: à la négligence, à l’utilisation abusive du produit, à l’utilisation commerciale du produit, au non-respect du mode d’emploi, au démontage et
à la réparation ou à l’altération par quiconque, sauf Coleman ou un centre de service agréé Coleman. Cette garantie ne couvre pas non plus les cas de force
majeure comme incendies, inondations, ouragans et tornades. La garantie est automatiquement annulée si l’endommagement du produit découle de l’utilisation d’une pièce autre qu’une pièce de marque Coleman®.
COLEMAN N’ASSUME AUCUNE RESPONSABILITÉ POUR LES VICES RÉSULTANT DE L’EMPLOI DE PIÈCES NON AUTORISÉES OU DE RÉPARATIONS
EXÉCUTÉES PAR UN PERSONNEL NON AUTORISÉ. COLEMAN DÉCLINE TOUTE RESPONSABILITÉ EN CAS DE DOMMAGES ACCESSOIRES OU
INDIRECTS RÉSULTANT DU NON-RESPECT DE TOUTE GARANTIE OU CONDITION EXPLICITE OU IMPLICITE. SAUF DANS LA MESURE INTERDITE PAR LA
LÉGISLATION PERTINENTE, TOUTE GARANTIE IMPLICITE DE QUALITÉ COMMERCIALE OU D’APPLICATION À UN USAGE PARTICULIER EST LIMITÉE À
LA DURÉE DE LA GARANTIE OU CONDITION CI-DESSUS. CERTAINS ÉTATS ET CERTAINES PROVINCES OU JURIDICTIONS INTERDISENT D’EXCLURE OU
DE LIMITER LES DOMMAGES ACCESSOIRES OU INDIRECTS, OU NE PERMETTENT PAS LA LIMITATION DE LA DURÉE D’APPLICATION DE LA GARANTIE
IMPLICITE, DE SORTE QUE VOUS POUVEZ NE PAS ÊTRE ASSUJETTI AUX LIMITES OU EXCLUSIONS ÉNONCÉES CI-DESSUS. CETTE GARANTIE VOUS
CONFÈRE DES DROITS JURIDIQUES PRÉCIS ET VOUS POUVEZ AVOIR D’AUTRES DROITS, CES DROITS VARIANT D’UN ÉTAT OU D’UNE PROVINCE À
L’AUTRE.
Comment obtenir le service prévu par la garantie
Votre produit doit être couvert par la garantie afin d’obtenir le service de garantie. Si votre produit est défectueux et qu’il est encore couvert par la garantie,
communiquez avec nous au 1-800-835-3278 (TDD 1-316-832-8707) afin d’obtenir une autorisation de retour. Ne retournez pas le produit à Coleman sans
autorisation. On vous demandera de fixer une étiquette au produit qui comprendra votre nom, adresse, numéro de téléphone le jour et une description du
problème. Ajoutez une copie du reçu de vente d’origine. Emballez le produit et envoyez-le assuré par UPS, FedEx Ground ou colis postal avec frais d’expédition et assurance prépayés à :
Pour les produits achetés aux États-Unis :
The Coleman Company, Inc.
3600 North Hydraulic Wichita, KS 67219
U.S.A.
Pour les produits achetés au Canada :
Sunbeam Corporation (Canada) Limited
DBA Jarden Consumer Solutions
20B Hereford Street
Brampton, ON L6Y 0M1
Les frais d’envoi du produit à Coleman pour obtenir le service de garantie doivent être payés par l’acheteur.
N’envoyez pas de produits dont le réservoir contienne du carburant ou bien auxquels soit fixée un bouteille jetable de propane.
NE RETOURNEZ PAS CE PRODUIT AU LIEU D’ACHAT.
Si vous avez toute question quant à cette garantie, veuillez composer le 1-800-835-3278 ou le ATS 1-316-832-8707 aux États-Unis, et le 1-800-387-6161 au
Canada.
25
Page 27

INSTRUCCIONES DE EMPLEO
Modelo -
2302-A Series
2302-B Series
- Solo para uso en exteriores -
• Este calentador de agua portátil e independiente
está diseñado para suministrar agua caliente
solo para duchas y tareas de limpieza en exteriores.
No utilice el producto para calentar agua potable.
• Este aparato no está diseñado para ser conectado
directamente a una manguera de jardín.
• Este aparato es para usar en el lugar, para calentar agua
temporalmente y no para enchufar en forma permanente
en una conexión de entrada de agua o para conectar a un
sistema de distribución de agua para abastecer múltiples
salidas.
• Este aparato está diseñado para calentar una fuente de
agua hasta aproximadamente 30°C sobre la temperatura
ambiente (hasta un máximo de 122°F).
(Exclusivamente con fines ilustrativos; su modelo puede ser diferente)
IMPORTANTE
CONSERVE ESTAS INSTRUCCIONES - Este manual contiene instrucciones de uso importantes de
seguridad y operación. Lea estas instrucciones de uso atentamente.
Familiarícese con el aparato antes de conectarlo a un tanque de gas.
Este manual de instrucciones contiene información importante necesaria para el ensamble correcto y uso seguro
del aparato. Respete todas las advertencias e instrucciones al usar el aparato. Si tiene dudas con respecto a la
ensambladura, operación, mantenimiento o reparación de este producto, comuníquese por teléfono con Coleman
al 1-800-835-3278 o TDD: 316-832-8707. Los cilindros de gas deben cargarse en un lugar bien ventilado,
preferentemente en exteriores, lejos de personas o de fuentes de ignición, como llamas expuestas, llamas del piloto,
calentadores y equipos eléctricos. Si el aparato pierde (hay olor a gas) y no puede cerrar el paso de gas, lleve el
aparato a un lugar bien ventilado, lejos de toda fuente de ignición. Revise las pérdidas con agua jabonosa. No trate
de detectar pérdidas con llamas.
26
Page 28

Contenido
Información general de seguridad ...............27-28
Descripción general del sistema ..................29
Instalación ..................................................... 30-31
Uso y operación ............................................32-33
Sugerencias útiles ........................................34
Almacenamiento ........................................... 34
Mantenimiento ..............................................34
Información general de seguridad
Diagrama de indicadores .............................35
Guía de resolución de problemas ................36
Características técnicas ...............................36
Repuestos .....................................................36
Diagrama de circuitos ..................................37
Garantia ......................................................... 38
Este manual contiene información importante acerca del ensamblaje,
funcionamiento y mantenimiento de este producto y sistema. Se presenta
información general de seguridad en estas primeras páginas y también
se encuentra a través del manual. Debe prestar particular atención a la
información acompañada por los símbolos de alerta de seguridad:
“ PELIGRO”, “ ADVERTENCIA”, “ PRECAUCIÓN”.
Guarde este manual para referencia en el futuro y para educar a nuevos
usuarios de este producto. Este manual debería leerse en conjunto con la
etiqueta en el producto.
Las medidas de seguridad son esenciales cuando algún equipo mecánico o
abastecido por propano está implicado. Estas precauciones son necesarias
al usarla, guardarla y darle servicio. Usar este equipo con el respeto y la
precaución exigida reducirá las posibilidades de herida personal o daño a la
propiedad.
Los siguientes símbolos mostrados abajo se usan extensivamente a través
de este manual. Siempre preste atención a estas precauciones, puesto que
son esenciales cuando se usa cualquier equipo mecánico o abastecido por
combustible.
PELIGRO
PELIGRO indica una situación inminentemente arriesgada que, si no se
evita, resultará en muerte o lesiones graves.
ADVERTENCIA
ADVERTENCIA indica una situación inminentemente arriesgada que, si
no se evita, podría resultar en muerte o lesiones graves.
PRECAUCIÓN
PRECAUCIÓN indica una situación inminentemente arriesgada que, si
no se evita, puede resultar en lesiones personales menores o leves o
daño a la propiedad.
ADVERTENCIA
No guarde o use gasolina u otros vapores y
líquidos inflamables cerca de este u otros aparatos.
PELIGRO DE MONÓXIDO DE
PELIGRO
CARBONO
Este aparato puede producir
monóxido de carbono, que no
tiene olor.
Usar este aparato en un espacio
cerrado puede causar la muerte.
Nunca utilice este aparato en un
espacio cerrado, como una casa
rodante, una tienda de campaña,
un automóvil o una vivienda.
La temperatura del
PELIGRO
agua superior a 125°F
(52°C) puede causar
inmediatamente
quemaduras graves
o lesiones fatales por
escaldaduras.
PELIGRO
Si hay olor a gas:
1. Desconecte la alimentación de gas del aparato.
2. Extinga las llamas expuestas.
3. Si el olor continúa, manténgase lejos del aparato
y comuníquese de inmediato con los bomberos.
El incumplimiento de estas instrucciones podría
resultar en incendio o explosión, que podría causar
daños materiales, lesiones a personas o lesiones
fatales.
CALIENTE
QUEMA
Los niños, las personas
discapacitadas y
los ancianos tienen
más riesgo de sufrir
escaldaduras.
Consulte el manual de
instrucciones antes de
ajustar la temperatura del
calentador de agua.
Pruebe el agua antes de
bañarse o ducharse.
27
Page 29

Información general de seguridad (continuación)
PELIGRO
PELIGRO DE EXPLOSIÓN E INCENDIO
•Nunca guarde propano cerca de fuentes de alta temperatura, llamas
expuestas, luces del piloto, luz solar directa, otras fuentes de ignición
o donde las temperaturas exceden 120gradosF (49°C).
•El propano es más pesado que el aire y se puede acumular en
lugares bajos. Si hay olor a gas, abandone el lugar de inmediato.
•Nunca instale o retire un tanque de propano mientras el calentador
esté en funcionamiento, cerca de llamas, luces del piloto, otras
fuentes de ignición o mientras la temperatura del calentador esté alta
al tacto.
•Durante su operación, este producto puede ser una fuente de
ignición. Nunca encienda o use el calentador en lugares que
contienen o que pueden contener combustibles volátiles o
transportados por el aire o bien, productos tales como gasolina,
solventes, disolventes de pintura, partículas de polvo o químicos
desconocidos. Distancia libre mínima con materiales combustibles:
12pulgadas (30,5cm) a los lados y 48pulgadas (122cm) de la parte
superior.
•Mantenga las distancias libres adecuadas alrededor de los
respiraderos del producto.
•No obstruya el paso de aire de combustión y ventilación.
AVERTISSEMENT
Este producto no se debe utilizar en viviendas o vehículos de uso
No nos es posible prever todas las circunstancias en que se pueden
utilizar nuestros productos.
Consulte a los bomberos de su localidad si tiene dudas con respecto
al uso.
Existen otras normas que rigen el uso de gases combustibles y
productos que generan temperatura para usos específicos. Las
autoridades de su localidad pueden asesorarle sobre esas normas.
•Nuncarellenecilindrosdesechables.
•Utiliceelreguladorpredefinidoinstaladoenelcalentadordeagua.No
trate de ajustarlo.
recreativo.
ADVERTENCIA
Cuando utilice productos eléctricos, siempre debe adoptar
precauciones básicas, como por ejemplo:
1. LEA Y RESPETE TODAS LAS INSTRUCCIONES DE SEGURIDAD.
2. Lea y respete todas las instrucciones en la etiqueta del producto o
entregadas con el producto.
3. No utilice cables prolongadores en unidades que tienen un cable de
alimentación o que se conectan directamente a la alimentación.
4. No instale o use este producto a menos de 10pies (3m) de
distancia de una piscina.
5. No utilice este producto en baños.
ADVERTENCIA: Peligro de descarga eléctrica. Cuando se utiliza en
exteriores, solo enchufe el producto en un receptáculo protegido y
cubierto de claseA con circuito contra fallas a tierra, resistente a la
intemperie y con la unidad de alimentación conectada al receptáculo.
Si no tiene una unidad de este tipo, comuníquese con un electricista
calificado para que corrija su instalación. Asegúrese de que la
unidad y el cable de alimentación no interfieran para poder cerrar
completamente la cubierta del receptáculo.
ADVERTENCIA
•Este producto recibe alimentación de gas propano. El gas propano
es invisible, inodoro e inflamable. Normalmente, se le incorpora
un agente oloroso para ayudar a detectar pérdidas, que se puede
describir como olor a “huevo podrido”. El agente oloroso se puede
desvanecer con el tiempo, de modo que las pérdidas de gas no
siempre se pueden detectar solo por el olor.
•El gas propano es más pesado que el aire y las pérdidas de propano
se hundirán al nivel más bajo posible. Se puede encender con
fuentes de ignición, como por ejemplo, fósforos, encendedores,
chispas o llamas expuestas de cualquier tipo a muchos pies de
distancia de la pérdida original. Solo use gas propano instalado para
eliminar vapor.
•Los cilindros de gas se deben guardar en exteriores, en un lugar
bien ventilado lejos del alcance de niños; todos los lugares de
almacenamiento en interiores deben cumplir la norma AS/NZS1596.
•Desconecte el propano antes de guardar el calentador.
PELIGRO
El incumplimiento de las precauciones e instrucciones que recibió con
este producto puede resultar en lesiones fatales, lesiones graves a
personas y pérdidas materiales o daños a causa de riesgos de incendio,
explosión, quemaduras, asfixia o envenenamiento con monóxido de
carbono.
Solo las personas que entienden y respetan instrucciones deberían usar
o realizar las tareas de mantenimiento de este producto.
Si necesita asistencia o información, como por ejemplo, un manual de
instrucciones o etiquetas, comuníquese con The Coleman Company, Inc.
28
ADVERTENCIA
SEGURIDAD DE MANTENIMIENTO
•Mantenga todas las conexiones y accesorios limpios. Revise si
el cilindro y las conexiones de propano están dañados antes de
conectarlos.
•Durante la instalación, revise con agua jabonosa todas las
conexiones y los accesorios para verificar si pierden. Nunca
utilice llamas. Las burbujas indican una pérdida. Confirme que la
conexión no esté mal enroscada y que esté apretada. Realice otra
comprobación de pérdidas. Si todavía hay una pérdida, desconecte
el cilindro y comuníquese con Coleman para solicitar mantenimiento
o reparación.
•Solo use para calentar agua. Nunca altere de ninguna manera o use
con un dispositivo o pieza que no esté explícitamente aprobado por
Coleman.
•Siempre use el producto en posición vertical.
ADVERTENCIA: Nunca deje el calentador sin supervisión si está
caliente o en uso. No toque las piezas metálicas y los respiraderos
del calentador ya que pueden estar a mucha temperatura cuando el
producto está en uso. Mantenga fuera del alcance de los niños.
ESTE APARATO NO ESTÁ DISEÑADO PARA SUMINISTRAR AGUA
POTABLE.
Page 30

Descripción general del sistema
Le agradecemos su compra de la unidad de Coleman Hot Water on DemandTM.
Compartimento de almacenamiento del cable
Lugar donde se conectará
Régulateur –
el cilindro de gas.
Extensión para fósforos
Utilice la extensión para
fósforos para sostener
e introducir un fósforo
encendido por la
mirilla de la llama.
Mirilla de la llama –
Compruebe el estado de la
luz del piloto y la llama del
quemador o bien, introduzca
un fósforo encendido por
esta mirilla para encender el
calentador manualmente.
Dos puertos USB -
(Solo disponible para el modelo2302-
A) Para cargar dispositivos
compatibles con USB. (Tensión: 5V
cada uno; corriente: ≤1A total)
del cargador y extensión para fósforos–
Los cables del cargador de 12V para
automóviles y del cargador domiciliario de
120V se guardan aquí (cargador de 120V solo
disponible para el modelo2302-A)
Perilla de mando– Presione
esta perilla para girarla en el
sentido contrario a las agujas del
reloj. Ajuste la perilla según la
temperatura deseada del agua
Pantalla (varía según el modelo)-
Lugar donde se muestra el estado del aparato,
como temperatura del agua, códigos de error, etc.
Consulte la sección “Diagrama de indicadores”
Ducha (varía según el
modelo) - Ducha de mano
desmontable
Brazo de la ducha -
Brazo de ducha
ajustable que
mantiene la ducha
inmovilizada.
Salida de agua -
Se conecta a la
Conector para fusible
- El fusible de repuesto
se instala aquí.
Puerto de recarga –
Conecte aquí el cable
de los cargadores de
12 y 120V
Entrada de agua -
ducha.
Se conecta a la
bomba.
Conector de alimentación
para la bomba –
Enchufe el cable de
alimentación de la bomba en
este conector para alimentar
la bomba.
Respiraderos -
No obstruya los
respiraderos.
Compartimento para la
pila -
La pila recargable de iones
de litio de 12voltios y
2000mAh se instala en
este compartimento. La
pila alimenta la bomba y
los circuitos.
Interruptor de
energía principal –
(Disponible solo en el
modelo 2302-A)
DESEMPAQUE DEL PRODUCTO.
Retire su nuevo calentador de agua de la caja y asegúrese de haber recibido todas las piezas. Si falta uno de los componentes, comuníquese con Coleman
para solicitar su reposición: 1-800-835-3278 o TDD: 316-832-8707. Asegúrese de quitar la película protectora de la pantalla en el frente del calentador antes de
usarlo.
Cable para cargador de
Bidón plegable para agua
de 5galones (19litros)
automóvil de 12 voltios (ubicado
en el compartimento de
almacenamiento del aparato)
THIS SIDE UP
Conjunto de la bomba Manguera de la ducha Bolsa de red para la manguera
Cable para cargador domiciliario
de 120voltios (solo disponible para
el modelo2302-A, ubicado en el
compartimento de almacenamiento)
(varía según el modelo)
Brazo de la
Ducha
ducha
29
Page 31

CARGA DE LA PILA
1. Cargue la pila antes de usar el calentador de agua por primera vez.
Fig. 1
2. Apague el interruptor de energía principal (disponible únicamente en
OFF
1
el modelo 2302-A).
3. (Fig.1) Retire la solapa de caucho que cubre el puerto de carga.
2
4. Enchufe el cable del cargador para automóviles de 12voltios o
el cable del cargador domiciliario de 120voltios en la unidad y la
fuente de alimentación.
5. Consulte en el diagrama de indicadores el estado de la pila y de la
carga.
NOTA: Cargue la pila durante 6horas la primera vez que la use para
maximizar su rendimiento.
LIMPIEZA DEL PRODUCTO
Limpie este producto antes de usarlo por primera vez. Recomendamos enfáticamente que limpie el calentador antes de utilizarlo por primera vez. Siga los
pasos simples de la página33 antes de salir de su casa y luego límpielo al menos una vez por año o cuando la manguera se decolore con una acumulación de
calcio blanco.
Instalación
Elija una superficie nivelada y firme para colocar su calentador de agua. Una mesa de picnic o plegable
es ideal. No haga funcionar la unidad Hot Water on Demand
garantiza el drenaje de agua y evita daños mientras la unidad está apagada y la temperatura es de
congelación.)
Llene el bidón plegable con 5galones (19litros) de agua. El producto puede utilizar agua de lagos
o arroyos, pero asegúrese de que el agua no tenga suciedad o
arena, que podrían obstruir el sistema y dañar el producto.
Recomendamos utilizar un trozo de tela como filtro para cubrir la
abertura del bidón antes de llenarlo con agua.
TM
instalada directamente en el suelo. (Esto
Fig. 2
CONEXIÓN DEL CABEZAL DE LA DUCHA (FIG. 2)
•Extremo de la ducha: conector roscado
Atornille el conector roscado de la manguera de la ducha en el
extremo de la ducha.
•Extremo del calentador: conector con funda
A - Levante la funda del conector y manténgala levantada.
B y C - Mientras sostiene la funda, introduzca a presión el conector en la
salida de agua hasta el tope.
D - Libere la funda y el conector quedará bloqueado.
IMPORTANTE: Para desconectar la manguera de la ducha del calentador, primero lleve
la funda hacia arriba para desbloquearla y mientras sostiene la funda, separe el conector.
CONEXIÓN DE LA BOMBA DE AGUA
Al receptáculo de alimentación del calentador
THIS SIDE UP
A la entrada
de agua del
calentador
Conjunto de la bomba
THIS SIDE UP
Al bidón o
tanque de
agua
Fig. 3
A B
C
Fig. 4
D
•Extremo de la bomba (Fig. 3):
1. Coloque el bidón de agua por debajo del nivel del
calentador de agua para un drenaje correcto.
2. Enrosque la bomba de agua en la abertura del bidón de
agua y apriétela a mano.
3. Apoye el bidón de agua sobre uno de sus lados de modo
que la bomba quede orientada hacia la base del bidón
(paso2).
4. Asegúrese de girar la bomba para que “THIS SIDE UP”
(ESTE LADO HACIA ARRIBA) quede orientado hacia
30
arriba de modo que la bomba se cebe y fluya el agua.
THIS SIDE UP
A B
C
D
Page 32

SUGERENCIA: También puede sumergir la bomba de agua en un recipiente abierto con agua, como por ejemplo, una nevera portátil (nevera portátil no
incluida). Alternativamente, si dispone de una manguera de jardín, puede conectarla directamente a la unidad. Asegúrese de que el caudal no sea excesivo
ya que esto afectará la capacidad de la unidad para calentar el agua y podría forzar la desconexión de la conexión de salida. A la inversa, asegúrese de que
el caudal no sea insuficiente, ya que esto puede causar un error por poco caudal. Asegúrese de que el agua fluya antes de encender la unidad y regule el
paso de agua según sea necesario.
•Extremo del calentador (Fig. 4):
1. Enchufe el conector de alimentación de la bomba en el receptáculo de alimentación de la bomba en el calentador.
2. Enchufe el conector con funda de la bomba en la entrada de agua del calentador.
(Siga los mismos pasos A, B, C y D de la sección “CONEXIÓN DE LA DUCHA”)
INSTALACIÓN DEL BRAZO DE LA DUCHA
Fig. 5
1. Desmonte el brazo de la ducha; para ello,
desenrosque la perilla de ajuste (Fig. 5).
2. Instale el brazo de la ducha en la barra del
calentador y gire la perilla de ajuste para
apretarlo. (Fig. 6)
3. Afloje la perilla de ajuste y regule el ángulo
y la altura del brazo de la ducha. Cuando
encuentre la posición deseada, apriete la perilla de ajuste (Fig. 7).
4. Después de haber instalado el brazo de la ducha puede colocar la ducha en el brazo.
INSTALACIÓN DEL CILINDRO DE GAS (FIG. 8)
Este aparato solo se podrá usar con cilindros de gas desechables de 1libra de propano LPG
de Coleman certificados según normas DOT-39 NRC 232/290 M1110. TRATAR DE ADAPTAR
OTROS TIPOS DE RECIPIENTES DE GAS PUEDE SER PELIGROSO. Confirme que todos
los sellos entre el aparato y el cilindro de gas estén adheridos y en buenas condiciones antes
de conectar el cilindro de gas. Retire todo el material de protección de transporte. NO MUEVA
el aparato mientras esté funcionando. Después de usarlo, cierre la perilla de mando.
No utilice cilindros de gas MAPP o ningún otro combustible que no sea propano.
1. Lleve la perilla de mando a la posición “OFF” (apagado).
2. Quite la tapa del cilindro de gas propano, pero no la deseche.
3. Mientras sostiene el cilindro de propano en posición vertical, enrósquele el regulador.
Fig. 6 Fig. 7
Fig. 8
REGULADOR
APAGADO
COMPROBACIÓN DE PÉRDIDA DE GAS
ADVERTENCIA
•Realice la prueba de pérdida de gas en exteriores.
•Extinga todas las llamas expuestas.
•NUNCA realice una prueba de pérdida de gas mientras esté fumando.
•No utilice la unidad Hot Water on Demand
pérdida de gas y confirmar que la unidad no pierde gas.
1. Prepare 2 a 3onzas (56~85g) de
solución para comprobar pérdidas (una
parte de detergente líquido para lavar
vajilla y tres partes de agua).
2. Aplique varias gotas de solución en la
conexión entre el cilindro de propano y el
regulador.
TM
hasta no haber realizado la prueba de
3. Las burbujas indican una pérdida.
4. Confirme que la conexión no esté mal
enroscada y que esté apretada.
5. Realice otra comprobación de pérdidas.
Si todavía hay una pérdida, desconecte
el cilindro y comuníquese con Coleman
para solicitar mantenimiento o reparación.
Fig. 9
31
Page 33

Uso y operación
PRESSE
Limpie este producto antes de usarlo por primera vez (consulte “INSTRUCCIONES DE LIMPIEZA” en la siguiente página). Recomendamos enfáticamente que
limpie el calentador antes de utilizarlo por primera vez. Siga estos pasos simples antes de salir de su casa y luego límpielo al menos una vez por año o cuando
la manguera se decolore con una acumulación de calcio blanco.
PRECAUCIÓN: las piezas accesibles pueden alcanzar temperaturas muy altas. Mantenga a los niños alejados; SOLO USE EN EXTERIORES. Este producto
solo se debe operar apoyado en una superficie horizontal. No apto para ambientes náuticos. No modifique este aparato. Recomendamos que una persona
autorizada realice un mantenimiento anual. O, si observa alguna de las siguientes situaciones: encendido incompleto; puntas amarillas evidentes; carbono
sedimentado, precipitado o flotando; retroceso de la llama u olor inaceptable. NO USE este aparato si tiene los sellos dañados o desgastados. NO USE este
aparato si tiene pérdidas, está dañado o no funciona correctamente. Para comprobar si el cilindro de gas está vacío, desconecte el cilindro del aparato y
agítelo de un lado a otro. Si no hay sonido o movimiento de líquido en el interior, el cilindro está vacío.
ENCENDIDO DEL CALENTADOR
El calentador de agua no se debe exponer a vapores o líquidos inflamables durante el encendido. Antes de encender el calentador, asegúrese de que el
suministro de agua esté listo, las conexiones de la ducha y la bomba estén instaladas, el cilindro de gas esté instalado y la pila recargable no esté descargada
(para comprobar el estado de la pila, consulte la sección “Diagrama de indicadores” o “Carga de la pila”).
• Encendido electrónico
1. Encienda el interruptor de energía principal.
(disponible únicamente en el modelo 2302-A).
2. Para encender el sistema eléctrico lleve el botón de encendido ubicado en la
pantalla a la posición “ON” (encendido). Una vez encendido:
MODELO2302-A - Se ilumina el indicador de la pila y se muestra la temperatura
ambiente actual.
MODELO2302-B - Una luz verde intermitente en la pantalla indica que el sistema
eléctrico recibe alimentación.
IMPORTANTE: Cuando está encendida, la bomba comienza a funcionar
y el agua comienza a fluir antes de que se encienda el calentador. Para
ahorrar agua, familiarícese con todas las instrucciones de operación antes
de encender el aparato.
3. Presione y gire la perilla de mando en el sentido contrario a las agujas del reloj, hasta la posición de encendido “ PILOT” (piloto).
4. Mantenga presionada (7~10segundos) la perilla de mando para comenzar la secuencia de encendido electrónico; escuchará el chasquido.
5. Mientras presiona la perilla de mando, consulte el indicador en la pantalla para comprobar si la luz del piloto está encendida (consulte la sección
“Diagrama de indicadores”).
NOTA: El encendido demora más tiempo la primera vez que utiliza el aparato debido a que el gas debe fluir y llenar la tubería de gas.
6. Cuando la luz del piloto está iluminada, gire la perilla de mando en el sentido contrario a las agujas del reloj hasta una posición entre “MAX” y “MIN”
según la temperatura deseada para el agua.
NOTA: En la posición “MAX”, el calentador puede aumentar la temperatura del agua aproximadamente 30°C (si la temperatura de la fuente de agua es
59°F, el calentador aumentará la temperatura del agua a 113°F). Si el encendido electrónico no enciende la luz del piloto, consulte la sección “Encendido
con fósforos” o “Resolución de problemas”, más abajo.
ON
PRESSE
PRESSE
varía según el modelo
• Encendido con fósforos
1. Lleve el botón de encendido a la posición “ON” (encendido).
2. Presione y gire la perilla de mando en el sentido contrario a las agujas del reloj, hasta la
posición de encendido “
PILOT ” (piloto).
3. Introduzca un fósforo largo de madera encendido por la mirilla de la llama para
colocarlo cerca del quemador y luego mantenga presionada la perilla de mando hasta
encender el piloto (consulte el indicador en la pantalla). Si no tiene un fósforo de largo
alcance, utilice la extensión para fósforos (consulte la sección “Descripción general del
PRESSE
sistema”) para sostener un fósforo encendido e introducir el fósforo por la mirilla.
4. Gire la perilla de mando en el sentido contrario a las agujas del reloj hasta una posición
entre “MAX” y “MIN” según la temperatura deseada para el agua.
NOTA: Es normal sentir un ligero cambio en el caudal y la temperatura del agua al mover el adaptador de tipo de lluvia de la ducha de una altura superior a
una inferior. El calentador apagará el quemador automáticamente cuando la temperatura del agua exceda 125°F (52°C). En caso de sobrecalentamiento o si
la alimentación de gas no se desconecta, cierre la perilla de mando manualmente.
32
PRESSE
Page 34

Uso y operación (continuación)
APAGADO DEL CALENTADOR
1. Gire la perilla de mando en el sentido de las agujas del reloj hasta la posición “OFF” (Apagado).
2. Lleve el botón de encendido a la posición “OFF” (apagado) en la pantalla.
3. Encienda el interruptor de energía principal. (disponible únicamente en el modelo 2302-A).
IMPORTANTE: El usuario no debe cambiar el orden de la secuencia de la operación de apagado.
Siempre gire en primer lugar la perilla de mando hasta la posición “OFF” (apagado) para apagar el
quemador y cerrar la alimentación de gas y después, lleve el botón de encendido a la posición “OFF”.
INTERRUPCIÓN TEMPORAL DEL QUEMADOR
Por razones de seguridad, no hay un interruptor para interrumpir el caudal mientras se ducha. Solo se puede apagar el quemador principal girando la perilla de
mando en el sentido de las agujas del reloj hasta la posición de encendido “PILOT” (piloto) para ahorrar gas; la luz del piloto permanece iluminada, la bomba
sigue funcionando y el agua sigue fluyendo. Para reanudar el calentamiento del agua, lleve la perilla de mando en el sentido contrario a las agujas del reloj
hasta una posición entre “MAX” y “MIN”.
O bien, puede apagar completamente el calentador siguiendo los pasos de la sección de más arriba, “Apagado del calentador”, y luego, reiniciar todo el
proceso de encendido que se describe en la sección “Encendido del calentador”.
INSTRUCCIONES DE LIMPIEZA
1. En un recipiente limpio, mezcle dos galones (7.5litros) de agua con 12onzas (340g) de desincrustante (disponible en la sección de limpiadores de
ferreterías y tiendas de mercadería general y alimentos).
2. Coloque la bomba y la ducha en el recipiente con esta solución. La etiqueta “Este lado hacia arriba” en la bomba debe quedar orientada hacia arriba.
3. Encienda el calentador según las instrucciones en la sección
Ciclo de solución con agua
“Encendido del calentador” y gire la perilla de mando a una
posición “tibia”.
4. Haga circular la solución por el calentador durante 2minutos,
luego gire la perilla en el sentido de las agujas del reloj hasta
la posición “OFF” para apagar el calentador y lleve el botón de
encendido a la posición “OFF” en la pantalla.
5. Deseche la solución de limpieza en un fregadero u otro desagüe;
no lo vierta en el suelo.
6. Llene el recipiente con 2.4galones (9litros) de agua limpia.
Ciclo de limpieza con agua
7. Coloque la bomba y la ducha en el recipiente con el agua.
8. Encienda el calentador y haga circular el agua limpia por el
calentador de agua durante 2minutos en la posición “fresca” y
apague el calentador.
9. Apague el calentador.
10. Cambie el agua de nuevo y repita los pasos 6-9.
11. Limpie el filtro en la entrada de agua de la bomba para quitar los residuos que podrían obstruir la bomba. Consulte las instrucciones en la sección
“Mantenimiento” de la página34.
OFF
ENCENDIDO
ENCENDIDO
TIBIA
APAGADO
PRESSE
FRESCA
APAGADO
PRESSE
CARGA DE DISPOSITIVOS COMPATIBLES CON USB (solo disponible para el modelo 2302-A)
Puede cargar 2teléfonos celulares simultáneamente si los conecta a los puertos USB del calentador. La
capacidad de la pila recargable del calentador es 2000mAh, que permite cargar un ciclo completo de
un teléfono celular de 1570mAh (iPhone5s).
IMPORTANTE: Los puertos USB solo funcionan cuando el interruptor de energía principal está
encendido. No conecte dispositivos a los puertos USB cuando el calentador esté en uso o si
todavía está caliente al tacto. No conecte dispositivos a los puertos USB del calentador si está
iluminada la indicación “LOW BATTERY” (pila descargada) en la pantalla (consulte la sección
“Gráfico de indicadores”). No cargue dispositivos con pilas cuya capacidad exceda 1700mAh.
CAMBIO DE LA INDICACIÓN DE
TEMPERATURA
(solo disponible para el modelo 2302-A)
La temperatura actual del agua se muestra
en la pantalla; para recorrer el ciclo de
grados centígrados y Fahrenheit, presione
varias veces el botón
en la pantalla.
CAMBIO DEL TIPO DE LLUVIA DE LA DUCHA
(solo disponible para el modelo 2302-A)
La ducha tiene los tipos de lluvia siguientes: aireada,
completa y fina. Para cambiar el tipo de lluvia solo
tiene que girar el dial en el cabezal de la ducha.
Puede cerrar el paso de agua con solo girar el dial
en el cabezal de la ducha y llevarlo a la posición
“OFF”.
NOTA: Cuando el calentador se enciende, al girar el dial en el cabezal de la ducha
a la posición “OFF” se iluminará la advertencia de poco caudal de agua y la unidad
se apagará. Asegúrese de que el cabezal de la ducha esté abierto antes de
reiniciar el aparato.
33
Page 35

Sugerencias útiles
•En la parte posterior de la ducha encontrará una correa con material de contacto que puede usar para sujetar la ducha a un objeto en lo alto (solo disponible
para el modelo 2302-A).
•Si no pretende utilizar el calentador de agua durante un largo período (3 días o más), se recomienda enfáticamente apagar el interruptor de energía principal.
Esto prolongará la carga de la pila (corresponde únicamente al modelo 2302-A).
•Nunca coloque la ducha a 6.5 pies (2 metros) de distancia por encima del calentador ya que, si lo hace, el caudal podría caer al nivel de advertencia y activar
el mecanismo de apagado.
•Nunca retuerza o curve las mangueras por las que pasa el agua ya que reducirá el caudal y se activará el mecanismo de apagado.
•Por lo general, el aparato calentará 40 galones (151 litros) de agua tibia o caliente con una carga completa de la pila y un cilindro de propano de 16,4 onzas
(464 g). Asegúrese de contar con suficiente combustible para la duración de su salida.
•Debido a los dispositivos de apagado mecánicos y eléctricos integrados de sobretemperatura, el quemador se apagará inmediatamente después de que
la temperatura en la salida de agua del calentador sea de 122 °F. Mientras tanto, la bomba continuará funcionando durante 30 segundos para enfriar el
calentador.
•El calentador de agua es ideal para muchas tareas de limpieza en exteriores. Coleman apoya los principios de No dejar rastros, que alientan el efecto mínimo
sobre el medio ambiente en los campamentos. Se dará cuenta de que necesita menos jabón que con agua fresca o fría si usa agua caliente, así que use
pequeñas cantidades de jabón biodegradable. Deseche el agua residual con responsabilidad. Báñese o lave la vajilla a 200 pies (61 metros) de distancia de
arroyos o lagos para evitar que el jabón escurrido encuentre el paso a una fuente natural de agua. Consulte en el campamento o parque para conocer su
política específica para aguas residuales.
•La operación continua del calentador de agua en la posición tibia por 20 minutos puede causar el congelamiento del cilindro de propano. Deje que el cilindro
se descongele o reemplácelo por un nuevo cilindro de propano.
Almacenamiento
•Separe el cilindro de propano del calentador después de usarlo y antes de transportarlo o de guardar el calentador. Siempre guarde el propano en exteriores.
•Vacíe el agua de las mangueras y la unidad antes de guardarlas: Desconecte las mangueras e incline el producto hacia el lado de conexión de la manguera.
Mueva la unidad de izquierda a derecha mientras la inclina, hasta que deje de drenar agua.
•Recargue la pila antes de guardar el aparato. Encienda el interruptor de energía principal (corresponde únicamente al modelo 2302-A).
•Para guardar el aparato por un período prolongado, limpie y seque el calentador y guárdelo en interiores, en un lugar limpio y seco.
•La caja de transporte de Coleman es ideal para guardar y transportar este aparato.
Mantenimiento
Este aparato solo debe recibir el servicio de mantenimiento de personas
autorizadas.
• Limpie el paso de agua al menos una vez por año o siempre que aparezca
una acumulación blanca en la manguera. Consulte “Instrucciones de
limpieza” en la página 33 de este manual.
• Cargue la pila inmediatamente después de cada salida para lograr su
rendimiento óptimo.
• Limpieza de la superficie exterior del calentador - Solo limpie la superficie
de la unidad cuando esté apagada y fría al tacto y después de haber quitado
el cilindro de gas. Limpie las superficies con un paño suave humedecido en
una solución de detergente para lavar la vajilla. Nunca use abrasivos.
• Reemplazo de la pila (consulte las ilustraciones a la derecha) - Solo use
pilas de repuesto Coleman
®
2000027851 (pila de iones de litio de 12voltios
y 2000mAh).
1. Retire el tornillo de la cubierta para la pila en el lado derecho del
calentador de agua y separe la cubierta.
2. Retire la pila del compartimento de almacenamiento llevándola hacia
arriba y desenchufe los conectores.
3. Vuelva a colocar la pila y enchufe los conectores asegurándose de
que los pasadores circular y rectangular en el conector macho estén
correctamente alineados con los orificios circular y rectangular del
conector hembra. Puede solicitar pilas de repuesto a Coleman.
• Reemplazo del fusible (consulte las ilustraciones a la derecha) - Solo use
fusibles de repuesto Coleman
®
2000027844 (corriente nominal: 5A). Retire
el tornillo del receptáculo para el fusible ubicado directamente sobre el
compartimento para la pila, deseche el fusible defectuoso y coloque un
fusible nuevo.
• Limpieza de la pantalla de la bomba (consulte las ilustraciones a la
derecha)
1. Sujete la boquilla en el extremo de la bomba y gírela en el sentido
contrario a las agujas del reloj para desenroscarla.
2. Separe la boquilla y la tapa del aro.
3. Utilice el dedo para presionar la pantalla y separarla de la boquilla para
limpiarla.
4. Luego, invierta el orden de los pasos para instalar las piezas de nuevo.
• Comprobación de la llama (consulte las ilustraciones a la derecha) - Para comprobar la llama, observe por la mirilla de la llama en el panel frontal del
aparato. Una llama correcta debería ser de color azul con la punta amarilla. Algunas puntas amarillas en llamas de hasta 1pulgada de longitud son
34
aceptables, siempre que no aparezcan depósitos de carbono u hollín.
Reemplazo de la pila
Reemplazo del fusible
Comprobación de la llama
Armarillo
Azul
Orificios en el
Quemador
MalBien
Armarillo
Azul
Limpieza de la pantalla de
la bomba
Aro tórico de
sellado
Page 36

Diagrama de indicadores
Luz continua luz intermitente
Modelo 2302-B
Explicación
La pila se está cargando
La pila está
completamente cargada
El sistema eléctrico está
encendido
La luz del piloto está
encendida
Advertencia de agua
caliente (cámara)
Advertencia de agua
caliente (salida de agua)
Advertencia de inclinación
Advertencia de llama
apagada
Advertencia de pila
descargada
Advertencia de poco
caudal
Pantalla de
indicadores
/ /
(Rojo / Amarillo / Verde)
/ /
(Rojo / Amarillo / Verde)
Activación Respuesta del sistema Medida correctiva
La temperatura del agua
en el intercambiador de
calor excede 131°F.
La temperatura del agua
en la salida de agua
excede 122°F.
El calentador tiene una
inclinación de más de
30grados.
Llama o luz del piloto
apagada
La tensión de la pila
interna es inferior a 9,8V.
Circula un caudal de
menos de 0.4galones
(1.5litros) de agua por
minuto.
El gas se desconectará inmediatamente. La
bomba se desconectará en 30segundos.
El gas se desconectará inmediatamente. La
bomba se desconectará en 30segundos.
El gas y la bomba se desconectarán
inmediatamente.
El gas y la bomba se desconectarán
inmediatamente.
El gas y la bomba se desconectarán
inmediatamente.
Transcurridos 2segundos desde la primera
advertencia, el sistema detectará el caudal de
nuevo; si el caudal todavía es inferior al nivel
especificado, se desconectarán el gas y la bomba.
Lleve la perilla de mando y el botón de encendido
a la posición “OFF” (apagado). Consulte la sección
“Resolución de problemas”, corrija el inconveniente
y luego, reinicie la secuencia de encendido.
Lleve la perilla de mando y el botón de encendido
a la posición “OFF” (apagado). Consulte la sección
“Resolución de problemas”, corrija el inconveniente
y luego, reinicie la secuencia de encendido.
Lleve la perilla de mando y el botón de encendido
a la posición “OFF” (apagado). Consulte la sección
“Resolución de problemas”, corrija el inconveniente
y luego, reinicie la secuencia de encendido.
Lleve la perilla de mando y el botón de encendido
a la posición “OFF” (apagado). Consulte la sección
“Resolución de problemas”, corrija el inconveniente
y luego, reinicie la secuencia de encendido.
Lleve la perilla de mando y el botón de encendido
a la posición “OFF” (apagado). Consulte la sección
“Resolución de problemas”, corrija el inconveniente
y luego, reinicie la secuencia de encendido.
Lleve la perilla de mando y el botón de encendido
a la posición “OFF” (apagado). Consulte la sección
“Resolución de problemas”, corrija el inconveniente
y luego, reinicie la secuencia de encendido.
Explicación
La pila se está cargando
La pila está completamente
cargada
La luz del piloto está encendida
El agua está en movimiento
Advertencia de agua caliente
(cámara)
Advertencia de agua caliente
(salida de agua)
Advertencia de inclinación
Advertencia de llama apagada
Advertencia de pila descargada
Advertencia de poco caudal
Pantalla de
indicadores
(animado)
Modelo 2302-A
Activación Respuesta del sistema Medida correctiva
La temperatura del agua en
el intercambiador de calor
excede 131°F.
La temperatura del agua en la
salida de agua excede 122°F.
El calentador tiene una
inclinación de más de
30grados.
Llama o luz del piloto
apagada
La tensión de la pila interna
es inferior a 9,8V.
Circula un caudal de menos
de 0.4galones (1.5litros) de
agua por minuto.
El gas se desconectará
inmediatamente. La bomba se
desconectará en 30segundos.
El gas se desconectará
inmediatamente. La bomba se
desconectará en 30segundos.
El gas y la bomba se
desconectarán inmediatamente.
El gas y la bomba se
desconectarán inmediatamente.
El gas y la bomba se
desconectarán inmediatamente.
Gas y la bomba se apagarán 2
segundos más tarde
Lleve la perilla de mando y el botón de encendido
a la posición “OFF” (apagado). Consulte la sección
“Resolución de problemas”, corrija el inconveniente
y luego, reinicie la secuencia de encendido.
Lleve la perilla de mando y el botón de encendido
a la posición “OFF” (apagado). Consulte la sección
“Resolución de problemas”, corrija el inconveniente
y luego, reinicie la secuencia de encendido.
Lleve la perilla de mando y el botón de encendido
a la posición “OFF” (apagado). Consulte la sección
“Resolución de problemas”, corrija el inconveniente
y luego, reinicie la secuencia de encendido.
Lleve la perilla de mando y el botón de encendido
a la posición “OFF” (apagado). Consulte la sección
“Resolución de problemas”, corrija el inconveniente
y luego, reinicie la secuencia de encendido.
Lleve la perilla de mando y el botón de encendido
a la posición “OFF” (apagado). Consulte la sección
“Resolución de problemas”, corrija el inconveniente
y luego, reinicie la secuencia de encendido.
Lleve la perilla de mando y el botón de encendido
a la posición “OFF” (apagado). Consulte la sección
“Resolución de problemas”, corrija el inconveniente
y luego, reinicie la secuencia de encendido.
35
Page 37

Guide de dépannage
Síntoma Causa posible Solución
El tanque o bidón tiene poca agua Llene el tanque o bidón con agua.
Advertencia de agua
caliente
Advertencia de inclinación
Advertencia de llama
apagada
Advertencia de pila
descargada
Advertencia de poco
caudal
El quemador no se
enciende
Pérdida de agua
La manguera se vuelve
blanca o se decolora su
interior
La pila no retiene la carga
No hay indicaciones en la
pantalla
La temperatura ambiente es alta Gire la perilla de mando a una posición más fría.
El detector de temperatura es defectuoso Comuníquese con Coleman si el producto está bajo garantía.
El calentador está inclinado más de 30grados. El gas y la bomba se desconectarán inmediatamente.
El detector es defectuoso Comuníquese con Coleman si el producto está bajo garantía.
El viento apagó las llamas; la luz del piloto está
apagada
El módulo de detección de llama es defectuoso Comuníquese con Coleman si el producto está bajo garantía.
La tensión de la batería es de menos de 9,8V. Recargue la pila.
La batería es defectuosa Comuníquese con el Centro de servicio de Coleman y reemplace la pila recargable.
La bomba no está en la posición correcta Gire la bomba para que “ESTE LADO HACIA ARRIBA” quede orientado hacia arriba.
El tanque o bidón no tiene agua Llene el tanque o bidón con agua.
El filtro de entrada de la bomba está obstruido Limpie la pantalla; consulte las instrucciones en la sección “Mantenimiento”.
La manguera está plegada o retorcida Enderece la manguera.
El cable de la pila está desconectado Retire la tapa de la pila e instale el cable de nuevo.
El cable de alimentación de la bomba está
desconectado
La pila está descargada Recargue la pila.
El detector de caudal es defectuoso Comuníquese con Coleman si el producto está bajo garantía.
El cilindro de propano está vacío Reemplace el cilindro.
El cilindro de propano está congelado Reemplace el cilindro y utilícelo de nuevo después de descongelarlo.
El fusible es defectuoso Consulte la sección “Mantenimiento” y reemplace el fusible.
El circuito electrónico es defectuoso Comuníquese con Coleman si el producto está bajo garantía.
Los conectores están mal enroscados;
Los conectores con funda no están bloqueados
El sello es defectuoso o se rompió
Hay calcio acumulado Limpie el calentador (consulte la sección “Instrucciones de limpieza” en la página33)
Pile défectueuse Comuníquese con Coleman si el producto está bajo garantía.
L'interrupteur d'alimentation principale n'a pas
été manœuvré
El cable de la pila está desconectado Retire la cubierta de la pila e instale de nuevo el cable
El fusible es defectuoso Consulte la sección “Mantenimiento” y reemplace el fusible.
El circuito electrónico es defectuoso Comuníquese con Coleman si el producto está bajo garantía.
La batería está descargada Recargue la pila.
Interrupteur d'alimentation principale à la position
«OFF» (désactivé) (modèle 2302-A seulement)
No utilice si el viento es muy fuerte. Apague completamente el calentador y reinicie la secuencia
de encendido.
Enchufe el cable de alimentación en el receptáculo de alimentación de la bomba.
Enchufe de nuevo los conectores.
Lea las instrucciones para enchufar conectores con funda y enchufe de nuevo los conectores.
Reemplace los componentes de sellado (aros tóricos) o envíe el producto a Coleman cuando sea
necesario
Se reporter à la section Astuces utiles pour savoir comment utiliser l'interrupteur d'alimentation
principale
Mettre l'interrupteur d'alimentation principale en position de marche
Características técnicas
Presión: 2,8 kPa
Tamaño del inyector: 0,026pulgadas (0,66 mm)
Consumo total de gas: 21,0 MJ/h
Tipo de gas: Gas licuado de propano
Repuestos
Lista de repuestos
1. 2000027853 Ducha
2. 2000027851 Pila de iones de litio
3. 2000027849 Conjunto de la bomba
4. 2000027850 Adaptador de 120V
5. 2000027848 Adaptador de 12V
6. 2000027847 Bidón de agua
7. 2000027845 Brazo de la ducha
8. 2000027844 Fusible
9. 2000027842 Bolsa del conjunto de la ducha
10. 2000027937 Manguera para la ducha
36
- Comuníquese con Coleman -
www.coleman.com | 1-800-835-3278 | TDD 316-832-8707
Page 38

Diagrama de circuito
PRECAUCIÓN: Etiquete todos los cables antes de desconectarlos cuando realice el mantenimiento de los mandos. Los errores en el cableado pueden
causar la operación incorrecta y peligrosa. Verifique la operación correcta del producto después de realizarle el mantenimiento. Esta conexión es para pilas
de baja tensión o solo para corriente continua. No conectar a entradas de CA de 120 o 240voltios.
MODELO 2302-A
Pila
recargable
Interruptor de energía principal
PASS
Parte
exterior del
aparato
Encendido de impulso
L
N
Cargador de
pilas
Fusible
Interruptor de
encendido
2
Válvula
de gas
Termopar
2
2
2
Módulo de fuente de
alimentación PH01
Parte exterior del aparato
2
2
Bomba
de agua
7
Módulo
USB
7
Circuito de
protección por
inclinación
Pantalla PH01
2
2
Circuito de
protección por
sobrecalentamiento
Detector de caudal de agua
3
2
Detector de temperatura
en la salida de agua
Pila
recargable
Interruptor de energía principal
PASS
Parte
exterior del
aparato
Encendido de impulso
L
N
Cargador de
pilas
Fusible
Interruptor de
encendido
2
Válvula
de gas
Termopar
MODEL 2302-B
2
Módulo de fuente de
alimentación PH01
2
3
2
2
2
2
2
2
Parte exterior del aparato
2
2
Circuito de
protección por
inclinación
Circuito de
protección por
sobrecalentamiento
Bomba
de agua
Indicador luminoso amarillo
Indicador luminoso verde
Indicador luminoso rojo
interruptor de alimentación
Detector de caudal de agua
Detector de temperatura
en la salida de agua
37
Page 39

Garantia
Garantía Limitada de Tres Años
The Coleman Company, Inc. (“Coleman”) garantiza que por un periodo de tres (3) años a partir de la fecha original de compra, este producto estará libre de
defectos en material y construccion. Coleman, a su discreción, reparará o reemplazará este producto o cualquier componente del producto que esté defectuoso durante el periodo de la garantía. Cualquier reemplazo será hecho con un producto o componente nuevo o refabricado. Si el producto no se encuentra
disponible, el reemplazo se podrá hacer con un producto similar de igual o mayor valor. Esta es su garantía exclusiva.
Esta garantía es válida para el comprador original desde la fecha de la compra inicial y no es transferible. Guarde su recibo de compra. Prueba de recibo de
compra es requerido para obtener ejecución de la garantía. Los comerciantes de Coleman, centros de servicio o las tiendas al por menor que venden articles
Coleman® no tienen el derecho de alterar, modificar o cambiar de ninguna otra manera los términos y condiciones de esta garantía.
Lo Que Esta Garantia No Cubre
Esta garantía no cubre el desgaste normal de las piezas, piezas que no sean genuinas de Coleman® ni daño resultante por las siguientes causas; uso negligente o uso incorrecto del producto; uso comercial de este producto, uso contrario a las instrucciones de operación, desmontaje, reparación o alteración
por cualquiera que no sea Coleman o un centro de servicio autorizado. Además, la garantía no cubre Fuerzas Naturales tales como son fuego, inundaciones,
huracanes y tornados. La garantía no es valida si el daño al producto es un resultado del uso de piezas que no sean piezas genuinas Coleman®.
COLEMAN NO SERA PESPONSABLE POR DEFECTOS CAUSADOS POR EL USO DE PIEZAS O SERVICIO NO AUTORIZADO. COLEMAN NO SERÁ
RESPONSABLE POR NINGÚN DA—O INCIDENTAL O CONSIGUIENTE OCASIONADO POR LA VIOLACIÓN DE CUALQUIER GARANTÍA O CONDICIÓN
IMPLICADA O EXPRESADA. CON EXCEPCIÓN AL LIMITE DE LO QUE PROVEE LA LEY APLICABLE, CUALQUIER GARANTÍA IMPLICADA DE COMERCIO
O ADAPTACIÓN PARA UN USO EN PARTICULAR ES LIMITADA EN SU DURACIÓN A LA DURACIÓN DE LA GARANTÍA ARRIBA MENCIONADA.
ALGUNOS ESTADOS, PROVINCIAS O JURISDICCIONES NO PERMITEN LA EXCLUSIÓN O LIMITACIÓN DE DA—OS INCIDENTALES O CONSIGUIENTES
O LIMITACIONES REFERENTE A CUÁNTO UNA GARANTÍA LIMITADA DEBE DURAR, POR LO TANTO LAS LIMITACIONES O EXCLUSIONES ARRIBA
MENCIONADAS PUEDE QUE NO SEAN APLICABLES A USTED. ESTA GARANTÍA LE PROVEE DERECHOS LEGALES EXPECÍFICOS, Y ADEMÁS PUEDE QUE
USTED TENGA OTROS DERECHOS QUE VARÍAN DE ESTADO A ESTADO O DE PROVINCIA A PROVINCIA.
Como Obtener Servicio de Garantía
Su producto debe estar en garantía para obtener servicio de garantía. Si su producto presenta defectos y está dentro del período de garantía, comuníquese
con nosotros al 1-800-835-3278 (TDD 1-316-832-8707) para recibir una autorización de devolución. No devuelva el producto a Coleman sin autorización. Se le
indicará colocar una etiqueta en el producto con su nombre, dirección, número de teléfono diurno y una descripción del problema. Incluya una copia del recibo original de compra. Empaque cuidadosamente el producto y envíelo asegurado por UPS, FedEx Ground o Servicio de paquetes postales con el envío y el
seguro prepagados a:
Para productos comprados en los Estados Unidos:
The Coleman Company, Inc.
3600 North Hydraulic Wichita, KS 67219
U.S.A.
El costo del transporte del producto a Coleman para el servicio de garantía es responsabilidad del comprador. No envíe productos con combustible en los tanques, o con cilindros de propano desechables. NO DEVUELVA ESTE PRODUCTO AL LUGAR DONDE LO COMPRO. Si usted tiene alguna pregunta sobre esta
garantia favor de llamar al 1-800-835-3278 o al TDD 1-316-832-8707 en los Estados Unidos o al 1-800-387-6161 en Canadá.
Para productos comprados en Canada:
Sunbeam Corporation (Canada) Limited
DBA Jarden Consumer Solutions
20B Hereford Street
Brampton, ON L6Y 0M1
38
Page 40

NOTE / REMARQUE / NOTA
39
Page 41

The Coleman Company, Inc.
3600 North Hydraulic
Wichita, KS 67219 U.S.A.
1-800-835-3278 TDD: 1-316-832-8707
www.coleman.com.
© 2015 The Coleman Company, Inc. All Rights reserved.
© 2015 The Coleman Company, Inc. Tous droits réservés.
© 2015 The Coleman Company, Inc. Todos los derechos reservados.
®
Coleman
HOT WATER ON DEMAND™ is a trademark of The Coleman Company, Inc.
Coleman
HOT WATER ON DEMAND™ est une marques de commerce de The Coleman Company, Inc.
Coleman
HOT WATER ON DEMAND™ es una marca de la compañía The Coleman Company, Inc.
, and are registered trademarks and
®
, and sont des marques déposées, alors que
®
, and son marcas registradas y
40
4010047124 (ECN20054446-02)
 Loading...