

Page 1

COLDTUB™
Owners Manual
Page 2

READ AND
FOLLOW ALL
INSTRUCTIONS
It is important to inform
occasional users of the tub
about the
DANGERS,
WARNINGS,
&
CAUTIONS
listed in this manual before
they use the tub.
Congratulations!
Your choice of a COLDTUB™ indicates that you are devoted to excellence. The management and
staff appreciate your patronage. At COLDTUB™ we believe a good foundation is required to build a
superior product, both in design and philosophy. Built in the U.S.A. with the nest materials and advanced technology, COLDTUB™s are made to perform. To safely and effectively make use of your
tub, we recommend that you take the time to read this manual before you hook-up and operate the
tub. This guide will acquaint you with operating features, hook-up, maintenance and safety procedures, ensuring an enjoyable experience right from the start.
IF YOU REQUIRE ADDITIONAL INFORMATION, PLEASE CONTACT COLDTUB™
TECH SUPPORT.
In most cities and counties, permits will be required for the installation of electrical circuits or the
construction of exterior surfaces (decks and gazebos). In addition, some communities have adopted residential barrier codes which may require fencing and/or self-closing gates on the property to
TM
prevent unsupervised access to a pool or tub by children under 5 years of age. Your COLDTUB
equipped with a locking cover that meets the ASTM F1346-91 Standard for Safety Covers and as a
result, is usually exempt from most barrier requirements. As a general practice, your local Building
Department will inform you of any applicable barrier requirements at the time a permit is obtained
for the installation of an electrical circuit. Your COLDTUB™ Dealer can provide information on
which permits may be required.
is
Table of Contents
CAUTION!
Indicates a situation in
which damage to equip-
ment or
material may occur.
DANGER!
Indicates risk of injury.
WARNING!
Indicates information of
critical importance.
IMPORTANT!
Indicates information of
necessary importance.
1.1 Important Safety Instructions 1
1.2 Warnings 2
1.3 Tub Specications 3
1.4 Hypothermia 3
1.5 Installation Instructions 4
1.6 Equipment Compartment & Wiring Diagram 5
1.7 Electrical Installation Instructions 5
1.8 Startup Procedures 6
1.9 Water Maintenance Quick Reference Card 7
1.10 Venturi 11
1.11 Topside Control Panel 11
1.12 Care and Maintenance 12
1.13 Manual Safety Cover 15
1.14 Water Maintenance 16
1.15 Basic Chemical Safety 17
1.16 Quick Reference Guide 19
1.17 Troubleshooting Tub Problems 22
1.18 WiFi Quick Reference Guide 24
Page 3

WWW.COLDTUB.COM
IMPORTANT!
This manual was
written to ensure
the proper use
and installation of
any COLDTUB™.
Any
modications to
the procedures
outlined may
result in your
warranty being
voided.
Please read
this manual to
avoid any
unnecessary
damage to your
tub and
equipment.
1
1.1 Important Safety Instructions
READ AND FOLLOW ALL INSTRUCTIONS CAREFULLY
When installing and using this electrical equipment, basic safety precautions should always be
followed, including:
1) WARNING: To reduce the risk of injury, do not permit children to use this product unless they
are closely supervised at all times.
2) DANGER: Risk of accidental drowning. Extreme caution must be exercised to prevent
unauthorized access by children. To avoid accidents, ensure that children cannot use this
product unless they are supervised at all times.
3) DANGER: Risk of Injury. The suction ttings in this tub are sized to match the specic water
ow created by the pump. Should the need arise to replace the suction ttings or the pump, be
sure that the ow rates are compatible. Never operate the tub if the suction ttings are broken
or missing. Consult your local dealer for assistance in choosing an appropriate replacement
suction tting.
4) DANGER: Risk of electric shock. Install at least 1.5 meters (5 feet), from all metal surfaces.
As an alternative, a tub may be installed within 1.5 meters (5 feet) of metal surfaces if each
metal surface is permanently connected (bonded) by a minimum No. 8 AWG solid (USA) No. 6
AWG stranded (Canada) copper conductor attached to the wire connector on the grounding lug,
inside the equipment compartment on the equipment box.
5) DANGER: Risk of Electric Shock. Do not permit any electrical appliance, such as a light,
telephone, radio, television, etc. within 1.5 meters (5 feet) of a tub.
6) ELECTRICAL SUPPLY: The electrical supply for this product must include a suitable circuit
breaker to open all ungrounded supply conductors. The disconnect must be readily accessible
and visible to the tub occupant but installed at least 1.5 meters (5 feet), from the tub water.
7) WARNING To Reduce the Risk of Injury:
a) Before entering the tub, the user should measure the water temperature with an accurate
thermometer since the tolerance of water temperature regulating devices may vary as much as
+/-2°C (5°F).
b) The use of alcohol, drugs, or medication before or during cold tub use may lead to unconsciousness with the possibility of drowning.
c) Persons suffering from obesity or a medical history of heart disease, low or high blood
pressure, circulatory system problems, or diabetes should consult a physician before using a
COLDTUB™
d) Persons using medication should consult a physician before using a cold tub since some
medication may induce drowsiness, while other medication may affect heart rate, blood pressure and circulation.
8) A bonding lug bar is provided on the side of your tub control pack to accommodate ground-
ing of entire tub. To reduce the risk of electric shock, connect the local common bonding grid
in the area of the cold tub to these terminals with an insulated or bare copper conductor not
smaller than 8.4 millimeter2.
9) All eld-installed metal components such as rails, ladders, drains or other similar hardware
within 3 meters of the tub shall be bonded to the equipment grounding buss with copper con-
ductors not smaller than 8.4 millimeter2.
10) Use the tub straps and clip tie downs to secure the cover when not in use. This will help
to discourage unsupervised children from entering the tub. There is no representation that the
cover, clip tie downs, or actual locks will prevent access to the cold tub.
11) Save these instructions
Page 4

Winning is cool™
2
1.1 Important Safety Information
WARNING: THIS APPLIANCE IS NOT INTENDED FOR USE BY PERSONS (INCLUDING
CHILDREN) WITH REDUCED PHYSICAL, SENSORY OR MENTAL CAPABILITIES, OR LACK
OF EXPERIENCE AND KNOWLEDGE, UNLESS THEY HAVE BEEN GIVEN SUPERVISION OR
INSTRUCTION CONCERNING USE OF THE APPLIANCE BY A PERSON RESPONSIBLE FOR
THEIR SAFETY.
WARNING: CHILDREN SHOULD BE SUPERVISED TO ENSURE THAT THEY DO NOT PLAY
WITH THE APPLIANCE.
WARNING: CLEANING AND USER MAINTENANCE SHALL NOT BE MADE BY CHILDREN
WITHOUT SUPERVISION.
(Continued)
1.2 Warnings
WARNING: CHILDREN SHOULD NOT USE TUB.
WARNING: DO NOT USE TUB UNLESS ALL SUCTION GUARDS ARE INSTALLED TO PREVENT
BODY AND HAIR ENTRAPMENT.
WARNING: PEOPLE WITH INFECTIOUS DISEASES SHOULD NOT USE TUB.
WARNING: TO AVOID INJURY, EXERCISE CARE WHEN ENTERING OR EXITING THE TUB.
WARNING: DO NOT USE DRUGS OR ALCOHOL BEFORE OR DURING THE USE OF TUB TO
AVOID UNCONSCIOUSNESS AND POSSIBLE DROWNING.
WARNING: PREGNANT OR POSSIBLY PREGNANT WOMEN SHOULD CONSULT A PHYSICIAN
BEFORE USING TUB.
WARNING: WATER TEMPERATURE IN EXCESS OF 38°C (100ºF) MAY BE INJURIOUS TO YOUR
HEALTH.
WARNING: BEFORE ENTERING THE TUB, MEASURE THE WATER TEMPERATURE WITH AN
ACCURATE THERMOMETER.
WARNING: PROLONGED IMMERSION IN TUB MAY BE INJURIOUS TO YOUR HEALTH.
WARNING: DO NOT PERMIT ELECTRIC APPLIANCES (SUCH AS LIGHT, TELEPHONE, RADIO,
TELEVISION, ETC.) WITHIN 1.5 METERS (5 FEET) OF THIS TUB.
CAUTION: MAINTAIN WATER CHEMISTRY IN ACCORDANCE WITH MANUFACTURER’S IN-
STRUCTIONS.
WARNING: THE USE OF ALCOHOL OR DRUGS CAN GREATLY INCREASE THE RISK OF FATAL
HYPOTHERMIA IN TUBS.
Page 5

WWW.COLDTUB.COM
1.3 Tub Specications
3
Model Outside Heater Water Dry Weight Electrical
Dimensions Capacity Weight Per M
Icekube 47” x 26”x 34” N/A 250 Gal 200 lbs 171 lbs/ft
(on wheels) 946 L 90.7 kg 83 kg/M
Icekube Blue 49” x 34” x 35” N/A 80 Gal 130 lbs 110V / I5Amp
396 L 59 kg
Icepod 29.25” x 59.25” x 40.25” 1125 / 4500 60 Gal 400 lbs 68 lbs/ft
227 L 181 kg 332 kg/M
Icepod PLUS 71” x 30” x 43” 1125 / 4500 100 Gal 450 lbs 110V / I5Amp
379 L 205 kg
POLARPOOL
605 L 300 kg 300 kg/M
POLARPOOL
Stretch 1287 L 300 kg 300 kg/M
Icebox 76” x 76” x 30” 1125 / 4500 260 Gal 810 lbs 130 lbs/ft
984 L 367 kg 634 kg/M
Polarplunge
1722 L 431 kg 230V 33A
®
81” x 71” x 30” 1125 / 4500 160 Gal 670 lbs 80 lbs/ft2 110V / I5Amp
®
86.5” x 71” x 39” 1125 / 4500 340 Gal 670 lbs 80 lbs/ft2 110V / I5Amp
TM
106” x 77” x 30” 1125 / 4500 455 Gal 959 lbs 110V / I5Amp
2
Requirement
2
110V / I5Amp
2
2
110V / I5Amp
2
2
230V 33A
2
230V 33A
2
110V / I5Amp
2
230V 33A
Iceberg 171.75” x 93” x 50.5” 5500 W 1558 Gal 1550 lbs 132 lbs/ft
5900 L 700 kg 644 kg/M
*Filled weight includes weight of water and maximum recommended number of people in the tub.
Average weight per person = 80 Kg (176 Lbs)
2
110V / I5Amp
2
230V 33A
1.4 Hypothermia
Prolonged immersion in cold water may induce hypothermia.
While it is important to keep our bodies properly warm, it is equally important for us to
be able to cool down. But in certain environmental conditions our bodies cool down too
much. Our temperatures drop too far when they dip into hypothermic internal temperatures of 95 degrees and lower.
There are four main ways that our bodies give off heat and cool themselves: conduction,
convection, radiation and evaporation. Each of these processes helps us sustain healthy
internal temperatures. They also give us a better understanding of how hypothermia
happens.
When someone’s re-warming reactions, like shivering, aren’t enough to overcome the
cooling process, hypothermia can set in. Look for several important signs indicating the
different stages of hypothermia.
Mild Hypothermia: shivering, goose bumps, diculty with complex motor
skills
WARNING!
The use of alcohol or drugs
can greatly increase the risk
of fatal hypothermia in cold
tubs.
Moderate Hypothermia: violent shivering, sluggish, speech problems, di-
culty with ne motor skills
Severe Hypothermia: rigid muscles, dazed, shivering has stopped, blue
skin, erratic heart beat, unconscious
Page 6
Winning is cool™
4
WARNING!
We recommend that the COLDTUB™
be installed above ground. Consult a
licensed building contractor to design
or evaluate your custom decking
requirements.
1.5 Installation Instructions
SITE PREPARATION
Make sure you ensure the following:
Always put your tub on a structurally sound, LEVEL surface. A lled tub can weigh a great deal.
Make certain that the location you choose can support the weight of your lled tub.
Position equipment compartment which houses all of the electrical components in a place where
your will have easy access for periodic tub care and maintenance.
Allow adequate access to all other access panels for service.
OUTDOOR GROUND LEVEL INSTALLATION
No matter where you install your new tub, it’s important that you have a solid foundation for support.
If using patio stones, they should be at least two inches thick and twelve inches square. Even with
stones in place, the tub will possibly settle and become uneven, and may require re-leveling over
time.
Deck Installation
To be certain your deck can support your tub, you must know the deck’s maximum load capacity.
Consult a qualied building contractor or structural engineer. To nd your tub refer to the Tub
Specication chart. This weight per square foot must not exceed the structure’s rated capacity, or
serious structural damage could result.
Page 7
WWW.COLDTUB.COM
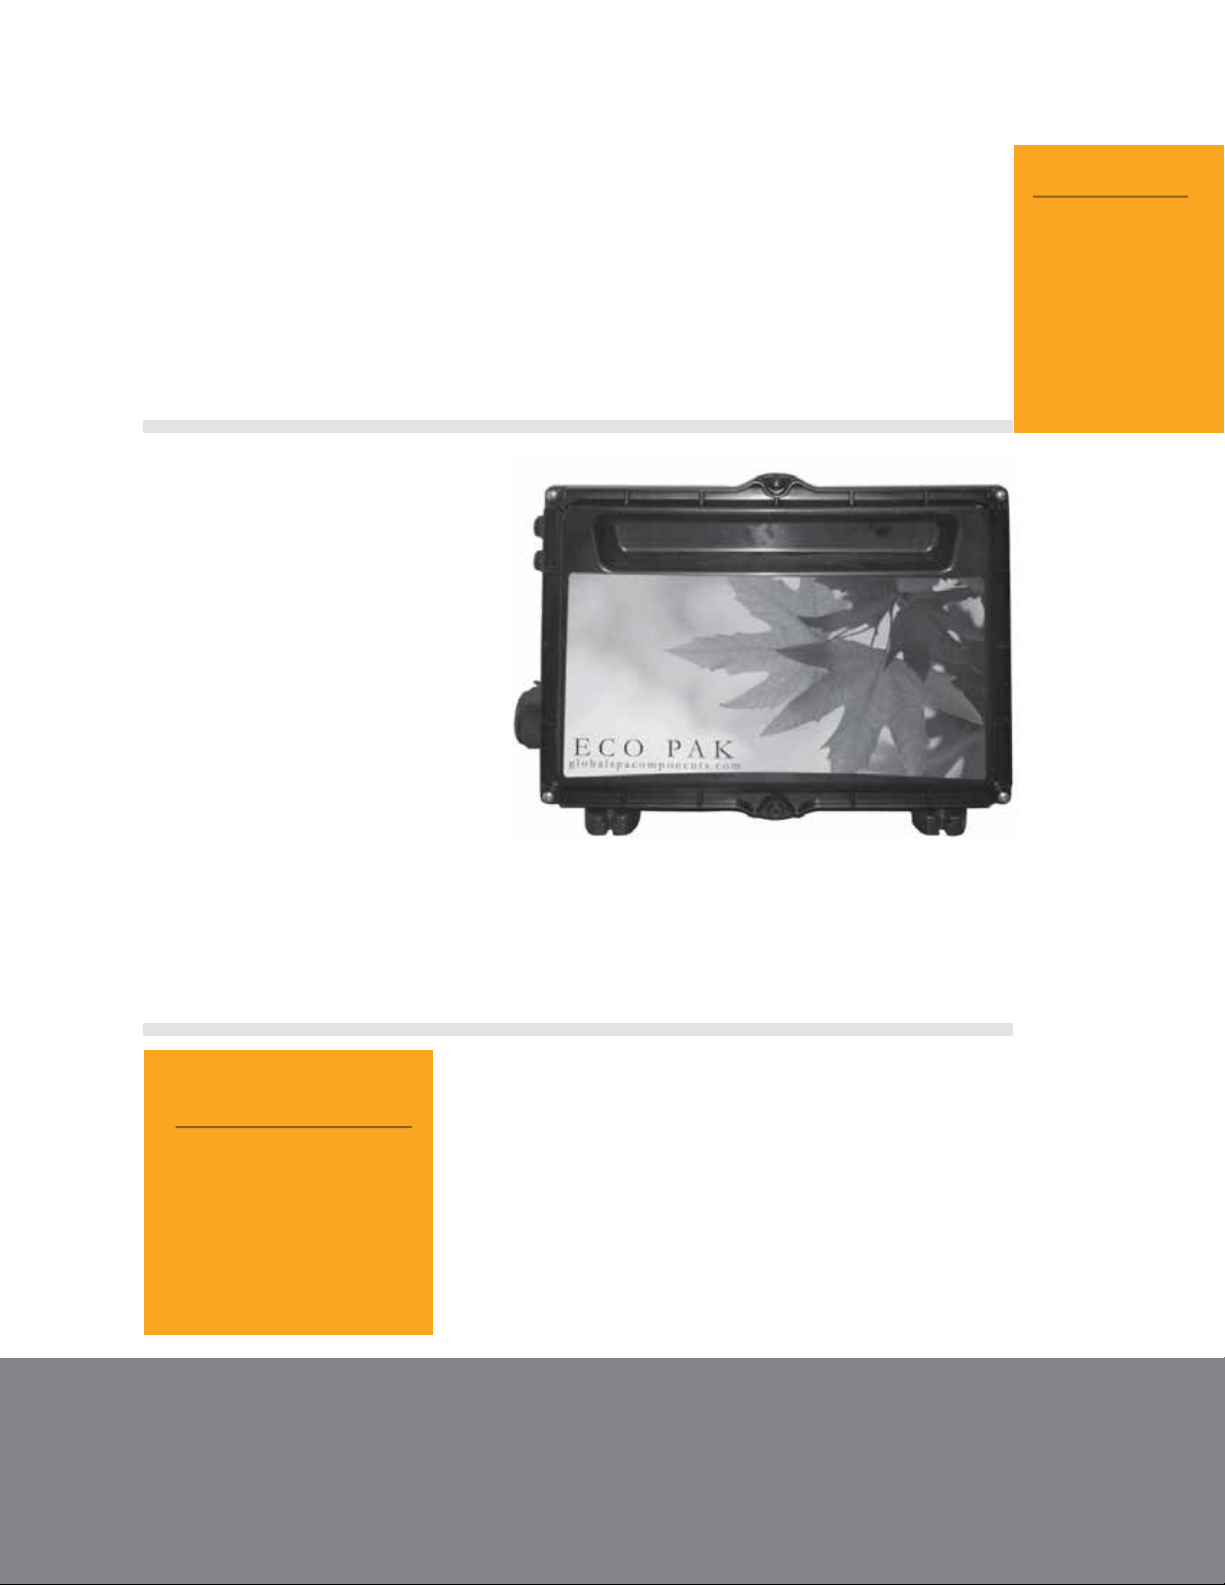
1.6 Equipment Compartment and
Wiring Diagram
5
WARNING!
All electrical
hookups ( except
where cords with
built in GFCI
are supplied by
COLDTUB™ must
be performed by a
licensed electrition!
1.7 Electrical Installation Instructions
WARNING!
Do not turn on power to the
tub until the tub is lled to the
required level. Running the
pump without water could
cause immediate damage and
void your warranty!
IMPORTANT: Should you ever nd the need to relocate your COLDTUB™, it is
essential that you understand and apply these installation requirements. Your ColdTub has been carefully engineered to provide maximum safety against electric shock.
Remember, connecting the tub to an improperly wired circuit will negate many of its
safety features.
COLDTUB™ MUST BE WIRED IN ACCORDANCE WITH ALL
APPLICABLE LOCAL ELECTRICAL CODES. ALL ELECTRICAL
WORK SHOULD BE DONE BY AN EXPERIENCED, LICENSED
ELECTRICIAN AND APPROVED BY A LOCAL BUILDING/ELECTRICAL INSPECTION AUTHORITY. WE RECOMMEND THE
USE OF APPROPRIATE ELECTRICAL CONDUIT, FITTINGS
AND WIRE FOR ALL CIRCUITS.
WARNING: Removing or bypassing any Ground Fault Circuit Interrupter breaker will result in an unsafe tub and will void the tub’s
warranty.
Page 8

Winning is cool™
6
CAUTION!
Do not turn on power to the tub until it
is lled to the required level. Running
the pump without water could cause
1.8 Startup
immediate damage and void your
warranty!
Procedures
IMPORTANT:
YOUR COLDTUB™ HAS BEEN THOROUGHLY TESTED DURING THE MANUFACTURING
PROCESS TO ENSURE RELIABILITY AND LONG-TERM CUSTOMER SATISFACTION.
BEFORE FILLING THE TUB, WIPE THE SHELL CLEAN WITH A SOFT RAG.
The following instructions must be followed exactly to ensure a successful start-up or rell.
1) Ensure the electrical connections have been made in accordance with this manual.
2) Fill the tub with water until water level reaches to half way up the skimmer box. Please watch for any sign of
leaks that may have been caused by shipping.
3) Once lled to the proper level, turn the power to the tub on by pluging it in and pressing the Reset button
on the Ground Fault Circuit Interrupter breaker. Watch the display on the topside control. After power-up,
the display will blink until a key is pressed. This feature is to let you know that the set point and other system
parameters are at their default settings.
4) The jet pump, cooling system and all internal plumbing will achieve a partial prime as the tub is lled. Once
the tub is full, turn each pump on to complete prime. Once the jet system is fully operational (as indicated by
strong, non-surging jets), priming of the tub is complete. Weak or surging jets are an indication of a low water
level condition or clogged lter cartridges.
5) Adjust the chemicals and balance the water according to your dealer’s instructions. A guideline is also
included in this manual, under the Water Maintenance Section.
6) Set the temperature control to the desired temperature (as low as 42ºF - 5.5ºC), then place the vinyl cover
on the tub and allow the water temperature to stabilize (approximately 16 hours). Make sure you secure the
cover in place using the cover locks. Periodically check the tub water temperature.
START BY ADDING
THIS MUCH SALT
Icepod 460 grams = 1 Pound
Icepod PLUS 766 grams = 1.69 Lbs.
POLARPOOL 1.22 Kg = 2.70 Lbs.
Icebox 1.99 Kg. = 4.39 Lbs.
( 1 Pail = 4.4 Lbs.)
Polarplunge™ 3.48 Kg = 7.69 Lbs.
Iceberg 11.94 Kg = 26.32 Lbs.
7) Fill the tub
• Test total alkalinity (TA)- it should be between 120-150. if it is high use Cold water
Rundown to lower the TA. If it is to low use Cold water Balance to raise the TA.
• Test Ph - it should be between 7.2- 7.6. If it is to high use Run Down to lower the Ph.
If it is too low use Jump to raise it.
• Add Sodium chloride Dead Seasalt according to this chart.
• Use Cold Water Sanitizer any time the water is “heavily used” or any time it
looses clarity.
• Test and adjust sanitizer level (Chlorine ideal 1 - 3 ppm).
8) You may raise the water temperature by pressing the TEMP (
control panel, or lower it by pressing TEMP (
temperature will remain within one degree of your selected temperature.
) button. After a few hours, the water
) button on the
Page 9
WWW.COLDTUB.COM
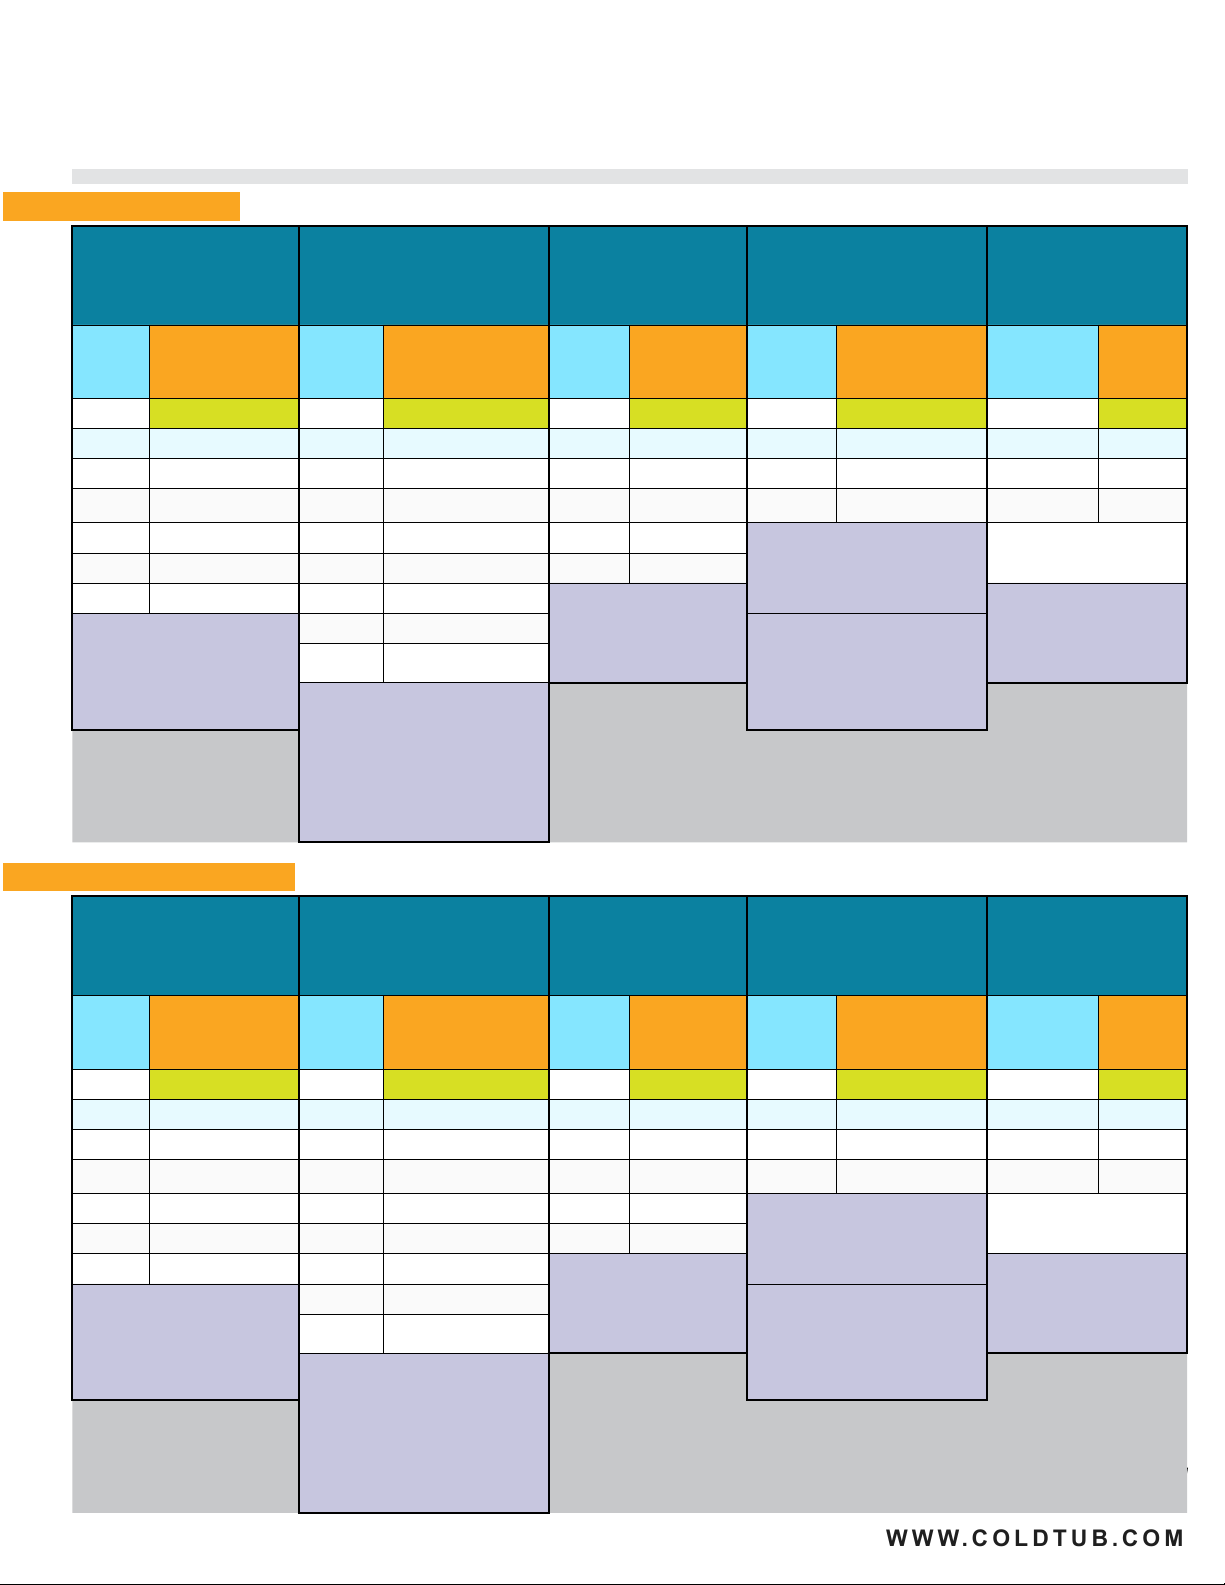
1.9 Water Maintenance QRC
Icepod
Cold Water Balance
(TA Increaser Sodium
Bicarbonate)
TA ppm
Reading
120-150 Nil 7.2 - 7.6 Nil 7.2 - 7.6 Nil 2-3ppm Nil 2000ppm Nil
85 5 7.7 1 7.1 2 1ppm or less 2 1500ppm 115
70 9 7.8 2 7.0 3 0000ppm 460
Icepod
227 Ltrs/60 Gal
Grams to add Grams to add Grams to add Grams to add Gr. to add
Cold Water Run Down
(pH Decreaser Sodium
Bisulphate)
pH Reading Icepod
227 Ltrs/60 Gal
Cold Water Jump
(pH Increaser Sodium
Carbonate)
pH Reading Icepod
227 Ltrs/60 Gal
Cold Water Sanatizer
(Sanitizer Increaser Sodium
Dichloro -S-Trianetrionee)
Sanitizer
ppm Reading
Icepod
227 Ltrs/60 Gal
Cold Water Dead
Sea Salt
(Dead Sea Salt increases
Sodium Chloride)
Sodium Chloride
Reading
7
Icepod
227 Ltrs/60
Gal
55 19 7.9 4 6.9 4 Note:
40 28 8.0 6 6.8 4
25 37 8.1 7 Note:
Note:
2.5 Grams = 1/2 Tea Spoon.
5 Grams = 1 Tea Spoon.
8.2 9 Caution:
8.2 11
Note:
3 Grams = 1/2 Tea Spoon.
6 Grms = 1 Tea Spoon.
Caution:
pH Decreaser also decreases TA ensure TA
is in the desired range 120-150 before
decreasing pH.
2.5 Grams = 1/2 Tea Spoon.
5 Grams = 1 Tea Spoon.
2.5 Grams = 1/2 Tea Spoon.
5 Grams = 1 Tea Spoon.
Do not enter water if Clorine is above
5ppm.
Do not enter water if Chlorine is below
1ppm.
Small Adjustments 11 Grams =
50ppm
Note:
2.5 Grams = 1/2 Tea Spoon.
5 Grams = 1 Tea Spoon.
275 Grams = 1 Cup.
Icepod Plus
Cold Water Balance
(TA Increaser Sodium
Bicarbonate)
TA ppm
Reading
120-150 Nil 7.2 - 7.6 Nil 7.2 - 7.6 Nil 2-3ppm Nil 2000ppm Nil
85 10 7.7 2 7.1 5 1ppm or less 6 1500ppm 191
70 19 7.8 4 7.0 6 0000ppm 766
Icepod Plus
379Ltrs /100Gal
Grams to add Grams to add Grams to add Grams to add Gr. to add
Cold Water Run Down
(pH Decreaser Sodium
Bisulphate)
pH Reading Icepod Plus
379Ltrs /100Gal
Cold Water Jump
(pH Increaser Sodium
Carbonate)
pH Reading Icepod Plus
379Ltrs /100Gal
Cold Water Sanatizer
(Sanitizer Increaser Sodium
Dichloro -S-Trianetrionee)
Sanitizer
ppm Reading
Icepod Plus
379Ltrs /100Gal
Cold Water Dead
Sea Salt
(Dead Sea Salt increases
Sodium Chloride)
Sodium Chloride
Reading
Icepod Plus
379Ltrs
/100Gal
55 38 7.9 8 6.9 8 Note:
40 58 8.0 12 6.8 9
25 77 8.1 15 Note:
Note:
2.5 Grams = 1/2 Tea Spoon.
5 Grams = 1 Tea Spoon.
8.2 19 Caution:
8.2 23
Note:
3 Grams = 1/2 Tea Spoon.
6 Grms = 1 Tea Spoon.
Caution:
pH Decreaser also decreases TA ensure TA
is in the desired range 120-150 before
decreasing pH.
2.5 Grams = 1/2 Tea Spoon.
5 Grams = 1 Tea Spoon.
2.5 Grams = 1/2 Tea Spoon.
5 Grams = 1 Tea Spoon.
Do not enter water if Clorine is above
5ppm.
Do not enter water if Chlorine is below
1ppm.
Small Adjustments 20 Grams =
50ppm
Note:
2.5 Grams = 1/2 Tea Spoon.
5 Grams = 1 Tea Spoon.
275 Grams = 1 Cup.
Page 10
Winning is cool™
8
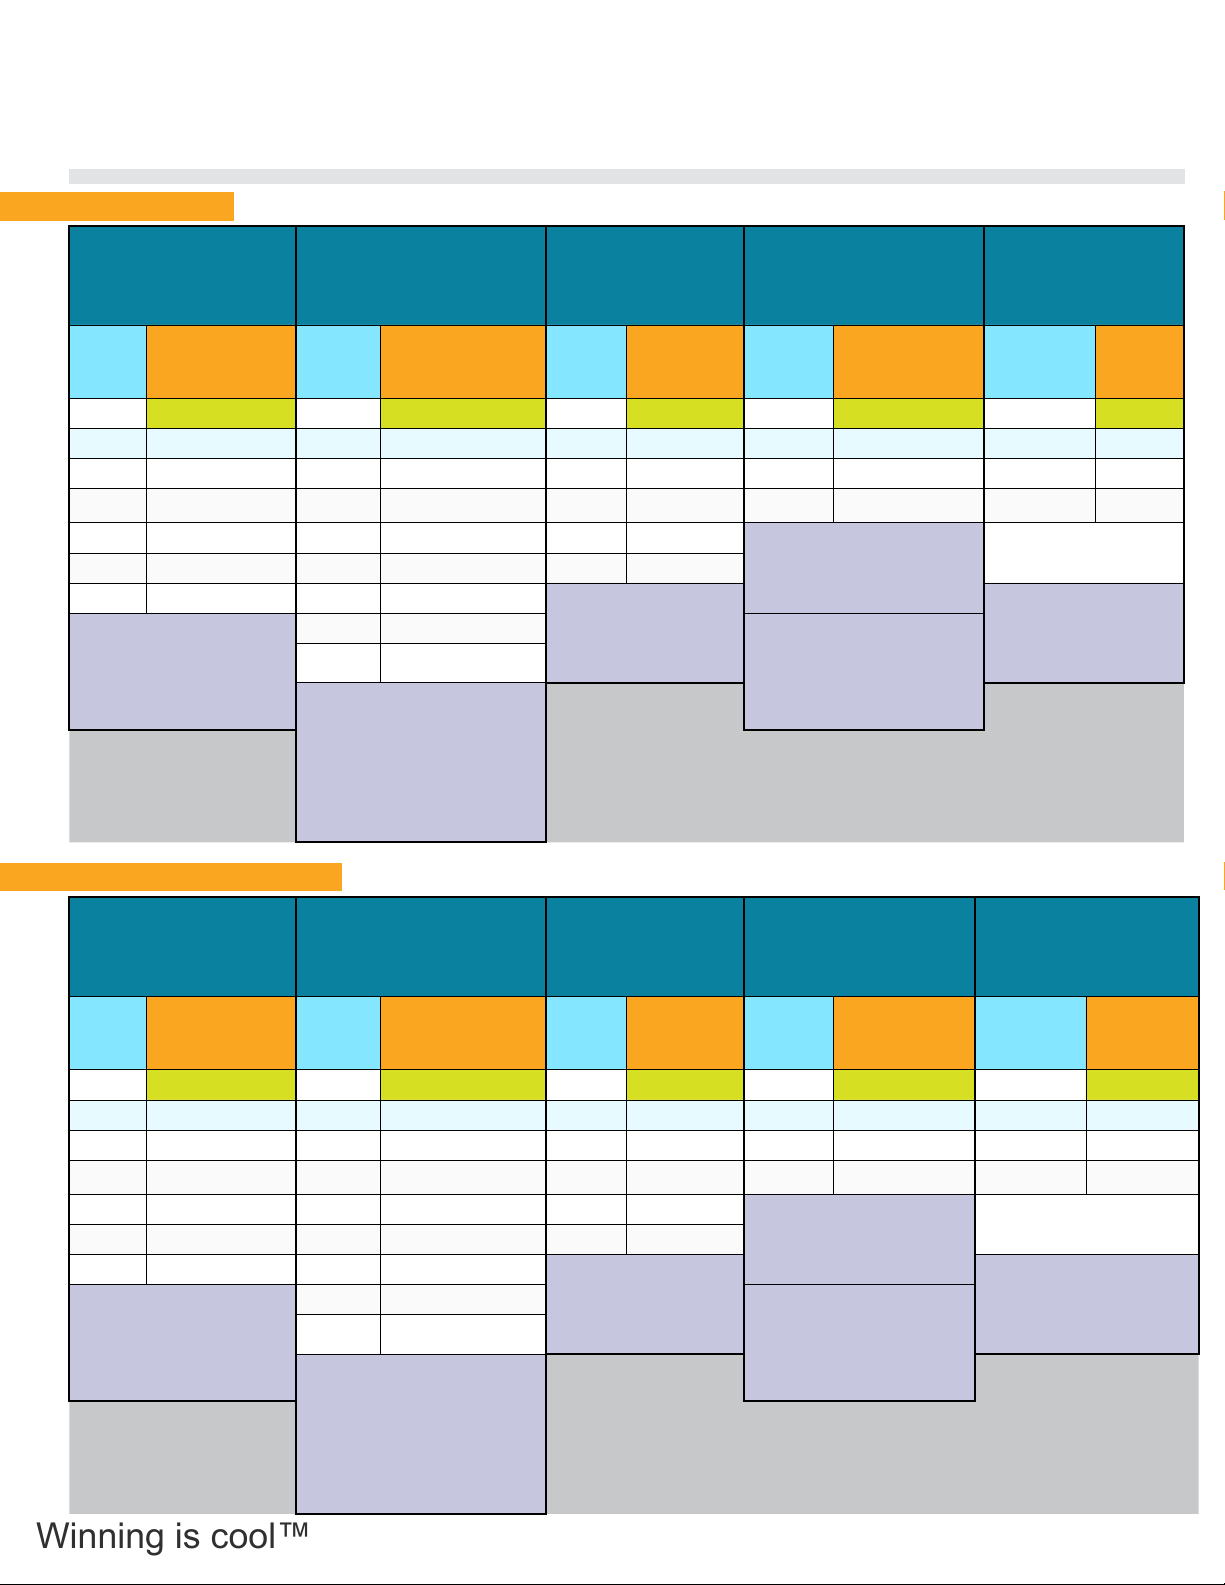
1.9 Water Maintenance QRC
(Continued)
Polarpool
Cold Water Balance
(TA Increaser Sodium
Bicarbonate)
TA ppm
Reading
120-150 Nil 7.2 - 7.6 Nil 7.2 - 7.6 Nil 2-3ppm Nil 2000ppm Nil
85 15 7.7 2 7.1 7 1ppm or less 8 1500ppm 306
70 30 7.8 4 7.0 10 0000ppm 1226
55 61 7.9 8 6.9 12 Note:
40 91 8.0 12 6.8 15
25 121 8.1 15 Note:
Note:
2.5 Grams = 1/2 Tea Spoon.
5 Grams = 1 Tea Spoon.
Polarpool
605 Ltrs/160 Gal
Grams to add Grams to add Grams to add Grams to add Gr. to add
Cold Water Run Down
(pH Decreaser Sodium
Bisulphate)
pH Reading Polarpool
605 Ltrs/160 Gal
8.2 19 Caution:
8.2 23
Note:
3 Grams = 1/2 Tea Spoon.
6 Grms = 1 Tea Spoon.
Caution:
pH Decreaser also decreases TA ensure TA
is in the desired range 120-150 before
decreasing pH.
Cold Water Jump
(pH Increaser Sodium
Carbonate)
pH Reading Polarpool
605 Ltrs/160 Gal
2.5 Grams = 1/2 Tea Spoon.
5 Grams = 1 Tea Spoon.
Cold Water Sanatizer
(Sanitizer Increaser Sodium
Dichloro -S-Trianetrionee)
Sanitizer
ppm Reading
2.5 Grams = 1/2 Tea Spoon.
5 Grams = 1 Tea Spoon.
Do not enter water if Clorine is above
5ppm.
Do not enter water if Chlorine is below
1ppm.
Polarpool
605 Ltrs/160 Gal
Cold Water Dead
Sea Salt
(Dead Sea Salt increases
Sodium Chloride)
Sodium Chloride
Reading
Small Adjustments 30 Grams =
50ppm
Note:
2.5 Grams = 1/2 Tea Spoon.
5 Grams = 1 Tea Spoon.
275 Grams = 1 Cup.
Polarpool
605
Ltrs/160 Gal
Polarpool Stretch
Cold Water Balance
(TA Increaser Sodium
Bicarbonate)
TA ppm
Reading
120-150 Nil 7.2 - 7.6 Nil 7.2 - 7.6 Nil 2-3ppm Nil 2000ppm Nil
85 32 7.7 6 7.1 15 1ppm or less 16 1500ppm 651
70 64 7.8 13 7.0 21 0000ppm 2605
55 129 7.9 26 6.9 26 Note:
40 193 8.0 39 6.8 31
25 257 8.1 51 Note:
Note:
2.5 Grams = 1/2 Tea Spoon.
5 Grams = 1 Tea Spoon.
Polarpool Stretch
1287 Ltrs/340 Gal
Grams to add Grams to add Grams to add Grams to add Gr. to add
Cold Water Run Down
(pH Decreaser Sodium
Bisulphate)
pH Reading Polarpool Stretch
1287 Ltrs/340 Gal
8.2 64 Caution:
8.2 77
Note:
3 Grams = 1/2 Tea Spoon.
6 Grms = 1 Tea Spoon.
Caution:
pH Decreaser also decreases TA ensure TA
is in the desired range 120-150 before
decreasing pH.
Cold Water Jump
(pH Increaser Sodium
Carbonate)
pH Reading Polarpool Stretch
1287 Ltrs/340
Gal
2.5 Grams = 1/2 Tea Spoon.
5 Grams = 1 Tea Spoon.
Cold Water Sanatizer
(Sanitizer Increaser Sodium
Dichloro -S-Trianetrionee)
Sanitizer
ppm Reading
2.5 Grams = 1/2 Tea Spoon.
5 Grams = 1 Tea Spoon.
Do not enter water if Clorine is above
5ppm.
Do not enter water if Chlorine is below
1ppm.
Polarpool Stretch
1287 Ltrs/340 Gal
Cold Water Dead
Sea Salt
(Dead Sea Salt increases
Sodium Chloride)
Sodium Chloride
Reading
Small Adjustments 65 Grams =
50ppm
Note:
2.5 Grams = 1/2 Tea Spoon.
5 Grams = 1 Tea Spoon.
275 Grams = 1 Cup.
Polarpool Stretch
1287 Ltrs/340
Gal
Page 11
WWW.COLDTUB.COM
9
1.9 Water Maintenance QRC
(Continued)
Icebox
Cold Water Balance
(TA Increaser Sodium
Bicarbonate)
TA ppm
Reading
120-150 Nil 7.2 - 7.6 Nil 7.2 - 7.6 Nil 2-3ppm Nil 2000ppm Nil
85 25 7.7 5 7.1 12 1ppm or less 12 1500ppm 498
70 50 7.8 10 7.0 16 0000ppm 1992
55 99 7.9 20 6.9 20 Note:
40 149 8.0 30 6.8 24
25 198 8.1 40 Note:
Note:
2.5 Grams = 1/2 Tea Spoon.
5 Grams = 1 Tea Spoon.
Icebox
984 Ltrs/260 Gal
Grams to add Grams to add Grams to add Grams to add Gr. to add
Cold Water Run Down
(pH Decreaser Sodium
Bisulphate)
pH Reading Icebox
984 Ltrs/260 Gal
8.2 50 Caution:
8.2 59
Note:
3 Grams = 1/2 Tea Spoon.
6 Grms = 1 Tea Spoon.
Caution:
pH Decreaser also decreases TA ensure TA
is in the desired range 120-150 before
decreasing pH.
Cold Water Jump
(pH Increaser Sodium
Carbonate)
pH Reading Icebox
984 Ltrs/260 Gal
2.5 Grams = 1/2 Tea Spoon.
5 Grams = 1 Tea Spoon.
Cold Water Sanatizer
(Sanitizer Increaser Sodium
Dichloro -S-Trianetrionee)
Sanitizer
ppm Reading
2.5 Grams = 1/2 Tea Spoon.
5 Grams = 1 Tea Spoon.
Do not enter water if Clorine is above
5ppm.
Do not enter water if Chlorine is below
1ppm.
Icebox
984 Ltrs/260 Gal
Cold Water Dead
Sea Salt
(Dead Sea Salt increases
Sodium Chloride)
Sodium Chloride
Reading
Small Adjustments 50 Grams =
50ppm
Note:
2.5 Grams = 1/2 Tea Spoon.
5 Grams = 1 Tea Spoon.
275 Grams = 1 Cup.
Icebox
984
Ltrs/260 Gal
Polarplunge
Cold Water Balance
(TA Increaser Sodium
Bicarbonate)
TA ppm
Reading
120-150 Nil 7.2 - 7.6 Nil 7.2 - 7.6 Nil 2-3ppm Nil 2000ppm Nil
85 43 7.7 9 7.1 21 1ppm or less 22 1500ppm 871
70 86 7.8 17 7.0 28 0000ppm 3486
55 172 7.9 34 6.9 34 Note:
40 259 8.0 52 6.8 41
25 345 8.1 69 Note:
Note:
2.5 Grams = 1/2 Tea Spoon.
5 Grams = 1 Tea Spoon.
Polarplunge
1722 Ltrs/455 Gal
Grams to add Grams to add Grams to add Grams to add Gr. to add
Cold Water Run Down
(pH Decreaser Sodium
Bisulphate)
pH Reading Polarplunge
1722 Ltrs/455 Gal
8.2 86 Caution:
8.2 103
Note:
3 Grams = 1/2 Tea Spoon.
6 Grms = 1 Tea Spoon.
Caution:
pH Decreaser also decreases TA ensure TA
is in the desired range 120-150 before
decreasing pH.
Cold Water Jump
(pH Increaser Sodium
Carbonate)
pH Reading Polarplunge
1722 Ltrs/455
Gal
2.5 Grams = 1/2 Tea Spoon.
5 Grams = 1 Tea Spoon.
Cold Water Sanatizer
(Sanitizer Increaser Sodium
Dichloro -S-Trianetrionee)
Sanitizer
ppm Reading
2.5 Grams = 1/2 Tea Spoon.
5 Grams = 1 Tea Spoon.
Do not enter water if Clorine is above
5ppm.
Do not enter water if Chlorine is below
1ppm.
Polarplunge
1722 Ltrs/455 Gal
Cold Water Dead
Sea Salt
(Dead Sea Salt increases
Sodium Chloride)
Sodium Chloride
Reading
Small Adjustments 85 Grams =
50ppm
Note:
2.5 Grams = 1/2 Tea Spoon.
5 Grams = 1 Tea Spoon.
275 Grams = 1 Cup.
Polarplunge
1722
Ltrs/455 Gal
Page 12

Winning is cool™
Winning is cool™
10
1.9 Water Maintenance QRC
(Continued)
Iceberg
Cold Water Balance
(TA Increaser Sodium
Bicarbonate)
TA ppm
Reading
120-150 Nil 7.2 - 7.6 Nil 7.2 - 7.6 Nil 2-3ppm Nil 2000ppm Nil
85 148 7.7 30 7.1 71 1ppm or less 74 1500ppm 2983
70 296 7.8 59 7.0 95 0000ppm 11937
55 592 7.9 118 6.9 118 Note:
40 888 8.0 178 6.8 142
25 1183 8.1 237 Note:
Note:
2.5 Grams = 1/2 Tea Spoon.
5 Grams = 1 Tea Spoon.
Iceberg
5900Ltrs/1558Gal
Grams to add Grams to add Grams to add Grams to add Gr. to add
Cold Water Run Down
(pH Decreaser Sodium
Bisulphate)
pH Reading Iceberg
5900Ltrs/1558Gal
8.2 296 Caution:
8.2 355
Note:
3 Grams = 1/2 Tea Spoon.
6 Grms = 1 Tea Spoon.
Caution:
pH Decreaser also decreases TA ensure TA
is in the desired range 120-150 before
decreasing pH.
Cold Water Jump
(pH Increaser Sodium
Carbonate)
pH Reading Iceberg
5900Ltrs/
1558Gal
2.5 Grams = 1/2 Tea Spoon.
5 Grams = 1 Tea Spoon.
Cold Water Sanatizer
(Sanitizer Increaser Sodium
Dichloro -S-Trianetrionee)
Sanitizer
ppm Reading
2.5 Grams = 1/2 Tea Spoon.
5 Grams = 1 Tea Spoon.
Do not enter water if Clorine is above
5ppm.
Do not enter water if Chlorine is below
1ppm.
Iceberg
5900Ltrs/1558Gal
Cold Water Dead
Sea Salt
(Dead Sea Salt increases
Sodium Chloride)
Sodium Chloride
Reading
Small Adjustments 85 Grams =
50ppm
Note:
2.5 Grams = 1/2 Tea Spoon.
5 Grams = 1 Tea Spoon.
275 Grams = 1 Cup.
Iceberg
5900Ltrs/
1558Gal
Page 13

WWW.COLDTUB.COM
1.10 Venturi Controls
WWW.COLDTUB.COM
The Venturi Controls allow you to control the intensity of the massage at each jet by adjusting the mixture of air
and water. Simply turn the venturi control lever counter clockwise for a stronger ow and clockwise for a
softer ow. ( Not available on Icekube or Icepod models )
1.11 Topside Control Panel
IMPORTANT: BEFORE PERFORMING ANY SERVICE ON THE TUB. MAKE A VISUAL INSPECTION
OF THE TUB TO GET AN UNDERSTANDING OF WHAT CONDITION IT MAY BE IN AND IF
ANYTHING LOOKS OUT OF THE ORDINARY. IF ANY PART APPEARS TO BE DAMAGED,
LOOSE OR MISSING, DO NOT PROCEED. CONTACT TECH SUPPORT IMMEDIATELY.
11
Your tub control has been specically designed so that by simply connecting the tub to its properly grounded
source, and following the start-up procedures in this manual, the tub will automatically cool to the set temperature. You can adjust the set temperature by pressing the up or down arrows on your control panel to the
desired temperature.
TEMPERATURE DISPLAYED IN FAHRENHEIT OR CELSIUS
Press and hold the Light Key for 5 seconds to toggle between Fahrenheit and Celsius.
The topside control panel has buttons which you press to set the temperature, initiate the ltration cycle, turn
the light on, and activate or deactivate the pump(s). The topside control panel display responds to let you
know you have pressed a button, and that the selected function has been performed.
SETTING WATER TEMPERATURE
Use Up or Down arrow key to regulate water temperature. The temperature setting will be displayed for 5
seconds to conrm your new selection.
The “Set Point” symbol indicates the desired temperature, NOT the current water temperature.
Water temperature can be adjusted by 1- degree increments from 42-104F (5.5 - 40ºC).
Page 14

12
1.12 Care and Maintenance
YOUR COLDTUB™ IS MANUFACTURED FROM THE HIGHEST QUALITY, MOST DURABLE MATERIALS AVAILABLE EVEN SO, THE CARE AND MAINTENANCE PROGRAM YOU DEVELOP WILL
ULTIMATELY DETERMINE HOW LONG YOUR TUB AND ITS INDIVIDUAL COMPONENTS WILL LAST.
REGULAR MAINTENANCE ACCORDING TO THE ADVICE IN THIS SECTION WILL HELP YOU TO
PROTECT YOUR INVESTMENT.
DRAINING THE WATER
Detergent residues and dissolved solids from bathing suits and chemicals will gradually accumulate in your
tub’s water. Normally, in about three months the water will become difcult to balance and should be replaced.
Showering without using soap prior to entering the tub or using only the rinse cycle when laundering your
bathing suit will help to reduce detergent residue in the tub water. However, foam problems are more likely to
be caused by a build up of organic pollutants in the tub-mostly by body oils. If you’re using your tub frequently
with a high bather load the water will need to be replaced more often. Water gradually loses quality because of
build ups of unlterable pollutants.
IMPORTANT!
Remember to
change your water
every three to four
months.
TO DRAIN YOUR TUB
1. Trip the Ground Fault Circuit Interrupter breaker located in the sub panel or the quick disconnect.
2. All COLDTUB™s have an external drain that can be attached to a typical garden hose for convenient drain-
ing. Simply locate the drain on the side of the oor, pull the nozzle out, remove cap, and attach your hose.
Once the hose is attached, push the nozzle in slightly to open the internal valve and the tub will start draining.
Note: All COLDTUB™ models will drain almost completely through the drain. Equipment such as
the pump(s) and water cooler will drain. Any water remaining in the plumbing or equipment after
draining will only need to be removed if the tub is being winterized.
3. When empty, inspect the shell and clean as required.
4. Close the drain valve.
5. Rell BEFORE restoring power.
IMPORTANT!
Replace your lters every couple
weeks when in use. Disposable lters
can last a maximum of 3 months
under minimal usage.
Replacement lters can be purchased
on line at www.coldtub.com/supplies/
Page 15

13
IMPORTANT!
The use of
clariers and foam
inhibitors is not
recommended with
disposable lters!
1.12 Care and Maintenance
(Continued)
FILTRATION SYSTEM
COLDTUB™s are equipped with balanced ltration, meaning that the lter cartridges are sized to meet
the needs of the pump system. As with any water ltering system, the lter cartridge may become clogged,
resulting in reduced water ow. It is important to maintain a clean, unobstructed lter system. We recommend
replacing your lter regularly depending on usage.
FILTER CARTRIDGE REMOVAL AND INSTALLATION
1. Shut the tub down using the on/off button on the topside control panel. Wait until all pumps have stopped
completely (this may take up to 3 minutes).
2. Remove the lter basket.
3. Remove the lter cartridge.
4. Clean any debris out of the skimmer basket.
5. To reinstall the new lter cartridge, reverse the order of steps in which it was removed.
CARE OF THE SHELL
Your COLDTUB™ has a reinforced, cast acrylic shell. Stains and dirt generally will not adhere to your tub’s
surface. A soft cloth or sponge should easily remove most dirt. Most household chemicals are harmful to your
tub’s shell, do not use them. Baking soda or vinegar can also be used for minor surface cleaning. Always
thoroughly rinse off any tub shell cleaning agent with fresh water.
SERVICE NOTE:
The use of alcohol or any household cleaners other than those listed to clean the shell surface is NOT
recommended. DO NOT use any cleaning products containing abrasives or solvents since they may damage
the shell surface. Damage to the shell by the use of harsh chemicals in not covered under the warranty.
Page 16

Winning is cool™
14
1.12 Care and Maintenance
(Continued)
LED LIGHT REPLACEMENT
ALL COLDTUB™S COME EQUIPPED WITH A BLUE LED (LIGHT EMITTING DIODE) LIGHT
FOR NIGHT-TIME USE. THE OPTIONAL UPGRADE LIGHT COMES WITH A MULTI
COLOURED LED. SHOULD YOU WISH TO CHANGE EITHER LIGHT, FOLLOW THESE
SIMPLE STEPS:
1. Make sure the light is turned off, by checking the topside to see if the light icon is not showing.
2. Remove the screws securing the equipment access doors; remove the doors.
3. Locate the lamp assembly, which is secured into the light housing. Carefully rotate the lamp assembly
counter-clockwise until it comes off the light housing.
4. Remove the LED assembly from the socket and replace with a new assembly. Contact tech support for part
number. Reconnect the cable(s).
NOTE: TAKE CARE TO INSERT THE PLUG IN THE CORRECT ORIENTATION, OR YOU MAY
DAMAGE THE CONNECTORS.
5. To reinstall, rotate the lamp assembly clockwise onto the light housing until secure.
VACATION CARE INSTRUCTIONS
If you plan to be away for 7 - 14 days, follow these instructions to ensure that the water quality of
your tub is maintained.
1. Adjust pH as needed.
2. Ensure you have sufcient sanitizer to last until you return.
3. Shock the tub with a tablespoon of Cold Water Sanitizer and oxidizer.
4. Lower the temperature to between 45ºF and 55º F.
UPON YOUR RETURN
1. Shock the tub with a tablespoon of Cold Water Sanitizer and oxidizer.
2. Ensure you have sufcient sanitizer for regular use.
3. Return the temperature to its original setting. You can use your tub once the residual sanitizer level falls
within the ideal range.
WINTERIZING
If you plan to leave your tub unused in severely cold weather, you should drain the tub and add RV antifreeze
to avoid accidental freezing. For assistance contact tech support. Damage due to freezing is not covered
under and can void warranty.
TO RESTART TUB
Reinstall the lter cartridges; close the drain valve. Follow the Start-up and Rell procedures.
Page 17
WWW.COLDTUB.COM
1.13 Manual Safety Cover
CARE OF THE COVER
ATTENTION: The cover is a manual safety cover that meets or exceeds all prevailing requirements of ASTM
Standards for safety covers when installed and used correctly as of the date of manufacture. Non-secured or
improperly secured covers are a hazard. Always open the cover to its fully open position before use. Be sure
to inspect the cover for premature wear or deterioration. Over time, with use, there is a chance of normal cover
wear and deterioration. To properly maintain your cover see directions below.
15
VINYL COVER
The vinyl tub cover is an attractive, durable foam insulation product. Monthly cleaning and conditioning are
recommended to maintain its beauty.
To clean and condition the vinyl cover:
1. Remove the cover from the tub and gently lean it against a wall.
2. With a garden hose, spray the cover to loosen and rinse away dirt or debris.
3. Using a large sponge and/or a soft bristle brush, and a very mild soap solution or baking soda, scrub the
vinyl top in a circular motion. Do not let the vinyl dry with a soap lm on it before it can be rinsed clean.
4. Scrub the cover’s perimeter and side aps. Rinse clean with water.
5. Rinse off the underside of the cover with water only (use no soap), and wipe it clean with a dry rag.
Page 18
Winning is cool™
16
1.14 Water Maintenance
It’s important to have clean water. Water maintenance is one of the least understood, yet most important areas
of tub ownership. Your dealer can guide you through the process of achieving and maintaining perfect water in
your tub, given your local conditions. Your program will depend on your water’s mineral content, how often you
use the tub and how many people use it.
General Information
There are three fundamental areas of water maintenance. They are (1) Water Filtration, (2) Water Sanitation,
and (3) Chemical Balance/pH Control.
Although your lter system is working several hours a day to remove particles from your water, it does not
remove bacteria or viruses. Water sanitation is the responsibility of the owner. It can be achieved through the
regular and periodic (daily, if necessary) addition of an approved sanitizer. The sanitizer will chemically control
the bacteria and viruses present in the tub water. Bacteria and viruses can grow quickly in poorly under
sanitized water.
The water’s chemical balance and pH control are also the responsibility of the owner. You will have to add
chemicals to maintain proper levels of Total Alkalinity (TA) and pH. Proper water balance and pH control will
minimize scale buildup and corrosion of metals, extend the life of the tub, and allow the sanitizer to work at
maximum efciency.
Methods For Testing Water
You will be required test and balance the water in this order.
First adjust the Total Alkalinity within 80 and 120ppm using Cold Water Balance to raise the TA, and Cold
Water Run Down to lower the TA.
you will adjust the pH to between 7.2 and 7.6. use Cold Water Jump to raise the pH and Cold Water
Second
Run Down to lower the pH.
Once you have balanced the TA and pH you will be able to accurately test and adjust the sanitizer level. you
will want a Chlorine level between 1 and 5ppm. To instantly raise the Chlorine level add Cold Water Sanitizer.
Use Tablespoon measurements to slowly increase the Chlorine in the COLDTUB.
For using the automated Sea Salt Sanitize system add 1/2 a cup of Dead Sea Salt for every 50gal of water
in the tub. Only add the salt to fresh water when the tub is lled from empty or relled from a large amount of
water loss. Test the salt content of the water using test strips and adjust to between 1800 and 2200ppm. If
the salt gets over 3000ppm you will need to drain some water and rell to dilute the concentration as not to
corrode metal components.
IMPORTANT!
Always read and
carefully follow the
directions included
with the test kit or
test strips to ensure
the accuracy of the
test results.
Page 19

WWW.COLDTUB.COM
1.15 Basic Chemical Safety
When using chemicals, read the labels carefully and follow directions precisely. Though chemicals protect you and your tub when used correctly, they can be hazardous in concentrated form.
Always observe the following guidelines:
• ALWAYS KEEP CHEMICALS OUT OF CHILDREN’S REACH.
• NEVER MIX CONCENTRATED CHEMICALS TOGETHER.
• ALWAYS THOROUGHLY RINSE ANY CONTAINER USED TO MIX CHEMICALS
AFTER USE.
• ALWAYS RINSE OUT ANY EMPTY CHEMICAL STORAGE CONTAINER
BEFORE DISPOSAL.
• Accurately measure the quantities specied. Do not overdose your tub. Amount required will
vary depending on water condition, quantities to be used are only guidelines.
• Store chemicals in a cool, dry, well-ventilated place.
• Always keep chemical containers closed when not in use.
• Do not inhale fumes or allow chemicals to come in contact with your eyes, nose or mouth.
• Wash your hands immediately after use.
• Follow the emergency advice on the product label in case of accidental contact.
• Never smoke around chemicals. Some fumes can be highly ammable.
• Do not store any chemicals in the equipment compartment.
ADDING CHEMICALS TO THE TUB
We recommend all chemicals be premixed in a bucket of water to ensure they dissolve. Then
pour the solution into the COLDTUB and run for 10 minutes before retesting.
17
IMPORTANT “SUPER CHLORINATION/OXIDIZER SHOCK TREATMENT”
NOTE: After adding chlorine or oxidizer to your tub, leave the cover open for a minimum of 20
minutes to allow the gasses to vent. Oxidizer gas may eventually cause discolouration or vinyl
degradation to the bottom of the cover and other components around the lip of the tub. This type
of damage is considered chemical abuse and not covered under warranty.
The COLDTUB Water Maintenance Program
Following the COLDTUB water maintenance program will save you time and frustration and
ensure clear, clean tub water.
As water evaporates from your tub and new water is added, the amount of dissolved minerals
will increase. The water may eventually become “hard” (Hardness too high) enough to damage the heater by calcifying its surface.
Page 20

Winning is cool™
18
BALANCE THE TOTAL ALKALINITY (TA)
• The recommended Total Alkalinity (TA) for your tub water is 80-120 ppm.
• Total Alkalinity is a measure of the total levels of carbonates, bicarbonates, hydroxides, and other
alkaline substances in the water. TA is referred to as the water’s “pH buffer”. In other words, it’s a
measure of the ability of the water to resist changes in pH level.
• If the Total Alkalinity is too high, the pH level will tend to be high and may be difcult to bring down.
It can be lowered by using Cold Water Run Down.
• Once the TA is balanced, it normally remains stable, although some sanitizers, and the addition of
more water with a high or low alkalinity will raise or lower the TA reading of the water.
• When the Total Alkalinity is within the recommended range, proceed to the next step.
BALANCING THE PH
• We recommend a pH range for your water of 7.2-7.6.
• The pH level is the measure of acidity and alkalinity. Values above 7 are alkaline; those below 7 are
acidic. Maintaining the proper pH level is extremely important for:
• Optimizing the effectiveness of the sanitizer.
• Maintaining water that is comfortable for the user.
• Preventing equipment deterioration.
• If the water’s pH level is too low, the following may result:
• The sanitizer will dissipate rapidly.
• The water may become irritating to users.
• The equipment may corrode.
If the pH is too low, it can be increased by adding Jump to the water.
• If the pH level is too high, the following may result:
• The sanitizer will become less effective.
• Scale will form on the shell surface and the equipment.
• The water may become cloudy.
If the pH is too high, it can be decreased by adding Run Down to the water.
• It is important to check the pH on a regular basis. The pH will be affected by the bather load, the
addition of new water, the addition of various chemicals, and the type of sanitizer used.
• When the pH is within the recommended range, proceed to the nal step.
SANITIZE THE TUB
Sanitizer is extremely important for killing algae, bacteria and viruses, and preventing unwanted
organisms from growing in the tub. At the same time, you don’t want too high a sanitizer level, or it
can irritate your skin, lungs and eyes.
• Always maintain the sanitizer level in your tub at the recommended level for each
type of sanitizer.
IMPORTANT: Sanitizers are acidic and will decrease the TA. Regular testing, removal and changing
of TA is extremely important with these products.
IMPORTANT: Always remove the oating dispenser while the tub is in use. Remove dispensers with
a plastic bucket and store out of reach of children until tub use has ended.
IMPORTANT!
Cold water oxidizer signicantly
reduces pH and TA. One hour after
adding cold water oxidizer test and
adjust TA and pH as needed.
Page 21
WWW.COLDTUB.COM
1.16 Quick Reference Guide
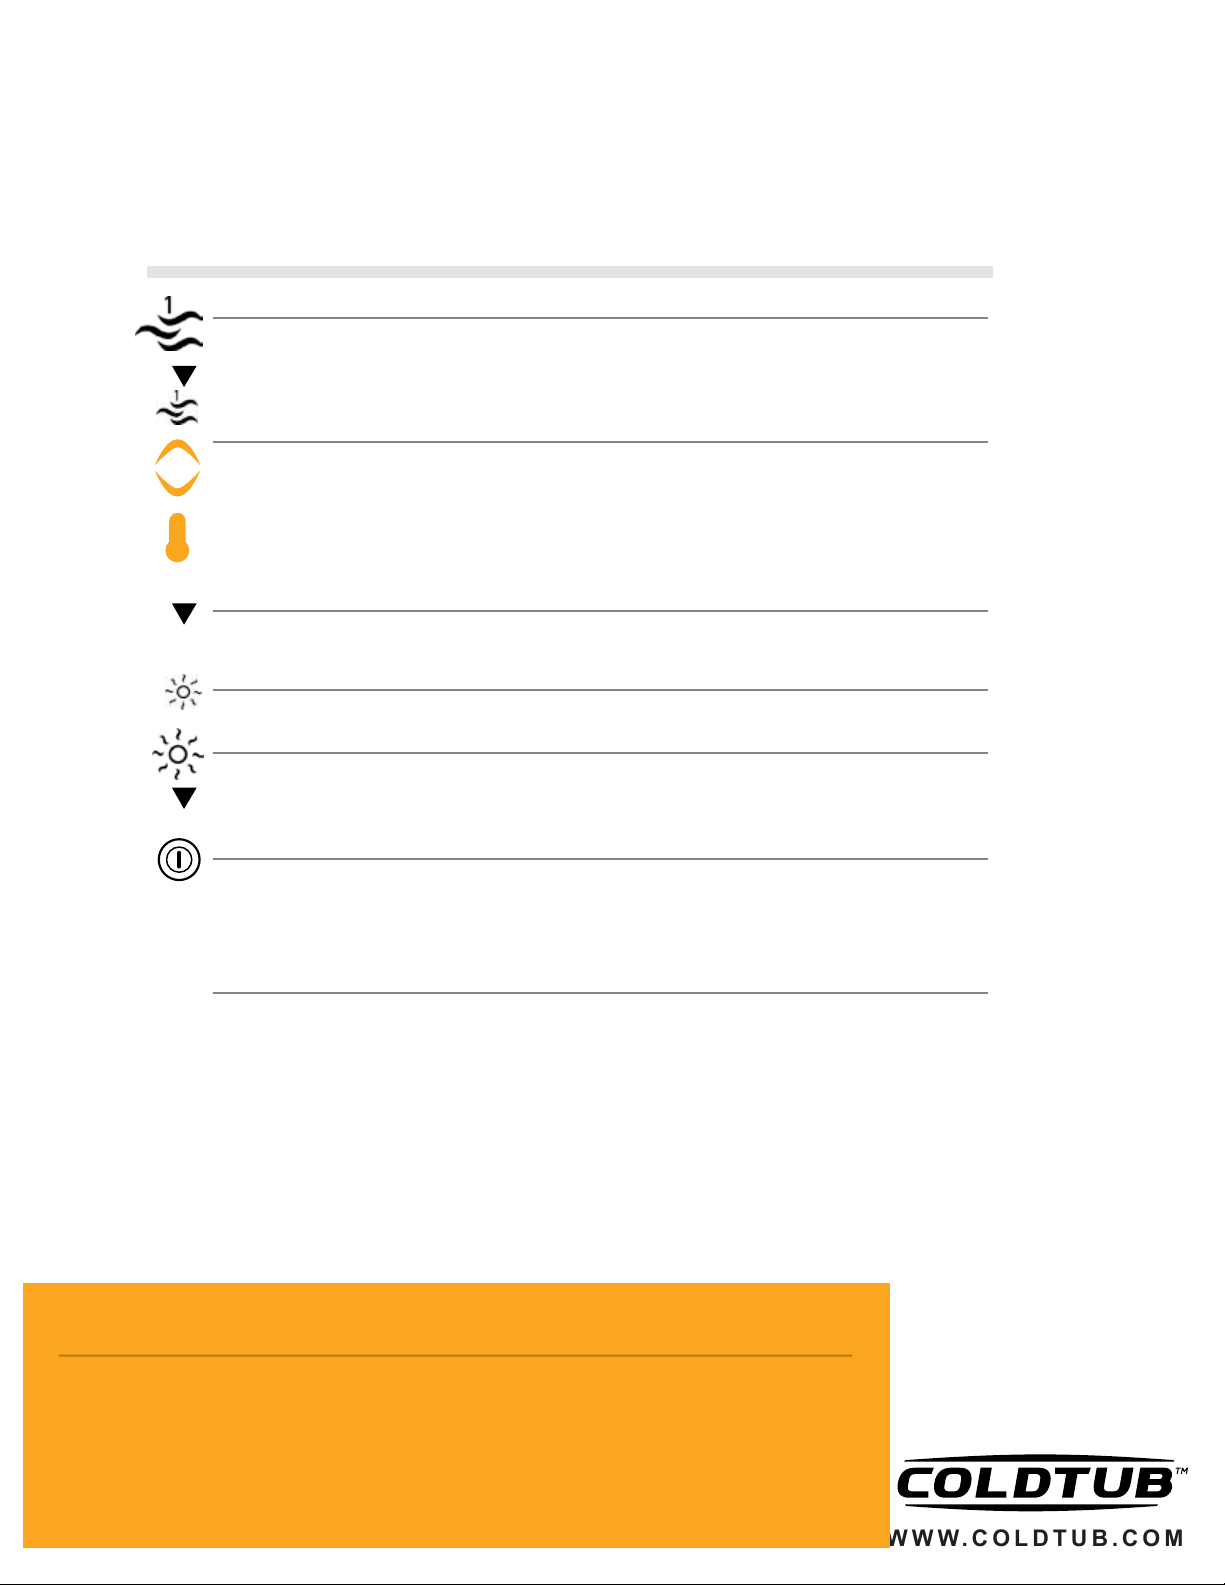
STARTING PUMP
Press the Pump key to turn Pump on at low speed. Press a second time to turn Pump to high speed.
A third time turns Pump off. A built-in timer will shut Pump off.
The Pump indicator lights up when Pump is on a high speed.
It ashes when Pump is on at low speed.
SETTING WATER TEMPERATURE
Use Up or Down arrow key to regulate water temperature. The temperature setting will be displayed
for 5 seconds to conrm your new selection.
The “Set Point” symbol indicates the desired temperature,
NOT the current water temperature!
Water temperature can be adjusted by 1- degree increments from 42º to 104ºF
(5.5º to 40ºC).
AUTOMATIC WATER COOLER START
When water temperature is 1ºF (0.5ºC) higher than the Set Point, the chiller will automatically turn on
until water temperature reaches Set Point minus 1ºF (0.5ºC).
19
TEMPERATURE UNIT
Press and hold Light key for 5 seconds to toggle between ºF and ºC.
TURNING THE LIGHT ON
Press the Light key to turn light on. Press a second time to turn light off. A built in timer automatically
turns the light off after 2 hours, unless it has been manually deactivaved.
The light indicator is displayed when light is on.
STANDBY MODE
Press and hold Standby key for 5 seconds to turn the system down (i.e. to set it to standby
mode) for 30 minutes. The “STbY” message is displayed. All keys are then disabled, unless you
push and hold the Standby key for 5 seconds again to reactivate the system before the expiration
of the 30- minute delay. If the system is turned down using the Standby key while the cooler is
on, Pump will run for an additional 3 minutes.
PAD LOCKOUT
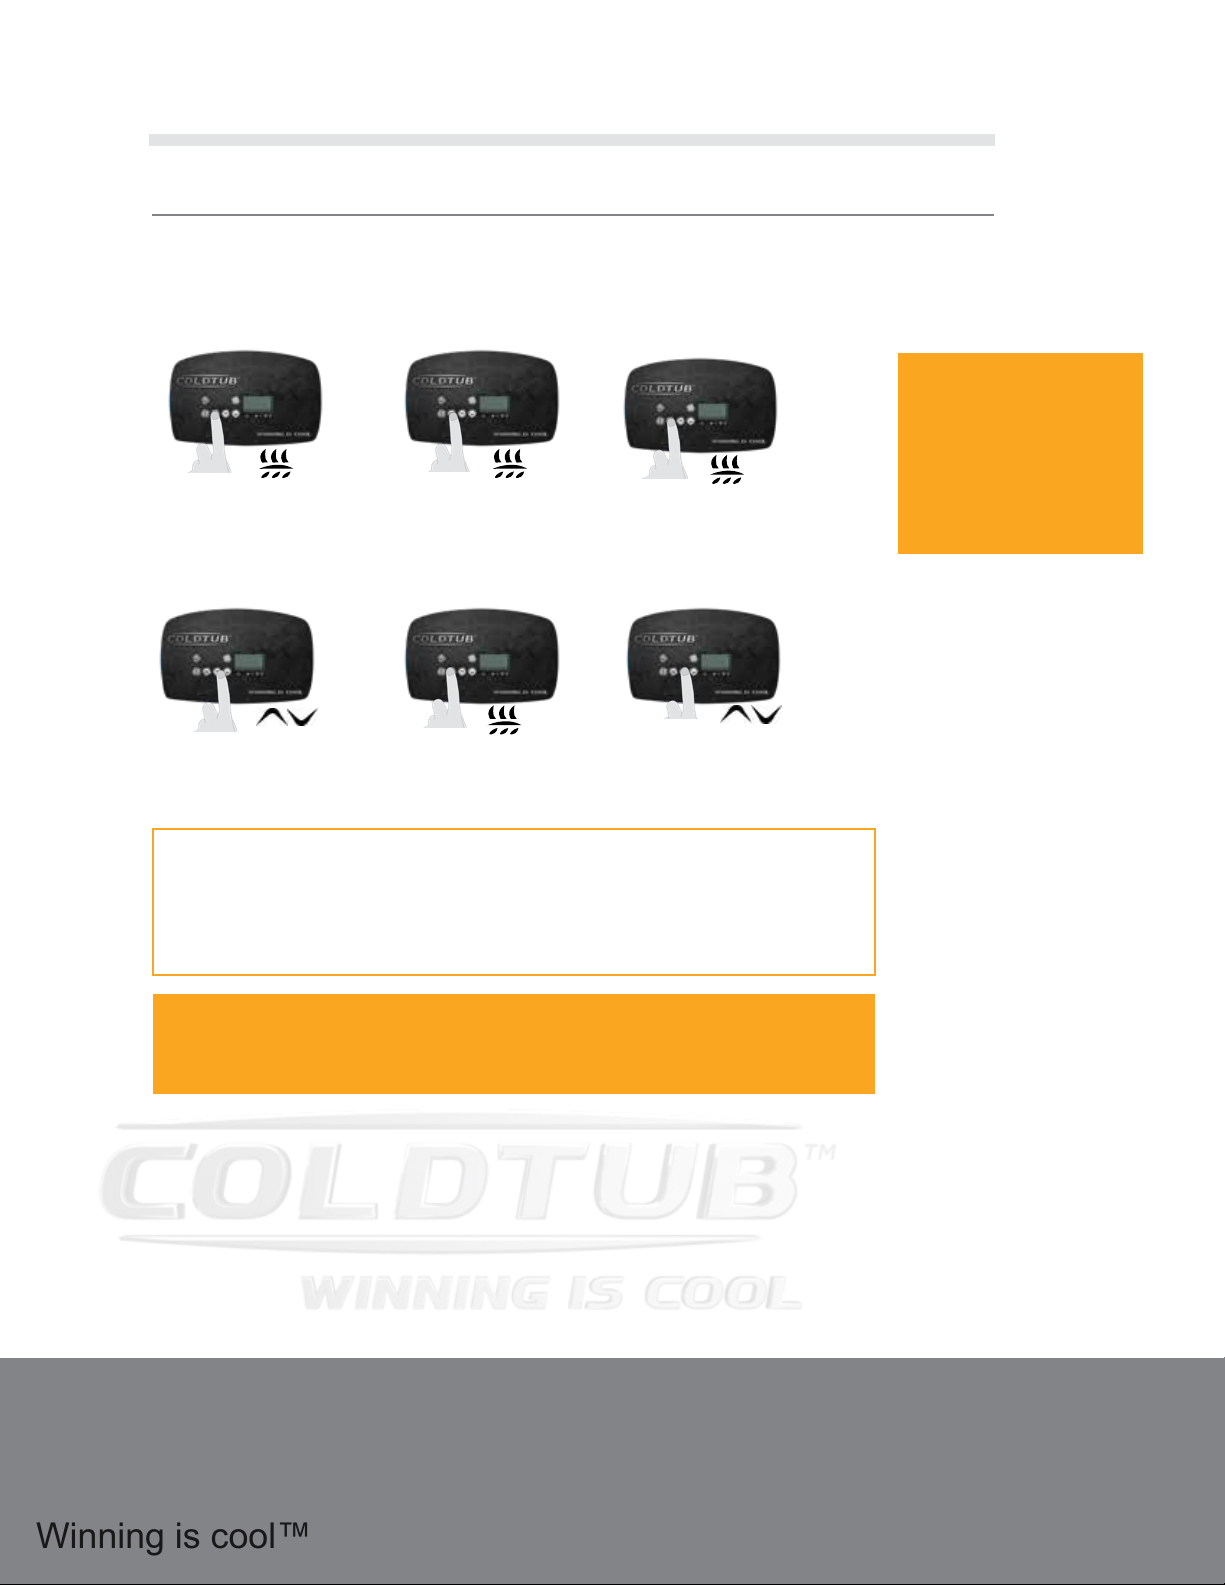
Full or partical. Full lock means that all the key pad functions have been locked. Partical lock
means that only the basic functions of the spa will remain accessible (pumps, blower, light).
When control pad is locked, the “Lock” icon will be displayed.Locking your digital control pad:
Press and hold Pump 1 key for 5 seconds. The display will show “LocP”, with “P” representing
Partical lock. Release the key and the key pad will be in Partical lock mode. Keep key pressed
down for 5 more seconds if you want to be in Full lock mode. The “LocF” message will then be
displayed. When the control pad is locked, all automatic functions of the system run as usual. If
a key is pressed down, a “LocP” or “LocF” message will be displayed for 1 second. To unlock the
keypad, simply press and hold Pump 1 key again for 5 seconds.
IMPORTANT!
This manual and its contents are subject to change without notice. Although
COLDTUB™ has prepared this manual as accurately and precisely as
possible, COLDTUB™ will not be liable for loss, injury or damages caused by improper servicing or by use of tub (improper or otherwise).
Page 22
Winning is cool™
20
1.16 Quick Reference Guide
PROGRAMMING THE SETTINGS
During a filter cycle:
- Pump runs at low speed for the programmed number of hours (see below), and
Sett
Press the Settings button to enter
into your ltration options. Your
display will show “Sett” and from
here you will be able to choose
your settings.
p
F 06
On 02
Press your Settings button again.
The letters “On” will display
followed by a number. This
sets how long your Salt Water
Sanitizer System will run within
a 24 hour period.
FF 02
Press your Settings button
again. Your display will
now show the settings for
your Filter Duration.
F 06
FF 02
p
(Continued)
Use your arrow keys to
select your Salt water
sanitizer Cycle Duration.
You can select from 1 to
24 hours per day. (longer
duration equals more
sanitizer in the water).
Use your arrow keys to
select your Filter Duration in
hours. You can select from
0 to 6 hours.
Press your Settings button
again. Your display will
now show the settings for
your Filter Cycle Frequency.
Use your arrow keys to
select your Filter Cycle
Frequency from 1 to 4 times
per day.
PLEASE NOTE:
You can move backwards through the settings by pressing the standby button. The Pump button will allow you to exit
without saving any changes. When you get to the end of the options, press the lter key one last time to save changes
and begin a lter cycle immediately. If you do not press the lter key again your changes will be saved and the lter
cycle will begin when you have programmed it to do so.
45 Minute lter cycle time-out:
If you turn a pump or light on during a lter cycle, the cycle will be interrupted and will only resume 45 minutes after
you (or the system) have turned the last active output off.
Page 23
WWW.COLDTUB.COM
21
1.16 Quick Reference Guide
TROUBLE SHOOTING
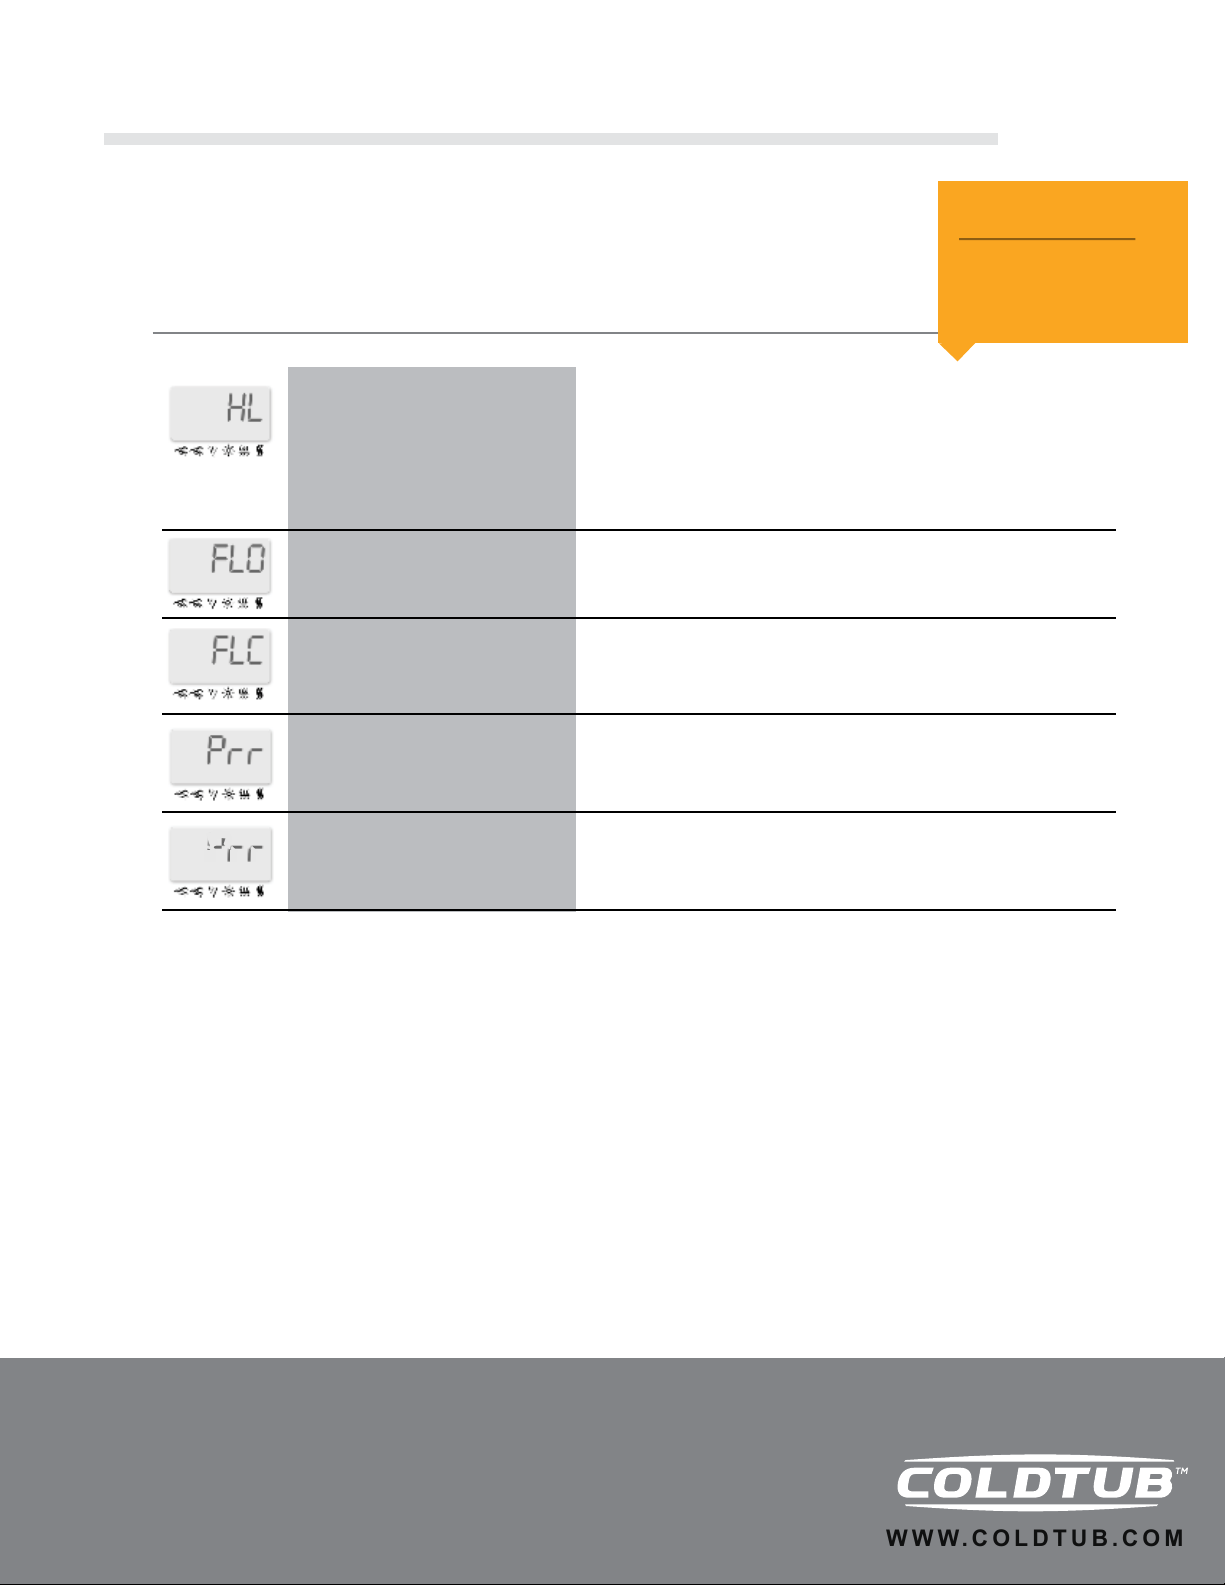
“HL” error message is displayed.
“HL” error message is ashing.
“FLO” error message is displayed.
“FLC” error message is displayed.
The system has shut the heater down because the temperature at the
heater has reached 119ºF (48ºC). Do not enter the water! Remove
COLDTUB™ cover and allow the water to cool down, then reset the
breaker to reset the system.
The system has shut down because the water temperature in the
COLDTUB™ has reached 112ºF (44ºC). Do not enter the water!
Remove spa cover and allow the water to cool down to 109ºF (43ºC).
Call your dealer or service supplier if problem persists.
The system detects no water pressure while a pump is running.
Check and open water valves. Check water level. Clean lter or
replace. Contact tech support if problem persists.
A problem has been detected with the pressure switch. Contact tech
support.
(Continued)
IMPORTANT!
Possible air lock, if not
clear in 2 minutes,
contact service.
“Prr” error message is displayed.
4 dashes are displayed.
-
A problem has been detected with the temperature probe. Contact
tech support.
The Processor has been damaged…DO NOT ENTER THE WATER…
this is usually caused by abnormal power uctuations, Contact tech
support.
Page 24

Winning is cool™
22
1.17 Troubleshooting
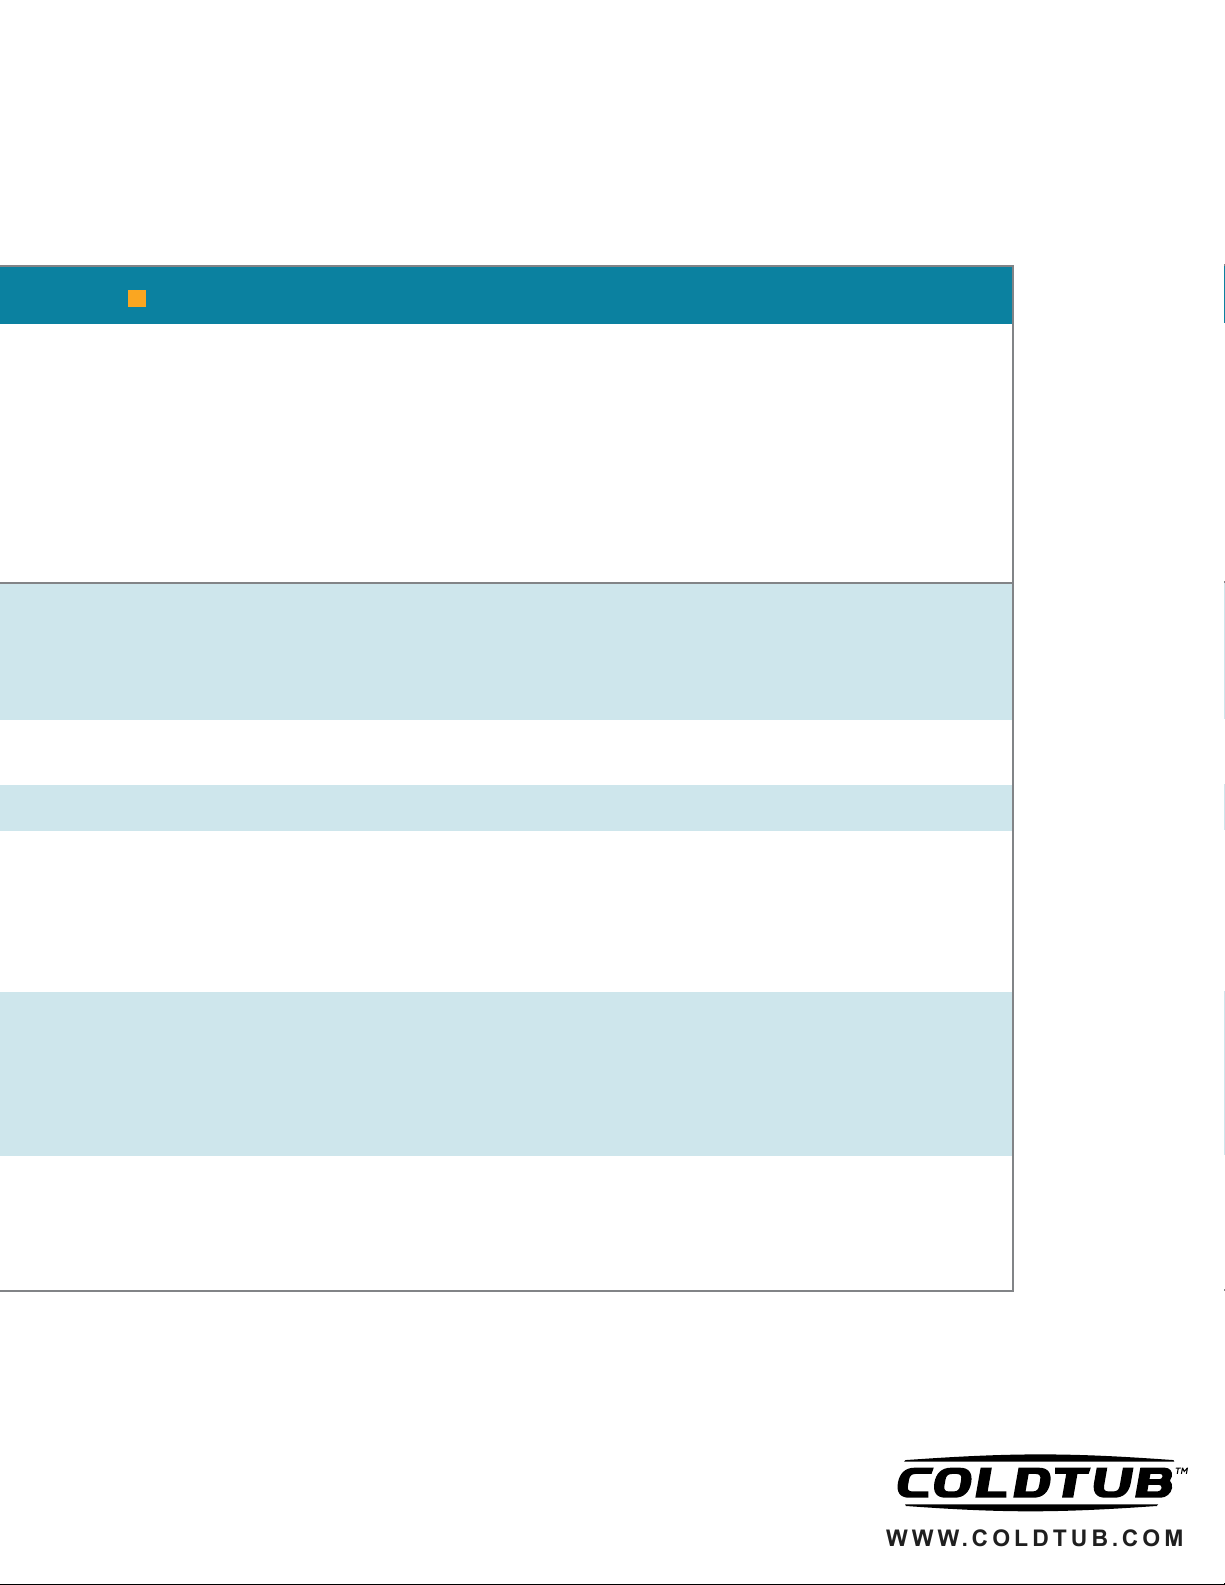
PROBLEM POSSIBLE CAUSES
CLOUDY WATER
COLORED WATER
FOAMING
SCALE DEPOSITS
ODOR
A. Poor Filtration
B. Suspended particles
C. Organic contaminants build up
D. TA high
E. pH high
F. Combined chlorine in the water
G. High dissolved solids
A. Dissolved metals from water source
B. Low chlorine levels
C. Fragrance
A. High concentration of oils and organics being
agitated by the jets
A. High Calcium level, high pH, high alkalinity
A. High level of organic contaminants, combined with
chlorine
EYE/SKIN IRRITATION
NO CHLORINE
A. pH too low
B. Combined chlorine due to high concentration of
organic contaminants
C. Allergic reaction to sanitizer
D. Bacterial contamination
A. High concentration of contaminants using
up sanitizers
B. Test kit reagents ineective
Page 25
WWW.COLDTUB.COM
SOLUTIONS
A. Dirty lter, increase Filter cycle.
B. Add Cold Water Clear ( not with disposable lter )
C. Shock treatment with Cold Water Oxidizer.
D. Add Cold Water Run Down to adjust TA level to 100-130 ppm.
E. Add Cold Water Run Down until PH level reads 7.2-7.6.
F. Cold Water Oxidizer treatment until combined chlorine is eliminated
G. Empty tub and rell.
A. pH has gone to high. Empty tub and rell.
B. Add Cold Water Sanitizer treatment to raise chlorine levels and test chlorine levels.
C. Stop the use of fragrance.
(see container instructions).
23
Cold Water Bubble Remover on foam. (not with disposable lter)
Empty tub,clean,rell and correct Alkalinity to 80-130ppm then pH to 7.2 - 7.6
A. Check pH and adjust as required.
B. Shock with Oxidizer, add Sanitizer
C. Dilution of water will reduce contaminants and odor.
D. Check if ozone system is operational.
A. High concentration of contaminants using up sanitizers.
B. Test kit reagents ineective.
A. Add sanitizers until levels are up to the recommended levels.
B. Replace test kits at least once a year.
C. Chlorine level very high and is bleaching test reagent, Allow sanitizer levels to recede by
opening cover and running jets.
Page 26
Winning is cool™
24
1.18 Wi Fi Connect
Overview:
WiFi Connect lets you use your iphone, ipod touch, or ipad to control your COLDTUB. Put it
in the waterproof case and you have the most advanced COLDTUB remote available. You
can turn the lights on, check and adjust the temperature, check and adjust ltration settings,
make sure there are no error codes etc…
COLDTUB Functions: The functions are controlled using Wi-Fi signals. The COLDTUB
creates its own wi network (no internet connection is needed). When you join the Wi-Fi
network of the COLDTUB and launch the app you will be able to control the functions of the
COLDTUB.
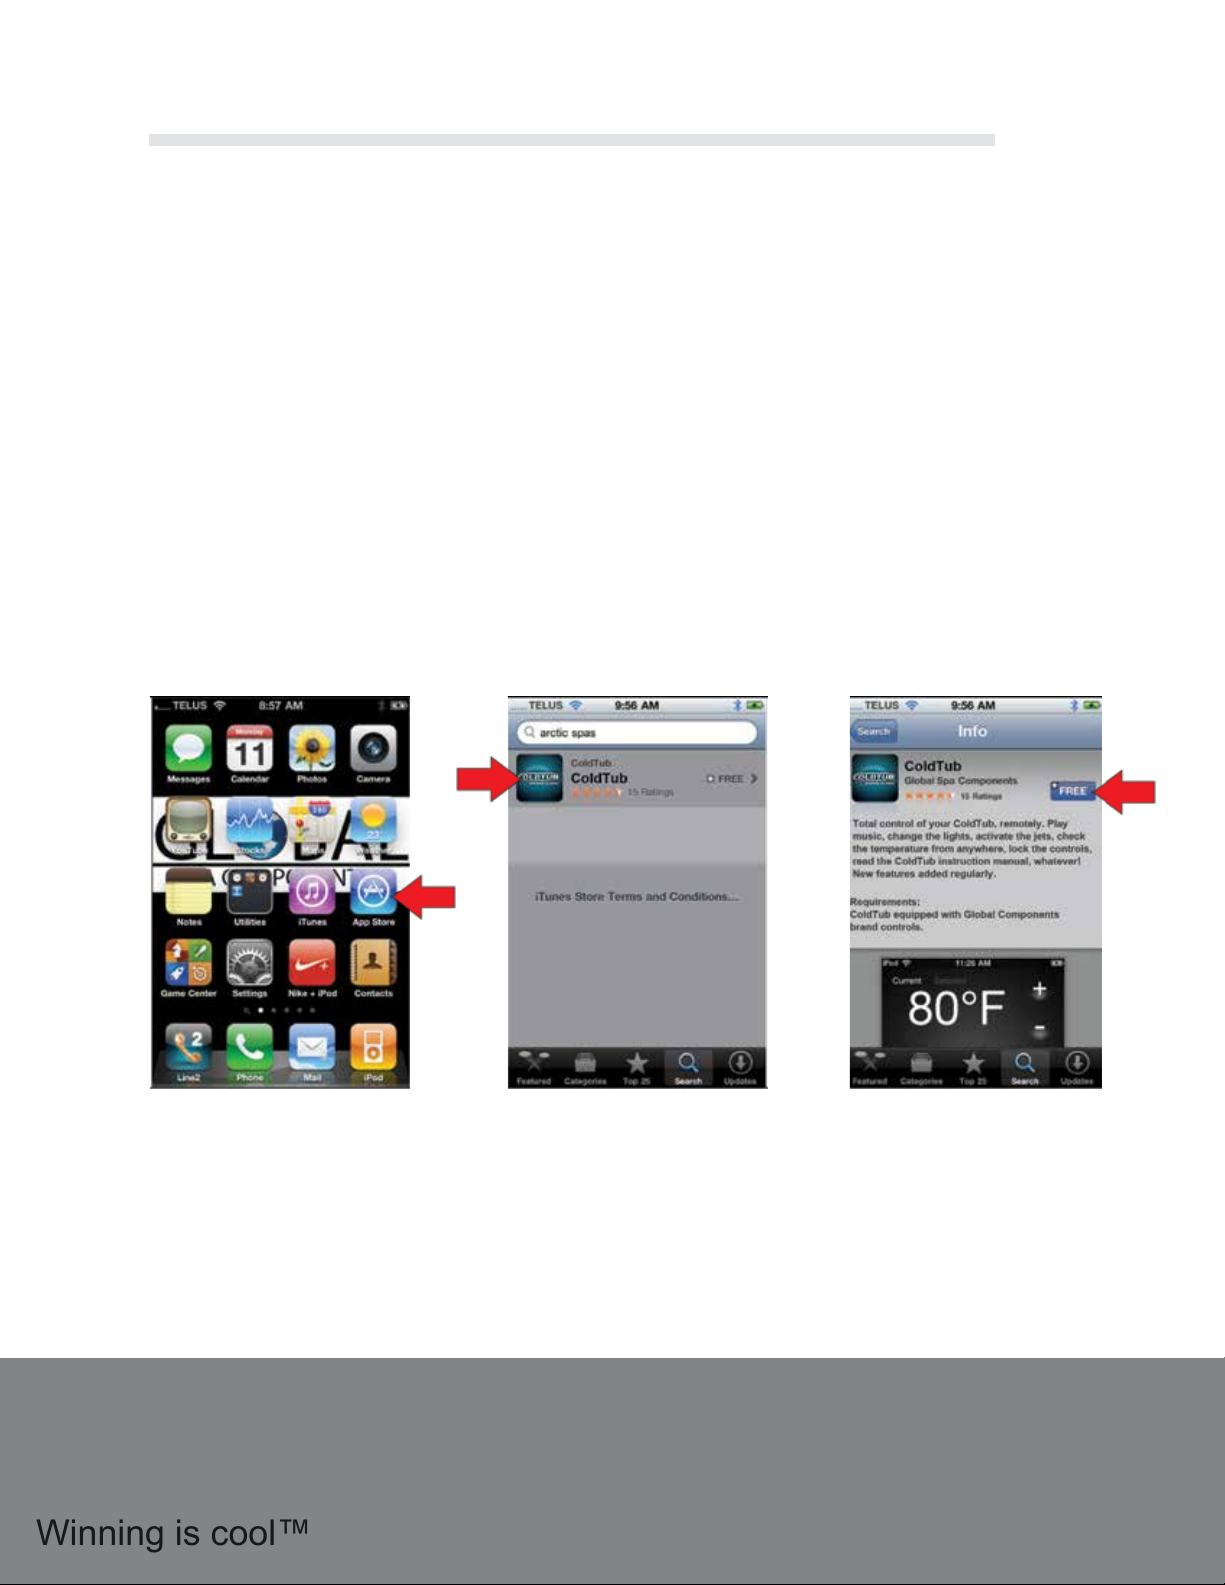
Downloading the App:
To download the app make sure you are connected to the Internet
and launch the Apple “App Store” app
From the main screen
nd and click on the “App
Store” Icon
Click on “Search” on the
bottom tab and type in
“ColdTub”, the app will
appear
Click the word “Free”,
then “Install” to begin
downloading the free app.
Its that easy!
Page 27
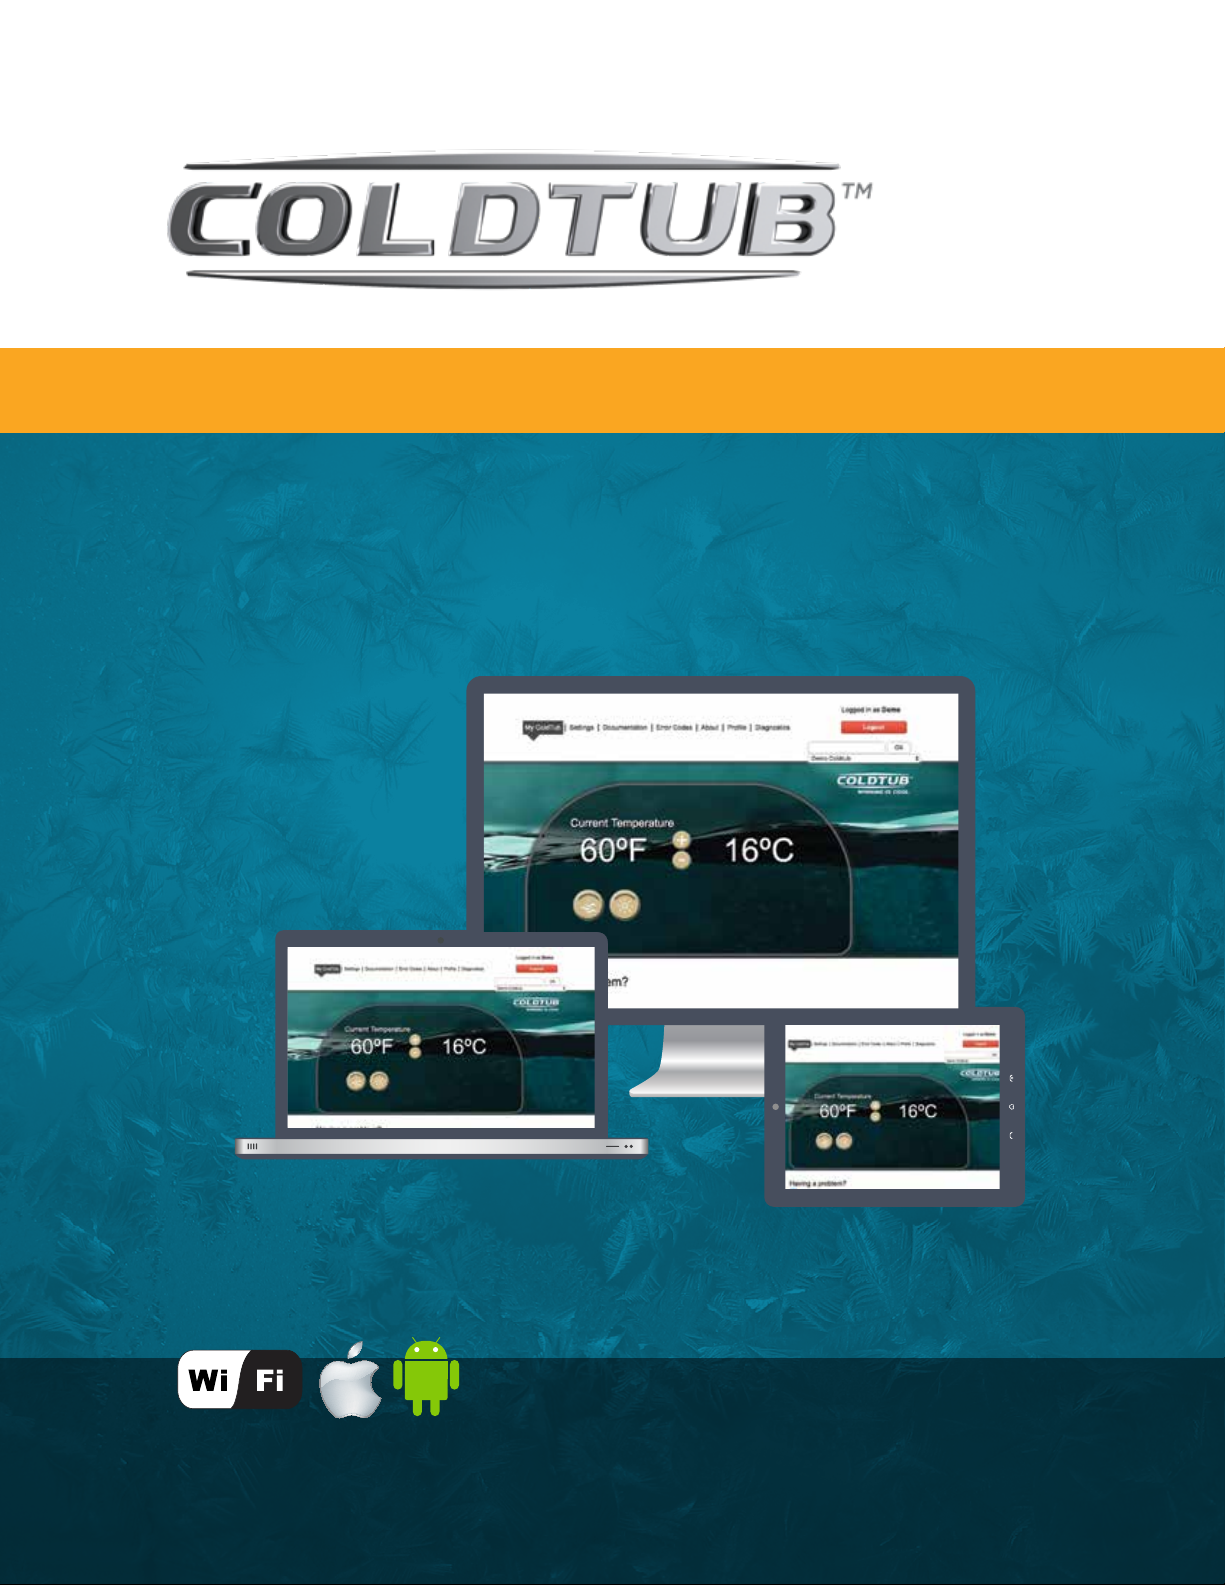
COLDTUB App and Web Connect to mycoldtub.com
User Guide
25
For COLDTUBs Configured with WIFI Capability.
* Apps available for iPhone & iPad.
Page 28

Winning is cool™
26
Table of Contents
2 COLDTUB App and Web Connect User Guide 27
2.1 COLDTUBs App? 27
2.2 What is Web Connect? 27
2.3 What is WIFI Extender? 27
2.4 What is a Network Connection Through LAN Cable? 28
2.5 What does Web Connect Do? 28
2.6 What is mycoldtub.com? 28
2.7 Web Connect Interface Through WIFI Extender 29
2.8 Web Connect Interface Through LAN Cable 29
2.9 COLDTUB App QRC Through WIFI Extender Flowchart 30
2.10 COLDTUB App QRC Through LAN Cable Flowchart 31
2.11 How to connect Your COLDTUB to the My COLDTUBs Server Flowchart 32
2.12 My COLDTUB 33
2.12.1 Home Page 34
2.12.2 New User Registration 34
2.12.3 Login First Time 35
2.12.4 Register a COLDTUB 36
2.12.5 Login 36
2.12.6 My COLDTUB - Logged In 37
2.13.1 Settings 37
2.13.2 Documentation 37
2.13.3 Error Codes 38
2.13.4 About 38
2.13.5 Prole 38
2.13.6 Diagnostics 39
2.13.7 Logout 39
2.14 Connect with the NETGEAR Installation Assistant 40
Page 29

2 COLDTUB App and Web Connect User Guide
This User Guide provides the COLDTUB owner information on how to connect their COLDTUB to their
network and the My COLDTUB Server allowing the COLDTUB owner access to the full benets of COLDTUB
App, Web Connect and owning a COLDTUB.
There are three steps involved in the complete connection process:
1. Download the free COLDTUBs App from your App Store.
2. Connect your network to your COLDTUB by WIFI Extender or LAN Cable. Once this is achieved COLDTUB
App will function through your device allowing you to control your COLDTUB with your device locally (within
your network WIFI range).
3. Connect your COLDTUB to the My COLDTUB Server through Web Connect which is achieved by opening
a free User Account on the mycoldtub.com Web Page and registering your COLDTUB against the User
Account raised. Once this is achieved, COLDTUB App will function through your device or computer allowing
you to control your COLDTUB with your device or computer anywhere in the world where you have internet
connection.
Note: If your COLDTUB is not optioned with WIFI capability for COLDTUB App, any COLDTUB can be
upgraded to have the required COLDTUB App components installed. Please contact COLDTUB with the
Serial Number of your COLDTUB.
27
2.1 COLDTUBs App?
The COLDTUB App provides total control of your COLDTUB remotely.
Allows you to:
• Activate the jets, lights.
• Check and adjust water temperature, ltration, salt water sanitizing system
• View your COLDTUBs power consumption detail.
• Play Music.
• Lock controls.
• Access COLDTUB owner manuals, quick reference cards, user guides and lots more.
• Access new features as added.
2.2 What is Web Connect?
Web Connect is the most ambitious extension of the COLDTUB App system, allowing an EcoPack equipped
COLDTUB to establish a connection directly to the Internet. In doing so, the COLDTUB owner can log into the
COLDTUB anywhere there is an Internet connection, and from the convenience of a smartphone, tablet or
computer can monitor and adjust all major functions of the COLDTUB. Web Connect allows the user to have
choice within this functionality, connect via the Cloud, WiFi or via the mycoldtub.com website.
Note: Before you can utilise Web Connect you must rst connect your COLDTUB to your Network by WIFI
Extender or LAN Cable.
2.3 What is WIFI Extender?
A Wi-Fi Extender, sometimes called a range expander, is a type of wireless repeater used to expand the reach
of a wireless LAN.
Page 30

Winning is cool™
28
2.4 What is a Network Connection Through
LAN Cable?
An Ethernet cable which is directly connected to the RJ45 Port on your COLDTUBs Processor Card and
the other end connected to an RJ45 Port on your Router. Where a new power cable needs to be run to your
COLDTUB, it is also a good opportunity to run an Ethernet cable to your COLDTUB at the same time. Doing
so achieves the best method of connecting your network to your COLDTUB.
2.5 What Does Web Connect Do?
• Adjust basic COLDTUB functions, such as:
1. Turn pumps on or off
2. View current status:
a. Chilling
b. Heating cycle
c. Filtration cycle
3. View current, and adjust temperature
4. Turn lighting systems on/off
• Adjust Higher level functions such as:
1. Adjust ltration cycle frequency and duration
2. Adjust Salt Water system output.
3. Monitor your COLDTUBs power consumption
• Reference Functions, such as access:
1. Owners Manuals.
2. Troubleshooting Guide, brochures and Quick Reference Cards (QRC).
2.6 What is mycoldtub.com?
Mycoldtub.com is a Web based after sales support system designed and built by COLDTUB especially for
COLDTUB owners that are utilising the COLDTUB App.
Mycoldtub.com through Web Connect allows the COLDTUB owner to log into their COLDTUB anywhere in
the world where they have Internet connection, and from the convenience of a smartphone, tablet or computer
can monitor and adjust all major functions of the COLDTUB. Web Connect allows the user to have choice
within this functionality, connect via the Cloud, WiFi or via the mycoldtub.com website.
Web Address is: www.mycoldtub.com
Page 31
1.9.5 W e b Co nnec t Int erfac e Th r ough WIF I Ext ende r
The following diagram reflects onSpa interface with Web Connect through WIFI Extender.
WebConnectThroughWIFIExtender
2011GlobalEcoPAK
HomeRouter
MyArctic
SpaServer
WebEnabled
Devicewith
AppInstalled
WIFI
Delivering
networkdata
Topside
Controller
Internet
Computer
1.9.5 W e b Co nnec t Int erfac e Th r ough WIF I Ext ende r
The following diagram reflects onSpa interface with Web Connect through WIFI Extender.
WebConnectThroughWIFIExtender
2011GlobalEcoPAK
HomeRouter
MyArctic
SpaServer
WebEnabled
Devicewith
AppInstalled
WIFI
Delivering
networkdata
Topside
Controller
Internet
Computer
1.9.6 W e b Co nnec t Int erfac e Th r ough LAN Cabl e
The following diagram reflects onSpa interface with Web Connect through a LAN Cable
connected to the Spas Processor Card and home Router
WebConnectThroughLANCable
Internet
HomeRouter
MyArctic
SpaServer
WebEnabled
Devicewith
AppInstalled
Computer
Topside
Controller
2011GlobalEcoPAK
Electrical
PowerLine
delivering
networkdata
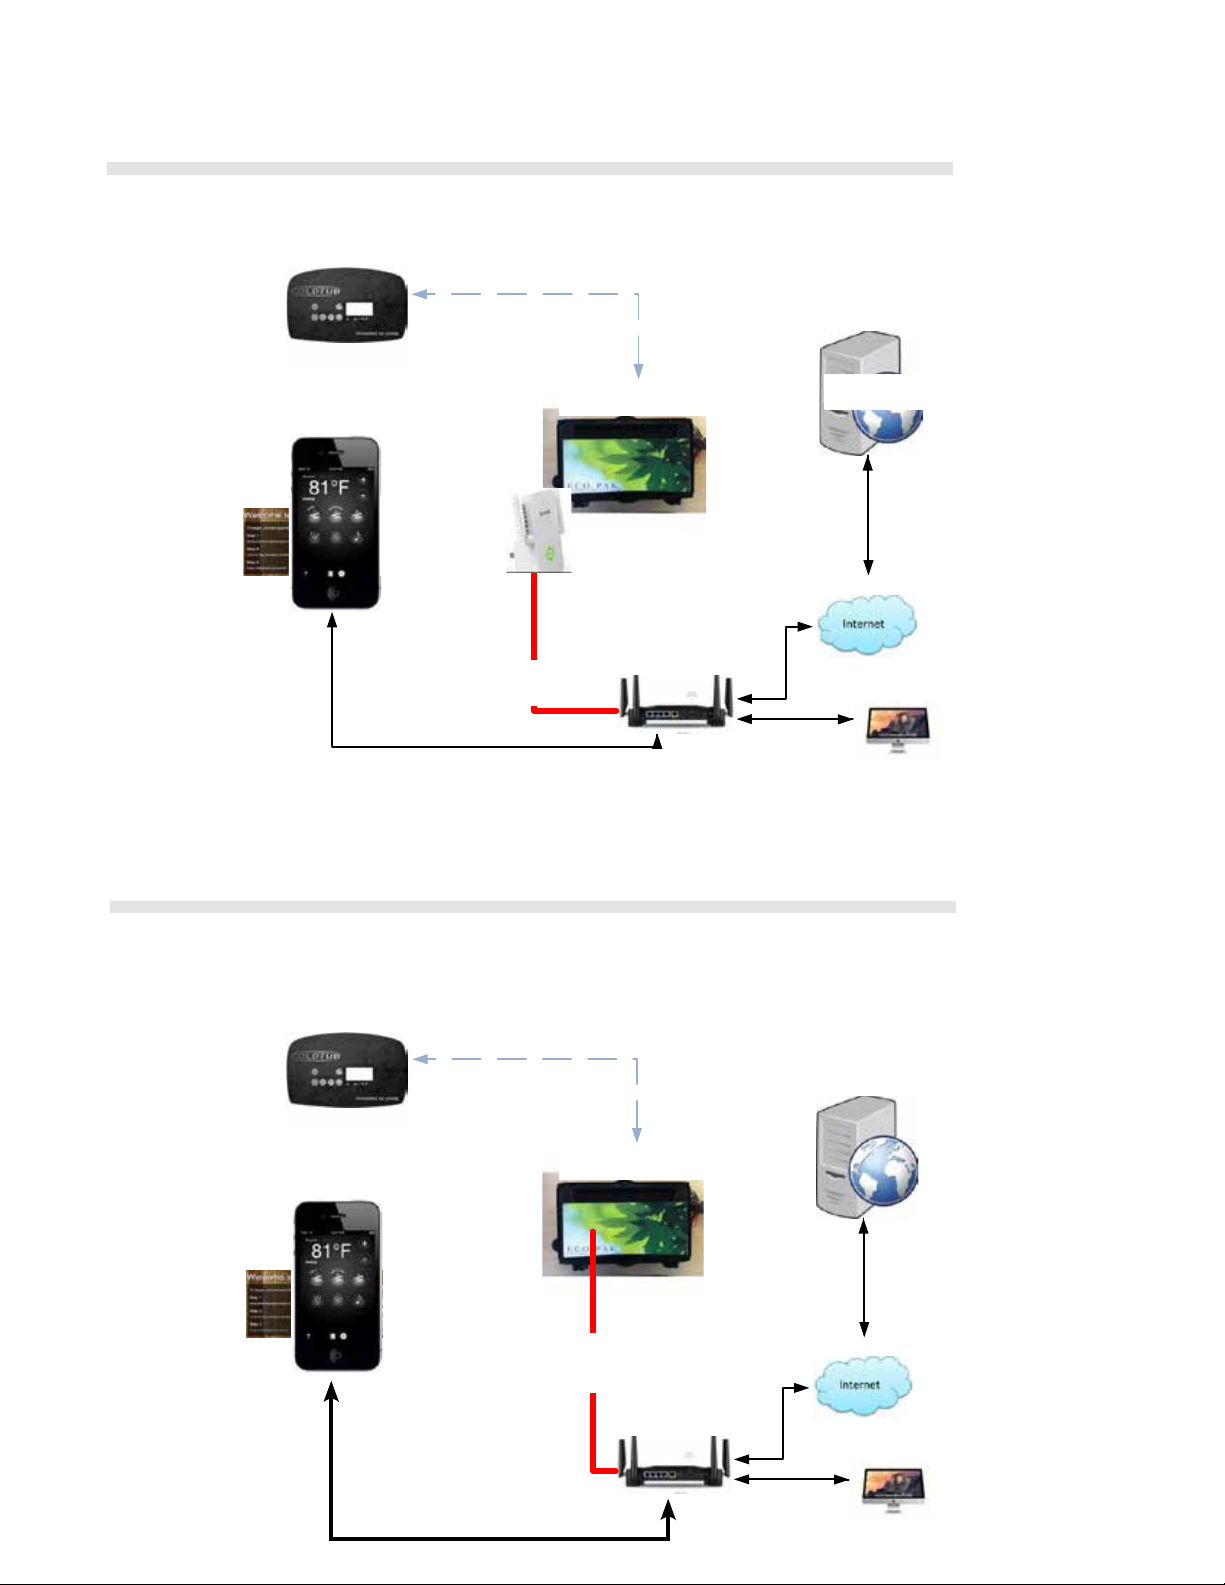
2.7 Web Connect Interface Through WIFI
Extender
The following diagram reects COLDTUB App interface with Web Connect through WIFI Extender.
29
My Coldtub
Server
Wi Extender
2.8 Web Connect Interface Through LAN Cable
The following diagram reects COLDTUB App interface with Web Connect through a LAN Cable connected to
the COLDTUBs Processor Card and home Router
My Coldtub
Server
Page 32
Winning is cool™
How to Connect Your Tub To Your Network With WIFI Extender
Quick Reference Guide
#17486
If your Tub Was ordered with a WIFI Extender the WIFI Ex-
tender will be Connected to the Motherboard & Processor
Card in the Tub Pack of your Tub and your Tubs Low Level
Programming (LLP) settings will be factory set to Dynamic.
Set up to have a Dynamic Internet Protocol (IP) address.
Watch the Video that demonstrates How to Connect
Your Tenda Wireless Range Extender to Your Net-
work(WIFI Extender ordered with your Tub)
Following the directions in the Video, connect the
WIFI Extender to your Network
Using your smart phone or tablet go to Settings/WIFI.
Connect to Tenda _XXXXX (Open)
Do you see the WIFI Extender?
Illuminated?
Try another
WIFI Extender
Are all lights illuminated?
Remove the Tubs PAK cover, lo-
cate the WIFI Extender check and
con rm WIFI Extender power light
is illuminated.If not illuminated
ensure the power cable is correctly
installed.
Check home router rewall settings for
restrictions. The router may be set to
Block devices “scanning” the network.
Contact your Dealer for assistance.
Connect to the Tub using the LAN
button on the App.
Note: It can take up to 6-8 times for the
App to nd The Tub on your Network,
if need be keep pressing the reconnect
button.
Scroll through the Tubs Low
Level Programming (LLP) check
to ensure the Tubs Internet
Protocol (IP) address.
Access the Tubs Low Level
Programming (LLP) through the
Topside Controller by holding
the FILTER button down until LLP
is displayed.
• Scroll through the LLP settings by
pressing the FILTER button, each
time you press the lter button you
move to the next LLP setting, scroll
through until IP is displayed.
•St or dy will be displayed, if St
is displayed press the Up Arrow
button to change to dy Dynamic.
• Press the FILTER button again to
display the Tubs IP address (Last
Octec should appear).
• Continue to press the FILTER
button until you have exited the
LLP settings. At this time the Pack
will save the settings.
Doyou have an IP
address?
Blocked?
Connected?
Try connecting
to the Tub with
another device.
Unblock router
settings.
Remove the Tubs PAK cover, locate the WIFI Extend-
er check and con rm:
• Power light on WIFI extender is illuminated.
• Ethernet cable is plugged into the RJ45 plug on the
WIFI Extender and light is illuminated.
• Ethernet cable is plugged into the RJ45 plug on the
Processor Card and light directly under the RJ45
plug is illuminated.
If WIFI light is Orange home
WIFI signal may be weak, try
the following:
• Relocate WIFI Extender.
• Relocate home router.
Note: If the above does not
correct the problem, contact
your Dealer for assistance.
Try the following one at a time
in the bellow order:
• Different Ethernet cable.
• Reset the WIFI Extender by
holding down
the factory reset button for
10 seconds
with a pen.
• New WIFI Extender.
• New Processor Card.
Note: If the above does not
correct the problem, contact
your Dealer for assistance.
YES
YES NO
YES
NO
YESNO
NO
YES
NO
YES
YES
Connected?
Connect to the Tub Usingthe
LAN bbutton on the App.
Note: It can take up to 6-8
times for the App to nd the
Tub on your Network, if need be keep
pressing the reconnect button.
Go to the myarcticTubs.com webpage to
create an account for your Tub and to register
you Tub. Refer Flowchart How to Connect
Your Tub to the Myarctic Tubs Server.
Open the Arctic Tubs App on your de-
vice such as your Smart Phone or tablet.
Your Tub is now connected to your Network
and you can control your Tub through the App.
NO
NO
The following Supportive Video Link may
also assist you with this process:
http://www.ColdTub.com/support/how-to-videos/
how-to-connect-with-a-tenda-wi -extender/
How to Connect Your Tub To Your Network With WIFI Extender
Quick Reference Guide
If your Tub Was ordered with a WIFI Extender the WIFI Ex-
tender will be Connected to the Motherboard & Processor
Card in the Tub Pack of your Tub and your Tubs Low Level
Programming (LLP) settings will be factory set to Dynamic.
Set up to have a Dynamic Internet Protocol (IP) address.
The following Supportive Video Link may
also assist you with this process:
http://www.ColdTub.com/support/how-to-videos/
how-to-connect-with-a-tenda-wi -extender/
30
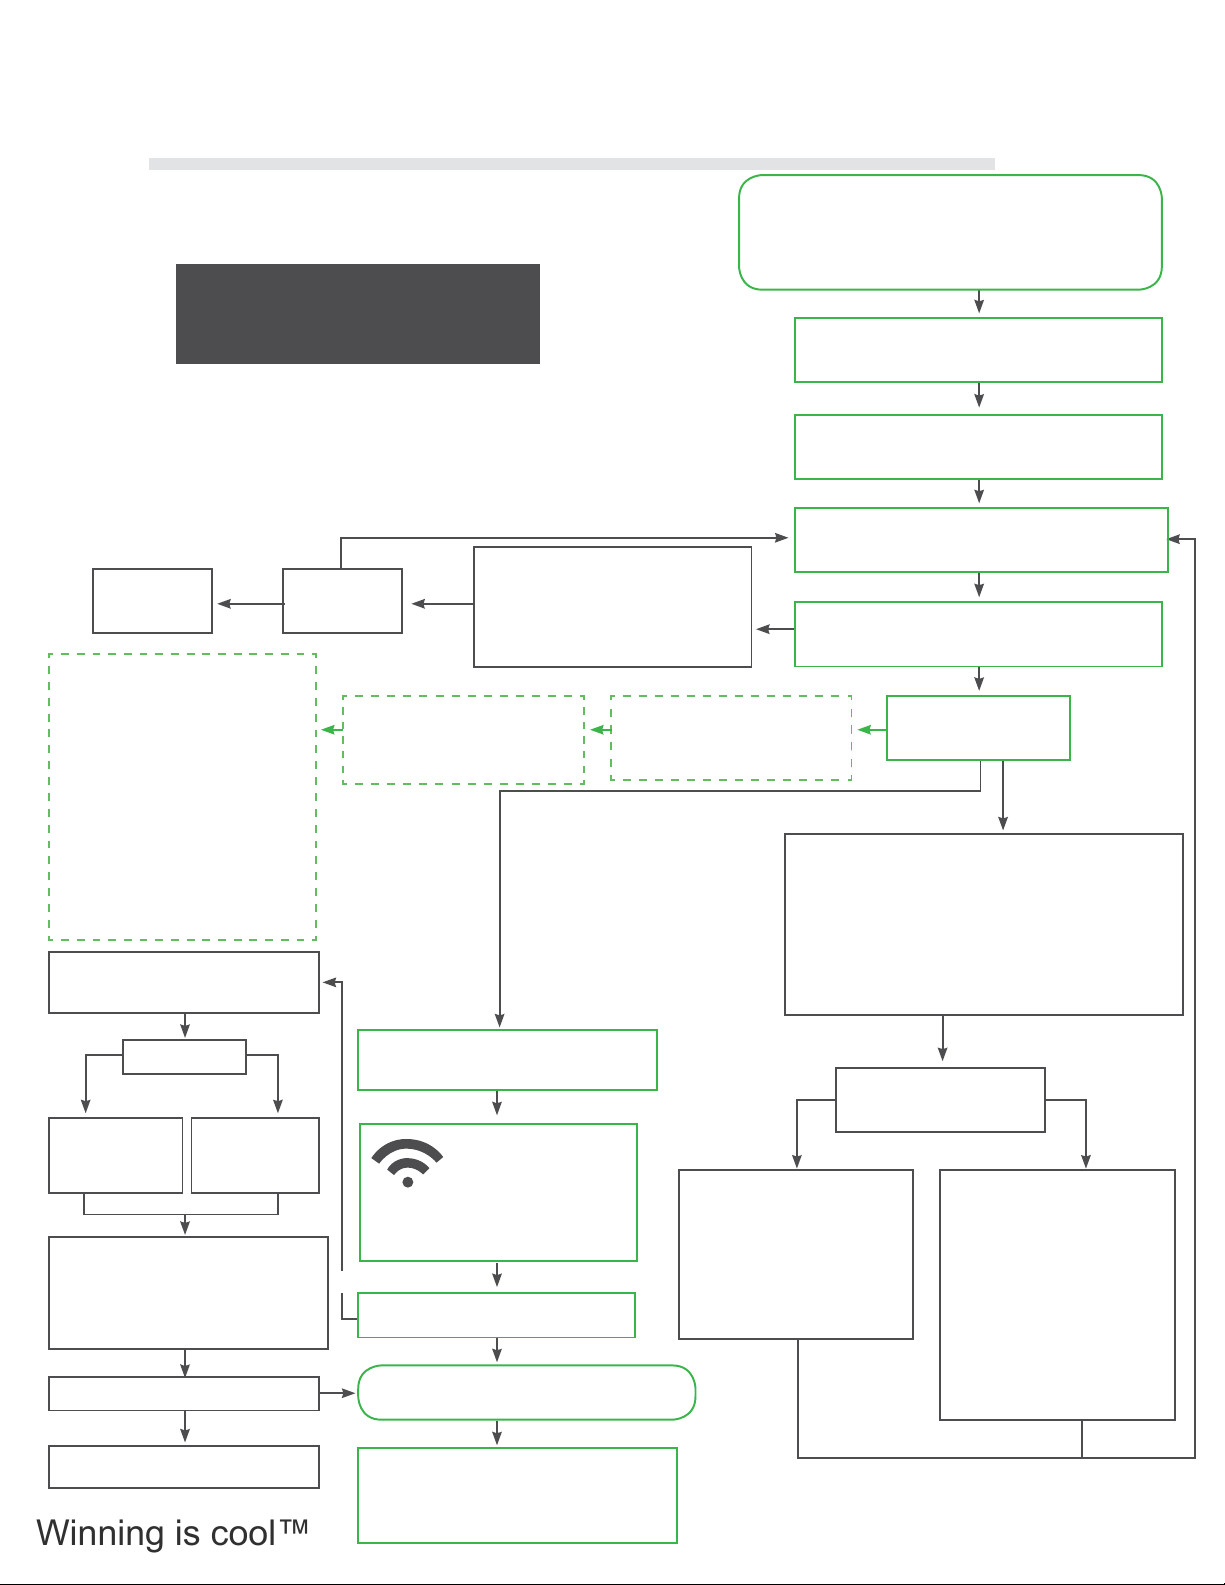
2.9 COLDTUB App QRC Through WIFI
Extender Flowchart
The following owchart shows how to connect COLDTUB App
through WIFI Extender.
Page 33
2.10 COLDTUB App QRC Through LAN Cable
How to Connect Your Tub To Your Network With LAN Cable
Quick Reference Guide
Obtain a LAN cable with RJ45 plugs t-
ted both ends and long enough to reach
from your Router to the RJ45 port on the
Processor Card mounted to the Mother-
board in the Tub Pack of your Tub.
Is your Tub equipped with an EoP
Module or WIFI Extender?
As appropriate:
• Disconnect the EoP Module from the Motherboard, disconnect the Ethernet cable from
the Processor Card and remove the EoP module from your Tub pack, or
• Disconnect the WIFI Extender from the Motherboard, disconnect the Ethernet cable
from the Processor Card and remove the WIFI Extender from your Tub cabinet.
Access the Tubs Low Level
Programming (LLP) through
the Topside Controller by
holding the FILTER button
down until LLP is displayed.
Reset the Tubs Breaker (Turn
power off and then on again at
the circuit breaker for the Tub).
Try connecting to the Tub with
another device
Blocked?
Check Router rewall settings
for restrictions. The router
may be set to Block devices
“scanning” the network
.
• Ensure the port on your
router is not
defective.
• Try another router port.
• Try another Ethernet cable.
• Try another router.
• Try another Processor Card.
Access the Tubs Low Level Programming (LLP)
through the Topside Controller by holding
the FILTER button down until LLP is displayed.
Do you have an IP address?
Scroll through the LLP settings by pressing the FILTER but-
ton, each time you press the lter button you move to the
next LLP setting, scroll through until IP is displayed.
• Con rm IP is set to dy
• Press the FILTER button again to display the Tubs IP
address(Last Octec).Note: .100 or .0 are false, any other
number is ne.
• Continue to press the FILTER button until you have exited
the LLP settings. At this time the Pack will save the settings.
Checkis the ETHERNET light illuminatedon the
Processor Card. Look directly under the RJ45 Port?
Contact your Dealer for assistance
• Scroll through the LLP settings by pressing the FILTER
button, each time you press the lter button you
move to the next LLP setting, scroll through until IP is
displayed.
• St or dy will be displayed, if St is displayed press the
Up Arrow button to change to dy Dynamic.
• Press the FILTER button again to display the Tubs IP
address (Last Octec should appear).
• Continue to press the FILTER button until you have
exited the
LLP settings. At this time the Pack will save the settings.
Connect the Ethernet cable, one end of
cable plugs into the RJ45 port on the
Processor Card & the other end plugs
into an RJ45 port on the Router.
YES
NO
NO
NO
NO
YES
NO
YES
YES
Scroll through the Tubs Low Level Pro-
gramming (LLP) check to ensure the Tubs
Internet Protocol (IP) address.
Do youhave an IP address?
Allow 3-4 minutes for Tub to reset.
Note: .100 or .0 are false. Any other
number is ne.
Open the COLDTUB App on your de-
vise such as your Smart Phone or tablet.
Connected?
Connect to the Tub Using
the LAN bbutton on the
App.
Note: It can take up to
6-8 times for the App to nd the Tub
on your Network, if need be keep
pressing the reconnect button.
Go to the mycoldtub.com webpage to create
an account for your Tub and to register you
Tub. Refer Flowchart How to Connect Your
Tub to the MyCOLDTUB Server.
Your Tub is now connected to your Network
and you can control your Tub through the App.
YES
NO
Unblock router
settings.
YES
The following Supportive Video Link may
also assist you with this process:
http://www.coldtub.com/support/how-to-videos/
how-to-connect-with-direct-ethernet-connection/
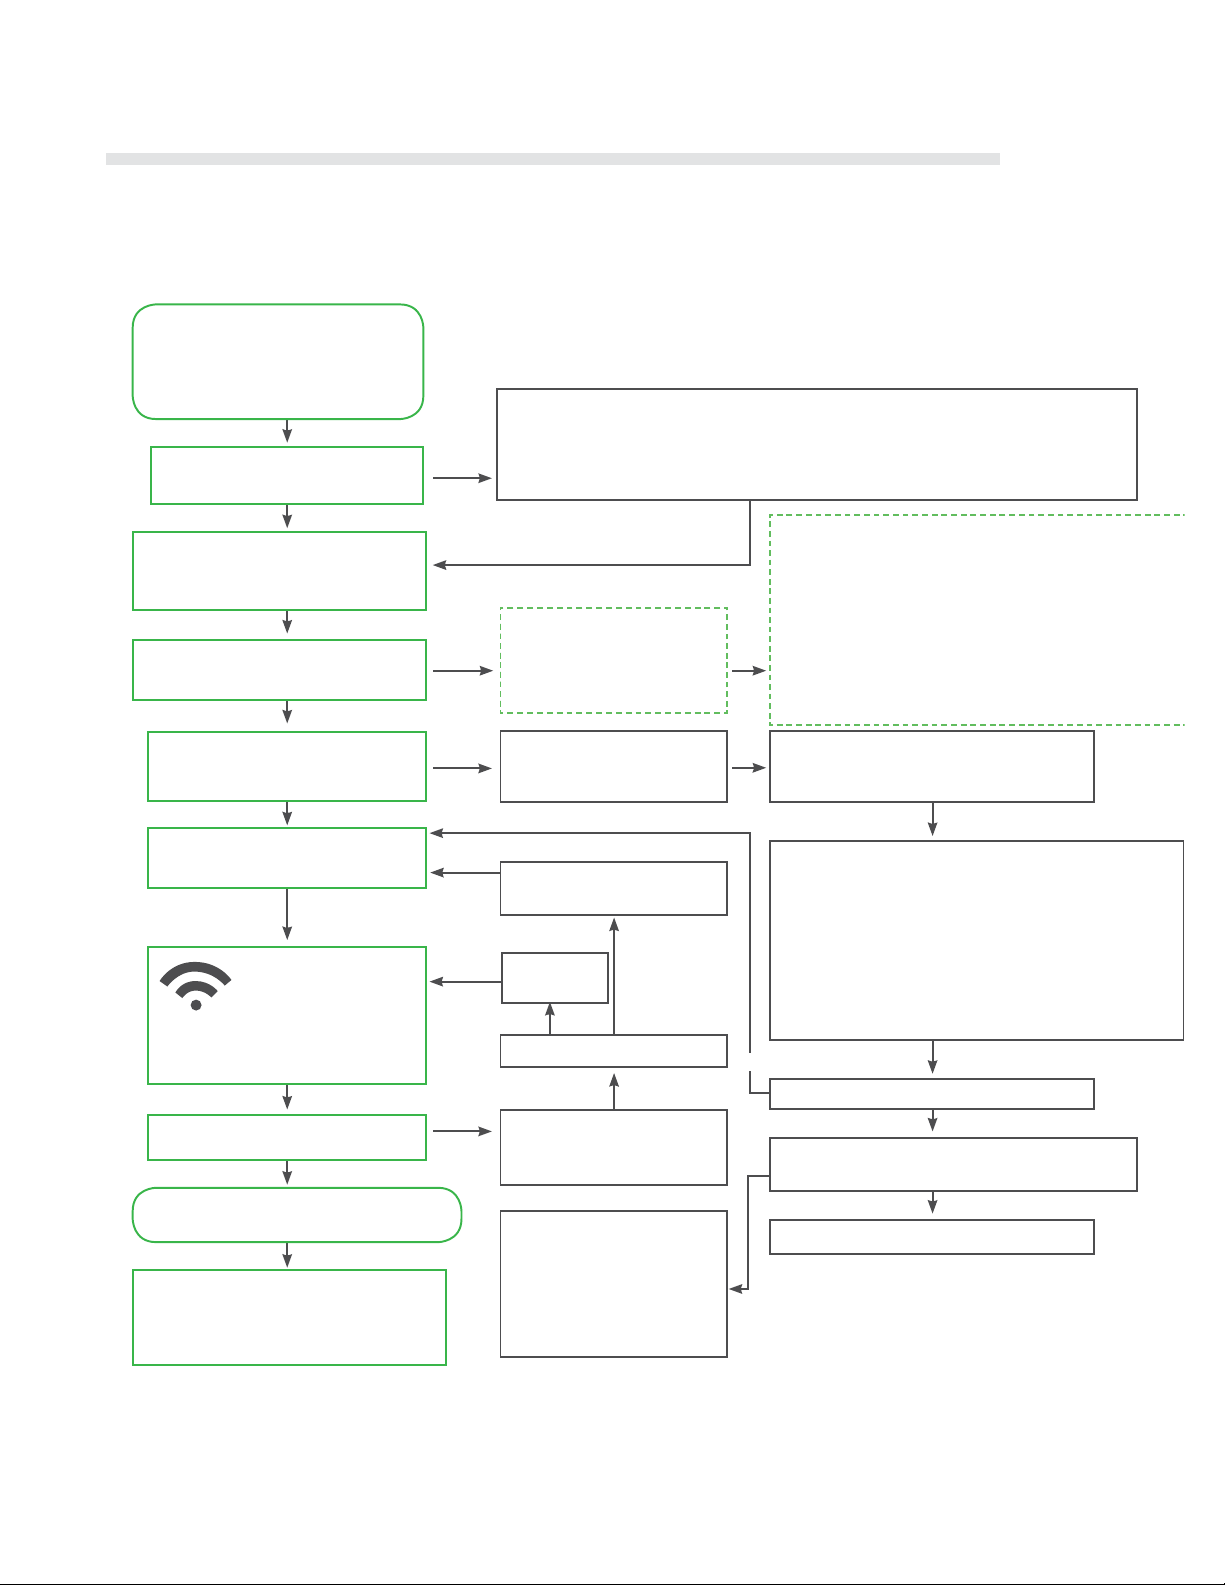
Flowchart
The following owchart shows how to connect COLDTUB App through connecting a LAN cable to the RJ45 Port
on your COLDTUBs Processor Card and the other end connected to an RJ45 Port on your Home Router.
31
Page 34
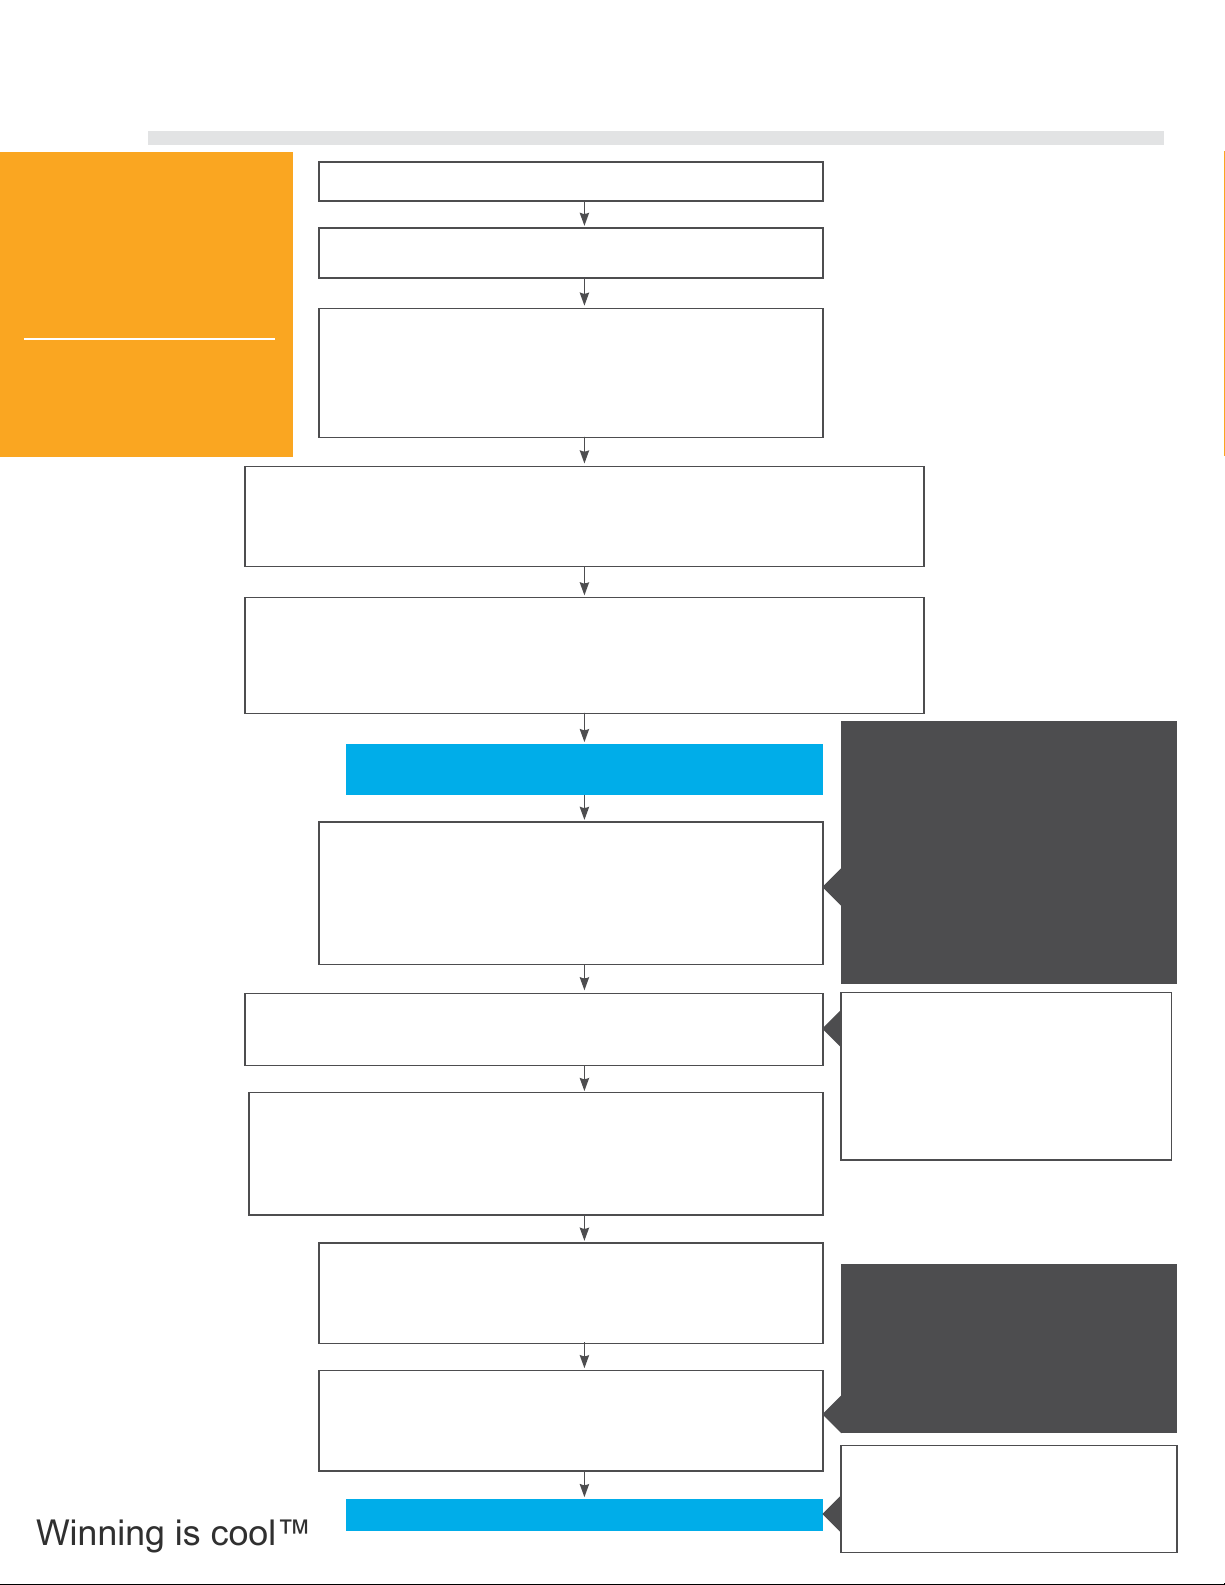
Winning is cool™
Quick Reference Guide
New Users must rst create a New User Account on the mycoldtub.
com Home Page.
To access the My COLDTUB Home page enter the following web
address into your browser www.mycoldtub.com
To create a New User Account Complete the details in the Register
box located on the right hand side of the Home Page.
Note: Ensure the Password you set is at least seven characters long.
Once completed, press the Click Here to Register button at the
bottom of the Register box to take you to the New User Account
screen.
On the New User Account screen, complete all the Required Information elds accordingly.
Once completed, press the Register button at the bottom of the New User Account screen.
A pop up message will be displayed advising you that you will receive an
Account Con rmation Email in a few minutes to complete the registration process.
Open the Email received from [email protected].
Complete the registration process by clicking on the Con rm my Mycoldtub.com account:
link in the Email received.
You will be directed to the Account Activation screen on the mycoldtub.com web page
and the con rmation message will be displayed.
Click the Login link in the Con rmation Message on the Account
Activation screen and you will be directed to a Login screen.
Enter your user name and password in the elds provided in the
Login Box.Once entered, press the Login button directly under the
Username and Password elds.You will be directed to the Pro le
and Preferences Page, where you can click on the link to register
your Tub details.
Click the Register an COLDTUB link in the Pro le and Preferences box to
commence the Tub registration process.
You will automatically be directed to
the Register A Tub Page, where you will need to register your Tub details.
Click the Search button to nd your Tub.
The Tub Registration Con rmation pop up box will be displayed advising
you to press a button on your Tubs Topside Controller to con rm the Tub
registration.
Note: You have 3 minutes to press a button on your Tubs Topside Controller
otherwise you will need to press the search button again.
You must go to your Tub to press any button on the Topside Con-
troller.
“rEG” will be displayed on the Topside Controller. When you press
any button on your Tubs Topside Controller “ConF” will be dis-
played, re ecting that your Tub is being con rmed for registration.
On the Register a Tub page you will now be able to see your Tub.
Press the Register button.
Then enter a nickname for your Tub and the Serial Number of your
Tub in the Nickname and Tub Number elds on the Register a Tub
Page. Press the Register button to complete the registration process.
Through mycoldtub.com you now have
direct access to all your Tubs Functions
and Settings from anywhere in the world
where internet access is available through
your smart phone, tablet or computer.
The Tubs Serial No. can be located on
the Metal Compliance Plate mounted to
your Tub just above the Bottom Rail and
between two doors.You only need and
register the number portion of the com-
plete Serial No.Eg Tub Serial No. AX-
16KX178910, 17890 is the portion of the
Serial No. required to be recorded.
NOTE: You will receive a prompt to re ect
that your Tub must be connected to the
Internet (Your Network). You must have
rst connected your Tub to your network
using the App on your device such as
a Smart Phone or tablet. This will have
been achieved with a WIFI connection
using either EoP, WIFI Extender or LAN
connection.
NOTE: Once you have logged in for the rst
time and registered your Tub details within
mycoldtub.com, logging into mycoldtub.com
is achieved from accessing the My COLDTUB
home page.
Login by entering your user name and
password in the elds on the upper right
hand side of the home page.
Once entered press the Login button
directly under the Username and Password
elds. Once logged in, My COLDTUB will
automatically open your personal My
COLDTUB page.
You can now login for the First Time
Do the following to Login.
Your Tub is now connected to The My COLDTUBs Server.
The following Supportive Video Link may
also assist you with this process:
http://www.coldtub.com/support/how-to-videos/
how-to-connect-coldtub-to-the-my-coldtub-server/
32
2.11 How to Connect Your COLDTUB to the
My COLDTUB Server
The following owchart
shows how to open a free
account with mycoldtub.
com and register your
COLDTUB on the server
linked to the mycoldtub.
com webpage.
Once completed, your
COLDTUB with be fully
functional through Web
Connect
(Web Connect) Flowchart
Page 35

33
2.12 My COLDTUB
The following is a brief outline of My COLDTUB.
Mycoldtub.com is a Web based after sales support system designed and built by COLDTUBs especially for COLDTUBs
owners allowing owners access to the full benets of owning a COLDTUB.
The My COLDTUB Server has been designed to receive data from your COLDTUB over the internet through your network
system. The data is logged and saved to the My COLDTUB Server on a continual basis.
My COLDTUB has been designed to:
• Receive data from your COLDTUB over the Internet through your network which has been connected to your
COLDTUB. The data is logged and saved on the My COLDTUB Server on a continual basis.
The following pages make up the My COLDTUB Web site:
• Home.
• Register.
• Login.
• Settings.
• Documentation.
• Error Codes.
• About.
• Prole.
• Diagnostics.
• Logout.
As you can see from the above, My COLDTUB clearly places COLDTUBs owners another milestone ahead of owners of
other brand COLDTUBs.
Register and enjoy the experience.
Page 36
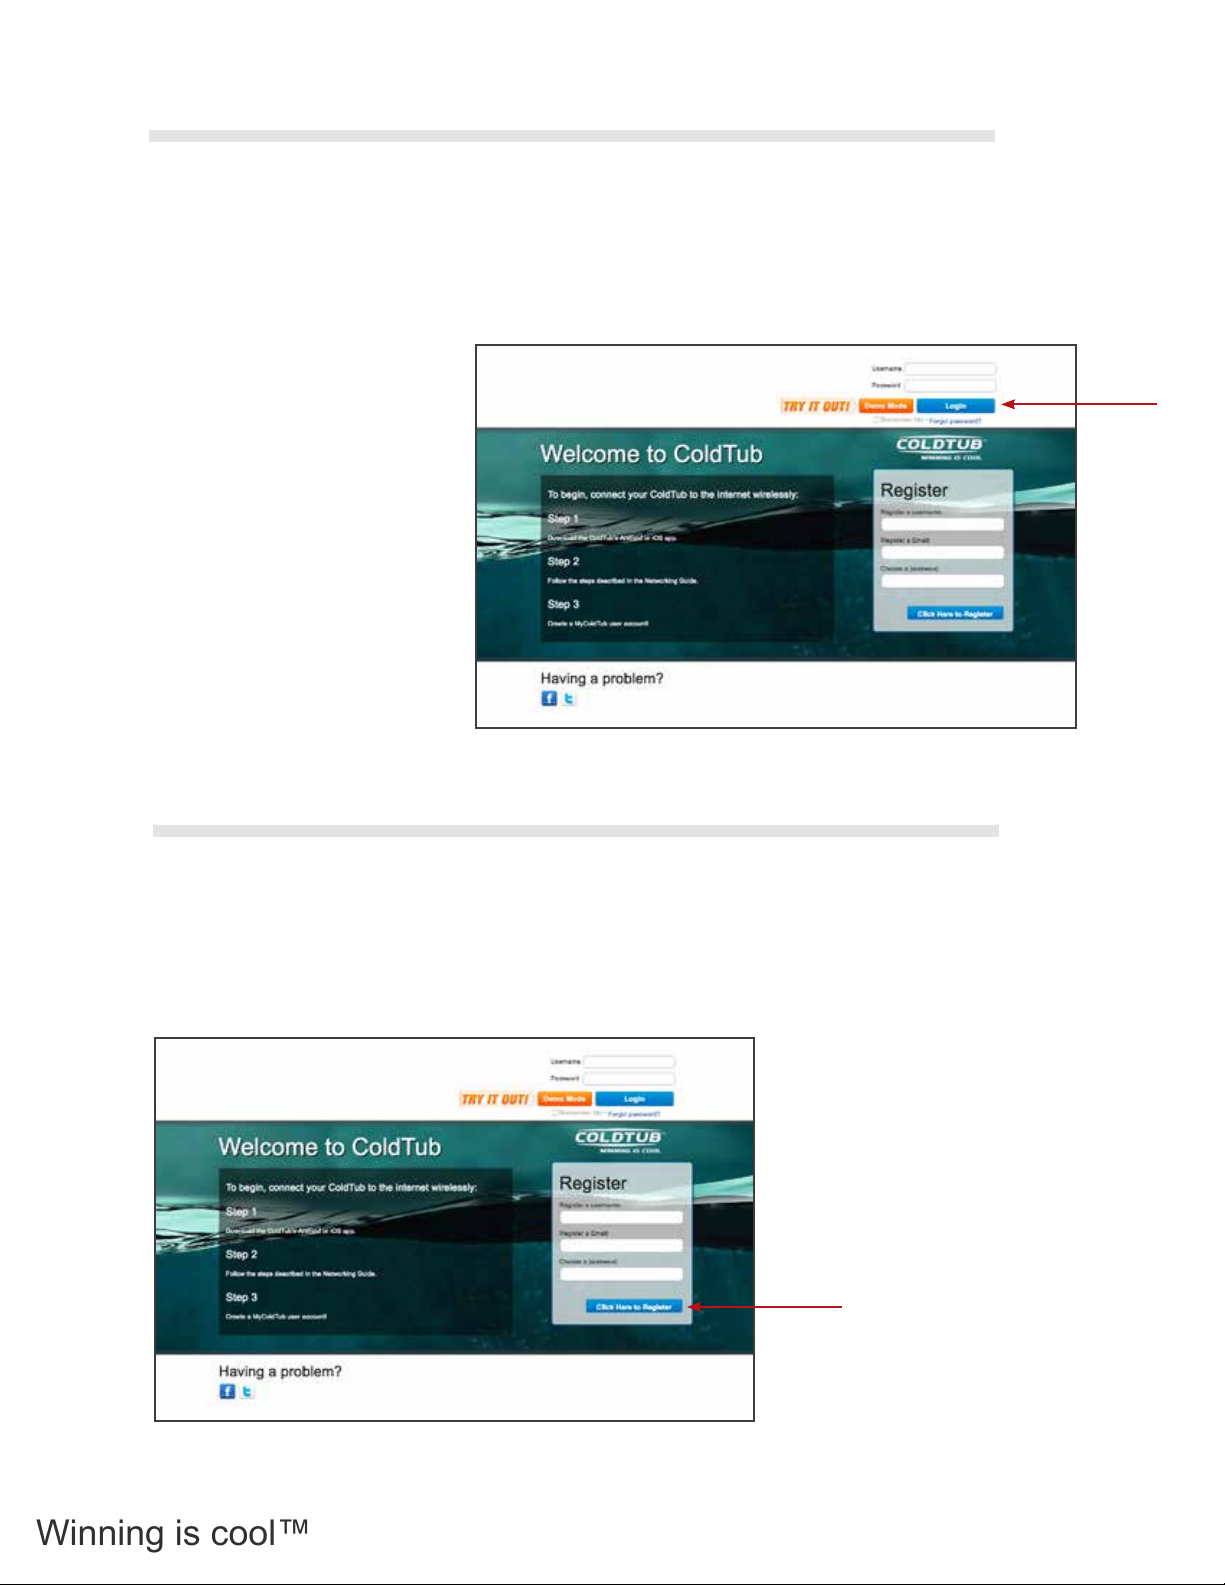
Winning is cool™
34
2.12.1 Home Page
To access the My COLDTUB Home page enter the following web address into your browser.
www.mycoldtub.com
For a new user, the user must rst create a new user account by completing the details in the Register box
located on the right hand side of the Home Page.
For a registered user, click on the Login button located on the upper right hand side of the Home Page.
2.12.2 New User Registration
For a new user, to create a user account complete the details in the Register box located on the right hand
side of the Home Page.
Note: password must be at least seven characters long.
Once completed, press the Click Here to Register button at the bottom of the Register box on the Home Page.
You will now have been directed to New
User Account screen.
Complete all the Required information elds
accordingly.
Once completed, press the Register button
at the bottom of the New User Account
screen.
Page 37
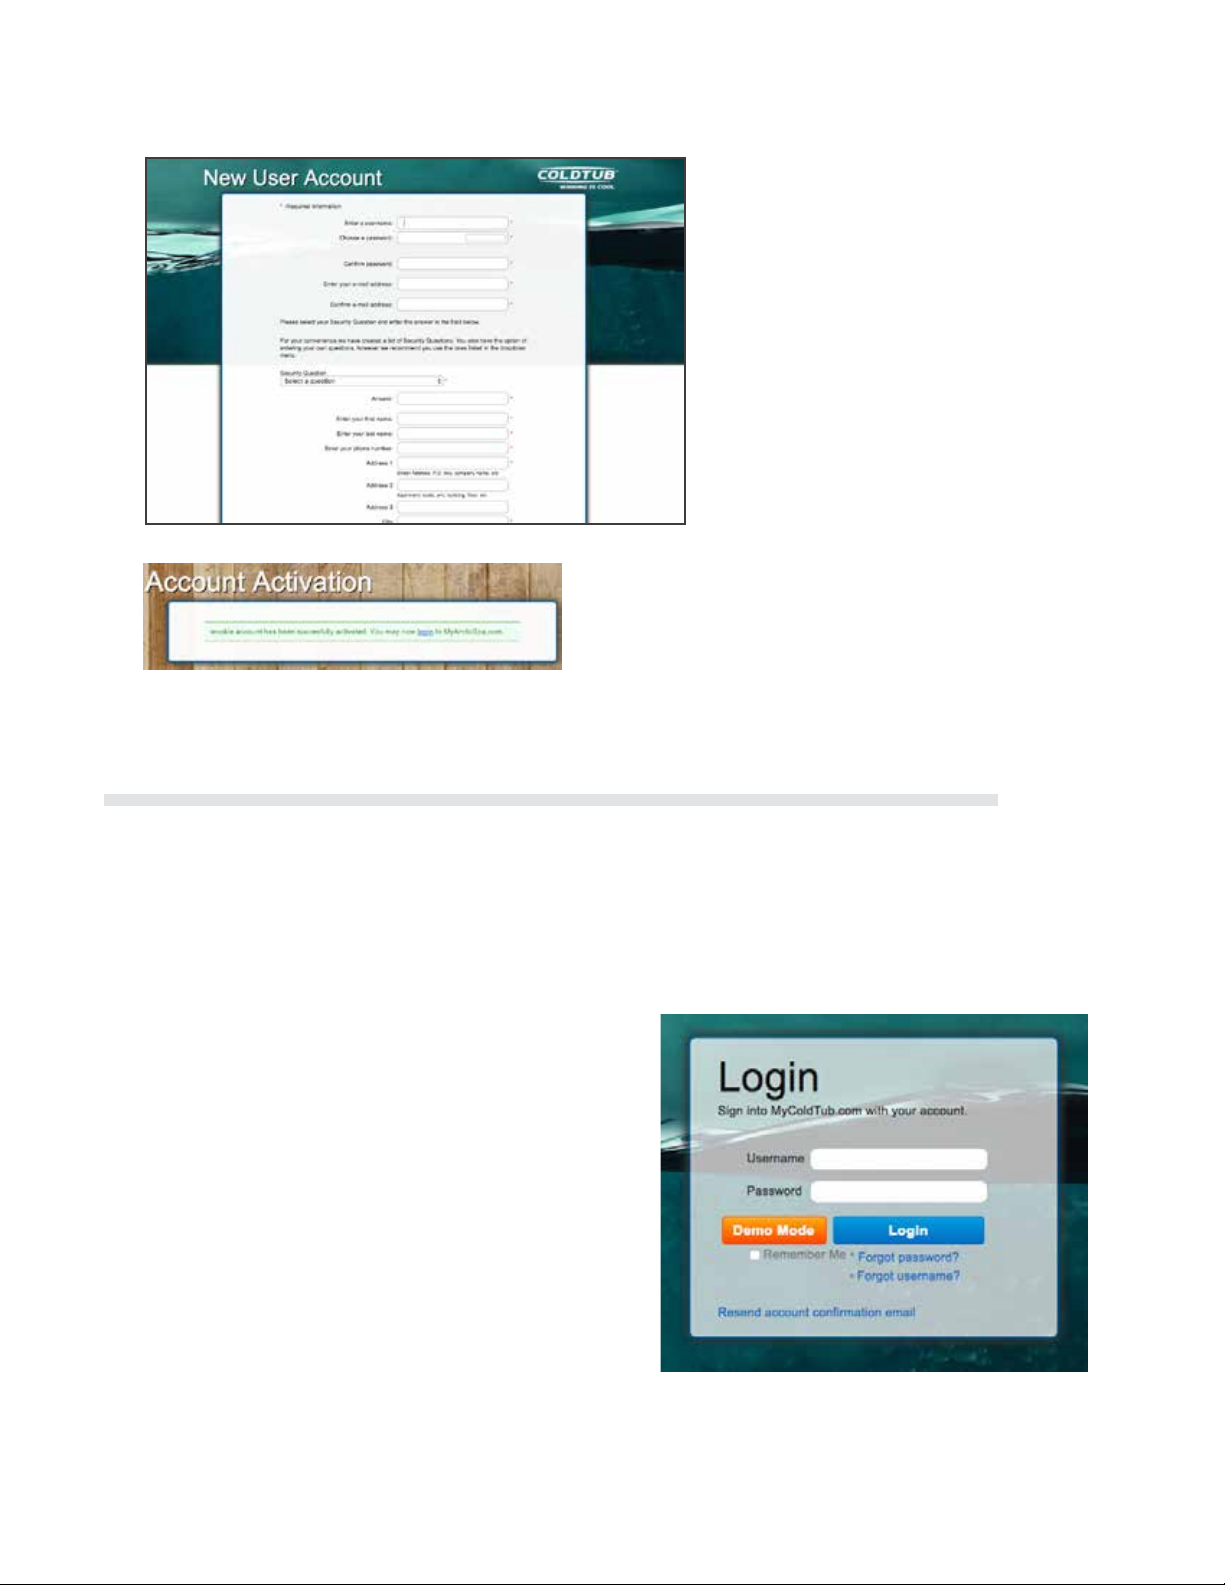
You will then receive an Account Conrmation Email
My Arctic Spa: New User Account – Screen
Shot
My Arctic Spa: Login Box Account
Activation – Screen Shot
from My COLDTUB.
Once you receive the email complete the registration
through conrming your email address by clicking on
the LINK in the email received.
You will be directed to the Account Activation
screen on the mycoldtub.com Web page, and the
conrmation will be displayed.
35
2.12.3 Login First Time
Before you login for the rst time you should rst ensure your COLDTUB has already been connect your
network.
You can now login by clicking the login link on the Account Activation screen and entering your user name and
password in the elds provided in the Login box.
You will automatically be directed to the Prole and Preferences Page, where you will need to register your
COLDTUB details.
Note: Once you have logged in for the rst time
and registered your COLDTUB details within
mycoldtub.com, logging into mycoldtub.com
is achieved from accessing the My COLDTUB
home page Log in by entering your user name
and password in the elds on the upper right
hand side of the home page. Once logged in, My
COLDTUB will automatically open your personal
My COLDTUB Page.
Page 38
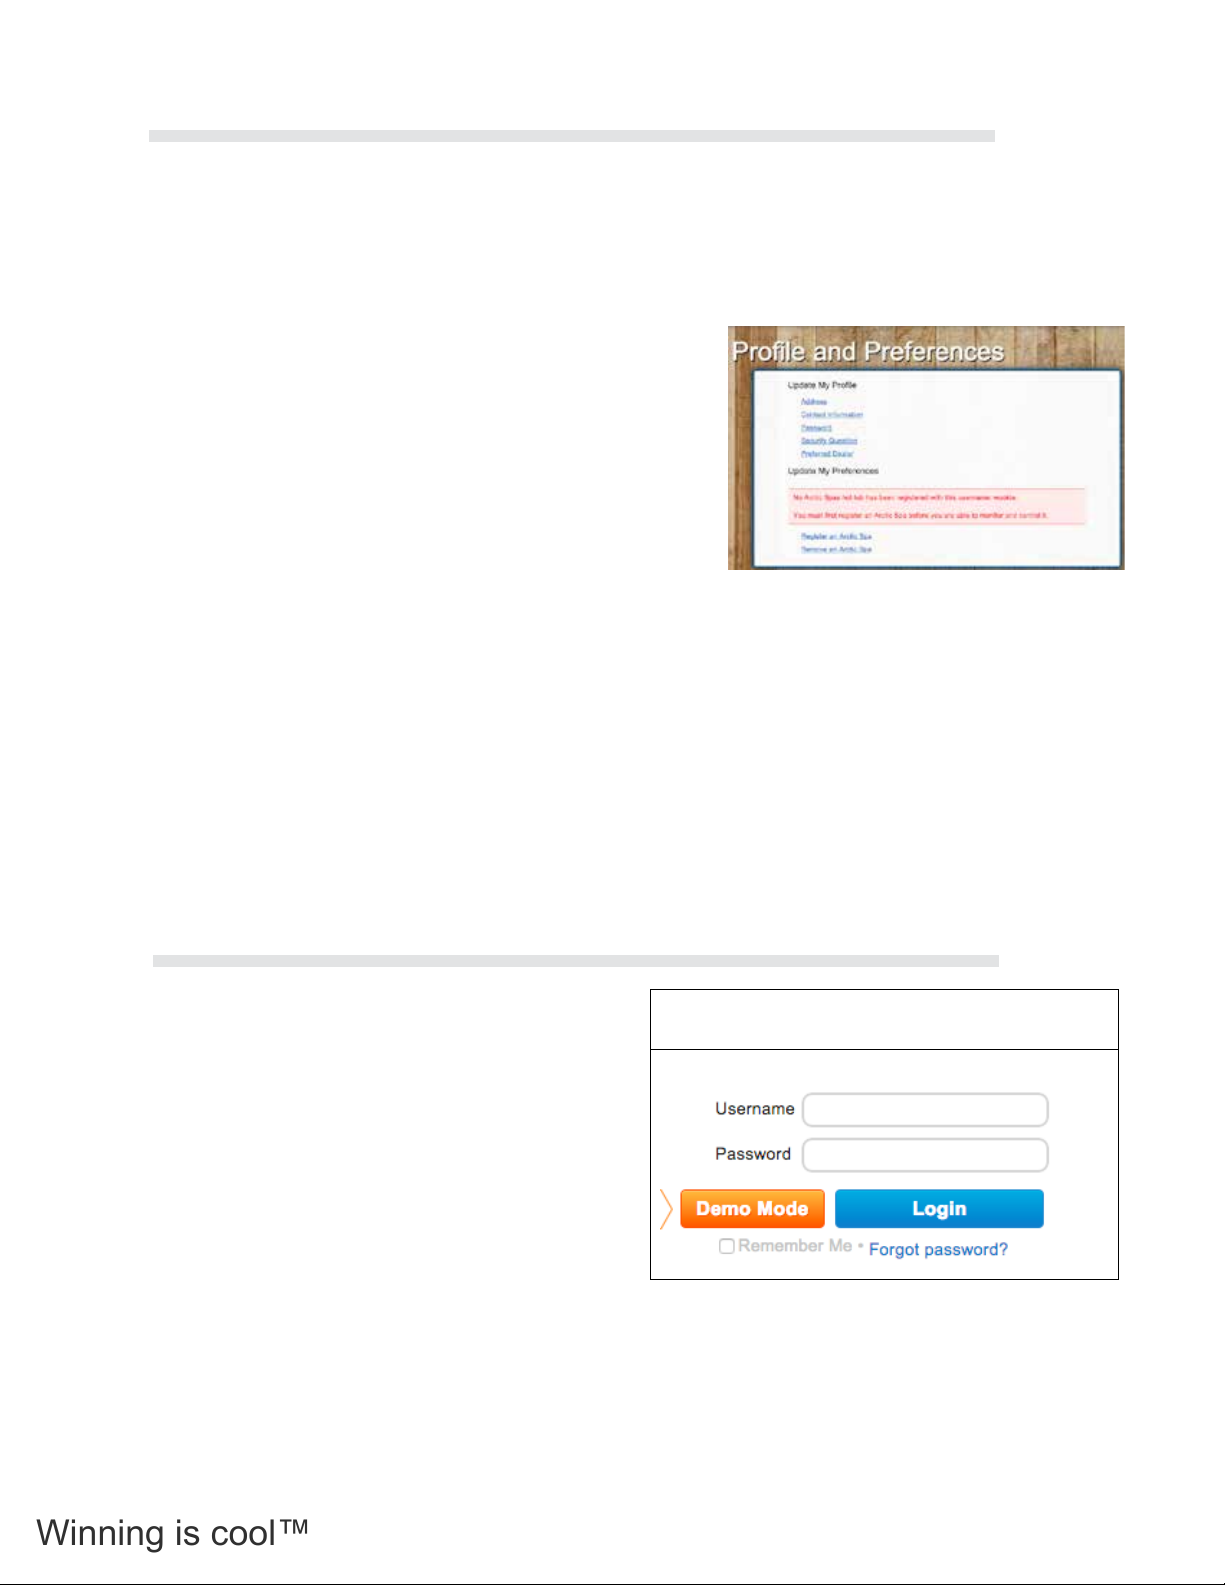
Winning is cool™
My Arctic Spa: Login Box – Screen Shot
My Arctic Spa: Profile and Preferences – Screen
Shot
1.15.5 Login
Once you have logged in for the first time and registered your spa details within My Arctic
Spa, logging into My Arctic Spa is achieved from accessing the My Arctic Spa home
page. Login by entering your user name and password in the fields on the upper right
hand side of the home page.
Once entered press the Login button directly under the Username and Password fields.
Once logged in, My Arctic Spa will automatically open your personal My Arctic Spa page.
Note: If you have forgotten your password you can press the Forgot Password button
to re-establish your password.
My Arctic Spa: Login Box on Home Page –
36
2.12.4 Register a COLDTUB
To register your COLDTUB details click the Register a COLDTUB link in the Prole and Preferences box.
You will receive a prompt to reect that your COLDTUB must be connected to the Internet (Your Network).
Click the Search button to nd your COLDTUB. The COLDTUB Registration Conrmation pop up box will
be displayed advising you to press a button on your COLDTUBs Topside Controller to conrm the COLDTUB
registration.
You must go to your COLDTUB and press any button on the
Topside Controller.
‘rEG” will be displayed on the Topside Controller. When you
press any button on your COLDTUBs Topside Controller
“Conf” will be displayed, reecting that your COLDTUB is being
conrmed for registration.
On the Register a COLDTUB page you will now be able to see
your COLDTUB.
Press the Register button.
Then enter a nickname for your COLDTUB and the Serial Number of your COLDTUB in the Nickname and
COLDTUB Registration elds on the Register a COLDTUB Page.
Press the Register button to complete the registration process.
Your COLDTUB will now be connected to the My COLDTUB server
2.12.5 Login
Once you have logged in for the rst time and
registered your COLDTUB details within My
COLDTUB, logging into My COLDTUB is achieved
from accessing the My COLDTUB home page.
Login by entering your user name and password in
the elds on the upper right hand side of the home
page.
Once entered press the Login button directly under
the Username and Password elds.
Screen Shot
Once logged in, My COLDTUB will automatically
open your personal My COLDTUB page.
Note: If you have forgotten your password you can press the Forgot Password button to re-establish your
password.
Page 39
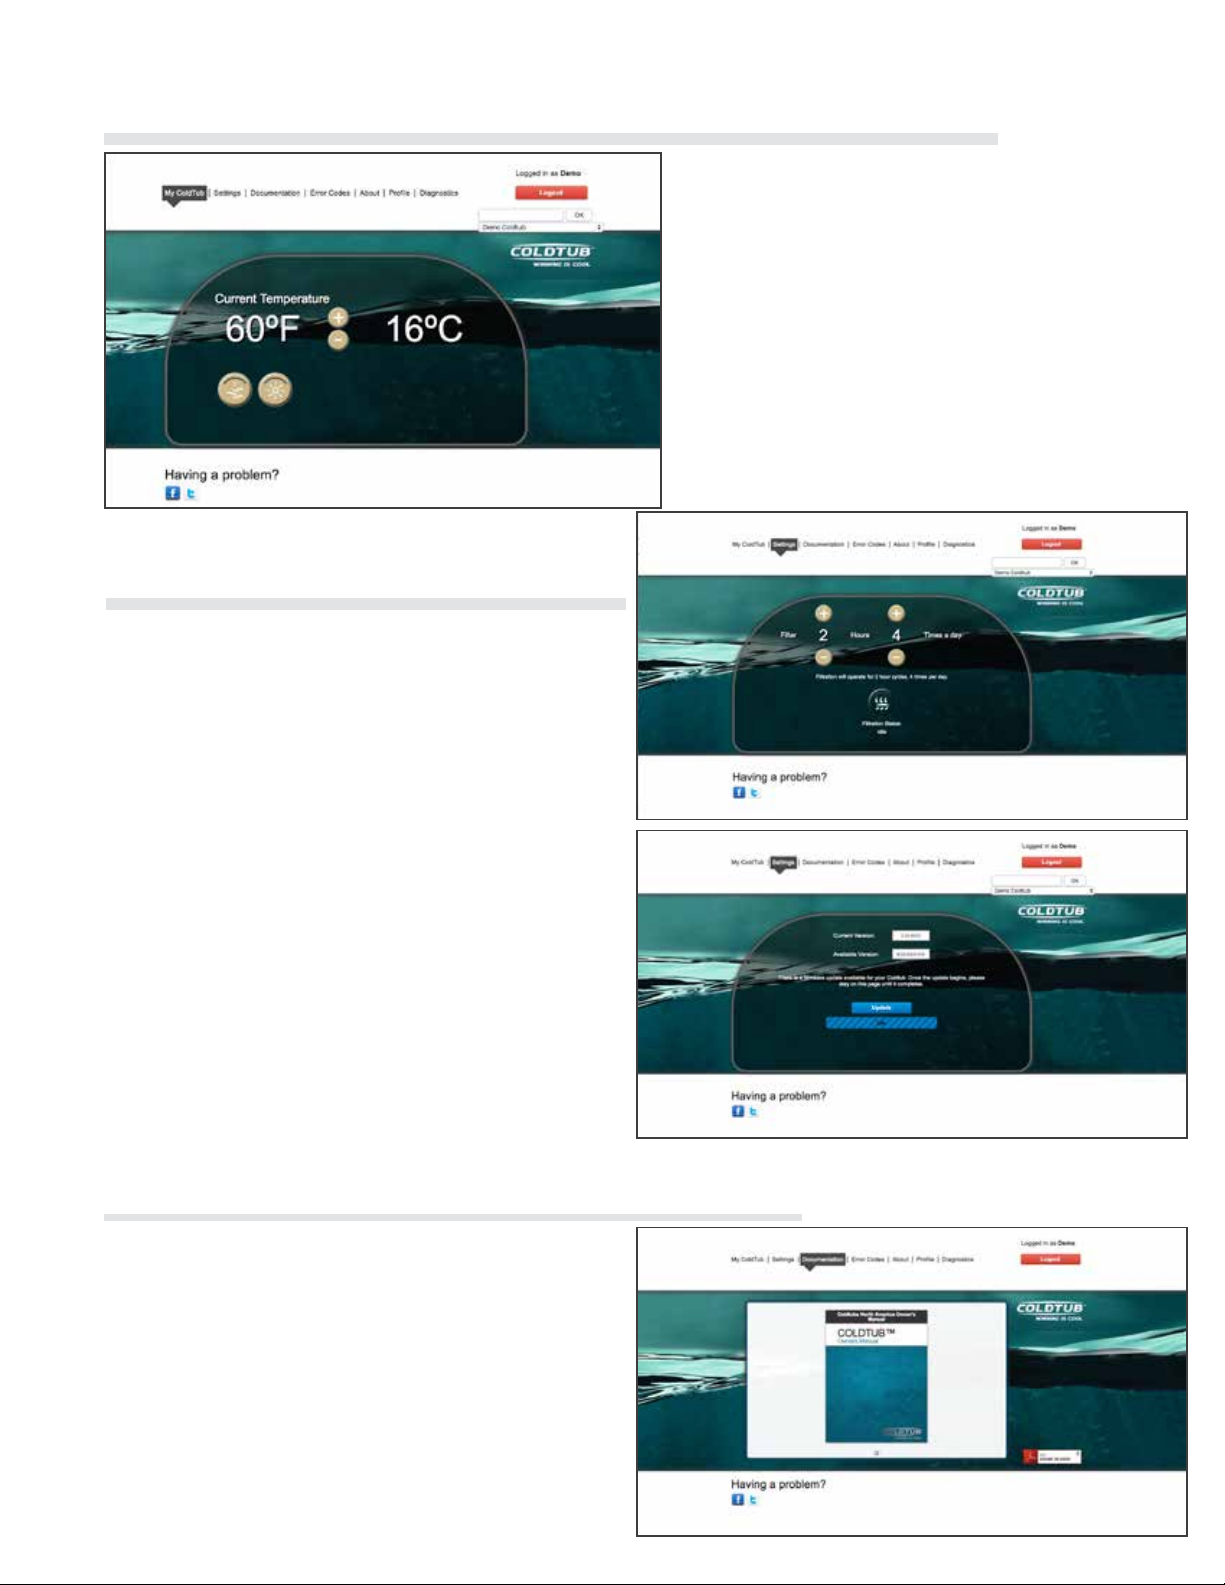
2.12.6 My COLDTUB
2.13.1 Settings
37
Once you have logged in, My COLDTUB will
have automatically directed you to, your My
COLDTUB page.
If your COLDTUB is connected to the internet
through your network you can see if your
COLDTUB is in use, adjust the temperature
and turn on and off components if desired
From this page you are able to explore the My
COLDTUB web pages by clicking the desired
tab along the horizontal tool bar.
Click on this tab to access the Settings page.
From this page, you can see your COLDTUBs
currently producing Sanitizer (Sanitizing) adjust
the following settings of your COLDTUB:
• Filtration
• Firmware Upgrade
1.13.2 Documentation
Click on this tab to access the Documentation page.
This page provides you easy access to:
• Owners manual
• Networking guide
• COLDTUB App user guide
• Other cool stuff
• Quick Reference Cards
Page 40
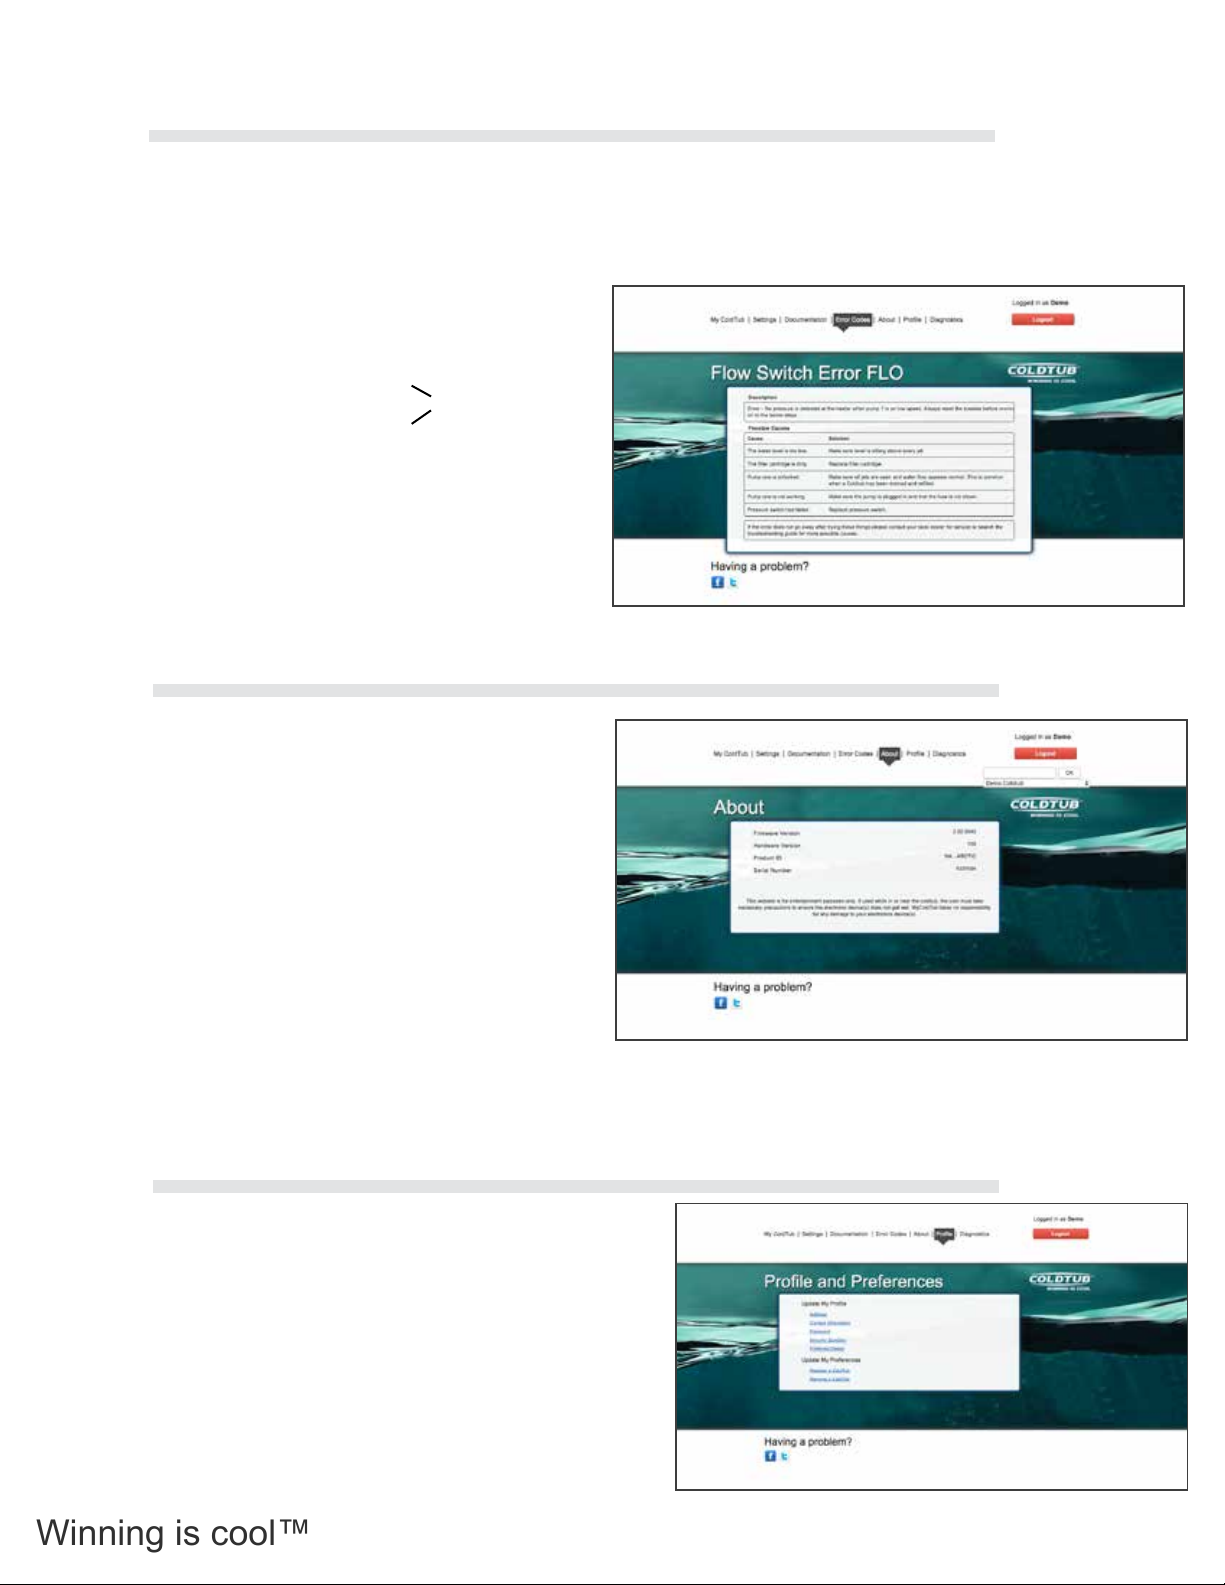
Winning is cool™
38
2.13.3 Error Codes
Click on this tab to access the Error Codes page.
This page provides you quick access to error code descriptions, possible causes and solutions for error codes
that will be displayed on your COLDTUBs topside controller, in the unlikely event of a system warning linked to a
possible component fault, such as:
• Flow switch error - FLC.
• Flow switch error - FLO.
Or HPT
• High limit error - HL.
• High limit temp probe error - HL.
• Temp probe error - PRR.
2.13.4 About
Click on this tab to access the About page.
This page displays the following details about your
COLDTUB:
• Firmware version load.
• Hardware version.
• Product ID.
• COLDTUB serial number.
2.13.5 Prole
Click on this tab to access the Prole page.
This page is used to:
• Update your personal details such as email
and password.
• Update your preferences such as register and
remove a COLDTUB from My COLDTUB.
Page 41
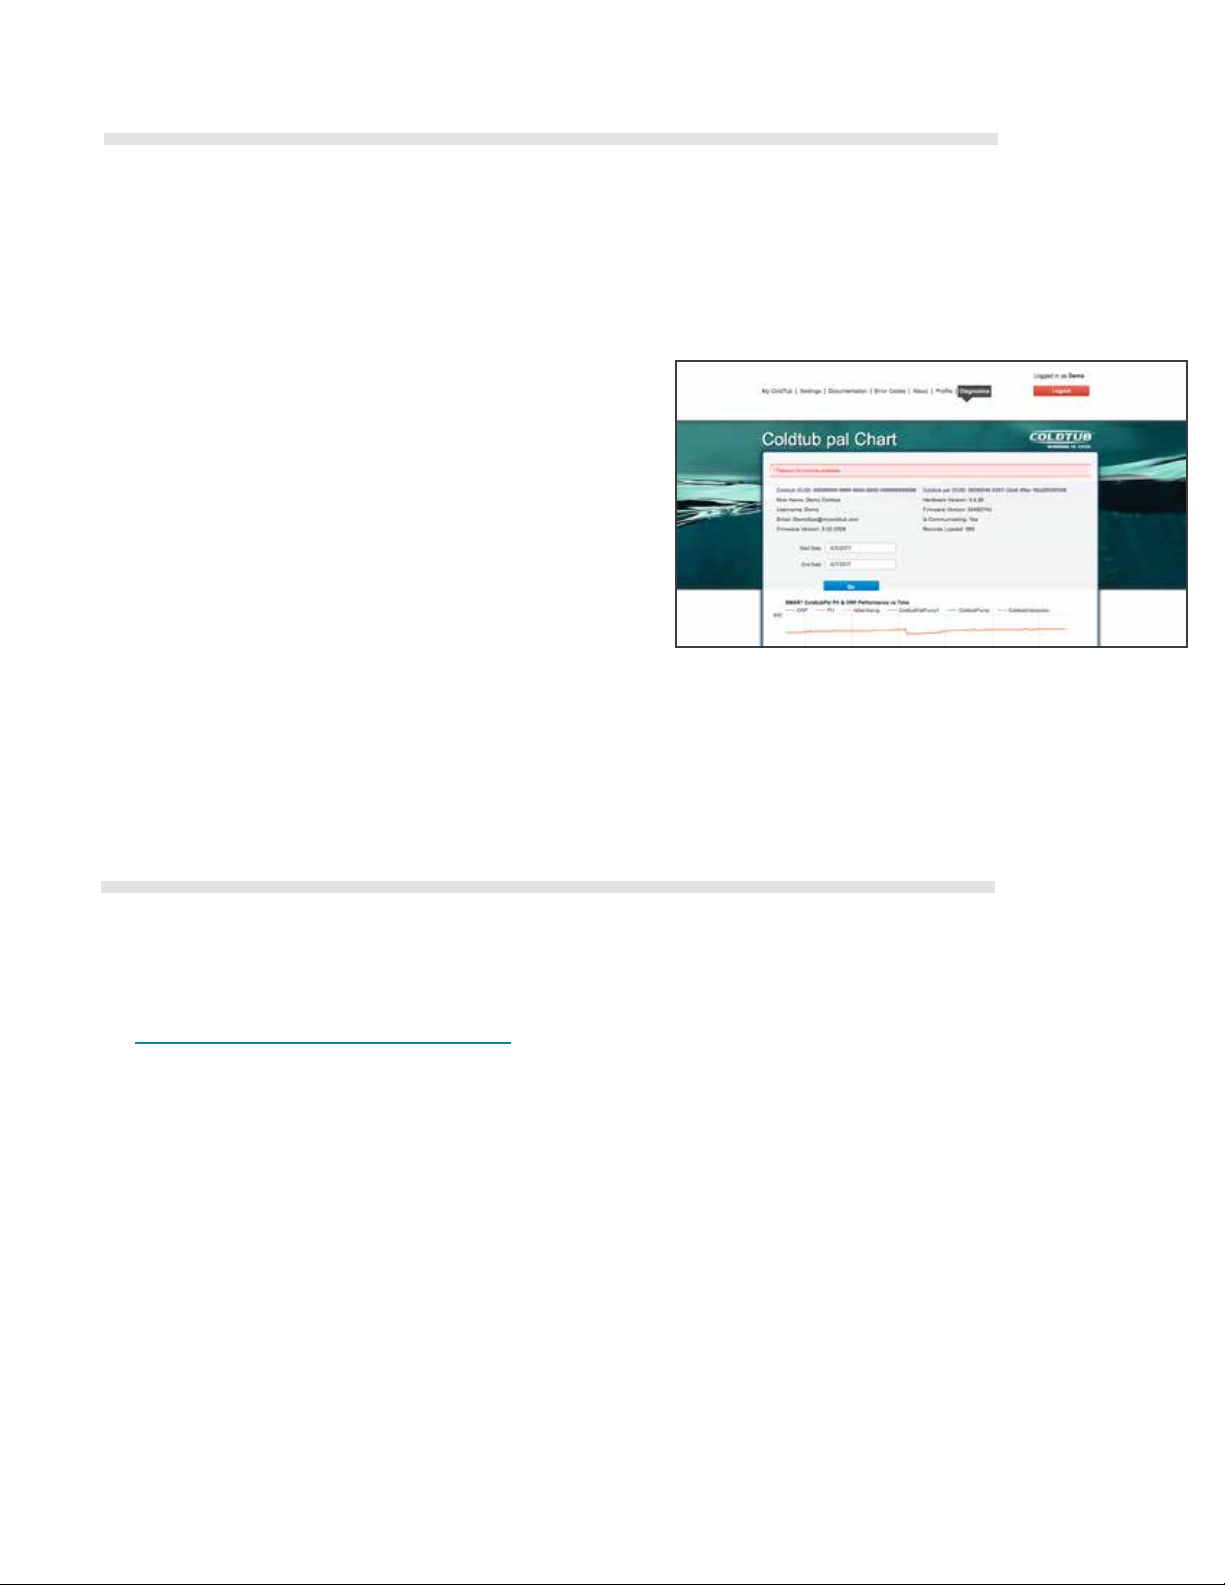
2.13.6 Diagnostics
Click on this tab to access the Diagnostics page.
This page is used to access the data that has been transmitted from your COLDTUB to My COLDTUB. Data such
as, but not limited to the following is captured:
The data can be used by the COLDTUBs owner to determine and track their COLDTUBs power consumption.
39
2.13.7 Logout
To logout of My COLDTUB press the Logout
button on the horizontal tool bar in the right
hand upper corner of the screen.
Once out, enjoy your COLDTUB!
Page 42

Winning is cool™
40
2.14 Connect with the NETGEAR
Installation Assistant
1. Use a WiFi network manager on a computer or mobile device to nd and connect to the extender
WiFi network NETGEAR_EXT
After the connection with the computer or WiFi device is established, the Device Link LED lights.
2. Launch a web browser.
3. Enter www.mywiext.net in the address eld of the browser. The New Extender Setup page displays.
4. Click the NEW EXTENDER SETUP button.
The Create Account page displays.
5. Complete the elds on the page to set up your login credentials and click the NEXT button.
6. Select a WiFi network to extend and click the NEXT button.
7. In the Password (Network Key) eld, type the existing WiFi network password
(also called the passphrase or security key) and click the NEXT button.
8. Set the network name (SSID) and password for your extender and click the NEXT button.
9. Connect your computer or WiFi device to the new extended WiFi network using the SSID and password that
you created in Steps 7 and
10. Make sure that your computer or WiFi device is successfully
connected before you click the CONTINUE button.
11. Click the CONTINUE button. A message displays conrming that the extender is connected and ready.
12. Click the NEXT button.
The registration page displays
13. Complete the registration elds and click the FINISH button to complete the setup.
If you do not want to register your extender, click the Skip Registration link
Page 43
Owners Manual
41
NATURAL SALT WATER CARE
Page 44

Winning is cool™
42
Table of Contents
3.1 What is COLDTUB Pal? 43
3.2 What Does COLDTUB Pal Do? 43
3.3 What Are The Benets of COLDTUB Pal? 43
3.4 How Does COLDTUB Pal Work? 44
3.4.1 COLDTUB Pal System Interface 44
3.4.2 COLDTUB Pal Main Components 45
3.5 COLDTUB Pal Version Table 46
3.6 COLDTUB Pal Version – Installed in Owners Tub 46
3.7 Denitions of Terms 46
3.8 Water Chemistry Abbreviations/Acronyms & Ranges 49
3.9 COLDTUB Pal Warranty 49
3.10 COLDTUB Pal Start – Up Guide 50
3.10.1 COLDTUB Pal Start-Up Overview Flowchart 50
3.10.2 Fill Tub With Water Power Up Tub and Set Water Temperature 53
3.10.3 Program Filtration Cycles/Filtration Duration 54
3.10.4 Establishing Correct Water Chemistry 54
3.10.5 Register Tub With COLDTUB Pal 55
3.10.6 Sanitizer and pH Readings 55
3.11 COLDTUB Pal 56
3.11.1 Home Page 57
3.11.2 New User Registration 57
3.11.3 Login First Time 58
3.11.4 Register a COLDTUB 58
3.11.5 Login 59
3.11.6 COLDTUB Pal 59
3.11.7 Settings 59
3.11.8 Documentation 60
3.11.9 Error Codes 60
3.12 About 61
3.12.1 Prole 61
3.12.2 Diagnostics 62
3.12.3 Logout 62
3.12.4 Caring for your COLDTUB Pal System - Maintenance 63
3.12.5 Caring for your COLDTUB Pal System - Questions 65
3.13 COLDTUB COLDTUB Pal Version 1 R1 Maintenance Schedule 68
Page 45

3.1 What is COLDTUB Pal?
COLDTUB Pal is an advanced salt water maintenance system designed to data log pH (potential
Hydrogen) and ORP (Oxidation-Reduction Potential) readings and self manage the ORP level within
the specied range.
3.2 What Does COLDTUB Pal Do?
• Data log Tub water pH and ORP readings.
• Maintains ORP within the specied range by automatically producing sanitizer (Chlorine) agents.
• Displays current ORP and pH levels of your Tub water.
• Softens water.
• Claries water.
43
3.3 What Are The Benets of
COLDTUB Pal?
• Automatically maintains sanitizer (Chlorine) within the specied ORP range.
• Displays current ORP and pH levels of your Tub water.
• Takes the guess work out of calculating how much COLDTUB Cold Water Run Down is required
to add to your Tub water to lower the pH level within the required range.
• Makes skin feel soft and smooth.
• Makes water look Sparkling clean.
• Reduces contact with harsh chemicals.
• Dramatically reduces time and money needed to maintain Tub water.
• Reduces impact to the environment:
1. Fewer trips to the Tub store for supplies and having your water tested.
2. Less packaging wasted on chemical containers.
3. Less industrial waste produced making Tub chemicals.
Page 46
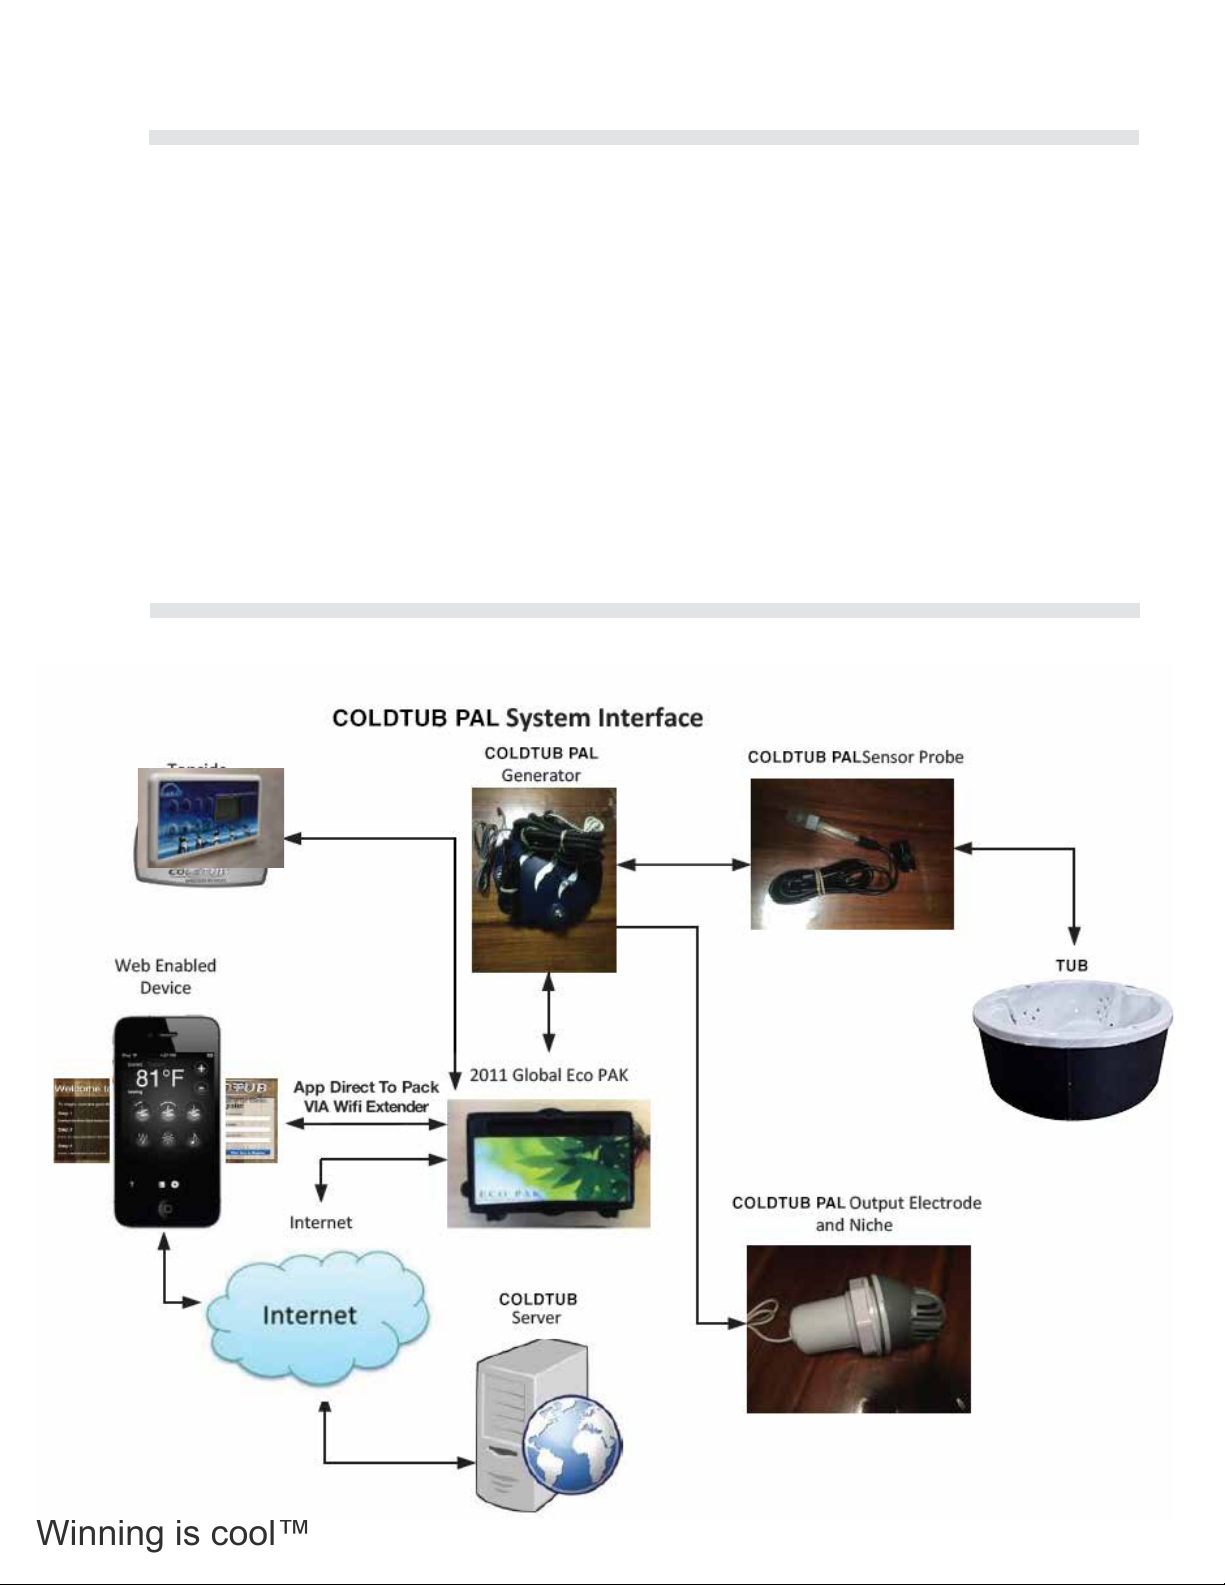
Winning is cool™
44
3.4 How Does COLDTUB Pal Work?
• Consumer registers their Tub on the COLDTUB Pal web based after sales support system.
• COLDTUB Cold Water Dead Sea Salt is added to the Tubs water when the Tub has been lled with water
and water balanced.
• An ORP/pH probe xed into the foot well area of your Tub sends a signal to the Global Eco Pak through
the COLDTUB Pal Communication Cable. The Global Eco Pak then establishes a two-way communication
channel between the Global Eco Pack and COLDTUB Pal.
• COLDTUB Pal data logs the Tub water pH and ORP levels.
• COLDTUB Pal automatically produces and maintains sanitizer (Chlorine) within the specied ORP range.
• COLDTUB Pal displays current ORP and pH levels of your Tub water within COLDTUB Pal.
• As required the consumer adds the required amount of COLDTUB Cold Water Run Down to keep the pH
within the required range.
3.4.1 COLDTUB Pal System Interface
The following diagram reects the COLDTUB Pal System interface:
Page 47
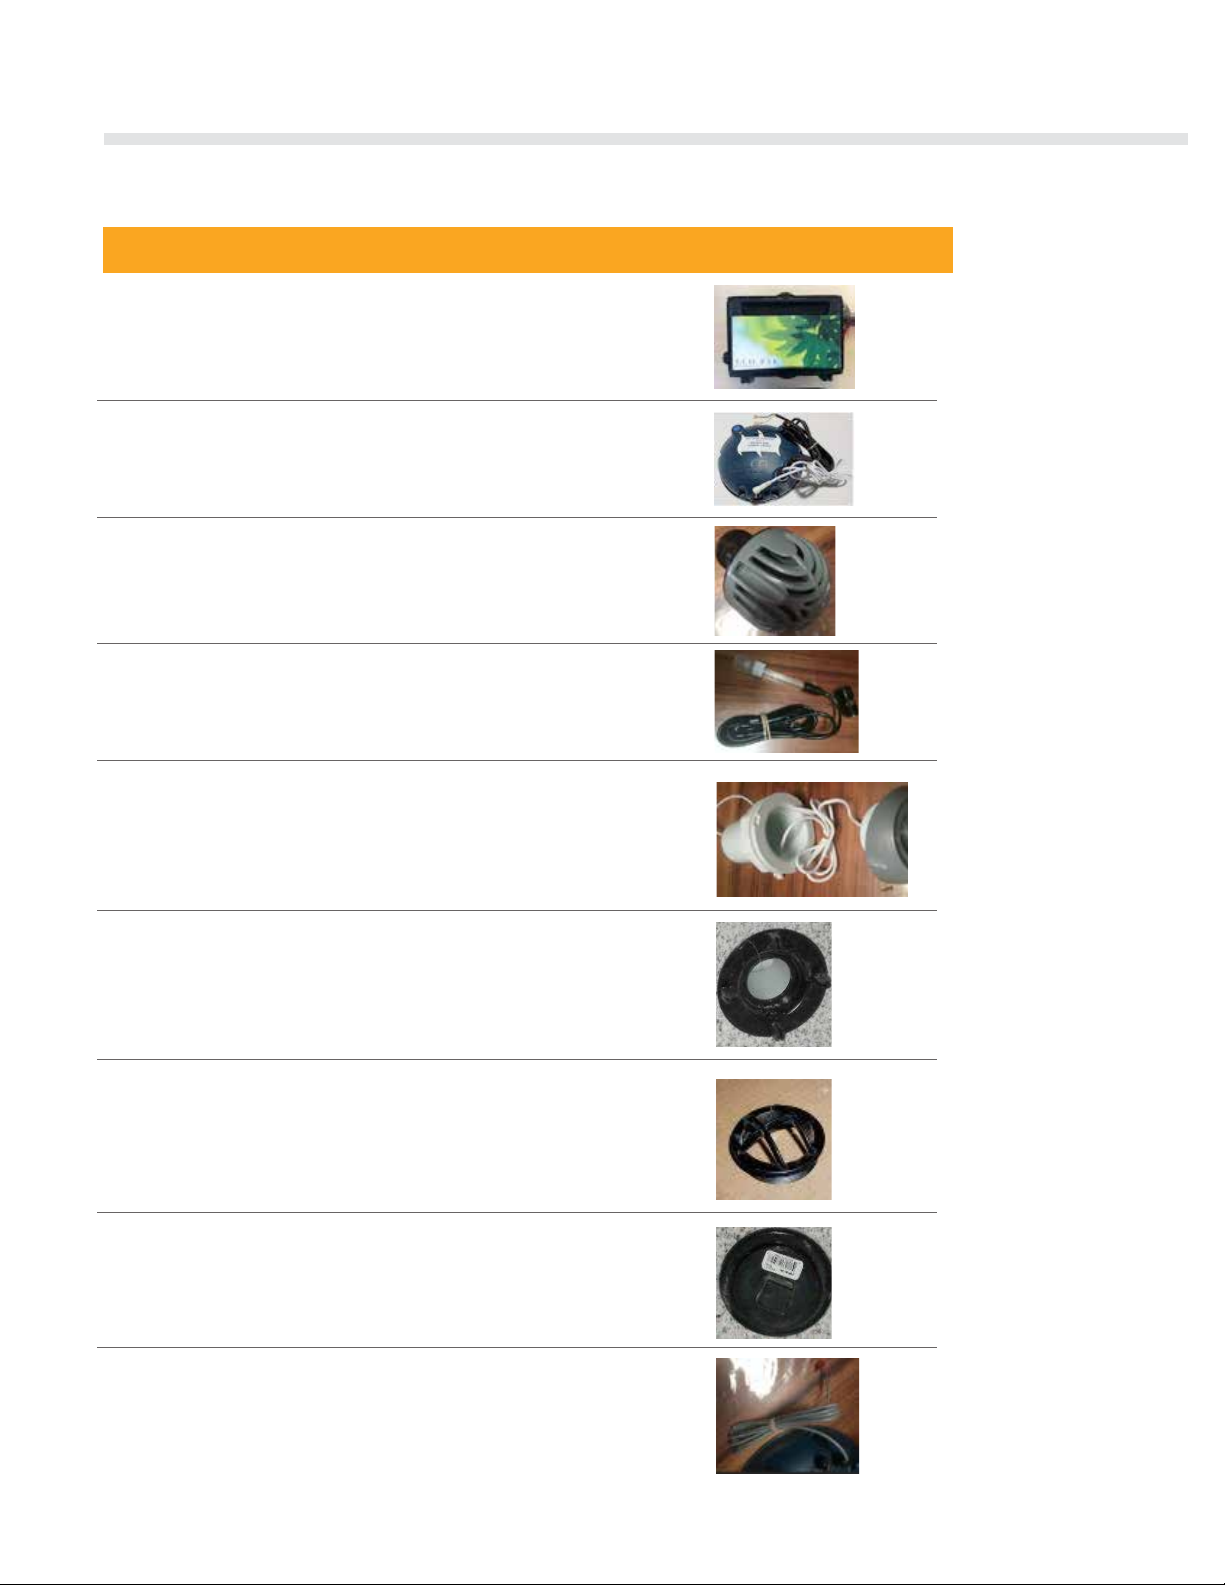
3.4.2 COLDTUB Pal Main Components
Picture
Picture
Picture
Picture
Picture
Picture
Picture
Picture
Picture
The following table depicts the COLDTUB Pal components referenced in this manual.
45
Term
Global Eco PAK
COLDTUB Pal Generator
COLDTUB Pal Output Electrode
COLDTUB Pal Sensor
COLDTUB Pal Niche
(Two piece the front section unscrews from the body
section)
COLDTUB Pal Electrode Housing
(Also known as Lippert Walltting Threaded)
Picture
COLDTUB Pal Housing Grate
(Also known as Lippert Grate Threaded)
COLDTUB Pal Housing Plug
COLDTUB Pal Communication Cable
Page 48
Winning is cool™
46
3.5 COLDTUB Pal Version Table
The following table is used to track the release dates and provide a summary for any COLDTUB Pal version
releases.
COLDTUB Pal VERSION PRODUCTION RELEASE DATE SUMMARY
Version 1 January 2018 Initial release
3.6 COLDTUB Pal
Version – Installed in Owners Tub
The following table provides for the owner to record the COLDTUB Pal version details of their Tub.
COLDTUB Pal VERSION Tub PRODUCTION DATE Tub SERIAL NO.
3.7 Denitions of Terms
TERM DEFINITION
COLDTUB Pal COLDTUB Pal is an advanced salt water maintenance system designed to data log pH
and ORP readings and self manage the ORP level within the specied range
COLDTUB Pal
Output Electrode
COLDTUB Pal
Output Electrode
Version
COLDTUB Pal
Sensor
COLDTUB Pal
Communication
Cable
COLDTUB Cold
Water
COLDTUB Pal COLDTUB Pal is a Web based after sales support system designed and built by
Five plate platinum-iridium Titanium electrode - equipped salt cell converts the saltwater
solution to sanitizer, and as this solution reverts back to its natural form (salt) after sanitizing. Unless large volumes of water are added to the Tub you never have to add more
salt. The ve plate electrode plastic outer casing is silver in color.
Modication status of the electrode tted to the Tub.
pH and ORP sensor (probe) used to measure pH and chlorine (ORP) readings along
with many other reading and transfer the readings to the COLDTUB Pal web site.
The Sensor is connected to the Global Eco Pak with a COLDTUB Pal Communication
Cable.
Cable that connects the COLDTUB Pal Sensor to the Global Eco Pak. The communication cable is used to establish continous two-way communication between the
COLDTUB Pal System and COLDTUB Pal.
COLDTUB range of products developed especially for maintaining your Tubs water.
COLDTUB especially for COLDTUB owners that have COLDTUB Pal installed in their
Tub.
COLDTUB Pal has been designed to receive data from your Tub over the internet
through the Tubs Wi-Fi system. The data is logged and saved by COLDTUB Pal on a
continual basis.
Page 49

47
Denitions of Terms
TERM DEFINITION
Calcium Hardness
(CH)
Alkalinity
Total Alkalinity (TA)
Potential Hydrogen
(pH)
Calcium Hardness is a measure of the total amount of dissolved calcium salts in the water.
CH helps determine how scaling or corrosive the water is. It is believed that calcium helps
control the corrosive nature of water.
Calcium has two major problems in Hot Water Chemistry:
1. CH has a tendency to precipitate (fall out of suspension in high temperatures).
2. High pH will cause calcium to precipitate. The problem with calcium falling out of sus-
pension is that it collects on the heater and pump, and shortens their life.
Any natural corrosiveness in the water can be combated by maintaining a slightly higher Total
Alkalinity Level.
A measure of how stable the pH is (a measure of the total levels of carbonates, bicarbonates,
hydroxides, and other alkaline substances in the water).
TA is referred to as the water’s “”pH buffer””. In other words, it’s a measure of the ability of the
water to resist changes in pH level.
If the TA is too low, the pH level will uctuate widely from high to low. Fluctuations in pH can
cause corrosion or scaling of the Tub components.
Low TA can be corrected by adding COLDTUB Cold Water Balance to the Tub water.
If the Total Alkalinity is too high, the water will be more susceptible to scale and high pH. High
pH may be difcult to bring down.
Note: Salt systems naturally drive pH levels to increase.
High TA can be lowerd by adding COLDTUB Cold Water Run Down to the Tub water.
Once the TA is Balanced, it normally remains stable, although some sanitizers, and the addition of more water with a high or low alkalinity will raise or lower the TA reading of the water.
The pH level is the measure of alkalinity.
pH is measured between 0 and 14 denoting verious degrees of acidity or alkalinity.
Neutral water has a pH of 7.0 Water below 7.0 is acidic and becomes more acidic as it ap-
proaches zero.
Water above 7.0 is alkaline and alkalinity increases as it approaches 14.
When the pH of water is 7.0 or below, chlorine will act primarily as a sanitizer. At this level, it
is very effective at killing bacteria.
At 7.4, chlorine will act equally as a sanitizer and oxidizer.
Above 7.8, chlorine will act principally as an oxidizer.
The pH of chlorine is 11.7ppm.
Tub water is considered balanced if the pH level is within the target range, between 7.0pH to
7.6pH.
Adding chlorine either automatically through a salt system or manually, into Tub water with
high pH, above 7.6pH, will further increase the pH level and dramatically reduce the effectiveness of the chlorine as a sanitizer. This must be avoided by rst reducing the pH level into
the target range 7.2pH - 7.6pH.
Maintaining a Balanced pH level between 7.2pH and 7.6pH is extremely important for:
• Optimizing the effectiveness of the sanitizer.
• Maintaining water that is comfortable for the user.
• Preventing equipment deterioration.
• Note: Salt systems naturally drive pH levels to increase, strive to achieve a balanced pH level.
(Continued)
Page 50

Winning is cool™
48
Denitions of Terms (Continued)
TERM DEFINITION
Potential Hydrogen
(pH)
(Continued)
ORP Oxidation–Reduction Potential.
Free Chlorine
(FCL)
Chlorine Residual
If the Tub water’s pH level is too low, the following may result:
• The sanitizer will dissipate rapidly.
• The water may become irritation to Tub users.
• The Tub’s equipment may corrode.
Low pH can be raised by adding COLDTUB Cold Water Jump Up to the Tub water.
If the pH level is too high, the following may result:
• The sanitizer is less effective.
• Scale will form on the Tub shell surface and the equipment.
• High pH will cause calcium to precipitate (fall out of suspension).
• The water may become cloudy.
High pH can be lowered by adding COLDTUB Cold Water Run Down to the Tub water.
It is important to check the pH on a regular basis. The pH will be affected by the bather load,
the addition of new water, the addition of various chemicals, and the type of
sanitizer used.
This is simply a measurement of the water’s ability to cleanse itself. ORP is measured in
millivolts (mV). Also refer FCL
FCL is the active form of chlorine that actually kills bacteria and algae (It is a Sanitizer).
Sanitizer is extremely important for killing algae, bacteria and viruses, and preventing
unwanted organisms for growing in the Tub. At the same time, you don’t want too high a
sanitizer level, or it can irritate your skin, lungs and eyes.
Always maintain the sanitizer level in your Tub within the recommended range.
Also refer ORP
The actual level of chlorine in the water after the chlorine demand has been satised.
Sanitizer Chemical used to kill bacteria.
Generic names: Chlorine, Bromine and Biguanide.
Warning Adding a Chlorine agent such as Cold Water Sanitizer will cause inacurate
ORP and pH readings. If chlorine is added to the Tubs water it will take three days
for the COLDTUB Pal Sensor Probe to clense itself and start sending accurate
readings to COLDTUB Pal.
Also Refer Section 1.16 Caring for your COLDTUB Pal System, Question 3 If the
COLDTUB Pal System is not working, what should I do if I need to add COLDTUB
Cold Water BOOST or other sanitizer to the Tubs water?
Parts Per Million
(ppm)
Organic waste Debris such as microorganisms, perspiration, urine, etc. which needs to be burned up or
Shock An oxidizer that “burns off” the organic wastes which cause cloudiness and algae. It is a
ppm: parts per million, a standard measure of chemical or mineral concentration.
“oxidized” regularly to prevent haze, algae, chloramines, etc.
generic term for a chemical used to oxidize organic wastes.
Page 51

3.8 Water Chemistry Abbreviations /
Acronyms & Ranges
ABBREVIATION/ACRONYMS DEFINITION CORRECT CHEMICAL LEVELS
CH Calcium Hardness 50 - 150 ppm
TA Total Alkalinity 80-100 ppm
pH Potential Hydrogen 7.0 – 7.6 ppm
ORP Oxidation–Reduction Potential 545 – 550 mV COLDTUB Pal Optimum
Range.
(Optimum Range is the default factory
setting, user may adjust higher if prefered).
Depending on the water chemistry
which will be effected by bather load and
Tub usage, at times the ORP value will
overshoot or undershoot the Optimum
Range.
49
3.9 Warranty
COLDTUB Pal Warranty
COLDTUB warrants the COLDTUB Pal system against malfunctions due to defects in materials and
workmanship for 2 years from the original date of delivery to the original customer on factory installed systems,
except the user replaceable COLDTUB Pal Electrode which needs to be replaced annually. This warranty
includes parts only.
Tub water quality and other damages resulting from water imbalance are specically not covered by this
warranty.
Disclaimer: This is not an automatic water care system. The system is set up for typical Tub use.
The Tub user is ultimately responsible for maintaining proper sanitary water conditions. Use of salt other than
COLDTUB Cold Water Sea Salt Blend will damage the COLDTUB Pal components and void the warranty. The
COLDTUB Cold Water Sea Salt blend has been developed to protect COLDTUB Pal components from damage
and the use of alternative salt blends will be easily detected by technicians.
This warranty may be void if the Tub is operated with water salt concentrations outside the recommended level of
2000 to 2500 parts per million (ppm).
Damage to other Tub components unrelated to the COLDTUB Pal system as a result of leaking pump seals are
specically not covered by this warranty. For example, heaters, heater barrels, jets, grab rails, pump seals, and
pump motors are not covered in this case.
Page 52
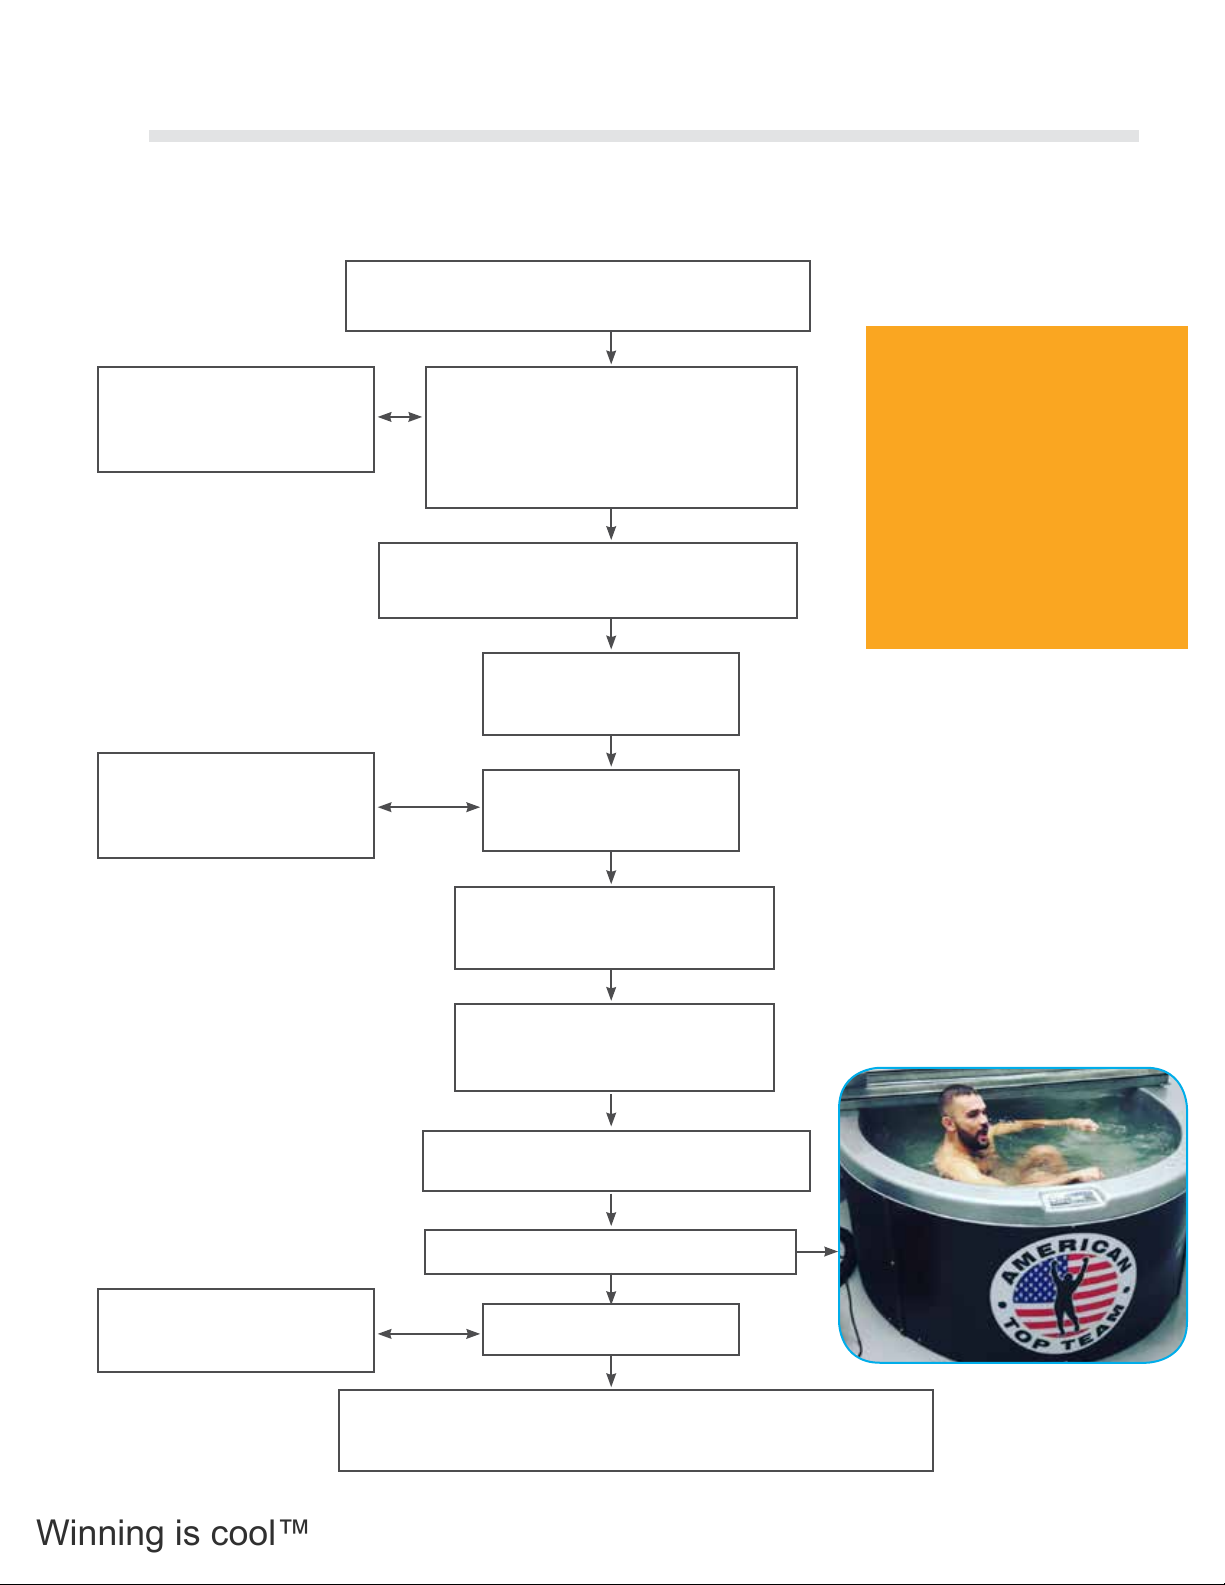
Winning is cool™
50
3.10 COLDTUB Pal Start-up Guide
3.10.1 COLDTUB Pal Start-Up Overview Flowchart
Tub has been positioned in accordance with the
COLDTUB Owners Manual.
NOTE:
Have electrical power to Tub
connected in accordance
with
COLDTUB Owners Manual
COLDTUB COLDTUB Pal Salt
Dose
Guidance Table.
Refer: Section 1.14.6
Fill Tub With Water, Power Up Tub and
Set
Water Temperature
Note: COLDTUB Pal Sensor Probe
Should have been installed.
Refer: Section 1.14.2
Program Filtration Cycles/Filtration Duration.
Refer: Section 1.14.3
Stabilize Tub Water.
Refer: Section 1.14.4
Establishing Correct Water
Chemistry.
Refer: Section 1.14.5
Connect Your Tub to the Home
Network.
Refer: Section 1.14.7
This owchart provides an
overview of the COLDTUB Pal
start-up process.
The detailed support procedures
are contained in this document.
All checks and test should be
carried out in accordance with
the COLDTUB COLDTUB Pal
Owners Manual.
Caring For Your COLDTUB
Pal System.
Refer: Section 1.16
Register Tub With COLDTUB Pal.
mycoldtub.com
Refer: Section 1.14.8
Establishing Correct Water Chemistry.
Refer: Section 1.14.9
Relax and Enjoy Your Tub
Maintain Correct Water
Chemistry
COLDTUB COLDTUB Pal Version 1 R1 Maintenance Schedule.
Refer: Section 1.17 or, COLDTUB COLDTUB Pal Version 1 R1
Maintenance Schedule QRC
Page 53
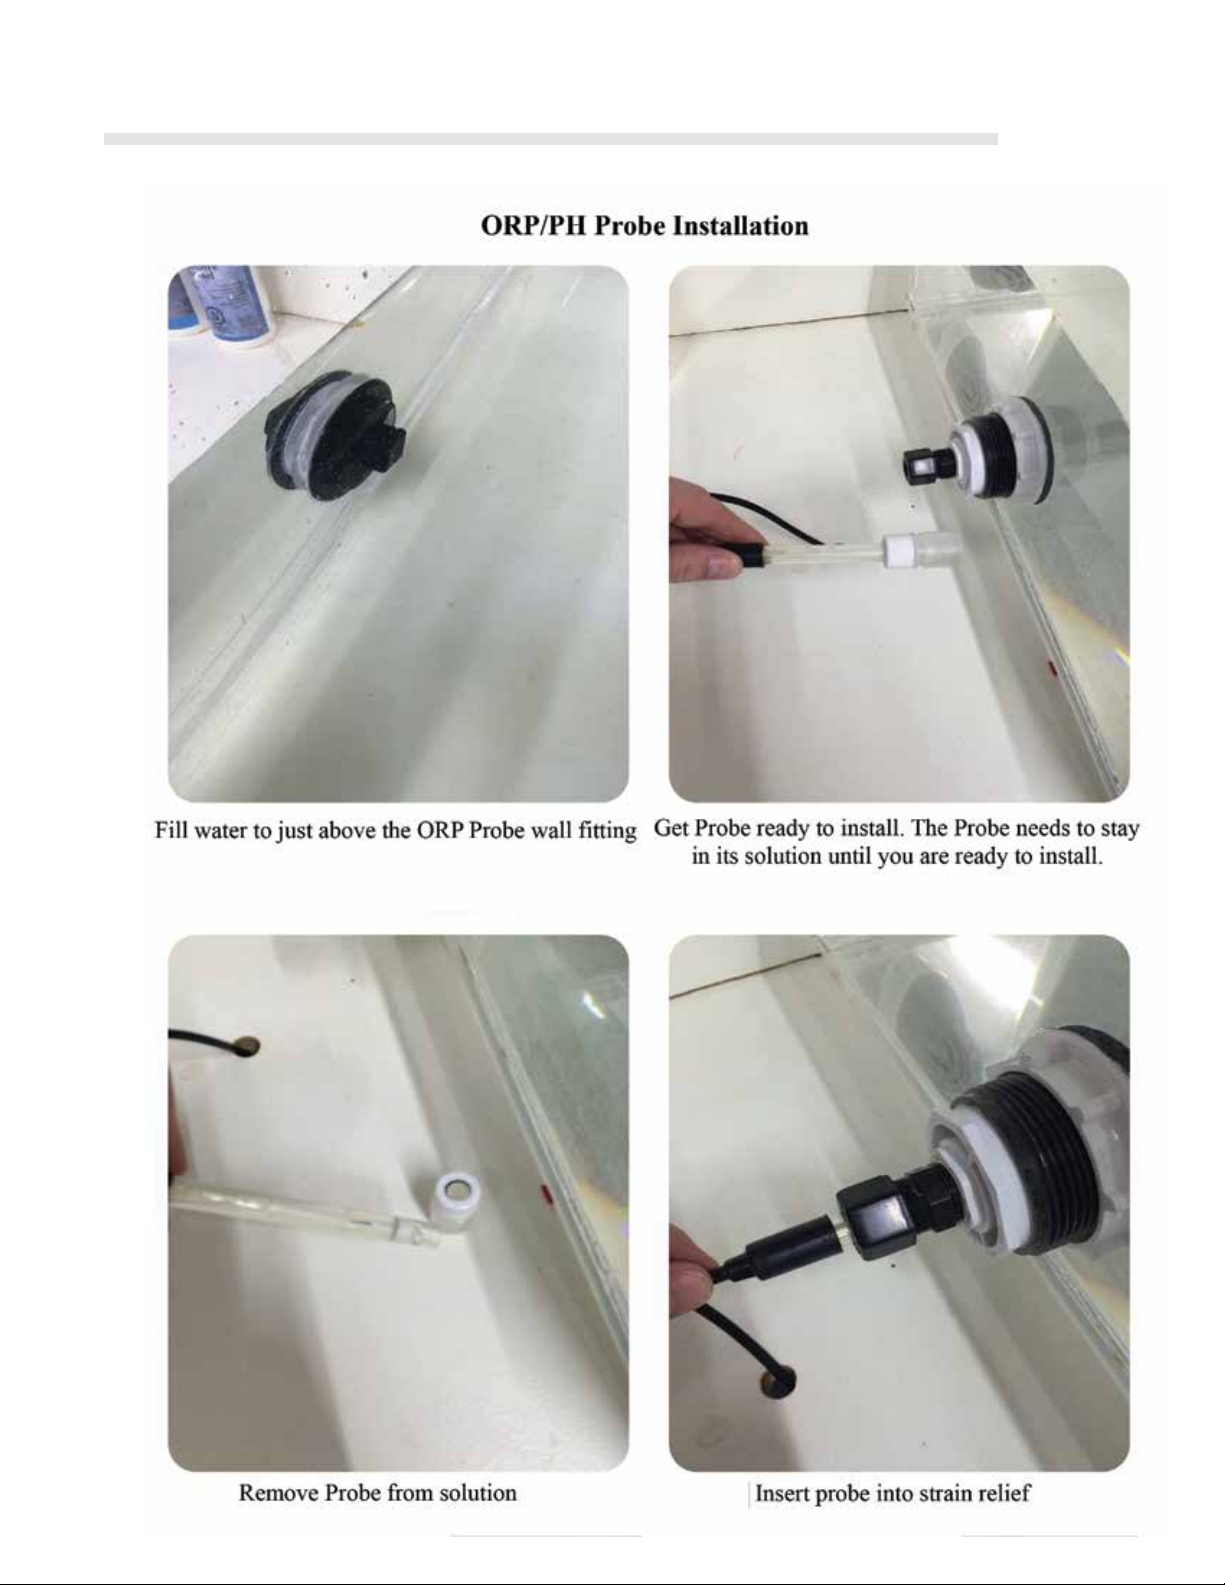
ORP/PH Probe Installation
51
Page 54
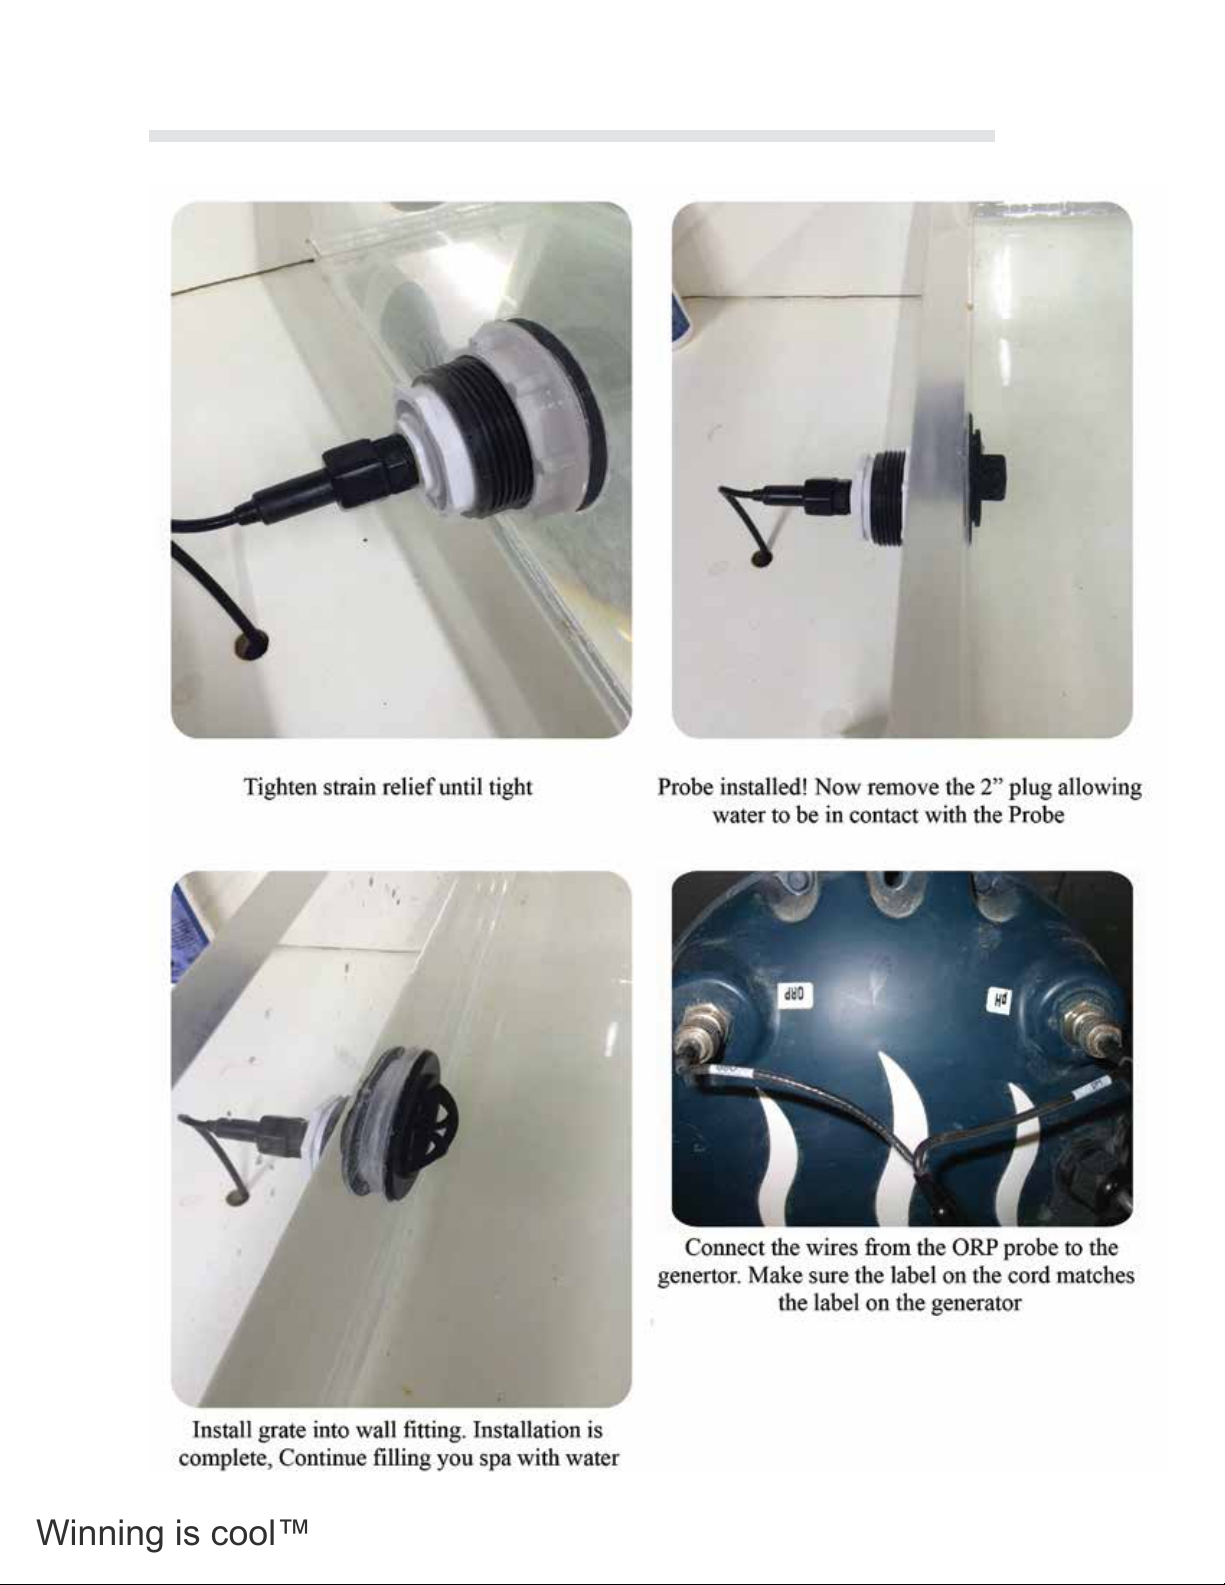
Winning is cool™
52
ORP/PH Probe Installation (Continued)
Page 55
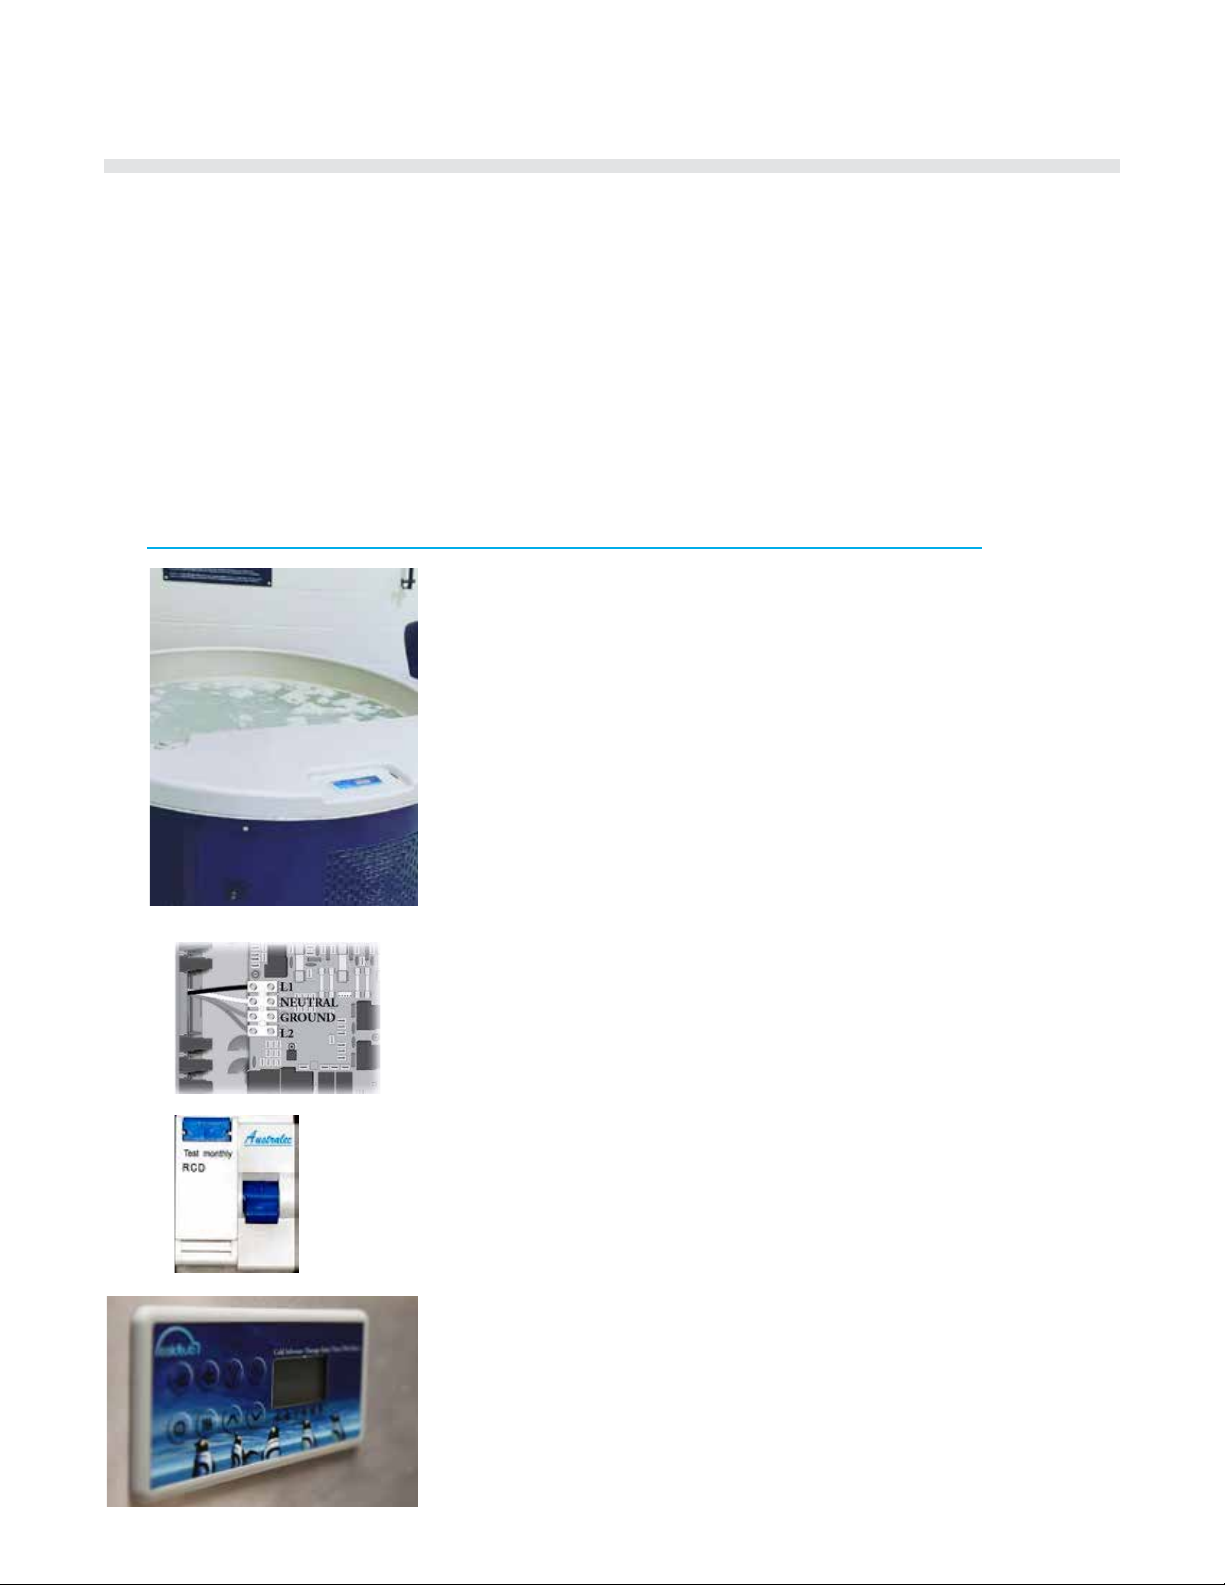
Te
mpe r atu r e
The following steps provide guidance to help establish correct chemically balanced water.
To help ensure chemicals dissolve appropriately it is good practice to first mix/dissolve the
chemical in an uncontaminated container of hot water before carefully adding to the spa
water.
Note: The following steps take into account that the Spa Technician has filled your spa
with water to above the Spa Boy Sensor Housing, removed the Spa Boy Sensor Plug,
installed the Spa Boy Sensor Housing Grate and installed the Spa Boy Sensor.
Warning: Do not proceed until the Spa Technician has filled your spa with water
to above the Spa Boy Sensor Housing, removed the Spa Boy Housing
Plug, installed the Spa Boy Sensor Housing Grate and installed the Spa
Boy Sensor. or you have obtained further direction from your Dealer.
Steps to Fill Spa With Water Power Up Spa and Set Water Temperature
Step 1. Fill Spa
Fill your spa through the filter intake as shown to the
appropriate level (just under the head rests). If you have
sediment or high mineral content a “carbon filled pre-filter”,
as pictured, can help. (This is optional and will prolong
the fill time).
Step 2. Connect/Turn on Electrical Power to the Spa
Once the spa is filled to the proper level, connect power to
the spa in accordance with the Arctic Spas Owners Manual,
and turn the power on to the spa on.
3.10.2 Fill Tub With Water Power Up Tub and
Set Water Temperature
The following steps provide guidance to help establish correct chemically balanced water. To help
ensure chemicals dissolve appropriately it is good practice to rst mix/dissolve the chemical in an
uncontaminated container of hot water before carefully adding to the Tub water.
Note: The following steps take into account that your Tub has water above the COLDTUB Pal Sensor
Housing, removed the COLDTUB Pal Sensor Plug, installed the COLDTUB Pal Sensor Housing Grate
and installed the COLDTUB Pal Sensor.
WARNING: Do not proceed until your Tub water is above the COLDTUB Pal Sensor Housing,
removed the COLDTUB Pal Housing Plug, installed the COLDTUB Pal Sensor Housing Grate
and installed the COLDTUB Pal Sensor. or you have obtained further direction from your
Dealer.
Steps to Fill Tub With Water Power Up Tub and Set Water Temperature
53
STEP 1. FILL TUB
Fill your Tub through half way up the skimmer box as shown
to the appropriate level.
STEP 2. CONNECT/TURN ON ELECTRICAL POWER TO
THE TUB
Once the Tub is lled to the proper level, connect power to the
Tub in accordance with the COLDTUB Owners Manual, and
turn the power on to the Tub on.
STEP 3. SET WATER TEMPERATURE
Set the water temperature control on the settings to the
desired temperature (between 42ºF and 104ºF or 5.5°C and
40°C).
Page 56
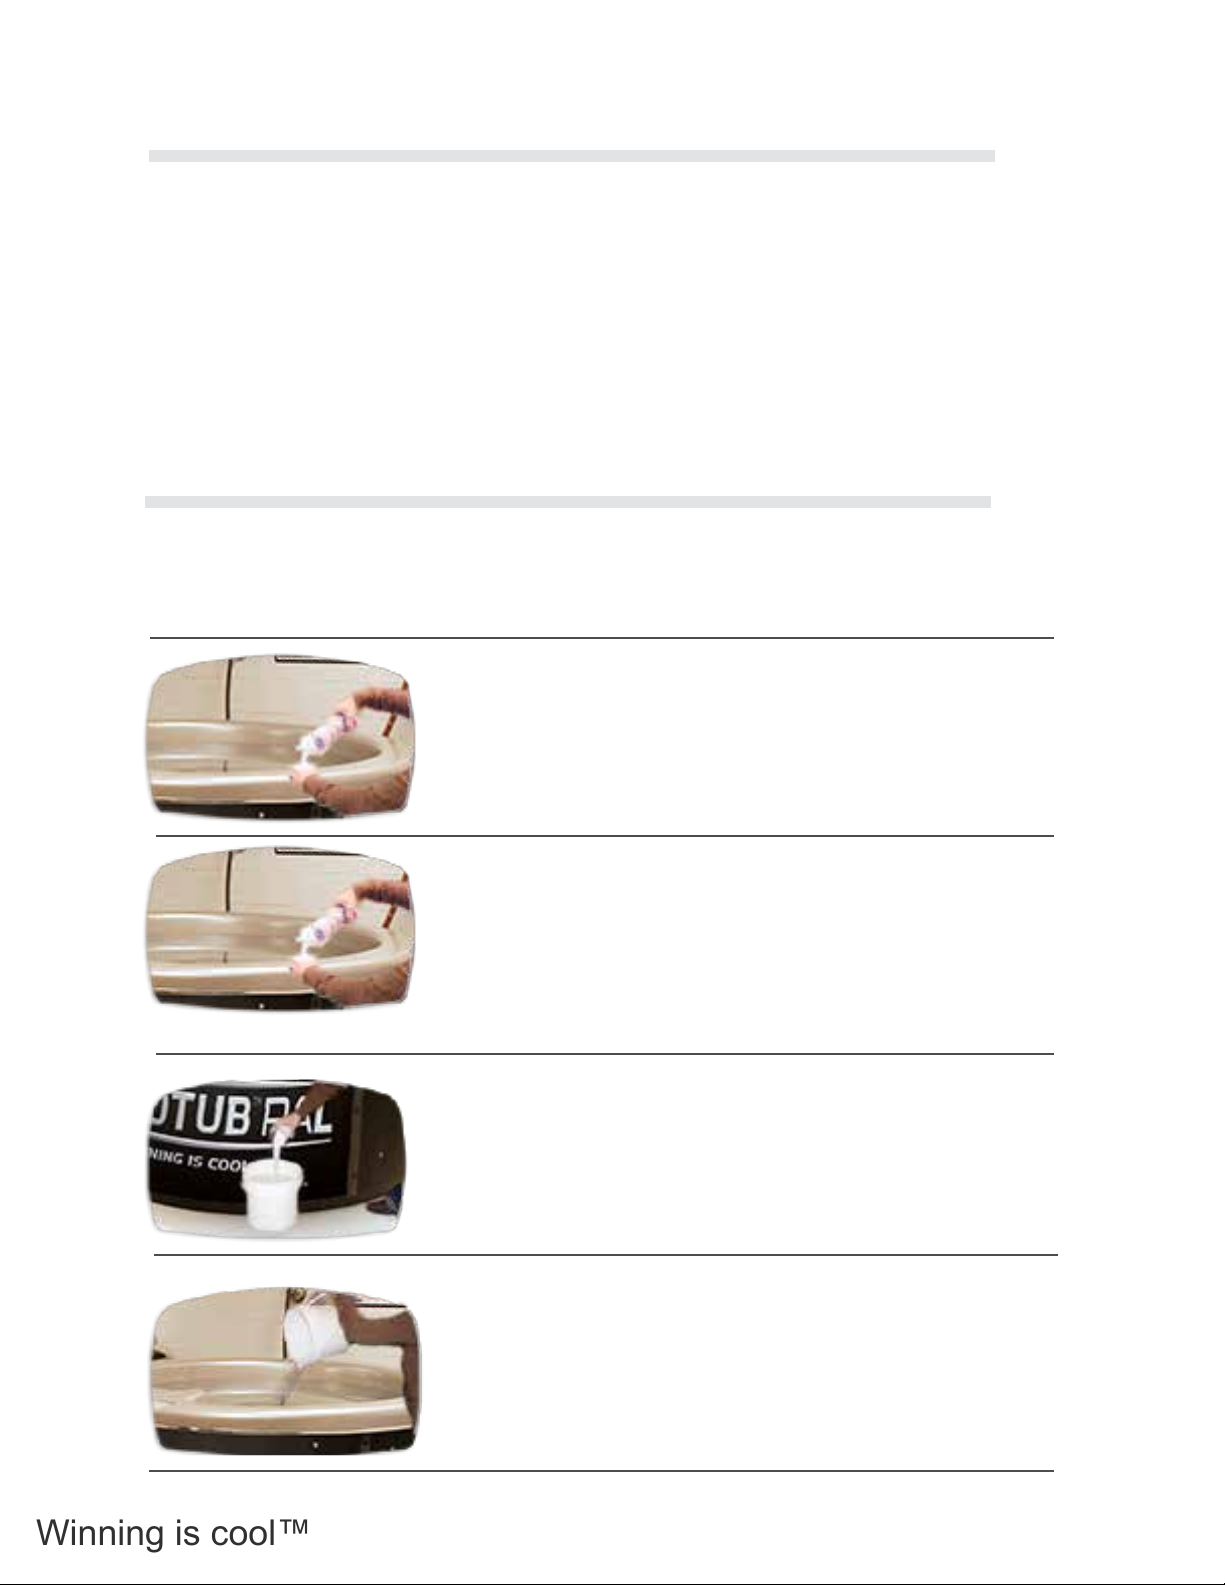
Winning is cool™
54
3.10.3 Program Filtration Cycles/Filtration
Duration
The system will automatically perform 4 one hour ltration cycles per day, 6 hours apart. The
above system factory ltration settings can be adjusted by the consumer through:
• onTub power management using your device such as smart phone or tablet that has been
connected to your Tub through WiFi. Refer onTub user Guide.
• The settings. Refer COLDTUB COLDTUB Owners Manual.
3.10.4 Establishing Correct Water
Chemistry
The following steps provide guidance to help establish correct chemically balanced water.
To help ensure chemicals dissolve appropriately it is good practice to rst mix/dissolve the
chemical in an uncontaminated container of hot water before adding to the Tub water.
Steps to Establish Chemically Balanced Water With COLDTUB Pal
Step 1. Test and Adjust Total Alkalinity
Test Total Alkalinity. It should be 80 – 100 ppm (100 max). If high,
lower Total Alkalinity with COLDTUB Cold Water Run Down (pH
Down) or muriatic acid. Do not raise Total Alkalinity!
WARNING: Skipping this step on Start-up can cause scaling
problems and cloudy water that may not be covered under warranty.
NOTE: Use all products according to directions on the bottle.
Step 2. Test and Adjust pH
Test pH. Levels should be between 7.0 – 7.6.
If pH is high, (over 7.6) add COLDTUB Cold Water Run Down.
NOTE: Use all products according to directions on the bottle.
NOTE: Salt systems naturally drive pH levels to increase, strive to
achieve a Balanced pH level.
NOTE: High pH will cause calcium to precipitate (fall out of
suspension). The problem with calcium falling out of suspension is
that it collects on the heater and pump, and shortens their life.
Step 3. Mix Salt Crystals
Dissolve the required recommended salt dosage in a 5 Gallon
(20 litre) pail of hot water.
Pal Salt Dosage Chart contained in this guide.
Step 4. Add Salt to Tub Water & Re-Test TA / pH
(a) Slowly pour the dissolved salt from the pail into the Tub water.
(b) Run pumps for 5 minutes to help mix salt blend through.
(c) Wait 1 hour.
(d) Then re-test and adjust Total Alkalinity level accordingly.
(e) Then re-test and adjust pH level accordingly.
Refer: Steps 2 and 3 for correct TA/pH levels
Page 57

3.10.5 Register Tub With COLDTUB Pal
You will now need to register your Tub through the internet with COLDTUB Pal.
COLDTUB Pal is a Web based after sales support system designed and built by COLDTUB especially for
COLDTUB owners that have COLDTUB Pal installed in their Tub.
COLDTUB Pal has been designed to receive data from your Tub over the internet through the Tubs Wi-Fi
system. The data is logged and saved by COLDTUB Pal on a continual basis.
The web address is: www.mycoldtub.com
Refer Section 1.15 COLDTUB Pal for registration details.
3.10.6 Sanitizer and pH Reading
55
The following provides guidance on the establishment and maintenance of sanitizer and pH readings.
Sanitizer Readings
You should have ORP sanitizer (Chlorine) readings within 24 hours.
24 hours post adding the salt to the Tubs water, COLDTUB Pal will be able to provide
accurate readings regarding the ORP sanitizer (chlorine) reading, and pH reading.
Important: Always check the pH and ORP (sanitizer) levels before each Tub use.
* Expect the pH too increase slowly over each week and when the pH gets too high use
COLDTUB Cold Water Run Down to correct it.
High pH will cause premature failure of the COLDTUB Pal Output Electrode, cloudy
water, and decreased effectiveness of the sanitizer.
Page 58

Winning is cool™
56
3.11 COLDTUB Pal
The following is a brief outline of COLDTUB Pal.
COLDTUB Pal is a Web based after sales support system designed and built by COLDTUB
especially for COLDTUB owners that have COLDTUB Pal installed in their Tub.
COLDTUB Pal has been designed to receive data from your Tub over the Internet through the
Tubs Wi-Fi system. The data is logged and saved by COLDTUB Pal on a continual basis.
The data is translated into a format that allows:
The Tub Owner
To log into COLDTUB Pal and check their Tub water to conrm that it is safe for bathers to
enter the Tub by accurately conrming pH and ORP sanitizer (Chlorine) are in the required
target range. If not the Tub owner will know the exact pH and ORP readings and this is critical
in ensuring the correct chemical volume is added to the Tubs water when needed. No need to
interpret test strips, takes the guesswork out of maintaining water.
The following pages make up the COLDTUB Pal Web site:
• Home.
• Register.
• Login.
• Settings.
• Documentation.
• Error Codes.
• About.
• Prole.
• Diagnostics.
• Logout.
As you can see from the above, COLDTUB Pal clearly places COLDTUB owners another milestone ahead
of owners of other brand Tubs.
Register and enjoy the experience.
Page 59
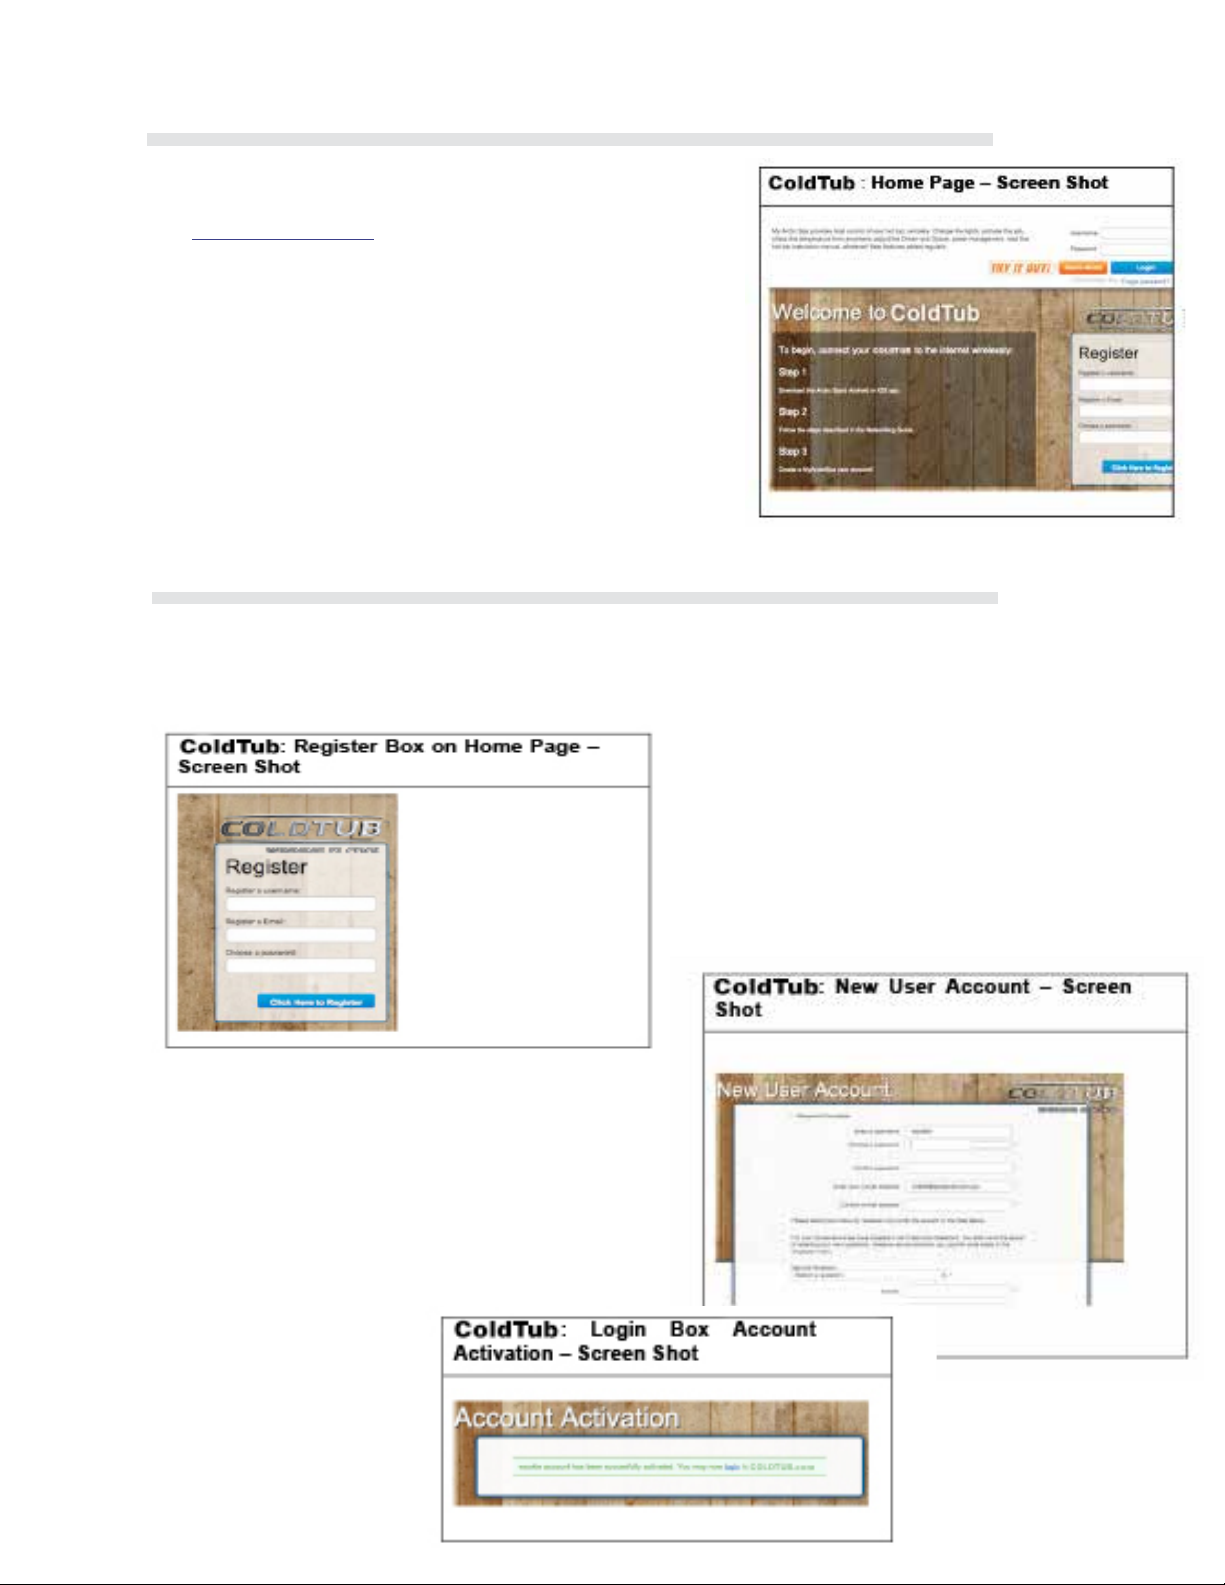
3.11.1 Home Page
To access the COLDTUB Pal Home page enter the following
web address into your browser.
www.mycoldtub.com
For a new user, create a new user account by completing the
details in the Register box located on the right hand side
of the Home Page.
For a registered user, click on the Login button located on the upper right hand side of
the Home Page.
3.11.2 New User Registration Page
57
For a new user, to create a user account complete the details in the Register box located on the right
hand side of the Home Page.
Once completed, press the Click Here to Register button at the bottom of the Register box on the Home
Page.
You will now have been directed to New User
Account Tab.
Complete the data elds as required.
Once completed, press the Register button at the
bottom of the New User Account tab.
You will then receive an account registration email from
COLDTUB Pal.
Once you receive the email complete the registration by
conrming your email address by clicking on the link in
the received email.
You will be directed to the COLDTUB Pal Web page and
the conrmation will be displayed.
Page 60
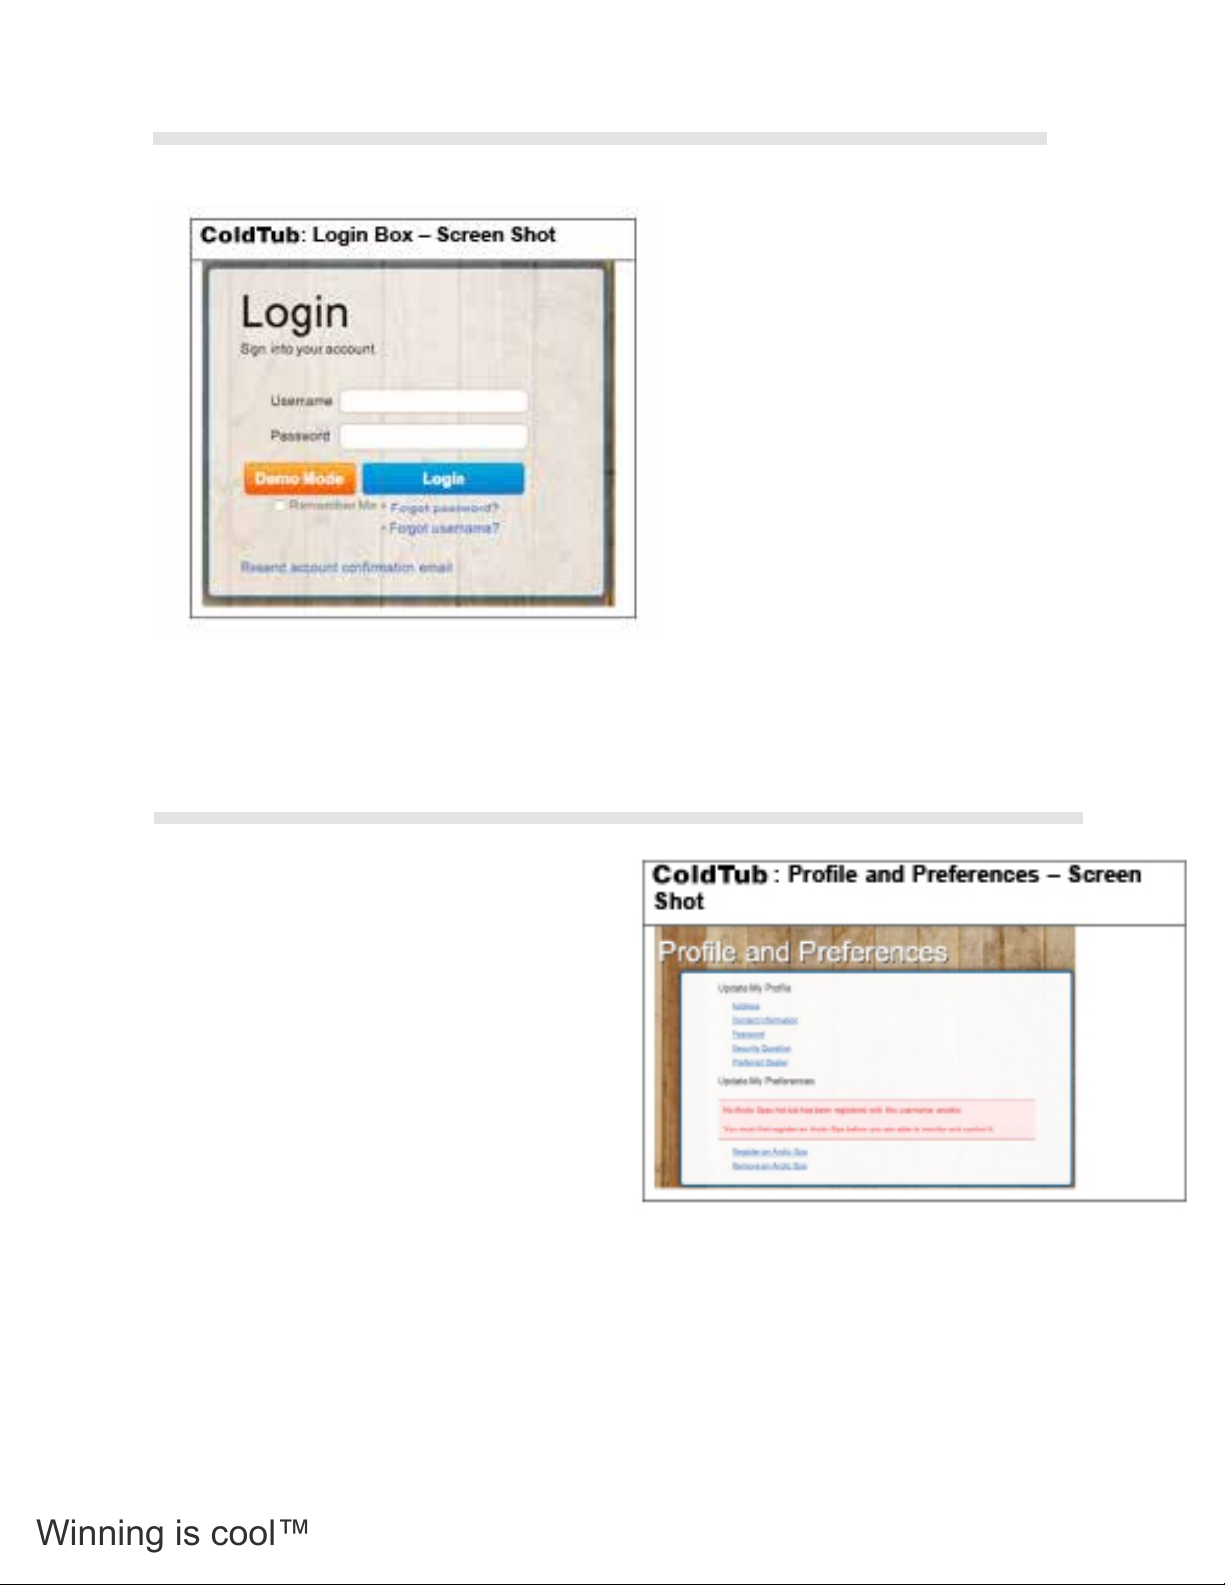
Winning is cool™
58
3.11.3 Login First Time
Before you login for the rst time you should rst connect
your Tub to your home network.
You can now login by clicking the login link and entering
your user name and password in the elds provided in the
Login box.
Once you have access to the home page, you can log in
by entering your user name and password in the elds on
the upper right hand side of the home page.
Once entered press the Login button directly under the
Username and Password elds.
You will automatically be directed to the Prole and
Preferences Page, where you will need to register your
Tub details.
3.11.4 Register an COLDTUB
To register your COLDTUB details click the
Register an COLDTUB link in the Prole
and Preferences box.
You will receive a prompt to reect that your
Tub must be connected to the Internet (Your
Home Network). Click the Search button to nd
your Tub. The Tub Registration Conrmation
pop up box will be displayed advising you to
press a button on your Tubs Topside Controller
to conrm the Tub registration.
If you are not sure of how to register your
Tub you can click on the Help Video button to
obtain further guidance.
Your Tub will now be connected to the
COLDTUB Pal server
Page 61
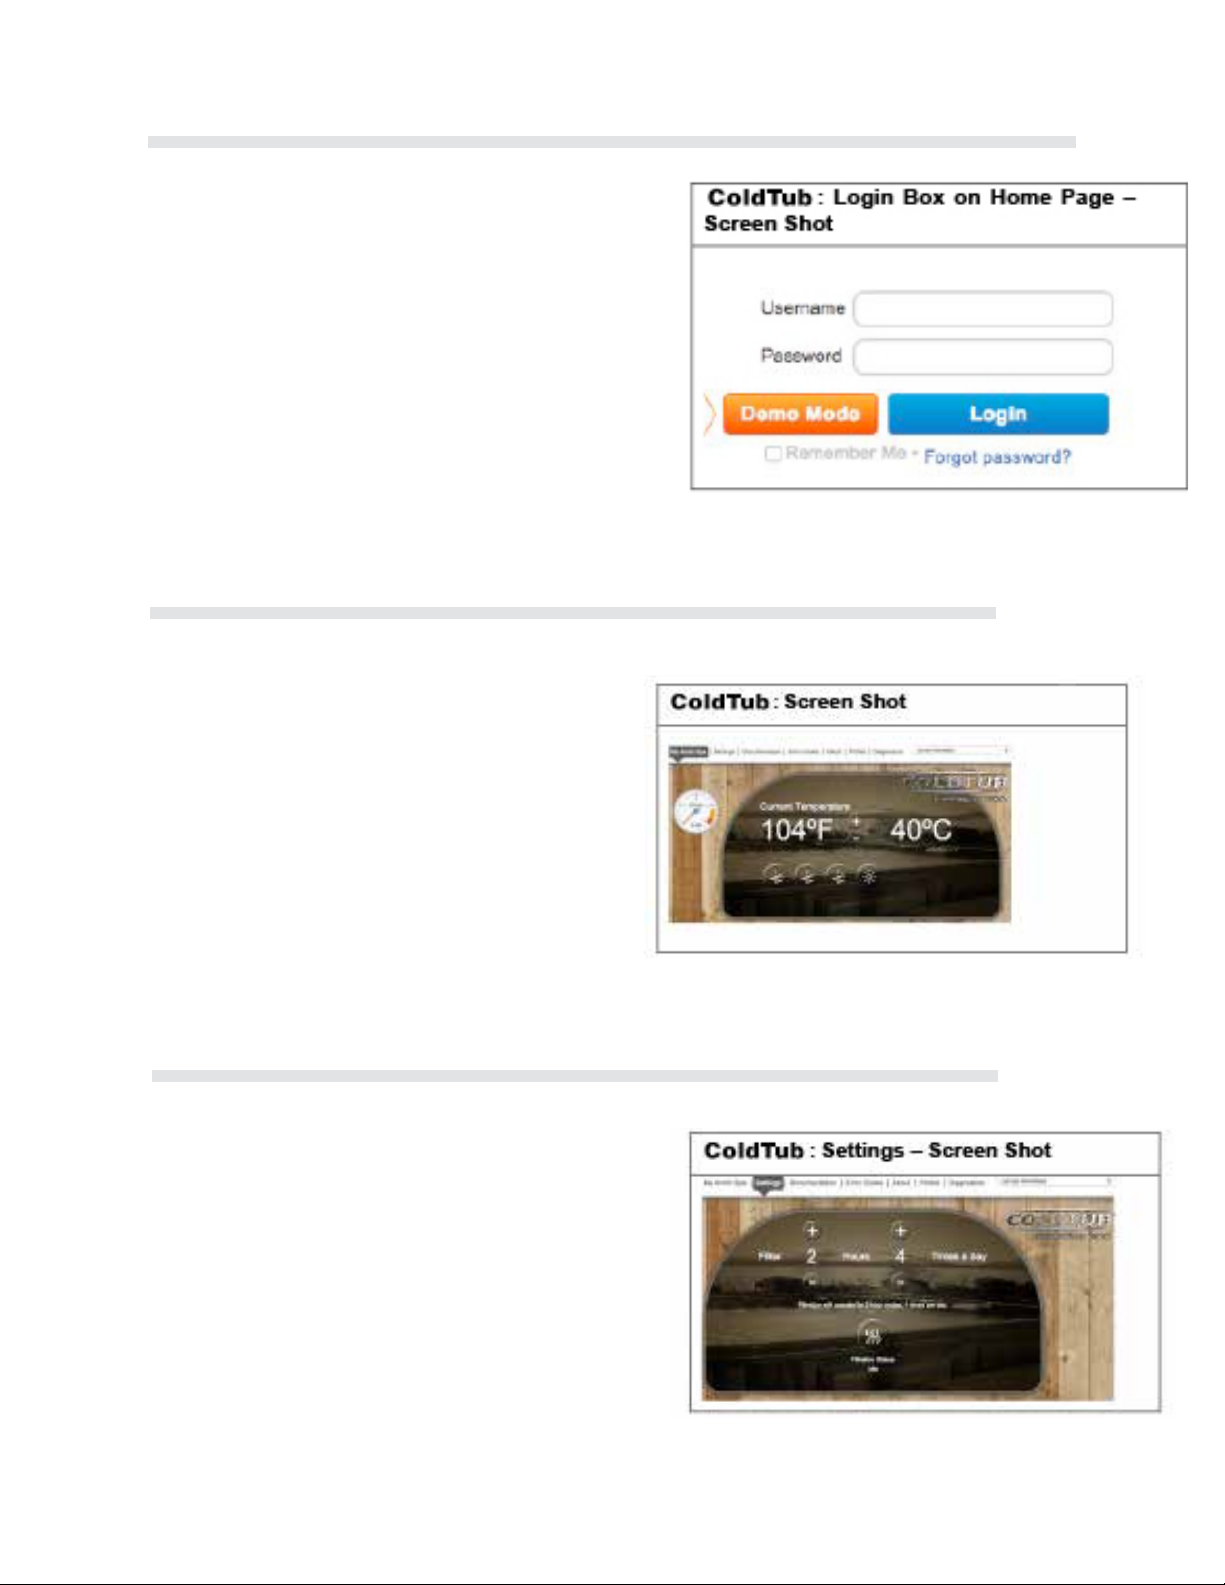
3.11.5 Login
Once you have logged in for the rst time and registered your Tub details within COLDTUB Pal logging
into COLDTUB Pal is achieved from accessing the
COLDTUB Pal home page. Login by entering your
user name and password in the elds on the upper
right hand side of the home page.
Once entered press the Login button directly under
the Username and Password elds.
Once logged in, COLDTUB Pal will automatically
open your personal COLDTUB Pal page.
Note: If you have forgotten your password you can
press the Forgot Password button to reestablish your
password.
3.11.6 COLDTUB Pal
59
Once you have logged in, COLDTUB Pal
will have automatically directed you to, your
COLDTUB Pal page.
If your Tub is connected to the internet through
your home network you can see if your Tub is in
use, adjust the temperature and turn on and off
components if desired, see ORP and pH levels,
etc
From this page you are able to explore the
COLDTUB Pal web pages by clicking the desired
tab along the horizontal tool bar.
3.11.7 Settings
Click on this tab to access the Settings page.
From this page, you can see your Tubs pH and
ORP readings, see if your COLDTUB Pal System is
currently producing Sanitizer (Sanitizing) adjust the
following settings of your Tub:
• Filtration.
• Power Management.
• Firmware Upgrade
Page 62
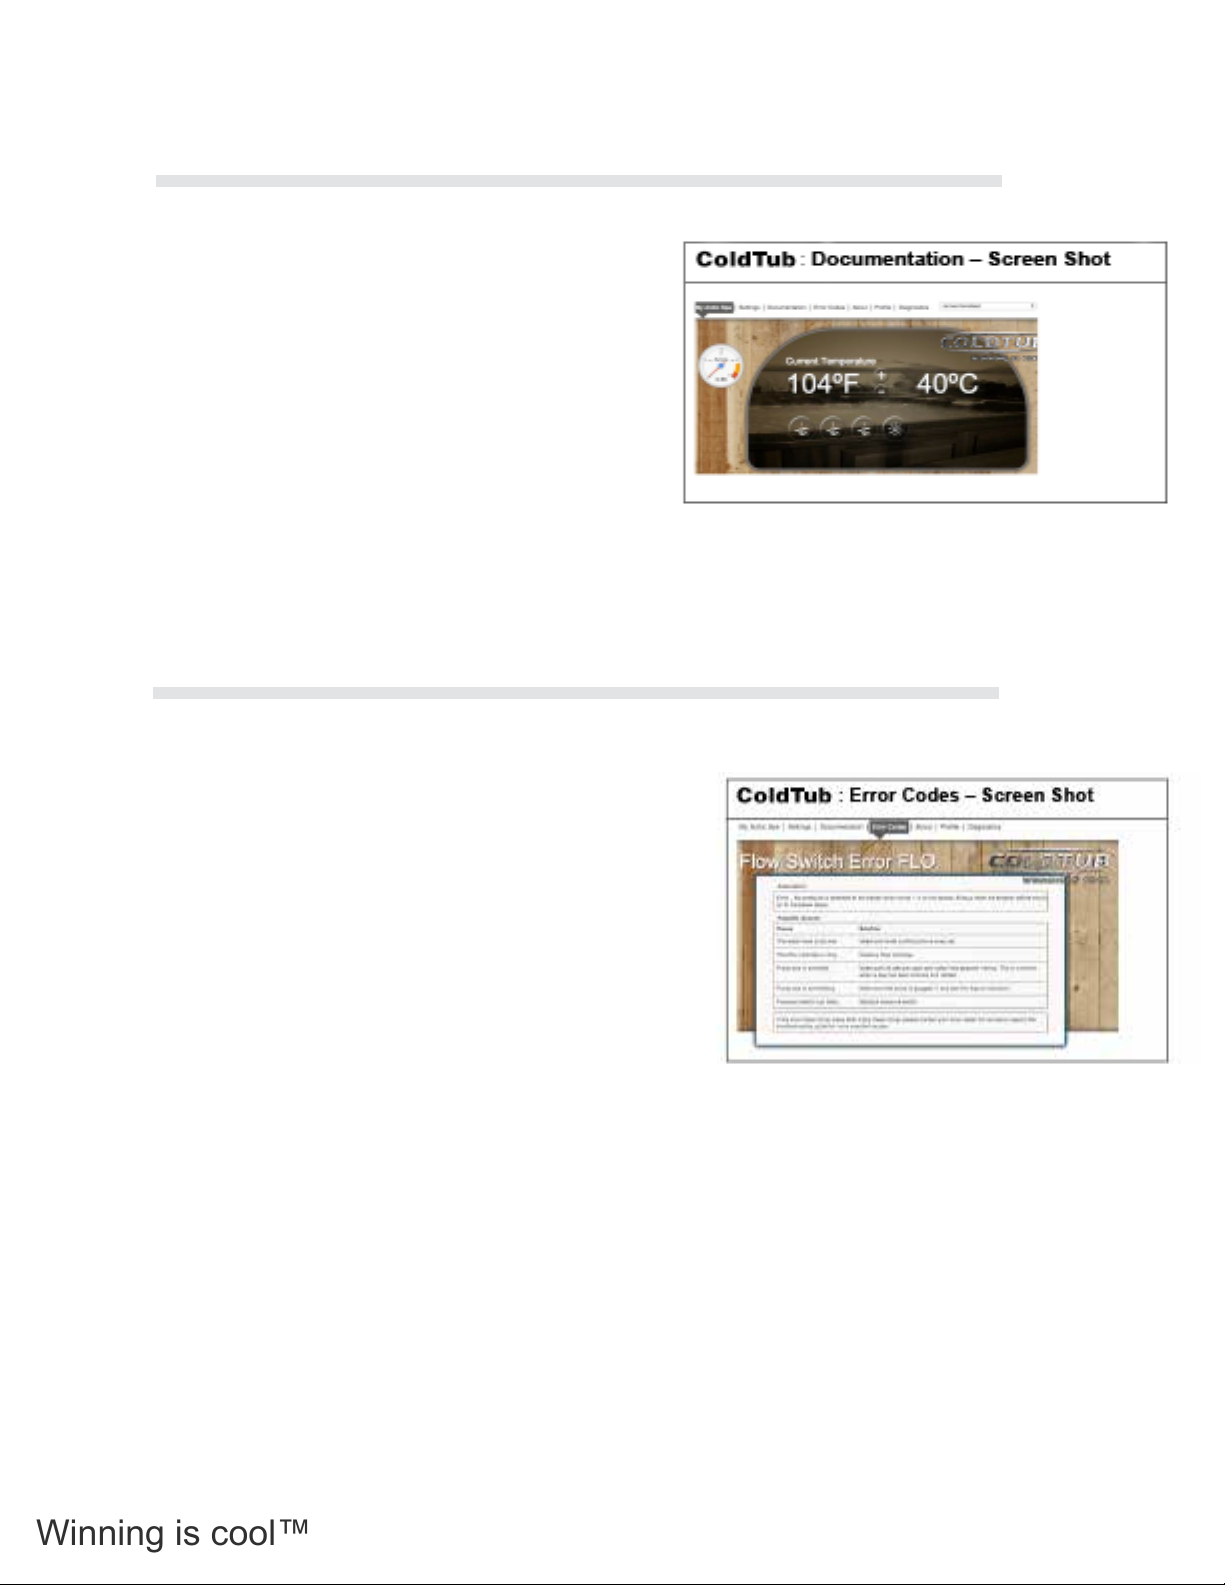
Winning is cool™
60
3.11.8 Documentation
Click on this tab to access the Documentation
page.
This page provides you easy access to:
• Your owners manual.
• Networking guide.
• onTub user guide.
• COLDTUB Pal Owners Manual.
• Power Management.
• Quick Reference Cards.
• Other cool stuff.
3.11.9 Error Codes
Click on this tab to access the Error Codes page.
This page provides you quick access to error code
descriptions, possible causes and solutions for error
codes that will be displayed on your Tubs topside
controller, in the unlikely event of a system warning
linked to a possible component fault, such as:
• Pressure switch error -FLC
• No water ow - FLO.
• High limit error - HL.
• Temp probe error - PRR.
Page 63
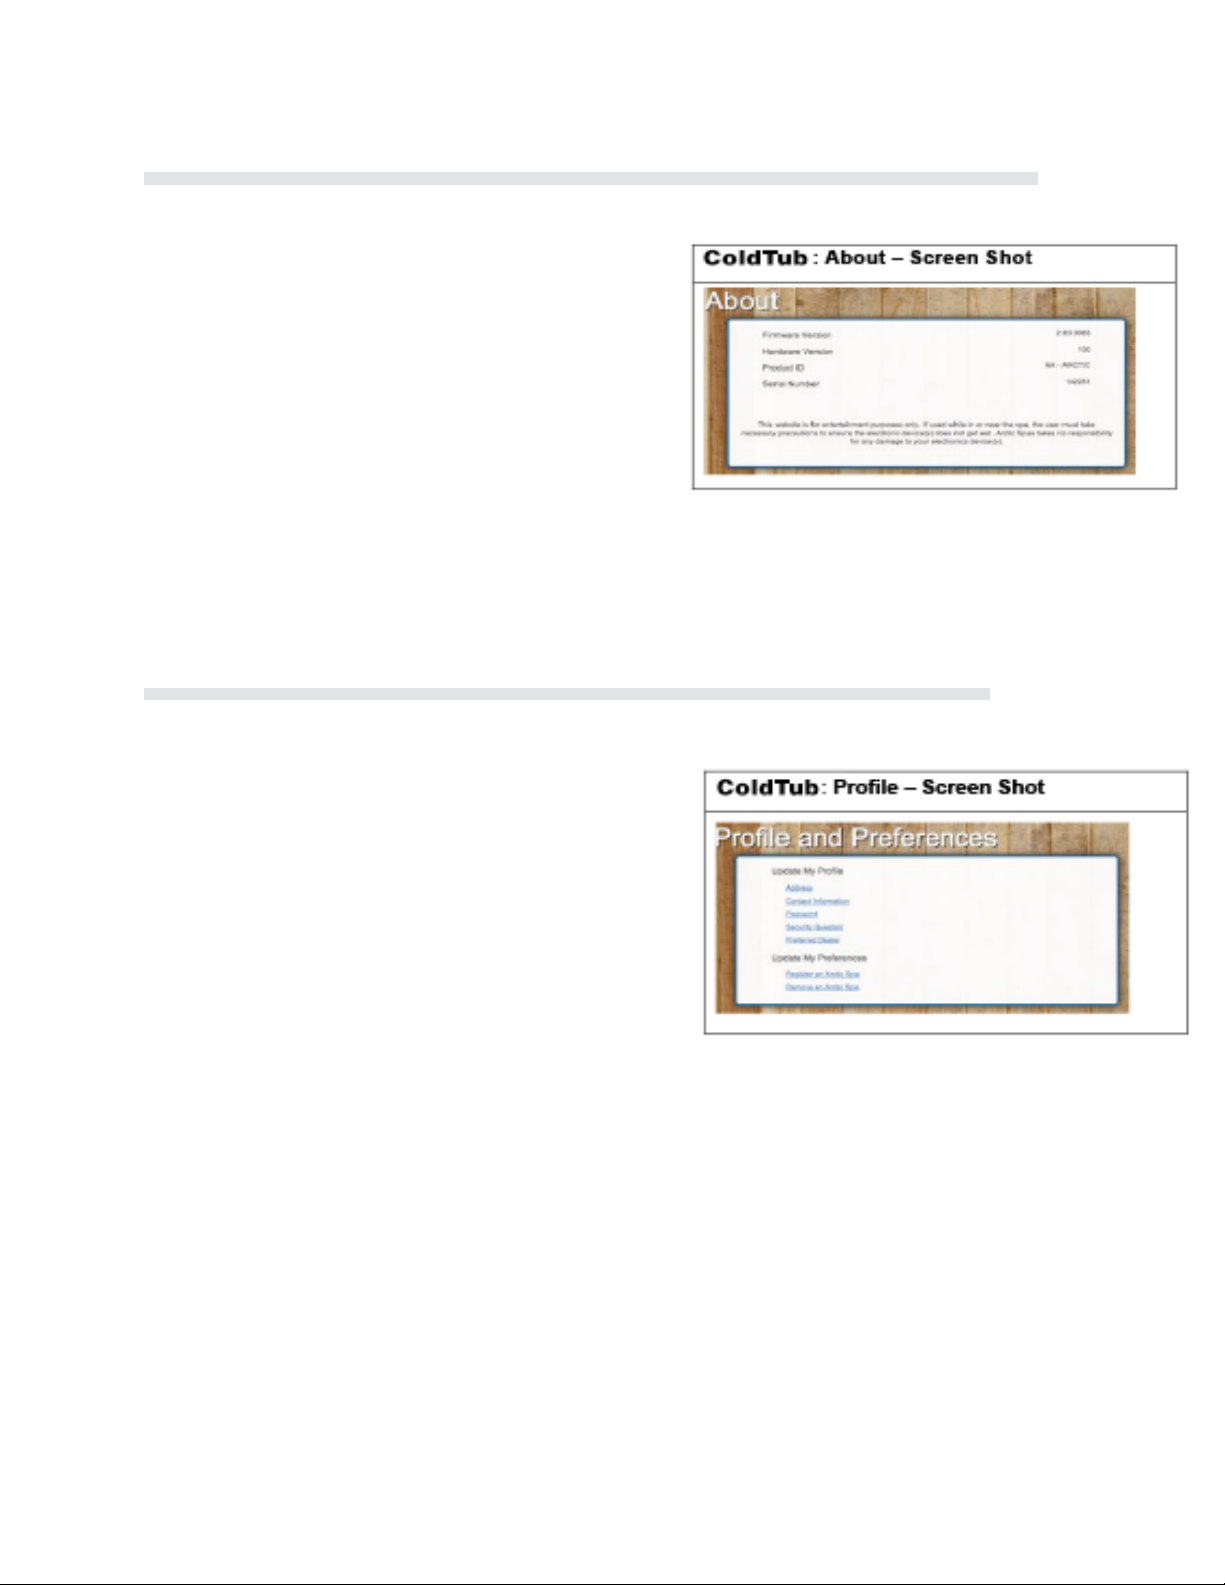
3.12 About
Click on this tab to access the About page.
This page displays the following details about your Tub:
• Firmware version load.
• Hardware version.
• Product ID.
• Tub serial number.
61
3.12.1 Prole
Click on this tab to access the Prole page.
This page is used to:
• Update your personal details such as email and
password.
• Update your preferences such as register and
remove a COLDTUB from Mycoldtub.com.
Page 64
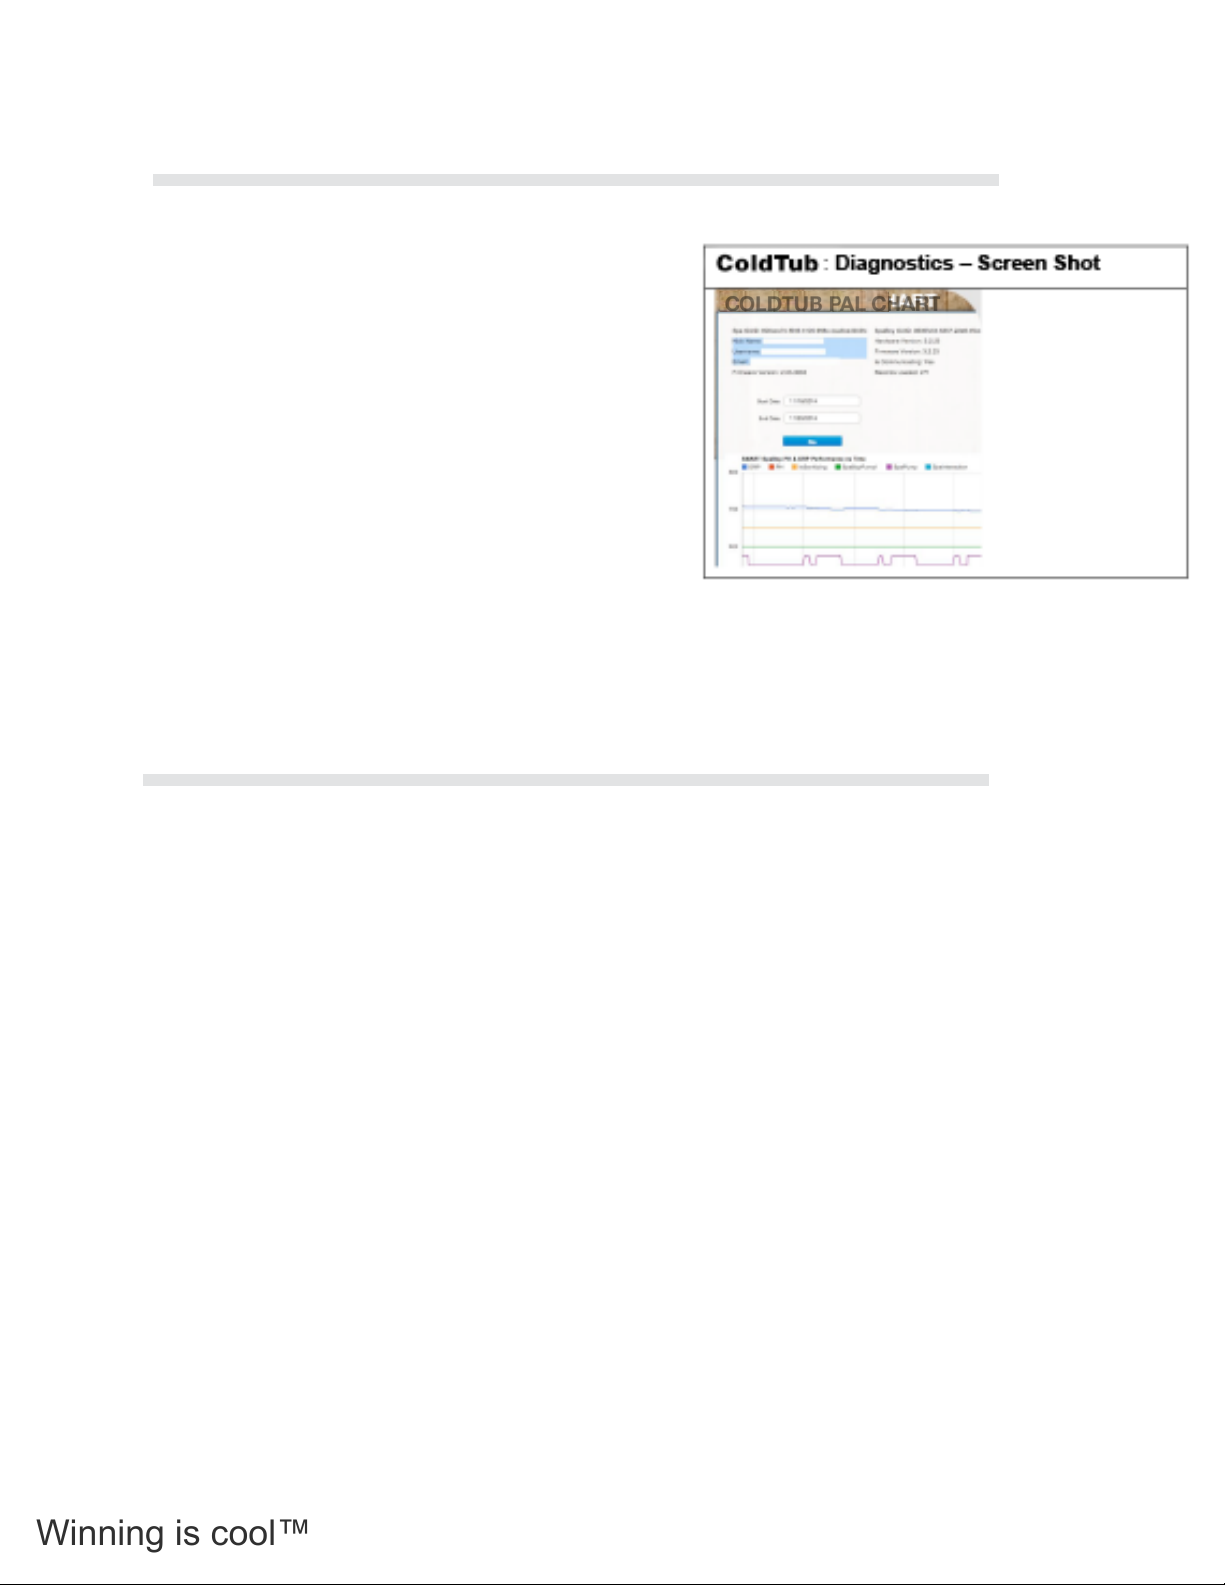
Winning is cool™
62
3.12.2 Diagnostics
Click on this tab to access the Diagnostics page.
This page is used to access the data that has been
transmitted from your Tub to COLDTUB Pal. Data such
as, but not limited to the following is captured:
• COLDTUB Pal chart.
• COLDTUB Pal Table.
• COLDTUB Pal Controls.
• COLDTUB Pal Report.
The data can be used by the Tubs owner to graphically
check pH and ORP readings determine power usage.
COLDTUB PAL CHART
3.12.3 Logout
To logout of COLDTUB Pal press the Logout button on the horizontal tool bar in the right hand upper corner
of the screen.
Once out, enjoy your Tub!
Page 65

3.12.4 Caring for your COLDTUB
Pal System COLDTUB Pal Maintenance
Question 1 How do I Replace the COLDTUB Pal Output Electrode?
The COLDTUB Pal Output Electrode should be replaced every 12 months. Doing this ensures
Sanitizer will be produced and sanitizer remains in the required range.
The COLDTUB Pal Output Electrode can be replaced without draining the Tubs water
providing these steps are followed.
Steps:
• Unscrew the COLDTUB Pal Niche out of its housing.
• Raise the Niche completely out of the Tubs water and dry off any water on the Niche and
Electrode.
• To help prevent galvanic corrosion, it is critical to ensure that Tub water does not come into
contact with the COLDTUB Pal Electrode Electrical Pin or female matting connection located on
the COLDTUB Pal Niche when disconnecting the Niche from the COLDTUB Pal Electrode.
* Keep them high and keep them dry, when replacing the COLDTUB Pal Output
Electrode!
• With a small Phillips screwdriver unscrew the set screw that secures the COLDTUB Pal
Output Electrode to the Niche.
• Remove the COLDTUB Pal Output Electrode from the Niche by Unscrewing the Electrode
anticlockwise and ensure the small O-ring has not dislodged from the Electrode and
remained behind inside the Niche.
• Ensure the new Electrode has the small O-ring correctly seated into the groove that is
positioned around the electrical pin.
• Inspect the male electrical connection plug in the Niche to ensure it is not corroded. If
corroded the dealer will need to be contacted as the COLDTUB Pal Niche Assembly will
require replacement.
• Apply Dielectric Grease to the electrical pin on the new COLDTUB Pal Electrode.
• Insert the COLDTUB Pal Electrode back into the Niche and turning clockwise screw the
Electrode into the Niche until tight and the locating hole has aligned (approximately 4
revolutions).
• Insert the set screw into the Electrode and using a Phillips screwdriver tighten the set screw.
• Tuck the wiring loom back into the Housing.
• Screw the Niche back into its Housing ensuring the Electrode points upwards when tight.
This ensures maximum output from the Electrode.
63
Question 2 How do I Care for the COLDTUB Pal Sensor?
The COLDTUB Pal Sensor must never be permitted to freeze and must always remain in
contact with water. If the Sensor freezes or is not left in contact with water at all times the
sensor will fail and will require replacement!
Page 66

Winning is cool™
64
3.12.4 Caring for your COLDTUB
Pal System COLDTUB Pal Maintenance
(Continued)
Question 3 How do I Care for the COLDTUB Pal Sensor when Draining
the Tubs Water?
Note: Draining tub and using the provided plug, should take place when Tub will be
empty for period of time. (1 week or longer) If doing a quick drain/rell for fresh water,
steps using the plug are not needed. The probe will not dry out in 24 hours.
As the COLDTUB Pal Sensor must always remain in contact with water, when the Tubs
water is being drained the COLDTUB Pal Sensor Housing must be sealed before the water is
drained.
The COLDTUB Pal Sensor Housing is usually located in the foot well or other area of the Tub
that is not in the way of bathers or impacted by water turbulence from jets. The COLDTUB Pal
Housing has a Grate screwed into the front of the Housing.
Steps for caring for your COLDTUB Pal Sensor when draining the Tubs water:
• Obtain the COLDTUB Pal Housing Plug provided with the Tub.
• Check to ensure the Housing Plug has an O-ring in place.
• Turn the breaker off to isolate power to your Tub.
• Turning anticlockwise, unscrew the Grate located on the front of the COLDTUB Pal
Sensor Housing.
• Screw the COLDTUB Pal Housing Plug provided with your Tub into the front of the
COLDTUB Pal Sensor Housing. This will seal the water
that is in the Housing and prevent the water in the Housing from draining when you drain
your Tubs water.
Warning: The COLDTUB Pal Sensor must never be permitted to freeze and must always
remain in contact with water. If the Sensor freezes or is not left in contact with water at
all times the sensor will fail and will require replacement!
• You can now drain your Tubs water.
• When relling your Tub with water, leave the COLDTUB Pal Sensor Plug secured in place
until the water line is higher than the
PH Probe housing.
• The COLDTUB Pal Housing Plug can now be unscrewed from the Housing and the Hous
ing Grate can be screwed back into the Housing.
• Once the water level has been reached you can turn the breaker back on to repower your
Tub.
Page 67

3.12.5 Caring for your COLDTUB
65
Pal System
COLDTUB Pal Questions
Question 1 Does adding salt to the Tubs water impact pH?
Yes adding salt to the Tubs water will increase the pH level.
The chlorine that is produced by a salt chlorinator plays a role in the water chemistry of a salt
Tub. Salt is sodium chloride. When an electric charge is passed through salt water, the sodium
chloride is turned into sodium hypochlorite. This is the same kind of chlorine that is sold by the
gallon as liquid chlorine. The most important feature of sodium hypochlorite is a high pH. When
the salt chlorinator produces chlorine, it raises the pH of the Tubs water. Strive to achieve a Low
pH level 7.0. pH must not exceed 7.6.
Question 2 What do I do if my ORP Reading is below the Optimum Range?
If COLDTUB Pal reects that the ORP is below the Optimum Range of 545 – 550 mV you must
rst consider that water chemistry may have been affected by recent bather load and Tub usage,
at times the ORP value will overshoot or undershoot the Optimum Range.
If the COLDTUB Pal Dashboard on COLDTUB Pal reects that the ORP is below 545 mV do the
following:
Check COLDTUB Pal Dashboard through COLDTUB Pal to see if the Dashboard reects
sanitizing YES, if yes COLDTUB Pal is currently producing sanitizer. Re-check ORP in a few
hours to conrm ORP is increasing.
If Dashboard reects Sanitizing NO:
Trip the Tubs breaker to isolate the power to the Tub and then turn the breaker back on to
repower the Tub.
Check COLDTUB Pal Dashboard through COLDTUB Pal to see if the Dashboard reects
sanitizing YES, if yes COLDTUB Pal is currently producing sanitizer. Re-check ORP in a few
hours to conrm ORP is increasing.
If Dashboard reects Sanitizing NO: Contact COLDTUB who will request a Master Technician
to log onto your Tub to determine the possible cause, such as depleted COLDTUB Pal Output
Electrode, Poisoned COLDTUB Pal Sensor or corroded COLDTUB Pal Output Electrode
electrical connections.
Page 68

Winning is cool™
66
3.12.5 Caring for your COLDTUB
Pal System
Question 3 If the COLDTUB Pal System is not working, what should I do
if I need to add COLDTUB Cold Water SANITIZER or other sanitizer to the
Tubs water?
Adding any type of chlorine sanitizer directly to the Tubs water will poison the COLDTUB Pals
Sensor Probe which will cause inaccurate ORP and pH readings to be sent to COLDTUB Pal
and registered with COLDTUB Pal.
Before adding chlorine sanitizer to the Tubs water, protect the COLDTUB Pal Sensor Probe from
becoming poisoned by Obtain the COLDTUB Pal Housing Plug provided with the Tub.
Check to ensure the Housing Plug has an O-ring in place.
Turning anticlockwise, unscrew the Grate located on the front of the COLDTUB Pal Sensor
Housing.
Screw the COLDTUB Pal Housing Plug provided with your Tub into the front of the COLDTUB
Pal Sensor Housing. This will seal the water that is in the Housing and prevent the COLDTUB
Pal Sensor Probe from becoming poisoned from adding sanitizer to the Tubs water.
You can now add the sanitizer.
After adding the sanitizer to the Tubs water, ensure the COLDTUB Pal Housing Plug remains in
place for three days.
Once three days have past , the COLDTUB Pal Housing Plug can be unscrewed from the
Housing and the Housing.
Grate can be screwed back into the Housing.
(Continued)
COLDTUB Pal Questions
Question 4 How do I help prevent impedance increase at the COLDTUB Pal
Electrode?
Maintain the pH level within the target range 7.0 pH – 7.6 pH.
As salt systems naturally drive pH levels upwards, it is most critical to the performance/life of the
salt system to
maintain the pH within the target range.
High pH reduces the effectiveness of chlorine.
Therefore, high pH causes your COLDTUB Pal system to produce more chlorine unnecessarily
thus increasing pH even higher and reducing the effectiveness of chlorine even further.
Strive to achieve a Low pH level 7.0. pH must not exceed 7.6.
Page 69

3.12.5 Caring for your COLDTUB
67
Pal System
(Continued)
COLDTUB Pal Questions
Question 5 Why is my water bright yellow, or bright green, or a rusty color
suddenly?
This can happen if the pH gets too high.
Maintain the pH level within the target range 7.0 pH – 7.6 pH.
Lower the pH using ‘Cold Water Run Down’. If the color of the water does not normalize you may
need to replace the water.
* Keep an eye on the pH and adjust it weekly to avoid this problem in the future.
Question 6 What happens if my water becomes cloudy?
1. Check you pH level to ensure it is in the target range. If high Lower the pH using ‘Cold Water Run
Down’
2. Check/Test the water for chlorine content. If the level is low or there is no reading the COLDTUB
Pal Output Electrode may be exhausted and require replacement.
3. Check your lters as they may require replacement.
Question 7 What is the impact of phosphates on the COLDTUB Pal system?
High levels of phosphates (above 250 ppb) may reduce the effectiveness of sanitizer output.
Question 8 Can I use softened water with my COLDTUB Pal system?
Yes.
You probably have a water softener because your water is quite hard. Your water-softener removes
calcium from your water and helps you achieve water with calcium content near the target range,
between 50 - 150ppm.
Page 70
Winning is cool™
68
3.13 COLDTUB Pal Version 1 R1
Maintenance Schedule
The following table outlines the typical water maintenance program required for an COLDTUB
tted with COLDTUB Pal Version 1 R1.
To help ensure chemicals dissolve appropriately it is good practice to rst mix/dissolve the
chemical in an uncontaminated container of hot water before carefully adding to the Tub water.
There are two methods to check the target range:
• COLDTUB Pal Application, if your Tub has Wi-Fi and access to the internet through
your home network or portable device such as iPad or smart phone, you can log onto
COLDTUB Pal and open the Settings or Diagnostics Page to review the readings (To
access COLDTUB Pal you must rst register your details on the COLDTUB Pal web site:
www.mycoldtub.com.
Item Frequency Maintenance Task Target Range
pH Weekly Check the Potential Hydrogen (pH) to
ensure it is in the target range.
Always rst check to ensure the pH is
within the target range. If the pH is out
of the target range pH must be adjusted
before making any adjustments to chlorine levels
ORP Weekly
(& before
each use)
Sodium
Chloride
Monthly Check the Sodium Chloride Level to
Check the Free Chlorine Level to ensure
it is in the
target range.
ensure it is in the target range.
7.2 – 7.6 pH As Salt systems naturally drive pH levels upwards, it is most critical to the performance/
545–550 mV 545-550 mV is the Optimum Range factory default setting.
Version 1 R1
1500 – 1800
ppm
Filter 3 Monthly Change the lter(s) N/A Change the lter(s) in accordance with Owners Manual instructions.
Water 6 Monthly Change the water N/A Change the water in accordance with Owners Manual instructions.
Page 71
Maintenance Action to Adjust/Correct
life of the salt system to maintain the pH within the target range.
High pH reduces the effectiveness of chlorine.
69
Therefore, high pH causes your COLDTUB Pal system to produce more chlorine thus
increasing pH even higher and reducing the effectiveness of chlorine even further.
Strive to achieve a Low pH level 7.0. pH must not exceed 7.6.
Low pH - Can be raised by adding COLDTUB Cold WaterJump to the Tub water.
High pH - Can be lowered by adding COLDTUB Cold Water Run Down to Tub water.
The user may adjust higher if preferred through the COLDTUB Pal Web Page.
COLDTUB Pal will strive to maintain ORP within the Optimum Range.
Depending on the water chemistry which will be affected by bather load and Tub usage,
at times the ORP value will overshoot or undershoot the Optimum Range.
Once Sodium Chloride reading is in the target range salt concentration will only change
if water is splashed or drained out. Do not add salt unless this test conrms the level is
below the chemical acceptable range.
High Sodium Chloride - add water.
Low Sodium Chloride - add salt.
Page 72

#201808
 Loading...