

Coldheat Pro Instruction Manual
L
i
m
i
t
e
d
W
a
r
r
a
n
t
y
I
n
f
o
r
m
a
t
i
o
n
A
c
c
e
s
s
o
r
i
e
s
T
h
e
W
e
l
l
e
r
®
/
C
o
l
d
H
e
a
t
T
M
P
r
o
S
o
l
d
e
r
i
n
g
T
o
o
l
B
a
t
t
e
r
y
I
n
s
t
a
l
l
a
t
i
o
n
&
R
e
p
l
a
c
e
m
e
n
t
Cooper Hand Tools warrants to the original purchaser and any subsequent owner ("Buyer") that this product
will be free from defects in material and workmanship for a period of 90 days from date of purchase, provided
that no warranty is made with respect to products which have been altered, subjected to abuse or improperly
used, installed or repaired. Use of non-Cooper Hand Tools components will void this warranty if a non-Cooper
Hand Tools component is defective (or is the source of the defect).
Cooper Hand Tools will repair or replace products found to be defective not caused by a part, component or
accessory manufactured by another company, during the warranty period. Contact Cooper Hand Tools with
dated proof of purchase and return to Cooper Hand Tools, 1000 Lufkin Road, Apex, NC 27539. All costs of
transportation and reinstallation shall be borne by Buyers.
IN NO EVENT SHALL COOPER HAND TOOLS BE LIABLE FOR INCIDENTAL OR CONSEQUENTIAL DAMAGES.
COOPER HAND TOOLS LIABILITY FOR ANY CLAIMS ARISING OUT OF THIS WARRANTY SHALL NOT EXCEED
THE PURCHASE PRICE OF THE PRODUCT.
THE PERIOD OF ALL IMPLIED WARRANTIES APPLICABLE TO THIS PRODUCT INCLUDING ANY IMPLIED
WARRANTY OF MERCHANTABILITY OR FITNESS, OR FITNESS FOR A PARTICULAR PURPOSE IS LIMITED TO
90 DAYS FROM THE DATE OF PURCHASE BY THE USER.
Some states do not allow the exclusion or limitation of incidental or consequential damages, so the above
limitation or exclusion may not apply to you. Some states do not allow limitation on how long an implied
warranty lasts, so the above limitation may not apply to you.
This warranty gives you specific legal rights, and you may also have other rights which vary from state to
state.
Protected by U.S. Patent number 6,646,228.
Other U.S. and foreign patents pending.
See coldheat.com for more information.
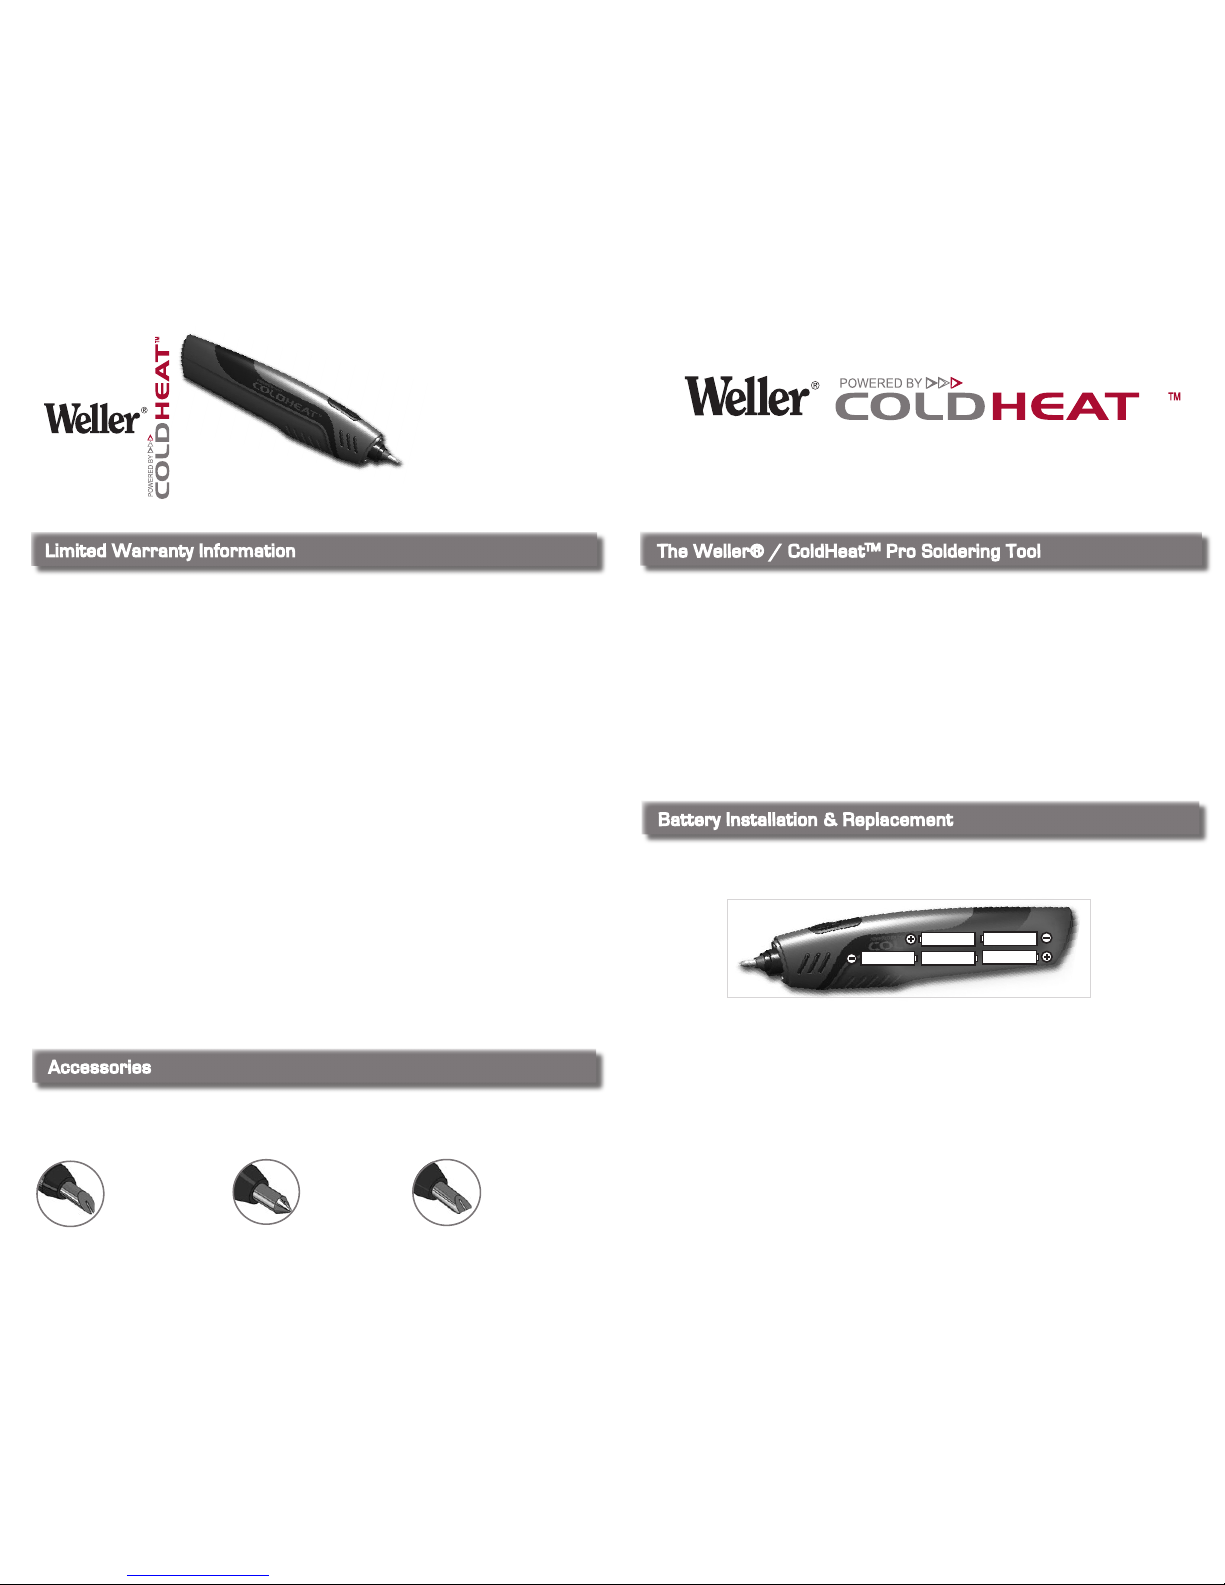
The patented Split-TipTM soldering tips are replaceable, and can be easily removed b y gently pulling on the tips’
black housing. Please turn off power and allow the tip to cool b efor e chan ging . There are three different SplitTipsTM, the Chisel tip, the Bevel tip and the Conical tip:
To insert or change the batteries:
1.Slide the batte ry compart ment cover (located on the
bottom of the tool) away from the tool.
2. Insert or replace batteries according to the polarity
diagram lo cate d above and also inside the tool’s
battery compartment.
3. Replace the battery compartment cover prior to use.
Battery Notes:
• Do not mix old and new batteries.
• Do not use rechargeable batteries.
• Re move batteries if not using the sold erin g tool
for an extended period of time.
• Dispose of batteries promptly and properly.
Thank you for purchasing the Weller® ColdHeatTM Pro Soldering Tool. The Pro Tool’s patent ed technology
creates the heat you need to solder within seconds, and its cordless design lets you operate it anywhere.
The patented Split-TipTM combines unique material properties into two electrically insulated electrodes that
form part of an internal electrical circuit. Unlike regular soldering ir ons, the Pro Soldering Tool does not require
pre-heating the tip. When the tip’s two electrodes make simultaneous contact with an electrically conductive
material (such as a wire lead, terminal, solder, PCB pad, metal jewelry or other material), the circuit is
completed and the electrodes generate nearly instantaneous heat at the tip. The heat is then rapidly transmitted to the work piece.
The Pro Tool has the high est available power, g ivin g you more ability to work with larger projects. It will tin
wires up to 12 gauge (or equivalent mass).
Pro Soldering Tool Instruction Manual
© Hyperion Innovations Inc, 2005
“ColdHeat” and “Powered by ColdHeat”
are trademarks of Hyperion Innovations Inc.
Chisel - wide and flatfaced tip is good for
larger components
and applications.
Bevel - the most
versatile tip, useful
for general applications.
Conical - ideal for
precision soldering
and work in tight
spaces.
The Weller® ColdHeatTM Pro Soldering Tool u ses five replaceable AA alkaline batteries. Please see battery
polarity diagram below for proper placement of batteries.
USE REPLACEABLE AA ALKALINE BATTERIES.
RECHARGEABLE BATTERIES ARE NOT RECOMMENDED.
Pro Soldering Tool Instruction Manual
© Cooper Industries, Inc., 2005
“Weller” and “Cooper Hand Tools”
are trademarks of Cooper Industries, Inc.
CHT1 Bevel Tip
CHT2 Conical Tip
CHT3 Chisel Tip
(included with tool)
S
o
l
d
e
r
i
n
g
T
e
c
h
n
i
q
u
e
Follow these safety precautions to reduce the risk of personal injury or property damage from fumes, burns, or fire.
WARNING
• Use with proper ventilation, use caution, common sense, and become educated about the soldering process. This
product, when used for soldering and similar applications, produces chemicals known to the State of California to cause
cancer and birth defects (or other reproductive harm) (CA Health and Safety Code 25249.5 et seq.) Flux fumes from
soldering and de-soldering can be harmful, especially when using lead-based solder.
To reduce the risk of fire or explosion:
• Do not operate near flammable or explosive materials. This tool may create a spark at the tip while soldering, which
could ignite flammable fumes, liquid or other materials.
To reduce the risk of personal injury or property damage from burns or fire:
• Do not touch the tip during active operation (indicated by the red light). Make sure that the tip is cool before touching or
replacing the cap. Allow sufficient time for the tip to cool before touching it. Under most circumstances, the tip will cool
to the touch very quickly. However, after prolonged use—such as after applying solder to several joints or applying
solder to a work piece for a long time—the tip may take longer to cool down.
• Be sure the Split-TipTM is free of debris when not in use. The tip may inadvertently become hot or remain hot if a piece
of metallic debris is lodged in the gap between the Split-Tip electrodes. If debris is lodged in the Split-TipTM, shut the
unit off and use a thin, non-conductive material such as a toothpick to wedge the debris out of the Split-TipTM.
• Turn the soldering tool OFF when not in use. The tool may inadvertently create heat if it is left in the ON position and
conductive material becomes lodged between the Split-Tip electrodes.
• Keep out of reach of children.
CAUTION
To avoid damage to your soldering tool:
• Do not apply unnecessary pressure to the Split-TipTM. The Split-TipTM is fragile. Excessive pressure will damage or
break the tip. Light-handed operation will prolong the life of your tip.
• Do not store tool in high-temperature environments as this can damage the batteries and electrical parts.
• Do not attempt to repair the soldering tool. This could damage the tool and will invalidate the warranty.
SAVE THESE INSTRUCTIONS
S
a
f
e
t
y
I
n
s
t
r
u
c
t
i
o
n
s
-
-
R
e
a
d
A
l
l
I
n
s
t
r
u
c
t
i
o
n
s
B
e
f
o
r
e
U
s
e
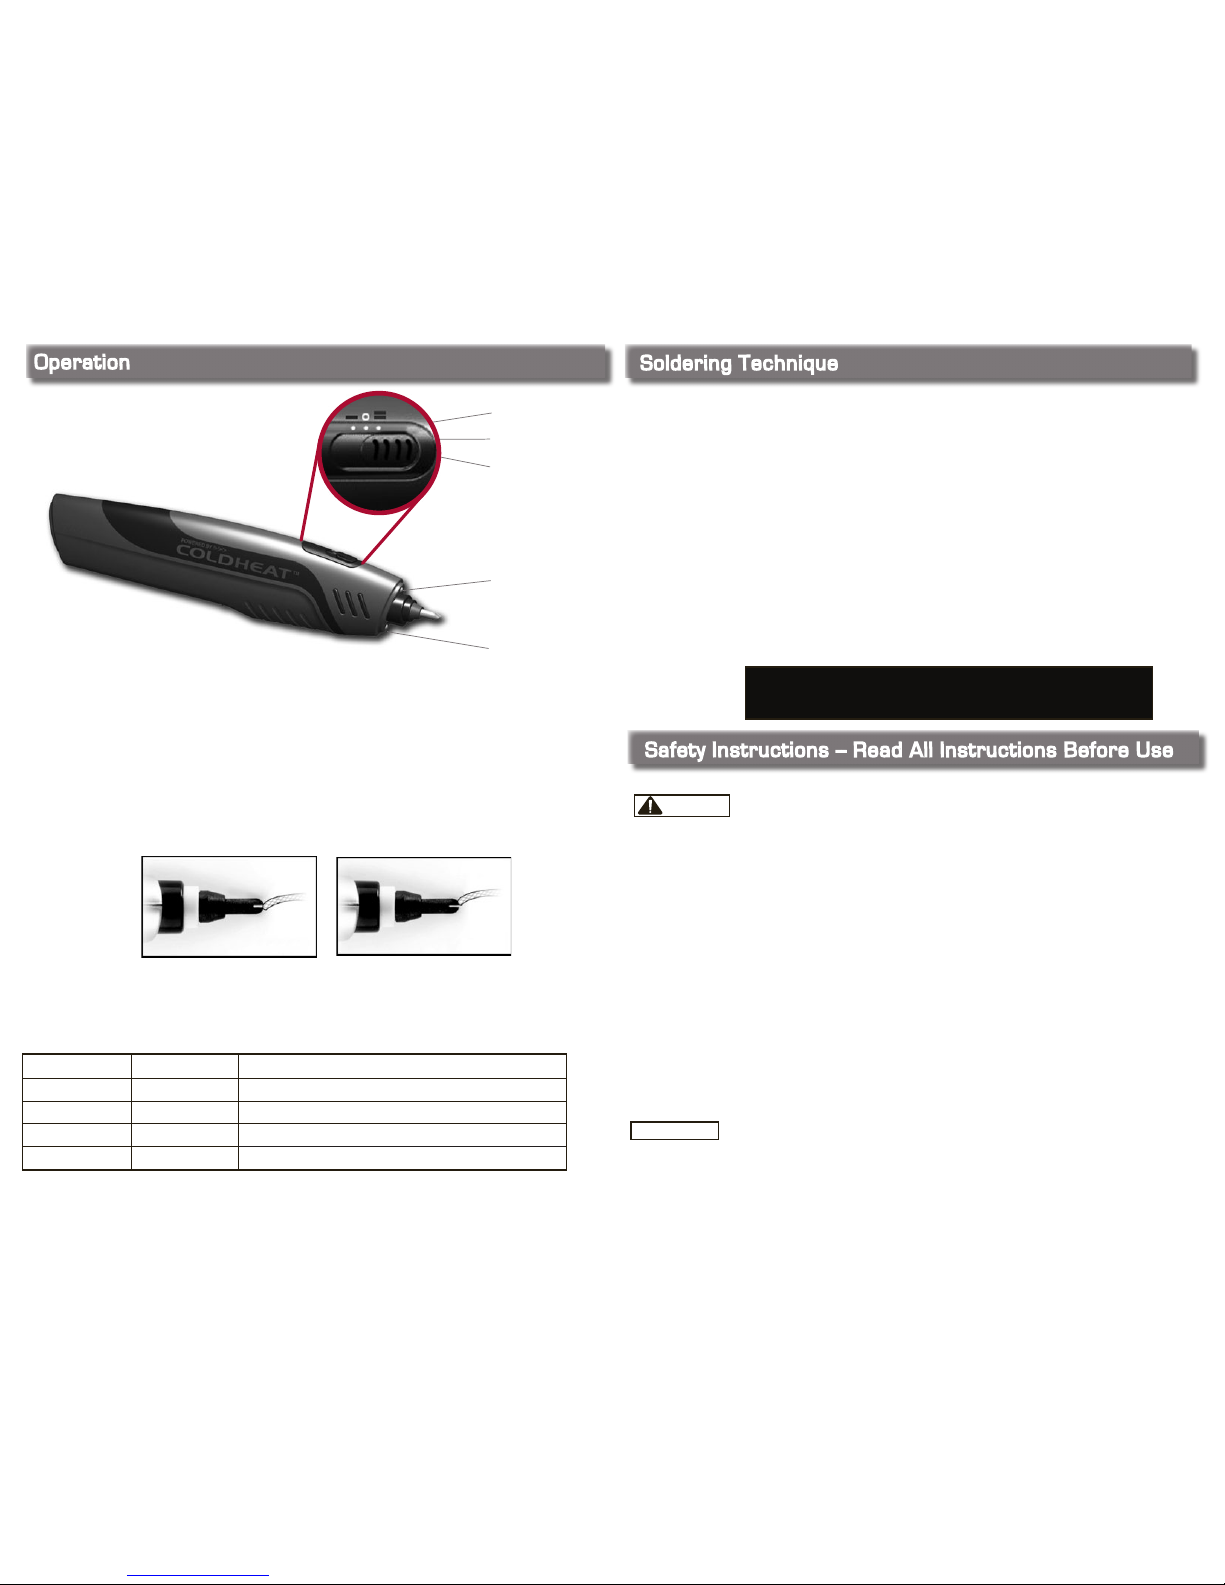
When you first open the Pro tool’s case, a translucent cap protects the electrical contacts at the front end of the tool.
Remove the protective cap and insert one of the tips by pushing it into the tool.
1. Slide the ON/OFF switch on top of the tool to the appropriate power setting (I for low power or II for high power). The
white light illuminates, and although the tip is still cool, your tool is now ready to solder.
2. To heat the tip, gently place it against the electrically-conductive work piece so that both tip electrodes make solid
contact with the work piece; then add solder. If the tip is placed correctly, the red light illuminates and the tip will create
heat almost instantly, allowing for clean solder flow and the formation of a smooth joint. A slight spark may occur at the
tip during soldering.
3. When the joint is complete, remove the tip from the work piece. The tip should cool off to touch-safe temperatures
within a few seconds to a few minutes, depending on the length of your soldering process.
CAUTION: DO NOT PRESS HARD. Excessive pressure does not improve performance and may break the tip. If the tool is not supplying
the required heat, the tip electrodes are not both making contact with electrically-conductive material. Reposition the tool for better
contact until the red light turns on.
The Weller® ColdHeatTM Pro Soldering Tool displays a white light and a red light that indicate the tool’s operating
status, as follows:
O
p
e
r
a
t
i
o
n
Red “in use” light
Correct Contact
Incorrect Contact
Meaning
White pen-light
Low Power
Off
High Power
* First try changing the batteries. If this does not help, or if your tool in any way does not function properly, please visit coldheat.com for detailed
troubleshooting, help and frequently asked questions.
Work piece makes contact
with only one half of tip.
Work piece makes contact
with both halves of tip.
NOTE: The Weller® ColdHeatTM Pro Soldering Tool is not
recommended for large joints that require long, continuous soldering.
Below are a few operational tips intended to improve your soldering technique with the Pro Soldering Tool:
• This tool is intended for short bursts of heat. Do not dwell on a single soldering joint for a long duration.
• The Low Power setting (I) is best for smaller projects (tinning 20-24 gauge wires, or equivalent). The High Power setting
(II) is best for larger projects (tinning 12-18 gauge wires, or equivalent).
• If you are having trouble establishing electrical contact between the Split-Tip™ electrodes and the work piece, tilt the tip
so that it touches the work piece at an angle. The red light will then turn on when the tip makes correct contact with the
work piece. A few minutes of practice will go a long way to ensure that you enjoy your tool. Remember: light-handed
operation will prolong the life of your tip and create better joints.
• Users more experienced with the soldering process will recognize that the Split-Tip™ eliminates the need for wetting and
cleaning the tip. The tips can also be used for desoldering with wick.
• When soldering electronic components with small pin-outs, do not bridge two or more different pins with the opposite
halves of the Split-Tip™. Doing so will cause a current discharge and may damage the part.
• Turn off the tool when not in use. Extended use of the white light will diminish battery life.
• A new set of batteries will perform approximately 700 joints under normal conditions. We recommend that you replace the
batteries often to maintain high performance from your tool.
• For best results use solder approximately 1 mm (0.040”) in diameter.
White Light
Red Light
OFF
ON
OFF
OFF
ON
ON
The tool is shut off.
The tool is ready to solder. If just used, the tip may be hot.
The tool is soldering and the tip is hot.
OFF
ON
Error. Turn power off and check tool*.
Power Switch Detail
 Loading...