

COHU 3230 series Installation Manual

3230 SERIES ANALOG
ENVIRONMENTAL CAMERA
INSTALLATION MANUAL
RS-232
RS-422
Technical Manual 6X-1086
Figure 1. Model 3230 NTSC or PAL Camera
March 21, 2008

3230 CAMERA
Two other manuals related to this camera are available:
1. Manual 6X-1084. The setup GUI - for conguring camera
characteristics
2. Manual 6X-1085. The protocol - for use by programmers to
write software for controlling camera functions
INST
ALLA
TION MANUAL
CAUTION
Do not power the 24 V ac version of
this camera directly from a Variac. It
will blow up the power supply.
2
6X-1086

INSTALLATION MANUAL
3230 CAMERA
1.0 GENERAL DESCRIPTION
This introduction briey describes overall
characteristics of the Model 3230 Camera (gure
1) related to its installation. Specications can be
found on the CD supplied with this camera.
Electrical Characteristics
1.1
The 3230 provides a highly sensitive CCD
camera in an environmental housing.
This camera is available with either NTSC or
PAL video output, depending on the model. Operat-
ing power is either 12 V dc, 24 V dc/ac, or 115 V ac
— again depending on the model.
An integrated camera module provides a 3.3 to
99 mm zoom lens.
Data communications with the camera can be
either RS-232 or RS-422 for control of DSP func-
tions.
It has a day/night feature that increases sensi-
tivity by reverting from color to monochrome output
in low light conditions. This feature can be made to
operate automatically or by manual control when
desired.
A model number interpretation diagram ap-
pears in gure 2. That diagram shows the various
basic congurations of the 3230.
1.1.1 Initial Setup Software
Graphical User Interface (GUI) software is
available for setting the address and performing
eld tests and setups for each camera. This is in-
cluded on a CD provided with the camera.
Technical manual 6X-1084, also included on
the CD, is the reference manual for this GUI.
1.1.2 Camera Firmware Protocol
Technical manual 6X-1085 provides the pro-
tocol details for develop software for controlling
the camera. This document is available on the CD
provided with the camera.
Mechanical Characteristics
1.2
Dimensions are shown in gure 5. The 3230
consists of an IP67 environmentally sealed and
pressurized camera module. Dry nitrogen is used
for the presssurization. Dry desiccant packs are
placed inside the camera during during the sealing
process.
An integral sun shield over the camera housing
minimizes heat build up from sun light.
The mounting base (gure 5) for the 3230 has
a ve-hole in-line 1/4/20 pattern for attachment to a
suitable base.
A 3230 can be mounted on any one of ve me-
chanical congurations. The model number denes
any mounting equipment that was supplied with the
camera. Table 1 lists the mounting items supplied
for each of the mounting congurations available
with a 3230.
A Schrader valve (gure 7 — the car tire type
air valve on the left) on the rear panel provides for
pressurizing the housing with the dry nitrogen.
The pressure relief valve, on the right, should
be lifted off its seat during purging of the camera.
This aids in the ow of gas through the housing
while purging moisture laden air from inside.
2.0
INSTALLATION
This section covers the general requirements
of installing the 3230 including cabling and power
requirements. Section 5, toward the rear of this
manual, covers several other items including static
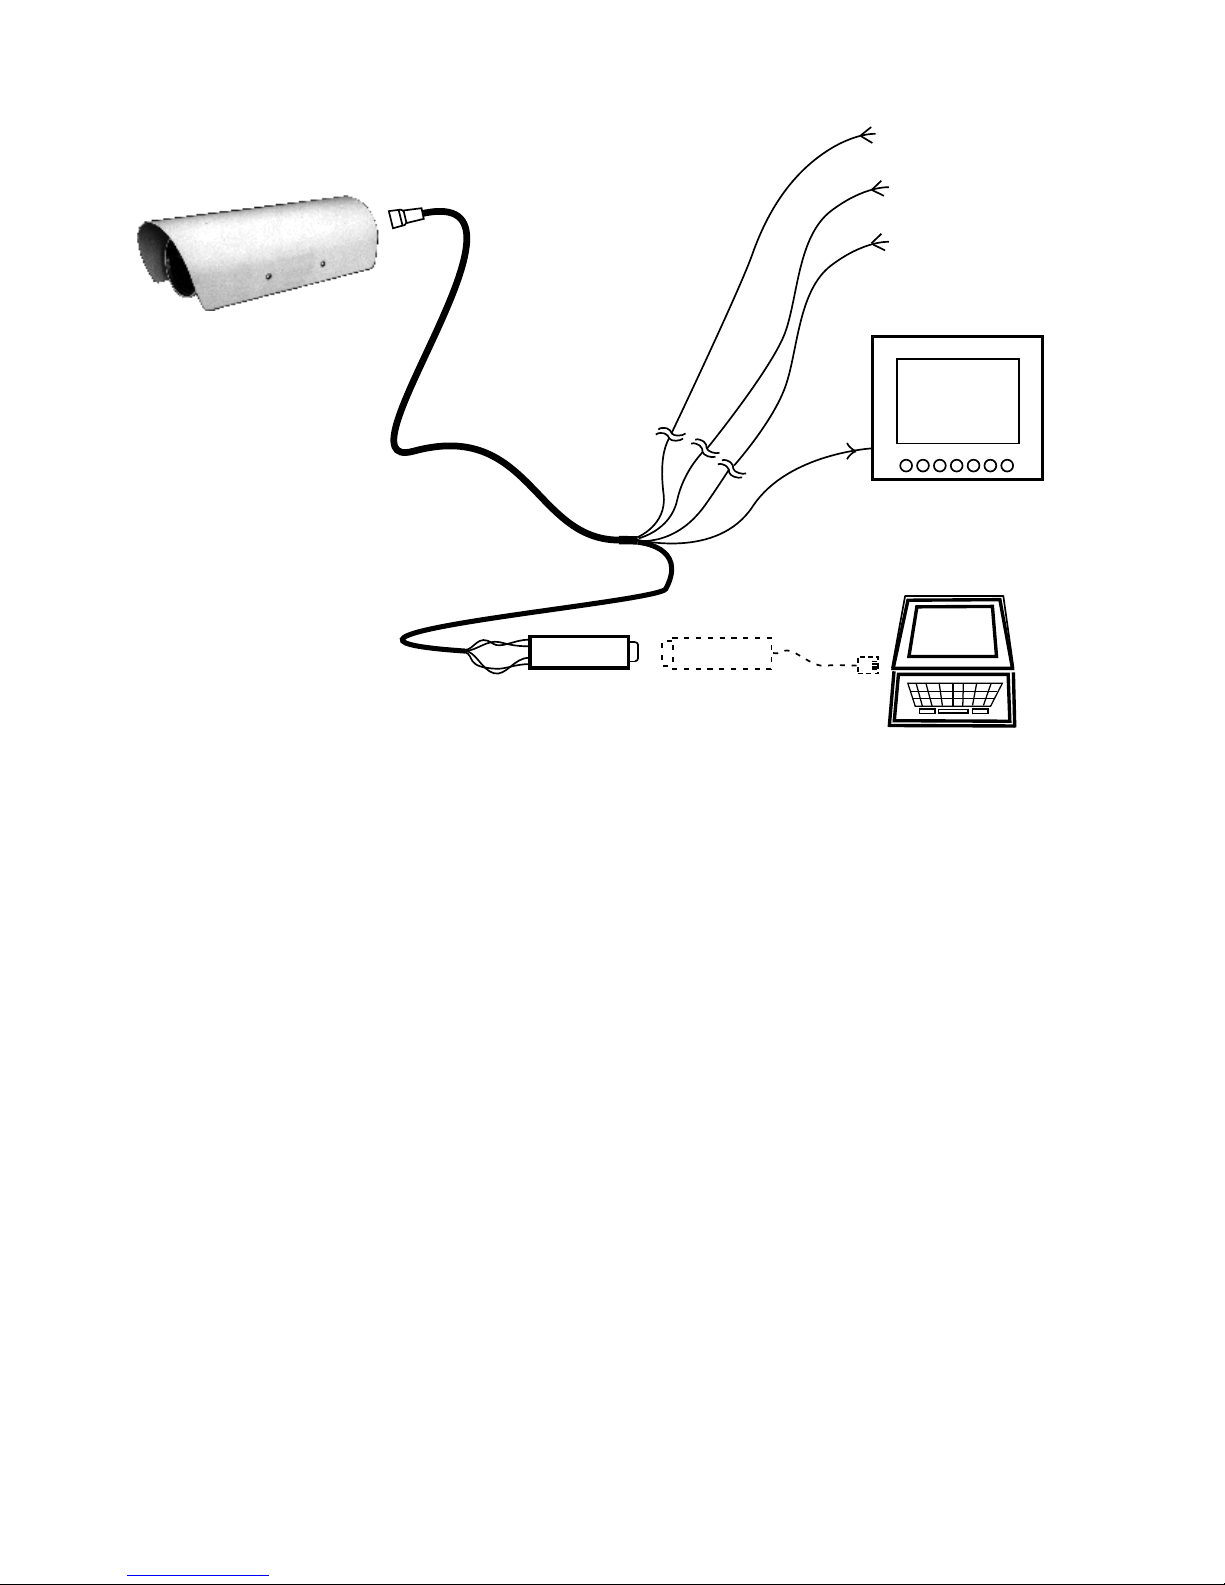
discharge protection and proper shipping and handling of the 3230. Figure 4 shows a typical intercon-
nection diagram using RS-422 connections on the
camera.
Equipment Supplied
2.3
The most basic conguration of the camera
consists of only the camera, its sunshield, and a
mating connector kit. This connector kit builds the
system cable plug which connects to the camera 18
pin MS type connector.
Figure 3 shows the ve optional mounts that
can be ordered with the camera. The mount sup-
plide with the camera will be reected in the camera
model number.
Equipment Required but Not Supplied
2.4
As a minimum the 3230 requires a source of
operating power, a monitor on which to view the
6X-1086
3

3230 CAMERA
SERIES
POWER
Camera in IP67 Rated
3.5-inch Diameter
Pressurized Housing
2 12 V dc
4 24 V ac/dc
5 115 V ac
MOUNT
3 NTSC
7 PAL
Not
Assigned
NONE (No Mount Provided)
PEDD (Pedestal Mount)
CEIL (Ceiling Mount)
POLE (Pole Mount)
MAST (Mast Mount)
HDWM (Heavy Duty Wall Mount)
VIDEO
FORMAT
323 x—x000 xxxx
INST
ALLA
TION MANUAL
Figure 2. Model Number Interpretation Diagram
scene, an interconnection cable, and a computer
running Graphical User Interface (GUI) software for
setup and control of the 3230. Setup GUI software
and the camera protocol are included on the CD
supplied with the camera.
During maintenance and setup operations us-
ing either a laptop or desktop PC it is likely that a
USB to RS-232 converter will be required.
Typically PC’s have had only an RS-232 port
— and rarely an RS-422 port.
have an RS-232 port and instead rely on USB and
other newer type ports.
verter will be required. Be aware that some of these
converters do not provide reliable RS-232 com-
munications If problems are experienced determine
whether it is the converter.
camera it will then be necessary to add an RS-232
to RS-422 converter.
directly but these are not common devices.
However, newer PC’s and laptops no longer
With these computers, a USB to RS-232 con-
If it is desired to use the RS-422 feature of the
Or a USB to RS-422 converter could be used
2.5 RS-422 and RS-232 Wiring
tions for both RS-232 and RS-422 connections.
Only one of these communications methods can be
used at any one time.
RS-422 connectors and all other RS-422 connec-
tors in a system using this notation cause much
confusion for eld installers. There is a tendency to
want to connect Tx to Tx and Rx to Rx. This almost
always is wrong.
should go to the Rx+ input of another. And Tx- goes
to Rx-.
universally used notations for the same functions.
Sometimes Command Out is used for Tx and Com-
mand In for Rx. Other naming conventions are also
used among different equipment manufacturers and
their cables. TD is sometimes used — the “D” indi-
cating that it is a data line not a line for some other
function.
Cable diagrams in this manual show pin func-
The Tx+ Tx- and Rx+ Rx- notations for these
The Tx+ output of one piece of hardware
To add to the confusion Tx and Rx are not
4
6X-1086

INSTALLATION MANUAL
MOUNT
DESIGNATION
MOUNT
DESCRIPTION
Table 1. Mounting Congurations
ITEMS SUPPLIED
3230
CAMERA
PEDESTAL
MOUNT
CEILING
MOUNT
POLE
MOUNT
MAST
MOUNT
3230 CAMERA
HEAVY DUTY
WALL MOUNT
NONE
PEDD
CEIL
POLE
MAST
HDWM
None Supplied
Pedestal Mount
Ceiling Mount
Pole Mount
Mast Mount
Heavy Duty
Wall Mount
•
• •
• •
• •
• •
• •
Note: Read the table horizontally. A dot “•” designates an item supplied for each mounting conguration. As an example, for the CEIL (Ceiling Mount) two items are supplied: a 3230 camera and a ceiling mount.
MAST
CEIL
POLE
6X-1086
PEDD
HDWM
Figure 3. Mounts
5
3230 CAMERA
232
422
75 Ohm
Coax
Twisted
Data Pairs
115 V ac
24 V ac/dc
Connect Either
115 V ac
or
24 V ac/dc
or
12 V dc
(Depends on
Camera Model)
Converter
232
USB
Converter
Picture
Monitor
3230
GUI
3230
Terminated 75 Ohms
12 V dc
(Use if computer
does not have an
RS-232 serial port)
For cable runs greater than about
80 feet, RS-422 must be used.
Plug wired for
RS-422 connections
INST
ALLA
TION MANUAL
Figure 4. Typical Interconnection Diagram
Since RS-422 provides bidirectional communi-
cations over the cable a connector can be an input
at one moment and then an output milliseconds
later (RS-422 half-duplex).
Identifying labels that connectors and wires
are assigned can sometimes appear to be arbitrary
to those not familiar with all the various subtleties
involved in serial communications.
Wiring for RS-232 has the same situation. Tx
typically goes to Rx and at the other end Rx to Tx.
If any confusion exists it is best to contact the
Customer Support department at Cohu or your local
Cohu representative.
2.6
Cabling Requirements
The system cable plugs into the 18 pin MS
connector on the rear of the camera. Various prewired cables available for the camera are shown in
gure 14 though gure 30. Note that these cables
have different maximum lengths depending on the
camera model and installation situation.
6
2.6.1 Customer Supplied Cable
A high quality multiconductor shielded cable
must be used with this camera both to minimize EMI
radiation and to reduce susceptibility to interference.
The cable must have an overall shield with at
least 95 percent coverage.
Data wiring must be twisted pairs similar to that
used in CAT-5e cable. A data ground wire must be
used.
Coaxial cable must be 75 ohm RG-59/U and
not have any iron used in the conductors. Belden
8241F is a typical good coax.
Power wiring must be of sufcient size to main-
tain proper operating voltage at the camera. Power
wires can be paralleled to reduce voltage drop.
When calculating voltage drop remember to calcu-
late the total length to the camera and also back to
the power source. (A camera connected to a 100
foot cable has a total power run of 200 feet.)
6X-1086

INSTALLATION MANUAL
3230 CAMERA
Camera Sunshield Dimensions
Figure 5. Dimensions, Model 3230 Camera
6X-1086
7
3230 CAMERA
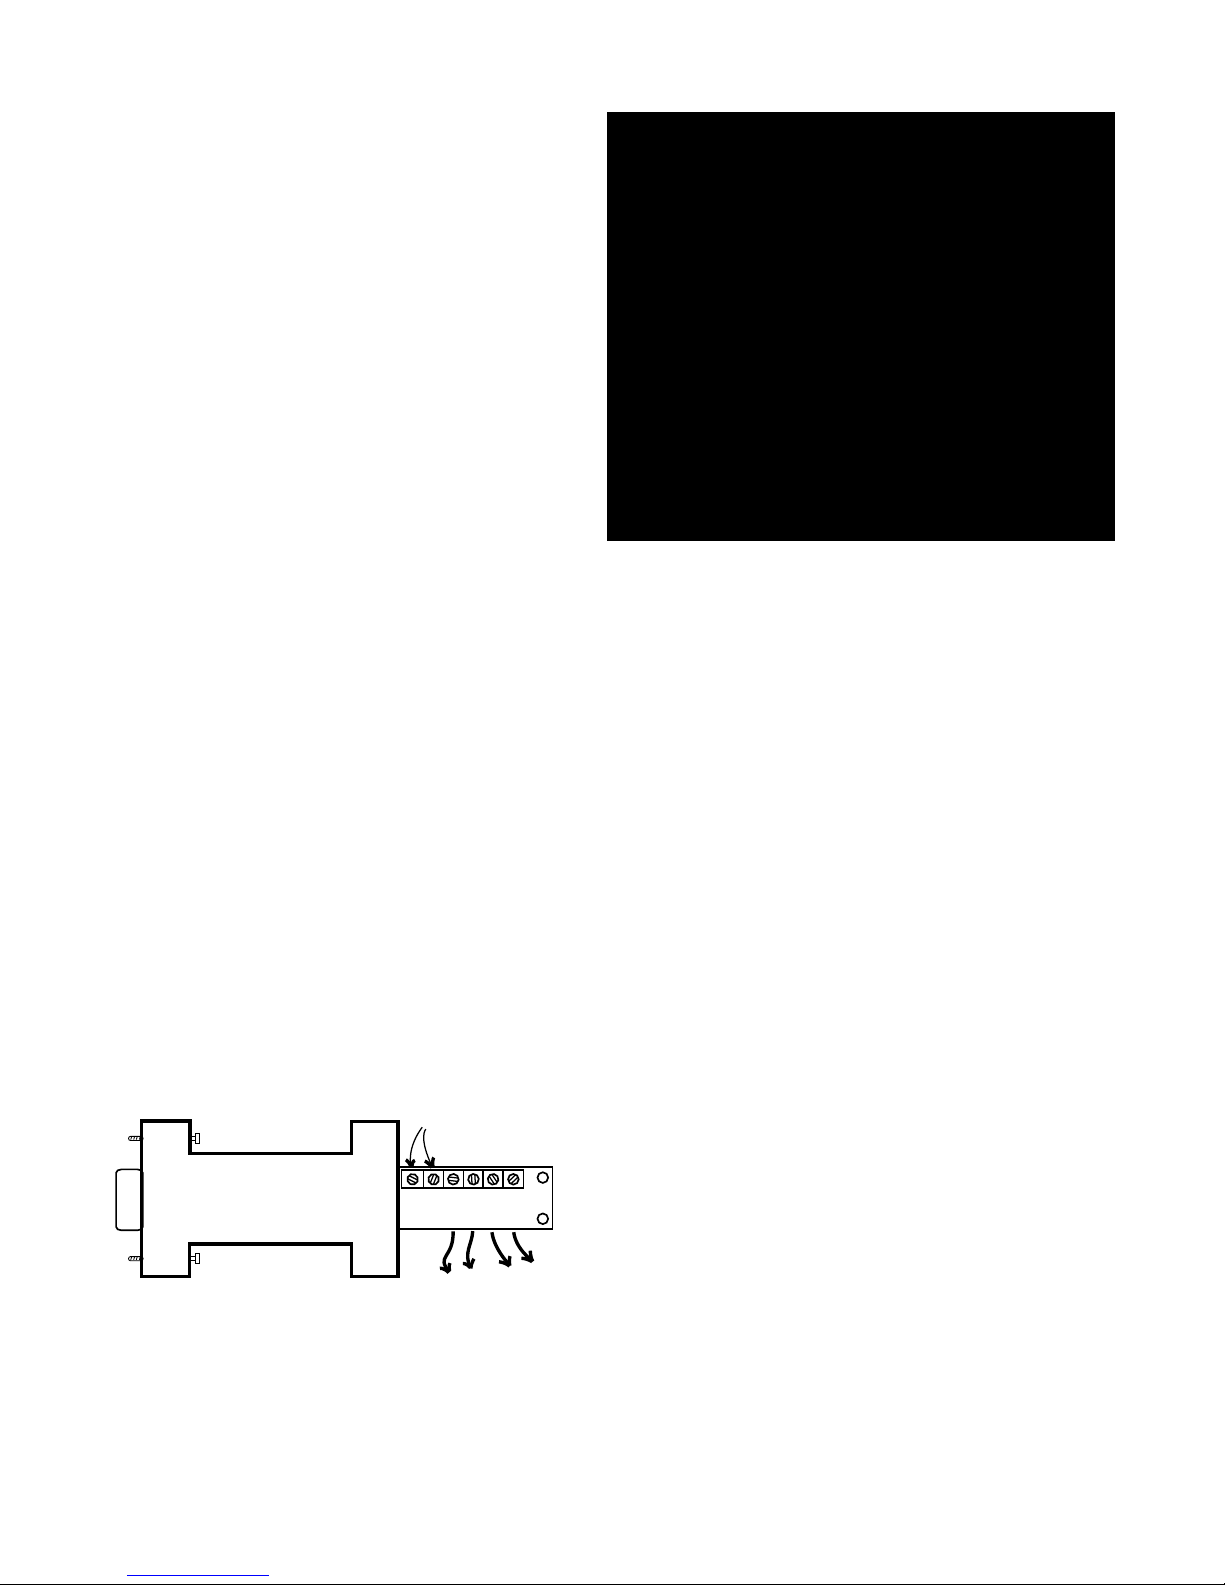
232
D9
FEMALE
B & B
Model 422PP9TB
B&B Electronics
707 Dayton Road
PO Box 1040
Ottawa IL 61350
www.bb-elec.com
sales@bb-elec.com
+12V
GND
RD(B)
RD(A)
TD(A)
TD(B)
422
CONVERTER
(Available from Cohu as Part Number 3010100-001)
Rx-
Rx+
Tx+
Tx-
TO 3970
POWER TYPICALLY
NOT REQUIRED
2.6.2 Camera Connector Pinout
Table 4, table 5, and table 6 lists pin functions
for the 12 V dc, 24 V ac/dc, and 115 V ac power
input versions of the camera.
2.6.3 System Interconnection Cables
Seventeen system interconnection cables are
available for use with the camera.
Table 8 lists these cables and describes their
basic characteristics.
The major breakdown between cables types is
whether they are for 12 V dc, 24 V ac/dc, or 115 V
ac cameras.
Each of these two groups is then further sub-
divided into whether a camera is to use RS-232 or
RS-422 communications.
The nal determination is whether the cable
should have stripped leads for all the eld instal-
lation connections or whether certain connectors
and/or data converters should be provided with the
cable.
Cables can also be special ordered if none of
these standard cables meet the requirements of an
installation.
INST
ALLA
TION MANUAL
Figure 7. Camera Rear View
2. The model 3234 operates from either 24 V ac or
24 V dc +/- 10%.
3. The model 3235 operates from 115 V ac +/- 10%
2.7 Power Requirements
Three versions of the 3230 are available in
relation to power input requirements:
1. The model 3232 operates from 12 V dc +/- 10
percent;
Figure 6. Typical 232/422 Converter
Power consumption is less than 4 watts when
the internal heater is off and less than 22 watts
when the thermostat turns the heater on.
CAUTION
Do not power the 24 V ac version of
this camera directly from a Variac. It
will blow up the power supply.
2.8 Mounting Requirements
The dimensions shown in gure 5 relate to
mounting the camera. It can be optioned to mount
to ve different mounting congurations:
1. Pedestal Mount (PEDD). Direct mounting of the
camera to the top of a short pedestal (gure 3) or
tall pole. The pedestal or pole must have a mounting
hole pattern to which the camera can be secured.
See section 4.1 for details about this standard
mounting base.
8
6X-1086

INSTALLATION MANUAL
3230 CAMERA
Table 2. Items Supplied
ITEM DESCRIPTION CHARACTERIS-
TICS
1 Camera with sun-
shield
2. Connector Kit 1310230-011
Note: See gure 9 for the kit. This kit contains items to construct a cable plug that mates with the camera rear panel
connector.
2. Ceiling mount (CEIL). This mounting arrangement
uses a ceiling mount arm to which the camera is
secured. See gure 3.
3. Pole Mount (POLE). When the camera must be
mounted to a pole this option provides both a clamp
to attach to the pole and also the heavy duty wall
mount (HDWM) on which to fasten the camera (See
gure 3).
4. Mast Mount (MAST). A mast mount attaches to
a horizontal arm using stainless steel straps. (See
gure 3.)
5. Heavy Duty Wall Mount (HDWM). This mounting
arrangement uses a wall mount arm designed for
rugged duty use (See gure 3).
Model 3230 series
The following paragraphs describe some of
the features of the 3230 related to the installation
process.
2.9 Installation Procedure
It is important to carefully plan for all cable
routing before starting an installation. In some situ-
ations cable will have to be pulled through conduit
or other narrow places before adding a connector to
the end of a system cable. Any through-wall holes
may require weatherproong.
Installing the 3230 is straightforward. It is only
necessary to mount the 3230 to a suitable base,
mate the cable connector to the system cable and
apply power. (Or connect to the camera with an
on-site cable.) This assumes the other end of the
cable is properly connected to a source of power, a
tv monitor, a graphical user interface (GUI), and any
other required equipment.
2.9.1 Camera Rear Panel Features
Three features on the rear panel are of interest
when installing the camera.
Table 3. Items Typically Requried but not
Supplied
ITEM DESCRIPTION CHARACTERIS-
TICS
1 Support Base See gure 5
2
3
4
5 PC, Laptop, or oth-
6
2.9.1.1 18-pin MS Connector
Cable
Source of power
TV Monitor
er control method
Serial Converte
- end table -
Power, RS-232 or RS-
422, 75-ohm Coax
12 V dc, 24 V ac/dc, or
115 V ac, depending
on model
75 ohm, NTSC or PAL,
as required
RS-232, RS-422 Serial
Output or converters
232 / 422 converter
r
(see gure 6)
An 18-Pin MS connector on the rear panel
provides for all interconnections with the camera. A
mating plug kit is supplied for the system cable con-
necting to this rear panel connector.
2.9.1.2 Schrader Valve
A Schrader valve (gure 7 — the car tire type
air valve on the left) on the rear panel provides for
pressurizing the housing with dry nitrogen. This
valve can be used to occasionally add dry nitrogen
as necessary to maintain pressure in the barrel at
about 5 psig (34 kPa). (Note: psig refers to pounds
square inch gauge — which designates pressure
relative to the altitude above sea level at which it is
being measured.)
2.9.1.3 Pressure Relief Valve
The pressure relief valve has a short piece of
clear tubing slipped around it to prevent acciden-
tal movement of the pop out valve — which would
release nitrogen from inside the valve.
During shipping, at which times high altitude
might be encountered during aircraft transportation,
a pressure relief valve on the rear panel (gure 7)
may release some pressure. Back at low altitudes
this would be experienced as a housing pressure
below the standard 5 psig (34 kPa).
6X-1086
9
 Loading...