

Page 1
USER GUIDE
Page 2
KEY FUNCTIONS
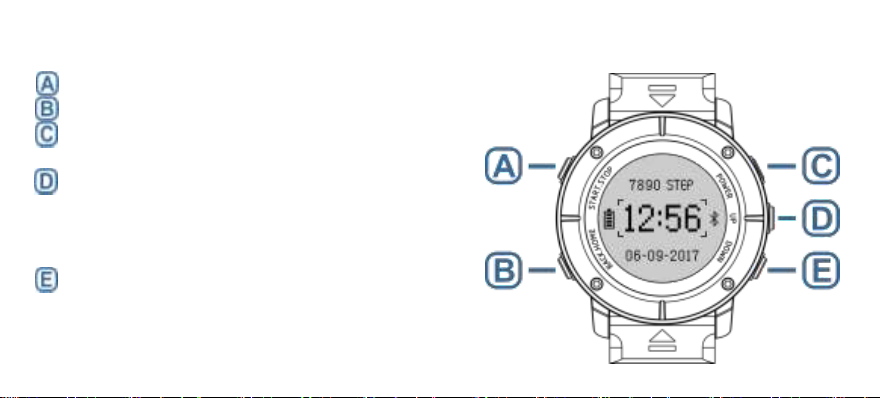
Short press to confirm; long press to enter the sport mode.
Short press to return; long press to send SOS location.
Short press to turn on / off the background light; long press to
turn on or off your watch.
Short press to go up (In time, date or other settings, press the
key to increase the value); long press to directly enter the
custom sport mode 1. In the "Golf" sport mode, press once to
count one shot.
Short Press to go down (In time, date or other settings, press
the key to decrease the value); long press to directly enter the
custom sport mode 2. In the "Golf" sport mode, press once to
count one hole.
Page 3
CHARGING
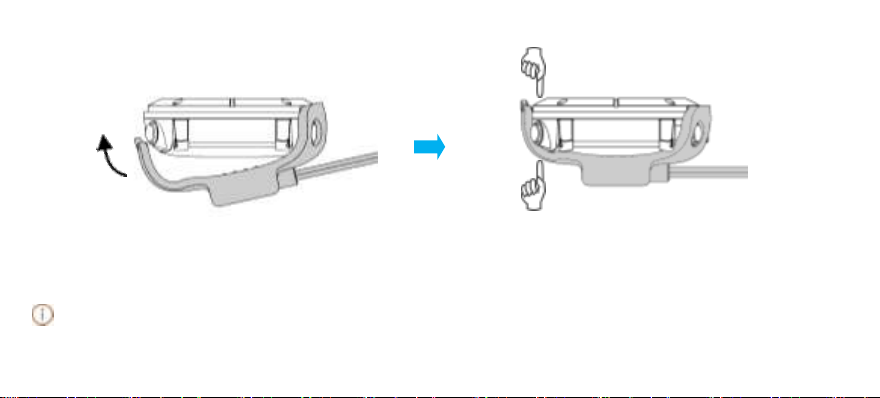
To charge the watch, buckle the charging shell properly, as shown in the above figure. Press tight the position indicated by the
two fingers in the above figure to ensure that the charging shell and the watch are buckled tight. It takes about 2.5 hours to be
fully charged. The charging time may vary according to actual battery level of the watch.
Before charging, please dry the charging port, so as to avoid short circuit or other risks as a result of dirty or wet metal
contacts.
Page 4

APP & PAIRING
1. Scan the above QR code with
your mobile phone or enter the
URL
(http://www.uwatchsz.cn/uw80/ap
p.html) to download and install the
APP.
3. Run the APP. After registration,
click"Connect Device" in the "My"
interface. Find the watch name in the
device list and click to pair. After
pairing, "Connected" appears on the
left of the " Connect Device".
Mobile phone requirements: iPhone 5 / 5C / 5S / 6 / 6 Plus / 7 / 7 Plus with IOS8.0 or above OS; Android 4.3 (factory setting) or
above OS.
2. Press the A key (start key) in the
time interface to enter the setting
menu and check the watch name
"UW80 XX" in "About Watch".
Page 5
NOTIFICATION
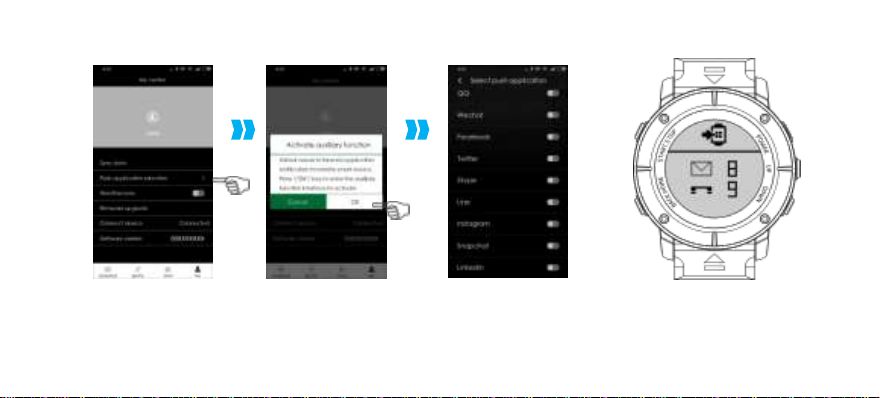
After pairing successfully with your mobile phone through the APP, push notification of messages, calls or various kinds of
software on your phone can be viewed on the watch. For Android phones, applications can be checked and selected for push to
the watch, as shown in the above figure. For iPhone devices, application notifications can be set in the "Notifications" menu under
the "Settings".
Page 6
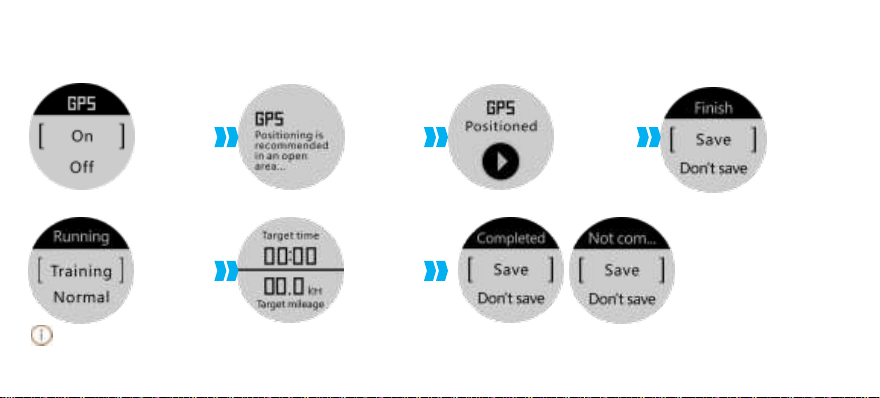
OPERATION IN THE SPORT MODE
During the sport, you can press B key to exit the sport interface and the sport icon will appear in the time interface. You cannot
perform two kinds of sports at the same time.
A: For sports with GPS switch or GPS constantly on, operation is as below:
B: For sports with Training mode and Normal mode, operation is as below (take running for example):
Step1:
Press the A key to
enter a sport, and
an interface appears for you to turn
on or off GPS; for
sports requiring constant GPS activetion, this step is
skipped.
Step2:
If you choose to
turn on GPS, the
watch will start positioning (if positioning fails after 10
minutes, it automatically returns to the
sport list); if you
choose to turn off
GPS, the sport directly starts.
Step3:
When the positioning finishes, an
interface will appear
to indicate the
positioning succeeded. Press the A
key to start the
sport.
Step4:
Press the A key in
the sport interface
and the "Finish"
interface will pop
up. You can choose
whether to save
the sport data.
Step1:
After entering t he
Running sport, the
mode selection interface will appear.
Step2:
If you select the
Training mode, the
time and mileage
setting interface
will appear; if you
select the Normal
mode, follow directly Step 2 and on
in the above Procedure A.
Step3:
After the positioning finishes and the
sport starts, a "completed" hin t will pop
up in the sport interface when the target
mileage is reached within the target time,
and you can choose whether to save the
sport data; when the target mileage is
not reached within the target time, a "
Not completed" hint will pop up in the
sport interface.
Page 7
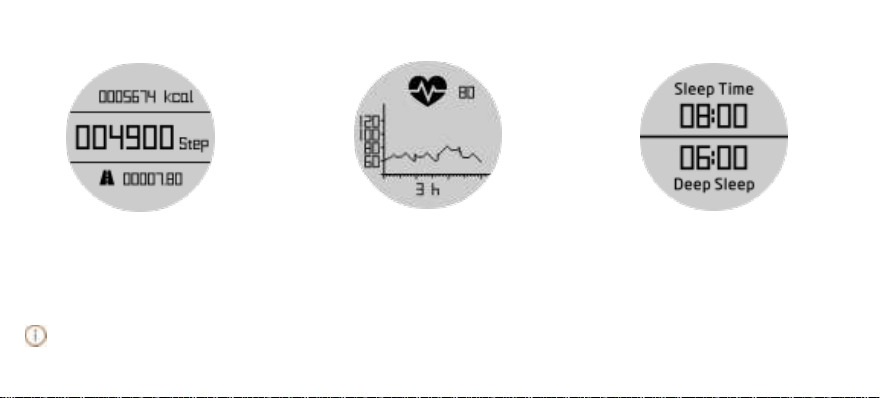
HEALTH DATA
Heart rate: The number at the upper right
corner indicates the last detected heart rate
value. Press the A key and the heart-shaped
icon flashes to begin heart rate detection.
Tip: The watch automatically detects your
heart rate every half an hour.
Health and sport data is uploaded to your mobile phone APP every 20 minutes. The data will be kept in your watch for three
days.
Sleep monitoring: your sleep quality is
monitored automatically every day
from 8:00 P.M. to 10:00 A.M the next
day. The data of your sleep time and
deep sleep time will be recorded.
My day: It records daily number of
steps, calorie consumption and
mileage. This interface is refreshed
every minute. Press the A key to set
height, weight and unit system.
Page 8
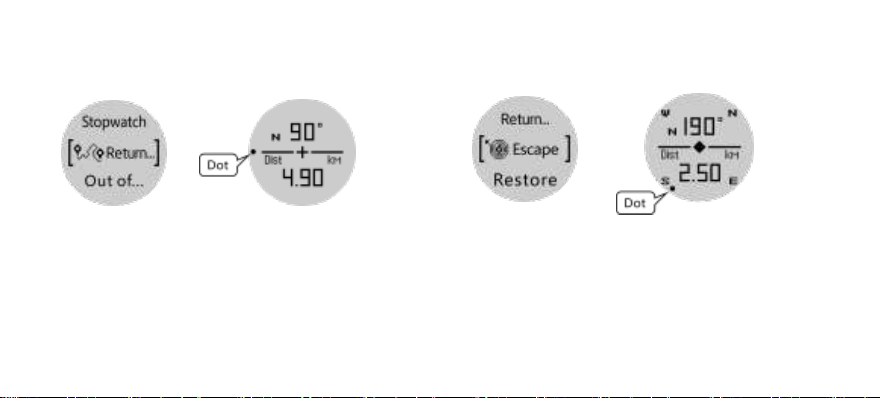
RETURN CRUISE AND ESCAPE
Return cruise
Escape
Set a starting point through GPS positioning. When users are about
to return, they can click "Check return orientation." to indicate the
orientation of the starting point and the distance between the
starting point and current location. They can return to the starting
point according to the orientation and distance. In the above figure,
the dot indicates the starting point orientation. 90° represents the
angle between the straight line connecting the starting point and
current location and the north. 4.90 KM stands for distance.
When you get lost, enable this function. Through the GPS
positioning, the current location will serve as recording point,
and the distance and relative direction to the recording point will
be displayed when you move, so you can find your way out. In
the above figure, the dot indicates the orientation of the
recording point. 190° represents the angle between the straight
line connecting the starting point and the current position and
the north. 2.50 KM stands for distance.
Page 9
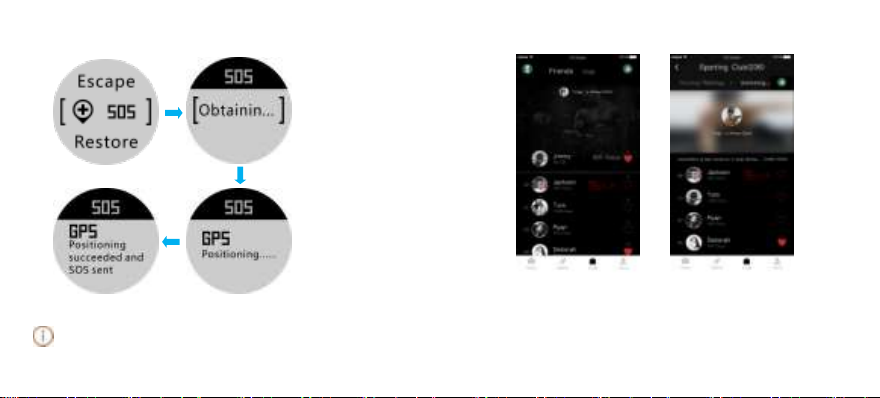
SOS
Step1:
In the time interface, press
the A key to find "SOS",
and press the key again to
enter.
Step2:
Click "Obtain SOS location".
Step3:
Your watch starts
positioning.
Step4:
When positioning succeeds, the latitude and
longitude of the SOS
location will be sent to
your phone APP, and then
to your friends and club
through the APP, so your
friends and club friends
will immediately receive
your SOS.
SOS information will be displayed to APP friends and your club.
SOS may also be activated by long pressing the B key for 3 seconds. Both users and their friends can delete the SOS
information displayed in the friends list and the club.
Page 10
PRECAUTIONS
1.The APP compatibility with different mobile phone models may be different. In case of a
connection problem in the use, restart your phone or re-download and re-install the
APP.
2.When the watch is connected with your mobile phone APP, the APP will prompt "whether
to update to the latest firmware" in case there is an updated watch firmware. You may
click to confirm the update and the watch will automatically upgrade the firmware.
During firmware upgrading, ensure that your watch is near to your phone and it is better
when they are put together. Make sure the battery level of your watch has at least two
bars, in order to avoid upgrading error. When there is a new firmware version, users may
also click "firmware upgrade" in the "My" menu of the APP for upgrading.
3.The watch strap has a standard width of 24mm. Users may buy straps of the same size
from the market for replacement. A special Torx screwdriver should be used for
replacement.
4.If your watch crashes due to improper operation, long press the C key (power key) for 10
seconds to shut it down and then restart it.
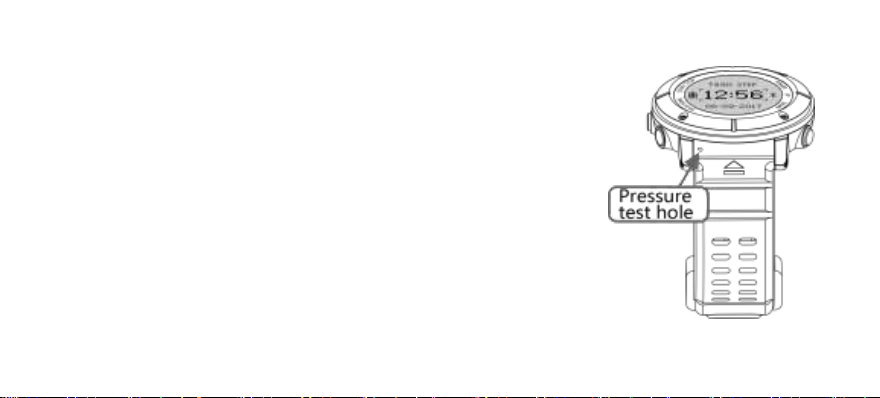
5. There is a pressure test hole in the shell in the position where the strap is installed to the
watch (see the right figure), which should not be damaged or blocked.
Page 11

FCC Statement
This device complies with part 15 of the FCC rules. Operation is subject to the following two
conditions: (1) this device may not cause harmful interference, and (2) this device must accept
any interference received, including interference that may cause undesired operation.
Changes or modifications not expressly approved by the party responsible for compliance could
void the user's authority to operate the equipment.
Page 12

NOTE: This equipment has been tested and found to comply with the limits for a Class B digital
device, pursuant to part 15 of the FCC Rules. These limits are designed to provide reasonable
protection against harmful interference in a residential installation. This equipment generates uses
and can radiate radio frequency energy and, if not installed and used in accordance with the
instructions, may cause harmful interference to radio communications. However, there is no
guarantee that interference will not occur in a particular installation. If this equipment does cause
harmful interference to radio or television reception, which can be determined by turning the
equipment off and on, the user is encouraged to try to correct the interference by one or more of
the following measures:
1) Reorient or relocate the receiving antenna.
2) Reorient or relocate the receiving antenna.
Page 13

3) Reorient or relocate the receiving antenna.
4) Consult the dealer or an experienced radio/TV technician for help important announcement
The device has been evaluated to meet general RF exposure requirement. The device can be used
in portable exposure condition without restriction.
 Loading...