

Page 1

Cognitive
Programming
Language (CPL)
Programmer's Guide
105-008-04 Revision F – January 2012
*105-008-04*
Page 2

Federal Communications Commission (FCC) Radio Frequency Interference Statement Warning
Changes or modifications to this unit not expressly approved by the party responsible for compliance could void the
user’s authority to operate the equipment.
Note
This equipment has been tested and found to comply with the limits for a Class A digital device, pursuant to Part 15 of the
FCC Rules. These limits are designed to provide reasonable protection against harmful interference when the equipment
is operated in a commercial environment. This equipment generates, uses, and can radiate radio frequency energy and, if
not installed and used in accordance with the instruction manual, may cause harmful interference to radio
communications. Operation of this equipment in a residential area is likely to cause harmful interference in which case
the user will be required to correct the interference at his own expense.
Information to the User
This equipment must be installed and used in strict accordance with the manufacturer’s instructions. However, there is no
guarantee that interference to radio communications will not occur in a particular commercial installation. If this
equipment does cause interference, which can be determined by turning the equipment off and on, the user is
encouraged to contact CognitiveTPG immediately.
CognitiveTPG is not responsible for any radio or television interference caused by unauthorized modification of this
equipment or the substitution or attachment of connecting cables and equipment other than those specified by
CognitiveTPG. The correction of interferences caused by such unauthorized modification, substitution or attachment will
be the responsibility of the user.
In order to ensure compliance with the Product Safety, FCC and CE marking requirements, you must use the power
supply, power cord, and interface cable which are sold for use with this product or which meet the following parameters:
Power Supply
UL Listed (QQGQ), Class 2 power supply with SELV (Secondary Extra Low Voltage), non-energy hazard output, limited
energy source, input rated 100-240 Vac, 1.5/0.8 A, 50/60 Hz, output rated 24 Vdc, 2.9 A for 70 watt unit.
Use of this product with a power supply other than the CognitiveTPG power supply will require you to test the power
supply and CognitiveTPG printer for FCC and CE mark certification.
Communication Interface Cable
A shielded (360 degree) interface cable must be used with this product. The shield must be connected to the frame or
earth ground connection or earth ground reference at EACH end of the cable.
Use of a cable other than described here will require that you test the cable with the CognitiveTPG printer and your
system for FCC and CE mark certification.
Power Cord
A UL listed, detachable power cord must be used. For applications where the power supply module may be mounted on
the floor, a power cord with Type SJT marking must be used. For applications outside the US, power cords which meet the
particular country’s certification and application requirements should be used.
Use of a power cord other than described here may result in a violation of safety certifications which are in force in the
country of use.
Industry Canada (IC) Radio Frequency Interference Statement
This Class A digital apparatus meets all requirements of the Canadian Interference-Causing Equipment Regulations.
Cet appareil numérique de la classe A respecte toutes les exigences du Règlement sur le matériel brouilleur du Canada.
Voluntary Control Council for Interference (VCCI) Radio Frequency Interference Statement
This is a Class A product based on the standard of the Voluntary Control
Council for Interference by Information Technology Equipment (VCCI). If this equipment is used in a domestic
environment, radio disturbance may arise. When such trouble occurs, the user may be required to take corrective actions.
Disclaimer
Information in this document is subject to change without notice. Consult your CognitiveTPG sales representative for
information that is applicable and current. CognitiveTPG reserves the right to improve products as new technology,
components, software, and firmware become available.
No part of this document may be reproduced, transmitted, or translated in any form or by any means, electronic or
mechanical, for any purpose without the express written permission of CognitiveTPG.
Copyright
Copyright © 2012 by TPG IPB, Inc., 950 Danby Road, Ithaca, New York 14850, USA. All rights reserved. Printed in USA.
Confidential, Unpublished. Property of TPG IPB, Inc.
Trademarks
CognitiveTPG™ is a trademark of TPG IPB, Inc.
Microsoft and Windows are registered Trademarks of Microsoft Corporation. All other trademarks and registered
trademarks are the property of their respective holders.
Contact Information
CognitiveTPG, Inc.
25 Tri-State International, Suite 200
Lincolnshire, IL 60069
Email:
marketing@cognitivetpg.com
Telephone: +1.800.732.8950
Fax: +1.847.383.7949
Website:
http://www.CognitiveTPG.com
Page 3

T able of Contents
Introduction.............................................................................................. 2
Label Format Organization.................................................................. 3
Command Syntax................................................................................ 3
Important Programming Rules............................................................. 4
Related Publications............................................................................ 5
Printer Command Compatibility............................................................. 6
Printer Models..................................................................................... 6
Compatibility Tables............................................................................ 7
Table 1. Printer Command Compatibility (CPL only)..................... 8
Table 2. Printer Set-up and Diagnostic.......................................11
Table 3. Printer Bar Code Support .............................................. 17
Table 4. Printer Font Support...................................................... 18
Standard Printer Commands................................................................ 20
Standard Printer Command List........................................................ 20
ADJUST...................................................................................... 21
ADJUST_DUP ............................................................................ 23
AREA_CLEAR............................................................................ 24
BARCODE.................................................................................. 25
BARCODE AZTEC ..................................................................... 30
BARCODE DATAMATRIX.......................................................... 32
BARCODE_FONT ...................................................................... 35
Barcode GS1 Databar................................................................. 38
BARCODE PDF417.................................................................... 41
BARCODE QR............................................................................ 45
BARCODE RSS.......................................................................... 47
BARCODE UPS.......................................................................... 47
BEEP..........................................................................................52
COMMENT ................................................................................. 53
DOUBLE..................................................................................... 54
DRAW_BOX ............................................................................... 56
DRAW_CIRCLE.......................................................................... 57
Page 4

DRAW_ELLIPSE ........................................................................ 58
DRAW_LINE............................................................................... 59
END............................................................................................60
FILL_BOX................................................................................... 61
GRAPHIC ................................................................................... 63
Graphics mode............................................................................ 65
HALT........................................................................................... 68
Header line ................................................................................. 69
INDEX......................................................................................... 72
JUSTIFY.....................................................................................74
LOGO mode ............................................................................... 76
MULTIPLE..................................................................................78
NOINDEX ................................................................................... 80
PITCH......................................................................................... 81
PRINT TEST LABEL................................................................... 83
QUANTITY.................................................................................. 84
Query Firmware Revision ........................................................... 85
Query Index Buffer Values.......................................................... 86
Query Index Settings .................................................................. 87
Query Printer Status ................................................................... 88
Status Query Response Messages............................................. 89
ROTATE R90, R180, R270......................................................... 93
Show Inches Printed................................................................... 95
Show MAC Address.................................................................... 95
Show Model Number .................................................................. 96
Show Print Head......................................................................... 96
Show Serial Number................................................................... 97
STRING......................................................................................98
TERMINAL................................................................................ 102
TEXT......................................................................................... 103
TIME.........................................................................................106
ULTRA_FONT .......................................................................... 111
Universal Clear ......................................................................... 115
Wake-up string.......................................................................... 116
WIDTH...................................................................................... 118
Storing Data in the Printer Memory.................................................... 120
Before Using Data Storage Commands..........................................120
Data Storage Commands................................................................ 121
Page 5

Get Object Data........................................................................ 122
Mark Object for Deletion........................................................... 123
Mark Type of Objects for Deletion............................................. 124
Pack Objects............................................................................. 126
Delete Stored Object................................................................. 127
DELIMIT.................................................................................... 128
DEFINE VARIABLE.................................................................. 129
Format Recall ........................................................................... 134
Format Store............................................................................. 135
GRAPHIC RECALL................................................................... 139
GRAPHIC STORE.................................................................... 140
Initialize Storage ....................................................................... 142
List Stored Objects.................................................................... 143
Recall Menu.............................................................................. 144
Recall Variable.......................................................................... 145
Menu Commands................................................................................. 146
Menu Operation............................................................................... 146
Menu Programming......................................................................... 147
Menu Command List.......................................................................148
MENU ACTION ......................................................................... 149
MENU CONTROL..................................................................... 152
MENU END............................................................................... 153
MENU EXIT .............................................................................. 154
MENU ITEM.............................................................................. 155
MENU MESSAGE..................................................................... 157
MENU START........................................................................... 158
Recall Menu.............................................................................. 160
Capturing Data to USB Drive Commands.......................................... 162
Open Output Message Trace.................................................... 163
Close Output Message Trace................................................... 164
Open Input Capture Trace........................................................ 165
Close Input Capture Trace........................................................ 166
Add String to Trace File............................................................167
Write Trace Data to File............................................................ 168
Printer Setup (VARIABLE) Commands.............................................. 170
Variable Command Rules ............................................................... 170
Variable Command List................................................................... 171
VARIABLE ALLOCATE............................................................. 172
Page 6

VARIABLE AUDIO_FREQ........................................................ 173
VARIABLE AUTOCUT.............................................................. 174
VARIABLE AUTO_TOF............................................................175
VARIABLE AUX_POWER ........................................................ 176
VARIABLE BACKLIGHT........................................................... 177
VARIABLE BEEPER................................................................. 178
VARIABLE BUFFER_TIMED_RESET...................................... 179
VARIABLE CODE_PAGE......................................................... 180
VARIABLE COMM.................................................................... 182
VARIABLE COMPATIBLE........................................................ 185
VARIABLE COMPATIBLE LOCAL_PITCH............................... 186
VARIABLE COMPATIBLE LX_VAR_ERROR........................... 187
VARIABLE COMPATIBLE DBF_ROT_LOC_ADJUST ............. 188
VARIABLE COMPATIBLE DISABLE_RG_JUSTIFY ................ 189
VARIABLE COMPATIBLE POWERUP_PITCH........................ 190
VARIABLE COMPATIBLE USE_LX_PARSER......................... 191
VARIABLE COMPATIBLE LX_HEAD_DEFS ........................... 192
VARIABLE COMPATIBLE LX_SINGLE_LABEL....................... 193
VARIABLE CONTRAST............................................................ 194
VARIABLE CPL_COMMAND_MASK ....................................... 195
VARIABLE DARKNESS............................................................ 196
VARIABLE EPL_COMMAND_MASK........................................ 198
VARIABLE ERROR_LEVEL ..................................................... 199
VARIABLE FEED...................................................................... 200
VARIABLE FEED_BUTTON..................................................... 201
VARIABLE FEED_CONFIG...................................................... 202
VARIABLE FEED_TYPE .......................................................... 204
VARIABLE GAP_SIZE.............................................................. 205
VARIABLE HIGHSPEED..........................................................206
VARIABLE INDEX .................................................................... 207
VARIABLE INDEX SETTING.................................................... 208
VARIABLE IRDA....................................................................... 211
VARIABLE IRDA COMM .......................................................... 212
VARIABLE IRDA PROTOCOL.................................................. 213
VARIABLE KBLAYOUT............................................................214
VARIABLE LABEL_LENGTH.................................................... 215
VARIABLE LANGUAGE ........................................................... 216
VARIABLE LOWSPEED........................................................... 217
Page 7

VARIABLE MEASURE_LABEL................................................. 218
VARIABLE MEDIA_ADJUST.................................................... 219
VARIABLE MENU_LANGUAGE............................................... 222
VARIABLE MIRROR_LABEL.................................................... 223
VARIABLE MODE..................................................................... 224
VARIABLE NO_MEDIA............................................................. 226
VARIABLE NORMAL................................................................ 228
VARIABLE OFF AFTER ........................................................... 229
VARIABLE ON/OFF.................................................................. 230
VARIABLE ON_TIME ............................................................... 231
VARIABLE OVERRIDE............................................................. 231
VARIABLE PITCH..................................................................... 231
VARIABLE POSITION..............................................................233
VARIABLE PRESENTLABEL ................................................... 234
VARIABLE PRINT_MODE........................................................ 237
VARIABLE PRINT_SPEED ...................................................... 238
VARIABLE READ ..................................................................... 239
VARIABLE RECALIBRATE ...................................................... 240
VARIABLE REPORT_LEVEL ................................................... 241
VARIABLE REPORT_TYPE..................................................... 242
VARIABLE REPRINT................................................................ 243
VARIABLE RESET ................................................................... 244
VARIABLE ROTATE_LABEL.................................................... 245
VARIABLE SCRIPT_INPUT_RESET........................................ 246
VARIABLE SHIFT LEFT...........................................................247
VARIABLE SLEEP_AFTER...................................................... 248
VARIABLE TERMINAL.............................................................249
VARIABLE TIME....................................................................... 250
VARIABLE TOF........................................................................ 251
VARIABLE TXTBFR ................................................................. 252
VARIABLE USER_FEEDBACK................................................ 254
VARIABLE USB_TXTBFR........................................................ 255
VARIABLE WIDTH.................................................................... 257
VARIABLE WRITE.................................................................... 258
VARIABLE ZPL_COMMAND_MASK........................................ 260
Using VARIABLE Commands............................................................. 262
Blazer Compatibility......................................................................... 263
Setting DT or TT Print Method......................................................... 264
Page 8

Setting Bar or Gap Index Type........................................................ 265
Optimizing Index Detection ............................................................. 265
Direct Thermal Printing.............................................................265
Thermal Transfer Printing with Standard Wax Ribbon.............. 266
Thermal Transfer Printing with Resin Ribbon ........................... 266
Automatic Detect....................................................................... 266
Calibrate the Index.................................................................... 267
Setting Print Width........................................................................... 267
Ethernet Printer Information............................................................... 268
Ethernet Interface............................................................................ 268
Ethernet Link Indicator.............................................................. 268
Ethernet Connector................................................................... 268
Physical Address ...................................................................... 268
Network Protocols..................................................................... 269
Network Applications ................................................................ 269
LPD........................................................................................... 269
TFTP......................................................................................... 269
RTEL......................................................................................... 269
TELNET.................................................................................... 270
BOOTP.....................................................................................270
DHCP........................................................................................ 271
Printer Configuration ....................................................................... 271
Configuration Options...............................................................271
Manual Configuration................................................................ 272
Set Host Name.......................................................................... 273
Show Host Name...................................................................... 274
Operation ........................................................................................ 275
Self Test.................................................................................... 275
Variable Commands for Ethernet.................................................... 276
Ethernet Variable Commands ......................................................... 276
VARIABLE ETHERNET BOOTP............................................... 277
VARIABLE ETHERNET DHCP................................................. 277
VARIABLE ETHERNET DHCP_CRIT....................................... 278
VARIABLE ETHERNET DHCP_OFFERS ................................ 279
VARIABLE ETHERNET FIRMWARE........................................ 280
VARIABLE ETHERNET GARP................................................. 280
VARIABLE ETHERNET GATEWAY......................................... 281
VARIABLE ETHERNET IP ADDRESS ..................................... 281
Page 9

VARIABLE ETHERNET JOBSOKINERROR............................ 282
VARIABLE ETHERNET LPD.................................................... 282
VARIABLE ETHERNET NETMASK.......................................... 283
VARIABLE ETHERNET RESET............................................... 283
VARIABLE ETHERNET RESET COMMUNITY........................ 284
VARIABLE ETHERNET RTEL.................................................. 284
VARIABLE ETHERNET RTEL PORT....................................... 285
VARIABLE ETHERNET RTEL TIMEOUT................................. 285
VARIABLE ETHERNET TELNET ............................................. 286
VARIABLE ETHERNET TELNET TIMEOUT............................286
VARIABLE ETHERNET TEXT BUFFER................................... 287
VARIABLE ETHERNET SNMP................................................. 287
Bar Code Information.......................................................................... 288
Uniform Product Code (UPC).......................................................... 288
I2OF5 AND D2OF5.........................................................................289
CODE39 and CODE39+.................................................................. 289
CODE93.......................................................................................... 289
EAN, EAN8, and EAN13.................................................................290
ADD2, ADD5................................................................................... 290
CODABAR ...................................................................................... 290
PLESSEY AND MSI1...................................................................... 291
MAXICODE..................................................................................... 291
PDF417........................................................................................... 291
POSTNET ....................................................................................... 292
CODE128 A, B, C............................................................................ 293
CODE16K ....................................................................................... 295
Media Tips and Tricks .........................................................................296
Label/tag Size and Shape............................................................... 296
Adhesives ........................................................................................ 297
Print Method (Direct Thermal or Thermal Transfer)......................... 297
Cut Type (Butt Cut, Gap Cut, or Continuous Form)......................... 298
Media Sensitivity ............................................................................. 299
Troubleshooting .................................................................................. 300
Common Issues .............................................................................. 303
Graphics Programming Issues........................................................ 312
Page 10

Page 11

Chapter
1
Introduction
Bar code printers are programmable devices. Most CognitiveTPG
printers use the same command language, which has become an
industry standard.
NOTE: EZ-LP and PCL printers are an exception. Standard CPL printer
commands do not work on an EZ-LP or PCL printer. However, VARIABLE
commands can be used to configure these printers.
In typical label printing applications, you will use simple ASCII
commands to control the printer. You will write these commands in
files called label formats. When sent to the printer, each label format
tells the printer how to produce one or more labels.
One label format can print many similar labels. Label formats may be
sent to the printer individually or in batches, in multiple file uploads.
You may combine several different ASCII label formats in a single file,
with each format capable of producing a different label.
This document describes the ASCII and graphics commands used to
create label formats, stored objects, and menus, as well as the
VARIABLE commands used to configure the printer.
IMPORTANT: If you are using Microsoft Windows and preparing and printing
label formats directly from Notepad or another Windows-based program, be
aware that most Windows printer drivers will not work with CognitiveTPG
printers. The "generic ASCII" printer driver (supplied with Windows) will pa ss
ASCII label formats to the printer without interference. Please in stall and use
this driver when sending ASCII label formats to the printer from the Windows
environment. Do not use the CognitiveTPG Windows Driver when sending
ASCII formats to the printer. The CognitiveTPG Windows Driver converts
Windows documents to ASCII label formats; thus, your label form ats will print
as they appear in the text editor rather than directly contro l the printer as
intended.
Revision F, January 2012, CognitiveTPG 2
Page 12

INTRODUCTION
Label Format Organization
With a few exceptions that are noted in the command descriptions,
every label format contains:
• A header line, which defines the overall label characteristics.
• One or more printer commands.
• An END statement, which tells the printer that it has
received all required data.
Here is a typical label format:
! 0 100 190 3
PITCH 100
BARCODE UPCA+ 20 75 70 19112610203
END
This label format would print a UPCA bar code on a label.
Command Syntax
CognitiveTPG printers will accept most commands in either an explicit
(long) or implicit (abbreviated) form. Both command forms, where
supported, are shown in the command descriptions. The command
descriptions use the following format:
Command
Function The purpose of the command is described here.
Explicit Form
Implicit Form
Parameters Any optional or required command parameters are
Comments Any additional comments relating to use of the
Command parameters.
Command parameters.
described here.
command are noted here.
Revision F, January 2012, CognitiveTPG 3
Page 13

INTRODUCTION
Example
Sample program code is included here showing
proper use of the command.
NOTE: The sample code shown does not always include
all the lines in the label format that produced the sample
label. Header lines,
often omitted to save space.
Also, the label images shown only illustrate the features
or command under discussion. They are not to scale.
The labels your printer produces using the sample code
will differ considerably from the label images in this
document.
END statements and the like are
Important Programming Rules
Use blank spaces exactly as shown in the command descriptions.
Blank spaces are the delimiters between parameters. Omitting a
necessary space may cause incorrect label printing.
Do not send extraneous control characters to the printer.
End every command line with a line feed or a carriage return and line
feed. If you create labels using a word processor, confirm that your
system uses "hard" carriage returns (inserts ASCII characters 10 and
13 at the end of each line) to form the newline sequence.
Begin every label format with a header line. End every format with an
END statement, unless otherwise noted in the command descriptions.
(A few commands are "stand alone" and should not be followed by an
END statement or any other commands.)
Not all printers support all commands, and there may be some
variation in command use depending on the printer model. Review
your printer's User's Guide and the compatibility information in
Tables 1, 2, and 3 before you begin writing label formats or software.
4 Revision F, January 2012, CognitiveTPG
Page 14

INTRODUCTION
Related Publications
Every printer has a User's Guide, which covers hardware issues like
installation, setup, and troubleshooting. We strongly recommend that
you familiarize yourself with your User's Guide before attempting to
program the printer.
We also recommend the following books for readers desiring more
information about bar code technology in general:
• The Bar Code Book by Roger C. Palmer (Helmers
Publishing, Inc., 174 Concord Street, Peterborough, NH
03458)
• Reading Between the Lines by Craig Harmon and Russ
Adams (Helmers Publishing, Inc., 174 Concord Street,
Peterborough, NH 03458)
Revision F, January 2012, CognitiveTPG 5
Page 15

Chapter
2
Printer Command Compatibility
All commands, bar codes, and fonts do not work with all printers.
Commands are added with the introduction of new printers and new
firmware releases. Command usage can also vary, depending on the
printer's firmware. The tables following provide some general
command compatibility guidelines.
Y indicates that the command is supported in the current firmware
version for the listed printer.
N indicates that the command is NOT supported by the listed printer
and will cause the printer to report errors if the command is
encountered.
- indicates that the command is not supported by the listed printer and
it will have no effect if issued to the printer.
Printer Models
Printer models in the tables are designated as follows:
RD: Code Ranger Printers, all models
PW/PT42: Code Courier printers, models PW422003 and PT422003
BD/BT02: Barcode Blaster LS printers, models BD242002, BD422002,
BT242002, BT422002, and early Barcode Blaster SR printers
BD/BT05: Barcode Blaster high speed printers, models BD242005,
BD422005, BT242004, BT422004
BL4202: Barcode Blaster CL, model BL422003 and BL423002
ADVANTAGE/LX: Barcode Blaster Advantage series, models
BD242003, BD422003, BT242003, BT422003, current Barcode Blaster
SR model BT423002, and Advantage LX model LBT and LBD.
Revision F, January 2012, CognitiveTPG 6
Page 16

PRINTER COMMAND COMPATIBILITY
SOLUS: Solus printer series, models SD4TI and ST4TI
DEL SOL/LX: Del Sol models DT and DD, and Del Sol LX models
LDT and LDD
EZ-LP: EZ-LP models (printers recognize some CPL commands but do
not support printing CPL formats; EcPL and ZcPL emulation printing
only.)
PCL: C Series, models with PCL, Cxxx-1330, Cxxx-1330-RX (printers
recognize some CPL commands but do not support printing CPL
formats; PCL printing only.)
CI: C Series, model Ci (except PCL models, CIxx-1330)
CXI: C Series, model Cxi (except PCL models, CXxx-1330)
DLX: Advantage DLX series
Compatibility Tables
Use the tables to determine command and functional compatibilities.
Table 1. Printer Command Compatibility (CPL)
Table 2. Printer Set-up and Diagnostic Compatibility
Table 3. Printer Bar Code Support
Table 4. Printer Font Support
Revision F, January 2012, CognitiveTPG 7
Page 17

PRINTER COMMAND COMPATIBILITY
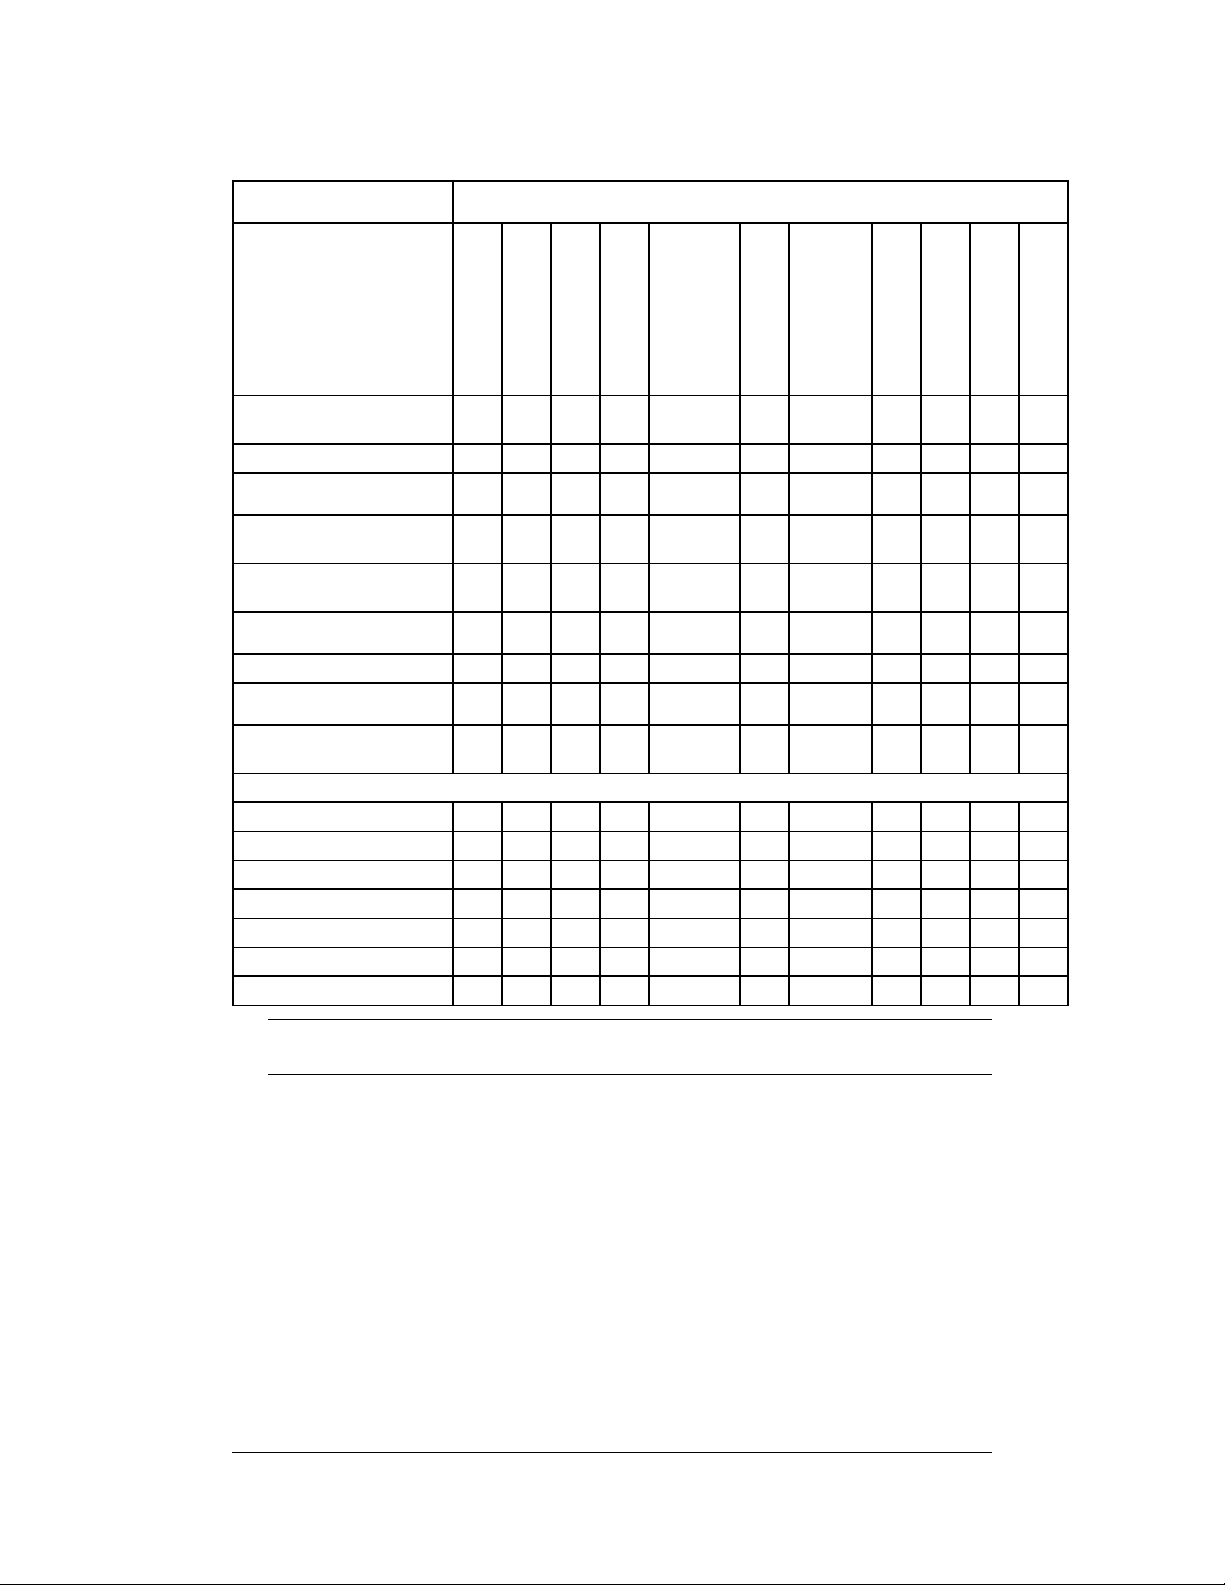
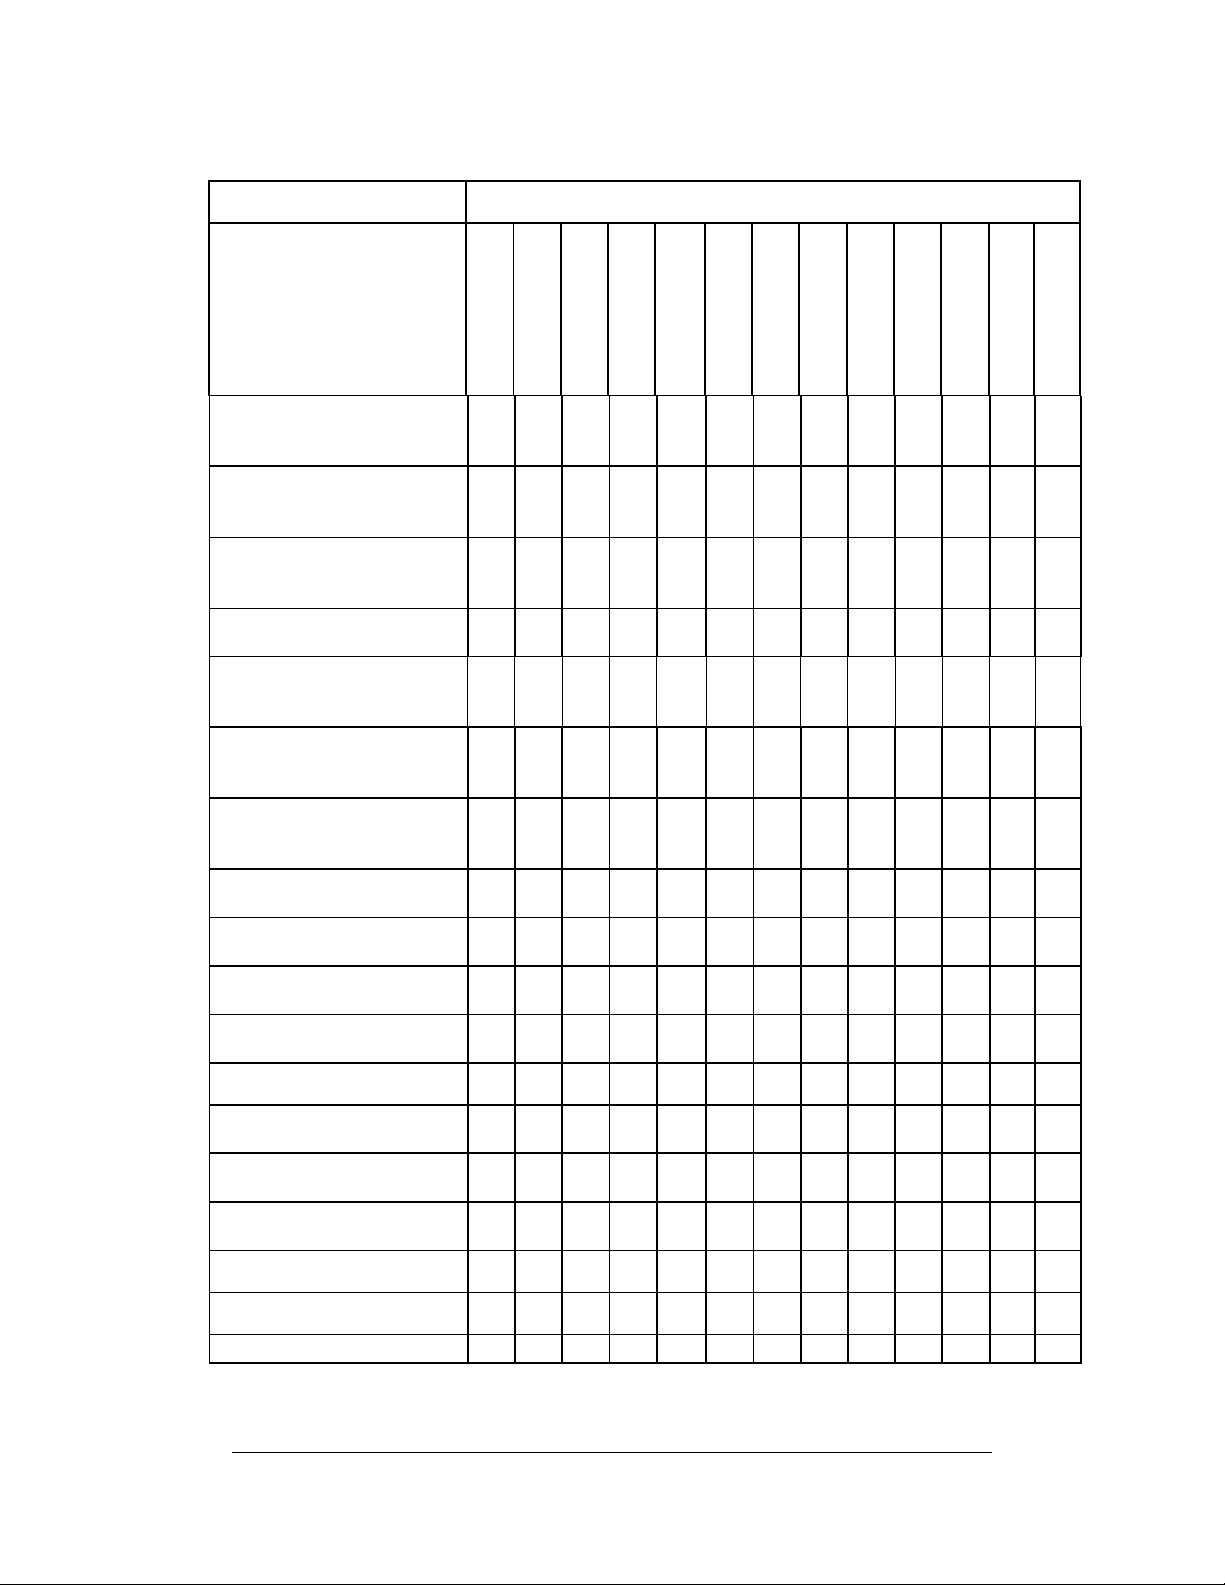
Table 1. Printer Command Compatibility (CPL only)
The following table summarizes commands that are compatible with
each printer model when operating with the most current version of
firmware.
COMMAND NAME PRINTER SUPPORT / NOTES
ADJUST Y Y Y Y Y Y Y Y Y Y Y
Variable
parameter for
ADJUST
ADJUST_DUP Y Y Y Y Y Y Y Y Y Y Y
AREA_CLEAR Y Y Y Y Y Y Y Y Y Y Y
BARCODE Y Y Y Y Y Y Y Y Y Y Y
BARCODE AZTEC N N N N Y(LX) N Y (LX) N Y Y Y
BARCODE
DATAMATRIX
BARCODE_FONT Y Y Y Y Y Y Y Y Y Y Y
Barcode GS1 Y Y Y
BARCODE PDF417 Y - Y Y Y Y Y Y Y Y Y
BARCODE QR N N N N N N N N Y Y Y
BARCODE RSS N N N N N N N N Y Y Y
BARCODE UPS Y - Y - Y Y Y Y Y Y Y
BEEP N N N N N N N N Y Y Y
COMMENT Y Y Y Y Y Y Y Y Y Y Y
DELIMIT - - - Y Y Y Y Y Y Y Y
DEFINE_VAR - - - Y Y Y Y Y Y Y Y
DOUBLE - - - - Y Y Y Y Y Y Y
DRAW_BOX Y Y Y Y Y Y Y Y Y Y Y
DRAW CIRCLE Y Y Y
DRAW ELLIPSE Y Y Y
DRAW LINE Y Y Y
END Y Y Y Y Y Y Y Y Y Y Y
FILL_BOX Y Y Y Y Y Y Y Y Y Y Y
GRAPHIC - Y Y Y Y Y Y Y Y Y Y
HALT Y Y Y Y Y Y Y Y Y Y Y
CODE COURIER
BD/BT02
BD/BT05
BL42
- - - Y Y Y Y Y Y Y Y
N N N N Y(LX) N Y (LX) N Y Y Y
ADVANTAGE/LX
SOLUS
DEL SOL/LX
CODE RANGER
CI
CXI
DLX/DLXi
8 Revision F, January 2012, CognitiveTPG
Page 18

PRINTER COMMAND COMPATIBILITY
COMMAND NAME PRINTER SUPPORT / NOTES
CODE COURIER
BD/BT02
BD/BT05
BL42
ADVANTAGE/LX
SOLUS
DEL SOL/LX
CODE RANGER
CI
CXI
DLX/DLXi
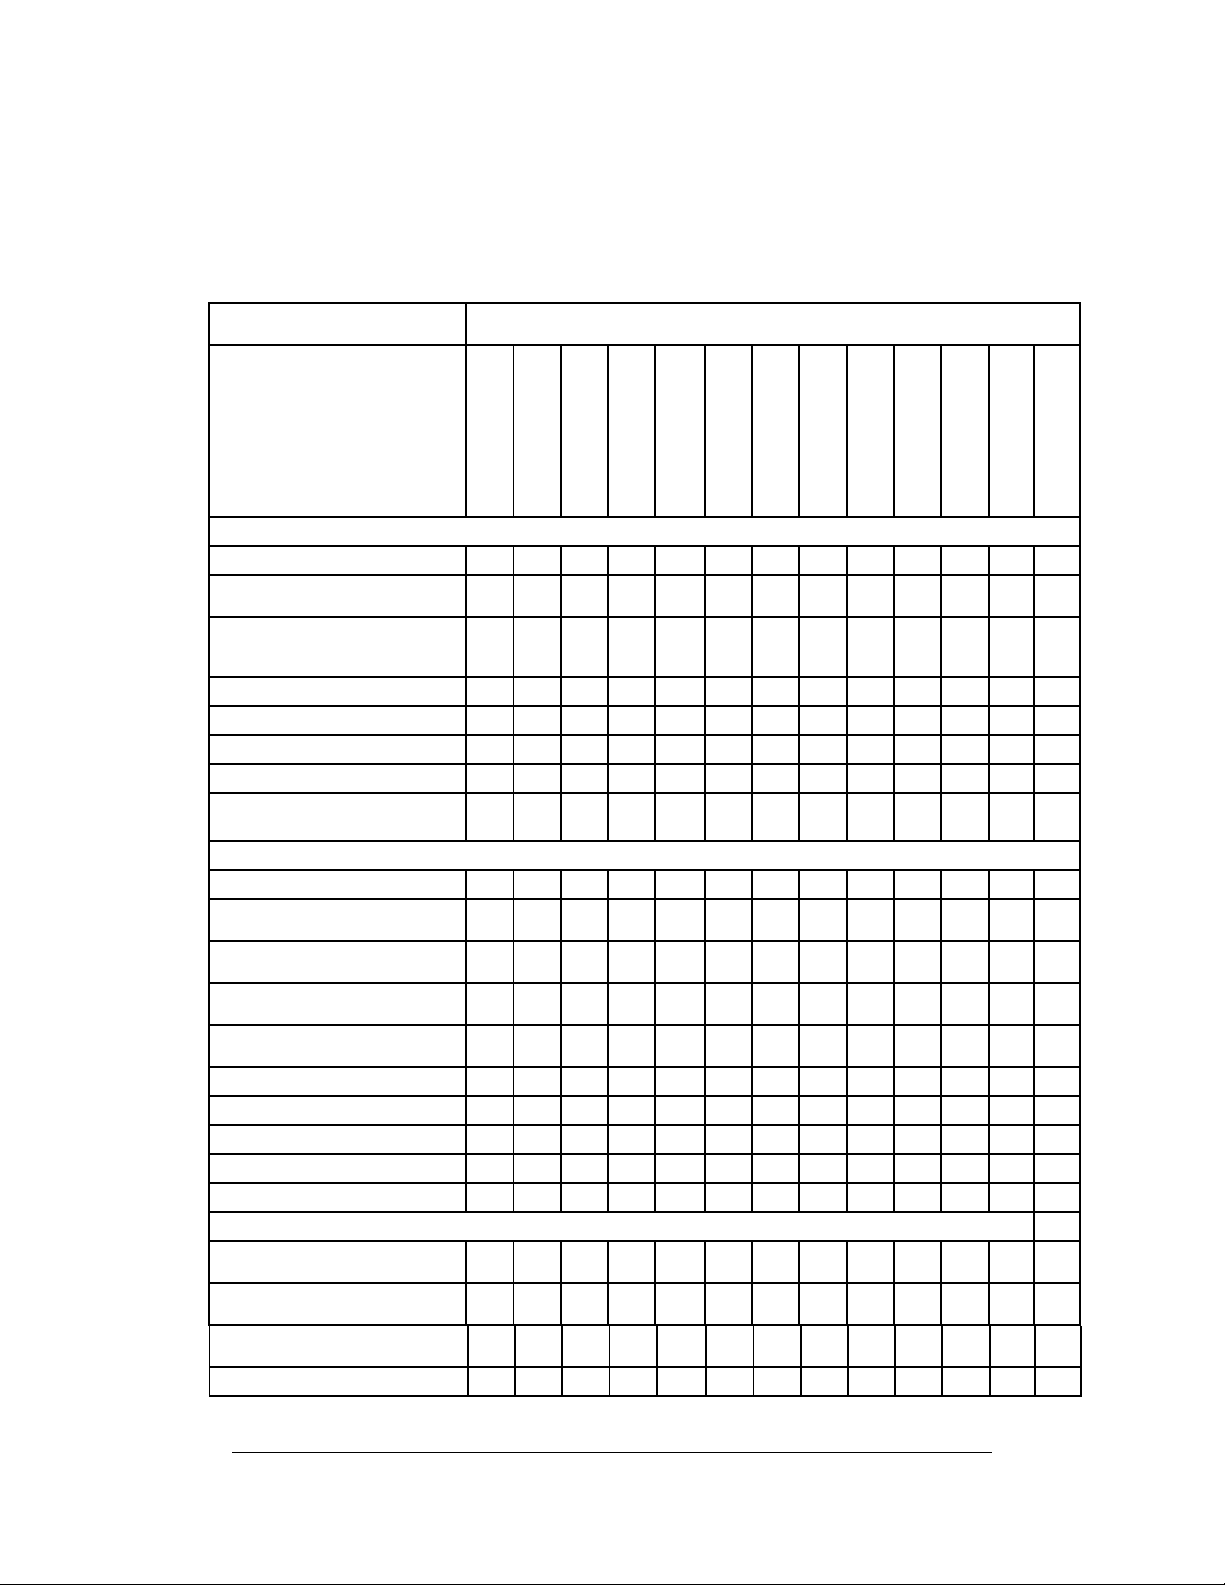
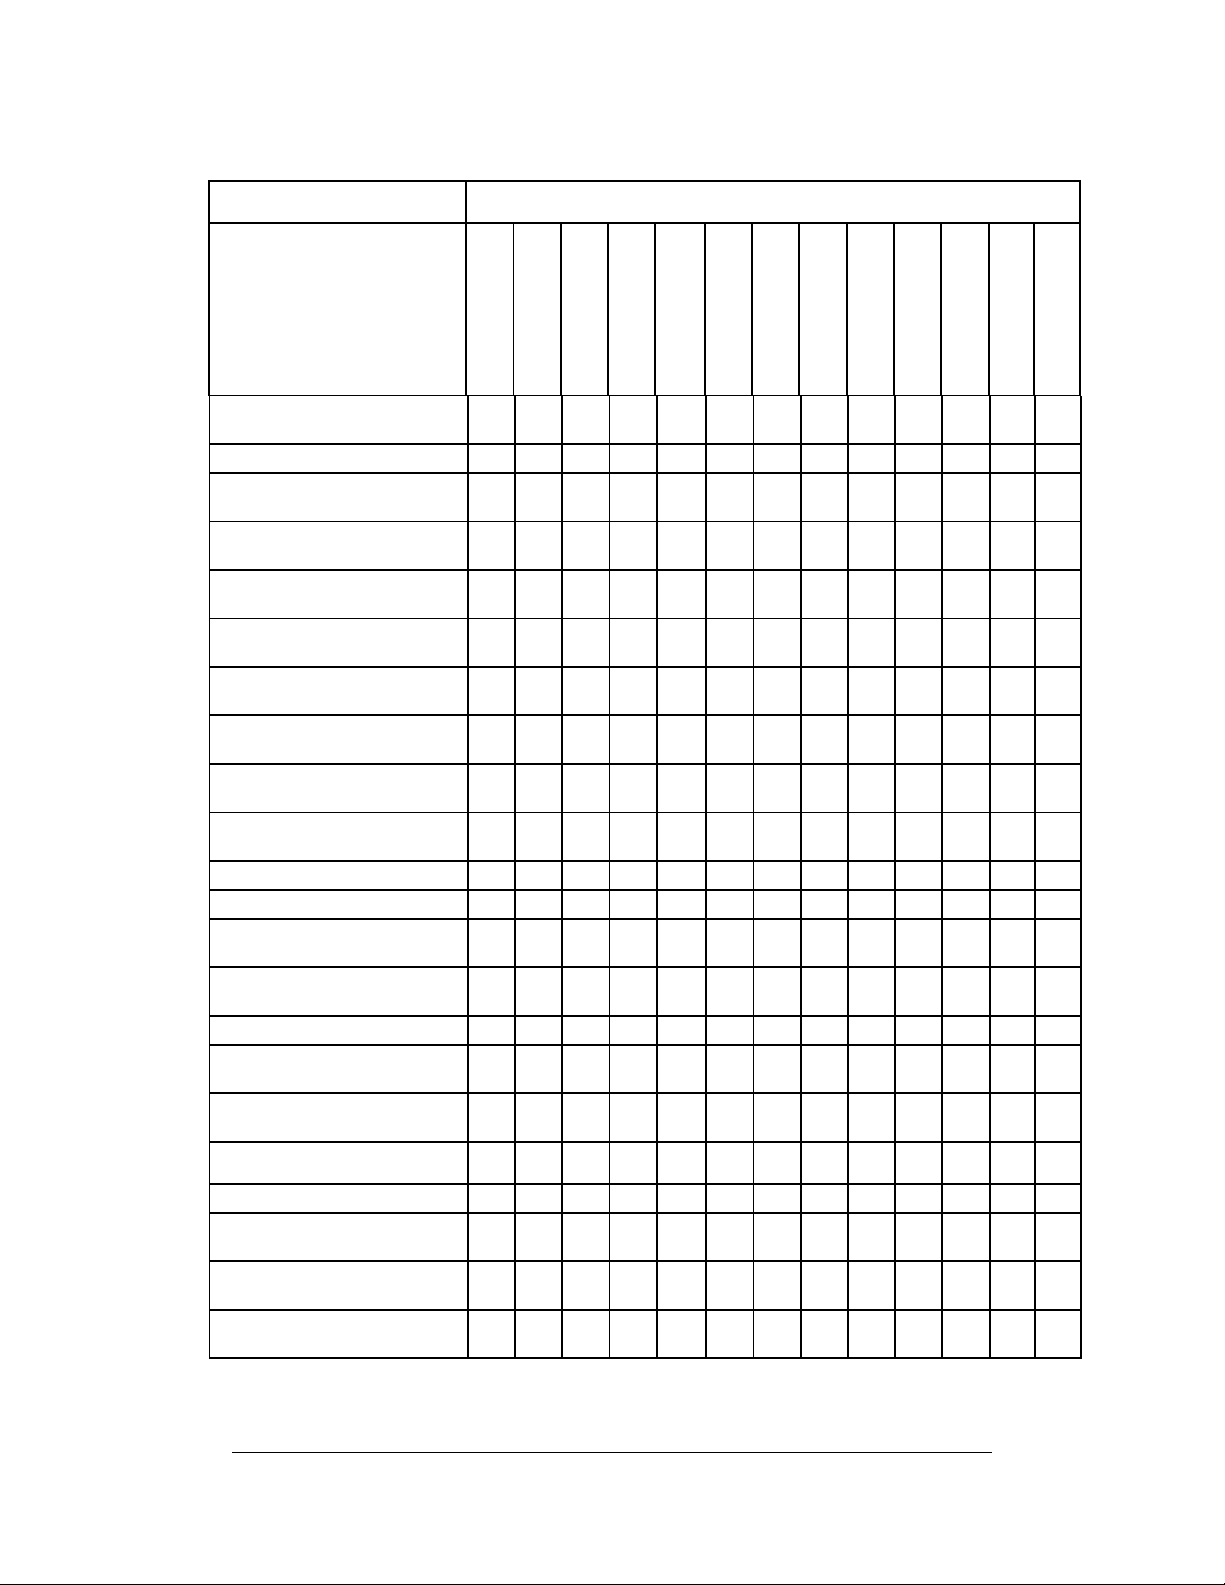
INDEX Y Y Y N Y Y Y Y Y Y Y
JUSTIFY Y Y Y Y Y Y Y Y Y Y Y
LOGO mode Y Y Y Y Y Y Y Y N N N
MULTIPLE Y Y Y Y Y Y Y Y Y Y Y
NOINDEX Y Y Y Y Y Y Y Y Y Y Y
PITCH Y Y Y Y Y Y Y Y Y Y Y
QUANTITY - - - Y Y Y Y Y Y Y Y
R90, R180, R270 Y Y Y Y Y Y Y Y Y Y Y
STRING Y Y Y Y Y Y Y Y Y Y Y
TERMINAL Y Y Y
TEXT - Y Y Y Y Y Y Y Y Y Y
TIME SET N N N Y Y Y Y Y Y Y Y
TIME ADD N N N Y Y Y Y Y Y Y Y
TIME GET N N N Y Y Y Y Y Y Y Y
TIME QUERY N N N Y Y Y Y Y Y Y Y
ULTRA_FONT Y Y Y Y Y Y Y Y Y Y Y
Universal clear Y Y Y Y Y Y Y Y - - -
Wake-up string Y - - - - - - - - - -
WIDTH Y Y Y Y Y Y Y Y Y Y Y
Data storage commands:
Prompts N N N N Y N Y N Y Y Y
DataSkip N N N N Y N Y N Y Y Y
Delete Stored
Object
- - - Y Y Y Y Y Y Y Y
Format Recall - - - Y Y Y Y Y Y Y Y
Format Store - - - Y Y Y Y Y Y Y Y
Store Enhanced
Format
- - - Y Y Y Y Y Y Y Y
Graphic Store - - - Y Y Y Y Y Y Y Y
Graphic Recall - - - Y Y Y Y Y Y Y Y
Recall Menu - - - Y Y Y Y Y Y Y Y
Recall Variable - - - Y Y Y Y Y Y Y Y
HEADER commands:
Graphics mode Y Y Y Y Y Y Y Y N N N
Revision F, January 2012, CognitiveTPG 9
Page 19
PRINTER COMMAND COMPATIBILITY
COMMAND NAME PRINTER SUPPORT / NOTES
Background
graphics
CODE COURIER
BD/BT02
BD/BT05
BL42
ADVANTAGE/LX
SOLUS
DEL SOL/LX
CODE RANGER
CI
CXI
DLX/DLXi
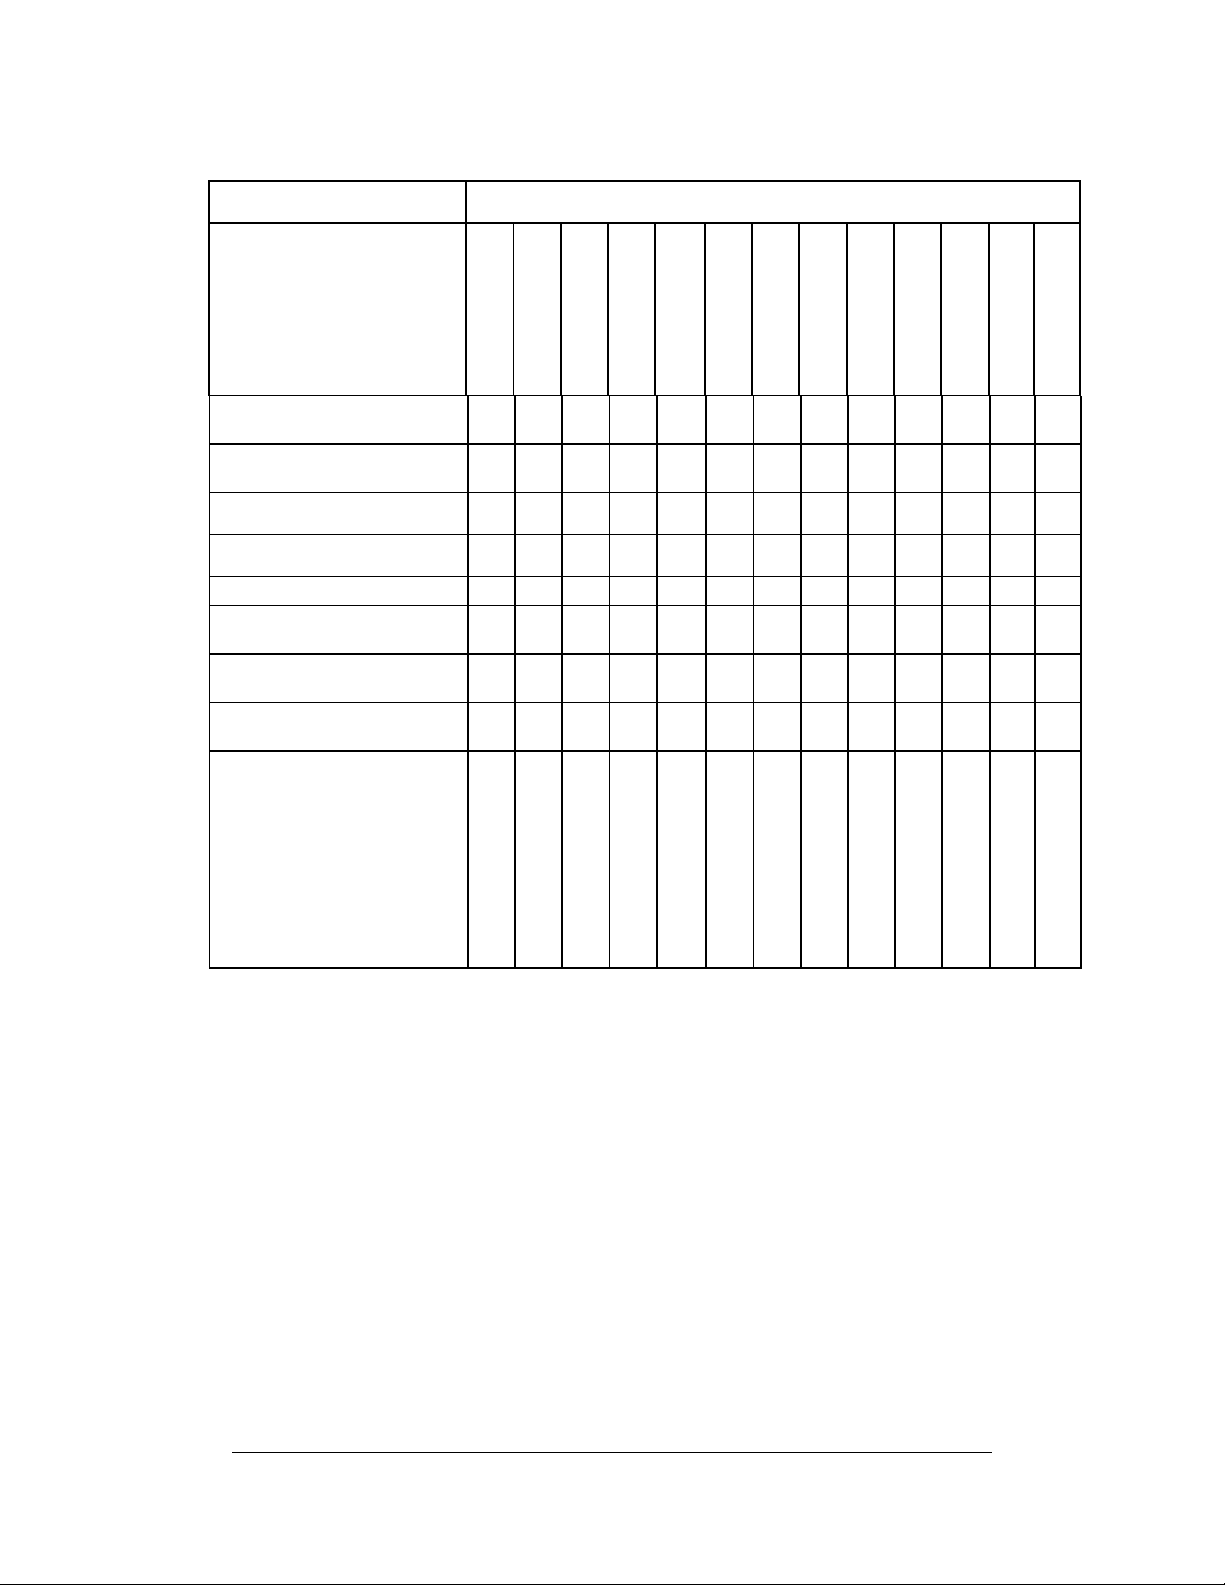
Y Y Y Y Y Y Y Y Y Y Y
Header line Y Y Y Y Y Y Y Y Y Y Y
variable dot
time
!A automatic
header line
Standard Header
Line
Reuse Header
Line
Y - Y Y Y Y Y Y Y Y Y
- - - Y Y Y Y Y Y Y Y
Y Y Y Y Y Y Y Y Y Y Y
Y Y Y Y Y Y Y Y Y Y Y
Automatic Header N N N N Y Y Y Y Y Y Y
Background
Header
Clear Background
Header
N N N N Y Y Y Y Y Y Y
N N N N Y Y Y Y Y Y Y
MENU commands:
MENU START N N N N Y Y Y Y Y Y Y
MENU END N N N N Y Y Y Y Y Y Y
MENU EXIT N N N N Y Y Y Y Y Y Y
MENU CONTROL N N N N Y Y Y Y Y Y Y
MENU ACTION N N N N Y Y Y Y Y Y Y
MENU ITEM N N N N Y Y Y Y Y Y Y
ME Y Y NU MESSAGE N N N N Y Y Y Y Y
NOTE: On the Del Sol, the WIDTH command is mandatory or errors will
occur.
10 Revision F, January 2012, CognitiveTPG
Page 20
PRINTER COMMAND COMPATIBILITY
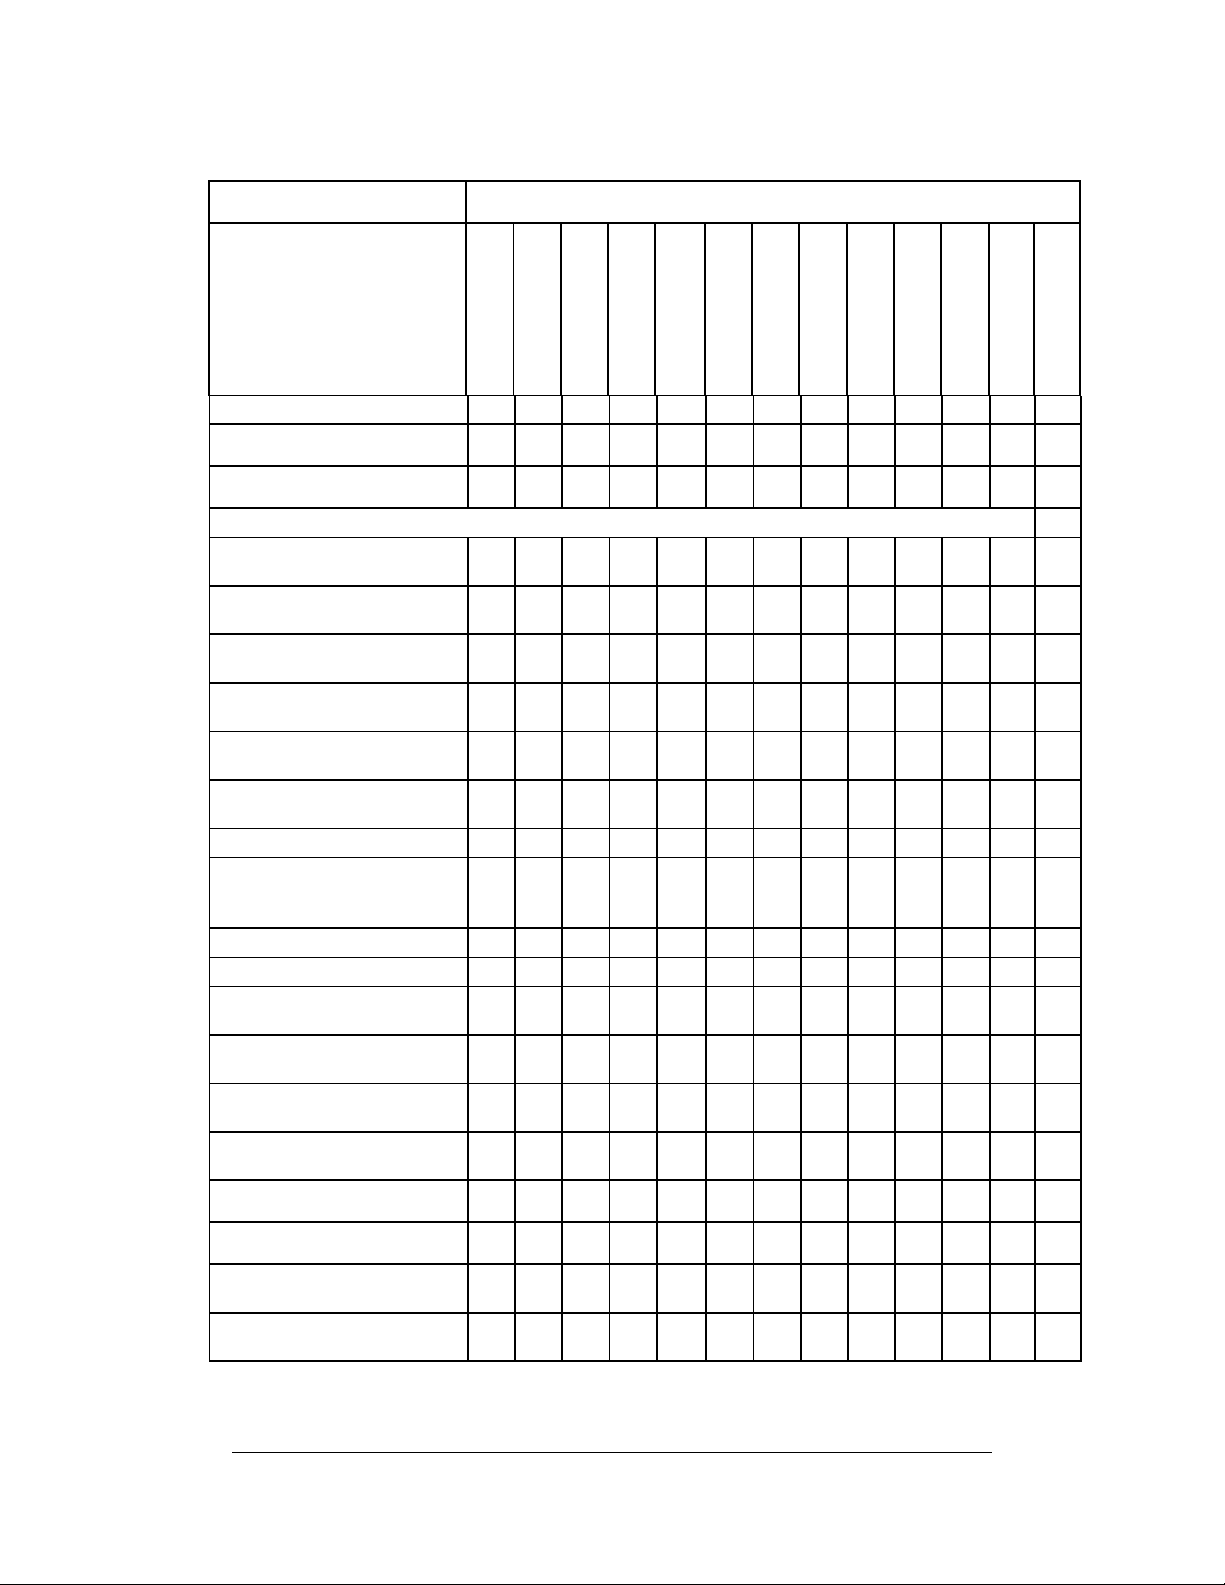
Table 2. Printer Set-up and Diagnostic
The following table summarizes set-up and diagnostic commands
supported by each printer model.
COMMAND NAME PRINTER SUPPORT / NOTES
OBJECT MAINTENANCE commands:
Get Object Data Y Y Y Y Y
Mark Object for
Deletion
Mark Type of Object
for Deletion
Pack Objects Y Y Y Y Y
Delete Object Y Y Y Y Y Y Y Y Y Y Y Y Y
Delete All Objects Y Y Y Y Y Y Y Y Y Y Y Y Y
Print Object List Y Y Y Y Y Y Y Y Y Y Y Y Y
Object List out
Serial Port/USB
DIAGNOSTIC commands:
PRINT TEST LABEL Y Y Y Y Y
Query Firmware
Revision
Query Index
Settings
Query Index Buffer
Values
Query Printer
Status
Show Inches Printed Y Y Y Y Y
Show MAC Address Y Y Y Y Y
Show Model Number Y Y Y Y Y
Show Print Head Y Y Y Y Y
Show Serial Number Y Y Y Y Y
CAPTURE TO USB commands:
Open Output Message
Trace
Close Output
Message Trace
Open Input Capture
Trace
Close Input Capture Y Y Y Y Y
CODE COURIER
BD/BT02
BD/BT05
BL42
ADVANTAGE/LX
SOLUS
DEL SOL/LX
CODE RANGER
CI
CXI
DLX/DLXi
EZ-LP
PCL
Y Y Y Y Y
Y Y Y Y Y
Y Y Y Y Y Y Y Y Y Y Y Y Y
- Y Y Y Y Y Y Y Y Y Y Y Y
Y Y
Y Y
Y Y Y Y Y Y Y Y Y Y Y Y Y
Y Y Y Y Y
Y Y Y Y Y
Y Y Y Y Y
Revision F, January 2012, CognitiveTPG 11
Page 21
PRINTER COMMAND COMPATIBILITY
COMMAND NAME PRINTER SUPPORT / NOTES
CODE COURIER
BD/BT02
BD/BT05
BL42
ADVANTAGE/LX
SOLUS
DEL SOL/LX
CODE RANGER
CI
CXI
DLX/DLXi
EZ-LP
PCL
Trace
Add String to Trace
File
Write Trace Data to
File
VARIABLE commands:
Y Y Y Y Y
Y Y Y Y Y
VARIABLE ALLOCATE - - - Y Y Y Y Y - - -
VARIABLE AUTOCUT - - - Y - Y - Y Y Y Y Y Y
VARIABLE AUDIO_FREQ Y Y Y Y Y
VARIABLE AUTO_TOF N N N N N N N N Y Y Y Y Y
VARIABLE AUX_POWER N N N N N N N Y Y Y Y Y Y
VARIABLE BACKLIGHT N N N N N N N N Y Y N N N
VARIABLE BEEPER N N N N N N N N Y Y Y Y Y
VARIABLE
BUFFER_TIMED_RESET
Y Y Y Y - - - Y Y Y Y Y Y
VARIABLE CODE_PAGE Y Y Y Y N
VARIABLE COMM Y Y Y Y Y Y Y Y Y Y Y Y Y
VARIABLE COMPATIBLE N N N N N N N N Y Y Y Y Y
VARIABLE CONTRAST N N N N N N N N Y Y N N N
VARIABLE
CPL_COMMAND_MASK
Y Y Y Y Y
VARIABLE DARKNESS Y Y Y Y Y Y Y Y Y Y Y Y Y
VARIABLE
EPL_COMMAND_MASK
VARIABLE
ERROR_LEVEL
VARIABLE ETHERNET
BOOTP
VARIABLE ETHERNET
DHCP
Y Y Y Y N
Y Y Y Y Y
Y Y Y Y Y Y Y Y N N N Y Y
N N N N N N N N Y Y Y Y Y
12 Revision F, January 2012, CognitiveTPG
Page 22
PRINTER COMMAND COMPATIBILITY
COMMAND NAME PRINTER SUPPORT / NOTES
VARIABLE ETHERNET
DHCP_CRIT
VARIABLE ETHERNET
DHCP_OFFERS
VARIABLE ETHERNET
FIRMWARE
VARIABLE ETHERNET
GARP
VARIABLE ETHERNET
GATEWAY
VARIABLE ETHERNET
IP ADDRESS
VARIABLE ETHERNET
JOBSOKINERROR
VARIABLE ETHERNET
LPD
VARIABLE ETHERNET
NETMASK
VARIABLE ETHERNET
RESET
CODE COURIER
BD/BT02
BD/BT05
BL42
ADVANTAGE/LX
SOLUS
DEL SOL/LX
CODE RANGER
CI
CXI
DLX/DLXi
EZ-LP
PCL
N N N N N N N N Y Y Y Y Y
N N N N N N N N Y Y Y Y Y
N N N N Y Y Y N Y Y Y Y Y
Y Y Y Y Y
N N N N Y N Y N Y Y Y Y Y
N N N N Y N Y N Y Y Y Y Y
N N N N Y Y Y N Y Y Y Y Y
N N N N Y Y Y N Y Y Y Y Y
N N N N Y N Y N Y Y Y Y Y
N N N N Y N Y N Y Y Y Y Y
VARIABLE ETHERNET
RESET COMMUNITY
VARIABLE ETHERNET
RTEL
VARIABLE ETHERNET
RTEL PORT
VARIABLE ETHERNET
RTEL TIMEOUT
VARIABLE ETHERNET
TELNET
Revision F, January 2012, CognitiveTPG 13
Y Y Y Y Y
N N N N Y Y Y N Y Y Y Y Y
N N N N Y Y Y N Y Y Y Y Y
N N N N
Y
N N N Y Y Y Y Y
LX
Y
Y Y Y Y Y
LX
Page 23
PRINTER COMMAND COMPATIBILITY
COMMAND NAME PRINTER SUPPORT / NOTES
VARIABLE ETHERNET
TELNET TIMEOUT
VARIABLE ETHERNET
TEXT BUFFER
VARIABLE ETHERNET
SNMP
CODE COURIER
BD/BT05
BD/BT02
BL42
ADVANTAGE/LX
DEL SOL/LX
SOLUS
CODE RANGER
CI
CXI
DLX/DLXi
EZ-LP
PCL
Y Y Y Y Y
N N N N Y N Y N Y Y Y Y Y
Y Y Y Y Y
VARIABLE FEED N N N N N N N Y Y Y Y Y Y
VARIABLE
FEED_BUTTON
VARIABLE
FEED_CONFIG
Y Y Y Y Y
Y Y Y Y Y
VARIABLE FEED_TYPE Y Y Y N Y Y Y Y Y Y Y Y Y
VARIABLE GAP_SIZE Y Y Y Y Y
VARIABLE HIGHSPEED Y Y Y Y Y Y Y Y Y Y Y Y Y
VARIABLE INDEX - Y Y Y Y Y Y Y Y Y Y Y Y
VARIABLE INDEX
SETTING
VARIABLE INDEX
SETTING CALIBRATE
- Y Y Y Y Y Y Y - - - - -
- - - - Y N Y Y Y Y Y Y Y
VARIABLE IRDA N N N N N N N Y - - - - -
VARIABLE IRDA
PROTOCOL
N N N N N N N Y - - - - -
VARIABLE IRDA COMM N N N N N N N Y - - - - -
VARIABLE KBLAYOUT
VARIABLE
LBEL_LENGTH
Y Y Y Y N
Y Y Y Y Y
VARIABLE LANGUAGE N N N N N N N N Y Y Y Y N
14 Revision F, January 2012, CognitiveTPG
Page 24
PRINTER COMMAND COMPATIBILITY
COMMAND NAME PRINTER SUPPORT / NOTES
VARIABLE
LOW_BATTERY
CODE COURIER
BD/BT05
BD/BT02
BL42
ADVANTAGE/LX
DEL SOL/LX
SOLUS
CODE RANGER
CI
CXI
DLX/DLXi
EZ-LP
PCL
Y - - - - - - - - - - - -
VARIABLE LOWSPEED Y Y Y Y Y Y Y Y Y Y Y Y Y
VARIABLE
MEASURE_LABEL
VARIABLE MEDIA
_ADJUST
VARIABLE
MENU_LANGUAGE
VARIABLE
MIRROR_LABEL
Y Y Y Y Y
- - - Y Y Y Y Y - - - - -
Y Y N N Y
Y Y Y Y Y
VARIABLE MODE - - Y - Y Y Y Y - - - - -
VARIABLE NO_MEDIA - Y Y Y Y Y Y Y Y Y Y Y Y
VARIABLE NORMAL Y Y Y - Y Y Y Y Y Y Y Y Y
VARIABLE OFF_AFTER Y - - - - -
VARIABLE ON_TIME Y Y Y Y Y
VARIABLES ON/OFF - Y Y Y Y Y Y - - - - - -
VARIABLE OVERRIDE
Y
Y Y Y Y Y
LX
VARIABLE PITCH Y Y Y Y Y Y Y Y Y Y Y Y Y
VARIABLE POSITION Y Y Y Y Y Y Y Y Y Y Y Y Y
VARIABLE
PRESENTLABEL
N N N N Y Y Y Y Y Y Y Y Y
VARIABLE PRINT_MODE Y Y Y Y Y Y Y Y Y Y Y Y Y
VARIABLE
PRINT_SPEED
Y Y Y Y Y
VARIABLE READ Y Y Y Y Y Y Y Y Y Y Y Y Y
VARIABLE
RECALIBRATE
VARIABLE
REPORT_TYPE
N N N N Y N Y N Y Y Y Y Y
Y Y Y Y Y
VARIABLE REPRINT N N N N N N N N Y Y Y Y Y
Revision F, January 2012, CognitiveTPG 15
Page 25
PRINTER COMMAND COMPATIBILITY
COMMAND NAME PRINTER SUPPORT / NOTES
VARIABLE
REPORT_LEVEL
CODE COURIER
BD/BT05
BD/BT02
BL42
ADVANTAGE/LX
DEL SOL/LX
SOLUS
CODE RANGER
CI
CXI
DLX/DLXi
EZ-LP
PCL
- - - - Y Y Y Y Y Y Y Y Y
VARIABLE RESET - Y Y Y Y Y Y Y Y Y Y Y Y
VARIABLE
ROTATE_LABEL
VARIABLE SCRIPT_
INPUT_RESET
Y Y Y Y Y
Y Y Y Y Y
VARIABLE SHIFT_LEFT - Y Y Y Y Y Y Y Y Y Y Y Y
VARIABLE
SLEEP_AFTER
Y - - - - - - Y - - - - -
VARIABLE TERMINAL Y Y Y Y N
VARIABLE TIME Y Y Y Y Y
VARIABLE TOF N N N N N N N N Y Y Y Y Y
VARIABLE TXTBFR Y Y Y Y Y Y Y Y Y Y Y Y Y
VARIABLE USB_TXTBFR Y Y Y Y Y
VARIABLE
USER_FEEDBACK
Y Y Y Y Y Y Y Y Y Y Y Y Y
VARIABLE WIDTH - Y Y Y Y Y Y Y Y Y Y Y Y
VARIABLE WRITE Y Y Y Y Y Y Y Y Y Y Y Y Y
VARIABLE
ZPL_COMMAND_MASK
Y Y Y Y N
16 Revision F, January 2012, CognitiveTPG
Page 26
PRINTER COMMAND COMPATIBILITY
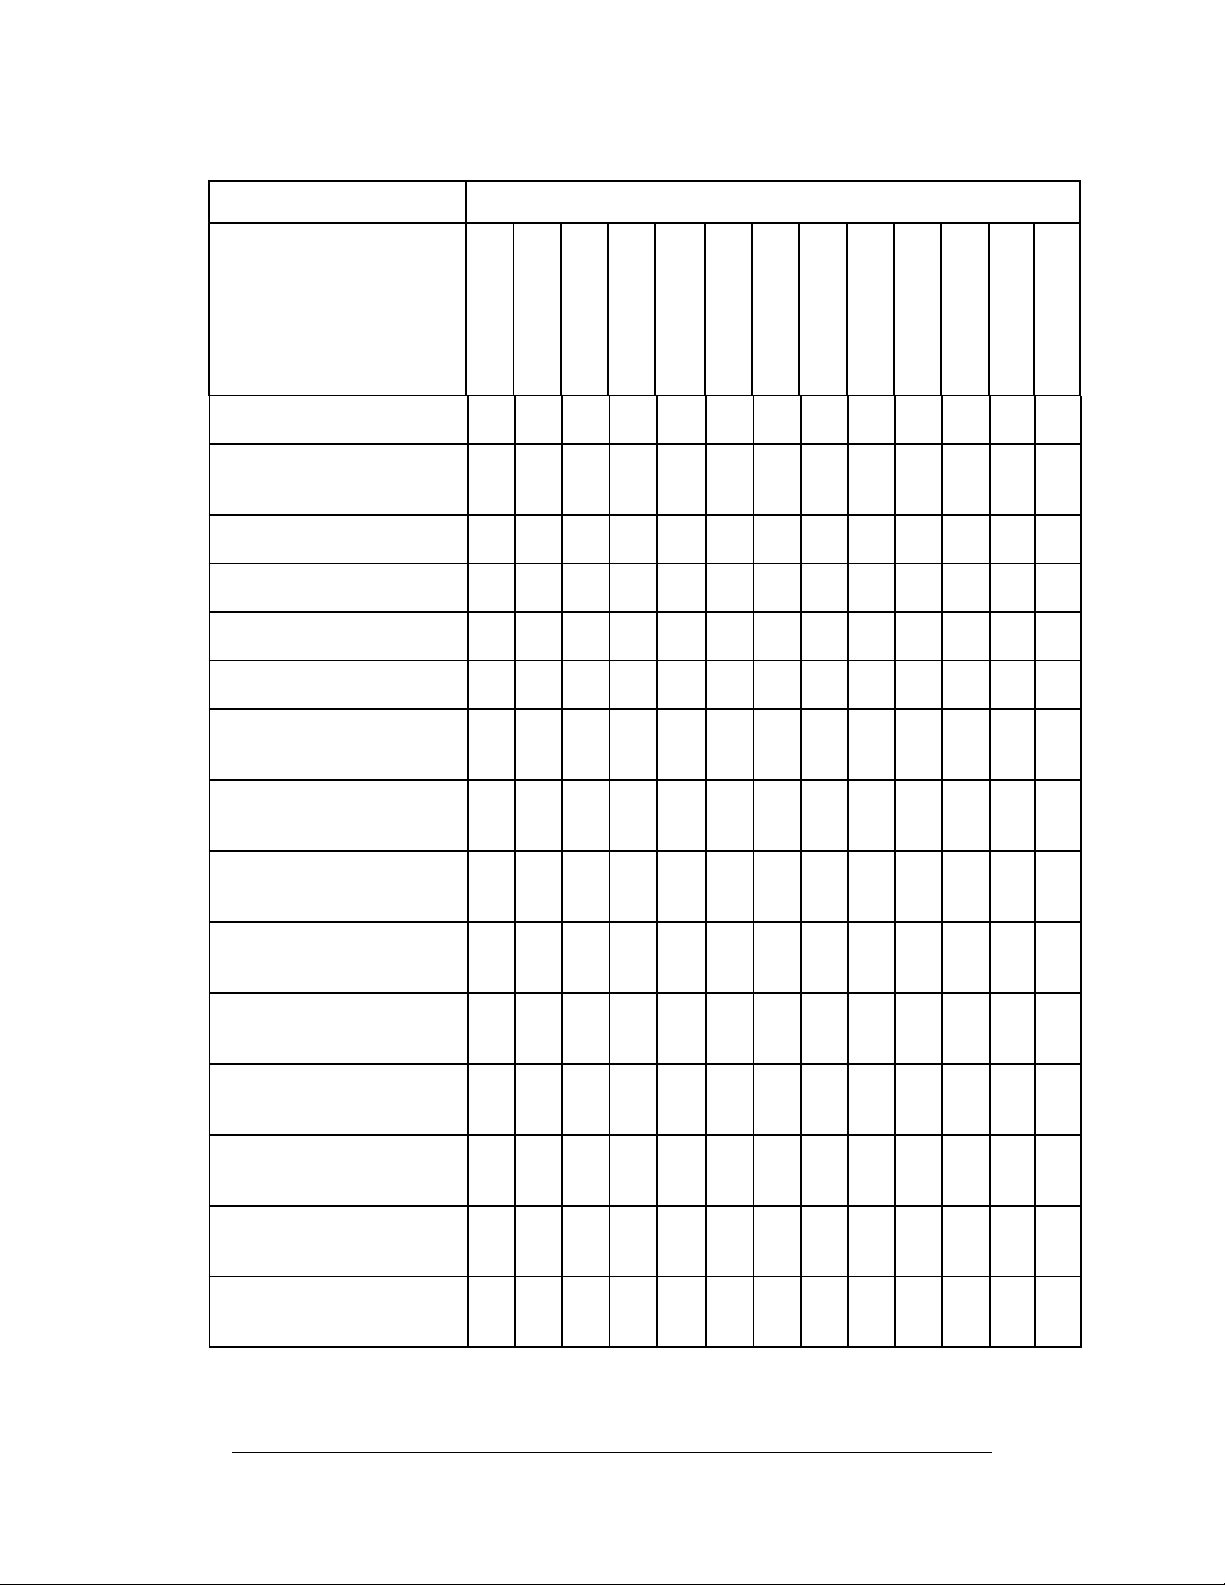
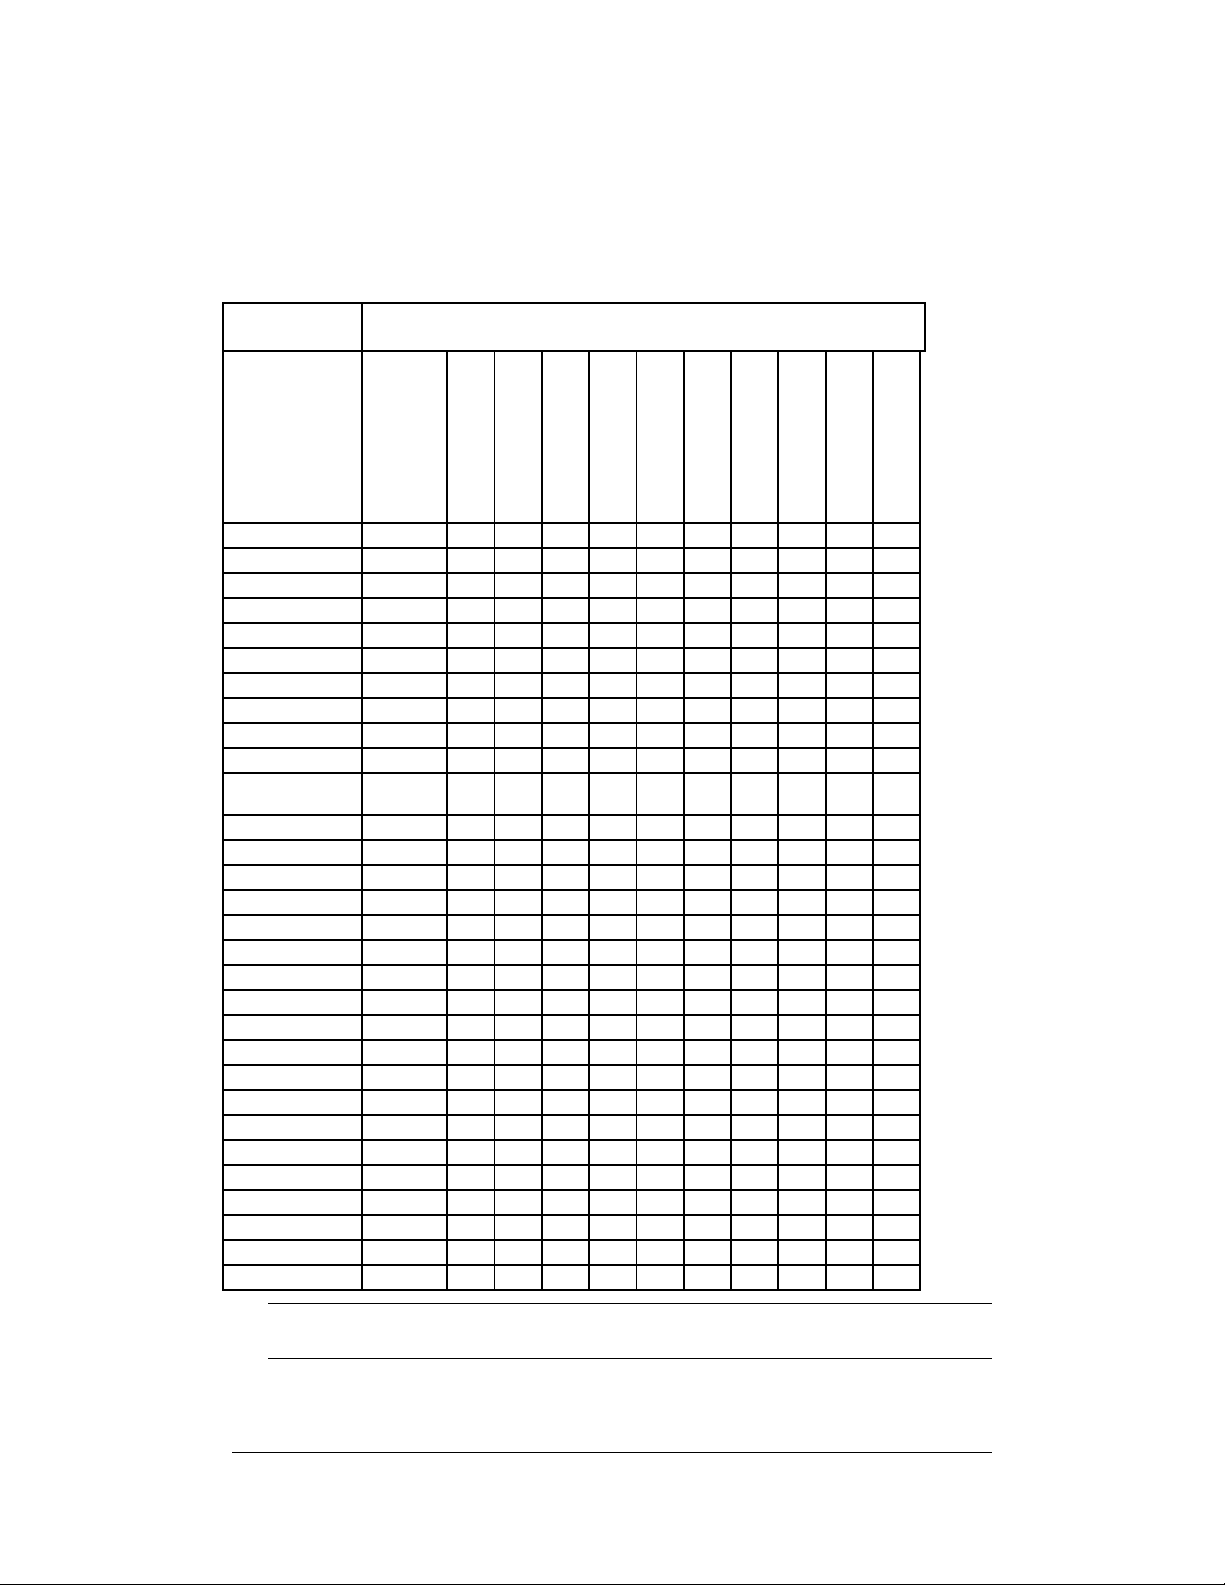
Table 3. Printer Bar Code Support
The following table summarizes bar codes supported by each printer
model.
BAR CODE
SYMBOLOGY
ADD2 Y Y Y Y Y Y Y Y Y Y Y Y
ADD5 Y Y Y Y Y Y Y Y Y Y Y Y
AZTEC N N N N - - - Y Y Y Y
CODE16K Y - Y - - - - - N N N N
CODE39 Y Y Y Y Y Y Y Y Y Y Y Y
CODE93 - - - Y Y Y Y Y Y Y Y Y
CODE128A Y Y Y Y Y Y Y Y Y Y Y Y
CODE128B Y Y Y Y Y Y Y Y Y Y Y Y
CODE128C Y Y Y Y Y Y Y Y Y Y Y Y
CODABAR Y Y Y Y Y Y Y Y Y Y Y Y
DATA
MATRIX
EAN8 Y Y Y Y Y Y Y Y Y Y Y Y
EAN13 Y Y Y Y Y Y Y Y Y Y Y Y
EAN128 Y Y Y Y Y Y Y Y Y Y Y Y
GS1 Y Y Y Y
MAXICODE Y - Y Y Y Y Y Y Y Y Y Y
MSI Y Y Y Y Y Y Y Y Y Y Y Y
MSI1 Y Y Y Y Y Y Y Y Y Y Y Y
PDF417 Y - Y Y Y Y Y Y Y Y Y Y
PLESSEY Y Y Y Y Y Y Y Y Y Y Y Y
POSTNET - - - Y Y Y Y Y Y Y Y Y
QR CODE Y Y Y Y
UPCA Y Y Y Y Y Y Y Y Y Y Y Y
UPCE Y Y Y Y Y Y Y Y Y Y Y Y
UPCE1 Y Y Y Y Y Y Y Y Y Y Y Y
UPCA+ Y Y Y Y Y Y Y Y Y Y Y Y
RSS Y Y Y Y
I2OF5 Y Y Y Y Y Y Y Y Y Y Y Y
D2OF5 - - - Y Y Y Y Y Y Y Y Y
S2OF5 - - - Y Y Y Y Y Y Y Y Y
SUPPORTED IN PRINTERS
PW/PT 42
BD/BT 02
BD/BT 04/05
BL42
ADVANTAGE/LX
SOLUS
DEL SOL/LX
CODE RANGER
CI
CXI
DLX/DLXi
PCL
N N N N - - - N Y Y Y Y
NOTE: EZ-LP printers do not support CPL printing and therefore do n ot
support printing the CPL format bar code symbologies listed .
Revision F, January 2012, CognitiveTPG 17
Page 27
PRINTER COMMAND COMPATIBILITY
Table 4. Printer Font Support
The following table summarizes the fonts supported by each printer
model.
FONT OR
FEATURE
STRING 3X5
STRING 5X7
STRING 8X8
STRING 9X12
STRING 12X16
STRING 18X23
STRING 24X31
ULTRA_FONT A
ULTRA_FONT B
ULTRA_FONT C
TEXT 0
TEXT 1
TEXT 2
TEXT 3
TEXT 4
TEXT 5
TEXT 6
BARCODE_FONTS
STORED FONTS
DOUBLE byte
Kanji,Korean)
fonts
DOUBLE byte
(Traditional
Chinese)font
SUPPORTED IN PRINTERS
PW/PT 42
BD/BT 02
BD/BT 04/05
BL42
ADVANTAGE/LX
SOLUS
DEL SOL/LX
CODE RANGER
CI
CXI
DLX/DLXi
PCL
Y Y Y Y Y Y Y Y Y Y Y Y
Y Y Y Y Y Y Y Y Y Y Y Y
Y Y Y Y Y Y Y Y Y Y Y Y
Y Y Y Y Y Y Y Y Y Y Y Y
Y Y Y Y Y Y Y Y Y Y Y Y
Y Y Y Y Y Y Y Y Y Y Y Y
Y - Y Y Y Y Y Y Y Y Y Y
Y Y Y Y Y Y Y Y Y Y Y Y
Y Y Y Y Y Y Y Y Y Y Y Y
Y - Y - Y LX Y Y Y Y Y Y Y
- Y Y Y Y Y Y Y Y Y Y Y
- Y Y Y Y Y Y Y Y Y Y Y
- Y Y Y Y Y Y Y Y Y Y Y
- Y Y Y Y Y Y Y Y Y Y Y
- Y Y Y Y Y Y Y Y Y Y Y
- - Y Y Y Y Y Y Y Y Y Y
- - Y Y Y Y Y Y Y Y Y Y
- - - Y Y Y Y Y Y Y Y Y
- - - Y Y Y Y Y Y Y Y Y
-
-
- - - - - - - -
-
- Y Y Y Y Y Y Y Y
TRUE TYPE - - - - - - - - Y Y Y Y
NOTE: EZ-LP printers do not support CPL printing and therefore do not
support printing the CPL format fonts listed.
18 Revision F, January 2012, CognitiveTPG
Page 28

Page 29

Chapter
3
Standard Printer Commands
This chapter describes standard printer commands.
Standard Printer Command List
The following is a list of standard printer commands.
ADJUST DRAW_BOX PRINT TEST LABEL
ADJUST_DUP DRAW_CIRCLE QUANTITY
AREA_CLEAR DRAW_ELLIPSE QUERY INDEX
BARCODE DRAW_LINE QUERY REVISION
BARCODE AZTEC END QUERY STATUS
BARCODE DATAMATRIX FILL_BOX ROTATE R90, R180,
R270
BARCODE_FONT GRAPHIC SHOW INCHES
Barcode GS1 Graphics mode SHOW MAC
BARCODE PDF417 HALT SHOW MODEL
BARCODE QR Header line SHOW PRINT HEAD
BARCODE RSS INDEX SHOW SERIAL NO.
BARCODE UPS JUSTIFY STRING
BARCODE_FONT LOGO mode TERMINAL
BEEP MULTIPLE TEXT
COMMENT NOINDEX TIME
DOUBLE PITCH ULTRA_FONT
Universal clear
Wake-up string
WIDTH
Revision F, January 2012, CognitiveTPG 20
Page 30

STANDARD PRINTER COMMANDS
ADJUST
Function Increments or decrements a variable value or numeric
data on the preceding command line.
Explicit
Form
Implicit
Form
Parameters
ADJUST variable nnn
A variable nnn
Variable
The name of the variable to be adjusted,
as specified in its DEFINE_VAR command.
The variable value is adjusted wherever it
is called before the ADJUST command in
the label format. This is an optional
parameter, and is not supported in all
printers. If no variable is specified, the
printer will adjust the data on the
command line immediately preceding the
ADJUST command.
NOTE: Do not confuse variable values (as
used to represent data) with VARIABLE
commands (which control the printer). Also,
only printers that support the
command will support variable values. Refer
to Table 1, Printer command compatibility
for more information.
DEFINE_VAR
Nnnn
The incrementing or decrementing step
size. Positive or negative numbers are
accepted.
Comments Using ADJUST to increment or decrement alpha data can
produce unexpected results.
NOTE: ADJUST will not work properly with the !+ header
line parameter
See also ADJUST_DUP
Example
! 0 100 200 3
BARCODE CODE39 150 30 30 TEST20
Revision F, January 2012, CognitiveTPG 21
Page 31

STANDARD PRINTER COMMANDS
ADJUST -01
STRING 12X16 150 65 ADJUST20
ADJUST 01
END
22 Revision F, January 2012, CognitiveTPG
Page 32

STANDARD PRINTER COMMANDS
ADJUST_DUP
Function Used with the ADJUST command to print non-
incremented duplicates of incremented labels.
Explicit Form
Implicit Form
Parameters
ADJUST_DUP nnn
AP nnn
n
The number of duplicate labels printed for each
increment specified with the ADJUST command.
See also ADJUST
Example
! 0 100 50 2
STRING 8X8 0 0 1000
ADJUST 0001
ADJUST_DUP 2
END
NOTE: Only one ADJUST_DUP command is
allowed in each label format. Do not use
ADJUST_DUP with the HALT command
Revision F, January 2012, CognitiveTPG 23
Page 33

STANDARD PRINTER COMMANDS
AREA_CLEAR
Function Clears an area of a label for replotting. AREA_CLEAR
may be used in a normal label format, or with the !+
header mode to combine ASCII and graphics.
Explicit Form
Implicit Form
Parameters
AREA_CLEAR x y w h
AR x y w h
X
Y
W
H
Upper left X coordinate of the cleared area
Upper left Y coordinate of the cleared area
Width of the cleared area
Height of the cleared area
See also Header line
Example
! 0 100 560 1
PITCH 200
JUSTIFY CENTER
ULTRA_FONT A100 (20,3,0) 425 20 COGNITIVE
AREA_CLEAR 288 55 260 27
STRING 18X23 310 60 PRINTERS
END
24 Revision F, January 2012, CognitiveTPG
Page 34

STANDARD PRINTER COMMANDS
BARCODE
Function Prints a bar code, specifying type, position, height, and
characters to be coded.
Explicit
Form
Implicit
Form
Parameters
BARCODE[Rnnn] type modifiers x y h
characters
B[Rnnn] type modifiers x y h characters
[Rnnn]
type
modifiers
Prints bar codes that are rotated 0, 90,
180, or 270 degrees clockwise from
horizontal.
Bar code type. Accepted types are:
UPCA UPCE UPCE1 UPCA+
EAN8 EAN13 EAN8+ EAN13+
EAN128 ADD2 ADD5 CODE39
I2OF5 S2OF5 D2OF5 CODE128A
MSI MSI1 CODE93 POSTNET
CODE128B CODE128C CODABAR
CODE16K PDF417 PLESSEY
Optional characters that change the bar
code appearance. Modifiers must directly
follow the bar code type with no
intervening spaces. Multiple modifiers are
accepted, and their order does not matter.
Available modifiers are:
-
Prints the bar code without
uncoded subtext (not used with
CODE16K, since it never has
uncoded subtext).
+
Adds a modulo 43 check digit to
CODE39, or when used with
S2OF5 or D2OF5, causes the
intercharacter spacing to be
equal to the width of the wide
bar.
Revision F, January 2012, CognitiveTPG 25
Page 35

STANDARD PRINTER COMMANDS
(n:w)
Specifications for the narrow (n)
and wide (w) bars. Place these
modifiers within parentheses.
Allowable range is 1 to 9 for both
n and w. For UPC, EAN, ADD2,
ADD5, and CODE128 (A, B, and C),
n specifies an integral multiplier
for the bar code width. For all
other codes, this option specifies
the width in dots of the narrow
and wide bars. The value of w
must always be greater than n.
W
Increases the width ratio of wide
to narrow bars (use only with
CODE39).
X
Doubles the width of all bars and
spaces in the bar code (use only
with CODE39).
x y
Starting position of printed bar code. This
is the lower left corner of the bar code
block. Extender bars and bar code subtext
are below this position.
h
Characters
Height of bar code in dots. Allowable
range is 1 to 256. This does not include the
height of the bar code subtext or extender
bars (if any).
ASCII characters to be bar coded.
NOTE: Not all printers support bar codes.
Refer to Table 3. Printer Bar Code Support
for more information.
26 Revision F, January 2012, CognitiveTPG
Page 36

STANDARD PRINTER COMMANDS
Comments Unless modified by a BARCODE_FONT command, all codes
except UPCA+, EAN8+, EAN13+, and UPCE use an 8x8 font
for bar code subtext. The excepted codes use a 5x7 font, to
allow space for extender bars. Bar code subtext begins
two dots below the bar code block.
All bar codes are positioned independently. This includes
ADD2 and ADD5, which are normally used as add-ons for
UPC and EAN codes. The programmer is responsible for
the proper placement of all codes, including add-ons.
MAXICODE and PDF417 codes differ considerably from
other bar codes. See BARCODE UPS and BARCODE
PDF417 for programming information.
See also
Example 1
BARCODE_FONT
IMPORTANT!
Follow the rules of the bar code in use. For example,
UPCA and several other codes do not support characters
A-Z. Attempting to print unsupported characters will
produce bar codes that will not scan. Incorrect bar width
ratios can also produce unscannable bar codes. Please
refer to Chapter 10 - Bar Code information.
Character darkness and pitch also affect the reliability of
the bar codes. Avoid printing bar codes having bar widths
of less than 10 mils. Rotated bar codes should not be
printed with bar widths of less than 15 mils.
! 0 100 90 1
PITCH 100
BARCODE I2OF5 1 20 20 0123456789
BARCODE CODE39W- 1 50 20 34A
END
Revision F, January 2012, CognitiveTPG 27
Page 37

STANDARD PRINTER COMMANDS
Example 2
Example 3
Example 4
BARCODE UPCA+ 20 75 70 19112610203
BARCODE CODABAR(2:5) 10 30 20 A0123B
! 0 100 120 1
PITCH 100
BARCODE UPCA+ 10 95 70 04644200395
BARCODE_FONT 8X8(00,-73,1,1,1,1)
BARCODE ADD5 120 100 61 34028
STRING 8X8 10 5 ISBN 0-395-34028-4
END
The following label formats print the same bar code using
different dot times and bar width ratios. (Please note,
though, that these formats use variable dot time. This
feature is not supported in all printers.)
! 0 100 190 1
PITCH 100
BARCODER CODE39(2:6)- 10 0 30 1A2
END
! 0 100 90 1
PITCH 100
BARCODER CODE39(1:3)- 10 0 30 1A2
END
28 Revision F, January 2012, CognitiveTPG
Page 38

Example 5
STANDARD PRINTER COMMANDS
Revision F, January 2012, CognitiveTPG 29
Page 39

STANDARD PRINTER COMMANDS
BARCODE AZTEC
Function Prints a two-dimensional matrix symbol consisting
of square modules arranged around a bulls-eye
pattern at the center, using the AZTEC symbology.
Explicit Form
BARCODE AZTEC (ECP, SqrSize, numSym, ID
E M) x y size data
ECP
Error control and symbol size/type
indicator.
0 = Default error correction level.
(This is the default value)
1 to 99 = Error correction
percentage (Fixed)
101 to 104 = 1 to 4 layer compact
symbol.
201 to 232 = 1 to 32 layer fullrange symbol.
300 = Aztec “Rune” format.
SqrSize
Sets the number of pixels which
make a module (square) in the
barcode. The default is 5.
numSym
Specifies the number of symbols for a
structured append. The range is 1 to
26 (Default = 1/OFF).
ID
The ID field is a text string with a
24-character maximum. This string
is used to identify the elements of the
structured append symbol. (Default =
No ID).
E
M
Enable escape encoding .
“n=0to6” Ec E
E
c
Default is none.
c
Creates a menu symbol (bar code
reader initialization). Default is “not
a menu symbol”
30 Revision F, January 2012, CognitiveTPG
Page 40

STANDARD PRINTER COMMANDS
Examples
x y
X and Y starting position for bar code
block.
size
Number of encoded data bytes,
including carriage returns and line
feeds, or A[delim] where delim
indicates a delimiter used to mark
the data start and end (see Example).
data
Data to be encoded. Maximum data
size for the AZTEC encoding is 1536
bytes.
NOTE: The number of bytes specified
must exactly equal the number of
bytes in the data that follows. The
printer may not execute other
commands following the
AZTEC command if the byte value is
incorrect.
! 0 100 300 1
BARCODE AZTEC 50 60 20
PI = 3.141592653
INDEX
END
! 0 100 300 1
BARCODE AZTEC 50 60 A/
/Cognitive does AZTEC BARCODE 1234/
INDEX
END
BARCODE
Revision F, January 2012, CognitiveTPG 31
Page 41

STANDARD PRINTER COMMANDS
BARCODE DATAMATRIX
Function Prints a two-dimensional barcode using the
Datamatrix symbology.
Explicit Form
BARCODE DATAMATRIX (format, ecctype,
rows, cols, cell size, bytes) x y data
format
Specifies the data format.
1 (for Numeric Data)
2 (for Upper-case alphabetic)
3 (for Upper-case alphanumeric and
punctuation)
4 (for Upper-case alphanumeric)
5 (for full 128 ASCII set)
6 (for 8-bit binary, user defined)
For ECC 200 encoding, the format
parameter has no effect.
ecctype
Specifies the error correction level.
The default value is type F.
A (for ECC 000)
B (for ECC 050)
C (for ECC 080)
D (for ECC 100)
E (for ECC 140)
F (for ECC 200)
rows
Forced rows: Leave blank for the
encoder to determine the smallest
matrix size. If specified, values must
fall between 9 and 144.
cols
Forced columns: Leave blank for the
encoded to determine the smallest
matrix size. If specified, values must
fall between 9 and 144.
32 Revision F, January 2012, CognitiveTPG
Page 42

STANDARD PRINTER COMMANDS
cell size
Sets size of module (square) in the
barcode in 100ths of an inch. Value
specified can be decimal (see first
example below). Values are between
1.0 and 10.0, blank indicates a
default of 2.
bytes
Number of encoded data bytes,
including carriage returns and line
feeds, or delim which indicates a
delimiter used to mark the data start
and end (see Example).
Leave blank for the encoder to
determine the byte count. The
encoder will stop at the first newline
sequence.
x y
X and Y starting position for bar code
block.
data
Data to be encoded. Data must start
on a new line, separated from the
command by a newline sequence.
NOTE: The number of bytes specified
must exactly equal the number of
bytes in the data that follows. The
printer may not execute other
commands following the
BARCODE
DATA_MATRIX command if the byte
value is incorrect.
Revision F, January 2012, CognitiveTPG 33
Page 43

STANDARD PRINTER COMMANDS
Examples
! 0 100 500 1
DELIMIT ~
BARCODE DATAMATRIX (5,E,,,2.5,) 50 50
This has a ~0x0D~ Carriage Return.
END
! 0 100 500 1
BARCODE DATAMATRIX (,F,,,3,~) 50 50
~An Alternative Simple encoding.~
INDEX
END
! 0 100 500 1
BARCODE DATAMATRIX (5,E,,,2.5,) 50 50
This is Data Matrix coding. CognitiveTPG.
END
34 Revision F, January 2012, CognitiveTPG
Page 44

STANDARD PRINTER COMMANDS
BARCODE_FONT
Function Allows selection of the font type, size, and position of
the human-readable characters printed below the
bar-coded information.
Explicit Form
Implicit Form
Parameters
BARCODE_FONT type
BT type
type
Font type. Most printers can use any
resident font except Ultra Font C.
STRING is the default font type and will
work with any printer. If you use a
STRING font you only need to specify the
font size and modifiers. For all other fonts
you must spell out the font command
name, font size, and modifiers; for
example, ULTRA_FONT A20 (5,3,0) or
TEXT 3.
NOTE: Not all printers will accept all font
types for bar code subtext. Refer to Table
4. Printer Font Support for more
information.
You may use any font modifiers except
for font rotation modifiers (bar code
subtext automatically rotates with the
bar code). When using STRING fonts,
two more optional modifiers are
available:
horadj
Offsets the printed text horizontally.
Must be two digits; add leading zeros as
required. May be positive or negative. If
negative, the subtext is moved to the left.
Revision F, January 2012, CognitiveTPG 35
Page 45

STANDARD PRINTER COMMANDS
vertadj
Offsets the printed text vertically. Must
be two digits; add leading zeros as
required. May be positive or negative.
Positive values move the subtext down,
negative values move it up.
NOTE: If you use the horadj or
vertadj modifiers, you must specify
values for all modifiers as described for the
STRING command.
See the STRING, TEXT, and ULTRA_FONT commands
for other parameter details.
Comments The default subtext font for all bar codes except
UPCA+, EAN8+, EAN13+, and UPCE is an 8x8 string
font. The excepted codes use a 5x7 string font, to
allow extra space for extender bars. Unless modified
using the horadj and vertadj modifiers, the bar
code subtext is placed two dot rows below the bar
code block.
See also
Example 1
BARCODE
NOTE: This command modifies all bar codes following it
in the label format up to the next BARCODE_FONT
command.
If you use multiple
label format and specify optional font modifiers for one or
more of the commands, you must specify optional font
modifiers for all of the
within the label format.
BARCODE_FONT 12X16
BARCODE CODE39 5 55 15 ABC
BARCODE_FONT commands in a
BARCODE_FONT commands
36 Revision F, January 2012, CognitiveTPG
Page 46

STANDARD PRINTER COMMANDS
Example 2
Example 3
BARCODE_FONT 9x12(00,05,1,1,1,2)
BARCODE UPCAX+ 35 50 50 72773740001
! 0 100 120 1
PITCH 100
BARCODE UPCA+ 10 95 70 04644200395
BARCODE_FONT 8X8(00,-73,1,1,1,1)
BARCODE ADD5 120 100 61 34028
STRING 8X8 10 5 ISBN 0-395-34028-4
END
Revision F, January 2012, CognitiveTPG 37
Page 47

STANDARD PRINTER COMMANDS
Barcode GS1 Databar
Function Uses BARCODE RSS command to print a GS1
databar type barcode for space-constrained
identification from EAN International and the
Uniform Code Council, Inc.
Explicit Form
Parameters
BARCODE RSS type (mult, sep, height) x y
h delim data
type
Specifies the symbology type in the GS1
databar family
0 = GS1 Databar Omnidirectional
1 = GS1 Databar Truncated
2 = GS1 Databar Stacked
3 = GS1 Databar Stacked Omnidirectional
4 = GS1 Databar Limited
5 = GS1 Databar Expanded and Expanded
Stacked
6 = UPC-A
7 = UPC-E
8 = EAN-13
9 = EAN-8
10 = UCC/EAN-128 & CC-A/B
11 = UCC/EAN-128 & CC-C
mult
Specifies magnification factor for X and Y
dots. Acceptable values are 1 to 10,
default value is 1.
sep
Height of separator row used in stacked
codes. Acceptable values are 1 and 2.
Default is 1.
38 Revision F, January 2012, CognitiveTPG
Page 48

STANDARD PRINTER COMMANDS
height
For GS1 Databar Expanded type, this
parameter is used to specify the segment
width, in segments per line. Acceptable
values are 2 to 22, default is 22.
For UCC/EAN & CC-A/B/C types, this
parameter specifies the height of the
linear portion of the bar code. Acceptable
values are 1 to 500, default is 25.
For all other types, this parameter is
ignored. Use 0 as a placeholder.
x y
X and Y starting position for bar code
block.
h
This parameter is ignored. Use 0 as a
placeholder.
delim
A[delim] where delim indicates a
delimiter used to mark the data start and
end (see Example).
data
Data to be encoded. The data to encode
resides between the delimiters specified in
the DELIM parameter. To separate the
linear from the composite component, a
pipe symbol ‘|’ is used. Please see the
examples.
Comments If additional information about the GS1 Databar bar
code is required, go to www.gs1.org.
Revision F, January 2012, CognitiveTPG 39
Page 49

STANDARD PRINTER COMMANDS
Examples
! 0 100 250 1
C A linear barcode only
BARCODE RSS 0 (1,1,22) 50 50 200 A~
~123456765432~
INDEX
END
! 0 100 250 1
C A stacked composite component
BARCODE RSS 0 (1,1,22) 250 50 200 A~
~123456765432|Composite Component~
INDEX
END
40 Revision F, January 2012, CognitiveTPG
Page 50

STANDARD PRINTER COMMANDS
BARCODE PDF417
Function Prints a two-dimensional bar code on a label, using
the PDF417 symbology.
Explicit Form
Implicit Form
Parameters
BARCODE PDF417 x y w:h ec% rows:cols
bytes T M data
BARCODE 7 x y w:h ec% rows:cols bytes T
M data
R
x y
Optional. Indicates rotated code
X and Y starting position for bar code
block.
w
Width (x dimension) of the narrowest
element (bar or space) in the bar code.
h
Height (y dimension) of the shortest
element (bar or space) in the bar code.
:
Optional. When used, indicates that w
and h define aspect ratio rather than
absolute size in dots.
ec
%
Error correction level; 0 through 8.
Optional; indicates the error correction
level is expressed as the percentage of
code words in the bar code that are
devoted to error correction.
rows
Number of bar code rows, from 3 to 90.
Entering 0 will cause the printer to
calculate the number of rows.
:
Optional. When used, indicates that rows
and cols define the overall symbol
aspect ratio rather than absolute number
of rows or columns.
cols
Number of bar code columns, from 1 to
30. Entering 0 will cause the printer to
calculate the number of columns.
Revision F, January 2012, CognitiveTPG 41
Page 51

STANDARD PRINTER COMMANDS
bytes
Number of encoded data bytes, including
carriage returns and line feeds. Macro
PDF functions are invoked if this value
exceeds 3072 (see comments).
T
Optional; produces a truncated bar code
(the right row indicator and stop bar are
replaced by a single width bar).
M
Optional; enables Macro PDF functions
(see comments).
data
Data to be encoded.
NOTE: The number of bytes specified must
exactly equal the number of bytes in the
data that follows. The printer may not
execute other commands following the
BARCODE PDF417 command if the byte
value is incorrect.
Comments PDF417 bar codes never have human-readable
subtext.
All dimensions specified in the command are in dots.
The starting position of the bar code block is
normally its upper left corner, but the JUSTIFY
command can right justify or center justify PDF417
codes. Place the proper JUSTIFY command before
the BARCODE PDF417 or BARCODER PDF417
command that plots the bar code you wish to justify.
Macro PDF functions provide command
enhancements useful for handling large amounts of
data. Macro PDF can create a distributed
representation of files that are too large for a single
PDF417 bar code block. An M before the data will
invoke macro PDF, or the printer will invoke it
automatically if the supplied data will not fit in a
single PDF417 symbol. With macro PDF in effect,
you may add the following optional parameters
before the data:
42 Revision F, January 2012, CognitiveTPG
Page 52

STANDARD PRINTER COMMANDS
I
File ID. Enter the desired file
identification as a string after the I
character. If the I is not followed by a
valid string, the printer will select a
random file ID.
N
File name. Enter the desired file name as
a string after the N character.
B
Block count. The B character tells the
printer to count the number of PDF417
symbols spanned by the data, and attach
this number to the code.
P
Time stamp. Follow the P with an eight
character string equal to the number of
seconds since January 1, 1970, 00:00
GMT.
S
Sender. Place an alphanumeric string
after the S character to indicate the
sender.
A
Addressee. An alphanumeric string after
the A character identifies the addressee.
F
File size, in bytes. The printer will
calculate this value automatically.
C
Checksum. The presence of the C
character will tell the printer to calculate
a 16 bit CRC checksum and append it to
the code.
Place double quotes (") around all strings used in
the macro commands. To include a double quote
within the string, precede it by a backslash (\). To
include a backslash within a string, precede it with
an extra backslash.
Revision F, January 2012, CognitiveTPG 43
Page 53

STANDARD PRINTER COMMANDS
Example
PITCH 200
BARCODE PDF417 50 10 2 6 1 0 7 309
NAME:JOHN SMITH
ADDRESS:116 WILBUR
BOHEMIA, NY 11716
PHONE:516-555-4907
PHYSICIAN:DR.HARRY KLINE
STONYBROOK MED CTR
INSURANCE:AETNA
POLICY NO:918-1287345
SPOUSE:JENNIFER SMITH
HT:5'9"
WT:165
HAIR COLOR:BROWN
EYE COLOR:BROWN
ALLERGIES:NONE
DISABILITIES:NONE
BLOOD:A
SS#051-98-2374
DOB:5/24/60
END
44 Revision F, January 2012, CognitiveTPG
Page 54

STANDARD PRINTER COMMANDS
BARCODE QR
Function Prints a 2-D matrix symbology consisting of an array
of nominally square modules arranged in an overall
square pattern using the QR symbology. A unique
pattern at three of the symbol’s four corners assists
in determining the bar code size, position, and
rotation.
Explicit Form
BARCODE QR x y cellsize [m=model] size
data
x y
X and Y starting position for bar code
block.
cellsize
Sets the number of pixels which
make a module (square) in the
barcode.
model
Specifies the original version (m = 1),
or the enhanced form of the
symbology (m = 2). model 2 is the
recommended model.
size
Number of encoded data bytes,
including carriage returns and line
feeds, or A[delim] where delim
indicates a delimiter used to mark
the data start and end (see Example).
data
Data to be encoded.
NOTE: The number of bytes specified
must exactly equal the number of
bytes in the data that follows. The
printer may not execute other
commands following the
command if the byte value is
QR
incorrect.
BARCODE
Revision F, January 2012, CognitiveTPG 45
Page 55

STANDARD PRINTER COMMANDS
Comments When using the QR barcode the data must be
formatted to ensure the proper barcode is created.
The recommended format to encode DATA in the QR
barcode is QA,DATA. The first character specifies
the error correction level whose possible values are
L, M, Q, or H for Low, Mid, Mid-high, and High level
correction, respectively. The second character
specifies the method of data input, with possible
values of A or M for Automatic Data Input or
Manual Data Input, respectively, If the Automatic
Data Input mode is not sufficient please refer to the
QR barcode specification to ensure proper data is
sent to the printer.
Examples
! 0 100 250 1
BARCODE QR 50 60 3 M=2 A~
~QA,This is a QR Barcode~
INDEX
END
! 0 100 250 1
BARCODE QR 50 60 3 M=2 23
~QA,This is a QR Barcode~
INDEX
END
46 Revision F, January 2012, CognitiveTPG
Page 56

STANDARD PRINTER COMMANDS
BARCODE RSS
RSS is legacy term. Current term is GSI Databar. See Barcode
GS1 Databar.
BARCODE UPS
Function Prints a two-dimensional bar code on a label, using
the MaxiCode symbology. CognitiveTPG printers
may implement this bar code two ways, as described
below.
Explicit Form
Implicit Form
Alternate
Explicit Form
Alternate
Implicit Form
BARCODE UPS x y mod data
B PS x y mod data
BARCODE UPS x y mod CrLF data
B PS x y mod CrLF data
x y
mod
CrLF
X and Y starting position for bar code
block.
Encoding mode; allowable values are 0
through 6.
Carriage return and line feed
Revision F, January 2012, CognitiveTPG 47
Page 57

STANDARD PRINTER COMMANDS
data
Data to be encoded. If not preceded by
a carriage return and line feed, the
data must conform to the following
format:
zip plus4 class ccode bytes
LMdata
zip – Five digit postal (zip) code,
numeric
plus4 – Four digit zip code extension,
numeric only
class – Three digit service class,
numeric only
ccode – Three digit country code,
numeric only
48 Revision F, January 2012, CognitiveTPG
Page 58

STANDARD PRINTER COMMANDS
bytes – Number of encoded data bytes
in the Low Priority Message. The
number of bytes includes all carriage
returns and line feeds, and must equal
84.
LMdata – Alphanumeric data to be
encoded as the Low Priority Message.
Uppercase alpha characters only. If the
total number of bytes is less than 84,
pad the data with the exclamation
point character (!) until there are 84
bytes in the message.
NOTE: Most printers that support
MaxiCode will automatically pad the data
as required, but some earlier printers
may not. Manually placing the correct
number of data bytes in the message will
help assure that the code prints and
scans correctly when using the
command with older printers.
The data does not have to follow the
above format if it is preceded by a
carriage return and line feed, as shown
in the alternate explicit and implicit
forms above. The presence of the
carriage return/line feed tells the
printer to encode all the data as it is
encountered, regardless of order or
content. But the data must conform to
ANSI standards if you are using
MaxiCode for common carrier
shipment identification. For more
information, see ANSI MH10.8.3, or
Guide to Bar Coding with UPS,
published by United Parcel Service,
Inc. This booklet contains detailed
UPS MaxiCode requirements, plus
programming examples for various
printers.
Revision F, January 2012, CognitiveTPG 49
Page 59

STANDARD PRINTER COMMANDS
Comments MaxiCodes cannot be rotated, and can never have
human-readable subtext.
Example The following example uses the alternate form, with
data coded following the ANSI MH10.8.3 standard.
NOTE: This format will not print if copied directly to the
printer. The BARCODE UPS command line is broken
for Help window readability. Also, the example uses
non-displayable control characters, represented as
follows:
CrLF = carriage return and line feed
Gs = ASCII 29 (decimal)
Rs = ASCII 30 (decimal)
Eot = ASCII 4 (decimal)
! 0 100 570 1
PITCH 200
BARCODE UPS 0 0 2 CrLF[)>Rs01Gs96841706672
Gs001Gs1Z12345675GsUPSNGs12345EGs089GsGs
1/1Gs10.1GsYGsGsGsUTRsEot
END
This example codes the following data:
[)>Rs Message Header
01Gs96 Transportation Data
Format Header
50 Revision F, January 2012, CognitiveTPG
Page 60

STANDARD PRINTER COMMANDS
841706672Gs840 Postal Code, Country
Code
Gs001Gs1Z12345675 Class of Service,
Tracking Number
GsUPSNGs12345EGs089 SCAC, UPS Shipper
Number, Julian Day of
Pickup
GsGs1/1 Place holder for
Shipment ID Number,
Package n/x
Gs10.1GsY Package Weight,
Address Validation
Gs
Place holder for Ship To
Street Address
Gs
Place holder for Ship To
City
GsUT Ship To State
Rs
Eot
End Of Format
End Of Message
Revision F, January 2012, CognitiveTPG 51
Page 61

STANDARD PRINTER COMMANDS
BEEP
Function Causes the printer to beep for the specified duration
when the command is received. The beeper volume
has been previously set.
Explicit Form
Parameters
BEEP seconds
seconds
The number of seconds to beep. The
range is 1 to 255 seconds.
Comments The beeper will sound when the command is
processed in the label. If a beep is desired when the
label has finished printing, the HALT command can
be used.
See also
HALT
Example The format below will cause the printer to beep for
five (5) seconds when the label is received:
! 0 0 0 0
WIDTH 400
TEXT 3 10 10 This label will BEEP.
BEEP 5
END
52 Revision F, January 2012, CognitiveTPG
Page 62

STANDARD PRINTER COMMANDS
COMMENT
Function This command is used for documenting label
formats. Comment lines do not affect label printing.
Explicit Form
Implicit Form
Parameters
COMMENT characters
C characters
characters
The non-printing comment. The
printer ignores all characters
following the COMMENT command, up
to the end of the line as indicated by
the presence of a line feed character
(ASCII character 10).
Comments This command is primarily for internal
documentation of label formats, but you can also
use it to temporarily disable commands within the
label format. Placing a C or the word COMMENT
before the command will disable it.
This command is valid only within the label format;
it cannot be used to remove an entire format or to
add comments above the format. Placing a C or the
word COMMENT before the ! or after END will result in
an invalid command.
Example In the label format below, the presence of the C
character at the beginning of the third line and the
word COMMENT in the fourth line tells the printer to
ignore everything that follows up to the next line
feed.
! 0 100 190 1
STRING 8X8 115 5 THIS COMMENT WILL PRINT
C STRING 8X8 115 15 THIS COMMENT WON'T PRINT
COMMENT this is a comment. It won't print
either.
END
Revision F, January 2012, CognitiveTPG 53
Page 63

STANDARD PRINTER COMMANDS
DOUBLE
Function Prints "double byte" text characters from a selected
font set. Double byte fonts are used for characters
that require greater resolution than can be
provided in a single byte (specifically, Kanji
characters).
Explicit Form
Parameters
DOUBLE font ID
(exspace,rotation,xmult,ymult) x y
mtid characters
font
Specifies the text font. There are
two double byte fonts available at
present:
16 = 16x16 dot (Kanji, Korean,
Traditional Chinese)
24 = 24x24 dot (Kanji, Korean,
Traditional Chinese)
exspace
Specifies the extra spaces between
characters.
rotation
Specifies the character rotation,
where rotation can be 0, 90, 180 or
270 in a clockwise direction.
xmult
Specifies font multiplier in x
dimension.
ymult
Specifies font multiplier in y
dimension.
mtid
Specifies a font mapping table;
must be 1 (specifies mapping table
SHIFTJIS) for Kanji and 3 for
Korean. Traditional Chinese is not
currently in the firmware but is
available for download.
Comments DOUBLE fonts are stored in user-accessible memory
in many printers, and are handled as stored
objects. This means they may be deleted or
replaced in the field, so the actual resident fonts
may differ from those delivered in the printer. Take
54 Revision F, January 2012, CognitiveTPG
Page 64

STANDARD PRINTER COMMANDS
this into account when using the DOUBLE
command.
Example The following label format will print text using the
double byte characters. The Kanji characters are
mapped above ASCII 128, so may not display
correctly on your terminal.
! 0 100 210 1
DOUBLE 24 0 0 1 This is Kanji(24x24) ˆ ˆ¡
DOUBLE 16(0,0,2,2) 0 50 1 This is
Kanji(16x16*2) ˆ ˆ¡’@
END
Revision F, January 2012, CognitiveTPG 55
Page 65

STANDARD PRINTER COMMANDS
DRAW_BOX
Function Draws a hollow rectangle on the label.
Explicit Form
Implicit Form
Parameters
DRAW_BOX x y w h t
D x y w h t
x
y
w
X coordinate of upper left corner of box
Y coordinate of upper left corner of box
Box width, measured in dot columns. Must
be greater than zero.
h
Box height, measured in dot rows. Must be
greater than zero.
t
Optional; specifies line thickness in dots. The
default is 1. If t is greater than 1, the x, y, w,
and h parameters refer to the box outside
dimensions.
Comments DRAW_BOX can draw horizontal and vertical lines on labels if
you set t and h or w equal to 1, but the lines are two dots
wide. Boxes drawn with this command may not print well at
200 DPI or higher resolution unless the t parameter is 2 or
more. Some early printers do not support the t parameter, in
which case we suggest using multiple FILL_BOX commands
to create boxes with thicker lines.
See also
Example
FILL_BOX
NOTE: Avoid drawing boxes around bar codes. Vertical lines
near the bar code edge may be confused by scanners as being
part of the code.
DRAW_BOX 5 5 100 50
DRAW_BOX 10 10 90 40
DRAW_BOX 20 30 70 1
56 Revision F, January 2012, CognitiveTPG
Page 66

STANDARD PRINTER COMMANDS
DRAW_CIRCLE
Function Draws a circle located by the upper left corner of a
square enclosing the circle.
Explicit Form
Parameters
DRAW_CIRCLE x y d t c
x
X coordinate of upper left corner of
enclosing square
y
Y coordinate of upper left corner of
enclosing square
d
Circle diameter. Must be greater
than zero.
t
Optional; specifies line thickness in
dots. The default is 1. If t is greater
than 1, the x and y parameters refer
to the box outside dimensions.
c
Optional; specifies plotting modes.
B=plot black, W=plot white.
Comments DRAW_CIRCLE can draw a circle enclosed by a
square on labels if you set t and d equal to 1, but
the lines are two dots wide. Figures drawn with this
command may not print well at 200 DPI or higher
resolution unless the t parameter is 2 or more.
Some early printers do not support the t parameter,
in which case we suggest using multiple
FILL_CIRCLE commands to create figures with
thicker lines.
Example
DRAW_CIRCLE 25 35 150 75
DRAW_CIRCLE 150 5 175 10
DRAW_CIRCLE 75 75 225 10
Revision F, January 2012, CognitiveTPG 57
Page 67

STANDARD PRINTER COMMANDS
DRAW_ELLIPSE
Function Draws an ellipse located by the upper left corner of
a rectangle enclosing the ellipse on the label.
Explicit Form
Parameters
DRAW_ELLIPSE x y w h t c
x
X coordinate of upper left corner of
enclosing rectangle.
y
Y coordinate of upper left corner of
enclosing rectangle.
w
Ellipse width, measured in dot
columns. Must be greater than zero.
h
Ellipse height, measured in dot
rows. Must be greater than zero.
t
Optional; specifies line thickness in
dots. The default is 1. If t is greater
than 1, the x, y, w, and h parameters
refer to the box outside dimensions.
c
Optional; specifies plotting modes.
B=plot black, W=plot white
Comments DRAW_ELLIPSE can draw a rectangle enclosing an
ellipse if you set t and h or w equal to 1, but the
lines are two dots wide. Figures drawn with this
command may not print well at 200 DPI or higher
resolution unless the t parameter is 2 or more.
Some early printers do not support the t parameter,
in which case we suggest using multiple
FILL_ELLIPSE commands to create boxes with
thicker lines.
Example
DRAW_ELLIPSE 90 15 50 75 15
DRAW_ELLIPSE 75 105 225 200 100
DRAW_ELLIPSE 150 5 175 100 1
58 Revision F, January 2012, CognitiveTPG
Page 68

STANDARD PRINTER COMMANDS
DRAW_LINE
Function Draws a line from coordinate x1, y1 to x2,y2.
Explicit Form
Parameters
DRAW_LINE x1 y1 x2 y2 t c
x1
x2
x2
y2
t
Starting X coordinate of line.
Starting Y coordinate of line.
Ending X coordinate of line.
Ending Y coordinate of line.
Optional; specifies line thickness in
dots. The default is 1.
c
Optional; specifies plotting modes.
B=plot black, W=plot white.
Comments DRAW_LINE can draw horizontal and vertical lines
on labels if you set t, x1,y1,x2, y2 equal to 1, but the
lines are two dots wide. Lines drawn with this
command may not print well at 200 DPI or higher
resolution unless the t parameter is 2 or more.
Some early printers do not support the t parameter,
in which case we suggest using multiple FILL_???
commands to create boxes with thicker lines.
Note
Example
NOTE: Avoid drawing vertical lines around bar
codes. Vertical lines near the bar code edge may be
confused by scanners as being part of the code.
DRAW_LINE 15 15 150 285 5
DRAW_LINE 15 285 150 15 5
DRAW_LINE 15 5 150 5 5
Revision F, January 2012, CognitiveTPG 59
Page 69

STANDARD PRINTER COMMANDS
END
Function Signals the end of a label format
Explicit Form
Implicit Form
END
E
Parameters None
Comments The END command tells the printer that all data
required for the current label format has been sent.
When the END command reaches the printer, the
label format is processed and printing begins.
Printing normally continues until all the labels
specified in the label format have printed, but it
may be temporarily paused with the HALT
command (or by enabling label taken mode in
printers so equipped).
See also
HALT
IMPORTANT!
Place an END statement at the end of every ASCII label
format unless otherwise noted in specific command
instructions. The printer will not print the lab el format
until it receives an
END command.
60 Revision F, January 2012, CognitiveTPG
Page 70

STANDARD PRINTER COMMANDS
FILL_BOX
Function This command inverts every dot in the specified
rectangular area. Where the existing field is white,
the FILL_BOX command fills it in black, while areas
already black are flipped to white.
Explicit Form
Implicit Form
Parameters
FILL_BOX x y w h
F x y w h
x
X coordinate of upper left corner of
box
y
Y coordinate of upper left corner of
box
w
Box width, measured in dot
columns. Must be greater than zero.
h
Box height, measured in dot rows.
Must be greater than zero.
Comments The FILL_BOX command can produce many useful
effects. Overlaying multiple filled boxes can produce
wide or multiple-line borders. Overlaying filled
boxes can also produce shadow effects or one-dotwide lines. The following examples show some
possible uses of the command.
See also
DRAW_BOX
IMPORTANT!
You can print black labels with white text on them using
the
FILL_BOX command, but this is not
recommended. Printing large dark areas causes
excessive heat buildup and is very hard on the print
head. Long horizontal boxes are most strenuous to
print. They may adversely affect print quality, and also
place considerable drain on a portable printer's battery.
Revision F, January 2012, CognitiveTPG 61
Page 71

STANDARD PRINTER COMMANDS
Example 1
Example 2
! 0 100 180 1
PITCH 200
FILL_BOX 50 50 750 85
FILL_BOX 50 50 725 60
FILL_BOX 25 25 750 85
FILL_BOX 27 27 750 85
END
! 0 100 90 1
PITCH 100
ULTRA_FONT B25 (6,0,0) 70 5 SHELL 1
FILL_BOX 65 1 130 20
ULTRA_FONT B25 (4,2,0) 71 6 SHELL 1
FILL_BOX 65 1 130 30
ULTRA_FONT B25 (6,0,0) 70 40 SHELL 2
FILL_BOX 65 36 130 20
ULTRA_FONT B25 (4,2,0) 71 40 SHELL 2
END
62 Revision F, January 2012, CognitiveTPG
Page 72

STANDARD PRINTER COMMANDS
GRAPHIC
Function Initializes the printer to receive graphics data, and
positions the received graphic on a label. This
ASCII command allows you to send standard PCX
or BMP format graphics directly from a file.
NOTE: GRAPHIC must be the last command in its label
format. Do not follow it with an END command. The
printer waits for graphics data and a following printable
label file after receiving this command.
Explicit Form
Implicit Form
Parameters
GRAPHIC type x y
G type x y
type
Graphic file type. Allowable types
are PCX and BMP.
x y
Starting position of the printed
graphic; normally the upper-left
corner unless changed by a JUSTIFY
command.
Comments After the printer receives the GRAPHIC command it
waits for the arrival of graphics data. The data is
then mapped in the printer's memory. To print the
graphic, send another label format using a !+
header line to the printer.
The printer only prints monochrome (black and
white) graphics. Do not try to print color or
grayscale graphics. Also, graphics are printed full
scale, with each image dot corresponding to one
printed dot. The printer will not scale graphics to
fit.
Revision F, January 2012, CognitiveTPG 63
Page 73

STANDARD PRINTER COMMANDS
Example The following two label formats will print a PCX
graphic with its upper left corner at location 416, 14
if the appropriate PCX file is sent to the printer
following the first label format.
Format 1
! 0 100 600 0
JUSTIFY RIGHT
GRAPHIC PCX 416 14
- (Send the graphics file here. The printer will print
after it receives the label format below.)
Format 2
!+ 0 100 590 1
END
64 Revision F, January 2012, CognitiveTPG
Page 74

STANDARD PRINTER COMMANDS
Graphics mode
Function Initializes the printer to receive binary data for
printing bitmapped graphics. Unlike most
commands, this command is not sent as ASCII text.
Send all graphics data, including the header line, to
the printer in a continuous binary data stream.
Explicit Form
Parameters
mode dottime dotrows numlbls data
mode
The graphics command. Use @ for
foreground graphics printing, # for
background graphics printing. The
mode parameter is sent as a one
byte binary representation of the
ASCII character.
dottime
Determines the Y dimension of each
dot. Dot time is a one byte binary
number with a decimal value
between 1 and 255.
dotrows
Number of dot rows required for the
image, sent as a two byte binary
value with a minimum of 1 and a
maximum limited by label size and
available printer memory.
numlbls
Number of duplicate labels to print,
sent as a two byte binary number
having a decimal value between 0
and 65535. Set this value to 0 when
preparing background graphics.
data
Binary data defining the bitmapped
image. The image is coded as a
raster scan, with binary 1's
representing black dots and binary
0's representing white dots.
Revision F, January 2012, CognitiveTPG 65
IMPORTANT!
Dot time values that result in aspect ratios le ss than 0.8
are not recommended, as poor print quality can result.
Page 75

STANDARD PRINTER COMMANDS
Comments When programming in graphics mode, you control
every dot on the print head separately. All the dots
on the finished label can be either dark or light,
depending on the setting for each bit in the graphics
file.
Send all data to the printer in a continuous binary
stream. Enough data must reach the printer to
control all the dots for the specified number of dot
rows over the print width. That may be quite a lot of
data, since each square inch of label when printed
at 200 DPI can have 40,000 dots. If your graphics
image is much smaller than the print head width,
we recommend using LOGO mode programming if
possible. If you cannot use LOGO mode, reducing the
width with a WIDTH statement in a normal ASCII
label format will help reduce the data requirement.
You cannot use a typical word processor to create
binary files. This is because word processors enter
every character as an ASCII code. Typing the
number zero, for example, produces ASCII 48. This
character leaves the computer as binary code
00110000, which is not the same as sending binary
00000000 (true binary zero).
66 Revision F, January 2012, CognitiveTPG
Page 76

STANDARD PRINTER COMMANDS
ASCII commands cannot be mixed in the binary
graphics file. If you want to print predefined objects
(such as bar codes or text) on the same label with
binary bitmapped graphics, you have four possible
approaches:
1. Program either the graphics or the ASCII
components in the background, and put the other
components in the foreground.
2. Use the !+ header line mode with AREA_CLEAR
to overlay existing data with new data (typically,
you send the bitmap to the printer first, then use !+
to put the ASCII components over the bitmap).
3. Use LOGO mode to place graphics where you want
them, then use !+ to send ASCII components to the
printer.
4. Use the GRAPHIC command to send the graphics
to the printer as a BMP or PCX file, and then follow
it with an ASCII label format containing the
predefined objects.
See also Header line, LOGO mode, AREA_CLEAR, and
GRAPHIC
Example Here is the beginning of a typical foreground
graphic in ASCII form, hexadecimal form, and
binary. The segment shown covers the graphics
header and the beginning of the bitmap. Spaces
have been added to the ASCII and hexadecimal
forms for clarity. The printer will only accept the
binary form.
ASCII: @ 100 100 1 0000000000...
Hex: 40 64 0064 1 000000000...
Binary:
0010100001000000000000000100000000000000000
000100000…
Revision F, January 2012, CognitiveTPG 67
Page 77

STANDARD PRINTER COMMANDS
HALT
Function Pauses the printer after it prints one label. If there
are more labels left to print in the current batch,
pressing the printer's feed switch will signal the
printer to print the next label. The HALT command
also activates the label cutter in printers so
equipped.
Explicit Form
Implicit Form
HALT
H
Parameters None
Comments This feature is intended for situations that require
many similar labels, presented one at a time. For
example, tagging a large quantity of boxes on a
warehouse floor might call for labels that are
identical except for a serial number. You could write
the label format using the ADJUST command to
change the serial number, and use the HALT
command to put printing "on hold." Only one label
prints when you upload the label format to the
printer. If using a portable printer, you could even
disconnect the printer from the host and carry it to
the warehouse with the labels ready to print as
needed, without any other equipment.
See also
Printers that have an integral cutter and label
taken sensor will stream labels without cutting
them unless there is a HALT command in the label
format, or VARIABLE AUTOCUT is ON.
VARIABLE AUTOCUT
NOTE: Place the HALT command before the END
command but after all commands that map components
on the label (such as
68 Revision F, January 2012, CognitiveTPG
STRING or BARCODE).
Page 78

STANDARD PRINTER COMMANDS
Header line
Function Initializes the printer to receive a label format.
Explicit Form
Parameters
mode x dottime maxY numlbls
mode
Sets the encoding mode for the label
format. Valid characters are:
!
Standard header line.
ASCII mode: The printer
treats all incoming data as
ASCII commands in this
mode.
@
Graphics mode: All
incoming data is treated as
binary graphics. (See
Graphics mode for further
details.)
!#
Background header line.
ASCII background mode:
Same as ! mode, except
does not immediately print
labels (see below).
#
Graphics background mode:
Same as graphics mode,
except does not immediately
print labels.
Revision F, January 2012, CognitiveTPG 69
Page 79

STANDARD PRINTER COMMANDS
!*
Clear background header
line. (ASCII or GRAPHICS):
Turns off background mode,
recombining the foreground
and background memory
buffers. Does not clear
memory.
!+
Reuse header line. New
start sequence - plots a label
over an existing label
without erasing the
previous label. (See also
AREA_CLEAR command.)
!A
Automatic header line.
Same as !, except
remaining header line
parameters are not
required. The printer sets x
to zero, dottime to 100,
calculates MaxY, and sets
numlbls to zero. MaxY is
calculated based on the
location of the last plotted
row in the image buffer. Use
this header line with the
QUANTITY command. This
header can be used for
labels up to 6 inches long.
The actual label length is
calculated based on the
position of the last plotted
row in the image buffer.
70 Revision F, January 2012, CognitiveTPG
Page 80

STANDARD PRINTER COMMANDS
x
X starting position for label. Older
printers used this parameter to
position labels horizontally so two
labels could be printed side-by-side.
Always set x equal to zero in any
printers that support the MULTIPLE
command. High speed Barcode
Blaster printers automatically limit
their print speed to 3 IPS when x is
nonzero.
dottime
Determines how long the printhead
dots stay hot, thereby changing the
dot length. Values can range from 0
to 255, but values less than 30 are
treated as 30. The dot time will
increment in steps of 10 when
operating in linear dot time mode
(see the VARIABLE MODE
command). The specified dot time is
rounded down to the nearest step.
NOTE: Dot time values that result in
aspect ratios less than 0.8 may cause
poor print quality. Dot times under 100
automatically disable high speed
printing. Some printers only support
dot time 100. Refer to Table 1.
Printer Command Compatibility for
more information.
maxY
Specifies how many dot rows are
memory-mapped for each label max
Y must be large enough to map all
label components, but not so large
that it causes memory overflow or
label skipping.
numlbls
Sets the quantity of labels to be
printed by the label format. The
allowable range is 0 to 65535.
Revision F, January 2012, CognitiveTPG 71
Page 81

STANDARD PRINTER COMMANDS
Comments The ASCII background and graphics background
modes do not print labels immediately. Background
mode splits the printer memory into two segments:
the foreground and background memory buffers.
Data sent via background mode resides in the
background buffer and prints when the next label
format containing foreground data reaches the
printer. Background data stays in memory until
intentionally cleared.
All label formats require a header line. The header
line precedes all other commands in the label
format, with the exception of the printer wake-up
string (if used).
NOTE: A few ASCII commands, such as the QUERY
STATUS command, replace the normal header line.
These cases are noted in their command descriptions.
Header line parameters are critical for proper
printing. For most ASCII label formats you can
"rough-in" header line values as follows:
Use ! for ASCII foreground printing.
Use 0 for the X starting position.
Use a dot time of 100 for an aspect ratio of 1:1 in
linear dot time mode.
Determine an approximate maxY value by
multiplying the label length (or desired label length,
for cutter equipped printers) by the print pitch and
then reducing the value by 10%. For dot times other
than 100, divide the result by the aspect ratio (dot
time divided by 100).
See also Graphics mode, LOGO mode, Wake-up string
Example
! 0 100 60 13
COMMENT ASCII FOREGROUND, X START=0,
COMMENT DOTTIME=100, MAX Y=60, 13 LABELS
INDEX
72 Revision F, January 2012, CognitiveTPG
Page 82

STANDARD PRINTER COMMANDS
V
Function Enables automatic label indexing. When printing is
finished the printer feeds the label stock until the
next label's first dot row is positioned under the
printhead burn line (based on the position of the
label's indexing cue; i.e., the black bar or gap
location). This is the default operating mode. Label
indexing remains on unless disabled with a
NOINDEX command.
IMPORTANT!
Do not use this command when using continuous-form
media. Continuous-form media has no indexing cues
and will feed continuously if automatic label indexing is
enabled.
Explicit Form
Implicit Form
INDEX
I
Parameters None
NOTE: Because INDEX positions the first dot row of the
next label at the burn line, with butt-cut label stock the
label perforation may be under the edge of the print
head.
The exact index position may vary slightly from printer
to printer due to calibration differences. The
POSITION command can adjust the index position.
See also NOINDEX, VARIABLE POSITION
Example
! 0 0 0 0
C This format will turn indexing on and feed a
label
INDEX
END
ARIABLE
Revision F, January 2012, CognitiveTPG 73
Page 83

STANDARD PRINTER COMMANDS
JUSTIFY
Function Positions Ultra Font and TEXT printing, PDF417
and MAXICODE bar codes, and GRAPHIC command
images either left, right, or center of their horizontal
coordinate (X coordinate for non-rotated text and
bar codes, Y coordinate for rotated text and bar
codes). Once invoked, the justification remains in
effect for the rest of the label format or until
changed by another JUSTIFY command
Explicit Form
Implicit Form
Parameters
JUSTIFY alignment
J alignment
alignment LEFT
or L
Aligns the component's
left edge with its specified
horizontal coordinate.
(Default)
RIGHT
or R
Aligns the component's
right edge with the
specified horizontal
coordinate.
CENTER
or C
Centers the text on the
specified horizontal
coordinate.
See also ULTRA_FONT, TEXT, BARCODE(R) PDF417,
BARCODE UPS, GRAPHIC
74 Revision F, January 2012, CognitiveTPG
Page 84

STANDARD PRINTER COMMANDS
Example 1
Example 2
JUSTIFY LEFT
ULTRA_FONT A40 (5,0,0) 400 10 LEFT JUSTIFY
JUSTIFY RIGHT
ULTRA_FONT A40 (5,0,0) 400 50 RIGHT JUSTIFY
JUSTIFY CENTER
ULTRA_FONT A40 (5,0,0) 400 90 CENTER JUSTIFY
END
JUSTIFY LEFT
ULTRA_FONT A40 (5,0,90) 150 120 LEFT
JUSTIFY RIGHT
ULTRA_FONT A40 (5,0,90) 100 120 RIGHT
JUSTIFY CENTER
ULTRA_FONT A40 (5,0,90) 50 120 CENTER
END
Revision F, January 2012, CognitiveTPG 75
Page 85

STANDARD PRINTER COMMANDS
LOGO mode
Function Allows placement of bitmapped graphics in specific label
areas, or windows. You specify the window sizes and
locations individually. Any number of graphics windows
is allowed, providing they do not overlap.
NOTE: Unlike most commands, you cannot enter the logo
mode command in ASCII form. The printer will only accept it
as pure binary data with no extraneous characters.
Explicit
Form
Parameters
mode 0 x y w h data
mode 0
Logo mode identifier. Send the 0 as one
byte (hexadecimal zero). For foreground
graphics, mode is the @ sign, or
hexadecimal 40. For background graphics,
mode is the # sign, or hexadecimal 23.
x
Graphics window starting point X
coordinate, sent as two bytes. The X
coordinate equals the dot-column of the
desired starting point divided by 8.
y
Graphics window starting point Y
coordinate (dot-row), sent as two bytes.
w
Graphics window width, sent as two bytes.
The width equals the window width in
dot-columns divided by 8.
h
Graphics window height in dots, sent in
two bytes.
Data
Binary graphics data. Always send
enough data to specify the condition of
every dot in the window area. Darkened
dots are programmed with a binary 1;
light dots are binary 0. Program the
graphics image as a raster-scan.
76 Revision F, January 2012, CognitiveTPG
Page 86

STANDARD PRINTER COMMANDS
Comments In background mode, the maximum programmable label
size is cut in half. Consider using foreground LOGO mode
with the !+ header line when printing combined ASCII
and graphics.
When sending the x, y, w, and h parameters, send the
most significant byte first.
Clear memory by sending a dummy label format to the
printer before and after using LOGO mode. This keeps
residual data from spoiling the finished label.
See also Graphics mode, Header line, GRAPHIC
Revision F, January 2012, CognitiveTPG 77
Page 87

STANDARD PRINTER COMMANDS
MULTIPLE
Function Causes the printer to print duplicate labels side-by-
side.
Explicit Form
Implicit Form
MULTIPLE nnn
M nnn
Parameters n is the number of duplicate labels to print side-by-
side. The acceptable range is 2 to 9.
The labels printed side-by-side must actually fit in
the available space; otherwise they are truncated on
the right side.
NOTE: Avoid using this command with high speed
Barcode Blaster printers. Barcode Blaster will
automatically reduce its print speed to 3 IPS when it
encounters this command, due to the increased
processing requirements.
Comments Using this command when printing many small
labels can save considerable amounts of label stock.
The command is also useful for printing split labels.
The total number of labels printed is the same as
the quantity specified in the header line.
You may use the MULTIPLE command with the
ADJUST command to print labels side-by-side with
changing numeric data. However, the adjusted
values will only change when the printer feeds the
next label, so each set of side-by-side labels are
identical.
NOTE: Place the MULTIPLE command after the
header line but before any commands that map
components on the label, such as
STRING or
BARCODE.
78 Revision F, January 2012, CognitiveTPG
Page 88

STANDARD PRINTER COMMANDS
Example
! 0 130 70 2
PITCH 100
WIDTH 224
MULTIPLE 2
STRING 8X8 7 0 ADIDAS 4446
STRING 8X8 7 10 JOGGING
STRING 8X8 7 20 SHORTS
STRING 8X8 37 30 $14.00
BARCODE I2OF5- 17 60 20 3445478940
END
Revision F, January 2012, CognitiveTPG 79
Page 89

STANDARD PRINTER COMMANDS
NOINDEX
Function Disables index detection. The printer will stop
feeding the label after printing the last dot row.
With most printers, this command remains in effect
until you turn the printer off or issue an INDEX
command. Portable printers are an exception: in
these printers, NOINDEX shuts off when the printer
goes to sleep.
Explicit Form
Implicit Form
NOINDEX
N
Parameters None
Comments Use NOINDEX when printing on paper without gaps
or index bars, or when you want the printer to print
multiple small labels on large label stock. You can
allow space between labels by increasing max Y in
the header line or by sending a dummy label
format having the required number of dot rows.
Example
! 0 100 60 1
NOINDEX
NOTE: Do not use the INDEX and NOINDEX
commands in the same label format.
80 Revision F, January 2012, CognitiveTPG
Page 90

STANDARD PRINTER COMMANDS
PITCH
Function Sets the print density in dots per inch.
Explicit Form
Implicit Form
PITCH nnn
P nnn
Parameters nnn is equal to print pitch in dots per inch (DPI).
Allowable values depend on the printhead density:
PH Density Default Pitch Alternate Pitch
300 300 150
203 200 100
150 150 75
NOTE: The default pitch changes to the lowest
available print pitch if Blazer emulation is enabled. See
VARIABLE MODE command for more information.
the
Comments Decreasing the print density (decreasing nnn
above) increases the size of each printed dot by a
corresponding amount. This increases the size of
the entire label. For example, a 100 dot-wide box
printed at 200 pitch is 0.5" wide, but the same box
printed at 100 pitch is 1" wide. Both boxes use the
same amount of memory, and occupy the same
number of dot rows.
See also
Do not use PITCH more than once in any label
format. Multiple PITCH commands may produce
unusual effects.
NOTE: Place the PITCH command after the header
line but before any commands that locate label
components, such as
printers will always default to their highest pitch with
each new label format unless explicitly set to a lower
pitch.
STRING or BARCODE. Portable
VARIABLE PITCH
Revision F, January 2012, CognitiveTPG 81
Page 91

STANDARD PRINTER COMMANDS
Example
! 0 100 90 1
PITCH 200
JUSTIFY CENTER
ULTRA_FONT B20 (5,0,0) 400 10 UFONT B20 AT
200 PITCH
END
! 0 100 45 1
PITCH 100
JUSTIFY CENTER
ULTRA_FONT B20 (5,0,0) 200 10 UFONT B20 AT
100 PITCH
END
82 Revision F, January 2012, CognitiveTPG
Page 92

STANDARD PRINTER COMMANDS
PRINT TEST LABEL
Function Causes the printer to print a test label that displays
most of the current configuration settings. This is
the same label that prints out when the feed button
is pressed at power up.
Explicit Form
!PRINT TESTLABEL
Parameters None
Comments This command does not require a header line, but
must be followed by a line feed (or carriage return
and line feed). Do not use any other commands with
PRINT TEST LABEL.
Ultra Font B is used to print the test
label. If this object does not exist
in the printer memory then this command
will have no affect.
Example
!PRINT TESTLABEL
IMPORTANT!
Use this command exactly as shown in the example.
Do not use other commands with the
PRINT TEST
LABEL command.
Revision F, January 2012, CognitiveTPG 83
Page 93

STANDARD PRINTER COMMANDS
QUANTITY
Function Sets the quantity of labels to be printed by the label
format.
Explicit Form
QUANTITY numlabels
Implicit Form
QY numlabels
Parameters numlabels is equal to the number of labels printed
by the label format. The allowable range is 0 to
65535.
Comments Using this command is functionally identical to
specifying the number of labels in the header line,
but offers the programmer some added flexibility
since numlabels can be a variable. The QUANTITY
command also lets the programmer specify the
number of labels to print when using the automatic
header line (!A) feature.
NOTE: The number of labels printed is the last quantity
specified; therefore, the quantity specified by
QUANTITY takes precedence over the quantity
specified in the header line.
See also DEFINE_VAR, Header Line
Example The following example will print three identical
labels:
! 0 100 90 1
PITCH 100
BARCODE I2OF5 1 20 20 0123456789
BARCODE CODE39W- 1 50 20 34A
QUANTITY 3
END
84 Revision F, January 2012, CognitiveTPG
Page 94

STANDARD PRINTER COMMANDS
Query Firmware Revision
Function Causes the printer to send firmware revision
information to the host computer. The printer
sends its firmware part number, revision, revision
time, and revision date in response to this
command. Such information is useful when
developing software that must control several
different printers.
Explicit Form
!QR
Parameters None
Comments This command does not require a header line, but
must be followed by a line feed (or carriage return
and line feed). Do not use any other commands with
QUERY REVISION.
See also QUERY STATUS, VARIABLE USER_FEEDBACK
Example
!QR
IMPORTANT!
Use this command exactly as shown in the example.
Do not use other commands with the
QUERY
REVISION command.
Revision F, January 2012, CognitiveTPG 85
Page 95

STANDARD PRINTER COMMANDS
Query Index Buffer Values
Function This command is used to query the values in the
index sensor buffer.
Explicit Form
!QIB
Comments This command will return comma separated values
that are the value from the index sensor and the
index mark value. The index mark value will be 0 if
this is the trailing edge of an index mark, 255 if it is
the leading edge of an index mark or it will be
current white level value.
This command does not require a header line, but
must be followed by a line feed (or carriage return
and line feed). Do not use any other commands with
!GET INDEX.
Example The following will return the index settings to the
current communication port.
!QIB
86 Revision F, January 2012, CognitiveTPG
Page 96

STANDARD PRINTER COMMANDS
Query Index Settings
Function This command is used to query the current index
sensor settings.
Explicit Form
!QI
Comments This command does not require a header line, but
must be followed by a line feed (or carriage return
and line feed). Do not use any other commands with
!GET INDEX.
Example The following will return the index settings to the
current communication port.
!QI
Revision F, January 2012, CognitiveTPG 87
Page 97

STANDARD PRINTER COMMANDS
Query Printer Status
Function Causes the printer to send a status message to the
host computer. The status message indicates the
current printer condition, such as ready, printing, low
battery, out of paper, and so on. Such information is
useful when controlling the printer from a remote
site. However, the host computer must be
programmed to properly interpret the incoming data.
Explicit Form
!QS
Parameters None
Continued on next page…
88 Revision F, January 2012, CognitiveTPG
Page 98

STANDARD PRINTER COMMANDS
Comments This command replaces the normal header line.
Follow the command with a line feed (or carriage
return and line feed). Do not use any other commands
with QUERY STATUS.
Status Query Response Messages
Status Type Prog
Guide
Ready R R R R
Printhead
Hot
Head Up U U U U
Motor Hot M H
Parse Error A A e
Paper Out O O O O
Ribbon Out o o o o
Programming F F
Halted W W W W
Hex dump X X
Printing
(printing
in process,
or printer
paused
during
batch mode
processing)
Background
image is
present
Low Battery L L L
EEPROM
Error
Error (only
upon a
checksum
error)
Charging C C* C
Cutter
Error
Serial
Error
Integrity
Error
Download
Error
Sleep Z
Off Z
H H H H
P P P P
B B
E e E*
E**
c c c*
S S* S*
I I*
D D D*
Advantage C-
Series
/DLX
Code
Ranger
The printer can send the following status messages to
the host computer when it is queried:
Revision F, January 2012, CognitiveTPG 89
Page 99

STANDARD PRINTER COMMANDS
B
Background. This is the status if there is a
valid image in the background memory
buffer and no print tasks are pending.
C
Charging (applicable only to portable
printers). The printer battery is charging
and no print tasks are pending. The printer
sends this message once per second if
USER_FEEDBACK is ON.
R
Ready. The printer has no pending print
tasks, is not charging, and the background
buffer is empty.
The printer can send many other status messages to
the host in response to error conditions, but the
printer communications port will go busy in the event
of a printer error. Therefore, the printer will send the
following error messages but will not respond to the
QUERY STATUS command if these errors occur:
c
(lowercase letter C) Cutter error (applicable
only to cutter equipped printers). The label
cutter is jammed or not working correctly.
D
Download error. An error has occurred while
attempting to load new firmware.
E
EEPROM error. This error will occur when
printer is first turned on if the EEPROM
checksum is invalid.
H
Hot printhead. This error will occur if the
printhead thermal cycles.
I
Nonvolatile memory failure.
90 Revision F, January 2012, CognitiveTPG
Page 100

STANDARD PRINTER COMMANDS
L
Low battery. The printer sends this message
eight times per second if it detects a low
power condition and USER_FEEDBACK is ON.
The printer will send this message once
regardless of the USER_FEEDBACK state if
the power drops below the normal operating
voltage level (for example, when the power
is switched off).
O
Out of paper. The printer sends this
message eight times per second if it runs out
of paper and USER_FEEDBACK is ON.
o
(lowercase letter O) Out of ribbon or ribbon
stalled. (Only reported by TT printers
capable of detecting a stalled ribbon.) The
printer sends this message eight times per
second if it runs out of ribbon and
USER_FEEDBACK is ON.
P
Printing in process, or printer paused during
batch mode processing.
S
U
W
Serial port communications error.
Printhead Up. The printhead is not fully
closed.
Waiting. The printer is paused during a
batch printing operation.
Revision F, January 2012, CognitiveTPG 91
 Loading...