

Cognisys Scout Flash Owner's Manual

Owner’s Manual
Revision 1.0
Copyright 2019 Cognisys, Inc.
1

Table of Contents
1. SAFETY INSTRUCTIONS .................................................................................................................................. 4
2. GETTING STARTED ......................................................................................................................................... 5
2.1 WHAT IS THE SCOUT FLASH? ............................................................................................................................... 6
2.2 WHAT IS INCLUDED ........................................................................................................................................... 7
2.3 BATTERY INSTALLATION ...................................................................................................................................... 8
2.4 QUICK START GUIDE .......................................................................................................................................... 9
2.5 CLEANING AND CARE ....................................................................................................................................... 10
2.5.1 Cleaning ................................................................................................................................................. 10
2.5.2 Care and storage .................................................................................................................................... 10
2.5.3 Maintaining Weatherproof Design ........................................................................................................ 11
2.5.4 Painting the housing .............................................................................................................................. 12
2.6 THE SCOUT FLASH ........................................................................................................................................... 13
3. BASIC NAVIGATION ..................................................................................................................................... 15
3.1 BUTTONS ....................................................................................................................................................... 15
3.2 MAIN SCREEN ICONS ....................................................................................................................................... 16
3.3 MENU ICONS ................................................................................................................................................. 17
3.4 THE SCREEN ................................................................................................................................................... 17
3.5 LED INDICATORS............................................................................................................................................. 17
4. SETTINGS ..................................................................................................................................................... 18
4.1 SETTINGS NAVIGATION MAP ............................................................................................................................. 18
4.2 SETTING DESCRIPTIONS .................................................................................................................................... 20
4.2.1 Power Level Adjustment ........................................................................................................................ 20
4.2.2 Mode ...................................................................................................................................................... 20
4.2.2.1 Manual .......................................................................................................................................................... 20
4.2.2.2 Master ........................................................................................................................................................... 20
4.2.2.3 Pulsed ............................................................................................................................................................ 20
4.2.3 Multi Settings ......................................................................................................................................... 20
4.2.4 Power Settings ....................................................................................................................................... 20
4.2.5 System Settings ...................................................................................................................................... 21
4.2.5.1 Wireless Settings ........................................................................................................................................... 21
4.2.5.1.1 Enabled .................................................................................................................................................... 21
4.2.5.1.2 Channel .................................................................................................................................................... 21
4.2.5.1.3 ID .............................................................................................................................................................. 22
4.2.5.1.4 Scan Channels .......................................................................................................................................... 22
4.2.5.1.5 Wake Up ................................................................................................................................................... 22
4.2.5.2 Time Settings................................................................................................................................................. 22
4.2.5.2.1 Set current time ....................................................................................................................................... 23
4.2.5.2.2 Window On .............................................................................................................................................. 23
4.2.5.2.3 Set Start Time ........................................................................................................................................... 23
4.2.5.2.4 Set End Time ............................................................................................................................................ 23
4.2.5.3 Screen Timeout ............................................................................................................................................. 23
2

4.2.5.4 Brightness ..................................................................................................................................................... 24
4.2.5.5 Lockout ......................................................................................................................................................... 24
4.2.5.6 LED Debug ..................................................................................................................................................... 24
4.2.5.7 Load Defaults ................................................................................................................................................ 24
4.2.5.8 Statistics ........................................................................................................................................................ 24
5. EXAMPLES ................................................................................................................................................... 25
5.1 WIRELESS FLASH ............................................................................................................................................. 25
5.2 WIRED FLASH (SCOUT CAMERA BOX/RECEIVER CONTROLS FLASHES) ........................................................................ 27
5.3 WIRED FLASH (3
RD
PARTY SENSORS) .................................................................................................................... 27
5.4 MAXIMUM BATTERY LIFE.................................................................................................................................. 28
6. INSTALLING THE REFLASH SOFTWARE (OPTIONAL) ...................................................................................... 29
6.1 WINDOWS INSTALLATION ................................................................................................................................. 29
6.2 OS X INSTALLATION ......................................................................................................................................... 29
7. TROUBLESHOOTING .................................................................................................................................... 30
8. SPECIFICATIONS .......................................................................................................................................... 32
9. WARRANTY ................................................................................................................................................. 34
10. REVISION HISTORY .................................................................................................................................. 35
3

1. Safety Instructions
WARNING indicates a potentially hazardous situation which, if not avoided, could result in death
or serious injury.
Follow all CAUTION notices to reduce the risk of personal injury, prevent damage to the Scout
equipment, accessories, and devices (computers, cameras, flashes, etc). Failure to follow all
CAUTION notices may void your warranty. CAUTION may also indicate a potentially hazardous
situation which, if not avoided, may result in personal injury.
The safety alert symbol precedes a general CAUTION or WARNING statement.
The electrical hazard symbol precedes an electric shock hazard CAUTION or WARNING
statement.
CAUTION: Only use approved power sources for Scout equipment. Use of other power
adapters or batteries may damage the flash and/or attached equipment.
CAUTION: Misuse of Scout equipment could potentially damage your equipment. Cognisys, Inc.
will not be held liable for damage to your equipment. If you have questions about safety please
contact us!
WARNINGS: Follow the warnings below. Otherwise, death or serious injuries may result
• Do not look directly into the flash during operation. Eye damage may result.
• Do not activate the flash in direct contact with your body or other objects. This may result in
the risk of burns and fire.
• Do not disassemble or modify the flash. There are no user serviceable parts inside. The flash
has internal components that may cause death or serious injury.
• Do not submerge the flash in any liquids.
• Do not use the flash in environments with volatile/flammable chemicals or gasses.
• Do not operate the flash without the battery door (and seal) fully installed and tightened.
• If the equipment is dropped exposing internal electronics do not touch the electronics.
Hazardous voltage may be present.
4

2. Getting Started
The latest version of this manual is available on our website at:
https://www.cognisys-inc.com/store/scout-flash.html
The graphics/menus included in this manual may not be identical to the software that you are
running. Improvements and adjustments to the software may happen prior to an updated
version of the manual.
Not big on reading manuals? (What? No thumbs-up? We worked hard on this you know!) We
have a few real world setups in the “5 - Examples” section. You can always come back to the
technical details if you get stuck. You really should finish reading this section though – it goes
through battery replacement and the basic care of the flash.
5

2.1 What is the Scout Flash?
The Scout Flash is an ideal solution for short-term or long-term trail photography. It is designed
to be used with the Scout Camera Box but can also be used with the Scout Receiver.
The Scout Flash has several features not available with other flashes:
• Weatherproof
• Exceptional battery life (90 – 200 days)
• Wireless (up to 1/500 flash sync speed)
• Fast recycle time
• Quartz tube for durability and longevity
• Easy to use OLED dot matrix display
• All flashes can be controlled wirelessly through the Camera Box app (easy setup)
• Power level adjustments in 1/3 stops
• Time windows of operation – only fire when desired
• ¼-20 tripod mount ideal for inexpensive ball-heads
• Uses the Scout Li-Ion battery pack
• External sync jack for wired operation
• External power jack
• High performance low power ARM processor
• Wide operating temperature range: -40C – 70C (-40F – 158F)
6

2.2 What is Included
The Scout Flash includes:
• Scout Flash
• Scout 5200mAh battery
• Optional battery charger
• Quick-start guide insert
If you purchased the Scout Flash as a kit it may include additional accessories.
7
2.3 Battery Installation
Pull-strap
Wires/connectors
Battery installation is a simple process and because the Scout Flash has excellent battery life –
you won’t have to do it often!
The Flash requires a Scout 5200mAh battery. You can optionally use the Scout six AA (LR6)
battery pack. The AA battery pack is not recommended as the cycle time will increase and
overall battery life will be considerably less. For details about maximizing battery life see
section “5.4 - Maximum Battery Life”.
on this side
1. Be sure the Flash is clean prior to replacing the battery pack otherwise dirt may
compromise the weatherproof seal.
2. Turn off the flash.
3. Remove the four thumb screws from the front of the flash.
4. Remove the battery door.
5. Remove the battery pack and disconnect it from the flash.
6. Install a fresh battery pack. The pull-strap of the battery should be facing out and the
battery wires facing to the left side (toward the flash). If the battery wire is facing to the
right the battery may not fully install.
7. Verify the orange O-ring is still installed.
8. Install the battery door.
9. Tighten the four thumb screws.
You can also power the Scout Flash with external power using the optional power cable
available here:
https://www.cognisys-inc.com/store/3pin-extpwr-cable.html
If using the external power you MUST remove the internal battery.
The internal battery should be removed if storing the flash for an extended duration.
8
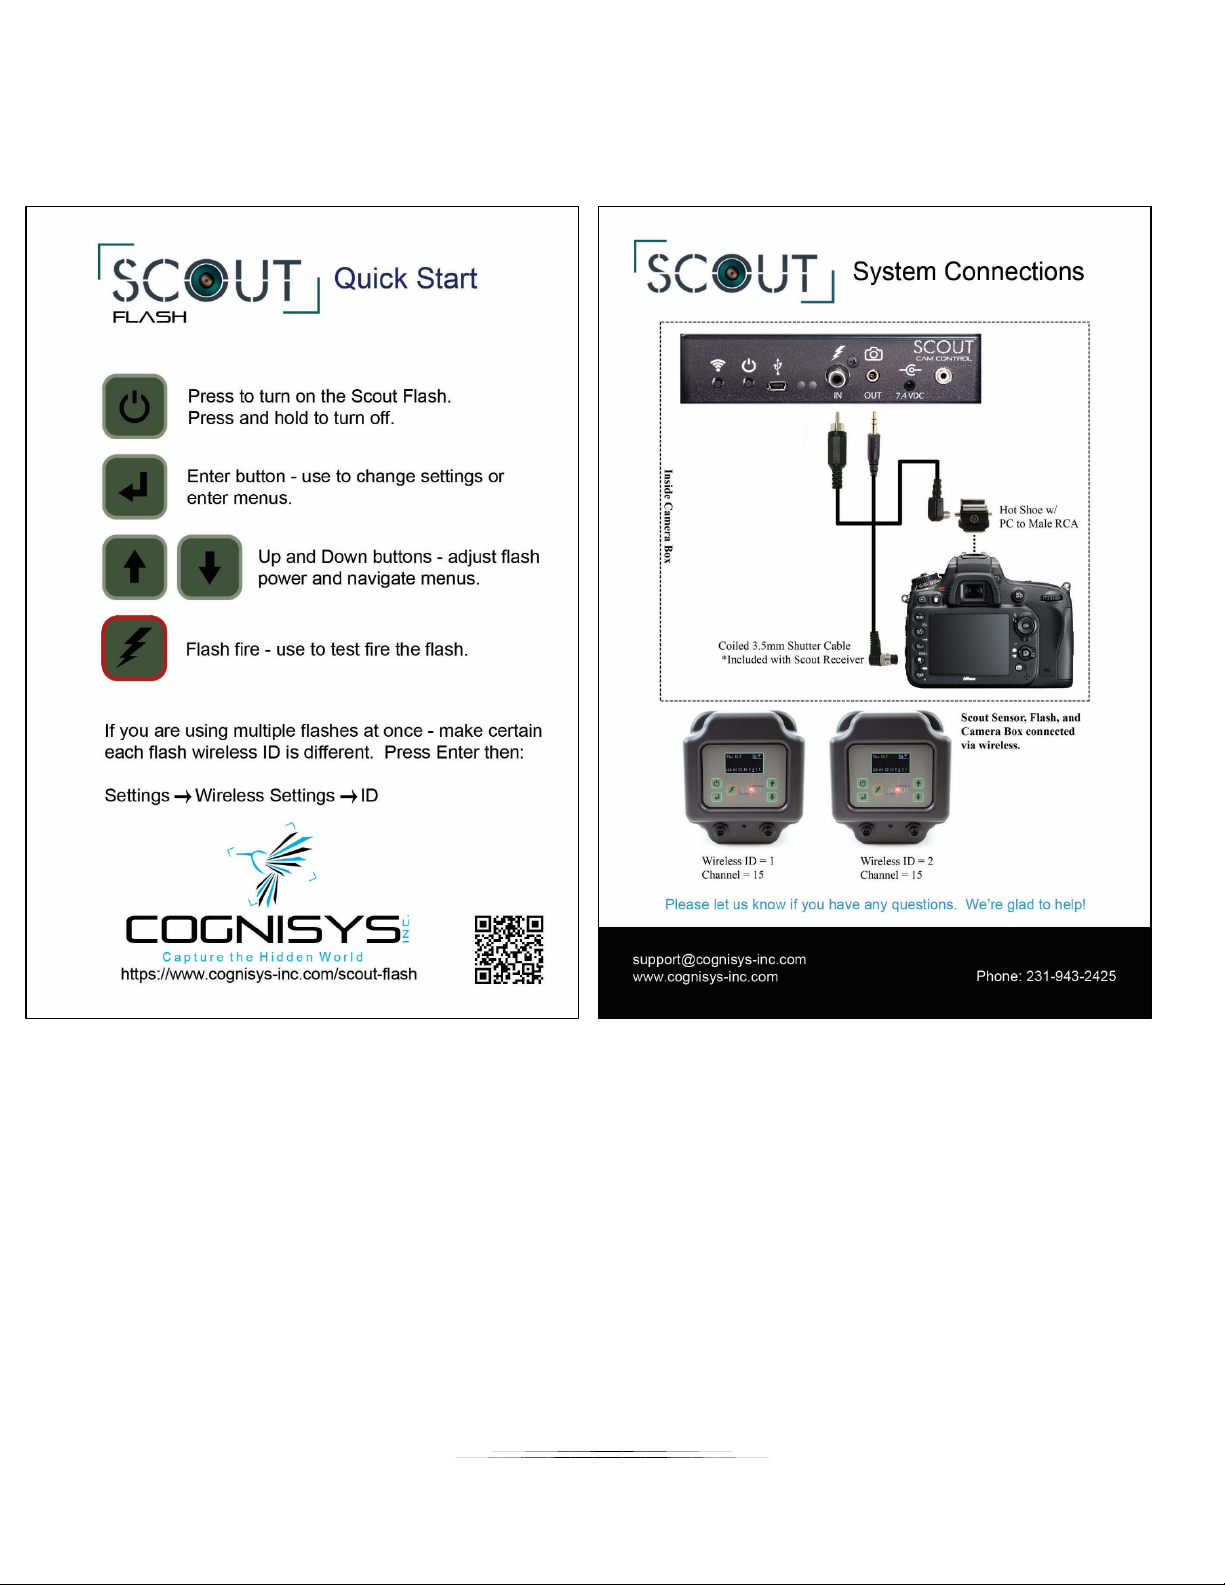
2.4 Quick Start Guide
Want to be up and running in two minutes or less? Here’s the quick-start guide in case you
misplaced it:
9

2.5 Cleaning and Care
We want your Scout equipment to last – so here are some brief steps to keep it happy!
2.5.1 Cleaning
Turn off the flash prior to cleaning and wait at least two minutes. For cleaning we
recommend a slightly dampened (not wet) micro-fiber cloth. Do not spray water directly
into the inside of the equipment. Any liquid that goes into the flash may cause an electrical
failure of the device. Do not use a flammable liquid/solvents or cleaning agents on the flash
– just a micro-fiber cloth (dampened if needed).
2.5.2 Care and storage
Scout equipment is designed to handle normal wear and tear but there are some things to
avoid:
Do not get the unit wet internally.
If not using the external connectors be sure to attach the protective cover or
water may leak into the controller causing damage.
Do not drop the unit (the display, much like a cell-phone, is made of glass). The
flash tube itself may be damaged if the flash is dropped.
Protect the unit’s display and membrane when packing up your gear. If a tripod
fights the display or membrane on the flash – the flash will lose.
Do not allow dirt to get into the weatherproof seal. This could cause seal failure
and damage to the flash.
Remove the battery pack prior to long term storage.
Failure to properly care for the Scout Flash could result in a leak that may cause damage.
The product warranty does not cover water damage resulting from user error.
10

2.5.3 Maintaining Weatherproof Design
Scout equipment is designed to meet the most challenging environmental conditions. It
does, however, require some care to maintain its weatherproof sealing.
Prior to opening the equipment turn it off, wait at least two minutes, and rinse it under
gently running water if it is dirty.
It’s very important to keep the housing’s battery door silicone seal clean. A single hair or
grain of sand could potentially cause the housing to leak and damage the equipment. The
goal is to prevent dirt from getting into the seal! If you need to clean the gasket use a pair
of tweezers to remove the seal, rinse it under water, allow it to dry, and re-install.
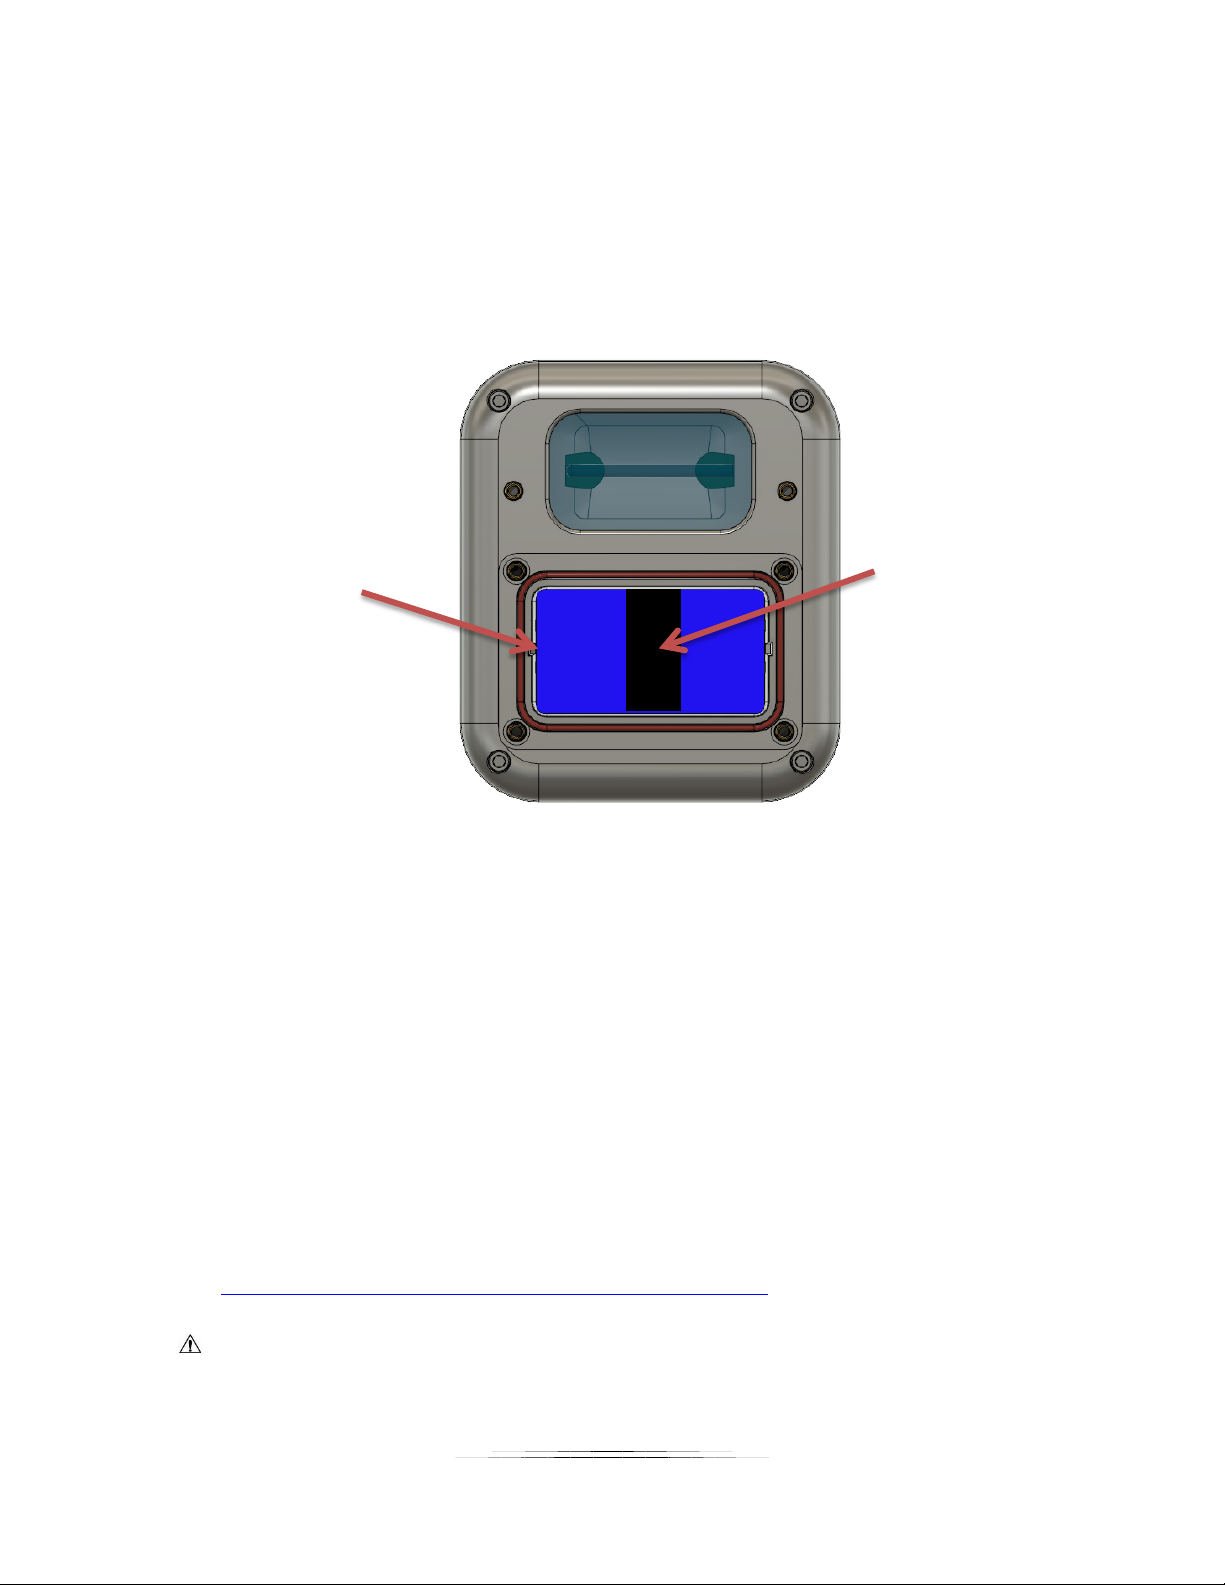
Below is an image indicating the seal location. It is recessed in a groove in the battery
compartment.
11
 Loading...