

Cognisys Sabre Owner's Manual
Owner’s Manual
Revision 1.2
Copyright 2017 Cognisys, Inc.
1

Table of Contents
1. SAFETY INSTRUCTIONS .................................................................................................................................. 6
2. GETTING STARTED ......................................................................................................................................... 7
2.1 HOW IT WORKS ................................................................................................................................................ 7
2.2 CLEANING AND CARE ......................................................................................................................................... 8
2.2.1 Cleaning ................................................................................................................................................... 8
2.2.2 Care and storage ...................................................................................................................................... 8
2.3 THE SABRE SENSOR ........................................................................................................................................... 9
2.4 CONNECTION DIAGRAM ................................................................................................................................... 10
2.5 CONNECTING POWER ....................................................................................................................................... 10
2.6 BATTERY CHARGING ......................................................................................................................................... 11
2.7 BUTTONS ....................................................................................................................................................... 11
2.8 LED INDICATORS............................................................................................................................................. 12
2.9 CAMERA CONNECTION ..................................................................................................................................... 12
2.10 DUAL-BEAM CONNECTION ................................................................................................................................ 12
3. BASIC USE .................................................................................................................................................... 13
3.1 Physical Setup ........................................................................................................................................ 13
3.2 AUTO MODE .................................................................................................................................................. 14
3.3 MANUAL MODE ............................................................................................................................................. 14
4. SABRE SOFTWARE ....................................................................................................................................... 16
4.1 INSTALLATION ................................................................................................................................................. 16
4.2 WINDOWS INSTALLATION ................................................................................................................................. 16
4.3 OS X INSTALLATION ......................................................................................................................................... 17
4.4 CONNECTING TO SABRE .................................................................................................................................... 17
4.5 CONTROL BUTTONS ......................................................................................................................................... 18
4.5.1 Connected .............................................................................................................................................. 18
4.5.2 Read Config ............................................................................................................................................ 18
4.5.3 Save Config ............................................................................................................................................ 18
4.5.4 Load Defaults ......................................................................................................................................... 18
4.5.5 Shutter ................................................................................................................................................... 19
4.6 AUTO/MANUAL/USER 1-3 TABS ....................................................................................................................... 19
4.7 WIFI ............................................................................................................................................................. 21
4.8 GLOBAL ......................................................................................................................................................... 21
4.9 MEASURE ...................................................................................................................................................... 22
5. AUTO/MANUAL/USER SETTINGS ................................................................................................................. 23
5.1 MODE .......................................................................................................................................................... 23
5.1.1 Auto Range ............................................................................................................................................ 23
5.1.2 Manual ................................................................................................................................................... 23
5.1.3 Window .................................................................................................................................................. 24
5.1.4 Timelapse ............................................................................................................................................... 24
2

5.2 I/O MODE ..................................................................................................................................................... 24
5.2.1 Normal ................................................................................................................................................... 24
5.2.2 Dual-Beam ............................................................................................................................................. 24
5.2.3 A->B ....................................................................................................................................................... 25
5.2.4 B->A ....................................................................................................................................................... 25
5.2.5 Bulb ........................................................................................................................................................ 25
5.2.6 A | B ....................................................................................................................................................... 26
5.3 UNITS ........................................................................................................................................................... 26
5.4 SAMPLE RATE ................................................................................................................................................. 26
5.5 SENSITIVITY .................................................................................................................................................... 26
5.6 FILTER RATE ................................................................................................................................................... 27
5.7 DETECTION % ................................................................................................................................................. 27
5.8 TRIGGER DISTANCE .......................................................................................................................................... 27
5.9 DISTANCE MIN ............................................................................................................................................... 27
5.10 DISTANCE MAX............................................................................................................................................... 28
5.11 TIMEOUT ....................................................................................................................................................... 28
5.12 BULB REFRESH ................................................................................................................................................ 28
5.13 BULB OFF ...................................................................................................................................................... 28
5.14 SHOT LIMIT .................................................................................................................................................... 28
5.15 LIMIT WINDOW .............................................................................................................................................. 28
5.16 LIMIT TIMEOUT............................................................................................................................................... 29
5.17 BRIGHTNESS ................................................................................................................................................... 29
5.18 DRIVE MODE ................................................................................................................................................. 29
5.18.1 Single ................................................................................................................................................. 29
5.18.2 Continuous ......................................................................................................................................... 29
5.18.3 Hybrid ................................................................................................................................................ 30
5.18.4 Enter/Exit ........................................................................................................................................... 30
5.19 SHUTTER SETTINGS .......................................................................................................................................... 30
5.19.1 # Pics .................................................................................................................................................. 31
5.19.2 Delay .................................................................................................................................................. 31
5.19.3 On Time ............................................................................................................................................. 31
5.19.4 Off Time ............................................................................................................................................. 31
5.19.5 Always On .......................................................................................................................................... 31
5.19.6 Review Timeout ................................................................................................................................. 32
5.19.7 Keep Alive .......................................................................................................................................... 32
5.19.8 Final Off ............................................................................................................................................. 32
6. WIFI SETTINGS ............................................................................................................................................. 33
6.1 SECURITY ....................................................................................................................................................... 33
6.1.1 Open ....................................................................................................................................................... 33
6.1.2 WPA ....................................................................................................................................................... 33
6.2 KEY .............................................................................................................................................................. 33
6.3 CHANNEL ....................................................................................................................................................... 33
6.4 TIMEOUT ....................................................................................................................................................... 34
7. GLOBAL SETTINGS ....................................................................................................................................... 34
7.1 SERIAL OUTPUT .............................................................................................................................................. 34
3

7.2 SHUTDOWN VOLTAGE ...................................................................................................................................... 34
7.3 SOFTWARE VERSION ........................................................................................................................................ 34
7.4 HARDWARE ID ............................................................................................................................................... 34
7.5 START TIME / STOP TIME ................................................................................................................................. 34
8. MEASURE .................................................................................................................................................... 35
8.1 DISTANCE WINDOW ........................................................................................................................................ 35
8.2 BATTERY PERCENT ........................................................................................................................................... 35
8.3 DC VOLTAGE .................................................................................................................................................. 35
9. TROUBLESHOOTING .................................................................................................................................... 36
10. CONNECTOR PIN-OUTS............................................................................................................................ 37
10.1 SHUTTER / DC POWER ..................................................................................................................................... 37
10.2 DUAL-BEAM / AUXILIARY SHUTTER ..................................................................................................................... 37
10.3 SOLAR / AUXILIARY POWER ............................................................................................................................... 38
11. SPECIFICATIONS ...................................................................................................................................... 39
12. WARRANTY ............................................................................................................................................. 40
13. WIRELESS CERTIFICATION ........................................................................................................................ 41
13.1 FCC CERTIFICATION - USA ............................................................................................................................... 41
13.2 IC CERTIFICATION – CANADA ............................................................................................................................. 42
14. GLOSSARY ............................................................................................................................................... 43
15. REVISION HISTORY .................................................................................................................................. 44
4

Table of Figures
Figure 1 – Sabre Sensor ................................................................................................................................. 9
Figure 2 - Connection Diagram ................................................................................................................... 10
Figure 3 - Shutter Timing Diagram .............................................................................................................. 30
5

1. Safety Instructions
WARNING indicates a potentially hazardous situation which, if not avoided, could result in death
or serious injury.
Follow all CAUTION notices to reduce the risk of personal injury, prevent damage to Sabre,
accessories, and devices (computers, cameras, flashes, etc). Failure to follow all CAUTION
notices may void your warranty. CAUTION may also indicate a potentially hazardous situation
which, if not avoided, may result in personal injury.
The safety alert symbol precedes a general CAUTION or WARNING statement.
The electrical hazard symbol precedes an electric shock hazard CAUTION or WARNING
statement.
CAUTION: Only use the AD/DC power adapter (cube) that was included with your Sabre. Use of
other power adapters or non-Cognisys equipment may damage the sensor and/or attached
equipment.
Sabre is a laser range-finder that emits laser radiation. This Laser Product is designated Class 1
during all procedures of operation. This means that the laser is safe to look at with the unaided
eye. However, it is advisable to avoid staring into the beam.
CLASS 1 LASER PRODUCT
CLASSIFIED EN/IEC 60825-1 2007
Complies with US FDA performance standards for laser products except for deviations pursuant
to Laser Notice No. 50, dated June 24, 2007.
CAUTION: No user should modify Sabre or operate it without its housing or optics. The
operation of Sabre without a housing and optics or modification of the housing or optics that
exposes the laser source may result in direct exposure to laser radiation and the risk of
permanent eye damage. Removal or modification of the diffuser in front of the laser optic may
result in the risk of permanent eye damage.
6

2. Getting Started
The latest version of this manual is available at
http://www.cognisys-inc.com
The sections included in this manual may not be identical to the software that you are running.
Improvements and adjustments to the software may happen prior to an updated version of the
manual. You’ll see several screen-shots in this manual. The screen may look different on the
device/operating system you are using.
Not big on reading manuals? (We worked hard on this you know!) We have a few real world
walk-throughs on our website, including some of the more difficult subjects to photograph:
https://www.cognisys-inc.com/products/sabre/sabre.php
You can always come back to the technical details if you get stuck.
2.1 How It Works
There are several different infrared technologies out there to detect objects. We’ll go through a
quick discussion of their pros and cons.
/downloads/SabreManual.pdf.
Passive Infrared Detector (PIR/PID):
PIR sensors look for a change in temperature from the field of view they’re currently looking at.
The temperature change could be warmer or colder, causing the sensor to trigger.
Pros: Inexpensive
Cons: Slow response time, temperature based, poor performance through glass, no absolute
distance (just that some temperature changed in its field of view), sensitive to sudden
temperature changes (direct sunlight, followed by clouds).
Infrared Triangulation:
Infrared Triangulation uses a high-powered infrared LED transmitter (flashlight) and a sensitive
infrared receiver (think of it as its eyeball). The transmitter sends out a pulse of infrared
energy and then the receiver measures the angle of the reflected light. With a little
trigonometry you can determine the distance an object is away from the sensor.
Pros: Absolute distance can be measured, fairly fast, not temperature sensitive
Cons: Maximum range and returned distance can be affected by sunlight, range is limited using
IR LED’s, the transmitter “fan-out” makes it difficult to detect small objects at a distance.
7

Laser Time of Flight (LIDAR):
This is the technology that Sabre incorporates. A high-powered (but eye-safe!) infrared laser is
turned on and off rapidly (500 billionths of a second in Sabre’s case). Sabre then measures the
time it takes for that laser beam to get to the target and be reflected back to its detector. If
you’re a techno-geek, we can tell your ears have just perked up a bit. For the rest of you – this
is really cool! The speed of light is fast -- 300 million meters per second, or 186,000 miles per
second. The nice thing is that in our application, the speed of light is constant. So if you can
measure how long it takes to get from the Sabre and back to it, you’ll know the distance (since
distance is: speed × time). The tricky bit is trying to measure something that fast – but we have
that covered! To maintain the accuracy, over a hundred measurements are used for every
“sample” that is used to determine the distance. Typical measurement accuracy is ±2.5cm/1in
up to 15 meters/50 ft (5% worst-case). Also, because a laser is used instead of an infrared LED,
the beam width/fan-out is quite small. At one meter (3.3ft), the beam is about 1cm/0.4in. At
10 meters (33ft), it is about 10cm/3.9in.
Pros: Accurate, long range, sunlight tolerant, temperature independent, fast response time
Cons: Expensive (sorry about that!)
2.2 Cleaning and Care
We want your Sabre to last – so here are some brief steps to keep your sensor happy!
2.2.1 Cleaning
For cleaning the housing and optical opening you can use a slightly dampened micro-fiber
cloth. Do not spray water directly into the sensor. Do not use a flammable liquids or
cleaning agents on the sensor – just a micro-fiber cloth (dampened).
It is important to keep the two optical openings clear of dust and debris. A burst of air
might be all it needs to get dust free. Sabre needs to “see” in order to work!
2.2.2 Care and storage
Sabre is a precision piece of electronics. It’s designed to handle normal wear and tear but
there are some things to avoid:
Do not submerge in water.
Do not drop the unit.
Protect the optical openings from damage. They are recessed to reduce debris
and damage but a sharp object could still scratch the lens and potentially make
the unit non-functional.
Store Sabre with its battery charged (but not charging). Avoid storing with a
completely discharged battery as this can significantly decrease the battery life.
Periodically “top off” the battery if it will be stored for months.
8
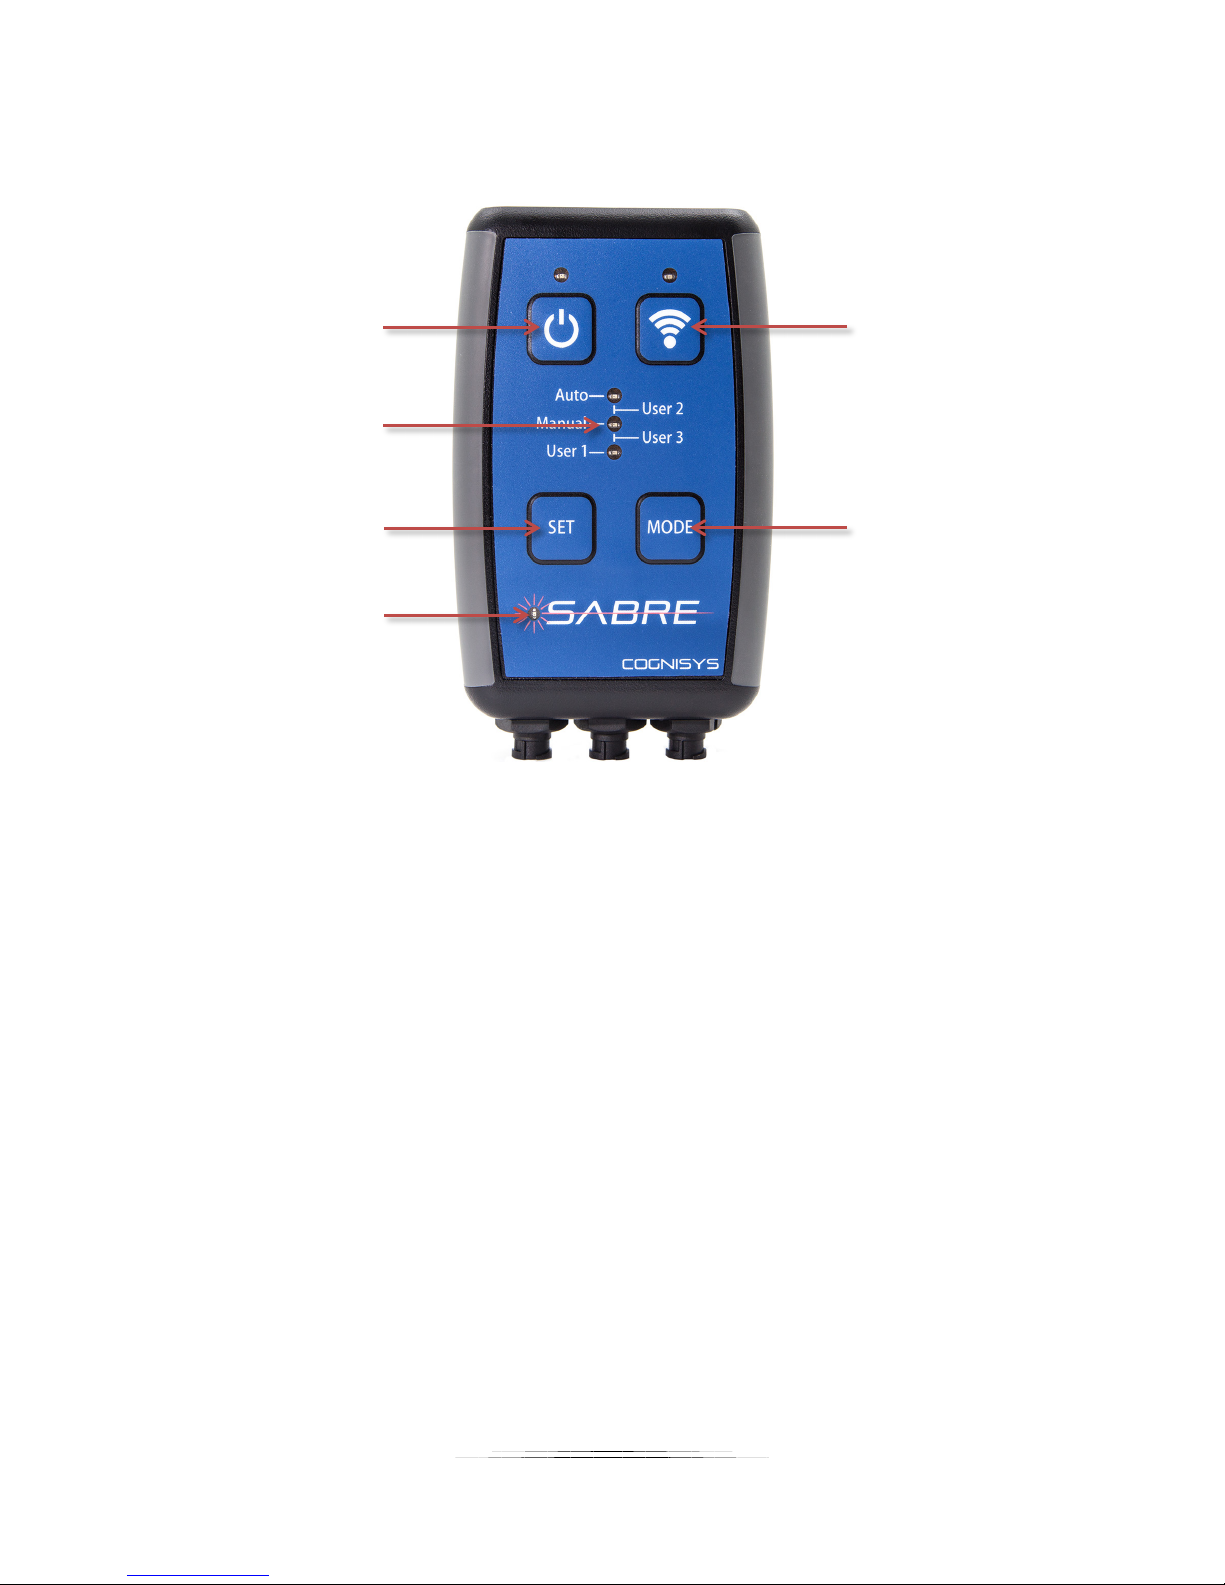
2.3 The Sabre Sensor
1 2
3
7
9 10 11
4
5
8
6
Figure 1 – Sabre Sensor
Sabre has the following connectors/openings/buttons from top to bottom:
1. Laser Transmitter Opening (left)
2. Laser Receiver Opening (right)
3. Power On/Off
4. Mode Indicators
5. Set distance – Manual mode
6. Shutter active indicator
7. Wifi On/Off
8. Change Mode
On the bottom:
9. Solar/Auxiliary power connector (3-pin)
10. Dual-beam / Auxiliary shutter connector (4-pin)
11. Shutter / DC Power connector (5-pin)
9
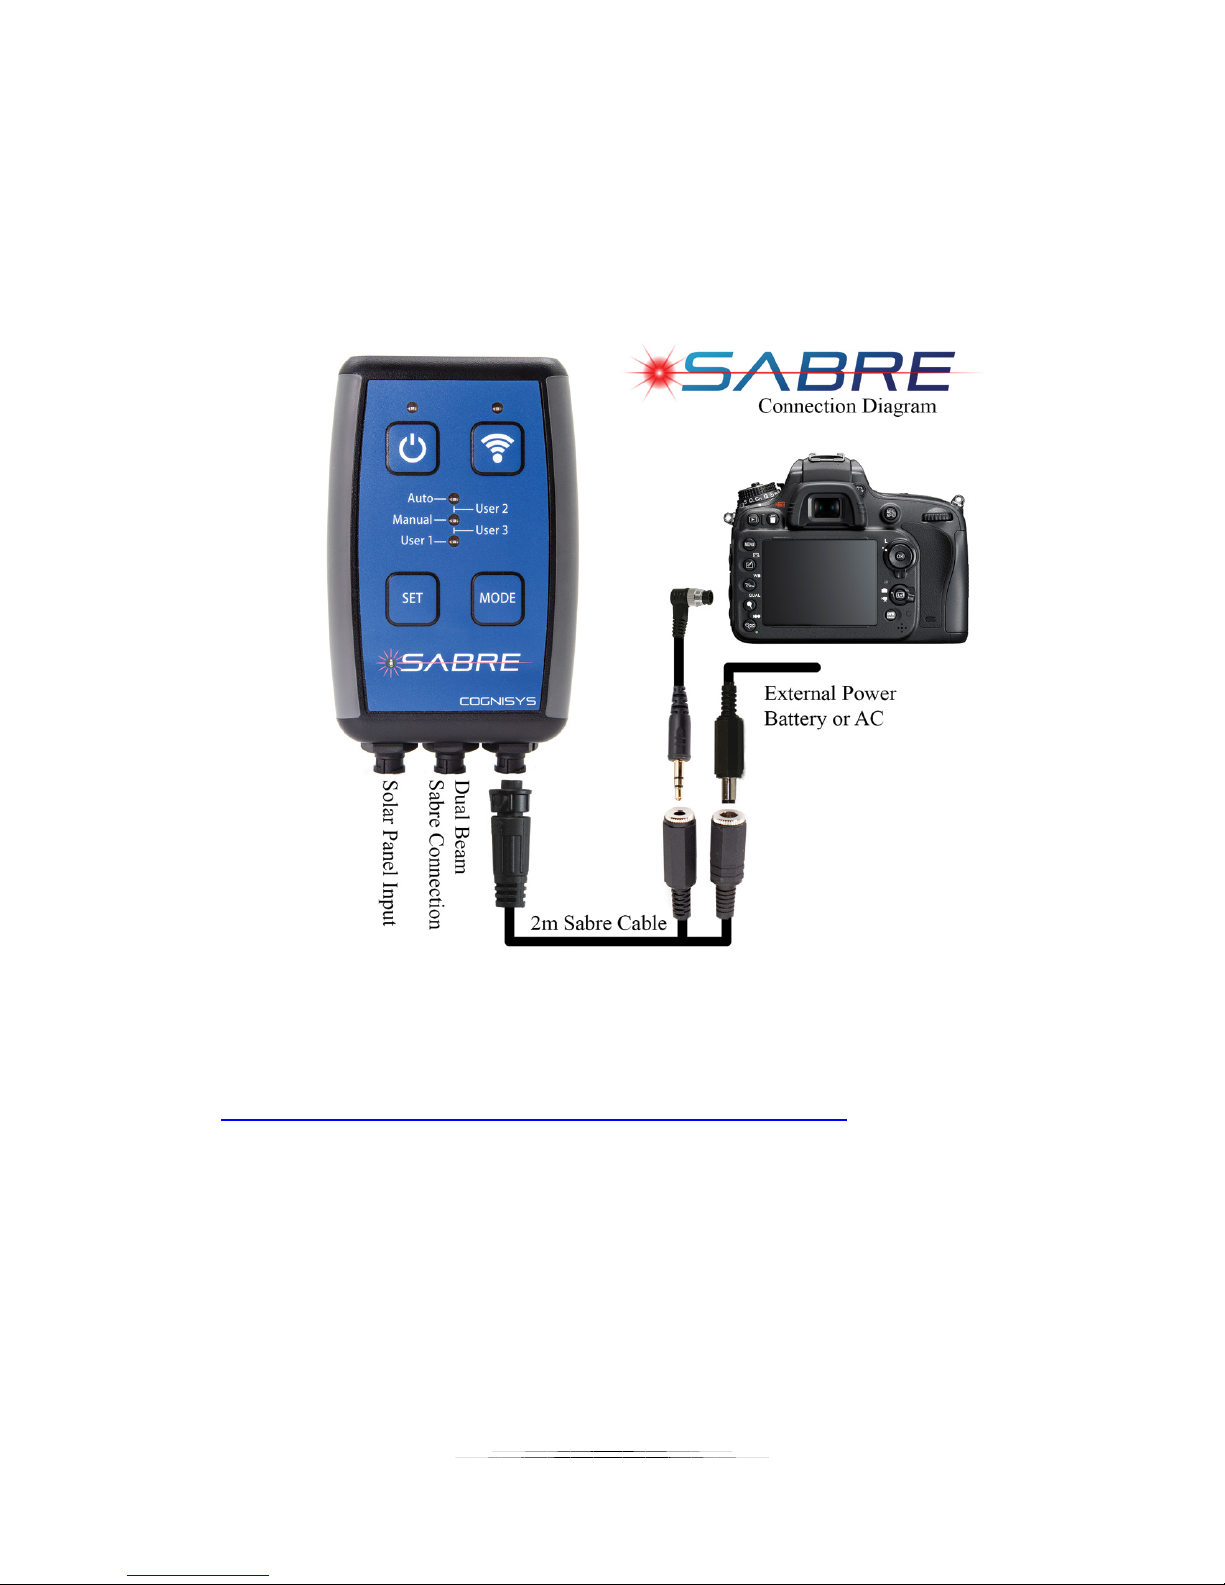
2.4 Connection Diagram
Sabre uses weather-resistant connectors and cables. If the sensor will be used outside during
the rain or condensing humidity, be sure to have the connectors locked in place (including the
included connector caps). The 3.5mm and 2.1mm connectors must be kept dry.
For alternative power connections (including solar) please see our website:
https://www.cognisys-inc.com/how-to/sabre/sabre-external-batt.php
2.5 Connecting Power
Sabre uses a 12V DC power adapter to charge its internal battery as well as to operate. If Sabre
is plugged into 12V DC it will automatically start charging the internal battery. You do not need
to worry about “over-charging” the battery – it will automatically stop charging when fully
charged. Sabre will charge its battery while either on or off. If it is on, you will see the power
indicator fade in/out while charging. You can then continue to operate off of the DC power or
remove it and run from battery.
Figure 2 - Connection Diagram
10
To attach the power adapter to Sabre, simply plug it into the 2.1mm jack on the included
3.5mm/2.1mm interface cable.
2.6 Battery charging
Simply plug in the included 12V DC power adapter into the interface cable to begin charging.
Sabre can be charged with power on or off. If Sabre is on, the power LED (above the power
button) will show the current state of charging:
on – Fully charged or running from battery
fade in/out – Battery is charging
flashing – The temperature is out of range or the battery needs service (valid
temperatures for charging are 0-40C / 32-104F)
The charge time is approximately six hours for a fully depleted battery when using the included
12V AC/DC adapter. The battery does not need to be fully charged in order to use Sabre, but it
should not be stored when completely discharged (this is true of all Li-Ion batteries). Sabre may
become slightly warm during the charging process. This is completely normal.
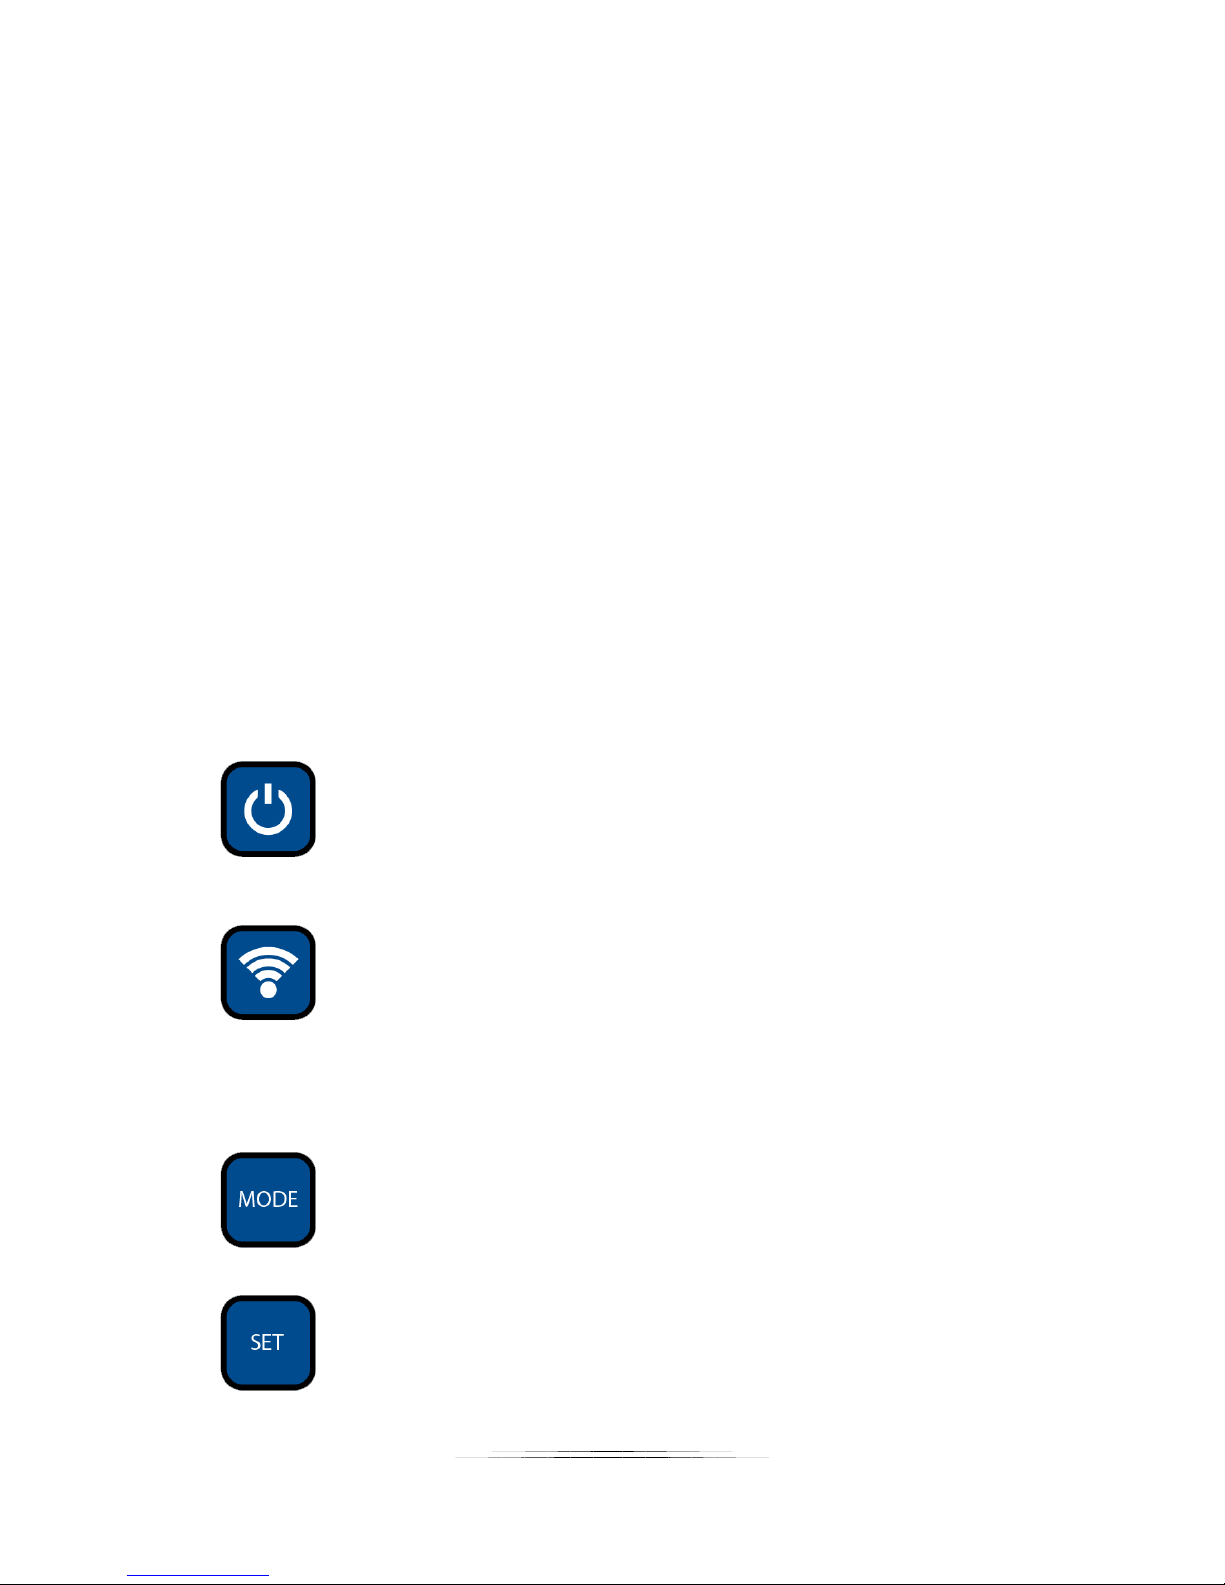
2.7 Buttons
There are four buttons on Sabre:
This button turns on Sabre. Press and hold for one second to turn Sabre off. A
quick press of this button has other features. See “Shot Limit” (section 5.13) and
“Always On” (section 5.18.5) for more details.
Wifi Button. This turns on and off Wifi. The Blue LED above this button will light
when Wifi is enabled. Wifi will automatically turn off after 10 minutes of
inactivity to preserve battery life.
Pressing the “Mode” button will cycle through the five modes (or settings).
“User 1 – 3” are custom operating modes and you can adjust all settings. Auto
and Manual only allow some settings to be changed.
“Set” will immediately set you to “Manual” mode, and use the distance of the
object you’re currently pointing Sabre at as the maximum distance to detect.
Anything that distance or closer will trigger your camera.
11

2.8 LED Indicators
There are several LED’s on Sabre’s keypad.
Power LED: Indicates if Sabre is on, or charging the battery.
Wifi LED: When Wifi is turned on, this LED will illuminate blue.
Mode LEDs: There are three “mode” LED’s to indicate which of the five modes Sabre
is operating in. “User 2” will light the upper two LED’s, where “User 3”
will light the bottom two LED’s.
Shutter Active LED: Indicates when the shutter output is on. Flashes when the shutter
output has been deactivated due to excessive triggering.
2.9 Camera connection
Sabre supports 3.5mm shutter cables. We have a selection available on our web-site. Plug the
3.5mm cable end into the included 3.5mm/2.1mm cable, and then the other end to your
camera. If you have a RCA shutter cable for one of your other Cognisys products we have
adapters available to use these shutter cables as well. Just keep in mind when using an RCA
shutter cable you will not have the ½ press functionality.
2.10 Dual-beam connection
Sabre supports advanced dual-beam triggering that allows you to connect multiple Sabre’s
together. It requires the optional “Dual Beam Sabre Cable”, and that both sensors are
connected to each other using the cable. This allows for the following additional modes:
dual-beam: (pin-point) spots in space or other advanced setups to trigger
directional: Only trigger when a subject is moving one direction but not the other.
12
3. Basic Use
Sabre
In this section we’ll go into the basics of using Sabre. For these modes you use the buttons on
the sensor to adjust any settings. No programs or apps required!
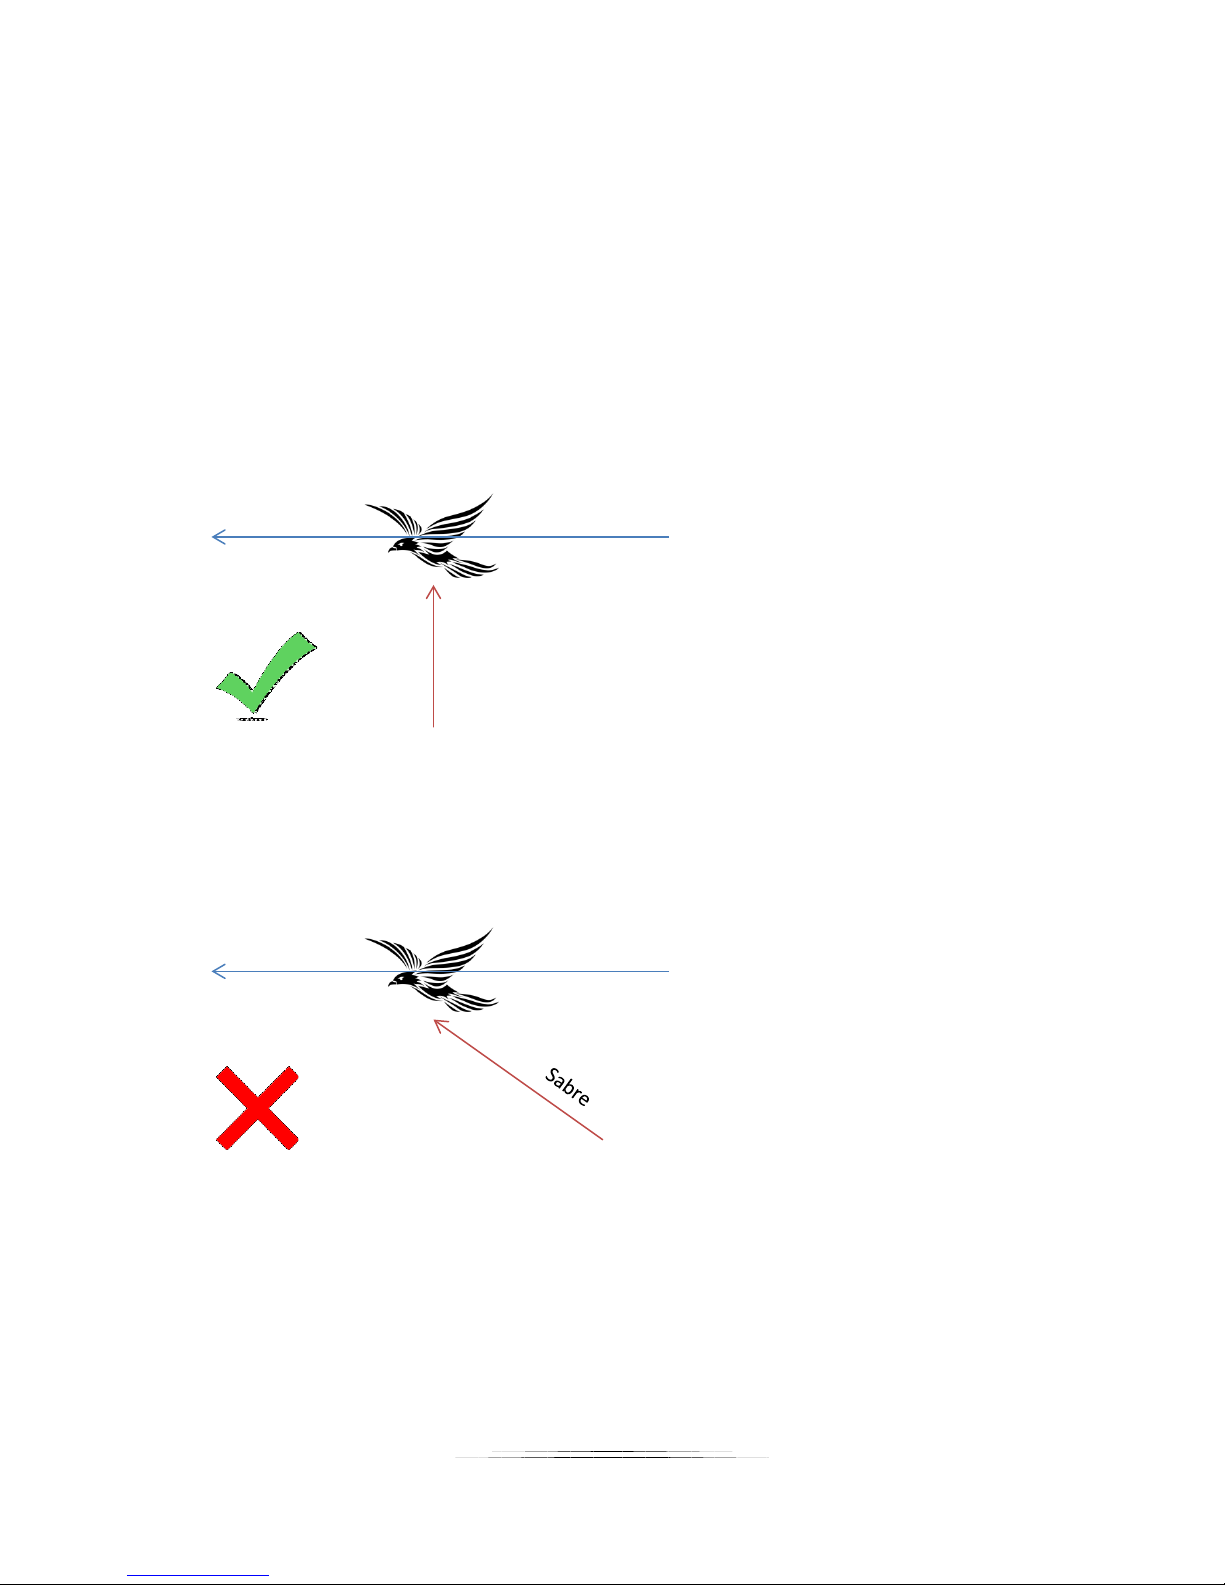
3.1 Physical Setup
Because Sabre transmits a beam of invisible light, it is best to position the sensor so that it will
receive the maximum amount of reflected light. This usually means it should be perpendicular
to the subject that you’re shooting. This will result in the highest returned signal strength. This
isn’t to say it has to be perpendicular, it’s just the best way to have the sensor set up.
Avoid shooting through glass. If that is unavoidable, make sure that Sabre is pushed directly to
the glass. Otherwise the distance measured can drift between the glass and what is outside the
glass, causing false triggers.
13

Also, avoid having a pool of water down-range from Sabre (where its beam will reach the
water). This can cause erroneous measurements as the beam reflects off of the water,
potentially causing false triggers.
3.2 Auto Mode
“Auto Mode” is the ideal instant-on point-and-shoot mode for Sabre. In this mode it is
constantly measuring the maximum distance that it “sees”. It averages these measurements
over a period of time (five seconds is the default) in order to account for slight movement in the
maximum distance. When a subject crosses within a “Detection %” (75% is the default – that
distance or closer), it will trigger your camera. Since the detection range is a percentage, you
don’t have to worry about an absolute distance or forget to adjust it. Just point and go!
If you move Sabre while in “Auto Mode”, it may trigger your camera as the maximum distance it
detects falls within the “Detection %”. Within a few seconds though, it will average and adjust
to the new distance and wait for the next subject.
It is generally a good idea to not have variable-distance backgrounds for automatic mode.
Because the laser beam is so small, it can easily pass between leaves as they move in the wind,
potentially causing false triggers. If this is how you need to operate, consider using “Manual
Mode” instead.
Avoid using “Auto Mode” at very close ranges (a 0.3m/1ft. or closer). This is due to the
accuracy of the measurements – 2.5cm of variation could falsely trigger your camera.
3.3 Manual Mode
“Manual Mode” requires that you set the maximum distance you would like to detect. This
could be the ground, a tree, or a bird feeder. Simply point Sabre at the object and press the
“Set” button. It will take a measurement and set that as the maximum distance. If you weren’t
already in “Manual Mode”, the mode indicator LEDs will change to “Manual”.
You can also enter “Manual Mode” by press the “Mode” button until the mode indicator LEDs
are next to (and only next to) “Manual”. This will use the previously stored distance.
This mode is great if you are trying to shoot up against a stationary object. When you press the
“Set” button, the measured distance will be backed off by 5% in order to prevent immediate
triggering (if the distance is two meters away and we didn’t do that, it would immediately see
something at two meters!).
When using this mode, make sure to account for your background moving. Example: If you
press the “Set” button when pointing at a tree one meter away, Sabre will think that anything
14
 Loading...