

Page 1

COGNEX
®
DataMan
Quick Reference Guide
8000 Series
®
Page 2

1
Getting Started
About DataMan 8000 • DataMan 8000 Accessories •
Physical Layout of the Reader and the Base Station
Page 4
DataMan 8000 Software
2
Connection Options
3
Using DataMan 8000 Series
4
5
6
ii DataMan 8000 Quick Reference Guide DataMan 8000 Quick Reference Guide iii
ii DataMan 8000 Quick Reference Guide
Wireless Readers
Reading Codes with the
DataMan 8000
Industrial Protocols,
Compliance Information,
Warnings and Notices
Overview of Setting Up the Reader • Install DataMan
8000 Software • Start the Setup Tool • Use the Setup
Tool Menu Bar
Connecting through Ethernet • Troubleshooting an
Ethernet Connection • Connecting through RS-232 •
Keyboard Emulation • Connecting through USB
Connecting to a Wireless DataMan 8000 • Base Station
Routing Capabilities • Buffering Data • Charging •
Changing Batteries
Field of View and Reading Distances • Trigger Types
Industrial Protocols • DataMan 8000 Reader and Base
Station Specications • Laser Information • Agency
Compliance Statements
Page 10
Page 16
Page 26
Page 41
Page 45
Page 3

About DataMan 8000
The DataMan 8000 series of readers offers the industry’s most advanced
technology for reading 1D and 2D codes regardless of size, quality, printing
method or surface, and is the only handheld ID reader that offers Industrial
Ethernet communication and liquid lens technology.
The DataMan 8000 series is available in two models, each with patented
1DMax and 2DMax algorithms, liquid lens technology, and future-proof modular
communication slide-ins with optional Industrial Ethernet capability.
The DataMan 8500 readers use Cognex’s patented
UltraLight® technology for superior image formation
on any mark type and surface. UltraLight illumination
provides dark eld, bright eld and diffuse lighting all
in one electronically controlled light.
The DataMan 8100 readers feature integrated bright
eld illumination ideal for applications that require
superior performance without specialty lighting.
Both models are available with the following communication options:
Ethernet RS-232 USB Wireless
An intelligent base station is also provided when the DataMan 8000
reader uses the wireless communication module. The base station acts
as a router between the reader and your computer or network.
4 DataMan 8000 Quick Reference Guide DataMan 8000 Quick Reference Guide 5
Page 4
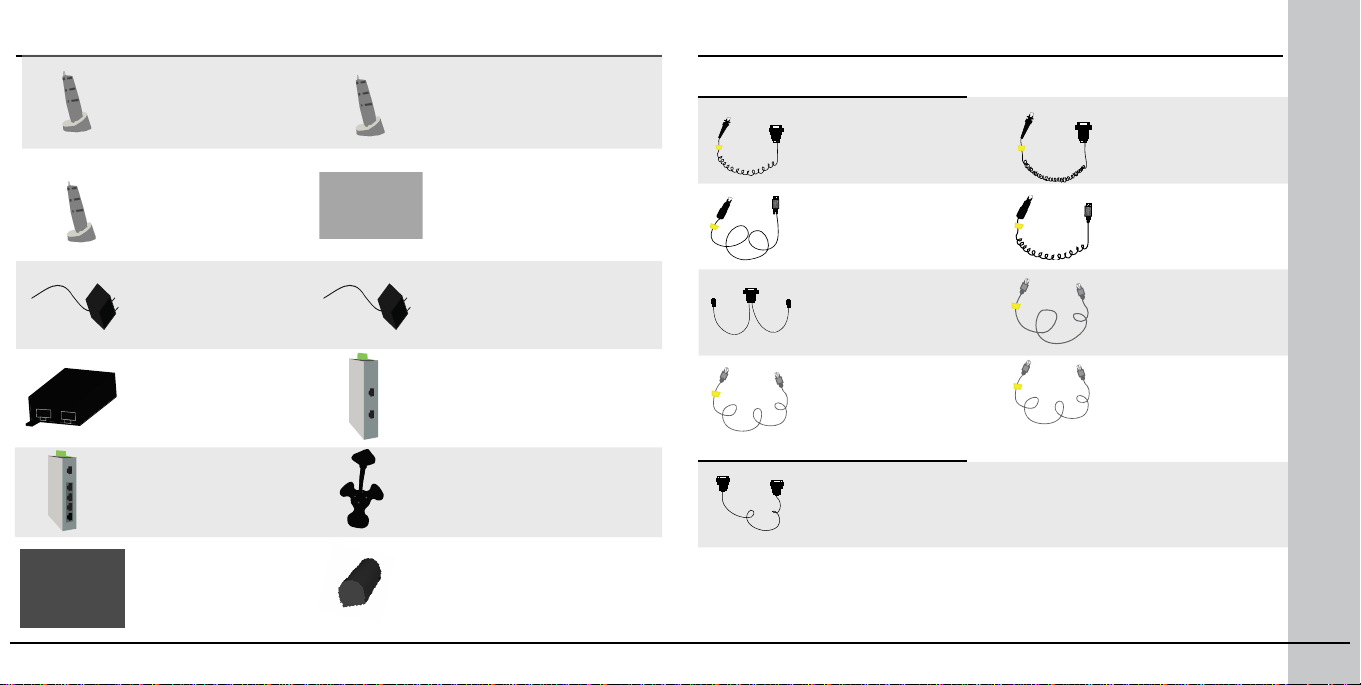
DataMan 8000 Accessories
Serial/USB slide-in
DMCM-SERIALM-00
Wireless slide-in
DMCM-WLESSM-00
Power Supply for
reader
DM100-PWR-00
Ethernet slide-in
DMCM-ENETM-00
Intelligent Base Station
DMA-IBASE-00
Power Supply for base
station
DMA-24VPWR-xx
DataMan 8000 Accessories: Cables
DataMan 8000 Reader Cables
RS-232 coiled cable
for reader, 2.5 m
DM8000-RS232-02
USB cable, 2.5 m
DM8500-USB-02
PS/2 adapter cable
DM700-PS2-00
RS-232 coiled cable
for reader, 5 m
DM8000-RS232-05
USB coiled cable,
2.5 m
DM8000-USBC-02
Ethernet cable, 2.5 m
DM8000-ECABLE-02
POE Adapter
CPS-AC-POE1A-xx
POE Adapter
CPS-24V-POE4
Wall Mount
DMA-WALL-8000-00
POE Adapter
CPS-24V-POE1
Stand
DM-STAND-00
Battery for the wireless
reader
DMA-HHBATTERY-00
DataMan Base Station Cables
• USB cable for base station: Use any standard USB-A to USB-B 2.0
cable up to 3 meters
• Ethernet cable for base station: Use any standard CAT5/5e, SF/FTP
or S/FTP cable
Ethernet cable, 5 m
DM8000-ECABLE-05
RS-232 cable for
base station, 5 m
DMA-RS232-05
Ethernet cable, 30 m
DM8000-ECABLE-30
6 DataMan 8000 Quick Reference Guide DataMan 8000 Quick Reference Guide 7
Page 5

Physical Layout of the Reader
LASER LIGHT, DO NOT STARE INTO BEAM
Laser aimer
Lanyard hook
Communication module
insertion point
UltraLight
(DataMan
8500 only)
Indicator Light
Trigger
(press and
hold to read)
Communication
module
Physical Layout of the Base Station
Connection point with
base station
status indicators
RS-232
spare battery charger
status indicator
spare battery
charger
USB
the reader:
• pairing reader and
base station
• non-wireless
communication
• charging
power plug (24V,
max. 13W)
Ethernet (with
optional Class
3 PoE power)
8 DataMan 8000 Quick Reference Guide DataMan 8000 Quick Reference Guide 9
Page 6
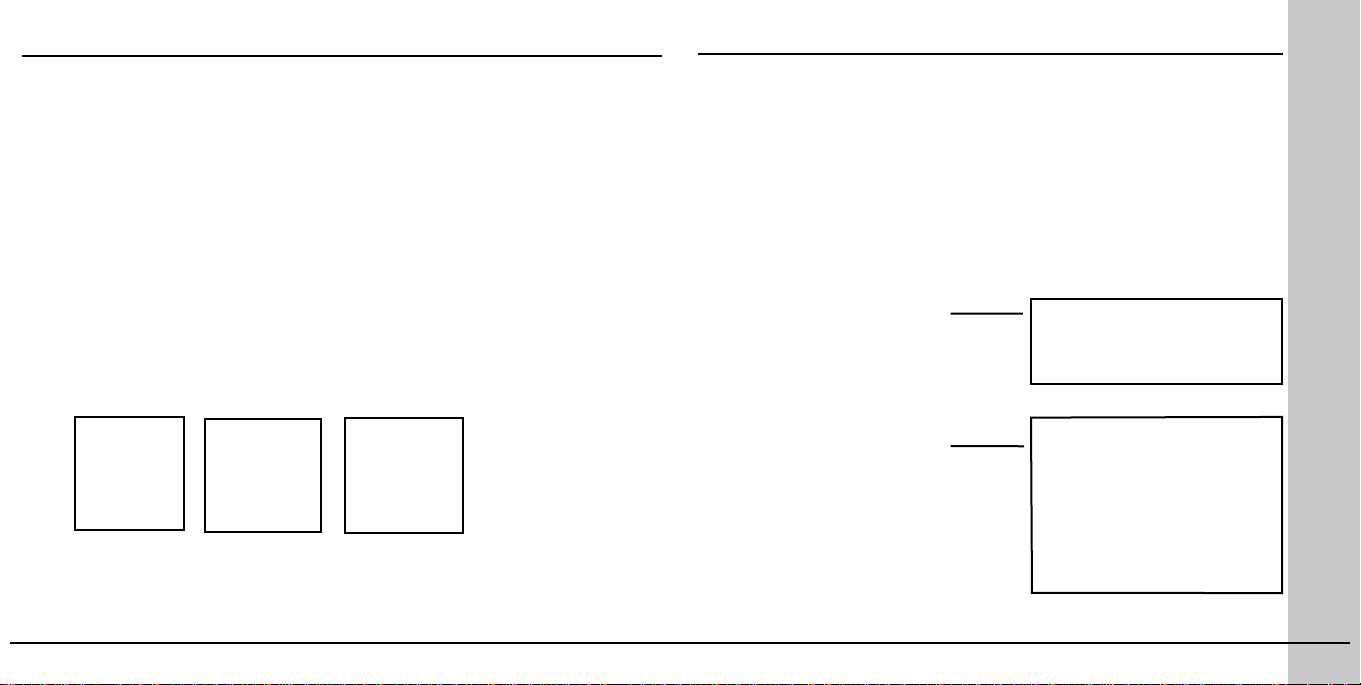
Overview of Setting Up the Reader
Install DataMan 8000 Software
To be able to connect to your reader or base station on your computer, you
must perform the following steps:
1. Install the Setup Tool on your computer.
1. Check the DataMan Release Notes for a full list of system
requirements.
2. Insert CD-ROM and follow the on-screen prompts.
3. Connect the DataMan 8000 to your PC.
4. Launch the Setup Tool and click Refresh. The reader or the base
station appears under COM ports or Network devices.
5. Select a COM port or a Network devices listing and click Connect.
RS-232/USB
connection
2. Select the connection type: Ethernet, Serial, or USB.
Ethernet connection
“DM8_00” with last 6
characters of MAC address,
printed on back of the reader
or the base station
Ethernet RS-232 USB
3. Connect the appropriate cabling.
4. Power on your device(s).
10 DataMan 8000 Quick Reference Guide DataMan 8000 Quick Reference Guide 11
Page 7

Start the Setup Tool
Connect the reader to the Setup Tool to
congure it with the type of symbologies
it will decode as well as other parameters,
such as the type of trigger it will use and the
format of the results it will generate.
Alternatively, congure your reader
by scanning the appropriate reader
conguration code from the Reader
Conguration Codes document, available
through the Windows Start menu.
Trigger button
Latest image Context based help
Quick Setup
Congure your reader in a few basic steps
Connect to Reader
Establish a connection to the reader
Results Display
View results
Light and Imager Settings/
UltraLight Settings
Choose a trigger type and other acquisition
parameters
System Settings
Congure visual and audio feedback, trigger
and output actions
Read history
Battery level indicator
Connection status/Signal strength
12 DataMan 8000 Quick Reference Guide DataMan 8000 Quick Reference Guide 13
Page 8

Use the Setup Tool Menu Bar
Each reader can store its current set of runtime parameters to a conguration
(.cfg) le, which contains information such as the enabled symbologies and
how any output data should be formatted.
The same conguration le can be loaded onto multiple readers, as the le
does not contain identication information such as the IP address or device
name of the reader used to create it.
A reader can also generate a Cognex device conguration (.cdc) le, which
stores the set of runtime parameters plus any identication data, such as
the name of the device, its IP address, subnet mask, and so on. Cognex
recommends generating a device conguration le for each reader to allow you
to restore a reader to its operating state with minimal effort.
Use the File menu of the Setup Tool to manage .cfg and .cdc les:
File Menu
Open Conguration Open a saved .cfg conguration le.
Save Conguration Create a .cfg conguration le of current runtime
parameters.
Print Conguration Code Generate a programming codes sheet
representing your reader’s conguration.
Restore Device Load a saved device conguration .cdc le,
with run-time parameters plus device-specic
information for a particular DataMan 8000.
Backup Device Create a device conguration .cdc le for a
specic reader.
Save Image Save the latest acquired image with .jpg le
format.
Use the Edit menu for standard Cut, Copy and Paste operations.
Use the View menu to view reader information (serial number, rmware
version, and so on) and to enable and disable various elements of the
Setup Tool, and the Tasks menu to switch between various Setup Tool
options.
Use the System menu to manage the current settings on the reader
and to upgrade the features it currently supports:
System Menu
Save Settings Save the current parameters to non-volatile
memory, which allows the reader to restore
these settings each time you reboot it.
Reset Conguration Reset all conguration parameters in RAM
(volatile memory) to the default settings
except for communication settings.
Update Firmware Update the reader software.
Upload Feature Key Unlock additional features available in the
reader software if you have the right key.
Use the Help menu to display Setup Tool version information.
14 DataMan 8000 Quick Reference Guide DataMan 8000 Quick Reference Guide 15
Page 9
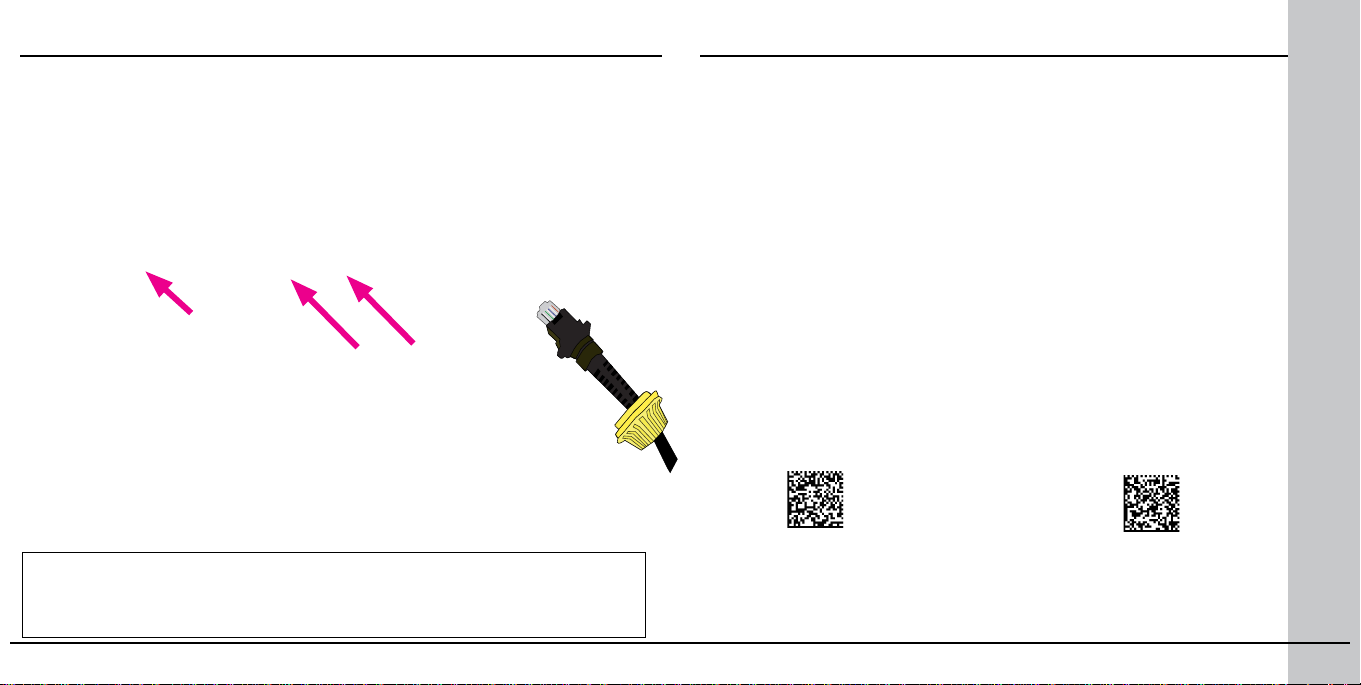
Connecting a DataMan 8000 through Ethernet
1. Connect the
Ethernet slidein (DMCMENETM-00) to
your DataMan
8000.
Use the DM8000-ECABLE-05 (5 meters) or the DM8000-ECABLE-30 (30 meters).
You also need a Power Over Ethernet Adapter (CPS-AC-POE1A-xx).
2. With a 2 mm
Allen Wrench,
tighten the
screws so that
the slide-in is
rmly locked.
3. Insert the plug and slide
the cable lock up to the
reader and twist the cable
lock in place.
location of the
two screws
Troubleshooting an Ethernet Connection
If your reader does not appear in the Setup Tool’s list of network
devices, you may need to adjust your network settings.
First check your Ethernet connection and click Refresh in the Setup
Tool. Next, scan the Enable DHCP code below (which you can also
nd in the DataMan Reader Conguration Codes document available
from the Windows Start menu). This might allow the reader to acquire
a suitable IP address from a DHCP server on your subnet.
If the reader still does not appear, you can use either the Add Device
or Force Network Settings options in the Setup Tool.
If you know the IP address of the reader, use the Add Device option.
If you do not know the IP address, use the Force Network Settings
options. Either method should allow the DataMan 8000 reader to
appear in the list of Network devices so that you can connect to it
through the Setup Tool and your Ethernet connection.
If none of the above helps, reset your reader to factory defaults by
scanning the Reser Scanner to Factory Defaults code below.
WARNING
Disconnect DataMan from power before inserting/removing
Enable DHCP
Reset Scanner to
Factory Defaults
communication modules.
16 DataMan 8000 Quick Reference Guide DataMan 8000 Quick Reference Guide 17
Page 10
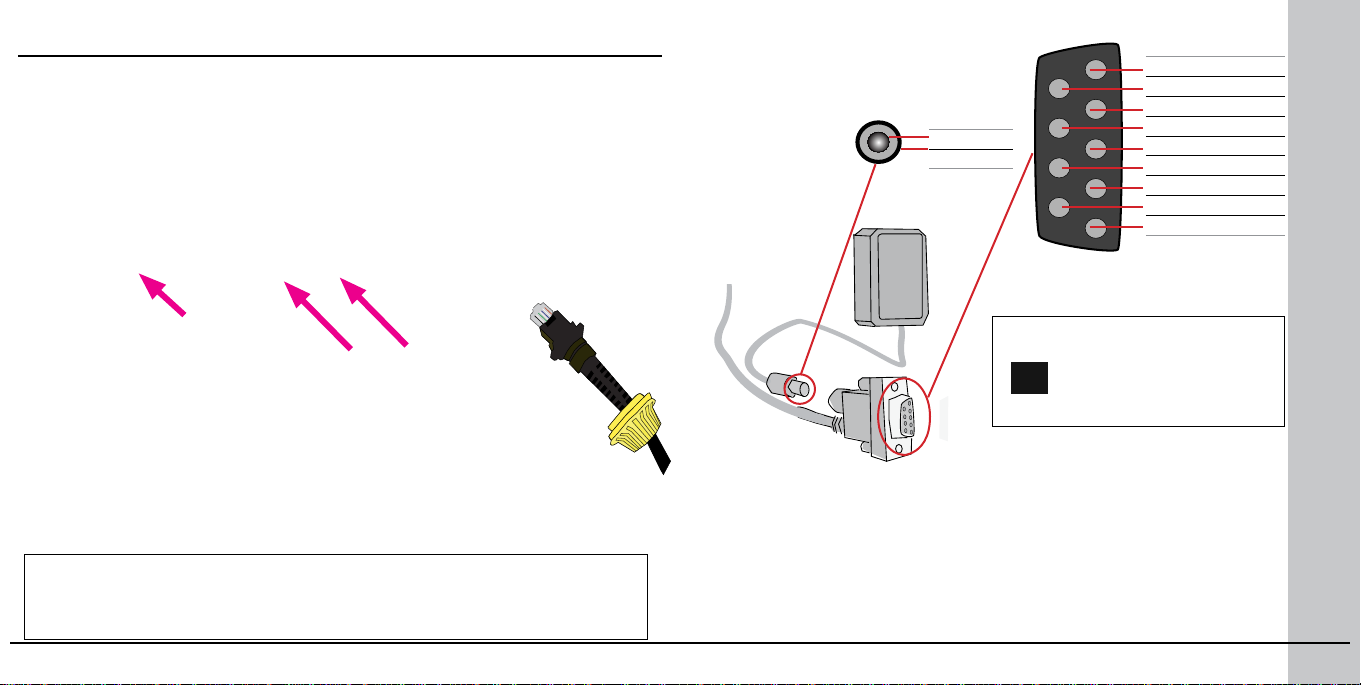
Connecting a DataMan 8000 through RS-232
1. Connect the
serial slidein (DMCMSERIALM-00) to
your DataMan
8000.
2. With a 2 mm Allen
Wrench, tighten
the screws so
that the slide-in is
rmly locked.
3. Insert the plug and slide
the cable lock up to the
reader and twist the cable
lock in place.
location of the
two screws
Observe the following electrical requirements:
VCC
GND
1
2
5 GND
9 Reserved
4 N/C
8 RTS
3 RxD
7 CTS
2 TxD
6 N/C
1 VCC PWR
WARNING
For proper RS-232
operation, do not apply
any voltage to pin 9.
Use the DM8000-RS232-02 cable (2.5 meters) or the DM8000-RS232-05 cable
(5 meters). For power supply, use the DataMan 8000 Power Supply (DM100PWR-000).
WARNING
Disconnect DataMan from power before inserting/removing
communication modules.
1. 6VDC power supply (DM100-PWR-000), a 5.5mm x 2.1mm DC Power
Plug
2. VCC = +4.75V up to +6.0V for 2.5 m cable
VCC = +5.5V up to +6.0V for 5.0 m cable
Power on the RS-232 cable can be supplied by either the DC Power Plug
or Pin 1 of the D-SUB. DO NOT use both in parallel.
18 DataMan 8000 Quick Reference Guide DataMan 8000 Quick Reference Guide 19
Page 11

Keyboard Emulation without KeyboardKeyboard Emulation with Keyboard
1. Connect the PS/2 keyboard adapter to your unpowered PC.
2. Connect your PS/2 keyboard to the PS/2 keyboard adapter, and start up
your PC.
3. Connect your reader to an RS-232 cable and power up your reader.
4. Scan the PS/2 Keyboard Emulation Disable Conguration Code (from the
Reader Conguration Codes document, available through the Windows Start
menu).
5. Connect the RS-232 cable to the PS/2 keyboard adapter.
6. Start reading codes.
You can change your reader’s conguration by switching back to the serial
interface and connecting to the Setup Tool.
20 DataMan 8000 Quick Reference Guide DataMan 8000 Quick Reference Guide 21
1. Scan the PS/2 Keyboard Emulation Enable Conguration Code (from
the Reader Conguration Codes document, available though the
Windows Start menu.)
2. Power down your PC and unplug your device from power.
3. Connect the PS/2 keyboard adapter to your PC.
4. Connect your reader’s serial cable to the PS/2 keyboard adapter and
plug in your device to power. Wait until the device boots up.
5. Power up your PC and start reading codes.
You can change your device’s conguration by scanning the appropriate
Conguration Codes.
Page 12

Keyboard Emulation with Wireless
Reader using Keyboard
Keyboard Emulation with Wireless
Reader without Keyboard
OR
1. Connect the PS/2 keyboard adapter
to your unpowered PC.
2. Connect your PS/2 keyboard to the PS/2
keyboard adapter.
3. Start up your PC.
4. Power up your base station.
5. With your wireless reader, scan the Base Station
PS/2 Keyboard Emulation Disable Conguration
Code (from the Reader Conguration Codes document,
available through the Windows Start menu).
6. Connect the base station to an RS-232 cable, and plug it in to
the PS/2 keyboard adapter.
7. Start reading codes.
You can change your device’s conguration by switching back to the
serial interface and connecting to the Setup Tool.
1. With your wireless reader,
scan the Base Station PS/2 Keyboard Emulation Enable Conguration
Code (from the Reader Conguration Codes document, available
though the Windows Start menu.)
2. Disconnect your base station’s serial cable from your PC.
3. Power down your PC and unplug your device from power.
4. Connect your base station’s serial cable to the PS/2 keyboard
adapter and plug in your device to power.
5. Connect the PS/2 keyboard adapter to your PC.
6. Power up your PC and start reading codes.
You can change your device’s conguration by scanning the appropriate
Conguration Codes.
OR
22 DataMan 8000 Quick Reference Guide DataMan 8000 Quick Reference Guide 23
Page 13

Connecting a DataMan 8000 through USB
1. Connect the
serial slidein (DMCMSERIALM-00)
to your
DataMan 8000.
2. With a 2 mm Allen
Wrench, tighten
the screws so
that the slide-in is
rmly locked.
3. Insert the plug and slide the
cable lock up to the reader and
twist the cable lock in place.
location of the
two screws
Using your Device through USB
If you connect your reader with the coiled USB cable, you must use
your device in USB 1.1 mode (which is the default mode). With a
straight USB cable, you can use your device in both modes.
Change the USB Connection in the Setup Tool’s Communication
Settings pane’s Serial tab, or scan the appropriate code from the
DataMan Conguration Codes document.
You can also switch the USB mode (CDC or HID) of both the reader and
the base station with a pair of RP codes. Perform the following steps:
Use the DM8000-USB-00 cable (2.5 meters) or the DM8000-USBC-02 cable
(2.5 meters). For DataMan 8500, use an external power supply: DataMan
8000 Power Supply (DM100-PWR-000).
WARNING
Disconnect DataMan from power before inserting/removing
communication modules.
1. Disconnect from the Setup Tool
if you are connected.
2. Scan the “USB Keyboard” code
from the DataMan Conguration
Codes document.
3. Start scanning codes with your
corded reader.
1. Disconnect from the Setup
Tool if you are connected.
2. Scan the “Enable USB
Keyboard for the base
station” code from the
DataMan Conguration Codes
document.
3. Start scanning codes with
your wireless reader.
24 DataMan 8000 Quick Reference Guide DataMan 8000 Quick Reference Guide 25
Page 14

Connecting to a Wireless DataMan 8000 through a Base Station
1. Connect the
wireless slidein (DMCMWLESSM-00) to
your DataMan
8000.
WARNING
2. With a 2 mm
Allen Wrench,
tighten the
screws so that
the slide-in is
rmly locked.
location of the
two screws
3. Insert the battery.
4. Insert the plug and twist it in place.
5. Power up the base station using either a 24V power supply, or a Class
3 Power Over Ethernet adapter.
6. Connect your base station to your PC using either serial, USB or
Ethernet communication.
Ethernet connection
RS-232 connection
USB connection
Power
Remove battery from your DataMan before inserting/
removing the communication module.
26 DataMan 8000 Quick Reference Guide DataMan 8000 Quick Reference Guide 27
Page 15

Wireless Connections (continued)
7. When the base station is powered up, place your reader into the base
station. They become automatically paired. The base station’s status
indicator becomes green. When the wireless reader is removed from the
base, a wireless connection is established. The status indicator of both
the base station and the reader become blue and you can hear a beep.
Blue lights indicate the reader and base have successfully paired and are
communicating.
8. Connect to your base station or to the wireless reader. You have the
possible connection options:
Base
Station
Connection
Type
RS-232 Base Station appears: COM port
USB Base Station appears: COM port 1
Ethernet Base station appears: Network device 1
Connect to Reader in the Setup Tool Connection
(Wireless reader does not appear)
Wireless reader appears: COM port 2
Wireless reader appears: Network device 2
Channels
terminal program
terminal program
Setup Tool
terminal program
Setup Tool
9. Lift your reader up from the base station and start reading codes.
NOTES
• When the reader is on the base, communication is established by
means of cradle contacts. Wireless communication is disabled.
• Congure wireless communication settings by connecting to the
base station. In order for the changed settings to be synchronized
between the DataMan 8000 wireless reader and the base station,
place your reader in the base station after your changes are saved.
To assign a static IP address to the base station or the reader when
communicating via Ethernet, connect to the base station in the Setup
Tool. The base station, however, auto-assigns the IP address to the
reader when they become paired.
• When you connect with the base station to a terminal program, your
wireless reader sends decode results to the terminal, but you cannot
send commands to the reader.
• If you want to unpair your reader from the base station, you can
either click Unassign in the Setup Tool’s Communication Settings
pane’s Wireless tab (when you are connected either with the
reader or the base station), or scan the “Unassign Reader” reader
conguration code.
• If you place the wrong reader (that is, a reader that is not associated
with the base station) into the base station, the base station status
indicator ashes red and a long beep is sounded.
28 DataMan 8000 Quick Reference Guide DataMan 8000 Quick Reference Guide 29
Page 16

Base Station Routing Capabilities
W
i
r
e
l
e
s
s
RS-232/
USB
reader
base station
PC
NETWORK
Ethernet
The base station is visible as connected through either RS-232, USB or
Ethernet, but it routes data through the wireless interface to the reader.
Wireless Reader: Buffering Data
When you are within the wireless range of the base station, your
wireless reader sends decoded data to your PC through the base station,
just as if you used a tethered reader. You can also see the decoded
images in the Setup Tool, if it is running and connected to the reader.
When you leave the wireless range, however, you lose connection to
your PC, but you can still keep reading codes. The decoded data is saved
in the buffer of the reader.
This buffered data appears on your PC again when you come back within
the wireless range, but ONLY IF you were connected to a terminal
program when you left the wireless range.
Buffered read results on the reader are not displayed in the Setup Tool;
they are only transmitted over an existing keyboard emulation, RS-232
Serial or TCP/IP Telnet connection. NOTE that the images acquired by
the reader when it is out of wireless range are never saved, and can not
be retrieved.
Open a connection with the reader in a terminal program so that you
gain the buffered data when wireless connection is established again.
See the following table for connection options according to
communication type:
30 DataMan 8000 Quick Reference Guide DataMan 8000 Quick Reference Guide 31
Page 17

Wireless Reader: Buffering Data (Continued)
Base Station Connection Type
RS-232 Connect to the COM port of the base station.
How to Connect
When you leave the wireless range, you can still keep reading codes.
The reader going ofine is indicated by a long beep and the status
indicator ashes magenta.
USB Connect to the COM port of the wireless reader.
Ethernet Connect to the terminal program using the IP address of the
PS/2 Keyboard or
USB Keyboard
While you are still within the wireless range, the reader occasionally blinks blue
to indicate that the wireless connection is established.
reader. To nd out the IP address, go to the Setup Tool’s Con-
nect to Reader pane and hover your mouse over the reader. The
Open the text editor or your program of choice to use keyboard
emulation. When you return to the wireless range, keyboard
emulation continues starting with the buffered data.
blinking blue status
indicator: wireless
connection is alive
IP address appears.
when the
reader leaves
the wireless
range, the base
station’s signal
stops being
blue
When the reader is ofine, good reads are indicated with 2 short beeps
and the selected good read status indicator color (green by deafult).
When the buffer is full, no more codes are read. The reader does not
discard the oldest read.
status indicator blinks
magenta: your reader is
ofine
status indicator beeps twice:
your reader is ofine while
decoding symbols
when the buffer is full, the
reader beeps and the status
indicator becomes white
32 DataMan 8000 Quick Reference Guide DataMan 8000 Quick Reference Guide 33
Page 18

Summary of Wireless Buffering Indicators
Condition Status Indicator:
Reader in wireless range of
base station
Reader out of
wireless range
of base station
Reader out of
wireless range,
buffer is full
Reader
When the reader is
awake, blinking blue
indicates wireless
connection with base.
When the reader is
ofine, no indicator.
Pull the trigger to
wake it up and it will
blink blue.
Good read: green,
single beep (default)
No read: red, no
beep (default)
Ofine: When the
reader wakes up out
of the wireless range,
there is no indicator.
Good read: green
(default)
No read: red (default)
Good read: green
and then white
No read: red (default)
Status Indicator: Base
Station
Reader out of the base
station and reader is
awake: steady blue.
Reader out of the base
station and reader is
ofine: steady red.
Paired reader in the base
station: steady green.
Base station is receiving
data or images from
reader: ashing blue.
Reader ofine: steady
red.
Reader ofine: steady
red
Sounds
Good read: 1 beep (default)
No read: no beep (default)
Long beep when you leave the
wireless range.
Good read: 2 beeps
No read: no beep
Good read: long beep
No read: no beep
Wireless Reader: Charging
When you are reading codes with your wireless reader, blinking red
status indicators will indicate low battery. As the battery discharges, the
blink frequency increases.
blinking red status indicator
indicates low battery
You can also check the status of the battery in the Setup Tool.
34 DataMan 8000 Quick Reference Guide DataMan 8000 Quick Reference Guide 35
Page 19

Wireless Reader: Charging (Continued)
Place the reader on the base station for charging.
Refer to the following table for a summary of indicators regarding
charging.
Paired Reader Charging
Paired Reader Fully Charged
Condition Status Indicator: Reader Status Indicator: Base
Battery low
Reader is charging in
the base station
Reader is fully charged
in the base station
ashing red indicators • steady blue,
• ashing blue,
steady red indicators • steady green
• ashing green,
steady green
indicators
• steady green
• ashing green,
Station
indicating wireless
connection
indicating data
transfer
indicator
indicating data
transfer
indicator
indicating data
transfer
36 DataMan 8000 Quick Reference Guide DataMan 8000 Quick Reference Guide 37
Page 20

Wireless Reader: Changing Batteries
To change batteries, perform the following steps:
1. Twist the reader’s end cap, and
take it off.
The battery should not be disposed of along with municipal waste.
Use the appropriate separate take-back systems for battery disposal.
2. Hold the reader in an upright
position and the battery will slide out
of the handle. NOTE that you may
need to shake the reader slightly.
3. Put the replacement battery into the slot. The battery has a small
triangle on one of its side. Make sure you insert the battery triangle end
rst.
4. Put the end cap back on and twist it.
Make sure the
triangle aligns with
the circle when the
cover is locked.
38 DataMan 8000 Quick Reference Guide DataMan 8000 Quick Reference Guide 39
Page 21

Wireless Reader: Changing Batteries (Cont.)
5. Place the battery in the spare battery charger in the direction of the small
triangle of the battery.
Field of View and Reading Distances
There is a range of reading distances available for different code sizes
and focus positions. Select a focus position that allows you to read the
desired code sizes at the desired working distance.
• If your application has a consistent reading range, set the focus
range to a limited depth of eld with no steps (for example, set it to
20) or with limited steps (for example, set it to 2 steps between 0
and 30). This way you can achieve fast performance.
• If your application has a variety of code types and sizes, set the
focus range to a wider depth of eld with increased number of steps
(for example, set it to 6 steps between 0 and 200). This way you can
get better coverage.
When you are charging the auxilliary battery, the base station’s spare battery
status indicator displays either charging in progress (red) or fully charged
(green).
For a map of the eld of view and reading distances, see pages 42-43.
40 DataMan 8000 Quick Reference Guide DataMan 8000 Quick Reference Guide 41
Page 22

Map of Field of View and Reading Distances
1D
2D
312 mm (12.2 in)
100mmin0
0
3
200
300
6
9
12
400
500
600
15
18
21
154 mm (6.06 in)
33 mm (1.29 in)
396 mm (15.5 in)
(2.9 in)
0
10 mil 210 mm (8.2 in)
0
20 mil
374 mm (14.7 in)
0
0
0
18 mil 500 mm (19.6 in)
13 mil
409 mm
(16.1 in)
7 mil 215 mm (8.4 in)
0
5 mil 75 mm
0
mm
in
100
100
200
200
6
6
3
3
24
COGNEX
42 DataMan 8000 Quick Reference Guide DataMan 8000 Quick Reference Guide 43
Page 23

Trigger Types
The DataMan 8000 trigger mode determines when the reader attempts to read
a code. Use the Setup Tool, or the appropriate reader conguration codes, to
change trigger types.
The following trigger types are supported:
Industrial Protocols
The DataMan 8000 corded readers support the following industrial
protocols:
• EtherNet/IP™
• PROFINET
• MC Protocol
• Modbus TCP
• Presentation: The laser aimer is always on. When motion is detected in front
of the reader, the reader will turn on and scan for a symbol. The reader
relies on an internal timing mechanism to acquire images.
• Manual (default): Begins acquiring images when you press the trigger
button on the reader, and continues acquiring images until a symbol is found
and decoded or you release the button.
Select the industrial
protocol tools and
sample programs
when installing the
Setup Tool.
There are three ways to enable or disable Industrial Protocols. Using
either method, a reboot is required for the changes to come into effect.
• Enable the protocols using the Industrial Protocols pane of the
Setup Tool (under Communication Settings).
• Scan the appropriate Reader Conguration codes (see Reader
Conguration Codes available through the Windows Start menu).
• Send the appropriate DMCC (see Command Reference available
through the Windows Start menu).
For more information on using the industrial protocols, read the
DataMan Communications and Programming Guide available through
the Windows Start menu.
44 DataMan 8000 Quick Reference Guide DataMan 8000 Quick Reference Guide 45
Page 24

DataMan 8000 Specications DataMan Base Station Specications
Weight 326 g
Operating Temperature 0ºC — 40ºC (32ºF — 104ºF)
Storage Temperature -40ºC — 60ºC (-40ºF — 140ºF)
Maximum Humidity 95% (non-condensing)
Codes Data Matrix
Power Supply
Requirements
Codabar, Interleaved 2 of 5, Code 39, Code 128, and Code
93, Pharma, Postal, RSS/CS, PDF 417, MicroPDF 417
• DataMan 8100 with USB (USB BUS powered or external
2.5 W maximum LPS or NEC class 2 power supply): +5V
- +6V DC
• DataMan 8500 with USB (external 2.5 W maximum LPS
or NEC class 2 power supply is required): +5V - +6V DC
DataMan 8100/8500 with RS-232 (external 5.0W maximum
LPS or NEC class 2 power supply): +4.75V - +6.0V DC (2.5
m RS-232 cable), +5.5V - +6.0V DC (5.0 m RS-232 cable)
TM
; QR Code and microQR Code; UPC/EAN/JAN;
Weight 328 g
Operating Temperature 0ºC — 40ºC (32ºF — 104ºF)
Storage Temperature -40ºC — 60ºC (-40ºF — 140ºF)
Maximum Humidity 95% (non-condensing)
Power Supply
Requirements 24V -+ 10%, 13 W maximum LPS or NEC class
2 power supply, or PoE class 3
DataMan 8100/8500 with Ethernet (Class 2 PoE supply):
Battery life for wireless
reader (typical use case)
Wireless protocol 802.11 b/g, 2.4 GHz, User Selectable channels 1-11
2900 triggers can be operated within a 10 hour working shift
6.0W maximum
46 DataMan 8000 Quick Reference Guide DataMan 8000 Quick Reference Guide 47
Page 25

Laser Information
LASER LIGHT, DO NOT STARE INTO BEAM: CLASS 2 LASER PRODUCT
FAILURE TO FOLLOW THESE INSTRUCTIONS MAY CAUSE SERIOUS INJURY
• CAUTION: Use of controls or adjustments or performance of procedures
other than those specied herein may result in hazardous radiation
exposure.
• Do not attempt to service or repair this product -- return it to Cognex for
service.
• Do not permit anyone other than Cognex Corporation to service, repair, or
adjust this product.
• Do not attempt to open or modify this device except as described in this
document.
• Do not direct or reect laser light toward people or reective objects.
• Do not operate this device if it is damaged or if the covers or seals are
missing or damaged.
This Laser Product is designated as Class 2 during all procedures of operation.
Wavelength 650 nm
Laser Power for classication < 1 mW
Beam Diameter < 3mm at aperture
Divergence < 5 mrad
For assistance contact Cognex Corporation at http://support.cognex.com
Agency Compliance Statements: DataMan
8000 Series Readers
The DataMan 8000 series device meets or exceeds the requirements of all applicable standards organizations for safe operation. However, as with any electrical
equipment, the best way to ensure safe operation is to operate them according
to the agency guidelines that follow. Please read these guidelines carefully before
using your device.
The following specications apply to the DataMan 8000 corded readers:
Regulator Specication
USA FCC Part 15B, Class A
FCC Part 15.247
FDA/CDRH Laser Notice No 50
Canada ICES-003
European Community EN55022, Class A
EN55024
EN60950
EN60825-1
Australia C-TICK, AS/NZS CISPR 22 / EN 55022 for Class A
Equipment
Japan J55022, Class A
The following specications apply to the DataMan 8000 wireless readers:
Regulator Specication
USA FCC Part 15B, Class A
FCC Part 15.247
FDA/CDRH Laser Notice No 50
Canada ICES-003
RSS 210
48 DataMan 8000 Quick Reference Guide DataMan 8000 Quick Reference Guide 49
Page 26

Agency Compliance Statements: DataMan 8000 Series Readers (Continued)
Regulator Specication
European Community EN301 489-1 / -17
EN300 328-2
EN60950
EN60825-1
Australia C-TICK
Japan ARIB STD-T66
FCC Class A Compliance Statement
This equipment has been tested and found to comply with the limits for a Class
A digital device, pursuant to part 15 of the FCC Rules. These limits are designed to provide
reasonable protection against harmful interference when the equipment is operated in a
commercial environment.
This equipment generates, uses, and can radiate radio frequency energy and, if not installed and used in accordance with the instruction manual, may cause harmful interference to radio communications. Operation of this equipment in a residential area is likely to
cause harmful interference in which case the user will be required to correct the interference at his own expense.
This device complies with Part 15 of the FCC Rules and with RSS-210 of Industry Canada.
Operation is subject to the following two conditions:
(1) this device may not cause harmful interference, and
(2) this device must accept any interference received, including interference that
may cause undesired operation.
Changes or modications made to this equipment not expressly approved by Cognex may
void the FCC authorization to operate this equipment.
Radiofrequency radiation exposure information:
For body worn operation, this device has been tested and meets the FCC RF exposure
guidelines when worn in hand or close to the body. Use of any accessory may not ensure
compliance with FCC RF exposure guidelines.
50 DataMan 8000 Quick Reference Guide DataMan 8000 Quick Reference Guide 51
Canadian Compliance
This Class A digital apparatus complies with Canadian ICES-003.
Cet appareil numérique de la classe A est conforme à la norme NMB-003 du
Canada.
Japanese Compliance
These devices have been granted a designation number by the Ministry of Internal
Affairs and Communications according to the Ordinance concerning the Technical
Regulations Conformity Certication etc. of Specied Radio Equipment
(特定無線設備の技術基準適合証明等に関する規則).
Article 2 clause 1 item 19
Approval n°: 202WW11139331
These devices should not be modied (otherwise the granted designation number
will become invalid).
C-Tick Statement
N13060
Conforms to AS/NZS CISPR 22/ EN 55022 for Class A Equipment.
European Compliance
This equipment complies with the essential requirements of EU Directives 1999/5/
EC, 2004/108/EC and 2006/95/EC, as applicable. Declarations are available from
your local representative.
Page 27

Agency Compliance Statements: DataMan 8000 Series Readers (Continued)
Където е приложимо, оборудването е съобразено с основните изисквания
наЕвропейските директиви 1999/5/ЕС, 2004/108/ЕС и 2006/95/ЕС. Декларации са
налични от местния представител.
Toto zařízení splňuje základní požadavky směrnic EU 1999/5/ES, 2004/108/ES a 2006/95/
ES, vždy dle konkrétního způsobu použití. Příslušná prohlášení jsou k dispozici u vašeho
lokálního distributora.
Dette udstyr overholder de væsentlige krav i EU-direktiv 1999/5/EF, 2004/108/EF og
2006/95/EF, som er relevant. Erklæringerne kan fås hos din lokale repræsentant.
Tämä laitteisto täyttää seuraavat EU Direktiivien olennaiset vaatimukset 1999/5/EY,
2004/108/EY ja 2006/95/EY, soveltuen. Vaatimusten-mukaisuusvakuutukset ovat saatavilla paikalliselta edustajalta.
Dit produkt voldoet aan de voorschriften van de richtlijnen van de EG Raad (1999/5/EC,
2004/108/EC en 2006/95/EC), indien van toepassing. Declaraties zijn beschikbaar bij uw
locale vertegenwoordiger.
Cet appareil est conforme aux exigences essentielles des Directives de l’Union Européenne 1999/5/CE, 2004/108/CE et/ou 2006/95/CE. Veuillez consulter votre représentant
local pour les déclarations applicables.
Ezen készülék technikai jellemzői megfelelnek a vonatkozó 1999/5/ EC, 2004/108/EC és
2006/95/EC EU rendeletekben foglalt követelményeknek. A megfelelőségi dokumentáció a
gyártó helyi partnereinél áll az Ön rendelkezésére.
Questo prodotto,ove applicabile, risponde alle direttive Europee 1999/5/EC, 2004/108/EC
e 2006/95/EC. Dichiarazioni sono disponibili presso il vostro rappresentante locale.
Ten sprzęt jest zgodny z ogólnymi wymaganiami Dyrektyw UE nr 1999/5/EC, 2004/108/
EC i 2006/95/EC, na ile znajdują zastosow-anie. Oświadczenia są dostępne u lokalnych
przedstawicieli.
Acest echipament este in conformitate cu cerintele esentiale ale Directivelor EU 1999/5/
EC, 2004/108/EC si 2006/95/EC. Certi-catele sunt disponibile la reprezentanta locala. Toto zariadenie spĺňa základné požiadavky smerníc EÚ 1999/5/ES,2004/108/ES a
2006/95/ES, vždy podľa konkrétneho spôsobu použitia. Príslušné vyhlásenia sú k dispozícii
u vášho lokálneho dis-tributora.
Das Gerät erfüllt die wesentlichen Anforderungen der EU-Direktiven 1999/5/EC, 2004/108/
EC und 2006/95/EC, soweit anwendbar. Eine entsprechende Bescheinigung kann bei Ihrem
zuständigen Vertriebspartner angefordert werden.
Ta oprema je skladna in izpolnjuje nujne zahteve direktiv EU 1999/5/ES, 2004/108/ES in
52 DataMan 8000 Quick Reference Guide DataMan 8000 Quick Reference Guide 53
2006/95/ES. Deklaracije so na voljo pri vašemkrajevnem predstavniku.
Αυτός ο εξοπλισμός συμμορφώνεται με τις βασικές απαιτήσεις των εφαρμοσμένων
οδηγιών 1999/5/EC, 2004/108/EC kai 2006/95/ECτης Ευρωπαικής Ένωσης. Οι
επίσημες δηλώσεις είναι διαθέσιμες από τον τοπικό σας αντιπρόσωπο.
Dan l-apparat huwa konformi mar-regolamenti stipulati mid-Direttivi Ewropej
1999/5/EC, 2004/108/EC u 2006/95/EC skond kif inhu likabbli. Kopji ta’ dawn iddikjarazjonijiet huma aċċessibbli mingħand ir-rappreżentant locali tiegħek.
Este equipo cumple com las condiçãos vigorantes de la EU diretivas 1999/5/EC,
2004/108/EC e 2006/95/EC, com é pertinente. Las normativas estão disponível
com su representado local.
Este equipo cumple con los requerimientos esenciales de las direc-tivas de la EU
1999/5/EC, 2004/108/EC y 2006/95/EC, si es aplica-ble. Dichas declaraciones
están en poder de sus representanteslocales.
Ši iranga atitinka esminius ES direktyvu 1999/5/EC, 2004/108/EC ir 2006/95/EC
reikalavimus. Deklaracijas galima gauti iš Jusu vietinio atstovo.
Šis iekartas atbilst ES direktivu 1999/5/EC, 2004/108/EC un 2006/95/EC prasibam. Deklaracijas ir pieejamas regionalajasparstavniecibas. See seadmed vastavad
olulistele nõuetele ELi direktiivide 1999/5/EC, 2004/108/EC ja 2006/95/EC, mida
kohaldatakse. Deklarat-sioonid on saadaval Teie kohaliku esindaja.
Laser Safety Statement
Complies with FDA performance standards for laser products except for deviations
pursuant to Laser Notice No. 50, dated June 24, 2007.
This device has been tested in accordance with IEC60825-1 2nd ed., and has been
certied to be under the limits of a Class 2 Laser device.
Page 28

Agency Compliance Statements: DataMan 8000
Series Readers
UL and cUL Statement
UL and cUL listed: UL60950-1 1st ed. and CSA C22.2 No.60950-1 1st ed.
For European Union Users
Cognex complies with Directive 2002/96/EC OF THE EUROPEAN PARLIAMENT AND OF THE
COUNCIL of 27 January 2003 on waste electrical and electronic equipment (WEEE).
This product has required the extraction and use of natural resources for its production. It
may contain hazardous substances that could impact health and the environment, if not
properly disposed.
In order to avoid the dissemination of those substances in our environment and to diminish the pressure on the natural resources, we encourage you to use the appropriate
take-back systems for product disposal. Those systems will reuse or recycle most of the
materials of the product you are disposing in a sound way.
The crossed out wheeled bin symbol informs you that the product should not be disposed
of along with municipal waste and invites you to use the appropriate separate take-back
systems for product disposal.
If you need more information on the collection, reuse, and recycling systems, please contact your local or regional waste administration.
You may also contact your supplier for more information on the environmental performance of this product.
Agency Compliance Statements: DataMan
Base Station
The DataMan Base Station meets or exceeds the requirements of all applicable
standards organizations for safe operation. However, as with any electrical equipment, the best way to ensure safe operation is to operate them according to the
agency guidelines that follow. Please read these guidelines carefully before using
your device.
Regulator Specication
USA FCC Part 15B, Class A
FCC Part 15.247
FDA/CDRH Laser Notice No 50
Canada ICES-003
RSS 210
European Community EN301 489-1 / -17
EN300 328-2
EN60950
Australia C-TICK, AS/NZS CISPR 22 / EN 55022 for Class A
Equipment
Japan J55022, Class A
ARIB STD-T66
FCC Class A Compliance Statement for the DataMan Base Station
This equipment has been tested and found to comply with the limits for a Class
A digital device, pursuant to part 15 of the FCC Rules. These limits are designed to
provide reasonable protection against harmful interference when the equipment is
operated in a commercial environment.
This equipment generates, uses, and can radiate radio
frequency energy and, if not installed and used in accordance with the instruction
manual, may cause harmful interference to radio communications. Operation of
54 DataMan 8000 Quick Reference Guide DataMan 8000 Quick Reference Guide 55
Page 29

Agency Compliance Statements: DataMan Base Station (Continued)
this equipment in a residential area is likely to cause harmful interference in which case
the
user will be required to correct the interference at his own expense.
This device complies with Part 15 of the FCC Rules and with RSS-210 of Industry Canada.
Operation is subject to the following two conditions:
(1) this device may not cause harmful interference, and
(2) this device must accept any interference received, including interference that
may cause undesired operation.
Changes or modications made to this equipment not expressly approved by Cognex may
void the FCC authorization to operate this equipment.
Canadian Compliance
This Class A digital apparatus complies with Canadian ICES-003.
Cet appareil numérique de la classe A est conforme à la norme NMB-003 du Canada.
Japanese Compliance
These devices have been granted a designation number by the Ministry of Internal Affairs
and Communications according to the Ordinance concerning the Technical Regulations
Conformity Certication etc. of Specied Radio Equipment
(特定無線設備の技術基準適合証明等に関する規則).
Article 2 clause 1 item 19
Approval n°: 202WW11139332
These devices should not be modied (otherwise the granted designation number will
become invalid).
C-Tick Statement
N13060
Conforms to AS/NZS CISPR 22/ EN 55022 for Class A Equipment.
European Compliance
This equipment complies with the essential requirements of EU Directives 1999/5/
EC, 2004/108/EC and 2006/95/EC, as applicable. Declarations are available from
your local representative.
Където е приложимо, оборудването е съобразено с основните изисквания
наЕвропейските директиви 1999/5/ЕС, 2004/108/ЕС и 2006/95/ЕС. Декларации
са налични от местния представител.
Toto zařízení splňuje základní požadavky směrnic EU 1999/5/ES, 2004/108/ES
a 2006/95/ES, vždy dle konkrétního způsobu použití. Příslušná prohlášení jsou k
dispozici u vašeho lokálního distributora.
Dette udstyr overholder de væsentlige krav i EU-direktiv 1999/5/EF, 2004/108/EF
og 2006/95/EF, som er relevant. Erklæringerne kan fås hos din lokale repræsentant.
Tämä laitteisto täyttää seuraavat EU Direktiivien olennaiset vaatimukset 1999/5/
EY, 2004/108/EY ja 2006/95/EY, soveltuen. Vaatimusten-mukaisuusvakuutukset
ovat saatavilla paikalliselta edustajalta.
Dit produkt voldoet aan de voorschriften van de richtlijnen van de EG Raad
(1999/5/EC, 2004/108/EC en 2006/95/EC), indien van toepassing. Declaraties zijn
beschikbaar bij uw locale vertegenwoordiger.
Cet appareil est conforme aux exigences essentielles des Directives de l’Union
Européenne 1999/5/CE, 2004/108/CE et/ou 2006/95/CE. Veuillez consulter votre
56 DataMan 8000 Quick Reference Guide DataMan 8000 Quick Reference Guide 57
Page 30

Agency Compliance Statements: DataMan Base Station (Continued)
représentant local pour les déclarations applicables.
Ezen készülék technikai jellemzői megfelelnek a vonatkozó 1999/5/ EC, 2004/108/EC és
2006/95/EC EU rendeletekben foglalt követelményeknek. A megfelelőségi dokumentáció a
gyártó helyi partnereinél áll az Ön rendelkezésére.
Questo prodotto,ove applicabile, risponde alle direttive Europee 1999/5/EC, 2004/108/EC
e 2006/95/EC. Dichiarazioni sono disponibili presso il vostro rappresentante locale.
Ten sprzęt jest zgodny z ogólnymi wymaganiami Dyrektyw UE nr 1999/5/EC, 2004/108/
EC i 2006/95/EC, na ile znajdują zastosow-anie. Oświadczenia są dostępne u lokalnych
przedstawicieli.
Acest echipament este in conformitate cu cerintele esentiale ale Directivelor EU 1999/5/
EC, 2004/108/EC si 2006/95/EC. Certi-catele sunt disponibile la reprezentanta locala. Toto zariadenie spĺňa základné požiadavky smerníc EÚ 1999/5/ES,2004/108/ES a
2006/95/ES, vždy podľa konkrétneho spôsobu použitia. Príslušné vyhlásenia sú k dispozícii
u vášho lokálneho dis-tributora.
Das Gerät erfüllt die wesentlichen Anforderungen der EU-Direktiven 1999/5/EC, 2004/108/
EC und 2006/95/EC, soweit anwendbar. Eine entsprechende Bescheinigung kann bei Ihrem
zuständigen Vertriebspartner angefordert werden.
Ta oprema je skladna in izpolnjuje nujne zahteve direktiv EU 1999/5/ES, 2004/108/ES in
2006/95/ES. Deklaracije so na voljo pri vašemkrajevnem predstavniku.
Αυτός ο εξοπλισμός συμμορφώνεται με τις βασικές απαιτήσεις των εφαρμοσμένων οδηγιών
1999/5/EC, 2004/108/EC kai 2006/95/ECτης Ευρωπαικής Ένωσης. Οι επίσημες δηλώσεις
είναι διαθέσιμες από τον τοπικό σας αντιπρόσωπο.
Dan l-apparat huwa konformi mar-regolamenti stipulati mid-Direttivi Ewropej 1999/5/EC,
2004/108/EC u 2006/95/EC skond kif inhu likabbli. Kopji ta’ dawn id-dikjarazjonijiet huma
aċċessibbli mingħand ir-rappreżentant locali tiegħek.
Este equipo cumple com las condiçãos vigorantes de la EU diretivas 1999/5/EC, 2004/108/
EC e 2006/95/EC, com é pertinente. Las normativas estão disponível com su representado
local.
Este equipo cumple con los requerimientos esenciales de las direc-tivas de la EU 1999/5/
EC, 2004/108/EC y 2006/95/EC, si es aplica-ble. Dichas declaraciones están en poder de
sus representanteslocales.
Ši iranga atitinka esminius ES direktyvu 1999/5/EC, 2004/108/EC ir 2006/95/EC reikalavimus. Deklaracijas galima gauti iš Jusu vietinio atstovo.
Šis iekartas atbilst ES direktivu 1999/5/EC, 2004/108/EC un 2006/95/EC prasibam. Deklaracijas ir pieejamas regionalajasparstavniecibas. See seadmed vastavad
olulistele nõuetele ELi direktiivide 1999/5/EC, 2004/108/EC ja 2006/95/EC, mida
kohaldatakse. Deklarat-sioonid on saadaval Teie kohaliku esindaja.
For European Union Users
Cognex complies with Directive 2002/96/EC OF THE EUROPEAN PARLIAMENT AND
OF THE COUNCIL of 27 January 2003 on waste electrical and electronic equipment
(WEEE).
This product has required the extraction and use of natural resources for its production. It may contain hazardous substances that could impact health and the
environment, if not properly disposed.
In order to avoid the dissemination of those substances in our environment and
to diminish the pressure on the natural resources, we encourage you to use the
appropriate take-back systems for product disposal. Those systems will reuse or
recycle most of the materials of the product you are disposing in a sound way.
The crossed out wheeled bin symbol informs you that the product should not be
disposed of along with municipal waste and invites you to use the appropriate
separate take-back systems for product disposal.
If you need more information on the collection, reuse, and recycling systems,
please contact your local or regional waste administration.
You may also contact your supplier for more information on the environmental
performance of this product.
58 DataMan 8000 Quick Reference Guide DataMan 8000 Quick Reference Guide 59
Page 31

Reader Control Codes
Reset Scanner to
Factory Defaults
Reboot
Scanner
USB KeyboardUSB Serial
Enable DHCP
Keyboard Language
US English
Copyright © 2011 Cognex Corporation All Rights Reserved. This document may not be
copied in whole or in part, nor transferred to any other media or language, without the
written permission of Cognex Corporation. The hardware and portions of the software
described in this document may be covered by one or more of the U.S. patents listed
on the Cognex web site http://www.cognex.com/patents.asp. Other U.S. and foreign
patents are pending. Cognex, the Cognex logo, UltraLight and DataMan are trade-
German
marks, or registered trademarks, of Cognex Corporation.
French Spanish Japanese
P/N 590-7135
 Loading...