

Page 1
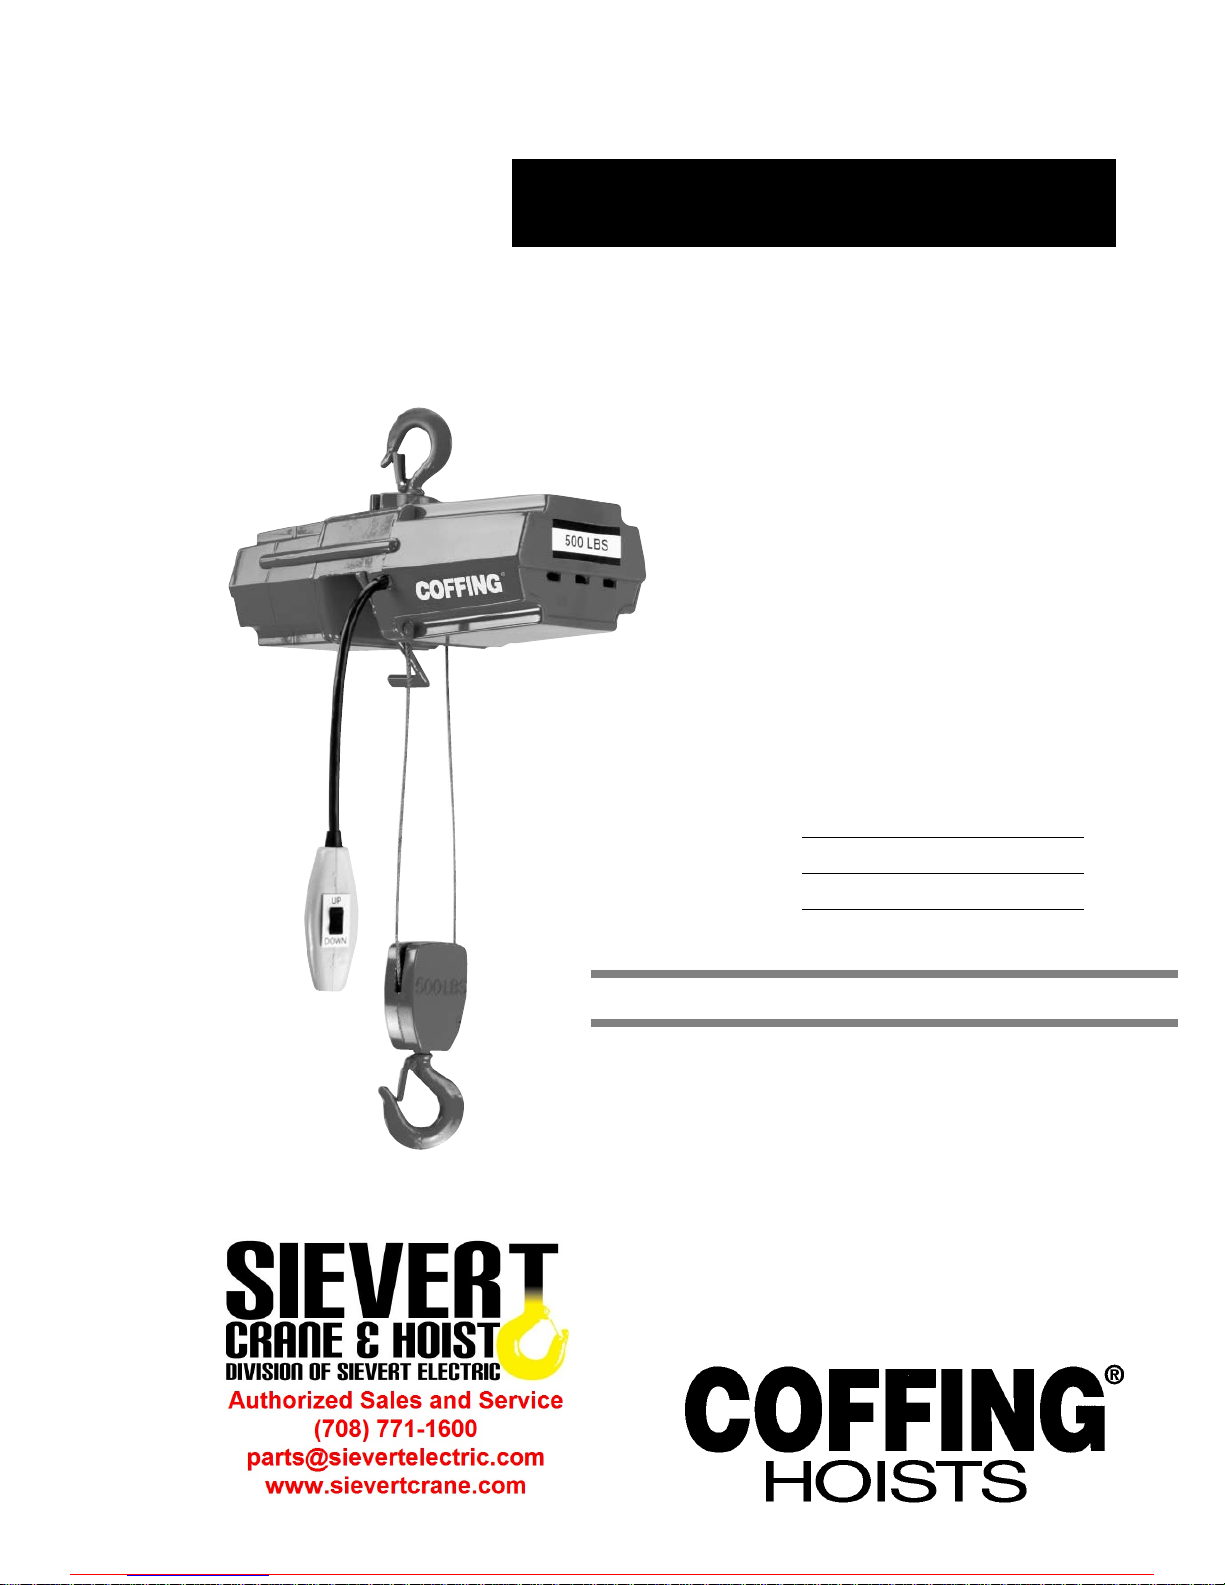
Operating, Maintenance &
P arts Manual
EMW680-1
EMW
Series
The use of any hoist presents some risk of personal injury
or property damage.That risk is greatly increased if proper
instructions and warnings are not followed.Before using this
hoist, each operator should become thoroughly familiar with
all warnings, instructions, and recommendations in this
manual.
Retain this manual for future reference and use.
Forward this manual to the hoist operator.
Failure to operate the equipment as directed in the manual
may cause injury.
Should you have any questions regarding this product,
please call Coffing Hoists at (800) 477-5003.
Before using the hoist, fill in the information below:
Model No.
Serial No.
Purchase Date
F
ollow all instructions and warnings for
inspecting, maintaining and operating this hoist.
Electric Wire Rope
500 lbs Capacity
TABLE OF CONTENTS
Safety Precautions . . . . . . . . . . . . . . . . . . . . . . . . . . . . . . . . . . . . . . . . . . .2
Hoist Specifications . . . . . . . . . . . . . . . . . . . . . . . . . . . . . . . . . . . . . . . . . .3
Application Information . . . . . . . . . . . . . . . . . . . . . . . . . . . . . . . . . . . . . . . .3
Safety Information . . . . . . . . . . . . . . . . . . . . . . . . . . . . . . . . . . . . . . . . . . . .3
Installation . . . . . . . . . . . . . . . . . . . . . . . . . . . . . . . . . . . . . . . . . . . . . . . . . .4
Operation . . . . . . . . . . . . . . . . . . . . . . . . . . . . . . . . . . . . . . . . . . . . . . . . . .4
Maintenance . . . . . . . . . . . . . . . . . . . . . . . . . . . . . . . . . . . . . . . . . . . . . . . .4
Trouble Shooting . . . . . . . . . . . . . . . . . . . . . . . . . . . . . . . . . . . . . . . . . . . . .5
Wiring Diagrams . . . . . . . . . . . . . . . . . . . . . . . . . . . . . . . . . . . . . . . . . . . . .7
Replacement Parts List . . . . . . . . . . . . . . . . . . . . . . . . . . . . . . . . . . . . . . . .7
Warranty . . . . . . . . . . . . . . . . . . . . . . . . . . . . . . . . . . . . . . . . . . .Back Cover
For more information contact: Sievert Crane and Hoist, (708) 771-1600, [email protected], www.sievertcrane.com
Page 2
2
Country Club Road
P.O. Box 779
Wadesboro, NC 28170 USA
TEL: (800) 477-5003
FAX: (800) 374-6853
SAFETY PRECAUTIONS
Each Coffing EMW series wire rope hoist is built in accordance
with the specifications contained herein and at the time of
manufacture complies with our interpretation of applicable
sections of *American Society of Mechanical Engineers Code
(ASME) B30.16 “Overhead Hoists,” the National Electrical Code
(ANSI/NFPA 70) and the Occupational Safety and Health Act
(OSHA). Since OSHA states the National Electrical Code applies
to all electric hoists, installers are required to provide current
overload protection and grounding on the branch circuit section in
keeping with the code.Check each installation for compliance with
the application, operation and maintenance sections of these
articles.
*Copies of this Standard can be obtained from ASME Order
Department, 22 Law Drive, Box 2300, F airfield, NJ 07007-2300,
U.S.A.
1. NOT operate a damaged, malfunctioning or unusually
performing hoist.
2. NOT operate the hoist until you have thoroughly read and
understood the manufacturer’s Operating and Maintenance
Instructions or Manuals.
3. NOT operate a hoist which has been modified without the
manufacturer’ s approval or without certification that it is in
conformity with ANSI/ASME B30 volumes.
4. NOT lift more than rated load for the hoist.
5. NOT use hoist with twisted, kinked, damaged, or worn wire rope.
6. NOT use the hoist to lift, support, or transport people.
7. NOT lift loads over people.
8. NOT operate a hoist unless all persons are and remain clear of
the supported load.
9. NOT operate unless load is centered under hoist.
10. NOT attempt to lengthen the wire rope or repair damaged
wire rope.
11. Protect the hoist’s wire rope from weld splatter or other damaging
contaminants.
12. NOT operate hoist when it is restricted from forming a straight
line from hook to hook in the direction of loading.
13. NOT use wire rope as a sling, or wrap wire rope
around load.
14. NOT apply the load to the tip of the hook or to the hook latch.
15. NOT apply load unless wire rope is properly seated in its
groove(s).
16. NOT apply load if bearing prevents equal loading on all load
supporting ropes.
17. NOT operate beyond the limits of the wire rope.
18. NOT leave load supported by the hoist unattended unless
specific precautions have been taken.
19. NOT allow the wire rope or hook to be used as an electrical or
welding ground.
20. NOT allow the wire rope or hook to be touched by a live
welding electrode.
21. NOT remove or obscure the warnings on the hoist.
22. NOT operate a hoist on which the safety placards or decals are
missing or illegible.
23. NOT operate a hoist unless it has been securely attached to a
suitable support.
24. NOT operate a hoist unless load slings or other approved single
attachments are properly sized and seated in the hook saddle.
25. Take up slac k carefully - make sure load is balanced and load
holding action is secure before continuing.
26. Shut down a hoist that malfunctions or performs unusually and
report such malfunction.
27. Make sure hoist limit switches function properly.
28. Warn personnel of an approaching load.
1. Maintain firm footing or be otherwise secured when operating
the hoist.
2. Check brake function by tensioning the hoist prior to each
lift operation.
3. Use hook latches. Latches are to retain slings, chains, etc. under
slack conditions only.
4. Make sure the hook latches are closed and not supporting any
parts of the load.
5. Make sure the load is free to move and will clear all obstructions.
6. Avoid swinging the load or hook.
7. Make sure hook travel is in the same direction as shown on
the controls.
8. Inspect the hoist regularly, replace damaged or worn parts, and
keep appropriate records of maintenance.
9. Use the hoist manufacturer’s recommended parts when repairing
the unit.
10. Lubricate wire rope per hoist manufacturer’s recommendations.
11. NOT use the hoist load limiting or warning device to measure load.
12. NOT use limit switches as routine operating stops.They are
emergency devices only.
13. NOT allow your attention to be diverted from operating
the hoist.
14. NOT allow the hoist to be subjected to sharp contact with other
hoists, structures, or objects through misuse.
15. NOT adjust or repair the hoist unless qualified to perform such
adjustments or repairs.
Improper operation of a hoist can create a potentially
hazardous situation which, if not avoided, could result
in death or serious injury. To avoid such a potentially
hazardous situation, THE OPERATOR SHALL:
Improper operation of a hoist can create a potentially
hazardous situation which, if not avoided, could result
in minor or moderate injury. To avoid such a potentially
hazardous situation, THE OPERATOR SHALL:
For more information contact: Sievert Crane and Hoist, (708) 771-1600, [email protected], www.sievertcrane.com
Page 3
3
Country Club Road
P.O.Box 779
Wadesboro, NC 28170 USA
TEL: (800) 477-5003
FAX: (800) 374-6853
HOIST SPECIFICATIONS
Coffing EMW series electric hoists are compact wire rope
hoists designed for a variety of light duty applications.The
EMW is constructed of lightweight aluminum housings to
provide strength and portability , weighing less than 25 lbs.
Other features include;thermally protected motors, swivel top
suspension, upper paddle limit switch to regulate load trav el,
quick acting electromagnetic brake f or positive load control and
thermal motor protection to prevent overheating.As a standard,
hooks are supplied with safety latches.
Coffing EMW series hoists are designed and tested in
accordance with the American Society of Mechanical
Engineers Code B30.16, “Safety Standard for Overhead
Hoists.” Coffing EMW series hoists are built in compliance with
UL, file number SA 5247.Made in U.S.A.
APPLICATION INFORMATION
This hoist is intended for lifting freely suspended (unguided)
loads weighing no more than 500 pounds.This hoist is not
intended for industrial or production applications requiring
continuous operation, it should only be used on an intermittent
basis.Coffing Hoists cannot be responsible for applications other
than those for which Coffing equipment is recommended.Prior
to installation and operation, we caution the user to review his
application for abnormal environmental or handling conditions
and to observe the applicable recommendations as follows:
ADVERSE ENVIRONMENTAL CONDITIONS
Do not use the hoist in uncovered outdoor locations, areas
containing flammable vapors, liquids , gases or an y combustible
dusts or fibers.Refer to Article 500 of the National Electrical
Code.Do not use this hoist in highly corrosive, abrasiv e or w et
environments.Do not use this hoist in applications involving
extended exposure to ambient temperatures belo w -10°F or
above 130°F.
LIFTING OF HAZARDOUS LOADS
This hoist is not recommended for use in lifting or transporting
hazardous loads or materials which could cause widespread
damage if dropped.The lifting of loads which could explode or
create chemical or radioactive contamination if dropped
requires fail-safe redundant supporting devices which are not
incorporated into this hoist.
LIFTING OF GUIDED LOADS
This hoist is not recommended for use in the lifting of guided
loads, including dumbwaiters and elev ators. Such applications
require additional protective devices which are not incorporated
into this hoist.For such applications, refer to the requirements
of applicable state and local codes, and the American National
Safety Code for elevators, dumbwaiters, escalators and moving
walks (ASME A17.1).
SAFETY INFORMATION
1. Follow all local electrical and safety codes, as well as the
National Electrical Code (NEC) and the Occupational
Safety and Health Act (OSHA) in the United States.
2. Hoist must be securely and adequately grounded.
3. Be careful when touching the exterior of an operating
motor; it may be hot enough to be painful or cause injury.
With modern motors this condition is normal if operated at
rated load and voltage (modern motors are built to operate
at higher temperatures).
4. Protect the power cable and control cable from coming in
contact with sharp objects.
5. Do not kink power cable and control cable and never allow
the cable to come in contact with oil, grease, hot surfaces,
or chemicals.
6. Make certain that the power source conforms to the
requirements of your equipment.
7. Inspect the unit daily before operating hoist.
8. Cluttered areas and benches invite accidents.
9. The operator should not engage in any practice which will
divert his attention while operating the hoist.
10. Before using the hoist, the operator should be certain that
all personnel are clear.
11. Do not operate hoist with loads exceeding its rated capacity.
12. Supporting frames or beams used as a hoist hanger must
have a greater load capacity than the hoist.
13. Do not attempt to operate hoist beyond normal maximum
lift range.
14. Align hoist for a straight line pull.Avoid side pull or end pull.
15. Do not operate hoist with twisted or damaged wire rope.
16. Do not operate a damaged or malfunctioning hoist until
necessary adjustments or repairs have been made.
17. Do not use hoist to lift people or to carry loads over people.
18. Do not leave a load suspended in the air unattended.
19. Always remove load before making repairs.
20. Do not remove or obscure capacity or warning decals.
Failure to comply with Safety Precautions outlined
throughout this manual can result in serious injuries
or death. Before using this hoist, each operator
should become thoroughly familiar with all warnings,
instructions and recommendations in this manual.
Lifting Max. Horse- Duty PB Cord Power Cord Overall Net
Model Rated Power Speed Lift power Head- Cycle Length Limit Length Amp Dia. Wt.
No. Capacity Supply (fpm) (ft) (hp) room Max. (in) Switches (in) Draw (in) (lb)
Table 1 - Basic Specifications
EMW500C 500 115 volts, 10 10 1/6 14½ 10 Minutes 6 Upper 13 3 amps 4
5
/
8
H x 21
1-Phase per hour Paddle 6 W x
60 Hz 14½ L
For more information contact: Sievert Crane and Hoist, (708) 771-1600, [email protected], www.sievertcrane.com
Page 4
INSTALLATION
1. Before installing the hoist, check the following:
a. Make sure all supporting structures and attaching devices
are strong enough to hold your intended loads.If in doubt,
consult a qualified structural engineer.
b. This hoist is equipped with a 3-prong, grounding-type plug
to minimize shock hazards.It must be plugged into a
properly installed and grounded receptacle to maintain
this protection.
c. This hoist is intended for use on a 115 volt, single-phase,
60 Hz power supply.The power supply should be plus or
minus 10% of 115 volts.
d. Installation area must provide operating conditions for the
operator including sufficient room for the operator and
other personnel to stand clear of the load at all times.
e. Make sure that the hook latch closes after hanging the hoist.
2. Before operating the hoist, be sure to observe the following:
a. ALWAYS DISCONNECT HOIST FROM POWER SUPPLY
before removing electrical cover or when making an y
electrical connection in the hoist or pushbutton station.
b. Limit Switch Operation. Before placing the hoist in
operation, check for proper upper limit switch operation.
Push the “UP”button, and while the hook is moving
upward, raise the limit switch paddle (Figure 2, Item 35).
The hook should stop immediately. Do not operate the
hoist if the limit switch is not operating properly.
c. Brake Operation. NOTE:Run the hoist with a light load a
few times bef ore lifting the r ated load.After lifting a light
load a few times, test the hoist b y lifting the r ated load.
Check for load hook drift with rated load on the hook.If
hook does not stop within one to two inches when
pushbutton is released, it may be necessary to replace
the brake assembly.
OPERATION
This hoist is designed for safe operation within the limits of its
rated capacity. It is controlled by the “UP” and “DOWN” buttons
of the pushbutton station.Although the Coffing EMW is built
with many features to ensure saf ety, it is a requirement that a
hoist operator understands safe lifting practices.The following
points must be observed.
1. Do not overload the hoist.
2. Align hoist directly over load.Do not make extreme side
pulls with the hoist.
3. Operate the hoist only in a hanging position with
adequate support.
4. Do not “sling” the load hook and wire rope around the load.
Use an approved sling.
5. Be sure there are no twists or kinks in the wire rope as it
travels into the hoist housing.
6. Lift the load just clear of its supports and stop the hoist to
check for proper brak e action.
7. Do not stand beneath a load! Do not move a load in such a
manner as to endanger personnel.
8. Don’t lower into areas where visibility is obscured unless
someone else is guiding the operation.
9. Use common sense at all times when operating a hoist.
10. Do not run hook down so that fewer than two wraps of
cable remain on drum.
11. Lift and lower the load smoothly, avoiding jogging of the
controls or quick rev ersals .
12. Do not reverse wind cable on drum.If hoist runs in direction
opposite that indicated on pushbutton, cable may be
reverse wound.If this situation occurs, cease using hoist
immediately. Rewind cable in proper direction and inspect
hoist for damage.
13. Do not operate damaged or malfunctioning hoist.
14. The limit switch is an emergency protective device.Do not
use the limit switch to stop the hoist in normal operation.
MAINTENANCE
INSPECTIONS
A planned inspection routine should be established for this
hoist based upon frequency of use, severity of use, and
environmental conditions (Reference ASME Standard B30.16).
All inspections should be performed or overseen by a
designated inspector.Special inspections should be made
following any significant repairs and if the hoist is used more
than 40 hours per week, under adverse environmental
conditions or any operating occurrence leading one to suspect
that the hoist’s capability ma y have been impaired.
1. Daily Inspection. Inspect the following items daily before
operating the hoist.
a. Check pushbutton station, brake, and limit switch for
proper operation (See INSTALLATION, 2-b & 2-c).
b. Check hooks for deformation, cracks, or chemical
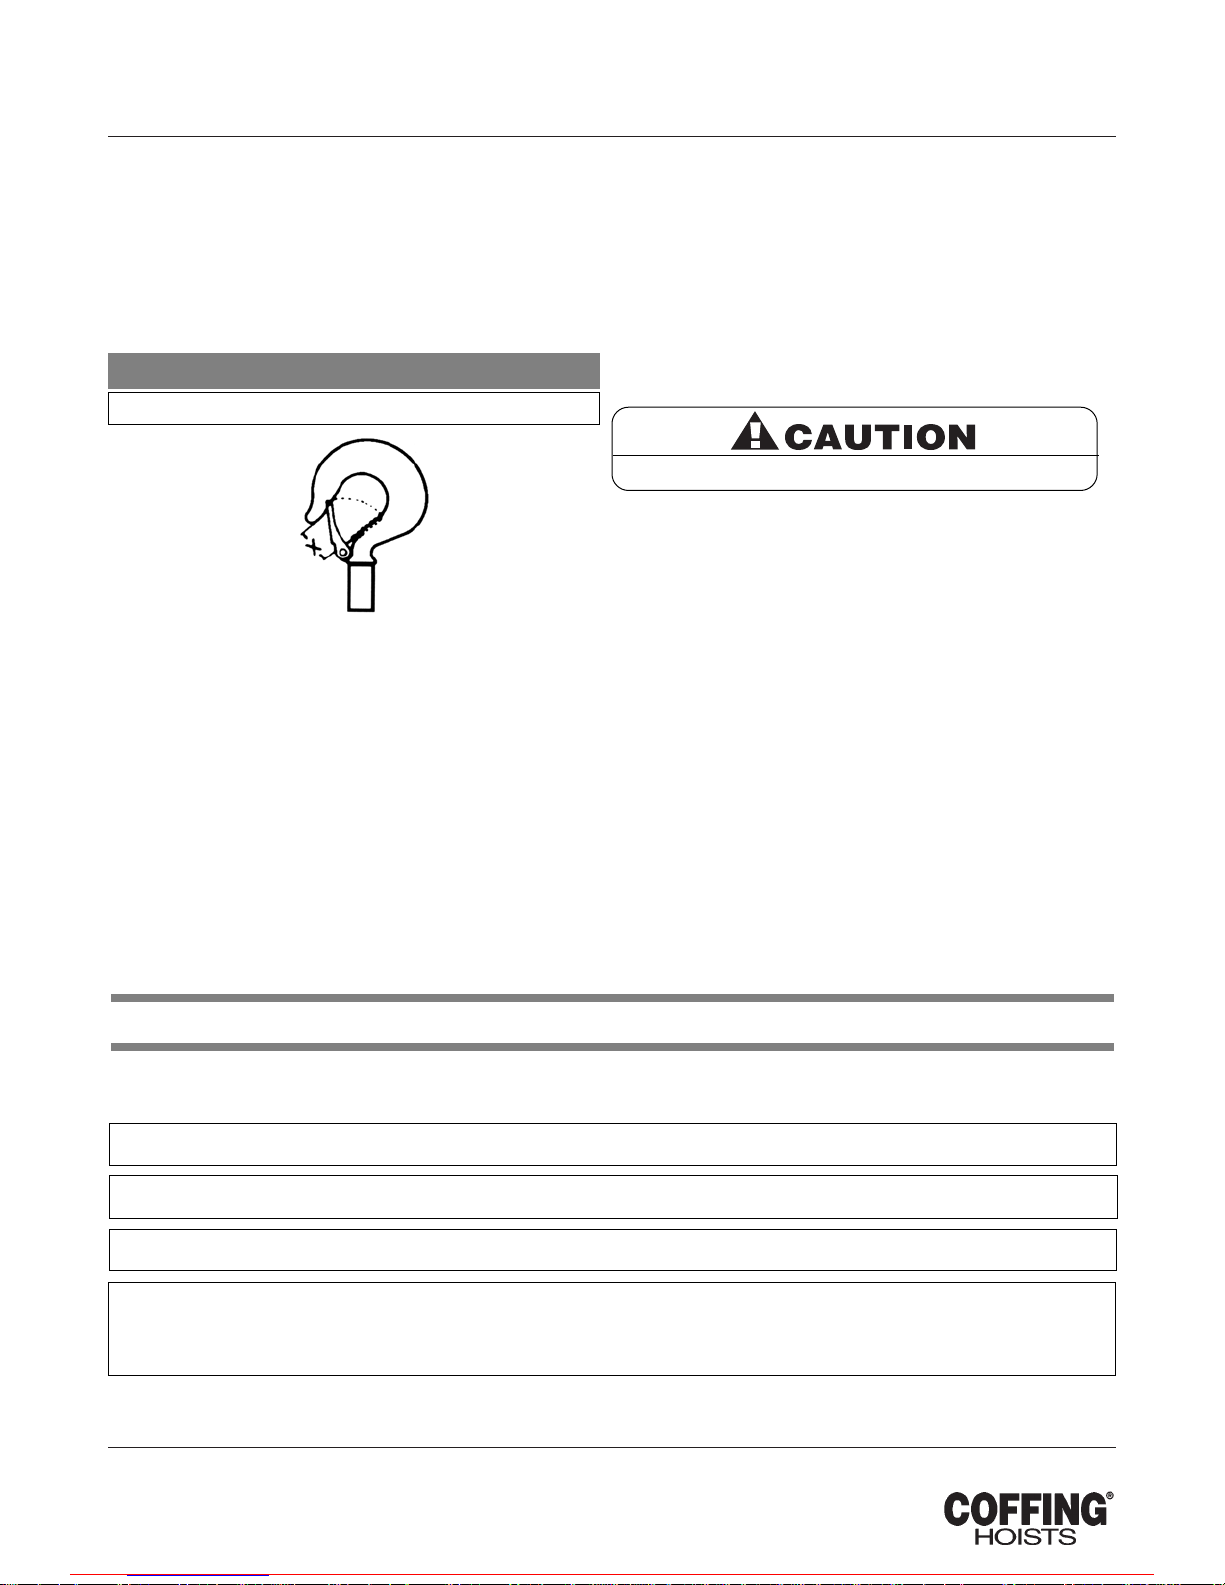
damage.Hooks having more than 1" throat opening
should be replaced, (See Figure 1, page 5).
c. Check for bent or otherwise damaged hook latches.
d. Check wire rope for wear, brok en wires , kinks or twists .
e. Check pushbutton cord and po wer cord f or cuts or damage .
2. Quarterly Inspection. Inspect the following items at 90-day
intervals.
a. Check all items under daily inspection.
b. Check for loose bolts, screws and nuts.
c. Inspect for worn, corroded, cracked or distorted parts.
d. Check electrical parts, limit switch and pushbutton station.
3. Annual Inspection. Inspect the following items annually.
a. Check all items under daily and quarterly inspection.
b. Check hooks for cracks by means of a magnetic particle
test or other crack detecting test.
4
Country Club Road
P.O.Box 779
Wadesboro, NC 28170 USA
TEL: (800) 477-5003
FAX: (800) 374-6853
Always disconnect power source before working on
or near a hoist or its connected load. If the power
disconnect point is out of sight, lock it in the open
position and tag to prevent unexpected application
of power.
For more information contact: Sievert Crane and Hoist, (708) 771-1600, [email protected], www.sievertcrane.com
Page 5
5
Country Club Road
P.O.Box 779
Wadesboro, NC 28170 USA
TEL: (800) 477-5003
FAX: (800) 374-6853
HOOKS
Refer to Figure 1.
1. Inspect hooks once daily for cracking, extreme wear or
spreading.Replace hooks showing any of these signs.If the
throat openings are spread wider than the maximum
permissible 15% increase listed here, the hooks have been
overstressed and must be replaced.Any hook that is bent or
twisted more than 10 degrees from the plane of an unbent
hook must also be replaced.
2. The hook latches should be inspected to ensure that they
close the hook throat opening in a secure manner when a
load is applied.On the top hook, the hook collar should be
fully restrained by the retaining pin.
WIRE ROPE
Refer to Figure 2.
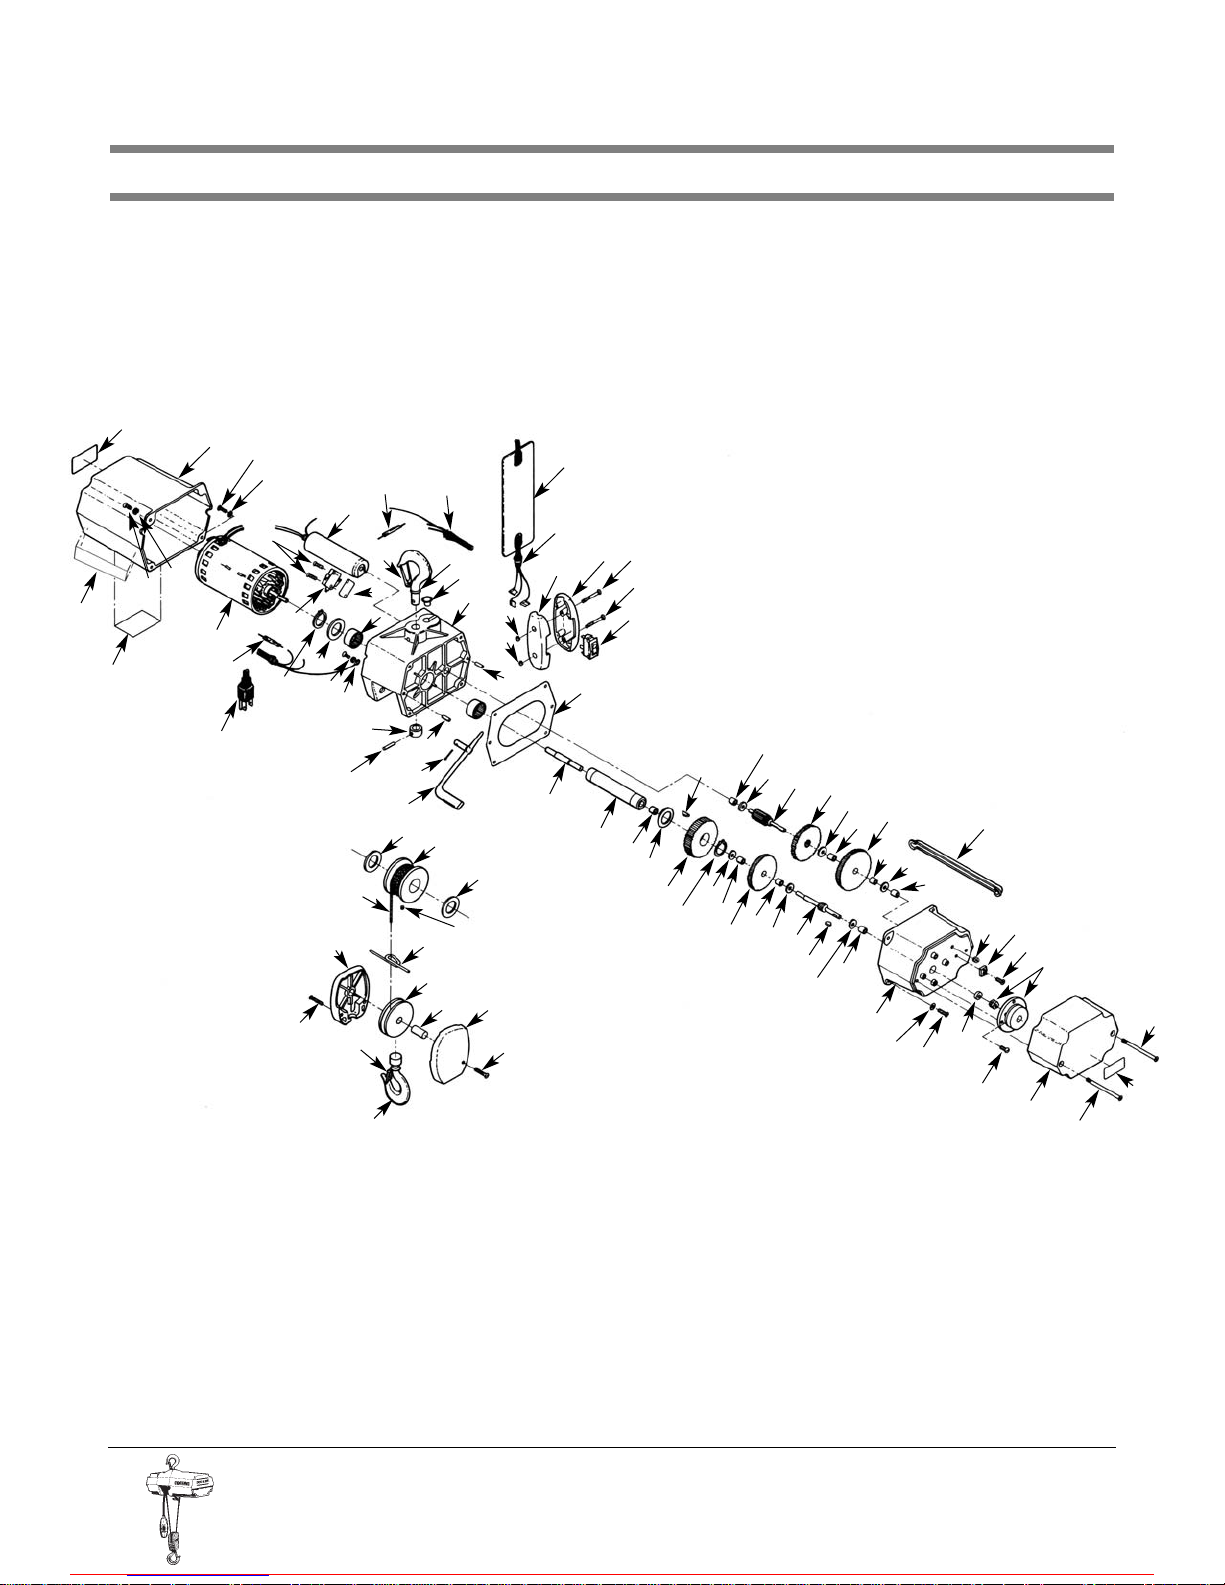
To remove the wire rope, loosen the setscrew (49).Remove
worn cable assembly (17) by pulling the cable from the drum
(4), through the cable guide (32) and the sheave (6), and
through the top of the suspension frame (1) after removing the
plug (47).NOTE: The bottom block (5) should be disassembled
by removing the two screws (44) for the installation of the
new cable.
To install the new cable, insert the plain end of the cable
assembly through the opening in the suspension frame (1) and
pull the cable through the frame until sw aged ball is seated in
the frame.Replace the plug (47) in top of the frame.Reeve the
cable around the sheave (6) and assemb le the bottom b loc k (5)
with the two screws (44).Position the drum as shown in Figure
2 and push the cable through the guide (32) and through the
top opening in the drum and back through the bottom opening
in the drum.While holding the cable in place, tighten the
setscrew (49) to 25 in.lbs.torque.
LUBRICATION
Proper lubrication is necessary for a long and relatively troublefree hoist operation.
Wire Rope
Wipe clean with a clean cloth periodically and apply a light coat
of oil.
Drum
Apply a small amount of grease to drum shaft bearings (See
Figure 2, Ref.No.39).
Gears
The gear housing is adequately lubricated at assembly with 1/3
pound of NLGI #1 grease.If relubrication becomes necessary,
use approximately 3/4 cup of light, semi-fluid grease.
Idler Shaft
Apply a small amount of grease to the bore of the idler sheave
(See Figure 2, Ref.No.6) in the bottom block.
Keep brake surface and brake lining free of grease.
NNoorrmmaall ““XX ”” RR eejj eecctt ““XX””
Figure 1 — Hook
Inspection
TROUBLE SHOOTING
Always disconnect unit from the power supply system before removing hoist covers or the back cover of control station.
Hoist cuts off after several minutes of operation, but Thermal protector opening due to excessive duty.
will run again after several minutes Reduce duty cycle.
––– Probable Cause –––
––– Remedy–––
Brake will not hold, load drifts down. Brake worn out or oil contaminated.Replace brake
assembly.
Brake chatters Check for gap greater than .010".Check rectifier for
open or shorted legs.
Hoist runs in wrong direction when pushbutton is operated. Check drum for reverse-wound cable. If cable is
reverse-wound, run cable off of drum and back on
in proper direction. Check for damage to cable guide,
limit switch and drum area of hoist which may have
resulted from reverse winding.
29/32" 1
1
/
16
"
For more information contact: Sievert Crane and Hoist, (708) 771-1600, [email protected], www.sievertcrane.com
Page 6
6
Figure 2 - EMW Exploded View
56
2
42
43
36
23
27
24
28
26
47
1
25
29
53
31
42
43
55
30
53
34
46
35
59
48
21
16
15
38
14
12
37
13
38
9
38
13
7
60
13
38
3
43
42
50
63
64
61
41
38
13
11
10
13
38
8
38
13
38
67
66
65
62
56
54
18
20
52
33
37
14
50
51
39
14
4
14
44
5
45
6
32
44
5
20
19
17
49
57
64
68
28
29
48
69
For more information contact: Sievert Crane and Hoist, (708) 771-1600, [email protected], www.sievertcrane.com
Page 7
7
1 Suspension Frame 33K4-5 1
2 Control Cover 36K9-2 1
3 Transmission Cover 35K4 1
4 Drum 16K4 1
5 Bottom Block Frame 30K4 2
6 Sheave 28K4 1
7 High Speed Pinion 400K8 1
8 High Speed Cluster Gear 406K1 1
9 Intermediate Cluster Gear 406K2 1
10 Intermediate Gear 403K10 1
11 Output Pinion 404K6 1
12 Output Gear 405K5 1
13 Thrust Washer 255K1 6
14 Thrust Washer 255K2 4
15 Drum Shaft 132KG6 1
16 Drive Coupling 107K27 1
17 Cable Assembly, 20 ft. 19K301 1
18 Hook Assembly 3M002C01S 1
(Includes Ref.No.20)
19 Hook Assembly 3M102C01S 1
(Includes Ref.No.20)
20 Latch Kit 4X1302 2
21 Hook Collar 124K2 1
22 Pushbutton Station Assembly MH534-1 1
(Includes Ref.Nos.23-29)
23 Warning Label 687K3W 1
24 Pushbutton Enclosure MH48R 1
25 Pushbutton Enclosure MH48L 1
26 Rocker Switch 4K1 1
27 Pushbutton Cord Assembly 936KG9 1
28 Pushbutton Screw H2967 2
29 Pushbutton Flexloc Nut H3972 2
30 Power Cord Assembly 951KG2 1
31 Motor 861K350A 1
32 Cable Guide 210K4 1
33 Insulator 759K1 1
34 Switch (Limit Switch) 815K5 1
35 Paddle (Limit Switch) 24K5B 1
36 Capacitor 810K1A 1
37 Retaining Ring H5543 2
38 Bearing 521K3 8
39 Load Bearing 521K4 2
40 Woodruff Key (Drum) H4355 1
41 Woodruff Key (Output Gear) H4356 1
42 Screw H1841P 6
43 Lockwasher H4061P 6
44 Bottom Block Screw H2743P 2
45 Dowel Pin H5387 1
46 Hook Pin H5159 1
47 Plug H6292 1
48 Dowel Pin H5383 2
49 Setscrew S7-121 1
50 Screw H2742P 1
51 Washer H4004P 1
52 Screw H2744P 2
53 Splice Connector H5757 3
54 Gasket MH560 1
55 Warning Label MH687 1
56 Capacity Label MH675-2 2
57 Coffing Label 912500001 2
58 Nameplate MH674-10 1
59 Cotter Pin H5021P 1
60 Woodruff Key H4362 1
61 Oil Seal 561K29 1
62 Motor Brake Assembly MH854T 1
63 Brake Cover 36K206 1
64 Screw H1303 2
65 Screw H2752 1
66 Rectifier 840J1 1
67 Wire Channel MH270 1
68 Pipe Plug S25-13 1
69 Brake Harness 940J11 1
70 Lubricant H7653 / lb.
Parts List for EMW Exploded View
Ref Description Part Qty Ref Description Part Qty
No. No. No. No.
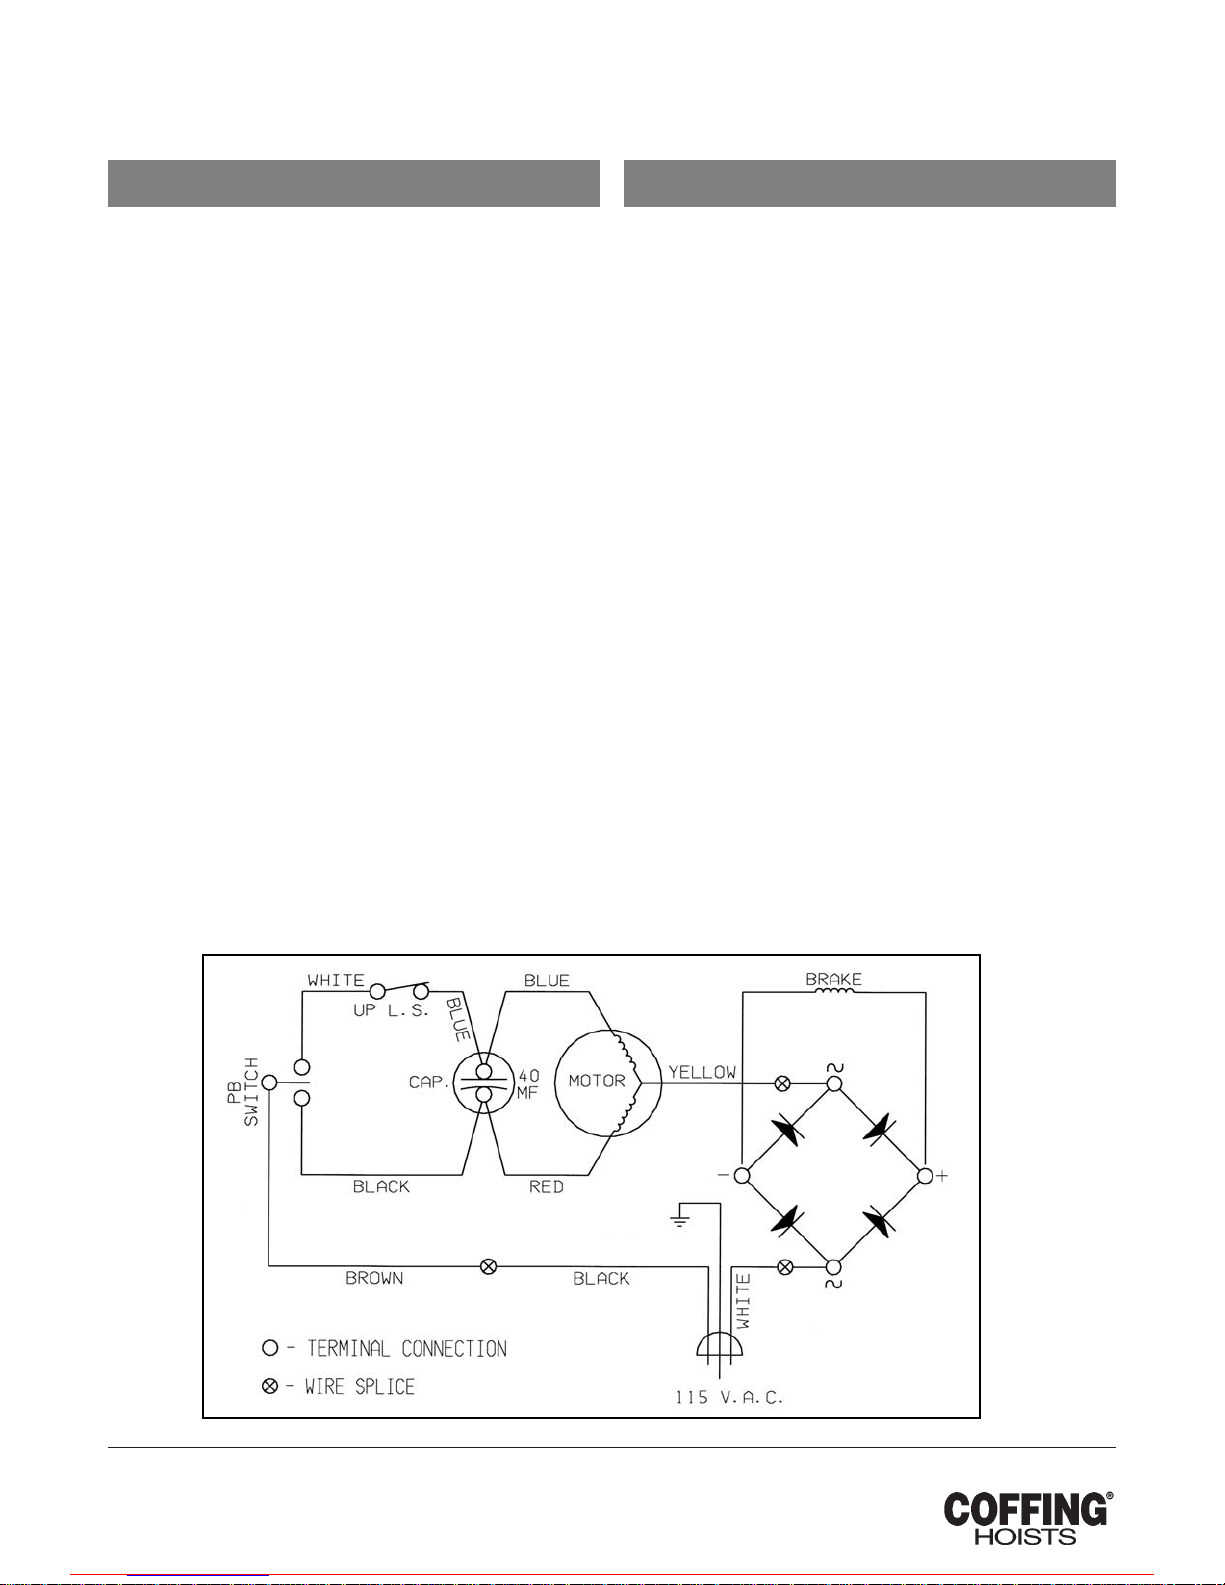
Figure 3 — 981MH4 Wiring Diagram
For more information contact: Sievert Crane and Hoist, (708) 771-1600, [email protected], www.sievertcrane.com
Page 8
E
very hoist is thoroughly inspected and
performance tested prior to shipment from the
factory. If any properly installed, maintained and
operated hoist as outlined in the applicable
accompanying Coffing Hoists manual develops a
performance problem due to defective materials or
workmanship as verified by Coffing Hoists, repair
or replacement of the hoist will be made to the
original purchaser without charge and the hoist
will be returned, transportation prepaid. This
warranty does not apply where deterioration is
caused by normal wear, abuse, improper or
inadequate power supply, improper or inadequate
maintenance, eccentric or side loading,
overloading, chemical or
abrasive actions, excessive
heat, unauthorized
modifications or repairs, or use of non-Coffing
repair parts. EXCEPT AS STATED HEREIN,
COFFING HOISTS MAKES NO OTHER
WARRANTIES,EXPRESS OR IMPLIED,
INCLUDING WARRANTIES OF
MERCHANTABILITY AND FITNESS FOR A
PARTICULAR PURPOSE.
© 2003 Coffing ®Hoists Printed in USA
®
WARRANTY
Coffing Hoists • Country Club Road • P.O.Box 779 •
Wadesboro, North Carolina 28170 USA
Tel: 800.477.5003 • Fax: 800.374.6853 • 704.694.6829
www.coffinghoists.com
For more information contact: Sievert Crane and Hoist, (708) 771-1600, [email protected], www.sievertcrane.com
 Loading...