

Page 1
Rev 091123
S_EN
MANUAL
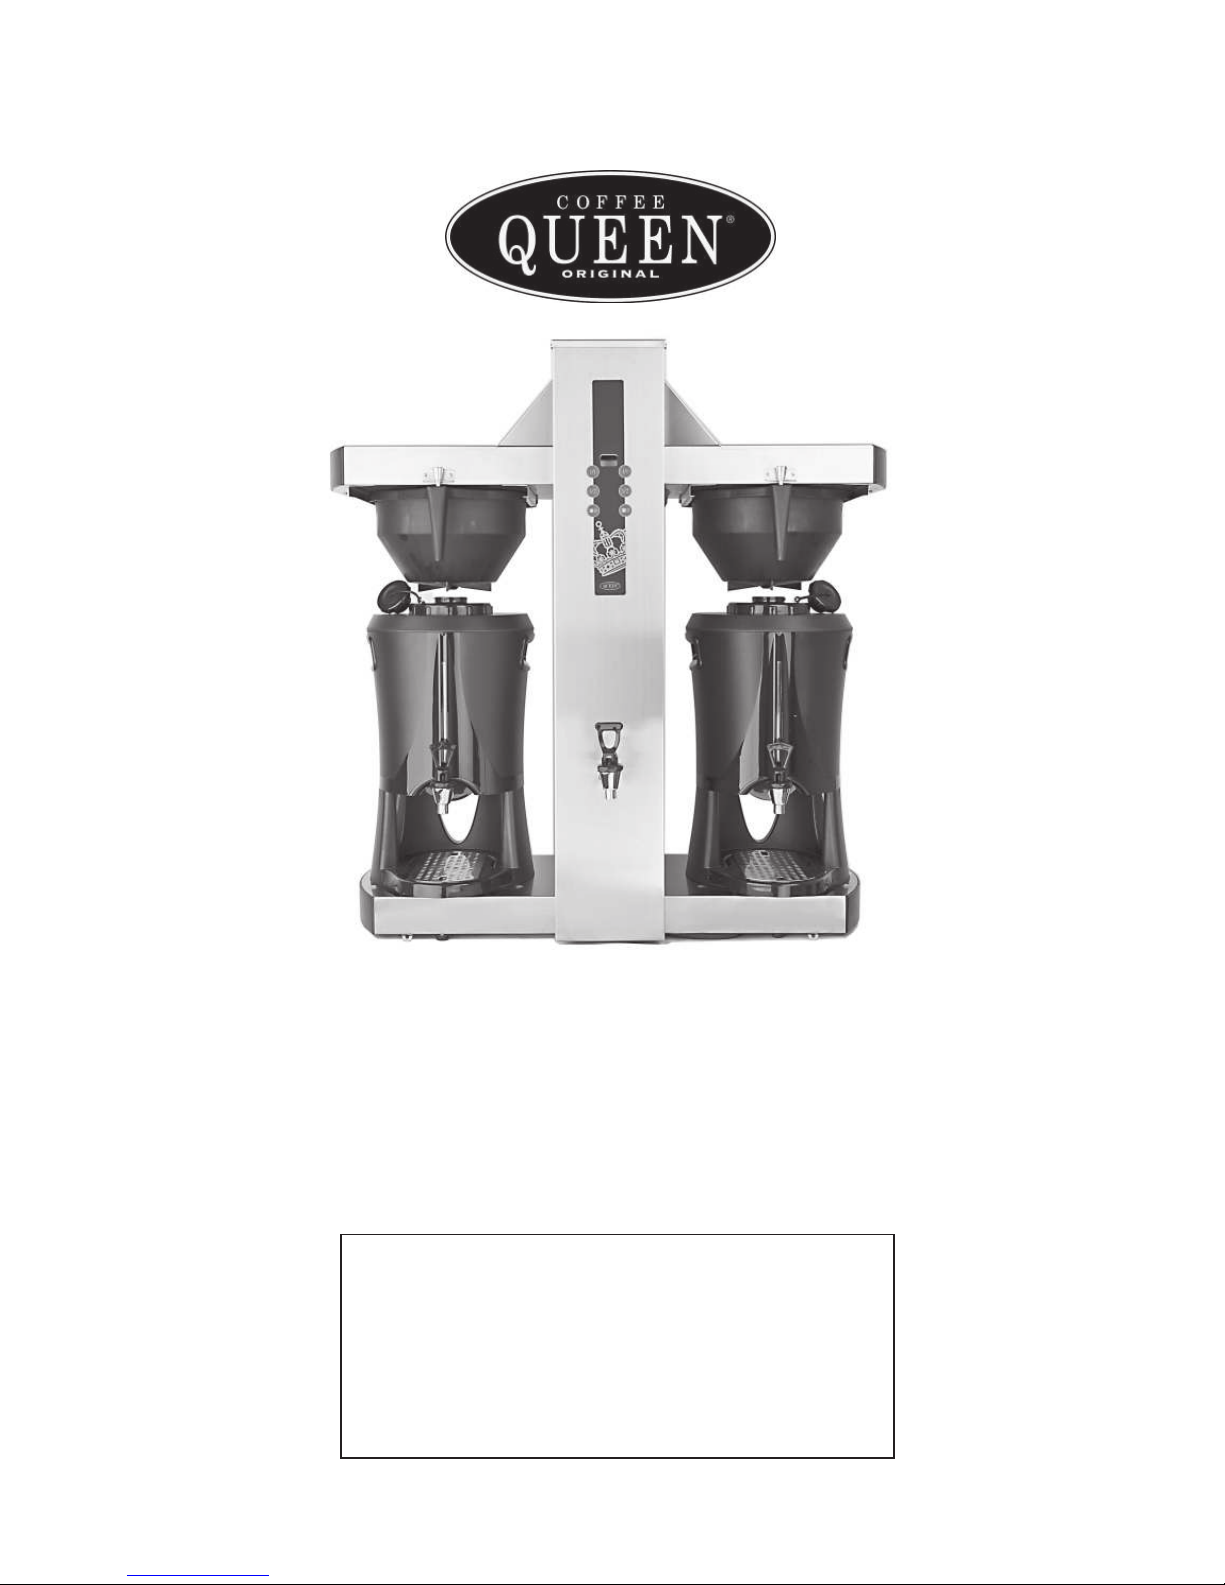
TOWER Marin
2 x 5 Litre
Your
retail dealer
Page 2

2.
1. Table of contents page 2
2. General Tower 3
3. Function description, general 3
4. Start
up, general 3
5. Overview of components 4
5. Overview operation buttons 5
6. Indications brewing 5
7. Installation and start 6
8. Operation instructions, brewing 7- 10
9. Maintenance and cleaning 11- 12
10. Important! 12
11. Mounting machine on a work bench 13 -14
12. Programming 15 - 17
13. Error message 18
14. Contemplated use and warnings 19
15. Spare parts list 20 - 21
16. Exploded View (serving station) 22 - 23
17. Electrical diagram 24
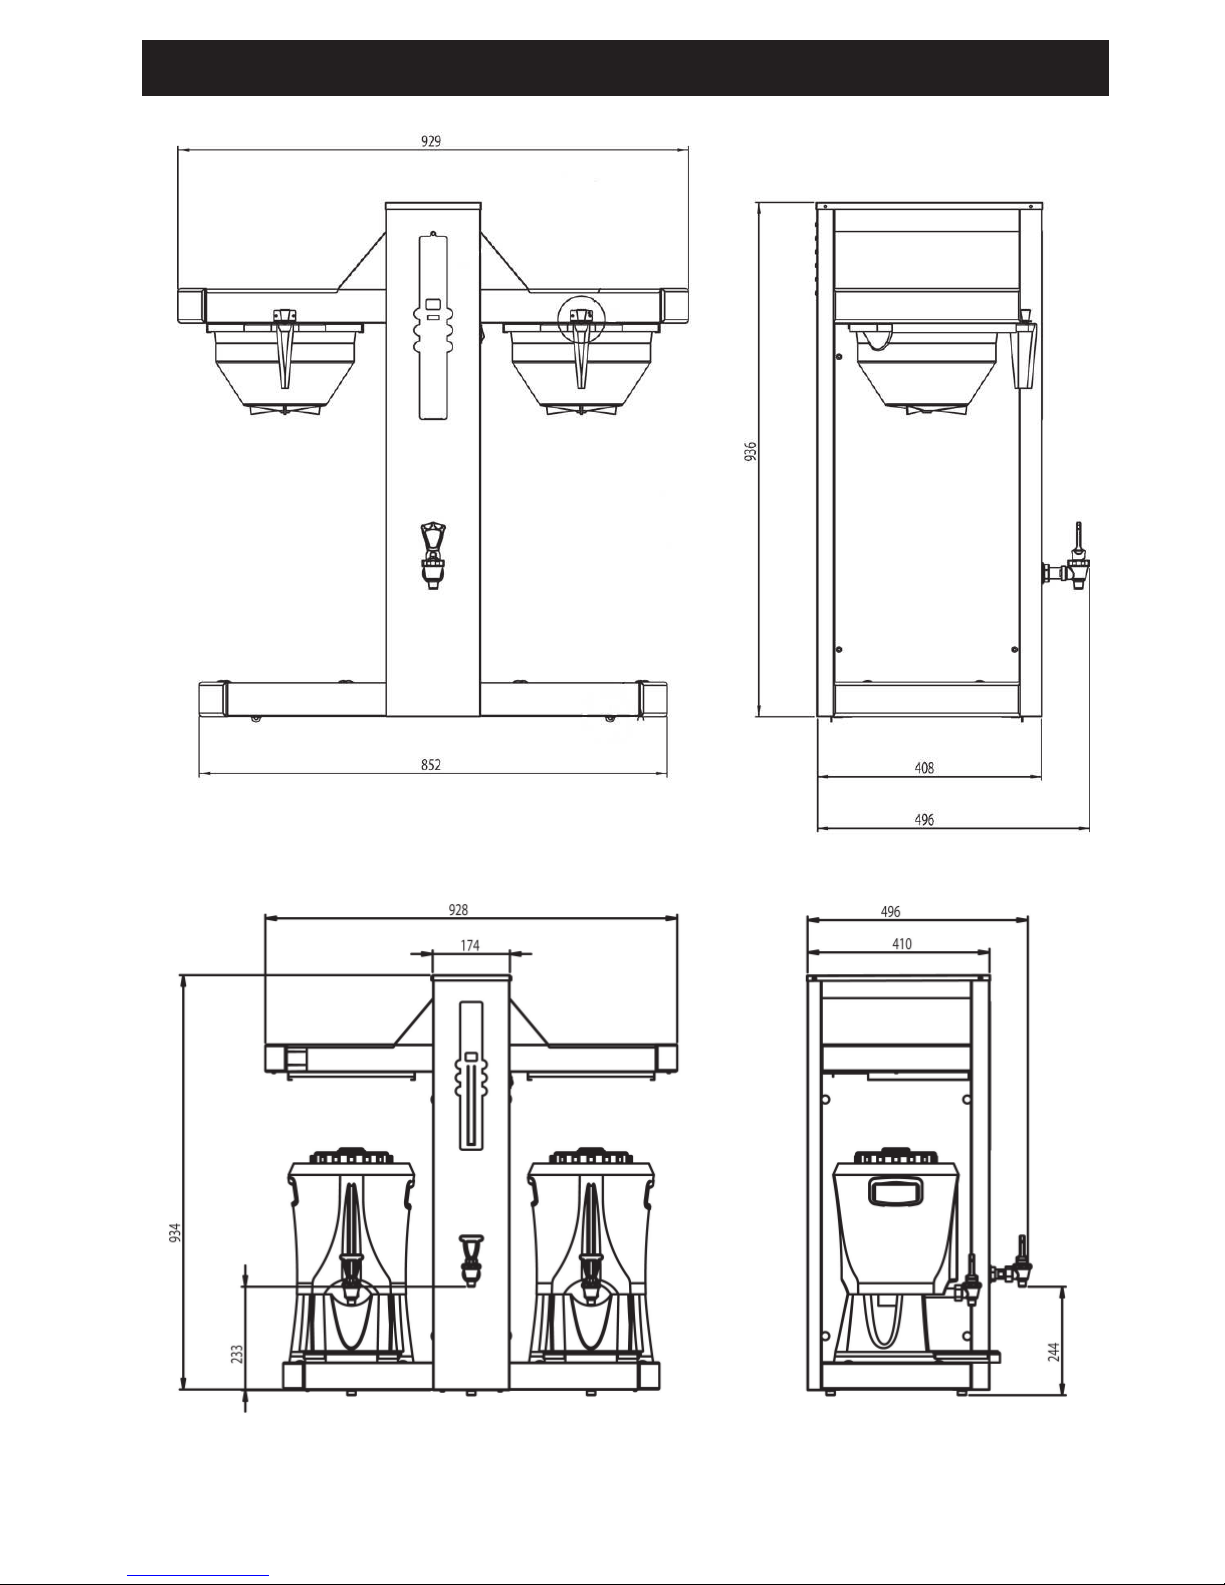
18. Dimension sketch Tower station 25
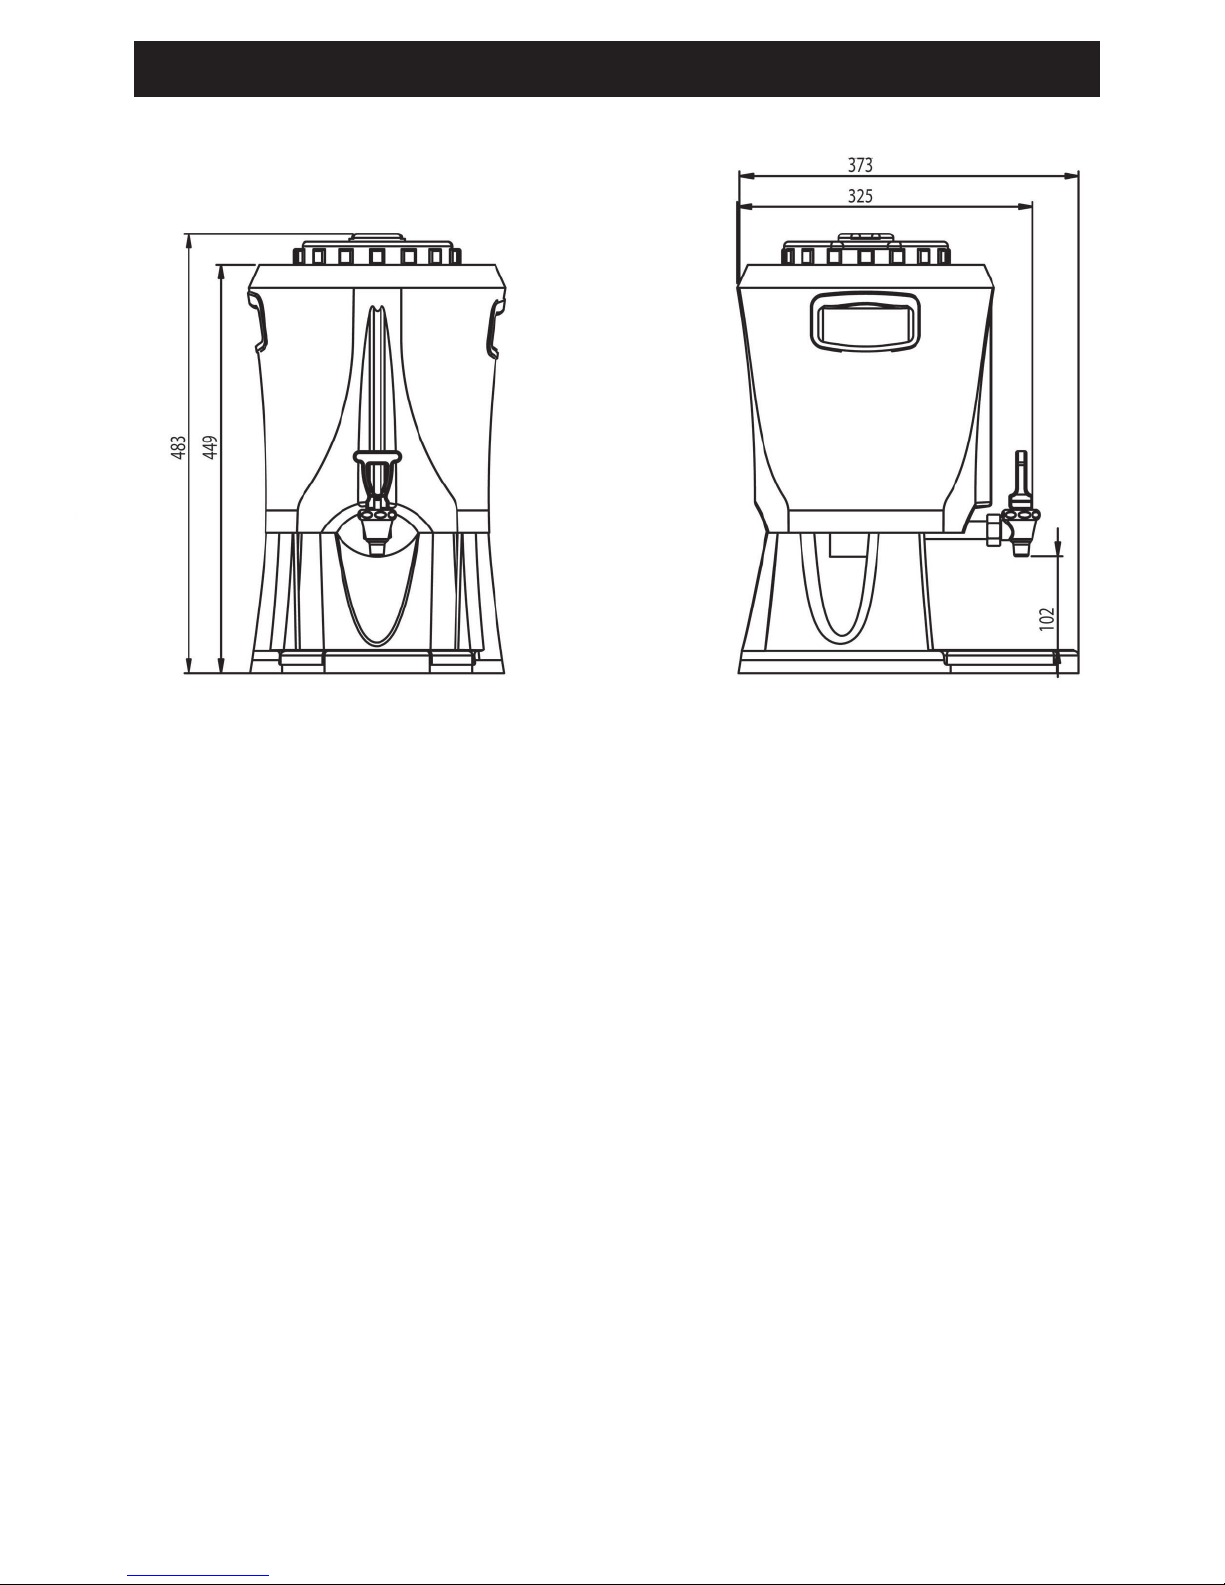
19. Dimension sketch serving station 5L 26
1. Table of contents Tower marin
EN
Page 3

3.
2. General TOWER marin
TOWER 2x5-Litre
We congratulate to your choice of Tower
coffee machine.
The brewer is equiped with full and half brew
function.and a separate outlet for hot water.
Tower is delivered with a brew unit, 2 serving
stations and filter holder.
Crem International AB is certified
ISO 9001 and 14001 and therefore
a minimal stress of the enviroment.
3. Function description - General
TOWER
bulk brewer
Coffee brewer with automatic water supply.
It is also equipped with a separate outlet for hot water.
Brewing takes place in removable serving stations.
Brewing is carried out in paper filters. (filter 523).
Brew time for 5 ltrs. approx. 7min.
4. Start
up - General
Turn on the main switch, push on/off.
The machine is now filling and will start heating water.
Machine is ready for brewing when ”Display” lights up
and the correct temperature has been reached. (A)
(approx 17 minutes).
Page 4

5. Overview
of components. TOWER marin
Warning!
The machine must be connected correctly for your safety.
Read the manual before using the machine.
Adjustable feet Tap for Hot water
Drip tray
Drip tray insert
Display
Lock
filter
holder
4.
Filter holder
Upper
lid
Level tube
Serving
station
Tap for
coffee
Upper lid
Handle
Level tube
Tap for
coffee
ON / OFF-switch
Function buttons
Slide Slide
lock
lock
Page 5
5. Overview
operating buttons. TOWER marin
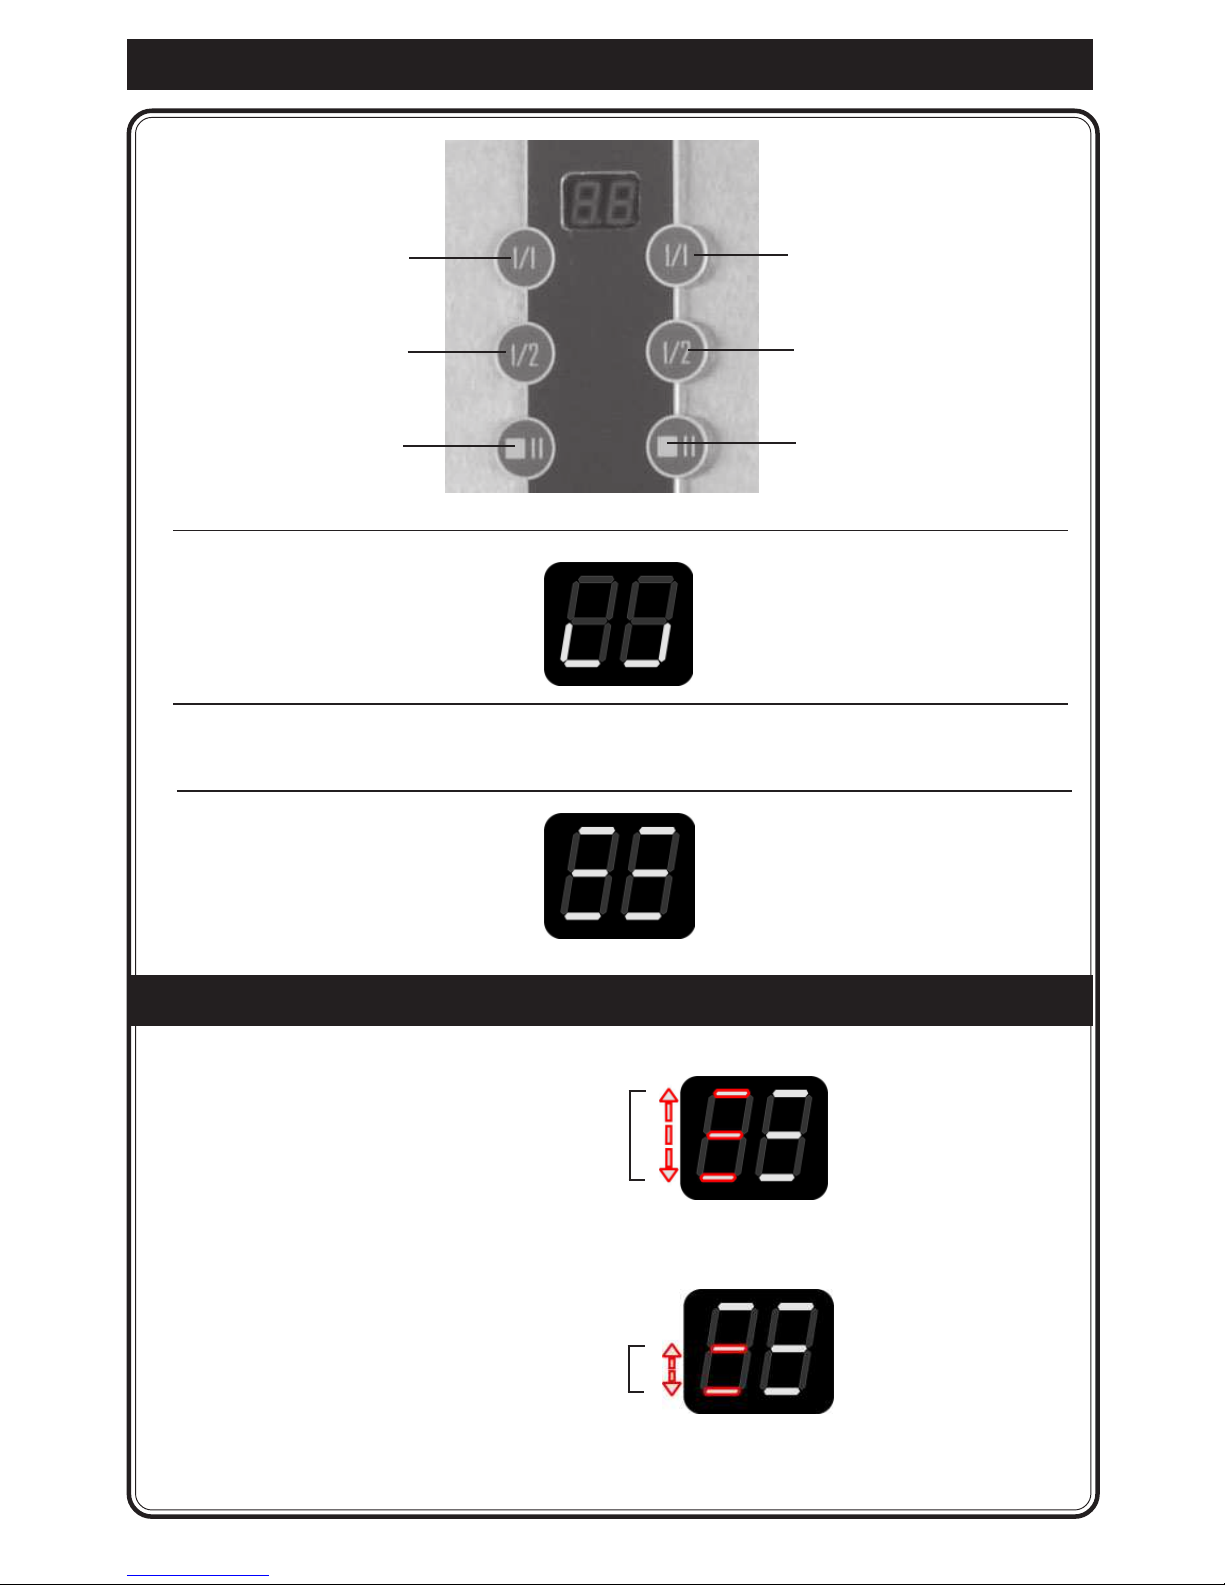
1/1 Brewing
Full brew 5,0 litre
1/2 Brewing
Half brew 2,5 litre
PAUSE / STOP
1/1 Brewing
Full brew 5,0 litre
1/2 Brewing
Half brew 2,5 litre
PAUSE / STOP
When machine is in use
and
filling water.
Display shows:
When machine is filling up andheating water. Display is blinking.
When water has reach right
temperature.
Display will light up
5.
6. Indications, Brewing. TOWER
marin
When machine is
brewing Full
brew
Display shows: see A
When machine is
brewing Half brew
Display shows: see B
A
B
Page 6

6.
7. Installation
and start - Service TOWER marin
7.1. Place the brewer unit on a flat, level and waterproof surface.
7.3. Connect the brewer unit to a coldwater feed -1/2"R with connection tube supplied.
NOTE! The new hose set supplied with the appliance shall be used and that old hose
sets shall not be reused. Connection to a closable valve is recommended.
Min. water pressure; 2bar (200kPa). Max. water pressure; 8bar (800kPa).
Water supply to the machine is the customer ’s responsibility according to
instruction and advice from the supplier.
In areas with high level lime problem, a descaling filter should be mounted.
7.4. Electrical connection;
The brewer is not reconnectable and may only be installed to the electric supply network
with a voltage that is stated on the brewer and shall be carried out by an Authorized
Electrician.
Recommended
:
Install a line circuit breaker and a earth fault breaker to the machine.
CAUTION! Connection to a separate 3 phase only
- Brewer should be connected to 380 V with Zero and ground.
- Use 16 Amp fuses.
IMPORTANT! Electrical installations must be done of an certificated electrician.
440 V 3 - phase + ground 9000W
Observe!
See
page 13-14, Mounting machine Service. And how to assemble the
machine.
7.2. Install
and lock machine. See fig, A.
Adjust feets to stabilize machine.
Fig. A
Page 7

8. Operating instructions. (Brewing
with coffee) TOWER marin
8.1. Startting up machine.
Turn on the switch A.
The machine will now starts filling water .
A
Display shows:
Place a filter in the filter holder.
Filter type 523 for 5Litre.
8.3. Place a filter in the filter holder.
Use Crem International´s recommended coffee filter
Filter type 523 for 5Litre. Article no. 110102 - 02
8.2. Machine starts heating water.
While machine is heating the water, display
is blinking.
When water has reached the right temperature.
Display will light up.
Machine is now ready to brew.
7.
Page 8

8. Operating instructions. (Brewing with coffee) TOWER
marin
8.4. Add coffee.
Add coffee; Use coffee dedicated for bulk brewer
approx. 250 grams for 5 litres of water.
Shake the filterholder easy and make sure that the
coffee is evenly spreaded.
8.5. Place filter holder.
Place the filter holder and lock it with filter lock (A). A
A A
A
8.6. Place the serving station.
Make sure that the serving station is centered
with the rotation plate (B).
B
8.
Page 9
8. Operating instructions. (Brewing with coffee) TOWER
marin
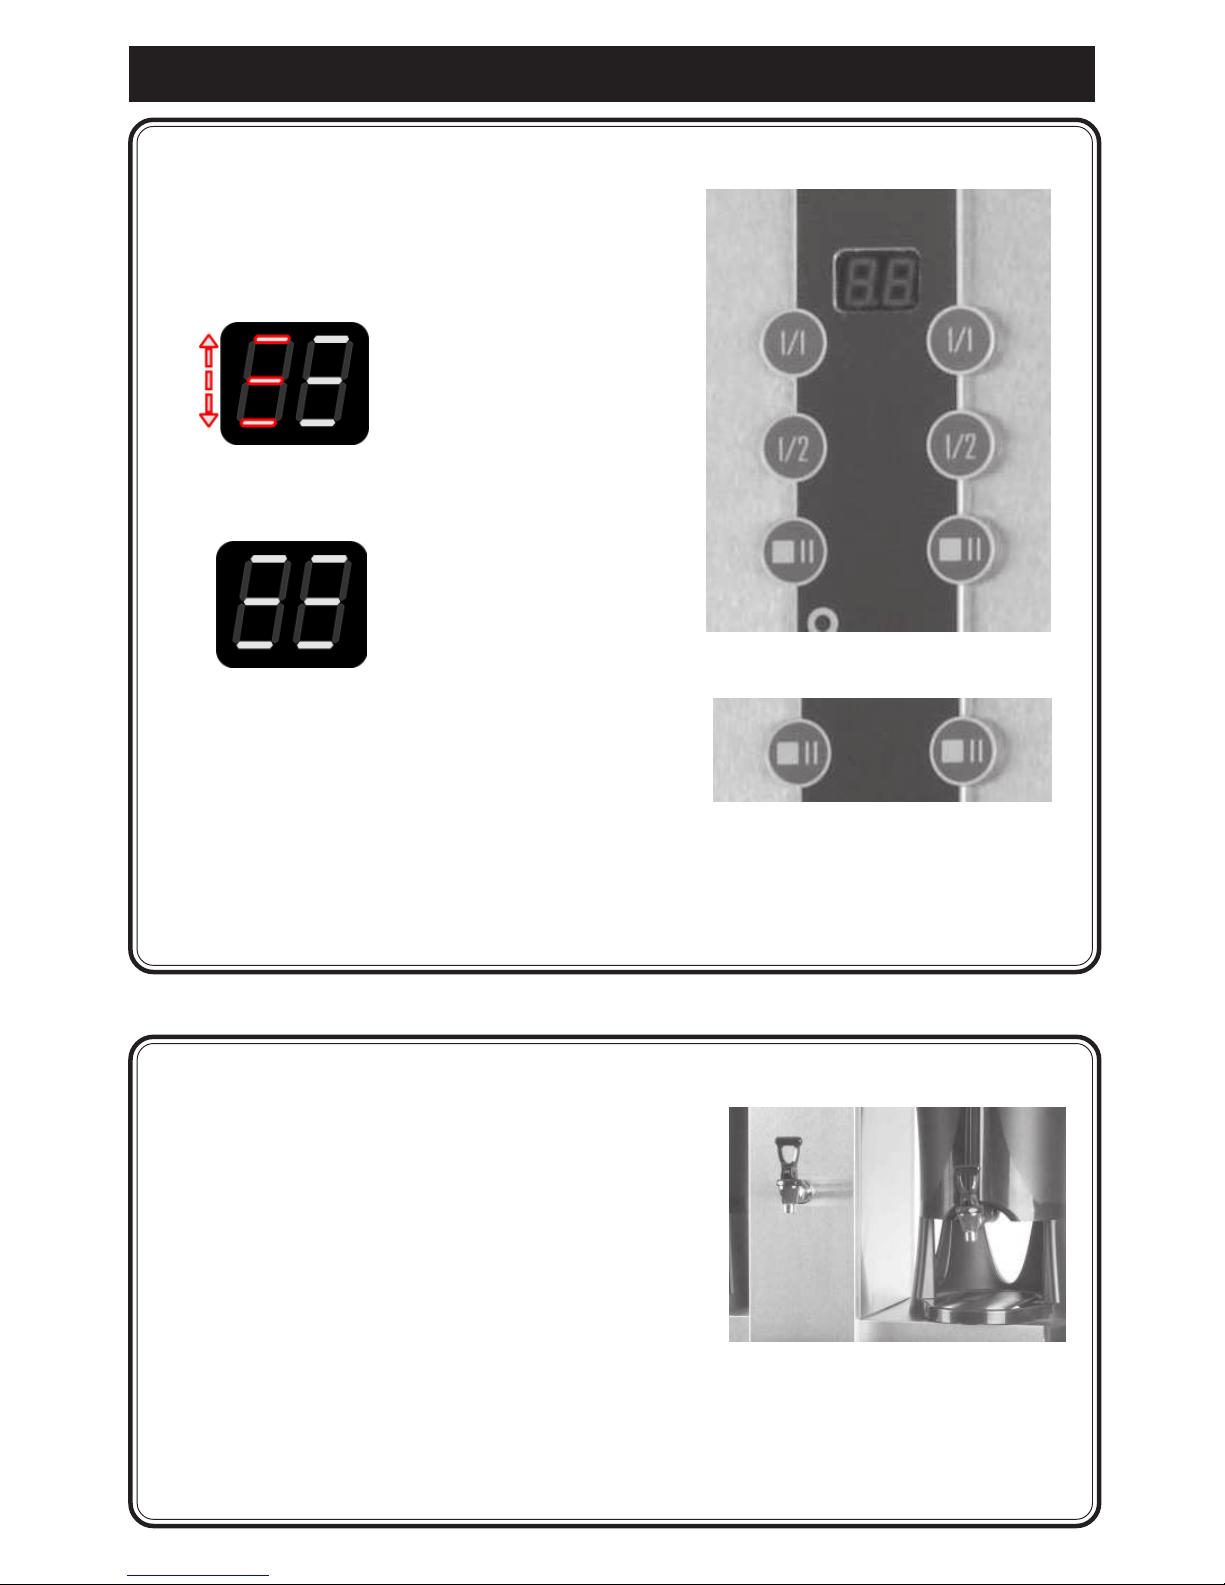
8.7. Start brewing .
1.
Push button 1/1 for 5 litre.
Display shows:
When ”Brewing” is ready.
The ”Brewing” indicator
lamp will lit.
2. STOP
/ PAUSE button
- Press button once for stand by.
- Press button twice to stop brewing.
To complete brewing press ½ alt. 1/1.
TAPING
HOT WATER It is possible to take
hot water while brewing coffee.
NOTE!
On the brewer unit, a water tap is placed for
serving hot water.
You can as a maximum taping 2 pitchers (1.8litre)
of hot water, while brewing coffee on 1 serving station .
9.
Page 10
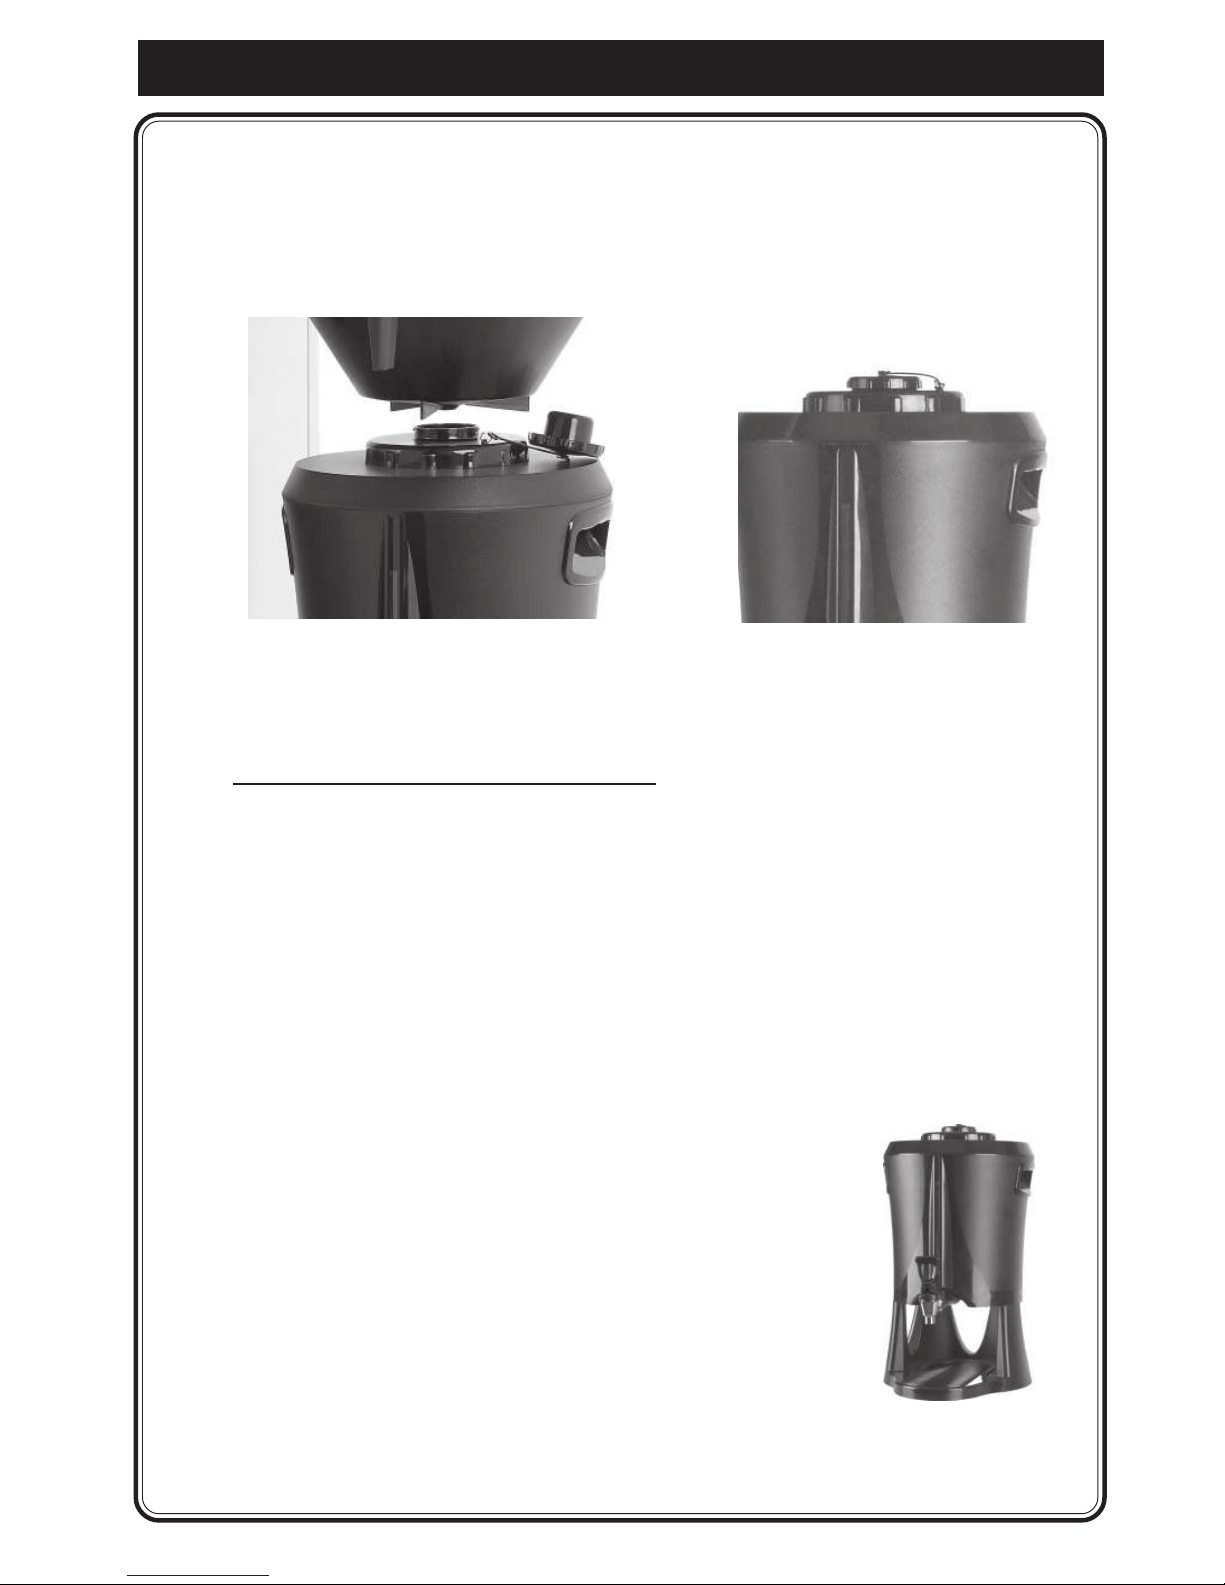
8.8. To
keep temperature and aroma.
Put the lid (A) back on the serving station
immediately after the brewing.
(A)
Tips!
Preheating of serving stations.
Fill the serving station with hot tap water one hour before brewing.
Pour out water and do a brewing.
8.9. Empty the filter holder from filter and coffee grounds
and clean the filter holder.
Machine is now ready for the next brew.
Some tips for best coffee quality
1. Do
not change the recommended
portion of coffee.
2. Do not mix freshly brewed coffee
with old coffee.
3. Always rinse the serving station before
next brew.
8. Operating instructions. (Brewing with coffee) TOWER marin
10.
Page 11

9. Maintenance and Cleaning
TOWER marin
Weekly Cleaning
Cleaning
- To keep the serving stations clean. It is effective to start a half brew with water only.
- This will disolve the coffee remains.
- Empty the serving station by opening the tap and this will also be cleaned.
- Repeat this every day.
- Dismount the level tube and clean it every week with the enclosed brush.
Cleaning with cleaning powder Article no. 1104162
CLEANING OF SERVING STATION 5 LITRE.
Fill the serving station. ( Full brewing without coffee and filter ).
Put 2 tablespoons with cleaning powder in the serving station
and wait at least 15 minutes.
Tap off 2/3 of the cleaning solution.
Clean the serving station with the following cleaning brush.
IMPORTANT! Rinse the serving station on the inside several
times with fresh tap water.
Observe!
The filter holder and serving station should be cleaned every day.
Rinse the serving station before each new brewing.
Do not use strong liquid solution when cleaning the brewer unit and serving station.
11.
Page 12
9. Maintenance and Cleaning
TOWER marin
Outwardly Cleaning of machine
Use a soft rag and liquid cleaning agent to prevent scratches.
10. Important!
TOWER marin
Important.
Do not make any alterations to the machine. Such measures may cause personal injury and
the machine to fail.
The machine should stand on a flat surface so that it will function properly.
The machine should be placed on a water-proof surface so that any leakage is easily noticeable.
Make sure there is no bendage on the connection tube when machine is pushed into its place.
The tube connections should be regularly checked. Make sure that no leakage has occurred in
connection with installation.
Do not leave the machine unattended while using.
Close water connection when not using machine.
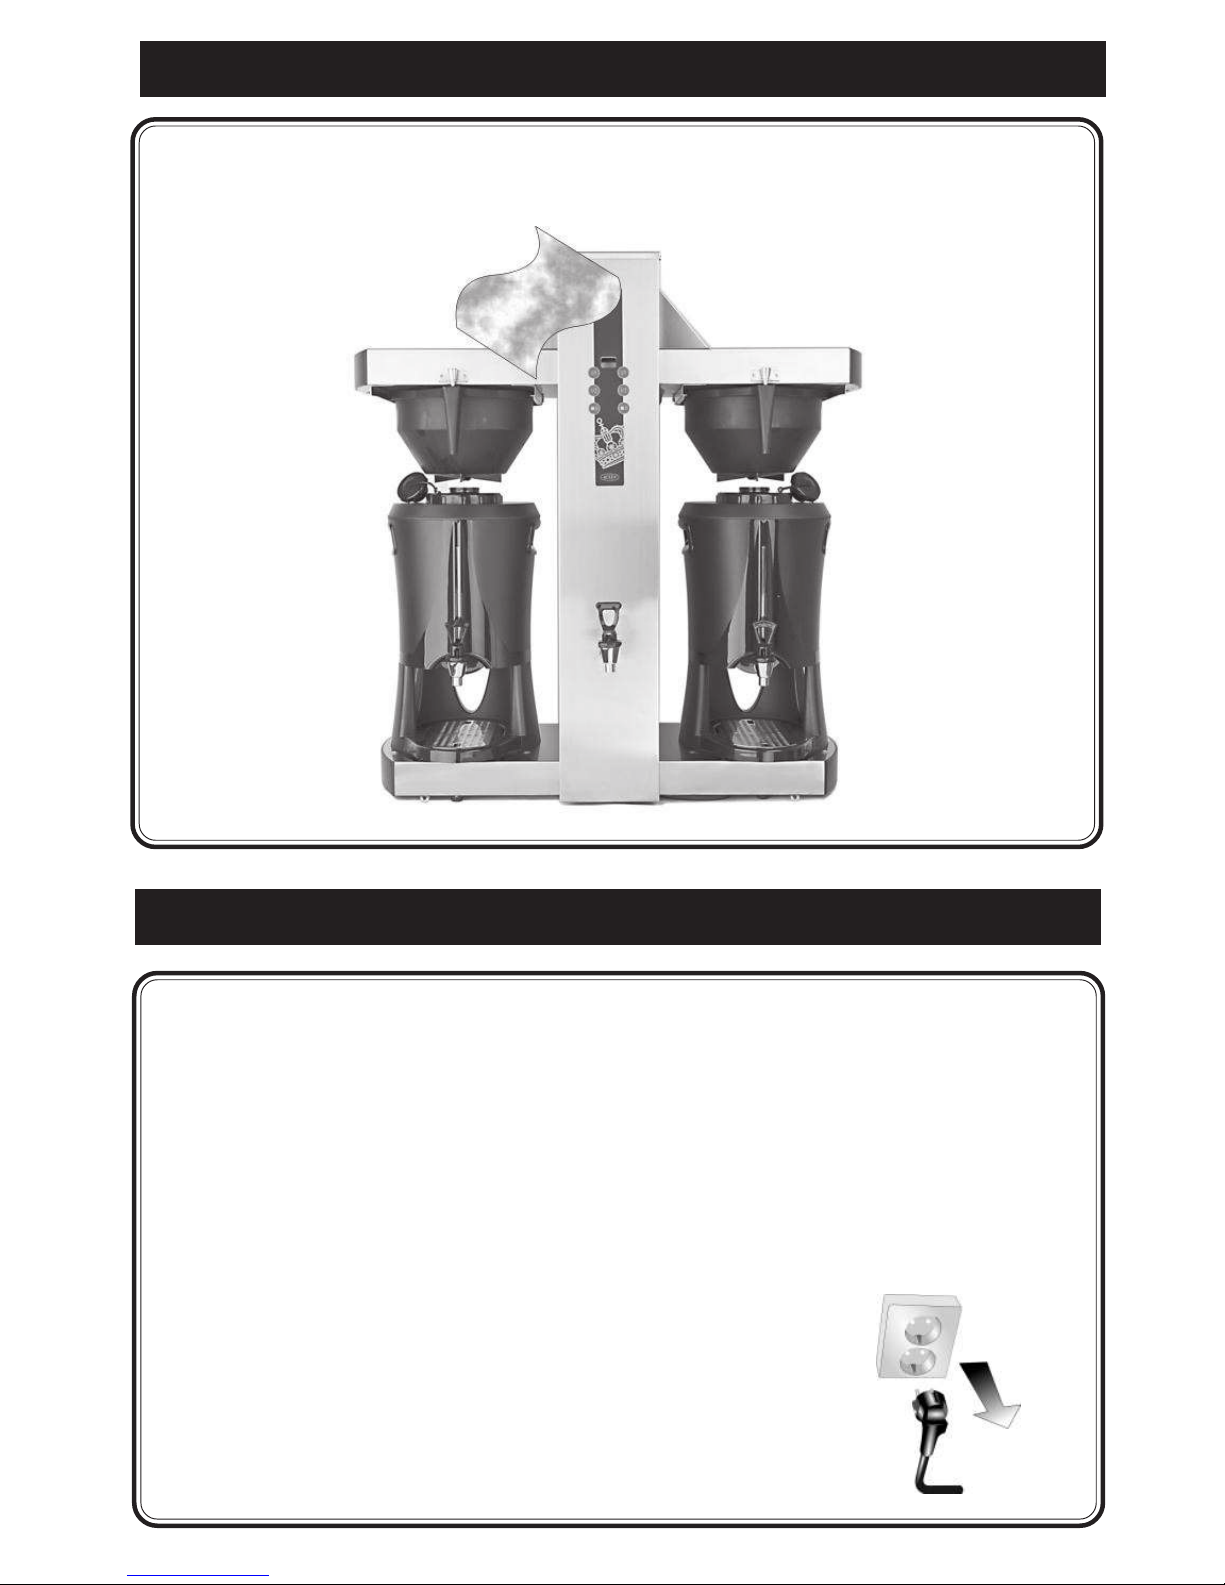
The machine must be disconnected from electrical supply before
any maintenance.
All maintenance and installations must be done by
authorized personel.
12.
Page 13

13.
11.
Mounting machine on workbench - SER VICE T OWER marin
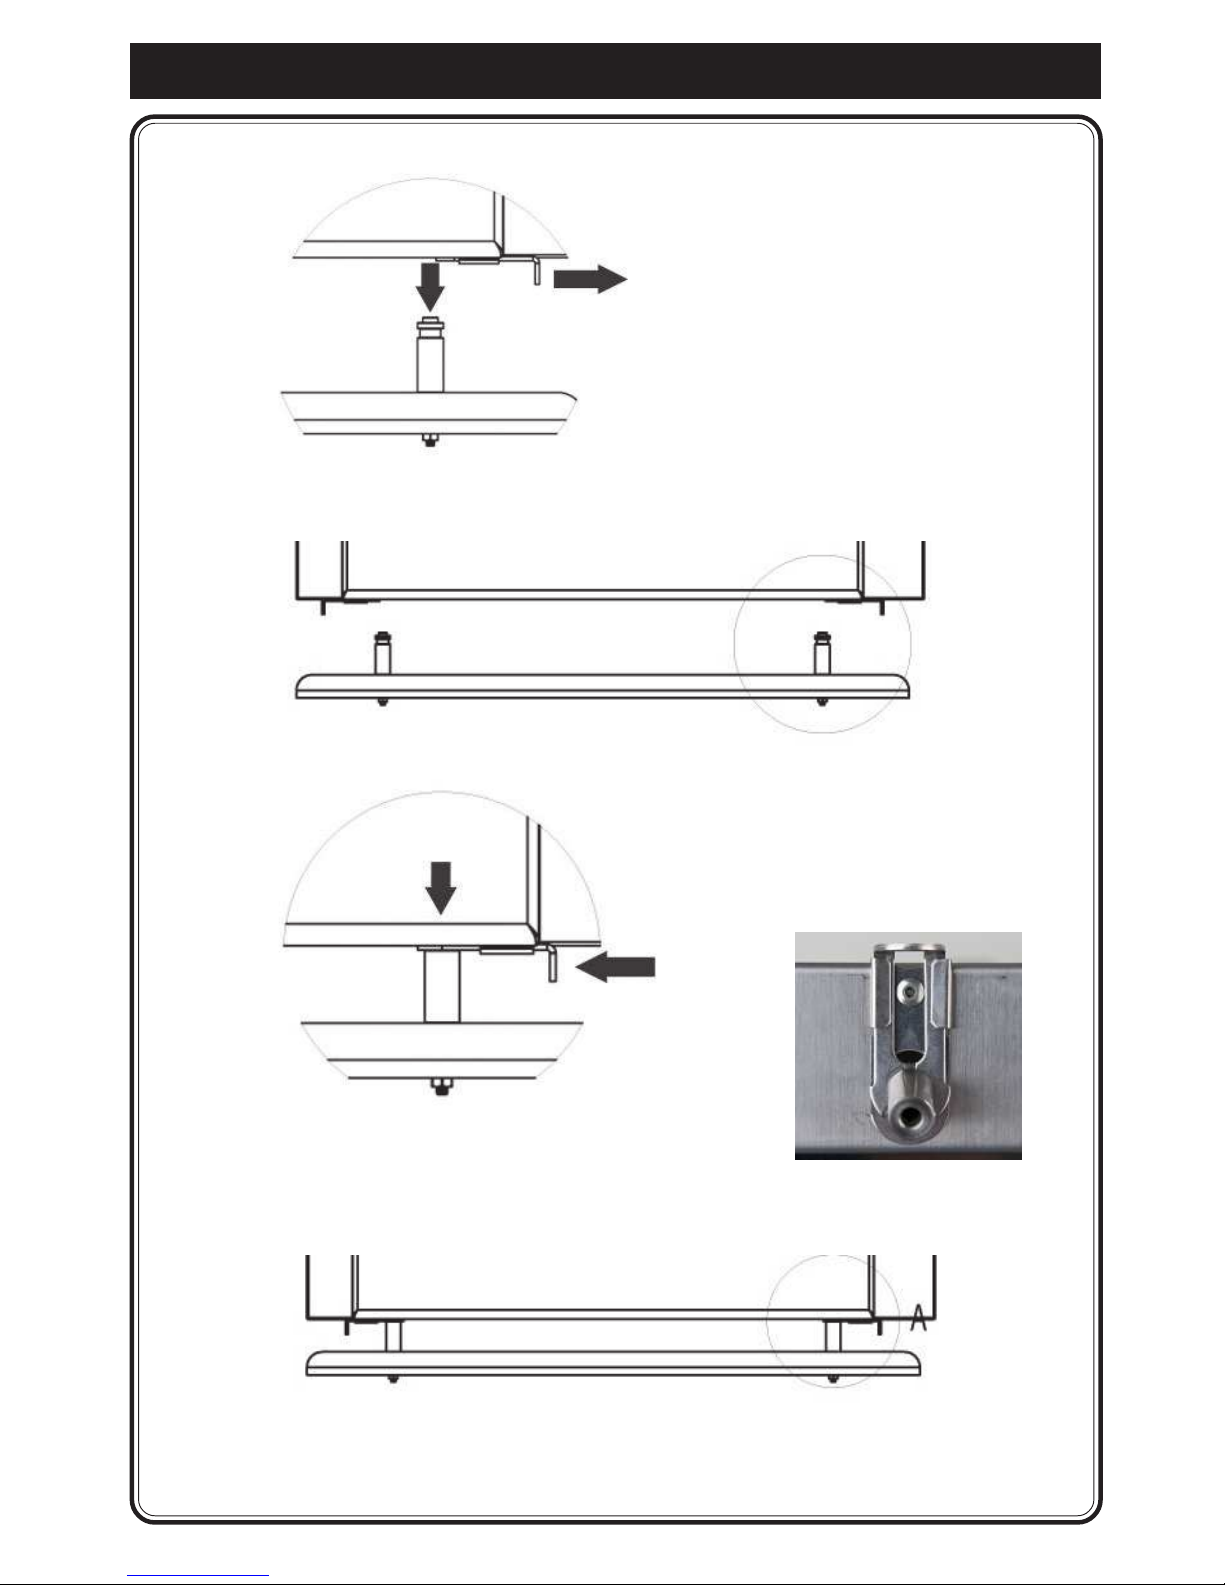
Mounting the lock pin. see Fig. 2. Fig. 2.
Mounting machine on a work top.
645
58,5 287
Fig.1. Bore holes for lock pin.
Ø 3mm. hole 4 pcs
Page 14
14.
11.
Mounting machine on workbench - SER VICE T OWER marin
Fig. 4.
Mounting machine on a work top.
Fig. 3.
Page 15
15.
12. Programming. Adjustings.
- SERVICE TOWER marin
ADJUSTING OF TEMPERATURE.
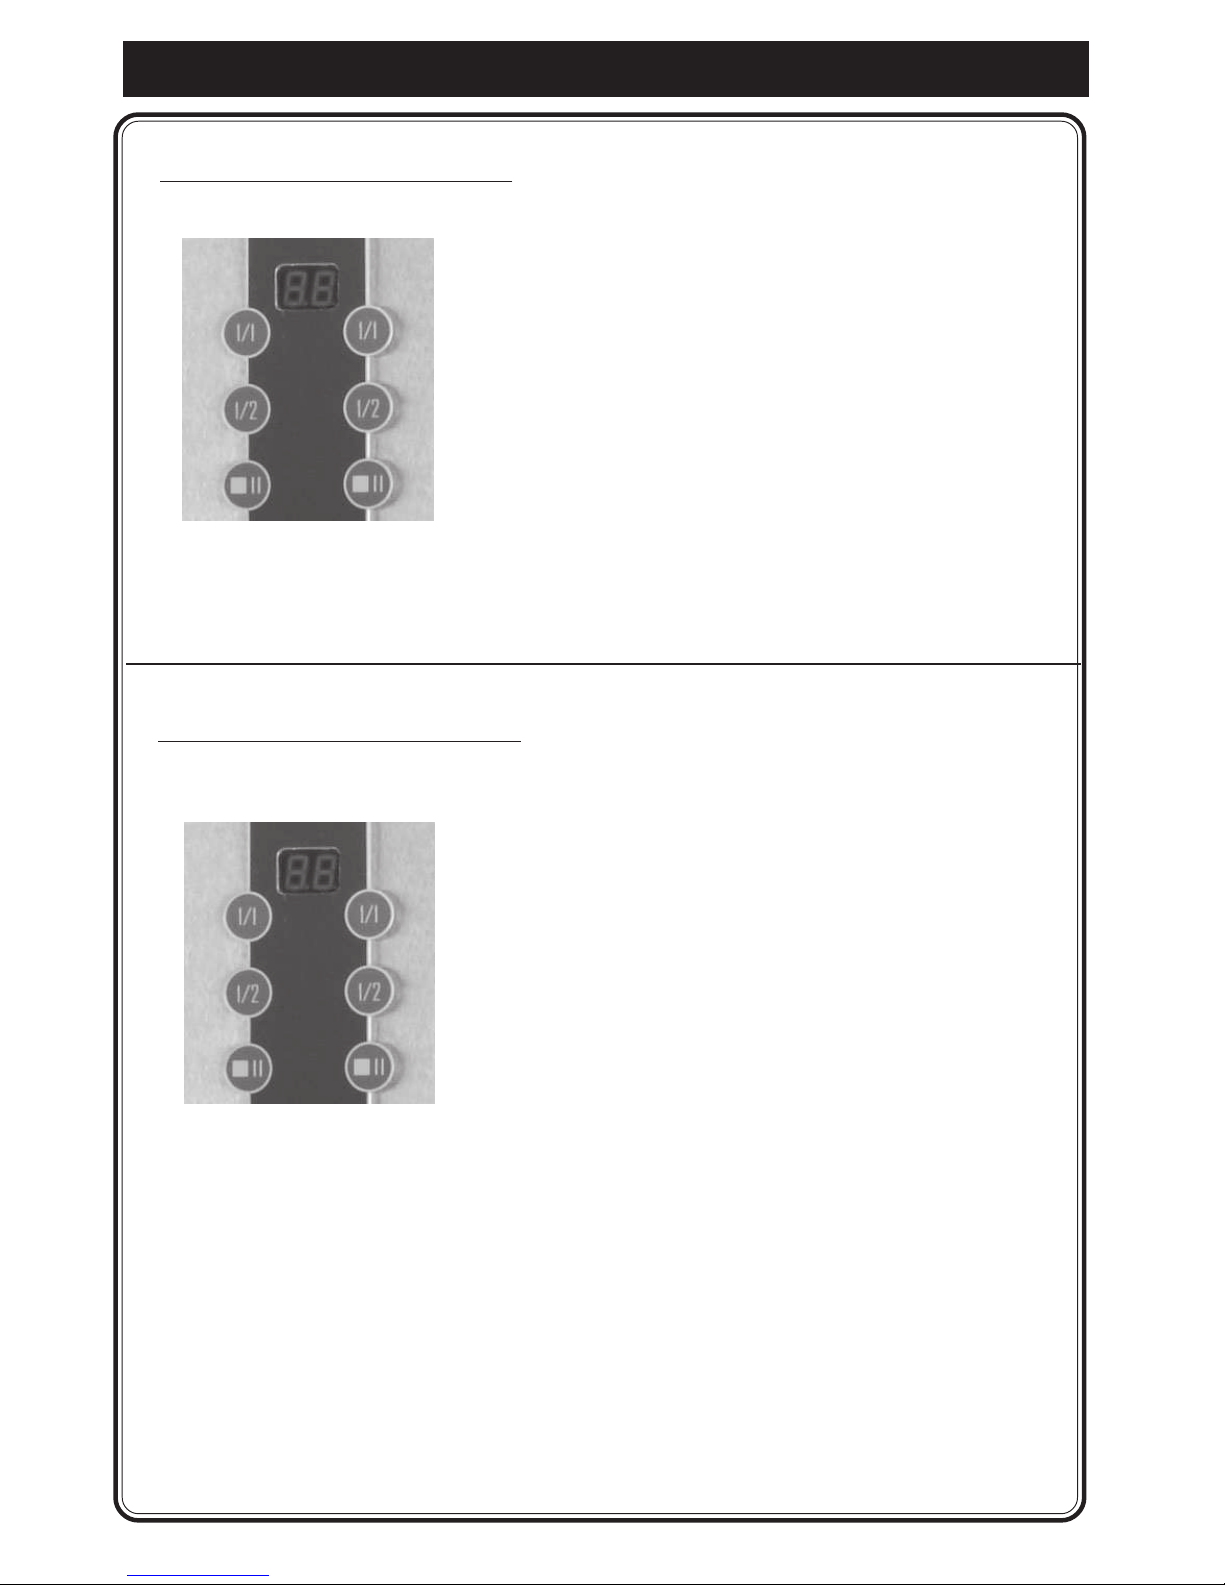
1. Push
buttons 1, 2, at the same time for 5 seconds
until you hear 1 beep .Left side.
Display shows: present setting.
Adjust with the buttons 1 and 2.
Confirm the new settings
by pushing button 3 once.
96°C = max. temperature.
70°C = min. temperature.
ADJUSTING AMOUNT OF WATER.
Adjust Signal
Off
6
-25% -5
-20% -4
-15% -3
-10% - 2
-5% -1
0% 0
5% 1
10% 2
15% 3
20% 4
25% 5
1. Push buttons 1, 3 at the same time for 5 seconds until you hear 3 beeps .
Left side. Display shows: present setting. Adjust with the buttons 1 and 2.
Confirm the new settings by pushing button 3 once.
Push buttons 4, 6 at the same time for 5 seconds until you hear 3 beeps.
Right side. Display shows: present setting. Adjust with the buttons 4 and 5.
Confirm the new settings by pushing button 6 once.
ON
ON
1
4
2 5
3 6
96
1
4
2 5
3 6
0
Page 16

16.
12. Programming. Adjustings. - SER VICE TOWER marin
ADJUST BREWING TIME. (Coffee Ready).
Adjust Signal
Off
6
-25% -5
-20% -4
-15% -3
-10% -2
-5% -1
0% 0
5% 1
10% 2
15% 3
20% 4
25% 5
1. Push buttons 2, 3 at the same time for 5 seconds until you hear 5 beeps .
Left side. Display shows: present setting. Adjust with the buttons 1 and 2.
Confirm the new settings by pushing button 3 once.
Push buttons 5, 6 at the same time for 5 seconds until you hear 5 beeps.
Right side. Display shows: present setting. Adjust with the buttons 4 and 5.
Confirm the new settings by pushing button 6 once.
CALIBRATE TEMPERATURE SENSOR.
1. Push
buttons 1, 2, 3 at the same time for 5 seconds until you hear a beep twice.
Left side. Display shows: present setting. Adjust with the buttons 1 and 2.
Confirm the new settings by pushing button 3 once.
NOTE! When calibrating the temperature sensor, you must check the present
temperature in water tank.
Adjust Signal
98° 2
97° 1
96° 0
95° 1
94° 2
93° 3
92° 4
91° 5
Off 6
1
4
2 5
3 6
0
ON
1
4
2 5
3 6
-1
ON
Page 17

17.
12. Programming. Hardware
test - SERVICE TOWER marin
Hardware test:
Controll
of hardware.
1. Checking all electrical outlets: (No outgoing
voltage from the electronic-card in 3 seconds).
2. Control of water, in 3 seconds.
3. Control left outlet valve, in 3 seconds.
4. Control right outlet valve, in 3 seconds.
5. Control heating element, in 3 seconds.
6. Testing buzzer, in 3 seconds.
7. Testing temperature in tank, in 3 seconds.
8. Control of membrane switch by pushing the
buttons 1, 2, 3, 4, 5, 6.
See fig.
9. Display shows:
Function of temp. sensor. = L1/L2.
10. To leave programming: Restart machine.
1. To do a hardware test, rest art machine.
Machine must be in position OFF.
Push buttons 1, 3 left side at the same time
and start machine, position ON.
ON/OFF
ON
1
4
2 5
3 6
1
4
2 5
3 6
Page 18

18.
13. Error message - SERVICE TOWER
marin
Error message: Display shows: E1, E2, E3, E4.
LEVEL CONTROL
TEMPERATURE CONTROL
Display shows: E1 = Level sensors short electrod is Clean level sensor.
earthed, (GND) Change level sensor.
but not level sensors long electrod. Cables wrongly coupled.
Display shows: E4 = Filling time too long. Restart machine.
Low pressure on water.
Water tap not open.
Display shows: E2 = Temp. sensor out of range 5°C - 105°C.
Temp. sensor failure. Change temp. sensor.
Cable is loose. Connect cable.
Display shows: E3 = Heating time too long. Restart machine.
Solid state defect. Change solid state.
Element defect. Change heating element.
High limit control defect.
IMPORTANT! All maintenance and installations must be done of an
authorized technician.
Page 19

19.
14. Contemplated use and warnings. TOWER marin
Contemplated use and warnings
Tower
is an appliance for delivering hot water and preparation of coffee.
Its long lasting, non-toxic components are easily accessible for proper cleaning and maintenance.
The user must be an adult.
The appliance must not be used by children or unsuitable people.
The user must comply with the safety regulations in force in the country of installation, as
well as with the rules dictated by common sense, and ensure that routine maintenance is carried
out regularly and correctly. The installer, the user and the maintenance technician must inform the
manufacturer of possible faults or wear which could affect the system´s original safety.
The installer must check that the environmental conditions are suitable, so as to guarantee safety
and hygiene for the operators and users. The various manufacturers are responsible for the
commercial components fitted to the applince; the customer is responsible for the people
authorized to use the machine. (Do not expose the machine to the weather (sun, rain, etc. ).
Long appliance stoppages at temperatures as below 0ºC (zero degrees celsius) can cause
damage or breakage to the water tank ; thus total emptying is recommended.
”If the Power cord is damaged, it must be replaced by the manufacturer, its service agent or
similarly qualified persons in order to avoid a hazard” (see servicemanual.)
All electrical installations must be done by a qualified electrician and within safety regulations that
applies for each country where the appliance are installed.
The manual is dedicated the user and/or an authorized personel. It will give you information how to
use the appliance in a correctly way, desirable maintenance and a good safety and security for the
user. The manufacturer is not responsible for personnel damage or environment damage, caused
by the appliance, if it has been used in a way, which is different from what prescribes in these
instructions.
This manual must always be available to the user and/or maintenance technician, who must
be informed of the correct use of the appliance and of possible hidden risks. It must be kept in
a dry, clean place.
The information given in this manual does not replace the safety instructions and technical
data for installation and operating directly affixed to the machine and packaging.
This manual is to be considered as part of the appliance and must be kept for future reference until
same is dismantled.
Should you lose it or require further information , contact your area agent or the manufacturer.
This manual reflects the state of the art at the current time and cannot be considered inadequate
merely because it is updated later on the basis of new developments.
The manufacturer also reserves the right to modify the manual without the duty of updating earlier
issues, except in exceptional basis of new developments.
If the appliance is used incorrectly or in ways, other than described in this manual,
it will render any guarantee or manufacturer´s responsibility condition null and void; it should
only be used by a responsible adult.
Page 20

1 15.
Spare part list. TOWER marin
20.
Pos. Article
number Description Quantity / unit
1 220220 High limit switch 1
2 1205302 Sensor pin short 1
3 1605362 Double seal level sensor 1
4 1205301 Sensor pin long 1
5 160536 Rubber 1
6 1206586 Gasket, tank 1
7 160537-03 Seal for outlet valve 1
8 1102122 End cover 1
9 160230-05 Solenoid valve 230V 1
10 160538-03 Plug for water outlet 1
11 1031642 PCB 1
12 1102131 Brew basket 1
13 1608017 Rocker switch (espresso) 1
14 1603856 Membrane switch 1
15 1505022 Silicon hose 1
16 1403400 Outlet plug 1
17 1104330 Rotation guide 1
18 120200-02 Faucet metal 1
19 1802120 Connection faucet, (short) 1
20 120634 Single valve 5L/min. 1
21 1203162 Foot, adjustable 1
22 160564 Nut PG 13,5 1
23 1505022 Silicon hose 1
24 160549 Connector FV/122/B 1
25 160351 Connector + sidewall 1
25 160352 Sidewall 1
26 160429-02 Fuse automatic 1
27 1602231 Contactor 1
28 160563 Restrainer PG 13,5 1
29 1604203 Solid state 1
30 1604133 NTC thermistor 1
31 1505076 Plastic plug 1
32 1031801 Spray nozzle, Tower 1
33 1505041 Silicon hose, hot water 1
34 1204016 Spray nozzle 1
35 1605361 Seal for NTC 1
36 1031502 Owerflow protection tube 1
37 1601312 Element 3000W 230V 1
38 1305011 Binding clip for sensor 1
39 1604393 Cable 5x 2,5 mm with EMI filtre 1
40 1203526 Water tank complete 1
41 1505042 Inlet hose 1
Page 21

1 15.
Spare part list. TOWER marin
21.
Pos. Artikelnummer Benämning Antal/enhet
50 1103351 Lid Cover with Tie
51 1103352 Brew-Thru Lid with SS Tube
52 1103353 Main Housing with
Upper Housing & Handle
53 1103354 SS Vacuum Bottle, Silicone Gasket
54 1103355 Lower Housing
55 1103356 Outlet Tube Jacket
56 1103357 Stand
57 1103358 Drip Tray
58 1103359 Glass Tube
59 1103360 Brush
60 1103361 Water Indicator Lens
61 1103362 Outlet Tube
62 1103363 Faucet
63 1103302 Serving station complete
64 1103370 Decor lid, 5 litre
65 500316 Transformer
- 1202492 KIT Slide lock
Page 22
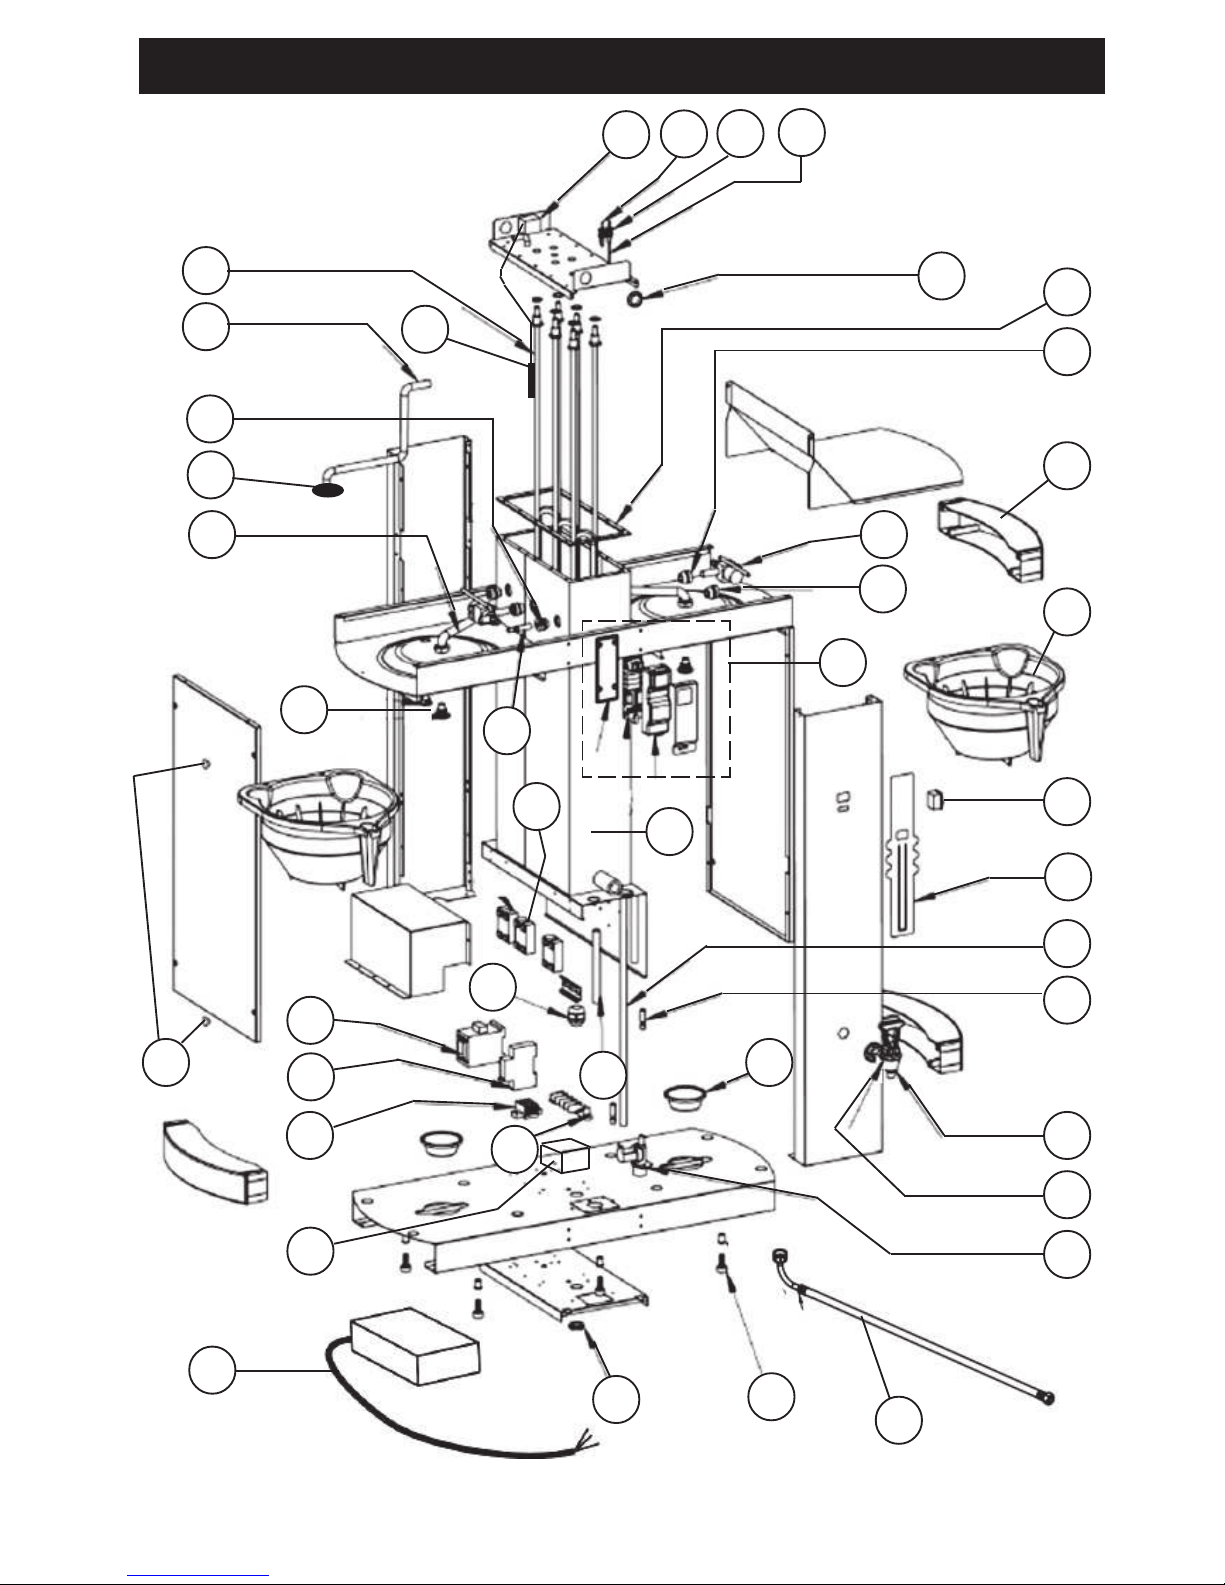
16. Exploded V iew. TOWER
marin
22.
15
16
17
18
14
2
1
10
3
6
9
4
7
30
11
22
20
21
25
27
26
24
28
32
35
31
33
36
37
5
13
8
12
29
23
34
19
38
39
40
41
65
Page 23

16. Exploded V iew. Serving
Station TOWER
23.
40
41
42
50
49
48
43
44
45
46
47
51
52
53
54
Page 24

24.
17. Electrical diagram. 3
x 440VAC + ground T ower marin
Page 25
25.
18. Dimension sketch. TOWER marin
Page 26
26.
19. Dimension sketch. Serving Station TOWER
Page 27
Tower marin
Din återförsäljare
FÖR SERVICE
Vänligen kontakta din återförsäljare
Art.nr. 1740054
CREM International AB
Box 10, Viksgränd 2, 670 40 Åmotfors,
Sweden
Tel: +46 (0)570-477 00, Fax: +46 (0)570-47719
E-mail: [email protected] www.creminternational.com
 Loading...