

Page 1
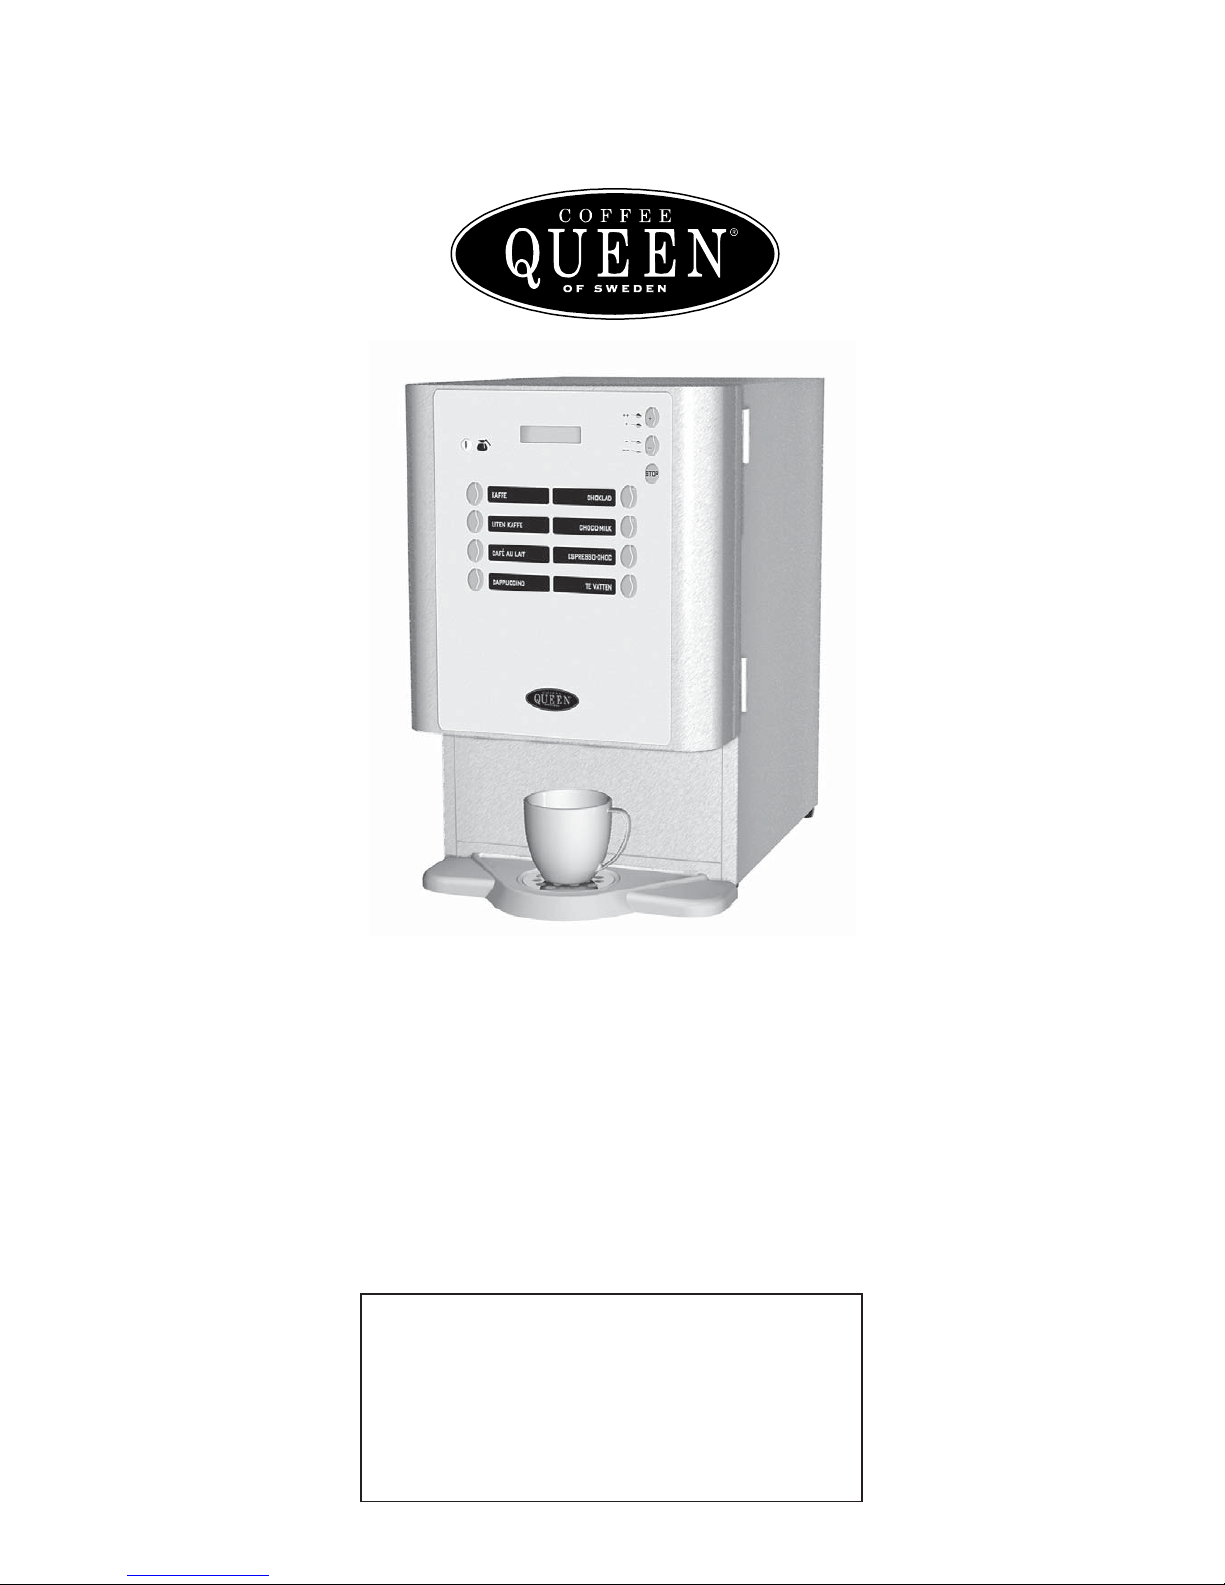
User manualUser manual
User manualUser manual
User manual
AA
AA
A
TT
TT
T
ASTE OF ASTE OF
ASTE OF ASTE OF
ASTE OF
THE FUTURETHE FUTURE
THE FUTURETHE FUTURE
THE FUTURE
Rev. 060530
041010
U / GB
Princess
COFFEE QUEEN
Din återförsäljare / Your retail dealer
...............................................................................
...............................................................................
Page 2

1. 1.
1. 1.
1.
TT
TT
T
able (list) of contentable (list) of content
able (list) of contentable (list) of content
able (list) of content
s.s.
s.s.
s.
..
..
.
OPERAOPERA
OPERAOPERA
OPERA
TING INSTRUCTIONS:TING INSTRUCTIONS:
TING INSTRUCTIONS:TING INSTRUCTIONS:
TING INSTRUCTIONS::
1. Table of contents sid. 2
2. Generally 3
3. Overview of components front 4
3. Overview of components mixing system 5
4. SERVICE;
Inst Inst
Inst Inst
Inst
allation and stallation and st
allation and stallation and st
allation and st
artart
artart
art
Locate the brewer 6
Connectings: Electricity/Water 6
Starting up machine 6
Fylla behållare med ingredienser 7
5. DRIFT
Making coffee in a cup, chocolate,, 8
Making coffee in a jug
6.
CLEANINGCLEANING
CLEANINGCLEANING
CLEANING
Weekly cleaning
Dismantle mixing system 9
Washing parts 9
Reassemble mixing system 10
7.
CLEANING programsCLEANING programs
CLEANING programsCLEANING programs
CLEANING programs:
Automatic cleaning of mixing bowl (only): 11
Automatic cleaning of mixing bowl 1 or 2 12
Automatic cleaning of In/Outlet valves: 13
8. Cup counter o Easy access 14
9. Safety functions 15
10. Failure messages 15
11. Storage / Transport. 15
12. DIMENSION SKETCH 16
13. Circuit diagram. 17
22
22
2.
Page 3
2. Generally2. Generally
2. Generally2. Generally
2. Generally
..
..
.
PrincessPrincess
PrincessPrincess
Princess
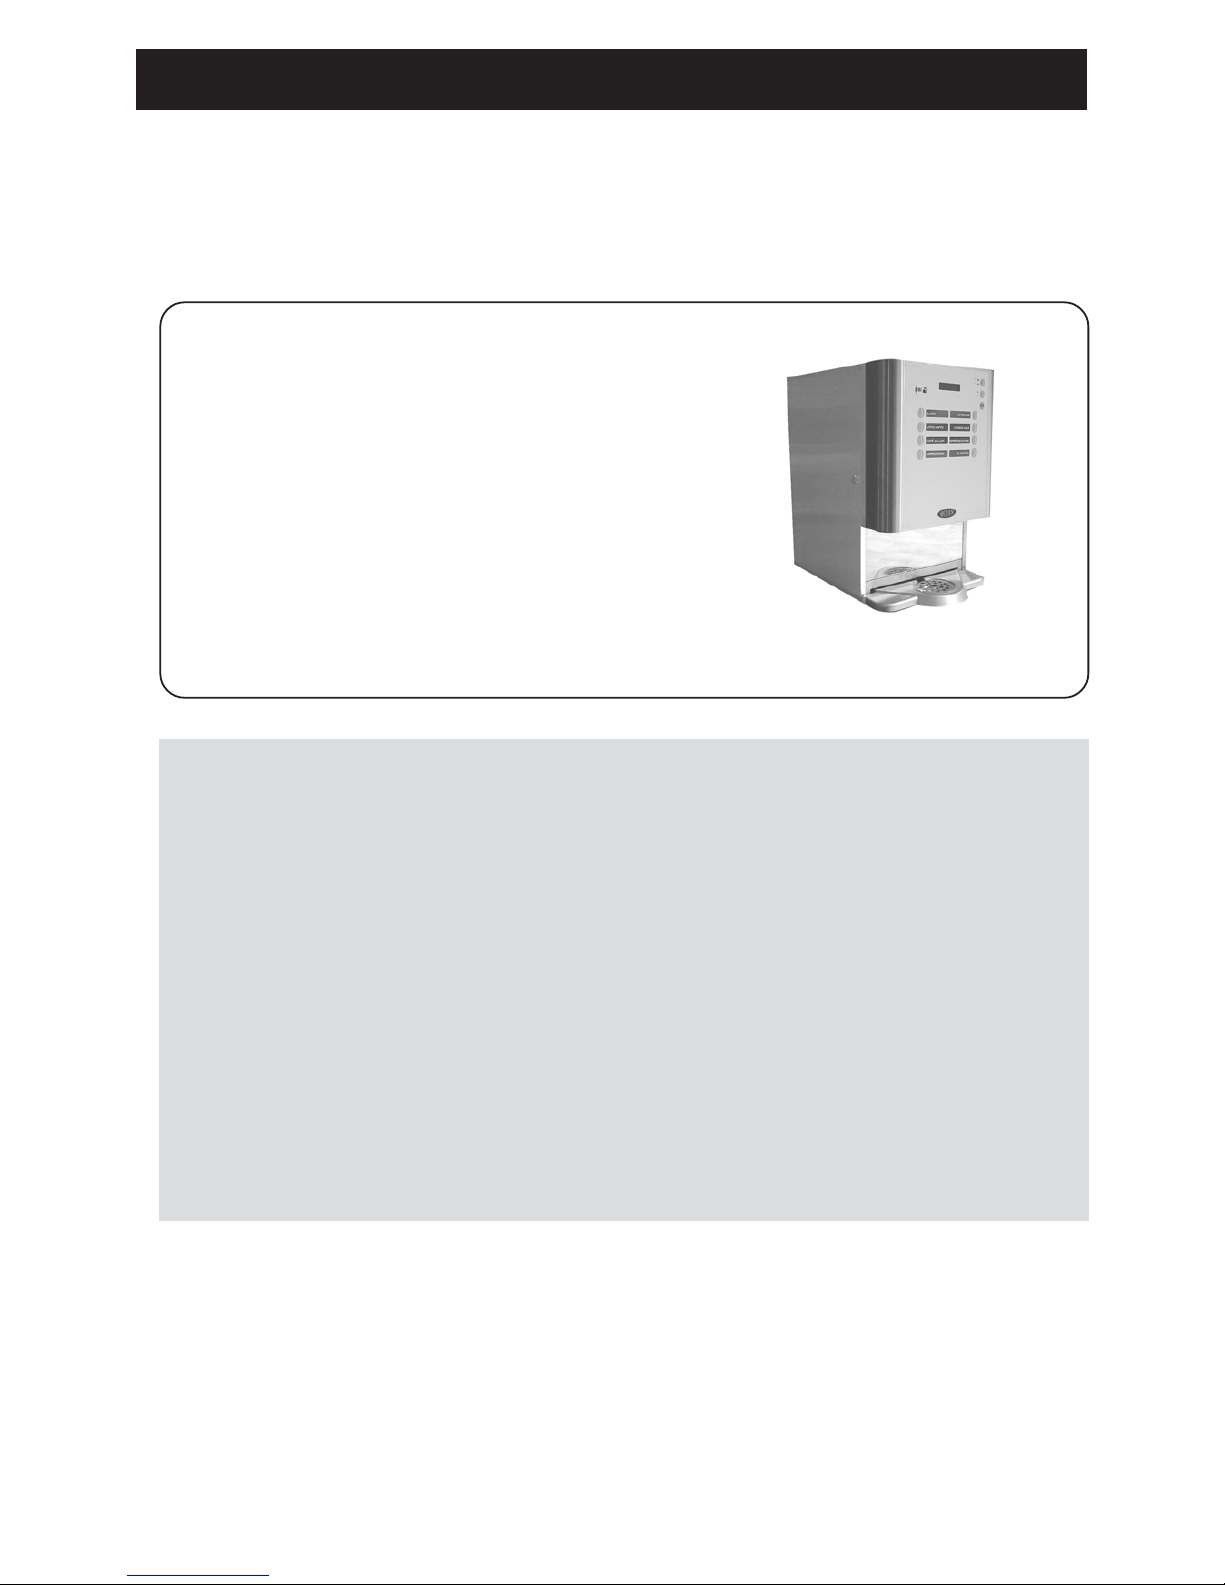
We congratulate to your choice of a Coffee Queen coffee machine.
Please read through this manual before you take the machine into operationPlease read through this manual before you take the machine into operation
Please read through this manual before you take the machine into operationPlease read through this manual before you take the machine into operation
Please read through this manual before you take the machine into operation
for the first time.for the first time.
for the first time.for the first time.
for the first time.
The manual contents important instructions for a safe and proper usage of the machine.
Always keep this manual within reach for the user!
Coffee Queen / PrincessCoffee Queen / Princess
Coffee Queen / PrincessCoffee Queen / Princess
Coffee Queen / Princess
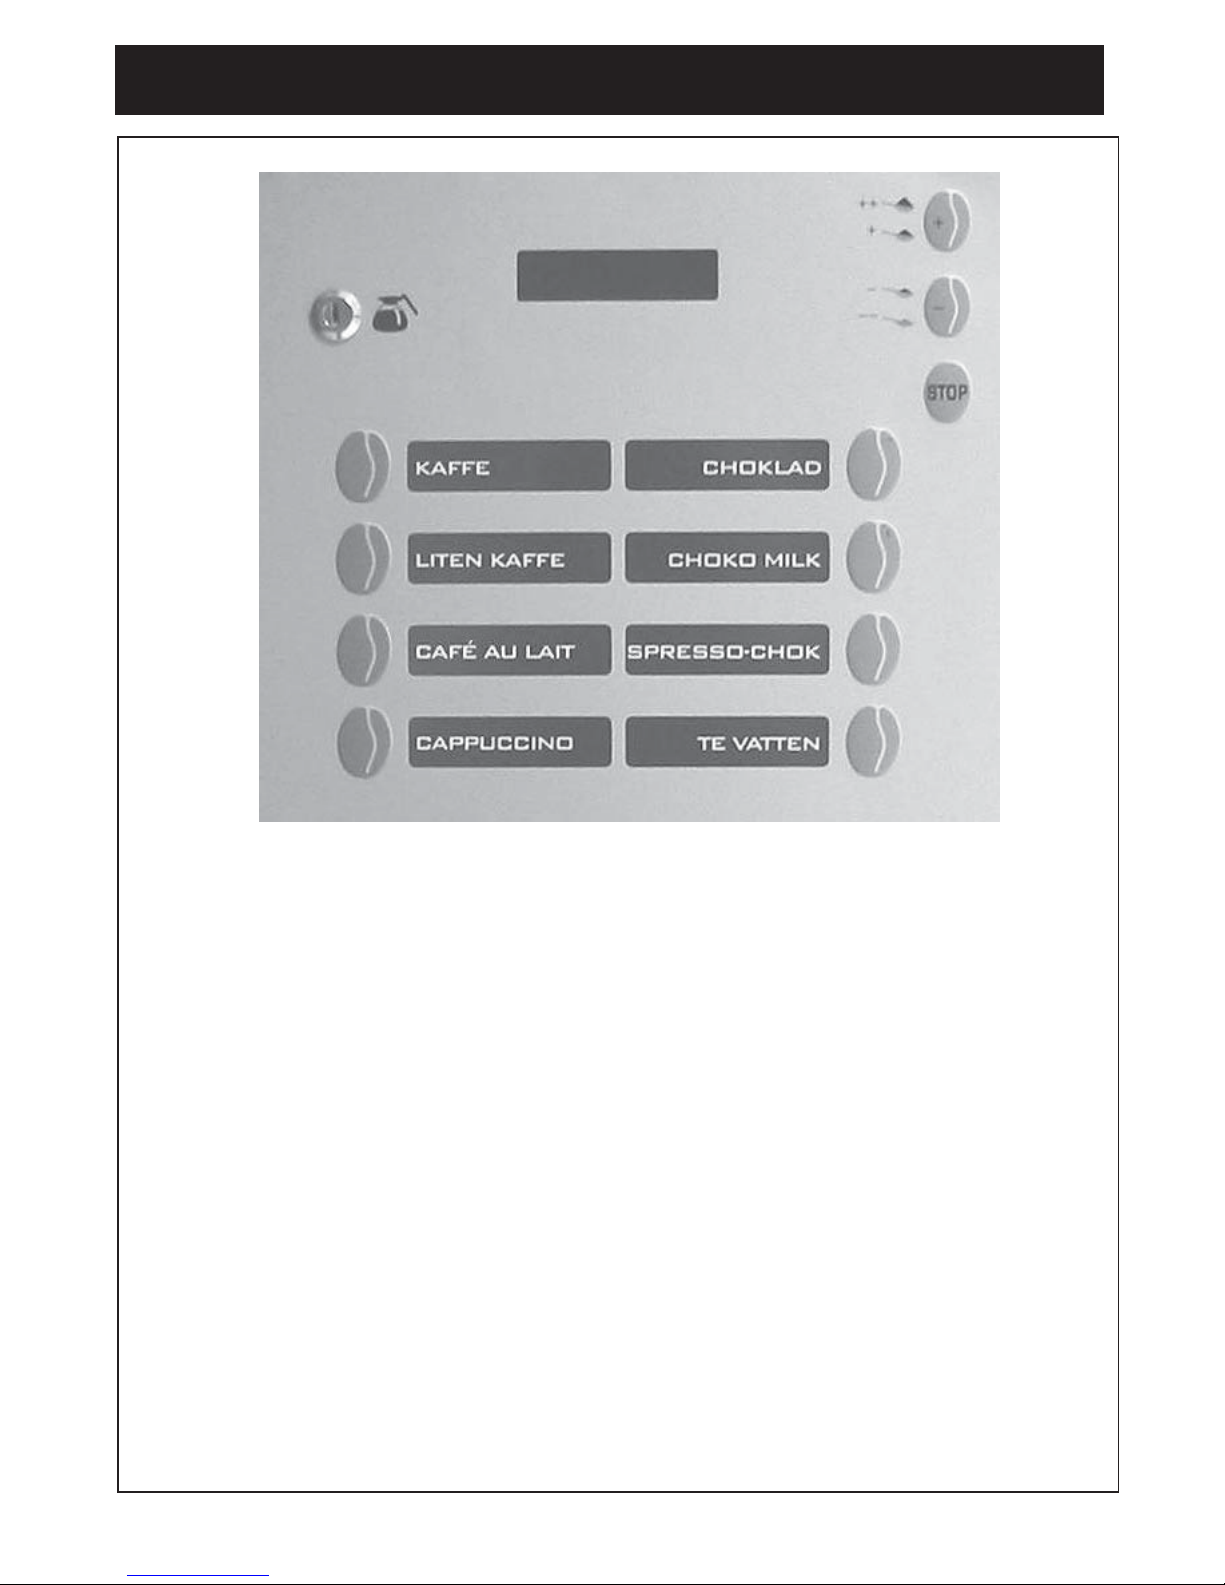
- making coffee cup by cup
- Jug facility with key switch
- 8 choices of drinks,
- 3 - 4 ingredients canisters,
- electronically temperature controlled
- adjustable coffee strenght
- clock functions
- manufactured in stainless steel
FactsFacts
FactsFacts
Facts
::
::
:
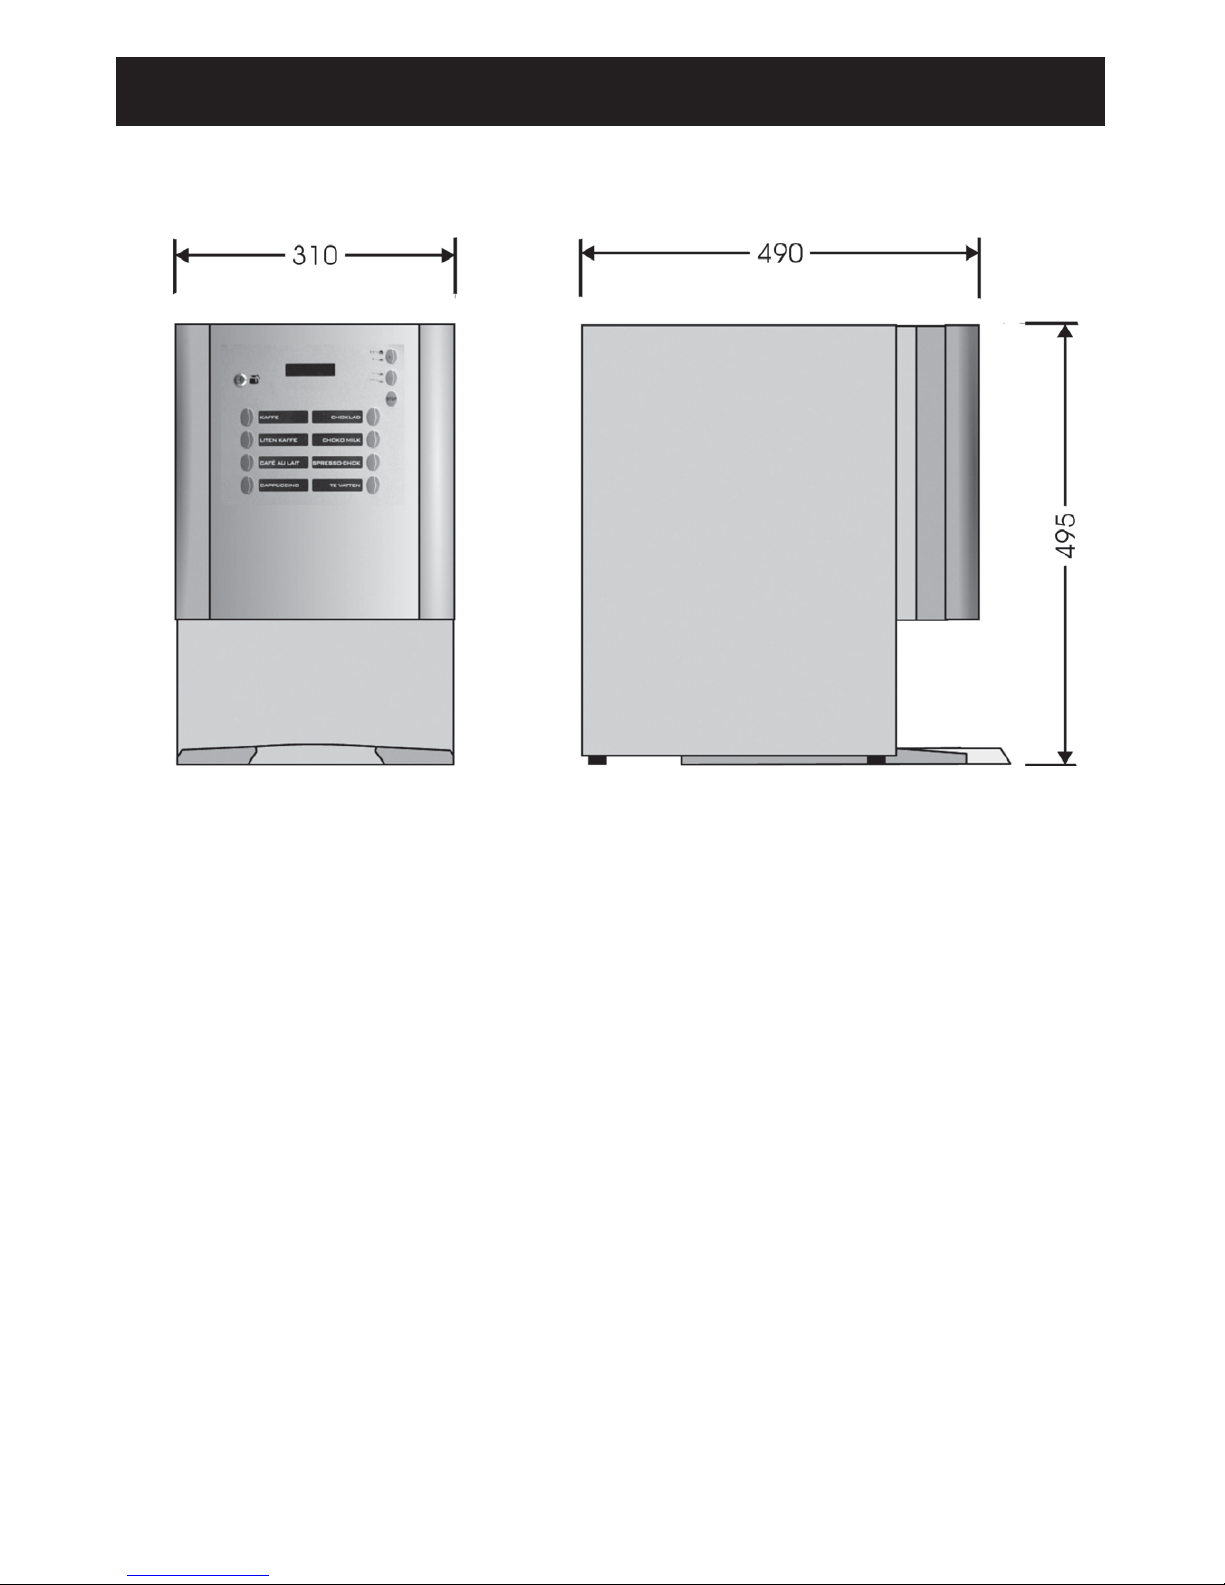
Height 495 mm
Width 310mm
Depth 490mm
Tankage 2.0 litre
Electricity 230V/2200W
Water connection ½”outside thread
CapacityCapacity
CapacityCapacity
Capacity
::
::
:
Cups of coffee 4 canisters 130 cups/filling
Cups of coffee 3 canisters 275 cups/filling
Ingredient canisters Coffee, Espresso, Chocolate, Topping (milk).
33
33
3.
Page 4
44
44
4.
3. Overview of component3. Overview of component
3. Overview of component3. Overview of component
3. Overview of component
s , fronts , front
s , fronts , front
s , front
PrincessPrincess
PrincessPrincess
Princess
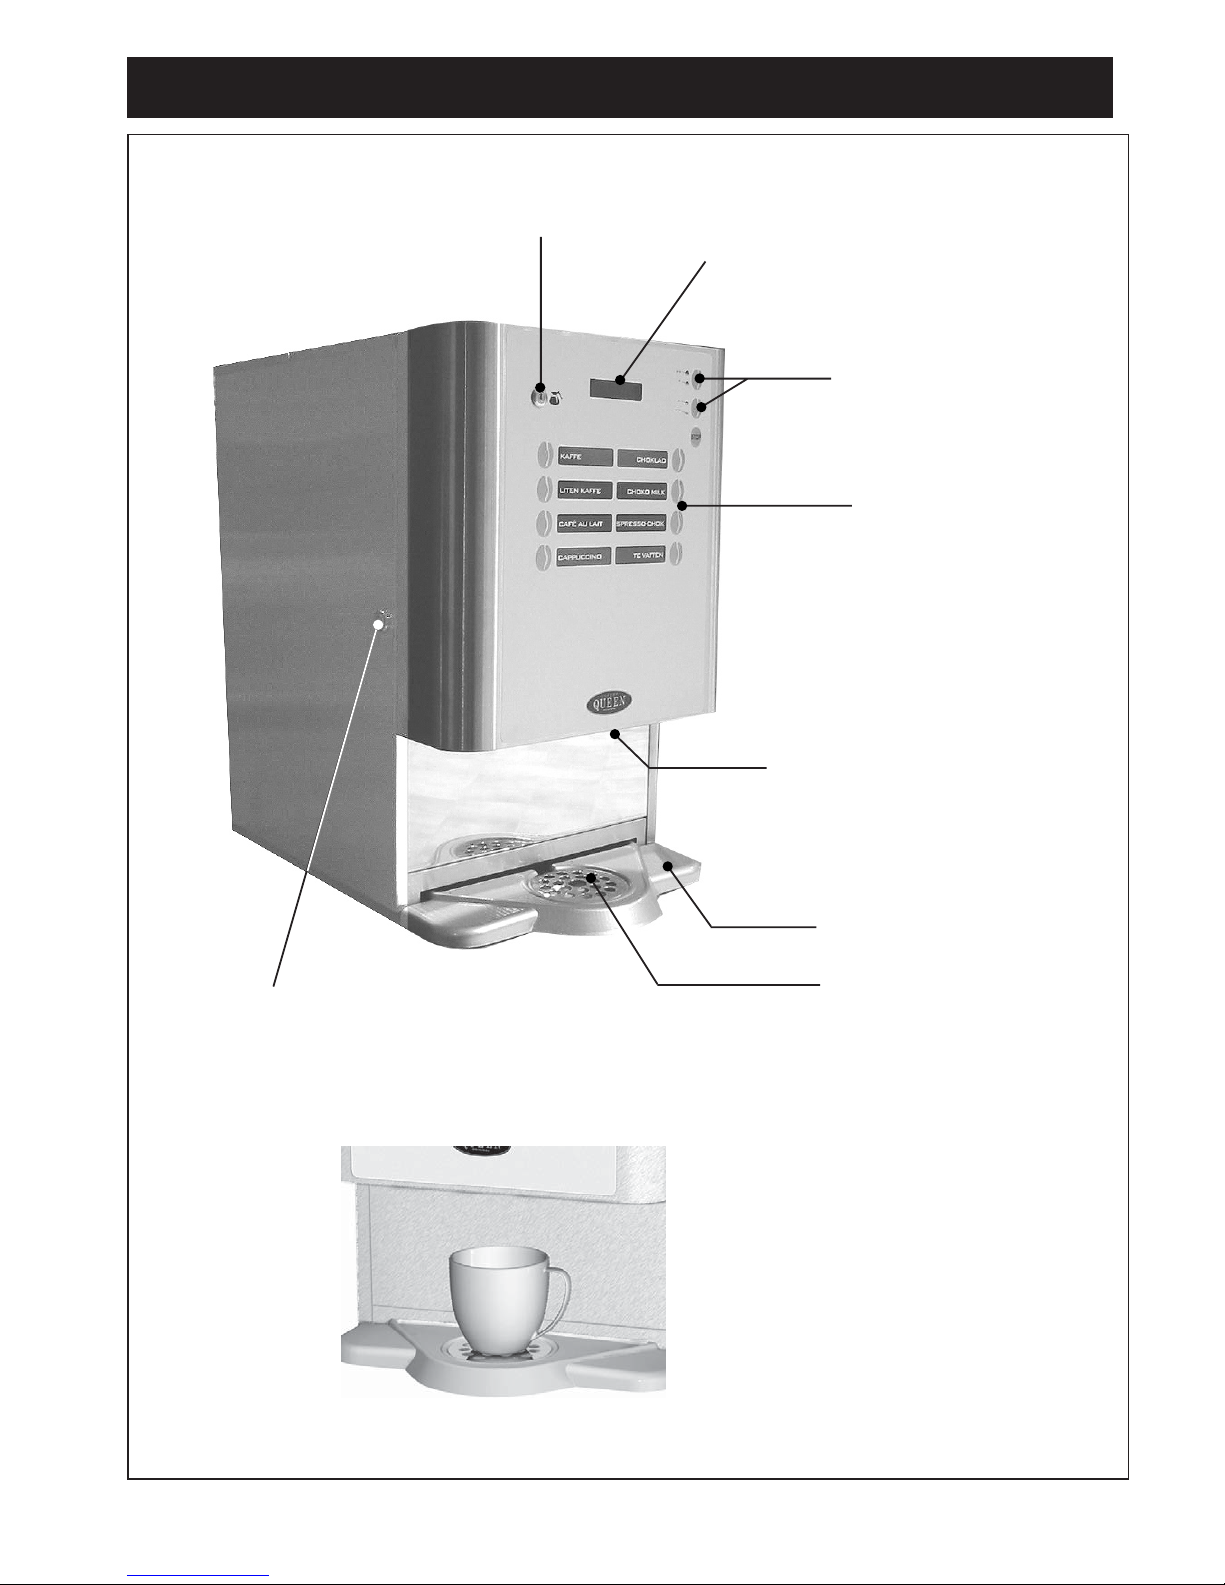
Outlet/ drinksOutlet/ drinks
Outlet/ drinksOutlet/ drinks
Outlet/ drinks
Drip trayDrip tray
Drip trayDrip tray
Drip tray
Drip tray insertDrip tray insert
Drip tray insertDrip tray insert
Drip tray insert
CupholderCupholder
CupholderCupholder
Cupholder
Strenght of drinksStrenght of drinks
Strenght of drinksStrenght of drinks
Strenght of drinks
++ or - -++ or - -
++ or - -++ or - -
++ or - -
8 choices of8 choices of
8 choices of8 choices of
8 choices of
drinksdrinks
drinksdrinks
drinks
Key switchKey switch
Key switchKey switch
Key switch
(cup and jug choice)(cup and jug choice)
(cup and jug choice)(cup and jug choice)
(cup and jug choice)
DisplayDisplay
DisplayDisplay
Display
Door lockDoor lock
Door lockDoor lock
Door lock
Page 5
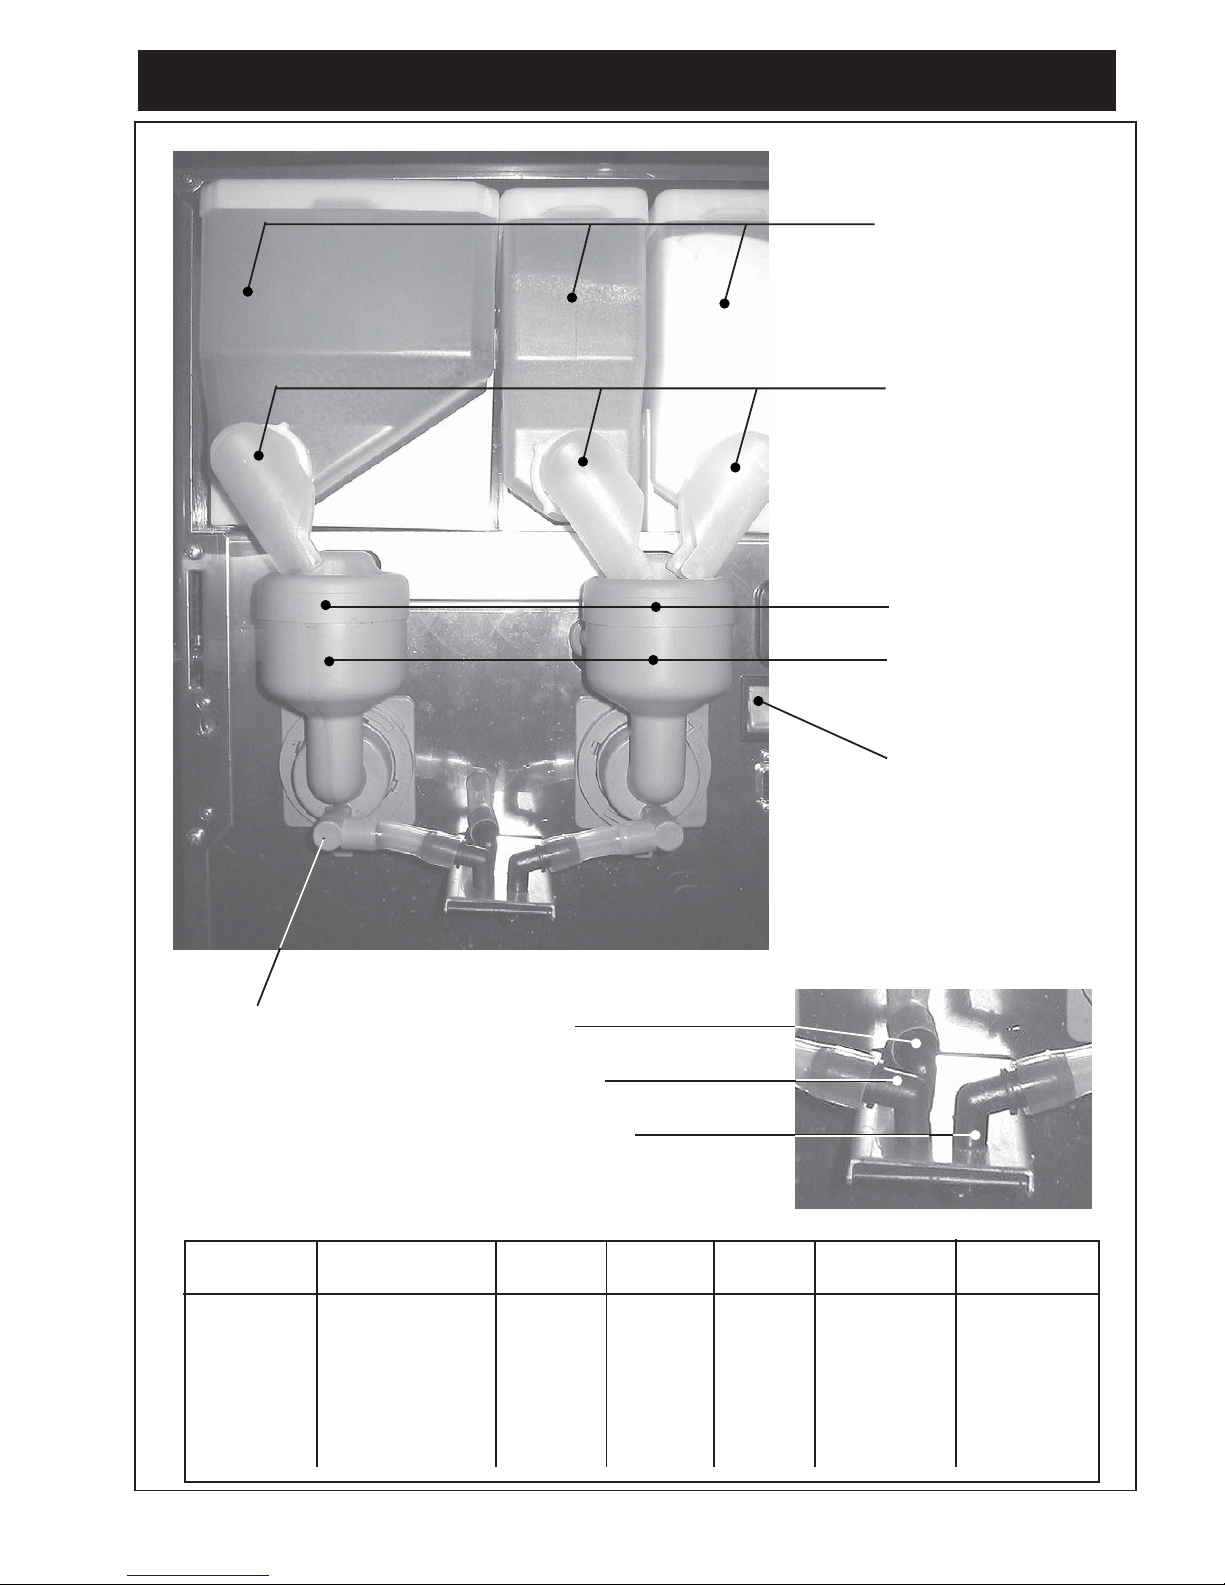
Outlet/drinks Outlet/drinks
Outlet/drinks Outlet/drinks
Outlet/drinks
TT
TT
T
eaea
eaea
ea
CoffeeCoffee
CoffeeCoffee
Coffee
TT
TT
T
opping(milk)opping(milk)
opping(milk)opping(milk)
opping(milk)
ChuteChute
ChuteChute
Chute
IngredientsIngredients
IngredientsIngredients
Ingredients
canistercanister
canistercanister
canister
3. Overview of component3. Overview of component
3. Overview of component3. Overview of component
3. Overview of component
s , mixer systems , mixer system
s , mixer systems , mixer system
s , mixer system
PrincessPrincess
PrincessPrincess
Princess
EminenceEminence
EminenceEminence
Eminence
55
55
5.
ON/OFF-ON/OFF-
ON/OFF-ON/OFF-
ON/OFFswitchswitch
switchswitch
switch
Detail;Detail;
Detail;Detail;
Detail;
Ingredients; Ingredients;
Ingredients; Ingredients;
Ingredients;
Width;Width;
Width;Width;
Width;
Height;Height;
Height;Height;
Height;
Depth;Depth;
Depth;Depth;
Depth;
VV
VV
V
olum/litre; olum/litre;
olum/litre; olum/litre;
olum/litre;
Amount/unitAmount/unit
Amount/unitAmount/unit
Amount/unit
Canister;Canister;
Canister;Canister;
Canister; coffee
134134
134134
134
156 156
156 156
156
230 230
230 230
230
2,52,5
2,52,5
2,5
11
11
1
Canister;Canister;
Canister;Canister;
Canister; coffee
67 67
67 67
67
156 156
156 156
156
225 225
225 225
225
1,151,15
1,151,15
1,15
11
11
1
CanisterCanister
CanisterCanister
Canister
;;
;;
; espresso
67 67
67 67
67
156156
156156
156
225225
225225
225
1,151,15
1,151,15
1,15
11
11
1
CanisterCanister
CanisterCanister
Canister
;;
;;
; choco
67 67
67 67
67
156156
156156
156
225225
225225
225
1,151,15
1,151,15
1,15
11
11
1
CanisterCanister
CanisterCanister
Canister
;;
;;
; topping
67 67
67 67
67
156156
156156
156
225225
225225
225
1,151,15
1,151,15
1,15
11
11
1
Steam trapSteam trap
Steam trapSteam trap
Steam trap
Mixing bowlMixing bowl
Mixing bowlMixing bowl
Mixing bowl
Outlet pipeOutlet pipe
Outlet pipeOutlet pipe
Outlet pipe
Page 6
66
66
6.
4. Service.4. Service.
4. Service.4. Service.
4. Service.
InstInst
InstInst
Inst
allation and stallation and st
allation and stallation and st
allation and st
artart
artart
art
PrincessPrincess
PrincessPrincess
Princess
1.1.
1.1.
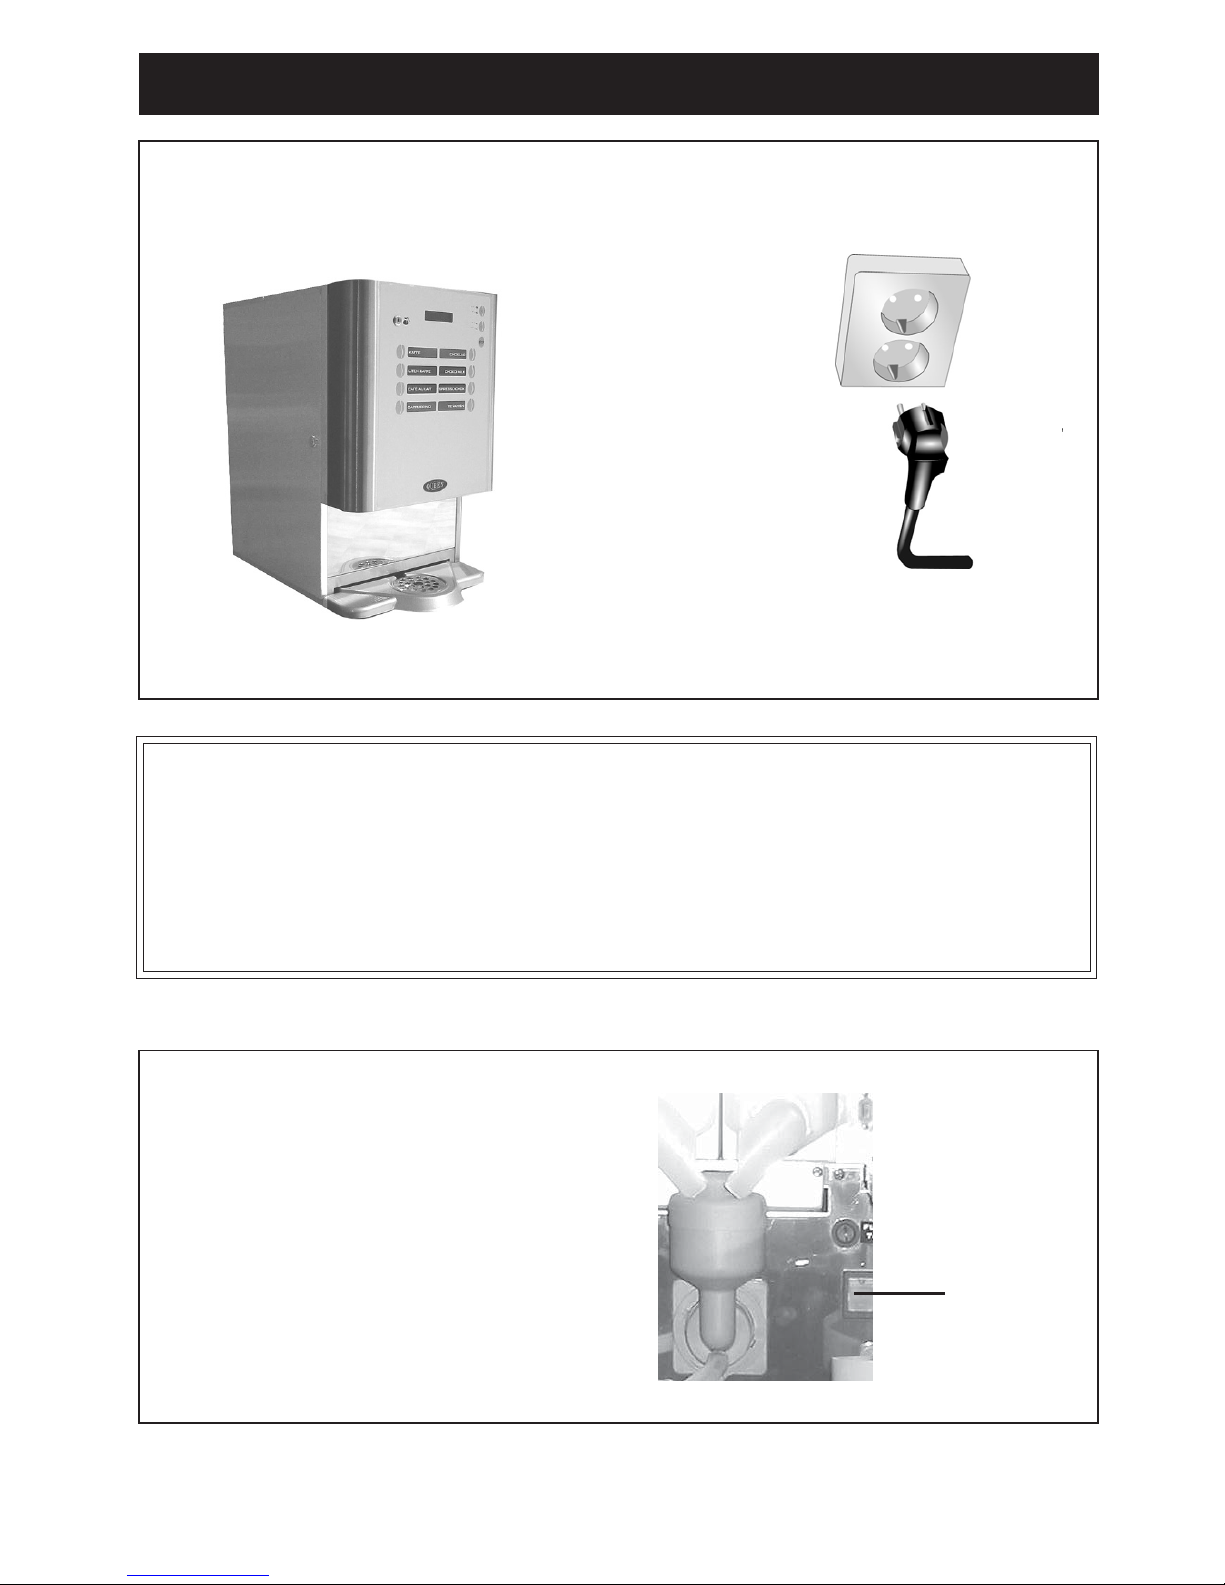
1. Locate the brewer on a flat Connect the electrical plug to a separate
level and waterproof surface. grounded wall socket
Grounded wall socketGrounded wall socket
Grounded wall socketGrounded wall socket
Grounded wall socket
230V 10A230V 10A
230V 10A230V 10A
230V 10A
OBSERVE!OBSERVE!
OBSERVE!OBSERVE!
OBSERVE!
Make sure there is a space behind the machineMake sure there is a space behind the machine
Make sure there is a space behind the machineMake sure there is a space behind the machine
Make sure there is a space behind the machine
for free flow of airfor free flow of air
for free flow of airfor free flow of air
for free flow of air
..
..
.
( minimum 10cm ).( minimum 10cm ).
( minimum 10cm ).( minimum 10cm ).
( minimum 10cm ).
2.2.
2.2.
2. Connect attached water tube to cold water with an R 1/2”.
Make sure that the water hose not are kinked anywhere when machine is
pushed into place.
Please flush the water tube before connecting to machine, this to avoid any
particles to destroy the inlet valve.
3.3.
3.3.
3.. Open the water inlet.
4.4.
4.4.
4. Turn on the ON-OFF switch inside the door.
Water is been filled into the tank automatically with
2,0 litres of water. The heating will not start before
the water level reaches the level sensor.
Set temperature is approx. 85ºC.Set temperature is approx. 85ºC.
Set temperature is approx. 85ºC.Set temperature is approx. 85ºC.
Set temperature is approx. 85ºC.
5.5.
5.5.
5.
Close doorClose door
Close doorClose door
Close door
..
..
.
ON / OFFON / OFF
ON / OFFON / OFF
ON / OFF
switchswitch
switchswitch
switch
Page 7
77
77
7.
4. Service.4. Service.
4. Service.4. Service.
4. Service.
InstInst
InstInst
Inst
allation and stallation and st
allation and stallation and st
allation and st
artart
artart
art
PrincessPrincess
PrincessPrincess
Princess
6.6.
6.6.
6.
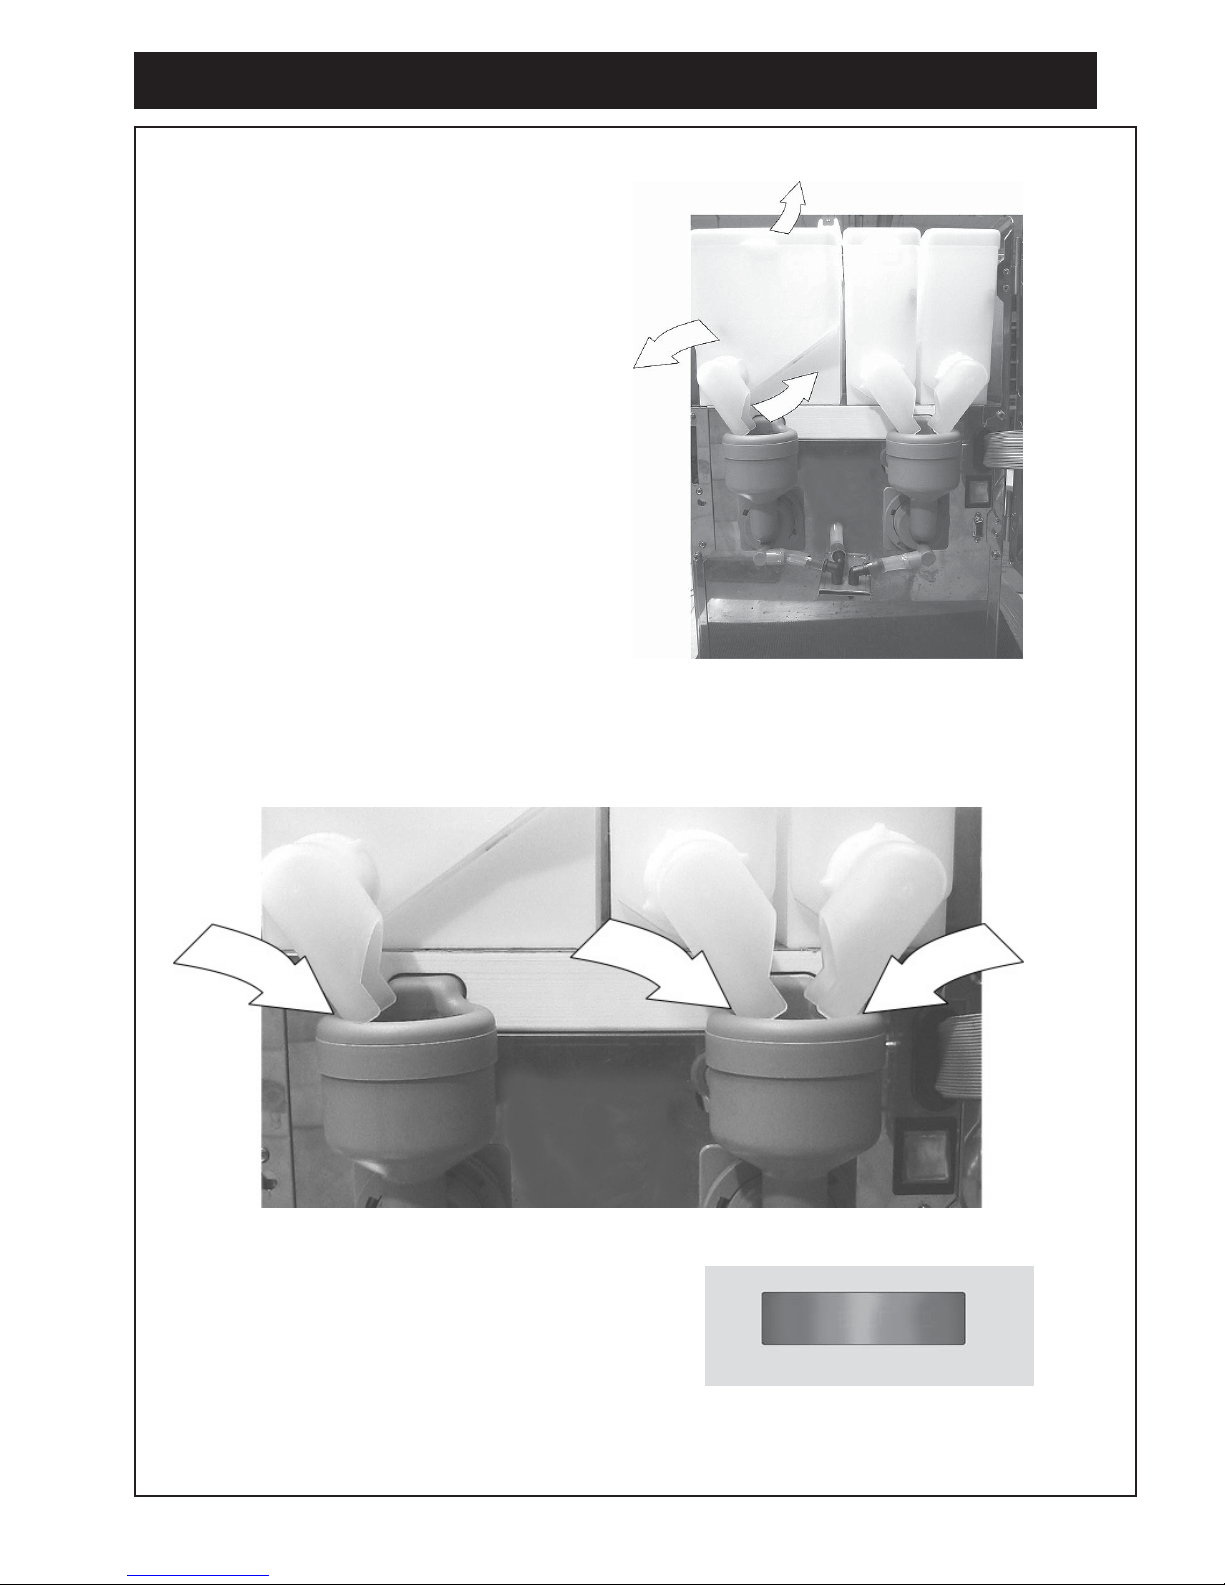
Fill canisters with ingredients. Fill canisters with ingredients.
Fill canisters with ingredients. Fill canisters with ingredients.
Fill canisters with ingredients.
3. 3.
3. 3.
3.
Take out (this to avoid unnecessery spillage in
the machine) ingredient canisters and fill them
with ingredients.
7.7.
7.7.
7.
When placing the ingredient canisters; When placing the ingredient canisters;
When placing the ingredient canisters; When placing the ingredient canisters;
When placing the ingredient canisters;
Make sure that the outlet pipes on the
ingredient canisters are touching the
steam traps (A).
8.8.
8.8.
8. When the water is heated up to right temperature
the text
”please wait” ”please wait”
”please wait” ”please wait”
”please wait” will disappear and
”please wait””please wait”
”please wait””please wait”
”please wait”
the machine
is ready to use.is ready to use.
is ready to use.is ready to use.
is ready to use.
(A).(A).
(A).(A).
(A).
(A).(A).
(A).(A).
(A).
Page 8
4 4
4 4
4
Making coffe in a jug.Making coffe in a jug.
Making coffe in a jug.Making coffe in a jug.
Making coffe in a jug.
Making coffe in a cup. Chocolate etc.Making coffe in a cup. Chocolate etc.
Making coffe in a cup. Chocolate etc.Making coffe in a cup. Chocolate etc.
Making coffe in a cup. Chocolate etc.
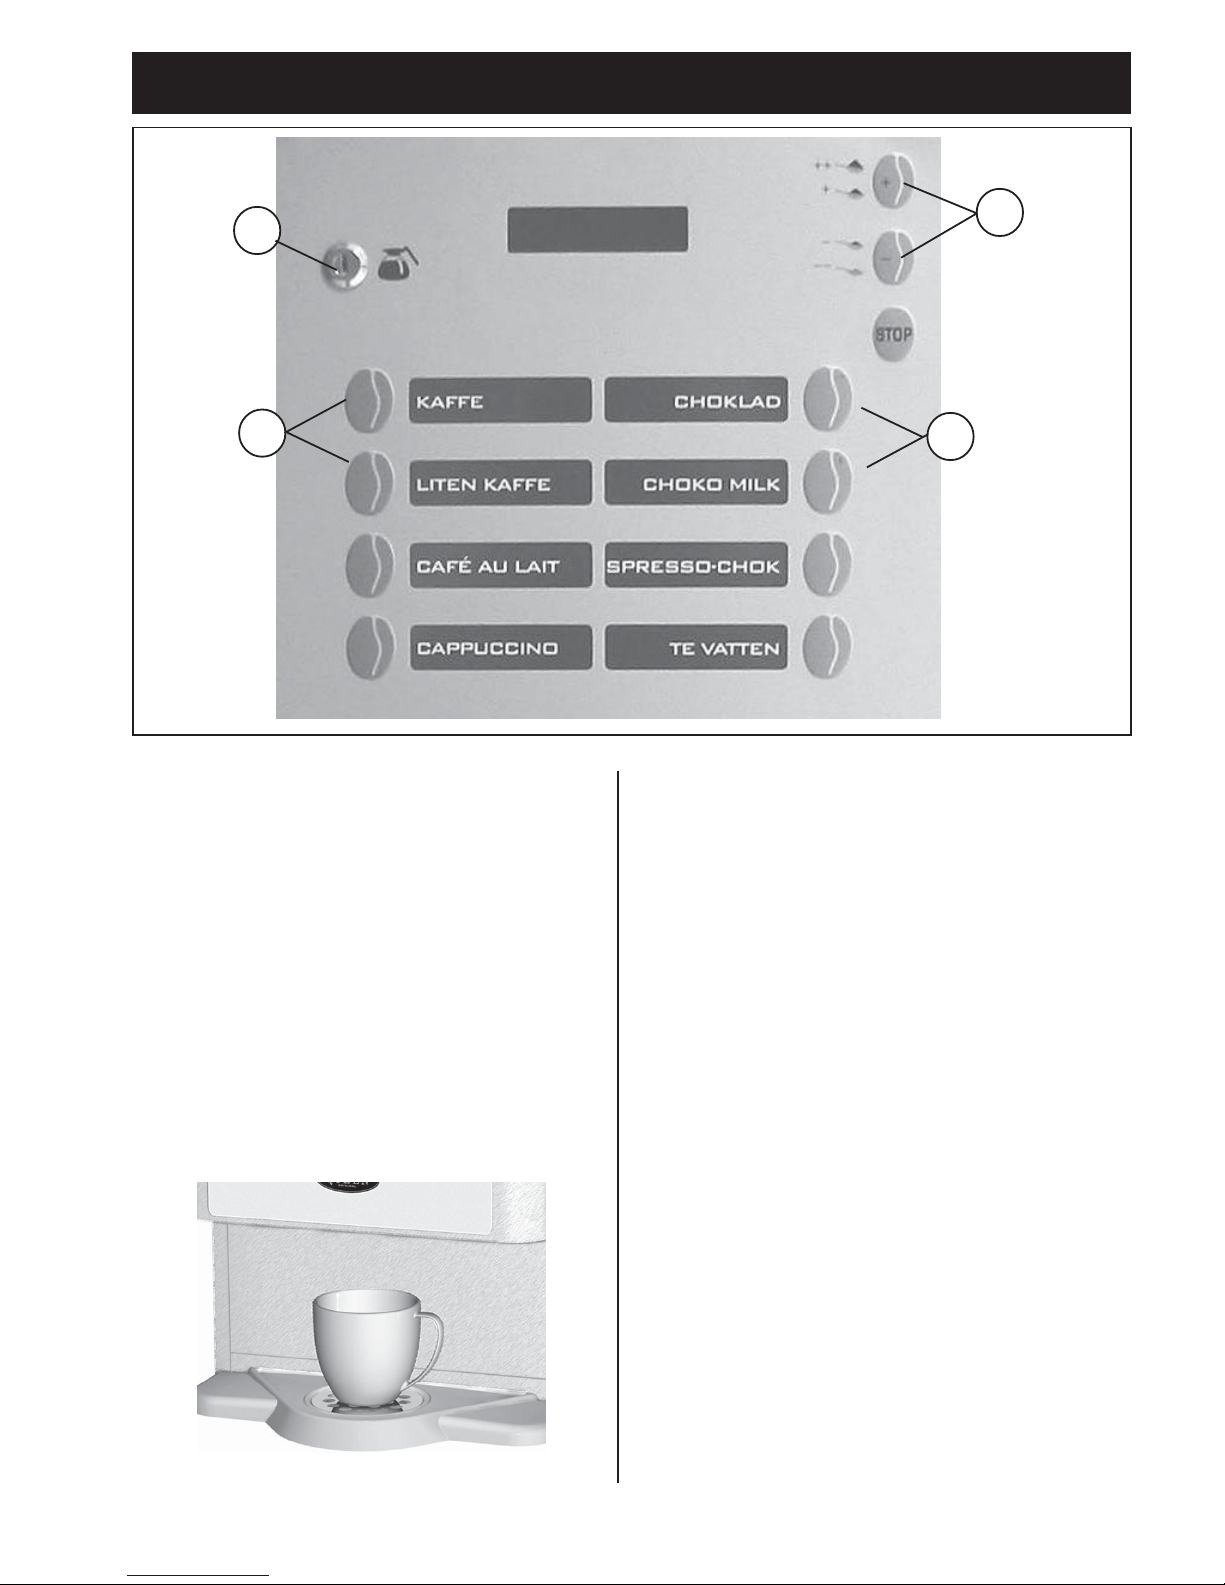
1a. Place a jug in the centre of the cup holder..
2a. Turn on the key with jug symbole clockwise.
1.1.
1.1.
1. Place a cup in the centre of the cup holder..
3a. 4 cups of brewing is standard settings,
2.2.
2.2.
2.
The strenght has a standard settingThe strenght has a standard setting
The strenght has a standard settingThe strenght has a standard setting
The strenght has a standard setting,
Change amount of cups by pushing + or - button.
Optional up to 12 cups or down to if you wish to increase or decrease it, do as follows
1 cup brewing. if not continue to point 3.
4a. Push the button ”Coffee”..
Stronger drink;Stronger drink;
Stronger drink;Stronger drink;
Stronger drink;
Increase by pushing + or ++ for 5% or 10%Increase by pushing + or ++ for 5% or 10%
Increase by pushing + or ++ for 5% or 10%Increase by pushing + or ++ for 5% or 10%
Increase by pushing + or ++ for 5% or 10%
5a.Wait until the light and text alternative
”Please wait” has been
Weaker drink;Weaker drink;
Weaker drink;Weaker drink;
Weaker drink;
turned off before you take out the jug.
DecreaseDecrease
DecreaseDecrease
Decrease
by pushing - or -- for 5% or 10%by pushing - or -- for 5% or 10%
by pushing - or -- for 5% or 10%by pushing - or -- for 5% or 10%
by pushing - or -- for 5% or 10%
(the indication lamp will go up or down
depending of choice).
3. 3.
3. 3.
3. Choose drink by pushing on the button to the right
of each menu
The display will show; ”Please wait”, and the light on
the cup will light up.
4.4.
4.4.
4.Wait until the light on cup and the text ”Please wait”
has been turned off before you take your cup.
5.5.
5.5.
5. Enjoy your drink.
8.8.
8.8.
8.
5. DRIFT5. DRIFT
5. DRIFT5. DRIFT
5. DRIFT
;;
;;
;
Making coffee in a cupMaking coffee in a cup
Making coffee in a cupMaking coffee in a cup
Making coffee in a cup
PrincessPrincess
PrincessPrincess
Princess
++++
++++
++
+ +
+ +
+
- -
- -
-
- -- -
- -- -
- -
2.2.
2.2.
2.
3.3.
3.3.
3.
3.3.
3.3.
3.
2a.2a.
2a.2a.
2a.
Page 9
99
99
9.
6. 6.
6. 6.
6.
CLEANING:CLEANING:
CLEANING:CLEANING:
CLEANING:
Weekly cleaningWeekly cleaning
Weekly cleaningWeekly cleaning
Weekly cleaning
PrincessPrincess
PrincessPrincess
Princess
(D)(D)
(D)(D)
(D)
Dismantle : Mixer systemDismantle : Mixer system
Dismantle : Mixer systemDismantle : Mixer system
Dismantle : Mixer system
1.1.
1.1.
1.
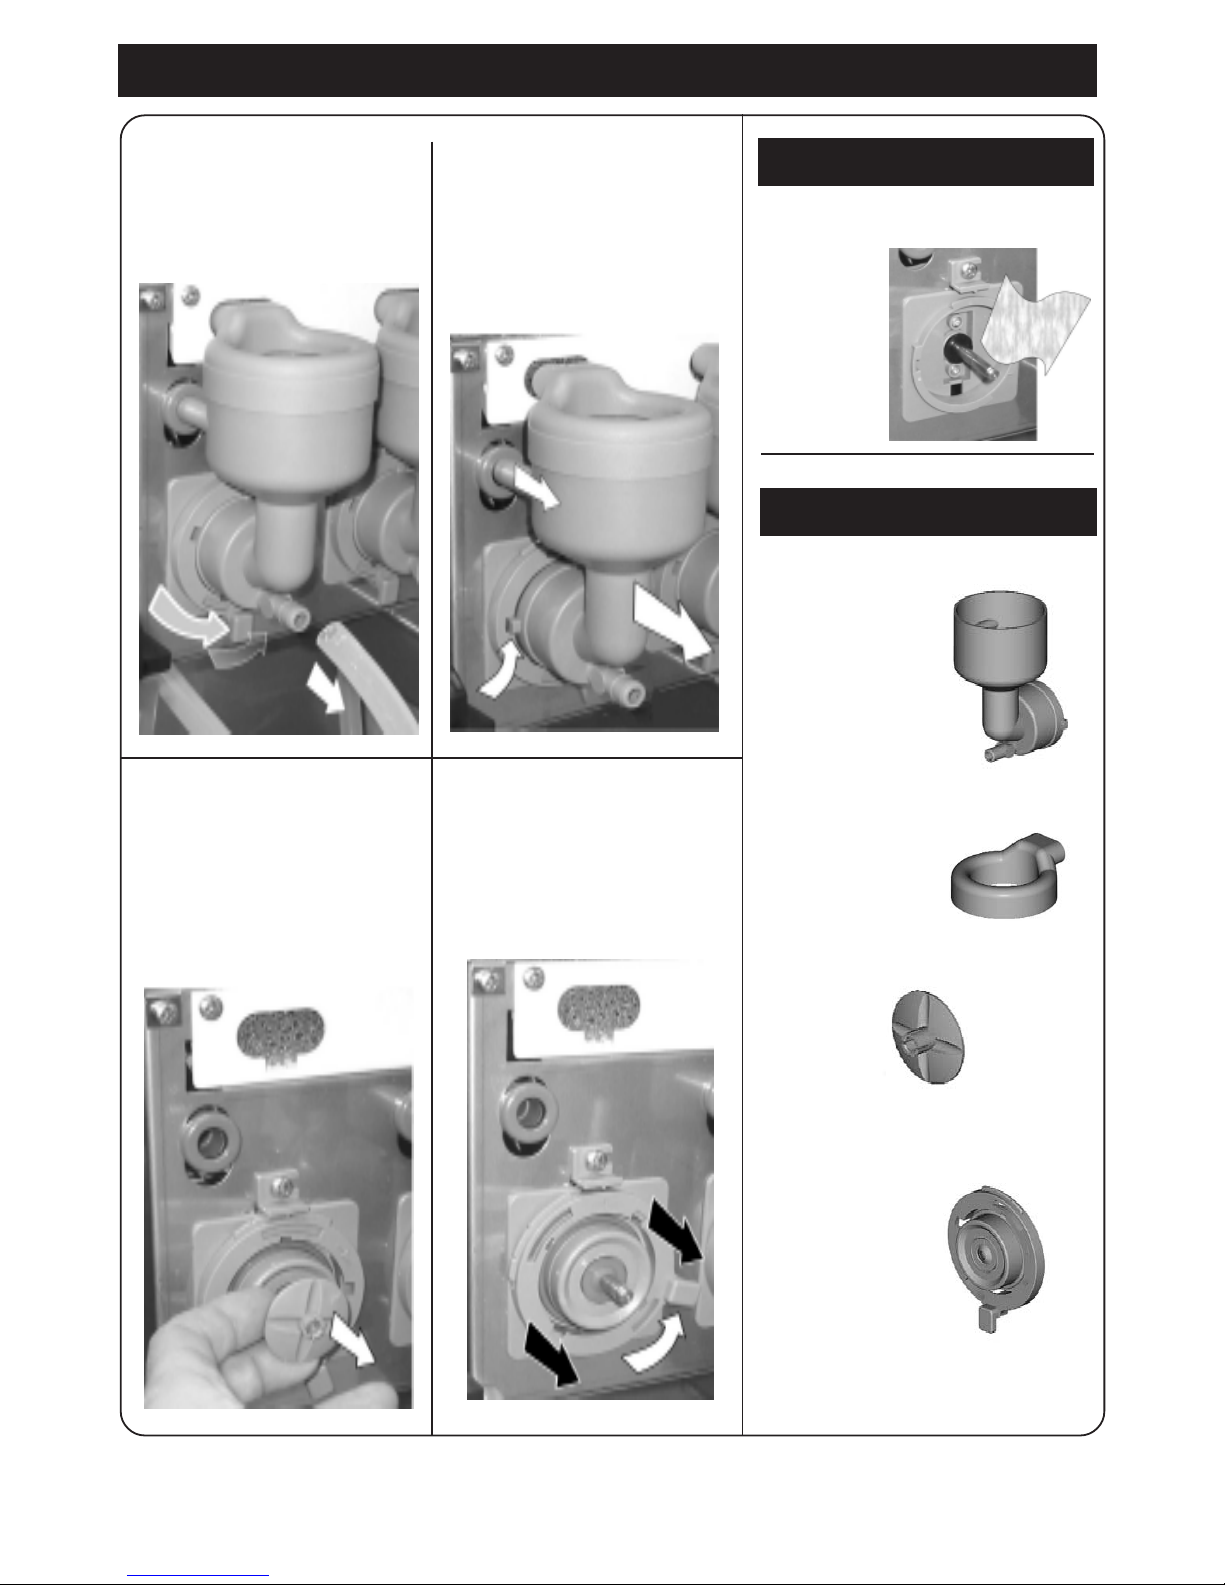
Loosen outlet hose
(A)(A)
(A)(A)
(A) and
turn lock knob
(B)(B)
(B)(B)
(B)
anti-clockwise.
3.3.
3.3.
3.
Loosen whipper
(D) (D)
(D) (D)
(D) pull
whipper straight out from the
machine.
(E)(E)
(E)(E)
(E)
(A)(A)
(A)(A)
(A)
(B)(B)
(B)(B)
(B)
(C)(C)
(C)(C)
(C)
CleaningCleaning
CleaningCleaning
Cleaning
WW
WW
W
ash these pash these p
ash these pash these p
ash these p
artart
artart
art
s:s:
s:s:
s:
.6..6.
.6..6.
.6.
A.A.
A.A.
A. Mixer bowl
B.B.
B.B.
B. Steam trap
C.C.
C.C.
C. Whipper
D.D.
D.D.
D. Assembly plate
Make sure this parts are dryMake sure this parts are dry
Make sure this parts are dryMake sure this parts are dry
Make sure this parts are dry
before usebefore use
before usebefore use
before use
2.2.
2.2.
2.
Loosen mixer bowl.
Pull apart
(C)(C)
(C)(C)
(C).
4.4.
4.4.
4.
Turn lock knob anticlockwise.
(E)(E)
(E)(E)
(E) until it stops
55
55
5. Clean with a wet rag and
drought drily.
Page 10
1010
1010
10.
6. 6.
6. 6.
6.
CLEANING: CLEANING:
CLEANING: CLEANING:
CLEANING:
Weekly cleaningWeekly cleaning
Weekly cleaningWeekly cleaning
Weekly cleaning
PrincessPrincess
PrincessPrincess
Princess
REASSEMBLE: Mixer systemREASSEMBLE: Mixer system
REASSEMBLE: Mixer systemREASSEMBLE: Mixer system
REASSEMBLE: Mixer system
7.7.
7.7.
7.
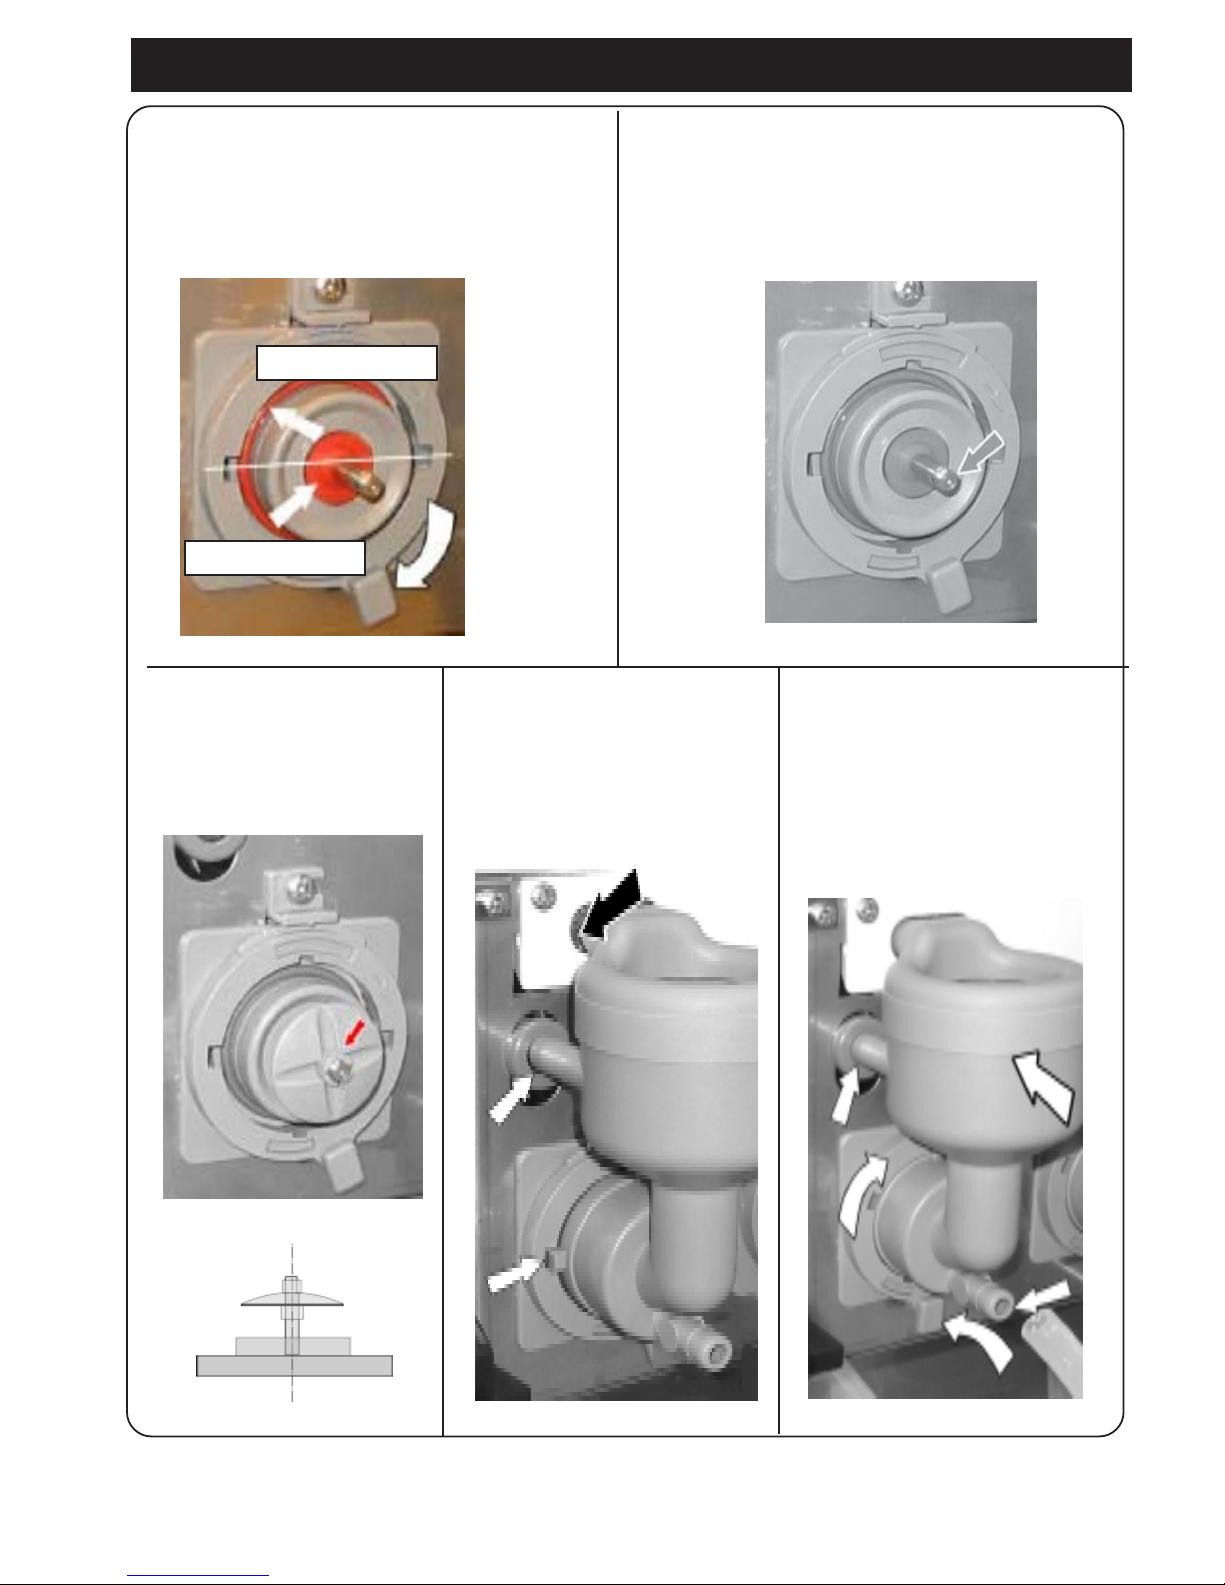
Reassemble the assembly plate by turning
lock knob
(F)(F)
(F)(F)
(F) clockwise.
INSPECT INSPECT
INSPECT INSPECT
INSPECT gaskets.
pil (G).pil (G).
pil (G).pil (G).
pil (G).
9.9.
9.9.
9.
Assemble whipper , pull until
you hear a clicking noise.
(H).(H).
(H).(H).
(H).
10.10.
10.10.
10.
Assemble mixer bowl and steam
trap
(J) (J)
(J) (J)
(J) see picture.
11
11
1
1.1.
1.1.
1.
Easily push the mixer bowl
towards, according to
(K)(K)
(K)(K)
(K) and lock
with lock knob
(L).(L).
(L).(L).
(L).Connect outlet
hose
(M).(M).
(M).(M).
(M).
(
NOTENOTE
NOTENOTE
NOTE! make sure that all water
hose are connected at right place
(H)(H)
(H)(H)
(H)
(J) (J)
(J) (J)
(J)
(J)(J)
(J)(J)
(J)
(J)(J)
(J)(J)
(J)
(K) (K)
(K) (K)
(K)
(M) (M)
(M) (M)
(M)
(L) (L)
(L) (L)
(L)
(G)(G)
(G)(G)
(G)
FF
FF
F
F F
F F
F
FF
FF
F
8.8.
8.8.
8.
Make sure that the motor whippers plane side
will be in accordance with the whippers plane
side. see next
(G) (G)
(G) (G)
(G) and picture
(H).(H).
(H).(H).
(H).
INSPECTINSPECT
INSPECTINSPECT
INSPECT
INSPECTINSPECT
INSPECTINSPECT
INSPECT
Page 11
drink drink
drink drink
drink
55
55
5
1 drink 1 drink
1 drink 1 drink
1 drink
66
66
6
2 2
2 2
2
77
77
7
3 3
3 3
3
88
88
8
4 4
4 4
4
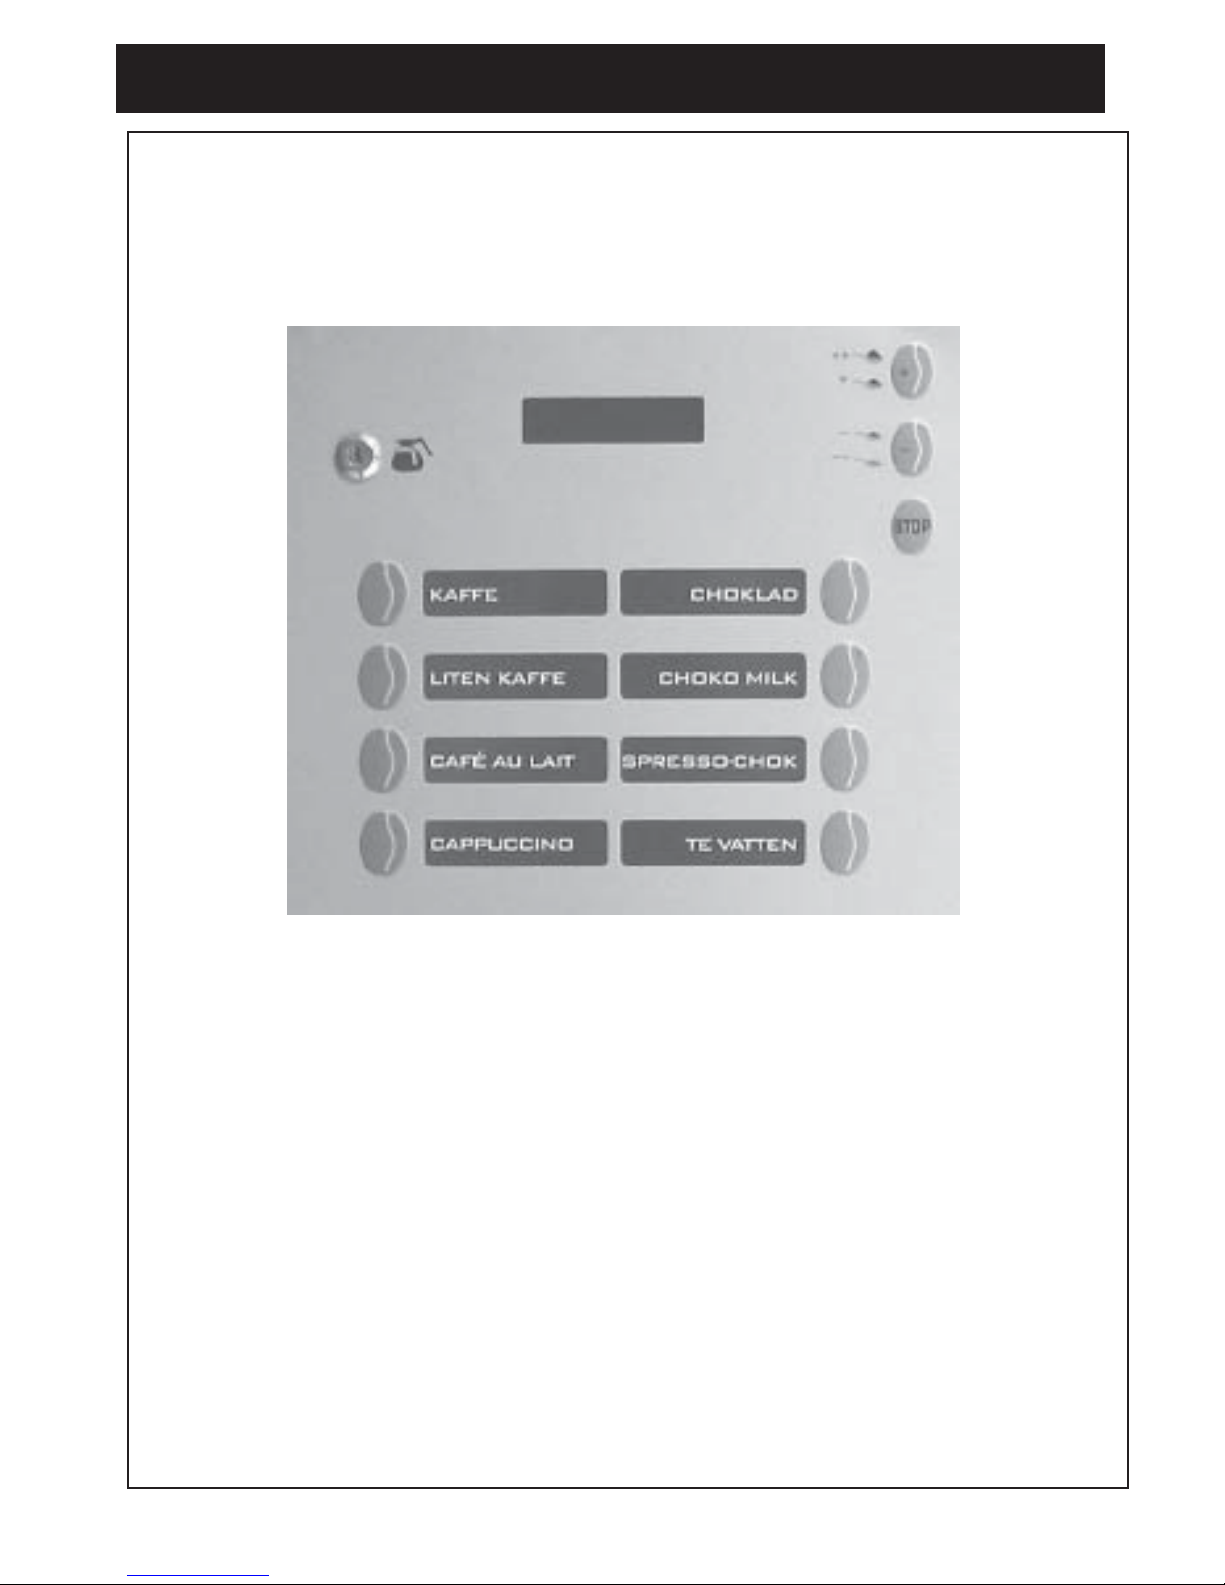
The mixer bowls can easily be cleaned with the key switch in ”cup” (normal)
position.
Weekly automatic cleaning of mixing bowls.Weekly automatic cleaning of mixing bowls.
Weekly automatic cleaning of mixing bowls.Weekly automatic cleaning of mixing bowls.
Weekly automatic cleaning of mixing bowls.
11
11
1
11
11
1.
7. CLEANING: 7. CLEANING:
7. CLEANING: 7. CLEANING:
7. CLEANING:
Cleaning program: weeklyCleaning program: weekly
Cleaning program: weeklyCleaning program: weekly
Cleaning program: weekly
PrincessPrincess
PrincessPrincess
Princess
1.1.
1.1.
1.
Place a jug in the drip trayPlace a jug in the drip tray
Place a jug in the drip trayPlace a jug in the drip tray
Place a jug in the drip tray
..
..
.
2.2.
2.2.
2. Turn the key slowly ninety degrees and back again.
Push button for drink 1 in 6 seconds.Push button for drink 1 in 6 seconds.
Push button for drink 1 in 6 seconds.Push button for drink 1 in 6 seconds.
Push button for drink 1 in 6 seconds.
3.3.
3.3.
3. After 6 seconds the mixer bowl starts to be cleaned as long as the
button is pushed or max.10 seconds.
The display shows:The display shows:
The display shows:The display shows:
The display shows: ”Cleaning Mixer 1, 2”.
Automatic cleaning of mixing bowls.Automatic cleaning of mixing bowls.
Automatic cleaning of mixing bowls.Automatic cleaning of mixing bowls.
Automatic cleaning of mixing bowls.
Page 12
drink drink
drink drink
drink
55
55
5
1 drink 1 drink
1 drink 1 drink
1 drink
66
66
6
2 2
2 2
2
77
77
7
3 3
3 3
3
88
88
8
4 4
4 4
4
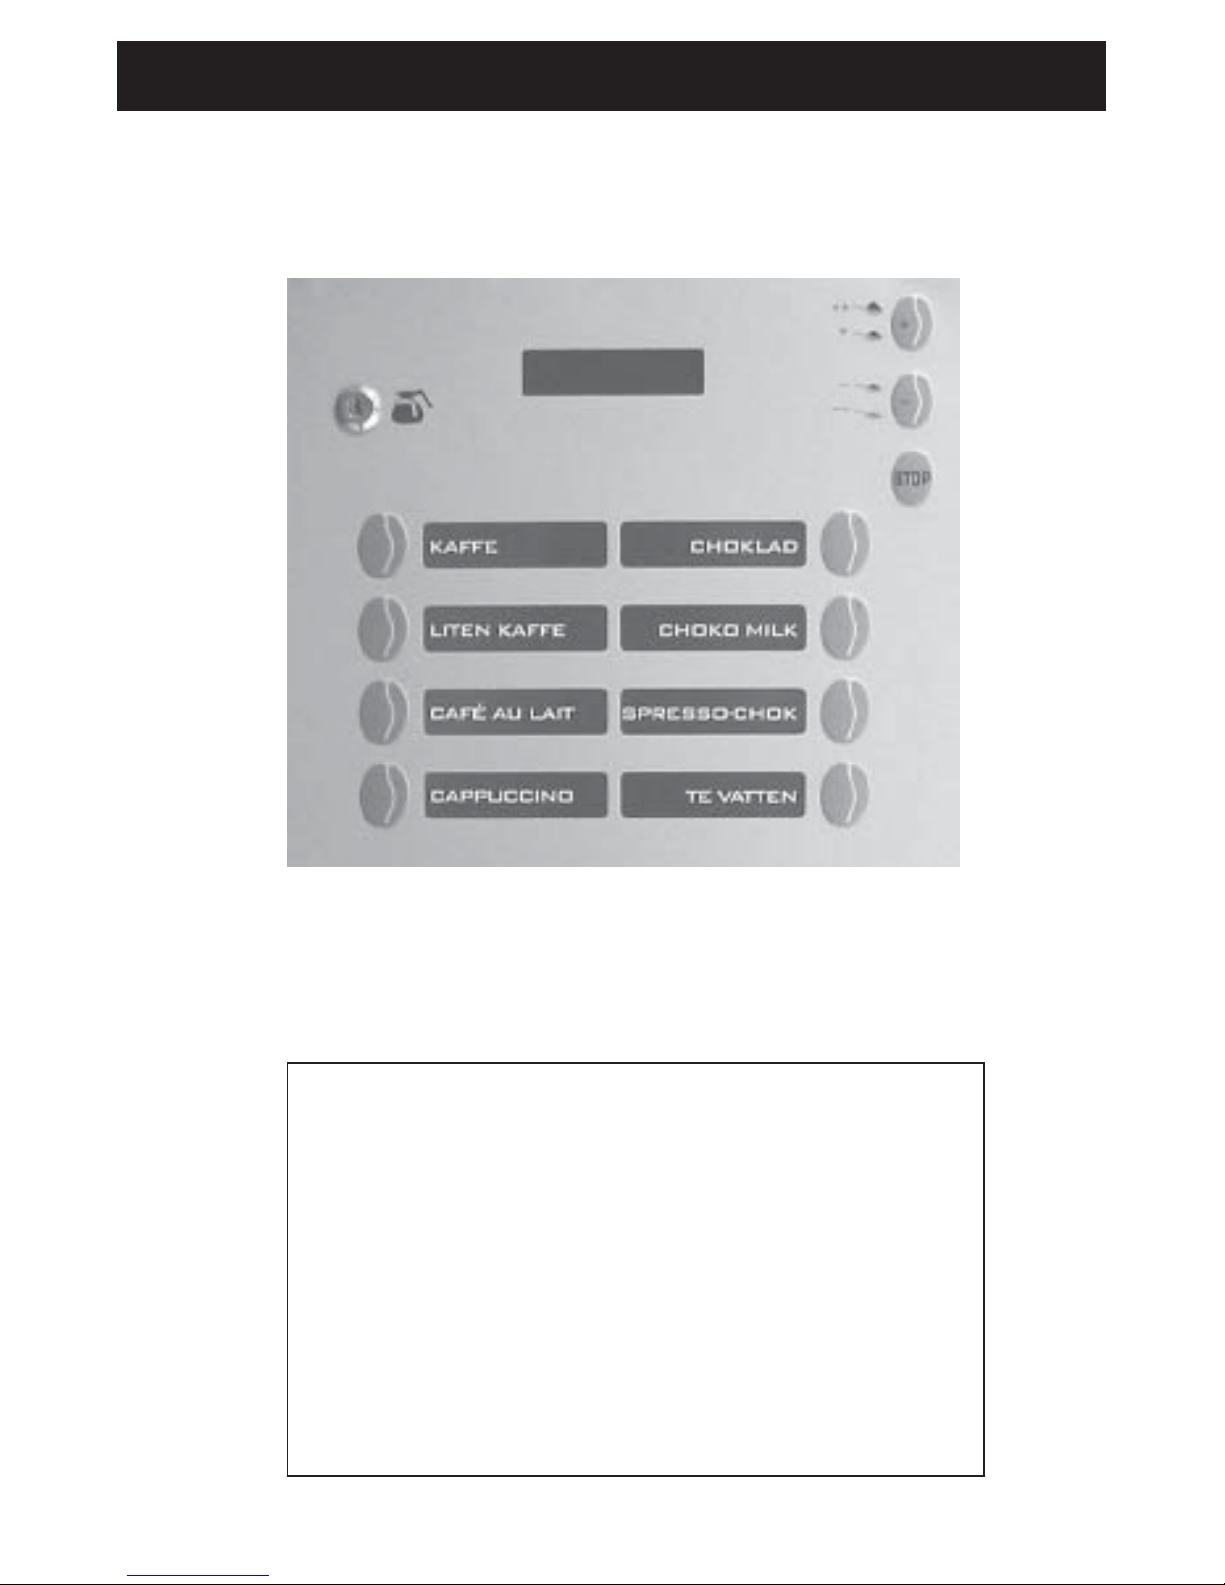
The mixer bowls can easily be cleaned with the key switch in ”cup” (normal)
position.
1212
1212
12.
7. CLEANING: 7. CLEANING:
7. CLEANING: 7. CLEANING:
7. CLEANING:
Cleaning programCleaning program
Cleaning programCleaning program
Cleaning program
PrincessPrincess
PrincessPrincess
Princess
Automatic cleaning of mixing bowl 1 or 2Automatic cleaning of mixing bowl 1 or 2
Automatic cleaning of mixing bowl 1 or 2Automatic cleaning of mixing bowl 1 or 2
Automatic cleaning of mixing bowl 1 or 2
1.1.
1.1.
1.
Place a jug in the drip trayPlace a jug in the drip tray
Place a jug in the drip trayPlace a jug in the drip tray
Place a jug in the drip tray
..
..
.
2.2.
2.2.
2. Turn the key slowly ninety degrees and back again.
Push button for drink ...(se. tabel below) in 6 seconds.Push button for drink ...(se. tabel below) in 6 seconds.
Push button for drink ...(se. tabel below) in 6 seconds.Push button for drink ...(se. tabel below) in 6 seconds.
Push button for drink ...(se. tabel below) in 6 seconds.
3.3.
3.3.
3.
Cleaning of mixing bowl 1Cleaning of mixing bowl 1
Cleaning of mixing bowl 1Cleaning of mixing bowl 1
Cleaning of mixing bowl 1
Turn the key slowly ninety degrees and back again.
Push button for drink 2.
After 6 seconds the mixer bowl starts to be cleaned
as long as the button is pushed or max.10 seconds.
The display shows:The display shows:
The display shows:The display shows:
The display shows: ”Cleaning Mixer 1”,
4.4.
4.4.
4.
Cleaning of mixing bowl 2Cleaning of mixing bowl 2
Cleaning of mixing bowl 2Cleaning of mixing bowl 2
Cleaning of mixing bowl 2
Turn the key slowly ninety degrees and back again.
Push button for drink 3.
After 6 seconds the mixer bowl starts to be cleaned
as long as the button is pushed or max.10 seconds.
The display shows:The display shows:
The display shows:The display shows:
The display shows: ”Cleaning Mixer 2”.
Page 13
1313
1313
13.
7. CLEANING: 7. CLEANING:
7. CLEANING: 7. CLEANING:
7. CLEANING:
Cleaning programCleaning program
Cleaning programCleaning program
Cleaning program
PrincessPrincess
PrincessPrincess
Princess
Automatic cleaning of In/Outlet valves:Automatic cleaning of In/Outlet valves:
Automatic cleaning of In/Outlet valves:Automatic cleaning of In/Outlet valves:
Automatic cleaning of In/Outlet valves:
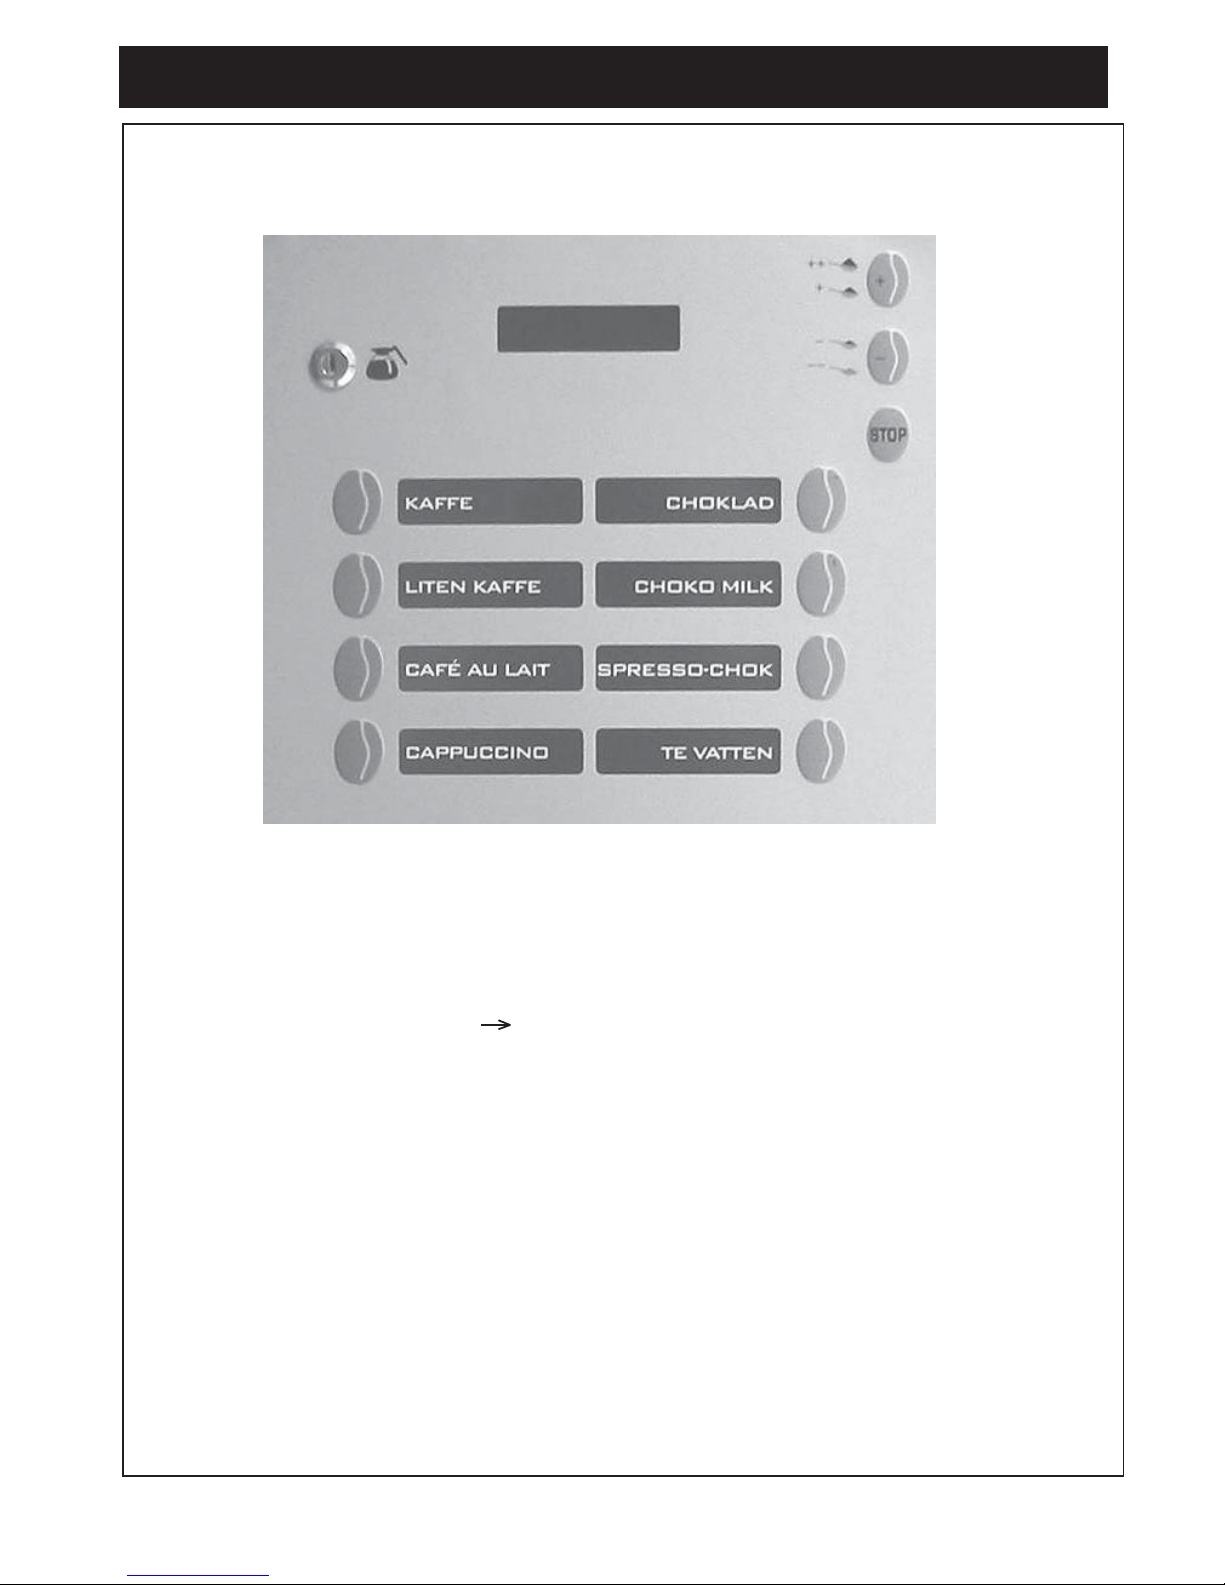
The In/Outlet valves can easily be cleaned with the key switch in ”cup” (normal) position.
1.1.
1.1.
1.
Place a jug in the drip trayPlace a jug in the drip tray
Place a jug in the drip trayPlace a jug in the drip tray
Place a jug in the drip tray
..
..
.
2.2.
2.2.
2. Turn the key slowly ninety degrees and back again.
Push button for drink 1 and 2 at the same time in 6Push button for drink 1 and 2 at the same time in 6
Push button for drink 1 and 2 at the same time in 6Push button for drink 1 and 2 at the same time in 6
Push button for drink 1 and 2 at the same time in 6
seconds. Keep buttons down.seconds. Keep buttons down.
seconds. Keep buttons down.seconds. Keep buttons down.
seconds. Keep buttons down.
3.3.
3.3.
3. All In/Outlet valves will now start to open and close
with 2 pulses/second in 10 seconds or so long you
pushed the buttons
4.4.
4.4.
4. The display shows: ”Cleaning valves”.
drink drink
drink drink
drink
55
55
5
1 drink 1 drink
1 drink 1 drink
1 drink
66
66
6
2 2
2 2
2
77
77
7
3 3
3 3
3
88
88
8
4 4
4 4
4
By cleaning is meant that valves ”knocks” awayBy cleaning is meant that valves ”knocks” away
By cleaning is meant that valves ”knocks” awayBy cleaning is meant that valves ”knocks” away
By cleaning is meant that valves ”knocks” away
eventual scale and other particles which has beeneventual scale and other particles which has been
eventual scale and other particles which has beeneventual scale and other particles which has been
eventual scale and other particles which has been
attached in the cylinders and that they are flushedattached in the cylinders and that they are flushed
attached in the cylinders and that they are flushedattached in the cylinders and that they are flushed
attached in the cylinders and that they are flushed
away with the wateraway with the water
away with the wateraway with the water
away with the water
..
..
.
Page 14
1414
1414
14.
8.8.
8.8.
8.
Cup counter Cup counter
Cup counter Cup counter
Cup counter
-Easy -Easy
-Easy -Easy
-Easy
AccessAccess
AccessAccess
Access
PrincessPrincess
PrincessPrincess
Princess
Easy Easy
Easy Easy
Easy
Access:Access:
Access:Access:
Access:
Water and ingredient amount can be adjusted
with±15% with the key switch in ”cup” (normal)
position.
1.1.
1.1.
1.
Push ”+” and ”-” button at the same time.Push ”+” and ”-” button at the same time.
Push ”+” and ”-” button at the same time.Push ”+” and ”-” button at the same time.
Push ”+” and ”-” button at the same time.
2.2.
2.2.
2.After 4 secondsa signal will go faster.
3.3.
3.3.
3.The display shows: ”Easy access” ”Styrka 1 100%”
44
44
4Go to right button(choise which you want to change
by pushing”+” or ”-” button.
5.5.
5.5.
5.Push button for drink 2
6.6.
6.6.
6.The display shows: for example. Volyme 4 and”
Blinking 100%”
7.7.
7.7.
7.Change by pushing ”+” or ”-” button.
8.8.
8.8.
8.Push button for drink 3 for entering the change.
Press ”stop” to quit.
1.1.
1.1.
1.
Push ”-” button in 6 seconds.Push ”-” button in 6 seconds.
Push ”-” button in 6 seconds.Push ”-” button in 6 seconds.
Push ”-” button in 6 seconds.
2.2.
2.2.
2.After 4 seconds a signal will go faster.
The display shows:
”T”T
”T”T
”T
otot
otot
ot
al xxx cupal xxx cup
al xxx cupal xxx cup
al xxx cup
s”s”
s”s”
s”
3.3.
3.3.
3.Push button for drink 2
The display shows:
”Choise 1 free xxx cups””Choise 1 free xxx cups”
”Choise 1 free xxx cups””Choise 1 free xxx cups”
”Choise 1 free xxx cups”
4.4.
4.4.
4.Push button for drink 2
The display shows
”Choise 1 coin xxx cups””Choise 1 coin xxx cups”
”Choise 1 coin xxx cups””Choise 1 coin xxx cups”
”Choise 1 coin xxx cups”
5.5.
5.5.
5.Push button for drink 2
The display shows
”Choise 1 xxx cups in can””Choise 1 xxx cups in can”
”Choise 1 xxx cups in can””Choise 1 xxx cups in can”
”Choise 1 xxx cups in can”
6.6.
6.6.
6.Push ”+” button to reach to ”choise 2” etc.
7.7.
7.7.
7.Push button for drink 3 to reset the counter.
8.8.
8.8.
8.Push ”Stop” button to go back to user mode.
Cup counter::Cup counter::
Cup counter::Cup counter::
Cup counter::
The machine has an in built cup counter which
is available to see and reset with the key
switch in ”cup” (normal) position.
DRINK 5DRINK 5
DRINK 5DRINK 5
DRINK 5
66
66
6
77
77
7
88
88
8
22
22
2
33
33
3
44
44
4
1 DRINK1 DRINK
1 DRINK1 DRINK
1 DRINK
Page 15
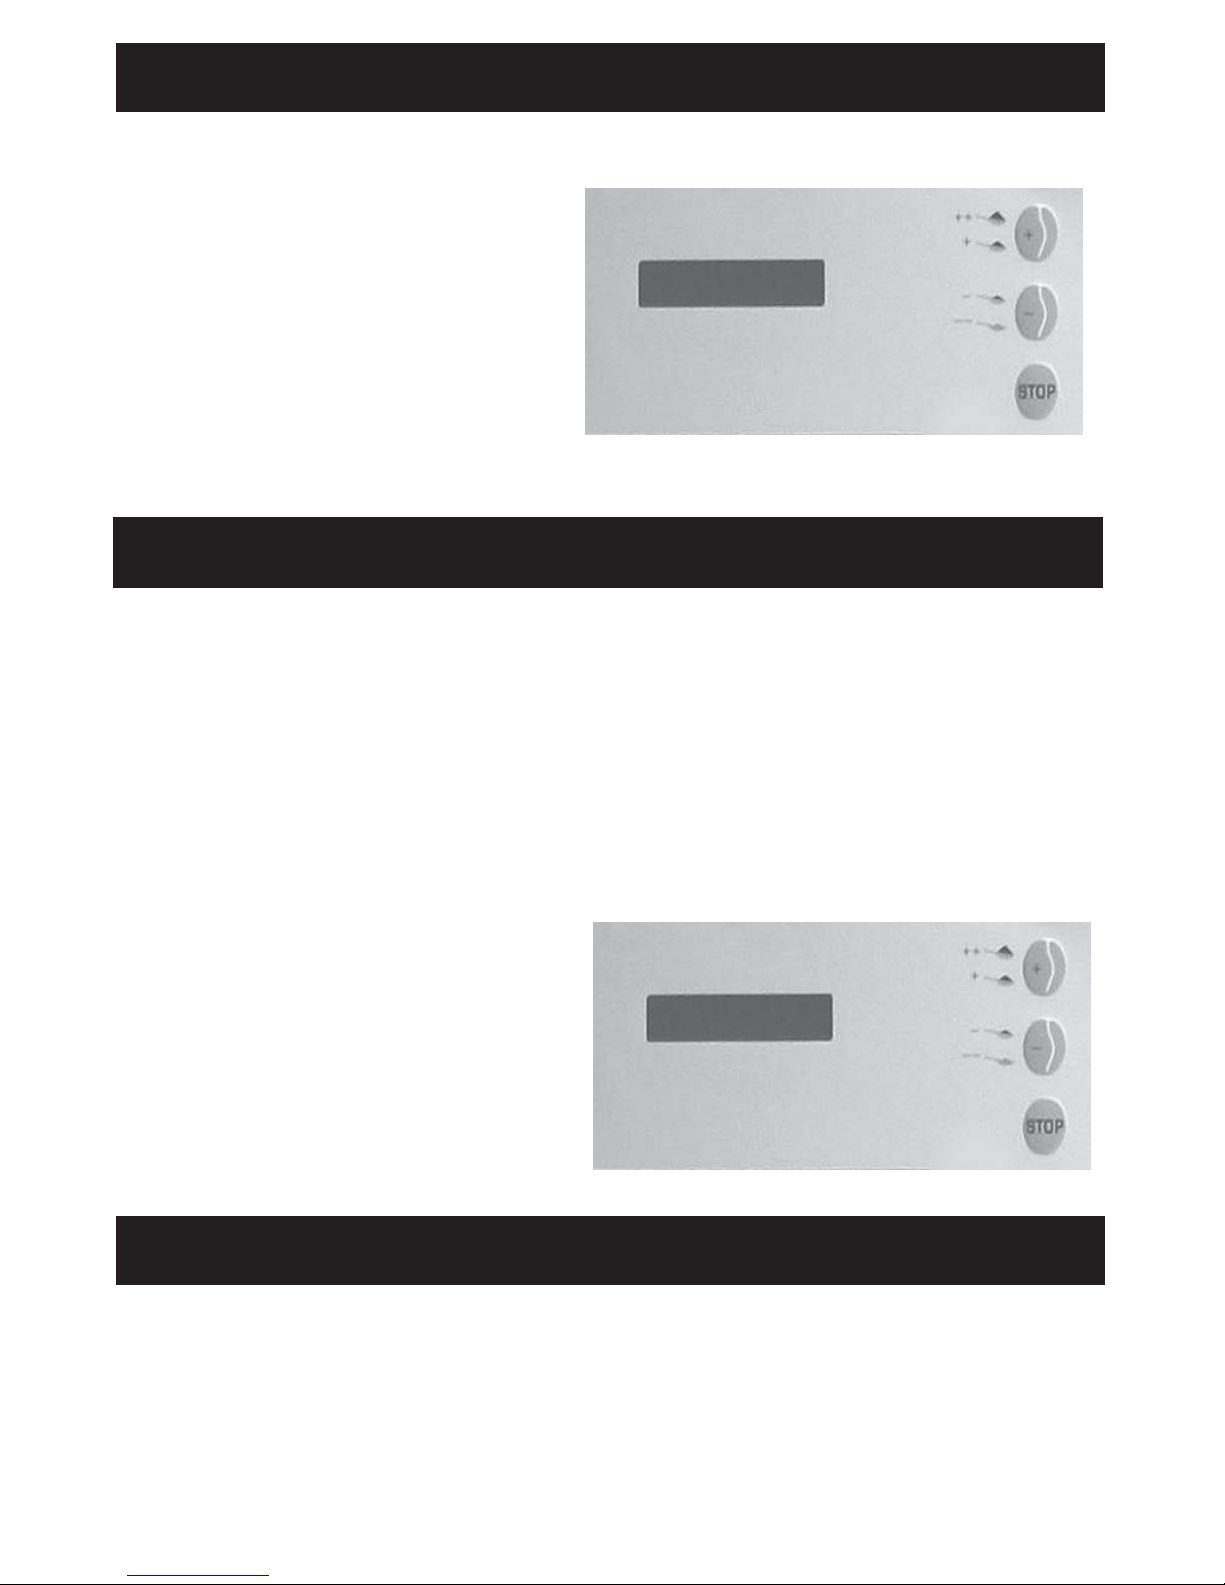
1. The display shows; ” Blocked” ”Water level low”
Please check incoming water connection Please check incoming water connection
Please check incoming water connection Please check incoming water connection
Please check incoming water connection
TT
TT
T
urn ofurn of
urn ofurn of
urn of
f the machine with the main switchf the machine with the main switch
f the machine with the main switchf the machine with the main switch
f the machine with the main switch
wait for 10 sec. and turn on again.wait for 10 sec. and turn on again.
wait for 10 sec. and turn on again.wait for 10 sec. and turn on again.
wait for 10 sec. and turn on again.
2.The display shows normal: but no drink is coming.
Possible cause of failure:
Mechanical stop in the ingredients canisters or whipper.
Measure:Measure:
Measure:Measure:
Measure:
TT
TT
T
ry to find the cause of failure.ry to find the cause of failure.
ry to find the cause of failure.ry to find the cause of failure.
ry to find the cause of failure.
Clean the mixer system and try again.Clean the mixer system and try again.
Clean the mixer system and try again.Clean the mixer system and try again.
Clean the mixer system and try again.
1515
1515
15.
9. Safety functions..9. Safety functions..
9. Safety functions..9. Safety functions..
9. Safety functions..
PrincessPrincess
PrincessPrincess
Princess
11
11
1.Indication of door
Door not closed
The display shows; ”Door open”
2.2.
2.2.
2.When machine is not in use:
The inlet valves are blocked.
10. Failure messages.10. Failure messages.
10. Failure messages.10. Failure messages.
10. Failure messages.
PrincessPrincess
PrincessPrincess
Princess
”Door open”
”Blocked”
++++
++++
++
+ +
+ +
+
--
--
-
- -- -
- -- -
- -
++++
++++
++
+ +
+ +
+
--
--
-
- -- -
- -- -
- -
TT
TT
T
ransport and no use in long time.ransport and no use in long time.
ransport and no use in long time.ransport and no use in long time.
ransport and no use in long time.
1. Turn off the switch, pull out the plug and close incoming water tube.
2. Empty the water tanks.
3. Keep machine free from frost.
Long machine storage at temperatures as below 0ºC (zero degrees celsius) can cause
damage of the machine. Total emptying of water is recommended.
1 1
1 1
1
1. S1. S
1. S1. S
1. S
torage / torage /
torage / torage /
torage /
TT
TT
T
ransport.ransport.
ransport.ransport.
ransport.
Failure messages which can mostly be corrected without any help fromFailure messages which can mostly be corrected without any help from
Failure messages which can mostly be corrected without any help fromFailure messages which can mostly be corrected without any help from
Failure messages which can mostly be corrected without any help from
service compservice comp
service compservice comp
service comp
anyany
anyany
any
The machine is equipped with followingThe machine is equipped with following
The machine is equipped with followingThe machine is equipped with following
The machine is equipped with following
safety functionssafety functions
safety functionssafety functions
safety functions
Page 16
12. DIMENSION SKETCH.12. DIMENSION SKETCH.
12. DIMENSION SKETCH.12. DIMENSION SKETCH.
12. DIMENSION SKETCH.
..
..
.
PrincessPrincess
PrincessPrincess
Princess
1616
1616
16.
Page 17
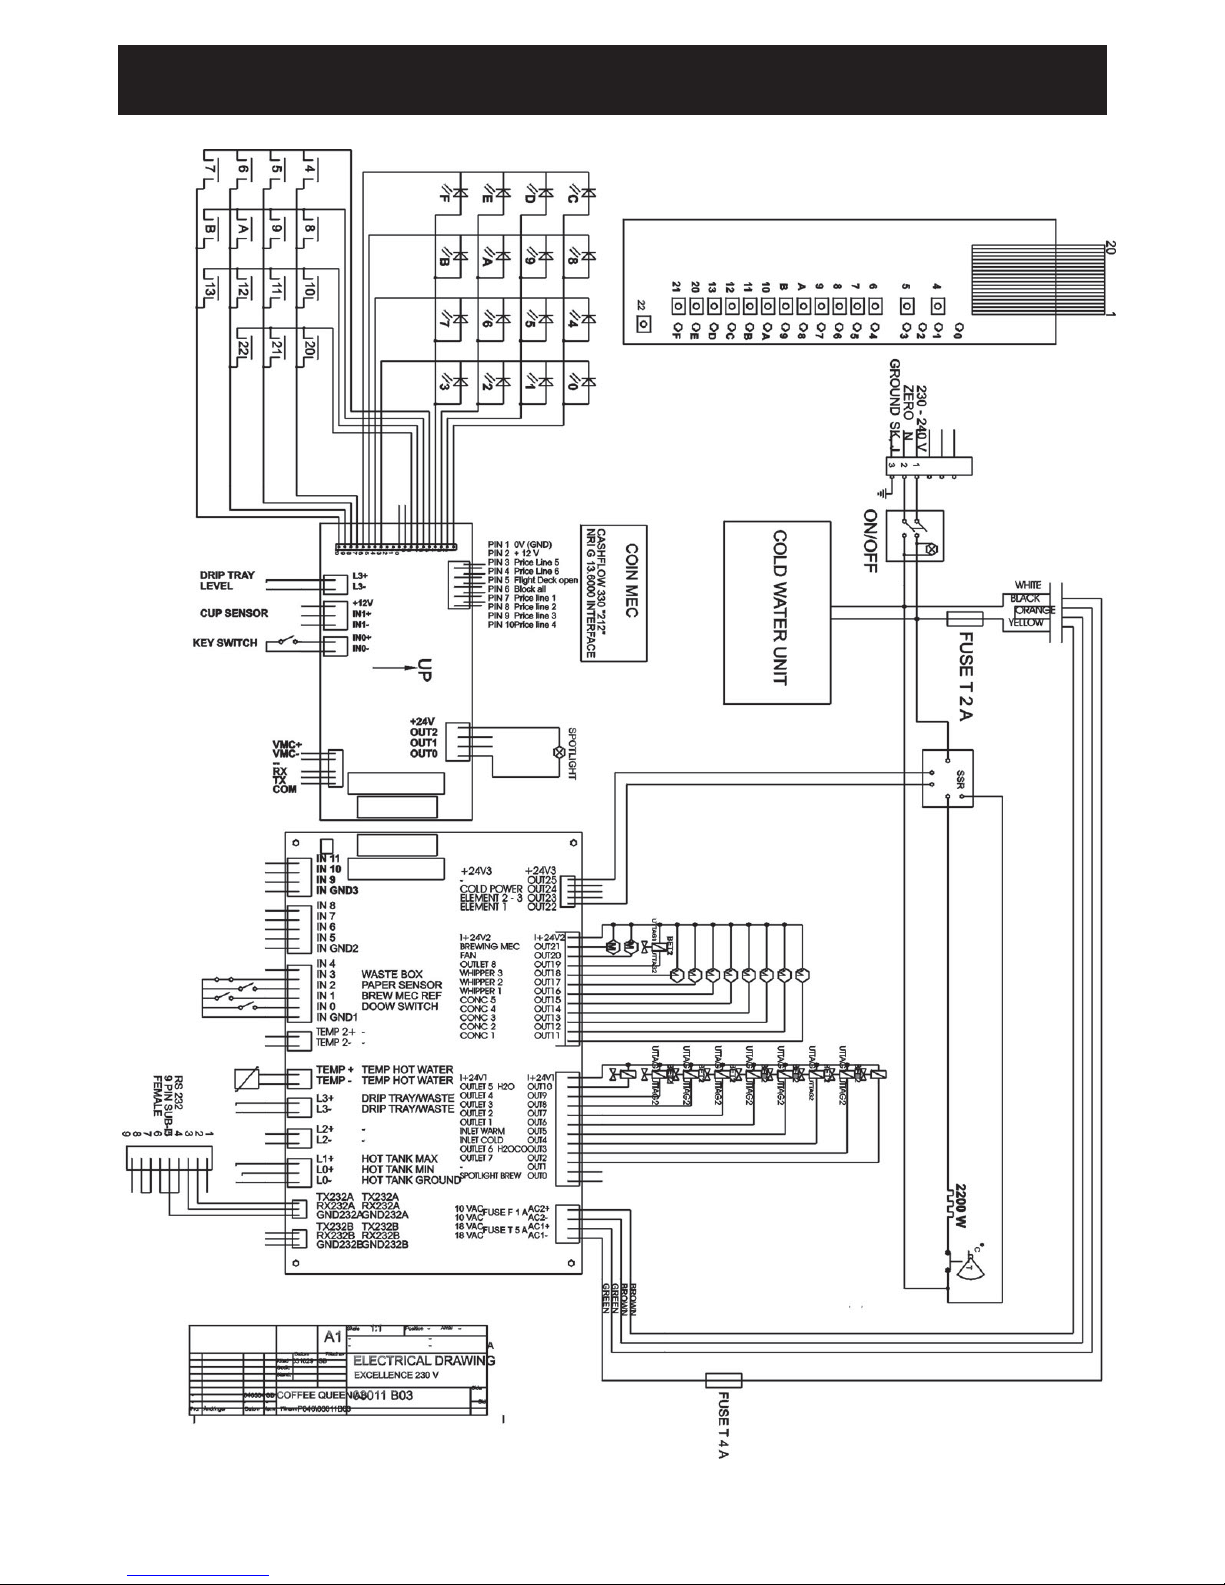
13. Circuit diagram.13. Circuit diagram.
13. Circuit diagram.13. Circuit diagram.
13. Circuit diagram.
1717
1717
17.
Page 18
PrincessPrincess
PrincessPrincess
Princess
COFFEE QUEENCOFFEE QUEEN
COFFEE QUEENCOFFEE QUEEN
COFFEE QUEEN
Art. nr/Art. no. 1704312
FOR SERVICEFOR SERVICE
FOR SERVICEFOR SERVICE
FOR SERVICE
Please contactPlease contact
Please contactPlease contact
Please contact
Din återförsäljare / Your retail dealer
...............................................................................
...............................................................................
...............................................................................
COFFEE QUEEN AB, Box 960, 671 29 ARVIKA,COFFEE QUEEN AB, Box 960, 671 29 ARVIKA,
COFFEE QUEEN AB, Box 960, 671 29 ARVIKA,COFFEE QUEEN AB, Box 960, 671 29 ARVIKA,
COFFEE QUEEN AB, Box 960, 671 29 ARVIKA, besöksadress; Korpralsv 1B,
Tel vxl; +46 (0)570-47700, Fax; +46 (0)570-47719
E-mail: [email protected] www.coffeequeen.se
 Loading...